Embed Size (px)
Citation preview

1
Disk Station
User’s Guide
Applied Model: DS109j, DS109, DS109+, DS209j, DS209, DS209+, DS209+II,
DS409, DS409slim, DS409+, RS409, RS409+, RS409RP+,
DS509+ Document ID: Synology _UserGuide_NASeries_20090901_enu
Based on Version: DSM 2.2-0925

COPYRIGHT NOTICE
All title, copyright and other intellectual property rights in and to any Synology Products, the “Products” or “Product” (including but not limited to product design and appearance, firmware, and any relevant media, images, photographs, animations, video, audio, music, text, and applets incorporated into the Products), the accompanying manuals and other documents, and on-line or electronic documents, if any, are owned by Synology Inc. Unless otherwise expressly licensed by Synology Inc. in writing, any provision of the Products does not represent any license of any of the above rights.
Copyright © 2004-2009 Synology Inc.; All rights reserved.
TRADEMARK NOTICE
Synology and other names of Synology Products are proprietary marks or registered trademarks of Synology Inc. Microsoft, Windows series, and Internet Explorer are trademarks of Microsoft Corporation. Apple, Mac, Mac OS series are trademarks of Apple Computer, Inc., registered in the U.S. and other countries. Other products and company names mentioned herein are trademarks of their respective holders.
LIMITED WARRANTY AND LIABILITY
Synology provides a limited warranty for its Products only to the initial person or entity that originally purchased the Product from Synology or its authorized distributor or retailer. Synology warrants that every hardware portion of the Products will be free from physical defects in material and workmanship within warranty period, or the Product will be repaired or replaced as determined solely by Synology. The DS509+, DS508, RS409RP+, RS409+, RS409, RS408-RP, RS408, RS407, DX5 and RX4 have three years warranty from the purchase date. All other models purchased before 2008/2/29 have one year warranty, and those purchased after 2008/3/1 have two years warranty from the purchase date. If the Product proves defective during this warranty period, you can contact the local dealer in order to obtain assistance. You must provide proof of purchase and a bar code number from the Product's packaging when asking for assistance. Synology Products are barebones devices so Synology makes no warranty of the hard disk installed, nor warranty on compatibility of all hard disks.
SYNOLOGY SHALL HAVE NO LIABILITY TO YOU UNDER THIS LIMITED WARRANTY IF THE PRODUCT IS INSTALLED AND USED IN A MANNER NOT SPECIFIED OR DESCRIBED IN THE PRODUCT SPECIFICATIONS OR DESCRIPTION, THE PRODUCT HAS BEEN MODIFIED OR ALTERED IN ANY WAY BY ANY PARTY OTHER THAN SYNOLOGY, OR THE FAILURE OF THE PRODUCT TO CONFORM TO ITS SPECIFICATIONS CAN BE ATTRIBUTED TO CAUSES THAT NOT THE RESPONSIBILITY OF SYNOLOGY.
SYNOLOGY MAKES NO WARRANTY OR REPRESENTATION, EXPRESSED, IMPLIED, OR STATUTORY, WITH RESPECT TO ITS PRODUCTS OR THE CONTENTS OR USE OF THIS DOCUMENTATION AND ALL ACCOMPANYING SOFTWARE, AND PARTICULARLY DISCLAIMS ITS QUALITY OR PERFORMANCE FOR ANY PARTICULAR PURPOSE.
SYNOLOGY MAKES NO GUARANTEE THAT ALL DATA STORED ON SYNOLOGY PRODUCTS IS ALWAYS SECURE WITHOUT ANY RISKS OF DATA LOSS. SYNOLOGY REMINDS YOU TO BACK UP THE DATA PERIODICALLY. UNDER NO CIRCUMSTANCES SHALL SYNOLOGY BE LIABLE IN ANY WAY TO THE USER FOR DAMAGES, INCLUDING ANY SAVINGS, LOST PROFITS OR OTHER INCIDENTAL OR CONSEQUENTIAL DAMAGES ARISING OUT OF THE USE OF, OR INABILITY TO USE SYNOLOGY PRODUCTS OR RESULTING LOSS OF DATA FROM SUCH USE.
2

THIS WARRANTY GIVES YOU SPECIFIC LEGAL RIGHTS, AND YOU MAY ALSO HAVE OTHER RIGHTS WHICH VARY FROM STATE TO STATE (OR JURISDICTION TO JURISDICTION). SYNOLOGY'S RESPONSIBILITY FOR MALFUNCTIONS AND DEFECTS IN HARDWARE IS LIMITED TO REPAIR OR REPLACEMENT AS SET FOR IN THIS WARRANTY STATEMENT. FOR CUSTOMERS, EXCEPT FOR THE EXPRESS WARRANTIES CONTAINED IN THIS WARRANTY STATEMENT, SYNOLOGY DISCLAIMS ALL OTHER WARRANTIES AND CONDITIONS, EXPRESS OR IMPLIED, STATUTORY OR OTHERWISE, FOR THE PRODUCT, INCLUDING BUT NOT LIMITED TO ANY IMPLIED WARRANTIES AND CONDITIONS OF MERCHANTABILITY AND FITNESS FOR A PARTICULAR PURPOSE. NO OTHER WARRANTIES, WHETHER EXPRESS OR IMPLIED, WILL APPLY AFTER THE LIMITED WARRANTY PERIOD HAS EXPIRED. SOME STATES OR JURISDICTIONS DO NOT ALLOW THE EXCLUSION OF CERTAIN IMPLIED WARRANTIES OR CONDITIONS, OR LIMITATIONS ON HOW LONG AN IMPLIED WARRANTY OR CONDITION LASTS, SO THIS LIMITATION MAY NOT APPLY TO YOU. THIS LIMITED WARRANTY COVERAGE TERMINATES IF YOU SELL OR OTHERWISE TRANSFER THIS PRODUCT TO ANOTHER PARTY.
SYNOLOGY DOES NOT ACCEPT LIABILITY BEYOND THE REMEDIES PROVIDED FOR IN THIS LIMITED WARRANTY OR FOR SPECIAL, INDIRECT, CONSEQUENTIAL OR INCIDENTAL DAMAGES, INCLUDING, WITHOUT LIMITATION, ANY LIABILITY FOR THIRD-PARTY CLAIMS AGAINST YOU FOR DAMAGES, FOR PRODUCTS NOT BEING AVAILABLE FOR USE, OR FOR LOST DATA OR LOST SOFTWARE. SYNOLOGY'S LIABILITY SHALL NOT EXCEED THE AMOUNT YOU PAID FOR THE PRODUCT THAT IS THE SUBJECT OF A CLAIM. THIS IS THE MAXIMUM AMOUNT FOR WHICH SYNOLOGY IS RESPONSIBLE.
SYNOLOGY INC. PRODUCTS ARE NOT INTENDED FOR USE IN MEDICAL, LIFE SAVING, OR LIFE SUSTAINING APPLICATIONS.
DISPUTE RESOLUTION
For the purposes of this provision, the term “Dispute” means any dispute, controversy, or claim arising out of or relating to (i) this Agreement, its interpretation, or the breach, termination, applicability or validity thereof, (ii) the related order for, purchase, delivery, receipt or use of any product or service from Synology, or iii) any other dispute arising out of or relating to the relationship between You and Synology; the term “Synology” means Synology, Inc, its parents, subsidiaries, affiliates, directors, officers, employees, beneficiaries, agents, assigns, component suppliers (both hardware and software), and/or any third party who provides products or services purchased from or distributed by Synology; and the term “You” means the owner or purchaser of the Synology product, or those in privity with you, such as family members or beneficiaries. For US customers, you and Synology agree that any Dispute between You and Synology will be resolved exclusively and finally by arbitration under the current commercial rules of the American Arbitration Association, except as otherwise provided below. The arbitration will be conducted before a single arbitrator, and will be limited solely to the dispute between You and Synology. The arbitration, or any portion of it, will not be consolidated with any other arbitration and will not be conducted on a class-wide or class action basis. The arbitration shall be held in King County, Washington State, United States of America by submission of documents, by telephone, online or in person as determined by the arbitrator at the request of the parties. The prevailing party in any U.S. or non-U.S. arbitration or other legal action shall receive all costs and reasonable attorneys’ fees, including any arbitration fee paid by the prevailing party. Any decision rendered in such arbitration proceedings will be final and binding on the parties, and judgment may be entered thereon in any court of competent jurisdiction. You understand that, in the absence of this provision, You would have had a right to litigate Disputes

through a court, including the right to litigate claims on a class-wide or class-action basis, and that You have expressly and knowingly waived those rights and agreed to resolve any disputes through binding arbitration in accordance with the provisions of this paragraph. For non-US customers, any Dispute shall be finally resolved by arbitration conducted by three neutral arbitrators in accordance with the procedures of the R.O.C. Arbitration Law and related enforcement rules. The arbitration shall take place in Taipei, Taiwan, R.O.C., and the arbitration proceedings shall be conducted in English or, if both parties so agree, in Mandarin Chinese. The arbitration award shall be final and binding on the parties and may be enforced in any court having jurisdiction.
REVISIONS
Synology reserves all rights to revise or update its Products, other products, software, or related documentation without further notice.
Synology Inc. reserves the right to revise this publication and to make changes in the content hereof without the obligation to notify any person of such revision or changes.

Index About this User’s Guide ...................................................................................................................................... 8
Getting to know your Synology Disk Station ..................................................................................... 9 Introduction ......................................................................................................................... 9
Storing and Sharing Files via the Internet ............................................................................ 9 Sharing Storage Capacity as an iSCSI Target .................................................................... 9 PC Data and Server Data Backup ........................................................................................ 9 Transferring Data via FTP ...................................................................................................... 9 Managing Files through Web Browsers ............................................................................... 9 Sharing Photos, Videos, and Blogs with Photo Station 3 .................................................. 9 Enjoying Entertainment Content on the Server ................................................................. 10 Enjoying Music instantly anytime ........................................................................................ 10 Hosting Websites ................................................................................................................... 10 Video Recording with IP Cameras ...................................................................................... 10 USB Printer Server ................................................................................................................ 10
Specification ....................................................................................................................... 11 1-bay Models .......................................................................................................................... 11 2-bay Models .......................................................................................................................... 13 4-bay Models .......................................................................................................................... 14 5-bay Models .......................................................................................................................... 16
Limitations ......................................................................................................................... 17 Appearance ....................................................................................................................... 18
1-bay & 2-bay Disk Station ................................................................................................... 18 4-bay Cube/Disk Station ....................................................................................................... 19 4-bay 1U Rack Station .......................................................................................................... 21 DS409slim .............................................................................................................................. 22 5-bay Disk Station .................................................................................................................. 24
LED Indications Table ....................................................................................................... 26 1-bay Models .......................................................................................................................... 26 2-bay Models .......................................................................................................................... 26 4-bay Models .......................................................................................................................... 27 5-bay Models .......................................................................................................................... 28
Managing Synology Disk Station ............................................................................................................... 29 Entering Web Management UI .......................................................................................... 29
Using Setup Utility ................................................................................................................. 29 Accessing Web Management UI Manually ........................................................................ 31
Managing Synology Disk Station ...................................................................................... 31 Connecting from Two Different Networks ......................................................................... 32 Volume .............................................................................................................................. 32
Managing Volume .................................................................................................................. 33 Repairing Volume by Hot Swapping ................................................................................... 33
Joining Windows ADS Domain ......................................................................................... 33 Accessing Synology Disk Station via Telnet/SSH ............................................................. 34 Accessing Synology Disk Station via NFS ........................................................................ 34 iSCSI Target ...................................................................................................................... 35 Protecting Synology Disk Station from Unauthorized Login ............................................. 35
Built-in Firewall ....................................................................................................................... 35 Auto Block ............................................................................................................................... 36
Resetting Administrator Password .................................................................................... 36 Reinstalling Synology Disk Station .................................................................................... 36
Accessing Synology Disk Station Data ................................................................................................ 37 Shared Folders .................................................................................................................. 37
5

System Built-in ....................................................................................................................... 37 Administrator-Created ........................................................................................................... 38
Setting Privileges .............................................................................................................. 38 Using Network Recycle Bin ............................................................................................... 39 Setting Encoding ............................................................................................................... 39 Accessing Shared Folders ................................................................................................ 40
Within the Intranet ................................................................................................................. 40 From the Internet ................................................................................................................... 43 From a Mobile Device ........................................................................................................... 43
Backup Solutions ................................................................................................................................................... 44 Local Backup and Network Backup .................................................................................. 44 Backing up Personal Data ................................................................................................. 45
Windows Users ...................................................................................................................... 45 Mac OS X User ...................................................................................................................... 46
Backing up Synology Disk Station Settings ...................................................................... 47 From Synology Disk Station to PC Client........................................................................... 47 From Synology Disk Station to another Synology Disk Station ...................................... 47
Sharing USB Printers .......................................................................................................................................... 48
More Features ............................................................................................................................................................ 49 Management ..................................................................................................................... 49
User Home ............................................................................................................................. 49 Applications Privilege Setting .............................................................................................. 49 Quick Search Box .................................................................................................................. 50 Notification .............................................................................................................................. 50 Firmware Update ................................................................................................................... 50
Audio Station ..................................................................................................................... 51 iTunes Service ................................................................................................................... 51 Media Server ..................................................................................................................... 52 Download Station 2 ........................................................................................................... 52
Enabling Download Station 2 ............................................................................................... 52 Installing Download Redirector ............................................................................................ 53
Web Station ....................................................................................................................... 53 Enabling Web Station and MySQL ...................................................................................... 54 Enabling Virtual Host ............................................................................................................. 54 Web Station’s detail description ........................................................................................... 54
Photo Station 3 .................................................................................................................. 54 Enabling Photo Station 3 ...................................................................................................... 55 Photo Station 3’s detail description ..................................................................................... 55
Surveillance Station 3 ........................................................................................................ 55 Enabling Surveillance Station 3 ........................................................................................... 55 Surveillance Station 3’s detailed description ..................................................................... 56
Mail Station ........................................................................................................................ 56 Mail Station Installation ......................................................................................................... 56 Mail Station Setting ................................................................................................................ 56 Mail Station’s detailed description ....................................................................................... 56
USBCopy .......................................................................................................................... 57 Setting USBCopy Target Location ...................................................................................... 57
Expanding Storage Capacity ......................................................................................................................... 58 With DX5/ RX4 .................................................................................................................. 58 With External HDD ............................................................................................................ 58
External USB HDD ................................................................................................................ 58 External SATA HDD ............................................................................................................... 59
Replacing Larger Internal HDD ......................................................................................... 59 For one-bay models .............................................................................................................. 59 For Basic or RAID 0 volume on two and more bays models .......................................... 60 For RAID 1 volume on two and more bays models* ........................................................ 60

For RAID 5 or RAID 6 volume on four and more bays models ....................................... 60 Adding an HDD to a RAID 5/RAID 6 Volume .................................................................... 61 Change Volume Type ........................................................................................................ 61
Troubleshooting ....................................................................................................................................................... 62
Appendix ........................................................................................................................................................................ 63 Recommended Peripherals .............................................................................................. 63 Recommended NTP Server .............................................................................................. 63
About this User’s Guide
This user's guide covers all major functions of Synology NAS Server (“Synology Disk Station”). Some of the functions may only be available on specific models. Please refer to product specification for further details.
8

Getting to know your Synology Disk Station
Introduction
Congratulations on your purchase of Synology Disk Station. Synology Disk Station is specially designed for the following purposes:
Storing and Sharing Files via the Internet Windows users, Mac users, and Linux users can easily share files within the Intranet or through the Internet. Unicode language support makes sharing files in different languages from Synology Disk Station simple.
Sharing Storage Capacity as an iSCSI Target You can designate portion of your Synology Disk Station volume space to be an iSCSI Target, which will allow the iSCSI initiator to access the space like a local disk. Go to “Storage > iSCSI Target” and click create to set up an iSCSI target.
PC Data and Server Data Backup Synology Disk Station provides various backup solutions to back up PC data to Synology Disk Station, back up Synology Disk Station data to an external hard drive, another Synology Disk Station, or an rsync-compatible server.
Transferring Data via FTP Synology Disk Station provides FTP service with bandwidth restriction and anonymous login. To transfer data safely, “FTP over SSL/TLS” and uninvited IP auto-black are also available.
Managing Files through Web Browsers File Station 2 makes it possible for users to manage their files on Synology Disk Station easily through a web interface with Windows style file operations. You can also access the files stored on Synology Disk Station with a mobile device.
Sharing Photos, Videos, and Blogs with Photo Station 3 “Photo Station 3” gives you the freedom to share photos and videos over the Internet without complicated upload steps. Album control ensures the content is shared with the right persons. Visitors can leave comments for your photos. Furthermore, a brand new blogging system is integrated for you to easily share your life and thoughts over the Internet.
9
10
Enjoying Entertainment Content on the Server “Download Station” allows you to download files from the Internet through BitTorrent, FTP, HTTP, eMule and NZB to Synology Disk Station. Moreover, if you have an UPnP DMA connected in the LAN, you can share the multimedia files on Synology Disk Station. If you just want to share and play mp3 files stored on Synology Disk Station, you can enable “iTunes Service”, and enjoy the music through any iTunes clients on LAN.
The built-in “Copy” button on the device allows instant copy of photos from the camera to Synology Disk Station.
Enjoying Music instantly anytime When a pair of USB speakers is connected to the Synology Disk Station, “Audio Station” allows users to listen to music stored on the Synology Disk Station, from a connected iPod, or even stream Internet Radio stations. In addition, users can stream music from the Synology Disk Station with a web browser over the Internet.
Hosting Websites The Virtual Host feature allows you to host up to 30 websites using “Web Station”, with PHP and MySQL supported.
Video Recording with IP Cameras "Surveillance Station 3" allows you to manage, view, and record videos from multiple* IP cameras over the network. By accessing the web-based management interface of Surveillance Station 3, you can watch the real-time image the camera is monitoring, and record videos continuously, in motion-detection mode, or in alarm-recording mode.
USB Printer Server You can share up to 2 USB 2.0 Printers through the LAN.
* Supported on specific models only. Please refer to the product Specification table.
Specification
Note: For the most recent product specification, please visit www.synology.com
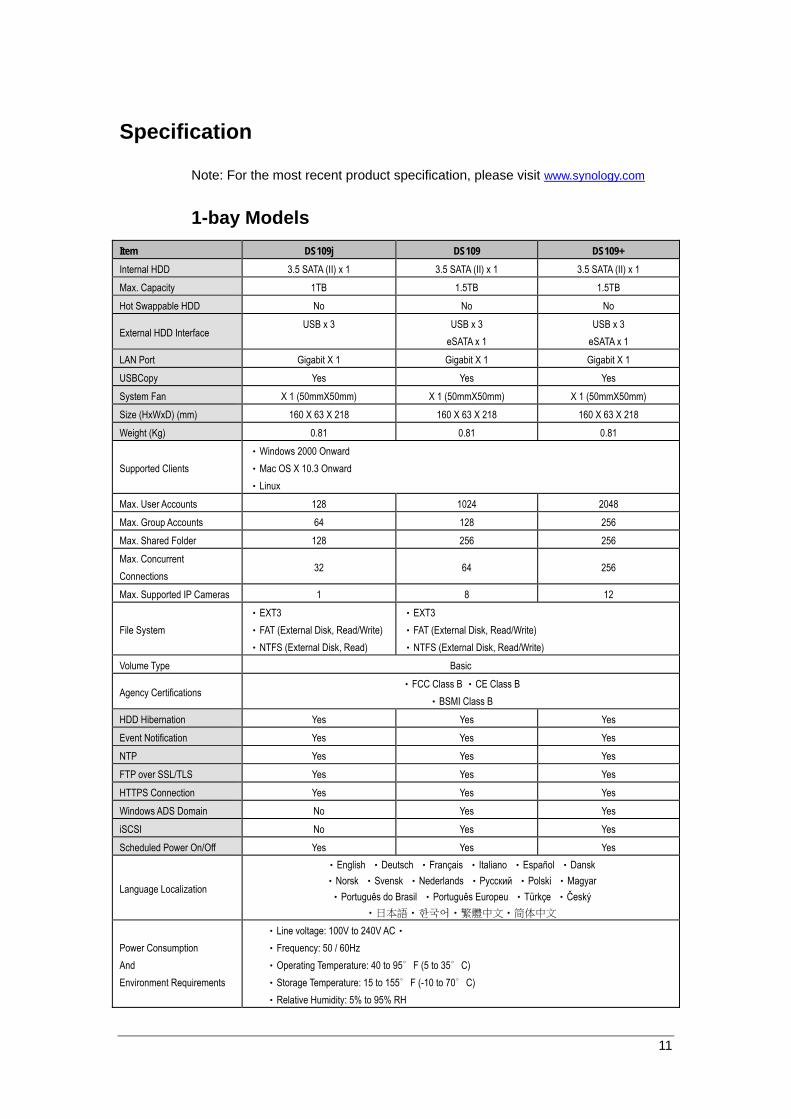
1-bay Models Item DS109j DS109 DS109+ Internal HDD 3.5 SATA (II) x 1 3.5 SATA (II) x 1 3.5 SATA (II) x 1 Max. Capacity 1TB 1.5TB 1.5TB Hot Swappable HDD No No No
External HDD Interface USB x 3
USB x 3
eSATA x 1 USB x 3
eSATA x 1 LAN Port Gigabit X 1 Gigabit X 1 Gigabit X 1 USBCopy Yes Yes Yes System Fan X 1 (50mmX50mm) X 1 (50mmX50mm) X 1 (50mmX50mm) Size (HxWxD) (mm) 160 X 63 X 218 160 X 63 X 218 160 X 63 X 218 Weight (Kg) 0.81 0.81 0.81
Supported Clients ‧Windows 2000 Onward ‧Mac OS X 10.3 Onward ‧Linux
Max. User Accounts 128 1024 2048 Max. Group Accounts 64 128 256 Max. Shared Folder 128 256 256 Max. Concurrent Connections
32 64 256
Max. Supported IP Cameras 1 8 12
File System ‧EXT3 ‧FAT (External Disk, Read/Write) ‧NTFS (External Disk, Read)
‧EXT3 ‧FAT (External Disk, Read/Write) ‧NTFS (External Disk, Read/Write)
Volume Type Basic
Agency Certifications ‧FCC Class B ‧CE Class B
‧BSMI Class B HDD Hibernation Yes Yes Yes Event Notification Yes Yes Yes NTP Yes Yes Yes FTP over SSL/TLS Yes Yes Yes HTTPS Connection Yes Yes Yes Windows ADS Domain No Yes Yes iSCSI No Yes Yes Scheduled Power On/Off Yes Yes Yes
Language Localization
‧English ‧Deutsch ‧Français ‧Italiano ‧Español ‧Dansk ‧Norsk ‧Svensk ‧Nederlands ‧Русский ‧Polski ‧Magyar ‧Português do Brasil ‧Português Europeu ‧Türkçe ‧Český
‧日本語‧한국어‧繁體中文‧简体中文
Power Consumption And Environment Requirements
‧Line voltage: 100V to 240V AC‧ ‧Frequency: 50 / 60Hz ‧Operating Temperature: 40 to 95∘F (5 to 35∘C) ‧Storage Temperature: 15 to 155∘F (-10 to 70∘C) ‧Relative Humidity: 5% to 95% RH
11

12
Item DS109j DS109 DS109+ ‧ Maximum Operating Altitude: 10,000 feet
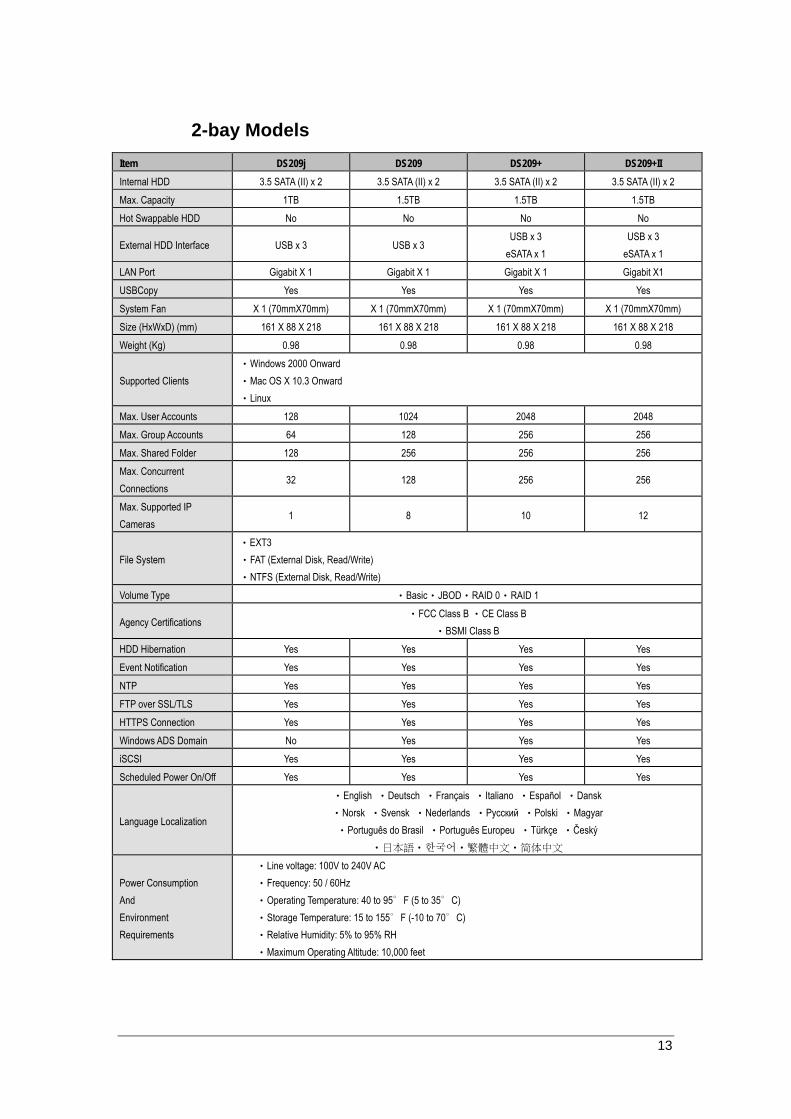
2-bay Models Item DS209j DS209 DS209+ DS209+II Internal HDD 3.5 SATA (II) x 2 3.5 SATA (II) x 2 3.5 SATA (II) x 2 3.5 SATA (II) x 2 Max. Capacity 1TB 1.5TB 1.5TB 1.5TB Hot Swappable HDD No No No No
External HDD Interface USB x 3 USB x 3 USB x 3
eSATA x 1 USB x 3
eSATA x 1 LAN Port Gigabit X 1 Gigabit X 1 Gigabit X 1 Gigabit X1 USBCopy Yes Yes Yes Yes System Fan X 1 (70mmX70mm) X 1 (70mmX70mm) X 1 (70mmX70mm) X 1 (70mmX70mm) Size (HxWxD) (mm) 161 X 88 X 218 161 X 88 X 218 161 X 88 X 218 161 X 88 X 218 Weight (Kg) 0.98 0.98 0.98 0.98
Supported Clients ‧Windows 2000 Onward ‧Mac OS X 10.3 Onward ‧Linux
Max. User Accounts 128 1024 2048 2048 Max. Group Accounts 64 128 256 256 Max. Shared Folder 128 256 256 256 Max. Concurrent Connections
32 128 256 256
Max. Supported IP Cameras
1 8 10 12
File System ‧EXT3 ‧FAT (External Disk, Read/Write) ‧NTFS (External Disk, Read/Write)
Volume Type ‧Basic‧JBOD‧RAID 0‧RAID 1
Agency Certifications ‧FCC Class B ‧CE Class B
‧BSMI Class B HDD Hibernation Yes Yes Yes Yes Event Notification Yes Yes Yes Yes NTP Yes Yes Yes Yes FTP over SSL/TLS Yes Yes Yes Yes HTTPS Connection Yes Yes Yes Yes Windows ADS Domain No Yes Yes Yes iSCSI Yes Yes Yes Yes Scheduled Power On/Off Yes Yes Yes Yes
Language Localization
‧English ‧Deutsch ‧Français ‧Italiano ‧Español ‧Dansk ‧Norsk ‧Svensk ‧Nederlands ‧Русский ‧Polski ‧Magyar ‧Português do Brasil ‧Português Europeu ‧Türkçe ‧Český
‧日本語‧한국어‧繁體中文‧简体中文
Power Consumption And Environment Requirements
‧Line voltage: 100V to 240V AC ‧Frequency: 50 / 60Hz ‧Operating Temperature: 40 to 95∘F (5 to 35∘C) ‧Storage Temperature: 15 to 155∘F (-10 to 70∘C) ‧Relative Humidity: 5% to 95% RH ‧Maximum Operating Altitude: 10,000 feet
13

4-bay Models Item DS409slim DS409 DS409+ RS409 RS409+ RS409RP+ Internal HDD 2.5 SATA (II) x 4 3.5 SATA (II) x 4 3.5 SATA (II) x 4 3.5 SATA (II) x 4 3.5 SATA (II) x 4 3.5 SATA (II) x 4 Max. Capacity 500GB 1.5TB 1.5TB 1.5TB 1.5TB 1.5TB Hot Swappable HDD No No No Yes Yes Yes External HDD Interface
USB x 2 eSATA x 1
USB x 2 eSATA x 1
USB x 2 eSATA x 1
USB x 2 eSATA x 1
USB x 2 eSATA x 1
USB x 2 eSATA x 1
LAN Port Gigabit X 1 Gigabit X 1 Gigabit X 1 Gigabit X 2 Gigabit X2 Gigabit X2 USBCopy Yes No No No No No
System Fan X 1
(60mmX60mm) X 2
(80mmX80mm) X 2
(80mmX80mm) X 3
(40mmX40mm) X 3
(40mmX40mm) X 4
(40mmX40mm)
Power Fan No No No X 1
(40mmX40mm) X 1
(40mmX40mm) X 1
(40mmX40mm)
Size (HxWxD) (mm) 120 X 105 X
142 168 X 184 X
230 168 X 184 X
230 44 X 430.5 X
457.5 44 X 430.5 X
457.5 44 X 430.5 X
457.5 Weight (Kg) 0.66 2.23 2.23 7.1 7.1 9.68
Supported Clients ‧Windows 2000 Onward ‧Mac OS X 10.3 Onward ‧Linux
Max. User Accounts 1024 2048 2,048 2,048 2,048 2,048 Max. Group Accounts 128 256 256 256 256 256 Max. Shared Folder 256 256 256 256 256 256 Max. Concurrent Connections
64 128 256 128 512 512
Max. Supported IP Cameras
8 8 12 8 12 12
File System ‧EXT3 ‧FAT (External Disk, Read/Write) ‧NTFS (External Disk, Read/Write)
Volume Type ‧Basic‧JBOD‧RAID 0‧RAID 1‧RAID 5‧RAID 5+Spare‧RAID 6
Agency Certifications ‧ FCC Class B ‧CE Class B
‧ BSMI Class B ‧ FCC Class A ‧CE Class A
HDD Hibernation Yes Yes Yes Yes Yes Yes Event Notification Yes Yes Yes Yes Yes Yes NTP Yes Yes Yes Yes Yes Yes FTP over SSL/TLS Yes Yes Yes Yes Yes Yes HTTPS Connection Yes Yes Yes Yes Yes Yes Windows ADS Domain
Yes Yes Yes Yes Yes Yes
iSCSI Yes Yes Yes Yes Yes Yes Scheduled Power On/Off
Yes Yes Yes Yes Yes Yes
Language Localization
‧English ‧Deutsch ‧Français ‧Italiano ‧Español ‧Dansk ‧Norsk ‧Svensk ‧Nederlands ‧Русский ‧Polski ‧Magyar ‧Português do Brasil ‧Português Europeu ‧Türkçe ‧Český
‧日本語‧한국어‧繁體中文‧简体中文 Power Consumption And Environment
‧Line voltage: 100V to 240V AC ‧Frequency: 50 / 60Hz ‧Operating Temperature: 40 to 95∘F (5 to 35∘C)
14

15
Item DS409slim DS409 DS409+ RS409 RS409+ RS409RP+ Requirements ‧Storage Temperature: 15 to 155∘F (-10 to 70∘C)
‧Relative Humidity: 5% to 95% RH ‧Maximum Operating Altitude: 10,000 feet

5-bay Models Item DS509+
Internal HDD 3.5 SATA (II) x 5
Max. Capacity 1.5TB
Hot Swappable HDD Yes
External HDD Interface USB x 2 eSATA x 1
LAN Port Gigabit X 2
USBCopy No
System Fan X 2(80mmX80mm)
Power Fan X 1(40mmX40mm)
Size (HxWxD) (mm) 177 X 203 X 242
Weight (Kg) 4.75
Supported Clients ‧Windows 2000 Onward ‧Mac OS X 10.3 Onward
‧Linux Max. User Accounts 2,048
Max. Group Accounts 256
Max. Shared Folder 256
Max. Concurrent Connections 512
Max. Supported IP Cameras 12
File System ‧EXT3
‧FAT (External Disk, Read/Write) ‧NTFS (External Disk, Read/Write)
Volume Type ‧Basic ‧JBOD ‧RAID 0 ‧RAID 1 ‧RAID 5 ‧RAID 5+Spare ‧RAID 6
Agency Certifications ‧FCC Class B ‧CE Class B‧BSMI Class B
HDD Hibernation Yes
Event Notification Yes
NTP Yes
FTP over SSL/TLS Yes
HTTPS Connection Yes
Windows ADS Domain Yes
iSCSI Yes
Scheduled Power On/Off Yes
Language Localization
‧English ‧Deutsch ‧Français ‧Italiano ‧Español ‧Dansk ‧Norsk ‧Svensk ‧Nederlands ‧Русский ‧Polski ‧Magyar ‧Português do Brasil ‧Português Europeu ‧Türkçe ‧Český
‧日本語‧한국어‧繁體中文‧简体中文
Power Consumption And Environment Requirements
‧Line voltage: 100V to 240V AC ‧Frequency: 50 / 60Hz ‧Operating Temperature: 40 to 95∘F (5 to 35∘C) ‧Storage Temperature: 15 to 155∘F (-10 to 70∘C) ‧Relative Humidity: 5% to 95% RH ‧Maximum Operating Altitude: 10,000 feet
16

Limitations
1. Each Synology Disk Station supports up to 2 USB printers.
2. USBCopy function only supports USB disks with FAT32 file system.
3. Some digital cameras are defined as a Still Image Device, such as Canon. For such devices, Synology Disk Station only supports USB Copy function (No USB share function).
4. For Mac users, Synology Disk Station supports only USB printers with PostScript.
17

Appearance
1-bay & 2-bay Disk Station Front View Rear View
* *
Fan
USB
Port
USBCopy
Button
LAN Port
RESET
eSATA
Port
Article Name Location Description
Power Button Front Panel The Power Button is used to turn the Synology Disk Station on or off. To turn off Synology Disk Station, press the Power Button and hold it until you hear a "beep" sound and the Power LED starts blinking.
COPY Button Front Panel The COPY Button lights up when you connect a USB Device (for example: digital camera, USB flash disk). Pressing the button will copy the data from the connected USB device to the Synology Disk Station's internal HDD.
USB Port Front & Back Panel
The Synology Disk Station offers 3 USB ports for adding additional external hard drives, USB printers,
DC In 12V
Port
POWER
Button
18

19
Article Name Location Description or other USB devices. One at the front, and other two at the back.
Smart Fan Ventilation
Back Panel The fan is built to exhaust waste heat out of Synology Disk Station. It will start automatically when the server starts. If the fan is malfunctioning, system will "beep" every 1 second.
eSATA Port Front Panel The eSATA port is for connecting with an external SATA HDD.
RESET Button
Back Panel 1. To restore IP, DNS, passwords for the "admin" account to default value, and reset the “guest”account to the “enabled” status. (Please refer to “Resetting Administrator Password”chapter.)
2. To reinstall the Synology Disk Station. (Please refer to “Reinstalling Synology Disk Station”chapter.)
LAN Port Back Panel The LAN port is where you connect RJ-45 cable to Synology Disk Station.
DC IN 12V Port
Back Panel The DC IN 12V Port is where you connect the AC Power Adapter.
4-bay Cube/Disk Station
Front View
* *
LED Indicators Power Button LED Indicators

Rear View
* *
DC In LAN USB Fan
RESET
Article Name Location Description
Power Button Front Panel The Power Button is used to turn Synology Disk Station on or ff. To turn off Synology Disk Station, press the Power Button until you hear a "beep" and the Power LED begins blinking. The shutdown process will complete in 30 seconds.
LED Indicators
Front Panel The LED indicator is used to display the status of the internal disk and the system.
USB Port Back Panel Synology Disk Station offers 2 USB ports for adding additional external hard drives, USB printers, or other USB devices.
Fan Ventilation
Back Panel The fan is built to exhaust waste heat out of Synology Disk Station. It will start automatically when the server starts. If the fan is malfunctioning, system will "beep" every 1 second.
RESET Button
Back Panel 1. To restore IP, DNS, passwords for the "admin" account to default value, and reset the “guest”account to the “enabled” status. (Please refer to “Resetting Administrator Password”chapter.)
2. To reinstall the Synology Disk Station. (Please refer to “Reinstalling Synology Disk Station” chapter.)
LAN Port Back Panel The LAN port is where you connect RJ-45 cable to Synology Disk Station.
DC IN Port Back Panel The DC IN Port is where you connect the AC Power Adapter.
20

4-bay 1U Rack Station
Front View
Power Button LED Indicators
Rear View
Power Fan LAN USB Console
Article Name Location Description
Power Button Back Panel The Power Button is used to turn Synology Disk Station on or off. To turn off Synology Disk Station, press the Power Button until you hear a "beep" and the Power LED begins blinking. The shutdown process will complete in 30 seconds.
LED Indicators
Front Panel The LED Indicator is used to display the status of the internal disk and the system.
USB Port Back Panel Synology Disk Station offers 2 USB ports for adding additional external hard drives or other USB devices.
Fan Back Panel There are 3 fans on the back panel. The fans are used to exhaust waste heat out of Synology Disk Station. The fans will start automatically when Synology Disk Station starts. If the fan is malfunctioning, system will "beep" every 1 second.
Console port Back Panel The console port is where you connect Synology Disk Station directly to a computer.
RESET Button
Back Panel 1. To restore IP, DNS, passwords for the"admin" account to default value, and reset the “guest” account to the “enabled” status.(Please refer to “Resetting Administrator Password” chapter.)
2. To reinstall the Synology Disk Station. (Please refer to “Reinstalling Synology Disk Station” chapter.)
LAN Port Back Panel The LAN port is where you connect RJ-45 cable to the Synology Disk Station.
21
22
Article Name Location Description
Power Port Back Panel The power port is where you connect the AC power cord.
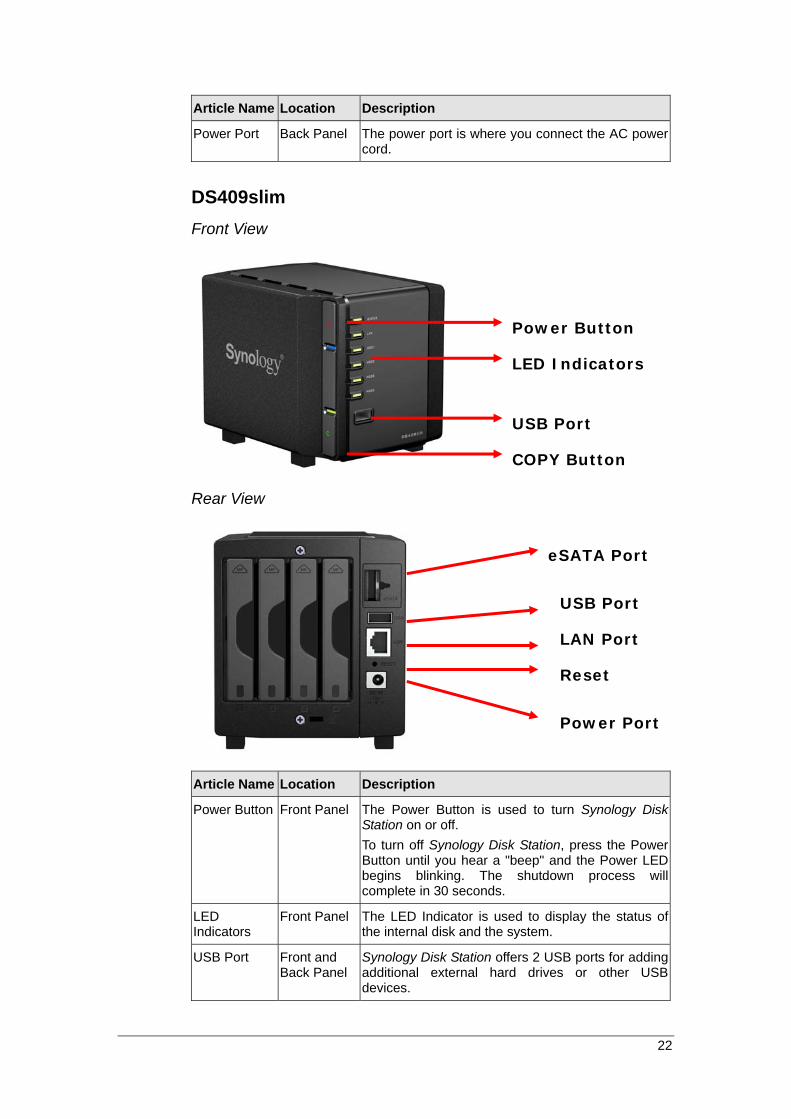
DS409slim Front View
Rear View
Article Name Location Description
Power Button Front Panel The Power Button is used to turn Synology Disk Station on or off. To turn off Synology Disk Station, press the Power Button until you hear a "beep" and the Power LED begins blinking. The shutdown process will complete in 30 seconds.
LED Indicators
Front Panel The LED Indicator is used to display the status of the internal disk and the system.
USB Port Front and Back Panel
Synology Disk Station offers 2 USB ports for adding additional external hard drives or other USB devices.
LED Indicators
USB Port
Power Button
COPY Button
USB Port
LAN Port
eSATA Port
Power Port
Reset

23
Article Name Location Description
COPY Button Front Panel The COPY Button lights up when you connect a USB Device (for example: digital camera, USB flash disk). Pressing the button will copy the data from the connected USB device to the Synology Disk Station's internal HDD.
RESET Button
Back Panel 1. To restore IP, DNS, passwords for the"admin" account to default value, and reset the “guest” account to the “enabled” status.(Please refer to “Resetting Administrator Password” chapter.)
2. To reinstall the Synology Disk Station. (Please refer to “Reinstalling Synology Disk Station” chapter.)
eSATA Port Back Panel The eSATA port is for connecting with an external SATA HDD.
LAN Port Back Panel The LAN port is where you connect RJ-45 cable to the Synology Disk Station.
Power Port Back Panel The power port is where you connect the AC power cord.

5-bay Disk Station
Front View
Activity
Indicator
Status
Indicator
LED
Indicators POWER
Button
Hard Drive
Tray Lock
Hard Drive
Tray
Rear View
Power
Jack
LAN
RESET
eSATA
USB
Console
Fan
24

Article Name Location Description
Power Button Front Panel The Power Button is used to turn Synology Disk Station on or off. To turn off Synology Disk Station, press the Power Button until you hear a "beep" and the Power LED begins blinking. The shutdown process will complete in 30 seconds.
LED Indicator Front Panel The LED Indicator is used to display the status of the internal disk and the system.
Hard Drive Tray
Front Panel There are 5 hard drive trays on the front panel. Eachtray is designed to hold a hard drive vertically.
Hard Drive Tray Lock
Front Panel Each of the 5 hard drive trays is equipped with one tray lock. Use the tubular key in the package to lock/unlock the trays to the system.
USB Port Back Panel Synology Disk Station offers 2 USB ports for adding additional external hard drives or other USB devices.
Fan Back Panel There are 2 fans on the back panel. The fans are used to exhaust waste heat out of Synology Disk Station. The fans will start automatically when Synology Disk Station starts. If the fan is malfunctioning, system will "beep" every 1 second.
Console port Back Panel The console port is where you connect Synology Disk Station directly to a computer.
RESET Button
Back Panel 1. To restore IP, DNS, passwords for the"admin" account to default value, and reset the “guest” account to the “enabled” status.(Please refer to “Resetting Administrator Password” chapter.)
2. To reinstall the Synology Disk Station. (Please refer to “Reinstalling Synology Disk Station” chapter.)
LAN Port Back Panel There are 2 LAN ports on the back panel. The LAN port is where you connect RJ-45 cable to your Synology Disk Station.
Power Jack Back Panel The power jack is where you connect the AC power cord.
eSATA Back Panel The eSATA port is for connecting with an external SATA HDD.
25

26
LED Indications Table
1-bay Models
LED Indication Color Status DescriptionStatic Volume normal
Off Hibernation
Static Available volume space < 1GB
Blinking Volume degraded or crashed
STATUS
Orange
Green
No volumeStatic Network is up
Blinking Network is active
Off Network is down
Off No internal disk
Static USB disk detected
Blinking Copying data
Off No USB disk attached
Static System ready
BlinkingBooting up orShutting down
Off Power off
GreenDISK / eSATA
LAN Green
Blinking Disk is being accessed
Power Blue
USBCopy Green
2-bay Models LED Indication Color Status Description
Static Volume normal
Off Hibernation
Static Available volume space < 1GB
Blinking Volume degraded or crashedNo volume
Static Network is up
STATUS
Orange
Green
Blinking Network is active
Off Network is down
Blinking Disk is being accessed
Off No internal disk
Orange Static Cannot Read/Write
Static USB disk detected
Blinking Copying data
Off No USB disk attached
Static System ready
Blinking Booting up orShutting down
Off Power off
LAN Green
Static Disk is ready and idle
Power Blue
USBCopy Green
DISK / eSATAGreen

27
4-bay Models
LED Indication Color Status DescriptionStatic Volume normal
Off Hibernation
Static Available volume space < 1GB
Blinking Volume degraded or crashedNo volume
Solid Network is up
Blinking Network is active
Off Network is down
Solid Disk ready
Blinking Disk is being accessed
Off No internal disk
Orange Static Cannot Read/Write
Static System ready
Blinking Booting up orShutting down
Off Power off
Static Two redundant power supplyare working
Blinking 1 RPS not working
* RS409RP+ only
DISK 1~4
LAN Green
Green
Green
RPS-STATUS*
Power Blue
STATUS
Orange
Green

5-bay Models LED Indication Color Status Description
Solid Volume NormalOff Hibernation
Solid Available volume size < 1GB
Blinking Volume degraded or crashedNo volume
Solid Network is upBlinking Network is active
Off Network is downBlinking Hardware Error
Off System is healthySolid System ready
Blinking Booting upShutting down
Off System off
Off No diskOrange Static Volume crashed
Off Disk idle
STATUS
Disk being accessed
LAN1 & LAN2 Green
ALERT Orange
Power Blue
Disk readyGreen
Green
Green
Orange
Status Indicator(on tray)
Activity Indicator(on tray)
Blinking
Solid
28

Managing Synology Disk Station
Entering Web Management UI
System administrator can manage the Synology Disk Station by entering the web management UI. There are two options for you to enter the management UI:
Using Setup Utility Windows User
1. Insert the Installation CD into CD/DVD-Rom Drive.
2. Choose “Synology Assistant” on the Autorun Menu.
3. Follow the steps to complete installation.
29

4. After installation, double click on the desktop icon to execute the program.
5. Choose the server you want to manage. Click Connect or double-click the selected server to enter the Web Management UI.
6. Choose “System administrator (admin)”, input password, and click “Login”. The default password is empty.
Mac OS X User
1. Insert the Installation CD into CD/DVD-Rom Drive.
2. Double-Click CD-Rom Drive thumbnail.
3. Double-Click "MacOSX" thumbnail.
4. Double-Click "Synology Assistant-SYNOLOGY.dmg" thumbnail.
5. Double-Click "Synology Assistant" thumbnail to run setup wizard.
30

6. Choose a Synology Disk Station. Click "Connect" or double-click the selected server to enter the Web Management UI.
7. Choose "System administrator (admin)", input password and click "Enter". The default password is empty.
Please note:
To ensure the process runs smoothly, please use the following browsers:
Browser Version
The Internet Explorer 6.0 and onward
Firefox 3.0 and onward
Safari (Mac only) 3.0 and onward
Accessing Web Management UI Manually 1. Open a web browser window.
2. At the address line input “http://Synology_Server_Name:5000/", where “Synology_Server_Name” should be replaced with the name you set up for Synology Disk Station during the setup process. If you choose "One-step Setup" during the setup process, the "Synology_Server_Name" will be "DiskStation", "CubeStation", or "RackStation".
3. Press “Enter” key on the keyboard.
4. Choose "System administrator (admin)".
5. Input password for admin.
6. Click “Enter” to access Web Management UI.
Managing Synology Disk Station
You can start managing Synology Disk Station in Web Management UI. Synology Disk Station Web Management UI provides distinctive and straightforward design for easy management. You will find an online “Help” button at the upper right corner of every page of the Web Management UI. Click on the “Help” button for further information whenever you encounter any problem.
To help you further manage Synology Disk Station, resource monitor allows you to watch over the CPU usage, memory usage, network flow, and volume usage. With SNMP service, you can now monitor Synology Disk Station with network management software.
31

32
Connecting from Two Different Networks*
Synology Disk Station supports dual LAN allowing you to connect to the network with two LAN cables at the same time, or to set the Synology Disk Station using two IP addresses under different subnets. With Link Aggregation enabled, trunking and network fault tolerances are supported. Please go to the "System > Network" page of the Web Management UI for setup.
Volume*
You can combine hard drives on Synology Disk Station to create different types of volumes, and find the data protection level of your need. The Synology Disk Station provides you various volume types as follows:
Volume Type
Amount of composed hard drive
Functionality
Basic 1 A Basic (non-RAID) volume must be created with one hard drive as an independent unit. When creating a Basic volume, you can select only one hard drive at a time.
JBOD ≧2 JBOD is a collection of hard drives. The maximum capacity of a JBOD volume is the total capacity of all hard drives.
RAID 0 ≧2 Combining multiple disks to build a volume, RAID 0 offers Striping, a process of dividing data into blocks and spreading the data blocks across several hard drives, but without safety measures.
RAID 1 2 With RAID 1, one of the composed disks is used for backup purposes. The content of disk A is mirrored to disk B to assure data integrity, so the actual available storage capacity equals to the capacity of one hard drive.
RAID 5 ≧3 This configuration includes a backup option. It uses parity mode to store redundant data on space equal to the size of one disk for later data recovery. Therefore the actual available storage capacity equals to the capacity of n-1 hard drives.
RAID 5+Spare
≧4 RAID 5+Spare is a new management mechanism to secure the data. It requires at least four drives to establish a RAID 5+Spare volume, and one will act as a hot Spare drive to rebuild the failed drive of the volume automatically.
RAID 6 ≧4 This volume type eliminates the risk of volume failure and provides extra data protection. It uses parity mode to store redundant data on space equal to the size of two disks for later data recovery. Therefore the actual available storage capacity equals to the capacity of n-2 hard drives.
* Supported on specific models only. Please refer to the product Specification table.

33
Managing Volume* You can create, remove, and repair volumes. For the detailed description, please refer to Help on “Storage > Volume” page.
Repairing Volume by Hot Swapping* Synology Disk Station provides hot swapping function. When you need to replace crashed disks in Synology Disk Station, you don’t need to turn off the server. You can refer to the disk status on the management UI, or the front panel LED indicators to identify crashed disks, and directly pull out the hard drive tray to replace the crashed disk with a new one. Then follow the steps on management UI to repair the degraded volume after replacing the hard drive.
Joining Windows ADS Domain*
You can add Synology Disk Station to Windows ADS domain and let the domain users access Synology Disk Station. Synology Disk Station supports Active Directory Service (ADS) domain. After adding Synology Disk Station to a Windows domain, you can go to the "Privileges > Shared Folder" page to assign the domain users’ privileges of shared folders on the server. When domain users access Synology Disk Station, they only need to enter their domain account and password for authentication.
For the detailed description, please refer to Help on “File Sharing > Win/Mac OS” page.
* Supported on specific models only. Please refer to the product Specification table.

Accessing Synology Disk Station via Telnet/SSH
To be able to access Synology Disk Station via Telnet/SSH, go to "Network Services > Terminal" and enable the terminal service.
Accessing Synology Disk Station via NFS
With the built-in NFS option, the administrator can quickly enable NFS and set up privileges on the UI with only a few clicks. Go to “File Sharing > NFS” and check the box to enable this function. Go to “Privileges > Shared Folder” to setup the NFS privileges.
34

iSCSI Target*
You can designate portion of your volume space to be an iSCSI Target, which will allow clients to access the space like a local disk. Go to “Storage > iSCSI Target” and create an iSCSI target.
Protecting Synology Disk Station from Unauthorized Login
Built-in Firewall The built-in firewall can prevent unauthorized logins and control which services can be accessed. Go to “Network Services > Firewall” to enable and create firewall rules. You can choose to allow or deny some or all IP addresses from accessing some or all network ports.
* Supported on specific models only. Please refer to the product Specification table.
35

Auto Block Auto Block is another method to block unauthorized logins via SSH, Telnet, rsync, FTP, mobile devices, File Station, and management UI. Go to “Network Services > Auto Block” to enable and set up the service so that IP addresses exceeding the specified number of failed login with a time period will be blocked.
Resetting Administrator Password
Pressing the “RESET” button and holding it for about 4 seconds before you heard a beep sound will restore IP, DNS, passwords for the "admin" account to default value, and reset the “guest” account to the “enabled” status. The default password of the “admin” account is blank.
Reinstalling Synology Disk Station
If for any reason you have to reinstall the Synology Disk Station, you can press the RESET button on the back panel twice, and the Synology Disk Station will be reinstalled. The data saved on the Synology Disk Station will not be erased during the reinstallation. However, for security’s reason, we strongly recommend that you back up the data on the server.
To reinstall the server:
1. Press the “RESET” button and hold it for about 4 seconds. Release the button when the Synology Disk Station emits a beep sound.
2. Within the next 10 seconds, press the “RESET” button and hold it for about 4 seconds again. Release the button when the Synology Disk Station emits a beep sound.
3. Run Synology Assistant, and set up the Synology Disk Station again.
Note: The version of Synology Assistant should be identical to the version of the firmware patch file you install.
36
Accessing Synology Disk Station Data
File sharing service is one of Synology Disk Station's major functions. Administrator can setup access rights for users to access shared folders.
Shared Folders
System Built-in Below are the system built-in shared folders.
Name Description
public The "public" shared folder will be created automatically after the first time you set up Synology 1-bay models.
web The shared folder “web” is for storing web pages. When Web Station is enabled, the "web" shared folder will be created automatically. You can upload web pages to the "web" shared folder to build your website. For detailed information, please refer to the “Extra Features > Web Station” section.
photo The shared folder “photo” is for storing images and videos you want to share on Photo Station 3. It will be created automatically when Photo Station or DLNA/UPnP Media Server is enabled. For detailed information, please refer to descriptions of Photo Station 3 and Media Server.
music You can store music files in the “music” shared folder. When iTunes Service is enabled, you can browse the music files on iTunes. For more details on the iTunes Service, refer to the "Extra Features > iTunes Service" section. In addition, when DLNA/UPnP Media Server is enabled, the music can be shared through a DLNA/UPnP device. For detailed information, please refer to descriptions of Media Server.
video Video files in the “video” shared folder can be browsed through DLNA/UPnP DMA when Media Server is enabled. For detailed information, please refer to descriptions of Media Server.
surveillance The shared folder "surveillance" is for storing the video files recorded by Surveillance Station 3. It will be created automatically when Surveillance Station 3 is enabled. This shared folder is read-only and can only be accessed with the "admin" account. For more details, please refer to the "Extra Features > Surveillance Station 3" section.
home The system will create a “home” folder for each user once User Home is enabled. It provides a private space for each user to store data where no other users can access.
homes Once User Home is enabled, admin will be able to see and manage all users’ “home” folders which are under “homes” folder.
NetBackup The shared folder “NetBackup” is for saving backed up files using
37

38
Name Description Network Backup. Please refer to the “Backup > Network Backup" page of the Web Management UI.
usbshare After you connect external USB HDD to Synology Disk Station’s USB port, system will automatically create a shared folder with the prefix “usbshare”. Refer to “Expanding Storage Capacity> External HDD” section for details.
satashare After you connect external SATA HDD to Synology Disk Station’s eSATA port, system will automatically create a shared folder with the prefix “satashare”. Refer to “Expanding Storage Capacity> External HDD” section for details.
Administrator-Created
Apart from the above system built-in shared folders, Administrator can create shared folders on the page “Privileges > Shared Folder” of the Web Management UI. Shared folders created by Administrator can be deleted or renamed at any time.
Setting Privileges
For security reasons, Administrator can go to the “Privileges > Shared Folder” page of the Web Management UI and assign user privileges for accessing the shared folders.
You can also setup each user’s privileges or accessing shared folders by going to “Privileges > User” page. Choose the user account and click “Edit”, and then go to “Privileges setup” to setup the user’s privileges. For the detailed description, please refer to Help on “Privileges > User”.

Using Network Recycle Bin
When users delete files in the shared folders via the SMB/CIFS protocol (ex: on Windows), the deleted files will be moved into the automatically-created folder "#recycle" in the same shared folder to avoid files being unintentionally deleted.
To enable the recycle bins, go to the page “Network Services > Win/Mac OS”, and check the “Enable CIFS Recycle Bin” option.
To permanently deleted files in a shared folder, just delete the “#recycle” folder; to permanently delete files in all shared folder, click the “Empty CIFS Recycle Bin” button.
Setting Encoding
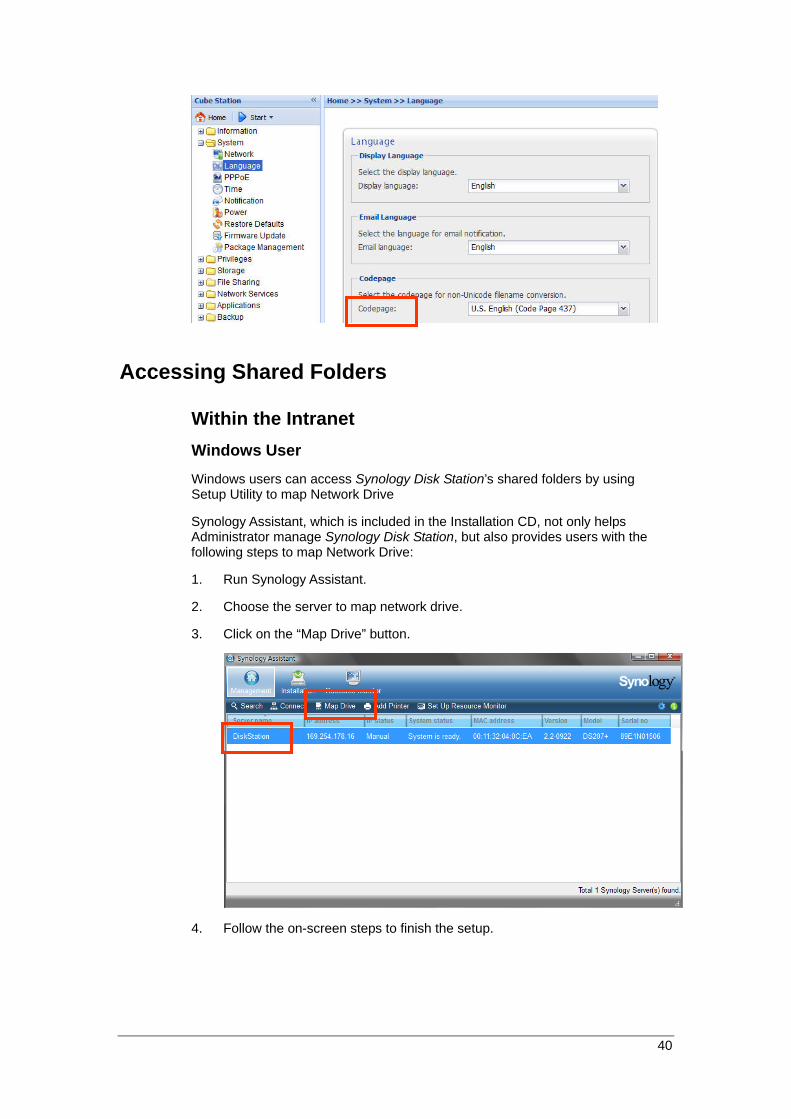
Synology Disk Station uses Unicode to avoid file inaccessibility between users who use different languages. For users without Unicode support on their PC, Administrator can set the Codepage of the files on the “System > Language” page of the Web Management UI to overcome the problem.
39
Accessing Shared Folders
Within the Intranet Windows User
Windows users can access Synology Disk Station’s shared folders by using Setup Utility to map Network Drive
Synology Assistant, which is included in the Installation CD, not only helps Administrator manage Synology Disk Station, but also provides users with the following steps to map Network Drive:
1. Run Synology Assistant.
2. Choose the server to map network drive.
3. Click on the “Map Drive” button.
4. Follow the on-screen steps to finish the setup.
40

5. Upon completion, user can access the mapped shared folder in Windows Explorer.
41

Mac User
Mac user can use “Go > Connect to Server” and type “smb://server_IP” or “afp://server_IP” to connect to a Synology Disk Station and access the shared folder on the server, Connecting through “smb://” is suggested for better performance.
Linux User
Linux users can mount the shared folders for accessing. Mount path can be found under “Privileges > Shared Folder > NFS Privileges” of the Web Management UI. Before mounting the shared folders, please make sure the NFS service is enabled.
42

From the Internet Through FTP
Synology Disk Station provides FTP service. Administrator can enable FTP service on the “File Sharing > FTP” page of the Web Management UI. Users can thus access data in Synology Disk Station by FTP Protocol. Synology Disk Station supports secure FTP by default when administrator enables the FTP service. To prevent data from being accessed while transferring, users can also use “FTP over SSL/TLS” on the FTP client to make the data more secure. For detailed information on using FTP and its limitation, please refer to Help on “File Sharing > FTP” page.
Please note:
Administrator has the option to adjust FTP Bandwidth or enable Anonymous login.
Through File Station 2
Synology File Station 2 is a web-based file management tool. Administrator can enable File Station 2 service on the “File Sharing > File Station” page of the Web Management UI. Users can thus access or manage data stored on Synology Disk Station with browsers. On File Station 2, you can drag-n-drop to move files among folders, and use the right-click action to manage the files. Also, you can upload or download multiple files at the same time. Furthermore, authorized users can assign the privileges of other users to access the folders, sub-folders, and files. For detailed function descriptions, please refer to the online Help in the File Station 2 user interface.
From a Mobile Device Mobile device support has been added to allow you to use iPhone OS 2.2.1 onward or Windows Mobile® 6.0 (Internet Explorer® Mobile or Opera® 9.0 and onward) to browse files stored in Files Station and Photo Station.
43

44 44
Backup Solutions
Synology Disk Station provides the following server backup solutions:
1. By using “Local Backup”, Administrator can back up Synology Disk Station’s data to external USB or SATA HDD.
2. By using “Network Backup”, Administrator can back up Synology Disk Station’s data to another Synology Disk Station or an rsync compatible server.
Synology Disk Station provides the following personal data backup solutions:
3. By installing Synology Data Replicator 3 software on the client PC, Windows users can back up data from PC to Synology Disk Station.
4. By using Time Machine on Mac OS X, Mac users can back up data from their desktop to assigned shared folder on Synology Disk Station.
Synology Disk Station also allows you to back up system settings.
Local Backup and Network Backup
Please follow the below steps to perform Local and Network Backup:
1. Connect an external USB HDD or SATA HDD to the corresponding port on Synology Disk Station.
2. Go to the page “External Devices > USB Disk” or “External Devices > eSATA Disk” of the Web Management UI, and format the HDD.

3. If you want to do network backup to another Synology Disk Station, make sure the Network Backup Service is enabled on the backup destination.
4. Go to “Backup > Backup” to set up your backup task, When creating a task, you could choose Local Backup, or perform Network Backup to another Synology Disk Station or rysnc compatible server.
Backing up Personal Data
Windows Users Windows users can install “Synology Data Replicator 3” backup software which can be found on the installation CD. They can back up client PC data to Synology Disk Station to maintain a copy of data whenever needed.
Using Synology Data Replicator 3, users can:
1. Monitor selected folders on client PC and perform real-time backup when any modification to the file is made.
2. Adjust backup versions and restore points.
3. Restore backup data on Synology Disk Station to client PC at user’s preference.
Before starting
Before using Synology Data Replicator 3, please ensure:
1. Client PC and Synology Disk Station use the same encoding for backup to perform adequately.
2. Synology Data Replicator 3 is the next generation of Synology Data Replicator. It can only restore the data on Synology Disk Station that was
45
backed up after Data Replicator 3 was installed. If users have backed up data on Synology Disk Station using Synology Data Replicator, we recommend restoring data on Synology Disk Station to PC first before using Synology Data Replicator 3.
Minimum System Requirement
1. Free HDD Space: 5MB
2. Operating System: Windows 2000 and onward
3. Best Screen Resolution: 1024*768 and above
4. Microsoft Networking over TCP/IP enabled and has network connection with Synology Disk Station.
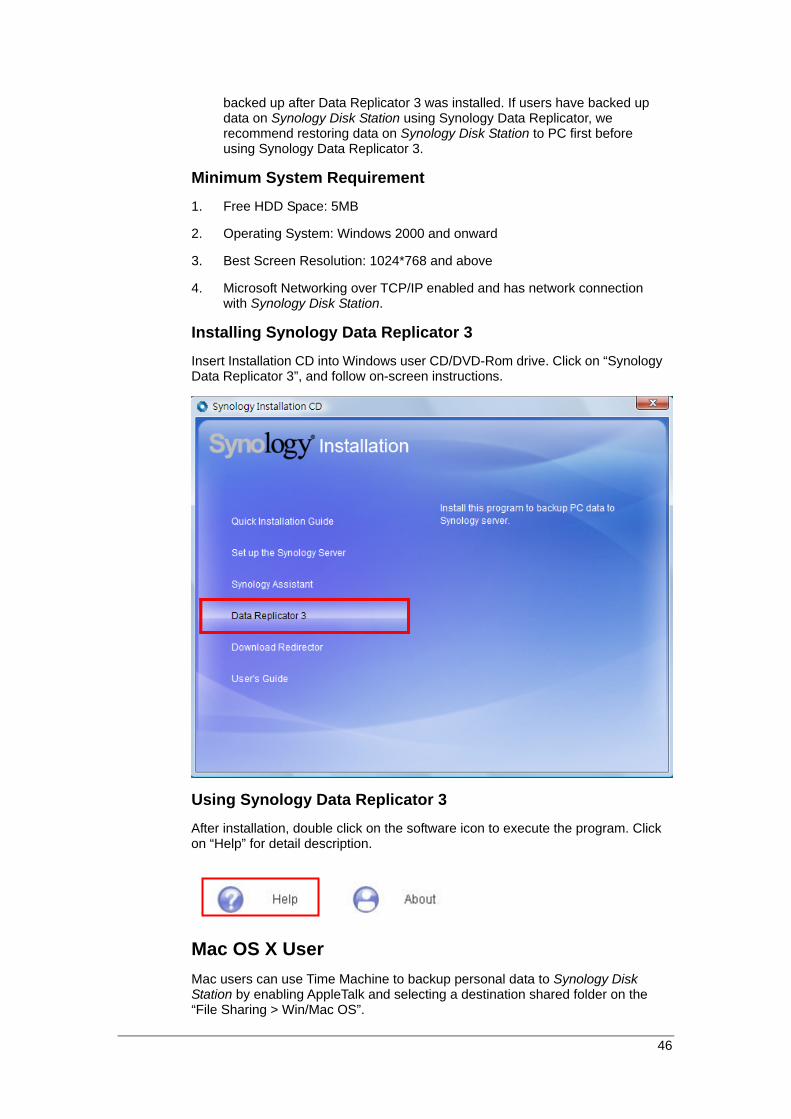
Installing Synology Data Replicator 3
Insert Installation CD into Windows user CD/DVD-Rom drive. Click on “Synology Data Replicator 3”, and follow on-screen instructions.
Using Synology Data Replicator 3
After installation, double click on the software icon to execute the program. Click on “Help” for detail description.
Mac OS X User Mac users can use Time Machine to backup personal data to Synology Disk Station by enabling AppleTalk and selecting a destination shared folder on the “File Sharing > Win/Mac OS”.
46

Backing up Synology Disk Station Settings
There are two options for you to back up Synology Disk Station’s “User”, “Group”, and “Shared Folder” settings for easy maintenance and restoration.
From Synology Disk Station to PC Client Go to the page “Backup > Configuration Backup” of the Web Management UI to back up settings from Synology Disk Station to PC Client.
From Synology Disk Station to another Synology Disk Station The data backed up to another Synology Disk Station or an rsync compatible server using “Network Backup” automatically includes the “User”, “Group”, “Shared Folder” settings. When you recover the data, you can choose if you want to recover these settings.
47
48 48
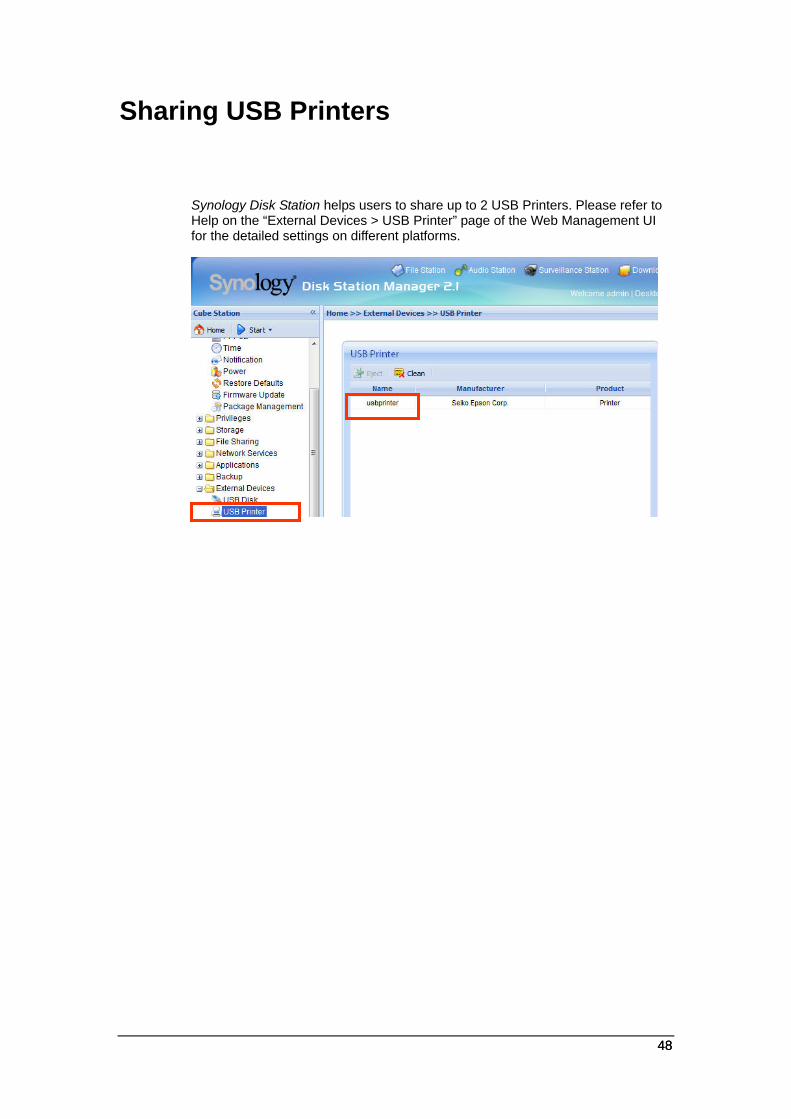
Sharing USB Printers
Synology Disk Station helps users to share up to 2 USB Printers. Please refer to Help on the “External Devices > USB Printer” page of the Web Management UI for the detailed settings on different platforms.

More Features
Management
User Home When the “User Home” function is enabled, the system will automatically create a “home” folder for each user account, so that users can store data to their own “home” folder.
Applications Privilege Setting Admin can assign privileges to other users for accessing applications at “Privileges > Application Setting” page.
49

Quick Search Box When the Quick Search Box is enabled, it will appear at the bottom of the Panel List. The “search while you type” feature helps you to quickly find the applications you want to manage by entering key words.
Notification Email Notification
Administrator can enter email address and SMTP server information on the page “System > Notification”. Synology Disk Station will send email to the address whenever an important event occurs to notify Administrator.
SMS Notification
If you would like to be notified by SMS, enable SMS notifications and enter
information for your preferred SMS service provider.
Firmware Update To keep your Synology Disk Station up to date, Administrator can go to “System > Firmware Update” page to upgrade firmware.
50
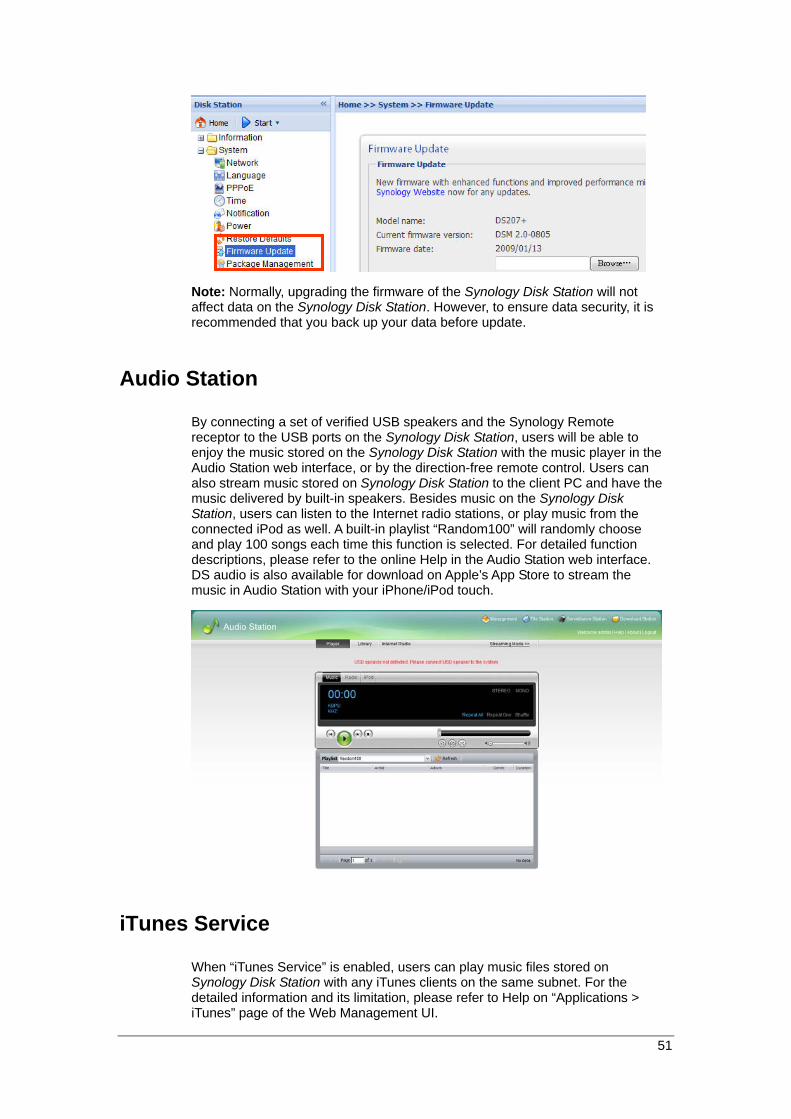
Note: Normally, upgrading the firmware of the Synology Disk Station will not affect data on the Synology Disk Station. However, to ensure data security, it is recommended that you back up your data before update.
Audio Station
By connecting a set of verified USB speakers and the Synology Remote receptor to the USB ports on the Synology Disk Station, users will be able to enjoy the music stored on the Synology Disk Station with the music player in the Audio Station web interface, or by the direction-free remote control. Users can also stream music stored on Synology Disk Station to the client PC and have the music delivered by built-in speakers. Besides music on the Synology Disk Station, users can listen to the Internet radio stations, or play music from the connected iPod as well. A built-in playlist “Random100” will randomly choose and play 100 songs each time this function is selected. For detailed function descriptions, please refer to the online Help in the Audio Station web interface. DS audio is also available for download on Apple’s App Store to stream the music in Audio Station with your iPhone/iPod touch.
iTunes Service
When “iTunes Service” is enabled, users can play music files stored on Synology Disk Station with any iTunes clients on the same subnet. For the detailed information and its limitation, please refer to Help on “Applications > iTunes” page of the Web Management UI.
51

Media Server
Using DLNA/UPnP media server, you can browse the multimedia files stored on the server via a DLNA/UPnP DMA (Digital Media Adapter). After enabling media server on the “Applications > Media Server” page, place the multimedia files in one of the following shared folders: photo, video, or music. You can customize how the files will be organized and displayed on the DMA menu or insert album covers for music files without embedded images. Furthermore, MIME types and transcoders can be enabled to enhance DMA compatibility.
Download Station 2
Synology Disk Station can download files from the Internet through BitTorrent, FTP, HTTP, NZB and eMule. BitTorrent partial file download is also available. E-mail notification upon the download tasks’ completion is optional. PC users and Mac users can either install Download Redirector or log in to the “Download Station” page on the Web Management UI to add download tasks and manage the download queue.
Before you start adding download tasks, you should enable Download Station on the Synology Disk Station.
Enabling Download Station 2 Go to the “Applications > Download Station” page.
52

Installing Download Redirector Insert Installation CD into the CD/DVD-Rom drive. Click on “Download Redirector”, and follow on-screen instructions to complete installation.
For the detailed description of Download Redirector, please refer to Help on Download Redirector program window.
Web Station
Personal or corporate website can be easily set up using “Web Station.” By integrating with PHP and MySQL, users can also set up online shop. PHP support is turned on by default, and MySQL needs to be enabled manually. With the Web Station enabled, the Virtual Host support allows you to host up to 30 websites on one Synology Disk Station.
53

Enabling Web Station and MySQL Go to the “Network Services > Web Services” page.
Enabling Virtual Host Go to the “Network Services > Web Services” page, and click on “Virtual Host”.
Web Station’s detail description Please click on the “Read Tutorial” link next to “Enable Web Station”.
Photo Station 3
“Photo Station 3” is the new online album function integrating a blogging system. After uploading a folder containing photos and videos to the "photo" shared folder, Photo Station 3 will start to create thumbnails automatically. Administrator can then sign in to Photo Station 3 to manage the album and create blogs. Administrator can customize Photo Station 3 background and theme, and choose the preferred language. Photo Station 3 also provides users with the search function. By entering key words, users can find the relevant photos, videos, and files. You can also click on the arrow for advanced search.
Photo Staion 3 can be accessed on a mobile device with OS 2.2.1 onward or Windows Mobile® 6.0 (Internet Explorer® Mobile or Opera® 9.0 and onward). You can also download DS photo on Apple’s App Store to upload photos stored on their iPhone/iPod Touch to a Synology Disk Station.
54

55
Enabling Photo Station 3 Go to the “Applications > Web Services” page.
Photo Station 3’s detail description Please click on “Read Tutorial” link next to “Enable Photo Station 3”.
Surveillance Station 3
By using "Surveillance Station 3", you can monitor the live image of various IP cameras attached on the network, customize video recording options, and choose among Continuous Recording, Motion Detection Recording, and Alarm Recording modes. When playing back the recording events, you can fast forward, slow down, or play up to 4 channels simultaneously. Both M-JPEG video format and MPEG4 format are supported; based on the IP camera’s ability, megapixel video live-view and recording can also be supported. If you record the event with MPEG4 format and the camera supports audio recording function, both sounds and images will be recorded when the system is recording an event. Centralized management allows you to monitor the live-view of IP cameras installed on multiple Disk Stations. SMS notification sends you a notification message when the events you have selected occur.
The supported camera number varies from different models for the best performance. For the supported camera number, please refer to the product specification table.
Enabling Surveillance Station 3 Go to the "Applications > Surveillance Station" page.
Surveillance Station 3’s detailed description For detailed function descriptions, please click “Help” on the Surveillance Station 3 Web Management UI.
Mail Station
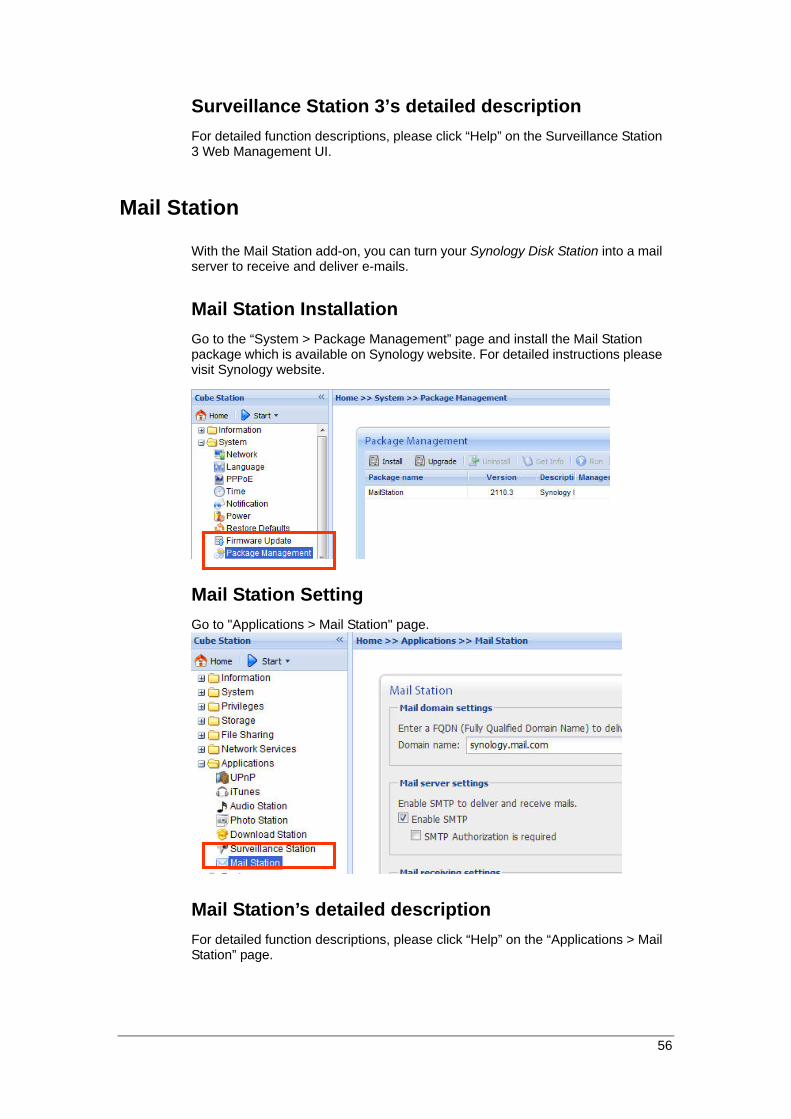
With the Mail Station add-on, you can turn your Synology Disk Station into a mail server to receive and deliver e-mails.
Mail Station Installation Go to the “System > Package Management” page and install the Mail Station package which is available on Synology website. For detailed instructions please visit Synology website.
Mail Station Setting Go to "Applications > Mail Station" page.
Mail Station’s detailed description For detailed function descriptions, please click “Help” on the “Applications > Mail Station” page.
56
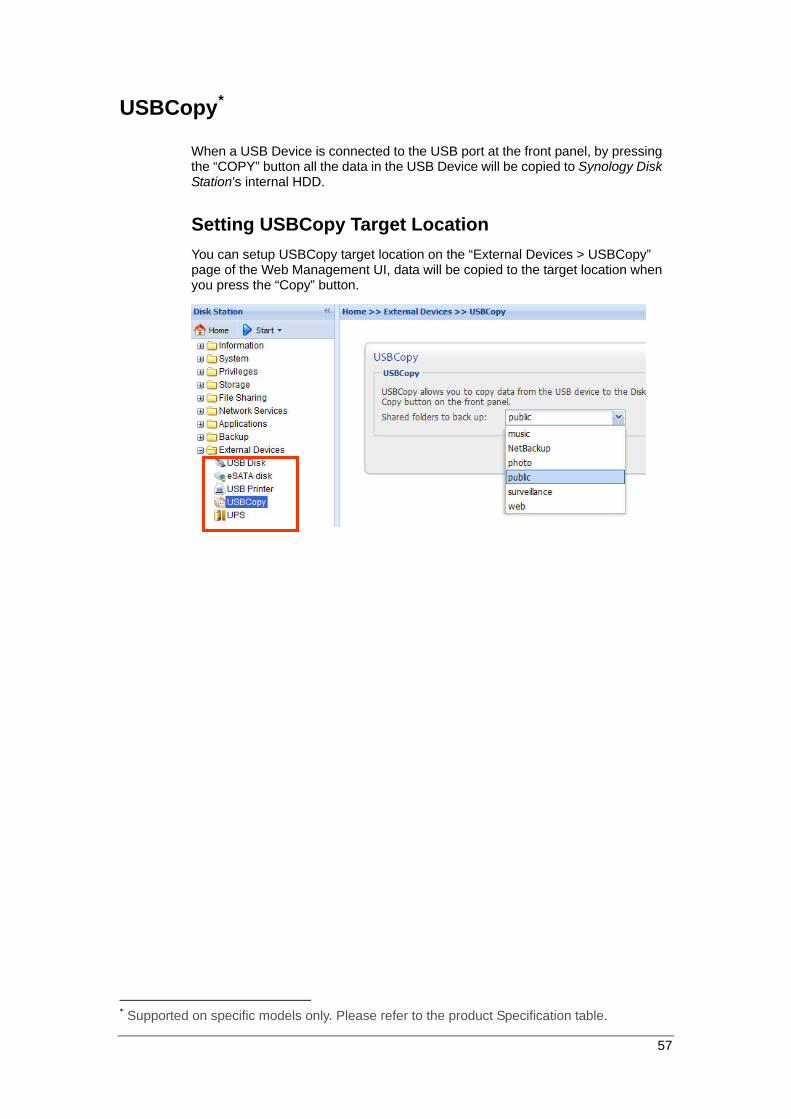
USBCopy*
When a USB Device is connected to the USB port at the front panel, by pressing the “COPY” button all the data in the USB Device will be copied to Synology Disk Station’s internal HDD.
Setting USBCopy Target Location You can setup USBCopy target location on the “External Devices > USBCopy” page of the Web Management UI, data will be copied to the target location when you press the “Copy” button.
* Supported on specific models only. Please refer to the product Specification table.
57

58
Expanding Storage Capacity
Administrator can expand the storage capacity by connecting external hard drives, replacing the internal hard drive with a larger one, or adding a hard drive to the volume.
With DX5/ RX41
You can expand the storage capacity of your Synology Disk Station by a connecting a DX5/RX4. For detailed function descriptions, please click “Help” on the Volume page.
With External HDD
External USB HDD When connecting an external USB HDD to Synology Disk Station’s USB port, “usbshare1” shared folder will be created automatically. Upon disconnecting external USB HDD, the shared folder will be removed. When more than 1 external USB HDD is connected, “usbshare2”, “usbshare3” will be created accordingly.
To eject or format external USB HDD, go to the page “External Devices > USB Disk” of the Web Management UI.
1 Supported on specific models only. Please refer to http:www.synology.com.

59
External SATA HDD* When connecting an external SATA HDD to Synology Disk Station’s eSATA port, “satashare” shared folder will be created automatically. Upon disconnecting External SATA HDD, shared folder will be removed.
To eject or format external SATA HDD, go to the page “External Devices > eSATA Disk” of the Web Management UI.
Replacing Larger Internal HDD
When the internal HDD storage runs out, Administrator can follow the steps below to replace a larger HDD but keep the original data:
For one-bay models*
1. Turn off the Synology Disk Station.
2. Replace the internal hard drive with a larger one.
3. Turn on the Synology Disk Station.
4. Reinstall the system.
5. Connect the replaced hard drive to the USB or eSATA port.
6. Copy the data from the replaced hard drive to the new hard drive.
* Supported on specific models only. Please refer to the product Specification table.

60
7. Remove the replaced hard drive.
For Basic or RAID 0 volume on two and more bays models*
1. Back up all data stored on the Synology Disk Station.
2. Turn off the Synology Disk Station.
3. Replace the internal hard drives with larger ones.
4. Turn on the Synology Disk Station
5. Reinstall the system.
6. Copy the backed up data to the new volume.
For RAID 1 volume on two and more bays models*
1. Turn off the Synology Disk Station.
2. Replace the first internal hard drive with a larger hard drive.
3. Turn on the Synology Disk Station and rebuild the volume.
4. Repeat step 1 to 3 until all internal hard drives are replaced with larger hard
drives.
5. Click the “Expand” button to expand the volume size.
p.s. For hot-swappable models, you can perform the above procedures when
the model is powered on.
For RAID 5 or RAID 6 volume on four and more bays models*
1. Turn off the Synology Disk Station.
2. Replace the first internal hard drive with a larger hard drive.
3. Turn on the Synology Disk Station and rebuild the volume.
4. Repeat step 1 to 3 until all internal hard drives are replaced with larger hard
drives.
5. Click the “Expand” button to expand the volume size.
p.s. For hot-swappable models, you can perform the above procedures when
the model is powered on.
* Supported on specific models only. Please refer to the product Specification table.
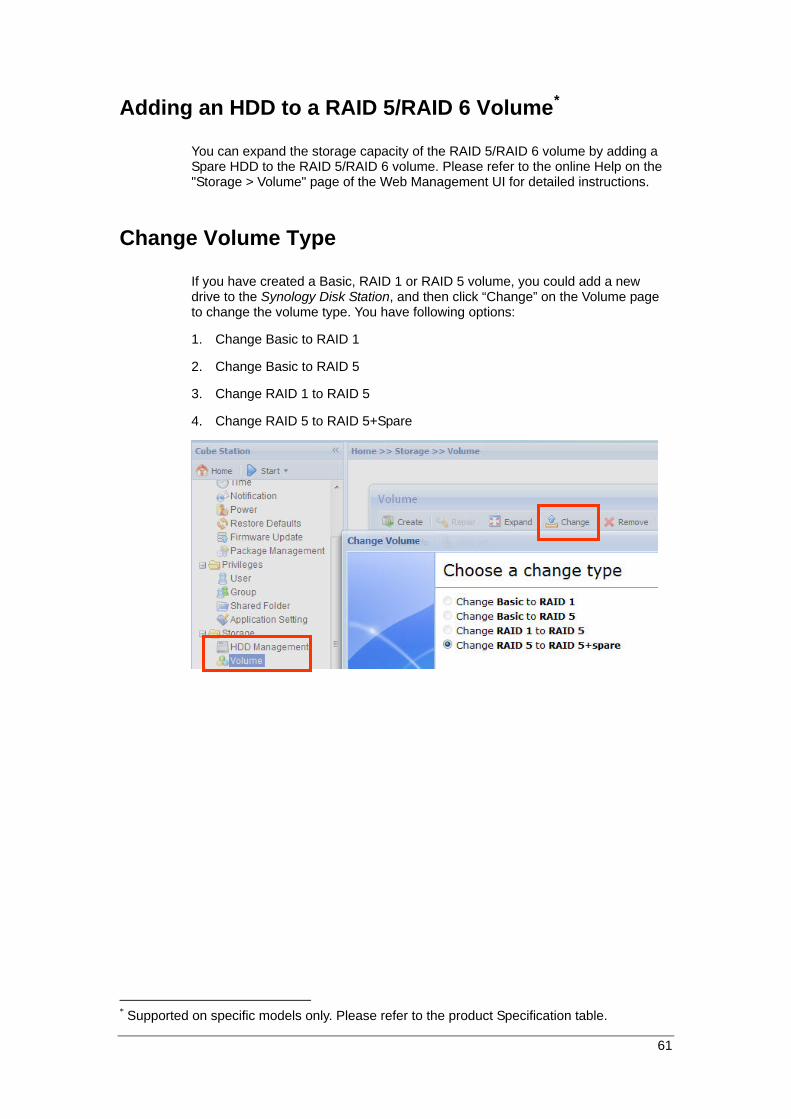
Adding an HDD to a RAID 5/RAID 6 Volume*
You can expand the storage capacity of the RAID 5/RAID 6 volume by adding a Spare HDD to the RAID 5/RAID 6 volume. Please refer to the online Help on the "Storage > Volume" page of the Web Management UI for detailed instructions.
Change Volume Type
If you have created a Basic, RAID 1 or RAID 5 volume, you could add a new drive to the Synology Disk Station, and then click “Change” on the Volume page to change the volume type. You have following options:
1. Change Basic to RAID 1
2. Change Basic to RAID 5
3. Change RAID 1 to RAID 5
4. Change RAID 5 to RAID 5+Spare
* Supported on specific models only. Please refer to the product Specification table.
61

Troubleshooting
For any questions about managing your Synology Disk Station, please refer to the “Help” button at every page of the Web Management UI. For any questions other than that, please visit Synology Inc. website (www.synology.com) for further assistance.
62

63
Appendix
Recommended Peripherals
For recommended peripheral models, including hard drive, USB printer, DMA, and UPS, please visit www.synology.com.
Recommended NTP Server
The main purpose of Network Time Protocol (NTP) is for synchronizing clocks of computer system over data network. We have provided a few recommended NTP servers. For more information about NTP Server, please visit http://www.eecis.udel.edu/~mills/ntp/servers.html
e
Below are few recommended NTP servers:
1. time.apple.com
2. time.asia.apple.com
3. time.euro.apple.com
4. time.nist.gov
5. time.windows.com
For more information, please refer to: http://ntp.isc.org/bin/view/Servers/WebHom


![Hard Disk Sentinel - Acronis · 2/27/2020 · Physical Disk Information - Disk: #0: Corsair Force GS Hard Disk Summary Hard Disk Number : 0 Interface : Intel RAID #0/0 [11/0 (0)]](https://img.pdfslide.net/doc/110x75/5fd4e819b229fa4ab0119a4e/hard-disk-sentinel-acronis-2272020-physical-disk-information-disk-0.jpg)