Embed Size (px)
Citation preview

8/6/2019 Drawing Objects Lt
http://slidepdf.com/reader/full/drawing-objects-lt 1/14
Tutorial 3: Drawing Objectsin AutoCAD LT 2011
Audience: Users new to AutoCAD LT
Prerequisites : NoneTime to complete: 15 minutes
In This TutorialPlease complete the lessons in this tutorial in order. The earlier lessons includeinformation that is needed in the later lessons. In this tutorial, you learn howto do the following:
NOTE For more information on the topics covered in this tutorial, see the AutoCADLT User ’ s Guide .
■ Specify drafting settings
■ Draw a circle
■ Draw a polygon inscribed in a circle
■ Apply a hatch pattern to a closed boundary
■ Draw an arc
■ Draw a polyline
1

8/6/2019 Drawing Objects Lt
http://slidepdf.com/reader/full/drawing-objects-lt 2/14
Tutorial FilesDownload the tutorial files as follows:
1 Download the drawing_objects_lt.zip file fromhttp://www.autodesk.com/autocadlt-tutorials .
2 Unzip drawing_objects_lt.zip to C:\My Documents\Tutorials .
Lesson 1: Specify Drafting Settings1 To open AutoCAD LT, click Start menu (Windows) ➤ (All) Programs ➤
Autodesk ➤ AutoCAD LT 2011 ➤ AutoCAD LT 2011- English. TheAutoCAD LT window opens with an empty drawing file named
Drawing1.dwg .2 Check the status bar to make sure you are in the 2D Drafting &
Annotation workspace.
3 To complete subsequent lessons in this tutorial, you must specify somedrafting settings. Right-click the Object Snap icon in the status bar at thebottom of the window, and select Settings.
4 The Drafting Settings dialog box is displayed. In the Object Snap tab,make sure the Object Snap On option is selected. Also, select Endpoint,Midpoint, and Center for the Object Snap modes. Make sure the otheroptions are not selected. Select OK.
2 | Tutorial 3: Drawing Objects in AutoCAD LT 2011

8/6/2019 Drawing Objects Lt
http://slidepdf.com/reader/full/drawing-objects-lt 3/14
Lesson 2: Draw a CircleIn this lesson, you learn how to draw a circle by specifying the center pointand radius.
To draw a circle
1 With Drawing1.dwg open, on the ribbon, click Home tab ➤ Draw panel
➤ Circle drop-down menu ➤ Center, Radius.
2 Drag the crosshairs cursor down to the drawing area.
3 Click the left mouse button to specify the center of the circle.
4 The dynamic input prompt asks you to “ Specify radius of circle. ” Enter3.25 from the keyboard and press the Enter key to create a circle with aradius of 3.25.
Lesson 2: Draw a Circle |3

8/6/2019 Drawing Objects Lt
http://slidepdf.com/reader/full/drawing-objects-lt 4/14
5 Click ➤ Save and save drawing as circle.dwg to your desktop. Youwill use this file in Lesson 3.
Lesson 3: Draw a PolygonA polygon is an equilateral closed polyline with between 3 and 1024 sides.Creating polygons is a simple way to draw equilateral triangles, squares,
pentagons, and hexagons.In this lesson, you learn how to create a polygon inscribed in a circle.
To draw a polygon
1 On the ribbon, click Home tab ➤ Draw panel ➤ ➤ Polygon.
2 Drag the cursor down to the drawing area. In the dynamic prompt, usethe keyboard to enter 6 to specify the number of sides of the polygon.Press Enter.
4 | Tutorial 3: Drawing Objects in AutoCAD LT 2011

8/6/2019 Drawing Objects Lt
http://slidepdf.com/reader/full/drawing-objects-lt 5/14
3 The dynamic prompt changes to “ Specify center of polygon. ” Move thecursor inside the circle to find its center point. Click when you see thegreen circle and the dynamic cursor “ center, ” which indicates the centerof the circle.
NOTE If the colored circle does not appear, make sure the drafting settingsare set as described in Lesson 1.
4 The dynamic prompt changes to “ Enter an option ” and you have a choiceof two options. Click the Inscribed in circle option.
Lesson 3: Draw a Polygon |5
8/6/2019 Drawing Objects Lt
http://slidepdf.com/reader/full/drawing-objects-lt 6/14
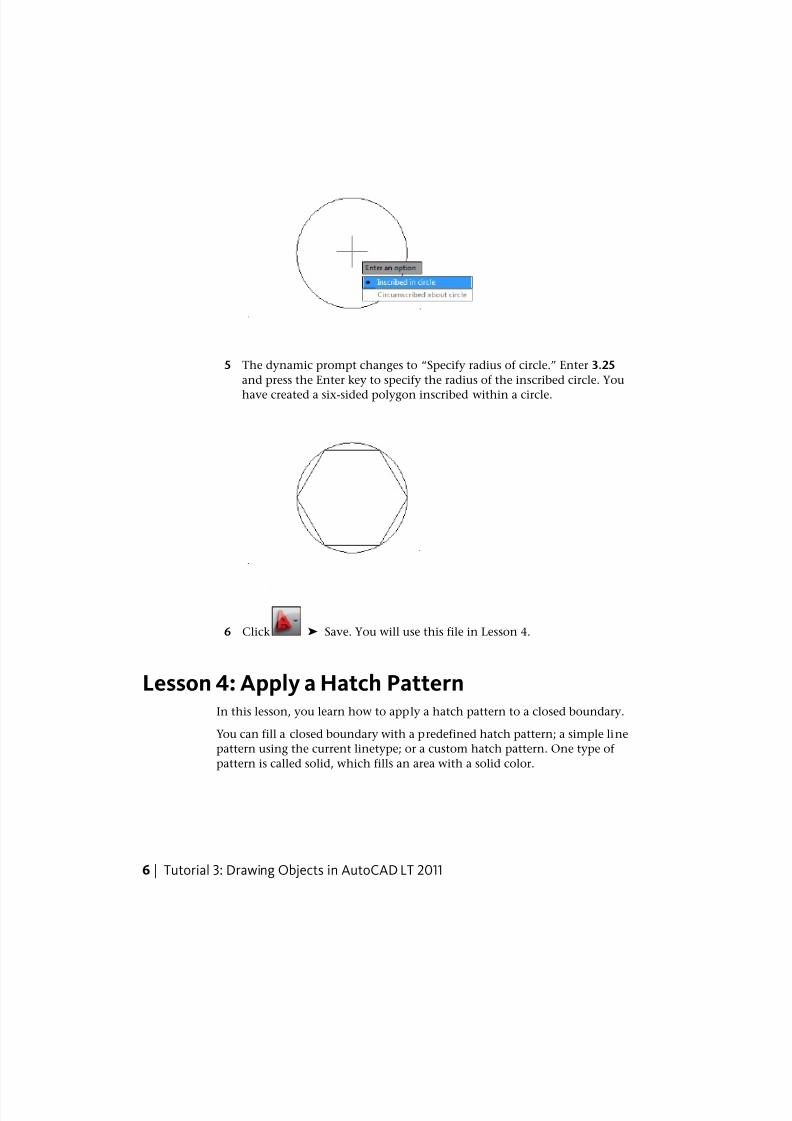
5 The dynamic prompt changes to “ Specify radius of circle. ” Enter 3.25and press the Enter key to specify the radius of the inscribed circle. Youhave created a six-sided polygon inscribed within a circle.
6 Click ➤ Save. You will use this file in Lesson 4.
Lesson 4: Apply a Hatch PatternIn this lesson, you learn how to apply a hatch pattern to a closed boundary.
You can fill a closed boundary with a predefined hatch pattern; a simple linepattern using the current linetype; or a custom hatch pattern. One type of pattern is called solid, which fills an area with a solid color.
6 | Tutorial 3: Drawing Objects in AutoCAD LT 2011
8/6/2019 Drawing Objects Lt
http://slidepdf.com/reader/full/drawing-objects-lt 7/14
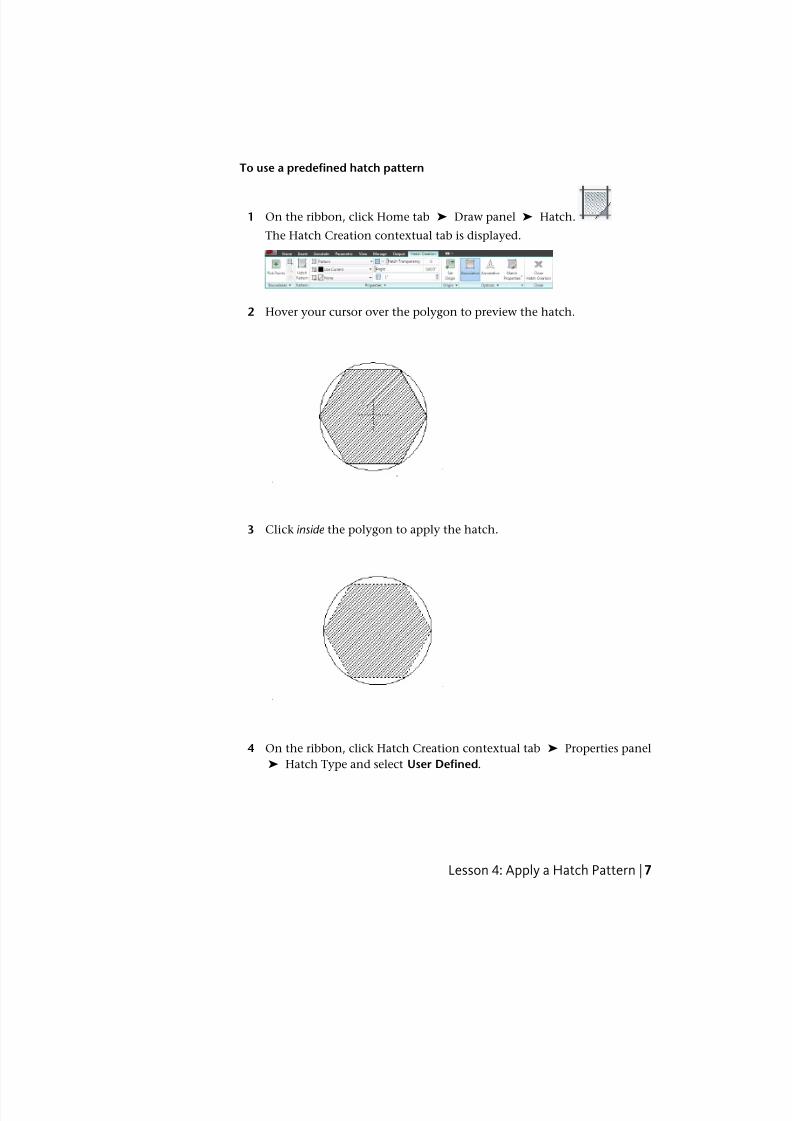
To use a predefined hatch pattern
1 On the ribbon, click Home tab ➤ Draw panel ➤ Hatch.
The Hatch Creation contextual tab is displayed.
2 Hover your cursor over the polygon to preview the hatch.
3 Click inside the polygon to apply the hatch.
4 On the ribbon, click Hatch Creation contextual tab ➤ Properties panel ➤ Hatch Type and select User Defined .
Lesson 4: Apply a Hatch Pattern | 7

8/6/2019 Drawing Objects Lt
http://slidepdf.com/reader/full/drawing-objects-lt 8/14
5 On the ribbon, click Hatch Creation contextual tab ➤ Pattern panel ➤ Hatch Pattern and select Steel .
6 Press Enter. The selected hatch pattern is applied to the polygon.
7 Click ➤ Save, and then close the drawing.
Lesson 5: Draw an ArcIn this lesson, you learn how to create a curved object called an arc .
To draw an arc
1 Click ➤ Open.
8 | Tutorial 3: Drawing Objects in AutoCAD LT 2011
8/6/2019 Drawing Objects Lt
http://slidepdf.com/reader/full/drawing-objects-lt 9/14
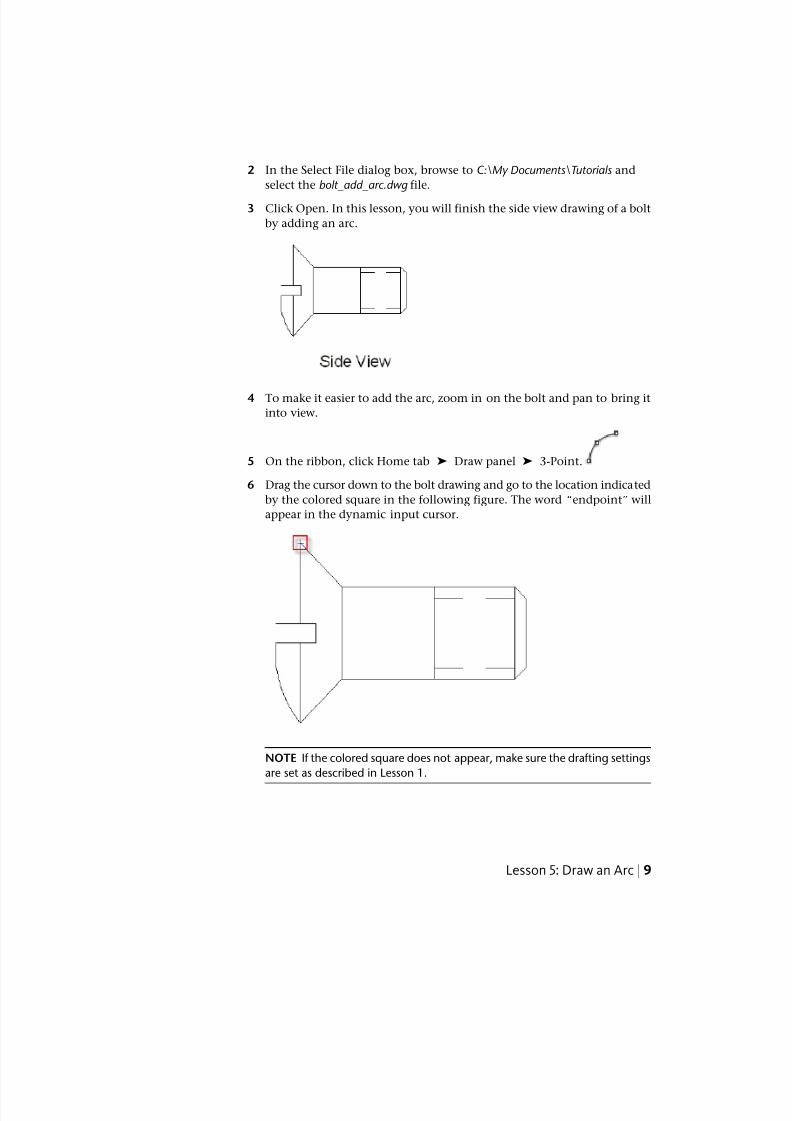
2 In the Select File dialog box, browse to C:\My Documents\Tutorials andselect the bolt_add_arc.dwg file.
3 Click Open. In this lesson, you will finish the side view drawing of a boltby adding an arc.
4 To make it easier to add the arc, zoom in on the bolt and pan to bring itinto view.
5 On the ribbon, click Home tab ➤ Draw panel ➤ 3-Point.
6 Drag the cursor down to the bolt drawing and go to the location indicatedby the colored square in the following figure. The word “ endpoint ” willappear in the dynamic input cursor.
NOTE If the colored square does not appear, make sure the drafting settingsare set as described in Lesson 1.
Lesson 5: Draw an Arc |9

8/6/2019 Drawing Objects Lt
http://slidepdf.com/reader/full/drawing-objects-lt 10/14
7 Click near the center of the colored square. This is the first point of thearc. The square is a visual cue that helps you “ snap ” to the exact endpointof the existing line. This feature allows you to create precise drawings.
8 Move the cursor away from the first point. Next, you will enter thelocation for the second point, as well as the arc angle. Both of these areentered using the dynamic input prompt.
9 First, use your keyboard to enter 0.2000 for the second point of the arc.Notice that this value appears in the dynamic input box. Do not pressEnter. Instead, press the Tab key on your keyboard.
10 The tab key takes you to the dynamic input prompt for the arc angle.Enter 120 . Press Enter to complete the second point of the arc.
11 Move the cursor down to the location shown in the following figure.When the colored square appears and “ endpoint ” appears in the dynamicinput cursor, click in the center of the square to complete the arc.
10 | Tutorial 3: Drawing Objects in AutoCAD LT 2011
8/6/2019 Drawing Objects Lt
http://slidepdf.com/reader/full/drawing-objects-lt 11/14
12 Click ➤ Save, and then close the drawing.
Lesson 6: Draw a PolylineIn this lesson, you learn how to create an object called a polyline . A polylineis a sequence of segments created as a single object. Polylines can containboth straight and curved segments. In this lesson, you learn how to draw apolyline with straight segments.
To draw a polyline
1 Click ➤ Open.
2 In the Select File dialog box, browse to C:\My Documents\Tutorials andselect the bolt_add_polyline.dwg file.
3 In this lesson, you will finish the side view drawing of a bolt by addingpolylines.
Lesson 6: Draw a Polyline |11

8/6/2019 Drawing Objects Lt
http://slidepdf.com/reader/full/drawing-objects-lt 12/14
4 On the ribbon, click Home tab ➤ Draw panel ➤ Polyline.
5 Drag the cursor down to the bolt drawing and go to the location indicatedby the colored square in the following figure:
NOTE If the colored square does not appear, make sure the drafting settingsare set as described in Lesson 1.
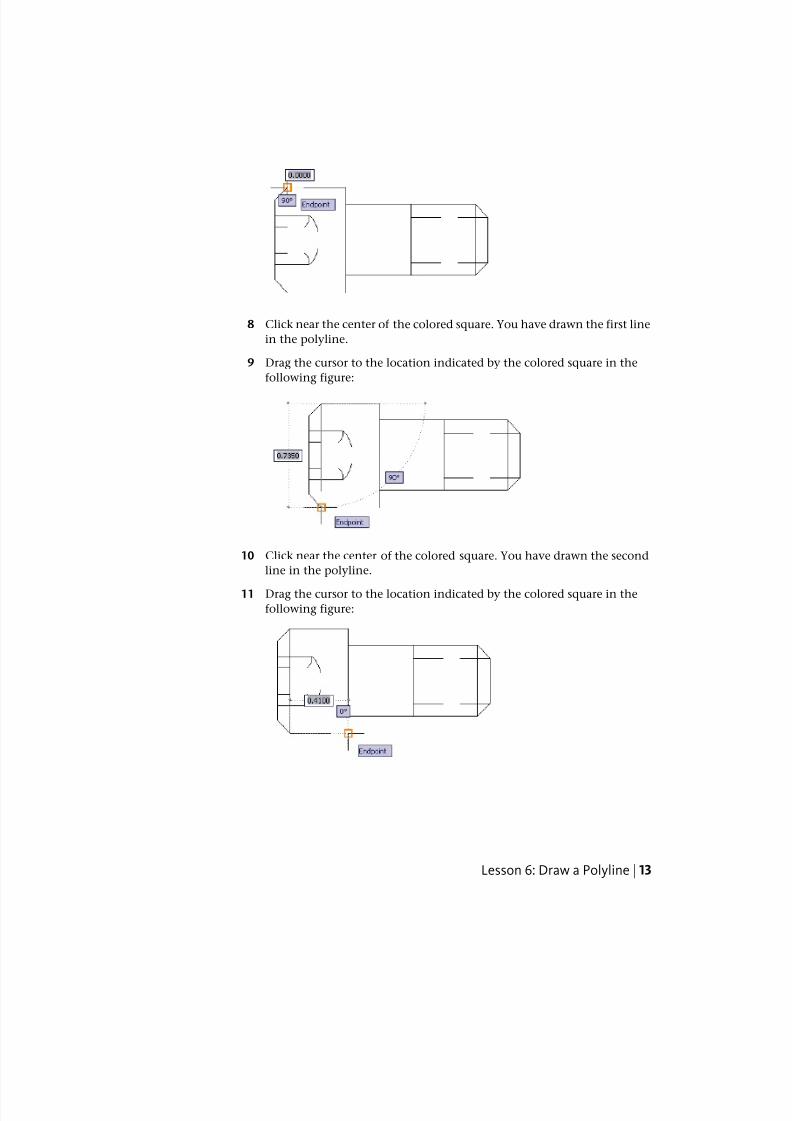
6 Click near the center of the colored square. This is the first point of thepolyline.
7 Drag the cursor to the location indicated by the colored square in thefollowing figure:
12 | Tutorial 3: Drawing Objects in AutoCAD LT 2011
8/6/2019 Drawing Objects Lt
http://slidepdf.com/reader/full/drawing-objects-lt 13/14
8 Click near the center of the colored square. You have drawn the first linein the polyline.
9 Drag the cursor to the location indicated by the colored square in thefollowing figure:
10 Click near the center of the colored square. You have drawn the secondline in the polyline.
11 Drag the cursor to the location indicated by the colored square in thefollowing figure:
Lesson 6: Draw a Polyline |13
8/6/2019 Drawing Objects Lt
http://slidepdf.com/reader/full/drawing-objects-lt 14/14
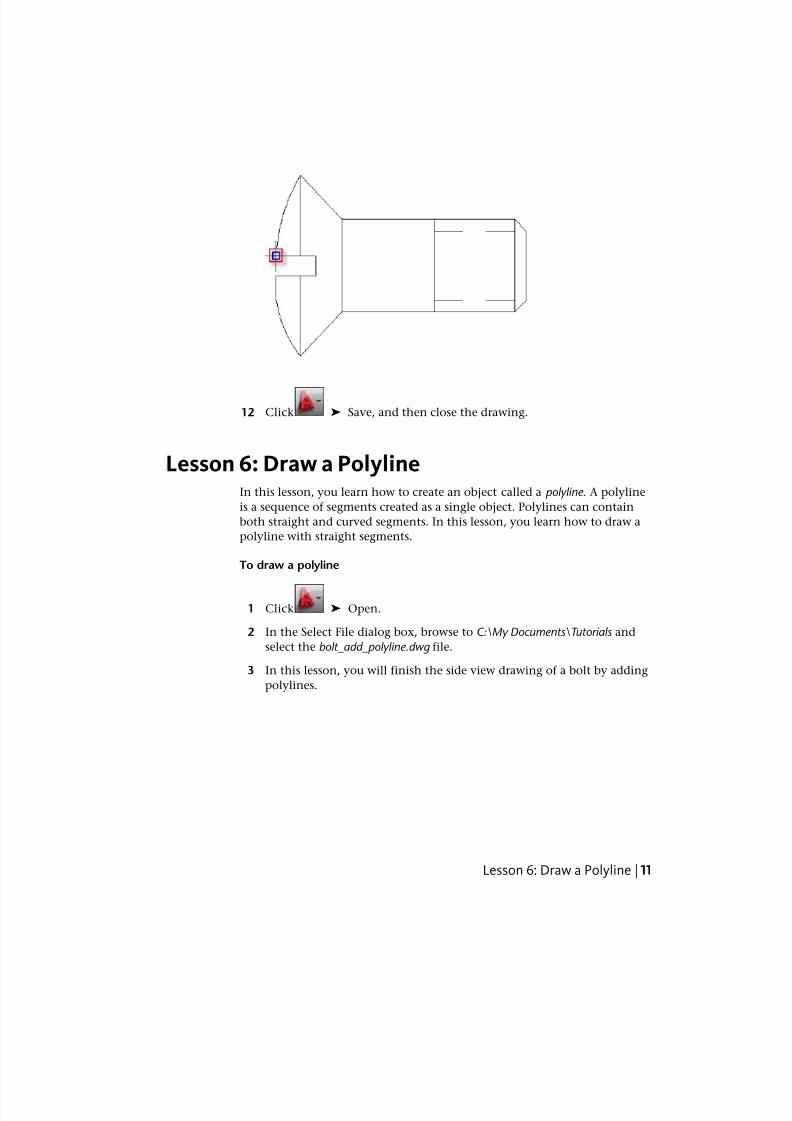
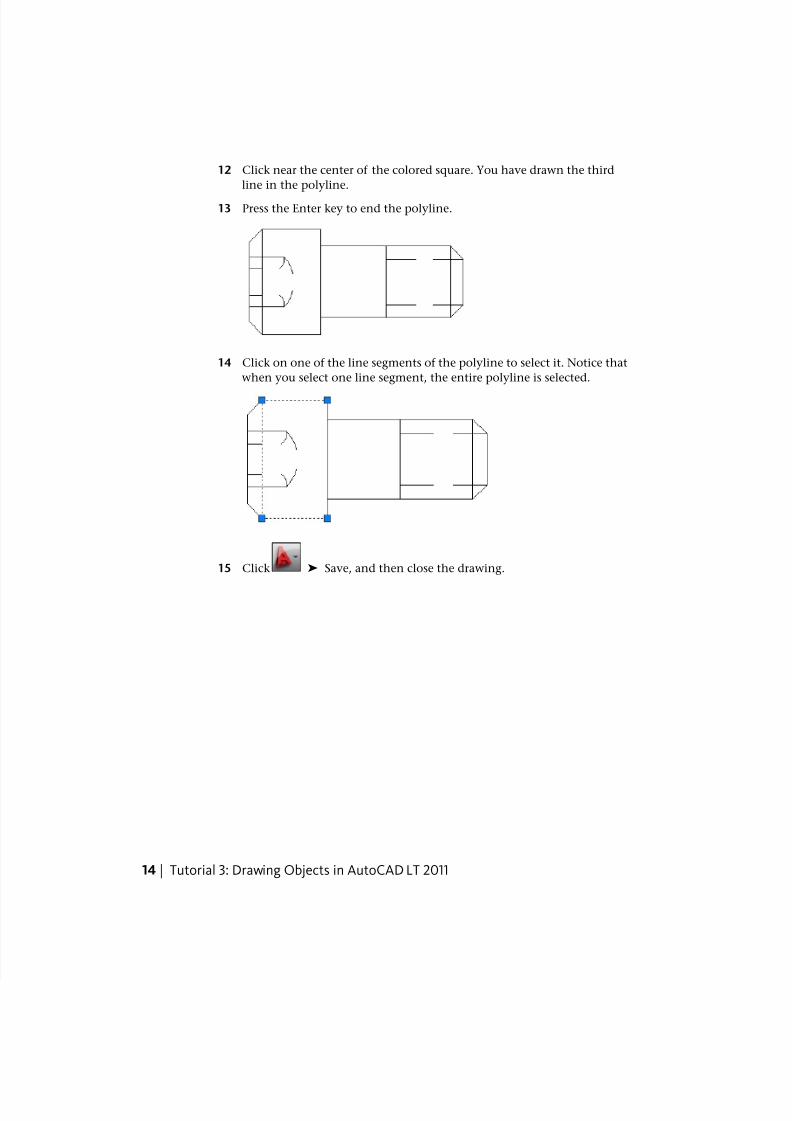
12 Click near the center of the colored square. You have drawn the thirdline in the polyline.
13 Press the Enter key to end the polyline.
14 Click on one of the line segments of the polyline to select it. Notice thatwhen you select one line segment, the entire polyline is selected.
15 Click ➤ Save, and then close the drawing.
14 | Tutorial 3: Drawing Objects in AutoCAD LT 2011


![DIMENSIONAL DRAWING: 5501L/LT€¦ · 25.5 [1.00] 1209.6 [47.62] display active area 680.4 [26.8] display active area 38.9 [1.53] dimensional drawing: 5501l/lt rev: c date: 10/01/2015dimensions](https://img.pdfslide.net/doc/110x75/5f06bdce7e708231d41980b6/dimensional-drawing-5501llt-255-100-12096-4762-display-active-area-6804.jpg)