Embed Size (px)
Citation preview
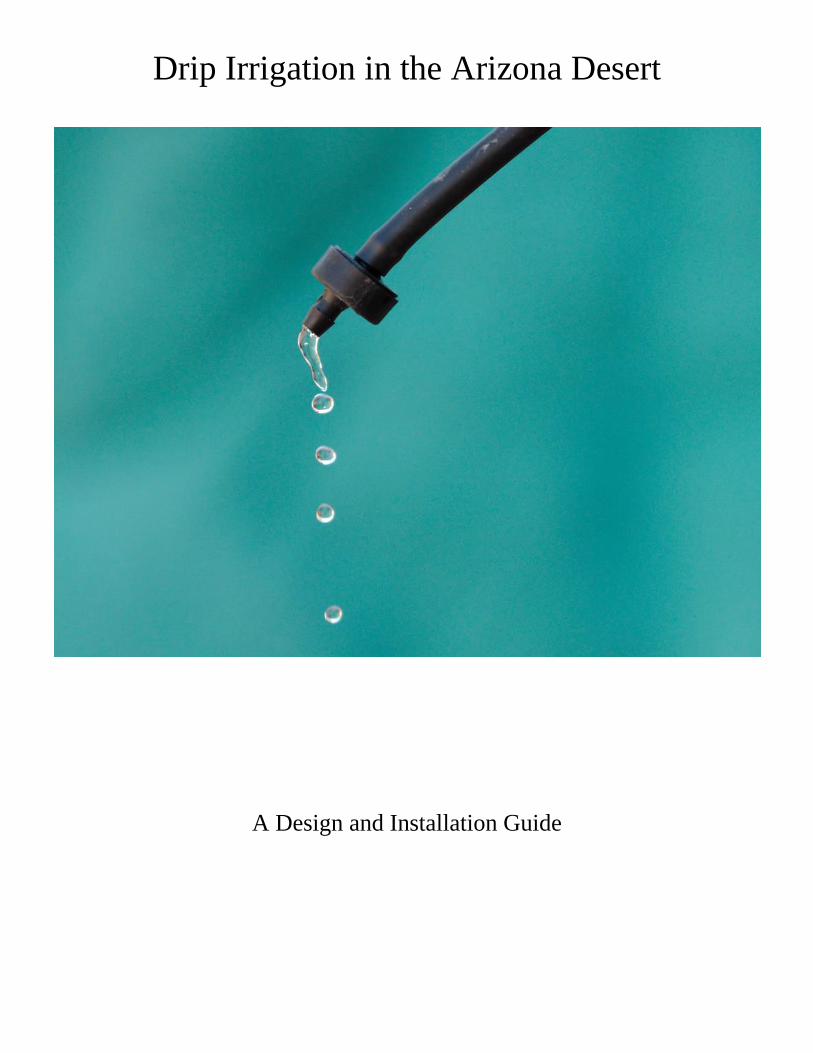
Drip Irrigation in the Arizona Desert
A Design and Installation Guide
1
What is drip irrigation?
Drip irrigation is designed to deliver the water at a very low rate and at a very low pressure into the soil
where the roots are.
Why use drip irrigation?
Drip irrigation has the potential to save water over previously used irrigation techniques. With a proper
design and the right components used it is very efficient in how it delivers the water to each individual location.
There is less water lost to evaporation because the water is not being sprayed through the air like sprinklers.
In some cases improved plant health has been observed as drip irrigation wets the soil and not the plant
itself. This prevents the minerals in the water from building up on the leaves, salt in particular.
When polyethylene tubing is used, the system is easier to install and easier to modify as the landscape
water needs change.
There are some things to take into consideration when using drip irrigation. Because it is operating at a
low pressure, leaks are not as obvious as sprinkler systems and they must be inspected regularly to locate them.
Additionally drip emitters can clog or become what are called “blown” where they are putting out much more
water than they should. The polyethylene tubing can also become damaged by digging. PVC pipe is a more
robust material and will be more durable but it is more difficult for the average person to make modifications to
as the landscape changes such as adding in new emitters. A properly designed, installed, and maintained
polyethylene tubing system will last decades.
2
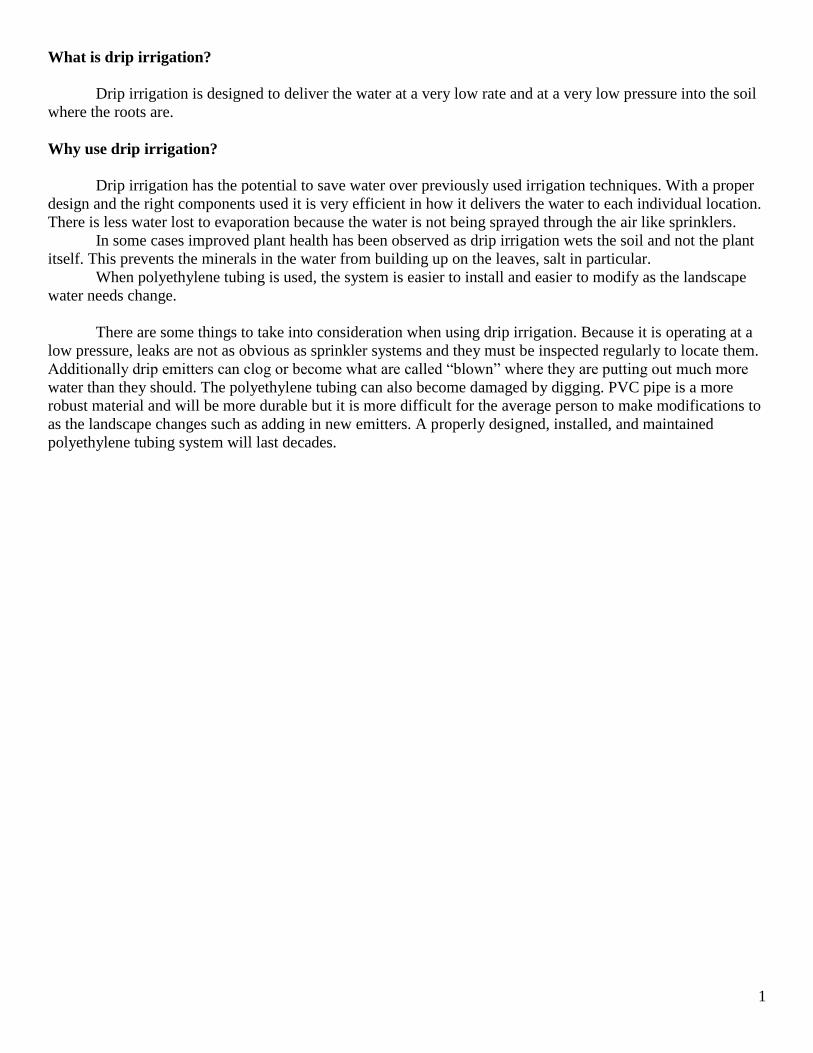
Drip Irrigation Components
3
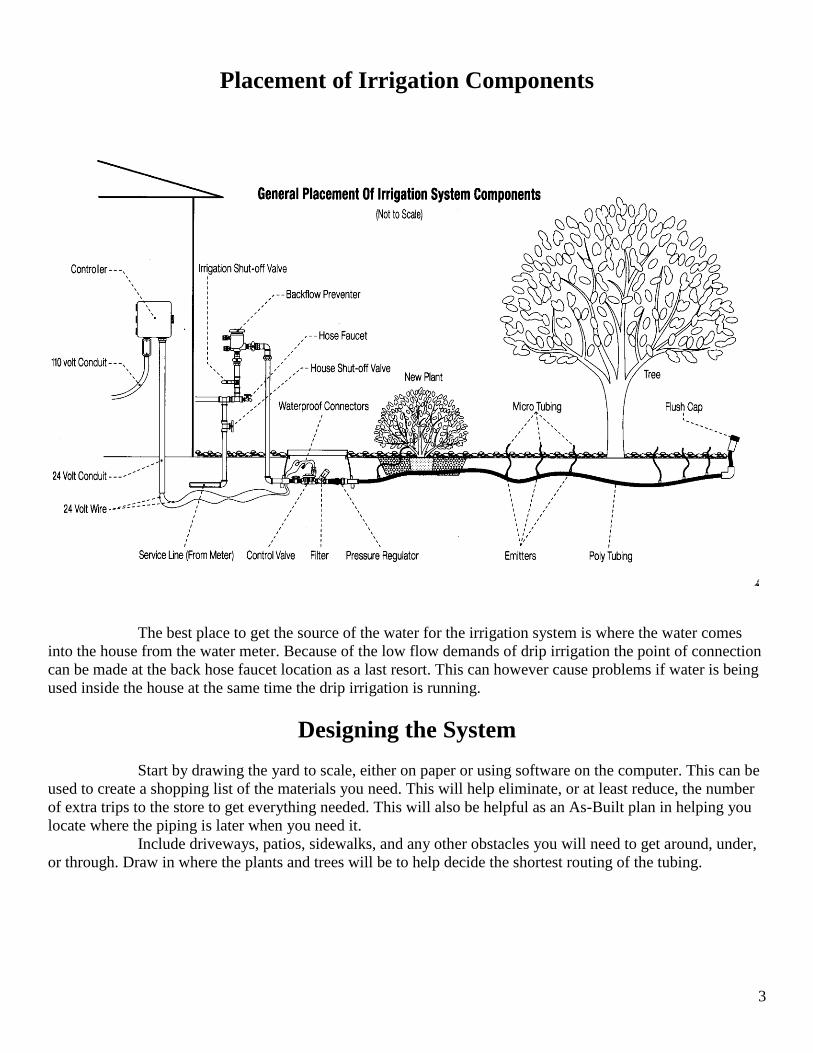
Placement of Irrigation Components
The best place to get the source of the water for the irrigation system is where the water comes
into the house from the water meter. Because of the low flow demands of drip irrigation the point of connection
can be made at the back hose faucet location as a last resort. This can however cause problems if water is being
used inside the house at the same time the drip irrigation is running.
Designing the System
Start by drawing the yard to scale, either on paper or using software on the computer. This can be
used to create a shopping list of the materials you need. This will help eliminate, or at least reduce, the number
of extra trips to the store to get everything needed. This will also be helpful as an As-Built plan in helping you
locate where the piping is later when you need it.
Include driveways, patios, sidewalks, and any other obstacles you will need to get around, under,
or through. Draw in where the plants and trees will be to help decide the shortest routing of the tubing.
4
Zoning
Separate the plant materials into groups with similar watering needs. This is often referred to as
hydro-zoning. This will allow you to water the plant groups appropriately and efficiently. The decision to
separate different plants will be based on how deep the system needs to water; this is driven by how long the
system runs, and how often it needs to water.
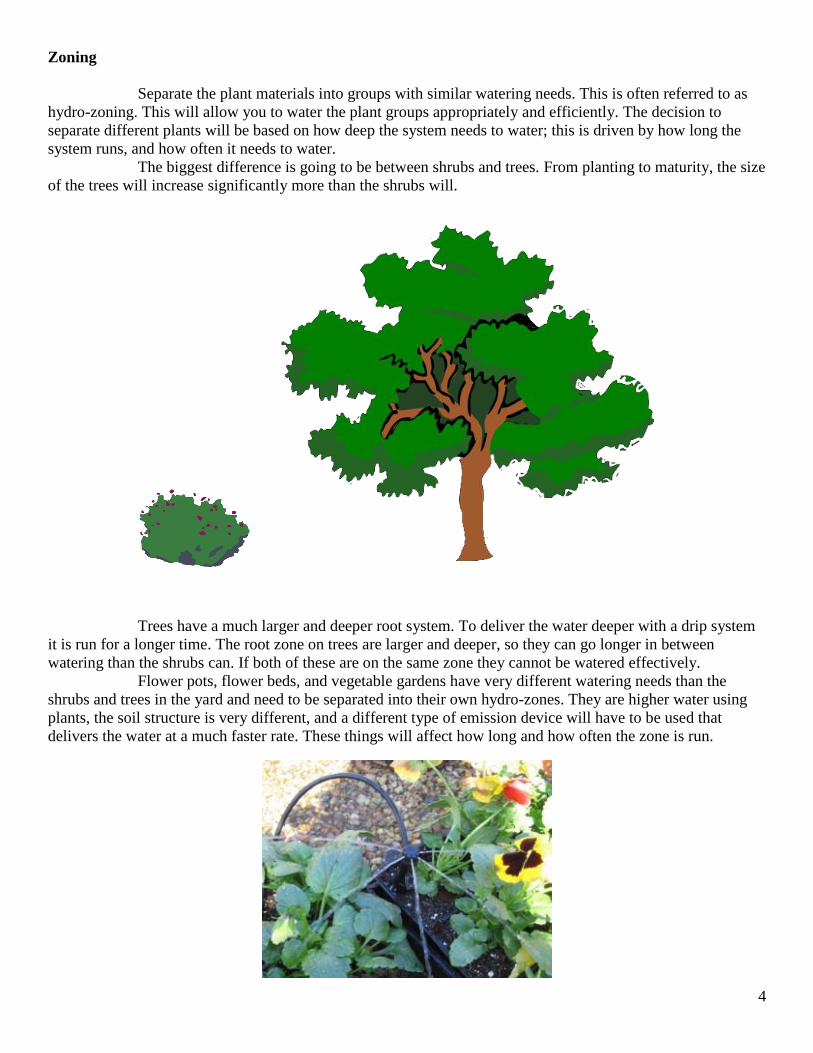
The biggest difference is going to be between shrubs and trees. From planting to maturity, the size
of the trees will increase significantly more than the shrubs will.
Trees have a much larger and deeper root system. To deliver the water deeper with a drip system
it is run for a longer time. The root zone on trees are larger and deeper, so they can go longer in between
watering than the shrubs can. If both of these are on the same zone they cannot be watered effectively.
Flower pots, flower beds, and vegetable gardens have very different watering needs than the
shrubs and trees in the yard and need to be separated into their own hydro-zones. They are higher water using
plants, the soil structure is very different, and a different type of emission device will have to be used that
delivers the water at a much faster rate. These things will affect how long and how often the zone is run.
5
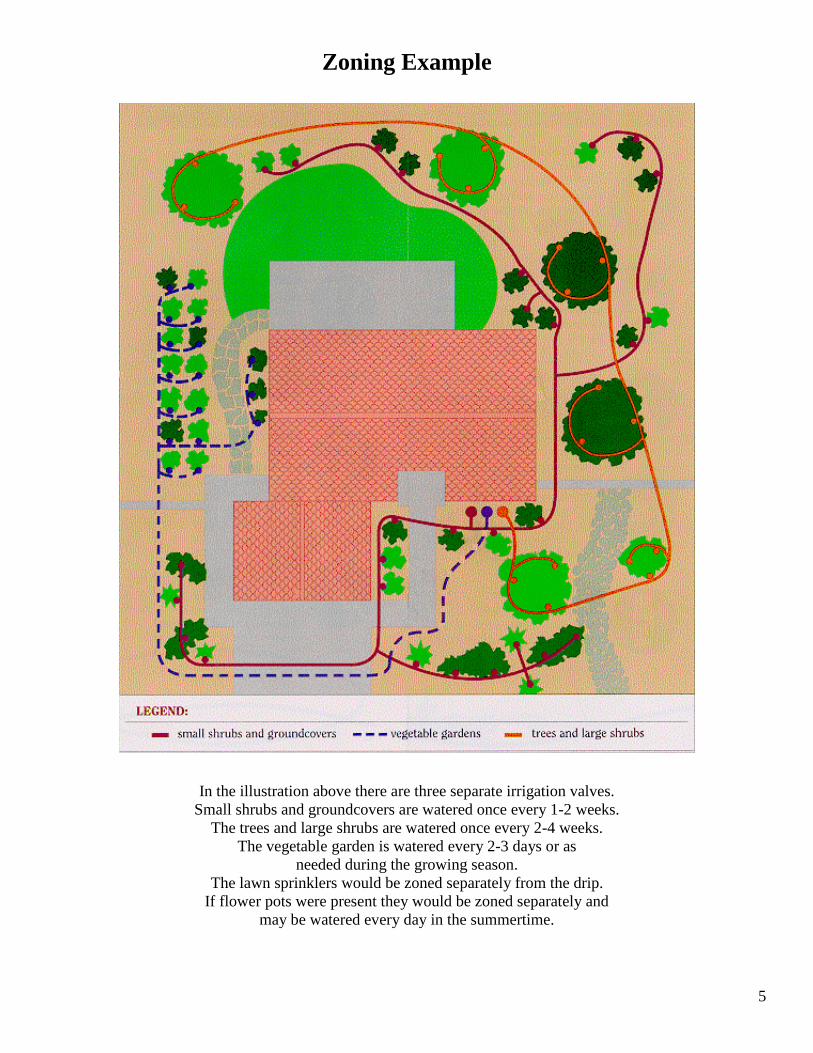
Zoning Example
In the illustration above there are three separate irrigation valves.
Small shrubs and groundcovers are watered once every 1-2 weeks.
The trees and large shrubs are watered once every 2-4 weeks.
The vegetable garden is watered every 2-3 days or as
needed during the growing season.
The lawn sprinklers would be zoned separately from the drip.
If flower pots were present they would be zoned separately and
may be watered every day in the summertime.
6
Hydraulics
Irrigation systems are moving water through piping. The movement of the water in the pipe creates a
loss in pressure. A good irrigation design will make sure you are not trying to move too much water through the
piping and not going too long of a distance so the pressure loss will be at an acceptable amount. This is
especially important because the system is working at a lower pressure to begin with.
Don’t exceed 200’ of poly tubing per leg of the system
Don’t exceed 200 gallons per hour (GPH) per leg of the system
Don’t exceed 6 feet of ¼” micro tubing after the emitter
These are guidelines and there are instances where the tubing can be run a longer distance. If you need
to do this, first consider changing the location of the valves to be in a more central location of the zone or have
someone calculate the pressure loss to make sure it will work. Design the system for the amount of emitters that
the plants and trees will need at maturity. As they grow, more emitters will be needed to adequately water the
larger root zones. The emitters will also need to be moved away from the original location as the plant material
grows.
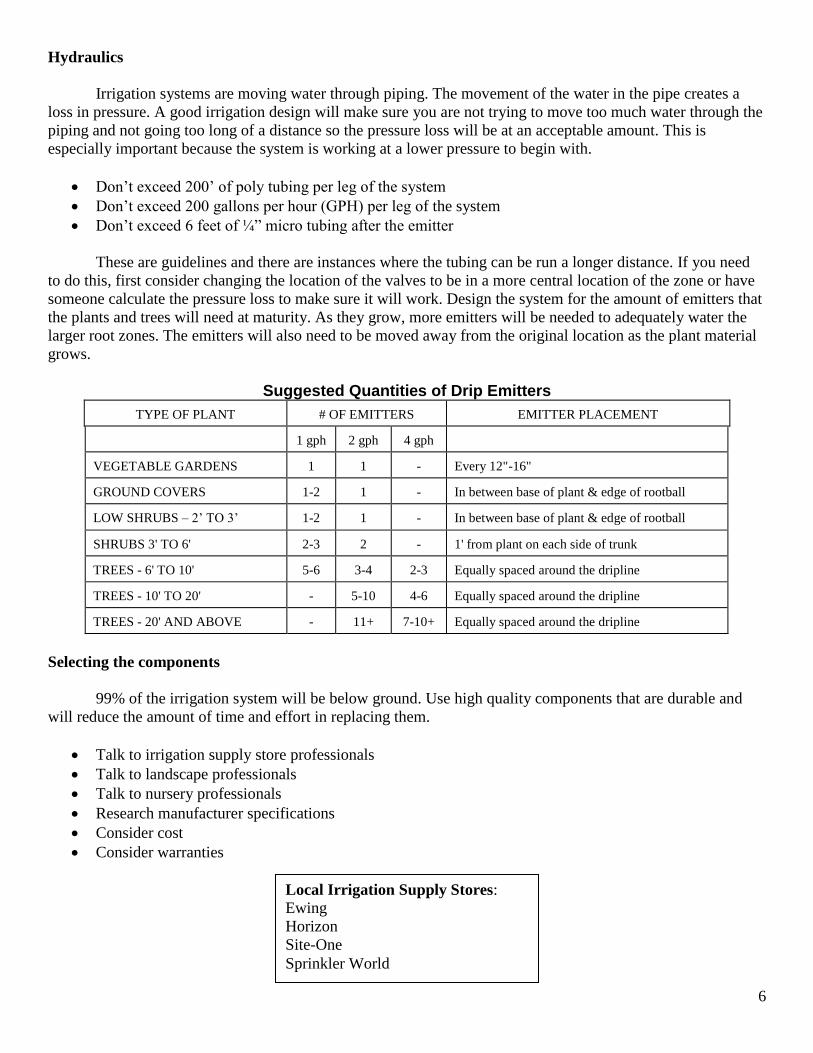
Suggested Quantities of Drip Emitters
TYPE OF PLANT # OF EMITTERS EMITTER PLACEMENT
1 gph 2 gph 4 gph
VEGETABLE GARDENS 1 1 - Every 12"-16"
GROUND COVERS 1-2 1 - In between base of plant & edge of rootball
LOW SHRUBS – 2’ TO 3’ 1-2 1 - In between base of plant & edge of rootball
SHRUBS 3' TO 6' 2-3 2 - 1' from plant on each side of trunk
TREES - 6' TO 10' 5-6 3-4 2-3 Equally spaced around the dripline
TREES - 10' TO 20' - 5-10 4-6 Equally spaced around the dripline
TREES - 20' AND ABOVE - 11+ 7-10+ Equally spaced around the dripline
Selecting the components
99% of the irrigation system will be below ground. Use high quality components that are durable and
will reduce the amount of time and effort in replacing them.
Talk to irrigation supply store professionals
Talk to landscape professionals
Talk to nursery professionals
Research manufacturer specifications
Consider cost
Consider warranties
Local Irrigation Supply Stores:
Ewing
Horizon
Site-One
Sprinkler World
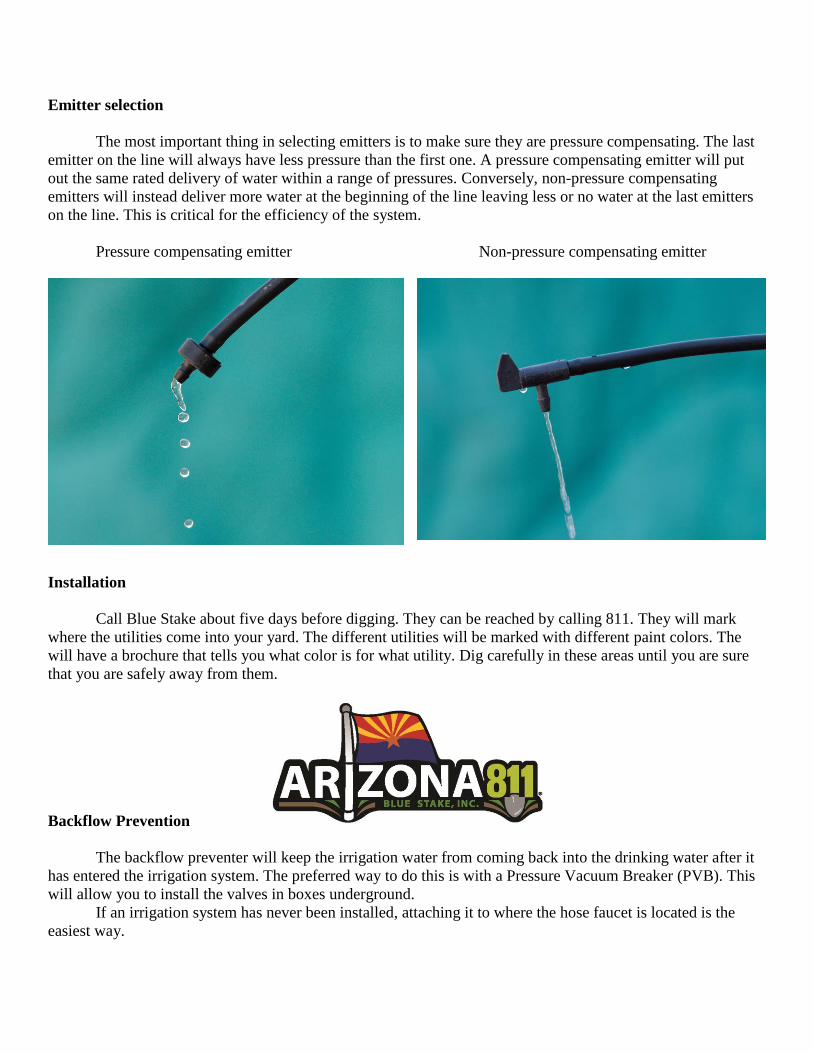
Emitter selection
The most important thing in selecting emitters is to make sure they are pressure compensating. The last
emitter on the line will always have less pressure than the first one. A pressure compensating emitter will put
out the same rated delivery of water within a range of pressures. Conversely, non-pressure compensating
emitters will instead deliver more water at the beginning of the line leaving less or no water at the last emitters
on the line. This is critical for the efficiency of the system.
Pressure compensating emitter Non-pressure compensating emitter
Installation
Call Blue Stake about five days before digging. They can be reached by calling 811. They will mark
where the utilities come into your yard. The different utilities will be marked with different paint colors. The
will have a brochure that tells you what color is for what utility. Dig carefully in these areas until you are sure
that you are safely away from them.
Backflow Prevention
The backflow preventer will keep the irrigation water from coming back into the drinking water after it
has entered the irrigation system. The preferred way to do this is with a Pressure Vacuum Breaker (PVB). This
will allow you to install the valves in boxes underground.
If an irrigation system has never been installed, attaching it to where the hose faucet is located is the
easiest way.

8
BeforeInstallation
AfterInstallation
Hose Bibb
House Shut Off Valve
Service Line From Meter
Irrigation Shut Off Valve
House Shut Off Valve
Backflow Preventer
Union
Hose Bibb
Mainline To Irrigation Valves
Service Line From Meter
DRPGDLN1
Must be above
ground
Must be above any
downstream piping
Valves allowed
downstream
Can be tested
Installed with copper
pipe not PVC
If it is possible cutting into the pipe
and installing the connection in front of the
shut off valve for the house is preferred.
This allows the water to be shut off to the
inside of the house and still have water
available for the irrigation. If the
downstream piping is going to be higher
than the assembly then a reduced
pressure assembly (RPA) needs to be used
instead. Once the piping is back below
ground it can be transitioned to PVC
pipe.
Use schedule 40 PVC for the piping
going from the backflow preventer to the valves.
House shut off valve
9
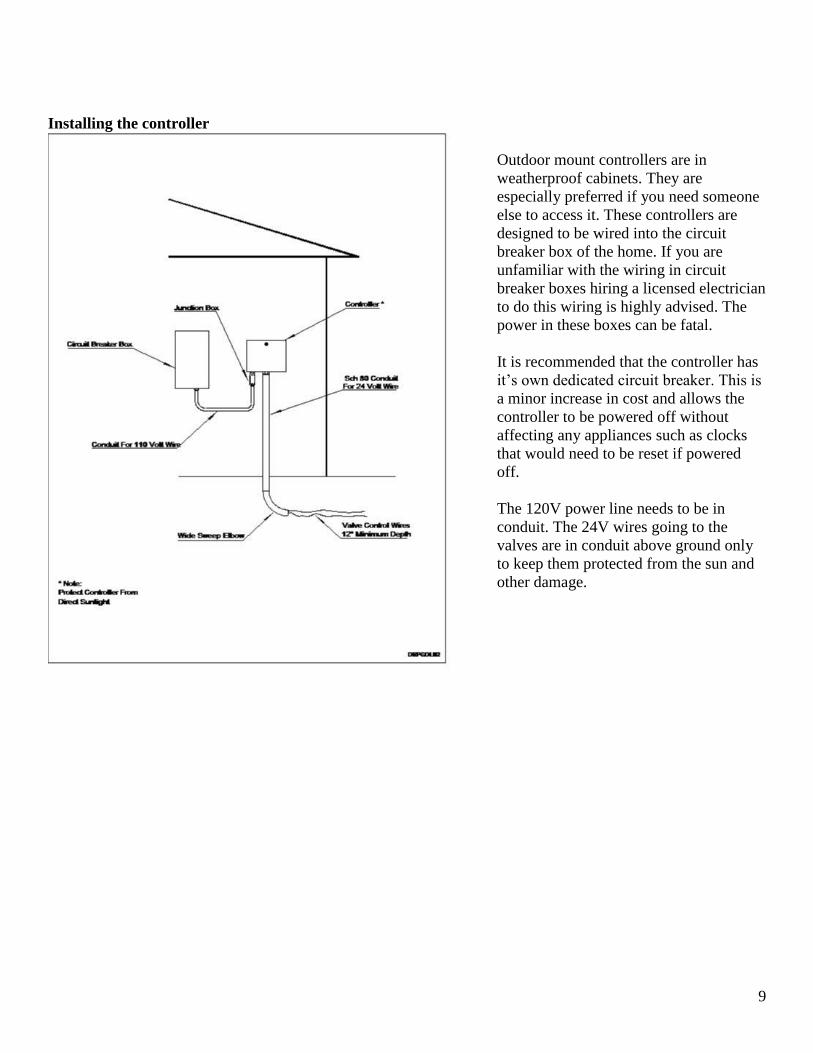
Installing the controller
Outdoor mount controllers are in
weatherproof cabinets. They are
especially preferred if you need someone
else to access it. These controllers are
designed to be wired into the circuit
breaker box of the home. If you are
unfamiliar with the wiring in circuit
breaker boxes hiring a licensed electrician
to do this wiring is highly advised. The
power in these boxes can be fatal.
It is recommended that the controller has
it’s own dedicated circuit breaker. This is
a minor increase in cost and allows the
controller to be powered off without
affecting any appliances such as clocks
that would need to be reset if powered
off.
The 120V power line needs to be in
conduit. The 24V wires going to the
valves are in conduit above ground only
to keep them protected from the sun and
other damage.

10
Sch 40 PVCMainline From
24 Volt ControlWires To Timer
MaleAdapter
Expansion Coils *Waterproof
ConnectorsWye Filter WithBlowout Valve
Sch 40 PVC
PVC Coupling
Poly
Tubing
PolyAdapter
Sch 80 Union(Optional)
PressureRegulator
Control
Valve
* Note:Wrap Wire 6-10 times
Around 3/4" Pipe for
Expansion Coils DRPGDL13
Backflow Preventer
Installing the valves
With the preferred backflow prevention the valves can be installed underground in a valve box to keep
them protected and less visible.
Make sure to use waterproof wire connectors and leave extra wire in the box to allow for future repairs.
It is recommended that the wires back to the controller are installed under the mainline piping to keep them
protected from any digging.
Many manufacturers are now making combination filter and pressure regulator units and this can help
shorten the length of the components in the box.
Installing PVC unions in front of and behind the control assembly will allow the entire assembly to be
removed from the valve box without digging it up for future repairs or replacements.
11
Mainline
PolyLateral
Distribution1/4"Minimum
Minimum
Minimum
12"6-8"
2-4"
drpgdl16
Earth Grade
FinishGrade
Tubing
"J" loop at installation
Same "J" loop at maturity
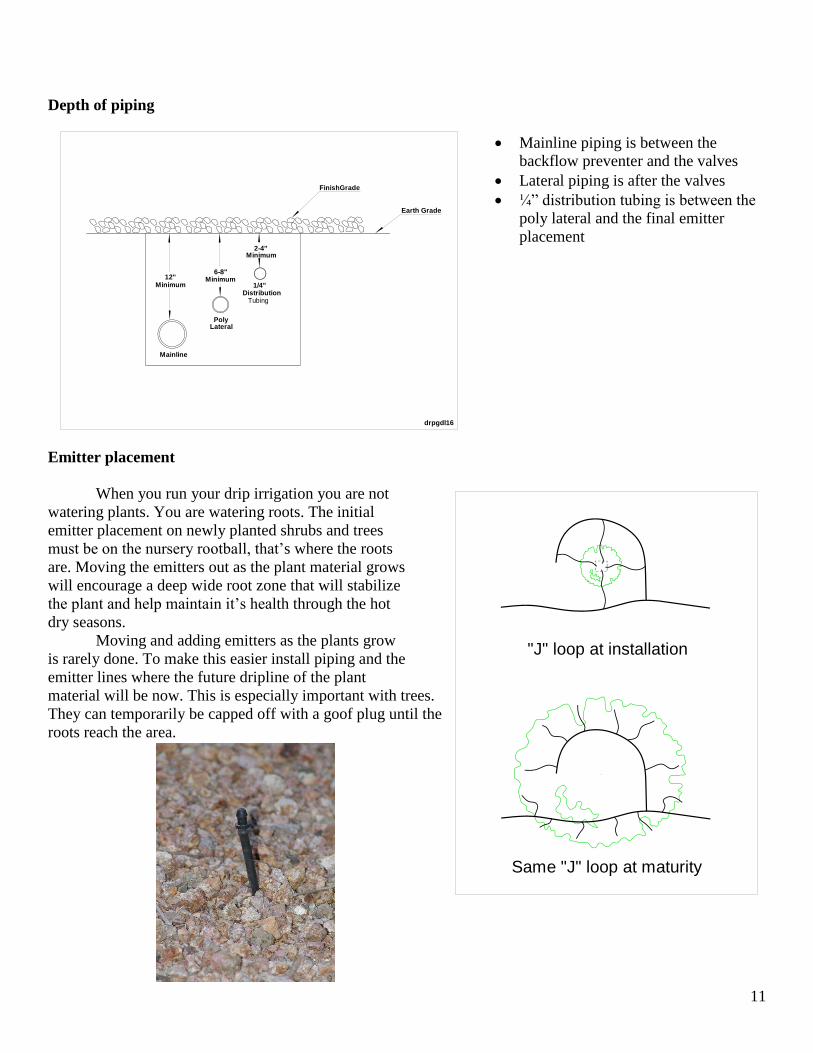
Depth of piping
Mainline piping is between the
backflow preventer and the valves
Lateral piping is after the valves
¼” distribution tubing is between the
poly lateral and the final emitter
placement
Emitter placement
When you run your drip irrigation you are not
watering plants. You are watering roots. The initial
emitter placement on newly planted shrubs and trees
must be on the nursery rootball, that’s where the roots
are. Moving the emitters out as the plant material grows
will encourage a deep wide root zone that will stabilize
the plant and help maintain it’s health through the hot
dry seasons.
Moving and adding emitters as the plants grow
is rarely done. To make this easier install piping and the
emitter lines where the future dripline of the plant
material will be now. This is especially important with trees.
They can temporarily be capped off with a goof plug until the
roots reach the area.
12
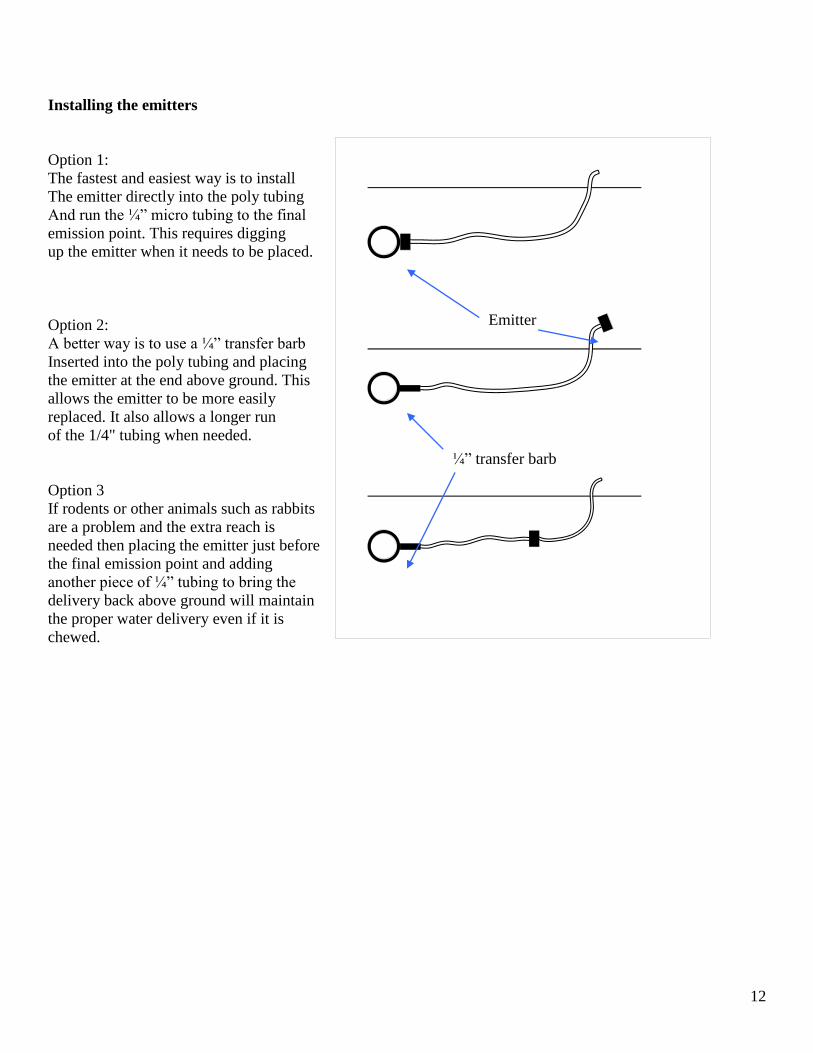
Installing the emitters
Option 1:
The fastest and easiest way is to install
The emitter directly into the poly tubing
And run the ¼” micro tubing to the final
emission point. This requires digging
up the emitter when it needs to be placed.
Option 2:
A better way is to use a ¼” transfer barb
Inserted into the poly tubing and placing
the emitter at the end above ground. This
allows the emitter to be more easily
replaced. It also allows a longer run
of the 1/4" tubing when needed.
Option 3
If rodents or other animals such as rabbits
are a problem and the extra reach is
needed then placing the emitter just before
the final emission point and adding
another piece of ¼” tubing to bring the
delivery back above ground will maintain
the proper water delivery even if it is
chewed.
Emitter
¼” transfer barb
13
End/flush caps
You will need to access the ends of the lines for flushing as part of regular maintenance and if the
polyethylene tubing becomes damaged allowing dirt to enter the system. Opening the ends and turning on the
system will flush most of the dirt out of the system keeping the emitters from becoming clogged.
The most commonly used way to end the poly tubing lines is
to use a figure eight closure fitting. This is simply folding over the
line and kinking it off. It is easily accessible but it does have some
drawbacks.
It is exposed to the sun and will deteriorate fairly quickly
becoming a leak. It is also susceptible to damage from vandalism.
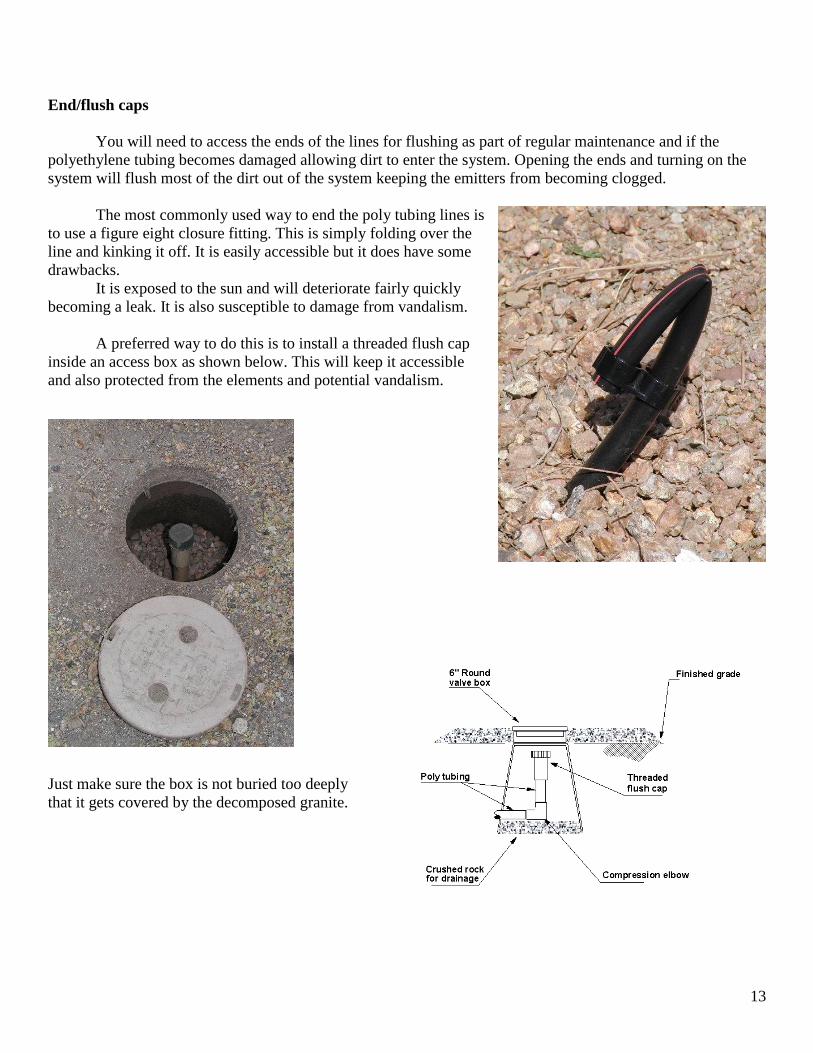
A preferred way to do this is to install a threaded flush cap
inside an access box as shown below. This will keep it accessible
and also protected from the elements and potential vandalism.
Just make sure the box is not buried too deeply
that it gets covered by the decomposed granite.
14
Final installation
The poly tubing will want to come out of the trenches when you lay it in. Hold it in place with soil every
ten feet or so. This will allow you to inspect the system for leaks before the final backfilling. Fill in the trenches
with clean soil, any rocks will puncture the tubing over time. Gently tamp the soil down, be careful not to crush
the tubing. Then soak the trenches with water, this will bring the soil back to compaction.
Make any adjustments to your drawing to reflect any changes that had to be made from the original
design.
You now have an irrigation system that will water your landscape effectively and efficiently.
Resources
The major irrigation manufacturer’s websites:
Rainbird.com
Hunterindustries.com
Irritrolsystems.com
Toro.com
The Irrigation Association:
Irrigation.org
The Arizona Municipal Water user’s Association:
AMWUA.org
The Arizona Landscape Contractors Association:
Azcla.com
Water Use it Wisely Watering Guide:
https://wateruseitwisely.com/100-ways-to-conserve/landscape-watering-guide/
University of Arizona Cooperative Extension Office:
https://extension.arizona.edu/maricopa