Embed Size (px)
Citation preview
8/16/2019 DS 100 SQLDataServiceGuide En
http://slidepdf.com/reader/full/ds-100-sqldataserviceguide-en 1/99
Informatica (Version 10.0.0)
SQL ata Service Guide

8/16/2019 DS 100 SQLDataServiceGuide En
http://slidepdf.com/reader/full/ds-100-sqldataserviceguide-en 2/99
Informatica SQL Data Service Guide
Version 10.0.0November 2015
Copyright (c) 1993-2015 Informatica LLC. All rights reserved.
This software and documentation contain proprietary information of Informatica LLC and are provided under a license agreement containing restrictions on use anddisclosure and are also protected by copyright law. Reverse engineering of the software is prohibited. No part of this document may be reproduced or transmitted in anyform, by any means (electronic, photocopying, recording or otherwise) without prior consent of Informatica LLC. This Software may be protected by U.S. and/orinternational Patents and other Patents Pending.
Use, duplication, or disclosure of the Software by the U.S. Government is subject to the restrictions set forth in the applicable software license agreement and asprovided in DFARS 227.7202-1(a) and 227.7702-3(a) (1995), DFARS 252.227-7013©(1)(ii) (OCT 1988), FAR 12.212(a) (1995), FAR 52.227-19, or FAR 52.227-14
(ALT III), as applicable.
The information in this product or documentation is subject to change without notice. If you find any problems in this product or documentation, please report them to usin writing.
Informatica, Informatica Platform, Informatica Data Services, PowerCenter, PowerCenterRT, PowerCenter Connect, PowerCenter Data Analyzer, PowerExchange,PowerMart, Metadata Manager, Informatica Data Quality, Informatica Data Explorer, Informatica B2B Data Transformation, Informatica B2B Data Exchange InformaticaOn Demand, Informatica Identity Resolution, Informatica Application Information Lifecycle Management, Informatica Complex Event Processing, Ultra Messaging andInformatica Master Data Management are trademarks or registered trademarks of Informatica LLC in the United States and in jurisdictions throughout the world. Allother company and product names may be trade names or trademarks of their respective owners.
Portions of this software and/or documentation are subject to copyright held by third parties, including without limitation: Copyright DataDirect Technologies. All rightsreserved. Copyright © Sun Microsystems. All rights reserved. Copyright © RSA Security Inc. All Rights Reserved. Copyright © Ordinal Technology Corp. All rightsreserved.Copyright© Aandacht c.v. All rights reserved. Copyright Genivia, Inc. All rights reserved. Copyright Isomorphic Software. All rights reserved. Copyright © MetaIntegration Technology, Inc. All rights reserved. Copyright © Intalio. All rights reserved. Copyright © Oracle. All rights reserved. Copyright © Adobe SystemsIncorporated. All rights reserved. Copyright © DataArt, Inc. All rights reserved. Copyright © ComponentSource. All rights reserved. Copyright © Microsoft Corporation. Allrights reserved. Copyright © Rogue Wave Software, Inc. All rights reserved. Copyright © Teradata Corporation. All rights reserved. Copyright © Yahoo! Inc. All rightsreserved. Copyright © Glyph & Cog, LLC. All r ights reserved. Copyright © Thinkmap, Inc. All rights reserved. Copyright © Clearpace Software Limited. All rightsreserved. Copyright © Information Builders, Inc. All rights reserved. Copyright © OSS Nokalva, Inc. All rights reserved. Copyright Edifecs, Inc. All rights reserved.Copyright Cleo Communications, Inc. All rights reserved. Copyright © International Organization for Standardization 1986. All rights reserved. Copyright © ej-
technologies GmbH. All rights reserved. Copyright © Jaspersoft Corporation. All rights reserved. Copyright © International Business Machines Corporation. All rightsreserved. Copyright © yWorks GmbH. All rights reserved. Copyright © Lucent Technologies. All rights reserved. Copyright (c) University of Toronto. All rights reserved.Copyright © Daniel Veillard. All rights reserved. Copyright © Unicode, Inc. Copyright IBM Corp. All rights reserved. Copyright © MicroQuill Software Publishing, Inc. Allrights reserved. Copyright © PassMark Software Pty Ltd. All rights reserved. Copyright © LogiXML, Inc. All rights reserved. Copyright © 2003-2010 Lorenzi Davide, Allrights reserved. Copyright © Red Hat, Inc. All rights reserved. Copyright © The Board of Trustees of the Leland Stanford Junior University. All rights reserved. Copyright© EMC Corporation. All r ights reserved. Copyright © Flexera Software. All rights reserved. Copyright © Jinfonet Software. All rights reserved. Copyright © Apple Inc. Allrights reserved. Copyright © Telerik Inc. All rights reserved. Copyright © BEA Systems. All rights reserved. Copyright © PDFlib GmbH. All rights reserved. Copyright ©
Orientation in Objects GmbH. All rights reserved. Copyright © Tanuki Software, Ltd. All rights reserved. Copyright © Ricebridge. All rights reserved. Copyright © Sencha,Inc. All rights reserved. Copyright © Scalable Systems, Inc. All rights reserved. Copyright © jQWidgets. All rights reserved. Copyright © Tableau Software, Inc. All rightsreserved. Copyright© MaxMind, Inc. All Rights Reserved. Copyright © TMate Software s.r.o. All rights reserved. Copyright © MapR Technologies Inc. All rights reserved.Copyright © Amazon Corporate LLC. All rights reserved. Copyright © Highsoft. All rights reserved. Copyright © Python Software Foundation. All rights reserved.Copyright © BeOpen.com. All rights reserved. Copyright © CNRI. All rights reserved.
This product includes software developed by the Apache Software Foundation (http://www.apache.org/), and/or other software which is licensed under various versionsof the Apache License (the "License"). You may obtain a copy of these Licenses at http://www.apache.org/licenses/. Unless required by applicable law or agreed to inwriting, software distributed under these Licenses is distributed on an "AS IS" BASIS, WITHOUT WARRANTIES OR CONDITIONS OF ANY KIND, either express orimplied. See the Licenses for the specific language governing permissions and limitations under the Licenses.
This product includes software which was developed by Mozilla (http://www.mozilla.org/), software copyright The JBoss Group, LLC, all rights reserved; software
copyright©
1999-2006 by Bruno Lowagie and Paulo Soares and other software which is licensed under various versions of the GNU Lesser General Public License Agreement, which may be found at http:// www.gnu.org/licenses/lgpl.html. The materials are provided free of charge by Informatica, "as-is", without warranty of anykind, either express or implied, including but not limited to the implied warranties of merchantability and fitness for a particular purpose.
The product includes ACE(TM) and TAO(TM) software copyrighted by Douglas C. Schmidt and his research group at Washington University, University of California,Irvine, and Vanderbilt University, Copyright (©) 1993-2006, all rights reserved.
This product includes software developed by the OpenSSL Project for use in the OpenSSL Toolkit (copyright The OpenSSL Project. All Rights Reserved) andredistribution of this software is subject to terms available at http://www.openssl.org and http://www.openssl.org/source/license.html.
This product includes Curl software which is Copyright 1996-2013, Daniel Stenberg, <[email protected]>. All Rights Reserved. Permissions and limitations regarding thissoftware are subject to terms available at http://curl.haxx.se/docs/copyright.html. Permission to use, copy, modify, and distribute this software for any purpose with orwithout fee is hereby granted, provided that the above copyright notice and this permission notice appear in all copies.
The product includes software copyright 2001-2005 (©) MetaStuff, Ltd. All Rights Reserved. Permissions and limitations regarding this software are subject to termsavailable at http://www.dom4j.org/ license.html.
The product includes software copyright © 2004-2007, The Dojo Foundation. All Rights Reserved. Permissions and limitations regarding this software are subject toterms available at http://dojotoolkit.org/license.
This product includes ICU software which is copyright International Business Machines Corporation and others. All rights reserved. Permissions and limitations
regarding this software are subject to terms available at http://source.icu-project.org/repos/icu/icu/trunk/license.html.
This product includes software copyright © 1996-2006 Per Bothner. All rights reserved. Your right to use such materials is set forth in the license which may be found athttp:// www.gnu.org/software/ kawa/Software-License.html.
This product includes OSSP UUID software which is Copyright © 2002 Ralf S. Engelschall, Copyright © 2002 The OSSP Project Copyright © 2002 Cable & WirelessDeutschland. Permissions and limitations regarding this software are subject to terms available at http://www.opensource.org/licenses/mit-license.php.
This product includes software developed by Boost (http://www.boost.org/) or under the Boost software license. Permissions and limitations regarding this software aresubject to terms available at http:/ /www.boost.org/LICENSE_1_0.txt.
This product includes software copyright © 1997-2007 University of Cambridge. Permissions and limitations regarding this software are subject to terms available athttp:// www.pcre.org/license.txt.
This product includes software copyright © 2007 The Eclipse Foundation. All Rights Reserved. Permissions and limitations regarding this software are subject to termsavailable at http:// www.eclipse.org/org/documents/epl-v10.php and at http://www.eclipse.org/org/documents/edl-v10.php.
8/16/2019 DS 100 SQLDataServiceGuide En
http://slidepdf.com/reader/full/ds-100-sqldataserviceguide-en 3/99
This product includes software licensed under the terms at http://www.tcl.tk/software/tcltk/license.html, http://www.bosrup.com/web/overlib/?License, http://www.stlport.org/doc/ license.html, http://asm.ow2.org/license.html, http://www.cryptix.org/LICENSE.TXT, http://hsqldb.org/web/hsqlLicense.html, http://httpunit.sourceforge.net/doc/ license.html, http://jung.sourceforge.net/license.txt , http://www.gzip.org/zlib/zlib_license.html, http://www.openldap.org/software/release/license.html, http://www.libssh2.org, http://slf4j.org/license.html, http://www.sente.ch/software/OpenSourceLicense.html, http://fusesource.com/downloads/license-agreements/fuse-message-broker-v-5-3- license-agreement; http://antlr.org/license.html; http://aopalliance.sourceforge.net/; http://www.bouncycastle.org/licence.html;http://www.jgraph.com/jgraphdownload.html; http://www.jcraft.com/jsch/LICENSE.txt; http://jotm.objectweb.org/bsd_license.html; . http://www.w3.org/Consortium/Legal/2002/copyright-software-20021231; http://www.slf4j.org/license.html; http://nanoxml.sourceforge.net/orig/copyright.html; http://www.json.org/license.html; http://forge.ow2.org/projects/javaservice/, http://www.postgresql.org/about/licence.html, http://www.sqlite.org/copyright.html, http://www.tcl.tk/software/tcltk/license.html, http://www.jaxen.org/faq.html, http://www.jdom.org/docs/faq.html, http://www.slf4j.org/license.html; http://www.iodbc.org/dataspace/iodbc/wiki/iODBC/License; http://www.keplerproject.org/md5/license.html; http://www.toedter.com/en/jcalendar/license.html; http://www.edankert.com/bounce/index.html; http://www.net-snmp.org/about/license.html; http://www.openmdx.org/#FAQ; http://www.php.net/license/3_01.txt; http://srp.stanford.edu/license.txt; http://www.schneier.com/blowfish.html; http://www.jmock.org/license.html; http://xsom.java.net; http://benalman.com/about/license/; https://github.com/CreateJS/EaselJS/blob/master/src/easeljs/display/Bitmap.js;http://www.h2database.com/html/license.html#summary; http://jsoncpp.sourceforge.net/LICENSE; http://jdbc.postgresql.org/license.html; http://
protobuf.googlecode.com/svn/trunk/src/google/protobuf/descriptor.proto; https://github.com/rantav/hector/blob/master/LICENSE; http://web.mit.edu/Kerberos/krb5-current/doc/mitK5license.html; http://jibx.sourceforge.net/jibx-license.html; https://github.com/lyokato/libgeohash/blob/master/LICENSE; https://github.com/hjiang/jsonxx/blob/master/LICENSE; https://code.google.com/p/lz4/; https://github.com/jedisct1/libsodium/blob/master/LICENSE; http://one-jar.sourceforge.net/index.php?page=documents&file=license; https://github.com/EsotericSoftware/kryo/blob/master/license.txt; http://www.scala-lang.org/license.html; https://github.com/tinkerpop/blueprints/blob/master/LICENSE.txt; http://gee.cs.oswego.edu/dl/classes/EDU/oswego/cs/dl/util/concurrent/intro.html; https://aws.amazon.com/asl/; https://github.com/twbs/bootstrap/blob/master/LICENSE; https://sourceforge.net/p/xmlunit/code/HEAD/tree/trunk/LICENSE.txt; https://github.com/documentcloud/underscore-contrib/blob/master/LICENSE, and https://github.com/apache/hbase/blob/master/LICENSE.txt.
This product includes software licensed under the Academic Free License (http://www.opensource.org/licenses/afl-3.0.php), the Common Development and DistributionLicense (http://www.opensource.org/licenses/cddl1.php) the Common Public License (http://www.opensource.org/licenses/cpl1.0.php), the Sun Binary Code License
Agreement Supplemental License Terms, the BSD License (http:// www.opensource.org/licenses/bsd-license.php), the new BSD License (http://opensource.org/licenses/BSD-3-Clause), the MIT License (http://www.opensource.org/licenses/mit-license.php), the Artistic License (http://www.opensource.org/licenses/artistic-license-1.0) and the Initial Developer’s Public License Version 1.0 (http://www.firebirdsql.org/en/initial-developer-s-public-license-version-1-0/).
This product includes software copyright © 2003-2006 Joe WaInes, 2006-2007 XStream Committers. All rights reserved. Permissions and limitations regarding thissoftware are subject to terms available at http://xstream.codehaus.org/license.html. This product includes software developed by the Indiana University Extreme! Lab.For further information please visit http://www.extreme.indiana.edu/.
This product includes software Copyright (c) 2013 Frank Balluffi and Markus Moeller. All rights reserved. Permissions and limitations regarding this software are subjectto terms of the MIT license.
See patents at https://www.informatica.com/legal/patents.html.
DISCLAIMER: Informatica LLC provides this documentation "as is" without warranty of any kind, either express or implied, including, but not limited to, the impliedwarranties of noninfringement, merchantability, or use for a particular purpose. Informatica LLC does not warrant that this software or documentation is error free. Theinformation provided in this software or documentation may include technical inaccuracies or typographical errors. The information in this software and documentation issubject to change at any time without notice.
NOTICES
This Informatica product (the "Software") includes certain drivers (the "DataDirect Drivers") from DataDirect Technologies, an operating company of Progress SoftwareCorporation ("DataDirect") which are subject to the following terms and conditions:
1.THE DATADIRECT DRIVERS ARE PROVIDED "AS IS" WITHOUT WARRANTY OF ANY KIND, EITHER EXPRESSED OR IMPLIED, INCLUDING BUT NOT
LIMITED TO, THE IMPLIED WARRANTIES OF MERCHANTABILITY, FITNESS FOR A PARTICULAR PURPOSE AND NON-INFRINGEMENT.
2.IN NO EVENT WILL DATADIRECT OR ITS THIRD PARTY SUPPLIERS BE LIABLE TO THE END-USER CUSTOMER FOR ANY DIRECT, INDIRECT,
INCIDENTAL, SPECIAL, CONSEQUENTIAL OR OTHER DAMAGES ARISING OUT OF THE USE OF THE ODBC DRIVERS, WHETHER OR NOT
INFORMED OF THE POSSIBILITIES OF DAMAGES IN ADVANCE. THESE LIMITATIONS APPLY TO ALL CAUSES OF ACTION, INCLUDING, WITHOUT
LIMITATION, BREACH OF CONTRACT, BREACH OF WARRANTY, NEGLIGENCE, STRICT LIABILITY, MISREPRESENTATION AND OTHER TORTS.
This software and documentation contain proprietary information of Informatica LLC and are provided under a license agreement containing restrictions on use anddisclosure and are also protected by copyright law. Reverse engineering of the software is prohibited. No part of this document may be reproduced or transmitted in anyform, by any means (electronic, photocopying, recording or otherwise) without prior consent of Informatica LLC. This Software may be protected by U.S. and/orinternational Patents and other Patents Pending.
Use, duplication, or disclosure of the Software by the U.S. Government is subject to the restrictions set forth in the applicable software license agreement and asprovided in DFARS 227.7202-1(a) and 227.7702-3(a) (1995), DFARS 252.227-7013©(1)(ii) (OCT 1988), FAR 12.212(a) (1995), FAR 52.227-19, or FAR 52.227-14(ALT III), as applicable.
The information in this product or documentation is subject to change without notice. If you find any problems in this product or documentation, please report them to usin writing.
Informatica, Informatica Platform, Informatica Data Services, PowerCenter, PowerCenterRT, PowerCenter Connect, PowerCenter Data Analyzer, PowerExchange,PowerMart, Metadata Manager, Informatica Data Quality, Informatica Data Explorer, Informatica B2B Data Transformation, Informatica B2B Data Exchange InformaticaOn Demand, Informatica Identity Resolution, Informatica Application Information Lifecycle Management, Informatica Complex Event Processing, Ultra Messaging andInformatica Master Data Management are trademarks or registered trademarks of Informatica LLC in the United States and in jurisdictions throughout the world. Allother company and product names may be trade names or trademarks of their respective owners.
Portions of this software and/or documentation are subject to copyright held by third parties, including without limitation: Copyright DataDirect Technologies. All rightsreserved. Copyright © Sun Microsystems. All rights reserved. Copyright © RSA Security Inc. All Rights Reserved. Copyright © Ordinal Technology Corp. All rightsreserved.Copyright© Aandacht c.v. All rights reserved. Copyright Genivia, Inc. All rights reserved. Copyright Isomorphic Software. All rights reserved. Copyright © MetaIntegration Technology, Inc. All rights reserved. Copyright © Intalio. All rights reserved. Copyright © Oracle. All rights reserved. Copyright © Adobe SystemsIncorporated. All rights reserved. Copyright © DataArt, Inc. All rights reserved. Copyright © ComponentSource. All rights reserved. Copyright © Microsoft Corporation. Allrights reserved. Copyright © Rogue Wave Software, Inc. All rights reserved. Copyright © Teradata Corporation. All rights reserved. Copyright © Yahoo! Inc. All rightsreserved. Copyright © Glyph & Cog, LLC. All r ights reserved. Copyright © Thinkmap, Inc. All rights reserved. Copyright © Clearpace Software Limited. All rightsreserved. Copyright © Information Builders, Inc. All rights reserved. Copyright © OSS Nokalva, Inc. All rights reserved. Copyright Edifecs, Inc. All rights reserved.Copyright Cleo Communications, Inc. All rights reserved. Copyright © International Organization for Standardization 1986. All rights reserved. Copyright © ej-technologies GmbH. All rights reserved. Copyright © Jaspersoft Corporation. All rights reserved. Copyright © International Business Machines Corporation. All rightsreserved. Copyright © yWorks GmbH. All rights reserved. Copyright © Lucent Technologies. All rights reserved. Copyright (c) University of Toronto. All rights reserved.Copyright © Daniel Veillard. All rights reserved. Copyright © Unicode, Inc. Copyright IBM Corp. All rights reserved. Copyright © MicroQuill Software Publishing, Inc. Allrights reserved. Copyright © PassMark Software Pty Ltd. All rights reserved. Copyright © LogiXML, Inc. All rights reserved. Copyright © 2003-2010 Lorenzi Davide, Allrights reserved. Copyright © Red Hat, Inc. All rights reserved. Copyright © The Board of Trustees of the Leland Stanford Junior University. All rights reserved. Copyright© EMC Corporation. All r ights reserved. Copyright © Flexera Software. All rights reserved. Copyright © Jinfonet Software. All rights reserved. Copyright © Apple Inc. Allrights reserved. Copyright © Telerik Inc. All rights reserved. Copyright © BEA Systems. All rights reserved. Copyright © PDFlib GmbH. All rights reserved. Copyright ©
Orientation in Objects GmbH. All rights reserved. Copyright © Tanuki Software, Ltd. All rights reserved. Copyright © Ricebridge. All rights reserved. Copyright © Sencha,
8/16/2019 DS 100 SQLDataServiceGuide En
http://slidepdf.com/reader/full/ds-100-sqldataserviceguide-en 4/99
Inc. All rights reserved. Copyright © Scalable Systems, Inc. All rights reserved. Copyright © jQWidgets. All rights reserved. Copyright © Tableau Software, Inc. All rightsreserved. Copyright© MaxMind, Inc. All Rights Reserved. Copyright © TMate Software s.r.o. All rights reserved. Copyright © MapR Technologies Inc. All rights reserved.Copyright © Amazon Corporate LLC. All rights reserved. Copyright © Highsoft. All rights reserved. Copyright © Python Software Foundation. All rights reserved.Copyright © BeOpen.com. All rights reserved. Copyright © CNRI. All rights reserved.
This product includes software developed by the Apache Software Foundation (http://www.apache.org/), and/or other software which is licensed under various versionsof the Apache License (the "License"). You may obtain a copy of these Licenses at http://www.apache.org/licenses/. Unless required by applicable law or agreed to inwriting, software distributed under these Licenses is distributed on an "AS IS" BASIS, WITHOUT WARRANTIES OR CONDITIONS OF ANY KIND, either express orimplied. See the Licenses for the specific language governing permissions and limitations under the Licenses.
This product includes software which was developed by Mozilla (http://www.mozilla.org/), software copyright The JBoss Group, LLC, all rights reserved; softwarecopyright © 1999-2006 by Bruno Lowagie and Paulo Soares and other software which is licensed under various versions of the GNU Lesser General Public License
Agreement, which may be found at http:// www.gnu.org/licenses/lgpl.html. The materials are provided free of charge by Informatica, "as-is", without warranty of any
kind, either express or implied, including but not limited to the implied warranties of merchantability and fitness for a particular purpose.The product includes ACE(TM) and TAO(TM) software copyrighted by Douglas C. Schmidt and his research group at Washington University, University of California,Irvine, and Vanderbilt University, Copyright (©) 1993-2006, all rights reserved.
This product includes software developed by the OpenSSL Project for use in the OpenSSL Toolkit (copyright The OpenSSL Project. All Rights Reserved) andredistribution of this software is subject to terms available at http://www.openssl.org and http://www.openssl.org/source/license.html.
This product includes Curl software which is Copyright 1996-2013, Daniel Stenberg, <[email protected]>. All Rights Reserved. Permissions and limitations regarding thissoftware are subject to terms available at http://curl.haxx.se/docs/copyright.html. Permission to use, copy, modify, and distribute this software for any purpose with orwithout fee is hereby granted, provided that the above copyright notice and this permission notice appear in all copies.
The product includes software copyright 2001-2005 (©) MetaStuff, Ltd. All Rights Reserved. Permissions and limitations regarding this software are subject to termsavailable at http://www.dom4j.org/ license.html.
The product includes software copyright © 2004-2007, The Dojo Foundation. All Rights Reserved. Permissions and limitations regarding this software are subject toterms available at http://dojotoolkit.org/license.
This product includes ICU software which is copyright International Business Machines Corporation and others. All rights reserved. Permissions and limitationsregarding this software are subject to terms available at http://source.icu-project.org/repos/icu/icu/trunk/license.html.
This product includes software copyright©
1996-2006 Per Bothner. All rights reserved. Your right to use such materials is set forth in the license which may be found athttp:// www.gnu.org/software/ kawa/Software-License.html.
This product includes OSSP UUID software which is Copyright © 2002 Ralf S. Engelschall, Copyright © 2002 The OSSP Project Copyright © 2002 Cable & WirelessDeutschland. Permissions and limitations regarding this software are subject to terms available at http://www.opensource.org/licenses/mit-license.php.
This product includes software developed by Boost (http://www.boost.org/) or under the Boost software license. Permissions and limitations regarding this software aresubject to terms available at http:/ /www.boost.org/LICENSE_1_0.txt.
This product includes software copyright © 1997-2007 University of Cambridge. Permissions and limitations regarding this software are subject to terms available athttp:// www.pcre.org/license.txt.
This product includes software copyright © 2007 The Eclipse Foundation. All Rights Reserved. Permissions and limitations regarding this software are subject to termsavailable at http:// www.eclipse.org/org/documents/epl-v10.php and at http://www.eclipse.org/org/documents/edl-v10.php.
This product includes software licensed under the terms at http://www.tcl.tk/software/tcltk/license.html, http://www.bosrup.com/web/overlib/?License, http://www.stlport.org/doc/ license.html, http://asm.ow2.org/license.html, http://www.cryptix.org/LICENSE.TXT, http://hsqldb.org/web/hsqlLicense.html, http://httpunit.sourceforge.net/doc/ license.html, http://jung.sourceforge.net/license.txt , http://www.gzip.org/zlib/zlib_license.html, http://www.openldap.org/software/release/license.html, http://www.libssh2.org, http://slf4j.org/license.html, http://www.sente.ch/software/OpenSourceLicense.html, http://fusesource.com/downloads/license-agreements/fuse-message-broker-v-5-3- license-agreement; http://antlr.org/license.html; http://aopalliance.sourceforge.net/; http://www.bouncycastle.org/licence.html;http://www.jgraph.com/jgraphdownload.html; http://www.jcraft.com/jsch/LICENSE.txt; http://jotm.objectweb.org/bsd_license.html; . http://www.w3.org/Consortium/Legal/2002/copyright-software-20021231; http://www.slf4j.org/license.html; http://nanoxml.sourceforge.net/orig/copyright.html; http://www.json.org/license.html; http://forge.ow2.org/projects/javaservice/, http://www.postgresql.org/about/licence.html, http://www.sqlite.org/copyright.html, http://www.tcl.tk/software/tcltk/license.html, http://www.jaxen.org/faq.html, http://www.jdom.org/docs/faq.html, http://www.slf4j.org/license.html; http://www.iodbc.org/dataspace/iodbc/wiki/iODBC/License; http://www.keplerproject.org/md5/license.html; http://www.toedter.com/en/jcalendar/license.html; http://www.edankert.com/bounce/index.html; http://www.net-snmp.org/about/license.html; http://www.openmdx.org/#FAQ; http://www.php.net/license/3_01.txt; http://srp.stanford.edu/license.txt; http://www.schneier.com/blowfish.html; http://www.jmock.org/license.html; http://xsom.java.net; http://benalman.com/about/license/; https://github.com/CreateJS/EaselJS/blob/master/src/easeljs/display/Bitmap.js;http://www.h2database.com/html/license.html#summary; http://jsoncpp.sourceforge.net/LICENSE; http://jdbc.postgresql.org/license.html; http://protobuf.googlecode.com/svn/trunk/src/google/protobuf/descriptor.proto; https://github.com/rantav/hector/blob/master/LICENSE; http://web.mit.edu/Kerberos/krb5-current/doc/mitK5license.html; http://jibx.sourceforge.net/jibx-license.html; https://github.com/lyokato/libgeohash/blob/master/LICENSE; https://github.com/hjiang/jsonxx/blob/master/LICENSE; https://code.google.com/p/lz4/; https://github.com/jedisct1/libsodium/blob/master/LICENSE; http://one-jar.sourceforge.net/index.php?page=documents&file=license; https://github.com/EsotericSoftware/kryo/blob/master/license.txt; http://www.scala-lang.org/license.html; https://github.com/tinkerpop/blueprints/blob/master/LICENSE.txt; http://gee.cs.oswego.edu/dl/classes/EDU/oswego/cs/dl/util/concurrent/intro.html; https://aws.amazon.com/asl/; https://github.com/twbs/bootstrap/blob/master/LICENSE; https://sourceforge.net/p/xmlunit/code/HEAD/tree/trunk/LICENSE.txt; https://github.com/documentcloud/underscore-contrib/blob/master/LICENSE, and https://github.com/apache/hbase/blob/master/LICENSE.txt.
This product includes software licensed under the Academic Free License (http://www.opensource.org/licenses/afl-3.0.php), the Common Development and DistributionLicense (http://www.opensource.org/licenses/cddl1.php) the Common Public License (http://www.opensource.org/licenses/cpl1.0.php), the Sun Binary Code License
Agreement Supplemental License Terms, the BSD License (http:// www.opensource.org/licenses/bsd-license.php), the new BSD License (http://opensource.org/licenses/BSD-3-Clause), the MIT License (http://www.opensource.org/licenses/mit-license.php), the Artistic License (http://www.opensource.org/licenses/artistic-
license-1.0) and the Initial Developer’s Public License Version 1.0 (http://www.firebirdsql.org/en/initial-developer-s-public-license-version-1-0/).
This product includes software copyright © 2003-2006 Joe WaInes, 2006-2007 XStream Committers. All rights reserved. Permissions and limitations regarding thissoftware are subject to terms available at http://xstream.codehaus.org/license.html. This product includes software developed by the Indiana University Extreme! Lab.For further information please visit http://www.extreme.indiana.edu/.
This product includes software Copyright (c) 2013 Frank Balluffi and Markus Moeller. All rights reserved. Permissions and limitations regarding this software are subjectto terms of the MIT license.
See patents at https://www.informatica.com/legal/patents.html.
DISCLAIMER: Informatica LLC provides this documentation "as is" without warranty of any kind, either express or implied, including, but not limited to, the impliedwarranties of noninfringement, merchantability, or use for a particular purpose. Informatica LLC does not warrant that this software or documentation is error free. Theinformation provided in this software or documentation may include technical inaccuracies or typographical errors. The information in this software and documentation issubject to change at any time without notice.

8/16/2019 DS 100 SQLDataServiceGuide En
http://slidepdf.com/reader/full/ds-100-sqldataserviceguide-en 5/99
NOTICES
This Informatica product (the "Software") includes certain drivers (the "DataDirect Drivers") from DataDirect Technologies, an operating
company of Progress Software Corporation ("DataDirect") which are subject to the following terms and conditions:
1. THE DATADIRECT DRIVERS ARE PROVIDED "AS IS" WITHOUT WARRANTY OF ANY KIND, EITHER EXPRESSED OR
IMPLIED, INCLUDING BUT NOT LIMITED TO, THE IMPLIED WARRANTIES OF MERCHANTABILITY, FITNESS FOR A
PARTICULAR PURPOSE AND NON-INFRINGEMENT.
2. IN NO EVENT WILL DATADIRECT OR ITS THIRD PARTY SUPPLIERS BE LIABLE TO THE END-USER CUSTOMER FOR
ANY DIRECT, INDIRECT, INCIDENTAL, SPECIAL, CONSEQUENTIAL OR OTHER DAMAGES ARISING OUT OF THE USEOF THE ODBC DRIVERS, WHETHER OR NOT INFORMED OF THE POSSIBILITIES OF DAMAGES IN ADVANCE. THESE
LIMITATIONS APPLY TO ALL CAUSES OF ACTION, INCLUDING, WITHOUT LIMITATION, BREACH OF CONTRACT,
BREACH OF WARRANTY, NEGLIGENCE, STRICT LIABILITY, MISREPRESENTATION AND OTHER TORTS.
Part Number: DS-DSG-10000-0001
8/16/2019 DS 100 SQLDataServiceGuide En
http://slidepdf.com/reader/full/ds-100-sqldataserviceguide-en 6/99
Table of Contents
Preface . . . . . . . . . . . . . . . . . . . . . . . . . . . . . . . . . . . . . . . . . . . . . . . . . . . . . . . . . . . . . . . . . . . . . 10
Informatica Resources. . . . . . . . . . . . . . . . . . . . . . . . . . . . . . . . . . . . . . . . . . . . . . . . . . 10
Informatica My Support Portal. . . . . . . . . . . . . . . . . . . . . . . . . . . . . . . . . . . . . . . . . . 10
Informatica Documentation. . . . . . . . . . . . . . . . . . . . . . . . . . . . . . . . . . . . . . . . . . . . 10
Informatica Pr oduct Availability Matrixes. . . . . . . . . . . . . . . . . . . . . . . . . . . . . . . . . . . . 10
Informatica Web Site. . . . . . . . . . . . . . . . . . . . . . . . . . . . . . . . . . . . . . . . . . . . . . . . 11
Informatica How-To Library. . . . . . . . . . . . . . . . . . . . . . . . . . . . . . . . . . . . . . . . . . . . 11
Informatica Knowledge Base. . . . . . . . . . . . . . . . . . . . . . . . . . . . . . . . . . . . . . . . . . . 11
Informatica Support YouTube Channel. . . . . . . . . . . . . . . . . . . . . . . . . . . . . . . . . . . . . 11
Informatica Marketplace. . . . . . . . . . . . . . . . . . . . . . . . . . . . . . . . . . . . . . . . . . . . . . 11
Informatica Velocity. . . . . . . . . . . . . . . . . . . . . . . . . . . . . . . . . . . . . . . . . . . . . . . . . 11
Informatica Global Customer Support. . . . . . . . . . . . . . . . . . . . . . . . . . . . . . . . . . . . . . 11
Chapter 1: Introduction to SQL Data Services. . . . . . . . . . . . . . . . . . . . . . . . . . . . . . . . . 13SQL Data Services Overview. . . . . . . . . . . . . . . . . . . . . . . . . . . . . . . . . . . . . . . . . . . . . . 13
SQL Data Service Connections. . . . . . . . . . . . . . . . . . . . . . . . . . . . . . . . . . . . . . . . . . . . . 13
SQL Data Ser vice Example. . . . . . . . . . . . . . . . . . . . . . . . . . . . . . . . . . . . . . . . . . . . . . . 14
Chapter 2: Virtual Data. . . . . . . . . . . . . . . . . . . . . . . . . . . . . . . . . . . . . . . . . . . . . . . . . . . . . . . 15
Virtual Data Overview. . . . . . . . . . . . . . . . . . . . . . . . . . . . . . . . . . . . . . . . . . . . . . . . . . . 15
SQL Data Services. . . . . . . . . . . . . . . . . . . . . . . . . . . . . . . . . . . . . . . . . . . . . . . . . . . . 16
Defining an SQL Data Service. . . . . . . . . . . . . . . . . . . . . . . . . . . . . . . . . . . . . . . . . . 16
Creating an SQL Data Service. . . . . . . . . . . . . . . . . . . . . . . . . . . . . . . . . . . . . . . . . . 16
Virtual Tables. . . . . . . . . . . . . . . . . . . . . . . . . . . . . . . . . . . . . . . . . . . . . . . . . . . . . . . . 17
Data Access Methods. . . . . . . . . . . . . . . . . . . . . . . . . . . . . . . . . . . . . . . . . . . . . . . . 18
Creating a Virtual Table from a Data Object. . . . . . . . . . . . . . . . . . . . . . . . . . . . . . . . . . 18
Creating a Virtual Table Manually. . . . . . . . . . . . . . . . . . . . . . . . . . . . . . . . . . . . . . . . 19
Defining Relationships between Virtual Tables. . . . . . . . . . . . . . . . . . . . . . . . . . . . . . . . 19
Running an SQL Query to Preview Data. . . . . . . . . . . . . . . . . . . . . . . . . . . . . . . . . . . . 19
Persisting Virtual Data in Temporary Tables. . . . . . . . . . . . . . . . . . . . . . . . . . . . . . . . . . . . 20
Temporary Table Implementation. . . . . . . . . . . . . . . . . . . . . . . . . . . . . . . . . . . . . . . . 20
Temporary Table Operations. . . . . . . . . . . . . . . . . . . . . . . . . . . . . . . . . . . . . . . . . . . 20
Rules and Guidelines for Temporary Tables. . . . . . . . . . . . . . . . . . . . . . . . . . . . . . . . . 22
Virtual Table Mappings. . . . . . . . . . . . . . . . . . . . . . . . . . . . . . . . . . . . . . . . . . . . . . . . . . 23
Defining a Vir tual Table Mapping. . . . . . . . . . . . . . . . . . . . . . . . . . . . . . . . . . . . . . . . . 23
Creating a Vir tual Table Mapping. . . . . . . . . . . . . . . . . . . . . . . . . . . . . . . . . . . . . . . . 24
Validating a Virtual Table Mapping. . . . . . . . . . . . . . . . . . . . . . . . . . . . . . . . . . . . . . . 24
Previewing Virtual Table Mapping Output. . . . . . . . . . . . . . . . . . . . . . . . . . . . . . . . . . . 24
Virtual Stored Procedures. . . . . . . . . . . . . . . . . . . . . . . . . . . . . . . . . . . . . . . . . . . . . . . . 25
Defining a Virtual Stored Procedure. . . . . . . . . . . . . . . . . . . . . . . . . . . . . . . . . . . . . . . 26
6 Table of Contents

8/16/2019 DS 100 SQLDataServiceGuide En
http://slidepdf.com/reader/full/ds-100-sqldataserviceguide-en 7/99
Creating a Virtual Stored Procedure. . . . . . . . . . . . . . . . . . . . . . . . . . . . . . . . . . . . . . . 26
Validating a Virtual Stored Procedure. . . . . . . . . . . . . . . . . . . . . . . . . . . . . . . . . . . . . . 26
Previewing Virtual Stored Procedure Output. . . . . . . . . . . . . . . . . . . . . . . . . . . . . . . . . 27
SQL Query Plans. . . . . . . . . . . . . . . . . . . . . . . . . . . . . . . . . . . . . . . . . . . . . . . . . . . . . . 27
SQL Query Plan Optimization. . . . . . . . . . . . . . . . . . . . . . . . . . . . . . . . . . . . . . . . . . . 27
SQL Query Plan Optimization Examples. . . . . . . . . . . . . . . . . . . . . . . . . . . . . . . . . . . . 28
Viewing an SQL Query Plan. . . . . . . . . . . . . . . . . . . . . . . . . . . . . . . . . . . . . . . . . . . . 29
Chapter 3: SQL Syntax. . . . . . . . . . . . . . . . . . . . . . . . . . . . . . . . . . . . . . . . . . . . . . . . . . . . . . . 30
SQL Syntax Overview. . . . . . . . . . . . . . . . . . . . . . . . . . . . . . . . . . . . . . . . . . . . . . . . . . . 30
Datatypes. . . . . . . . . . . . . . . . . . . . . . . . . . . . . . . . . . . . . . . . . . . . . . . . . . . . . . . . . . 31
Operators. . . . . . . . . . . . . . . . . . . . . . . . . . . . . . . . . . . . . . . . . . . . . . . . . . . . . . . . . . 31
Functions. . . . . . . . . . . . . . . . . . . . . . . . . . . . . . . . . . . . . . . . . . . . . . . . . . . . . . . . . . . 31
SQL Statements and Keywords. . . . . . . . . . . . . . . . . . . . . . . . . . . . . . . . . . . . . . . . . . . . 39
Queries. . . . . . . . . . . . . . . . . . . . . . . . . . . . . . . . . . . . . . . . . . . . . . . . . . . . . . . . . . . . 40
Non-Corr elated Subqueries. . . . . . . . . . . . . . . . . . . . . . . . . . . . . . . . . . . . . . . . . . . . 40
Correlated Subqueries. . . . . . . . . . . . . . . . . . . . . . . . . . . . . . . . . . . . . . . . . . . . . . . 41
Parameterized Queries. . . . . . . . . . . . . . . . . . . . . . . . . . . . . . . . . . . . . . . . . . . . . . . 42
Reserved Words. . . . . . . . . . . . . . . . . . . . . . . . . . . . . . . . . . . . . . . . . . . . . . . . . . . . . . 42
Escape Syntax. . . . . . . . . . . . . . . . . . . . . . . . . . . . . . . . . . . . . . . . . . . . . . . . . . . . . . . 42
Escape Syntax for the fn Keyword. . . . . . . . . . . . . . . . . . . . . . . . . . . . . . . . . . . . . . . . 43
Troubleshooting SQL Data Services. . . . . . . . . . . . . . . . . . . . . . . . . . . . . . . . . . . . . . . . . 45
Chapter 4: Installing and Configuring Drivers for Third-Party Clients. . . . . . . . . . . 47
Installing and Configuring Drivers for Third-Party Clients Overview. . . . . . . . . . . . . . . . . . . . . . 47
Before You Install the Drivers. . . . . . . . . . . . . . . . . . . . . . . . . . . . . . . . . . . . . . . . . . . . . . 48
Extract the Installer Files. . . . . . . . . . . . . . . . . . . . . . . . . . . . . . . . . . . . . . . . . . . . . . 48
Record Informatica Domain Information. . . . . . . . . . . . . . . . . . . . . . . . . . . . . . . . . . . . 48
Configure the Client for Secure Communication. . . . . . . . . . . . . . . . . . . . . . . . . . . . . . . 49
Configure the Client for Kerberos Authentication. . . . . . . . . . . . . . . . . . . . . . . . . . . . . . . 50
Install the Drivers on Windows. . . . . . . . . . . . . . . . . . . . . . . . . . . . . . . . . . . . . . . . . . . . . 50
Install the Drivers in Graphical Mode. . . . . . . . . . . . . . . . . . . . . . . . . . . . . . . . . . . . . . 50
Install the Drivers in Silent Mode. . . . . . . . . . . . . . . . . . . . . . . . . . . . . . . . . . . . . . . . . 51
Install the Drivers on UNIX. . . . . . . . . . . . . . . . . . . . . . . . . . . . . . . . . . . . . . . . . . . . . . . . 51
Install the Drivers in Console Mode. . . . . . . . . . . . . . . . . . . . . . . . . . . . . . . . . . . . . . . 51
Install the Drivers in Silent Mode. . . . . . . . . . . . . . . . . . . . . . . . . . . . . . . . . . . . . . . . . 52
JDBC Connections. . . . . . . . . . . . . . . . . . . . . . . . . . . . . . . . . . . . . . . . . . . . . . . . . . . . . 53
JDBC Connection Properties. . . . . . . . . . . . . . . . . . . . . . . . . . . . . . . . . . . . . . . . . . . 53
Configure JDBC Connections on Windows. . . . . . . . . . . . . . . . . . . . . . . . . . . . . . . . . . 54
Configure JDBC Connections on UNIX. . . . . . . . . . . . . . . . . . . . . . . . . . . . . . . . . . . . . 55
Troubleshooting JDBC Connections. . . . . . . . . . . . . . . . . . . . . . . . . . . . . . . . . . . . . . . 55
ODBC Connections. . . . . . . . . . . . . . . . . . . . . . . . . . . . . . . . . . . . . . . . . . . . . . . . . . . . 56
ODBC Connection Properties. . . . . . . . . . . . . . . . . . . . . . . . . . . . . . . . . . . . . . . . . . . 56
Table of Contents 7
8/16/2019 DS 100 SQLDataServiceGuide En
http://slidepdf.com/reader/full/ds-100-sqldataserviceguide-en 8/99
Configure ODBC Connections on Windows. . . . . . . . . . . . . . . . . . . . . . . . . . . . . . . . . . 58
Configure ODBC Connections on UNIX. . . . . . . . . . . . . . . . . . . . . . . . . . . . . . . . . . . . 59
Chapter 5: Third-Party Client Tool Configuration. . . . . . . . . . . . . . . . . . . . . . . . . . . . . . 61
Third-Party Client Tool Configuration Overview. . . . . . . . . . . . . . . . . . . . . . . . . . . . . . . . . . 61
BusinessObjects. . . . . . . . . . . . . . . . . . . . . . . . . . . . . . . . . . . . . . . . . . . . . . . . . . . . . . 62
BusinessObjects Configuration. . . . . . . . . . . . . . . . . . . . . . . . . . . . . . . . . . . . . . . . . . 62IBM Cognos Configuration. . . . . . . . . . . . . . . . . . . . . . . . . . . . . . . . . . . . . . . . . . . . . . . . 63
Step 1. Update the IBM Cognos Configuration File. . . . . . . . . . . . . . . . . . . . . . . . . . . . . 63
Step 2. Create the ODBC Connection and Import Metadata. . . . . . . . . . . . . . . . . . . . . . . 64
MicroStrategy Configuration. . . . . . . . . . . . . . . . . . . . . . . . . . . . . . . . . . . . . . . . . . . . . . . 65
Step 1. Create the Database Instance and Connection. . . . . . . . . . . . . . . . . . . . . . . . . . . 65
Step 2. Configure the SQL Generation Options. . . . . . . . . . . . . . . . . . . . . . . . . . . . . . . 66
Oracle Business Intelligence Enterprise Edition 11g Configuration. . . . . . . . . . . . . . . . . . . . . . 66
Oracle Database Gateway Configuration. . . . . . . . . . . . . . . . . . . . . . . . . . . . . . . . . . . . . . . 67
QlikView Configuration. . . . . . . . . . . . . . . . . . . . . . . . . . . . . . . . . . . . . . . . . . . . . . . . . . 67
SQL Server Business Intelligence Development Studio Configuration. . . . . . . . . . . . . . . . . . . . 68
SQuirreL SQL Client Configuration. . . . . . . . . . . . . . . . . . . . . . . . . . . . . . . . . . . . . . . . . . 69
Step 1. Copy the Driver File. . . . . . . . . . . . . . . . . . . . . . . . . . . . . . . . . . . . . . . . . . . . 69
Step 2. Create the Driver and Alias. . . . . . . . . . . . . . . . . . . . . . . . . . . . . . . . . . . . . . . 69
Tableau Conf iguration. . . . . . . . . . . . . . . . . . . . . . . . . . . . . . . . . . . . . . . . . . . . . . . . . . 70
Toad for Data Analysts Configuration. . . . . . . . . . . . . . . . . . . . . . . . . . . . . . . . . . . . . . . . . 71
WinSQL Conf iguration. . . . . . . . . . . . . . . . . . . . . . . . . . . . . . . . . . . . . . . . . . . . . . . . . . 72
Troubleshooting Third-Party Client Tools. . . . . . . . . . . . . . . . . . . . . . . . . . . . . . . . . . . . . . 73
Chapter 6: Installing and Configuring Drivers for PowerCenter. . . . . . . . . . . . . . . . . 74
Installing and Configuring Drivers for PowerCenter Overview. . . . . . . . . . . . . . . . . . . . . . . . . 74
Before You Install the Drivers. . . . . . . . . . . . . . . . . . . . . . . . . . . . . . . . . . . . . . . . . . . . . . 75
Extract the Installer Files. . . . . . . . . . . . . . . . . . . . . . . . . . . . . . . . . . . . . . . . . . . . . . 75
Record Informatica Domain Information. . . . . . . . . . . . . . . . . . . . . . . . . . . . . . . . . . . . 75
Install the Drivers on Windows. . . . . . . . . . . . . . . . . . . . . . . . . . . . . . . . . . . . . . . . . . . . . 76
Install the Drivers for PowerCenter in Graphical Mode. . . . . . . . . . . . . . . . . . . . . . . . . . . 76
Install the Drivers for PowerCenter in Silent Mode. . . . . . . . . . . . . . . . . . . . . . . . . . . . . . 77
Configure ODBC Connections on Windows. . . . . . . . . . . . . . . . . . . . . . . . . . . . . . . . . . . . . 77
Install the Drivers on UNIX. . . . . . . . . . . . . . . . . . . . . . . . . . . . . . . . . . . . . . . . . . . . . . . . 78
Install the Drivers for PowerCenter in Console Mode. . . . . . . . . . . . . . . . . . . . . . . . . . . . 79
Install the Drivers for PowerCenter in Silent Mode. . . . . . . . . . . . . . . . . . . . . . . . . . . . . . 79
Configure ODBC Connections on UNIX. . . . . . . . . . . . . . . . . . . . . . . . . . . . . . . . . . . . . . . 80
Configure the Shared Library Environment Variable. . . . . . . . . . . . . . . . . . . . . . . . . . . . 80
Configure the ODBC Files. . . . . . . . . . . . . . . . . . . . . . . . . . . . . . . . . . . . . . . . . . . . . 81
Troubleshooting ODBC Connections for PowerCenter. . . . . . . . . . . . . . . . . . . . . . . . . . . . . . 81
8 Table of Contents

8/16/2019 DS 100 SQLDataServiceGuide En
http://slidepdf.com/reader/full/ds-100-sqldataserviceguide-en 9/99
Chapter 7: SQL Data Service Administration. . . . . . . . . . . . . . . . . . . . . . . . . . . . . . . . . . 83
SQL Data Service Administration Overview. . . . . . . . . . . . . . . . . . . . . . . . . . . . . . . . . . . . . 83
SQL Data Service Security Management. . . . . . . . . . . . . . . . . . . . . . . . . . . . . . . . . . . . . . 84
Types of SQL Data Service Permissions. . . . . . . . . . . . . . . . . . . . . . . . . . . . . . . . . . . . 84
Column Level Security. . . . . . . . . . . . . . . . . . . . . . . . . . . . . . . . . . . . . . . . . . . . . . . 85
Row Level Security. . . . . . . . . . . . . . . . . . . . . . . . . . . . . . . . . . . . . . . . . . . . . . . . . 85Pass-Through Security. . . . . . . . . . . . . . . . . . . . . . . . . . . . . . . . . . . . . . . . . . . . . . . 85
SQL Data Service Properties Configuration . . . . . . . . . . . . . . . . . . . . . . . . . . . . . . . . . . . . 86
SQL Data Service Properties. . . . . . . . . . . . . . . . . . . . . . . . . . . . . . . . . . . . . . . . . . . 86
SQL Properties. . . . . . . . . . . . . . . . . . . . . . . . . . . . . . . . . . . . . . . . . . . . . . . . . . . . 88
Virtual Table Properties. . . . . . . . . . . . . . . . . . . . . . . . . . . . . . . . . . . . . . . . . . . . . . . 89
Virtual Column Properties. . . . . . . . . . . . . . . . . . . . . . . . . . . . . . . . . . . . . . . . . . . . . 90
Virtual Stored Procedure Properties. . . . . . . . . . . . . . . . . . . . . . . . . . . . . . . . . . . . . . . 90
Logical Data Objects. . . . . . . . . . . . . . . . . . . . . . . . . . . . . . . . . . . . . . . . . . . . . . . . 90
Logical Data Object/Virtual Table Cache Properties. . . . . . . . . . . . . . . . . . . . . . . . . . . . . 91
SQL Data Service Result Set Caching. . . . . . . . . . . . . . . . . . . . . . . . . . . . . . . . . . . . . . . . 92
Data Object Caching. . . . . . . . . . . . . . . . . . . . . . . . . . . . . . . . . . . . . . . . . . . . . . . . . . . 93
SQL Data Service Logs. . . . . . . . . . . . . . . . . . . . . . . . . . . . . . . . . . . . . . . . . . . . . . . . . . 93
Monitor SQL Data Services. . . . . . . . . . . . . . . . . . . . . . . . . . . . . . . . . . . . . . . . . . . . . . . 93
Properties View for an SQL Data Service. . . . . . . . . . . . . . . . . . . . . . . . . . . . . . . . . . . 94
Connections View for an SQL Data Service. . . . . . . . . . . . . . . . . . . . . . . . . . . . . . . . . . 94
Requests View for an SQL Data Service. . . . . . . . . . . . . . . . . . . . . . . . . . . . . . . . . . . . 95
Virtual Tables View for an SQL Data Service. . . . . . . . . . . . . . . . . . . . . . . . . . . . . . . . . 96
Reports View for an SQL Data Service. . . . . . . . . . . . . . . . . . . . . . . . . . . . . . . . . . . . . 96
Index. . . . . . . . . . . . . . . . . . . . . . . . . . . . . . . . . . . . . . . . . . . . . . . . . . . . . . . . . . . . 97
Table of Contents 9
8/16/2019 DS 100 SQLDataServiceGuide En
http://slidepdf.com/reader/full/ds-100-sqldataserviceguide-en 10/99
Preface
The Informatica SQL Data Service Guide discusses SQL data services, virtual data, configuration, connecting
to an SQL data service with a third-party tool, and troubleshooting. It also provides instructions on these
concepts. This guide is intended for data service developers. It assumes that you have an understanding of
flat files and relational databases in your environment.
Informatica Resources
Informatica My Support Portal
As an Informatica customer, the first step in reaching out to Informatica is through the Informatica My Support
Portal at https://mysupport.informatica.com. The My Support Portal is the largest online data integration
collaboration platform with over 100,000 Informatica customers and partners worldwide.
As a member, you can:
• Access all of your Informatica resources in one place.
• Review your support cases.
• Search the Knowledge Base, find product documentation, access how-to documents, and watch support
videos.
• Find your local Informatica User Group Network and collaborate with your peers.
Informatica Documentation
The Informatica Documentation team makes every effort to create accurate, usable documentation. If you
have questions, comments, or ideas about this documentation, contact the Informatica Documentation team
through email at [email protected]. We will use your feedback to improve our
documentation. Let us know if we can contact you regarding your comments.
The Documentation team updates documentation as needed. To get the latest documentation for your
product, navigate to Product Documentation from https://mysupport.informatica.com.
Informatica Product Availability Matrixes
Product Availability Matrixes (PAMs) indicate the versions of operating systems, databases, and other types
of data sources and targets that a product release supports. You can access the PAMs on the Informatica My
Support Portal at https://mysupport.informatica.com.
10

8/16/2019 DS 100 SQLDataServiceGuide En
http://slidepdf.com/reader/full/ds-100-sqldataserviceguide-en 11/99
Informatica Web Site
You can access the Informatica corporate web site at https://www.informatica.com. The site contains
information about Informatica, its background, upcoming events, and sales offices. You will also find product
and partner information. The services area of the site includes important information about technical support,
training and education, and implementation ser vices.
Informatica How-To Library
As an Informatica customer, you can access the Informatica How-To Library at
https://mysupport.informatica.com. The How-To Library is a collection of resources to help you learn more
about Informatica products and features. It includes articles and interactive demonstrations that provide
solutions to common problems, compare features and behaviors, and guide you through performing specific
real-world tasks.
Informatica Knowledge Base
As an Informatica customer, you can access the Informatica Knowledge Base at
https://mysupport.informatica.com. Use the Knowledge Base to search for documented solutions to known
technical issues about Informatica products. You can also find answers to frequently asked questions,
technical white papers, and technical tips. If you have questions, comments, or ideas about the Knowledge
Base, contact the Informatica Knowledge Base team through email at [email protected].
Informatica Support YouTube Channel
You can access the Informatica Support YouTube channel at http://www.youtube.com/user/INFASupport. The
Informatica Support YouTube channel includes videos about solutions that guide you through performing
specific tasks. If you have questions, comments, or ideas about the Informatica Support YouTube channel,
contact the Support YouTube team through email at [email protected] or send a tweet to
@INFASupport.
Informatica Marketplace
The Informatica Marketplace is a forum where developers and partners can share solutions that augment,
extend, or enhance data integration implementations. By leveraging any of the hundreds of solutions
available on the Marketplace, you can improve your productivity and speed up time to implementation on
your projects. You can access Informatica Marketplace at http://www.informaticamarketplace.com.
Informatica Velocity
You can access Informatica Velocity at https://mysupport.informatica.com. Developed from the real-world
experience of hundreds of data management projects, Informatica Velocity represents the collective
knowledge of our consultants who have worked with organizations from around the world to plan, develop,deploy, and maintain successful data management solutions. If you have questions, comments, or ideas
about Informatica Velocity, contact Informatica Professional Services at [email protected].
Informatica Global Customer Support
You can contact a Customer Support Center by telephone or through the Online Support.
Online Support requires a user name and password. You can request a user name and password at
http://mysupport.informatica.com.
Preface 11

8/16/2019 DS 100 SQLDataServiceGuide En
http://slidepdf.com/reader/full/ds-100-sqldataserviceguide-en 12/99
The telephone numbers for Informatica Global Customer Support are available from the Informatica web site
at http://www.informatica.com/us/services-and-training/support-services/global-support-centers/.
12 Preface
8/16/2019 DS 100 SQLDataServiceGuide En
http://slidepdf.com/reader/full/ds-100-sqldataserviceguide-en 13/99
C H A P T E R 1
Introduction to SQL Data Services
This chapter includes the following topics:
• SQL Data Services Overview, 13
• SQL Data Service Connections, 13
• SQL Data Service Example, 14
SQL Data Services Overview
A data service is a col lection of reusable operat ions that you can run to access and transform data. An SQL
data service is a virtual database that end users can query. It contains virtual schemas and the virtual tables
or stored procedures that define the database structure.
Create an SQL data service so that end users can run SQL queries against the virtual tables through a third-
party client tool. End users can query the virtual tables as if they were physical tables. End users can also
use a third-party client tool to run virtual stored procedures.
You can create an SQL data service in the Developer tool. To make it available to end users, include it in anapplication, and deploy the application to a Data Integration Service. When the application is running, end
users can connect to the SQL data service from a third-party client tool by supplying a connect string. After
they connect to the SQL data service, end users can run SQL queries through the client tool.
SQL Data Service Connections
An SQL data ser vice is a virtual database that you can query. It provides a uniform view of data that might be
scattered among disparate, heterogeneous data sources. You can use a third-party JDBC or ODBC client
tool to run SQL queries against the virtual tables in an SQL data service and to run virtual stored procedures.
An SQL data service can contain the following objects:
• Virtual schemas that define the database structure
• Virtual tables
• Virtual table mappings that define the flow of data between sources and a virtual table
• Virtual stored procedures that take optional inputs through parameters, transform the data, and optionally
return output through parameters
13
8/16/2019 DS 100 SQLDataServiceGuide En
http://slidepdf.com/reader/full/ds-100-sqldataserviceguide-en 14/99
To make the virtual tables and virtual stored procedures available to you, a developer creates and deploys an
application that contains the SQL data service. The developer deploys the application to a Data Integration
Service and an administrator runs the application. When the appl ication is running, you can query the virtual
tables and run the virtual stored procedures in the SQL data service.
When you query a virtual table or run a virtual stored procedure, the JDBC or ODBC driver sends the request
to the Data Integration Service. By default, the driver uses HTTP to communicate with the Data IntegrationService. If an administrator enables Transport Layer Security (TLS) for the domain, the dr iver uses TLS to
communicate with the Data Integration Service.
Before you can run SQL queries or virtual stored procedures for the first time, you must configure the
machine from which you want to access the SQL data service. You must also configure the client tool so that
it can connect to the SQL data service.
SQL Data Service Example
Create an SQL data service to make a virtual database available for end users to query. Create a virtualdatabase to define uniform views of data and to isolate the data from changes in structure. For example,
create an SQL data service to define a uniform view of customer data and to allow end users to run SQL
queries against the data.
Two companies that store customer data in multiple, heterogeneous data sources merge. A developer at the
merged company needs to make a single view of customer data available to other users at the company. The
other users need to make SQL queries against the data to retrieve information such as the number of
customers in a region or a list of customers whose purchases exceed a certain dollar amount.
To accomplish this goal, the developer creates an SQL data service that contains virtual schemas and virtual
tables that define a unified view of a customer. The developer creates virtual table mappings to link the virtual
tables of the customer with the sources and to standardize the data. To make the virtual data accessible by
end users, the developer includes the SQL data service in an application and deploys the application.
After the developer deploys the application, end users can make SQL queries against the standardized view
of the customer through a JDBC or ODBC client tool.
14 Chapter 1: Introduction to SQL Data Services
8/16/2019 DS 100 SQLDataServiceGuide En
http://slidepdf.com/reader/full/ds-100-sqldataserviceguide-en 15/99
C H A P T E R 2
Virtual Data
This chapter includes the following topics:
• Virtual Data Overview, 15
• SQL Data Services, 16
• Virtual Tables, 17
•
Persisting Virtual Data in Temporary Tables, 20• Virtual Table Mappings, 23
• Virtual Stored Procedures, 25
• SQL Query Plans, 27
Virtual Data Overview
Create a virtual database to define uniform views of data and make the data available for end users to query.
End users can run SQL queries against the virtual tables as if they were physical database tables.
Create a virtual database to accomplish the following tasks:
• Define a uniform view of data that you can expose to end users.
• Define the virtual flow of data between the sources and the virtual tables. Transform and standardize the
data.
• Provide end users with access to the data. End users can use a JDBC or ODBC client tool to run SQL
queries against the virtual tables as if they were actual, physical database tables.
• Isolate the data from changes in data structures. You can add the virtual database to a self-contained
application. If you make changes to the virtual database in the Developer tool , the virtual database in the
application does not change until you redeploy it.
To create a virtual database, you must create an SQL data service. An SQL data service contains the virtual
schemas and the virtual tables or stored pr ocedures that define the database structure. If the virtual schemacontains virtual tables, the SQL data service also contains virtual table mappings that define the flow of data
between the sources and the virtual tables.
After you create an SQL data service, you add it to an appl ication and deploy the applicat ion to make the
SQL data service accessible by end users.
End users can query the virtual tables or run the stored procedures in the SQL data service by entering an
SQL query in a third-party client tool. When the user enters the query, the Data Integration Service retrieves
virtual data from the sources or from cache tables, if an administrator specifies that any of the virtual tables
should be cached.
15
8/16/2019 DS 100 SQLDataServiceGuide En
http://slidepdf.com/reader/full/ds-100-sqldataserviceguide-en 16/99
Note: A virtual table mapping wi ll fai l if i t contains a user-defined parameter.
SQL Data Services An SQL data service is a virtual database that end users can query. It contains a schema and other objects
that represent underlying physical data.
An SQL data service can contain the following objects:
• Virtual schemas. Schemas that define the virtual database structure.
• Virtual tables. The virtual tables in the database. You can create virtual tables from physical or logical
data objects, or you can create virtual tables manually.
• Virtual table mappings. Mappings that link a virtual table to source data and define the data flow between
the sources and the virtual table. If you create a virtual table from a data object, you can create a virtual
table mapping to define data flow rules between the data object and the virtual table. If you create a virtual
table manually, you must create a virtual table mapping to link the virtual table with source data anddefine data flow.
• Virtual stored procedures. Sets of data flow instructions that allow end users to perform calculations or
retrieve data.
Defining an SQL Data Service
To define an SQL data service, create an SQL data service and add objects to it.
1. Create an SQL data service.
You can create virtual tables and virtual table mappings dur ing this step.
2. Create virtual tables in the SQL data service.You can create a virtual table from a data object, or you can create a virtual table manually.
3. Define relationships between virtual tables.
4. Create or update virtual table mappings to define the data flow between data objects and the virtual
tables.
5. Optionally, create virtual stored procedures.
6. Optionally, preview virtual table data.
Creating an SQL Data Service
Create an SQL data service to define a virtual database that end users can query. When you create an SQL
data service, you can create virtual schemas, virtual tables, and virtual table mappings that link virtual tableswith source data.
1. Select a project or folder in the Object Explorer view.
2. Click File > New > Data Service.
The New dialog box appears.
3. Select SQL Data Service.
4. Click Next.
16 Chapter 2: Virtual Data
8/16/2019 DS 100 SQLDataServiceGuide En
http://slidepdf.com/reader/full/ds-100-sqldataserviceguide-en 17/99
5. Enter a name for the SQL data service.
6. To create virtual tables in the SQL data service, click Next. To create an SQL data service without virtual
tables, click Finish.
If you click Next, the New SQL Data Service dialog box appears.
7. To create a virtual table, click the New button.
The Developer tool adds a virtual table to the list of virtual tables.
8. Enter a virtual table name in the Name column.
9. Click the Open button in the Data Object column.
The Select a Data Object dialog box appears.
10. Select a physical or logical data object and click OK.
11. Enter the virtual schema name in the Virtual Schema column.
12. Select Read in the Data Access column to link the virtual table with the data object. Select None if you
do not want to link the virtual table with the data object.
13. Repeat steps 7 through 12 to add more virtual tables.
14. Click Finish.
The Developer tool creates the SQL data service.
Virtual Tables
A virtual table is a table in a virtual database. Create a virtual table to define the structure of the data.
Create one or more virtual tables within a schema. If a schema contains multiple virtual tables, you can
define primary key-foreign key relationships between tables.
You can create virtual tables manually or from physical or log ical data objects. Each virtual table has a dataaccess method. The data access method defines how the Data Integration Service retrieves data. When you
manually create a virtual table, the Developer tool creates an empty virtual table and sets the data access
method to none.
When you create a virtual table from a data object, the Developer tool creates a virtual table with the same
columns and properties as the data object. The Developer tool sets the data access method to read. If you
change columns in the data object, the Developer tool updates the virtual table with the same changes. The
Developer tool does not update the virtual table if you change the data object name or description.
To define data transformation rules for the vir tual table, set the data access method to custom. The
Developer tool prompts you to create a virtual table mapping.
You can preview virtual table data when the data access method is read or custom.
Virtual Tables 17
8/16/2019 DS 100 SQLDataServiceGuide En
http://slidepdf.com/reader/full/ds-100-sqldataserviceguide-en 18/99
Data Access Methods
The data access method for a virtual table defines how the Data Integration Service retrieves data.
When you create a virtual table, you must choose a data access method. The following table describes the
data access methods:
Data Access
Method
Description
None The virtual table is not linked to source data.
If you change the data access method to none, the Developer tool removes the link between
the data object and the virtual table. If the virtual table has a virtual table mapping, the
Developer tool deletes the virtual table mapping.
The Data Integration Service cannot retrieve data for the table.
Read The vi rtua l tab le is linked to a physica l o r log ical da ta ob ject wi thou t data t rans fo rmat ion . I f
you add, remove, or change a column in the data object, the Developer tool makes the
same change to the virtual table. However, if you change primary key-foreign key
relationships, change the name of the data object, or change the data object description, theDeveloper tool does not update the virtual table.
If you change the data access method to read, the Developer tool prompts you to choose a
data object. If the virtual table has a virtual table mapping, the Developer tool deletes the
virtual table mapping.
When an end user queries the virtual table, the Data Integration Service retrieves data from
the data object.
Custom The virtual table is linked to a physical or logical data object through a virtual table mapping.
If you update the data object, the Developer tool does not update the virtual table.
If you change the data access method to custom, the Developer tool prompts you to createa virtual table mapping.
When an end user queries the virtual table, the Data Integration Service applies any
transformation rule defined in the virtual table mapping to the source data. It returns the
transformed data to the end user.
Creating a Virtual Table from a Data Object
Create a virtual table from a physical or logical data object when the virtual table structure matches the
structure of the data object. The Developer tool creates a virtual table mapping to read data from the data
object.
1. Open an SQL data service.
2. Click the Schema view.
3. Drag a physical or logical data object from the Object Explorer view to the editor.
The Add Data Objects to SQL Data Service dialog box appears. The Developer tool lists the dataobject in the Data Object column.
4. Enter the virtual schema name in the Virtual Schema column.
5. Click Finish.
The Developer tool places the virtual table in the edi tor and sets the data access method to read.
18 Chapter 2: Virtual Data
8/16/2019 DS 100 SQLDataServiceGuide En
http://slidepdf.com/reader/full/ds-100-sqldataserviceguide-en 19/99
Creating a Virtual Table Manually
Create a virtual table manually when the virtual table structure does not match the structure of an existing
data object. The Developer tool sets the data access method for the virtual table to none, which indicates the
virtual table is not linked to a source.
1. Open an SQL data service.
2. In the Overview view Tables section, click the New button.
The New Virtual Table dialog box appears.
3. Enter a name for the virtual table.
4. Enter a virtual schema name or select a virtual schema.
5. Click Finish.
The virtual table appears in the Schema view.
6. To add a column to the virtual table, right-click Columns and click New.
Verify that the virtual column names are not reserved words for the SQL standard.
7. To make a column a primary key, click the blank space to the left of the column name.
Defining Relationships between Virtual Tables
You can define primary key-foreign key relationships between virtual tables in an SQL data service to show
associations between columns in the virtual tables.
1. Open an SQL data service.
2. Click the Schema view.
3. Click the column you want to assign as a foreign key in one table. Drag the pointer from the foreign key
column to the primary key column in another table.
The Developer tool uses an arrow to indicate a relationship between the tables. The arrow points to the
primary key table.
Running an SQL Query to Preview Data
Run an SQL query against a virtual table to preview the data.
For the query to return results, the virtual table must be linked to source data. Therefore, the virtual table
must be created from a data object or it must be linked to source data in a virtual table mapping.
1. Open an SQL data service.
2. Click the Schema view.
3. Select the virtual table in the Outline view.
The virtual table appears in the Schema view.
4. Click the Data Viewer view.
5. Enter an SQL statement in the Input window.
For example:
select * from <schema>.<table>
6. Click Run.
The query results appear in the Output window.
Virtual Tables 19
8/16/2019 DS 100 SQLDataServiceGuide En
http://slidepdf.com/reader/full/ds-100-sqldataserviceguide-en 20/99
Persisting Virtual Data in Temporary Tables
A temporary table is a table in a relational database that stores intermediate, temporary data. Complex
queries commonly require storage for large amounts of intermediate data, such as information from joins.
When you implement temporary tables, business intelligence tools can retrieve this data from the temporary
table instead of the SQL data service. This results in an increase in performance.
Temporary tables also provide increased security in two ways. First, only the user of the active session can
access the tables. Also, the tables persist while a session is active, and the database drops the tables when
the connection closes.
To implement temporary tables, an administrator must create the Data Integration Service, and then
configure the Table Storage Connection in the SQL Connection properties of the Data Integration Service.
After the administrator configures the connect ion, a developer uses the Informat ica ODBC or JDBC driver to
configure a connection between a business intelligence tool and the Informatica SQL data service. When
these connections are configured, the business intelligence tool can create and use temporary tables.
Temporary tables for all SQL data services in a Data Integration Service use the same relational database
connection. When the connection to the SQL data service is active, you can connect to the SQL data service
through a JDBC or ODBC client. The relational database drops temporary tables when the session ends. Ifthe Data Integration Service unexpectedly shuts down, the relational database drops temporary tables on the
next Data Integration Service startup.
Temporary Table Implementation
You can store intermediate query result set data in temporary tables when complex queries produce large
amounts of intermediate data. For example, temporary tables can store frequently used join results. Business
intelligence tools can query the temporary table instead of the SQL data service, resulting in increased
performance.
To implement temporary tables, the Informatica administrator and the business intelligence tool user perform
the following separate tasks:
Step 1. The Informatica administrator creates a connection for the data integration service.
In the Administrator tool, create a connection to the SQL data service. Edit the SQL Properties of the
Data Integration Service and select a relational database connection for the Table Storage Connection
property. Recycle the Data Information Service.
Step 2. The business intelligence tool user creates a connection for the SQL data service.
In a business intelligence tool, create a connection to the SQL data service. The connection uses the
Informatica ODBC or JDBC driver.
Step 3. Queries from the business intelligence tool create and use temporary tables.
While the connection is active, the business intelligence tool issues queries to the SQL data service.
These queries create and use temporary tables to store large amounts of data that the complex query
produces. When the connection ends, the database drops the temporary table.
Temporary Table Operations
After you create the SQL data service connection, you can use SQL operations to create, populate, select
from, or drop a temporary table. You can issue these commands in a regular or stored SQL statement.
You can perform the following operations:
20 Chapter 2: Virtual Data
8/16/2019 DS 100 SQLDataServiceGuide En
http://slidepdf.com/reader/full/ds-100-sqldataserviceguide-en 21/99
Create a temporary table.
To create a temporary table on the relational database, use the following syntax:
CREATE TABLE emp (empID INTEGER PRIMARY KEY,eName char(50) NOT NULL,)
You can specify the table name in the SQL data service.
Note: Use CREATE TABLE, not CREATE TEMPORARY TABLE. The use of CREATE TEMPORARY TABLE is not
supported.
Create a temporary table from a source table.
You can create a temporary table with or without data from a source table.
The following syntax is supported in Informatica Data Services version 9.5.1:
CREATE TABLE emp.backup as select * from emp
Where emp is an existing schema in the SQL data service that you connected to.
The following syntax is supported in Informatica Data Services version 9.6.0 and 9.6.1:
CREATE TABLE emp.backup as select * from emp [ [LIMIT n] ]
Where emp is an existing schema in the SQL data service that you connected to.
When you create a temporary table with data, the Data Integration Service populates the table with the
data. The CREATE AS operator copies columns from a database table into the temporary table.
You cannot maintain foreign key or primary key constraints when you use CREATE AS.
You can cancel a request before the Data Integration Service copies al l the data.
Note: The Informatica administrator must create a connection, and then configure it in SQL Properties
as the Table Storage Connection, before you create the temporary table.
Insert data into a temporary table.
To insert data into a temporary table, use the INSERT INTO <temp_table> statement. You can insert
literal data and query data into a temporary table.
Persisting Virtual Data in Temporary Tables 21
8/16/2019 DS 100 SQLDataServiceGuide En
http://slidepdf.com/reader/full/ds-100-sqldataserviceguide-en 22/99
The following table shows examples of SQL statements that you can use to insert literal data and query
data into a temporary table:
Type Description
Literaldata
Literals describe a user or system-supplied string or value that is not an identifier or keyword.Use strings, numbers, dates, or boolean values when you insert literal data into a temporary
table. Use the following statement format to insert literal data into a temporary table:
INSERT INTO <TABLENAME> <OPTIONAL COLUMN LIST> VALUES (<VALUELIST>), (<VALUE LIST>)
For example, INSERT INTO temp_dept (dept_id, dept_name, location)
VALUES (2, 'Marketing', 'Los Angeles').
Query
data
You can query an SQL data service and insert data from the query into a temporary table. Use
the following statement format to insert query data into a temporary table:
INSERT INTO <TABLENAME> <OPTIONAL COLUMN LIST> <SELECT QUERY>
For example, INSERT INTO temp_dept(dept_id, dept_name, location) SELECT
dept_id, dept_name, location from dept where dept_id = 99.
You can use a set operator, such as UNION, in the SQL statement when you insert query data
into a temporary table. Use the following statement format when you use a set operator:
INSERT INTO <TABLENAME> <OPTIONAL COLUMN LIST> (<SELECT QUERY><SET OPERATOR> <SELECT QUERY>)
For example, INSERT INTO temp_dept select * from north_america_dept
UNION select * from asia_dept.
Select from a temporary table.
You can query the temporary table with the SELECT ... from <table> statement.
Drop a temporary table.
To drop a temporary table from the relational database, use the following syntax:
DROP TABLE <tableName>
If the table is not dropped on the physical database, the SQL data service drops the table the next time
the Data Integration Service starts, if the table still exists.
Rules and Guidelines for Temporary Tables
Consider the following rules and guidelines for creation and use of temporary tables:
• You can specify schema and default schema for a temporary table.
• You can place the primary key, NULL, NOT NULL, and DEFAULT constraints on a temporary table.
• You cannot place a foreign key or CHECK and UNIQUE constraints on a temporary table.
• You cannot issue a query that contains a common table expression or a correlated subquery against a
temporary table.
• CREATE AS statements cannot contain a correlated subquery.
22 Chapter 2: Virtual Data
8/16/2019 DS 100 SQLDataServiceGuide En
http://slidepdf.com/reader/full/ds-100-sqldataserviceguide-en 23/99
Virtual Table Mappings
A virtual table mapping defines the vir tual data flow between sources and a virtual table in an SQL data
service. Use a virtual table mapping to transform the data.
Create a virtual table mapping to link a virtual table in an SQL data service with source data and to define therules for data transformation. When an end user queries the virtual table, the Data Integration Service applies
the transformation rules defined in the virtual table mapping to the source data. It returns the transformed
data to the end user.
If you do not want to transform the data, you do not have to create a virtual table mapping. When an end user
queries the virtual table, the Data Integration Service retrieves data directly from the data object.
You can create one virtual table mapping for each virtual table in an SQL data service. You can preview
virtual table data as you create and update the mapping.
A virtual table mapping contains the following components:
• Sources. Physical or logical data objects that describe the characteristics of source tables or files. A
virtual table mapping must contain at least one source.
• Transformations. Objects that define the rules for data transformation. Use different transformation objects
to perform different functions. Transformations are optional in a virtual table mapping.
• Virtual table. A virtual table in an SQL data service.
• Links. Connections between columns that define virtual data flow between sources, transformations, and
the virtual table.
Example
You want to make order information available to one of your customers.
The orders information is stored in a relational database table that contains information for several
customers. The customer is not authorized to view the orders information for other customers.
Create an SQL data service to retrieve the orders information. Create a virtual table from the orders table and
set the data access method to custom. Add a Filter transformation to the virtual table mapping to remove
orders data for the other customers.
After you create and deploy an application that contains the SQL data service, the customer can query the
virtual table that contains his orders information.
Defining a Virtual Table Mapping
To define a virtual table mapping, create a virtual table mapping, add sources and transformations, and
validate the mapping.
1. Create a mapping from a virtual table in an SQL data service.
2. Add sources and transformations to the mapping and link columns.
3. Validate the mapping.
4. Optionally, preview the mapping data.
Virtual Table Mappings 23
8/16/2019 DS 100 SQLDataServiceGuide En
http://slidepdf.com/reader/full/ds-100-sqldataserviceguide-en 24/99
Creating a Virtual Table Mapping
Create a virtual table mapping to define the virtual data flow between source data and a virtual table in an
SQL data service. You can create one virtual table mapping for each virtual table.
1. Open the SQL data service that contains the virtual table for which you want to create a virtual table
mapping.
2. Click the Overview view.
3. In the Tables section, change the data access method for the virtual table to Custom.
The New Virtual Table Mapping dialog box appears.
4. Enter a name for the virtual table mapping.
5. Click Finish.
The Developer tool creates a view for the virtual table mapping and places the virtual table in the editor.
If you created the virtual table from a data object, the Developer tool adds the data object to the mapping
as a source.
6. To add sources to the mapping, drag data objects from the Object Explorer view into the editor.
You can add logical or physical data objects as sources.
7. Optionally, add transformations to the mapping by dragging them from the Object Explorer view or
Transformation palette into the editor.
8. Link columns by selecting a column in a source or transformation and dragging it to a column in another
transformation or the virtual table.
The Developer tool uses an arrow to indicate the columns are l inked.
Validating a Virtual Table Mapping
Validate a virtual table mapping to verify that the Data Integration Service can read and process the entire
virtual table mapping.
1. Open an SQL data service.
2. Select the virtual table mapping view.
3. Select Edit > Validate.
The Validation Log view opens. If no errors appear in the view, the virtual table mapping is valid.
4. If the Validation Log view lists errors, correct the errors and revalidate the virtual table mapping.
Previewing Virtual Table Mapping Output
As you develop a vir tual table mapping, preview the output to veri fy the virtual table mapping produces the
results you want.
The virtual table must be linked to source data.
1. Open the SQL data service that contains the virtual table mapping.
2. Click the virtual table mapping view.
3. Select the object for which you want to preview output. You can select a transformation or the virtual
table.
4. Click the Data Viewer view.
24 Chapter 2: Virtual Data
8/16/2019 DS 100 SQLDataServiceGuide En
http://slidepdf.com/reader/full/ds-100-sqldataserviceguide-en 25/99
5. Click Run.
The Developer tool displays results in the Output section.
Virtual Stored Procedures
A virtual stored procedure is a set of procedural or data flow instructions in an SQL data service. When you
deploy an application that contains an SQL data service, end users can access and run the virtual stored
procedures in the SQL data service through a JDBC client tool.
Create a virtual stored procedure to allow end users to perform calculations, retrieve data, or write data to a
data object. End users can send data to and receive data from the virtual stored procedure through input and
output parameters.
Create a virtual stored procedure within a virtual schema in an SQL data service. You can create multiple
stored procedures within a virtual schema.
A virtual stored procedure conta ins the following components:
• Inputs. Objects that pass data into the virtual stored procedure. Inputs can be input parameters, Read
transformations, or physical or logical data objects. Input parameters pass data to the stored procedure.
Read transformations extract data from logical data objects. A virtual stored procedure must contain at
least one input.
• Transformations. Objects that define the rules for data transformation. Use different transformation objects
to perform different functions. Transformations are optional in a virtual stored procedure.
• Outputs. Objects that pass data out of a virtual stored procedure. Outputs can be output parameters,
Write transformations, or physical or logical data objects. Output parameters receive data from the stored
procedure. Write transformations write data to logical data objects. A virtual stored procedure must
contain at least one output. Virtual stored procedures do not return result sets.
• Links. Connections between ports that define virtual data flow between inputs, transformations, andoutputs.
Example
An end user needs to update customer email addresses for customer records stored in multiple relational
databases.
To allow the end user to update the email addresses, first create a logical data object model to define a
unified view of the customer. Create a logical data object that represents a union of the relational tables.
Create a logical data object write mapping to write to the relational tables. Add a Router transformation to
determine which relational table contains the customer record the end user needs to update.
Next, create an SQL data service. In the SQL data service, create a virtual stored procedure that contains
input parameters for the customer ID and email address. Create a Write transformation based on the logical
data object and add it to the virtual stored procedure as output.
Finally, deploy the SQL data service. The end user can call the virtual stored procedure through a third-party
client tool. The end user passes the customer ID and updated email address to the virtual stored procedure.
The virtual stored procedure uses the Write transformation to update the logical data object. The logical data
object write mapping determines which relational table to update based on the customer ID and updates the
customer email address in the correct table.
Virtual Stored Procedures 25
8/16/2019 DS 100 SQLDataServiceGuide En
http://slidepdf.com/reader/full/ds-100-sqldataserviceguide-en 26/99
Defining a Virtual Stored Procedure
To define a virtual stored procedure, create a virtual stored procedure, add inputs, transformations, and
outputs, and validate the stored procedure.
1. Create a virtual stored procedure in an SQL data service.
2. Add inputs, transformations, and outputs to the virtual stored procedure, and link the ports.
3. Validate the virtual stored procedure.
4. Optionally, preview the virtual stored procedure output.
Creating a Virtual Stored Procedure
Create a virtual stored procedure to allow an end user to access the business logic within the procedure
through a JDBC or ODBC client tool. You must create a virtual stored procedure within a virtual schema.
1. In theOutline view for an SQL data service, right-click the data service and select New > Virtual Stored
Procedure.
The New Virtual Stored Procedure dialog box appears.
2. Enter a name for the virtual stored procedure.
3. Enter a virtual schema name or select a virtual schema.
4. If the virtual stored procedure has input parameters or output parameters, select the appropriate option.
5. Click Finish.
The Developer tool opens the virtual stored procedure in the editor. If you select input parameters or
output parameters, the Developer tool adds an Input Parameter transformation or an Output Parameter
transformation, or both, in the editor.
6. Add input parameters or sources to the virtual stored procedure.
7. Add output parameters or targets to the virtual stored procedure.
8. Optionally, add transformations to the virtual stored procedure by dragging them from the Object
Explorer view or the Transformation palette into the editor.
9. Link ports by selecting a port in a source or transformation and dragging it to a port in another
transformation or target.
The Developer tool uses an arrow to indicate the ports are linked.
Validating a Virtual Stored Procedure
Validate a virtual stored procedure to verify that the Data Integration Service can read and process the virtual
stored procedure.
1. Open a virtual stored procedure.2. Select Edit > Validate.
The Validation Log view opens. If no errors appear in the view, the virtual stored procedure is valid.
3. If the Validation Log view lists errors, correct the errors and revalidate the virtual stored procedure.
26 Chapter 2: Virtual Data
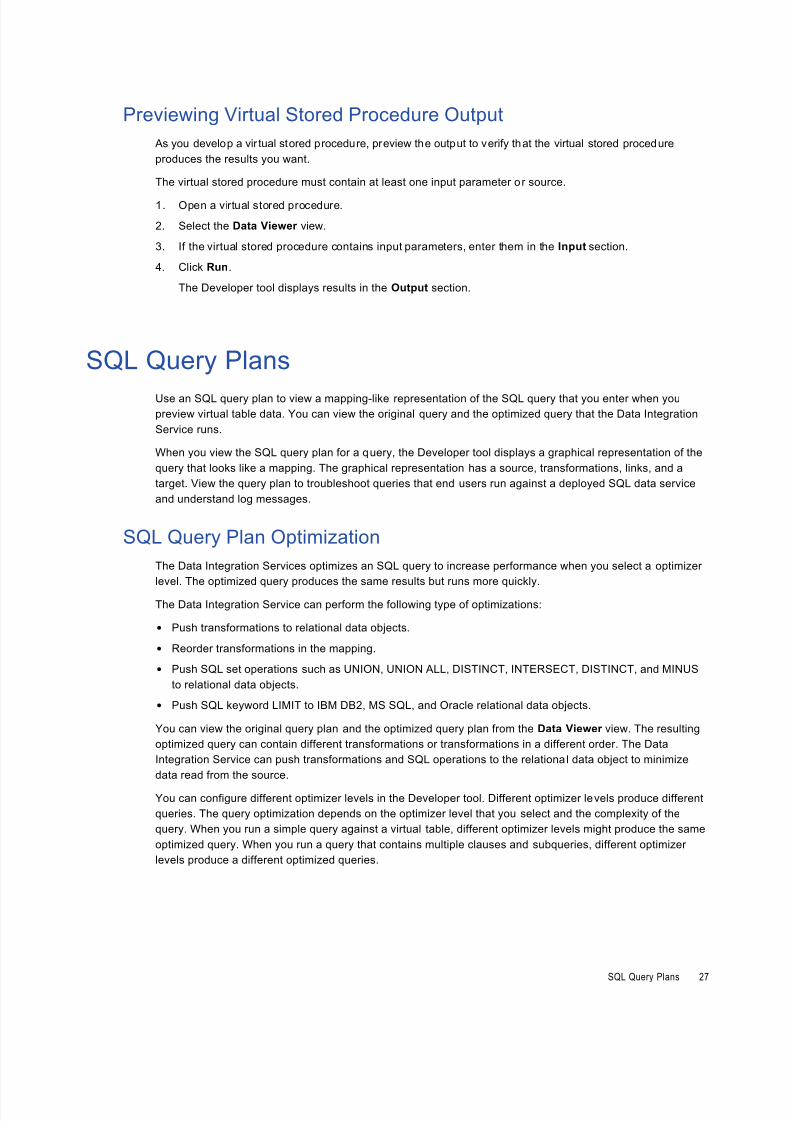
8/16/2019 DS 100 SQLDataServiceGuide En
http://slidepdf.com/reader/full/ds-100-sqldataserviceguide-en 27/99
Previewing Virtual Stored Procedure Output
As you develop a vir tual stored procedure, preview the output to verify that the virtual stored procedure
produces the results you want.
The virtual stored procedure must contain at least one input parameter or source.
1. Open a virtual stored procedure.
2. Select the Data Viewer view.
3. If the virtual stored procedure contains input parameters, enter them in the Input section.
4. Click Run.
The Developer tool displays results in the Output section.
SQL Query Plans
Use an SQL query plan to view a mapping-like representation of the SQL query that you enter when you
preview virtual table data. You can view the original query and the optimized query that the Data Integration
Service runs.
When you view the SQL query plan for a query, the Developer tool displays a graphical representation of the
query that looks like a mapping. The graphical representation has a source, transformations, links, and a
target. View the query plan to troubleshoot queries that end users run against a deployed SQL data service
and understand log messages.
SQL Query Plan Optimization
The Data Integration Services optimizes an SQL query to increase performance when you select a optimizer
level. The optimized query produces the same results but runs more quickly.
The Data Integration Service can perform the following type of optimizations:
• Push transformations to relational data objects.
• Reorder transformations in the mapping.
• Push SQL set operations such as UNION, UNION ALL, DISTINCT, INTERSECT, DISTINCT, and MINUS
to relational data objects.
• Push SQL keyword LIMIT to IBM DB2, MS SQL, and Oracle relational data objects.
You can view the original query plan and the optimized query plan from the Data Viewer view. The resulting
optimized query can contain different transformations or transformations in a different order. The Data
Integration Service can push transformations and SQL operations to the relational data object to minimize
data read from the source.
You can configure different optimizer levels in the Developer tool. Different optimizer levels produce different
queries. The query optimization depends on the optimizer level that you select and the complexity of the
query. When you run a simple query against a virtual table, different optimizer levels might produce the same
optimized query. When you run a query that contains multiple clauses and subqueries, different optimizer
levels produce a different optimized queries.
SQL Query Plans 27
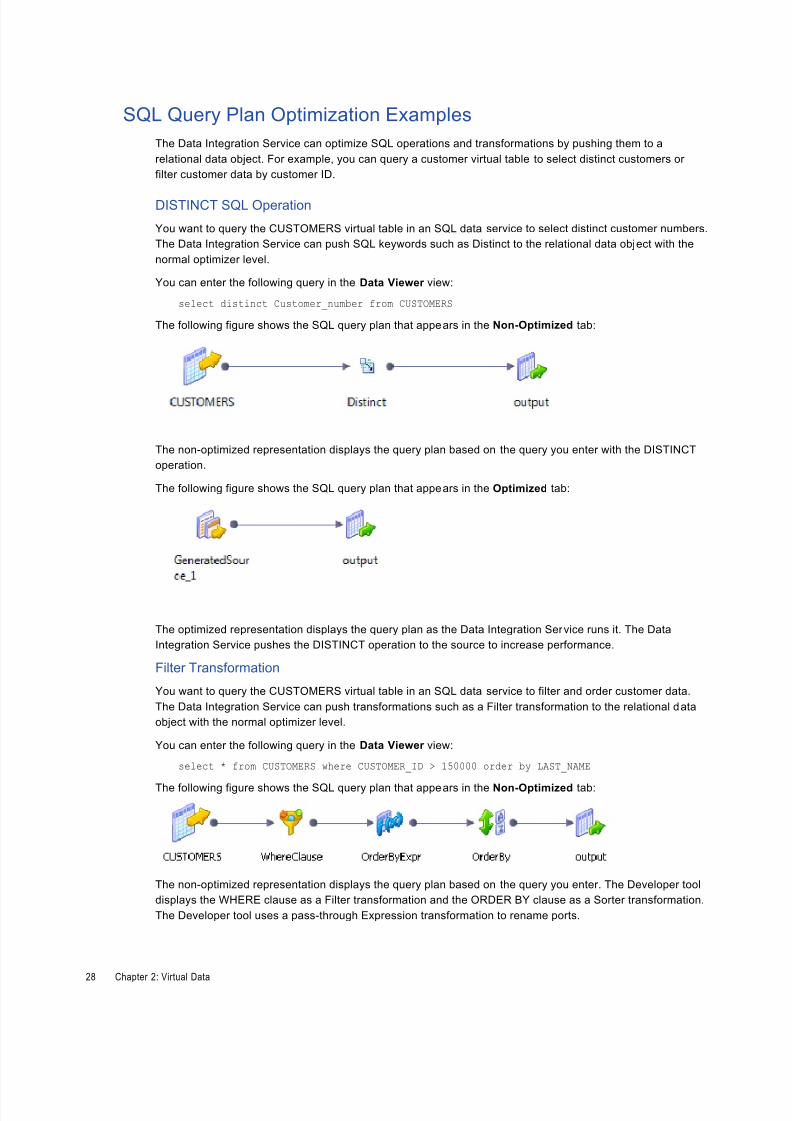
8/16/2019 DS 100 SQLDataServiceGuide En
http://slidepdf.com/reader/full/ds-100-sqldataserviceguide-en 28/99
SQL Query Plan Optimization Examples
The Data Integration Service can optimize SQL operations and transformations by pushing them to a
relational data object. For example, you can query a customer virtual table to select distinct customers or
filter customer data by customer ID.
DISTINCT SQL Operation
You want to query the CUSTOMERS virtual table in an SQL data service to select distinct customer numbers.
The Data Integration Service can push SQL keywords such as Distinct to the relational data object with the
normal optimizer level.
You can enter the following query in the Data Viewer view:
select distinct Customer_number from CUSTOMERS
The following figure shows the SQL query plan that appears in the Non-Optimized tab:
The non-optimized representation displays the query plan based on the query you enter with the DISTINCT
operation.
The following figure shows the SQL query plan that appears in the Optimized tab:
The optimized representation displays the query plan as the Data Integration Service runs it. The Data
Integration Service pushes the DISTINCT operation to the source to increase performance.
Filter Transformation
You want to query the CUSTOMERS virtual table in an SQL data service to filter and order customer data.
The Data Integration Service can push transformations such as a Filter transformation to the relational data
object with the normal optimizer level.
You can enter the following query in the Data Viewer view:
select * from CUSTOMERS where CUSTOMER_ID > 150000 order by LAST_NAME
The following figure shows the SQL query plan that appears in the Non-Optimized tab:
The non-optimized representation displays the query plan based on the query you enter. The Developer tool
displays the WHERE clause as a Filter transformation and the ORDER BY clause as a Sorter transformation.
The Developer tool uses a pass-through Expression transformation to rename ports.
28 Chapter 2: Virtual Data
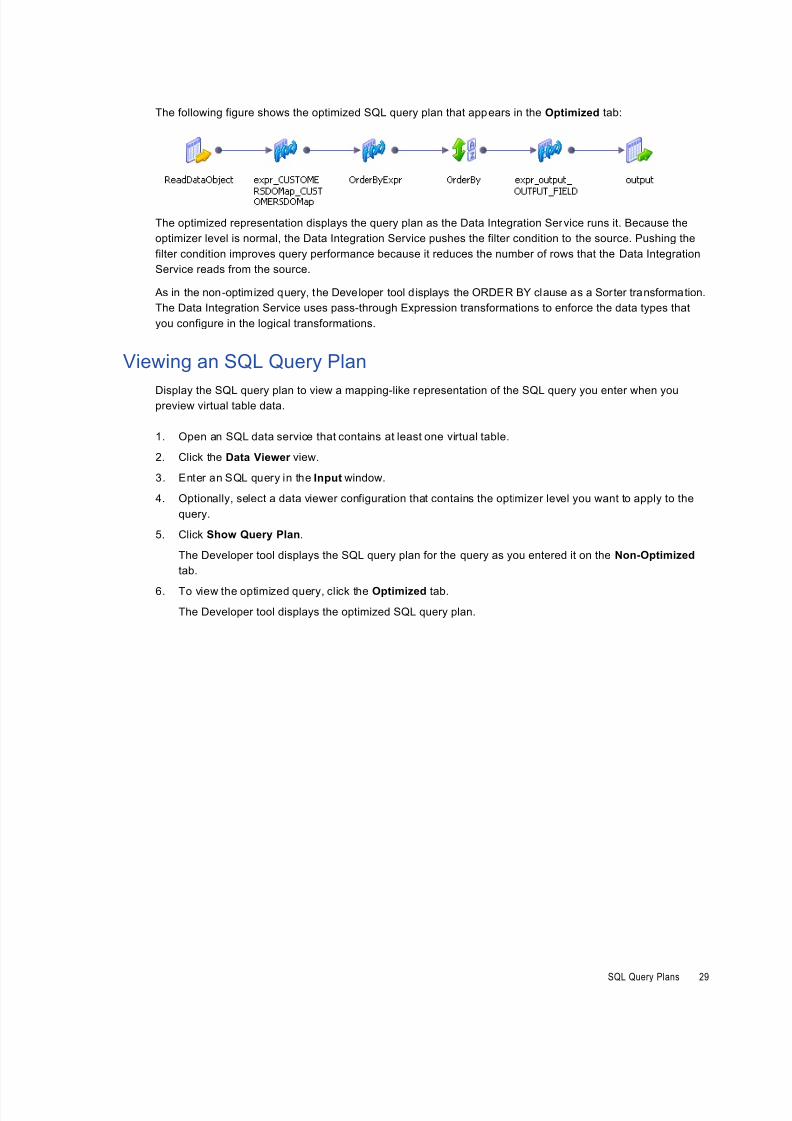
8/16/2019 DS 100 SQLDataServiceGuide En
http://slidepdf.com/reader/full/ds-100-sqldataserviceguide-en 29/99
The following figure shows the optimized SQL query plan that appears in the Optimized tab:
The optimized representation displays the query plan as the Data Integration Service runs it. Because the
optimizer level is normal, the Data Integration Service pushes the filter condition to the source. Pushing the
filter condition improves query performance because it reduces the number of rows that the Data Integration
Service reads from the source.
As in the non-optimized query, the Developer tool displays the ORDER BY clause as a Sorter transformation.
The Data Integration Service uses pass-through Expression transformations to enforce the data types that
you configure in the logical transformations.
Viewing an SQL Query Plan
Display the SQL query plan to view a mapping-like representation of the SQL query you enter when youpreview virtual table data.
1. Open an SQL data service that contains at least one virtual table.
2. Click the Data Viewer view.
3. Enter an SQL query in the Input window.
4. Optionally, select a data viewer configuration that contains the optimizer level you want to apply to the
query.
5. Click Show Query Plan.
The Developer tool displays the SQL query plan for the query as you entered it on the Non-Optimized
tab.
6. To view the optimized query, click the Optimized tab.
The Developer tool displays the optimized SQL query plan.
SQL Query Plans 29
8/16/2019 DS 100 SQLDataServiceGuide En
http://slidepdf.com/reader/full/ds-100-sqldataserviceguide-en 30/99
C H A P T E R 3
SQL Syntax
This chapter includes the following topics:
• SQL Syntax Overview, 30
• Datatypes, 31
• Operators, 31
•
Functions, 31• SQL Statements and Keywords, 39
• Queries, 40
• Reserved Words, 42
• Escape Syntax, 42
• Troubleshooting SQL Data Services, 45
SQL Syntax Overview
An SQL data service is a virtual database you can query. It provides a uniform view of data that might be
scattered among disparate, heterogeneous data sources. You can run SQL queries when you preview virtual
table data in Developer tool. You can also use a JDBC or ODBC client tool to run SQL queries against the
virtual tables in an SQL data service.
An SQL data service can contain the following objects:
• Virtual schemas that define the database structur e
• Virtual tables
• Virtual table mappings that define the flow of data between sources and a virtual table
• Virtual stored procedures that take optional inputs through parameters, transform the data, and optionally
return output through parameters
To allow end users to query the virtual tables and run the virtual stored procedures in an SQL data service, a
developer creates and deploys an application that contains the SQL data service. The developer deploys the
application to a Data Integration Service and an administrator runs the application. When the application is
running, end users can make SQL queries against the virtual tables and run the virtual stored procedures in
the SQL data service.
SQL data services support ANSI SQL-92 operators, functions, statements, and keywords.
30
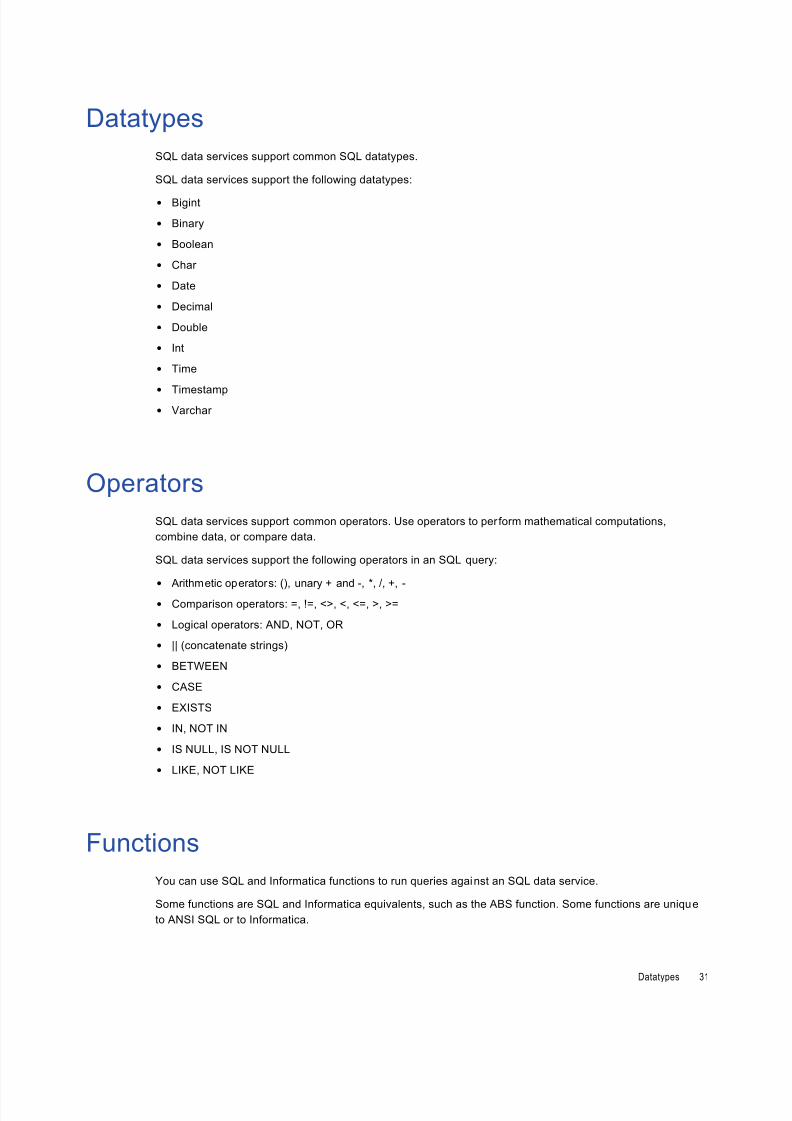
8/16/2019 DS 100 SQLDataServiceGuide En
http://slidepdf.com/reader/full/ds-100-sqldataserviceguide-en 31/99
Datatypes
SQL data services support common SQL datatypes.
SQL data services support the following datatypes:
• Bigint
• Binary
• Boolean
• Char
• Date
• Decimal
• Double
• Int
• Time
•
Timestamp• Varchar
Operators
SQL data services support common operators. Use operators to per form mathematical computations,
combine data, or compare data.
SQL data services support the following operators in an SQL query:
• Arithmetic operators: (), unary + and -, *, /, +, -
• Comparison operators: =, !=, <>, <, <=, >, >=
• Logical operators: AND, NOT, OR
• || (concatenate strings)
• BETWEEN
• CASE
• EXISTS
• IN, NOT IN
• IS NULL, IS NOT NULL
• LIKE, NOT LIKE
Functions
You can use SQL and Informatica functions to run queries against an SQL data service.
Some functions are SQL and Informatica equivalents, such as the ABS function. Some functions are unique
to ANSI SQL or to Informatica.
Datatypes 31
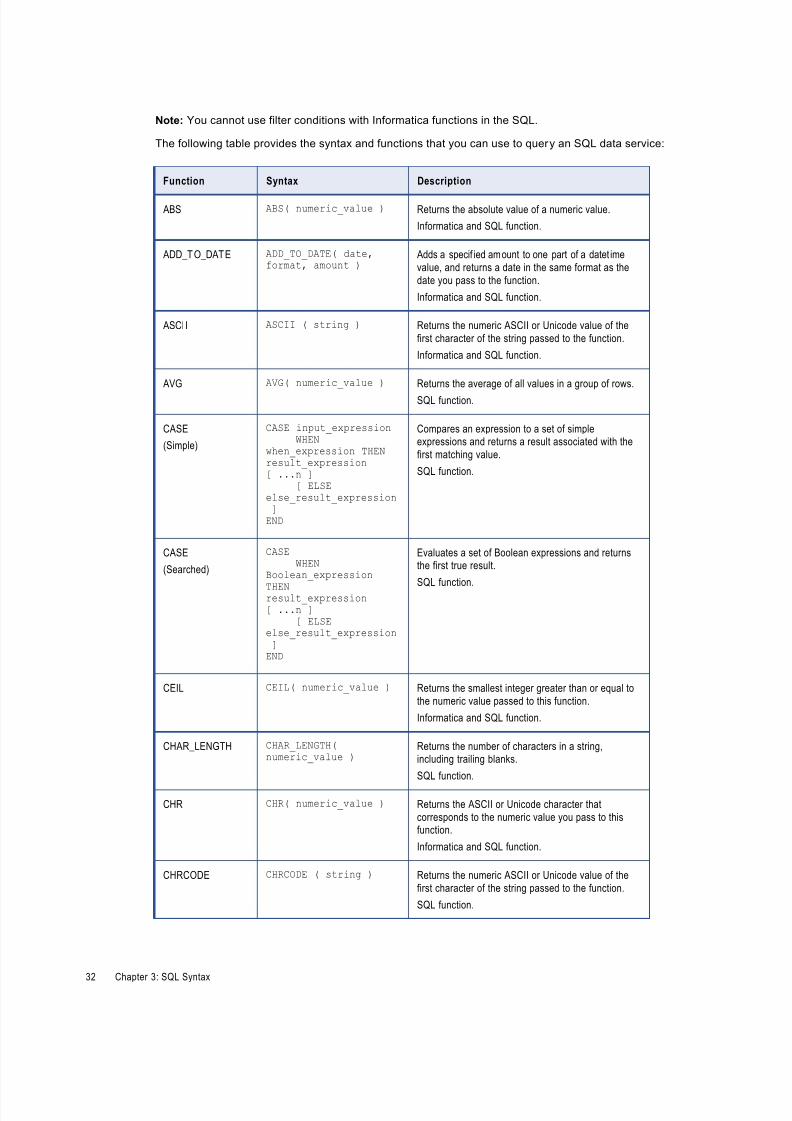
8/16/2019 DS 100 SQLDataServiceGuide En
http://slidepdf.com/reader/full/ds-100-sqldataserviceguide-en 32/99
Note: You cannot use filter conditions with Informatica functions in the SQL.
The following table provides the syntax and functions that you can use to query an SQL data service:
Function Syntax Description
ABS ABS( numeric_value ) Returns the absolute value of a numeric value.
Informatica and SQL function.
ADD_TO_DATE ADD_TO_DATE( date,format, amount )
Adds a specif ied amount to one part of a datet ime
value, and returns a date in the same format as the
date you pass to the function.
Informatica and SQL function.
ASCII ASCII ( string ) Returns the numeric ASCII or Unicode value of the
first character of the string passed to the function.
Informatica and SQL function.
AVG AVG( numeric_value ) Returns the average of all values in a group of rows.
SQL function.
CASE
(Simple)
CASE input_expressionWHEN
when_expression THENresult_expression[ ...n ]
[ ELSEelse_result_expression ]END
Compares an expression to a set of simpleexpressions and returns a result associated with the
first matching value.
SQL function.
CASE
(Searched)
CASE WHENBoolean_expression
THENresult_expression[ ...n ]
[ ELSEelse_result_expression ]END
Evaluates a set of Boolean expressions and returnsthe first true result.
SQL function.
CEIL CEIL( numeric_value ) Returns the smallest integer greater than or equal to
the numeric value passed to this function.
Informatica and SQL function.
CHAR_LENGTH CHAR_LENGTH(numeric_value )
Returns the number of characters in a string,including trailing blanks.
SQL function.
CHR CHR( numeric_value ) Returns the ASCII or Unicode character that
corresponds to the numeric value you pass to thisfunction.
Informatica and SQL function.
CHRCODE CHRCODE ( string ) Returns the numeric ASCII or Unicode value of the
first character of the string passed to the function.
SQL function.
32 Chapter 3: SQL Syntax
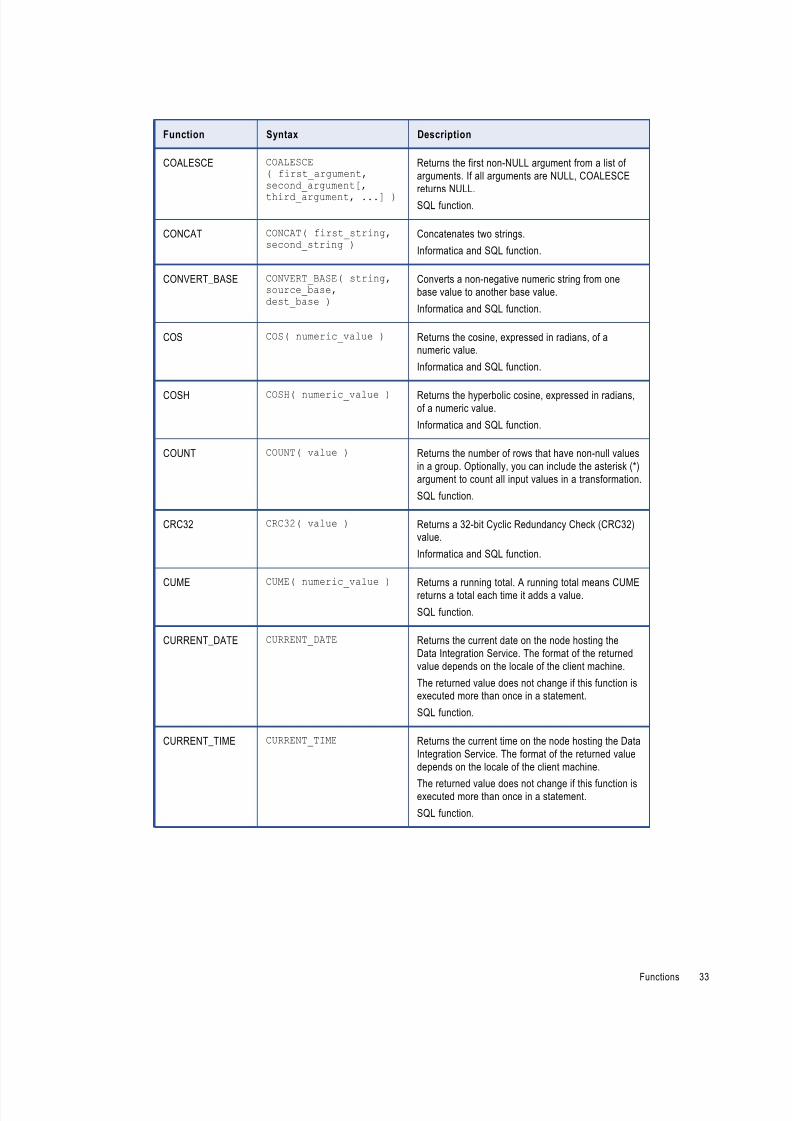
8/16/2019 DS 100 SQLDataServiceGuide En
http://slidepdf.com/reader/full/ds-100-sqldataserviceguide-en 33/99
Function Syntax Description
COALESCE COALESCE( first_argument,second_argument[,
third_argument, ...] )
Returns the first non-NULL argument from a list of
arguments. If all arguments are NULL, COALESCE
returns NULL.
SQL function.
CONCAT CONCAT( first_string,second_string )
Concatenates two strings.
Informatica and SQL function.
CONVERT_BASE CONVERT_BASE( string,source_base,dest_base )
Converts a non-negative numeric string from one
base value to another base value.
Informatica and SQL function.
COS COS( numeric_value ) Returns the cosine, expressed in radians, of anumeric value.
Informatica and SQL function.
COSH COSH( numeric_value ) Returns the hyperbolic cosine, expressed in radians,of a numeric value.
Informatica and SQL function.
COUNT COUNT( value ) Returns the number of rows that have non-null values
in a group. Optionally, you can include the asterisk (*)
argument to count all input values in a transformation.
SQL function.
CRC32 CRC32( value ) Returns a 32-bit Cyclic Redundancy Check (CRC32)value.
Informatica and SQL function.
CUME CUME( numeric_value ) Returns a running total. A running total means CUME
returns a total each time it adds a value.
SQL function.
CURRENT_DATE CURRENT_DATE Returns the current date on the node hosting the
Data Integration Service. The format of the returned
value depends on the locale of the client machine.
The returned value does not change if this function isexecuted more than once in a statement.
SQL function.
CURRENT_TIME CURRENT_TIME Returns the current time on the node hosting the Data
Integration Service. The format of the returned value
depends on the locale of the client machine.
The returned value does not change if this function isexecuted more than once in a statement.
SQL function.
Functions 33
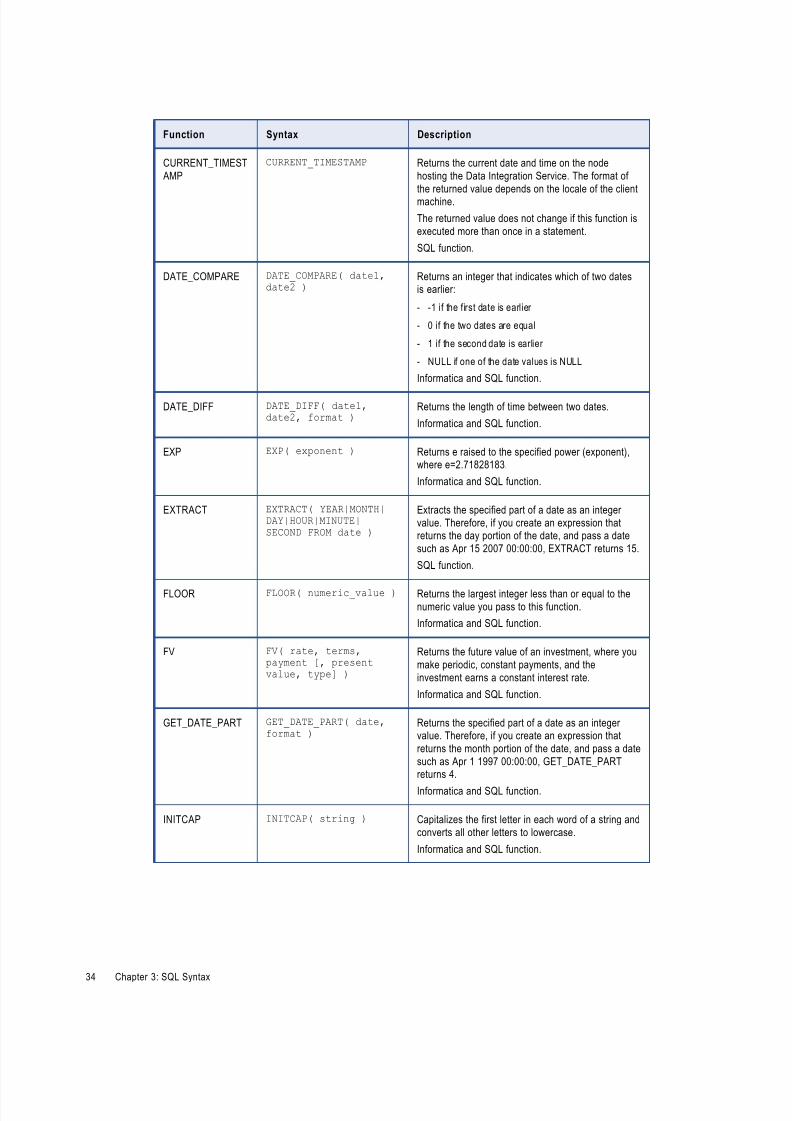
8/16/2019 DS 100 SQLDataServiceGuide En
http://slidepdf.com/reader/full/ds-100-sqldataserviceguide-en 34/99
Function Syntax Description
CURRENT_TIMEST
AMP
CURRENT_TIMESTAMP Returns the current date and time on the node
hosting the Data Integration Service. The format of
the returned value depends on the locale of the clientmachine.
The returned value does not change if this function is
executed more than once in a statement.
SQL function.
DATE_COMPARE DATE_COMPARE( date1,date2 )
Returns an integer that indicates which of two datesis earlier:
- -1 if the first date is earlier
- 0 if the two dates are equal
- 1 if the second date is earlier
- NULL if one of the date values is NULL
Informatica and SQL function.
DATE_DIFF DATE_DIFF( date1,date2, format )
Returns the length of time between two dates.
Informatica and SQL function.
EXP EXP( exponent ) Returns e raised to the specified power (exponent),where e=2.71828183.
Informatica and SQL function.
EXTRACT EXTRACT( YEAR|MONTH|DAY|HOUR|MINUTE|SECOND FROM date )
Extracts the specified part of a date as an integer
value. Therefore, if you create an expression thatreturns the day portion of the date, and pass a date
such as Apr 15 2007 00:00:00, EXTRACT returns 15.
SQL function.
FLOOR FLOOR( numeric_value ) Returns the largest integer less than or equal to thenumeric value you pass to this function.
Informatica and SQL function.
FV FV( rate, terms,payment [, presentvalue, type] )
Returns the future value of an investment, where you
make periodic, constant payments, and the
investment earns a constant interest rate.
Informatica and SQL function.
GET_DATE_PART GET_DATE_PART( date,format )
Returns the specified part of a date as an integervalue. Therefore, if you create an expression that
returns the month portion of the date, and pass a date
such as Apr 1 1997 00:00:00, GET_DATE_PARTreturns 4.
Informatica and SQL function.
INITCAP INITCAP( string ) Capitalizes the first letter in each word of a string and
converts all other letters to lowercase.
Informatica and SQL function.
34 Chapter 3: SQL Syntax

8/16/2019 DS 100 SQLDataServiceGuide En
http://slidepdf.com/reader/full/ds-100-sqldataserviceguide-en 35/99
Function Syntax Description
INSTR INSTR( string,search_value [,start[,occurrence
[,comparison_type ]]])
Returns the position of a character set in a string,
counting from left to right.
Informatica and SQL function.
IS_DATE IS_DATE( value[,format] )
Returns whether a string value is a valid date.
Informatica and SQL function.
IS_NUMBER IS_NUMBER( value ) Returns whether a string is a valid number.
Informatica function.
IS_SPACES IS_SPACES( value ) Returns whether a string value consists entirely of
spaces. A space is a blank space, a formfeed, anewline, a carriage return, a tab, or a vertical tab.
Informatica function.
ISNULL ISNULL( value ) Returns whether a value is NULL. Evaluates an
empty string as FALSE.
Informatica and SQL function.
ISNUMERIC ISNUMERIC( value ) Returns whether a string is a valid number.
SQL function.
LAST_DAY LAST_DAY( date ) Returns the date of the last day of the month for each
date in a column.
Informatica and SQL function.
LN LN( numeric_value ) Returns the natural logarithm of a numeric value.
Informatica and SQL function.
LOCATE LOCATE( string,search_value )
Returns the position of a character set from the
beginning of a string.
SQL function.
LOG LOG( base, exponent ) Returns the logarithm of a numeric value.
Informatica and SQL function.
LOWER LOWER( string ) Converts uppercase string characters to lowercase.
Informatica and SQL function.
LPAD LPAD( first_string,length
[,second_string] )
Adds a set o f blanks or charac ters to the beginning of
a string to set the string to a specified length.
Informatica and SQL function.
LTRIM LTRIM( string [,trim_set] )
Removes blanks or characters from the beginning ofa string.
Informatica and SQL function.
Functions 35
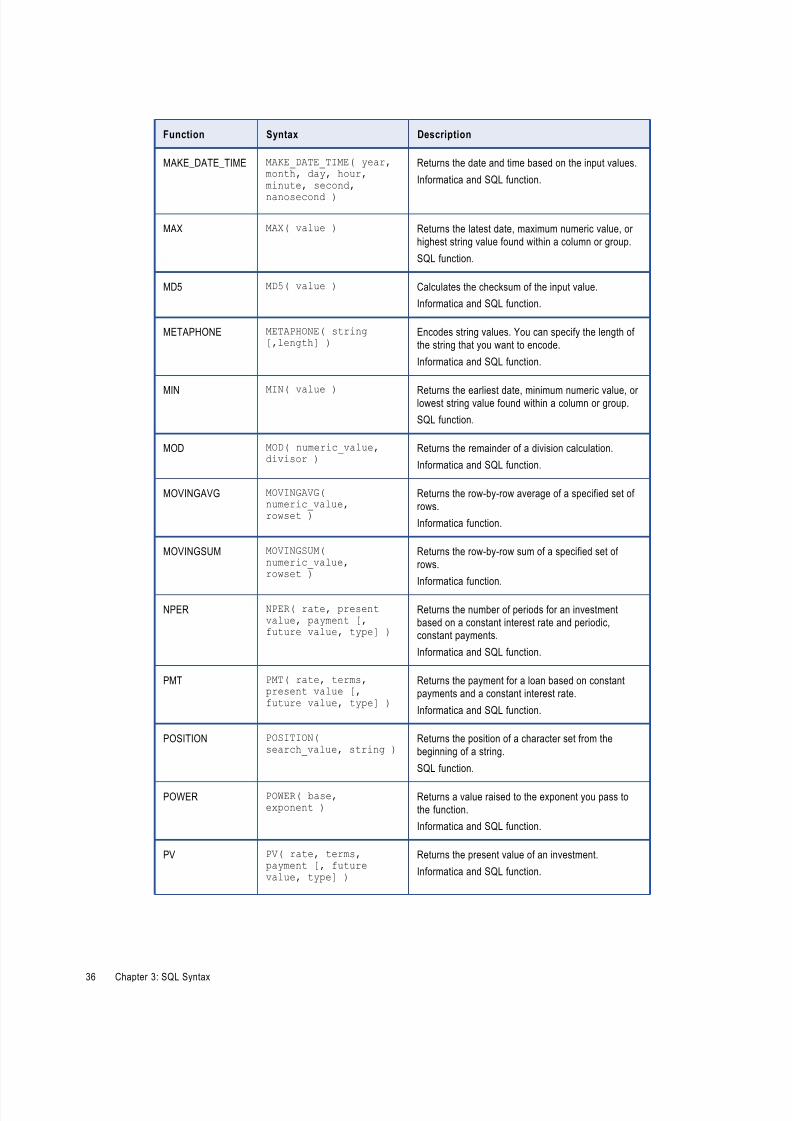
8/16/2019 DS 100 SQLDataServiceGuide En
http://slidepdf.com/reader/full/ds-100-sqldataserviceguide-en 36/99
Function Syntax Description
MAKE_DATE_TIME MAKE_DATE_TIME( year,month, day, hour,minute, second,
nanosecond )
Returns the date and time based on the input values.
Informatica and SQL function.
MAX MAX( value ) Returns the latest date, maximum numeric value, or
highest string value found within a column or group.
SQL function.
MD5 MD5( value ) Calculates the checksum of the input value.
Informatica and SQL function.
METAPHONE METAPHONE( string[,length] )
Encodes string values. You can specify the length of
the string that you want to encode.
Informatica and SQL function.
MIN MIN( value ) Returns the earliest date, minimum numeric value, orlowest string value found within a column or group.
SQL function.
MOD MOD( numeric_value,divisor )
Returns the remainder of a division calculation.
Informatica and SQL function.
MOVINGAVG MOVINGAVG(numeric_value,rowset )
Returns the row-by-row average of a specified set of
rows.
Informatica function.
MOVINGSUM MOVINGSUM(numeric_value,rowset )
Returns the row-by-row sum of a specified set of
rows.
Informatica function.
NPER NPER( rate, presentvalue, payment [,future value, type] )
Returns the number of periods for an investment
based on a constant interest rate and periodic,constant payments.
Informatica and SQL function.
PMT PMT( rate, terms,present value [,future value, type] )
Returns the payment for a loan based on constant
payments and a constant interest rate.
Informatica and SQL function.
POSITION POSITION(search_value, string )
Returns the position of a character set from the
beginning of a string.
SQL function.
POWER POWER( base,exponent )
Returns a value raised to the exponent you pass to
the function.
Informatica and SQL function.
PV PV( rate, terms,payment [, futurevalue, type] )
Returns the present value of an investment.
Informatica and SQL function.
36 Chapter 3: SQL Syntax
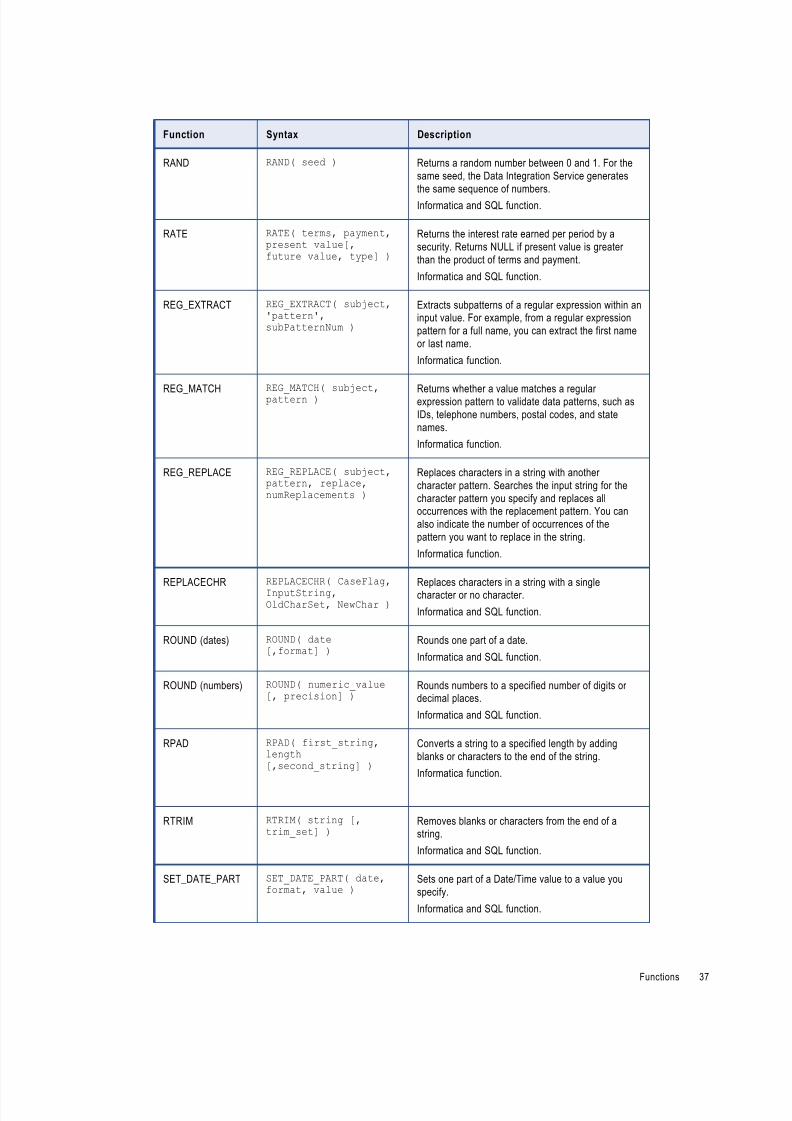
8/16/2019 DS 100 SQLDataServiceGuide En
http://slidepdf.com/reader/full/ds-100-sqldataserviceguide-en 37/99
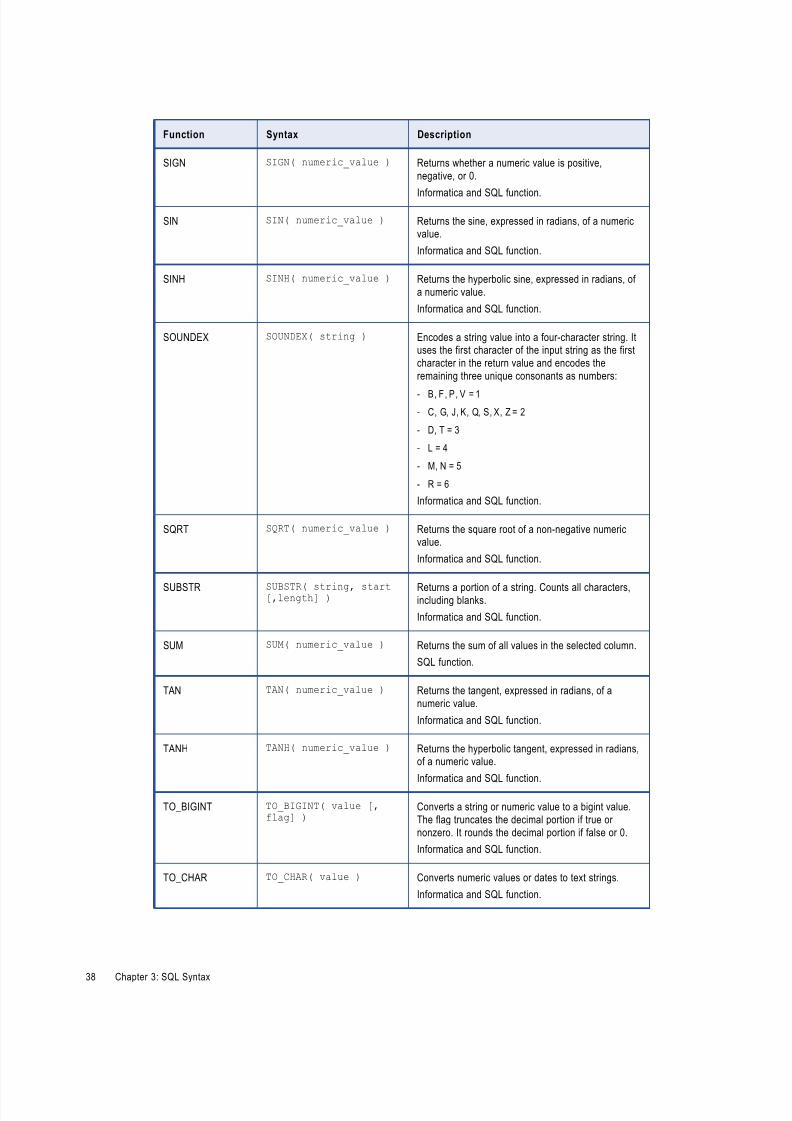
8/16/2019 DS 100 SQLDataServiceGuide En
http://slidepdf.com/reader/full/ds-100-sqldataserviceguide-en 38/99
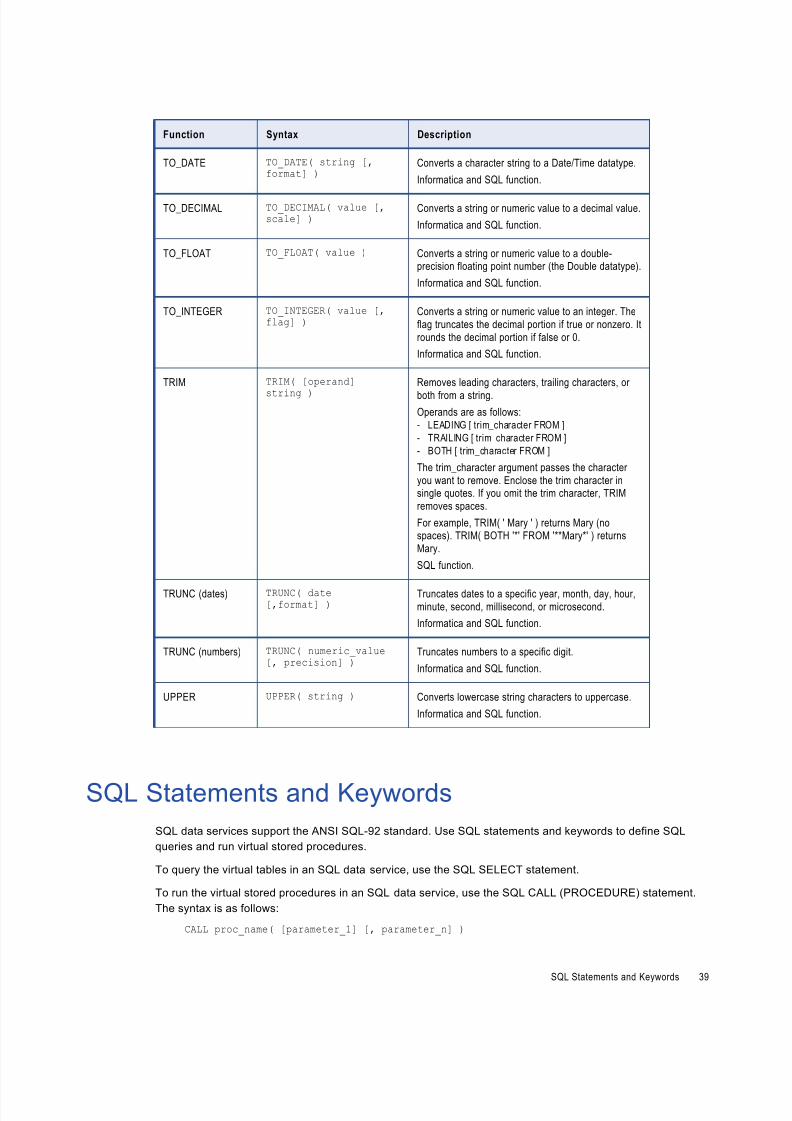
8/16/2019 DS 100 SQLDataServiceGuide En
http://slidepdf.com/reader/full/ds-100-sqldataserviceguide-en 39/99
Function Syntax Description
TO_DATE TO_DATE( string [,format] )
Converts a character string to a Date/Time datatype.
Informatica and SQL function.
TO_DECIMAL TO_DECIMAL( value [,scale] )
Converts a string or numeric value to a decimal value.
Informatica and SQL function.
TO_FLOAT TO_FLOAT( value ) Converts a string or numeric value to a double-precision floating point number (the Double datatype).
Informatica and SQL function.
TO_INTEGER TO_INTEGER( value [,flag] )
Converts a string or numeric value to an integer. The
flag truncates the decimal portion if true or nonzero. It
rounds the decimal portion if false or 0.
Informatica and SQL function.
TRIM TRIM( [operand]
string )
Removes leading characters, trailing characters, or
both from a string.
Operands are as follows:- LEADING [ trim_character FROM ]
- TRAILING [ trim_character FROM ]
- BOTH [ trim_character FROM ]
The trim_character argument passes the character
you want to remove. Enclose the trim character insingle quotes. If you omit the trim character, TRIM
removes spaces.
For example, TRIM( ' Mary ' ) returns Mary (nospaces). TRIM( BOTH '*' FROM '**Mary*' ) returns
Mary.
SQL function.
TRUNC (dates) TRUNC( date[,format] )
Truncates dates to a specific year, month, day, hour,minute, second, millisecond, or microsecond.
Informatica and SQL function.
TRUNC (numbers) TRUNC( numeric_value[, precision] )
Truncates numbers to a specific digit.
Informatica and SQL function.
UPPER UPPER( string ) Converts lowercase string characters to uppercase.
Informatica and SQL function.
SQL Statements and KeywordsSQL data services support the ANSI SQL-92 standard. Use SQL statements and keywords to define SQL
queries and run virtual stored procedures.
To query the virtual tables in an SQL data service, use the SQL SELECT statement.
To run the virtual stored procedures in an SQL data service, use the SQL CALL (PROCEDURE) statement.
The syntax is as follows:
CALL proc_name( [parameter_1] [, parameter_n] )
SQL Statements and Keywords 39

8/16/2019 DS 100 SQLDataServiceGuide En
http://slidepdf.com/reader/full/ds-100-sqldataserviceguide-en 40/99
You can use the following clauses in an SQL query:
• FROM
• GROUP BY
• HAVING
• ORDER BY
• WHERE
You can use the following SQL keywords in an SQL query:
• ALL
• CROSS JOIN
• DISTINCT
• EXCEPT
• FULL OUTER JOIN
• INNER JOIN
•
INTERSECT• LEFT OUTER JOIN
• LIMIT
• MINUS
• RIGHT OUTER JOIN
• UNION, UNION ALL
Queries
You can issue non-correlated subqueries, correlated subqueries, and parameterized queries when you query
virtual tables and run virtual stored procedures in an SQL data service.
Non-Correlated Subqueries
A non-correlated subquery is a subquery that is not dependent on the outer query. Use non-correlated
subqueries to filter or modify data when you query virtual tables in an SQL data service.
You can use non-correlated subqueries in the following places:
• Expressions
• BETWEEN operator
• CASE operator
• FROM clause
• HAVING clause
• IN, NOT IN operators
• SELECT statement
• WHERE clause
You can use scalar non-correlated subqueries.
40 Chapter 3: SQL Syntax
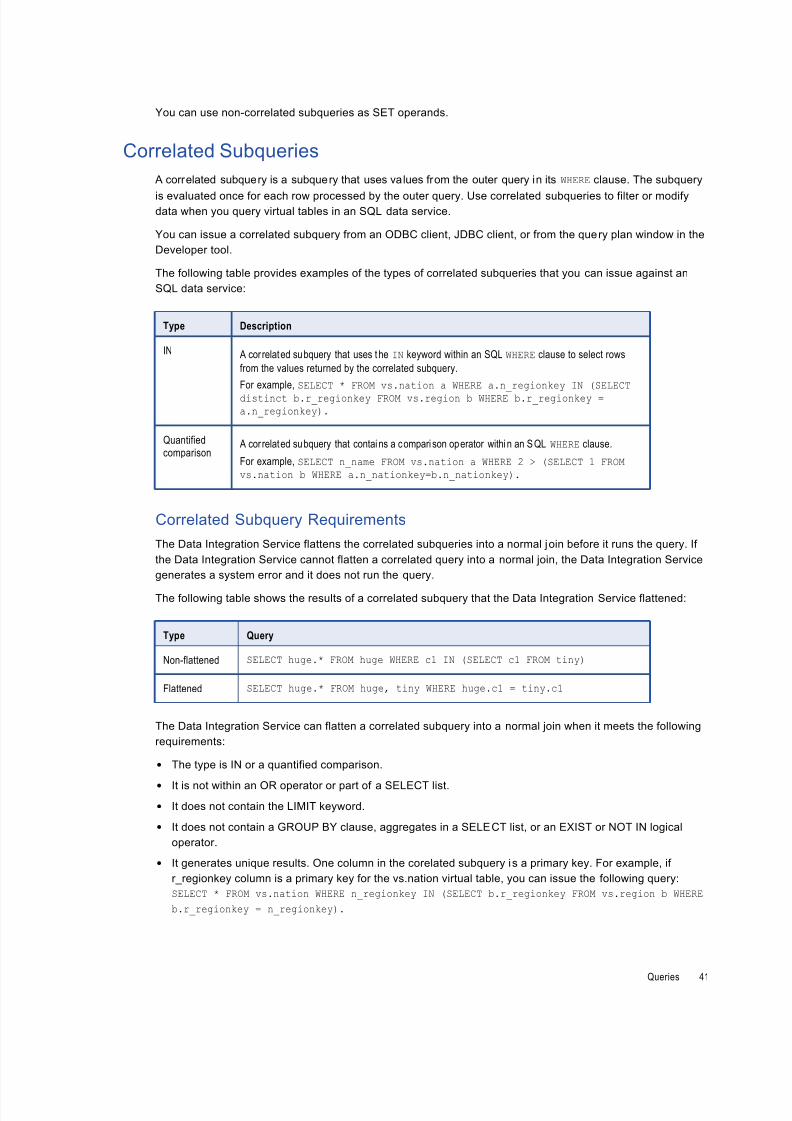
8/16/2019 DS 100 SQLDataServiceGuide En
http://slidepdf.com/reader/full/ds-100-sqldataserviceguide-en 41/99
You can use non-correlated subqueries as SET operands.
Correlated Subqueries
A correlated subquery is a subquery that uses values from the outer query in its WHERE clause. The subquery
is evaluated once for each row processed by the outer query. Use correlated subqueries to filter or modifydata when you query virtual tables in an SQL data service.
You can issue a correlated subquery from an ODBC client, JDBC client, or from the query plan window in the
Developer tool.
The following table provides examples of the types of correlated subqueries that you can issue against an
SQL data service:
Type Description
IN A cor related subquery that uses the IN keyword within an SQL WHERE clause to select rows
from the values returned by the correlated subquery.
For example, SELECT * FROM vs.nation a WHERE a.n_regionkey IN (SELECTdistinct b.r_regionkey FROM vs.region b WHERE b.r_regionkey =a.n_regionkey).
Quantifiedcomparison
A cor related subquery that contains a compari son operator within an SQL WHERE clause.
For example, SELECT n_name FROM vs.nation a WHERE 2 > (SELECT 1 FROMvs.nation b WHERE a.n_nationkey=b.n_nationkey).
Correlated Subquery Requirements
The Data Integration Service flattens the correlated subqueries into a normal join before it runs the query. If
the Data Integration Service cannot flatten a correlated query into a normal join, the Data Integration Service
generates a system error and it does not run the query.
The following table shows the results of a correlated subquery that the Data Integration Service flattened:
Type Query
Non-flattened SELECT huge.* FROM huge WHERE c1 IN (SELECT c1 FROM tiny)
Flattened SELECT huge.* FROM huge, tiny WHERE huge.c1 = tiny.c1
The Data Integration Service can flatten a correlated subquery into a normal join when it meets the following
requirements:
• The type is IN or a quantified comparison.
• It is not within an OR operator or part of a SELECT list.• It does not contain the LIMIT keyword.
• It does not contain a GROUP BY clause, aggregates in a SELECT list, or an EXIST or NOT IN logical
operator.
• It generates unique results. One column in the corelated subquery is a primary key. For example, if
r_regionkey column is a primary key for the vs.nation virtual table, you can issue the following query:
SELECT * FROM vs.nation WHERE n_regionkey IN (SELECT b.r_regionkey FROM vs.region b WHERE
b.r_regionkey = n_regionkey).
Queries 41
8/16/2019 DS 100 SQLDataServiceGuide En
http://slidepdf.com/reader/full/ds-100-sqldataserviceguide-en 42/99
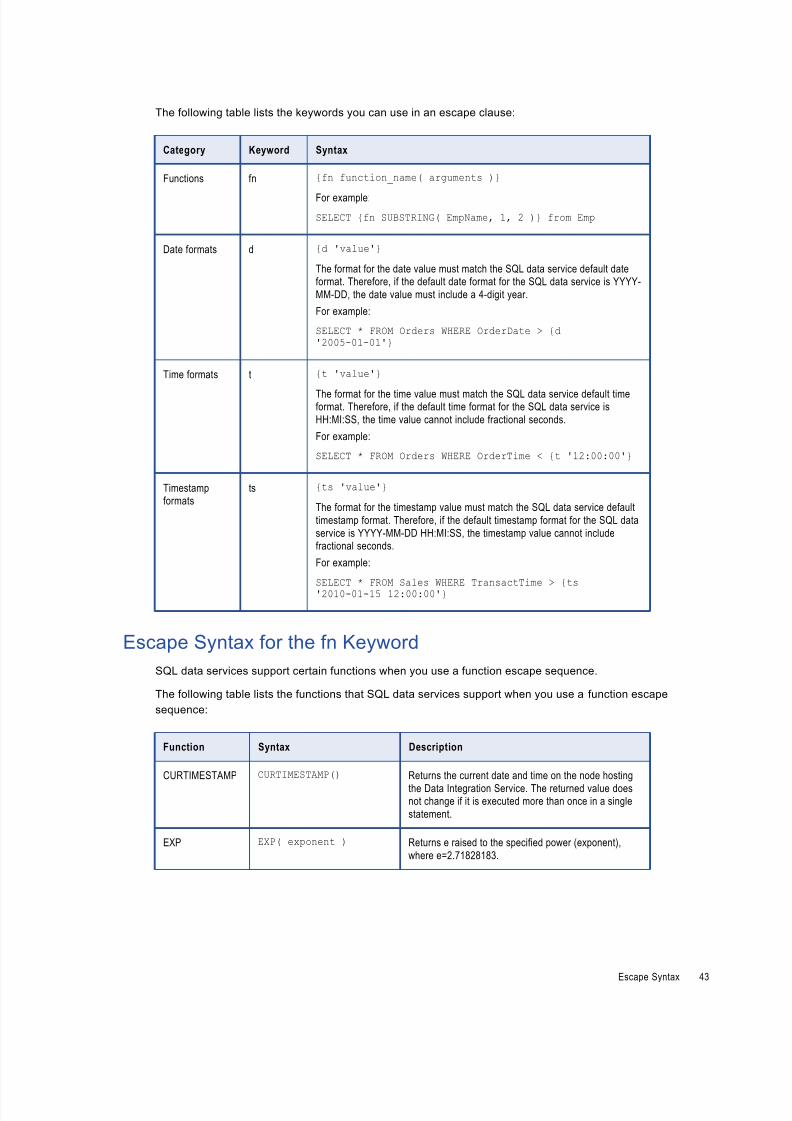
8/16/2019 DS 100 SQLDataServiceGuide En
http://slidepdf.com/reader/full/ds-100-sqldataserviceguide-en 43/99
The following table lists the keywords you can use in an escape clause:
Category Keyword Syntax
Functions fn {fn function_name( arguments )}
For example:
SELECT {fn SUBSTRING( EmpName, 1, 2 )} from Emp
Date formats d {d 'value'}
The format for the date value must match the SQL data service default dateformat. Therefore, if the default date format for the SQL data service is YYYY-
MM-DD, the date value must include a 4-digit year.
For example:
SELECT * FROM Orders WHERE OrderDate > {d'2005-01-01'}
Time formats t {t 'value'}
The format for the time value must match the SQL data service default timeformat. Therefore, if the default time format for the SQL data service is
HH:MI:SS, the time value cannot include fractional seconds.
For example:
SELECT * FROM Orders WHERE OrderTime < {t '12:00:00'}
Timestampformats
ts {ts 'value'}
The format for the timestamp value must match the SQL data service default
timestamp format. Therefore, if the default timestamp format for the SQL data
service is YYYY-MM-DD HH:MI:SS, the timestamp value cannot includefractional seconds.
For example:
SELECT * FROM Sales WHERE TransactTime > {ts'2010-01-15 12:00:00'}
Escape Syntax for the fn Keyword
SQL data services support certain functions when you use a function escape sequence.
The following table lists the functions that SQL data services support when you use a function escape
sequence:
Function Syntax Description
CURTIMESTAMP CURTIMESTAMP() Returns the current date and time on the node hosting
the Data Integration Service. The returned value doesnot change if it is executed more than once in a single
statement.
EXP EXP( exponent ) Returns e raised to the specified power (exponent),
where e=2.71828183.
Escape Syntax 43
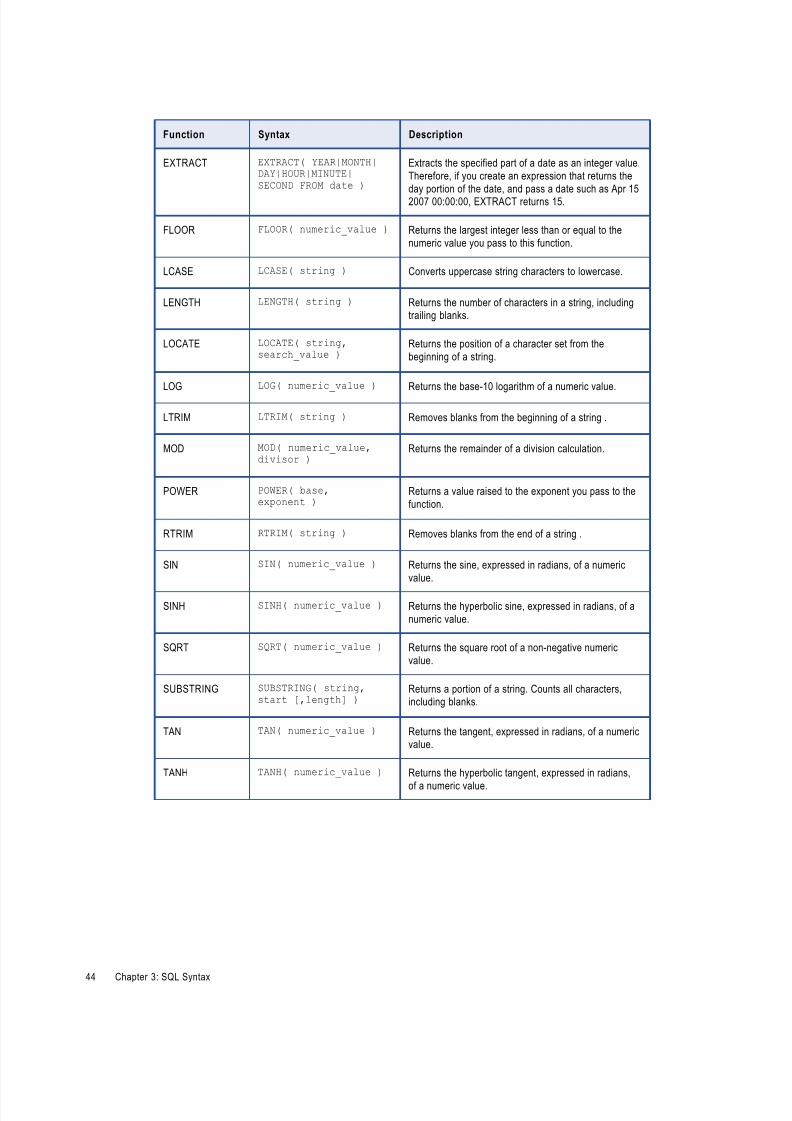
8/16/2019 DS 100 SQLDataServiceGuide En
http://slidepdf.com/reader/full/ds-100-sqldataserviceguide-en 44/99
Function Syntax Description
EXTRACT EXTRACT( YEAR|MONTH|DAY|HOUR|MINUTE|SECOND FROM date )
Extracts the specified part of a date as an integer value.
Therefore, if you create an expression that returns the
day portion of the date, and pass a date such as Apr 152007 00:00:00, EXTRACT returns 15.
FLOOR FLOOR( numeric_value ) Returns the largest integer less than or equal to the
numeric value you pass to this function.
LCASE LCASE( string ) Converts uppercase string characters to lowercase.
LENGTH LENGTH( string ) Returns the number of characters in a string, includingtrailing blanks.
LOCATE LOCATE( string,search_value )
Returns the position of a character set from the
beginning of a string.
LOG LOG( numeric_value ) Returns the base-10 logarithm of a numeric value.
LTRIM LTRIM( string ) Removes blanks from the beginning of a string .
MOD MOD( numeric_value,divisor )
Returns the remainder of a division calculation.
POWER POWER( base,exponent )
Returns a value raised to the exponent you pass to the
function.
RTRIM RTRIM( string ) Removes blanks from the end of a string .
SIN SIN( numeric_value ) Returns the sine, expressed in radians, of a numeric
value.
SINH SINH( numeric_value ) Returns the hyperbolic sine, expressed in radians, of a
numeric value.
SQRT SQRT( numeric_value ) Returns the square root of a non-negative numeric
value.
SUBSTRING SUBSTRING( string,start [,length] )
Returns a portion of a string. Counts all characters,including blanks.
TAN TAN( numeric_value ) Returns the tangent, expressed in radians, of a numericvalue.
TANH TANH( numeric_value ) Returns the hyperbolic tangent, expressed in radians,
of a numeric value.
44 Chapter 3: SQL Syntax
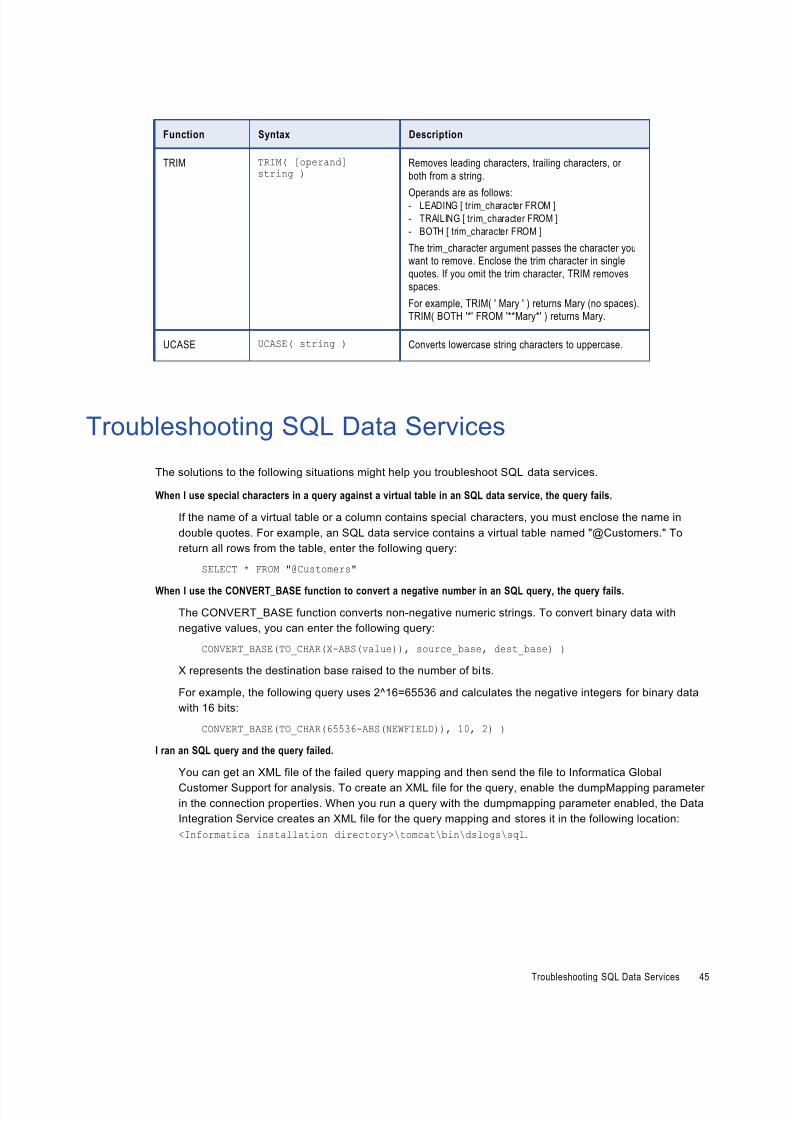
8/16/2019 DS 100 SQLDataServiceGuide En
http://slidepdf.com/reader/full/ds-100-sqldataserviceguide-en 45/99
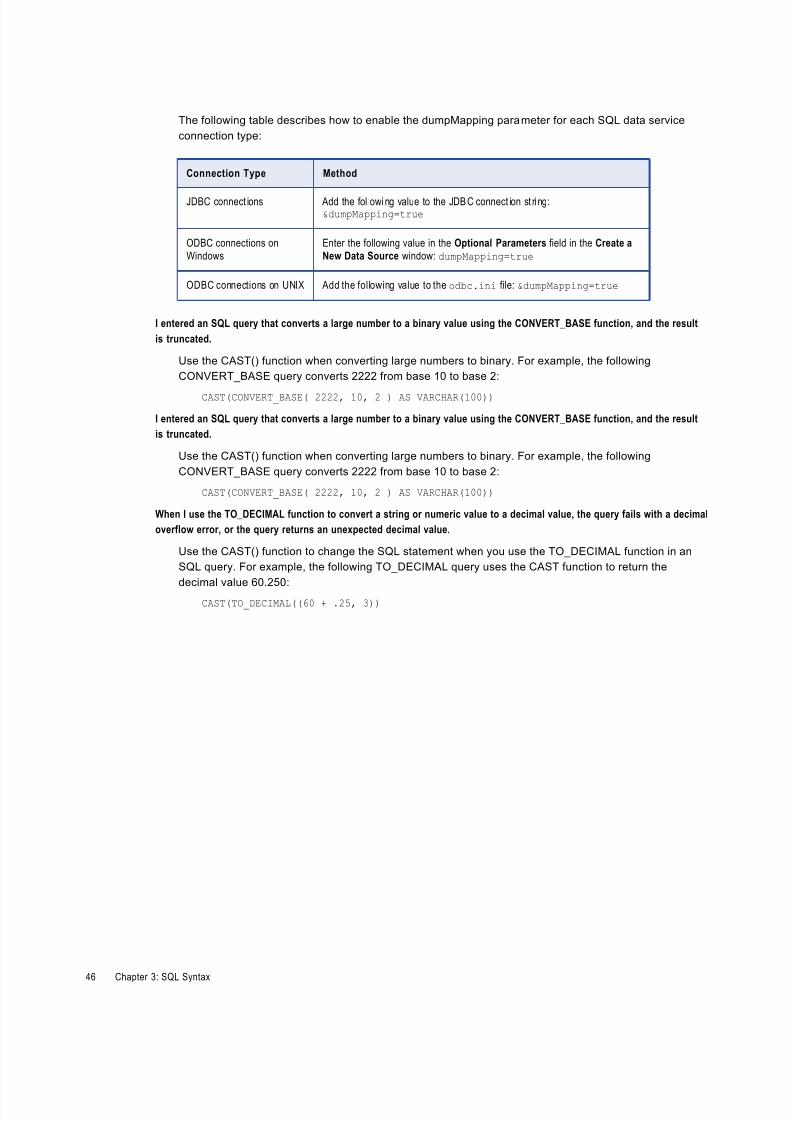
8/16/2019 DS 100 SQLDataServiceGuide En
http://slidepdf.com/reader/full/ds-100-sqldataserviceguide-en 46/99
The following table describes how to enable the dumpMapping parameter for each SQL data service
connection type:
Connection Type Method
JDBC connect ions Add the fol lowing value to the JDBC connect ion st ri ng:&dumpMapping=true
ODBC connections on
Windows
Enter the following value in the Optional Parameters field in the Create a
New Data Source window: dumpMapping=true
ODBC connections on UNIX Add the following value to the odbc.ini file: &dumpMapping=true
I entered an SQL query that converts a large number to a binary value using the CONVERT_BASE function, and the result
is truncated.
Use the CAST() function when converting large numbers to binary. For example, the following
CONVERT_BASE query converts 2222 from base 10 to base 2:
CAST(CONVERT_BASE( 2222, 10, 2 ) AS VARCHAR(100))
When I use the TO_DECIMAL function to convert a string or numeric value to a decimal value, the query fails with a decimal
overflow error, or the query returns an unexpected decimal value.
Use the CAST() function to change the SQL statement when you use the TO_DECIMAL function in an
SQL query. For example, the following TO_DECIMAL query uses the CAST function to return the
decimal value 60.250:
CAST(TO_DECIMAL((60 + .25, 3))
46 Chapter 3: SQL Syntax
8/16/2019 DS 100 SQLDataServiceGuide En
http://slidepdf.com/reader/full/ds-100-sqldataserviceguide-en 47/99
C H A P T E R 4
Installing and Configuring Driversfor Third-Party Clients
This chapter includes the following topics:
• Installing and Configuring Drivers for Third-Party Clients Overview, 47
• Before You Install the Drivers, 48
• Install the Drivers on Windows, 50
• Install the Drivers on UNIX, 51
• JDBC Connections, 53
• ODBC Connections, 56
Installing and Configuring Drivers for Third-Party
Clients OverviewYou can connect to an SQL data service from third-party client tools. Before you can connect from a third-
party client tool, you must install and configure the Informatica JDBC/ODBC drivers on the client machine.
Before you can connect to an SQL data service from a third party client tool, you must perform the following
tasks:
1. Record the Informatica domain information.
2. Configure the client for secure communication or Kerberos authentication.
3. Install or upgrade the Informatica JDBC/ODBC drivers.
4. Configure the Informatica JDBC/ODBC drivers.
47
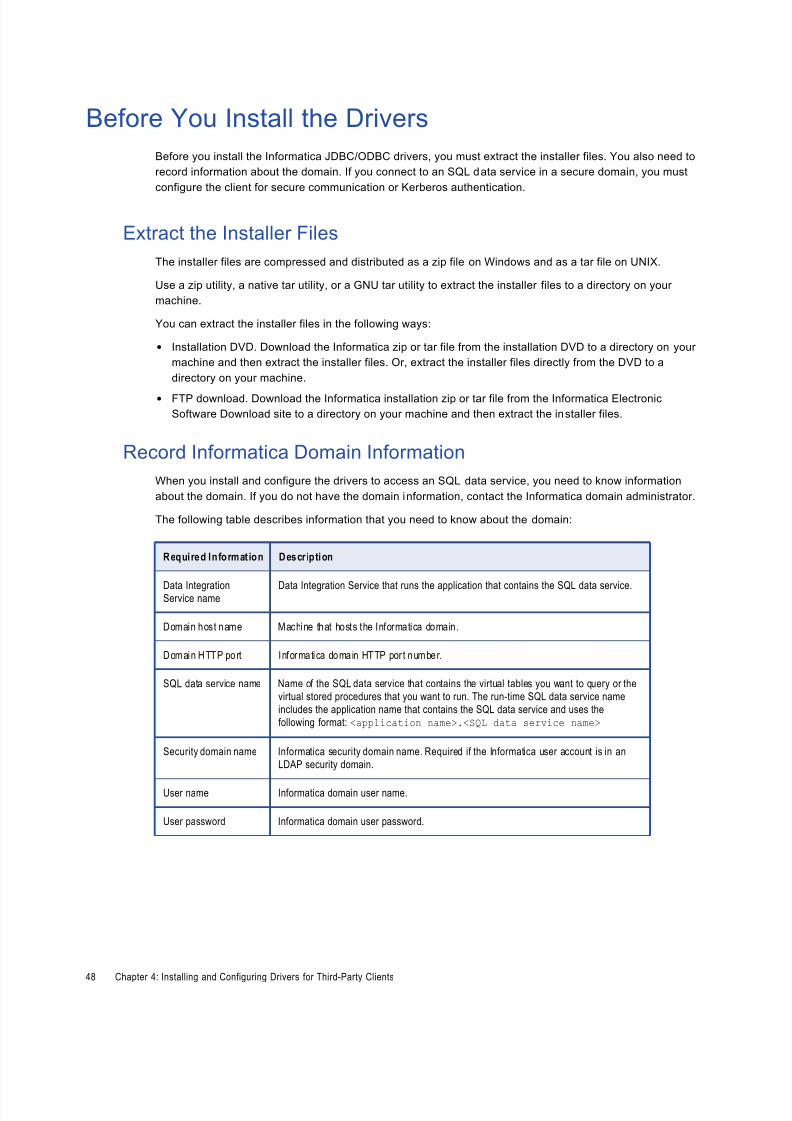
8/16/2019 DS 100 SQLDataServiceGuide En
http://slidepdf.com/reader/full/ds-100-sqldataserviceguide-en 48/99
Before You Install the Drivers
Before you install the Informatica JDBC/ODBC drivers, you must extract the installer files. You also need to
record information about the domain. If you connect to an SQL data service in a secure domain, you must
configure the client for secure communication or Kerberos authentication.
Extract the Installer Files
The installer files are compressed and distributed as a zip file on Windows and as a tar file on UNIX.
Use a zip utility, a native tar utility, or a GNU tar utility to extract the installer files to a directory on your
machine.
You can extract the installer files in the following ways:
• Installation DVD. Download the Informatica zip or tar file from the installation DVD to a directory on your
machine and then extract the installer files. Or, extract the installer files directly from the DVD to a
directory on your machine.
• FTP download. Download the Informatica installation zip or tar file from the Informatica Electronic
Software Download site to a directory on your machine and then extract the installer files.
Record Informatica Domain Information
When you install and configure the drivers to access an SQL data service, you need to know information
about the domain. If you do not have the domain information, contact the Informatica domain administrator.
The following table describes information that you need to know about the domain:
Required Informat ion Descr iption
Data IntegrationService name Data Integration Service that runs the application that contains the SQL data service.
Domain host name Machine that hosts the Informatica domain.
Domain HTTP port Informatica domain HTTP por t number.
SQL data service name Name of the SQL data service that contains the virtual tables you want to query or the
virtual stored procedures that you want to run. The run-time SQL data service name
includes the application name that contains the SQL data service and uses the
following format: <application name>.<SQL data service name>
Security domain name Informatica security domain name. Required if the Informatica user account is in an
LDAP security domain.
User name Informatica domain user name.
User password Informatica domain user password.
48 Chapter 4: Installing and Configuring Drivers for Third-Party Clients
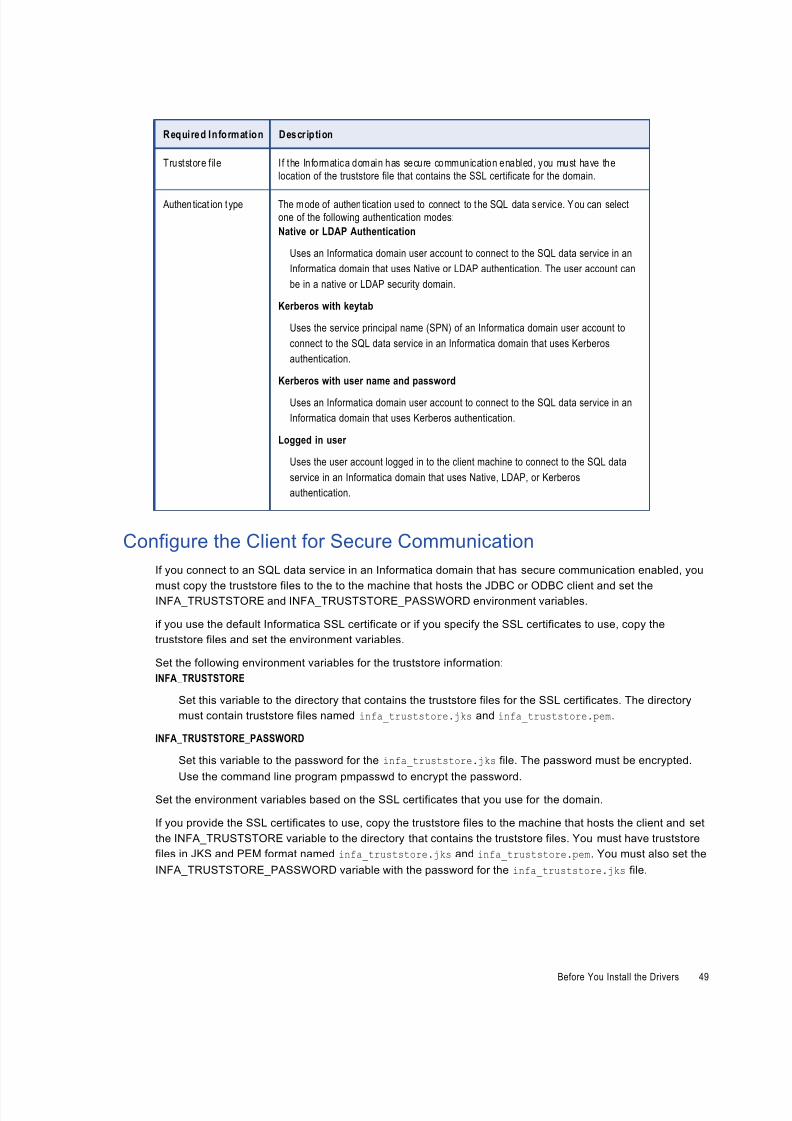
8/16/2019 DS 100 SQLDataServiceGuide En
http://slidepdf.com/reader/full/ds-100-sqldataserviceguide-en 49/99
Required Informat ion Descr iption
Truststore f ile If the Informatica domain has secure communication enabled, you must have the
location of the truststore file that contains the SSL certificate for the domain.
Authen ticat ion type The mode of authen ticat ion used to connect to the SQL data service. You can select
one of the following authentication modes:
Native or LDAP Authentication
Uses an Informatica domain user account to connect to the SQL data service in an
Informatica domain that uses Native or LDAP authentication. The user account can
be in a native or LDAP security domain.
Kerberos with keytab
Uses the service principal name (SPN) of an Informatica domain user account to
connect to the SQL data service in an Informatica domain that uses Kerberos
authentication.
Kerberos with user name and password
Uses an Informatica domain user account to connect to the SQL data service in an
Informatica domain that uses Kerberos authentication.
Logged in user
Uses the user account logged in to the client machine to connect to the SQL data
service in an Informatica domain that uses Native, LDAP, or Kerberos
authentication.
Configure the Client for Secure Communication
If you connect to an SQL data service in an Informatica domain that has secure communication enabled, you
must copy the truststore files to the to the machine that hosts the JDBC or ODBC client and set theINFA_TRUSTSTORE and INFA_TRUSTSTORE_PASSWORD environment variables.
if you use the default Informatica SSL certificate or if you specify the SSL certificates to use, copy the
truststore files and set the environment variables.
Set the following environment variables for the truststore information:
INFA_TRUSTSTORE
Set this variable to the directory that contains the truststore files for the SSL certificates. The directory
must contain truststore files named infa_truststore.jks and infa_truststore.pem.
INFA_TRUSTSTORE_PASSWORD
Set this variable to the password for the infa_truststore.jks file. The password must be encrypted.
Use the command line program pmpasswd to encrypt the password.
Set the environment variables based on the SSL certificates that you use for the domain.
If you provide the SSL certificates to use, copy the truststore files to the machine that hosts the client and set
the INFA_TRUSTSTORE variable to the directory that contains the truststore files. You must have truststore
files in JKS and PEM format named infa_truststore.jks and infa_truststore.pem. You must also set the
INFA_TRUSTSTORE_PASSWORD variable with the password for the infa_truststore.jks file.
Before You Install the Drivers 49
8/16/2019 DS 100 SQLDataServiceGuide En
http://slidepdf.com/reader/full/ds-100-sqldataserviceguide-en 50/99
Configure the Client for Kerberos Authentication
If you connect to an SQL data service in an Informatica domain that runs on a network that uses Kerberos
authentication, you must copy the Kerberos configuration file to the machine the hosts the client. You might
need to ask the Kerberos administrator to send you a copy of the file.
To connect to an Informatica domain that uses Kerberos authentication, perform the following tasks:Copy the Kerberos configuration file to the client machines.
Copy the Kerberos configuration file krb5.com to a directory on the client machine that is accessible to
the client application.
Set the KRB5_CONFIG environment variables with the Kerberos configuration file.
Use the KRB5_CONFIG environment variable to store the path and file name of the Kerberos
configuration file, krb5.conf. You must set the KRB5_CONFIG environment variable on each machine
that hosts an Informatica client.
For more information about Kerberos authentication and the configuration file, see the Informatica Security
Guide.
Install the Drivers on Windows
Before you can connect to an SQL data service from a third-party client tool, you must install or upgrade the
Informatica Data Services JDBC/ODBC drivers. Install the drivers on the machine that you connect to the
SQL data service from. You can install the drivers on multiple machines in graphical mode or silent mode.
The Informatica JDBC/ODBC driver version must match the Informatica version.
Install the Drivers in Graphical Mode
To install or upgrade the drivers in graphical mode, run the Informatica JDBC/ODBC driver installer.
1. Close all other applications.
2. Navigate to the root directory of the extracted installer files.
3. Run install.bat.
4. Choose to install or upgrade the drivers.
5. Click Next.
The Installation Prerequisites page displays the system requirements. Verify that all installation
requirements are met before you continue the installation.
6. Click Next.
7. On the Installation Directory page, enter the absolute path for the installation directory.8. On the Pre-Installation Summary page, review the installation information, and click Install.
The installer copies the driver files to the installation directory. The Post-Installation Summary page
indicates whether the installation completed successfully.
9. Click Done.
You can view the installation log files to get more information about the tasks performed by the installer.
50 Chapter 4: Installing and Configuring Drivers for Third-Party Clients
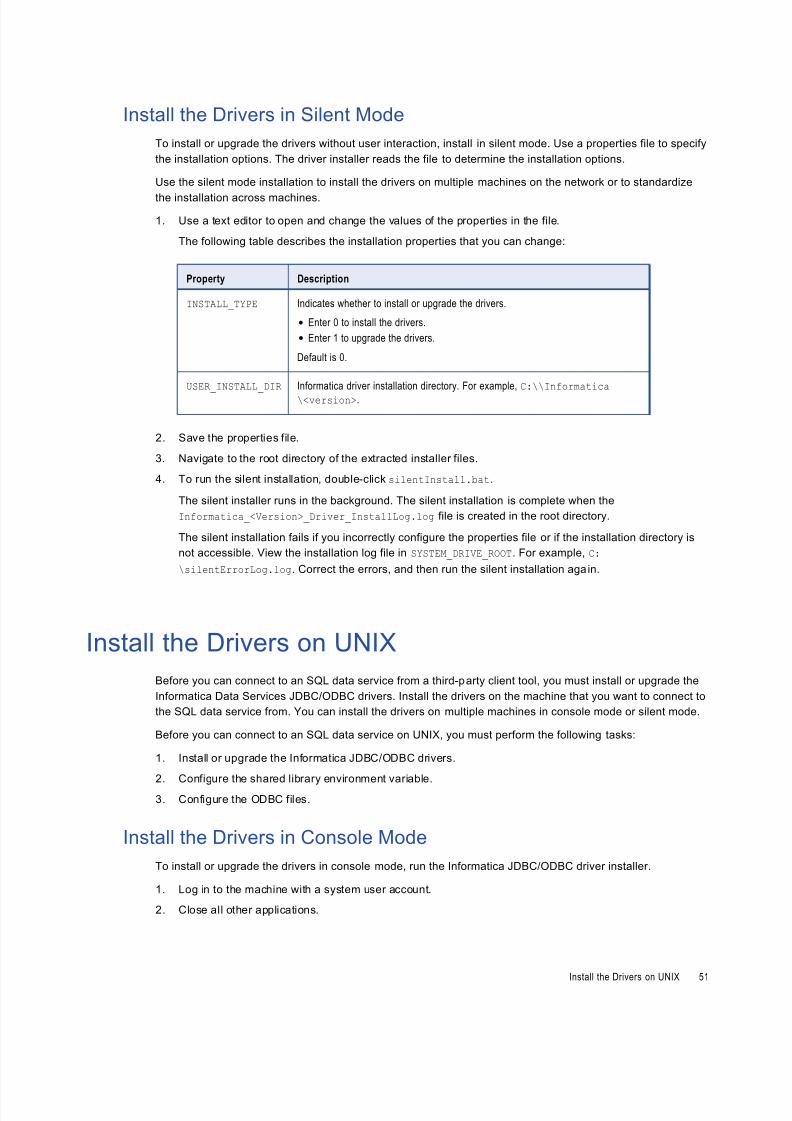
8/16/2019 DS 100 SQLDataServiceGuide En
http://slidepdf.com/reader/full/ds-100-sqldataserviceguide-en 51/99
Install the Drivers in Silent Mode
To install or upgrade the drivers without user interaction, install in silent mode. Use a properties file to specify
the installation options. The driver installer reads the file to determine the installation options.
Use the silent mode installation to install the drivers on multiple machines on the network or to standardize
the installation across machines.
1. Use a text editor to open and change the values of the properties in the file.
The following table describes the installation properties that you can change:
Property Description
INSTALL_TYPE Indicates whether to install or upgrade the drivers.
• Enter 0 to install the drivers.
• Enter 1 to upgrade the drivers.
Default is 0.
USER_INSTALL_DIR Informatica driver installation directory. For example, C:\\Informatica
\<version>.
2. Save the properties file.
3. Navigate to the root directory of the extracted installer files.
4. To run the silent installation, double-click silentInstall.bat.
The silent installer runs in the background. The silent installation is complete when the
Informatica_<Version>_Driver_InstallLog.log file is created in the root directory.
The silent installation fails if you incorrectly configure the properties file or if the installation directory is
not accessible. View the installation log file in SYSTEM_DRIVE_ROOT. For example, C:
\silentErrorLog.log. Correct the errors, and then run the silent installation again.
Install the Drivers on UNIX
Before you can connect to an SQL data service from a third-party client tool, you must install or upgrade the
Informatica Data Services JDBC/ODBC drivers. Install the drivers on the machine that you want to connect to
the SQL data service from. You can install the drivers on multiple machines in console mode or silent mode.
Before you can connect to an SQL data service on UNIX, you must perform the following tasks:
1. Install or upgrade the Informatica JDBC/ODBC drivers.
2. Configure the shared library environment variable.
3. Configure the ODBC files.
Install the Drivers in Console Mode
To install or upgrade the drivers in console mode, run the Informatica JDBC/ODBC driver installer.
1. Log in to the machine with a system user account.
2. Close all other applications.
Install the Drivers on UNIX 51
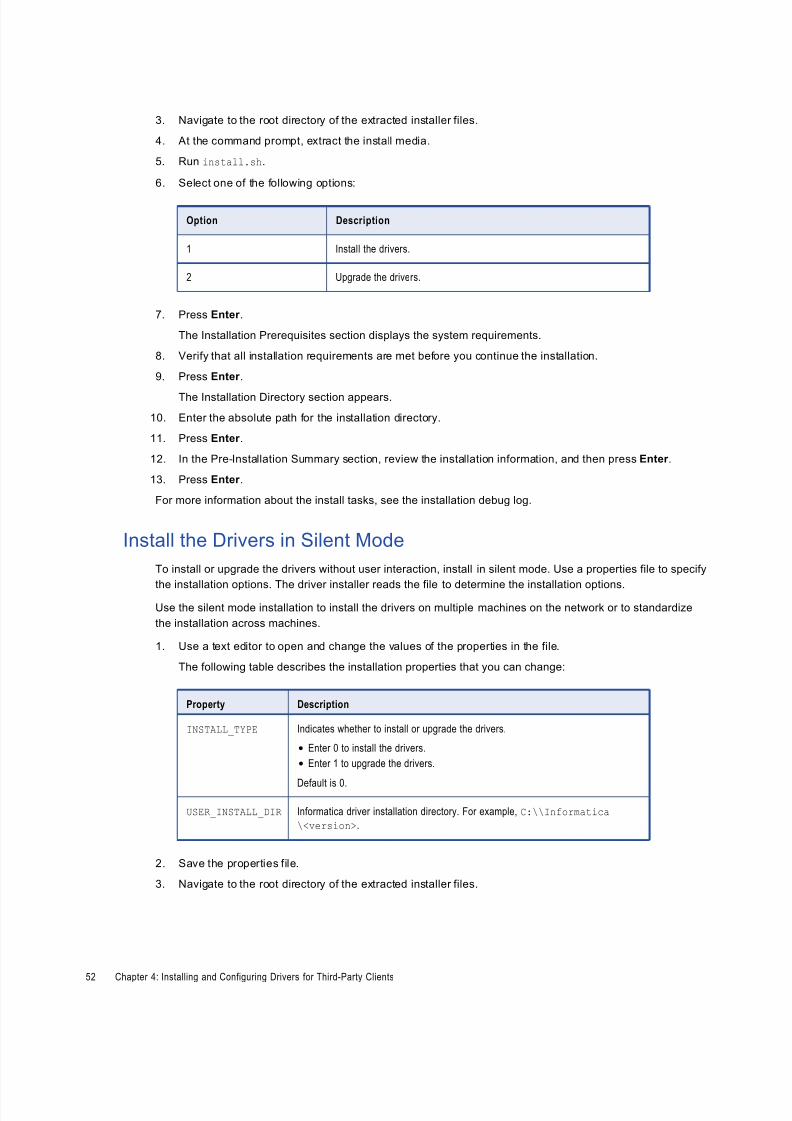
8/16/2019 DS 100 SQLDataServiceGuide En
http://slidepdf.com/reader/full/ds-100-sqldataserviceguide-en 52/99
3. Navigate to the root directory of the extracted installer files.
4. At the command prompt, extract the install media.
5. Run install.sh.
6. Select one of the following options:
Option Description
1 Install the drivers.
2 Upgrade the drivers.
7. Press Enter .
The Installation Prerequisites section displays the system requirements.
8. Verify that all installation requirements are met before you continue the installation.
9. Press Enter .
The Installation Directory section appears.
10. Enter the absolute path for the installation directory.
11. Press Enter .
12. In the Pre-Installation Summary section, review the installation information, and then press Enter .
13. Press Enter .
For more information about the install tasks, see the installation debug log.
Install the Drivers in Silent Mode
To install or upgrade the drivers without user interaction, install in silent mode. Use a properties file to specify
the installation options. The driver installer reads the file to determine the installation options.Use the silent mode installation to install the drivers on multiple machines on the network or to standardize
the installation across machines.
1. Use a text editor to open and change the values of the properties in the file.
The following table describes the installation properties that you can change:
Property Description
INSTALL_TYPE Indicates whether to install or upgrade the drivers.
• Enter 0 to install the drivers.
• Enter 1 to upgrade the drivers.
Default is 0.
USER_INSTALL_DIR Informatica driver installation directory. For example, C:\\Informatica
\<version>.
2. Save the properties file.
3. Navigate to the root directory of the extracted installer files.
52 Chapter 4: Installing and Configuring Drivers for Third-Party Clients
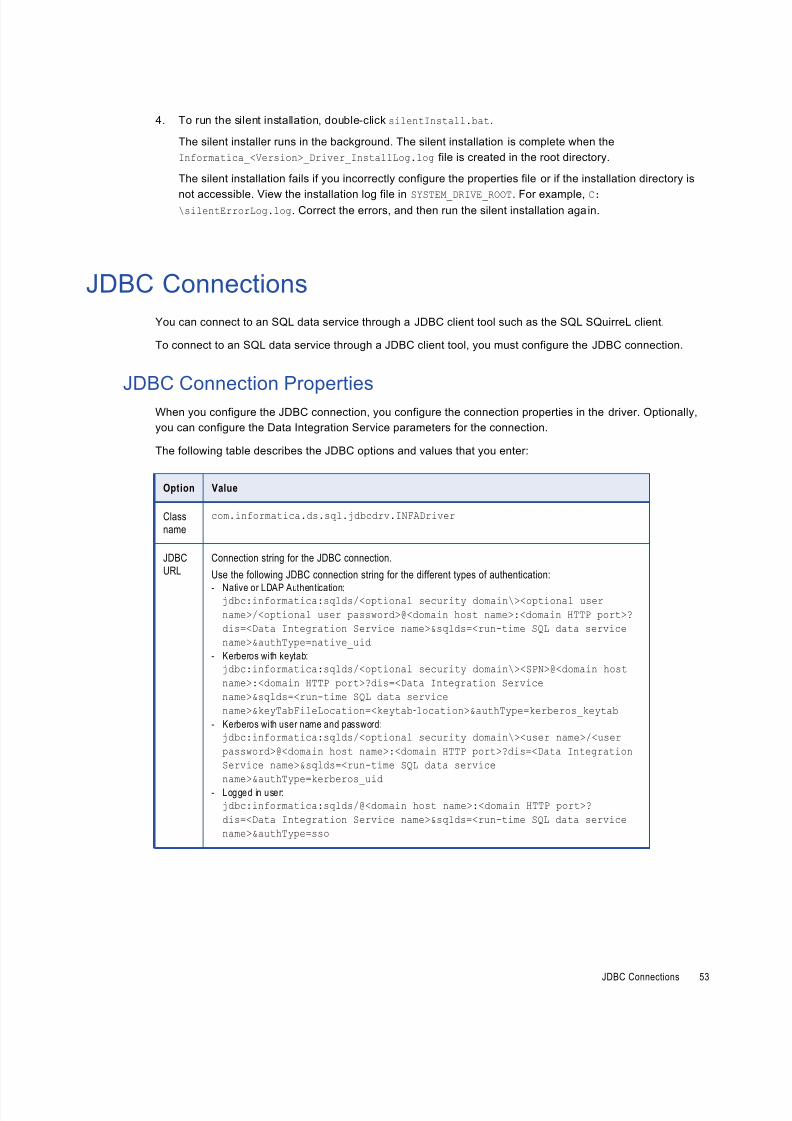
8/16/2019 DS 100 SQLDataServiceGuide En
http://slidepdf.com/reader/full/ds-100-sqldataserviceguide-en 53/99
4. To run the silent installation, double-click silentInstall.bat.
The silent installer runs in the background. The silent installation is complete when the
Informatica_<Version>_Driver_InstallLog.log file is created in the root directory.
The silent installation fails if you incorrectly configure the properties file or if the installation directory is
not accessible. View the installation log file in SYSTEM_DRIVE_ROOT. For example, C:\silentErrorLog.log. Correct the errors, and then run the silent installation again.
JDBC Connections
You can connect to an SQL data service through a JDBC client tool such as the SQL SQuirreL client.
To connect to an SQL data service through a JDBC client tool, you must configure the JDBC connection.
JDBC Connection PropertiesWhen you configure the JDBC connection, you configure the connection properties in the driver. Optionally,
you can configure the Data Integration Service parameters for the connection.
The following table describes the JDBC options and values that you enter:
Option Value
Class
name
com.informatica.ds.sql.jdbcdrv.INFADriver
JDBC
URL
Connection string for the JDBC connection.
Use the following JDBC connection string for the different types of authentication:
- Native or LDAP Authentication:jdbc:informatica:sqlds/<optional security domain\><optional user
name>/<optional user password>@<domain host name>:<domain HTTP port>?
dis=<Data Integration Service name>&sqlds=<run-time SQL data service
name>&authType=native_uid
- Kerberos with keytab:
jdbc:informatica:sqlds/<optional security domain\><SPN>@<domain host
name>:<domain HTTP port>?dis=<Data Integration Service
name>&sqlds=<run-time SQL data service
name>&keyTabFileLocation=<keytab‑location>&authType=kerberos_keytab
- Kerberos with user name and password:
jdbc:informatica:sqlds/<optional security domain\><user name>/<user
password>@<domain host name>:<domain HTTP port>?dis=<Data Integration
Service name>&sqlds=<run-time SQL data service
name>&authType=kerberos_uid
- Logged in user:
jdbc:informatica:sqlds/@<domain host name>:<domain HTTP port>?
dis=<Data Integration Service name>&sqlds=<run-time SQL data service
name>&authType=sso
JDBC Connections 53
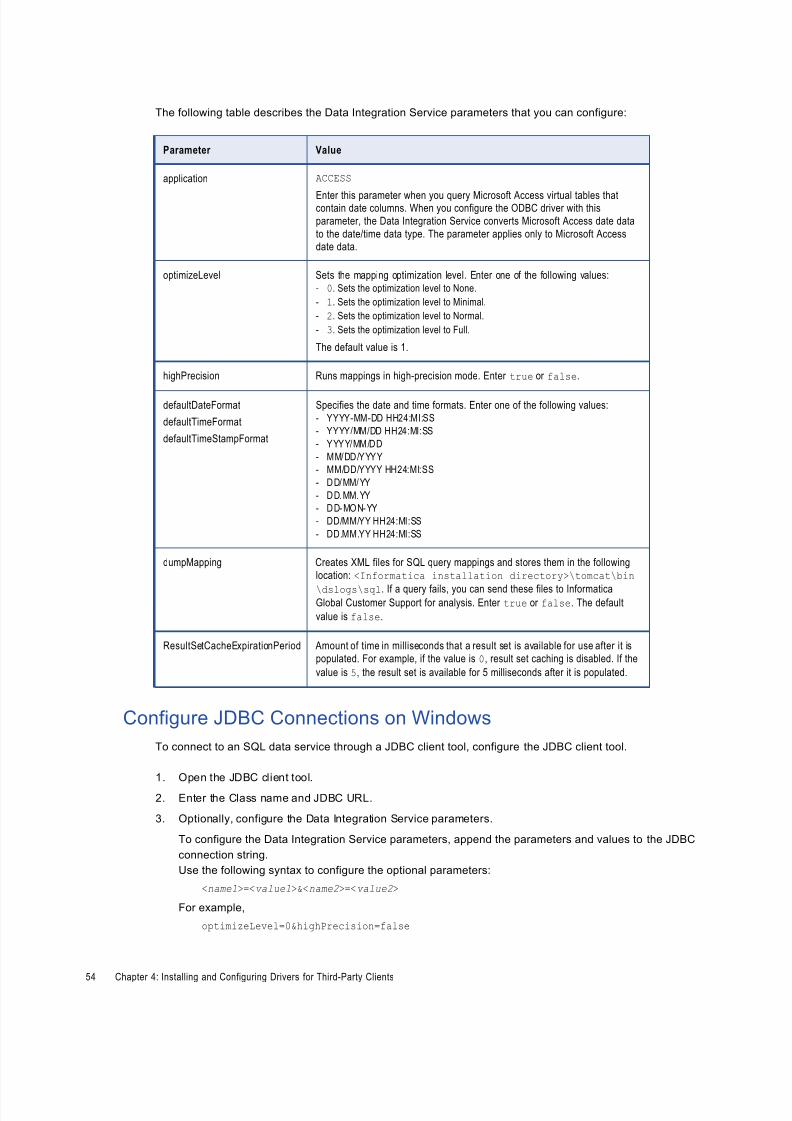
8/16/2019 DS 100 SQLDataServiceGuide En
http://slidepdf.com/reader/full/ds-100-sqldataserviceguide-en 54/99
The following table describes the Data Integration Service parameters that you can configure:
Parameter Value
application ACCESS
Enter this parameter when you query Microsoft Access virtual tables thatcontain date columns. When you configure the ODBC driver with this
parameter, the Data Integration Service converts Microsoft Access date data
to the date/time data type. The parameter applies only to Microsoft Accessdate data.
optimizeLevel Sets the mapping optimization level. Enter one of the following values:- 0. Sets the optimization level to None.
- 1. Sets the optimization level to Minimal.
- 2. Sets the optimization level to Normal.
- 3. Sets the optimization level to Full.
The default value is 1.
highPrecision Runs mappings in high-precision mode. Enter true or false.
defaultDateFormat
defaultTimeFormat
defaultTimeStampFormat
Specifies the date and time formats. Enter one of the following values:- YYYY-MM-DD HH24:MI:SS
- YYYY/MM/DD HH24:MI:SS
- YYYY/MM/DD
- MM/DD/YYYY
- MM/DD/YYYY HH24:MI:SS
- DD/MM/YY
- DD.MM.YY
- DD-MON-YY
- DD/MM/YY HH24:MI:SS
- DD.MM.YY HH24:MI:SS
dumpMapping Creates XML files for SQL query mappings and stores them in the following
location: <Informatica installation directory>\tomcat\bin
\dslogs\sql. If a query fails, you can send these files to InformaticaGlobal Customer Support for analysis. Enter true or false. The default
value is false.
ResultSetCacheExpirationPeriod Amount of time in milliseconds that a result set is available for use after it is
populated. For example, if the value is 0, result set caching is disabled. If the
value is 5, the result set is available for 5 milliseconds after it is populated.
Configure JDBC Connections on Windows
To connect to an SQL data service through a JDBC client tool, configure the JDBC client tool.
1. Open the JDBC client tool.
2. Enter the Class name and JDBC URL.
3. Optionally, configure the Data Integration Service parameters.
To configure the Data Integration Service parameters, append the parameters and values to the JDBC
connection string.
Use the following syntax to configure the optional parameters:
<name1>=<value1>&<name2>=<value2>
For example,
optimizeLevel=0&highPrecision=false
54 Chapter 4: Installing and Configuring Drivers for Third-Party Clients
8/16/2019 DS 100 SQLDataServiceGuide En
http://slidepdf.com/reader/full/ds-100-sqldataserviceguide-en 55/99
Configure JDBC Connections on UNIX
Before you can connect to an SQL data service on UNIX, you must configure the CLASSPATH environment
variable and configure the client tool.
Configure the CLASSPATH
To connect to an SQL data service through a JDBC client tool, configure the CLASSPATH environment
variable to include the JDBC driver. The Informatica JDBC driver is compiled with Java 7.
The Informatica JDBC driver is installed in the following location: <Informatica installation directory>
\tools\jdbcdrv\infadsjdbc.jar .
Configure the JDBC Client Tool
To connect to an SQL data service through a JDBC client tool, configure the JDBC client tool.
1. Open the JDBC client tool.
2. Enter the Class name and JDBC URL.
3. Optionally, configure the Data Integration Service parameters.
To configure the Data Integration Service parameters, append the parameters and values to the JDBC
connection string.
Use the following syntax to configure the optional parameters:
<name1>=<value1>&<name2>=<value2>
For example,
optimizeLevel=0&highPrecision=false
Troubleshooting JDBC Connections
I am connecting to an SQL data service through a JDBC client tool. I get an error when I try to bind data
to a bigint column through a parameterized query.
The Informatica JDBC driver does not support the setBigInt method. If you use setBigInt in a parameterized
query, the Java client code fails at compilation.
If you need to bind data to a big int column, use the setLong method instead of the setBigInt method. For
example, the following code does not cause a JDBC driver error:
String sql = "select * from VT where COL_BIGINT = ?";PreparedStatement stmt = connection.prepareStatement(sql);stmt.setLong (1,new Long("9223372036854775807"));
A third-party library included in infadsjdbc.jar causes a conflict on my machine.
The infadsjdbc.jar file contains the Informatica JDBC driver and the following third-party libraries required
by the JDBC driver:
• commons-codec-1.3.jar
• commons-httpclient-3.1.jar
• commons-logging-1.1.jar
• commons-pool-1.4.jar
• FastInfoset-1.2.3.jar
JDBC Connections 55
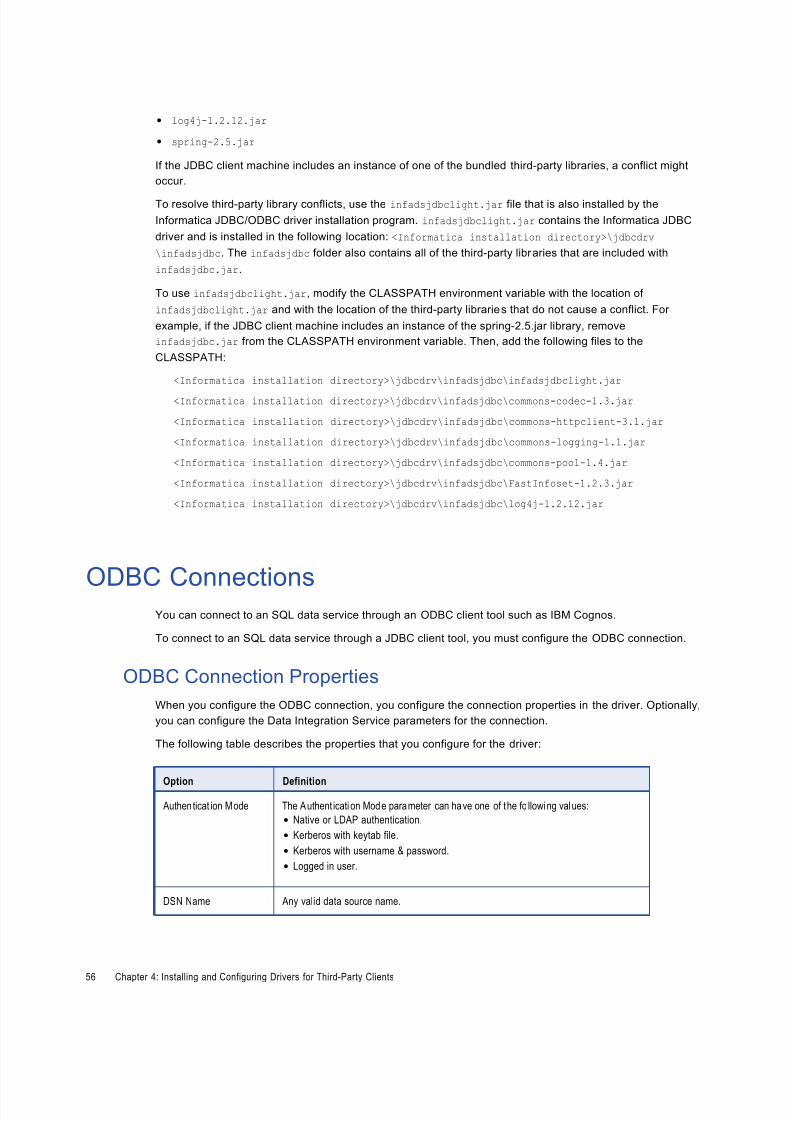
8/16/2019 DS 100 SQLDataServiceGuide En
http://slidepdf.com/reader/full/ds-100-sqldataserviceguide-en 56/99
• log4j-1.2.12.jar
• spring-2.5.jar
If the JDBC client machine includes an instance of one of the bundled third-party libraries, a conflict might
occur.
To resolve third-party library conflicts, use the infadsjdbclight.jar file that is also installed by the
Informatica JDBC/ODBC driver installation program. infadsjdbclight.jar contains the Informatica JDBC
driver and is installed in the following location: <Informatica installation directory>\jdbcdrv
\infadsjdbc. The infadsjdbc folder also contains all of the third-party libraries that are included with
infadsjdbc.jar.
To use infadsjdbclight.jar, modify the CLASSPATH environment variable with the location of
infadsjdbclight.jar and with the location of the third-party libraries that do not cause a conflict. For
example, if the JDBC client machine includes an instance of the spring-2.5.jar library, remove
infadsjdbc.jar from the CLASSPATH environment variable. Then, add the following files to the
CLASSPATH:
<Informatica installation directory>\jdbcdrv\infadsjdbc\infadsjdbclight.jar
<Informatica installation directory>\jdbcdrv\infadsjdbc\commons-codec-1.3.jar
<Informatica installation directory>\jdbcdrv\infadsjdbc\commons-httpclient-3.1.jar
<Informatica installation directory>\jdbcdrv\infadsjdbc\commons-logging-1.1.jar
<Informatica installation directory>\jdbcdrv\infadsjdbc\commons-pool-1.4.jar
<Informatica installation directory>\jdbcdrv\infadsjdbc\FastInfoset-1.2.3.jar
<Informatica installation directory>\jdbcdrv\infadsjdbc\log4j-1.2.12.jar
ODBC ConnectionsYou can connect to an SQL data service through an ODBC client tool such as IBM Cognos.
To connect to an SQL data service through a JDBC client tool, you must configure the ODBC connection.
ODBC Connection Properties
When you configure the ODBC connection, you configure the connection properties in the driver. Optionally,
you can configure the Data Integration Service parameters for the connection.
The following table describes the properties that you configure for the driver:
Option Definition
Authen ticat ion Mode The Authent ication Mode parameter can have one of the fo llowing values:
• Native or LDAP authentication.
• Kerberos with keytab file.
• Kerberos with username & password.
• Logged in user.
DSN Name Any valid data source name.
56 Chapter 4: Installing and Configuring Drivers for Third-Party Clients
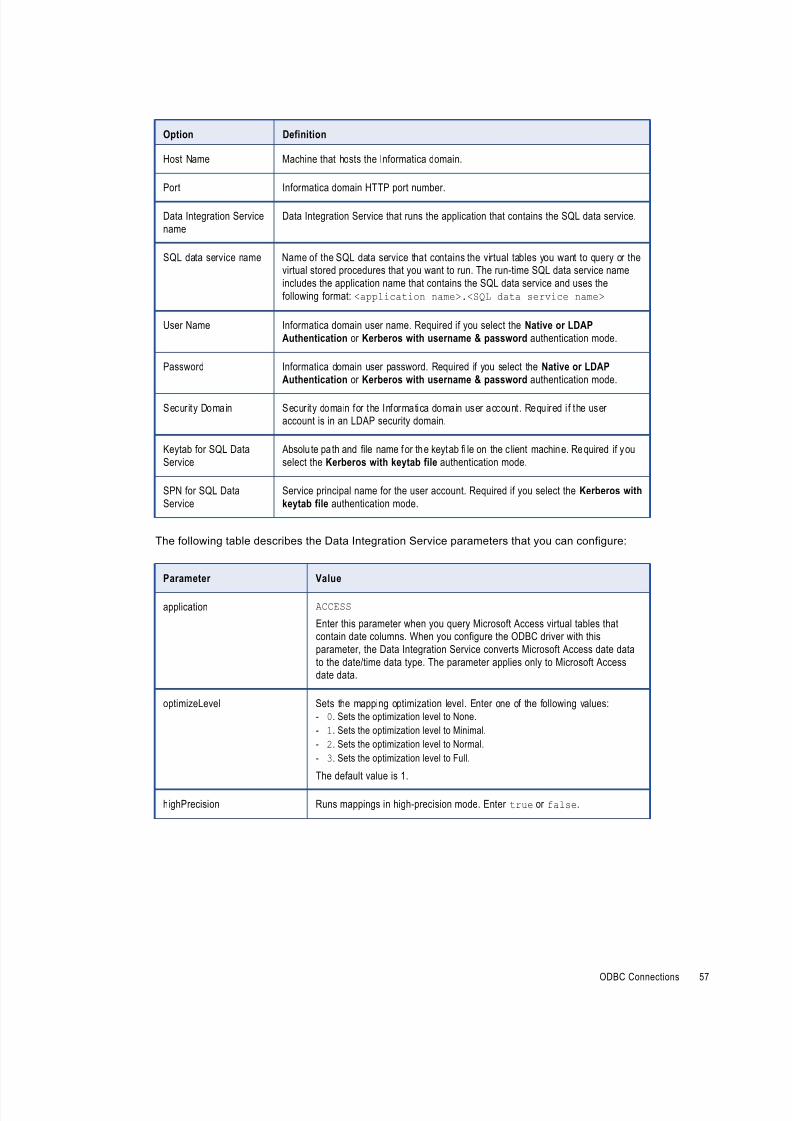
8/16/2019 DS 100 SQLDataServiceGuide En
http://slidepdf.com/reader/full/ds-100-sqldataserviceguide-en 57/99
Option Definition
Host Name Machine that hosts the Informatica domain.
Port Informatica domain HTTP port number.
Data Integration Service
name
Data Integration Service that runs the application that contains the SQL data service.
SQL data service name Name of the SQL data service that contains the virtual tables you want to query or thevirtual stored procedures that you want to run. The run-time SQL data service name
includes the application name that contains the SQL data service and uses the
following format: <application name>.<SQL data service name>
User Name Informatica domain user name. Required if you select the Native or LDAP
Authentication or Kerberos with username & password authentication mode.
Password Informatica domain user password. Required if you select the Native or LDAP
Authentication or Kerberos with username & password authentication mode.
Security Domain Security domain for the Informatica domain user account. Required i f the useraccount is in an LDAP security domain.
Keytab for SQL Data
Service
Absolu te pa th and file name for the keytab fi le on the c lient machine. Required if you
select the Kerberos with keytab file authentication mode.
SPN for SQL Data
Service
Service principal name for the user account. Required if you select the Kerberos with
keytab file authentication mode.
The following table describes the Data Integration Service parameters that you can configure:
Parameter Value
application ACCESS
Enter this parameter when you query Microsoft Access virtual tables thatcontain date columns. When you configure the ODBC driver with this
parameter, the Data Integration Service converts Microsoft Access date data
to the date/time data type. The parameter applies only to Microsoft Accessdate data.
optimizeLevel Sets the mapping optimization level. Enter one of the following values:- 0. Sets the optimization level to None.
- 1. Sets the optimization level to Minimal.
- 2. Sets the optimization level to Normal.
- 3. Sets the optimization level to Full.
The default value is 1.
highPrecision Runs mappings in high-precision mode. Enter true or false.
ODBC Connections 57
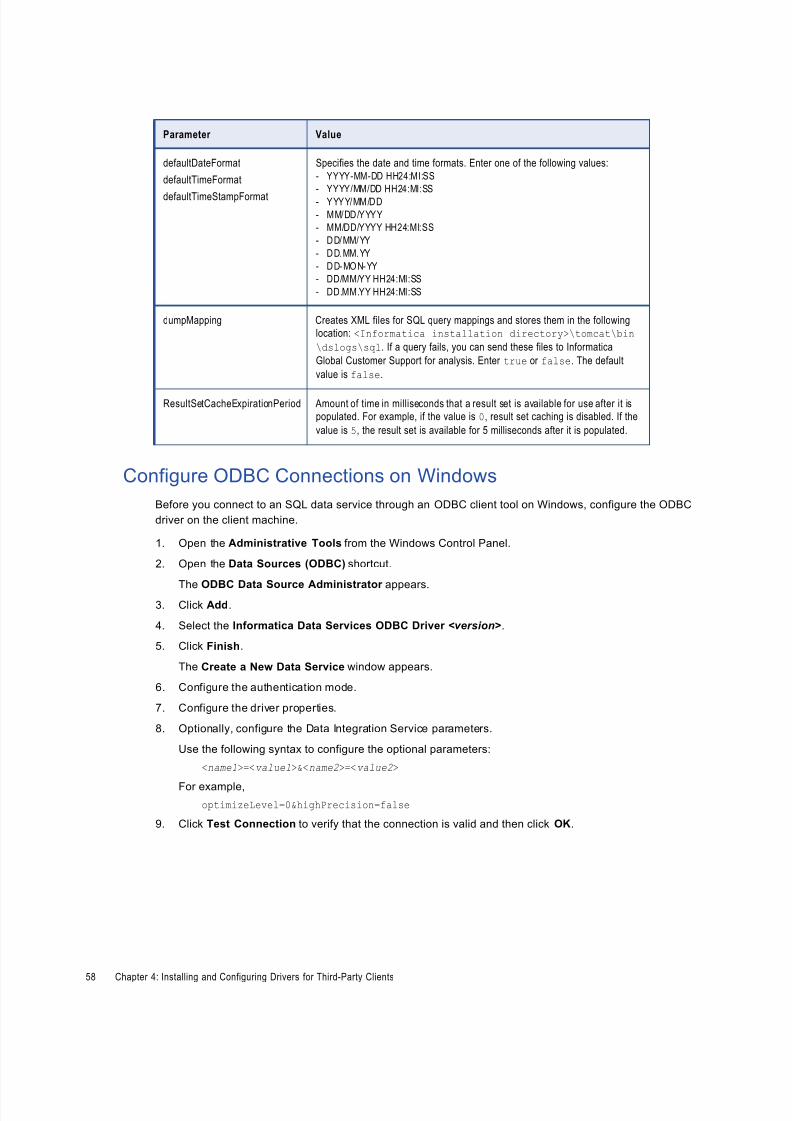
8/16/2019 DS 100 SQLDataServiceGuide En
http://slidepdf.com/reader/full/ds-100-sqldataserviceguide-en 58/99
Parameter Value
defaultDateFormat
defaultTimeFormat
defaultTimeStampFormat
Specifies the date and time formats. Enter one of the following values:- YYYY-MM-DD HH24:MI:SS
- YYYY/MM/DD HH24:MI:SS
- YYYY/MM/DD
- MM/DD/YYYY
- MM/DD/YYYY HH24:MI:SS
- DD/MM/YY
- DD.MM.YY
- DD-MON-YY
- DD/MM/YY HH24:MI:SS
- DD.MM.YY HH24:MI:SS
dumpMapping Creates XML files for SQL query mappings and stores them in the following
location: <Informatica installation directory>\tomcat\bin
\dslogs\sql. If a query fails, you can send these files to Informatica
Global Customer Support for analysis. Enter true or false. The default
value is false.
ResultSetCacheExpirationPeriod Amount of time in milliseconds that a result set is available for use after it is
populated. For example, if the value is 0, result set caching is disabled. If the
value is 5, the result set is available for 5 milliseconds after it is populated.
Configure ODBC Connections on Windows
Before you connect to an SQL data service through an ODBC client tool on Windows, configure the ODBC
driver on the client machine.
1. Open the Administrative Tools from the Windows Control Panel.
2. Open the Data Sources (ODBC) shortcut.
The ODBC Data Source Administrator appears.3. Click Add.
4. Select the Informatica Data Services ODBC Driver <version>.
5. Click Finish.
The Create a New Data Service window appears.
6. Configure the authentication mode.
7. Configure the driver properties.
8. Optionally, configure the Data Integration Service parameters.
Use the following syntax to configure the optional parameters:
<name1>=<value1>&<name2>=<value2>
For example,optimizeLevel=0&highPrecision=false
9. Click Test Connection to verify that the connection is valid and then click OK.
58 Chapter 4: Installing and Configuring Drivers for Third-Party Clients
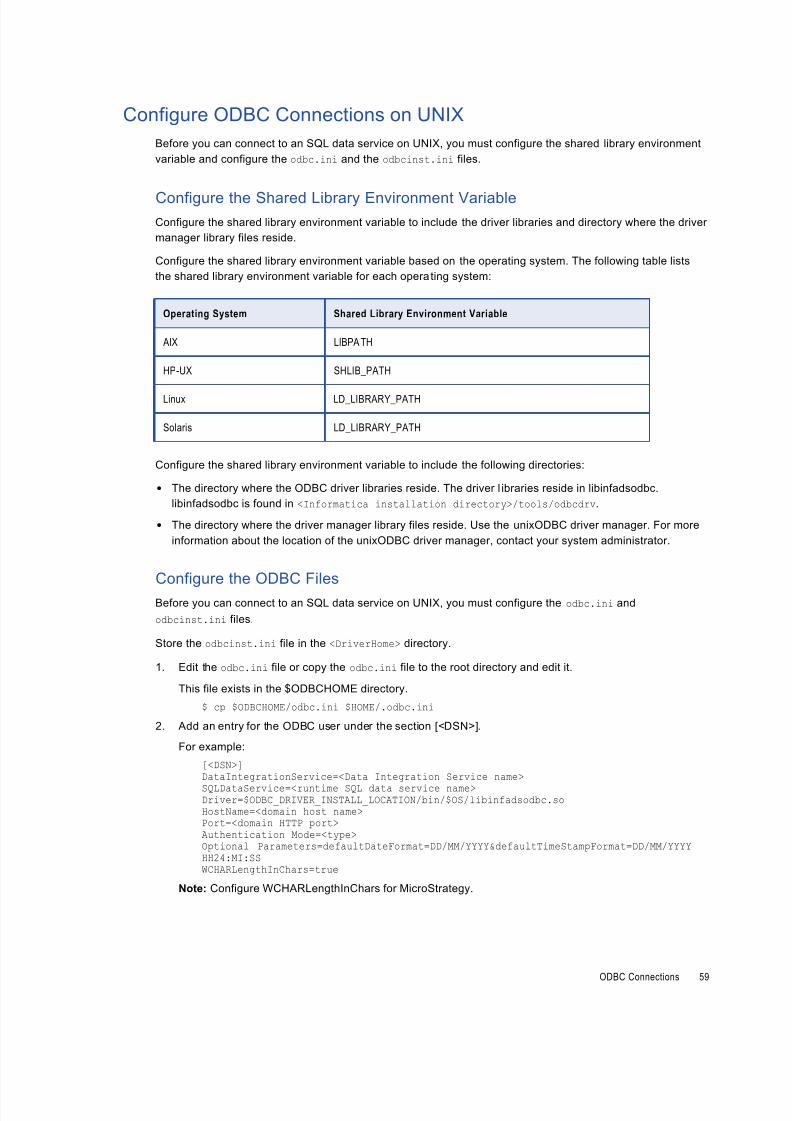
8/16/2019 DS 100 SQLDataServiceGuide En
http://slidepdf.com/reader/full/ds-100-sqldataserviceguide-en 59/99
Configure ODBC Connections on UNIX
Before you can connect to an SQL data service on UNIX, you must configure the shared library environment
variable and configure the odbc.ini and the odbcinst.ini files.
Configure the Shared Library Environment VariableConfigure the shared library environment variable to include the driver libraries and directory where the driver
manager library files reside.
Configure the shared library environment variable based on the operating system. The following table lists
the shared library environment variable for each operating system:
Operating System Shared Library Environment Variable
AIX LIBPATH
HP-UX SHLIB_PATH
Linux LD_LIBRARY_PATH
Solaris LD_LIBRARY_PATH
Configure the shared library environment variable to include the following directories:
• The directory where the ODBC driver libraries reside. The driver l ibraries reside in libinfadsodbc.
libinfadsodbc is found in <Informatica installation directory>/tools/odbcdrv.
• The directory where the driver manager library files reside. Use the unixODBC driver manager. For more
information about the location of the unixODBC driver manager, contact your system administrator.
Configure the ODBC Files
Before you can connect to an SQL data service on UNIX, you must configure the odbc.ini and
odbcinst.ini files.
Store the odbcinst.ini file in the <DriverHome> directory.
1. Edit the odbc.ini file or copy the odbc.ini file to the root directory and edit it.
This file exists in the $ODBCHOME directory.
$ cp $ODBCHOME/odbc.ini $HOME/.odbc.ini
2. Add an entry for the ODBC user under the section [<DSN>].
For example:
[<DSN>]DataIntegrationService=<Data Integration Service name>
SQLDataService=<runtime SQL data service name>Driver=$ODBC_DRIVER_INSTALL_LOCATION/bin/$OS/libinfadsodbc.soHostName=<domain host name>Port=<domain HTTP port>Authentication Mode=<type>Optional Parameters=defaultDateFormat=DD/MM/YYYY&defaultTimeStampFormat=DD/MM/YYYYHH24:MI:SSWCHARLengthInChars=true
Note: Configure WCHARLengthInChars for MicroStrategy.
ODBC Connections 59

8/16/2019 DS 100 SQLDataServiceGuide En
http://slidepdf.com/reader/full/ds-100-sqldataserviceguide-en 60/99
3. Add the driver and setup entries to the odbcinst.ini file.
[Informatica Data Services ODBC Driver <version>]Driver=<Complete path to driver>Setup=<Complete path to driver>
For example:
Driver=$ODBC_DRIVER_INSTALL_LOCATION/odbcdrv/libinfadsodbc.soSetup=$ODBC_DRIVER_INSTALL_LOCATION/odbcdrv/libinfadsodbc.so
60 Chapter 4: Installing and Configuring Drivers for Third-Party Clients
8/16/2019 DS 100 SQLDataServiceGuide En
http://slidepdf.com/reader/full/ds-100-sqldataserviceguide-en 61/99
C H A P T E R 5
Third-Party Client ToolConfiguration
This chapter includes the following topics:
• Third-Party Client Tool Configuration Overview, 61
• BusinessObjects, 62
• IBM Cognos Configuration, 63
• MicroStrategy Configuration, 65
• Oracle Business Intelligence Enterprise Edition 11g Configuration, 66
• Oracle Database Gateway Configuration, 67
• QlikView Configuration, 67
• SQL Server Business Intelligence Development Studio Configuration, 68
• SQuirreL SQL Client Configuration, 69
• Tableau Configuration, 70
• Toad for Data Analysts Configuration, 71
• WinSQL Configuration, 72
• Troubleshooting Third-Party Client Tools, 73
Third-Party Client Tool Configuration Overview
After you install and configure the JDBC or ODBC drivers, you can configure the third-party client tool to
connect to an SQL data service.
You can connect to an SQL data service through the following third-party client tools:
• BusinessObjects
• IBM Cognos
• MicroStrategy
• Oracle Business Intelligence Enterprise Edition 11g
• Oracle Database Gateway
• QlikView
• SQuirreL SQL Client
61
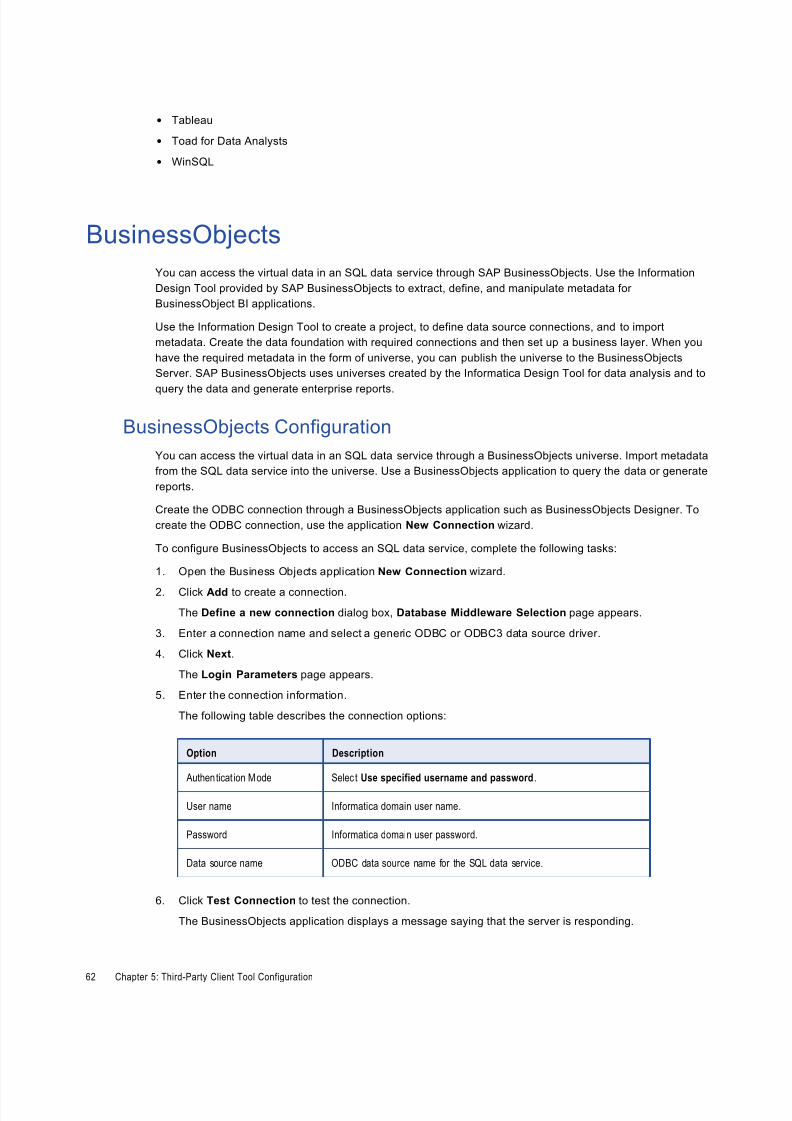
8/16/2019 DS 100 SQLDataServiceGuide En
http://slidepdf.com/reader/full/ds-100-sqldataserviceguide-en 62/99
• Tableau
• Toad for Data Analysts
• WinSQL
BusinessObjects
You can access the virtual data in an SQL data service through SAP BusinessObjects. Use the Information
Design Tool provided by SAP BusinessObjects to extract, define, and manipulate metadata for
BusinessObject BI applications.
Use the Information Design Tool to create a project, to define data source connections, and to import
metadata. Create the data foundation with required connections and then set up a business layer. When you
have the required metadata in the form of universe, you can publish the universe to the BusinessObjects
Server. SAP BusinessObjects uses universes created by the Informatica Design Tool for data analysis and to
query the data and generate enterprise reports.
BusinessObjects Configuration
You can access the virtual data in an SQL data service through a BusinessObjects universe. Import metadata
from the SQL data service into the universe. Use a BusinessObjects application to query the data or generate
reports.
Create the ODBC connection through a BusinessObjects application such as BusinessObjects Designer. To
create the ODBC connection, use the application New Connection wizard.
To configure BusinessObjects to access an SQL data service, complete the following tasks:
1. Open the Business Objects application New Connection wizard.
2. Click Add to create a connection.
The Define a new connection dialog box, Database Middleware Selection page appears.
3. Enter a connection name and select a generic ODBC or ODBC3 data source driver.
4. Click Next.
The Login Parameters page appears.
5. Enter the connection information.
The following table describes the connection options:
Option Description
Authen ticat ion Mode Selec t Use specified username and password .
User name Informatica domain user name.
Password Informatica domain user password.
Data source name ODBC data source name for the SQL data service.
6. Click Test Connection to test the connection.
The BusinessObjects application displays a message saying that the server is responding.
62 Chapter 5: Third-Party Client Tool Configuration
8/16/2019 DS 100 SQLDataServiceGuide En
http://slidepdf.com/reader/full/ds-100-sqldataserviceguide-en 63/99
7. Click OK.
After you perform this task, you can import metadata from an SQL data service into the universe and
generate reports based on the data.
IBM Cognos Configuration
IBM Cognos Framework Manager is a modeling tool that allows you to create and manage business-related
metadata for use in all Cognos 8 BI applications. Use Framework Manager to create a project. Within a
project, you can create data source connections and import data source metadata.
When you define a data source in Framework Manager, you create an ODBC connection to the SQL data
service. Cognos uses the information in the connection to connect to the SQL data service. After you create
the ODBC connection and import the SQL data service metadata, you can create a Cognos model based on
the SQL data service. Use the model to run queries and generate reports in Cognos BI applications.
To run queries that include aggregations, the Cognos configuration file must include Informatica ODBC driverinformation.
To configure IBM Cognos to access an SQL data service, complete the following tasks:
1. Update the IBM Cognos configuration file to include the Informatica ODBC driver information.
2. Create an ODBC connection to the SQL data service, and import SQL data service metadata in a
Cognos project.
Step 1. Update the IBM Cognos Configuration File
Update the IBM Cognos configuration file to include Informatica ODBC driver information. The ODBC driver
information in the configuration file enables the Data Integration Service to handle SQL queries that include
aggregations. If you do not update the configuration file and you query an SQL data service from an IBMCognos application, the query might fail if it includes aggregations.
The IBM Cognos configuration file, cogdmod.ini, is in the following directories:
• C:\Program Files\cognos\tools\c8\bin\
• C:\Program Files\cognos\c8\bin\
You must update both copies of the configuration file.
1. Stop the Cognos service.
2. Back up both copies of cogdmod.ini.
3. Add the following entry to both copies of cogdmod.ini:
[Exceptions Set Operators DRIVER:INFADSODBC.DLL]
Distinct="distinct"Except="except"Except_All=TIntersect="intersect"Intersect_All=TUnion="union"Union_All=T[Exceptions Tables DRIVER:INFADSODBC.DLL]Derived=TJoined=TSimple=TUniqueName_Prefix="coguda"
IBM Cognos Configuration 63

8/16/2019 DS 100 SQLDataServiceGuide En
http://slidepdf.com/reader/full/ds-100-sqldataserviceguide-en 64/99
[Exceptions OLAP Functions DRIVER:INFADSODBC.DLL]Olap_Max="max"Olap_Min="min"Olap_Sum="sum"Olap_Avg="avg"Olap_Count="count"Olap_Count_Star="count(*)"
Olap_Distinct="distinct"
4. Restart the Cognos service.
Step 2. Create the ODBC Connection and Import Metadata
Create the ODBC connection and import SQL data service metadata into a project. Use Cognos Framework
Manager to create the project. Run the Framework Manager Run Metadata wizard to create the connection
and import metadata.
1. Start Cognos Framework Manager.
2. Create a project.
3. Start the Run Metadata wizard.4. In the Select Metadata Source window, click Data Sources.
5. Click Next.
The Select Data Source window appears.
6. Click New.
The New Data Source wizard appears.
7. In the name and description page, enter a name and optional description for the data source.
8. Click Next.
9. In the connection page, select the ODBC database type, select an isolation level, and click Next.
10. In the connection string page, enter the SQL data service ODBC data source name in the ODBC data
source and ODBC connect string fields. Enter timeouts or sign-on information, if required. Enter theuser ID and password if they are not part of the Informatica ODBC driver connect string.
11. Click Test the connection to test the connection to the Informatica ODBC driver.
12. In the Run Metadata wizard, select the data source.
13. Click Next.
14. In the Select Objects page, select the objects you want to import and specify how the import handles
duplicate object names.
15. Specify the criteria to use to create relationships and click Import.
Framework Manager displays the number of imported objects and a list of objects that it could not
import.
16. Click Finish.
64 Chapter 5: Third-Party Client Tool Configuration
8/16/2019 DS 100 SQLDataServiceGuide En
http://slidepdf.com/reader/full/ds-100-sqldataserviceguide-en 65/99
MicroStrategy Configuration
MicroStrategy is a business intelligence platform that allows you to analyze, distribute, and customize
business information. MicroStrategy Desktop allows you to create projects and reports. Within a project, you
can create data source connections and import data source metadata.
To configure MicroStrategy to access an SQL data service, complete the following tasks:
1. Create the database instance and connection.
2. Configure the SQL generation options.
Step 1. Create the Database Instance and Connection
Use MicroStrategy Desktop to create the database instance and database connection. MicroStrategy
retrieves SQL data service metadata through the database instance.
1. Open MicroStrategy Desktop.
2. Create a project.3. Select Schema > Warehouse Catalog to open the project Warehouse Catalog.
The Warehouse Database Instance dialog box appears.
4. Click New.
The Database Instance Wizard opens.
5. Click Next.
6. In the Database Instance General Information page, enter a name for the database instance and
select Generic DBMS as the database type.
7. Click Next.
8. In the ODBC Data Source Information page, select the ODBC data source name for the SQL data
service and enter the Informatica domain user name and password.
9. Click Finish.
10. Click OK to close the Warehouse Database Instance dialog box.
11. Select Schema > Warehouse Catalog to open the Warehouse Catalog.
12. Click Options.
13. Select Warehouse Connection.
14. In the Warehouse Connection settings, select the database instance and click Edit.
The Database Instances dialog box opens.
15. Click New to create a database connection.
The Database Connections dialog box opens.
16. On the General tab, enter a database connection name and select the ODBC data source name for the
SQL data service.
17. Cl ick the Advanced tab.
18. Set the following options:
• Select the Multi-threaded database driver mode.
• Select the Use parameterized queries option.
• Set the character set encoding option for Windows and UNIX drivers to Non UTF-8.
19. Click OK to close the Database Connections dialog box.
MicroStrategy Configuration 65
8/16/2019 DS 100 SQLDataServiceGuide En
http://slidepdf.com/reader/full/ds-100-sqldataserviceguide-en 66/99
20. Click OK to close the Database Instances dialog box.
21. In the Warehouse Catalog, select Read Settings.
22. In the Read Settings, select Use standard ODBC calls to obtain the database catalog.
23. Click OK.
24. In the Warehouse Catalog, click Save and Close to save the changes.
Step 2. Configure the SQL Generation Options
The virtual tables in an SQL data service are read-only tables. Configure the SQL generation options to
prevent MicroStrategy Desktop users from trying to write data to the virtual database.
1. Select Schema > SQL Generation Options to open the SQL generation options.
2. In the SQL Data Warehouses settings, select the database instance you use to connect to the SQL data
service.
3. Click VLDB Properties to edit the VLDB properties for the database instance.
4. Open the Tables settings.
5. In the Drop Temp Tables Method settings, set the drop temp table method to Do nothing.
6. In the Intermediate Table Type settings, set the intermediate table type to Derived table.
7. In the Table Creation Type settings, set the table creation type to Implicit Table.
8. In the CREATE and INSERT Support settings, select the Create and insert are not supported option .
9. Save and close the SQL generation options.
Oracle Business Intelligence Enterprise Edition 11g
ConfigurationYou can access the virtual data in an SQL data service through the Oracle Business Intelligence Enterprise
Edition 11g (OBIEE 11g). Import metadata from an SQL data service into the OBIEE 11g to generate reports.
Import metadata from databases and other data sources to populate the physical layer. You can import
schemas or portions of schemas from existing data sources. You can manually create objects in the physical
layer.
To configure the OBIEE 11g to access an SQL data service, complete the following tasks:
1. Open the Oracle BI Administration Tool.
2. Create a new repository.
The New Repository dialog opens with the Repository folder selected by default.
3. Name the file <RPDfilename>.rpd and enter the repository password twice.
4. Select the data source name created for the ODBC connection.
5. Select the Metadata Types to import and click Next.
6. Select the Metadata Objects and click Finish.
66 Chapter 5: Third-Party Client Tool Configuration
8/16/2019 DS 100 SQLDataServiceGuide En
http://slidepdf.com/reader/full/ds-100-sqldataserviceguide-en 67/99
Oracle Database Gateway Configuration
Oracle Database Gateway provides ODBC access to heterogenous data sources through Oracle client
software. You can use Oracle Database Gateway to query and join data from di fferent data sources.
You can access the virtual data in an SQL data service through Oracle Database Gateway. You can useOracle client software to query an SQL data service. The query returns data as if it came from an Oracle
database. You can join virtual data from an SQL data service with data from other data sources.
You must change the configuration of Oracle Database Gateway to query an individual SQL data service.
You can query multiple SQL data services, but you must configure individual ODBC connections for each
SQL data service that you want to query.
For more information about configuring Oracle Database Gateway with an SQL data service, see the
Informatica How-To Library article, "Configuring Oracle Database Gateway for Informatica Data Services":
https://mysupport.informatica.com/docs/DOC-12786.
QlikView Configuration
You can access the virtual data in an SQL data service through QlikView. To read data from an SQL data
service into your QlikView document, use the Script Editor. The script that you create uses an ODBC
connection to connect to and retrieve data from the SQL data service.
1. Create a QlikView document.
2. Select File > Edit Script.
The Edit Script dialog box appears.
3. In the Data view, select ODBC as the database and click Connect.
The Connect to Data Source dialog box appears.
4. Select the ODBC data source name for the SQL data service and enter the user name and password for
the Informatica domain user.
5. Click Test Connection to test the connection.
6. Click OK to close the connection results.
7. Click OK to close the Connect to Data Source dialog box.
8. In the Data view of the Edit Script dialog box, click Select to create an SQL SELECT statement that
retrieves information from the SQL data service.
9. Click OK.
10. Run the script to retrieve data from the SQL data service.
Oracle Database Gateway Configuration 67
8/16/2019 DS 100 SQLDataServiceGuide En
http://slidepdf.com/reader/full/ds-100-sqldataserviceguide-en 68/99
SQL Server Business Intelligence DevelopmentStudio Configuration
Business Intelligence Development Studio is an integrated development environment used for developing
data analysis and business intelligence solutions that utilizes SQL Server Reporting Services. You can
access the virtual data in an SQL data service with SQL Server Business Intelligence Development Studio.
Use the Report Wizard to connect to a data source and create a report. The Business Intelligence
Development Studio imports data from an SQL data service based on the connection information.
To configure SQL Server Business Intelligence Development Studio, complete the following tasks:
1. Open the Business Intelligence Development Studio.
2. Create a new project and select Business Intelligence Project as the project type.
3. Select the Report Server Project Wizard.
4. Enter a project name and click OK.
The Report Wizard dialog box appears.5. Click Next.
6. Select New Data Source.
7. Enter the data source name and select ODBC as the type.
8. Click Edit.
The Connection Properties dialog box appears.
9. Enter the connection properties.
The following table describes the connection properties that you enter:
Option Description
Data Source Name Select the ODBC data source name for the SQL data service.
User ID Informatica domain user name.
Password Informatica domain user password.
10. Click Test Connection to validate the connection.
11. Click Next.
12. Click Query Builder and enter a username and password.
The Query Designer window appears.
13. Select the Add table option.
The Add Table dialog box appears.
14. Select tables and click Add.
15. Assign a relation or join tables manually.
16. Run an SQL query and verify that the data displays as expected.
17. Click OK.
18. Select Tabular or Matrix as the report type and click Next.
19. Select the available fields and click Next.
68 Chapter 5: Third-Party Client Tool Configuration
8/16/2019 DS 100 SQLDataServiceGuide En
http://slidepdf.com/reader/full/ds-100-sqldataserviceguide-en 69/99
20. Enter a report name and click Finish to create the report.
SQuirreL SQL Client ConfigurationYou can access the virtual data in an SQL data service through SQuirreL SQL Client. SQuirreL SQL Client
allows you to view the structure of a database and browse and query the data.
To configure SQuirreL SQL Client to access an SQL data service, complete the following tasks:
1. Copy the Informatica JDBC driver to the SQuirreL SQL Client library directory.
2. Create the Informatica JDBC driver and the database alias in SQuirreL SQL Client.
After you perform these tasks, you can import data from an SQL data service into SQuirreL SQL Client.
Step 1. Copy the Driver File
Copy the Informatica JDBC driver to the SQuirreL SQL Client library directory.
u Copy the Informatica JDBC driver, infadsjdbc.jar, from the following di rectory:
<Informatica Installation Directory>\tools\jdbcdrv\
To the following directory:
<SQuirreL SQL Client Installation Directory>\lib\
Step 2. Create the Driver and Alias
To read data from an SQL data service into SQuir reL SQL Client, create a driver definition and a database
alias. SQuirreL SQL Client uses the driver definition and the database alias to enable you to view the SQL
data service structure, browse the data in virtual tables, and enter SQL queries.
1. Open the Drivers list window.
2. Select Drivers > New Driver .
The Add Driver dialog box appears.
3. Enter the driver properties.
The following table describes the driver properties that you can enter:
Option Description
Name Informatica JDBC Driver
Example URL jdbc:informatica:sqlds/<optional security domain\><optionaluser name>/<optional user password>@<domain host name>:<domainHTTP port>?dis=<Data Integration Service name>&sqlds=<runtimeSQL data servicename>
SQuirreL SQL Client Configuration 69
8/16/2019 DS 100 SQLDataServiceGuide En
http://slidepdf.com/reader/full/ds-100-sqldataserviceguide-en 70/99
Option Description
Website URL jdbc:informatica:sqlds/<optional security domain\><optionaluser name>/<optional user password>@<domain host name>:<domainHTTP port>?dis=<Data Integration Service name>&sqlds=<runtime
SQL data servicename>
Extra Class
Path
<Informatica Installation Directory>\tools\jdbcdrv\infadsjdbc.jar
Class Name com.informatica.ds.sql.jdbcdrv.INFADriver
4. Click OK.
SQuirreL SQL Client displays a message saying that driver registration is successful.
5. Open the Aliases list window.
6. Select Aliases > New Alias.
The Add Alias dialog box appears.
7. Enter the alias properties.
The following table describes the alias properties that you can enter:
Option Description
Name Alias name.
Driver Select the new driver.
URL jdbc:informatica:sqlds/<optional security domain\><optional username>/<optional user password>@<domain host name>:<domain HTTPport>?dis=<Data Integration Service name>&sqlds=<runtime SQL dataservicename>
User Name Informatica domain user name.
Password Informatica domain user password.
8. Click Test.
SQuirreL SQL Client displays a message saying that the connection is successful.
9. Click OK.
Tableau ConfigurationYou can access the virtual data in an SQL data service through Tableau. Tableau uses the 32-bit Informatica
Data Services ODBC Driver to read source data from an SQL data service.
1. Start Tableau.
2. Click Connect to data.
3. Click Other Databases (ODBC).
70 Chapter 5: Third-Party Client Tool Configuration
8/16/2019 DS 100 SQLDataServiceGuide En
http://slidepdf.com/reader/full/ds-100-sqldataserviceguide-en 71/99
4. Select DSN to use an existing 32-bit ODBC connection or select Driver to provide the credentials to
connect to the SQL data service using the Informatica SQL Data Services ODBC driver.
If you select Driver , provide the connection information to connect to an SQL data service. Tableau
saves the credentials and options in the Tableau Workbook (.twb) file when you save the report. By
default, the .twb files are located in the following directory C:\Users\<username>\ Documents\My
Tableau Repository\Workbooks.
5. Click Connect.
6. Use Tableau to create a report from an SQL data service.
7. If you need to drag and drop date or numeric fields in Tableau, make the following modifications on the
Tableau Workbook file:
a. Locate the l ine <connection-customization class='genericodbc' enabled='true'
version='8.1'>, and verify that enabled =’true’.
b. Modify the SQL_NUMERIC_FIELDS field. Change the value to 6029280: <customization
name='SQL_MAX_IDENTIFIER_LEN' value='0' /> <customization
name='SQL_NUMERIC_FUNCTIONS' value='6029280' /> <customization
name='SQL_ODBC_INTERFACE_CONFORMANCE' value='1' />
For more information about Tableau customization, see the Tableau documentation.
Related Topics:
• “Configure ODBC Connections on Windows” on page 58
Toad for Data Analysts Configuration
Toad for Data Analysts is a database query tool. You can access the virtual data in an SQL data service with
Toad for Data Analysts. Use the Navigation Manager in Toad for Data Analysts to maintain and createdatabase connections.
If you connect to one or more databases, use the 'Connections' toolbar to specify the active connection to
assign the database connection Toad uses for any new windows or operations.
To configure Toad for Data Analysts to access an SQL data service, complete the following tasks:
1. Select the new connection option in the toolbar.
The Create New Connection dialog box appears.
2. Select ODBC from the Group list box.
3. Cl ick in the Data Source Name field.
4. Click Add.
5. Select the ODBC driver from the list, and click Finish.
6. Specify the configuration properties required for the database in the windows configuration dialog box.
Toad for Data Analysts Configuration 71
8/16/2019 DS 100 SQLDataServiceGuide En
http://slidepdf.com/reader/full/ds-100-sqldataserviceguide-en 72/99
The following table describes the configuration properties that you can specify:
Option Description
Data Source Name Select the ODBC data source name for the SQL data service.
User ID Informatica domain user name.
Password Informatica domain user password.
7. Specify the connection properties in the Create New Connection dialog.
The following table describes the connection properties that you can specify:
Option Description
Use data sourcename
Select to display the Data source names.
Deselect to display the driver names.
Data source name Select the data source name you added in the previous steps.
User Enter the user name to use when connecting.
Password Enter the password to use when connecting.
Database Specify the location of the database schema.
Data Source Name Displays the selected data source name.
Driver Displays the ODBC driver associated with the data source.
Category Selec t o r c reate a category i f you want to co lo r code Edi to r tabs for a speci fic
connection. This can help differentiate between development and productiondatabases. You can also set an option to color code the Object Explorer pane and
object editor windows .
8. Click Connect to save the connection and immediately connect to the database, or click Save to save
the connection without connecting to the database.
WinSQL Configuration
You can access the virtual data in an SQL data service through WinSQL. To read data from an SQL dataservice into WinSQL, create a new connection. WinSQL imports data from the SQL data service based on the
connection information.
1. Create a query.
2. Select File > New Connection.
The ODBC Data Source dialog box appears.
3. Enter the ODBC data source properties.
72 Chapter 5: Third-Party Client Tool Configuration
8/16/2019 DS 100 SQLDataServiceGuide En
http://slidepdf.com/reader/full/ds-100-sqldataserviceguide-en 73/99
The following table describes the ODBC data source properties that you can enter:
Option Description
Data Source Name Select the ODBC data source name for the SQL data service.
User ID Informatica domain user name.
Password Informatica domain user password.
Database Type (WinSQL Plugin) Select Generic ODBC.
4. Click OK.
Troubleshooting Third-Party Client Tools An error occurs when I query an SQL data service using Oracle Heterogeneous Services (OHS).
If you use Oracle Heterogeneous Services (OHS) to access data services directly from an Oracle query, add
quotation marks around the database link when you configure the Oracle 11g environment to connect to the
ODBC.
You can use the following syntax to configure the database link in an Oracle 11g environment:
CREATE DATABASE LINK "DataService_Link"CONNECT TO "userID" IDENTIFIED BY "password"USING 'DataService ODBC DSN';
For example:
CREATE DATABASE LINK "IDS_LINK1"CONNECT TO "Admin" IDENTIFIED BY "Admin1234"USING 'ids1';
An SQL data service is case-sensitive. When you query an SQL data service, the virtual schema and table
name must be identical to the names defined in the SQL data service.
An error occurs when I test a new ODBC connection th rough the Informatica Data Services ODBC Driver:
[SQLCMN_10007] The SQL Service Module could not find an SQL data service on the serverwith the name [<SQL data service name>]. Check the SQL data service name.
When you enter the SQLData Service Name, use the correct syntax. This is the correct syntax:
<application>.<SQL data service name>
A l ibrary error occurs when I create, configure, or test an ODBC connection.
Verify that the PATH environment variable has not exceeded the character limit and that it includes the path
to the ODBC driver installation directory.
Troubleshooting Third-Party Client Tools 73
8/16/2019 DS 100 SQLDataServiceGuide En
http://slidepdf.com/reader/full/ds-100-sqldataserviceguide-en 74/99
C H A P T E R 6
Installing and Configuring Driversfor PowerCenter
This chapter includes the following topics:
• Installing and Configuring Drivers for PowerCenter Overview, 74
• Before You Install the Drivers, 75
• Install the Drivers on Windows, 76
• Configure ODBC Connections on Windows, 77
• Install the Drivers on UNIX, 78
• Configure ODBC Connections on UNIX, 80
• Troubleshooting ODBC Connections for PowerCenter, 81
Installing and Configuring Drivers for PowerCenter
OverviewYou can connect to an SQL data service from PowerCenter. Before you connect from PowerCenter, you must
install and configure the drivers on both the PowerCenter Client and PowerCenter Integration Service
machines. After you install and configure the drivers, you can import the SQL data service into the
PowerCenter Client and run sessions with the PowerCenter Integration Service.
Before you can connect to an SQL data service from PowerCenter, you must perform the following tasks:
1. Record the Informatica domain information.
2. Install or upgrade the Informatica JDBC/ODBC drivers for PowerCenter.
3. Configure the Informatica JDBC/ODBC drivers for PowerCenter.
74
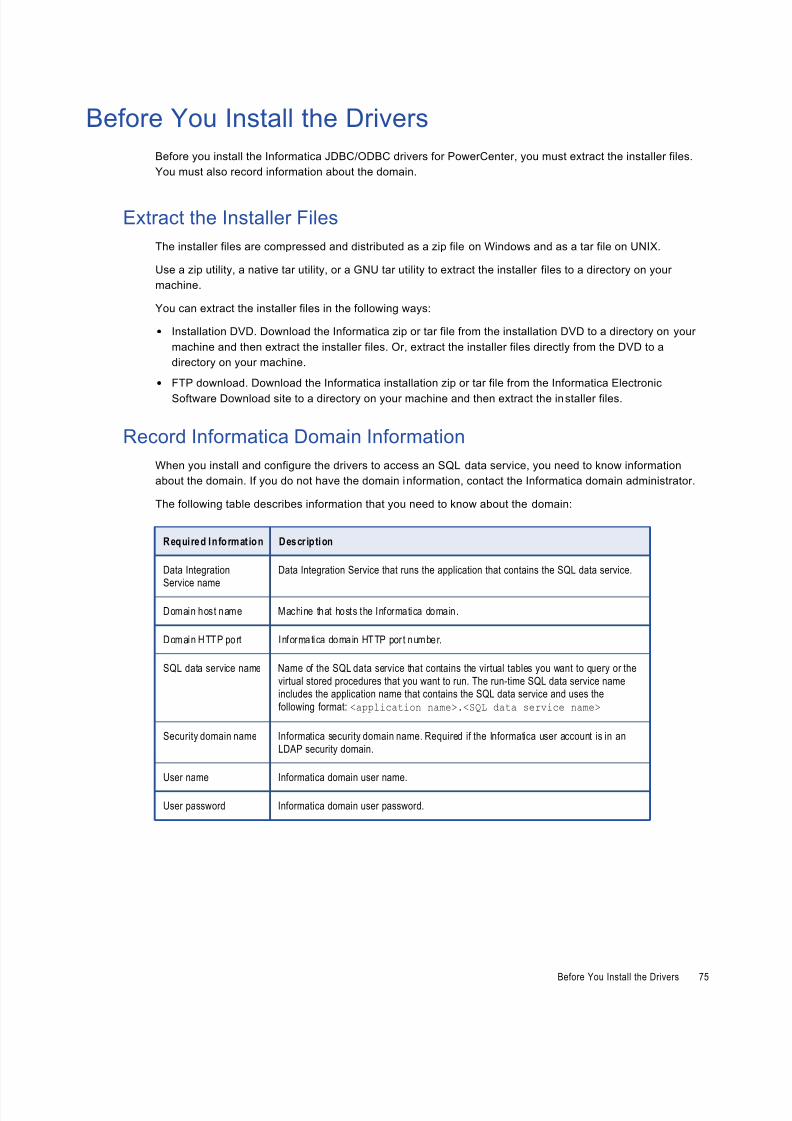
8/16/2019 DS 100 SQLDataServiceGuide En
http://slidepdf.com/reader/full/ds-100-sqldataserviceguide-en 75/99
Before You Install the Drivers
Before you install the Informatica JDBC/ODBC drivers for PowerCenter, you must extract the installer files.
You must also record information about the domain.
Extract the Installer Files
The installer files are compressed and distributed as a zip file on Windows and as a tar file on UNIX.
Use a zip utility, a native tar utility, or a GNU tar utility to extract the installer files to a directory on your
machine.
You can extract the installer files in the following ways:
• Installation DVD. Download the Informatica zip or tar file from the installation DVD to a directory on your
machine and then extract the installer files. Or, extract the installer files directly from the DVD to a
directory on your machine.
• FTP download. Download the Informatica installation zip or tar file from the Informatica Electronic
Software Download site to a directory on your machine and then extract the installer files.
Record Informatica Domain Information
When you install and configure the drivers to access an SQL data service, you need to know information
about the domain. If you do not have the domain information, contact the Informatica domain administrator.
The following table describes information that you need to know about the domain:
Required Informat ion Descr iption
Data IntegrationService name
Data Integration Service that runs the application that contains the SQL data service.
Domain host name Machine that hosts the Informatica domain.
Domain HTTP port Informatica domain HTTP por t number.
SQL data service name Name of the SQL data service that contains the virtual tables you want to query or the
virtual stored procedures that you want to run. The run-time SQL data service nameincludes the application name that contains the SQL data service and uses the
following format: <application name>.<SQL data service name>
Security domain name Informatica security domain name. Required if the Informatica user account is in an
LDAP security domain.
User name Informatica domain user name.
User password Informatica domain user password.
Before You Install the Drivers 75

8/16/2019 DS 100 SQLDataServiceGuide En
http://slidepdf.com/reader/full/ds-100-sqldataserviceguide-en 76/99
Required Informat ion Descr iption
Truststore f ile If the Informatica domain has secure communication enabled, you must have the
location of the truststore file that contains the SSL certificate for the domain.
Authen ticat ion type The mode of authen ticat ion used to connect to the SQL data service. You can select
one of the following authentication modes:
Native or LDAP Authentication
Uses an Informatica domain user account to connect to the SQL data service in an
Informatica domain that uses Native or LDAP authentication. The user account can
be in a native or LDAP security domain.
Kerberos with keytab
Uses the service principal name (SPN) of an Informatica domain user account to
connect to the SQL data service in an Informatica domain that uses Kerberos
authentication.
Kerberos with user name and password
Uses an Informatica domain user account to connect to the SQL data service in an
Informatica domain that uses Kerberos authentication.
Logged in user
Uses the user account logged in to the client machine to connect to the SQL data
service in an Informatica domain that uses Native, LDAP, or Kerberos
authentication.
Install the Drivers on Windows
Before you can connect to an SQL data service from PowerCenter, you must install or upgrade the
Informatica Data Services JDBC/ODBC drivers for PowerCenter. Install the drivers on the machine that you
connect to the SQL data service from. You can install the drivers on multiple machines in graphical mode or
silent mode.
The Informatica driver version must match the Informatica version.
Install the Drivers for PowerCenter in Graphical Mode
To install or upgrade the drivers in graphical mode, run the Informatica JDBC/ODBC driver for PowerCenter
installer.
1. Close all other applications.
2. Navigate to the root directory of the extracted installer files.
3. Run install.bat.
4. Choose to install or upgrade the drivers.
5. Click Next.
The Installation Prerequisites page displays the system requirements. Verify that all installation
requirements are met before you continue the installation.
6. Click Next.
76 Chapter 6: Installing and Configuring Drivers for PowerCenter
8/16/2019 DS 100 SQLDataServiceGuide En
http://slidepdf.com/reader/full/ds-100-sqldataserviceguide-en 77/99
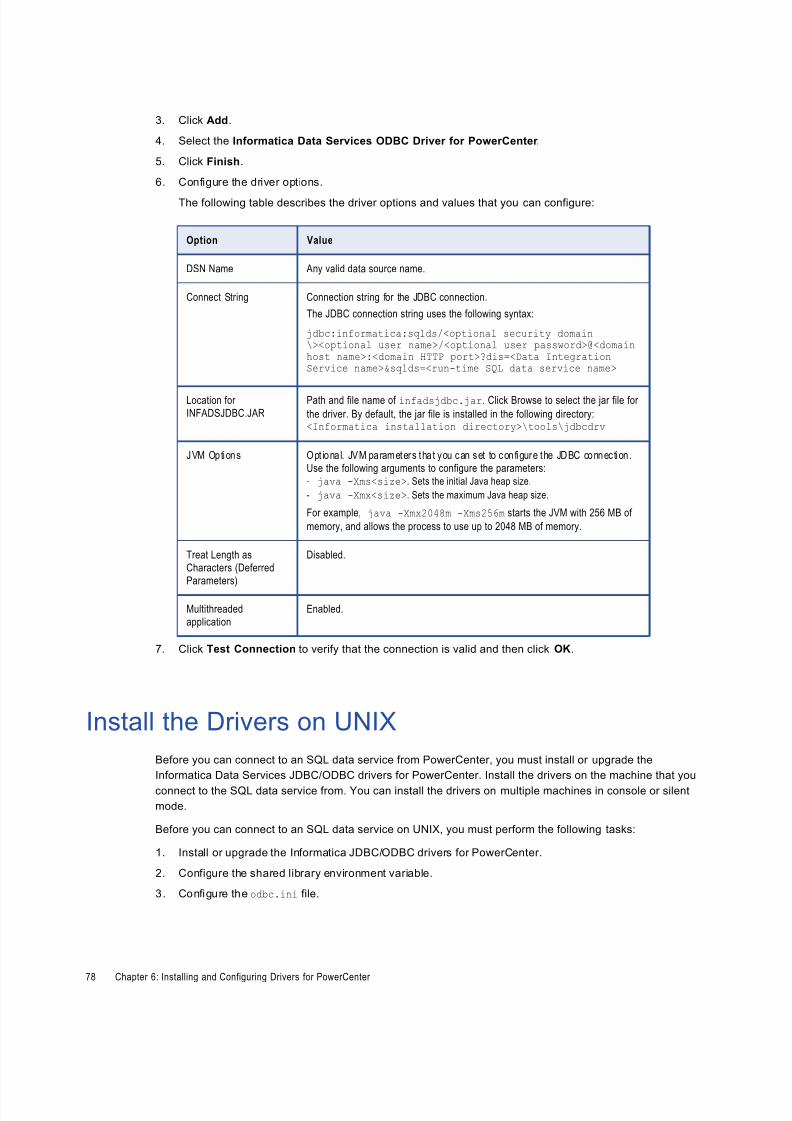
8/16/2019 DS 100 SQLDataServiceGuide En
http://slidepdf.com/reader/full/ds-100-sqldataserviceguide-en 78/99
3. Click Add.
4. Select the Informatica Data Services ODBC Driver for PowerCenter .
5. Click Finish.
6. Configure the driver options.
The following table describes the driver options and values that you can configure:
Option Value
DSN Name Any valid data source name.
Connect String Connection string for the JDBC connection.
The JDBC connection string uses the following syntax:
jdbc:informatica:sqlds/<optional security domain\><optional user name>/<optional user password>@<domainhost name>:<domain HTTP port>?dis=<Data IntegrationService name>&sqlds=<run-time SQL data service name>
Location for
INFADSJDBC.JAR
Path and file name of infadsjdbc.jar. Click Browse to select the jar file for
the driver. By default, the jar file is installed in the following directory:<Informatica installation directory>\tools\jdbcdrv
JVM Options Opt iona l. JVM parameters tha t you can set to con figure the JDBC connec tion .
Use the following arguments to configure the parameters:- java -Xms<size>. Sets the initial Java heap size.
- java -Xmx<size>. Sets the maximum Java heap size.
For example, java -Xmx2048m -Xms256m starts the JVM with 256 MB of
memory, and allows the process to use up to 2048 MB of memory.
Treat Length as
Characters (Deferred
Parameters)
Disabled.
Multithreaded
application
Enabled.
7. Click Test Connection to verify that the connection is valid and then click OK.
Install the Drivers on UNIX
Before you can connect to an SQL data service from PowerCenter, you must install or upgrade the
Informatica Data Services JDBC/ODBC drivers for PowerCenter. Install the drivers on the machine that you
connect to the SQL data service from. You can install the drivers on multiple machines in console or silent
mode.
Before you can connect to an SQL data service on UNIX, you must perform the following tasks:
1. Install or upgrade the Informatica JDBC/ODBC drivers for PowerCenter.
2. Configure the shared library environment variable.
3. Configure the odbc.ini file.
78 Chapter 6: Installing and Configuring Drivers for PowerCenter

8/16/2019 DS 100 SQLDataServiceGuide En
http://slidepdf.com/reader/full/ds-100-sqldataserviceguide-en 79/99
Install the Drivers for PowerCenter in Console Mode
To install or upgrade the drivers in console mode, run the Informatica JDBC/ODBC driver for PowerCenter
installer.
1. Log in to the machine with a system user account.
2. Close all other applications.
3. Navigate to the root directory of the extracted installer files.
4. At the command prompt, extract the install media.
5. Run install.sh.
6. Select one of the following options:
Option Description
1 Install the drivers.
2 Upgrade the drivers.
7. Press Enter .
The Installation Prerequisites section displays the system requirements.
8. Verify that all installation requirements are met before you continue the installation.
9. Press Enter .
The Installation Directory section appears.
10. Enter the absolute path for the installation directory.
11. Press Enter .
12. In the Pre-Installation Summary section, review the installation information, and then press Enter .
13. Press Enter .
For more information about the install tasks, see the installation debug log.
Install the Drivers for PowerCenter in Silent Mode
To install or upgrade the drivers without user interaction, install in silent mode. Use a properties file to specify
the installation options. The driver installer reads the file to determine the installation options.
Use the silent mode installation to install the drivers on multiple machines on the network or to standardize
the installation across machines.
1. Use a text editor to open and change the values of the properties in the file.
Install the Drivers on UNIX 79
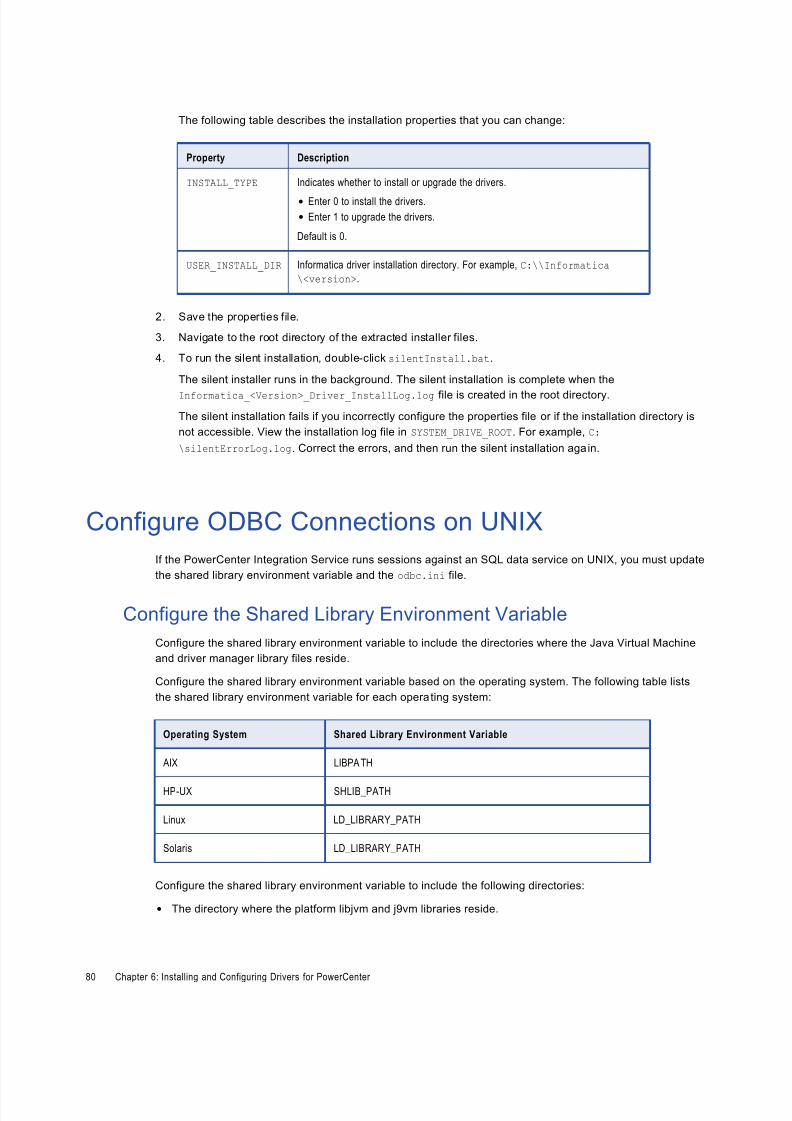
8/16/2019 DS 100 SQLDataServiceGuide En
http://slidepdf.com/reader/full/ds-100-sqldataserviceguide-en 80/99
The following table describes the installation properties that you can change:
Property Description
INSTALL_TYPE Indicates whether to install or upgrade the drivers.
• Enter 0 to install the drivers.
• Enter 1 to upgrade the drivers.
Default is 0.
USER_INSTALL_DIR Informatica driver installation directory. For example, C:\\Informatica
\<version>.
2. Save the properties file.
3. Navigate to the root directory of the extracted installer files.
4. To run the silent installation, double-click silentInstall.bat.
The silent installer runs in the background. The silent installation is complete when the
Informatica_<Version>_Driver_InstallLog.log file is created in the root directory.
The silent installation fails if you incorrectly configure the properties file or if the installation directory is
not accessible. View the installation log file in SYSTEM_DRIVE_ROOT. For example, C:
\silentErrorLog.log. Correct the errors, and then run the silent installation again.
Configure ODBC Connections on UNIX
If the PowerCenter Integration Service runs sessions against an SQL data service on UNIX, you must update
the shared library environment variable and the odbc.ini file.
Configure the Shared Library Environment Variable
Configure the shared library environment variable to include the directories where the Java Virtual Machine
and driver manager library files reside.
Configure the shared library environment variable based on the operating system. The following table lists
the shared library environment variable for each operating system:
Operating System Shared Library Environment Variable
AIX LIBPATH
HP-UX SHLIB_PATH
Linux LD_LIBRARY_PATH
Solaris LD_LIBRARY_PATH
Configure the shared library environment variable to include the following directories:
• The directory where the platform libjvm and j9vm libraries reside.
80 Chapter 6: Installing and Configuring Drivers for PowerCenter
8/16/2019 DS 100 SQLDataServiceGuide En
http://slidepdf.com/reader/full/ds-100-sqldataserviceguide-en 81/99
• The directory where the driver manager library files reside. Use the DataDirect driver manager. The
DataDirect driver manager is found in ODBCHOME/lib.
Use the DataDirect driver manager to create an OBDCINST environment variable to point to the
odbcinst.ini file.
Configure the ODBC Files
Before you can connect to an SQL data service on UNIX, you must configure the odbc.ini and
odbcinst.ini files.
Store the odbcinst.ini file in any location. Use the ${ODBCINST} environment variable to point to the
odbcinst.ini file.
1. Edit odbc.ini or copy odbc.ini to the home directory and edit it.
This file exists in the $ODBCHOME directory.
$ cp $ODBCHOME/odbc.ini $HOME/.odbc.ini
2. Add an entry for the ODBC user under the section [<user name>_odbc].
For example:
[<user name>_odbc]ConnectionString=jdbc:informatica:sqlds/<optional security domain\><user name>/<userpassword>@<domain host name>:<domain HTTP port>?dis=<Data Integration Servicename>&sqlds=<run-time SQL data service name>&authType=<type>Driver=$ODBC_DRIVER_INSTALL_LOCATION/odbcdrv/libinfadsodbc.soIsMultiThreaded=trueJDBCDriverLocation=<Informatica installation directory>/tools/jdbcdrv/infadsjdbc.jarUseDetach=false
The Authentication Mode parameter can have one of the following values:
• native_uid
• kerberos_keytab
• kerberos_uid
• sso
3. Add the driver and setup entries to the odbcinst.ini file.
[Informatica Data Services ODBC Driver for PowerCenter <version>]Driver=<Complete path to driver>Setup=<Complete path to driver>
For example:
Driver=$ODBC_DRIVER_INSTALL_LOCATION/odbcdrv/libinfadsodbc.soSetup=$ODBC_DRIVER_INSTALL_LOCATION/odbcdrv/libinfadsodbc.so
Troubleshooting ODBC Connections forPowerCenter
The ODBC application consumes large amounts of data.
Increase the maximum amount of memory available to the Java Virtual Machine (the -Xmx value).
Troubleshooting ODBC Connections for PowerCenter 81
8/16/2019 DS 100 SQLDataServiceGuide En
http://slidepdf.com/reader/full/ds-100-sqldataserviceguide-en 82/99
To increase the -Xmx value, set the environment variable INFA_ODBCJVM to -Xmx<megabytes>m. For
example, to set the -Xmx value to 64 MB, set INFA_ODBCJVM to -Xmx 64m. If you set the -Xmx value to a
very large value, for example >500 MB, the Memory Manager may not be able to allocate the memory.
A mapping that contains a Lookup transformation fails.
When a mapping that was created in PowerCenter contains a lookup to an SQL data service through ODBC,
and the Lookup transformation performs the lookup before the mapping executes Java transformations, the
Lookup will fail. The reason is that when the mapping connects through ODBC to run the Lookup, the
connection creates a JVM. This JVM lacks knowledge of the classpath that the later Java transformation
needs for its connection.
To work around this issue, enable the PowerCenter ODBC driver.
To do this, you must edit the infaservice.bat or infaservice.sh file to set the classpath. For example:
set CLASSPATH=D:\Informatica\961hf1\1007\server\source\server\bin\javalib\pmserversdk.jar;D:\Informatica\961hf1\1007\server\source\server\bin\javalib\pmjtx.jarcall "%CATALINA_HOME%\bin\setclasspath.bat"set CLASSPATH=%INFA_JAVA_CMD_CLASSPATH%;%CLASSPATH%;%JAVA_HOME%\lib\tools.jar;%CATALINA_HOME%\bin\bootstrap.jar;%CATALINA_HOME%\bin\tomcat-juli.jar;%INFA_HOME%
\services\shared\jars\platform\infatomcatbootstrap.jar; After you edit the classpath, restart the domain for your changes to take effect.
The Informatica Data Services ODBC/JDBC driver for PowerCenter does not support sing le sign-on
based authentication when the driver is used with PowerCenter clients to import virtual tables in
Informatica domains that use Kerberos authentication.
You must provide the keytab or username and password to import virtual tables and run workflows with the
ODBC/JDBC driver and PowerCenter client.
82 Chapter 6: Installing and Configuring Drivers for PowerCenter
8/16/2019 DS 100 SQLDataServiceGuide En
http://slidepdf.com/reader/full/ds-100-sqldataserviceguide-en 83/99
C H A P T E R 7
SQL Data Service Administration
This chapter includes the following topics:
• SQL Data Service Administration Overview, 83
• SQL Data Service Security Management, 84
• SQL Data Service Properties Configuration , 86
•
SQL Data Service Result Set Caching, 92• Data Object Caching, 93
• SQL Data Service Logs, 93
• Monitor SQL Data Services, 93
SQL Data Service Administration Overview
After you deploy an SQL data service to a Data Integrat ion Service, you can configure the service, assign
users permissions for the service, view logs, and monitor service requests. You must have the appropriate
privileges in order to perform these tasks.
After you deploy an SQL data service to a Data Integrat ion Service, you can complete the following tasks:
• Assign permissions. Enable SQL data service security and assign permissions on SQL data service
objects.
• Configure the SQL data service. Configur e read-only general properties, Data Integration Service settings,
logical data object, and caching properties.
• View the SQL data service logs. View Data Integration Service logs for an SQL data service.
• Monitor the SQL data service. Use the Administrator tool or the Monitoring tool to monitor SQL data
service requests.
83
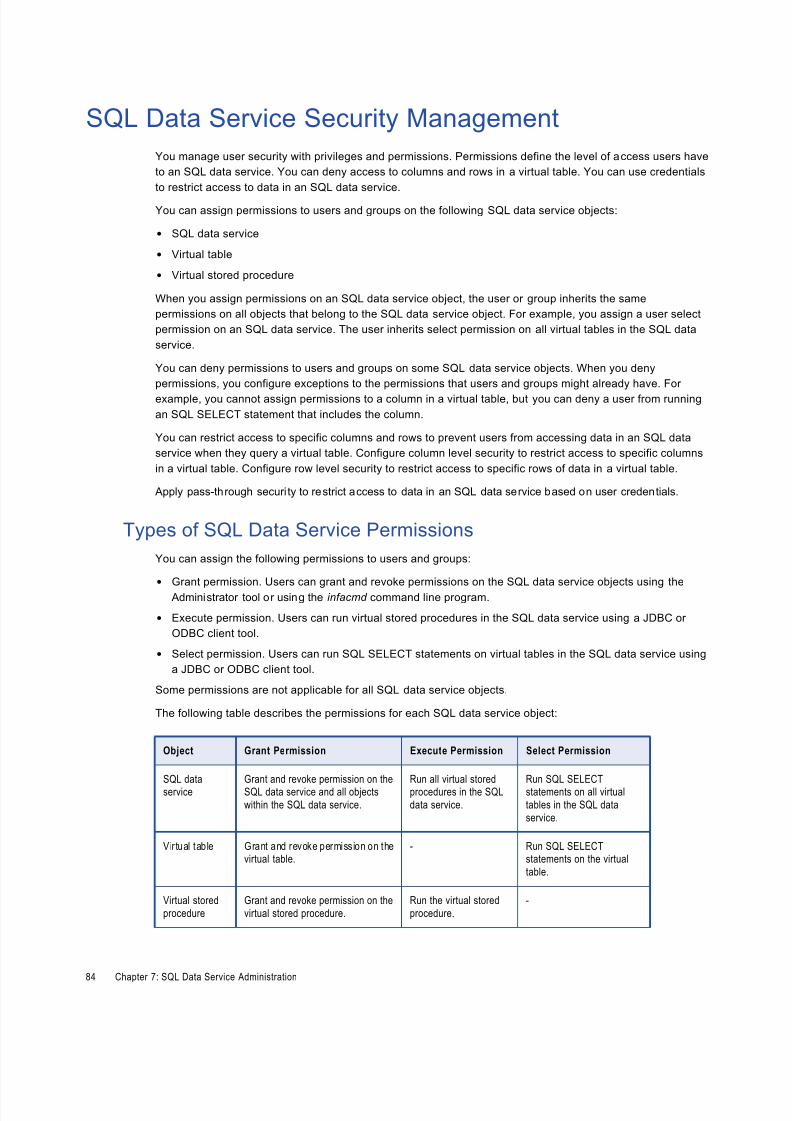
8/16/2019 DS 100 SQLDataServiceGuide En
http://slidepdf.com/reader/full/ds-100-sqldataserviceguide-en 84/99
SQL Data Service Security Management
You manage user security with privileges and permissions. Permissions define the level of access users have
to an SQL data service. You can deny access to columns and rows in a virtual table. You can use credentials
to restrict access to data in an SQL data service.
You can assign permissions to users and groups on the following SQL data service objects:
• SQL data service
• Virtual table
• Virtual stored procedure
When you assign permissions on an SQL data service object, the user or group inherits the same
permissions on all objects that belong to the SQL data service object. For example, you assign a user select
permission on an SQL data service. The user inherits select permission on all virtual tables in the SQL data
service.
You can deny permissions to users and groups on some SQL data service objects. When you deny
permissions, you configure exceptions to the permissions that users and groups might already have. For
example, you cannot assign permissions to a column in a virtual table, but you can deny a user from running
an SQL SELECT statement that includes the column.
You can restrict access to specific columns and rows to prevent users from accessing data in an SQL data
service when they query a virtual table. Configure column level security to restrict access to specific columns
in a virtual table. Configure row level security to restrict access to specific rows of data in a virtual table.
Apply pass-through securi ty to restrict access to data in an SQL data service based on user credentials.
Types of SQL Data Service Permissions
You can assign the following permissions to users and groups:
• Grant permission. Users can grant and revoke permissions on the SQL data service objects using the
Administrator tool or using the infacmd command line program.
• Execute permission. Users can run virtual stored procedures in the SQL data service using a JDBC or
ODBC client tool.
• Select permission. Users can run SQL SELECT statements on virtual tables in the SQL data service using
a JDBC or ODBC client tool.
Some permissions are not applicable for all SQL data service objects.
The following table describes the permissions for each SQL data service object:
Object Grant Permission Execute Permission Select Permission
SQL dataservice
Grant and revoke permission on theSQL data service and all objects
within the SQL data service.
Run all virtual storedprocedures in the SQL
data service.
Run SQL SELECTstatements on all virtual
tables in the SQL data
service.
Vir tual table Grant and revoke permission on thevirtual table.
- Run SQL SELECTstatements on the virtual
table.
Virtual stored
procedure
Grant and revoke permission on the
virtual stored procedure.
Run the virtual stored
procedure.
-
84 Chapter 7: SQL Data Service Administration

8/16/2019 DS 100 SQLDataServiceGuide En
http://slidepdf.com/reader/full/ds-100-sqldataserviceguide-en 85/99
Column Level Security
Column level security is the ability to deny access to individual columns in a virtual table. When end users
query columns that they are not authorized to view, the Data Integration Service returns substitute data
values, null values, or an error.
An administrator can deny access to columns in a virtual table of an SQL data object. The administrator canconfigure the Data Integration Service behavior for queries against a restricted column.
The following results might occur when the user queries a column that the user does not have permissions
for:
• The query returns a substitute value instead of the data. The query returns a substitute value in each row
that it returns. The substitute value replaces the column value through the query. If the query includes
filters or joins, the results substitute appears in the results.
• The query fails with an insufficient permission error.
Row Level Security
Row level security is a level of security that restricts rows of data from users or user groups when they querya virtual table. An administrator can create a security predicate that limits query access to specific rows of
data.
A security predicate is an SQL WHERE clause that filters data out of the result set when you query a virtual
table. The Data Integration Service modifies the query based on security predicates.
For example, a financial services company needs to integrate order data that is stored in disparate data
sources and provide a single, integrated orders view. An administrator can create a virtual table that
combines the order data and then restrict access to the table with security predicates so that users and
groups see a particular data set when they query the table. Employees can access data for orders that they
own and for orders in their region within a specified dollar amount.
Pass-Through SecurityPass-through security is the capability to connect to an SQL data service with the client user credentials
instead of the credentials from a connection object.
Users might have access to different sets of data based on the job in the organization. Client systems restrict
access to databases by the user name and the password. When you create an SQL data service, you might
combine data from different systems to create one view of the data. However, when you define the
connection to the SQL data service, the connection has one user name and password.
If you configure pass-through security, you can restrict users from some of the data in an SQL data service
based on their user name. When a user connects to the SQL data service, the Data Integration Service
ignores the user name and the password in the connection object. The user connects with the client user
name or the LDAP user name.
Configure pass-through security for a connection in the connection properties of the Administrator tool or with
infacmd dis UpdateServiceOptions. You can set pass-through security for connections to deployed
applications. You cannot set pass-through security in the Developer tool. Only SQL data services and web
services recognize the pass-through security configuration.
For more information about configuring security for SQL data services, see the Informatica How-To Library
article "How to Configure Security for SQL Data Services":
http://communities.informatica.com/docs/DOC-4507.
SQL Data Service Security Management 85
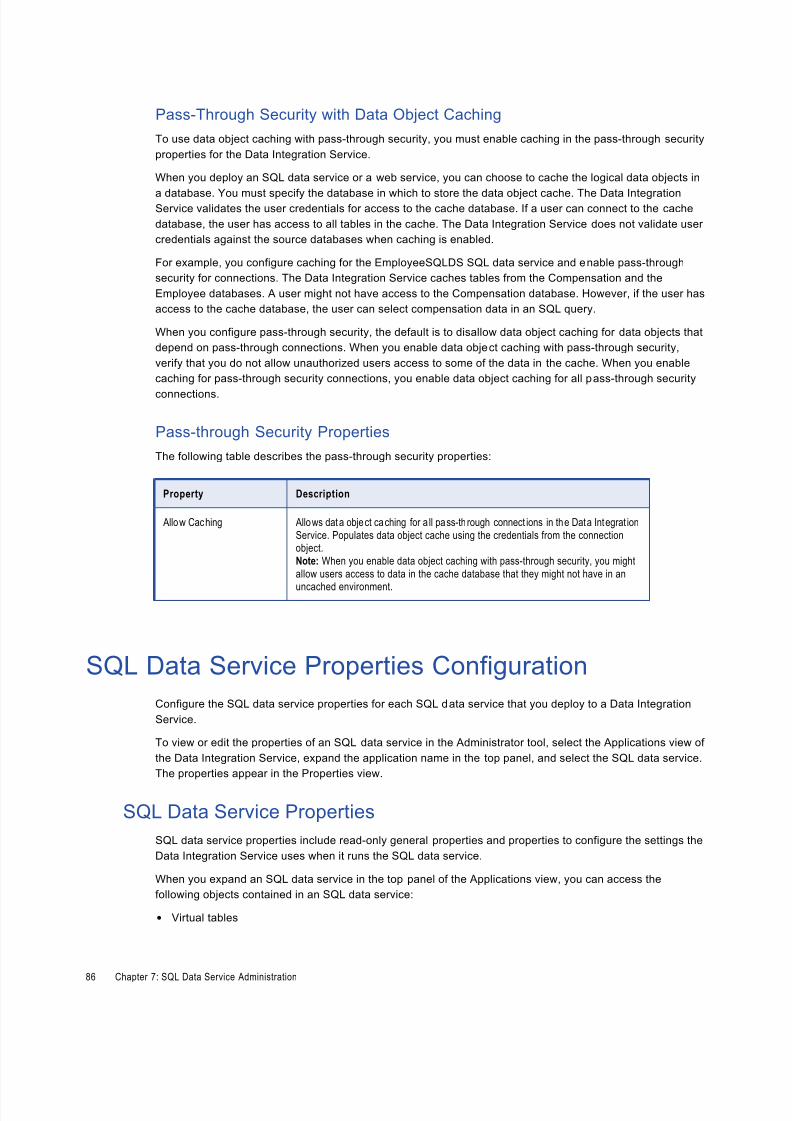
8/16/2019 DS 100 SQLDataServiceGuide En
http://slidepdf.com/reader/full/ds-100-sqldataserviceguide-en 86/99
Pass-Through Security with Data Object Caching
To use data object caching with pass-through security, you must enable caching in the pass-through security
properties for the Data Integration Service.
When you deploy an SQL data service or a web service, you can choose to cache the logical data objects in
a database. You must specify the database in which to store the data object cache. The Data IntegrationService validates the user credentials for access to the cache database. If a user can connect to the cache
database, the user has access to all tables in the cache. The Data Integration Service does not validate user
credentials against the source databases when caching is enabled.
For example, you configure caching for the EmployeeSQLDS SQL data service and enable pass-through
security for connections. The Data Integration Service caches tables from the Compensation and the
Employee databases. A user might not have access to the Compensation database. However, if the user has
access to the cache database, the user can select compensation data in an SQL query.
When you configure pass-through security, the default is to disallow data object caching for data objects that
depend on pass-through connections. When you enable data object caching with pass-through security,
verify that you do not allow unauthorized users access to some of the data in the cache. When you enable
caching for pass-through security connections, you enable data object caching for all pass-through security
connections.
Pass-through Security Properties
The following table describes the pass-through security properties:
Property Description
Allow Caching Allows data object caching for a ll pass-th rough connect ions in the Data Integrat ion
Service. Populates data object cache using the credentials from the connectionobject.
Note: When you enable data object caching with pass-through security, you might
allow users access to data in the cache database that they might not have in an
uncached environment.
SQL Data Service Properties Configuration
Configure the SQL data service properties for each SQL data service that you deploy to a Data Integration
Service.
To view or edit the properties of an SQL data service in the Administrator tool, select the Applications view of
the Data Integration Service, expand the application name in the top panel, and select the SQL data service.
The properties appear in the Properties view.
SQL Data Service Properties
SQL data service properties include read-only general properties and properties to configure the settings the
Data Integration Service uses when it runs the SQL data service.
When you expand an SQL data service in the top panel of the Applications view, you can access the
following objects contained in an SQL data service:
• Virtual tables
86 Chapter 7: SQL Data Service Administration

8/16/2019 DS 100 SQLDataServiceGuide En
http://slidepdf.com/reader/full/ds-100-sqldataserviceguide-en 87/99
• Virtual columns
• Virtual stored procedures
The Applications view displays read-only general properties for SQL data services and the objects contained
in the SQL data services. Properties that appear in the view depend on the object type.
The following table describes the read-only general properties for SQL data services, virtual tables, virtual
columns, and virtual stored procedures:
Property Description
Name Name o f the selec ted objec t. Appears fo r a ll objec t types .
Description Short description of the selected object. Appears for all object types.
Type Type of the selected object. Appears for al l object types.
Location The location of the selected object. This includes the domain and Data Integration Service name.
Appears for all object types.
JDBC URL JDBC connection string used to access the SQL data service. The SQL data service containsvirtual tables that you can query. It also contains virtual stored procedures that you can run.
Appears for SQL data services.
Column Type Datatype of the virtual column. Appears for virtual columns.
The following table describes the configurable SQL data service properties:
Property Description
Startup Type Determines whether the SQL data service is enabled to run when the application starts or
when you start the SQL data service. Enter ENABLED to allow the SQL data service to run.
Enter DISABLED to prevent the SQL data service from running.
Trace Level Level of error written to the log files. Choose one of the following message levels:- OFF
- SEVERE
- WARNING
- INFO
- FINE
- FINEST
- ALL
Default is INFO.
Connection
Timeout
Maximum number of milliseconds to wait for a connection to the SQL data service. Default is
3,600,000.
Request Timeout Maximum number of milliseconds for an SQL request to wait for an SQL data serviceresponse. Default is 3,600,000.
Sort Order Sort order that the Data Integration Service uses for sorting and comparing data when
running in Unicode mode. You can choose the sort order based on your code page. When the
Data Integration runs in ASCII mode, it ignores the sort order value and uses a binary sort
order. Default is binary.
Maximum Active
Connections
Maximum number of active connections to the SQL data service.
SQL Data Service Properties Configuration 87
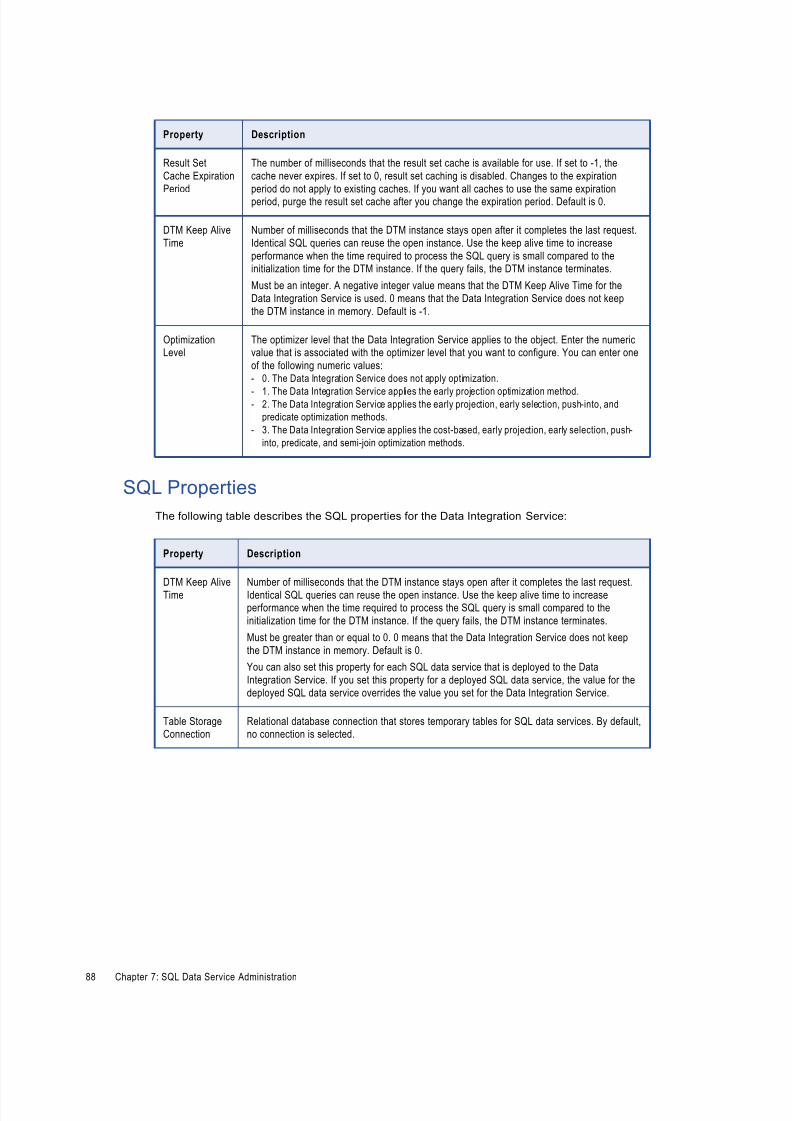
8/16/2019 DS 100 SQLDataServiceGuide En
http://slidepdf.com/reader/full/ds-100-sqldataserviceguide-en 88/99
Property Description
Result Set
Cache Expiration
Period
The number of milliseconds that the result set cache is available for use. If set to -1, the
cache never expires. If set to 0, result set caching is disabled. Changes to the expiration
period do not apply to existing caches. If you want all caches to use the same expirationperiod, purge the result set cache after you change the expiration period. Default is 0.
DTM Keep Alive
Time
Number of milliseconds that the DTM instance stays open after it completes the last request.
Identical SQL queries can reuse the open instance. Use the keep alive time to increase
performance when the time required to process the SQL query is small compared to theinitialization time for the DTM instance. If the query fails, the DTM instance terminates.
Must be an integer. A negative integer value means that the DTM Keep Alive Time for the
Data Integration Service is used. 0 means that the Data Integration Service does not keep
the DTM instance in memory. Default is -1.
OptimizationLevel
The optimizer level that the Data Integration Service applies to the object. Enter the numericvalue that is associated with the optimizer level that you want to configure. You can enter one
of the following numeric values:- 0. The Data Integration Service does not apply optimization.
- 1. The Data Integration Service applies the early projection optimization method.- 2. The Data Integration Service applies the early projection, early selection, push-into, and
predicate optimization methods.
- 3. The Data Integration Service applies the cost-based, early projection, early selection, push-
into, predicate, and semi-join optimization methods.
SQL Properties
The following table describes the SQL properties for the Data Integration Service:
Property Description
DTM Keep Alive
Time
Number of milliseconds that the DTM instance stays open after it completes the last request.
Identical SQL queries can reuse the open instance. Use the keep alive time to increaseperformance when the time required to process the SQL query is small compared to the
initialization time for the DTM instance. If the query fails, the DTM instance terminates.
Must be greater than or equal to 0. 0 means that the Data Integration Service does not keep
the DTM instance in memory. Default is 0.
You can also set this property for each SQL data service that is deployed to the Data
Integration Service. If you set this property for a deployed SQL data service, the value for the
deployed SQL data service overrides the value you set for the Data Integration Service.
Table StorageConnection
Relational database connection that stores temporary tables for SQL data services. By default,no connection is selected.
88 Chapter 7: SQL Data Service Administration
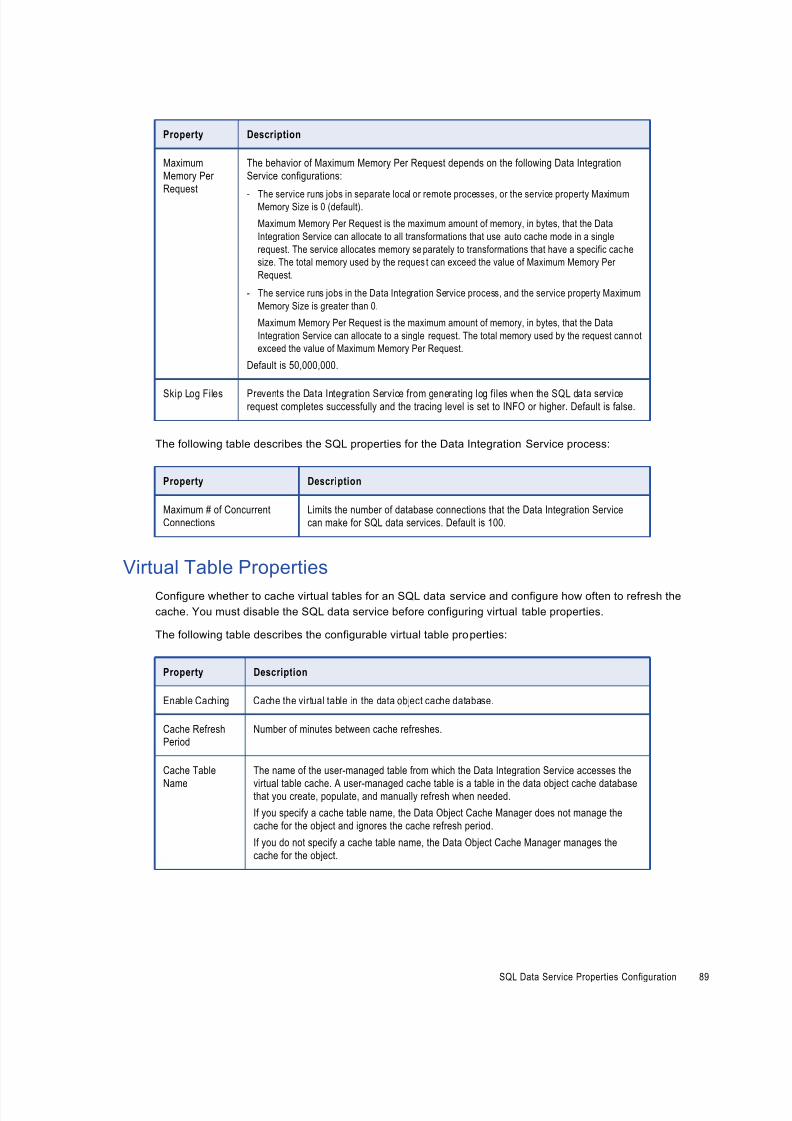
8/16/2019 DS 100 SQLDataServiceGuide En
http://slidepdf.com/reader/full/ds-100-sqldataserviceguide-en 89/99
Property Description
Maximum
Memory Per
Request
The behavior of Maximum Memory Per Request depends on the following Data Integration
Service configurations:
- The service runs jobs in separate local or remote processes, or the service property MaximumMemory Size is 0 (default).
Maximum Memory Per Request is the maximum amount of memory, in bytes, that the Data
Integration Service can allocate to all transformations that use auto cache mode in a single
request. The service allocates memory se parately to transformations that have a specific cache
size. The total memory used by the reques t can exceed the value of Maximum Memory Per
Request.
- The service runs jobs in the Data Integration Service process, and the service property Maximum
Memory Size is greater than 0.
Maximum Memory Per Request is the maximum amount of memory, in bytes, that the Data
Integration Service can allocate to a single request. The total memory used by the request cann ot
exceed the value of Maximum Memory Per Request.
Default is 50,000,000.
Skip Log Files Prevents the Data Integration Service from generating log files when the SQL data servicerequest completes successfully and the tracing level is set to INFO or higher. Default is false.
The following table describes the SQL properties for the Data Integration Service process:
Property Description
Maximum # of Concurrent
Connections
Limits the number of database connections that the Data Integration Service
can make for SQL data services. Default is 100.
Virtual Table Properties
Configure whether to cache virtual tables for an SQL data service and configure how often to refresh the
cache. You must disable the SQL data service before configuring virtual table properties.
The following table describes the configurable virtual table properties:
Property Description
Enable Caching Cache the virtual table in the data object cache database.
Cache RefreshPeriod
Number of minutes between cache refreshes.
Cache Table
Name
The name of the user-managed table from which the Data Integration Service accesses the
virtual table cache. A user-managed cache table is a table in the data object cache databasethat you create, populate, and manually refresh when needed.
If you specify a cache table name, the Data Object Cache Manager does not manage the
cache for the object and ignores the cache refresh period.
If you do not specify a cache table name, the Data Object Cache Manager manages the
cache for the object.
SQL Data Service Properties Configuration 89
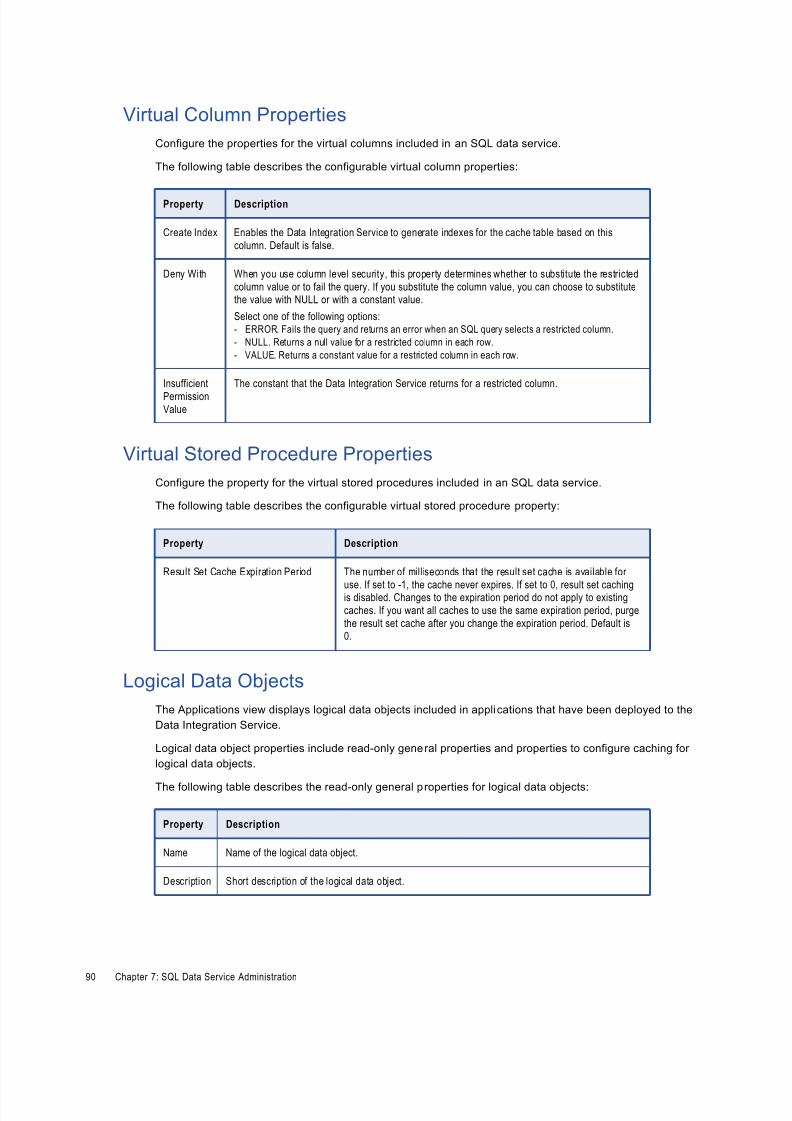
8/16/2019 DS 100 SQLDataServiceGuide En
http://slidepdf.com/reader/full/ds-100-sqldataserviceguide-en 90/99
Virtual Column Properties
Configure the properties for the virtual columns included in an SQL data service.
The following table describes the configurable virtual column properties:
Property Description
Create Index Enables the Data Integration Service to generate indexes for the cache table based on this
column. Default is false.
Deny With When you use column level security, this property determines whether to substitute the restricted
column value or to fail the query. If you substitute the column value, you can choose to substitutethe value with NULL or with a constant value.
Select one of the following options:- ERROR. Fails the query and returns an error when an SQL query selects a restricted column.
- NULL. Returns a null value for a restricted column in each row.
- VALUE. Returns a constant value for a restricted column in each row.
Insufficient
PermissionValue
The constant that the Data Integration Service returns for a restricted column.
Virtual Stored Procedure Properties
Configure the property for the virtual stored procedures included in an SQL data service.
The following table describes the configurable virtual stored procedure property:
Property Description
Result Set Cache Expiration Period The number of milliseconds that the result set cache is available for
use. If set to -1, the cache never expires. If set to 0, result set cachingis disabled. Changes to the expiration period do not apply to existing
caches. If you want all caches to use the same expiration period, purge
the result set cache after you change the expiration period. Default is0.
Logical Data Objects
The Applications view displays logical data objects included in applications that have been deployed to the
Data Integration Service.
Logical data object properties include read-only general properties and properties to configure caching for
logical data objects.
The following table describes the read-only general properties for logical data objects:
Property Description
Name Name of the logical data object.
Description Short description of the logical data object.
90 Chapter 7: SQL Data Service Administration

8/16/2019 DS 100 SQLDataServiceGuide En
http://slidepdf.com/reader/full/ds-100-sqldataserviceguide-en 91/99
Property Description
Type Type o f the ob ject . Val id va lue is log ical da ta ob ject .
Location The location of the logical data object. This includes the domain and Data Integration Servicename.
The following table describes the configurable logical data object properties:
Property Description
Enable Caching Cache the logical data object in the data object cache database.
Cache Refresh
Period
Number of minutes between cache refreshes.
Cache Table
Name
The name of the user-managed table from which the Data Integration Service accesses the
logical data object cache. A user-managed cache table is a table in the data object cachedatabase that you create, populate, and manually refresh when needed.
If you specify a cache table name, the Data Object Cache Manager does not manage the
cache for the object and ignores the cache refresh period.
If you do not specify a cache table name, the Data Object Cache Manager manages the
cache for the object.
The following table describes the configurable logical data object column properties:
Property Description
Create Index Enables the Data Integration Service to generate indexes for the cache table based on this
column. Default is false.
Logical Data Object/Virtual Table Cache Properties
The following table describes the data object and virtual table cache properties:
Property Description
Cache Removal Time The number of milliseconds that the Data Integration Service waits before cleaning
up cache storage after a refresh. Default is 3,600,000.
Cache Connection The database connection name for the database that stores the data object cache.
Select a valid connection object name.
SQL Data Service Properties Configuration 91
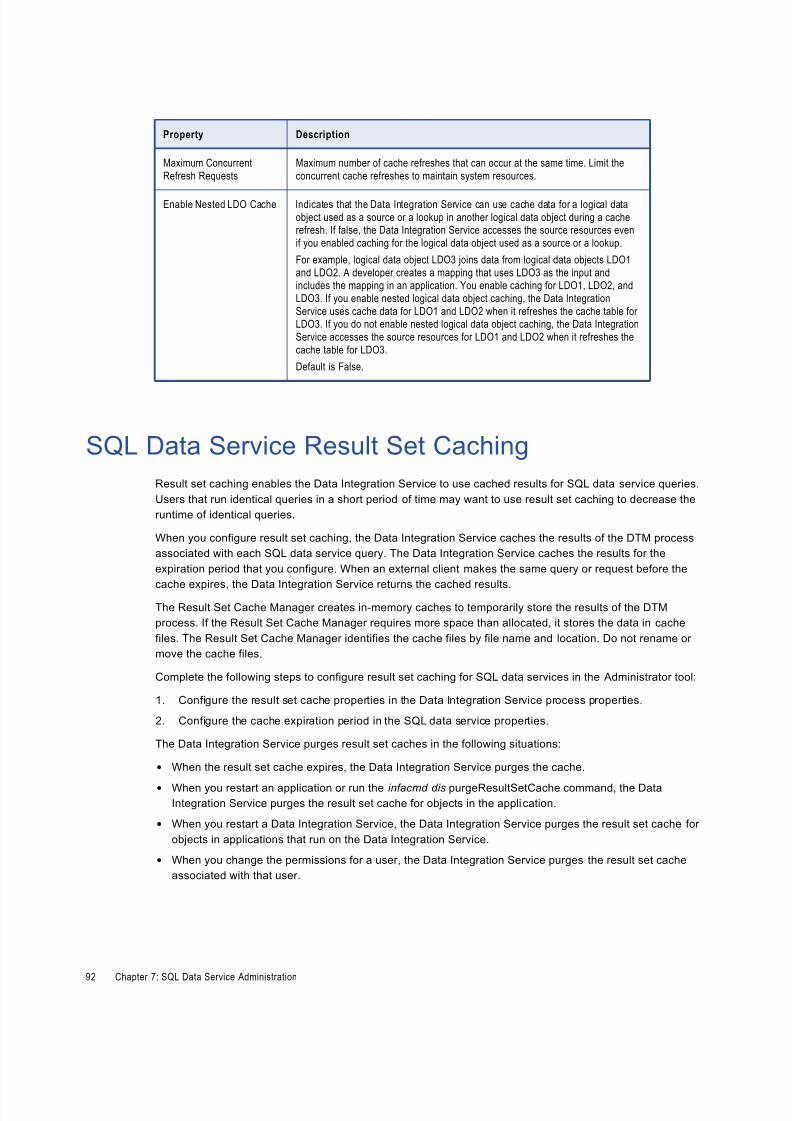
8/16/2019 DS 100 SQLDataServiceGuide En
http://slidepdf.com/reader/full/ds-100-sqldataserviceguide-en 92/99
Property Description
Maximum Concurrent
Refresh Requests
Maximum number of cache refreshes that can occur at the same time. Limit the
concurrent cache refreshes to maintain system resources.
Enable Nested LDO Cache Indicates that the Data Integration Service can use cache data for a logical data
object used as a source or a lookup in another logical data object during a cacherefresh. If false, the Data Integration Service accesses the source resources even
if you enabled caching for the logical data object used as a source or a lookup.
For example, logical data object LDO3 joins data from logical data objects LDO1
and LDO2. A developer creates a mapping that uses LDO3 as the input andincludes the mapping in an application. You enable caching for LDO1, LDO2, and
LDO3. If you enable nested logical data object caching, the Data Integration
Service uses cache data for LDO1 and LDO2 when it refreshes the cache table forLDO3. If you do not enable nested logical data object caching, the Data Integration
Service accesses the source resources for LDO1 and LDO2 when it refreshes the
cache table for LDO3.
Default is False.
SQL Data Service Result Set Caching
Result set caching enables the Data Integration Service to use cached results for SQL data service queries.
Users that run identical queries in a short period of time may want to use result set caching to decrease the
runtime of identical queries.
When you configure result set caching, the Data Integration Service caches the results of the DTM process
associated with each SQL data service query. The Data Integration Service caches the results for the
expiration period that you configure. When an external client makes the same query or request before the
cache expires, the Data Integration Service returns the cached results.The Result Set Cache Manager creates in-memory caches to temporarily store the results of the DTM
process. If the Result Set Cache Manager requires more space than allocated, it stores the data in cache
files. The Result Set Cache Manager identifies the cache files by file name and location. Do not rename or
move the cache files.
Complete the following steps to configure result set caching for SQL data services in the Administrator tool:
1. Configure the result set cache properties in the Data Integration Service process properties.
2. Configure the cache expiration period in the SQL data service properties.
The Data Integration Service purges result set caches in the following situations:
• When the result set cache expires, the Data Integration Service purges the cache.
• When you restart an application or run the infacmd dis purgeResultSetCache command, the DataIntegration Service purges the result set cache for objects in the application.
• When you restart a Data Integration Service, the Data Integration Service purges the result set cache for
objects in applications that run on the Data Integration Service.
• When you change the permissions for a user, the Data Integration Service purges the result set cache
associated with that user.
92 Chapter 7: SQL Data Service Administration
8/16/2019 DS 100 SQLDataServiceGuide En
http://slidepdf.com/reader/full/ds-100-sqldataserviceguide-en 93/99
Data Object Caching
The Data Integration Service uses data object caching to access pre-built logical data objects and virtual
tables. Enable data object caching to increase performance for mappings, SQL data service queries, and
web service requests that include logical data objects and virtual tables.
By default, the Data Integration Service extracts source data and builds required data objects when it runs a
mapping, SQL data service query, or a web service request. When you enable data object caching, the Data
Integration Service can use cached logical data objects and virtual tables.
Perform the following steps to configure data object caching for logical data objects and virtual tables in an
application:
1. Configure the data object cache database connection in the cache properties for the Data Integration
Service.
2. Enable caching in the properties of logical data objects or virtual tables in an application.
By default, the Data Object Cache Manager component of the Data Integration Service manages the cache
tables for logical data objects and virtual tables in the data object cache database. When the Data Object
Cache Manager manages the cache, it inserts all data into the cache tables with each refresh. If you want toincrementally update the cache tables, you can choose to manage the cache tables yourself using a
database client or other external tool. After enabling data object caching, you can configure a logical data
object or virtual table to use a user-managed cache table.
SQL Data Service Logs
You can view SQL data service logs in the Data Integration Service logs. View the Data Integration Service
logs on the Logs tab in the Administrator tool.
Data Integration Service logs contain logs about the following events:
• Configuration. Log events about system or service configuration changes and application deployment or
removal.
• Data Integration Service processes. Log events about application deployment, data object cache refresh,
and user requests to run mappings.
• System failures. Log events about failures that cause the Data Integration service to be unavailable, such
as Model Repository connection failures or the service failure to start.
Monitor SQL Data Services
Monitor an SQL data service to view its properties, connections, requests, virtual tables and reports. You can
also view graphical information about the distribution and state of SQL data services across the Data
Integration Services.
You can monitor an SQL data service in the following locations:
• Monitoring tool. In the Developer tool Progress view, click Menu > Monitor Jobs. Select the Data
Integration Service that runs the SQL data service and click OK. The Monitoring tool opens.
• Administrator tool. To monitor web services in the Administrator tool , click the Monitor tab.
Data Object Caching 93
8/16/2019 DS 100 SQLDataServiceGuide En
http://slidepdf.com/reader/full/ds-100-sqldataserviceguide-en 94/99
When you monitor an SQL data service, you can view summary statistics or execution statistics for the
service. The Summary Statistics view displays graphical information about SQL data service distribution
and state. The Execution Statistics view displays information about SQL data services that are deployed in
an application.
To monitor an SQL data service, expand an application in the Navigator and select the SQL Data Services
folder. A list of SQL data services appears in the contents panel . The contents panel shows properties abouteach SQL data service, such as the name, description, and state.
When you select an SQL data service in the contents panel, the contents panel shows the following views:
• Properties view
• Connections view
• Requests view
• Virtual Tables view
• Reports view
Properties View for an SQL Data Service
The Properties view shows general properties and run-time statistics for an SQL data service.
When you select an SQL data service in the contents panel of the Properties view, you can view the general
properties and run-time statistics.
General Properties for an SQL Data Service
You can view general properties, such as the SQL data service name and the description.
Statistics for an SQL Data Service
You can view run-time statistics about connections and requests for the SQL data service. Sample
statistics include the number of connections to the SQL data service, the number of requests, and the
number of aborted connections.
Connections View for an SQL Data Service
The Connections view displays properties about connections from third-party clients. The view shows
properties such as the connection ID, state of the connection, connect time, elapsed time, and disconnect
time.
When you select a connection in the contents panel, you can abort the connection or access the Properties
view and Requests view in the details panel.
Properties View
The Properties view in the details panel shows the user who is using the connection, the state of the
connection, and the connect time.
Requests View
The Requests view in the details panel shows information about the requests for the SQL connection.
Each connection can have more than one request. The view shows request properties such as request
ID, user name, state of the request, start time, elapsed time, and end time.
Aborting a Connection
You can abort a connection to prevent it from sending more requests to the SQL data service.
1. Click the Execution Statistics view.
94 Chapter 7: SQL Data Service Administration
8/16/2019 DS 100 SQLDataServiceGuide En
http://slidepdf.com/reader/full/ds-100-sqldataserviceguide-en 95/99
2. In the Domain Navigator, expand a Data Integration Service.
3. Expand an application and select SQL Data Services.
The contents panel lists the SQL data services in the application.
4. Select an SQL data service.
The contents panel displays multiple views for the SQL data service.
5. Click the Connections view.
The contents panel lists connections to the SQL data service.
6. Select a connection.
7. Click Actions > Abort Selected Connection.
Requests View for an SQL Data Service
The Requests view displays properties for requests for each SQL connection.
The Requests view shows properties about the requests for the SQL connection. Each connection can have
more than one request. The view shows request properties such as request ID, connection ID, user name,state of the request, start time, elapsed time, and end time.
Select a request in the contents panel to view additional information about the request in the details panel.
Aborting an SQL Data Service Connection Request
You can abort an SQL Data Service connection request. You might want to abort a connection request that
hangs or that is taking an excessive amount of time to complete.
1. Click the Execution Statistics view.
2. In the Domain Navigator, expand a Data Integration Service.
3. Expand an application and select SQL Data Services.
The contents panel displays a list of SQL data services.
4. Select an SQL data service.
5. Click the Requests view.
A list of connection requests for the SQL data service appears.
6. Select a request row.
7. Click Actions > Abort Selected Request.
Viewing Logs for an SQL Data Service Request
You can download the logs for an SQL data service request to view the request details.
1. Click the Execution Statistics view.2. In the Domain Navigator, expand a Data Integration Service.
3. Expand an application and select SQL Data Services.
The contents panel displays a list of SQL data services.
4. Select an SQL data service.
5. Click the Requests view.
A list of requests for the SQL data service appears.
6. Select a request row.
Monitor SQL Data Services 95
8/16/2019 DS 100 SQLDataServiceGuide En
http://slidepdf.com/reader/full/ds-100-sqldataserviceguide-en 96/99
7. Click Actions > View Logs for Selected Object.
Virtual Tables View for an SQL Data Service
The Virtual Tables view displays properties about the virtual tables in the SQL data service.
The view shows properties about the virtual tables, such as the name and description. When you select a
virtual table in the contents panel, you can view the Properties view and Cache Refresh Runs view in the
details panel.
Properties View
The Properties view displays general information and run-time statistics about the selected virtual table.
General properties include the virtual table name and the schema name. Monitoring statistics include the
number of request, the number of rows cached, and the last cache refresh time.
Cache Refresh Runs View
The Cache Refresh Runs view displays cache information for the selected virtual table. The view
includes the cache run ID, the request count, row count, and the cache hit rate. The cache hit rate is the
total number of requests on the cache divided by the total number of requests for the data object.
Viewing Logs for an SQL Data Service Table Cache
You can download the logs for an SQL data service table cache to view the table cache details.
1. Click the Execution Statistics view.
2. In the Domain Navigator, expand a Data Integration Service.
3. Expand an application and select SQL Data Services.
The contents panel displays a list of SQL data services.
4. Select an SQL data service.
5. Click the Virtual Tables view.
A list of virtual tables for the SQL data service appears.
6. Select a table row.
Details about the selected table appear in the details panel.
7. Select the Cache Refresh Runs view.
8. Click View Logs for Selected Object.
Reports View for an SQL Data Service
The Reports view shows monitoring reports about the selected SQL data service.
When you monitor an SQL data service, the Reports view shows reports about the SQL data service. For
example, you can view the Most Active SQL Connections report to determine the SQL connections thatreceived the most connection requests during a specific time period.
96 Chapter 7: SQL Data Service Administration

8/16/2019 DS 100 SQLDataServiceGuide En
http://slidepdf.com/reader/full/ds-100-sqldataserviceguide-en 97/99
Index
BBusinessObjects
BusinessObjects Configuration 62
creating the ODBC connection 62
CCache Connection
property 91
Cache Removal Time
property 91
CLASSPATH
updating 55
client configuration
secure domain 49
configuration
client tool configuration 61
IBM Cognos 63
MicroStrategy 65
Oracle Business Intelligence Enterprise Edition 11g 66
Oracle Database Gateway 67
QlikView 67
SQL Server Business Intelligence Development Studio 68
SQuirreL SQL Client 69
third-party client driver configuration 47
Toad for Data Analysts 71WinSQL 72
connecting
SQL data service 85
connections
overview 13
pass-through security 85
protocol 13
correlated subqueries
rules and guidelines for 41
SQL data service queries 41
Ddata object cache
configuring 93description 93
index cache 93
properties 91
user-managed tables 93
data object caching
with pass-through security 86
datatypes
SQL data service queries 31
EEnable Nested LDO Cache
property 91
environment variables
INFA_TRUSTSTORE_PASSWORD 49
INFA_TRUSTSTORE 49
escape syntax
SQL data service queries 42
Ffunctions
escape syntax 43
SQL data service queries 31
IIBM Cognos
configuration 63
creating the ODBC connection 64
updating the configuration file 63
infadsjdbc.jar
configuring 55
troubleshooting 55
infadsjdbclight.jarconfiguring 55
Informatica JDBC driver
infadsjdbc.jar 55
infadsjdbclight.jar 55
Informatica ODBC driver
configuring 77
JJDBC client connections
connecting to an SQL data service 54
overview 48, 50, 75, 76
troubleshooting 55
updating the CLASSPATH 55
LLD_LIBRARY_PATH
updating 80
LIBPATH
updating 80
logical data objects
caching in database 93
97

8/16/2019 DS 100 SQLDataServiceGuide En
http://slidepdf.com/reader/full/ds-100-sqldataserviceguide-en 98/99
MMaximum Active Connections
SQL data service property 86
Maximum Concurrent Connections
configuring 88
Maximum Concurrent Refresh Requests
property 91MicroStrategy
configuration 65
configuring SQL generation options 66
creating the database instance 65
monitoring
SQL data services 93
Nnon-correlated subqueries
SQL data service queries 40
OODBC client connections on UNIX
overview 51, 78
troubleshooting 81
updating odbc.ini 81
updating the shared library 80
ODBC client connections on Windows
configuring the driver 77
troubleshooting 81
odbc.ini
updating 81
operators
SQL data service queries 31
Oracle Business Intelligence Enterprise Edition 11g
configuration 66
Oracle Database Gateway
configuration 67
Pparameterized queries
SQL data service queries 42
troubleshooting 55
pass-through security
connecting to SQL data service 85
enabling caching 86
properties 86
web service operation mappings 85
QQlikView
configuration 67
queries
SQL data service queries 40
Rrequest timeout
SQL data services requests 86
reserved words
SQL data service queries 42
result set cache
configuring 92
purging 92
SQL data service properties 86
result set caching
virtual stored procedure properties 90
row level security
description 85
Ssecure domain
client configuration 49
shared library environment variable
updating 80
sort order
SQL data services 86
special characters
SQL data service queries 45
SQL data service
permission types 84
properties 86
SQL data service connectionsoverview 13
SQL data service queries
correlated subqueries 41
datatypes 31
escape syntax 42
function escape sequences 43
non-correlated subqueries 40
operators 31
overview 30
parameterized queries 42
queries 40
reserved words 42
special characters 45
SQL functions 31
SQL statements and keywords 39
SQL data servicesconnecting from JDBC 54
creating 16
defining 16
example 14
Informatica ODBC driver
installing on Windows 48, 50, 75, 76
JDBC client connections 48, 50, 75, 76
monitoring 93
ODBC client connections on UNIX 51, 78
ODBC client connections on Windows
installing the driver 48, 50, 75, 76
overview 48, 50, 75, 76
overview 13, 16
previewing data 19
SQL data services
ODBC client connections on Windows 48, 50, 75, 76SQL keywords
SQL data service queries 39
SQL queries
previewing data 19
SQL query plans
example 28
overview 27
viewing 29
SQL Server Business Intelligence Development Studio
configuration 68
SQL statements
SQL data service queries 39
98 Index
8/16/2019 DS 100 SQLDataServiceGuide En
http://slidepdf.com/reader/full/ds-100-sqldataserviceguide-en 99/99
SQuirreL SQL Client
configuration 69
copying the driver file 69
creating the driver and alias 69
startup type
configuring SQL data services 86
TTableau
configuration 70
temporary tables
description 20
operations 20
rules and guidelines 22
third-party client tools
supported third-party tools 61
Third-party Client Tools
troubleshooting 73
timeout
SQL data service connections 86
Toad for Data Analysts
configuration 71troubleshooting
converting large numbers to binary 45
converting negative values 45
Third-party Client Tools 73
Vvirtual column properties
configuring 90
virtual data
overview 15
virtual stored procedure properties
configuring 90
virtual stored procedures
creating 26
defining 26
overview 25
previewing output 27
running 39validating 26
virtual table mappings
creating 24
defining 23
description 23
previewing output 24
validating 24
virtual table properties
configuring 89
virtual tables
caching in database 93
creating from a data object 18
creating manually 19
data access methods 18
defining relationships 19
description 17example 14
previewing data 19
Wweb service
logs 93
property configuration 86
WinSQL
configuration 72