Embed Size (px)
Citation preview

NSW | QLD | SA | TAS | WA
making a difference
MASONRY WALL SAFETYDURING CONSTRUCTION WORK
GUIDE – OCTOBER 2009
DisclaimerThis publication may contain occupational health and safety and workers compensation information. It may include some of your obligations under the various legislations that WorkCover NSW administers. To ensure you comply with your legal obligations you must refer to the appropriate legislation.
Information on the latest laws can be checked by visiting the NSW legislation website (www.legislation.nsw.gov.au) or by contacting the free hotline service on 02 9321 3333.
This publication does not represent a comprehensive statement of the law as it applies to particular problems or to individuals or as a substitute for legal advice. You should seek independent legal advice if you need assistance on the application of the law to your situation.
© WorkCover NSW
1
During construction work, masonry walls (brick or block) can fail due to side loads on the walls, the rate of construction, inadequate foundations or adjacent excavations. Side loads may include wind, inadvertent impact with the walls or leaning materials against them. Such failures can result in serious injuries or fatalities.
You can improve the safety of masonry walls during construction work with good planning and preparation, risk management and (where required) temporary supports.
Temporary supports – eg braces – are often required until the wall is incorporated into the completed structure.
1. PLAN AND PREPARE
Principal contractors and masonry contractors are jointly responsible for the masonry work on site. As part of your preparation, provide:
• advice about who is responsible for installing, inspecting and removing any temporary supports
• designs and materials for temporary supports, considering the particular walls’ characteristics (seek engineering advice if necessary)
• materials to identify no-go zones – eg fencing, tape or signage
• instruction for workers, including site induction and supervision.
2
If you’re a masonry contractor, you must also prepare a safe work method statement in consultation with workers and get it reviewed by the principal contractor before you start work. Ensure that you use any relevant information from the manufacturer, supplier and site management.
2. IDENTIFY AND ASSESS THE RISKS
Principal contractors and masonry contractors are jointly responsible for the risk assessment, which should identify any walls that may need temporary supports during construction work. Include in your assessment:
• walls previously identified on the design drawings as needing temporary supports
• any features of the wall that may affect its strength – eg control joints, lintels, damp proof course, bond type or openings
• worker walkways or access paths
• plant, equipment and material movement, including delivery and storage areas
• the proposed sequence for the wall construction, (including whether you will build cross walls or returns at the same time as the wall so that they support each other, the rate of construction and proposed stop heights)
3
• the structural adequacy of the foundations
• existing or proposed excavations
• walls adjacent to another property or a public area
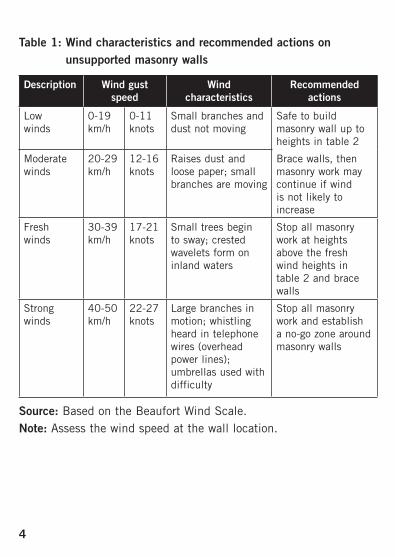
• likely weather conditions for the location and season – eg wind (see table 1), extreme temperatures and rain
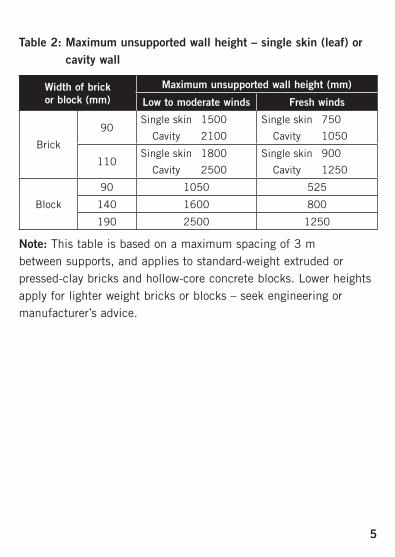
• the proposed height, width and layout of walls (see table 2 and figure 1).
In addition to your risk assessment, establish an ongoing inspection program – at the start of each day and after adverse weather conditions, inspect the walls and any temporary supports for damage. If repairs are required, maintain no-go zones until it is safe to approach.
4
Table 1: Wind characteristics and recommended actions on unsupported masonry walls
Description Wind gust speed
Wind characteristics
Recommended actions
Low winds
0-19 km/h
0-11 knots
Small branches and dust not moving
Safe to build masonry wall up to heights in table 2
Moderate winds
20-29 km/h
12-16 knots
Raises dust and loose paper; small branches are moving
Brace walls, then masonry work may continue if wind is not likely to increase
Fresh winds
30-39 km/h
17-21 knots
Small trees begin to sway; crested wavelets form on inland waters
Stop all masonry work at heights above the fresh wind heights in table 2 and brace walls
Strong winds
40-50 km/h
22-27 knots
Large branches in motion; whistling heard in telephone wires (overhead power lines); umbrellas used with difficulty
Stop all masonry work and establish a no-go zone around masonry walls
Source: Based on the Beaufort Wind Scale.Note: Assess the wind speed at the wall location.
5
Table 2: Maximum unsupported wall height – single skin (leaf) or cavity wall
Width of brick or block (mm)
Maximum unsupported wall height (mm)
Low to moderate winds Fresh winds
Brick
90Single skin
Cavity
1500
2100
Single skin
Cavity
750
1050
110Single skin
Cavity
1800
2500
Single skin
Cavity
900
1250
Block
90 1050 525
140 1600 800
190 2500 1250
Note: This table is based on a maximum spacing of 3 m between supports, and applies to standard-weight extruded or pressed-clay bricks and hollow-core concrete blocks. Lower heights apply for lighter weight bricks or blocks – seek engineering or manufacturer’s advice.

6
Figure 1: Illustration of unsupported wall height above a brace
Note: The upright member above the diagonal is ignored, as it may not be rigid enough to provide support. If the brace was not in place, the maximum unsupported wall height from table 2 would apply from ground level.
7
3. CONTROL THE RISKS
Your risk assessment may identify a range of control measures – such as:
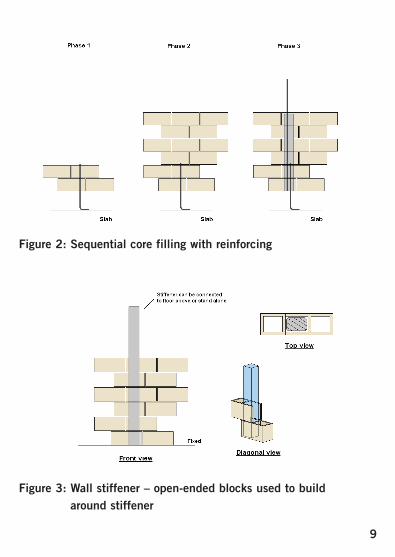
• designing walls to provide additional stability during the construction phase, such as adding sequential core filling with reinforcing or wall stiffeners (see figures 2 and 3)
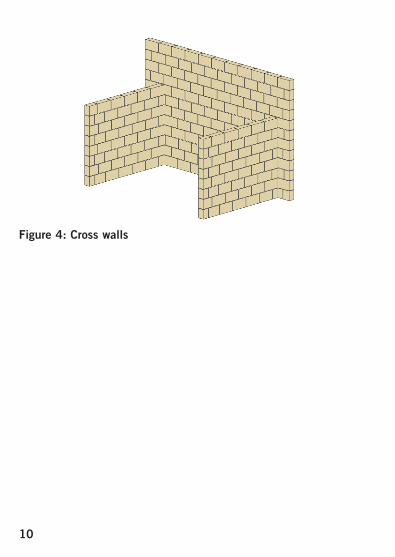
• building walls at the same time as cross walls (see figure 4) or returns, or nailing-off frame ties in veneer construction, so that they support each other
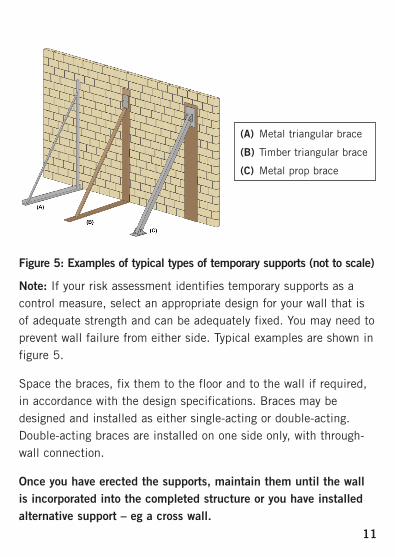
• installing temporary supports (see figure 5)
• establishing stop heights to allow mortar to gain adequate strength before further construction – eg at lintel height
• stacking materials away from unsupported masonry walls – ie no leaning materials against walls
• preventing inadvertent impact on walls by plant such as wheelbarrows, cranes or pallet trolleys – eg using dedicated travel paths and storage areas
• monitoring weather conditions – eg wind (see table 1), extreme temperatures and heavy rain – and amending work practices to suit
• stopping work if the existing top course is affected by rain to the point where the mortar bond strength will be impaired
• preventing the collapse of excavation behind masonry retaining walls
8
• not backfilling behind masonry retaining walls until they are permanently supported or (for self-supporting walls) have reached their design strength
• installing no-go zones, identified by barricades or other physical identifiers, to keep people outside of potential collapse zones. (This is not an adequate control measure for walls that could fall outside the construction site. Prevent such walls from falling under all likely conditions.)
No-go zones
Ensure that any no-go zone extends – at right angles to the wall on both sides – at least the distance equivalent to the total unsupported wall height plus 1.2 m.
If winds exceed ‘fresh winds’ (see table 1), establish a no-go zone – regardless of any wall supports already in place.
Consider individual no-go zones for each wall, isolating specific areas or isolating the entire site.
Do not let anyone within the no-go zones.
Note: You may need no-go zones for issues other than masonry wall failures – eg for falling objects.
Communicate the adopted risk control measures to all relevant people on site via site-specific induction training. Also communicate any changes to the controls – eg via toolbox talks.
9
Figure 2: Sequential core filling with reinforcing
Figure 3: Wall stiffener – open-ended blocks used to build around stiffener
10
Figure 4: Cross walls
11
(A) Metal triangular brace
(B) Timber triangular brace
(C) Metal prop brace
Figure 5: Examples of typical types of temporary supports (not to scale)
Note: If your risk assessment identifies temporary supports as a control measure, select an appropriate design for your wall that is of adequate strength and can be adequately fixed. You may need to prevent wall failure from either side. Typical examples are shown in figure 5.
Space the braces, fix them to the floor and to the wall if required, in accordance with the design specifications. Braces may be designed and installed as either single-acting or double-acting. Double-acting braces are installed on one side only, with through-wall connection.
Once you have erected the supports, maintain them until the wall is incorporated into the completed structure or you have installed alternative support – eg a cross wall.
12
FURTHER INFORMATION
WorkCover NSW:
• Call us on 13 10 50.
• Go to our website www.workcover.nsw.gov.au
• See our safety alert:
° Working near walls (Catalogue No. WC04053).
Reference material:
• Think Brick Australia – Manual 10: Construction guidelines for clay masonry
• Building Code of Australia
Australian Standards:
You can purchase Australian Standards from SAI Global, by contacting the customer service centre on 13 12 42 or visiting www.saiglobal.com/shop
AS 1170 Structural design actions (series)
AS 3600 Concrete structures
AS 3700 Masonry structures
AS 4055 Wind loads for housing
AS 4455 Masonry units, pavers, flags and segmental retaining wall units – Part 1: Masonry units
13
ACKNOWLEDGEMENTS
Contributors to this industry safety standard include:
• Austral Bricks
• Australand
• CFMEU
• Concrete Masonry Association
• CSR
• Department of Justice – Workplace Standards Tasmania
• Fugen
• Housing Industry Association Ltd
• Masonry Contractors Association
• Master Builders Association NSW
• Mirvac Limited
• SafeWork South Australia
• Workplace Health and Safety Queensland, Department of Justice and Attorney-General
• WorkSafe Western Australia.
14
OCCUPATIONAL HEALTH AND SAFETY LEGISLATION
For specific occupational health and safety state requirements, contact:
WorkCover New South Wales WorkCover Assistance Service: 13 10 50 www.workcover.nsw.gov.au
Workplace Health and Safety Queensland Workplace Health and Safety Infoline: 1300 367 915 www.worksafe.qld.gov.au
SafeWork South Australia Help Centre: 1300 365 255 www.safework.sa.gov.au

15
WorkCover Tasmania Helpline: 1300 366 322 www.workcover.tas.gov.au
WorkSafe Western Australia Customer Help Centre: 1300 307 877 www.worksafe.wa.gov.au


Catalogue No. WC02225
WorkCover Publications Hotline 1300 799 003
WorkCover NSW92-100 Donnison Street Gosford NSW 2250Locked Bag 2906 Lisarow NSW 2252 WorkCover Assistance Service 13 10 50Website www.workcover.nsw.gov.au
ISBN 978 1 74218 243 8 © Copyright WorkCover NSW 0909


![Green During Construction[1].3_0](https://img.pdfslide.net/doc/110x75/577cdd8a1a28ab9e78ad3ddb/green-during-construction130.jpg)