Embed Size (px)
Citation preview

DvrClient Software Operation Manual
- 1 -
DvrClient
Software Operation Manual
DvrClient Software Operation Manual
- 2 -
Content
1 Product introduction ...................................................................................................................... 4 1.1 Import statement ..................................................................................................................... 4 1.2 Software Instruction ................................................................................................................ 4
1.2.1 Software Installation Directory ........................................................................................ 4 1.2.2 Record storage Directory ................................................................................................. 4
1.3 Application environment ......................................................................................................... 4 2 System overview ............................................................................................................................ 5
2.1 System structure ...................................................................................................................... 5 2.2 Usage management ................................................................................................................. 5
3 Install and Un-install ...................................................................................................................... 6 3.1 Software installation ............................................................................................................... 6 3.2 Software un-installation .......................................................................................................... 7
4 Configuration and operation .......................................................................................................... 7 4.1 Starting and registering ........................................................................................................... 8
4.1.1 Starting the DvrClient ...................................................................................................... 8 4.2 Configuration .......................................................................................................................... 9 4.2.1 Add Device .......................................................................................................................... 9 4.2.2 Delete Device ..................................................................................................................... 12 4.2.3 Change device .................................................................................................................... 13 4.2.4 Search ................................................................................................................................ 13 4.3 User Parameters .................................................................................................................... 13 4.3.1 Add ..................................................................................................................................... 14 4.3.2 Change ............................................................................................................................... 15 4.3.3 Delete ................................................................................................................................. 15 4.4 Path Parameters ..................................................................................................................... 16 4.4.1Path Configuration .............................................................................................................. 16 4.4.2 Record Configuration ........................................................................................................ 16 4.4.3 Other Configuration ........................................................................................................... 17
5 Live Mode .................................................................................................................................... 18 5.1 Device List ............................................................................................................................ 18 5.1.1 Login and logout............................................................................................................... 18 5.1.2 Open / close all channels .................................................................................................. 18 5.1.2 Voice Intercom .................................................................................................................. 19 5.1.3 Subscribe Alarm ............................................................................................................... 19 5.1.4 All Main Stream / All Sub Stream .................................................................................... 20 5.1.5 Live tool-bar ..................................................................................................................... 20 5.1.6 Live screen ....................................................................................................................... 21 5.1.7 PTZ Control ...................................................................................................................... 21 5.1.7.1 Preset point set ............................................................................................................... 22 5.1.7.2 Cruise ............................................................................................................................. 23 5.1.7.2 Video Control ................................................................................................................ 23
6 Playback mode ............................................................................................................................. 24

DvrClient Software Operation Manual
- 3 -
6.1 Remote Playback .............................................................................................................. 24 6.1.1 Search ............................................................................................................................ 24 6.1.2 Playback control ............................................................................................................ 26
7 Device Parameters ....................................................................................................................... 27 7.1 Display .............................................................................................................................. 27 7.1.1 Live ................................................................................................................................ 27 7.1.2 Privacy Zone .................................................................................................................. 28 7.2 Record ............................................................................................................................... 28 7.2.1 Record Parameters ......................................................................................................... 28 7.2.2 Schedule ......................................................................................................................... 29 7.2.3 Main Stream ................................................................................................................... 29 7.3 Network ............................................................................................................................ 29 7.3.1 Network setting .............................................................................................................. 29 7.3.1.1 Router’s Port Forwarding ............................................................................................ 32 7.3.2 Sub Stream ..................................................................................................................... 32 7.3.3 Email .............................................................................................................................. 33 7.3.4 Mobile ............................................................................................................................ 34 7.3.5 DDNS ............................................................................................................................ 35 7.4 Alarm ................................................................................................................................ 35 7.4.1 Motion ............................................................................................................................ 35 7.4.2 Alarm setting .................................................................................................................. 36 7.5 Device ............................................................................................................................... 37 7.5.1 HDD Information ........................................................................................................... 37 7.5.2 PTZ Configuration ......................................................................................................... 38 7.6 System ............................................................................................................................... 38 7.6.1.1 DST/Time Configuration ............................................................................................ 38 7.6.1.2 NTP ............................................................................................................................. 39 7.6.2 User ................................................................................................................................ 39 7.6.3 Info… ............................................................................................................................. 40 7.7 Advanced .......................................................................................................................... 40 7.7.1 Firmware Update ........................................................................................................... 40 7.7.2 load Default .................................................................................................................. 40 7.7.3 Events ............................................................................................................................ 41 7.7.3 Maintain ......................................................................................................................... 41
8 E-map ........................................................................................................................................... 41 8.1 Edit the E-map .................................................................................................................. 41

DvrClient Software Operation Manual
- 4 -
1 Product introduction 1.1 Import statement
Thank you for using this DvrClient series product. Please read this manual carefully before installing this application software.
This software version is under continual improvement and we reserve the right to make change without notice.
Exemption Clause
We have tried our best endeavors to ensure the information contained in this manual is accurate, complete and up-to-date, we makes no representation as to its accuracy or completeness and expressly disclaims any liability whatsoever for any loss howsoever arising from or in reliance upon the whole or any part of such information
Read this manual carefully before using this software, we do not undertake any responsibility for the harms and losses caused by using this product incorrectly.
1.2 Software Instruction After installing and running the program, recording and capturing images, system will keep
the relative files to below specified path.
1.2.1 Software Installation Directory Software defaulted installation directory should be C:\ Program Files\Video client,and user
also can specify a particular installing path during the installation processing.
1.2.2 Record storage Directory
Recorded file will be kept to drive D firstly. And then once drive D is full, the record fill will auto convert to next drive. When all the drives except drive C is full, system will automatically overwrite the earlier recorded files starting from drive D
Note: User can set how many days recorded file can be saved as per actual request. And install enough HDD to guarantee record storage space. When record is activated, system will auto generate one storage file. And all the local and remote record files will be stored into the file (D:\Recordfile and \RS Record File\).
1.3 Application environment
Before installing the DvrClient software, please make sure your system configuration meets the following recommended minimum hardware requirements.

DvrClient Software Operation Manual
- 5 -
CPU Intel Pentium 4 or higher, minimum 3.0GHz
RAM Minimum 2G
Graphics Adapter Ge-force 4,AG memory 612 MB or higher
Operation system Windows XP professional/Vista, Windows 7
Software provided DirectX 9.1 or higher
Hard disk space for install Minimum 10 GB
2 System overview
2.1 System structure
The software includes two isolated sub-systems. After installing and running the two sub-systems, system will be easier to perform live media data storage, display, transfer and back-up etc.
Local server
Local server is acting as a core for data-gathering, video management and auto control of the whole security system, and monitor and record relative data of camera/alarm and system running status.
Remote server
User could monitor and record the real-time video, set relative data of external device (such as camera, alarm etc), control external devices and record system operational database and realize auto-control for the whole security system from a remote server.
2.2 Usage management
According to the functionality and characters of this software, we strongly suggest:
All operators should proceed basic operation training to avoid any wrong operation
You should establish user management and grade system to shelter operation authority of low level user.

DvrClient Software Operation Manual
- 6 -
3 Install and Un-install 3.1 Software installation 1 Double-click to run Video_Client.exe on your computer, and system will show below
windows
Picture 3-1
2 Click [Next >] to enter into the below window:
Picture 3-2
Installation route is faulted to C:\Program Files\Video Client\. If you want to change the installation route, pleas click [Browse…] button to specify a location again and click [Next>] button to continue.
3 Click <Install> button to start the installing process.

DvrClient Software Operation Manual
- 7 -
Picture 3-3 4 Wait for the processing to complete, and then click [Finish] button to exit the installation
program
Picture 3-4
3.2 Software un-installation
Note : Please backup all the files stored at \Program Files\Video Client before un-installation so as to retrieve relative settings, images and Log information after installing the software next time.
If user need to un-install the software, please enter into [start setting control panel add/delete program] to un-install the software.
User could also run File Un-installation Program to un-install. Details as follows:
1. Click [Start Programs Video Client Uninstall] to pop up the below window
Picture 3-5
2. Click [Yes] button to continue. 3. Wait for the un-installation processing to complete, and then click [Finish] button to exit the
un-installation program. Note: If you want to install the software again, please un-install (or delete) previous user name, password and device name, that is to say, please manually delete the files in the C:\Program Files \ Video Client.
4 Configuration and operation The chapter will introduce DvrClient’s detailed parameters and configuration.

DvrClient Software Operation Manual
- 8 -
4.1 Starting and registering
4.1.1 Starting the DvrClient
After successful installation, system will generate a shortcut menu – DvrClient- on the PC desk. Double click the Shortcut icon, or enter into [Start Program Video Client DvrClient] to run the program.
Please click the [DvrClient] icon on the desk to enter into the window shown as Picture 4-1.
When the program is activated firstly, please do register one administrator.
Picture 4-1
User name: supports up to 12 characters.
Password: supports up to 24 characters
Confirmed: should be equal to Password and all the password can’t enter special characters.
After customizing administrator and password, system will enter into below CMS main interface shown as Picture 4-2.
Click [ ] icon to display the software version information.
Picture 4-2
Picture 4-3
Click [ ] icon to lock the interface, and click [ ] to enter into the [user unlock] dialog window. Enter password to unlock the interface shown as Picture 4-3.
DvrClient Software Operation Manual
- 9 -
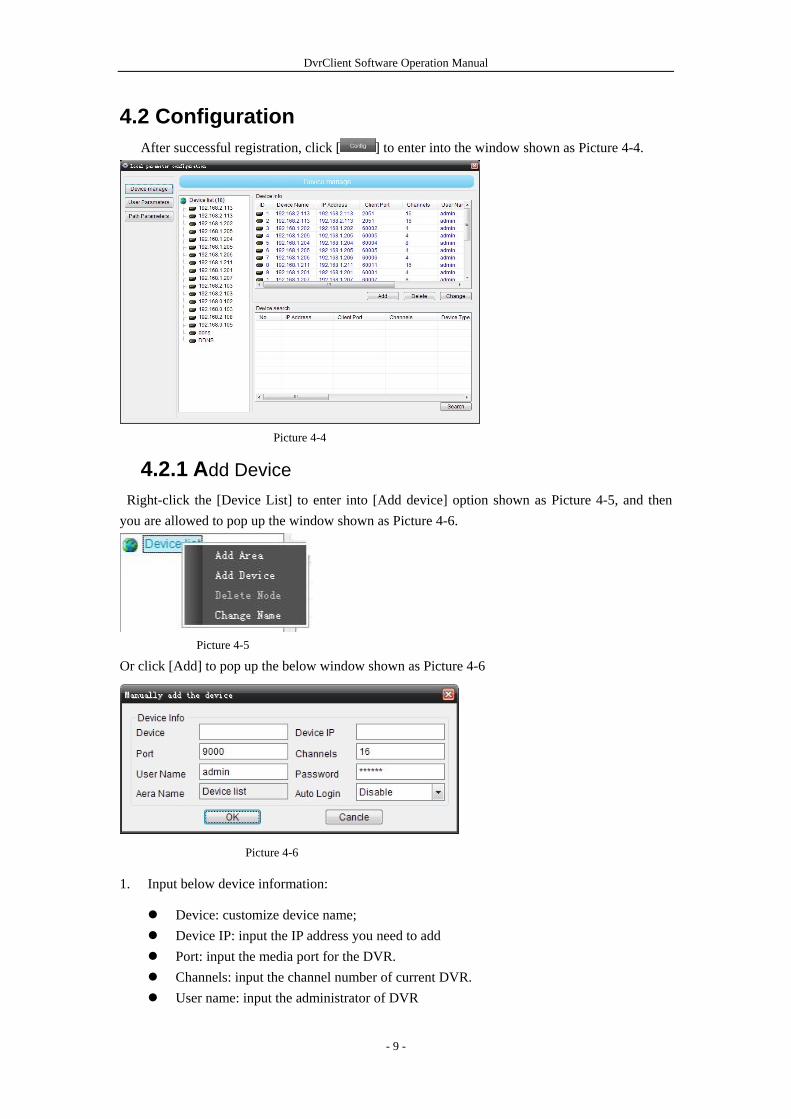
4.2 Configuration After successful registration, click [ ] to enter into the window shown as Picture 4-4.
Picture 4-4
4.2.1 Add Device Right-click the [Device List] to enter into [Add device] option shown as Picture 4-5, and then you are allowed to pop up the window shown as Picture 4-6.
Picture 4-5
Or click [Add] to pop up the below window shown as Picture 4-6
Picture 4-6
1. Input below device information:
Device: customize device name; Device IP: input the IP address you need to add Port: input the media port for the DVR. Channels: input the channel number of current DVR. User name: input the administrator of DVR

DvrClient Software Operation Manual
- 10 -
Password: input the administrator’s password Auto Login: If set to “Enable”, system will auto login to DVR once DvrClient is opened, otherwise, you need to manually register the DVR.
Picture 4-7
2. Click [Ok] to end the [Add] processing.
3. Follow the above step 1~2 to add more DVRs.
Below Picture 4-8 display you have successfully added DVR 101.
Picture 4-8
4. Change channel information
Click [DVR 101] on the left and channel info(101) appear in the screen shown as Picture 4-9.
Picture 4-9 Double-click any one channel, or select one channel and click [Change] to enter into the window shown as Picture 4-10.

DvrClient Software Operation Manual
- 11 -
Picture 4-10 Channel Indicate the channel no. you could not modify this item under this menu. Name Indicate current channel name. allow you change the name.
Protocol Select its protocol of the channel: TCP and UDP optional (If Device connected to Dvr Client via router, the router must support two network protocols.
Stream Type Select the stream type of the channel. Compound Stream and video stream optional
About alarm linkage:
Pop up Live Allow you pop up live alarm images. Alarm time Len Allow you set alarm time, and time format is Minute (1~60 minute)
Capture Allow you auto-capture images and save the images to a specified file when alarm occurs.
Volume The buzzer will sound when alarm is triggered. (Details please refer to Section 4.4) Record The channel will auto record when alarm is triggered.
Apply to Allow you apply above parameters to current channel or all other channels.
4.2.2.2 Add Area
(1) Add area Right-click [Device list] icon and enter into [Add area] item shown as Picture 4-11.
Picture 4-11
Picture 4-12
Click [Add area] to pop up below window shown as Picture 4-12; Input area name and click [Ok]

DvrClient Software Operation Manual
- 12 -
Picture 4-13
(2) Add Device
Herein allow you add device at this area. Details please refer to Picture 4-7.
(3)Delete Node Firstly select one node and right-click mouse to pop up the window shown as Picture 4-14. Then Click<Delete Node> option and then click <Ok> to confirm the deletion of the region.
Picture 4-14 Picture 4-15
(4)Change Name
Highlight the device list and right-click mouse to enter into <Change Name> option, now system will pop up below window shown as Picture 4-16.
You are allowed to customize the area name
Picture 4-16
4.2.2 Delete Device There are two methods to delete device, including:
2. Click < > button to delete the DVR/node you have selected, then system will pop up the dialog window shown as Picture 4-17. Click
<Ok> to sure to remove the device.
1. Select one node/DVR from <Device List> and right-click the mouse to
enter into <Delete Device> option shown as Picture 4-17.
Picture 4-17
Picture 4-18
You can find that <Area-22> have been added shown as Picture 4-13

DvrClient Software Operation Manual
- 13 -
4.2.3 Change device Note: Not allow you change device information unless you have exited the device.
4.2.4 Search Click [ ] button to search all the DVRs within the same LAN (shown as Picture 4-20).
Picture 4-20
Select one DVR and double click it and you are allowed to enter into below interface shown as Picture 4-21. Click <Ok> to add the DVR.
Picture 4-21
4.3 User Parameters
Click [ ] button to pop up the window shown as Picture 4-19. After changing the relative information, click [Ok]
Picture 4-19

DvrClient Software Operation Manual
- 14 -
Picture 4-22
4.3.1 Add Click <Add> button, or right-click the mouse and click [Add users] option to enter into <User Info> interface shown as Picture 4-23
Picture 4-23 Picture 4-24 User name: allow you customize user name and support up to twelve characters. Password: allow you customize password and support up to 24 characters (no permit to
all enter special characters) Confirm: equal to user password User level: include Administrator and Ordinary User.
Administrator is defaulted to have all the rights (Generic rights and channel rights) shown as Picture 4-25
Picture 4-25
Administrator could allocate rights/authorities to Ordinary user as per request shown as Picture 4-26.
Picture 4-26

DvrClient Software Operation Manual
- 15 -
4.3.2 Change
Picture 4-27
Picture 4-28
4.3.3 Delete
Picture 4-29
Picture 4-30
Click [Change] button or enter into [Change User] option, and then pop up the window shown as Picture 4-28.
Herein allow you change user information shown as Picture 4-27.
Delete user information: Select one user from the list and click [Delete] button to delete the user shown as Picture 4-29.
Clicking [Delete] button will pop up the left dialog and click [Ok] to confirm the deletion of the user shown as Picture 4-30.

DvrClient Software Operation Manual
- 16 -
4.4 Path Parameters
Picture 4-31
4.4.1Path Configuration The installing path for this program is defaulted to C:\Program Files\Video Client. Warning Volume :Herein allow you set warning volume to a specified path. Please note that Warning Volume must be with WAV format.
Download Path :Herein allow you download remote file to a specified path. Image Capture :Herein allow you save captured image to a specified path.
4.4.2 Record Configuration Disk Select (Picture 4-33)
Picture 4-32 If you select all the disks, record files will be stored from starting drive D to last drive in turn.
When all the drives exclude drive C is full, system will overwrite the previous record files from drive D.
If you only select drive D, all the record files will be stored in the drive D, when drive D is full, system will automatically overwrite the early ones in the drive D.
Loop Record (Picture 4-34)

DvrClient Software Operation Manual
- 17 -
Picture 4-33
Loop Recording: If tick-selecting [Loop Recording] option, system will overwrite the old record files and continue
to record when reserved space reach setting value; contrarily, If disabling the [Loop Recording] option, system
will stop record when reserved space reach setting value. Reserved Space (single): When reaching the setting value and tick-selecting <Loop Recording>, system will automatically overwrite the old files. Switch time: indicate record package time and herein is defaulted to 30 minutes. File type: indicate storage type of record file; generally include AVI and H.264 format.
4.4.3 Other Configuration
(1) :If enabling <Save the Live window> option, system will record/save
current live window. System will automatically recover the live window when you register it next time. (2) : select default stream set for remote operation, and allow you
select main stream or sub stream.
(3) :Allow you select the language you needed. The above settings
are available when you restart the program.
(4) :Upon the <Multi Screen Set> mode, you could select <No Auxiliary Screen>,
<Play back> or <E-map> option. When selecting <Single Auxiliary Screen> option, allow you set Auxiliary screen 1
to display playback or E-map screen shown as Picture 4-34;
Picture 4-34
When selecting <Double Auxiliary Screen> option, allow you set Auxiliary Screen 1 and Auxiliary Screen 2 to display playback or E-map screen shown as Picture 4-35.
Picture 4-35

DvrClient Software Operation Manual
- 18 -
(5) : Click <Check number of monitor> option to auto-connect to relative auxiliary screen. When externally connected to one auxiliary screen, system will be entered into Picture 4-34, and to two auxiliary screen, popped up picture 4-35.
5 Live Mode The <Live> mode display as follows (Picture 5-1):
Picture 5-1
5.1 Device List
5.1.1 Login and logout Select one DVR and right-click mouse, and then click <Login> / <Logout> option to login / logout the device shown as Picture 5-2.
Picture 5-2
5.1.2 Open / close all channels User could control the whole system remotely via LAN and/or WAN.

DvrClient Software Operation Manual
- 19 -
Select one device/channels and right-click mouse, and then click <Open all channels> option shown as Picture 5-3 to preview its live window of channels shown as Picture 5-4; or
select one device/channel and double-click the channel name to preview its live screen. Click <Close all channels> shown as Picture 5-3 to close all the channels for the device.
Picture 5-3
Picture 5-4
5.1.2 Voice Intercom Under the Live mode, right-click the mouse and select <Voice Intercom> option; and now
you are allowed to talk back with the selected device.
5.1.3 Subscribe Alarm Right click mouse to select <Subscribe alarm> option shown as Picture 5-3 (Motion detection / IO Alarm-Picture 5-5).
Picture 5-5

DvrClient Software Operation Manual
- 20 -
5.1.4 All Main Stream / All Sub Stream Main stream is mainly used for video stream for the device, and also for network transmission; however, a large stream requires high network. Sub stream is mainly used for network transmission and have poor images; so sub stream is applicable for poor network conditions. You are defaulted to preview all the images under sub stream mode. If you have higher network, you could switch to main stream for preview. Right-click device/channel and select <All main stream> or <All sub stream> option to change stream type of the selected device/channels shown as Picture 5-6.
Picture 5-6 Right-click the relative channel/camera and select <Main stream> or <Sub stream> option to
change stream type of the channel shown as Picture 5-7.
Picture 5-7
5.1.5 Live tool-bar
Picture 5-8 Key brief describe as follows:
Key Description Key Description
Hide device Open PTZ control mode
Hide / open all the
windows Real time/Smooth level
Select Split mode Full screen mode
Previous page / Next
page Hide / display alarm
information

DvrClient Software Operation Manual
- 21 -
5.1.6 Live screen
Picture 5-9 Picture 5-10
Key Description Key Description
Volume on/off Record on/off
Capture Stop playing Volume on/off Highlight the selected image and click [ ] icon, or right-click the mouse and click <Volume> option shown as Picture 5-9; at this moment, the [ ] icon will appear in the screen. Record on/off Highlight the selected window and click the [ ] icon, or right-click the mouse and click <Start record>. Now the [ ] icon will appear in the screen. And click [ ] icon again to stop recording. Snapshot Under the <Live> mode, select one window which is playing and click [ ] icon, or right-click
the mouse and select <Capture> option. After successful capture system will pop up thumbnail image and path reminder. Click the image to open the captured image and click the path connection to enter into the image’s storage directory.
Stop playing The option allows you close the channel’s video.
:the option allows you display bit rate of current channel to video window. :the option allow you recover screen to original proportions.
5.1.7 PTZ Control
Picture 5-11 We introduced setting PTZ parameters previously in chapter 5.2.5.3. Here we will discuss how to operate PTZ controls.

DvrClient Software Operation Manual
- 22 -
Click direction key to rotate PTZ camera; slide the processing bar to control PTZ rotation speed (level: 0~10); Click < > icon to make PTZ camera auto scan, click it again to stop the auto-scan; Click [Zoom-/+] button to zoom in / out the image; Click [Focus -/+] button to focus the image; Click [Iris -/+] button adjust iris to open or close.
The software also provide a new intelligent TILT control system-Screen PTZ control. User could
control PTZ rotation by clicking and dragging-and pulling on the play window. The play panel is
separated into 9-split mode shown as Picture 5-12. And < , , …> stand for , , …eight
directions respectively. Click it to control the PTZ rotation direction.
Picture 5-12
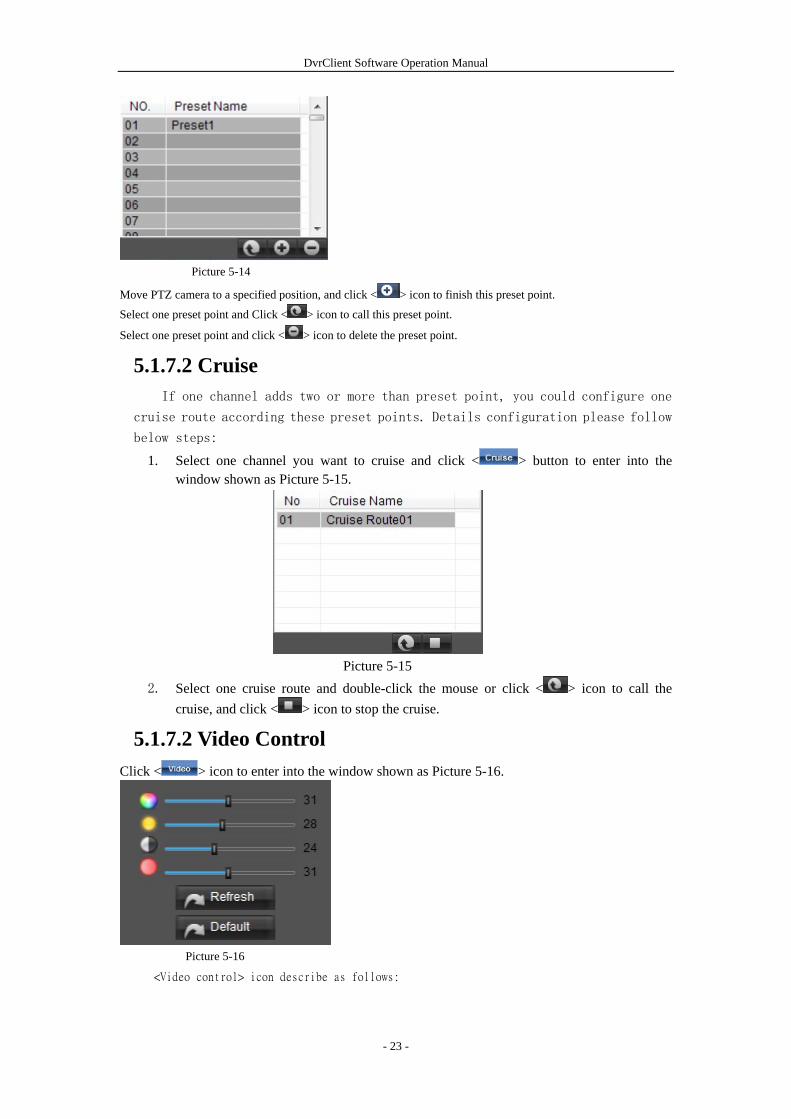
5.1.7.1 Preset point set Click < > button on the panel to edit one preset point shown as Picture 5-13. bn
Picture 5-13
Select one channel you want to set and number, and then click < > icon to add one preset point
shown as Picture 5-14.
DvrClient Software Operation Manual
- 23 -
Picture 5-14
Move PTZ camera to a specified position, and click < > icon to finish this preset point.
Select one preset point and Click < > icon to call this preset point.
Select one preset point and click < > icon to delete the preset point.
5.1.7.2 Cruise If one channel adds two or more than preset point, you could configure one
cruise route according these preset points. Details configuration please follow
below steps:
1. Select one channel you want to cruise and click < > button to enter into the window shown as Picture 5-15.
Picture 5-15
2. Select one cruise route and double-click the mouse or click < > icon to call the cruise, and click < > icon to stop the cruise.
5.1.7.2 Video Control Click < > icon to enter into the window shown as Picture 5-16.
Picture 5-16
<Video control> icon describe as follows:

DvrClient Software Operation Manual
- 24 -
6 Playback mode The monitoring software will include remote playback and file type playback according to different storage position.
6.1 Remote Playback Click < > button to pop up the below window shown as Picture 6-1.
Picture 6-1
6.1.1 Search Select one channel you desire to playback, and allow you select up to four channels (shown as Picture 6-2).
Icon Description Icon Description
Hue brightness
Contrast saturation
Refresh Recovery Default

DvrClient Software Operation Manual
- 25 -
Picture6-2 Secondly, select file type and date shown as Picture 6-3. And system support normal record, alarm
record and All.
Picture 6-3
Third, Click < > button to search relative record files.
Below Picture 6-4 is time axis panel of record file. Click < >/< > icon to enlarge or narrow display rate of the time axis.
Picture 6-4
Fourth, Click < > button to start record playback. When moving curse, current time will appear on the time axis. If the channel have record file at this day, system will playback early
record file of the day.
Picture6-5
Note:

DvrClient Software Operation Manual
- 26 -
1. The software support up to 4-CH synchronous playback. 2. If you tick-select <synchronous Playback>, the four playback window will perform 4-CH
synchronous playback.
6.1.2 Playback control
Picture 6-6 Playback control bar describes as follows:
Key Description Key Description
Open/Close Volume Volume adjust
Playing Pause
Stop Play by frame
Clip Snapshot
Download Playback processing bar
All stop
Single Channel display
Quad mode
Full screen display
Record file clip
After opening playback, click [ ] icon to clip the selected file; and click again to stop the clip function. Record
clip file will be saved to <RS RecordFile>. Snapshot function
Click [ ] icon to capture the live images remotely. After capturing the images successfully, thumbnail images and path prompt will be popped up. Click the thumbnail images to open the captured picture and click the path
connection to enter into images storage directory.
Picture 6-7
Record file download
Click [ ] icon to enter into the file download interface shown as Picture 6-8. Tick-select the record file you want to download and click [Start download], System will download the record

DvrClient Software Operation Manual
- 27 -
file in turn and save them to local PC. Downloaded file will display process percentage.
Picture 6-8
7 Device Parameters Select <Device Parameters> option to pop up the <Device Parameters> interface shown
as Picture7-1.
Picture 7-1
7.1 Display
7.1.1 Live
Picture 7-2

DvrClient Software Operation Manual
- 28 -
Channel:Select one channel you want to set from the pull-down menu. Name:Allow you specify channel name and support up to eight characters or four Chinese
characters. Position:indicate display position of the channel Covert:allow you enable real-time monitoring or not Show time:allow you record system time to Live mode Record time:allow you display system record on the record files Copy:allow you copy one channel’s parameter to other one channel/channels
7.1.2 Privacy Zone
Picture7-3
7.2 Record
7.2.1 Record Parameters
Picture7-4
Channel:Select one channel you want to set from the pull-down menu. Record:Allow you set the channel enable record Pack Duration: allow you set packing time of single record file (15m, 30m, 45m and 60m) Pre-record: When set to <Enable>, motion detection and I/O triggered supports the
Pre-record function.
Tick-select the <Privacy zone> option; Pull-and-drag the mouse to select one
privacy zone shown as Picture 7-3.

DvrClient Software Operation Manual
- 29 -
7.2.2 Schedule
Picture7-5
[Channel] option allows you select one channel you desired. To setup weekly schedules, tick-select the box of the record status you want (Alarm,
General, or No Record) and then click on each box in the schedule time line that you want this method to apply to. You can use the [From – To] pull-down menus and Copy button to copy settings from one day to another day or all days.
Note: Explanation: Under the <record Set> and <search> menu, original color stands for no record, “Red” stands for alarm record, “Blue” stands for normal record.
7.2.3 Main Stream
Picture7-6
Resolution: support CIF/HD1/D1 FPS:PAL:25f/s;NTSC:30f/s Bitrate:Allow you select Bitrate from the pull-down menu. Audio:When set to <Enable> under the main stream mode, device will record and transfer
video and audio simultaneously; and set to <Enable> under the sub stream mode, you are allowed to transfer video and audio simultaneously on the Live mode.
7.3 Network
7.3.1 Network setting After selecting network mode - such as DHCP, PPPOE or static allocation- and setting up web ports,you can visit DVR remotely through a network or internet.

DvrClient Software Operation Manual
- 30 -
Picture 7-7 1) When selecting DHCP from the Type, A router will automatically allocate IP address for your
DVR. After restarting each time, the IP address captured by your DVR may be different. So, port forwarding is required when you visit the remote DVR.
1. Select DHCP and click [Save] button; 2. Exit and restart DVR; 3. Input media port and web port 4. Set IP address captured by DVR and web port to a router 5. Visit a remote DVR
http: // public net IP: web port (such as: 8080) http: //intranet IP: web port (such as: 8080 - only use for Intranet)
DNS: DNS server is generally provided by local ISP. Herein please enter the IP address of your domain name server. Friendly Reminder:
1. All the parameters you set are available only when you click [Apply] and after system are restarted.
2. User need to change MAC address when there are multiple DVRs at the same local area network. Details please refer to section-System Information.
Picture 7-8 2) When selecting Static from the Type, user can directly input IP address, Net Mask, Gateway
and DNS shown as below picture 7-9.

DvrClient Software Operation Manual
- 31 -
Set your net type to Static; Set Client port number and HTTP port, and the ports need to be forwarded to a router. Input a specified IP address to [IP address] column. The Subnet Mask, gateway and DNS server should be consistent with your router’s
configurations. Input DNS address. Please check router firstly. The setting should be consistent with
router’s Click [Apply] button Now you could remotely visit the DVR via IP
http: // public net IP: web port (such as: 8080) http: //intranet IP: web port (such as: 8080 - only use for Intranet)
Picture 7-9
3) When selecting PPPoE form the Type, user can input user name and password provided by ISP and set Client and HTTP port. And now you can visit your remote DVR by using the IP address captured after registering a domain name and web port and connect to your DVR via public network.
Picture7-10
DDNS (Dynamic DNS) is a service that register a domain name and the floating IP address with the DDNS server so that the domain name can be routed to the IP address even if the IP address is changed in a dynamic IP system.
You could set and use DDNS to visit your remote DVR under above any one mode.

DvrClient Software Operation Manual
- 32 -
You can apply for a DDNS account for free at the web http://www.changeip.com/ or http://www.dnsexit.com/ or http://www.no-ip.com/ orwww.3322.org .
7.3.1.1 Router’s Port Forwarding If PPPoE is selected, port forwarding is not required. Port forwarding is required when
you select <Static> and <DHCP>. Once you set the relative parameters for Router and device, now you are allowed to visit and playback the remote record files.
Strongly commend user follow below steps before changing network parameters: 1、 Enter into below router configuration interface; 2、 Input router’s IP address which have be not used in the in-house network. 3、 Set the port of IP address specified to the device shown as Picture 7-11. 4、 The DVR IP address for the intranet should be 192.168.1.101, you should
forward server port (9000) and web port (8080) to this IP address respectively.
Picture7-11
Friendly Reminder: The router’s port forwarding interface may be different, however, when entering into virtual server, user will always need forward port 8080 and port 9000 of router to IP address of DVR allocated or automatically captured, and select [All] or [Both] in corresponding protocol column and save the above setting.
Above steps may differ from the router device depending on the manufacturer.
7.3.2 Sub Stream

DvrClient Software Operation Manual
- 33 -
Picture7-12 Resolution: support CIF Frame rate: PAL:1--5f/s;NTSC:1--6f/s。 Bit rate: allow you select relative stream. Audio:When set to <Enable> under the main stream mode, device will record and transfer
video and audio simultaneously; and set to <Enable> under the sub stream mode, you are allowed to transfer video and audio simultaneously on the Live mode.
7.3.3 Email Select <Enable email> option shown as Picture 7-13.
Picture7-13
SSL: is a security link transport protocol. You can encrypt your communication info (including your email) using SSL to prevent hackers from monitoring your email or communication info and even your password. Please set SSL to “On” via Gmail.com server, and set to “Off” via other mail server.
SMTP Port: indicate one kind of mail transmittal port opened by Simple Message Transfer Protocol (SMTP). The port number for most mails is 25 except such as Gmail server (Port number: 465).
SMTP server: indicates server address you used. Sender address: indicates sender’s email address. The email address should be
consistent with the server you use. That is to say, when you use email address – [email protected], the according server should be smtp.gmail.com.
Receiver address: indicates receiver’s email address. The email address is used to receive image transmitted from alarm DVR. Please clear the images you have received as soon as possible to avoid overloading your email account. STMP protocol setting please refers to below Picture 7-14 and Picture 7-15.

DvrClient Software Operation Manual
- 34 -
Picture 7-14
Picture 7-15
7.3.4 Mobile Please set the mobile configuration as per below (shown as Picture 7-16).
User Name: indicate user name of DVR, and support numbers and characters and 1~15 bits length
User password: indicate user password of DVR Server port: Mobile monitoring port. Setting range is between 1024 and 65535.
Please note that the server port is not equal to the port you have set to network set.

DvrClient Software Operation Manual
- 35 -
Picture7-16
7.3.5 DDNS DDNS (Dynamic DNS) is a service that register a domain name and the floating IP address
with the DDNS server so that the domain name can be routed to the IP address even if the IP address is changed in a dynamic IP system.
Tick select <Enable DDNS> option shown as Picture 7-17.
Picture 7-17
Password: Input a password you set when registering a user name. Enter the domain name (such as: http://www.no-ip.com/ ) to visit your remote DVR.
7.4 Alarm
7.4.1 Motion
Picture7-18
Channel: allow you enable/disable the motion function for any channel. Sensitivity: allow you to set sensitivity level of motion detection from higher to low with
8 being the most sensitive. Latch Time: how long the buzzer will sound when object move is detected (10s, 20,
40s, 60s); Post Recording: you can set how long alarm record will last when alarm ends (30s,
1m,2m,5m). Record Channel: the record channel will be activated when the object move is
Server: select DDNS provider Host name: input the host domain name you have
registered at dynamic domain name system, such as: DVR2011.no-ip.org
User Name: Input a user name registered before applying for a domain name

DvrClient Software Operation Manual
- 36 -
detected. Alarm out: allow you connect external alarm sensor. Latch Time: how long the external alarm will sound when object move is detected
(10s, 20, 40s, 60s); Full screen: The function is defaulted to “On". When the motion detection or external
alarm is triggered, the corresponding channel will be switched to the full screen mode.
Show Message: You can set show message on the screen when motion alarm is detected. Send Email:Allow you send the alarm images to a specified email when motion alarm is
detected. Area: Click the zone to enter into area setup interface shown as Picture 7-19.
Picture7-19
The channel will be separated into a 15X10 (PAL) or 15X12 (NTSC) grids. When any object moves into the motion detection area, and the area where the object is located is displayed in red and motion detection will be triggered. In the semi-transparent area the motion detection is not activated.
7.4.2 Alarm Setting
Picture7-20
Channel: allow you select one desired channel. I/O Status: allows you select the three options – NO (Normal Open), NC (Normal Close)
and OFF. Set to “Normal Open”, I/O status Alarm will be activated while sensor is ON; set to “Normal Close”, I/O status alarm will be activated while sensor is OFF; set to “OFF”, I/O status alarm will not be triggered.
Buzzer time: you can set how long the buzzer will sound when sensor alarm is

DvrClient Software Operation Manual
- 37 -
triggered (Off, 10s, 20, 40s, 60s). Show Message: You can set show message on the screen when sensor alarm is triggered. Send Email:Allow you send the alarm images to a specified email when sensor alarm is
triggered. Record Channel: the record channel will be activated when sensor alarm is triggered. Post Recording: you can set how long alarm record will last when alarm ends (30s,
1m,2m,5m). Alarm out: allow you connect external alarm sensor. Latch Time: how long the external alarm will sound when sensor alarm is triggered
(10s, 20, 40s, 60s). Full screen: When external sensor alarm is triggered, the corresponding channel will
be switched to the full screen mode.
7.5 Device
7.5.1 HDD Information
Picture7-21
Overwrite:When set to Auto the DVR will record over the oldest files on the hard drive once HDD is full; and set to Off, DVR will stop recording. Overwritten time: allow you select overwritten time (1H, 3H, 1 Day, 7 Days, 30 Days and 90 Days). The record files could be stored within your selected time; otherwise, the files will be deleted compulsively.

DvrClient Software Operation Manual
- 38 -
7.5.2 PTZ Configuration
Picture 7-22 You could select the channel you desire to control and set PTZ protocol (Pelco-D or
Pelco-P), Baud Rate (1200, 2400, 4800, 9600), Data bit (8, 7, 6, 5), Stop bit (1, 2), Parity Check (None, Odd, Even, Mark, Space) and Address Code (1-255) respectively. Above channel parameters must be consistent with PTZ parameters and you must set Protocol, Baud rate and address code. Detail connections please refer to system connection configuration and Rear Panel layout.
7.6 System
7.6.1 General
7.6.1.1 DST/Time Configuration
Picture 7-23 1. User could modify system date, time, date format and time format. 2. Time format includes 12 hour and 24 hour. 3. DST mode includes Week mode and day mode. 4. Time Offset includes 0-1 hour and 1-2 hour.

DvrClient Software Operation Manual
- 39 -
7.6.1.2 NTP Configuration Tick selects the <Enable NTP> option shown as Picture 7-24.
Picture 7-24
Enable NTP:Allow you Enable <NTP> function. Server Address: Allow you select NTP server, currently supports three servers. Time Zone: System supports thirty Time Zones.
Update: Click <Update> to calibrate NTP parameters, that is to say, DVR will calibrate system time to the selected Time zone (Note: DVR must be connected to Internet).
7.6.2 Users
Picture7-25
The model supports up to seven users with one Admin and six users. User name and password supports ASSIC code, and user name up to eight characters,
password to six characters. Generic rights/Channel Rights: Admin default to have all the generic rights and channel
rights; and select and configure common user’s Generic and Channel rights as per actual request. Generic Rights includes Log Search, Parameter, Maintain, Disk Manage, Remote Login,
SEQ Control and Manual Record. Channel Rights includes Backup, Live, Playback and PTZ control.

DvrClient Software Operation Manual
- 40 -
7.6.3 Info
Picture 7-26
7.7 Advanced
7.7.1 Firmware Update
Picture7-27
Select Update file path; The format of updated file is *.sw; Please do not break DVR power and close the software when update processing is running; After selecting the path, please click <Start>; After finishing the update processing, system will auto reboot, and please be patient to wait
for about five minutes…
7.7.2 Load Default
Tick-Select <check all> or any sub-option to recover defaulted parameters as per your actual requirement.

DvrClient Software Operation Manual
- 41 -
Picture 7-28
7.7.3 Events
Picture 7-29
Alarm out: Allows you connect external alarm sensor Latch: you can set how long the buzzer will sound when the alarm ends (10s, 20, 40s,
60s).
7.7.3 Maintain Allow you set auto-reboot and reboot time as per your actual requirement shown as Picture 7-30.
Picture 7-30
8 E-map 8.1 Edit the E-map Click the [ ] icon to enter into the below window shown as Picture 8-1. And initial Open mode is maximized.
Picture 8-1
Below picture 8-2 is shown as E-map tool-bar.
Event Type: support the three abnormal types: Disk No Space, Disk Error and Video Loss.
Enable/Disable: allow you enable/disable abnormal alarm. Buzzer time: you can set how long the buzzer will sound
when abnormal occurs. (Off, 10s, 20, 40s, and 60s). Show Message: You can set show message on the screen when
abnormal occurs. Send Email:Allows you send one alarm images to a specified
email when abnormal occurs.

DvrClient Software Operation Manual
- 42 -
Picture 8-2 and E-map toolbar brief description is as below:
Key Description Key Description
Open or close <Edit>
function.
<Down size>
<Enlarge> Full size
<Maximize> and
<Minimize> button
Click [ ] icon to minimize the window and start to edit the E-map shown as Picture 8-3.
Picture 8-3
Click [ ] icon, and then highlight [Map List] and right-click the mouse to add one E-map shown as Picture 8-4.
Picture 8-4
Click [Add Map] to enter into the following window shown as Picture 8-5.

DvrClient Software Operation Manual
- 43 -
Picture 8-5
Map name: allow you customize the Map name. Map route: allow you select and browse route of the Map.
After setting map configuration, pull and drag one Channel into the Map shown as Picture 8-6.
Picture8-6 Then select any one camera and right-click mouse to enter into <MapPin Config> option shown as Picture 8-7.
Picture 8-7 Click <MapPin Config> option to enter into the window shown as Picture 8-8.
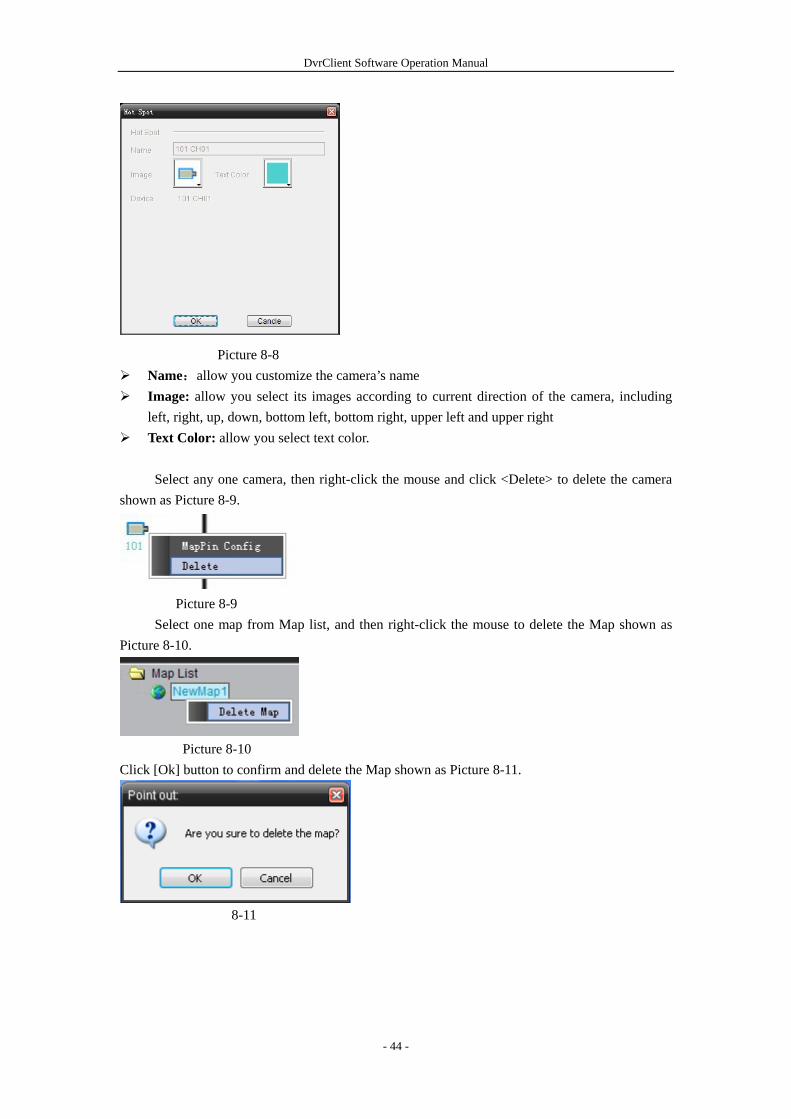
DvrClient Software Operation Manual
- 44 -
Picture 8-8 Name:allow you customize the camera’s name Image: allow you select its images according to current direction of the camera, including
left, right, up, down, bottom left, bottom right, upper left and upper right Text Color: allow you select text color.
Select any one camera, then right-click the mouse and click <Delete> to delete the camera
shown as Picture 8-9.
Picture 8-9
Select one map from Map list, and then right-click the mouse to delete the Map shown as Picture 8-10.
Picture 8-10 Click [Ok] button to confirm and delete the Map shown as Picture 8-11.
8-11

DvrClient Software Operation Manual
- 45 -
The material in this document is the intellectual property of our department. No part of this manual may be reproduced, copied, translated, transmitted, or
published in any form or by any means without our department prior written permission.
Our products are under continual improvement and we reserve the right to make changes without notice. But no guarantee is given as to the correctness of its contents.
We do not undertake any responsibility for the harms caused by using our product in the user’s manual only for recognition, but these names also perhaps are belong to other company’s registered trademark or the copyright.
The product picture may differ from the actual product, only for your reference. The accessories will probably be different according to the different selling areas. For details of accessories, please refer to your local distributor.
Copyright reserved.


![GB LONG-RANGE WIRELESS WEATHER STATION WITH ...global.oregonscientific.com/manual/BAR898HGA.pdfB2. [ ] BUTTON - Displays the daily alarm time or changes the corresponding alarm time](https://img.pdfslide.net/doc/110x75/613ad506f8f21c0c8268a927/gb-long-range-wireless-weather-station-with-b2-button-displays-the-daily.jpg)