Embed Size (px)
Citation preview

eCourts Malaysia Phase 2Law Firm Training
Release 1

Introduction

3
with the New e-Filing System, you can . . .
file cases online anytime, anywhere !
without queuing up at court, subject to operating hours !
check status of filing, payment & document processing !
extract processed documents easily !
4
Scope eCourts Phase 1 eCourts Phase 2
Division
Involved
Civil cases Criminal cases
Civil cases
High Court
Sessions Court
Magistrate Court
Federal Court
Court of AppealHigh Court
Sessions Court
Magistrate Court
System
Integration
& Users
Courts
Law Firms
Courts
Law Firms
Government Agencies
Sites
Involved
8 court locations 20 court locations
eCourts 2 New Features & CapabilitiesPhase 2 will introduce a wider range of functionalities

5
e-Filing System
Case Management System
eCourts Portal
eLelong
Enterprise Architecture Integration
1
2
3
4
5
Release 1 System Modules & Capabilities
eCourts 2 Release 1Coverage in this Release
6
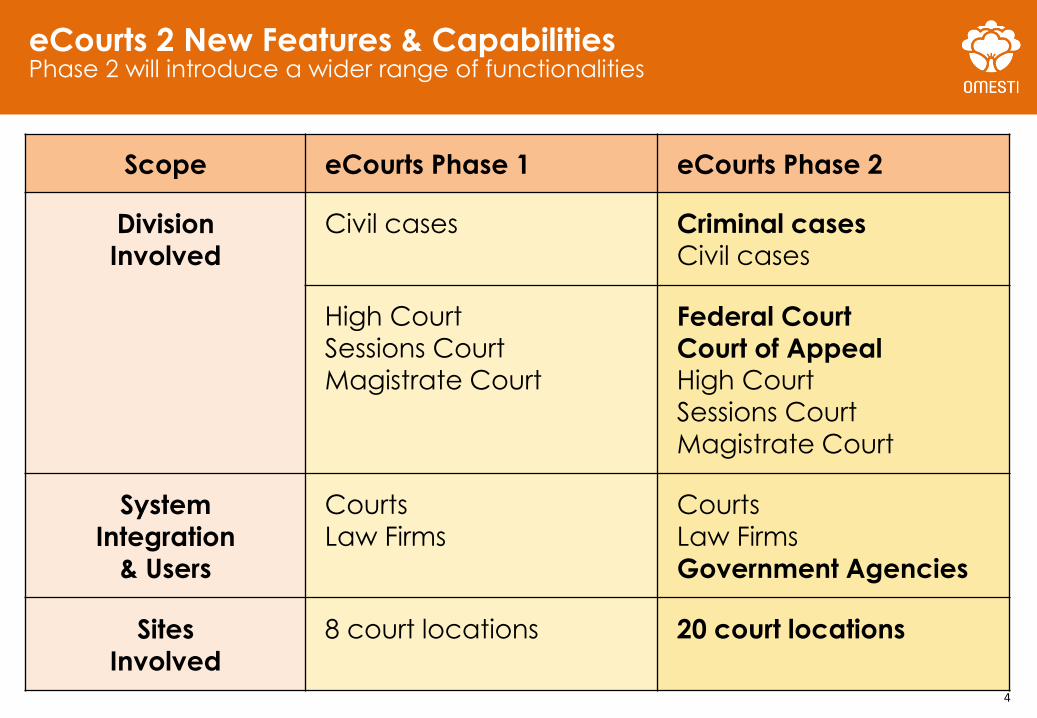
Bahagian Kuasa Mati
Bahagian Surat Kuasa Wakil
Mobile App (IOS & Android)
Data Migration for e-Filing
Data Migration for CMS
Practicing Certificates Process
System Integration with Agencies (PDRM, JPJ, JPN,
MDI and JKPTG)
1
2
3
4
5
6
eCourts 2 Release 2Coverage in this Release
Release 2 System Modules & Capabilities
7

7
Filing of Documents through EFSWhat forms can I file using this system?
Number of
Documents
Can I file
multiple documents
in a single filing?
Document
Format
What format
do these documents
need to be in to
file them in EFS?
YES.
eForms
There are
two types of documents
you can file:
8
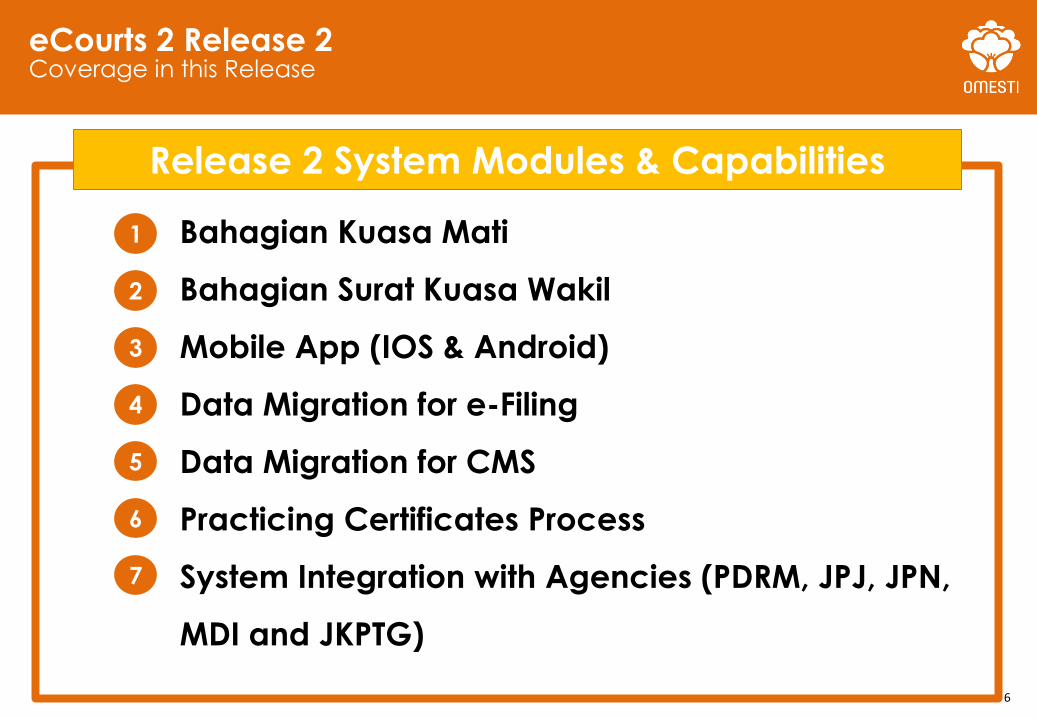
What forms can I file using this system?Example of Criminal Summons filing
To apply for a criminal summons, KWSP has to file:
Permohonan2Charge Sheet 1141 Pengaduan3
eForm PDF PDF
9
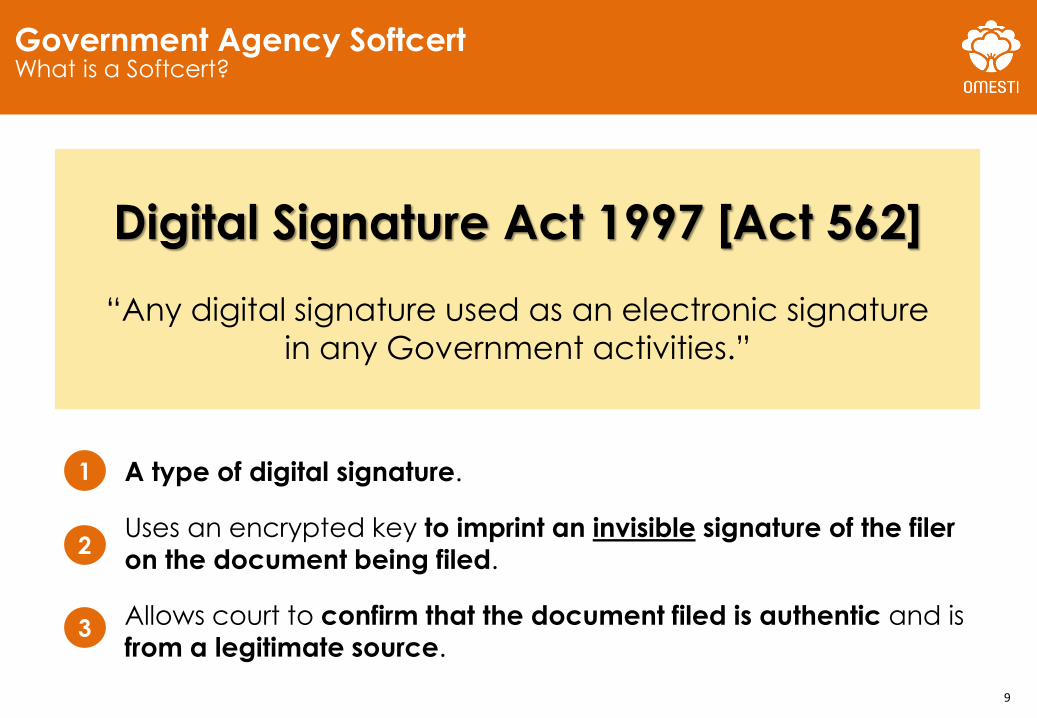
Government Agency SoftcertWhat is a Softcert?
Digital Signature Act 1997 [Act 562]
“Any digital signature used as an electronic signature
in any Government activities.”
A type of digital signature.
Uses an encrypted key to imprint an invisible signature of the filer
on the document being filed.
Allows court to confirm that the document filed is authentic and is
from a legitimate source.
1
2
3
10
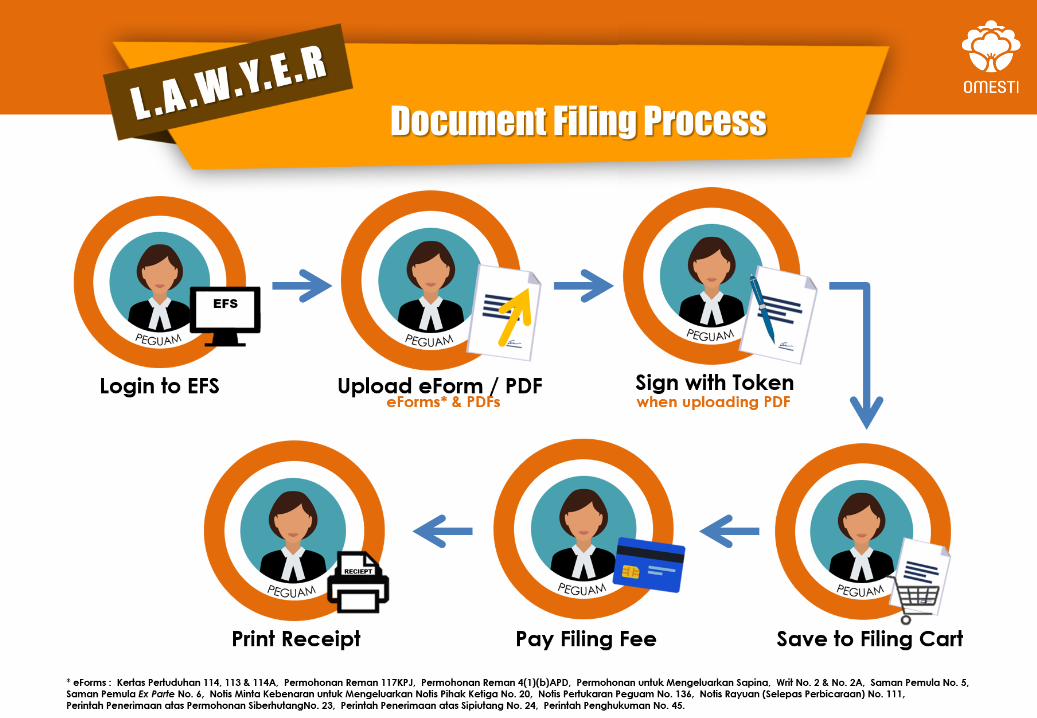
Document Filing Process
11
1
2
3
4
5
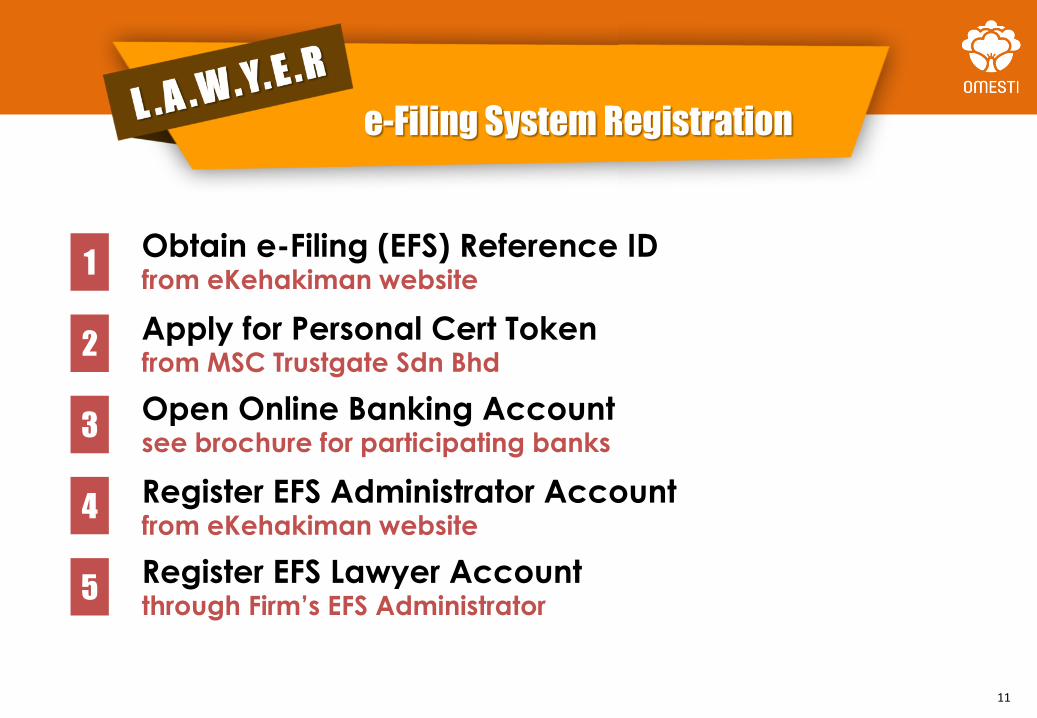
Obtain e-Filing (EFS) Reference IDfrom eKehakiman website
Apply for Personal Cert Tokenfrom MSC Trustgate Sdn Bhd
Open Online Banking Accountsee brochure for participating banks
Register EFS Administrator Accountfrom eKehakiman website
Register EFS Lawyer Accountthrough Firm’s EFS Administrator
e-Filing System Registration
12
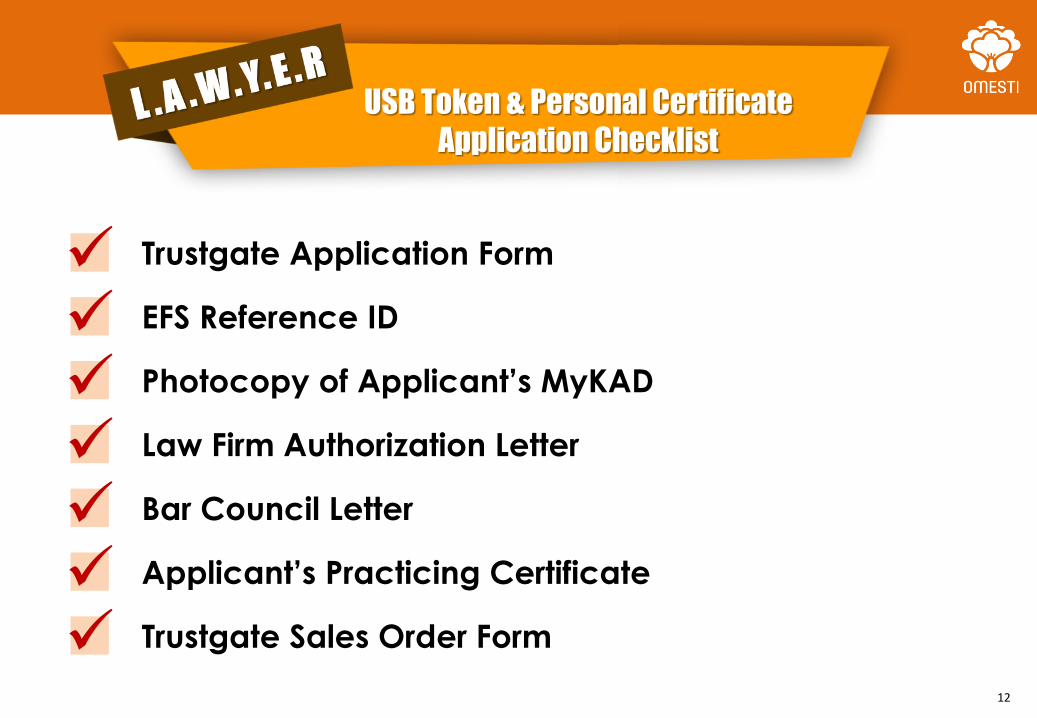
Trustgate Application Form
EFS Reference ID
Photocopy of Applicant’s MyKAD
Law Firm Authorization Letter
Bar Council Letter
Applicant’s Practicing Certificate
Trustgate Sales Order Form
USB Token & Personal Certificate
Application Checklist
e-Filing System (EFS) Overview
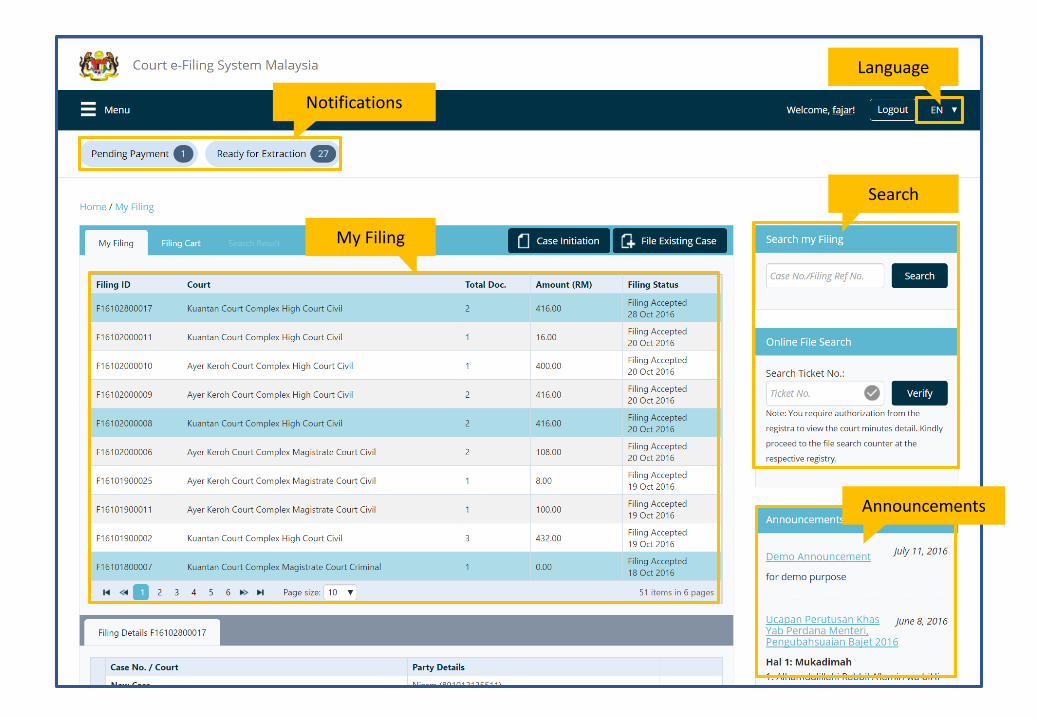
Overview – eFiling System (EFS)
Main Page
My Filing
Search
Announcements
Language
Notifications
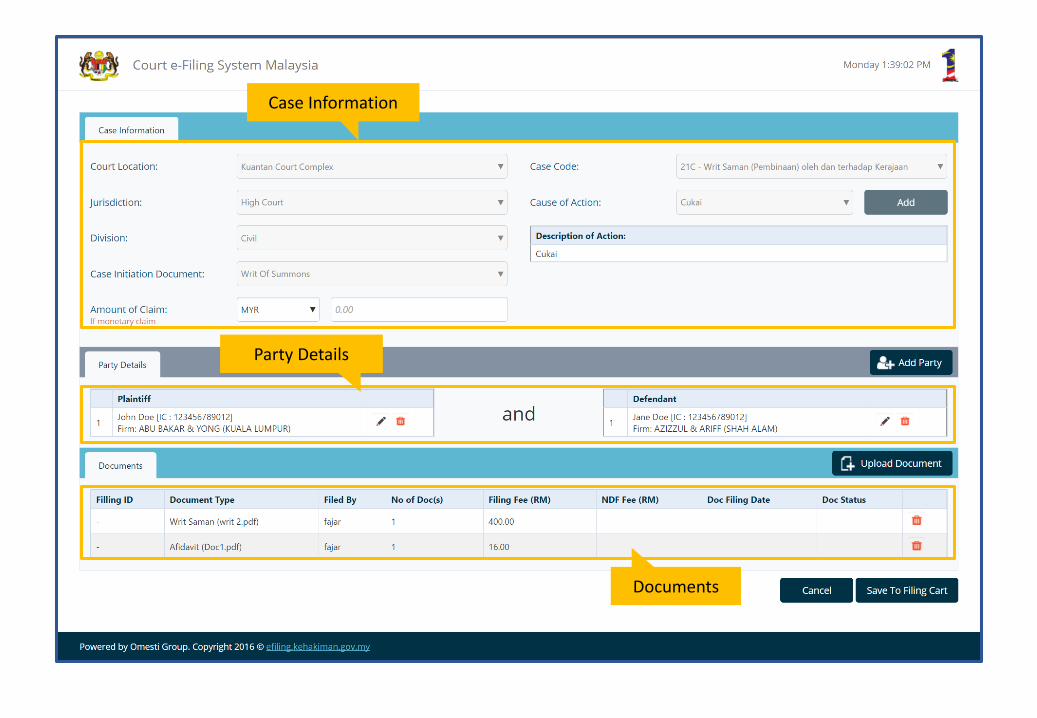
Overview – eFiling System (EFS)
Filing Page
Case Information
Party Details
Documents

Overview – eFiling System (EFS)
Filing Page
Claim Amount
Party Details
Memorandum to be Subscribed on the Writ
Endorsement of Claim
Endorsement as to Solicitor Address
Bail Mgmt tab
EFORM SAMPLE (WRIT SUMMON)
F
C
D
E
A
B
C
D
E
A
B

17
New Case Filing
(Civil)

18
1
Login to EFS system.1
Change the No. of Doc(s) if more than one copy of the same document is required.15
Set a Non Defined Fee (RM), if applicable.16
Click Select to browse for the document to be uploaded.17
Click Sign & Add to add the document to the table below.18

19
Click Case Initiation.2
Change the No. of Doc(s) if more than one copy of the same document is required.15
Set a Non Defined Fee (RM), if applicable.16
Click Select to browse for the document to be uploaded.17
Click Sign & Add to add the document to the table below.18
2

20
3
6
Fill in the required fields.3
Select Description of Action and click Add. Repeat if required.4
Fill in Amount of Claim if required.5
Click Add Party.6
Click Sign & Add to add the document to the table below.18
5
4
21
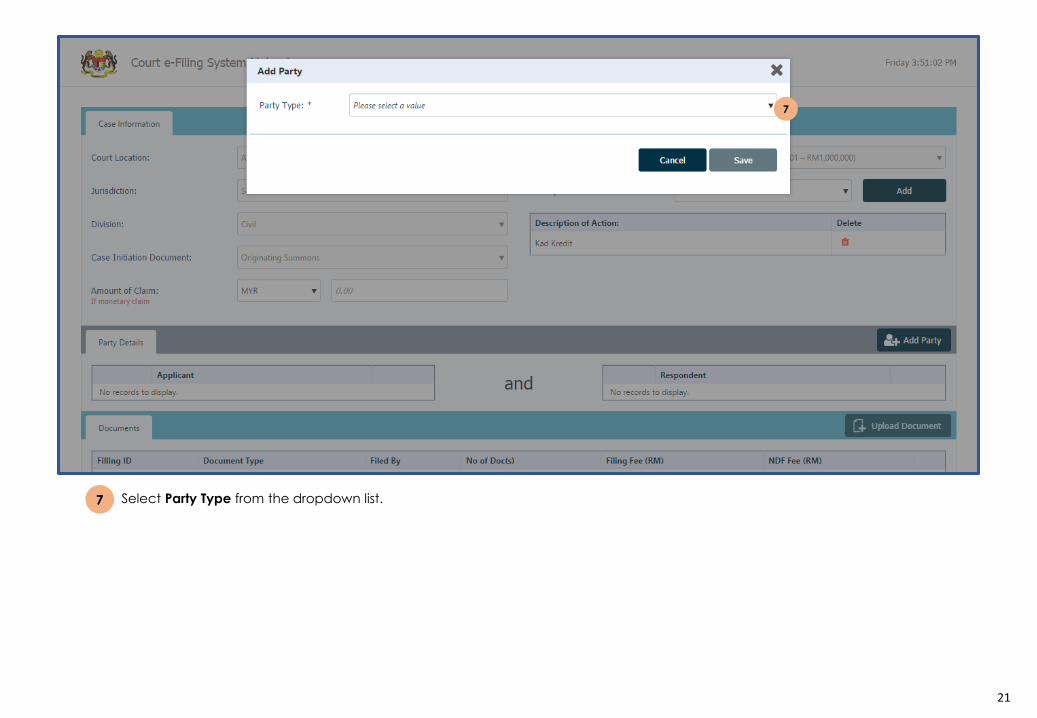
Select Party Type from the dropdown list.7
Select Cause of Action and click Add. Repeat if required.8
Fill in Amount of Claim if required.5
Click Add Party.6
Click Sign & Add to add the document to the table below.18
7

22
8
Select Identity Type from the dropdown list.8
Select Cause of Action and click Add. Repeat if required.4
Fill in Amount of Claim if required.5
Click Add Party.6
Click Sign & Add to add the document to the table below.18

23
9
Fill in the required fields.9
Select Cause of Action and click Add. Repeat if required.4
Fill in Amount of Claim if required.5
Click Add Party.6
Click Sign & Add to add the document to the table below.18
24
10
11
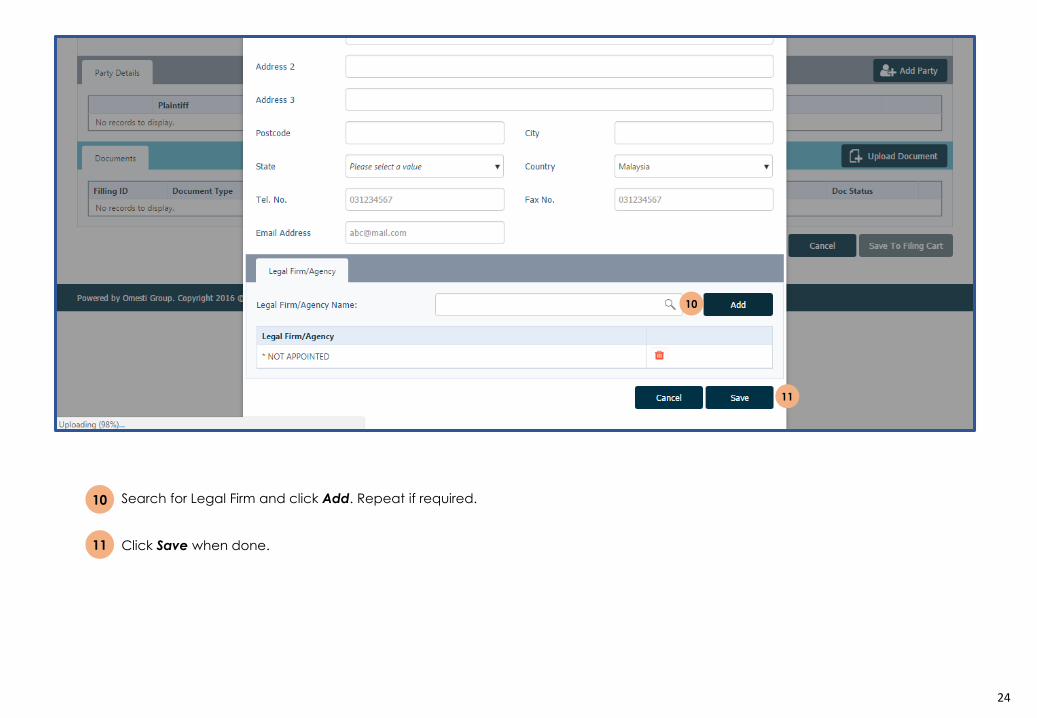
Search for Legal Firm and click Add. Repeat if required.10
Click Save when done.11
Fill in Amount of Claim if required.5
Click Add Party.6
Click Sign & Add to add the document to the table below.18
25
12
14
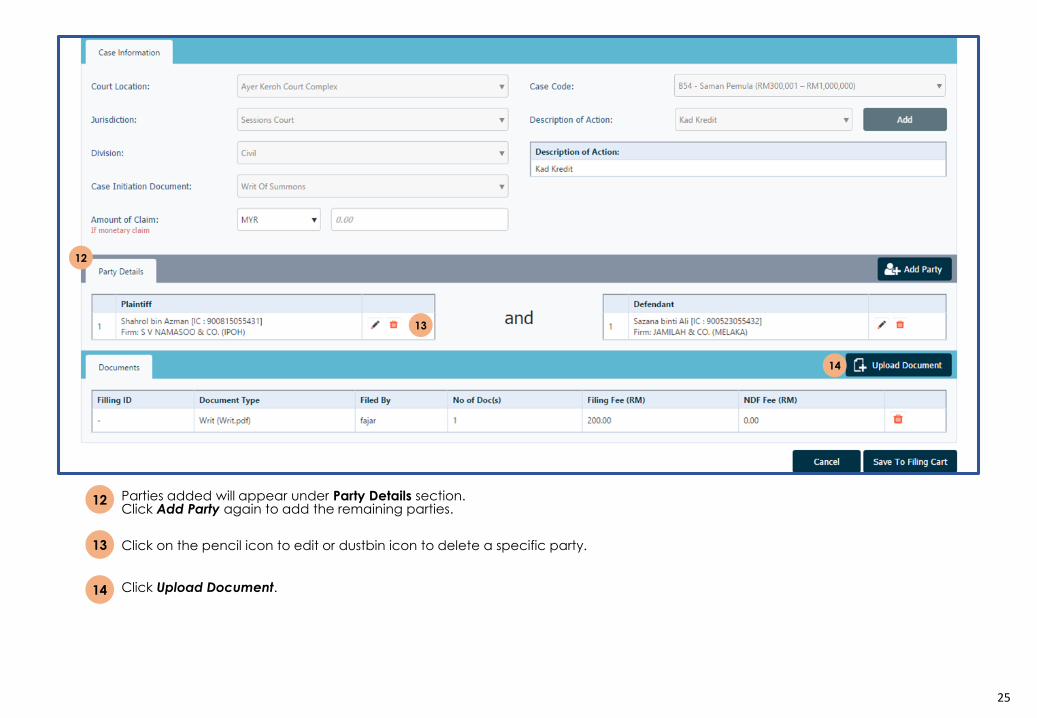
Parties added will appear under Party Details section.Click Add Party again to add the remaining parties.
12
Click on the pencil icon to edit or dustbin icon to delete a specific party.13
Click Upload Document.14
Click on Add Party.6
Click Sign & Add to add the document to the table below.18
13
26
15
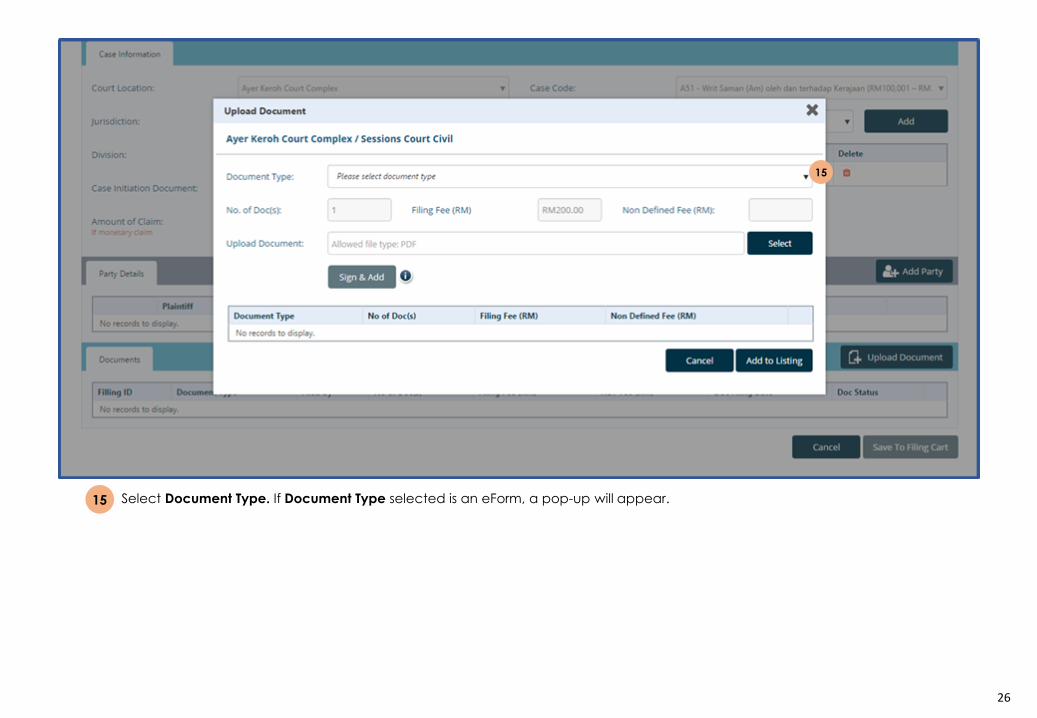
Select Document Type. If Document Type selected is an eForm, a pop-up will appear.15
Change the No. of Doc(s) if more than one copies of the same document is required.16
Set a Non Defined Fee (RM) if applicable.17
Click Select to browse the document file to be uploaded.18
Click Sign & Add to add the document into the table below.19

27
16
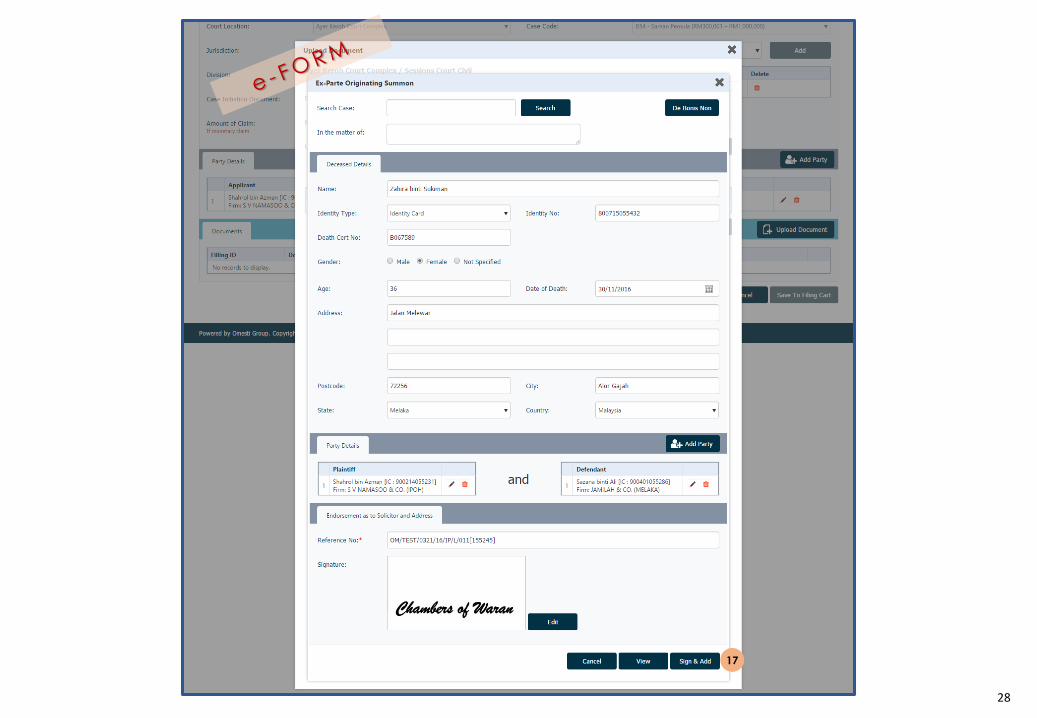
Select Saman Pemula Ex Parte from Document Type in the dropdown list.16
Fill in the form, then click Sign & Add .17
Set a Non Defined Fee (RM) if applicable.17
Click Select to browse the document file to be uploaded.18
Click Sign & Add to add the document into the table below.19
28
17

29
Document added will be shown here. Click on dustbin icon to delete the document.18
Click Add to Listing when done.19
Set a Non Defined Fee (RM) if applicable.15
Click on Select to browse the document file to be uploaded.16
Click Sign & Add to add the document to the table below.18
18
19

30
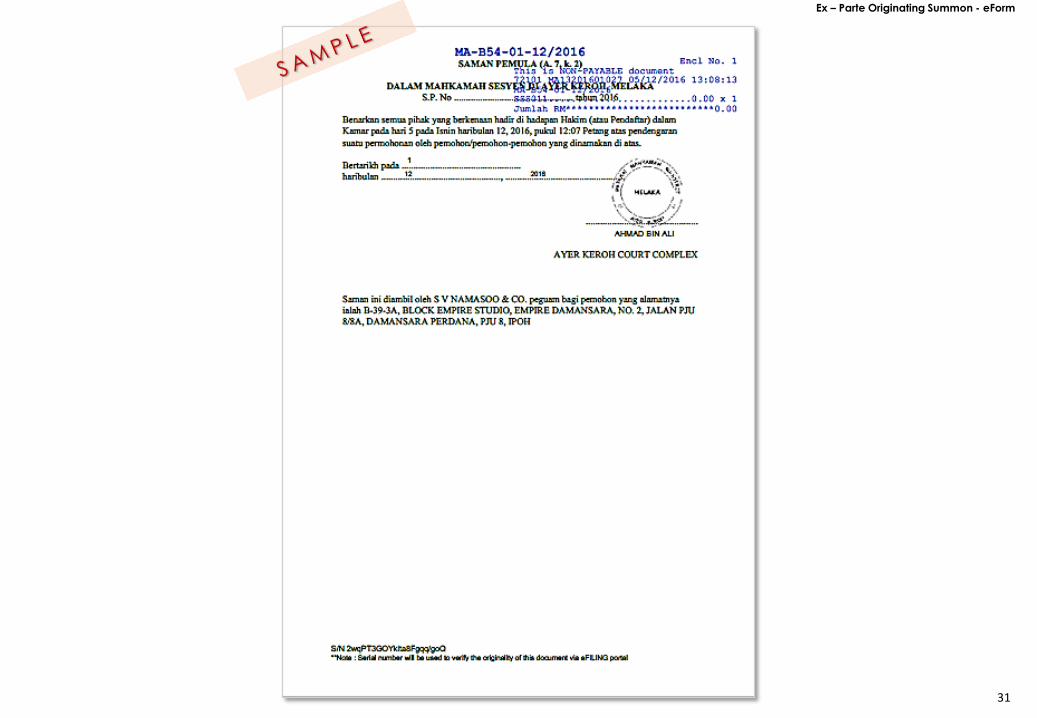
Ex – Parte Originating Summon - eForm
31
Ex – Parte Originating Summon - eForm

32
20
For non- eForm, user has to upload their document. Select Document Type from the dropdown list.20
Change the No. of Doc(s) if more than one copies of the same document is required.16
Set a Non Defined Fee (RM) if applicable.17
Click Select to browse the document file to be uploaded.18
Click Sign & Add to add the document into the table below.19

33
21
Change the No. of Doc(s) if more than one copy of the same document is required.21
Set a Non Defined Fee (RM) if applicable.22
Click Select to browse the document file to be uploaded.23
Click Add to add the document into the table below.5
Click Sign & Add to add the document into the table below.19
22
23

34
24
Select the document.24
Set a Non Defined Fee (RM) if applicable.3
Click Select to browse the document file to be uploaded.4
Click Add to add the document into the table below.5
Click Sign & Add to add the document into the table below.19
35
25
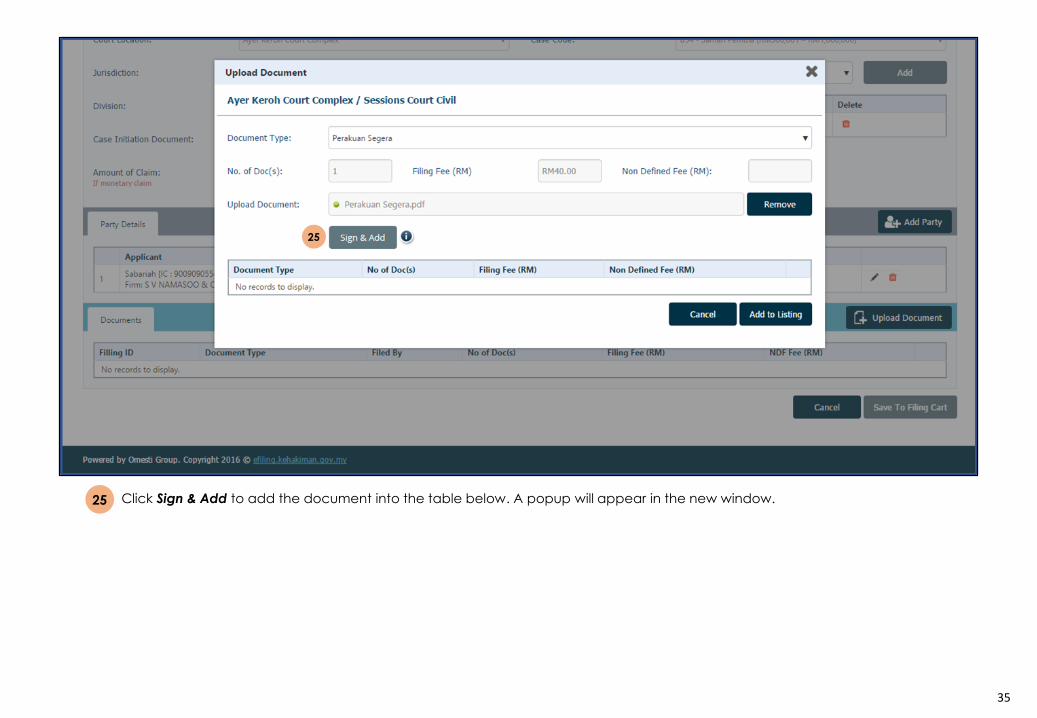
Click Sign & Add to add the document into the table below. A popup will appear in the new window.25
Set a Non Defined Fee (RM) if applicable.3
Click Select to browse the document file to be uploaded.4
Click Add to add the document into the table below.5
Click Sign & Add to add the document into the table below.19

36
Select Token from dropdown list.26
Filled in Password.27
Click Sign to sign the document. 28
Click Add to add the document into the table below.22
Click Sign & Add to add the document into the table below.19
26
28
27
37
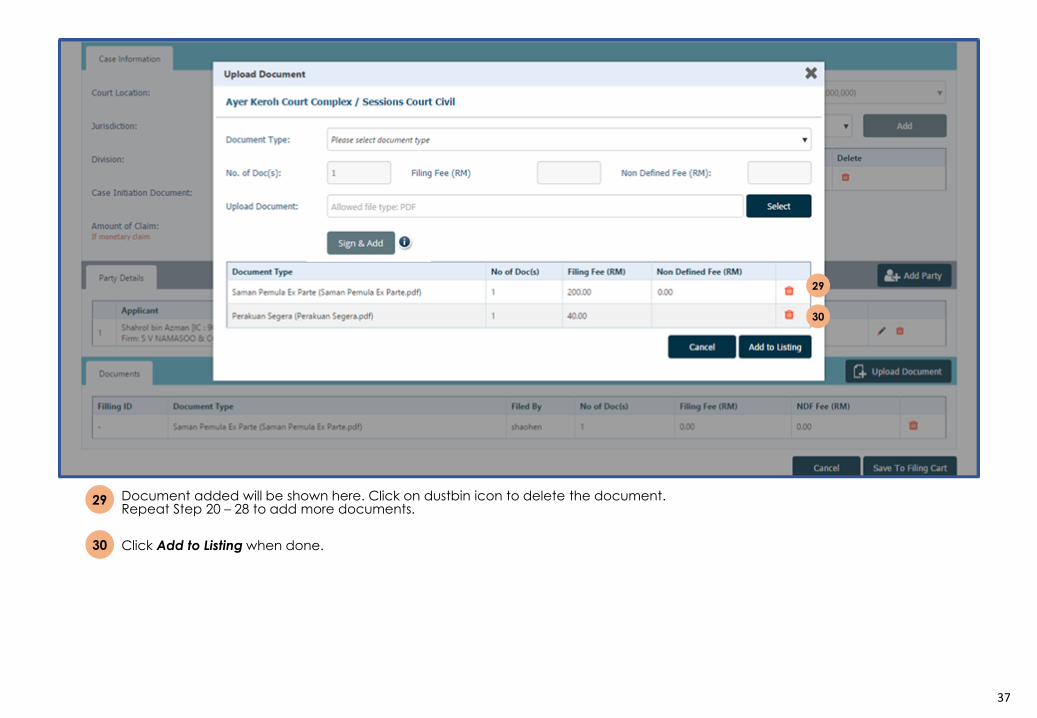
Document added will be shown here. Click on dustbin icon to delete the document.Repeat Step 20 – 28 to add more documents.
29
Click Add to Listing when done.30
Set a Non Defined Fee (RM) if applicable.15
Click on Select to browse the document file to be uploaded.16
Click Sign & Add to add the document to the table below.18
29
30
38
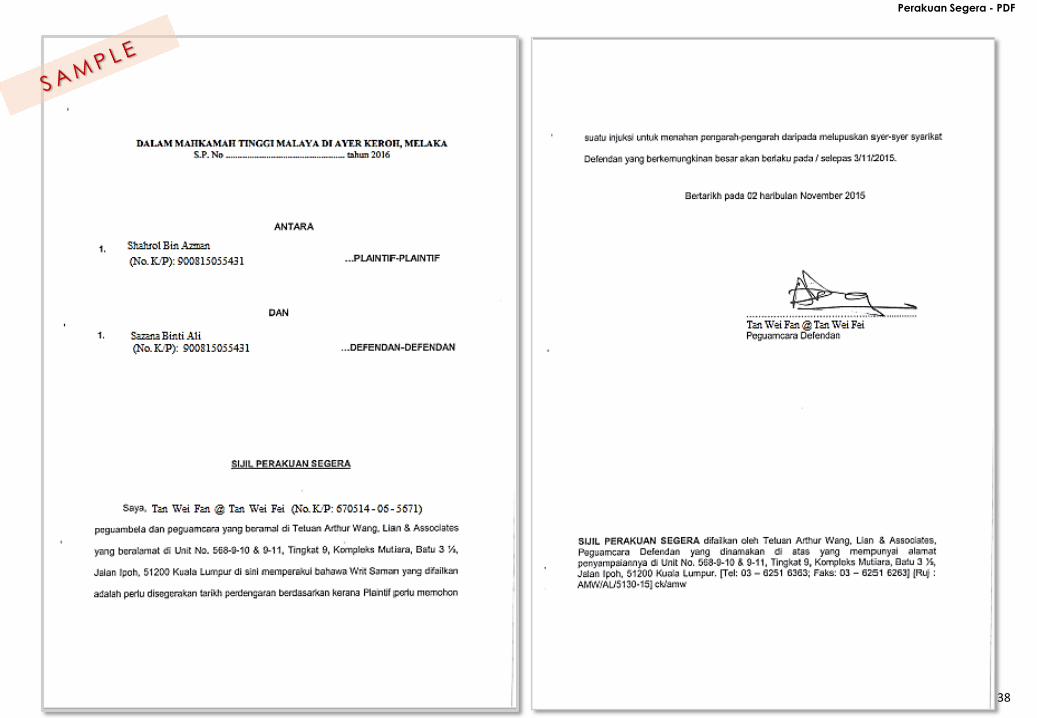
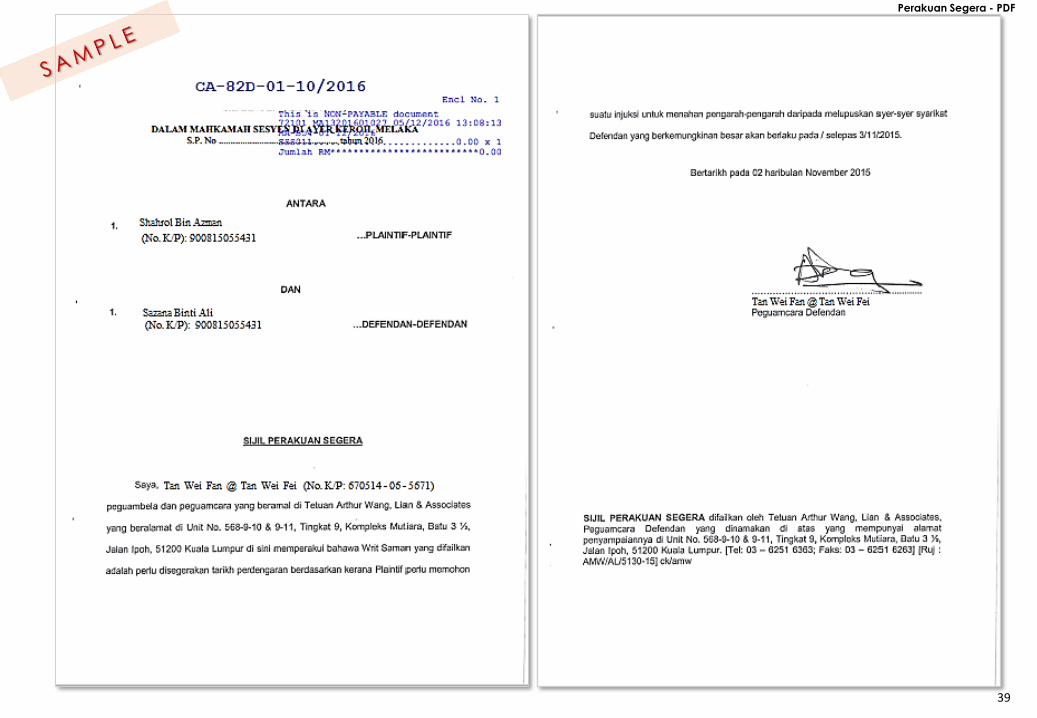
Perakuan Segera - PDF
39
Perakuan Segera - PDF
40
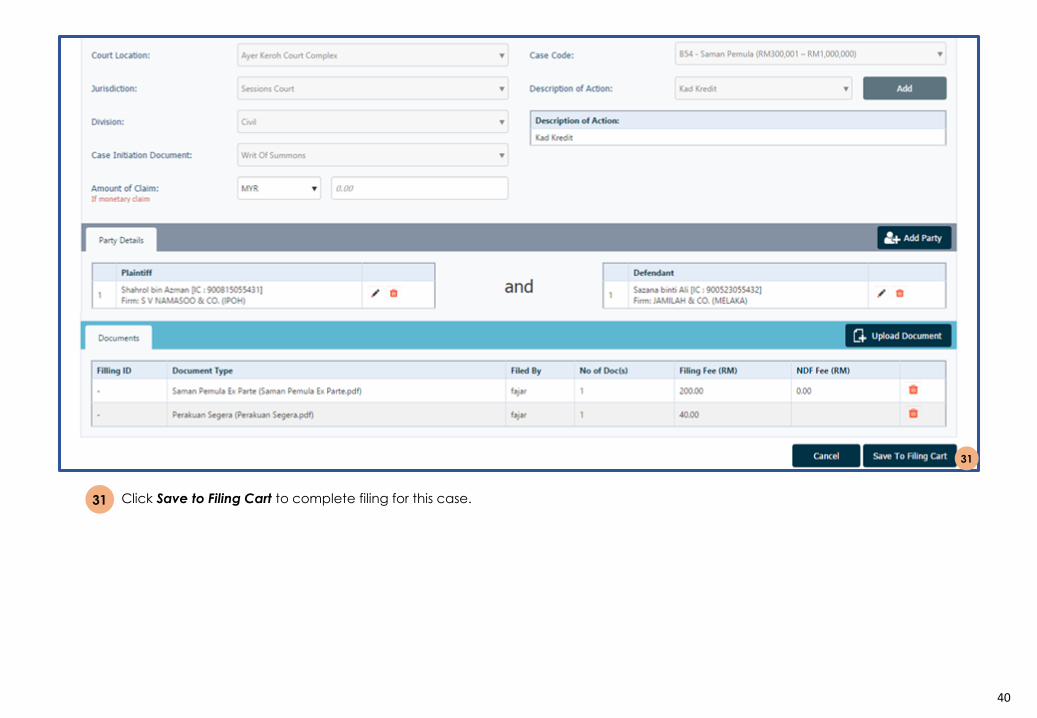
Click Save to Filing Cart to complete filing for this case.31
Click on Add to Listing when done.19
Set a Non Defined Fee (RM) if applicable.15
Click on Select to browse the document file to be uploaded.16
Click Sign & Add to add the document to the table below.18
31

41
Click OK. The filing page window will be closed and redirect to Filing Cart at EFS home page.32
Click on Add to Listing when done.19
Set a Non Defined Fee (RM) if applicable.15
Click on Select to browse the document file to be uploaded.16
Click Sign & Add to add the document to the table below.18
32

42
Click dollar sign ($) to make payment.33
Click on Add to Listing when done.19
Set a Non Defined Fee (RM) if applicable.15
Click on Select to browse the document file to be uploaded.16
Click Sign & Add to add the document to the table below.18
33
43
Payment > Personal Account
44
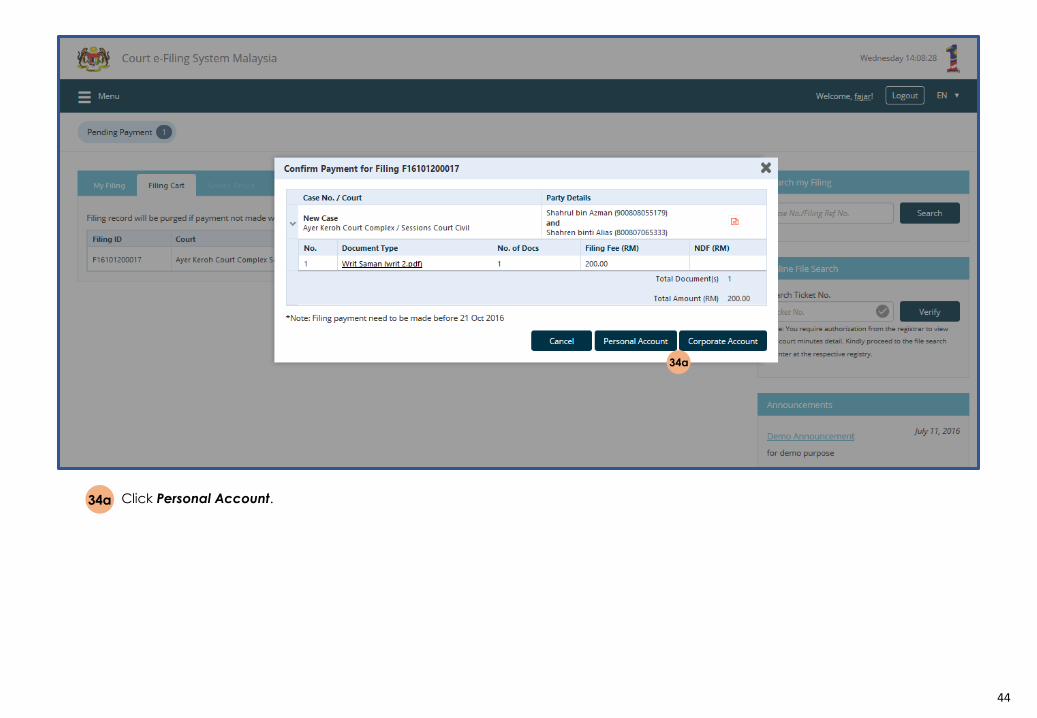
Click Personal Account.34a
Click on Add to Listing when done.19
Set a Non Defined Fee (RM) if applicable.15
Click on Select to browse the document file to be uploaded.16
Click Sign & Add to add the document to the table below.18
34a

45
Note that in the event of document type does not correspond with the actual document uploaded, document registration will be rejected and payments made for said document will be forfeited.Click Yes to proceed.
35a
Change the No. of Doc(s) if more than one copy of the same document is required.15
Set a Non Defined Fee (RM), if applicable.16
Click Select to browse for the document to be uploaded.17
Click Sign & Add to add the document to the table below.18
35a

46
Select from a link of bank to make payment via FPX.36a
Click Proceed.28
Set a Non Defined Fee (RM), if applicable.16
Click Select to browse for the document to be uploaded.17
Click Sign & Add to add the document to the table below.18
36a
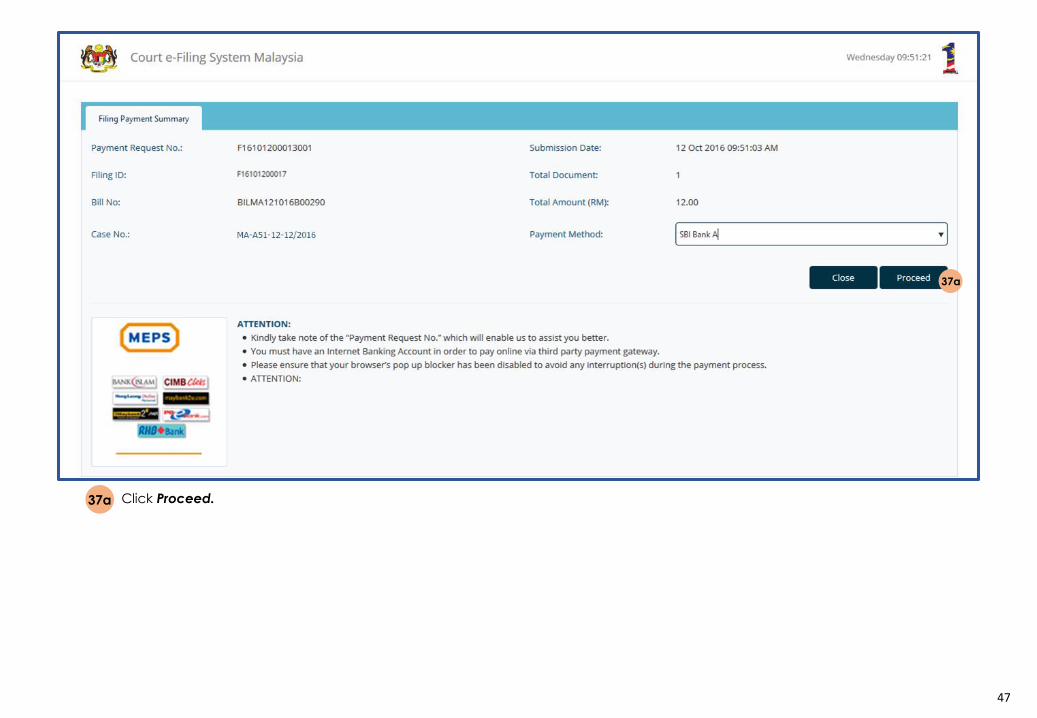
47
Click Proceed.37a
Click Proceed.28
Set a Non Defined Fee (RM), if applicable.16
Click Select to browse for the document to be uploaded.17
Click Sign & Add to add the document to the table below.18
37a

48
Key in User ID and Password.38a
Click Sign in to proceed to payment page.39a
Set a Non Defined Fee (RM), if applicable.16
Click Select to browse for the document to be uploaded.17
Click Sign & Add to add the document to the table below.18
39a
38a
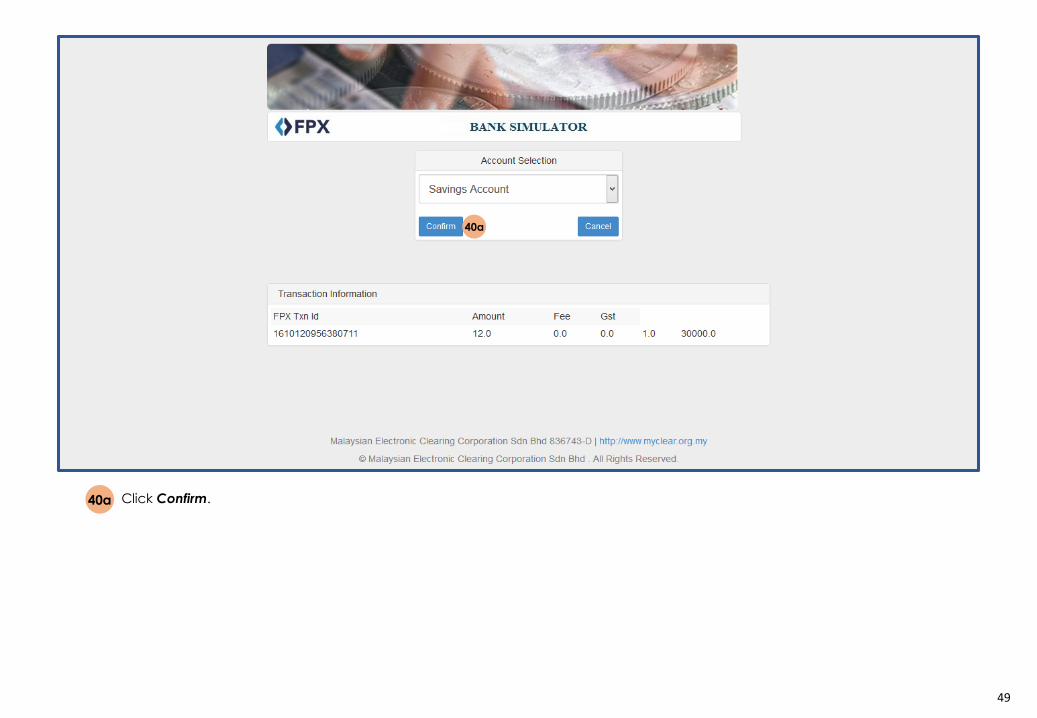
49
Click Confirm.40a
Click on Sign in.28
Set a Non Defined Fee (RM), if applicable.16
Click Select to browse for the document to be uploaded.17
Click Sign & Add to add the document to the table below.18
40a
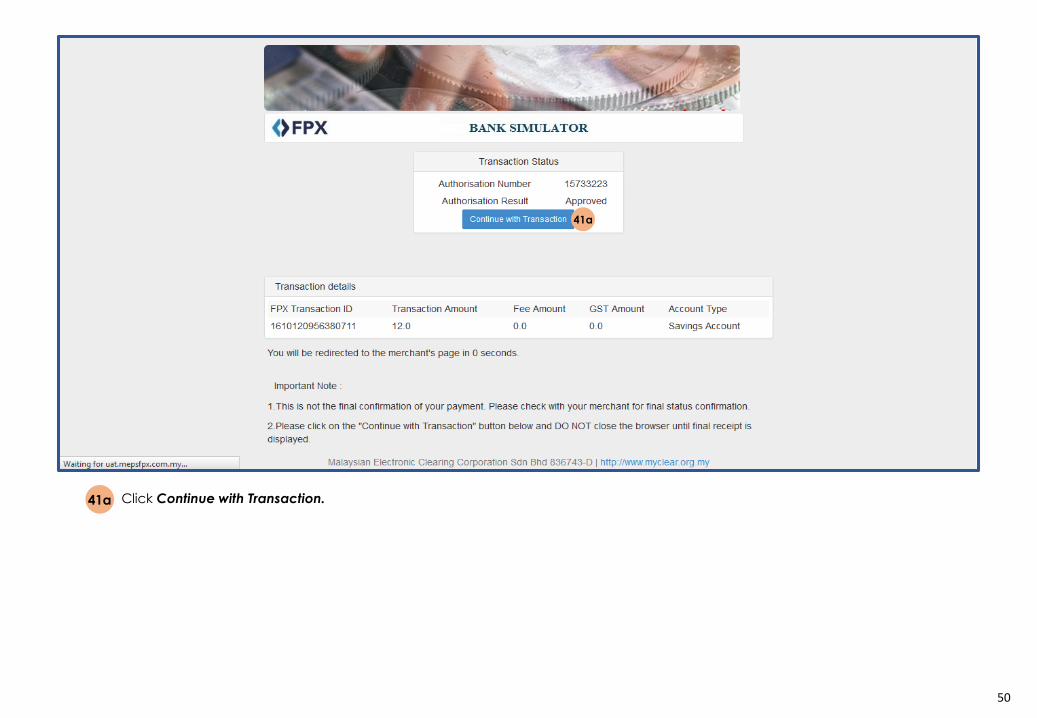
50
Click Continue with Transaction.41a
Click on Sign in.28
Set a Non Defined Fee (RM), if applicable.16
Click Select to browse for the document to be uploaded.17
Click Sign & Add to add the document to the table below.18
41a

51
Click View Receipt to download receipt.42a
Click Close.43a
Set a Non Defined Fee (RM), if applicable.16
Click Select to browse for the document to be uploaded.17
Click Sign & Add to add the document to the table below.18
43a 42a

52
44a
The filing with payment made successfully should now be listed under My Filing with the Filing Status of Filing Accepted.44a
Click the Personal Account button to proceed payment using personal account. 4
Click the Corporate Account button to proceed payment using corporate account. 5
Filing that were approved, will be made available in Inbox as well as email. 46b
Click the Proceed button to proceed with payment. (Proceed button will be active once user has chosen a payment method). 3

53
Payment > Corporate Account

54
Click Corporate Account.34b
Click on Add to Listing when done.19
Set a Non Defined Fee (RM) if applicable.15
Click on Select to browse the document file to be uploaded.16
Click Sign & Add to add the document to the table below.18
34b
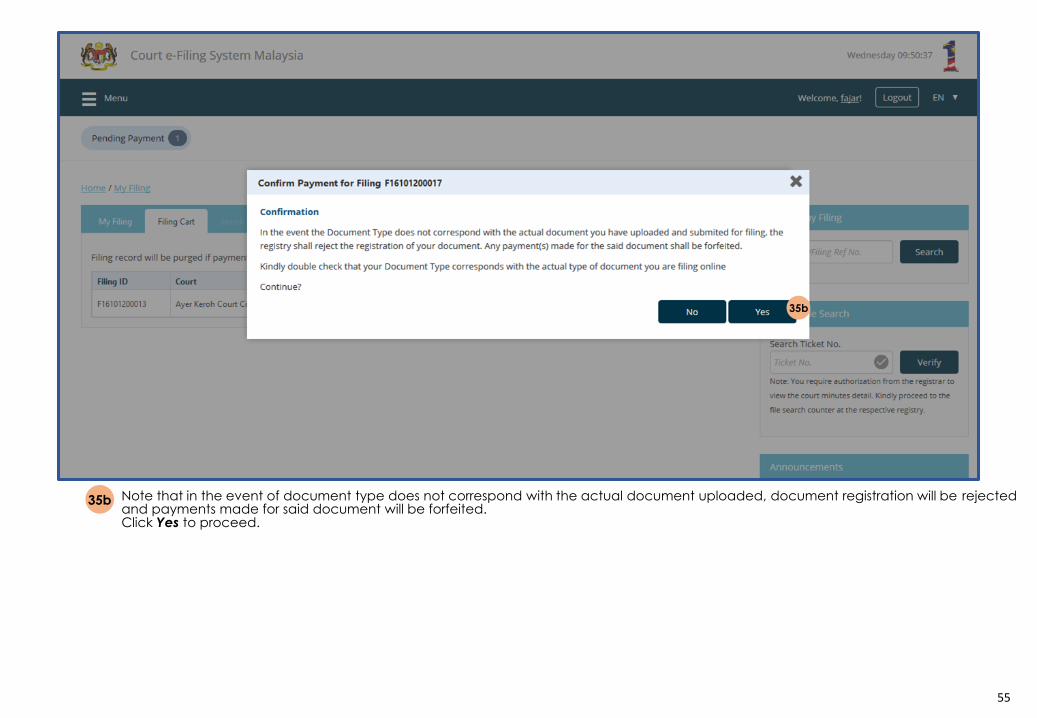
55
Note that in the event of document type does not correspond with the actual document uploaded, document registration will be rejected and payments made for said document will be forfeited.Click Yes to proceed.
35b
Change the No. of Doc(s) if more than one copy of the same document is required.15
Set a Non Defined Fee (RM), if applicable.16
Click Select to browse for the document to be uploaded.17
Click Sign & Add to add the document to the table below.18
35b
56
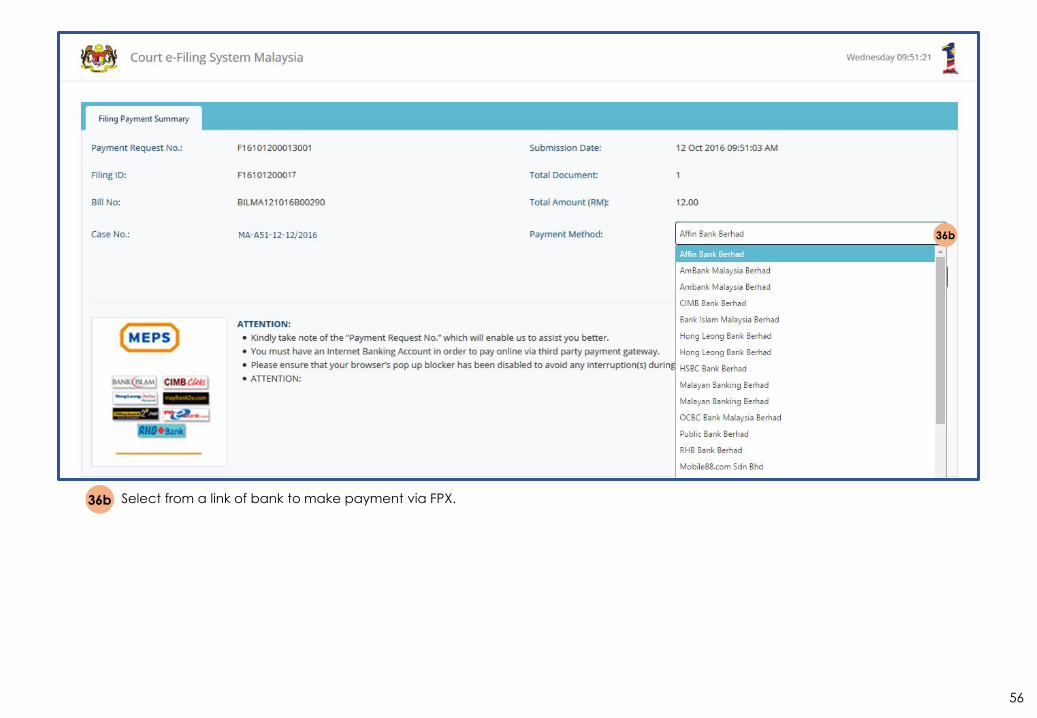
Select from a link of bank to make payment via FPX.36b
Click Proceed.28
Set a Non Defined Fee (RM), if applicable.16
Click Select to browse for the document to be uploaded.17
Click Sign & Add to add the document to the table below.18
36b
57
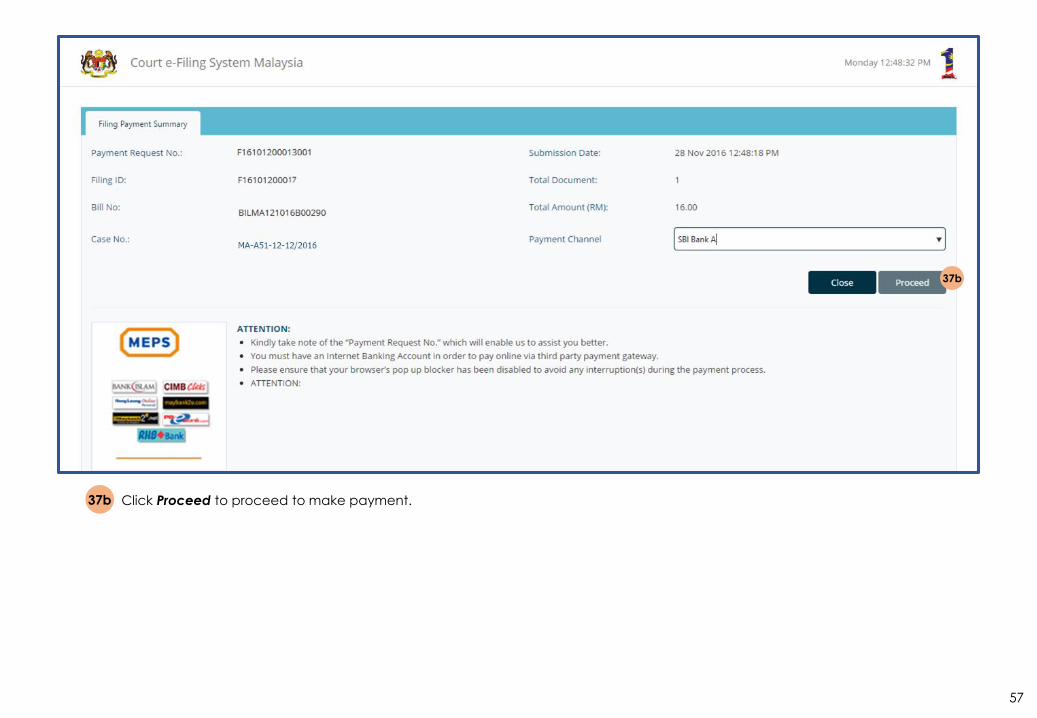
Click Proceed to proceed to make payment.37b
Click Close to not proceed with payment. Click Proceed to proceed to make payment. 4
37b

58
Click Cancel to cancel payment. 4
Click the Corporate Account button to proceed payment using corporate account. 5
Key in User Id and Password. 38b
Click Sign in to proceed to payment page.39b
Click Cancel to cancel payment. 3
39b
38b
59
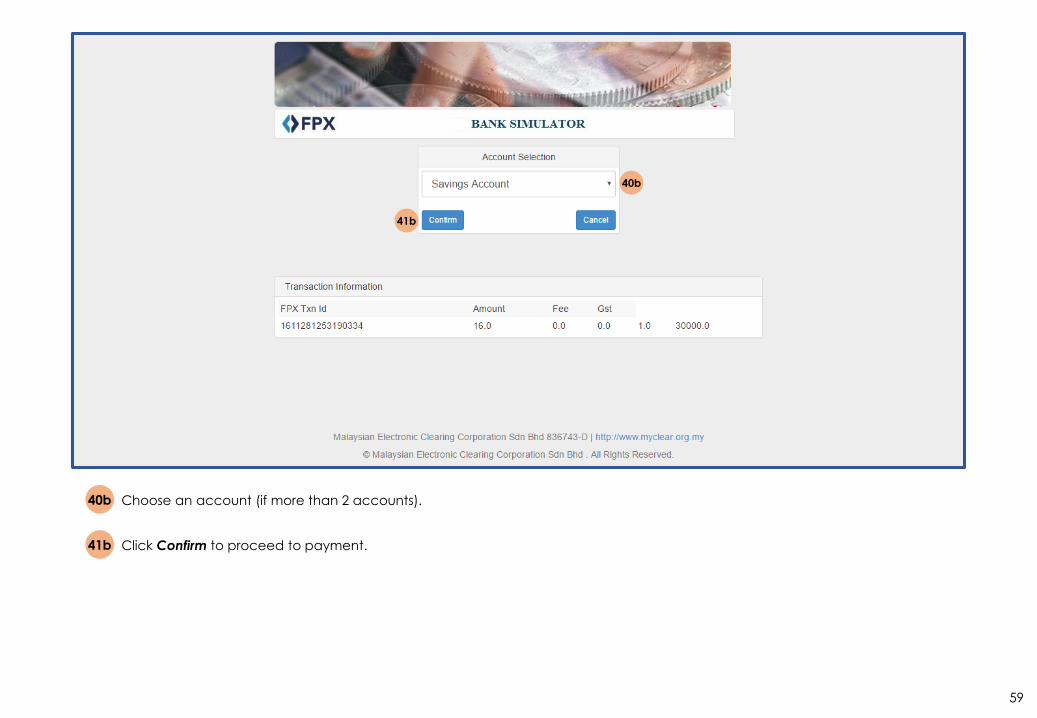
Choose an account (if more than 2 accounts). 40b
Click Confirm to proceed to payment.41b
41b
40b

60
The Authorisation Result will be shown as Pending – 99 pending approval from account holder. Once user has confirmed the information written is correct, user can click Continue with Transaction to confirm payment.
42b
42b
Pending

61
Click the Personal Account button to proceed payment using personal account. 4
Click the Corporate Account button to proceed payment using corporate account. 5
Payment Status will be shown as Pending awaiting approval from account holder. 43b
Click Close to exit Filing Payment Status and revert to the user’s My Filing page. 44b
Click the Proceed button to proceed with payment. (Proceed button will be active once user has chosen a payment method). 3
44b
43b
62
45b
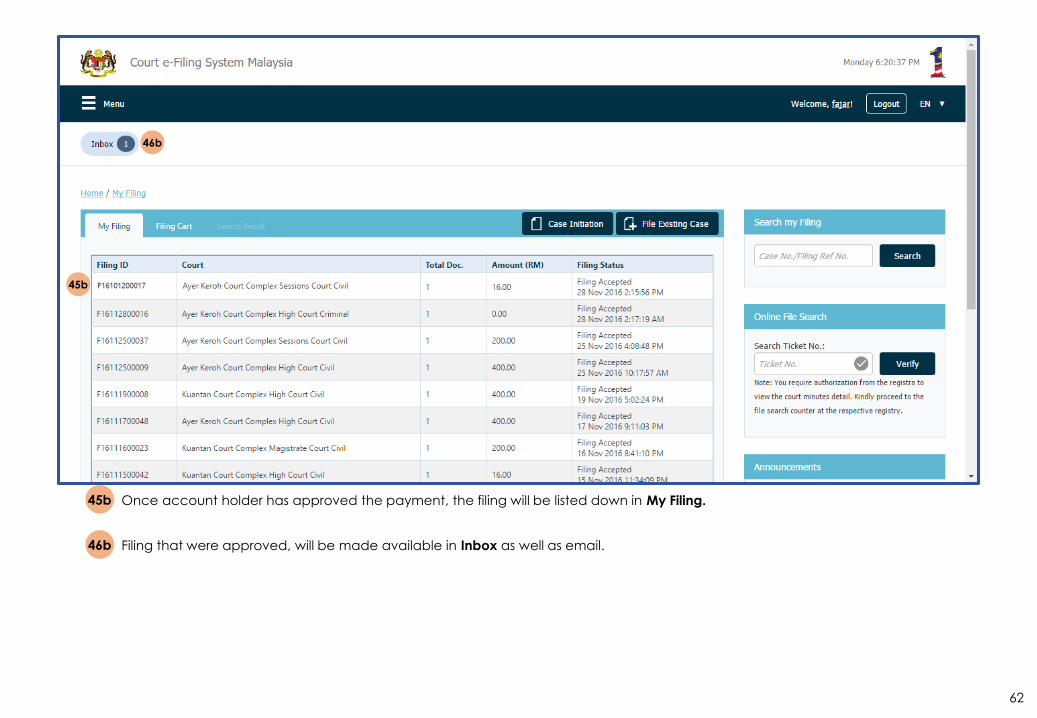
Once account holder has approved the payment, the filing will be listed down in My Filing. 45b
Click the Personal Account button to proceed payment using personal account. 4
Click the Corporate Account button to proceed payment using corporate account. 5
Filing that were approved, will be made available in Inbox as well as email. 46b
Click the Proceed button to proceed with payment. (Proceed button will be active once user has chosen a payment method). 3
46b