Embed Size (px)
Citation preview
Ed Verosky
FLASH PHOTOGRAPHY
Ed Verosky’s GUIDE TO

Ed Verosky’s Guide to Flash Photography. Copyright 2015 Edward Verosky. All rights reserved. No part of this book may be reproduced in any form or by any means, electronic or mechanical, including information storage and retrieval systems, without permission, in writing from the author/publisher.
Learn more about Photography at edverosky.com
ContentsAbout Light ............................................................................................ 5Duration of Light .........................................................................................................6Constant & Flash Lighting ..........................................................................................6Light Travels in Straight Paths .....................................................................................7Light Scatters...............................................................................................................7The Relative Size of Your Light Affects Contrast ........................................................8Direct & Diffuse Light ..................................................................................................9Color of Light ............................................................................................................10Light Loses Intensity as it Travels.............................................................................. 11
Camera & Exposure ............................................................................ 12How We Measure Light .............................................................................................13APERTURE, SHUTTER SPEED, AND ISO ..............................................................14Shooting Modes.........................................................................................................23Easy Adjustments With Two Simple Exposure Controls ............................................26Standardization..........................................................................................................29Manual Camera & Flash ............................................................................................34
Flash Gear & Concepts ........................................................................ 37Shoe-Mount Flash .....................................................................................................38Flash Units by Manufacturer......................................................................................38Budget Flash Units ....................................................................................................40Remote Flash Triggering ...........................................................................................41Light Stands...............................................................................................................43Light Meters ...............................................................................................................48Two Types Of Metering ..............................................................................................48Using A Light Meter ...................................................................................................48The Meter Is Accurate, Not Perfect ...........................................................................50Are Lighting Ratios Important? ..................................................................................50
On-Camera Flash ................................................................................. 51TTL for Camera-mounted Flash ................................................................................52Flash Exposure Compensation .................................................................................52Other Flash Features.................................................................................................53Straight-On Flash ......................................................................................................54Bounce Flash ............................................................................................................55
Off-Camera Flash ................................................................................. 58The Advantages of Small Flash Units For Off-Camera Lighting ................................59Building a Portable Studio .........................................................................................59lighting setups & Techniques .....................................................................................64
Portraiture Tips .................................................................................... 80Lighting For Faces ....................................................................................................81The Five Basic Lighting Patterns ...............................................................................81Flat vs. Dimensional Lighting ....................................................................................84
IntroductionEd Verosky’s Guide to Flash Photography is a compilation of my best flash instruction from books and tutorials over the last several years and a follow-up to my eBook, 100% Reliable Flash Photography which was originally written in 2010. Much of the information has been reworked and updated to present a clearer picture of my methodology.
My goal is to give you a complete foundational understanding of how light and flash work so that you can produce great flash photography quickly and easily, no matter what the circumstances. I recommend that you read through this guide from beginning to end. I’ve made an effort to present the material in a way that doesn’t waste your time, while it gives you every opportunity to learn and master your technique. Depending on your skill level and familiarity with topics like camera settings and exposure, you might have to spend a little more time with certain sections, but stick to it. It will pay off big as time goes on.
We start by covering the behavior of light. This is an important topic; understanding how light works is the key to addressing some of the basic challenges you’ll come across in most lighting situations.
Camera and exposure settings are discussed next. As important as those topics are, that chapter has a section that I want you to pay particular attention to: Standardization. It’s the key to being able to walk into any environment with complete confidence in your technical abilities. Indoor, out-door, day or night with a single portraiture subject, group, or in a fast-moving environment. There is no reason for you to have to struggle with camera settings and lighting gear. Essentially, what Stan-dardization is about is creating and using an ultra-simplified starting point for just about any environ-ment you’ll encounter. Two default setting combinations is all most people need!
We finish up with the most common and powerful techniques for flash photography. I could have made this part of the book more complicated, and come up with ten or twenty scenarios and provided specific gear and settings recommendations for each. But I decided to offer a different, more practi-cal approach; I realized it would make more sense to show you how to do the things most photogra-phers need to do with flash. My reasoning is that if I can teach you how to build up from a one-light scenario to a three-point (or more) lighting setup, then you should be able to handle just about every-thing else that comes your way.
Finally, some basic portraiture tips are provided in Chapter Six. I’ve added this for completeness because learning to use your flashes AND knowing what makes a good portrait go hand-in-hand.
I really hope you enjoy Ed Verosky’s Guide to Flash Photography. I know that if you take the time to read it, apply the principles presented, and practice, you will become an expert in flash photography.
Ed Verosky
5
About Light
CHAPTER ONE
6
Understanding how light works is the first step to mastering your flash photography. You should know the effects of light’s behavior, color, power and duration. In this chapter, we’ll cover several important characteristics of light as they relate to photography. This is where it all starts.
Duration of Light In still photography, the duration of the light in our scene is one of our major concerns. This is because duration is very closely linked to exposure. The reason for that? The sensor will record more light as the duration of that light increases. Not enough exposure time and the picture will be too dark. Too much exposure to light, and you’ll get an overexposed image.
We can control the duration and/or amount of light reaching the sensor with our camera settings, but let’s start by understanding what types of light we’re working with in the first place. Where du-ration is concerned, photographers work with two main types of light sources: constant and flash.
Constant & Flash LightingConstant light is light that persists for a duration exceeding the time of the average exposure. Examples of this type of light source are photographic “hot lights,” household lighting, street lights, candle light, and sunlight (often referred to as natural light). Ambient light (light that exists in a scene but is not necessarily a primary light source) is also part of the constant light mix. One of the great advantages to working with constant light sources is that you can see and somewhat control the effect of the lighting on your subject and background in real-time.
Portable flash units (and studio strobes) are among the most powerful and versatile lighting sourc-es you can use, but they’re also the most misunderstood. The challenge of working with flash or
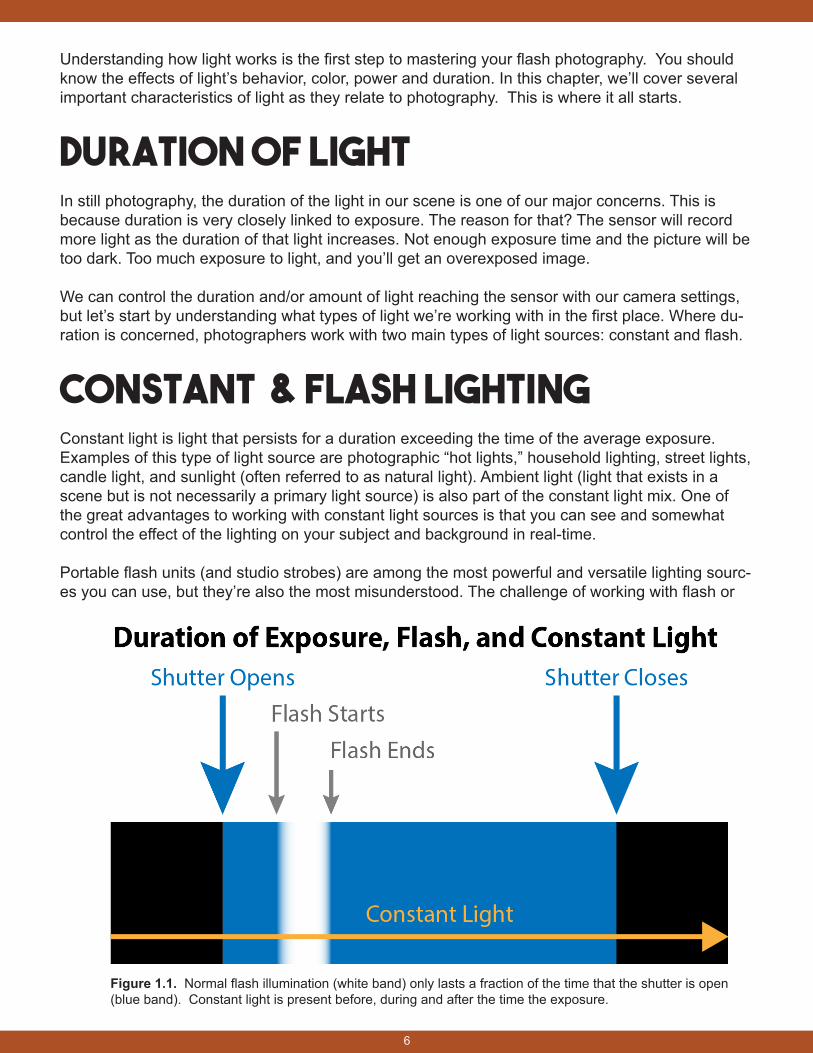
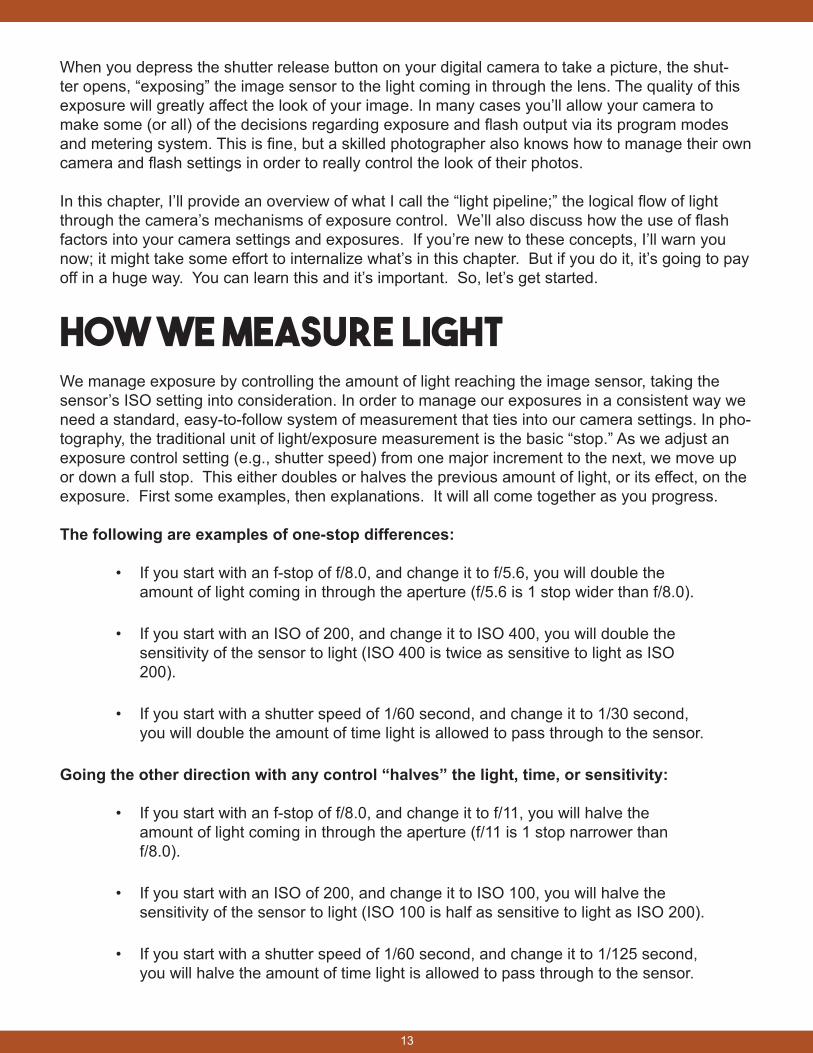
Figure 1.1. Normal flash illumination (white band) only lasts a fraction of the time that the shutter is open (blue band). Constant light is present before, during and after the time the exposure.
7
any strobe lighting has to do with the relatively short duration of the light output and its variable intensity. A single burst of light produced by a flash occurs for only a fraction of a second. In fact, the flash’s duration is usually much shorter than the total exposure time in use by the camera (see Figure 1.1). Of course, the light from the flash is so powerful, that’s enough time for it to do its job.
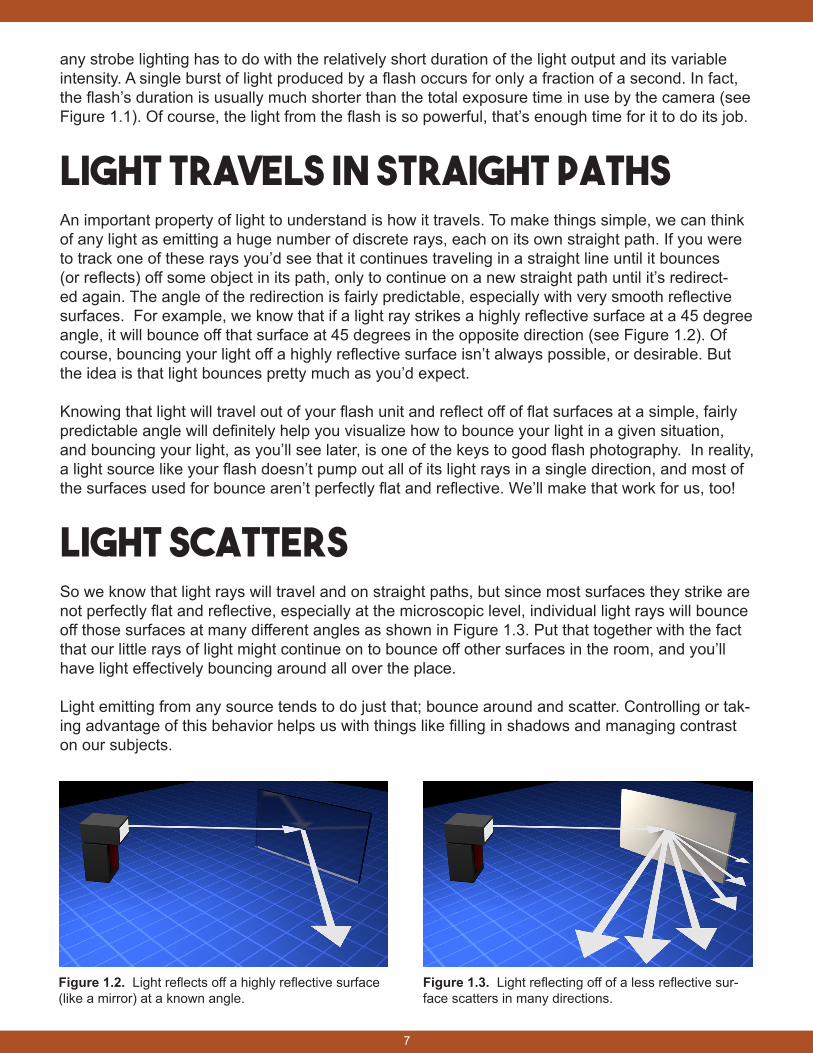
Light Travels in Straight PathsAn important property of light to understand is how it travels. To make things simple, we can think of any light as emitting a huge number of discrete rays, each on its own straight path. If you were to track one of these rays you’d see that it continues traveling in a straight line until it bounces (or reflects) off some object in its path, only to continue on a new straight path until it’s redirect-ed again. The angle of the redirection is fairly predictable, especially with very smooth reflective surfaces. For example, we know that if a light ray strikes a highly reflective surface at a 45 degree angle, it will bounce off that surface at 45 degrees in the opposite direction (see Figure 1.2). Of course, bouncing your light off a highly reflective surface isn’t always possible, or desirable. But the idea is that light bounces pretty much as you’d expect.
Knowing that light will travel out of your flash unit and reflect off of flat surfaces at a simple, fairly predictable angle will definitely help you visualize how to bounce your light in a given situation, and bouncing your light, as you’ll see later, is one of the keys to good flash photography. In reality, a light source like your flash doesn’t pump out all of its light rays in a single direction, and most of the surfaces used for bounce aren’t perfectly flat and reflective. We’ll make that work for us, too!
Light ScattersSo we know that light rays will travel and on straight paths, but since most surfaces they strike are not perfectly flat and reflective, especially at the microscopic level, individual light rays will bounce off those surfaces at many different angles as shown in Figure 1.3. Put that together with the fact that our little rays of light might continue on to bounce off other surfaces in the room, and you’ll have light effectively bouncing around all over the place.
Light emitting from any source tends to do just that; bounce around and scatter. Controlling or tak-ing advantage of this behavior helps us with things like filling in shadows and managing contrast on our subjects.
Figure 1.2. Light reflects off a highly reflective surface (like a mirror) at a known angle.
Figure 1.3. Light reflecting off of a less reflective sur-face scatters in many directions.
8
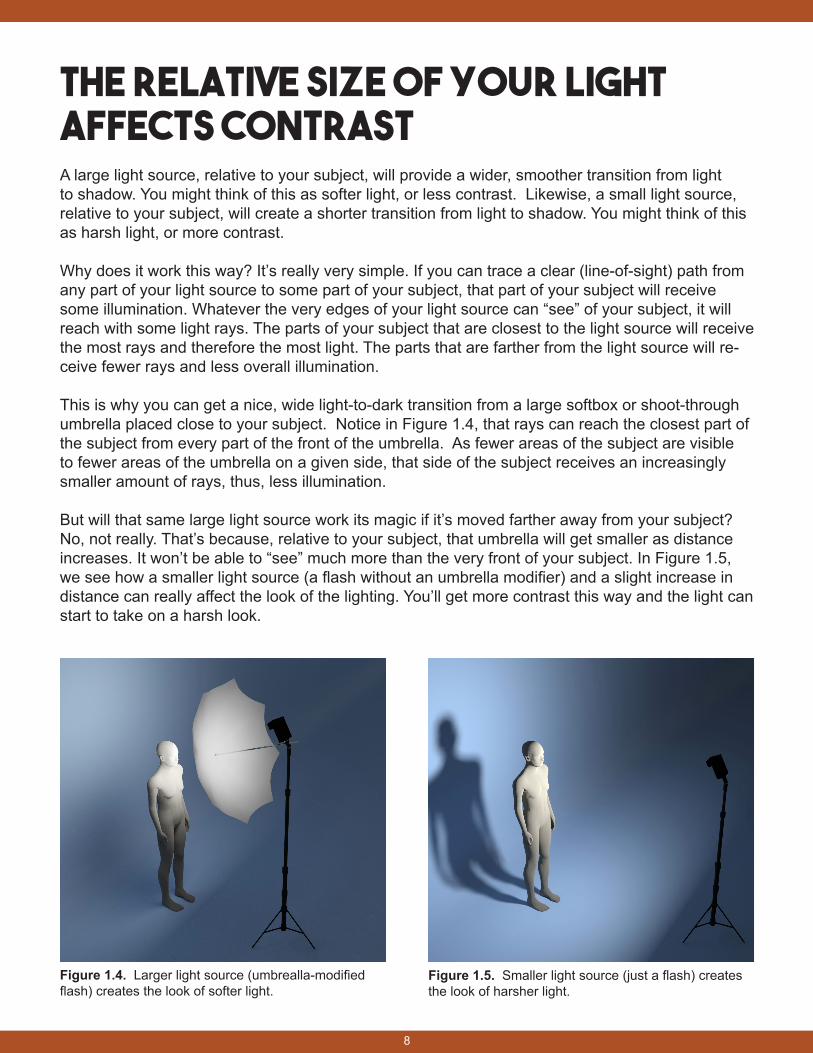
The Relative Size of Your Light Affects Contrast A large light source, relative to your subject, will provide a wider, smoother transition from light to shadow. You might think of this as softer light, or less contrast. Likewise, a small light source, relative to your subject, will create a shorter transition from light to shadow. You might think of this as harsh light, or more contrast.
Why does it work this way? It’s really very simple. If you can trace a clear (line-of-sight) path from any part of your light source to some part of your subject, that part of your subject will receive some illumination. Whatever the very edges of your light source can “see” of your subject, it will reach with some light rays. The parts of your subject that are closest to the light source will receive the most rays and therefore the most light. The parts that are farther from the light source will re-ceive fewer rays and less overall illumination.
This is why you can get a nice, wide light-to-dark transition from a large softbox or shoot-through umbrella placed close to your subject. Notice in Figure 1.4, that rays can reach the closest part of the subject from every part of the front of the umbrella. As fewer areas of the subject are visible to fewer areas of the umbrella on a given side, that side of the subject receives an increasingly smaller amount of rays, thus, less illumination.
But will that same large light source work its magic if it’s moved farther away from your subject? No, not really. That’s because, relative to your subject, that umbrella will get smaller as distance increases. It won’t be able to “see” much more than the very front of your subject. In Figure 1.5, we see how a smaller light source (a flash without an umbrella modifier) and a slight increase in distance can really affect the look of the lighting. You’ll get more contrast this way and the light can start to take on a harsh look.
Figure 1.4. Larger light source (umbrealla-modified flash) creates the look of softer light.
Figure 1.5. Smaller light source (just a flash) creates the look of harsher light.
9
Direct & Diffuse Light So, now it should be easier to understand why a flash unit pointed straight at your subject, from several feet away can create the look of harsh lighting. The flash unit, if you think about it, is a small light source, relative to your subject, even at a short distance; the face of the flash head might be no larger than a standard business card. The harsh look is there because the size of the light relative to the subject is very small.
A flash diffuser, like the STO-FEN Omni-Bounce shown below, would likely help in this situation, but it’s important to understand why. These types of modifiers are designed to scatter the light from your flash unit around the room as they simultaneously direct some of the light toward your subject. The actual light rays moving directly toward your subject from your diffuser-modified light are still just as harsh and direct. But with a diffuser there is a little extra light bouncing off the ceiling and walls, too (depending on your modifier). Light coming in from these different angles around your subject helps to fill in shadows produced by the more direct light. This fill light effect cuts down the contrast which produces a softer-looking light.
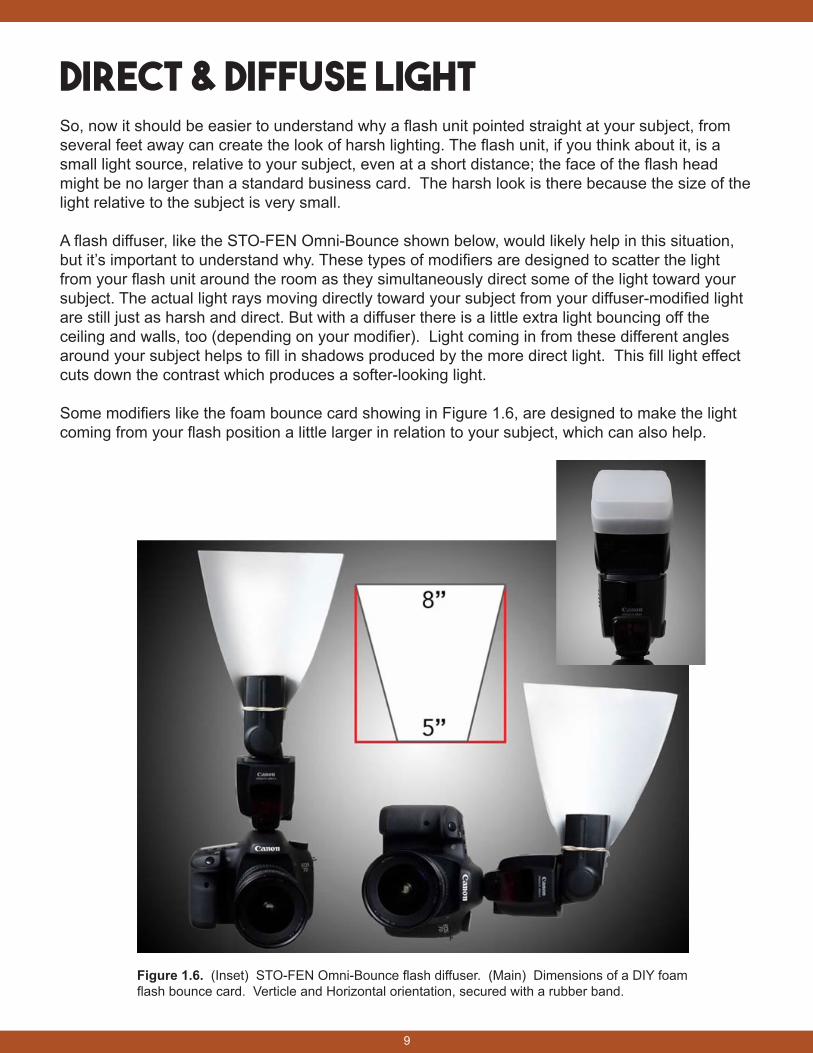
Some modifiers like the foam bounce card showing in Figure 1.6, are designed to make the light coming from your flash position a little larger in relation to your subject, which can also help.
Figure 1.6. (Inset) STO-FEN Omni-Bounce flash diffuser. (Main) Dimensions of a DIY foam flash bounce card. Verticle and Horizontal orientation, secured with a rubber band.
10
With flash units and mixed-lighting situations, you can simply keep a pack of small color correction gels with you and slap them over your flash unit(s) if necessary. Some flash units even have built-in filters for this purpose. It’s important to know that your flash unit emits a somewhat “daylight” color, so it’s on the cool side of the color temperature scale. If you’re indoors and want to record some ambient light along with flash in your pictures, but you don’t want the two light sources to appear to cast different colors, you’ll need to do some light color-balancing.
Color Temperature Orange (CTO) gels will warm the color of your flash, to match the warmer colors emitted by tungsten sources, such as standard household light bulbs. Put a CTO filter over your flash (see Figure 1.8) and shoot with your camera’s white balance set to tungsten. If you have standard fluorescent (not daylight balanced) lights to contend with, instead of tungsten, there is a green filter for that.
If you’re not interested in using color-correction filters on your flash unit, don’t sweat it. You can make quick ad-justments to color during RAW processing or individual image editing if need be. Selective (area) color correc-tion is common and really easy to do in post-processing. There are times when it makes sense to take corrective action for color-balancing while you’re shooting, but both-ering with little gel filters on my flash unit is something I’d rather not do, unless absolutely necessary.
Color of Light Light comes in different colors (see Figure 1.7). That’s a pretty simple concept. None of those col-ors are really right or wrong. So why all the fuss about color mixing and white balance? Well, we like to have some control over the color of light in our photographs in order to get the effects we want. Sometimes we’re after a warmer look, sometimes a cooler one. Sometimes we add gels to alter the colors of light for a stylized look, or simply to help match one light source’s color to anoth-er for a consistent look and to avoid an unwanted “color cast.”
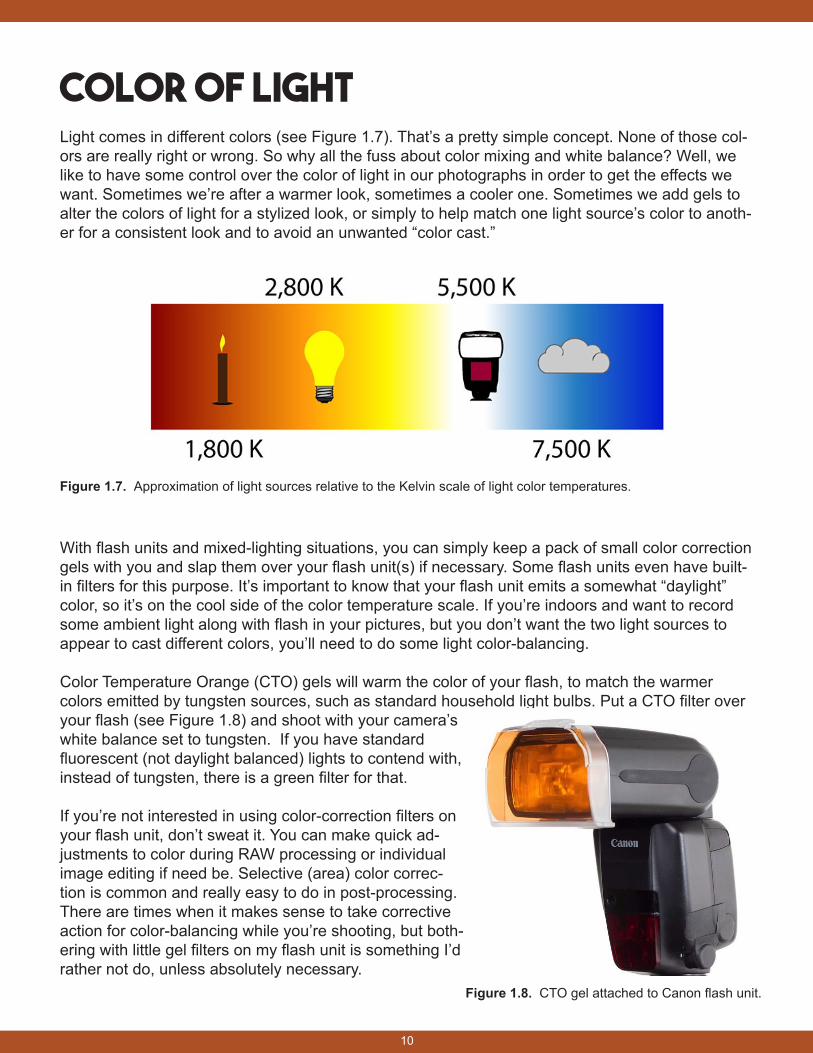
Figure 1.7. Approximation of light sources relative to the Kelvin scale of light color temperatures.
Figure 1.8. CTO gel attached to Canon flash unit.
11
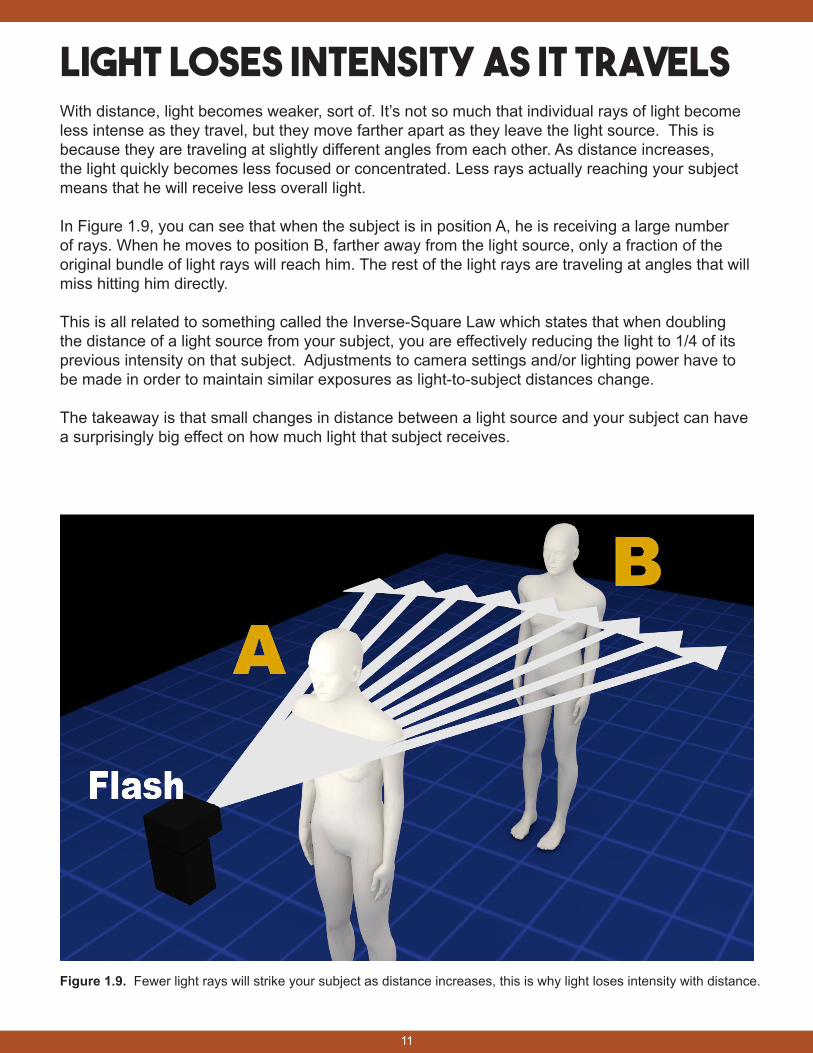
Light Loses Intensity as it TravelsWith distance, light becomes weaker, sort of. It’s not so much that individual rays of light become less intense as they travel, but they move farther apart as they leave the light source. This is because they are traveling at slightly different angles from each other. As distance increases, the light quickly becomes less focused or concentrated. Less rays actually reaching your subject means that he will receive less overall light.
In Figure 1.9, you can see that when the subject is in position A, he is receiving a large number of rays. When he moves to position B, farther away from the light source, only a fraction of the original bundle of light rays will reach him. The rest of the light rays are traveling at angles that will miss hitting him directly.
This is all related to something called the Inverse-Square Law which states that when doubling the distance of a light source from your subject, you are effectively reducing the light to 1/4 of its previous intensity on that subject. Adjustments to camera settings and/or lighting power have to be made in order to maintain similar exposures as light-to-subject distances change.
The takeaway is that small changes in distance between a light source and your subject can have a surprisingly big effect on how much light that subject receives.
Figure 1.9. Fewer light rays will strike your subject as distance increases, this is why light loses intensity with distance.
12
Camera & ExposureCHAPTER TWO
13
When you depress the shutter release button on your digital camera to take a picture, the shut-ter opens, “exposing” the image sensor to the light coming in through the lens. The quality of this exposure will greatly affect the look of your image. In many cases you’ll allow your camera to make some (or all) of the decisions regarding exposure and flash output via its program modes and metering system. This is fine, but a skilled photographer also knows how to manage their own camera and flash settings in order to really control the look of their photos.
In this chapter, I’ll provide an overview of what I call the “light pipeline;” the logical flow of light through the camera’s mechanisms of exposure control. We’ll also discuss how the use of flash factors into your camera settings and exposures. If you’re new to these concepts, I’ll warn you now; it might take some effort to internalize what’s in this chapter. But if you do it, it’s going to pay off in a huge way. You can learn this and it’s important. So, let’s get started.
How We Measure LightWe manage exposure by controlling the amount of light reaching the image sensor, taking the sensor’s ISO setting into consideration. In order to manage our exposures in a consistent way we need a standard, easy-to-follow system of measurement that ties into our camera settings. In pho-tography, the traditional unit of light/exposure measurement is the basic “stop.” As we adjust an exposure control setting (e.g., shutter speed) from one major increment to the next, we move up or down a full stop. This either doubles or halves the previous amount of light, or its effect, on the exposure. First some examples, then explanations. It will all come together as you progress.
The following are examples of one-stop differences:
• If you start with an f-stop of f/8.0, and change it to f/5.6, you will double the amount of light coming in through the aperture (f/5.6 is 1 stop wider than f/8.0).
• If you start with an ISO of 200, and change it to ISO 400, you will double the sensitivity of the sensor to light (ISO 400 is twice as sensitive to light as ISO 200).
• If you start with a shutter speed of 1/60 second, and change it to 1/30 second, you will double the amount of time light is allowed to pass through to the sensor.
Going the other direction with any control “halves” the light, time, or sensitivity:
• If you start with an f-stop of f/8.0, and change it to f/11, you will halve the amount of light coming in through the aperture (f/11 is 1 stop narrower than f/8.0).
• If you start with an ISO of 200, and change it to ISO 100, you will halve the sensitivity of the sensor to light (ISO 100 is half as sensitive to light as ISO 200).
• If you start with a shutter speed of 1/60 second, and change it to 1/125 second, you will halve the amount of time light is allowed to pass through to the sensor.
14
APERTURE, SHUTTER SPEED, AND ISOIn the following sections we’ll discuss how aperture, shutter speed, and ISO are not only useful creative tools, but also the most important components of exposure; the Big Three. They are also interdependent; any change made to one of these settings requires a reciprocal change to another to maintain the same overall exposure.
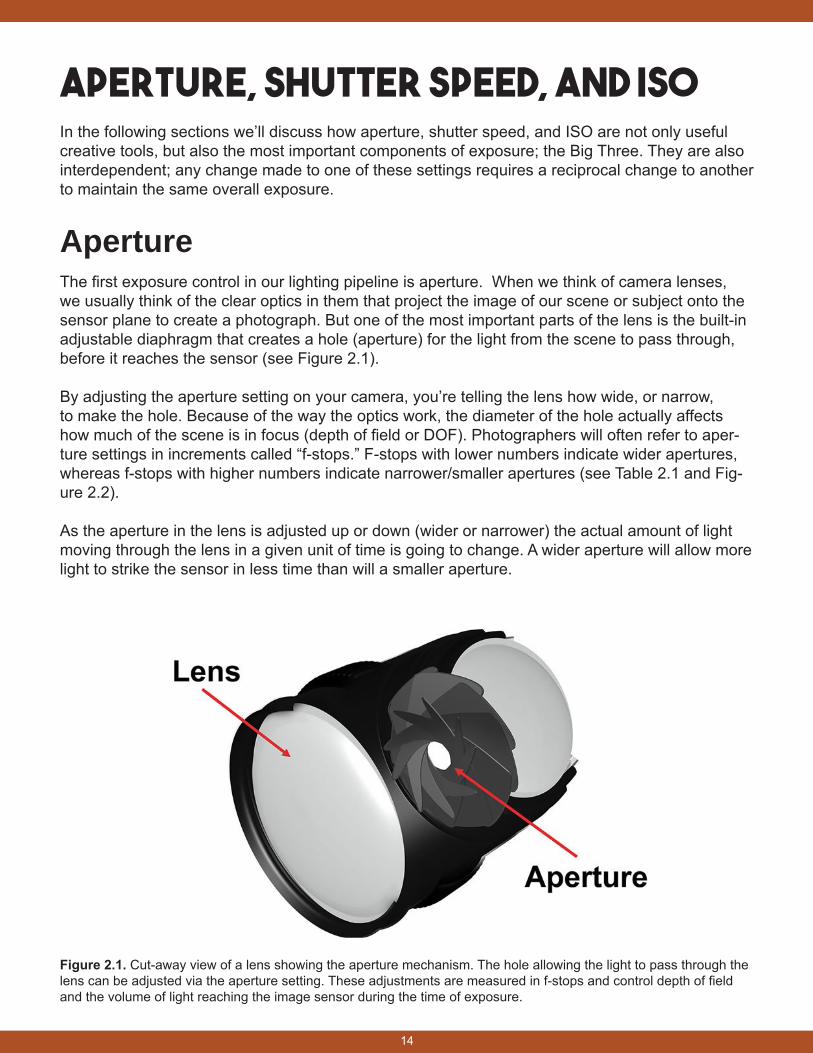
ApertureThe first exposure control in our lighting pipeline is aperture. When we think of camera lenses, we usually think of the clear optics in them that project the image of our scene or subject onto the sensor plane to create a photograph. But one of the most important parts of the lens is the built-in adjustable diaphragm that creates a hole (aperture) for the light from the scene to pass through, before it reaches the sensor (see Figure 2.1).
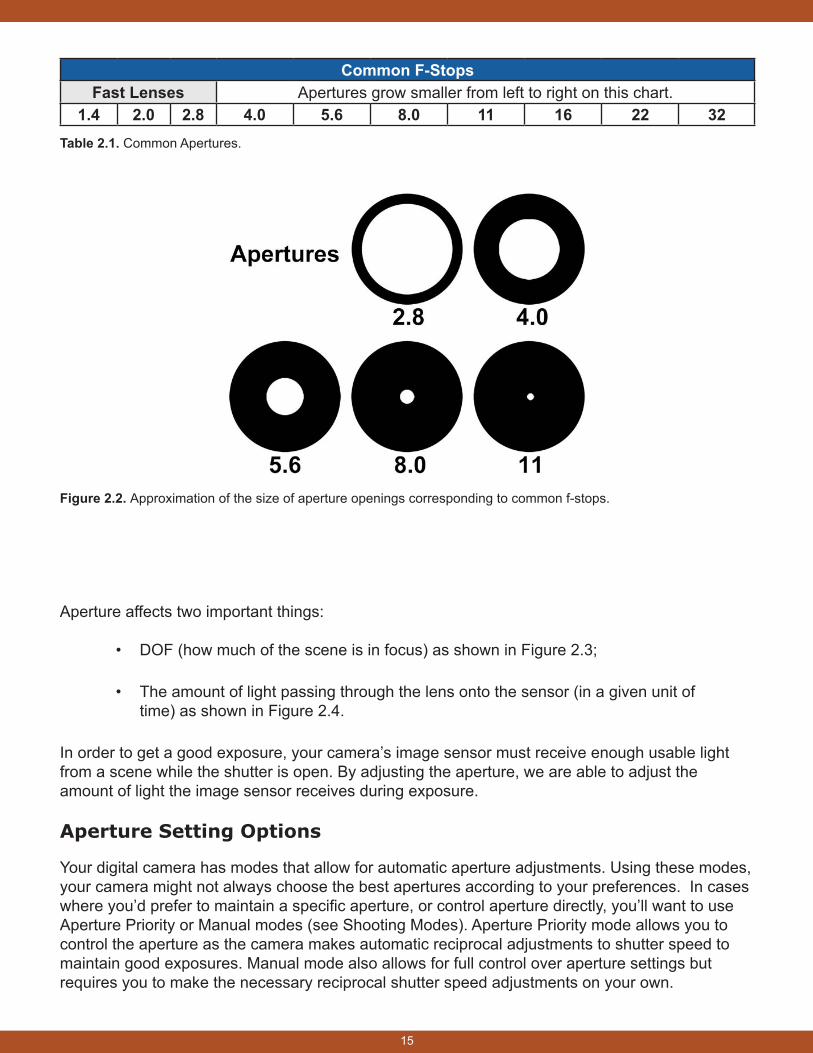
By adjusting the aperture setting on your camera, you’re telling the lens how wide, or narrow, to make the hole. Because of the way the optics work, the diameter of the hole actually affects how much of the scene is in focus (depth of field or DOF). Photographers will often refer to aper-ture settings in increments called “f-stops.” F-stops with lower numbers indicate wider apertures, whereas f-stops with higher numbers indicate narrower/smaller apertures (see Table 2.1 and Fig-ure 2.2).
As the aperture in the lens is adjusted up or down (wider or narrower) the actual amount of light moving through the lens in a given unit of time is going to change. A wider aperture will allow more light to strike the sensor in less time than will a smaller aperture.
Figure 2.1. Cut-away view of a lens showing the aperture mechanism. The hole allowing the light to pass through the lens can be adjusted via the aperture setting. These adjustments are measured in f-stops and control depth of field and the volume of light reaching the image sensor during the time of exposure.
15
Aperture affects two important things:
• DOF (how much of the scene is in focus) as shown in Figure 2.3;
• The amount of light passing through the lens onto the sensor (in a given unit oftime) as shown in Figure 2.4.
In order to get a good exposure, your camera’s image sensor must receive enough usable light from a scene while the shutter is open. By adjusting the aperture, we are able to adjust the amount of light the image sensor receives during exposure.
Aperture Setting Options
Your digital camera has modes that allow for automatic aperture adjustments. Using these modes, your camera might not always choose the best apertures according to your preferences. In cases where you’d prefer to maintain a specific aperture, or control aperture directly, you’ll want to use Aperture Priority or Manual modes (see Shooting Modes). Aperture Priority mode allows you to control the aperture as the camera makes automatic reciprocal adjustments to shutter speed to maintain good exposures. Manual mode also allows for full control over aperture settings but requires you to make the necessary reciprocal shutter speed adjustments on your own.
Figure 2.2. Approximation of the size of aperture openings corresponding to common f-stops.
Table 2.1. Common Apertures.
Common F-StopsFast Lenses Apertures grow smaller from left to right on this chart.
1.4 2.0 2.8 4.0 5.6 8.0 11 16 22 32

16
Figure 2.3. With automatic changes to ISO and shutter speed to maintain proper exposure, this sequence shows how DOF is affected by aperture adjustments (we’ve used f/1.8 but skipped f/8.0 and f/11 to maintain a six-shot format for this sequence). Notice the background detail at different f-stops.
Figure 2.4. With ISO and shutter speed remaining constant, this sequence shows how exposure is affected by aper-ture adjustments.

17
Shutter SpeedThe second exposure control in our light pipeline is shutter speed. As you’ve already seen, your camera’s image sensor must be exposed to light in a controlled way in order to properly record a picture. The mechanism that controls the duration of the exposure is called the shutter. The shut-ter’s job is to block the light coming in through your lens until you press the shutter release button to take a photo. When you press that button, the shutter slides open, exposing the image sensor to any constant light, and/or flash, coming in through the lens, then closes to block the light from the sensor again, ending the exposure. Your camera is capable of a wide range of shutter speeds (see Table 2.2).
Common Shutter SpeedsLeft to right: Slower (longer duration) to faster (shorter duration).
1/8 1/15 1/30 1/60 1/125 1/250 1/500 1/1000
Table 2.2. This is a range of common full-stop shutter speeds. These are fractions of a second, but shutter speeds can be several seconds or minutes long and as fast as 1/8000 second on some DSLRs.
Usually, the shutter remains open for only a fraction of a second, but the duration can be longer. We refer to the length of time the shutter remains open as the shutter speed. Shutter speed is either controlled by the photographer directly, or by the camera in some automatic modes.
Shutter Speed and Blur
Your camera’s image sensor records any light projected onto it when you take a photo and the result is saved as a single still image. If there is no movement during exposure, the sensor only records stillness. However, if there is movement during exposure (either in the scene or from camera movement) it will may be recorded as overlapping areas of light in the frame. This produc-es blur, ghosting, light streaks, and other effects. Sometimes these effects are used creatively, as shown in Figure 2.5.
Figure 2.5. A fast shutter speed and slow shutter speed give different effects to this waterfall photo. By using a slow shutter speed creatively, we’re able to get the soft, flowing water effect on the right.
18
To help prevent blur due to camera movement, a tripod or monopod can be used. Image Stabiliza-tion (IS), Vibration Reduction (VR) and similar technologies are lens and camera features that can also assist in minimizing this type of blurring. While these will help minimize the effects of camera movement, they will not reduce blurring caused by movement in your scene — but faster shutter speeds will.
The faster the shutter speed, the shorter the duration of exposure; the sensor will have less op-portunity to “see” anything move or change in the scene. Many cameras are capable of shutter speeds as fast as 1/8000 of a second. At high speeds, you can capture images with virtually no motion blur regardless of subject or camera movement.
Slower shutter speeds are useful, too. In low-light conditions slower shutter speeds offer the ability to capture the constant/ambient light in a scene when higher ISO and wider apertures are not practical. In other words, in dim light a slower shutter speed can allow time for the image sensor to collect enough constant light for proper exposure of that light. Again, the trade-off is that a slower shutter speed increases the potential for blur due to movement of the camera and/or the subject.
Shutter Speed and Exposure
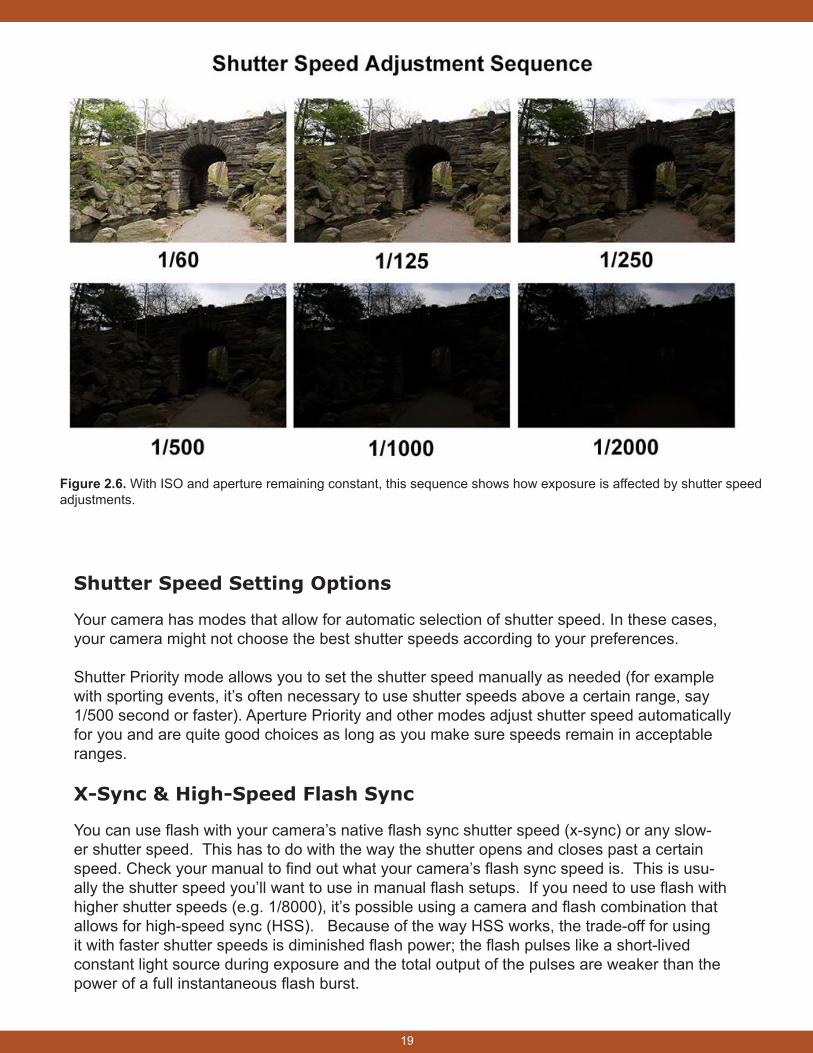
As the shutter speed is adjusted up or down (shorter or longer durations of exposure) the actu-al amount of constant/ambient light reaching the image sensor is going to increase or decrease (given the same aperture). Slower shutter speeds allow more constant light to strike the sensor because the exposure is longer, while faster shutter speeds allow less constant light to strike the sensor (see Figure 2.6).
Shutter speed affects two important things:
• The amount of ambient/constant light motion blur visible in an image;
• The amount of time constant light is able to build up onto the sensor.
A good exposure requires that the camera’s image sensor receive enough usable light from a scene in a given amount of time. Your shutter speed is going to control the duration of exposure, and your aperture setting is going to control how much light the sensor is exposed to in that time. By adjusting the shutter speed, we are able to control the amount of time constant light is allowed to build up on the image sensor.
When flash photography is introduced into the mix, shutter speed has much less to do with the areas of the image affected by flash. The duration of the flash is only a fraction of the time of the overall exposure; so a longer exposure (slower shutter speed) does not receive any more light from the flash than a much shorter one.
Put this all together and what it means is when you adjust your shutter speed, the exposure of the subject receiving flash illumination stays about the same but the amount of constant light being recorded changes. For practical purposes (other than flash sync), think of it this way: shutter speed doesn’t affect flash exposure.
19
Shutter Speed Setting Options
Your camera has modes that allow for automatic selection of shutter speed. In these cases, your camera might not choose the best shutter speeds according to your preferences.
Shutter Priority mode allows you to set the shutter speed manually as needed (for example with sporting events, it’s often necessary to use shutter speeds above a certain range, say 1/500 second or faster). Aperture Priority and other modes adjust shutter speed automatically for you and are quite good choices as long as you make sure speeds remain in acceptable ranges.
X-Sync & High-Speed Flash Sync
You can use flash with your camera’s native flash sync shutter speed (x-sync) or any slow-er shutter speed. This has to do with the way the shutter opens and closes past a certain speed. Check your manual to find out what your camera’s flash sync speed is. This is usu-ally the shutter speed you’ll want to use in manual flash setups. If you need to use flash with higher shutter speeds (e.g. 1/8000), it’s possible using a camera and flash combination that allows for high-speed sync (HSS). Because of the way HSS works, the trade-off for using it with faster shutter speeds is diminished flash power; the flash pulses like a short-lived constant light source during exposure and the total output of the pulses are weaker than the power of a full instantaneous flash burst.
Figure 2.6. With ISO and aperture remaining constant, this sequence shows how exposure is affected by shutter speed adjustments.
20
ISOThe final stop in our light pipeline through the camera is our sensor and its ISO setting. ISO is the camera setting we use to control the relative “sensitivity” of our camera’s sensor to light. When you take a picture, the lighting conditions of the scene, as well as shutter speed and aperture settings determine how much light is striking the image sensor during exposure. ISO determines if that amount of light is enough to record a properly exposed image. If enough light strikes the sen-sor according to the ISO setting, adequate data is recorded for producing an acceptable image.
ISO and Exposure
The sensor has a maximum amount of light that it is capable of recording (per each pixel). If that maximum is reached or exceeded, the data can only be interpreted as being the brightest possi-ble tone. In our images, this is often what specular highlights or pure, blown-out white areas, are made of.
Conversely, it’s possible for the sensor not to receive enough light to record adequate data for all or part of a picture. It might be that the scene is too dim, or that your shutter speed and aperture settings are cutting down on the amount of light necessary to record the desired detail during exposure. Whatever the reason, less light striking the sensor can mean a darker image, or lack of detail in darker parts of the image.
If we had no way to adjust the sensitivity of our camera’s sensor, we’d always have to adjust shutter speed and/or aperture to suit such a rigid constraint. This might result in slower than useful shutter speeds in low light or smaller than desired apertures in brighter light.
By having a way to adjust how the sensor reacts to the amount of light reaching it, we are given more control over our aperture and shutter speed settings. The camera’s ISO setting is our conve-nient way to tell the sensor to act as if it is more, or less, sensitive to the light during an exposure. A normal or low sensitivity response (normal or low ISO) allows the sensor to report light informa-tion under normal exposure conditions. Whereas a more sensitive response (higher ISO) might allow the sensor to report the same amount of light under lower lighting conditions.
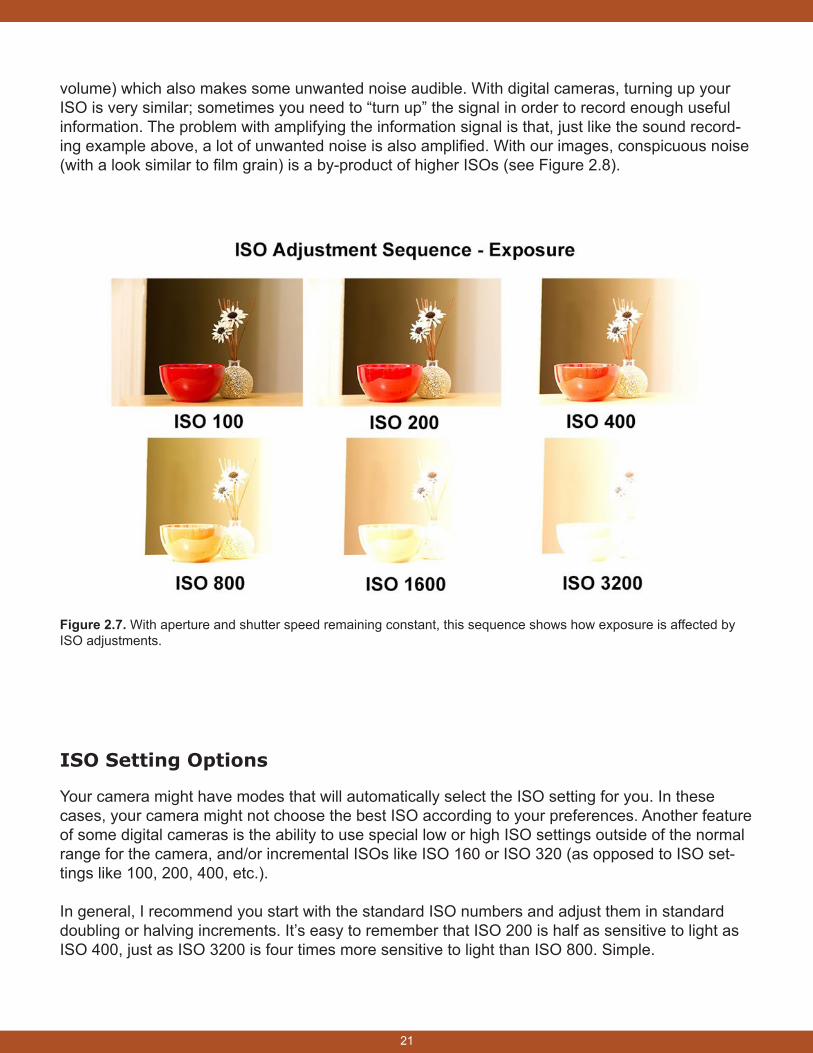
Just as with aperture and shutter speed, adjustments to ISO can affect exposure and will cause an image to record as darker or brighter if aperture and/or shutter speed are not adjusted as well (see Figure 2.7).
ISO and Image Quality
How exactly does adjusting the ISO setting make the sensor more “sensitive” to light? It might be helpful to understand that in order for our cameras to deliver enough information from our sensors, sometimes that information needs to be “turned up” just like the volume on a sound recording when the recording is too low.
For example, say that you made a recording of a distant or very low sound. The signal is stored on the recording media, but in order to clearly make out the sound, you must boost the gain (or
21
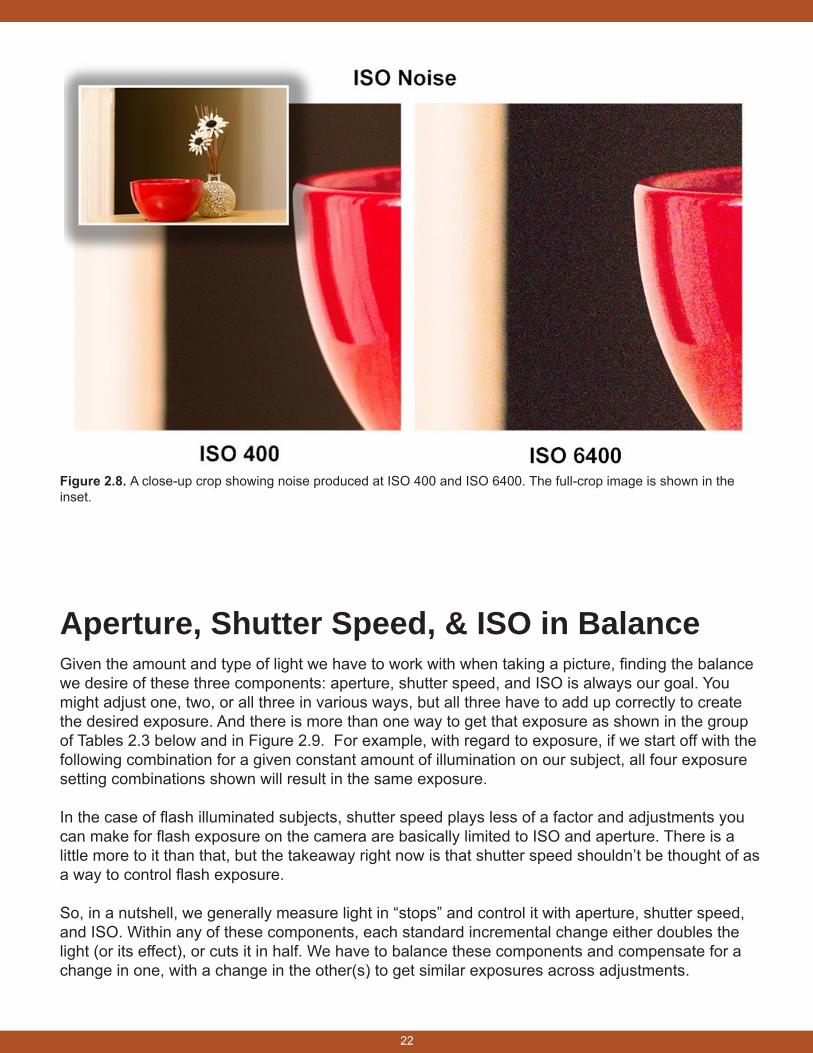
volume) which also makes some unwanted noise audible. With digital cameras, turning up your ISO is very similar; sometimes you need to “turn up” the signal in order to record enough useful information. The problem with amplifying the information signal is that, just like the sound record-ing example above, a lot of unwanted noise is also amplified. With our images, conspicuous noise (with a look similar to film grain) is a by-product of higher ISOs (see Figure 2.8).
Figure 2.7. With aperture and shutter speed remaining constant, this sequence shows how exposure is affected by ISO adjustments.
ISO Setting Options
Your camera might have modes that will automatically select the ISO setting for you. In these cases, your camera might not choose the best ISO according to your preferences. Another feature of some digital cameras is the ability to use special low or high ISO settings outside of the normal range for the camera, and/or incremental ISOs like ISO 160 or ISO 320 (as opposed to ISO set-tings like 100, 200, 400, etc.).
In general, I recommend you start with the standard ISO numbers and adjust them in standard doubling or halving increments. It’s easy to remember that ISO 200 is half as sensitive to light as ISO 400, just as ISO 3200 is four times more sensitive to light than ISO 800. Simple.
22
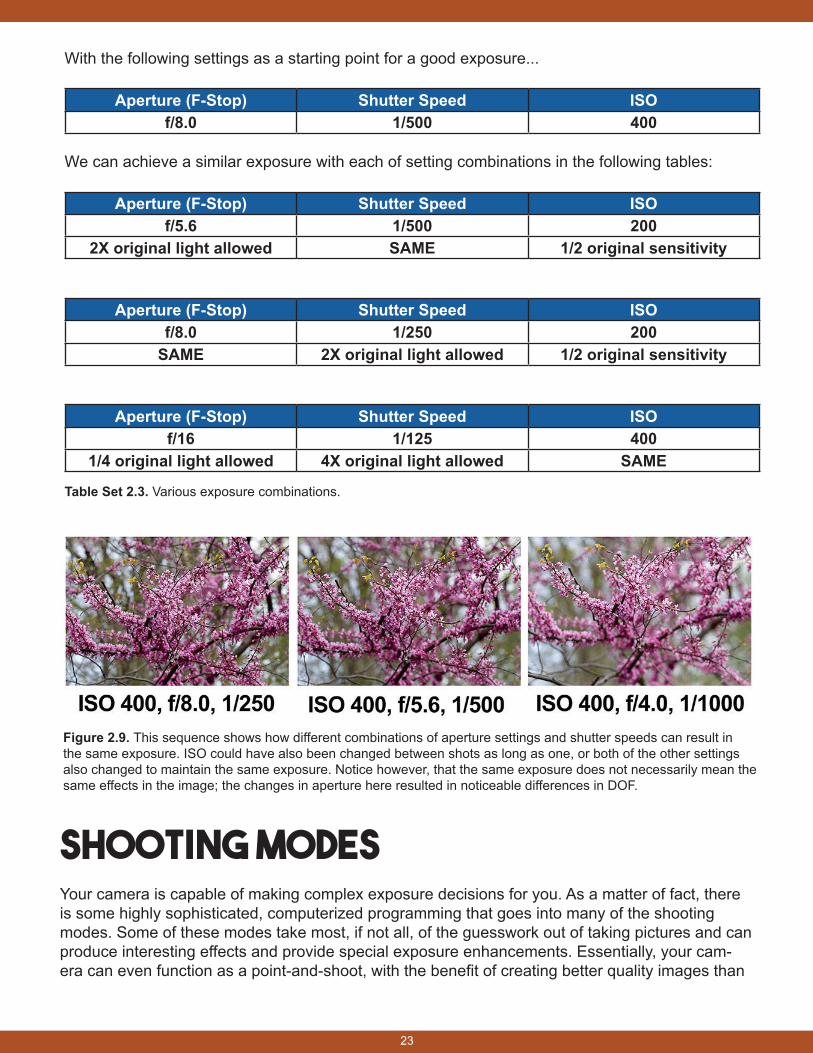
Aperture, Shutter Speed, & ISO in BalanceGiven the amount and type of light we have to work with when taking a picture, finding the balance we desire of these three components: aperture, shutter speed, and ISO is always our goal. You might adjust one, two, or all three in various ways, but all three have to add up correctly to create the desired exposure. And there is more than one way to get that exposure as shown in the group of Tables 2.3 below and in Figure 2.9. For example, with regard to exposure, if we start off with the following combination for a given constant amount of illumination on our subject, all four exposure setting combinations shown will result in the same exposure.
In the case of flash illuminated subjects, shutter speed plays less of a factor and adjustments you can make for flash exposure on the camera are basically limited to ISO and aperture. There is a little more to it than that, but the takeaway right now is that shutter speed shouldn’t be thought of as a way to control flash exposure.
So, in a nutshell, we generally measure light in “stops” and control it with aperture, shutter speed, and ISO. Within any of these components, each standard incremental change either doubles the light (or its effect), or cuts it in half. We have to balance these components and compensate for a change in one, with a change in the other(s) to get similar exposures across adjustments.
Figure 2.8. A close-up crop showing noise produced at ISO 400 and ISO 6400. The full-crop image is shown in the inset.
23
Table Set 2.3. Various exposure combinations.
Figure 2.9. This sequence shows how different combinations of aperture settings and shutter speeds can result in the same exposure. ISO could have also been changed between shots as long as one, or both of the other settings also changed to maintain the same exposure. Notice however, that the same exposure does not necessarily mean the same effects in the image; the changes in aperture here resulted in noticeable differences in DOF.
With the following settings as a starting point for a good exposure...
Aperture (F-Stop) Shutter Speed ISOf/8.0 1/500 400
We can achieve a similar exposure with each of setting combinations in the following tables:
Aperture (F-Stop) Shutter Speed ISOf/5.6 1/500 200
2X original light allowed SAME 1/2 original sensitivity
Aperture (F-Stop) Shutter Speed ISOf/8.0 1/250 200
SAME 2X original light allowed 1/2 original sensitivity
Aperture (F-Stop) Shutter Speed ISOf/16 1/125 400
1/4 original light allowed 4X original light allowed SAME
Shooting ModesYour camera is capable of making complex exposure decisions for you. As a matter of fact, there is some highly sophisticated, computerized programming that goes into many of the shooting modes. Some of these modes take most, if not all, of the guesswork out of taking pictures and can produce interesting effects and provide special exposure enhancements. Essentially, your cam-era can even function as a point-and-shoot, with the benefit of creating better quality images than
24
you’d get with a smaller, compact camera. As you get more confident with your camera, you’ll want to graduate to more sophisticated shooting modes.
Just to give you some context, shooting modes are what you use to tell your camera how you’re planning to use it. There’s no way we can cover all of the specific modes and terminology used by all of the different camera manufacturers, across all the models of cameras out there. But, generally speaking, a shooting mode sets up the way your camera will function in terms of handling exposure settings.
Fully Automatic ModeMore than likely, your camera has an all-encompassing automatic mode. On Canon and Nikon cam-eras this full-auto mode is denoted by a green icon on the mode dial. On your camera it might be under a different icon, or simply under the word AUTO. You can think of full-auto as sort of a point-and-shoot mode. Few camera settings are controlled by you, and the actual decisions about expo-sure are made entirely by the camera. ISO, aperture, and shutter speed are determined based on what the camera’s programming thinks is best for the scene. While this might seem like a great way to shoot, it provides you with very few creative choices and not always the intended results.
To use this mode, just set your camera to AUTO or the green icon, and you can start shooting just as if you were using a point-and-shoot. The camera will make all of the important exposure deci-sions for you including whether or not to trigger the internal or pop-up flash if your camera has one.
Again, just as with all of the automatic and easy shooting modes, you’ll have limited creative control over your exposure settings and the camera will not always make the best decisions on your behalf. That’s definitely a point you should be aware of. If you want more control, you’ll have to abandon these modes and move on to the ones that put more control into YOUR hands. We’ll get into those modes as we progress.
Basic/Scene ModesNow, besides full-auto, some cameras also have modes designed for very specific shooting scenar-ios like “Portrait” or “Landscape” shots, night shooting, action and other situations. Depending on the camera manufacturer, these might be called BASIC or SCENE shooting modes on your camera. These are more than likely found on consumer and some prosumer models than on high-end cam-eras. As you might expect, if you want the camera to attempt to make good exposure decisions for you, you’d select the BASIC or SCENE mode that matches up to your shooting scenario. I’ll stress this one last time: the camera’s not always going to make the best choices, and your creative op-tions might be very limited, but these modes could make shooting a little easier for beginners.
Program or Program Shift (P) ModeProgram mode is another easy-to-use mode that gives the camera initial control over the aperture and shutter speed settings. The camera controls the balance between the aperture and shutter speed, but it allows you to shift the exposure mix in case you’d like to see one of the other settings in a different place.
25
For example, let’s say your camera is showing an aperture at f/5.6 and shutter speed at 1/60 sec. If you’d like to open up your aperture to f/4, you can turn a dial until you see that adjustment as your camera automatically makes the reciprocal adjustment to the shutter speed (in this case, to 1/125 sec.). This is usually done via one of the adjustment “wheels” on the camera. This type of exposure control shifting is a handy way to exert a little more control over the exposure settings than you’d have with the full-auto mode.
Besides allowing you to shift the exposure settings up or down, P mode also allows you to set the ISO and dial-in Exposure Compensation, which we’ll cover later.
Shutter Priority (Tv or S) ModeControlling things like the aperture setting and shutter speed will become very important to you as seek to gain more control over the look of your images. When you want to deliberately control shut-ter speed, or the duration of your exposure, Shutter Priority mode, often denoted with the symbols “Tv” (time value) or “S”, allows you to select and adjust the shutter speed as you shoot, while the camera automatically adjusts the aperture to compensate for any change in exposure. If you’re taking pictures at a sporting event for example, you might want to capture the images at shutter speeds no slower than 1/500 sec in order to freeze the action. As background and other lighting conditions change, your aperture will be adjusted automatically.
Of course, the camera’s ability to maintain good exposures through automatic aperture adjustments is limited by the aperture range of the lens used. In other words, if the camera would otherwise adjust the aperture to f/2.8 to compensate for a change you’ve made to the shutter speed, it can’t if the lens’ widest built-in aperture is f/4. In those cases, a simple manual adjustment to your ISO will put you back into a good exposure range.
Aperture Priority (Av or A) ModeThis can be thought of as the flip side to Shutter Priority mode and can be found on your shooting mode dial under “Av” or “A.” You’ll use Aperture Priority when you want to have direct control of your aperture setting while allowing your camera to automatically adjust the shutter speed for you to maintain proper exposure. Although using this setting means you’re less concerned about the exact shutter speeds being used, you’ll want to keep an eye on the shutter speeds your camera is selecting for you. Stopping your aperture down too far can lead to slower shutter speeds and blurry pictures. Aperture Priority is the mode I recommend for most outdoor photography.
Manual (M) ModeManual mode (“M” on the shooting dial) gives you total control over all camera exposure settings: aperture, shutter speed, and ISO. This means you, and not the camera, are responsible for getting a proper exposure. The camera’s metering system will still provide you with feedback to help you judge the potential for over/under exposure, but it won’t take over to correct your exposure settings. Where lighting conditions are inconsistent, you’ll have to make frequent adjustments. Since you can freely adjust aperture and shutter speed independently of each other, you’ll find that you have a great amount of creative freedom with manual mode. But since you’re doing all the thinking for the
26
camera (as far as exposure goes), you might be spending more time dealing with the settings than you’d like.
Manual mode is very useful in situations where you can take your time composing and making creative adjustments to exposure. It’s also great for portrait setups using flash/strobe because in those situations the lighting conditions tend to remain consistent throughout a series of shots; few if any exposure adjustments have to be made unless there are changes made to the lighting setup and/or the ambient lighting conditions.
Note that Manual camera mode and Manual flash are not the same thing; camera and flash modes can be used independently of each other. For example, your camera can manage TTL flash metering for automatic flash output control while you operate that camera in Manual mode. Probably less effectively, you can use your flash in Manual mode with your camera set to one of the automatic modes.
Bulb (B) Mode
Another version of Manual mode is Bulb mode. Here, you can control all aspects of the camera as with manual, but instead of pre-selecting a shutter speed, the shutter simply remains open for as long as you hold the shutter release button down (or maintain the open shutter with a remote shutter release). This is a very inaccurate way to manage the duration of the exposure, but it can be useful under the right conditions. Bulb is best used with a tripod and some type of remote/ca-ble release to prevent blur from camera movement. It’s often used to photograph fireworks, the night sky, and other low-light scenes.
Easy Adjustments With Two Simple Exposure ControlsMost professional and prosumer cameras offer very two handy camera controls (check your camera’s manual for specific instructions on how to locate and use them): Exposure Compensa-tion (EC), and Flash Exposure Compensation (FEC). These controls effectively give you on-the-fly override power of the camera’s exposure and flash output decisions. They are like throttles for light control. You will use these two controls to dial-in light just the way you want it to look.
Flash Exposure CompensationWhen using automatic flash control (e.g., Canon’s E-TTL II or Nikon’s i-TTL) which we’ll refer to as simply, TTL throughout this book, it’s often advantageous to “ride” your camera’s Flash Ex-posure Compensation (FEC) control. Which is to say, adjust the setting to increase or decrease the amount of light your flash pumps out, overriding your camera’s flash metering decisions. For your camera this might simply be a matter of quickly pressing a button and rotating a control wheel left or right.
For example, if your subject is wearing a light-colored outfit, your camera might determine the scene requires less flash output than it actually needs, underexposing the scene. This is an easy
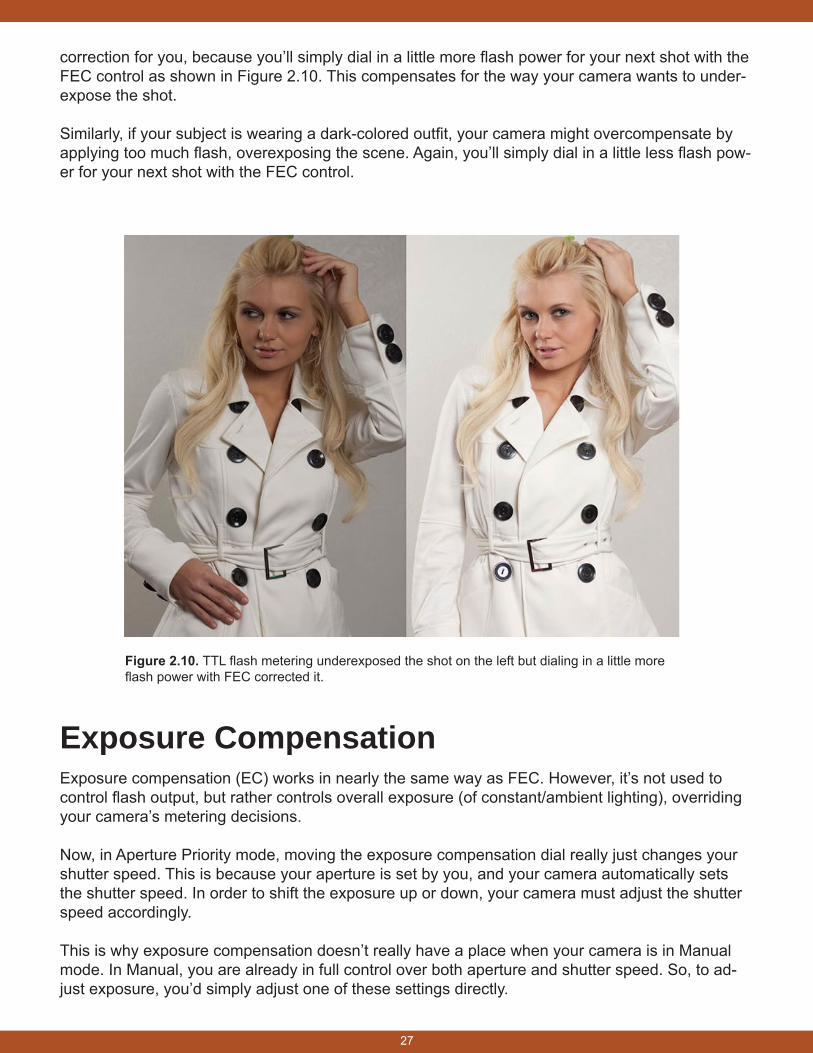
27
correction for you, because you’ll simply dial in a little more flash power for your next shot with the FEC control as shown in Figure 2.10. This compensates for the way your camera wants to under-expose the shot.
Similarly, if your subject is wearing a dark-colored outfit, your camera might overcompensate by applying too much flash, overexposing the scene. Again, you’ll simply dial in a little less flash pow-er for your next shot with the FEC control.
Figure 2.10. TTL flash metering underexposed the shot on the left but dialing in a little more flash power with FEC corrected it.
Exposure CompensationExposure compensation (EC) works in nearly the same way as FEC. However, it’s not used to control flash output, but rather controls overall exposure (of constant/ambient lighting), overriding your camera’s metering decisions.
Now, in Aperture Priority mode, moving the exposure compensation dial really just changes your shutter speed. This is because your aperture is set by you, and your camera automatically sets the shutter speed. In order to shift the exposure up or down, your camera must adjust the shutter speed accordingly.
This is why exposure compensation doesn’t really have a place when your camera is in Manual mode. In Manual, you are already in full control over both aperture and shutter speed. So, to ad-just exposure, you’d simply adjust one of these settings directly.
28
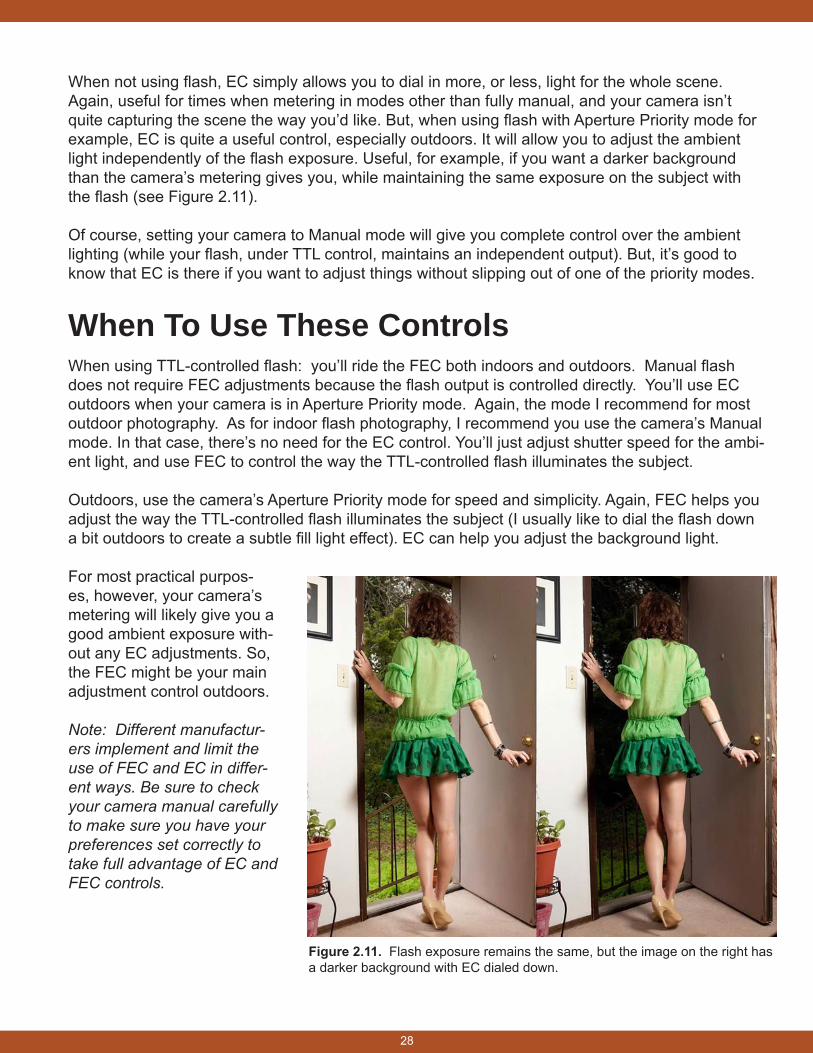
When not using flash, EC simply allows you to dial in more, or less, light for the whole scene. Again, useful for times when metering in modes other than fully manual, and your camera isn’t quite capturing the scene the way you’d like. But, when using flash with Aperture Priority mode for example, EC is quite a useful control, especially outdoors. It will allow you to adjust the ambient light independently of the flash exposure. Useful, for example, if you want a darker background than the camera’s metering gives you, while maintaining the same exposure on the subject with the flash (see Figure 2.11).
Of course, setting your camera to Manual mode will give you complete control over the ambient lighting (while your flash, under TTL control, maintains an independent output). But, it’s good to know that EC is there if you want to adjust things without slipping out of one of the priority modes.
When To Use These ControlsWhen using TTL-controlled flash: you’ll ride the FEC both indoors and outdoors. Manual flash does not require FEC adjustments because the flash output is controlled directly. You’ll use EC outdoors when your camera is in Aperture Priority mode. Again, the mode I recommend for most outdoor photography. As for indoor flash photography, I recommend you use the camera’s Manual mode. In that case, there’s no need for the EC control. You’ll just adjust shutter speed for the ambi-ent light, and use FEC to control the way the TTL-controlled flash illuminates the subject.
Outdoors, use the camera’s Aperture Priority mode for speed and simplicity. Again, FEC helps you adjust the way the TTL-controlled flash illuminates the subject (I usually like to dial the flash down a bit outdoors to create a subtle fill light effect). EC can help you adjust the background light.
For most practical purpos-es, however, your camera’s metering will likely give you a good ambient exposure with-out any EC adjustments. So, the FEC might be your main adjustment control outdoors.
Note: Different manufactur-ers implement and limit the use of FEC and EC in differ-ent ways. Be sure to check your camera manual carefully to make sure you have your preferences set correctly to take full advantage of EC and FEC controls.
Figure 2.11. Flash exposure remains the same, but the image on the right has a darker background with EC dialed down.
29
StandardizationWe’ve covered the lighting theory and camera controls that are most important for good flash pho-tography. Later, you’ll see examples of common lighting scenarios that should cover most of what you’ll want to do when starting out. But here is where I’ll present a working methodology that you can apply to just about everything when working with flash. I strongly believe this approach can make you more confident and capable.
By standardizing your basic camera and flash settings, and the way you work with your light, you will find a simplicity and consistency that will allow you to become a master of your preferred techniques. Working under a standard method doesn’t have to be a constraint. As a matter of fact, it can be more freeing to your creativity than having too many choices and technical concerns to deal with. Giving yourself fewer options to worry about will keep your focus on the subject of your picture, and that’s always a good thing. You’ll naturally start to think in ways that bend your situa-tion to your method instead of the other way around.
When time permits, stretch the self-imposed limits of standardization to further your technique. Do-ing this at a reasonable pace will allow you to expand your skill set over time. But, it’s still going to be your core techniques and standardized settings that will provide the consistent magic you can depend on. No more walking into a situation without knowing where to start. And when it counts the most standardization will save you.
How Standardization Works At its essence, standardization, as it pertains to our discussion, is all about simplicity and consis-tency. It’s about empowering yourself by eliminating the things that create uncertainty and waste valuable time when you need to step up and get the well-crafted shots that are expected.
Have you ever been amazed by a friend’s ability (or even your own) to get great pictures with a simple camera phone? Have you been surprised to discover that one of the photographers you admire uses only one lens, or one type of film, or a single light setup that rarely varies? All of these are examples of success via simplicity and consistency. With fewer options you are forced to simply work with what you have. And human nature drives the incremental improvement over a process that uses simple, relatively unchanging tools. Mastery is an eventual outcome.
To put it another way, it’s easier to become really great at your photography when you keep it sim-ple. While I’m not proposing you do all of your work with a iPhone from now on, I am suggesting you commit to a methodology that involves creating just TWO default starting points that you will use for virtually ALL of the situations you’ll encounter.
The following are examples of how you might do this. You’ll see that the main idea is to bring the number of settings you have to think about to a minimum. Where camera-mounted flash is concerned, I want you to virtually reduce your camera and flash to one simple tool. You’ll have only one or two controls to adjust, while still giving you the option of full creative control of your exposures. This works, so let’s put it to use.
30
Default Flash SettingsYour flash unit is a powerful and dependable source of light. Use it however it will work, on or off the hot shoe of your camera. The only thing that matters is that you get the results you want. If you have little time, little space, or just don’t feel like carrying around extra gear, keep your flash unit attached to your camera and make some great pictures that way.
We’ll assume, for the purposes of the following examples, that your flash will remain on your camera and that you’ll have your camera set to an overall metering mode using TTL for automatic flash exposure. So, let’s run through the gear and settings for both indoor and outdoor flash pho-tography:
IndoorsHere are my suggestions for getting great results when using flash indoors.
Always Start with these Settings:
• Camera in Manual mode
• Use the highest ISO possible that will result in acceptable noise for your purposes. Example: ISO 800
• Use the fastest normal sync speed (x-sync) for your flash. Usually 1/200 or 1/250 depending on your camera.
• Use the widest aperture that your lens will allow while still delivering acceptable sharpness. Example: f/4.0.
Adjustment Controls To Use
Flash Exposure Compensation (FEC) and shutter speed should be the main controls for adjust-ments for indoor camera-mounted, TTL-enabled flash.
• FEC. If you need more, or less, power from your flash.
• Shutter Speed. If you want more, or less, ambient light to show in a scene.
Putting It To Use
When using flash indoors, use your camera’s Manual mode. You probably do not want to use Aperture Priority mode because if you do, the camera will dictate shutter speed based on its assessment of the ambient light, causing long shutter speeds resulting in blurring and sometimes unwanted ambient light effects.

31
In practice, you’ll be all set with your indoor default settings when you walk into a room, ready to go. If you take a couple of shots and notice you’d like to have a little more warmth or ambient light appear in the photos, just slip your shutter speed dial down to 1/60. Want more? Try 1/40 or 1/15. Just ride your shutter speed dial to get the ambient lighting to look the way you want it to. Just remember that as the speeds get slower, the potential for noticeable blur increases. Depending on the look you’re going for, some creative blur can really work for you, too! But, it’s all up to you and that one little shutter speed dial. There’s a lot of power there.
If you need to make any adjustments to the amount of light you’re getting from the flash, that’s when you use FEC. You won’t need it often, but if your subject is wearing light colors, you might have to dial the FEC up a bit, otherwise your camera might underexpose the shot. If your sub-ject is wearing dark colors, you might have to dial down the FEC to compensate if your camera is overexposing the shot. Your camera controls the flash output based on what it thinks the best exposure is, so sometimes you have to force it to accept more or less light from your flash to get things to look right.
That’s it for indoor shooting. Shutter speed and sometimes FEC.
OutdoorsIndoors, your flash is usually the predominant light where your subject is concerned. But, when shooting outdoors during daylight hours, your flash usually serves as a fill light. Here are my sug-gestions for how to approach outdoor flash photography.
Always Start with these Settings:
• Camera in Aperture Priority mode.
• Use a lower ISO setting. Example: ISO 100.
• Use normal sync speed for your flash if possible. Example: 1/200 or 1/250 depending on your camera. But have HSS ready.
• Use the widest aperture that your lens will provide while still delivering acceptable sharpness and being suitable for daylight. Example: f/5.6 or f/8.0.
Adjustment Controls To Use
Flash Exposure Compensation (FEC, with TTL-enabled flash) and Exposure Compensation (EC) should be the main controls for adjustments. Adjust aperture for changes to DOF.
• FEC. If you need more, or less, power from your flash.
• EC. If you want more, or less, ambient/background light to show in a scene.
• Aperture. If you want to change depth of field.

32
Putting It To Use
You should realize that in Aperture Priority mode, by adjusting EC what you are actually doing is overriding the camera’s shutter speed selection. If you were shooting in Manual mode, you’d simply adjust shutter speed directly for the same effect. And, in Manual mode, you’d have a much wider range of control. The EC offers a limited number of stops over or under normal exposure. The trade-off is that Manual mode often requires more thinking and attention to your gear outdoors than does Aperture Priority. So, that’s why Aperture Priority is the right choice for outdoors when speed and simplicity are desired.
With your default settings in place, there are just two controls to think about now: EC and FEC. EC dialed down -1 stop or more will give you deeper sky colors and darker backgrounds. This is a starting point, but by no means do you have to keep it there. EC is your tool for easily adjusting overall exposure. Dial it down for darker, dial it up for brighter. Simple.
FEC dialed down -2/3 stop or so keeps it from looking too “flashy” on your subject. Again, this is only a suggestion. You’ll have to do some testing to determine what you like best as a starting point. Realize that FEC serves to make your flash more of a fill light as you dial it down and more of a main light as you increase flash output.
That’s pretty much it. Unless you want to adjust the aperture, too.
Aperture adjustments are good for changing DOF, without affecting the flash exposure on your subject (because with TTL, flash output will automatically adjust itself). The more you close down your aperture, however, the harder your flash will have to work, possibly not being able to put out enough power at smaller apertures. But, you can always make up for that by bumping up your ISO.
Now, various factors might cause your shutter speed to increase past 1/250 sec. (e.g., higher ISOs, wider apertures, brighter ambient light scenes). This will cause your flash’s high speed sync (HSS) mode to kick in, if you have it set to automatically do so. That’s fine. That’s why it’s there. When this happens, your flash has to work in such a way that it may not produce enough light to meet the needs of your shot. One solution for this is to move in closer to your subject. Chimp your camera’s preview monitor to make sure things are looking right.
Note: Outdoor flash photography at night can essentially be approached the same as indoor flash photography. Just set your camera on Manual mode and use FEC for flash control and shutter speed for ambient light exposure. In other words, use indoor settings.
Making Standardization Work For YouThe examples above may be good starting points for you, but I suggest you test them out for yourself. See if you can find better settings for your camera and flash combination. Once you find something that works, write it down and stick with it! Learn to do really great work without altering your default settings. Use EC, shutter speed, and FEC and stick to just one or two lenses. I believe maintaining a simplicity and consistency will work well for you. You should be able to rely on the standardized settings you have determined work best for your gear and shooting style.
33
Standardization takes the guesswork out of the equation so you won’t have to doubt yourself or spend time considering what the best settings are for a given situation; you’ll already have some-thing that you KNOW will work. Then just use FEC and EC/shutter speed as needed!
Off-Camera Flash
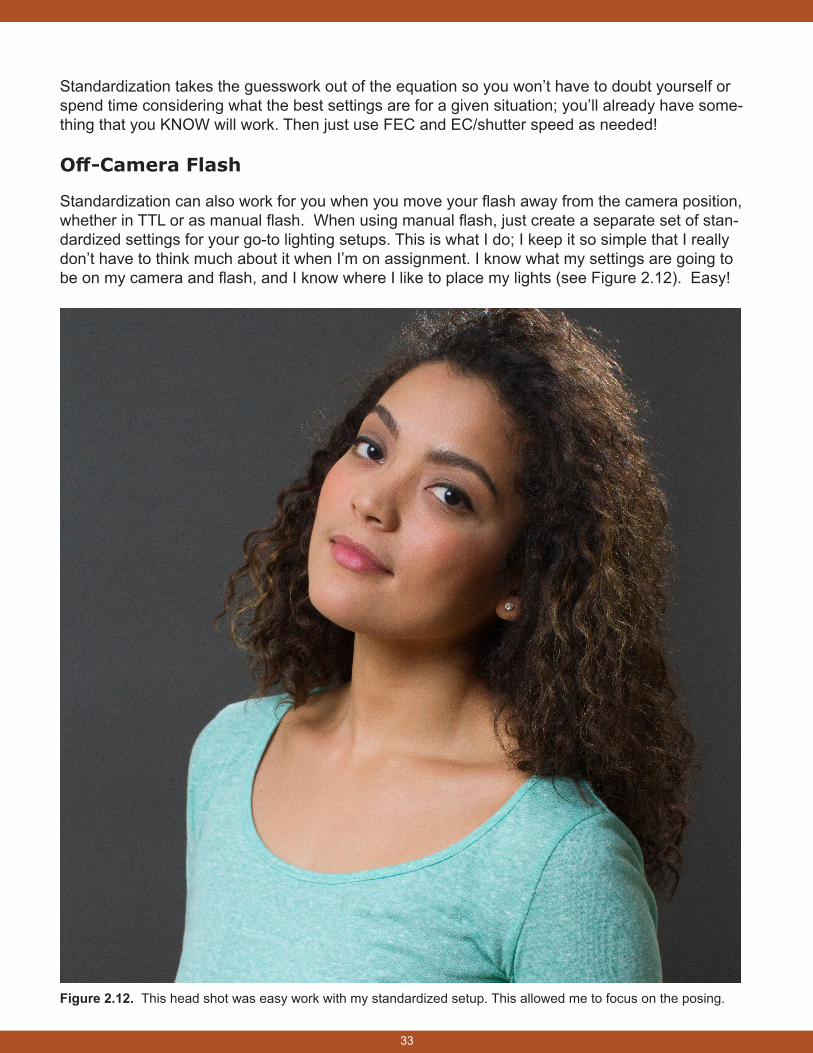
Standardization can also work for you when you move your flash away from the camera position, whether in TTL or as manual flash. When using manual flash, just create a separate set of stan-dardized settings for your go-to lighting setups. This is what I do; I keep it so simple that I really don’t have to think much about it when I’m on assignment. I know what my settings are going to be on my camera and flash, and I know where I like to place my lights (see Figure 2.12). Easy!
Figure 2.12. This head shot was easy work with my standardized setup. This allowed me to focus on the posing.
34
Manual Camera & FlashWe’ve already discussed how using your camera in Manual mode indoors can give you a great amount of control when it comes to capturing ambient light. I think it’s fair to say that full manual control of aperture, shutter speed, and ISO puts the most powerful components of in-camera expo-sure in your hands. Couple that with intelligent lighting and you’re virtually unstoppable!
But if manual control of your camera is so powerful, why are there so many other modes to choose from? Why do even the best professional photographers often shoot in Aperture Priority or other modes? Speed and simplicity is the reason. Camera modes other than Manual allow the photogra-pher to focus his attention on the control(s) most important to him at the time, while letting the cam-era’s metering system call the shots on the other controls to maintain good exposures. For example, in Aperture Priority mode, the photographer can make adjustments to the aperture setting while the camera adjusts the shutter speed automatically. While in Shutter Priority mode, the photographer can select different shutter speeds and let the camera decide the best aperture for proper exposure for each one.
Similarly, if the photographer changes the ISO setting, the metering system will, in Aperture Priority mode, adjust the shutter speed, or in Shutter Priority mode, adjust the aperture accordingly. And as we discussed earlier, there are camera modes that seem to do ALL of the thinking for you. An auto-matic mode like Program AE (P), or a fully automatic mode, might control, from shot to shot, DOF (aperture), areas of focus, shutter speed, ISO, flash usage and output, and even the format or qual-ity your images are recorded in. These offer the photographer the least amount of control over the camera, but can be good to use for quick point-and-shoot situations. For the most part, I’d suggest you stay away from the fully automatic modes.
Any modes that maintain the proper balance for good exposures can make life easier for you, while manual control will give you all the rope you need to hang yourself. Because, in Manual mode, any adjustments to aperture, shutter speed, and ISO are on you (in Manual mode, some cameras might automatically select ISO for you. I’d suggest you turn that feature off so you can fully control the ISO adjustments yourself). The camera won’t automat-ically correct your shutter speed to compensate for an aperture adjustment you make, for example. Sure, the camera will give you feedback on your settings via the exposure level indicator, but that’s all. You’re still free to take all the pictures you want, good exposure or bad.
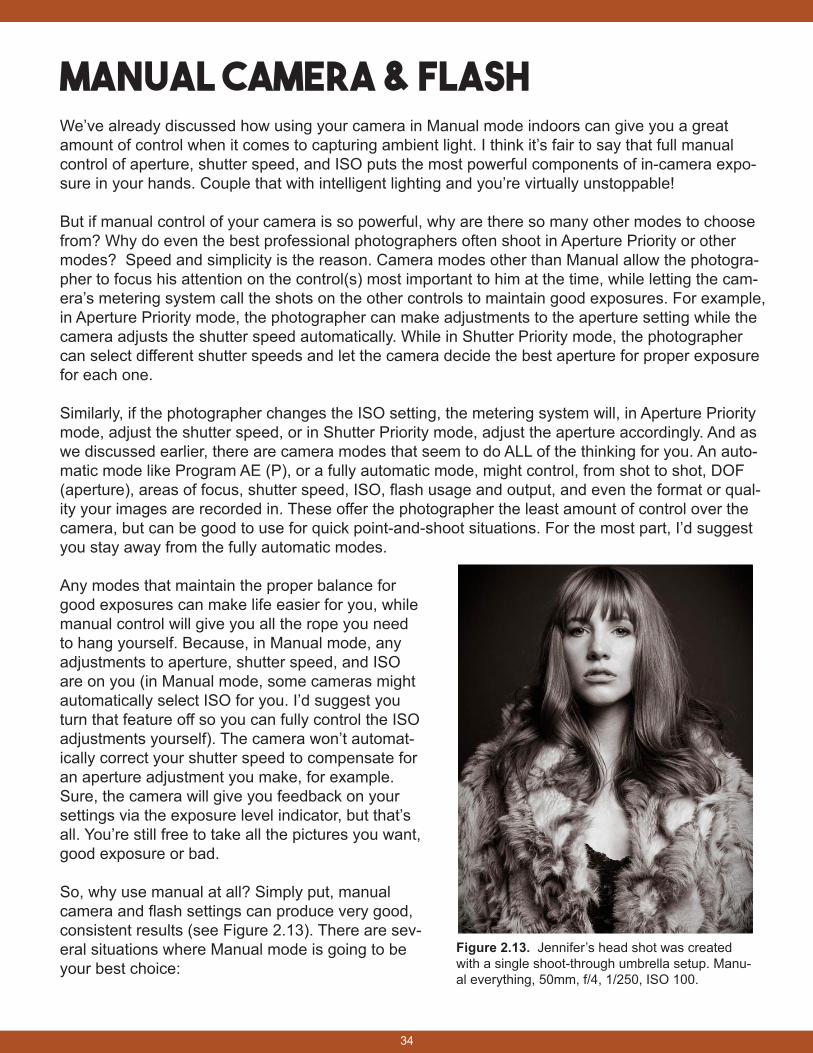
So, why use manual at all? Simply put, manual camera and flash settings can produce very good, consistent results (see Figure 2.13). There are sev-eral situations where Manual mode is going to be your best choice:
Figure 2.13. Jennifer’s head shot was created with a single shoot-through umbrella setup. Manu-al everything, 50mm, f/4, 1/250, ISO 100.
35
Indoor Flash Photography
When using flash indoors, the ambient light tends to be very dim compared to the light your flash emits. If you are NOT in Manual mode, your camera will make its own decisions about how to handle this. Sometimes this will result in acceptable images, and sometimes it won’t. Either way, you have little control over the outcome.
If your camera is set to Aperture Priority mode for example, you will have no direct control over your shutter speed. While TTL will give you a proper flash exposure, the camera will make its own shutter speed decisions to try to correctly expose for the ambient light. Sometimes this means the camera will default to its slowest standard flash sync speed (e.g., 1/60), and some-times it means you’ll get shutter speeds that are just too slow to work with.
Without the ability to control your shutter speed, you can end up with blurry images, light streaks, and other effects you might not want. Using Manual mode in this situation, however, gives you full control over how much ambient and/or blur you would like to record. TTL will adjust your flash’s output for good exposures of your subject, while you simply ride the shutter speed dial for the ambient, to your liking.
With regard to the above examples, you might be wondering why Shutter Priority mode isn’t a good option, since it gives you direct control over the shutter speed. The problem is that Shutter Priority mode gives the camera full control over aperture adjustments, a side-effect you probably don’t want. Using your camera in Manual mode when using flash indoors is easy. TTL takes care of flash exposure, leaving you with just the FEC and shutter speed dial to adjust as needed.
Outdoor Flash Photography
As you know, daytime outdoor ambient light is much brighter than the ambient light you’d find indoors. Recording ambient light outdoors during the day doesn’t require extremely slow shutter speeds. As a matter of fact, the ambient light usually provides enough illumination for your sub-ject that you can do without flash entirely. Outdoors, your flash is often regulated to the role of “fill light” rather than main light.
Outdoors, it’s often easiest to set the camera to Aperture Priority mode to take advantage of the camera’s automatic shutter speed adjustments. Here, as with indoors, your flash exposures will generally take care of themselves with TTL. Your camera will likely balance out the ambient light nicely. The light is bright enough outdoors so properly exposing for ambient won’t mean slow shutter speeds; you don’t have to worry about blur or light streaks as you would indoors. If your particular camera system allows it, you can even adjust ambient exposure with the EC dial while maintaining the same flash exposure on your subject.
If you would like full control over your outdoor exposures, Manual mode is the best choice when you have time to mange adjustments, or your lighting and other conditions are sufficiently con-stant and static. Since your camera isn’t managing exposure for you in Manual mode, you have to keep an eye on exposure variables at all times, so watch the exposure level indicator. Doing so is harder when things are moving quickly.
For outdoor work, Manual mode is a good choice for low-light, or nighttime situations. In these cases, you’re essentially dealing with the same issues as with indoor photography. You can
36
handle them the same way. Let the flash (now your main light) do its job, while you adjust shutter speed for the ambient light as you see fit, and FEC if necessary. Also, there may be times when you’d like to go for a special effect like overpowering the sunlight with flash, or blowing out the background light around your subject, etc. Manual mode may be the best choice in these situa-tions, as might, manual flash control.
Manual Flash
Switching your camera to Manual mode allows you to fully control aperture, shutter speed, and ISO settings independently of each other. But, your flash and camera are smart enough to work together to allow you to control these components, while keeping the flash exposure of your sub-ject on target with TTL. What happens when you go the final step, and put your flash under manu-al control along with your camera?
Manual flash power settings simply allow you to set your flash output power from lowest to highest in varying increments. As with your exposure controls, these increments indicate either halving or doubling of the light involved. Power settings range from 1/1 (full power) down to 1/64 or 1/128 power with most flash units. This is useful when your flash is used on a light stand or when multi-ple lights are used (so you can manually setup lighting ratios).
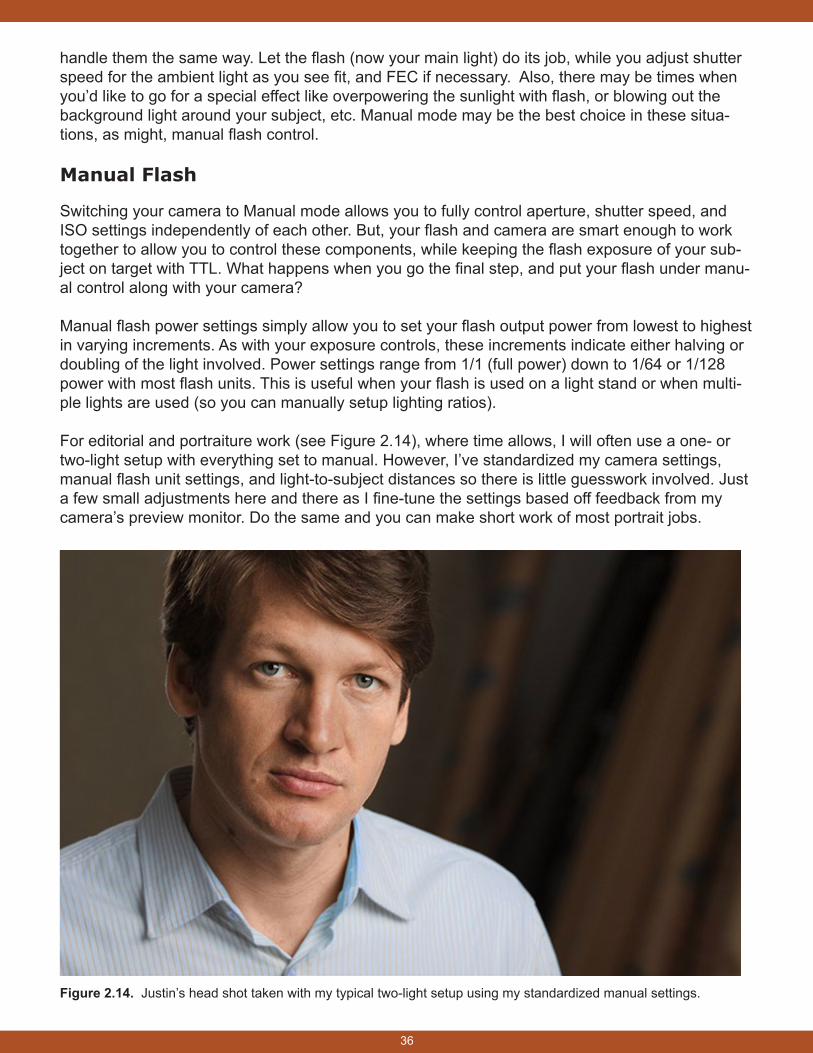
For editorial and portraiture work (see Figure 2.14), where time allows, I will often use a one- or two-light setup with everything set to manual. However, I’ve standardized my camera settings, manual flash unit settings, and light-to-subject distances so there is little guesswork involved. Just a few small adjustments here and there as I fine-tune the settings based off feedback from my camera’s preview monitor. Do the same and you can make short work of most portrait jobs.
Figure 2.14. Justin’s head shot taken with my typical two-light setup using my standardized manual settings.
Flash Gear & Concepts CHAPTER THREE
38
In this chapter, I want to give you an overview of the flash gear and concepts we’ll be covering. Later, you’ll learn all about setting everything up.
Shoe-Mount FlashAlthough they’re not considered professional studio lights, shoe-mount flash units can be just as expensive as budget studio strobes, or more so. So you might wonder, why spend more money on smaller, less powerful flashes? Small flash units offer many advantages over larger studio strobes; they’re more compact, lighter, operate on convenient size-AA batteries, and they’re ac-tually very powerful for their size. They also give you the option of using TTL, automatic flash metering technology (e.g. Canon’s E-TTL II or Nikon’s i-TTL) and simplify flash ratio control. Many photographers prefer them for their size and portability. There are also many light modifiers and other accessories for these types of strobes making them very suited to portrait work. The flash models that offer the most versatility include flash heads that rotate and tilt.
Flash Units by ManufacturerCanon LineupCanon has several flash units perfect for small studio work and outdoor shooting. Speedlites can be can be mounted to light stands and positioned anywhere around the scene and controlled with E-TTL II, Canon’s version of TTL flash metering and output control.
Of the models listed below, the Canon Speedlite 600EX-RT, can be mounted onto your camera and serve as an optical controller for any of the units listed here when those units are set to slave mode. It, and the 430EX III-RT can also serve as radio master controllers to matching models.
Here is a list of some of models you might find useful:
• 270EX II. While this model’s flash head doesn’t rotate (it only tilts vertically), that becomes much less of a limitation when remotely mounted to a light stand and/or swivel adapter; in that case, the flash head can be positioned as needed to point light in any direction. The settings for this unit are limited and can only be adjusted via a direct cam-era connection or E-TTL II optical wireless master. Unfortunately, it has limited use in multiple light setups where you’d want to control it as part of a designated group; it only operates as a member of E-TTL II Group A and will fire regardless of the channel setting on the master controller. This unit is the smallest and least powerful in this group, but it can still serve as a good secondary light. I’ve found it especially useful as a hair light or rim light. This Speedlite is best used as part of an E-TTL II configuration and not a fully manual setup.
39
• 320EX. This is an interesting model that boasts a built-in LED light which can be useful for some DSLR video recording when better light is not available. The LED can also serve as a modeling lamp and focus assist. As an off-camera slave unit, it allows you to manually adjust the Speedlite group and channel you wish it to operate on. As with the 270EX II, it’s great for use in an E-TTL II setup, but it will be of limited use in a fully manual setup.
• 430EX II. For more serious off-camera shooting, I’d recommend going with no less than the 430EX II. Unlike the 270EX II and 320EX, the 430EX II will allow you to make important settings adjustments directly on the unit, including manu-al output control. It’s easy to navigate its menu with the LCD monitor and a few simple buttons. It can function as a slave unit (Canon’s optical wireless system).
• 430EX III-RT. The new 430EX III-RT is the second Canon flash to incorporate radio as well as optical signal transmission and can function as a master con-troller in radio mode.
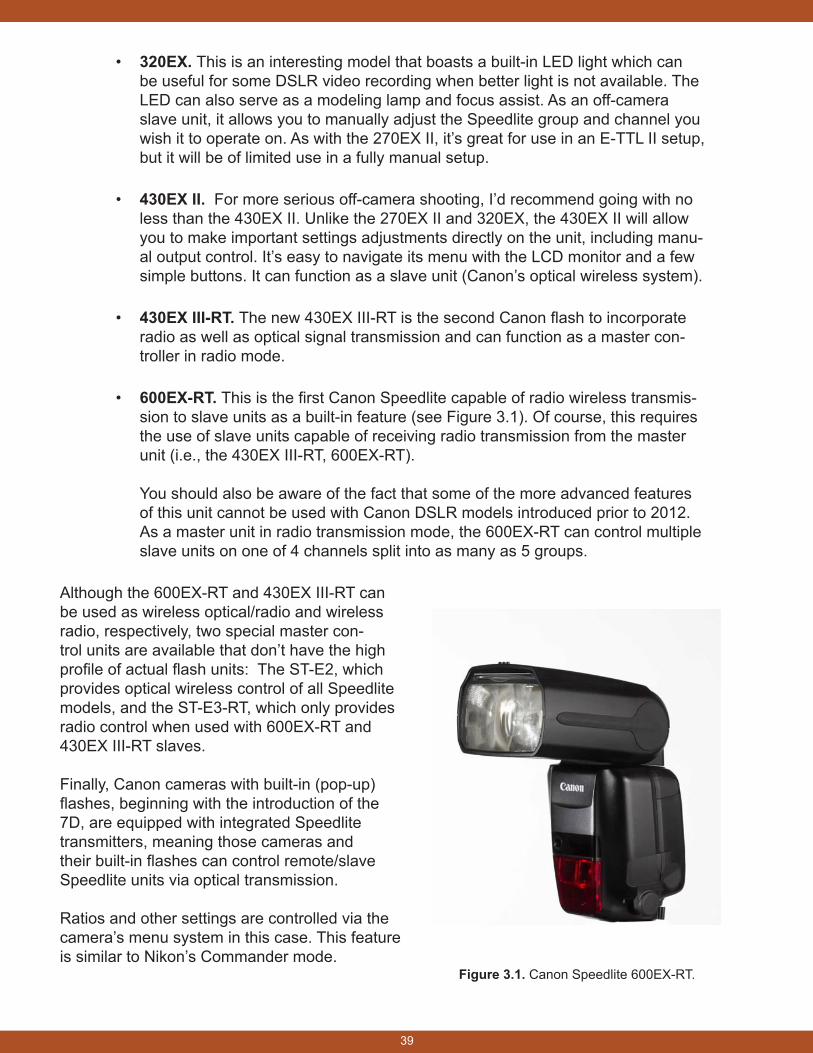
• 600EX-RT. This is the first Canon Speedlite capable of radio wireless transmis-sion to slave units as a built-in feature (see Figure 3.1). Of course, this requires the use of slave units capable of receiving radio transmission from the master unit (i.e., the 430EX III-RT, 600EX-RT). You should also be aware of the fact that some of the more advanced features of this unit cannot be used with Canon DSLR models introduced prior to 2012. As a master unit in radio transmission mode, the 600EX-RT can control multiple slave units on one of 4 channels split into as many as 5 groups.
Although the 600EX-RT and 430EX III-RT can be used as wireless optical/radio and wireless radio, respectively, two special master con-trol units are available that don’t have the high profile of actual flash units: The ST-E2, which provides optical wireless control of all Speedlite models, and the ST-E3-RT, which only provides radio control when used with 600EX-RT and 430EX III-RT slaves.
Finally, Canon cameras with built-in (pop-up) flashes, beginning with the introduction of the 7D, are equipped with integrated Speedlite transmitters, meaning those cameras and their built-in flashes can control remote/slave Speedlite units via optical transmission. Ratios and other settings are controlled via the camera’s menu system in this case. This feature is similar to Nikon’s Commander mode.
Figure 3.1. Canon Speedlite 600EX-RT.
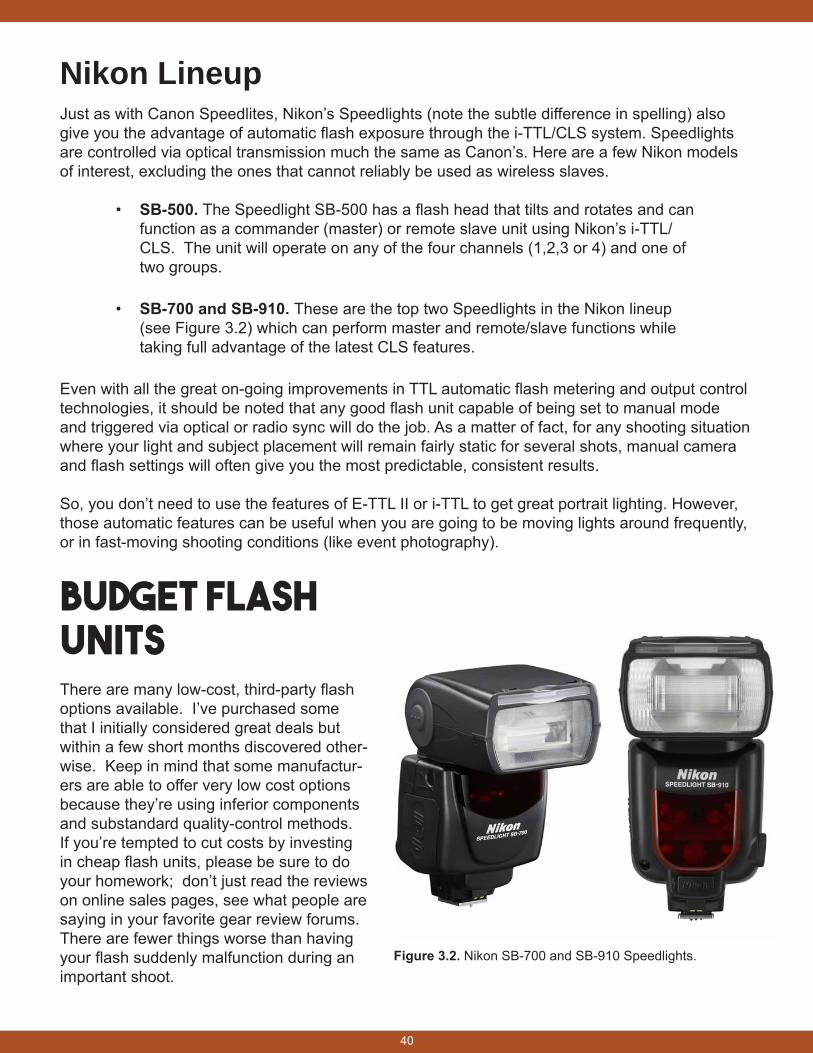
40
Nikon LineupJust as with Canon Speedlites, Nikon’s Speedlights (note the subtle difference in spelling) also give you the advantage of automatic flash exposure through the i-TTL/CLS system. Speedlights are controlled via optical transmission much the same as Canon’s. Here are a few Nikon models of interest, excluding the ones that cannot reliably be used as wireless slaves.
• SB-500. The Speedlight SB-500 has a flash head that tilts and rotates and can function as a commander (master) or remote slave unit using Nikon’s i-TTL/CLS. The unit will operate on any of the four channels (1,2,3 or 4) and one of two groups.
• SB-700 and SB-910. These are the top two Speedlights in the Nikon lineup (see Figure 3.2) which can perform master and remote/slave functions while taking full advantage of the latest CLS features.
Even with all the great on-going improvements in TTL automatic flash metering and output control technologies, it should be noted that any good flash unit capable of being set to manual mode and triggered via optical or radio sync will do the job. As a matter of fact, for any shooting situation where your light and subject placement will remain fairly static for several shots, manual camera and flash settings will often give you the most predictable, consistent results.
So, you don’t need to use the features of E-TTL II or i-TTL to get great portrait lighting. However, those automatic features can be useful when you are going to be moving lights around frequently, or in fast-moving shooting conditions (like event photography).
Budget Flash UnitsThere are many low-cost, third-party flash options available. I’ve purchased some that I initially considered great deals but within a few short months discovered other-wise. Keep in mind that some manufactur-ers are able to offer very low cost options because they’re using inferior components and substandard quality-control methods. If you’re tempted to cut costs by investing in cheap flash units, please be sure to do your homework; don’t just read the reviews on online sales pages, see what people are saying in your favorite gear review forums. There are fewer things worse than having your flash suddenly malfunction during an important shoot.
Figure 3.2. Nikon SB-700 and SB-910 Speedlights.
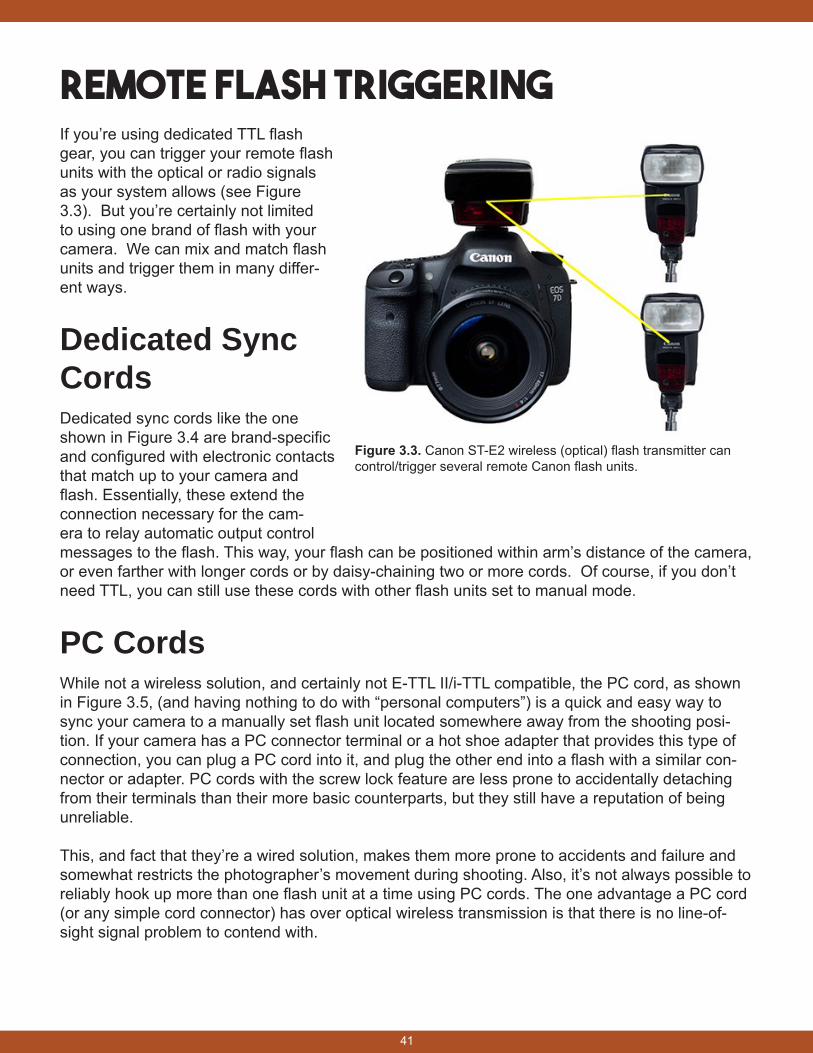
41
Remote Flash TriggeringIf you’re using dedicated TTL flash gear, you can trigger your remote flash units with the optical or radio signals as your system allows (see Figure 3.3). But you’re certainly not limited to using one brand of flash with your camera. We can mix and match flash units and trigger them in many differ-ent ways.
Dedicated Sync CordsDedicated sync cords like the one shown in Figure 3.4 are brand-specific and configured with electronic contacts that match up to your camera and flash. Essentially, these extend the connection necessary for the cam-era to relay automatic output control messages to the flash. This way, your flash can be positioned within arm’s distance of the camera, or even farther with longer cords or by daisy-chaining two or more cords. Of course, if you don’t need TTL, you can still use these cords with other flash units set to manual mode.
PC CordsWhile not a wireless solution, and certainly not E-TTL II/i-TTL compatible, the PC cord, as shown in Figure 3.5, (and having nothing to do with “personal computers”) is a quick and easy way to sync your camera to a manually set flash unit located somewhere away from the shooting posi-tion. If your camera has a PC connector terminal or a hot shoe adapter that provides this type of connection, you can plug a PC cord into it, and plug the other end into a flash with a similar con-nector or adapter. PC cords with the screw lock feature are less prone to accidentally detaching from their terminals than their more basic counterparts, but they still have a reputation of being unreliable.
This, and fact that they’re a wired solution, makes them more prone to accidents and failure and somewhat restricts the photographer’s movement during shooting. Also, it’s not always possible to reliably hook up more than one flash unit at a time using PC cords. The one advantage a PC cord (or any simple cord connector) has over optical wireless transmission is that there is no line-of-sight signal problem to contend with.
Figure 3.3. Canon ST-E2 wireless (optical) flash transmitter can control/trigger several remote Canon flash units.
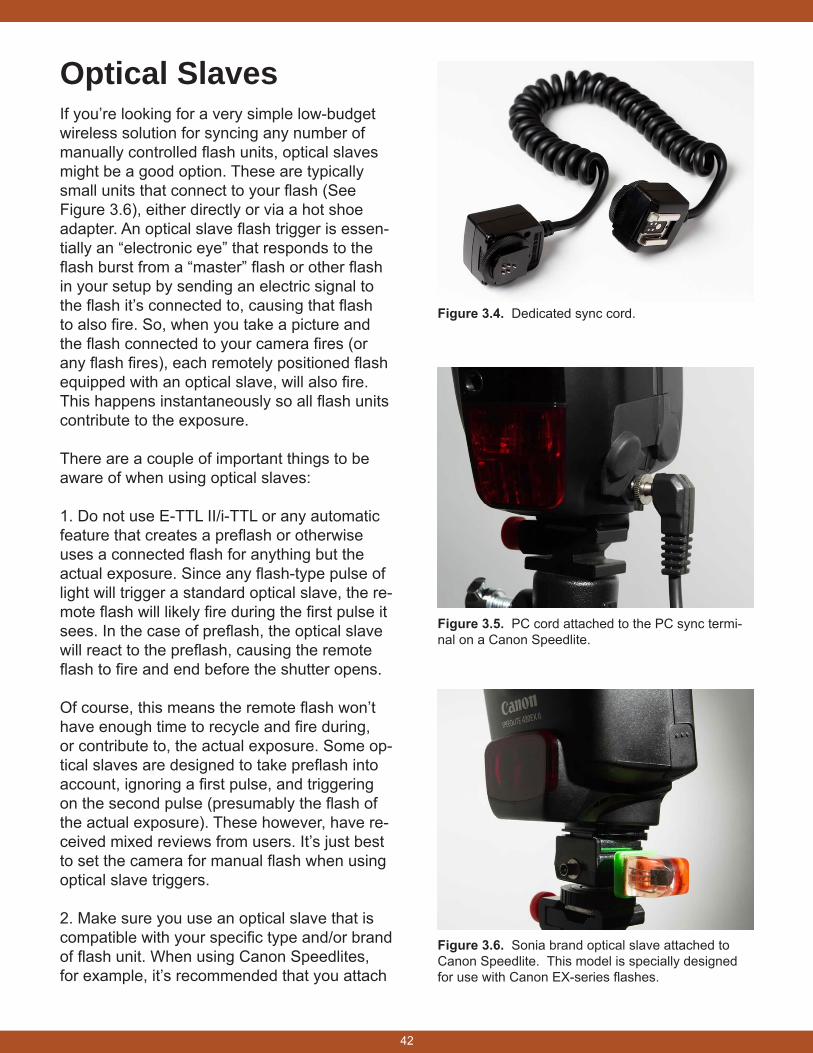
42
Optical SlavesIf you’re looking for a very simple low-budget wireless solution for syncing any number of manually controlled flash units, optical slaves might be a good option. These are typically small units that connect to your flash (See Figure 3.6), either directly or via a hot shoe adapter. An optical slave flash trigger is essen-tially an “electronic eye” that responds to the flash burst from a “master” flash or other flash in your setup by sending an electric signal to the flash it’s connected to, causing that flash to also fire. So, when you take a picture and the flash connected to your camera fires (or any flash fires), each remotely positioned flash equipped with an optical slave, will also fire. This happens instantaneously so all flash units contribute to the exposure.
There are a couple of important things to be aware of when using optical slaves:
1. Do not use E-TTL II/i-TTL or any automatic feature that creates a preflash or otherwise uses a connected flash for anything but the actual exposure. Since any flash-type pulse of light will trigger a standard optical slave, the re-mote flash will likely fire during the first pulse it sees. In the case of preflash, the optical slave will react to the preflash, causing the remote flash to fire and end before the shutter opens.
Of course, this means the remote flash won’t have enough time to recycle and fire during, or contribute to, the actual exposure. Some op-tical slaves are designed to take preflash into account, ignoring a first pulse, and triggering on the second pulse (presumably the flash of the actual exposure). These however, have re-ceived mixed reviews from users. It’s just best to set the camera for manual flash when using optical slave triggers.
2. Make sure you use an optical slave that is compatible with your specific type and/or brand of flash unit. When using Canon Speedlites, for example, it’s recommended that you attach
Figure 3.5. PC cord attached to the PC sync termi-nal on a Canon Speedlite.
Figure 3.4. Dedicated sync cord.
Figure 3.6. Sonia brand optical slave attached to Canon Speedlite. This model is specially designed for use with Canon EX-series flashes.
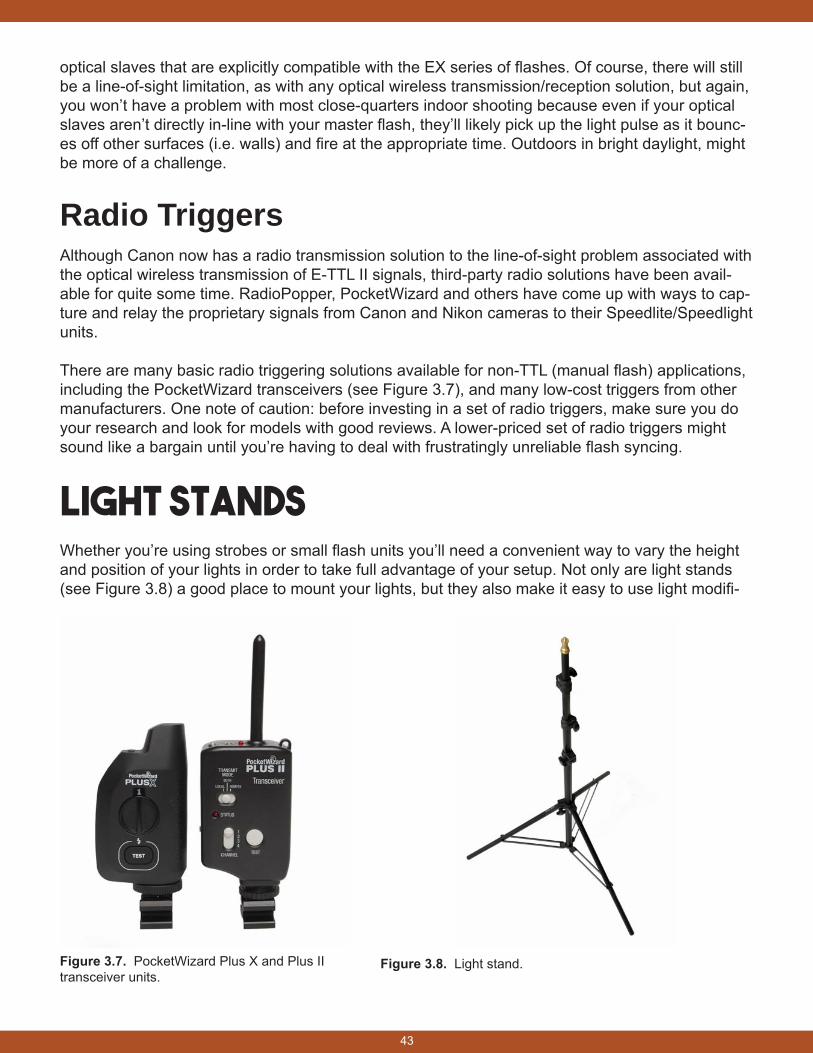
43
optical slaves that are explicitly compatible with the EX series of flashes. Of course, there will still be a line-of-sight limitation, as with any optical wireless transmission/reception solution, but again, you won’t have a problem with most close-quarters indoor shooting because even if your optical slaves aren’t directly in-line with your master flash, they’ll likely pick up the light pulse as it bounc-es off other surfaces (i.e. walls) and fire at the appropriate time. Outdoors in bright daylight, might be more of a challenge.
Radio TriggersAlthough Canon now has a radio transmission solution to the line-of-sight problem associated with the optical wireless transmission of E-TTL II signals, third-party radio solutions have been avail-able for quite some time. RadioPopper, PocketWizard and others have come up with ways to cap-ture and relay the proprietary signals from Canon and Nikon cameras to their Speedlite/Speedlight units.
There are many basic radio triggering solutions available for non-TTL (manual flash) applications, including the PocketWizard transceivers (see Figure 3.7), and many low-cost triggers from other manufacturers. One note of caution: before investing in a set of radio triggers, make sure you do your research and look for models with good reviews. A lower-priced set of radio triggers might sound like a bargain until you’re having to deal with frustratingly unreliable flash syncing.
Light StandsWhether you’re using strobes or small flash units you’ll need a convenient way to vary the height and position of your lights in order to take full advantage of your setup. Not only are light stands (see Figure 3.8) a good place to mount your lights, but they also make it easy to use light modifi-
Figure 3.7. PocketWizard Plus X and Plus II transceiver units.
Figure 3.8. Light stand.
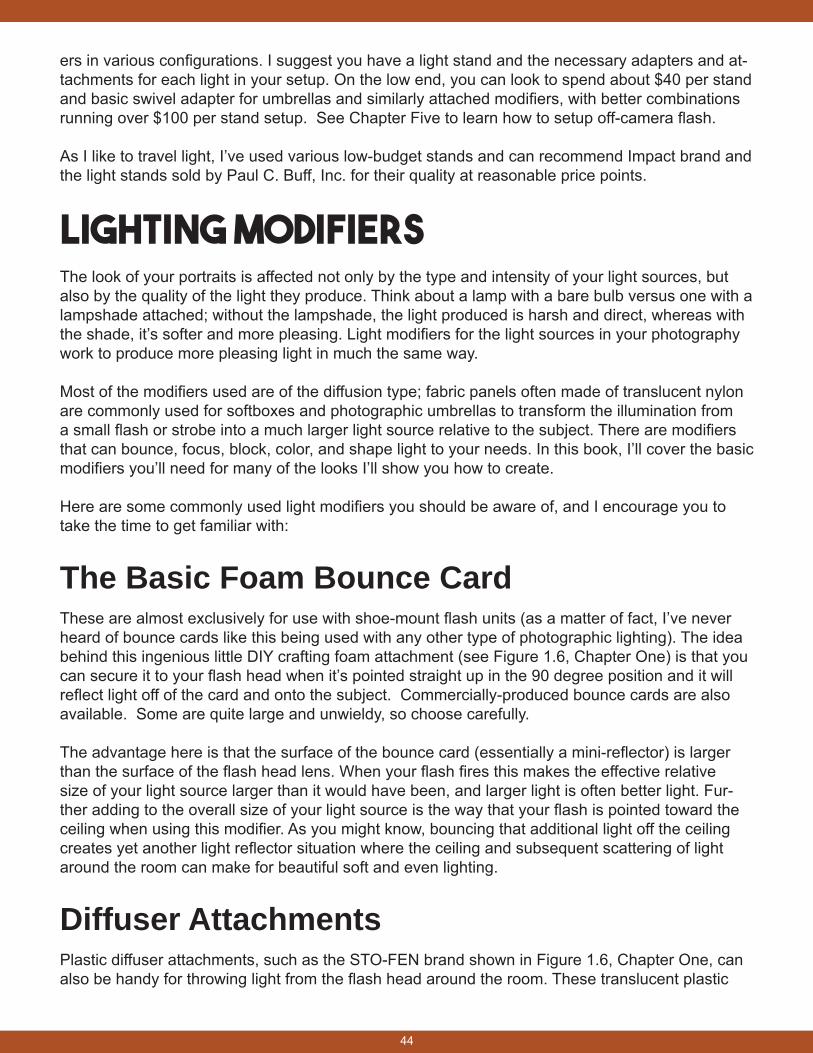
44
ers in various configurations. I suggest you have a light stand and the necessary adapters and at-tachments for each light in your setup. On the low end, you can look to spend about $40 per stand and basic swivel adapter for umbrellas and similarly attached modifiers, with better combinations running over $100 per stand setup. See Chapter Five to learn how to setup off-camera flash.
As I like to travel light, I’ve used various low-budget stands and can recommend Impact brand and the light stands sold by Paul C. Buff, Inc. for their quality at reasonable price points.
Lighting ModifiersThe look of your portraits is affected not only by the type and intensity of your light sources, but also by the quality of the light they produce. Think about a lamp with a bare bulb versus one with a lampshade attached; without the lampshade, the light produced is harsh and direct, whereas with the shade, it’s softer and more pleasing. Light modifiers for the light sources in your photography work to produce more pleasing light in much the same way.
Most of the modifiers used are of the diffusion type; fabric panels often made of translucent nylon are commonly used for softboxes and photographic umbrellas to transform the illumination from a small flash or strobe into a much larger light source relative to the subject. There are modifiers that can bounce, focus, block, color, and shape light to your needs. In this book, I’ll cover the basic modifiers you’ll need for many of the looks I’ll show you how to create.
Here are some commonly used light modifiers you should be aware of, and I encourage you to take the time to get familiar with:
The Basic Foam Bounce CardThese are almost exclusively for use with shoe-mount flash units (as a matter of fact, I’ve never heard of bounce cards like this being used with any other type of photographic lighting). The idea behind this ingenious little DIY crafting foam attachment (see Figure 1.6, Chapter One) is that you can secure it to your flash head when it’s pointed straight up in the 90 degree position and it will reflect light off of the card and onto the subject. Commercially-produced bounce cards are also available. Some are quite large and unwieldy, so choose carefully.
The advantage here is that the surface of the bounce card (essentially a mini-reflector) is larger than the surface of the flash head lens. When your flash fires this makes the effective relative size of your light source larger than it would have been, and larger light is often better light. Fur-ther adding to the overall size of your light source is the way that your flash is pointed toward the ceiling when using this modifier. As you might know, bouncing that additional light off the ceiling creates yet another light reflector situation where the ceiling and subsequent scattering of light around the room can make for beautiful soft and even lighting.
Diffuser AttachmentsPlastic diffuser attachments, such as the STO-FEN brand shown in Figure 1.6, Chapter One, can also be handy for throwing light from the flash head around the room. These translucent plastic
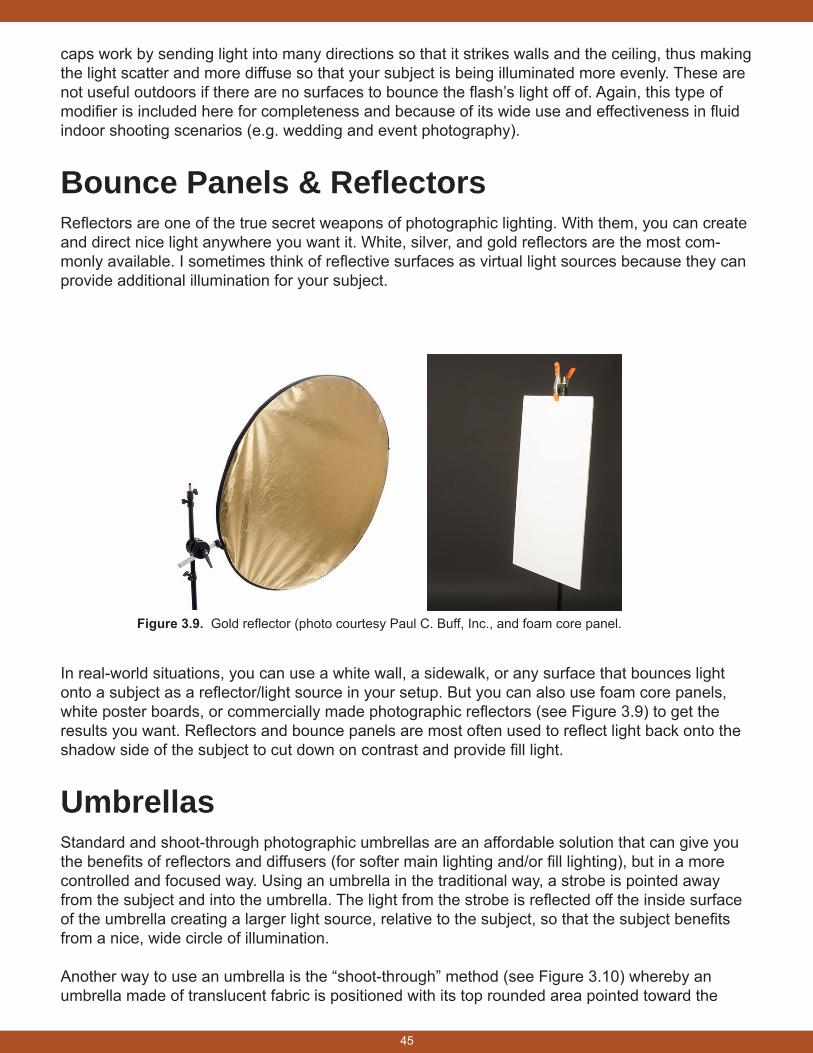
45
caps work by sending light into many directions so that it strikes walls and the ceiling, thus making the light scatter and more diffuse so that your subject is being illuminated more evenly. These are not useful outdoors if there are no surfaces to bounce the flash’s light off of. Again, this type of modifier is included here for completeness and because of its wide use and effectiveness in fluid indoor shooting scenarios (e.g. wedding and event photography).
Bounce Panels & ReflectorsReflectors are one of the true secret weapons of photographic lighting. With them, you can create and direct nice light anywhere you want it. White, silver, and gold reflectors are the most com-monly available. I sometimes think of reflective surfaces as virtual light sources because they can provide additional illumination for your subject.
Figure 3.9. Gold reflector (photo courtesy Paul C. Buff, Inc., and foam core panel.
In real-world situations, you can use a white wall, a sidewalk, or any surface that bounces light onto a subject as a reflector/light source in your setup. But you can also use foam core panels, white poster boards, or commercially made photographic reflectors (see Figure 3.9) to get the results you want. Reflectors and bounce panels are most often used to reflect light back onto the shadow side of the subject to cut down on contrast and provide fill light.
UmbrellasStandard and shoot-through photographic umbrellas are an affordable solution that can give you the benefits of reflectors and diffusers (for softer main lighting and/or fill lighting), but in a more controlled and focused way. Using an umbrella in the traditional way, a strobe is pointed away from the subject and into the umbrella. The light from the strobe is reflected off the inside surface of the umbrella creating a larger light source, relative to the subject, so that the subject benefits from a nice, wide circle of illumination.
Another way to use an umbrella is the “shoot-through” method (see Figure 3.10) whereby an umbrella made of translucent fabric is positioned with its top rounded area pointed toward the
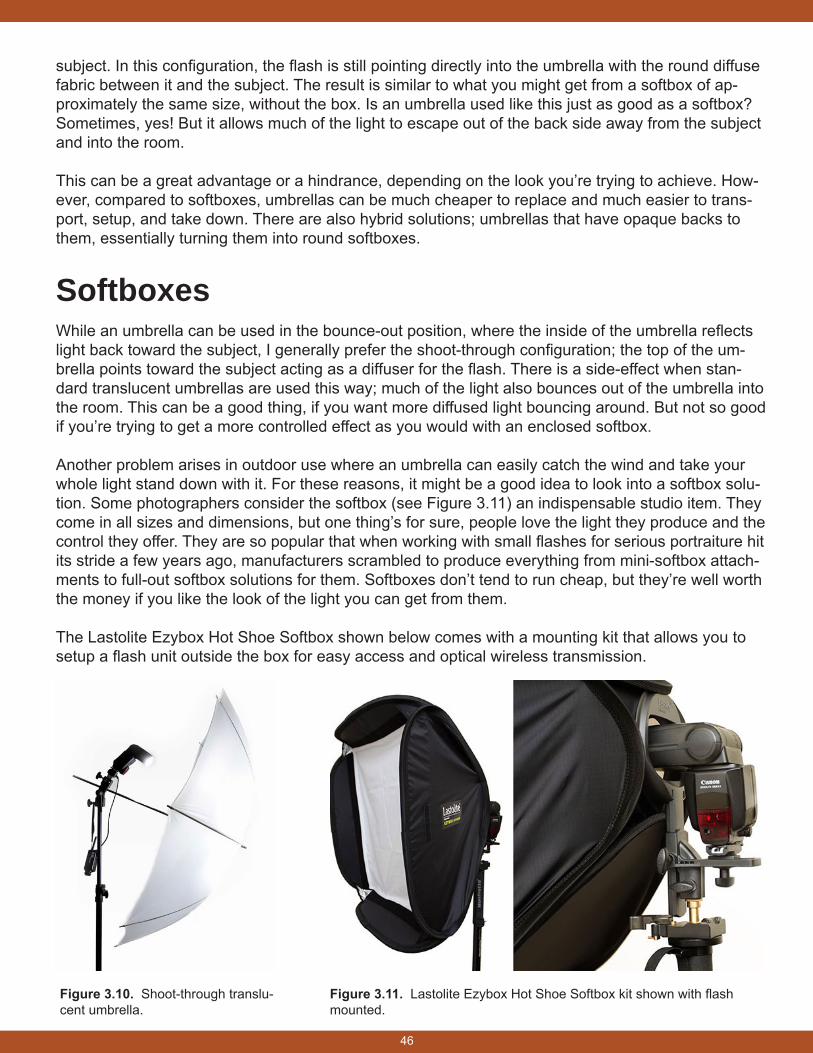
46
subject. In this configuration, the flash is still pointing directly into the umbrella with the round diffuse fabric between it and the subject. The result is similar to what you might get from a softbox of ap-proximately the same size, without the box. Is an umbrella used like this just as good as a softbox? Sometimes, yes! But it allows much of the light to escape out of the back side away from the subject and into the room.
This can be a great advantage or a hindrance, depending on the look you’re trying to achieve. How-ever, compared to softboxes, umbrellas can be much cheaper to replace and much easier to trans-port, setup, and take down. There are also hybrid solutions; umbrellas that have opaque backs to them, essentially turning them into round softboxes.
SoftboxesWhile an umbrella can be used in the bounce-out position, where the inside of the umbrella reflects light back toward the subject, I generally prefer the shoot-through configuration; the top of the um-brella points toward the subject acting as a diffuser for the flash. There is a side-effect when stan-dard translucent umbrellas are used this way; much of the light also bounces out of the umbrella into the room. This can be a good thing, if you want more diffused light bouncing around. But not so good if you’re trying to get a more controlled effect as you would with an enclosed softbox.
Another problem arises in outdoor use where an umbrella can easily catch the wind and take your whole light stand down with it. For these reasons, it might be a good idea to look into a softbox solu-tion. Some photographers consider the softbox (see Figure 3.11) an indispensable studio item. They come in all sizes and dimensions, but one thing’s for sure, people love the light they produce and the control they offer. They are so popular that when working with small flashes for serious portraiture hit its stride a few years ago, manufacturers scrambled to produce everything from mini-softbox attach-ments to full-out softbox solutions for them. Softboxes don’t tend to run cheap, but they’re well worth the money if you like the look of the light you can get from them.
The Lastolite Ezybox Hot Shoe Softbox shown below comes with a mounting kit that allows you to setup a flash unit outside the box for easy access and optical wireless transmission.
Figure 3.10. Shoot-through translu-cent umbrella.
Figure 3.11. Lastolite Ezybox Hot Shoe Softbox kit shown with flash mounted.
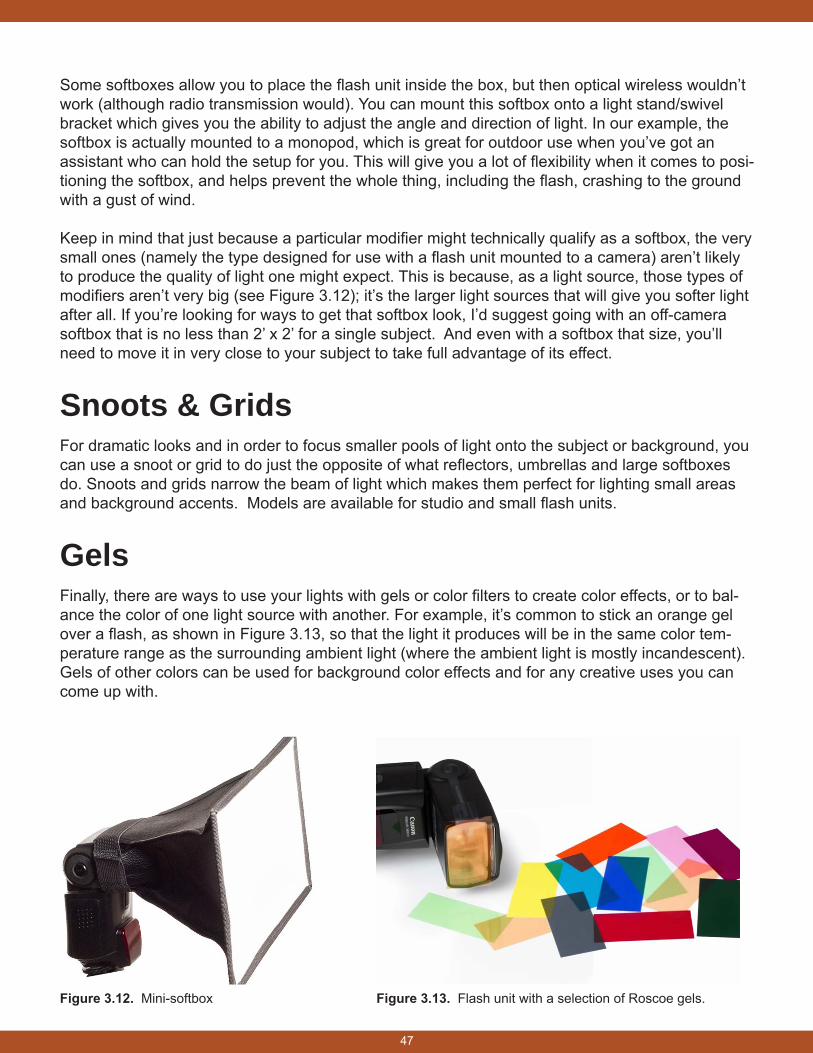
47
Some softboxes allow you to place the flash unit inside the box, but then optical wireless wouldn’t work (although radio transmission would). You can mount this softbox onto a light stand/swivel bracket which gives you the ability to adjust the angle and direction of light. In our example, the softbox is actually mounted to a monopod, which is great for outdoor use when you’ve got an assistant who can hold the setup for you. This will give you a lot of flexibility when it comes to posi-tioning the softbox, and helps prevent the whole thing, including the flash, crashing to the ground with a gust of wind.
Keep in mind that just because a particular modifier might technically qualify as a softbox, the very small ones (namely the type designed for use with a flash unit mounted to a camera) aren’t likely to produce the quality of light one might expect. This is because, as a light source, those types of modifiers aren’t very big (see Figure 3.12); it’s the larger light sources that will give you softer light after all. If you’re looking for ways to get that softbox look, I’d suggest going with an off-camera softbox that is no less than 2’ x 2’ for a single subject. And even with a softbox that size, you’ll need to move it in very close to your subject to take full advantage of its effect.
Snoots & GridsFor dramatic looks and in order to focus smaller pools of light onto the subject or background, you can use a snoot or grid to do just the opposite of what reflectors, umbrellas and large softboxes do. Snoots and grids narrow the beam of light which makes them perfect for lighting small areas and background accents. Models are available for studio and small flash units.
GelsFinally, there are ways to use your lights with gels or color filters to create color effects, or to bal-ance the color of one light source with another. For example, it’s common to stick an orange gel over a flash, as shown in Figure 3.13, so that the light it produces will be in the same color tem-perature range as the surrounding ambient light (where the ambient light is mostly incandescent). Gels of other colors can be used for background color effects and for any creative uses you can come up with.
Figure 3.12. Mini-softbox Figure 3.13. Flash unit with a selection of Roscoe gels.
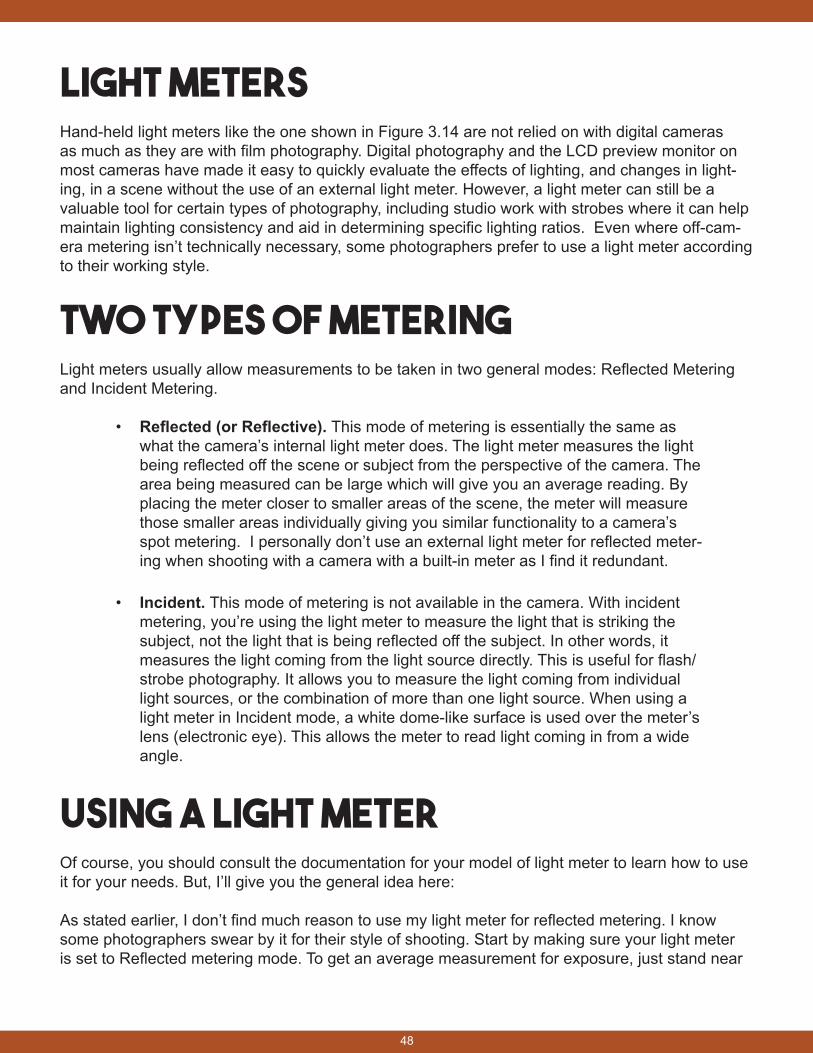
48
Light MetersHand-held light meters like the one shown in Figure 3.14 are not relied on with digital cameras as much as they are with film photography. Digital photography and the LCD preview monitor on most cameras have made it easy to quickly evaluate the effects of lighting, and changes in light-ing, in a scene without the use of an external light meter. However, a light meter can still be a valuable tool for certain types of photography, including studio work with strobes where it can help maintain lighting consistency and aid in determining specific lighting ratios. Even where off-cam-era metering isn’t technically necessary, some photographers prefer to use a light meter according to their working style.
Two Types Of MeteringLight meters usually allow measurements to be taken in two general modes: Reflected Metering and Incident Metering.
• Reflected (or Reflective). This mode of metering is essentially the same as what the camera’s internal light meter does. The light meter measures the light being reflected off the scene or subject from the perspective of the camera. The area being measured can be large which will give you an average reading. By placing the meter closer to smaller areas of the scene, the meter will measure those smaller areas individually giving you similar functionality to a camera’s spot metering. I personally don’t use an external light meter for reflected meter-ing when shooting with a camera with a built-in meter as I find it redundant.
• Incident. This mode of metering is not available in the camera. With incident metering, you’re using the light meter to measure the light that is striking the subject, not the light that is being reflected off the subject. In other words, it measures the light coming from the light source directly. This is useful for flash/strobe photography. It allows you to measure the light coming from individual light sources, or the combination of more than one light source. When using a light meter in Incident mode, a white dome-like surface is used over the meter’s lens (electronic eye). This allows the meter to read light coming in from a wide angle.
Using A Light MeterOf course, you should consult the documentation for your model of light meter to learn how to use it for your needs. But, I’ll give you the general idea here:
As stated earlier, I don’t find much reason to use my light meter for reflected metering. I know some photographers swear by it for their style of shooting. Start by making sure your light meter is set to Reflected metering mode. To get an average measurement for exposure, just stand near
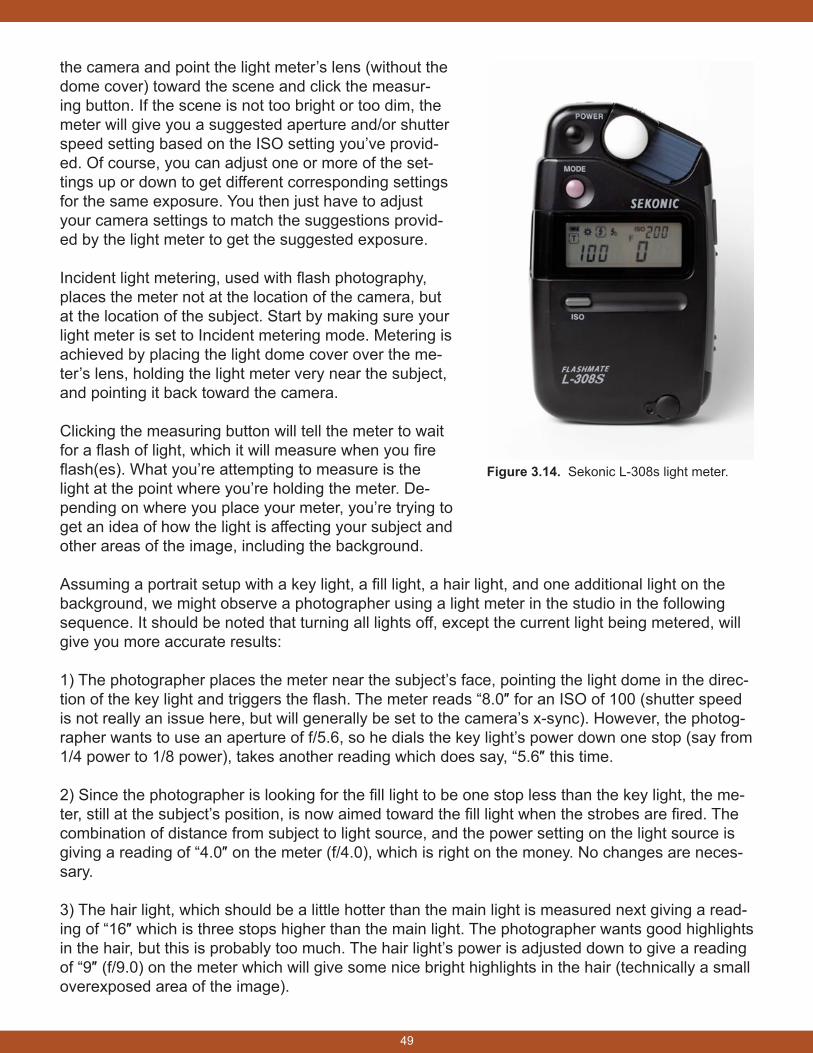
49
the camera and point the light meter’s lens (without the dome cover) toward the scene and click the measur-ing button. If the scene is not too bright or too dim, the meter will give you a suggested aperture and/or shutter speed setting based on the ISO setting you’ve provid-ed. Of course, you can adjust one or more of the set-tings up or down to get different corresponding settings for the same exposure. You then just have to adjust your camera settings to match the suggestions provid-ed by the light meter to get the suggested exposure.
Incident light metering, used with flash photography, places the meter not at the location of the camera, but at the location of the subject. Start by making sure your light meter is set to Incident metering mode. Metering is achieved by placing the light dome cover over the me-ter’s lens, holding the light meter very near the subject, and pointing it back toward the camera.
Clicking the measuring button will tell the meter to wait for a flash of light, which it will measure when you fire flash(es). What you’re attempting to measure is the light at the point where you’re holding the meter. De-pending on where you place your meter, you’re trying to get an idea of how the light is affecting your subject and other areas of the image, including the background.
Assuming a portrait setup with a key light, a fill light, a hair light, and one additional light on the background, we might observe a photographer using a light meter in the studio in the following sequence. It should be noted that turning all lights off, except the current light being metered, will give you more accurate results:
1) The photographer places the meter near the subject’s face, pointing the light dome in the direc-tion of the key light and triggers the flash. The meter reads “8.0″ for an ISO of 100 (shutter speed is not really an issue here, but will generally be set to the camera’s x-sync). However, the photog-rapher wants to use an aperture of f/5.6, so he dials the key light’s power down one stop (say from 1/4 power to 1/8 power), takes another reading which does say, “5.6″ this time.
2) Since the photographer is looking for the fill light to be one stop less than the key light, the me-ter, still at the subject’s position, is now aimed toward the fill light when the strobes are fired. The combination of distance from subject to light source, and the power setting on the light source is giving a reading of “4.0″ on the meter (f/4.0), which is right on the money. No changes are neces-sary.
3) The hair light, which should be a little hotter than the main light is measured next giving a read-ing of “16″ which is three stops higher than the main light. The photographer wants good highlights in the hair, but this is probably too much. The hair light’s power is adjusted down to give a reading of “9″ (f/9.0) on the meter which will give some nice bright highlights in the hair (technically a small overexposed area of the image).
Figure 3.14. Sekonic L-308s light meter.
50
4) Finally, the photographer holds the meter against the background at an area where the back-ground light strikes the backdrop to take a reading.
With any final adjustments, the photographer now knows the relationship between all the lights and can use this knowledge to avoid spending a lot of time with trial-and-error testing. You can see how this can be helpful with maintaining a consistent look or quickly achieving a desired, predeter-mined lighting ratio. For photographers who need to get their portrait lighting setup quickly, a light meter may be indispensable. I should note that some photographers prefer not to point the meter directly at the light source to take measurements, and methods exist that involve taking readings off of the main and fill at the same time, so use whatever method works best for you.
Of course, a light meter isn’t always necessary, even when using flash units on manual settings. For example, my usual setup is so simple and standardized that I usually only need to take a couple of test shots to know I have it all working. If my setup is more involved, I might use a light meter, especially if I don’t have time to shoot and evaluate several test shots.
The Meter Is Accurate, Not PerfectSomething to keep in mind is that whether you’re using a hand-held light meter, or relying on the one in your camera, metering does have its limitations. Most importantly, light meters are calibrat-ed to assume they are metering for a standard, middle-of-the-road tone and reflectance, but not all subjects and scenes fit neatly into that category. If your subject is an even gray or something simi-larly neutral, no problem. You’ll get a very accurate suggestion for your camera settings. However, if your subject is mostly very dark, or light, the light meter will provide you with exposure settings that will render the blacks as too light, or the whites as too dark, respectively. Also, in some cases, it’s a good idea to calibrate your light meter to your camera’s response (see your meter’s manual for more information). So, while it can be very accurate, the light meter might be thought of more as point of reference from which to base your final exposure settings.
Are Lighting Ratios Important?Lighting ratios are very important in photographic lighting, but not necessarily important to quanti-fy. In other words, you can achieve a good lighting ratio visually, without using the numerical data from a light meter. A few test shots to guide some simple adjustments to your lighting can yield great results, too. In this book, we don’t cover the advanced and varied ways to express and arrive at traditional lighting ratios; we’re more concerned with building up good lighting visually. But the basic understanding and application of ratios, in the sense that you’d want one light to be a stop or two lower than another, is important. And using a light meter can be very helpful in that regard.
Light meters are very useful when shooting with cameras that don’t have working exposure me-ters, in film photography where instant image previews aren’t available, and in studio work, espe-cially where flash lighting is used.
51
On-Camera Flash CHAPTER FOUR
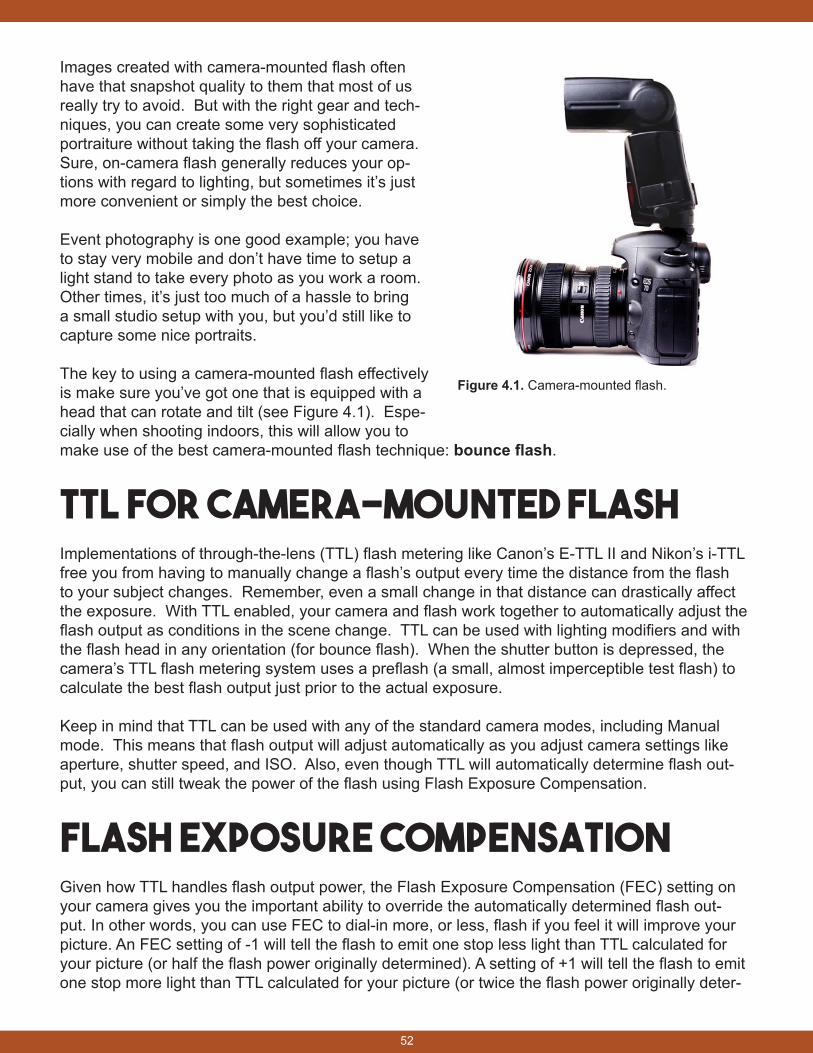
52
Images created with camera-mounted flash often have that snapshot quality to them that most of us really try to avoid. But with the right gear and tech-niques, you can create some very sophisticated portraiture without taking the flash off your camera. Sure, on-camera flash generally reduces your op-tions with regard to lighting, but sometimes it’s just more convenient or simply the best choice.
Event photography is one good example; you have to stay very mobile and don’t have time to setup a light stand to take every photo as you work a room. Other times, it’s just too much of a hassle to bring a small studio setup with you, but you’d still like to capture some nice portraits.
The key to using a camera-mounted flash effectively is make sure you’ve got one that is equipped with a head that can rotate and tilt (see Figure 4.1). Espe-cially when shooting indoors, this will allow you to make use of the best camera-mounted flash technique: bounce flash.
TTL for Camera-mounted FlashImplementations of through-the-lens (TTL) flash metering like Canon’s E-TTL II and Nikon’s i-TTL free you from having to manually change a flash’s output every time the distance from the flash to your subject changes. Remember, even a small change in that distance can drastically affect the exposure. With TTL enabled, your camera and flash work together to automatically adjust the flash output as conditions in the scene change. TTL can be used with lighting modifiers and with the flash head in any orientation (for bounce flash). When the shutter button is depressed, the camera’s TTL flash metering system uses a preflash (a small, almost imperceptible test flash) to calculate the best flash output just prior to the actual exposure.
Keep in mind that TTL can be used with any of the standard camera modes, including Manual mode. This means that flash output will adjust automatically as you adjust camera settings like aperture, shutter speed, and ISO. Also, even though TTL will automatically determine flash out-put, you can still tweak the power of the flash using Flash Exposure Compensation.
Flash Exposure CompensationGiven how TTL handles flash output power, the Flash Exposure Compensation (FEC) setting on your camera gives you the important ability to override the automatically determined flash out-put. In other words, you can use FEC to dial-in more, or less, flash if you feel it will improve your picture. An FEC setting of -1 will tell the flash to emit one stop less light than TTL calculated for your picture (or half the flash power originally determined). A setting of +1 will tell the flash to emit one stop more light than TTL calculated for your picture (or twice the flash power originally deter-
Figure 4.1. Camera-mounted flash.
53
mined). FEC is just an easy way to lower or boost your flash’s power while still relying on TTL’s automatic flash control as the baseline.
There’s also general Exposure Compensation (EC), a feature on your camera that allows you to adjust how constant/ambient light records in your image. EC is useful if you need to tweak the ambient light when using the recommended Aperture Priority mode outdoors (see Chapter Two for more on this).
Other Flash FeaturesHere is a short list of some other flash features you might find useful:
• High-Speed Sync (HSS). With compatible external flash units, your system will be capable of High-Speed Sync or FP Sync. This feature allows your camera to use shutter speeds faster than the normal speed recommended for flash (often up to the highest shutter speed your camera is capable of). This can be useful for daylight fill flash photography but you should be aware that HSS necessarily results in much weaker flash than what you’ll get using normal and slower shut-ter speeds. Use it if necessary, but avoid it when you want to make the most of your flash output.
• Front and Rear Curtain Sync. Since the burst of light from your flash is of a much shorter duration than any shutter speed normally used with flash, you have a choice as to when you want that burst to happen. Basically, you can set your camera to fire your flash near the start of the exposure, or close to the end. This becomes a factor when ambient light is being recorded along with flash. Front curtain sync will fire the flash at the beginning of the exposure and ter-minate, while the rest of the exposure continues to gather any ambient light it can. Rear curtain sync will fire the flash near the end of the exposure, after any ambient light was gathered. One effect of using front curtain sync is that mo-tion recorded as light streaks from a moving subject show the streaks ahead of him, whereas rear curtain sync will result in showing the streaks behind him in a more natural “follow” pattern.
• Multi/Stroboscopic Flash. This is a mode on your flash that creates a series of flashes in a single exposure. This is good for special effects showing an action sequence where the subject’s movements are displayed as discrete flash ex-posures within an exposure. Uses for this feature are probably limited for most types of photography and it’s important for you to be aware that firing your flash too many times in rapid succession can damage it.
54
Straight-On FlashPointing your on-camera flash straight ahead toward your subject isn’t generally the favored lighting technique but sometimes it’s best option. Some photographers use this as a technique for creating a look of immediacy or a snap-shot effect. But straight-on flash can also be used to provide a very subtle and pleasing fill light, especially for outdoor/daylight shots.
Flash for Fill LightingWhen people think of flash photography, they often think of pictures that have that typical bright “flash” look to them. The use of flash is certainly called for when there isn’t enough light in the scene to capture your subject the way you’d like, but flash can also be used in subtle ways to enhance a picture. Fill flash, for example, allows you to add a little extra illumination to an outdoor daylight portrait. Shadows often need some light brought in for a more balanced look and to re-duce contrast. Fill flash adds just enough light to the subject to get the job done (see Figure 4.2). When shooting outdoors and in TTL mode, your camera and flash will likely default to a fill flash type of output. But if it’s not to your liking, you can always adjust the FEC to achieve the desired results.
With any mode that allows FEC control, you can follow these steps to adjust your flash’s output:
1. Make sure your flash is set to operate in TTL mode and that FEC is set to “0” compensation (see your manual if you need instructions on how to do this).
2. With your subject at a normal distance of between 5-10 feet away, take a shot and view the results on the LCD monitor.
3. If you feel the illumination from the flash is too bright for the subject, set your FEC to -1 to lower the flash output by one stop.
4. If you feel the illumination from the flash is too dim for the subject, set your FEC to +1 to raise the flash output by one stop.
5. Make incremental changes to FEC until you are happy with the way the flash is illuminating your subject. Remember to reset FEC back to “0” when finished.
Figure 4.2. Sequence showing FEC at -1, 0, & +1 compensation. The leftmost image might be the most natural of the three. The rightmost image shows how flash is taking on the role of main light.

55
Flash as Main LightBecause camera-mounted flash is relatively small and positioned so close to the camera body, when using it straight-on it not only produces a rather harsh light, but also an unnatural light pattern. This is because the shadows are projected straight back and the light decreases in intensity quickly from the front of the subject to the background as shown in Figure 4.3. We lose the sense of dimension provid-ed by a more natural shadow pattern, and often get darker backgrounds than we expect.
There are times when bounce cards, and other cam-era-mounted flash modifiers really don’t help much (e.g., outdoors at night, or in large indoor spaces) and straight-on flash is our only option. Sure, a big bounce card can help by creating a larger light source from the camera position, but without other surfaces to bounce the light off of, your options are definitely limited.
Using slower shutter speeds can help pull more background light and atmosphere into scenes, making them more interesting. Dragging the shutter, as it’s often called helped me do that for the shot in Figure 4.4. But in most indoor environments, or out-doors where large reflective surfaces are available, bounce flash is your most powerful tool.
Bounce Flash In my opinion, this is the fastest way to create beautiful portraits with just a wall and a flash unit. If you’re indoors all the better because of the pleasing natural bounce you’ll get from all surfaces in varying degrees of illumination. This setup creates a virtual softbox that you can change in size and position at will. With your flash closer to the wall and zoomed, you’ll get a smaller “softbox,” a larger one as you move farther away. This wall/ceiling bounce tech-nique is where you and your flash can really work magic.
Figure 4.5 shows my standard orientation with this technique. I generally tilt and rotate the flash unit
Figure 4.3. Camera-mounted flash fired directly at the subject can produce harsh lighting.
Figure 4.4. Dial EC up (i.e., use a slower shutter speed) to add more background light while TTL maintains the flash exposure for you.

56
to hit the wall and part of the ceiling to reflect a large soft light onto my subject. This technique is very versatile as it can give you everything from very dramatic split-lighting to soft, even illumi-nation. Your subject’s orientation and the use of reflectors or light bouncing off the other walls in the room are the keys to making this work. Use a small flag on your flash if you’d like to control the amount of direct light your subject is receiving. This technique can also be used outdoors in fill-lighting situations as shown in Figure 4.6.
Diffuser attachments like the STO-FEN Omni-Bounce make use of bounce flash by helping to spread the light from your flash around the room. Figure 4.7 shows the recommended way to use this attachment. The flash head should be facing forward and tilted up about 45 degrees.
In fluid situations, such as a bride’s “getting ready” room, a party, or anytime you’re photograph-ing people in the room who aren’t necessarily interacting with the camera, bouncing the light up and behind you can be very handy.
Figure 4.5. Bouncing the flash off a light-colored wall. A small piece of crafting foam can be attached to the head of the flash (placement shown in yellow) to flag direct flash from striking the subject. Inset: Foam flag attached to flash.
Figure 4.7. Omni-Bounce and similar light bounce attachments are used in this orientation.
Figure 4.6. Here, I’m using the wall bounce technique out-doors to add some fill light and avoid the straight-on flash look.
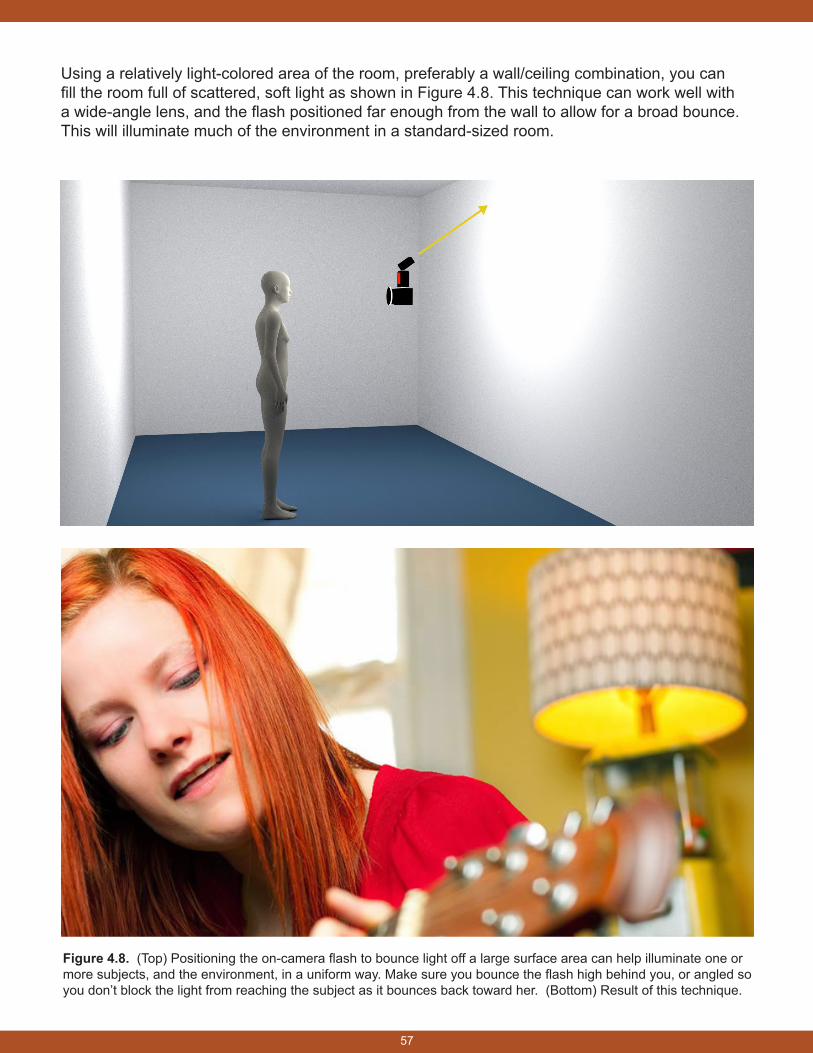
57
Figure 4.8. (Top) Positioning the on-camera flash to bounce light off a large surface area can help illuminate one or more subjects, and the environment, in a uniform way. Make sure you bounce the flash high behind you, or angled so you don’t block the light from reaching the subject as it bounces back toward her. (Bottom) Result of this technique.
Using a relatively light-colored area of the room, preferably a wall/ceiling combination, you can fill the room full of scattered, soft light as shown in Figure 4.8. This technique can work well with a wide-angle lens, and the flash positioned far enough from the wall to allow for a broad bounce. This will illuminate much of the environment in a standard-sized room.
Off-Camera Flash CHAPTER FIVE
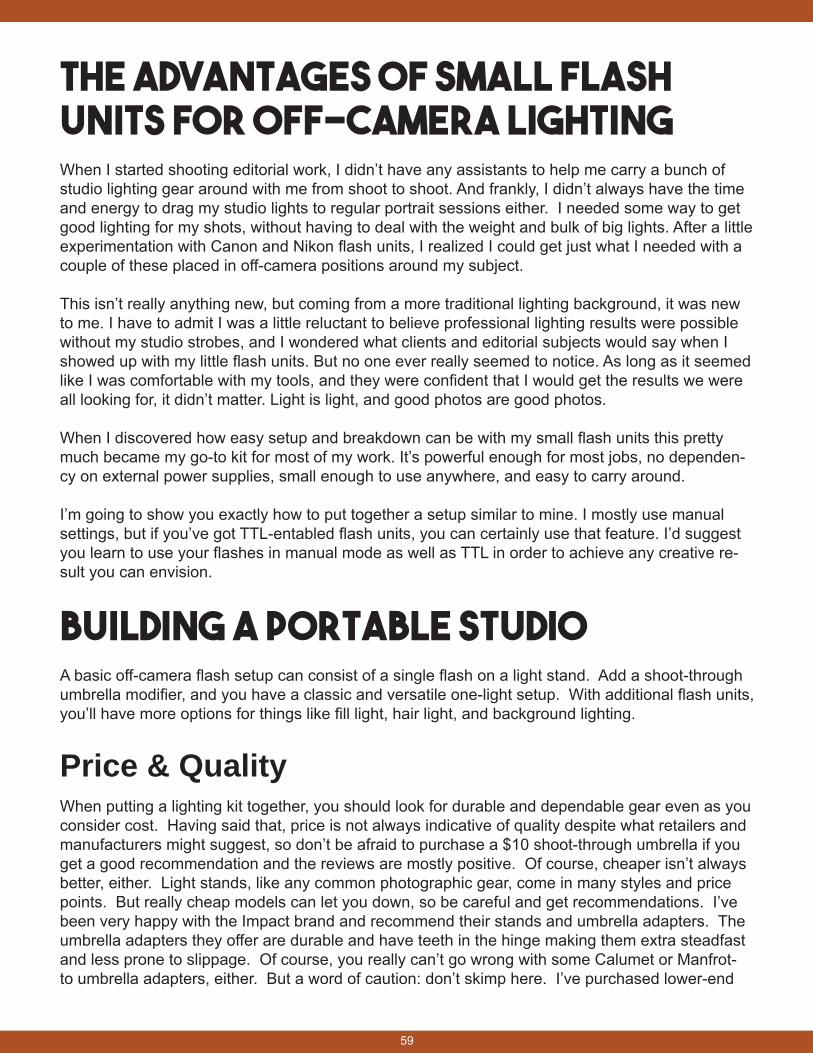
59
The Advantages of Small Flash Units For Off-Camera LightingWhen I started shooting editorial work, I didn’t have any assistants to help me carry a bunch of studio lighting gear around with me from shoot to shoot. And frankly, I didn’t always have the time and energy to drag my studio lights to regular portrait sessions either. I needed some way to get good lighting for my shots, without having to deal with the weight and bulk of big lights. After a little experimentation with Canon and Nikon flash units, I realized I could get just what I needed with a couple of these placed in off-camera positions around my subject.
This isn’t really anything new, but coming from a more traditional lighting background, it was new to me. I have to admit I was a little reluctant to believe professional lighting results were possible without my studio strobes, and I wondered what clients and editorial subjects would say when I showed up with my little flash units. But no one ever really seemed to notice. As long as it seemed like I was comfortable with my tools, and they were confident that I would get the results we were all looking for, it didn’t matter. Light is light, and good photos are good photos.
When I discovered how easy setup and breakdown can be with my small flash units this pretty much became my go-to kit for most of my work. It’s powerful enough for most jobs, no dependen-cy on external power supplies, small enough to use anywhere, and easy to carry around.
I’m going to show you exactly how to put together a setup similar to mine. I mostly use manual settings, but if you’ve got TTL-entabled flash units, you can certainly use that feature. I’d suggest you learn to use your flashes in manual mode as well as TTL in order to achieve any creative re-sult you can envision.
Building a Portable StudioA basic off-camera flash setup can consist of a single flash on a light stand. Add a shoot-through umbrella modifier, and you have a classic and versatile one-light setup. With additional flash units, you’ll have more options for things like fill light, hair light, and background lighting.
Price & QualityWhen putting a lighting kit together, you should look for durable and dependable gear even as you consider cost. Having said that, price is not always indicative of quality despite what retailers and manufacturers might suggest, so don’t be afraid to purchase a $10 shoot-through umbrella if you get a good recommendation and the reviews are mostly positive. Of course, cheaper isn’t always better, either. Light stands, like any common photographic gear, come in many styles and price points. But really cheap models can let you down, so be careful and get recommendations. I’ve been very happy with the Impact brand and recommend their stands and umbrella adapters. The umbrella adapters they offer are durable and have teeth in the hinge making them extra steadfast and less prone to slippage. Of course, you really can’t go wrong with some Calumet or Manfrot-to umbrella adapters, either. But a word of caution: don’t skimp here. I’ve purchased lower-end
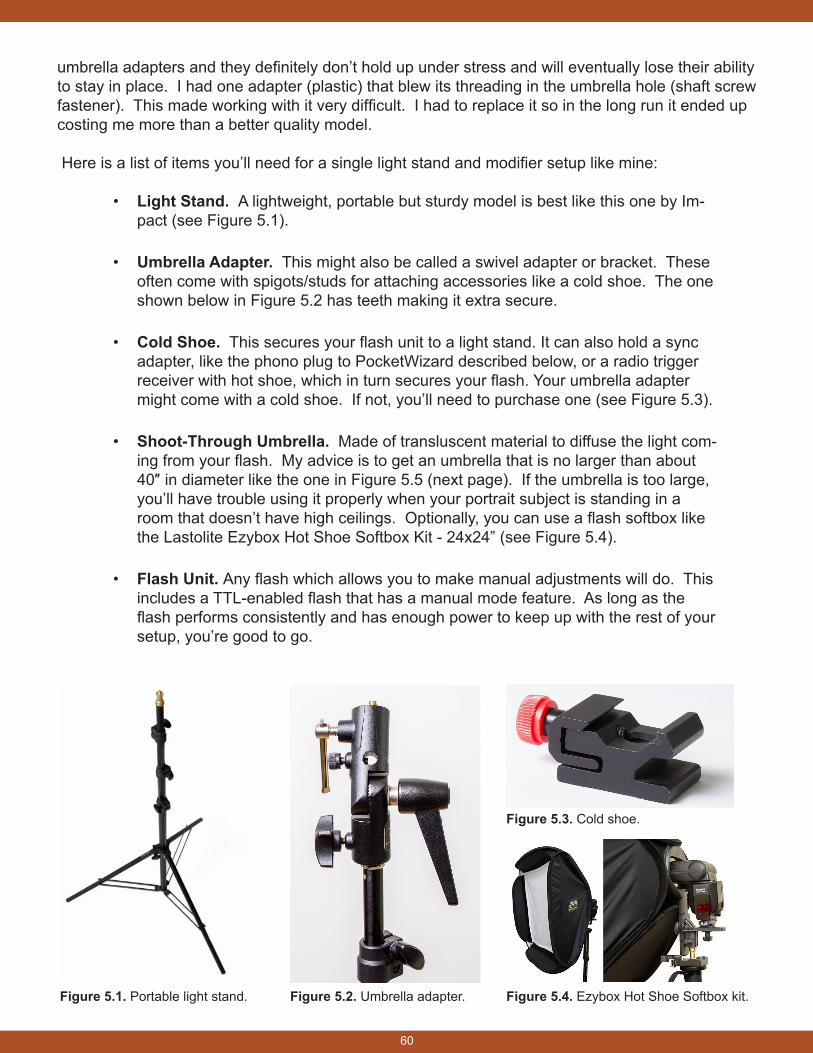
60
Figure 5.1. Portable light stand. Figure 5.2. Umbrella adapter.
umbrella adapters and they definitely don’t hold up under stress and will eventually lose their ability to stay in place. I had one adapter (plastic) that blew its threading in the umbrella hole (shaft screw fastener). This made working with it very difficult. I had to replace it so in the long run it ended up costing me more than a better quality model.
Here is a list of items you’ll need for a single light stand and modifier setup like mine:
• Light Stand. A lightweight, portable but sturdy model is best like this one by Im-pact (see Figure 5.1).
• Umbrella Adapter. This might also be called a swivel adapter or bracket. These often come with spigots/studs for attaching accessories like a cold shoe. The one shown below in Figure 5.2 has teeth making it extra secure.
• Cold Shoe. This secures your flash unit to a light stand. It can also hold a sync adapter, like the phono plug to PocketWizard described below, or a radio trigger receiver with hot shoe, which in turn secures your flash. Your umbrella adapter might come with a cold shoe. If not, you’ll need to purchase one (see Figure 5.3).
• Shoot-Through Umbrella. Made of transluscent material to diffuse the light com-ing from your flash. My advice is to get an umbrella that is no larger than about 40″ in diameter like the one in Figure 5.5 (next page). If the umbrella is too large, you’ll have trouble using it properly when your portrait subject is standing in a room that doesn’t have high ceilings. Optionally, you can use a flash softbox like the Lastolite Ezybox Hot Shoe Softbox Kit - 24x24” (see Figure 5.4).
• Flash Unit. Any flash which allows you to make manual adjustments will do. This includes a TTL-enabled flash that has a manual mode feature. As long as the flash performs consistently and has enough power to keep up with the rest of your setup, you’re good to go.
Figure 5.3. Cold shoe.
Figure 5.4. Ezybox Hot Shoe Softbox kit.
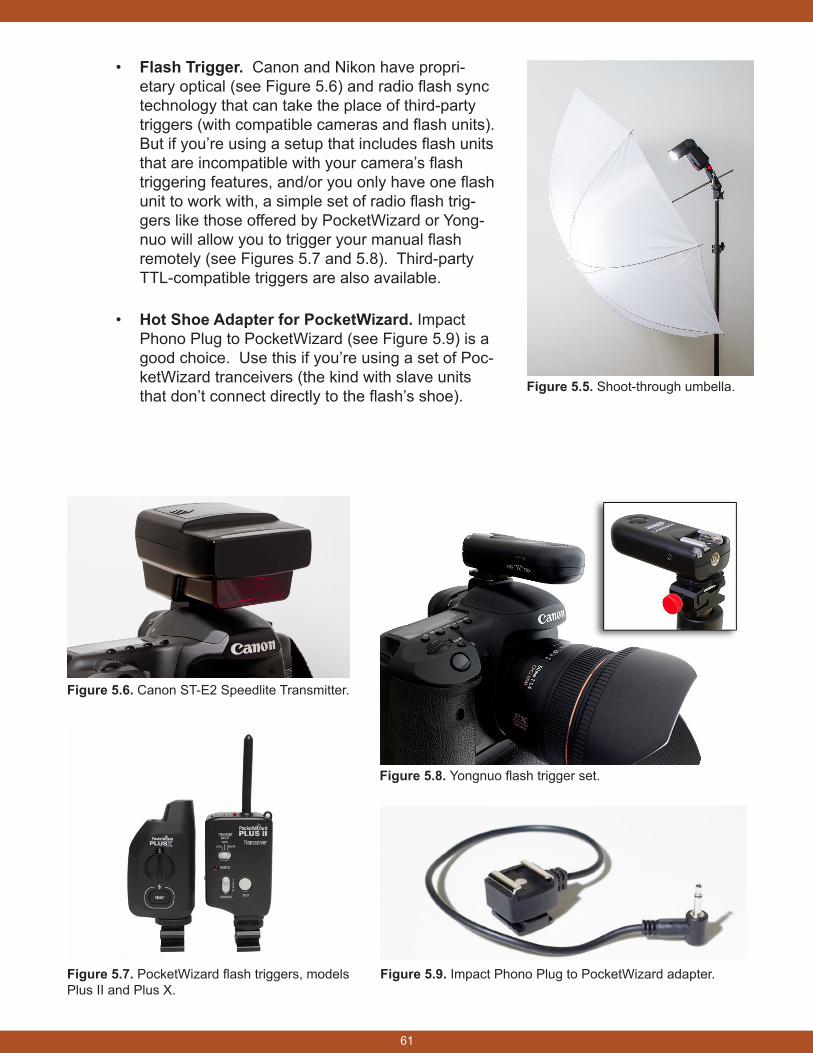
61
• Flash Trigger. Canon and Nikon have propri-etary optical (see Figure 5.6) and radio flash sync technology that can take the place of third-party triggers (with compatible cameras and flash units). But if you’re using a setup that includes flash units that are incompatible with your camera’s flash triggering features, and/or you only have one flash unit to work with, a simple set of radio flash trig-gers like those offered by PocketWizard or Yong-nuo will allow you to trigger your manual flash remotely (see Figures 5.7 and 5.8). Third-party TTL-compatible triggers are also available.
• Hot Shoe Adapter for PocketWizard. Impact Phono Plug to PocketWizard (see Figure 5.9) is a good choice. Use this if you’re using a set of Poc-ketWizard tranceivers (the kind with slave units that don’t connect directly to the flash’s shoe). Figure 5.5. Shoot-through umbella.
Figure 5.9. Impact Phono Plug to PocketWizard adapter.Figure 5.7. PocketWizard flash triggers, models Plus II and Plus X.
Figure 5.6. Canon ST-E2 Speedlite Transmitter.
Figure 5.8. Yongnuo flash trigger set.
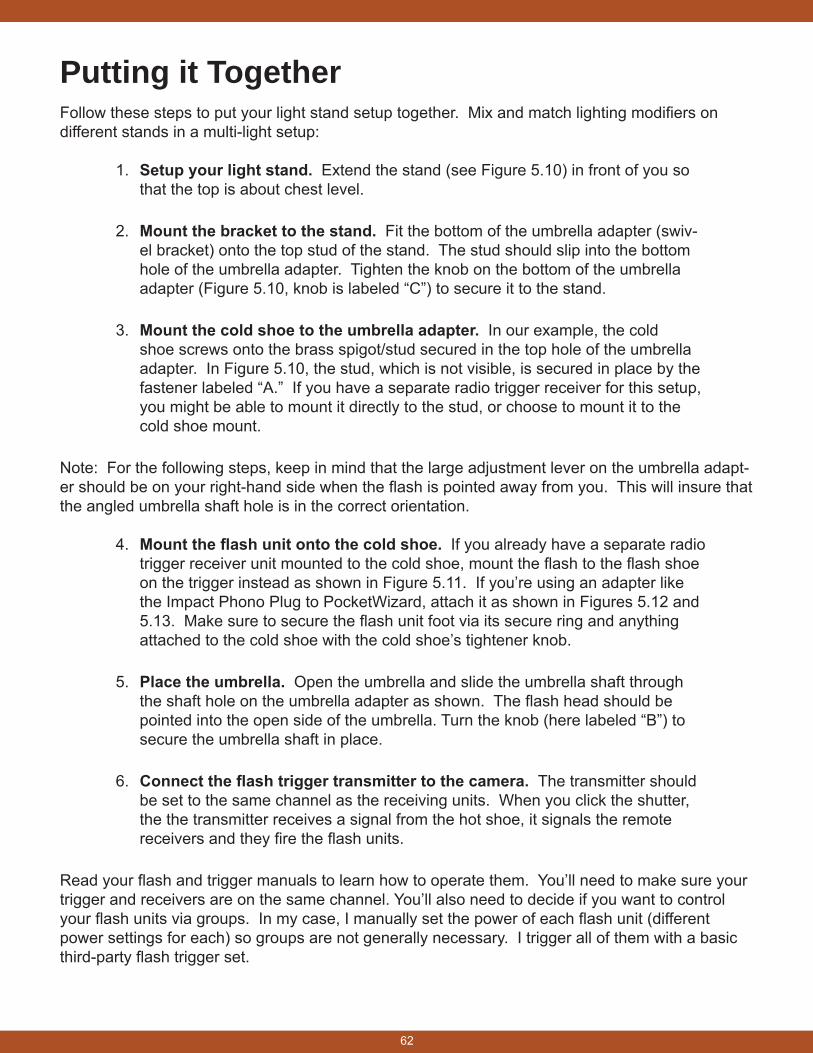
62
Putting it TogetherFollow these steps to put your light stand setup together. Mix and match lighting modifiers on different stands in a multi-light setup:
1. Setup your light stand. Extend the stand (see Figure 5.10) in front of you so that the top is about chest level.
2. Mount the bracket to the stand. Fit the bottom of the umbrella adapter (swiv-el bracket) onto the top stud of the stand. The stud should slip into the bottom hole of the umbrella adapter. Tighten the knob on the bottom of the umbrella adapter (Figure 5.10, knob is labeled “C”) to secure it to the stand.
3. Mount the cold shoe to the umbrella adapter. In our example, the cold shoe screws onto the brass spigot/stud secured in the top hole of the umbrella adapter. In Figure 5.10, the stud, which is not visible, is secured in place by the fastener labeled “A.” If you have a separate radio trigger receiver for this setup, you might be able to mount it directly to the stud, or choose to mount it to the cold shoe mount.
Note: For the following steps, keep in mind that the large adjustment lever on the umbrella adapt-er should be on your right-hand side when the flash is pointed away from you. This will insure that the angled umbrella shaft hole is in the correct orientation.
4. Mount the flash unit onto the cold shoe. If you already have a separate radio trigger receiver unit mounted to the cold shoe, mount the flash to the flash shoe on the trigger instead as shown in Figure 5.11. If you’re using an adapter like the Impact Phono Plug to PocketWizard, attach it as shown in Figures 5.12 and 5.13. Make sure to secure the flash unit foot via its secure ring and anything attached to the cold shoe with the cold shoe’s tightener knob.
5. Place the umbrella. Open the umbrella and slide the umbrella shaft through the shaft hole on the umbrella adapter as shown. The flash head should be pointed into the open side of the umbrella. Turn the knob (here labeled “B”) to secure the umbrella shaft in place.
6. Connect the flash trigger transmitter to the camera. The transmitter should be set to the same channel as the receiving units. When you click the shutter, the the transmitter receives a signal from the hot shoe, it signals the remote receivers and they fire the flash units.
Read your flash and trigger manuals to learn how to operate them. You’ll need to make sure your trigger and receivers are on the same channel. You’ll also need to decide if you want to control your flash units via groups. In my case, I manually set the power of each flash unit (different power settings for each) so groups are not generally necessary. I trigger all of them with a basic third-party flash trigger set.
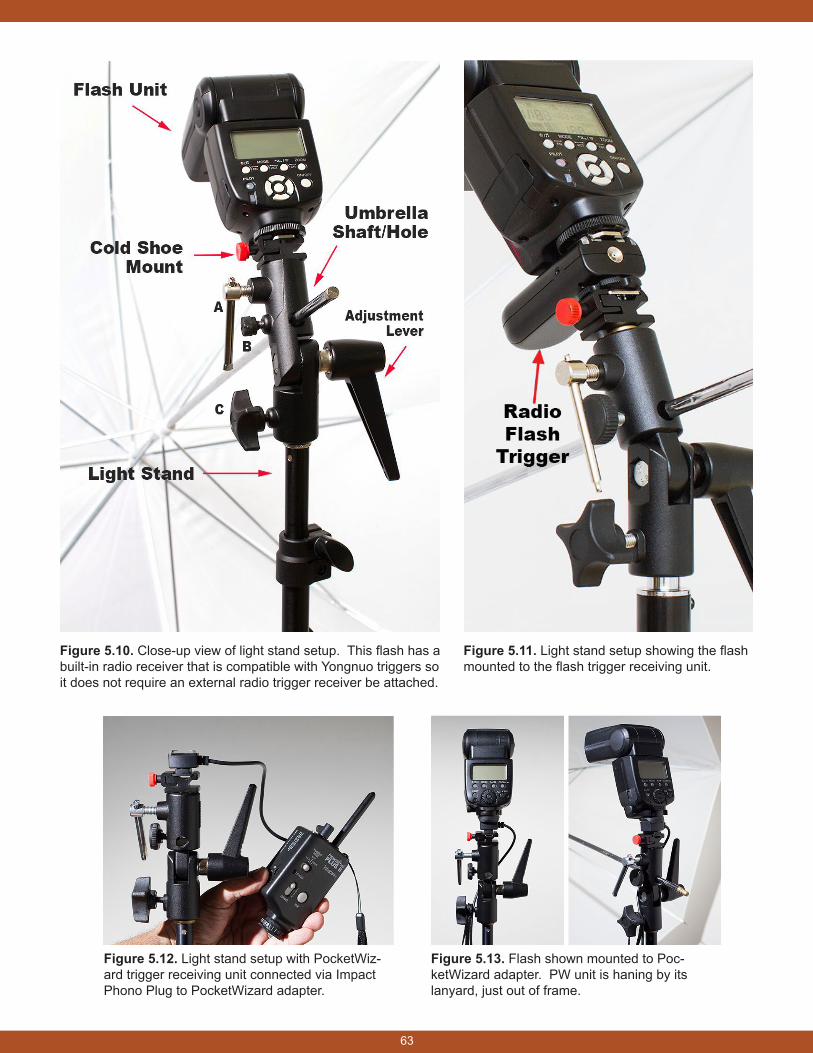
63
Figure 5.10. Close-up view of light stand setup. This flash has a built-in radio receiver that is compatible with Yongnuo triggers so it does not require an external radio trigger receiver be attached.
Figure 5.11. Light stand setup showing the flash mounted to the flash trigger receiving unit.
Figure 5.13. Flash shown mounted to Poc-ketWizard adapter. PW unit is haning by its lanyard, just out of frame.
Figure 5.12. Light stand setup with PocketWiz-ard trigger receiving unit connected via Impact Phono Plug to PocketWizard adapter.
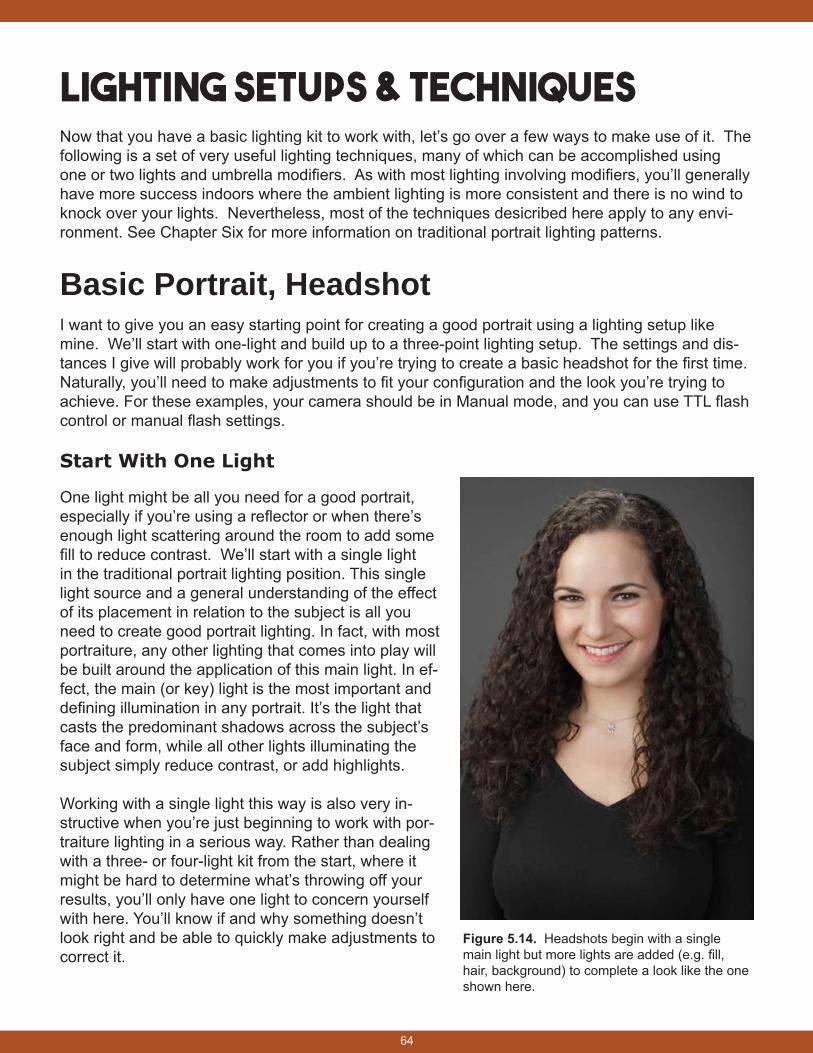
64
lighting setups & TechniquesNow that you have a basic lighting kit to work with, let’s go over a few ways to make use of it. The following is a set of very useful lighting techniques, many of which can be accomplished using one or two lights and umbrella modifiers. As with most lighting involving modifiers, you’ll generally have more success indoors where the ambient lighting is more consistent and there is no wind to knock over your lights. Nevertheless, most of the techniques desicribed here apply to any envi-ronment. See Chapter Six for more information on traditional portrait lighting patterns.
Basic Portrait, HeadshotI want to give you an easy starting point for creating a good portrait using a lighting setup like mine. We’ll start with one-light and build up to a three-point lighting setup. The settings and dis-tances I give will probably work for you if you’re trying to create a basic headshot for the first time. Naturally, you’ll need to make adjustments to fit your configuration and the look you’re trying to achieve. For these examples, your camera should be in Manual mode, and you can use TTL flash control or manual flash settings.
Start With One Light
One light might be all you need for a good portrait, especially if you’re using a reflector or when there’s enough light scattering around the room to add some fill to reduce contrast. We’ll start with a single light in the traditional portrait lighting position. This single light source and a general understanding of the effect of its placement in relation to the subject is all you need to create good portrait lighting. In fact, with most portraiture, any other lighting that comes into play will be built around the application of this main light. In ef-fect, the main (or key) light is the most important and defining illumination in any portrait. It’s the light that casts the predominant shadows across the subject’s face and form, while all other lights illuminating the subject simply reduce contrast, or add highlights.
Working with a single light this way is also very in-structive when you’re just beginning to work with por-traiture lighting in a serious way. Rather than dealing with a three- or four-light kit from the start, where it might be hard to determine what’s throwing off your results, you’ll only have one light to concern yourself with here. You’ll know if and why something doesn’t look right and be able to quickly make adjustments to correct it.
Figure 5.14. Headshots begin with a single main light but more lights are added (e.g. fill, hair, background) to complete a look like the one shown here.
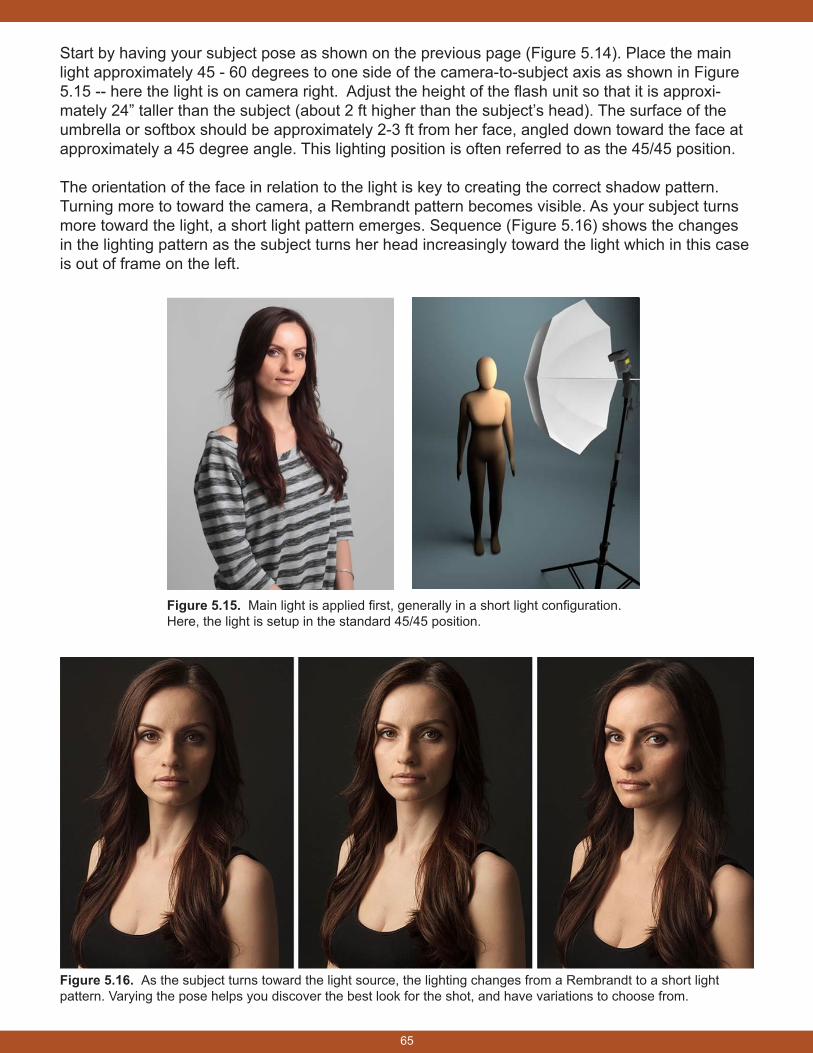
65
Start by having your subject pose as shown on the previous page (Figure 5.14). Place the main light approximately 45 - 60 degrees to one side of the camera-to-subject axis as shown in Figure 5.15 -- here the light is on camera right. Adjust the height of the flash unit so that it is approxi-mately 24” taller than the subject (about 2 ft higher than the subject’s head). The surface of the umbrella or softbox should be approximately 2-3 ft from her face, angled down toward the face at approximately a 45 degree angle. This lighting position is often referred to as the 45/45 position.
The orientation of the face in relation to the light is key to creating the correct shadow pattern. Turning more to toward the camera, a Rembrandt pattern becomes visible. As your subject turns more toward the light, a short light pattern emerges. Sequence (Figure 5.16) shows the changes in the lighting pattern as the subject turns her head increasingly toward the light which in this case is out of frame on the left.
Figure 5.16. As the subject turns toward the light source, the lighting changes from a Rembrandt to a short light pattern. Varying the pose helps you discover the best look for the shot, and have variations to choose from.
Figure 5.15. Main light is applied first, generally in a short light configuration. Here, the light is setup in the standard 45/45 position.
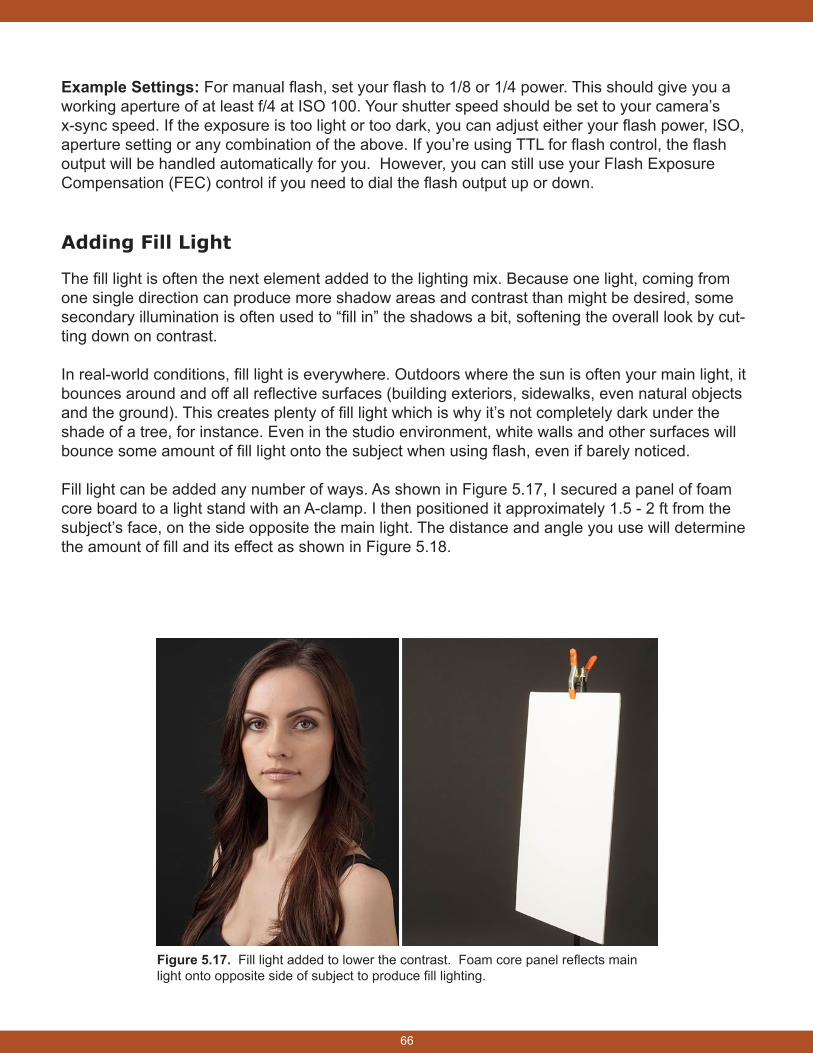
66
Example Settings: For manual flash, set your flash to 1/8 or 1/4 power. This should give you a working aperture of at least f/4 at ISO 100. Your shutter speed should be set to your camera’s x-sync speed. If the exposure is too light or too dark, you can adjust either your flash power, ISO, aperture setting or any combination of the above. If you’re using TTL for flash control, the flash output will be handled automatically for you. However, you can still use your Flash Exposure Compensation (FEC) control if you need to dial the flash output up or down.
Adding Fill Light
The fill light is often the next element added to the lighting mix. Because one light, coming from one single direction can produce more shadow areas and contrast than might be desired, some secondary illumination is often used to “fill in” the shadows a bit, softening the overall look by cut-ting down on contrast.
In real-world conditions, fill light is everywhere. Outdoors where the sun is often your main light, it bounces around and off all reflective surfaces (building exteriors, sidewalks, even natural objects and the ground). This creates plenty of fill light which is why it’s not completely dark under the shade of a tree, for instance. Even in the studio environment, white walls and other surfaces will bounce some amount of fill light onto the subject when using flash, even if barely noticed.
Fill light can be added any number of ways. As shown in Figure 5.17, I secured a panel of foam core board to a light stand with an A-clamp. I then positioned it approximately 1.5 - 2 ft from the subject’s face, on the side opposite the main light. The distance and angle you use will determine the amount of fill and its effect as shown in Figure 5.18.
Figure 5.17. Fill light added to lower the contrast. Foam core panel reflects main light onto opposite side of subject to produce fill lighting.
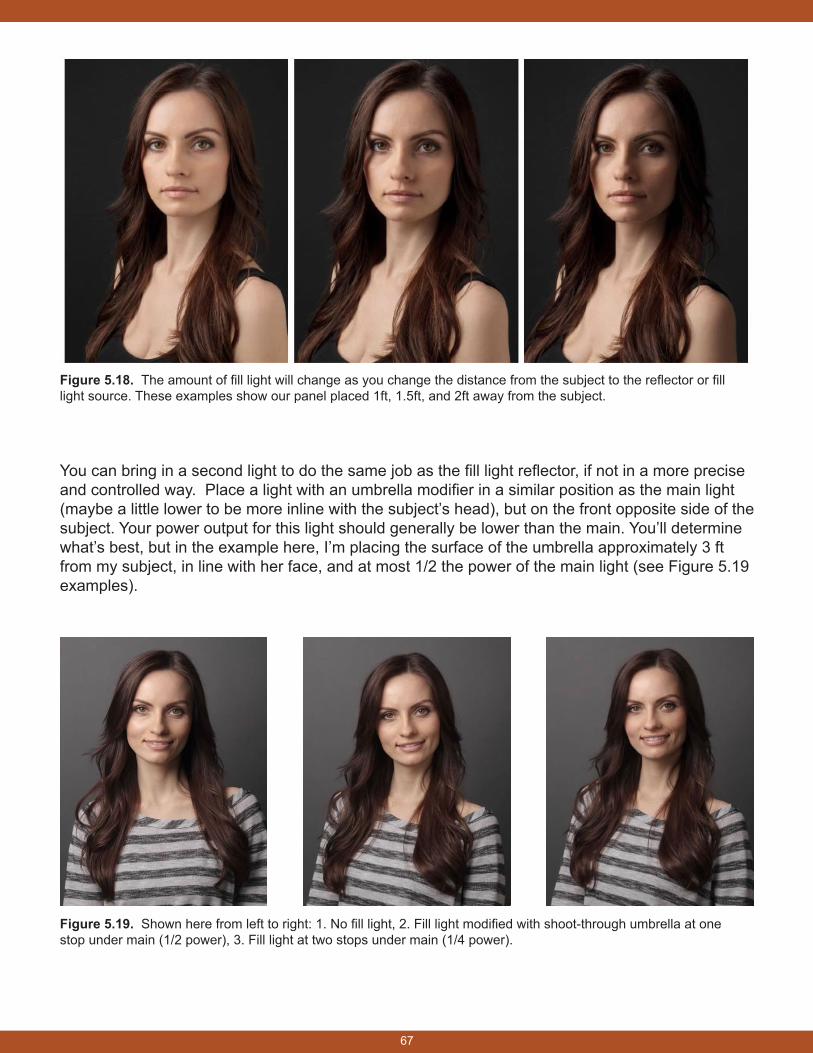
67
Figure 5.18. The amount of fill light will change as you change the distance from the subject to the reflector or fill light source. These examples show our panel placed 1ft, 1.5ft, and 2ft away from the subject.
You can bring in a second light to do the same job as the fill light reflector, if not in a more precise and controlled way. Place a light with an umbrella modifier in a similar position as the main light (maybe a little lower to be more inline with the subject’s head), but on the front opposite side of the subject. Your power output for this light should generally be lower than the main. You’ll determine what’s best, but in the example here, I’m placing the surface of the umbrella approximately 3 ft from my subject, in line with her face, and at most 1/2 the power of the main light (see Figure 5.19 examples).
Figure 5.19. Shown here from left to right: 1. No fill light, 2. Fill light modified with shoot-through umbrella at one stop under main (1/2 power), 3. Fill light at two stops under main (1/4 power).
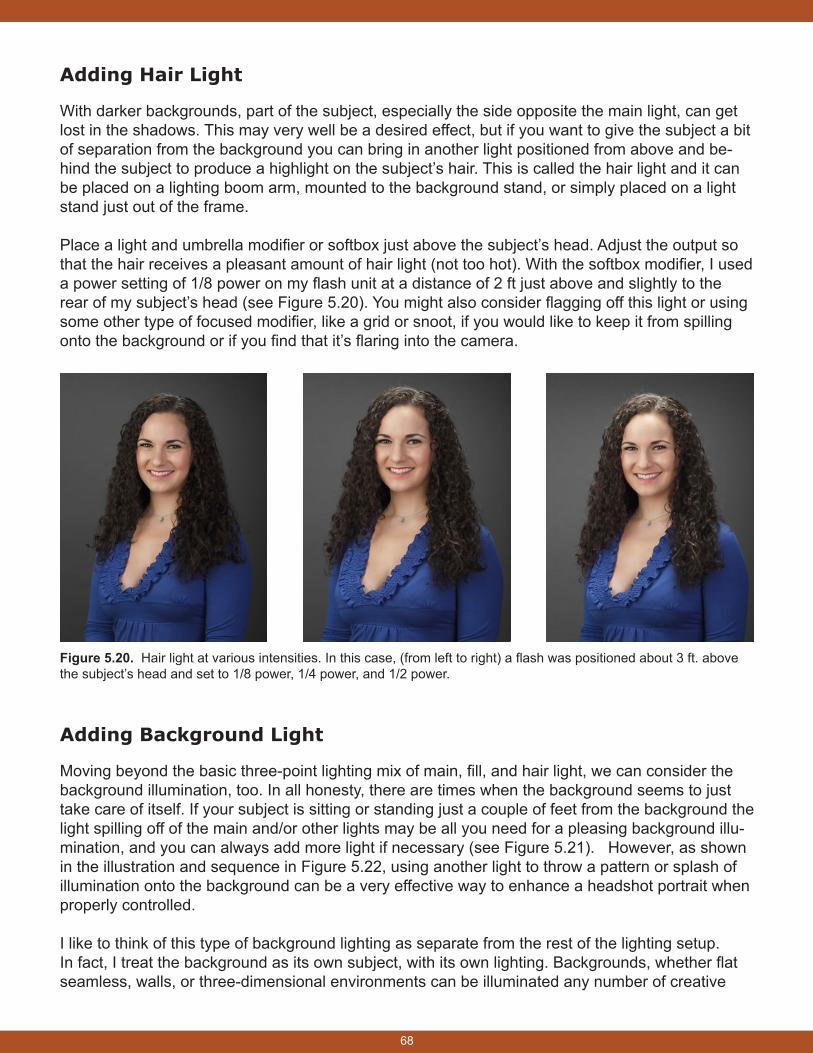
68
Adding Hair Light
With darker backgrounds, part of the subject, especially the side opposite the main light, can get lost in the shadows. This may very well be a desired effect, but if you want to give the subject a bit of separation from the background you can bring in another light positioned from above and be-hind the subject to produce a highlight on the subject’s hair. This is called the hair light and it can be placed on a lighting boom arm, mounted to the background stand, or simply placed on a light stand just out of the frame.
Place a light and umbrella modifier or softbox just above the subject’s head. Adjust the output so that the hair receives a pleasant amount of hair light (not too hot). With the softbox modifier, I used a power setting of 1/8 power on my flash unit at a distance of 2 ft just above and slightly to the rear of my subject’s head (see Figure 5.20). You might also consider flagging off this light or using some other type of focused modifier, like a grid or snoot, if you would like to keep it from spilling onto the background or if you find that it’s flaring into the camera.
Adding Background Light
Moving beyond the basic three-point lighting mix of main, fill, and hair light, we can consider the background illumination, too. In all honesty, there are times when the background seems to just take care of itself. If your subject is sitting or standing just a couple of feet from the background the light spilling off of the main and/or other lights may be all you need for a pleasing background illu-mination, and you can always add more light if necessary (see Figure 5.21). However, as shown in the illustration and sequence in Figure 5.22, using another light to throw a pattern or splash of illumination onto the background can be a very effective way to enhance a headshot portrait when properly controlled.
I like to think of this type of background lighting as separate from the rest of the lighting setup. In fact, I treat the background as its own subject, with its own lighting. Backgrounds, whether flat seamless, walls, or three-dimensional environments can be illuminated any number of creative
Figure 5.20. Hair light at various intensities. In this case, (from left to right) a flash was positioned about 3 ft. above the subject’s head and set to 1/8 power, 1/4 power, and 1/2 power.
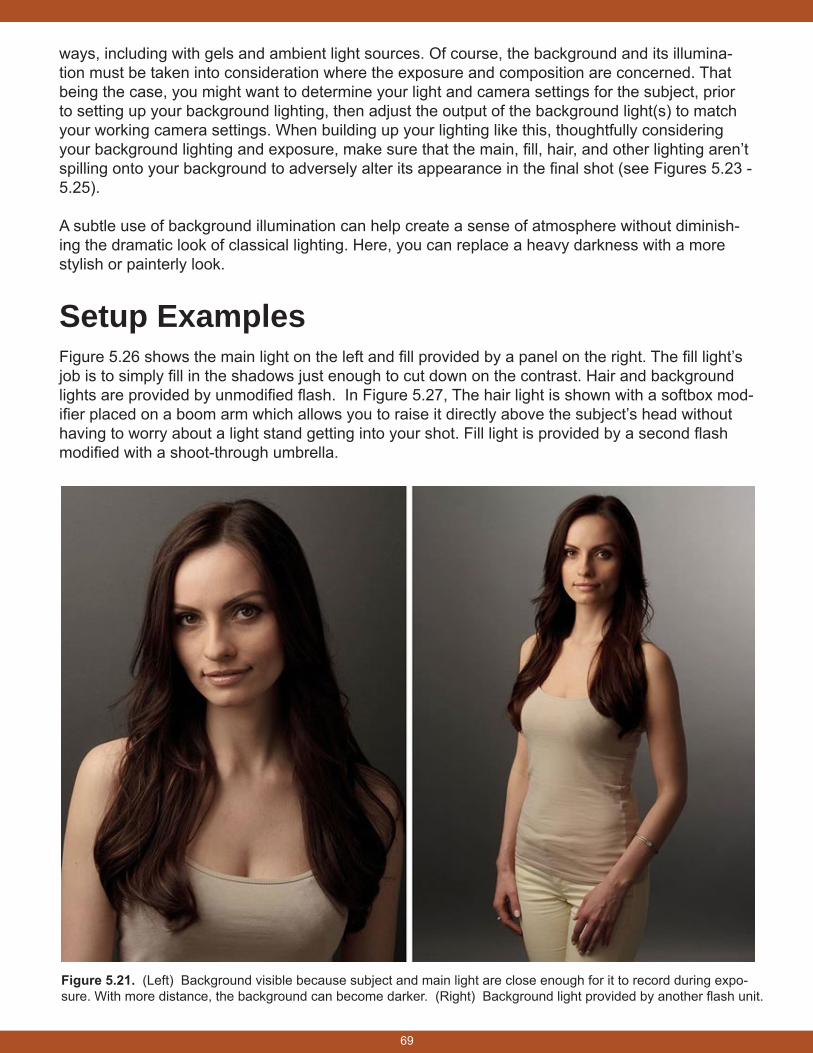
69
ways, including with gels and ambient light sources. Of course, the background and its illumina-tion must be taken into consideration where the exposure and composition are concerned. That being the case, you might want to determine your light and camera settings for the subject, prior to setting up your background lighting, then adjust the output of the background light(s) to match your working camera settings. When building up your lighting like this, thoughtfully considering your background lighting and exposure, make sure that the main, fill, hair, and other lighting aren’t spilling onto your background to adversely alter its appearance in the final shot (see Figures 5.23 - 5.25).
A subtle use of background illumination can help create a sense of atmosphere without diminish-ing the dramatic look of classical lighting. Here, you can replace a heavy darkness with a more stylish or painterly look.
Setup ExamplesFigure 5.26 shows the main light on the left and fill provided by a panel on the right. The fill light’s job is to simply fill in the shadows just enough to cut down on the contrast. Hair and background lights are provided by unmodified flash. In Figure 5.27, The hair light is shown with a softbox mod-ifier placed on a boom arm which allows you to raise it directly above the subject’s head without having to worry about a light stand getting into your shot. Fill light is provided by a second flash modified with a shoot-through umbrella.
Figure 5.21. (Left) Background visible because subject and main light are close enough for it to record during expo-sure. With more distance, the background can become darker. (Right) Background light provided by another flash unit.
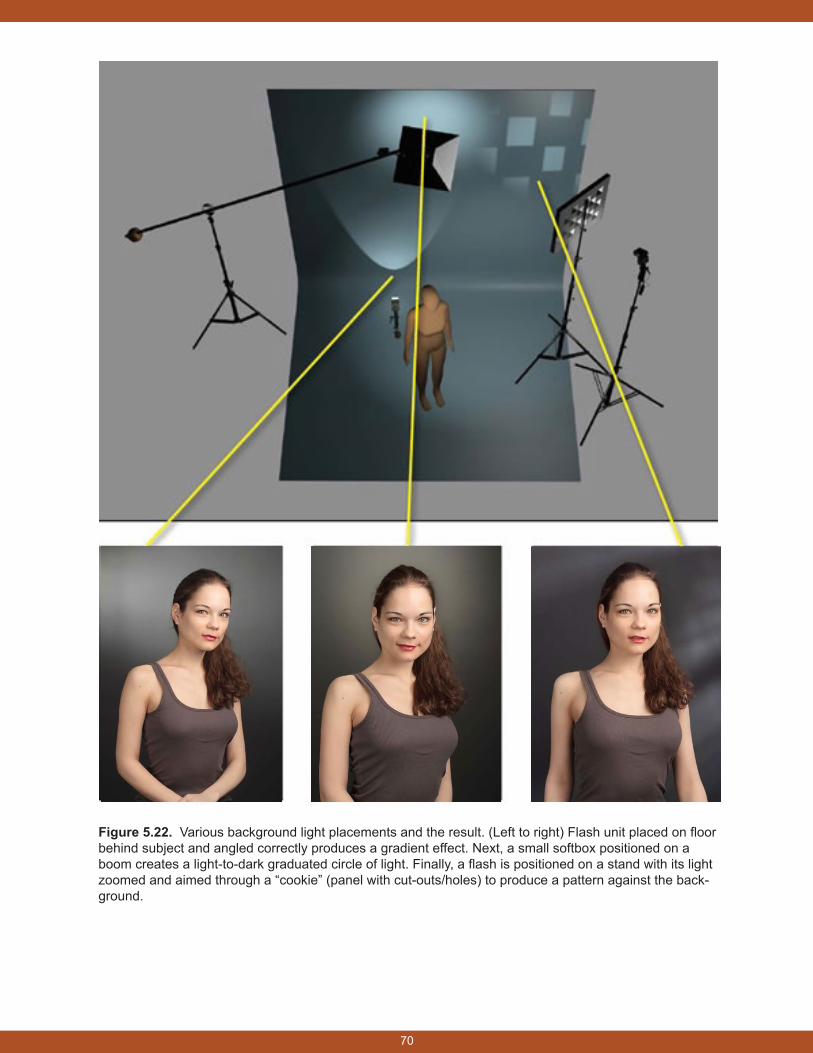
70
Figure 5.22. Various background light placements and the result. (Left to right) Flash unit placed on floor behind subject and angled correctly produces a gradient effect. Next, a small softbox positioned on a boom creates a light-to-dark graduated circle of light. Finally, a flash is positioned on a stand with its light zoomed and aimed through a “cookie” (panel with cut-outs/holes) to produce a pattern against the back-ground.
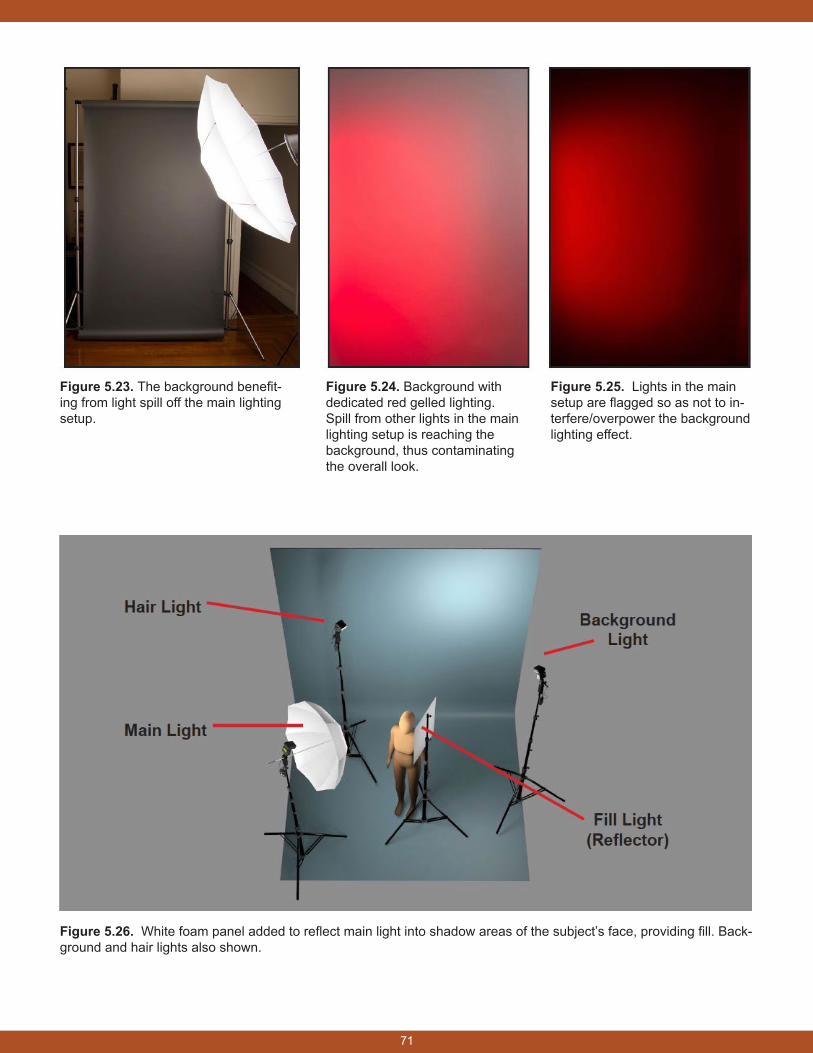
71
Figure 5.26. White foam panel added to reflect main light into shadow areas of the subject’s face, providing fill. Back-ground and hair lights also shown.
Figure 5.23. The background benefit-ing from light spill off the main lighting setup.
Figure 5.24. Background with dedicated red gelled lighting. Spill from other lights in the main lighting setup is reaching the background, thus contaminating the overall look.
Figure 5.25. Lights in the main setup are flagged so as not to in-terfere/overpower the background lighting effect.
72
Bounce Off-Camera FlashOne easy way to get big, soft, even light for your portraits is by reflecting the light from your flash off of a larger surface. This is a popular technique when using a camera-mounted flash, but I like to use it with off-camera flash units, too.
The shot shown in Figure 5.28 was taken in a medium-sized room with white walls. A large win-dow is behind the subject, and two flash units are positioned to the right, pointed at the wall on that side of the room. This effectively creates a larger light source (like a giant softbox); a more flattering light than if we had the flash units point directly toward the subject.
The setup:
• Two flash units each set to 1/4 power.
• Subject approximately 9 ft from the wall.
• Camera in Manual mode; ISO 200, f/5.6, 1/160 sec. This combination allowed me to balance the constant light outside the window with the flash exposure on the subject. Naturally, I could have used a similarly balanced combination of settings to achieve virtually the same results. I could have even overpowered the outdoor light making it look dark outside, or conversely, let the outdoor light blow-out to white to give the subject a more light-wrapped, ethereal look.
Figure 5.27. Basic headshot setup featuring main, fill, hair, and background lights.
73
Figure 5.28. Two flash units setup to bounce light off the wall opposite the subject.
Here are some of the advantages of using a setup like this:
• One natural-looking catchlight. If I’d used a couple of shoot-through um-brellas for this shot, you’d probably notice one catchlight for each light source. Hitting the wall with two or more lights creates one big light, thus one catchlight.
• Faster recycle times. I could have used one flash unit at double the power, but my recycle times would have been slower, especially as the batteries started to fade.
• Flexible shooting. Having the flash units positioned off-camera allowed me to move freely without changing exposure settings. As long as the distance from the subject to the main light source (the wall of light) remain the same, the expo-sure will be consistent regardless of my distance to any part of the scene.
• Manual vs TTL flash. In a fast-paced shooting scenario (like event photogra-phy), it might be a lot easier to use camera-mounted flash in TTL mode. The results aren’t precise, but they’ll do. But with a static shooting scenario, you’ve got more control over the subject and your environment, so why not take ad-vantage of that and use manual flash and camera settings for total control and consistency?
Remember that the larger your light source, relative to your subject, the softer the look of the light. The actual flash units emit very small, potentially harsh light, but since those units are bouncing light off a large surface, that light spreads more evenly throughout the room.
74
White BackgroundsThe basic white background seems like it would be simple enough to master, but it’s a frustrating challenge for many. In this section we’re going to discuss the reasons why attempts at images featuring solid white backgrounds often fail. I’ll show you how to successfully create simple clean backgrounds as well as wrap-around lighting and ethereal effects by employing a few simple tech-niques.
White Backgrounds Are Easy
If you think about it, there’s nothing mysterious about creating a basic white background. After all, a solid white space in any image is simply the lack of detail in an area of highlights. And what’s the easiest way to achieve that lack of detail? Over-exposure. For example, if you simply wanted an image of solid white (without a subject), all you’d have to do is point your camera at a clean white wall or seamless background and leave the shut-ter open long enough to blow out any detail.
If you’re using flash, you can maintain your cam-era’s flash sync (x-sync) and just blast the back-ground with enough light to achieve the same result. Yes, creating a solid white background might be easy, but things get more complicated when using one in a portrait (see Figure 5.29).
A White Background Isn’t Always White
If you’ve ever wanted to duplicate the look of a solid white background in an image you’ve seen elsewhere, and thought all you’d need was a clean white roll of seamless background paper or white sheet, you were probably surprised at your initial attempts to recreate the look. More often than not, first tries at this result in dull gray backgrounds or uneven hot spots. Perhaps you rem-edied this in Photoshop, but still wished you could capture an even, clean white area across the entire background.
Reasons why white doesn’t always show up as white have to do with simple exposure. As stated earlier, a lack of detail in white can easily be accomplished with overexposure. It makes sense then that as we move away from settings that produce overexposure into settings that start to re-veal some sense of detail, we lose pure white and get something just a little less white (and quite often, this is best). Continuing on this trend our white background will begin to look light gray, then darker gray, and eventually we would make our way to the other side of the exposure scale and end up with a completely dark background. That’s right, your bright white background can reproduce as pure white, pure black, or any shade of gray, even all within the same image; it all depends on light coverage and exposure.
Figure 5.29. Basic white background. Note in this sitting position, we allow the floor to retain detail. This keeps the subject “grounded” and avoids the artificial “floating” in white space look.
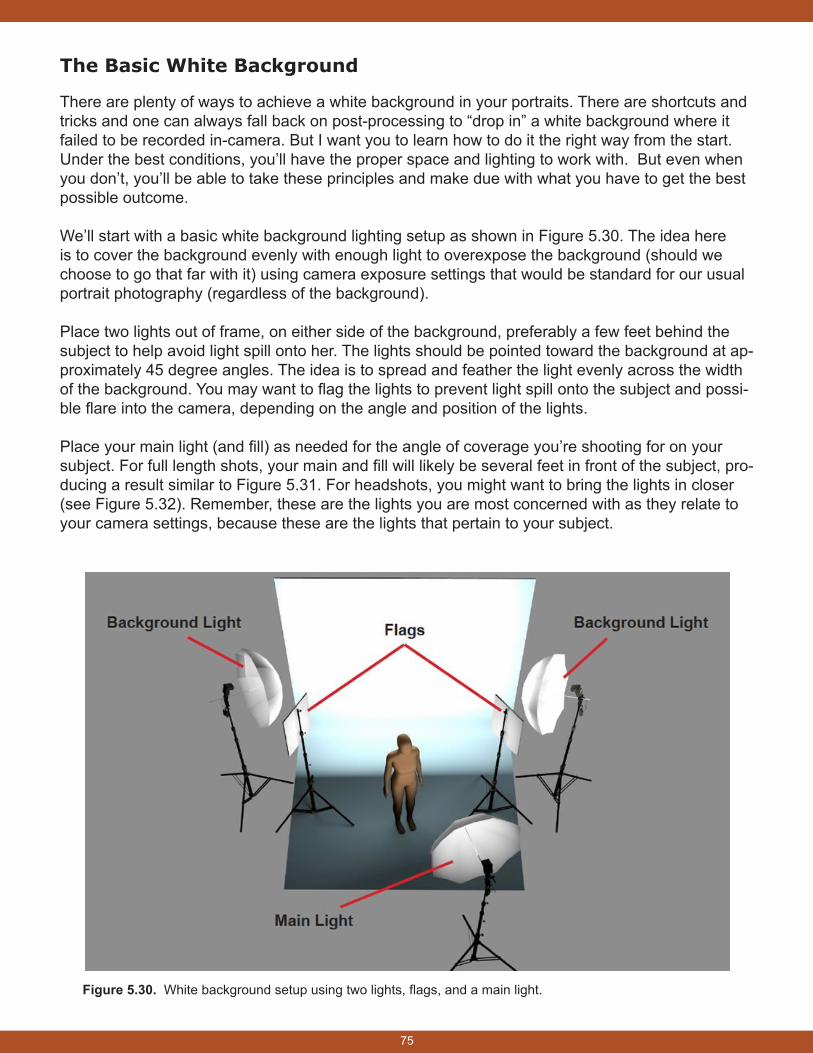
75
The Basic White Background
There are plenty of ways to achieve a white background in your portraits. There are shortcuts and tricks and one can always fall back on post-processing to “drop in” a white background where it failed to be recorded in-camera. But I want you to learn how to do it the right way from the start. Under the best conditions, you’ll have the proper space and lighting to work with. But even when you don’t, you’ll be able to take these principles and make due with what you have to get the best possible outcome.
We’ll start with a basic white background lighting setup as shown in Figure 5.30. The idea here is to cover the background evenly with enough light to overexpose the background (should we choose to go that far with it) using camera exposure settings that would be standard for our usual portrait photography (regardless of the background).
Place two lights out of frame, on either side of the background, preferably a few feet behind the subject to help avoid light spill onto her. The lights should be pointed toward the background at ap-proximately 45 degree angles. The idea is to spread and feather the light evenly across the width of the background. You may want to flag the lights to prevent light spill onto the subject and possi-ble flare into the camera, depending on the angle and position of the lights.
Place your main light (and fill) as needed for the angle of coverage you’re shooting for on your subject. For full length shots, your main and fill will likely be several feet in front of the subject, pro-ducing a result similar to Figure 5.31. For headshots, you might want to bring the lights in closer (see Figure 5.32). Remember, these are the lights you are most concerned with as they relate to your camera settings, because these are the lights that pertain to your subject.
Figure 5.30. White background setup using two lights, flags, and a main light.

76
Figure 5.31. White background, fulllength. Figure 5.32. Headshot on white background.
The background lights should then be adjusted and evenly powered to an output just enough to over-expose the background itself. Find this power setting by making incremental adjustments to the lights’ output and taking test shots. A look at your camera’s “highlight alert” feature might also help. If you use a light meter, it can help you identify when you’re lights have crossed into over-exposure territory.
Wrap-Around Lighting
The basic white background provides us with a clean, crisp way to present our subject. As you’ve seen, as long as the background lighting is even and just crosses into the overexposure zone, you’ll have a true white background. Go much beyond that, and you’ll get something a little less “crisp” and a little more ethereal (see Figures 5.33 and 5.34).
Wrap-around lighting gets its name from the way light seems to reach around from behind the subject to “wrap” itself around her. This effect becomes visible as your exposure settings allow more light to bleed around the edges of your subject in an overexposed, back-lighting scenario.
The Light Source As Background
Another way to create a bright, white, or blown-out background is to simply use a light source itself (rather than its reflection on the background). A potential side effect is flare. Even natural window light, coming in from directly behind the subject can work as shown in Figure 5.35 where no addition-al lighting was necessary. Again, this is an effect that perhaps has limited use for most portraiture, but can sometimes come in handy as an effect. (see Figures 5.36 and 5.37).
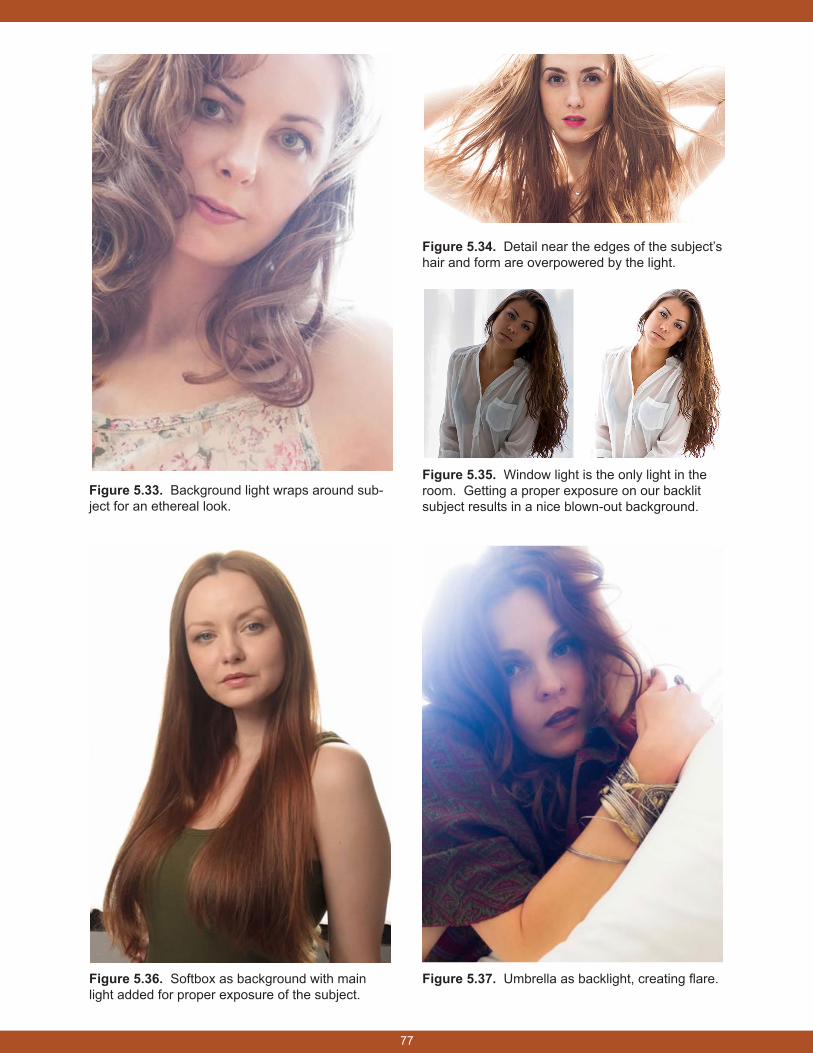
77
Figure 5.33. Background light wraps around sub-ject for an ethereal look.
Figure 5.34. Detail near the edges of the subject’s hair and form are overpowered by the light.
Figure 5.36. Softbox as background with main light added for proper exposure of the subject.
Figure 5.37. Umbrella as backlight, creating flare.
Figure 5.35. Window light is the only light in the room. Getting a proper exposure on our backlit subject results in a nice blown-out background.
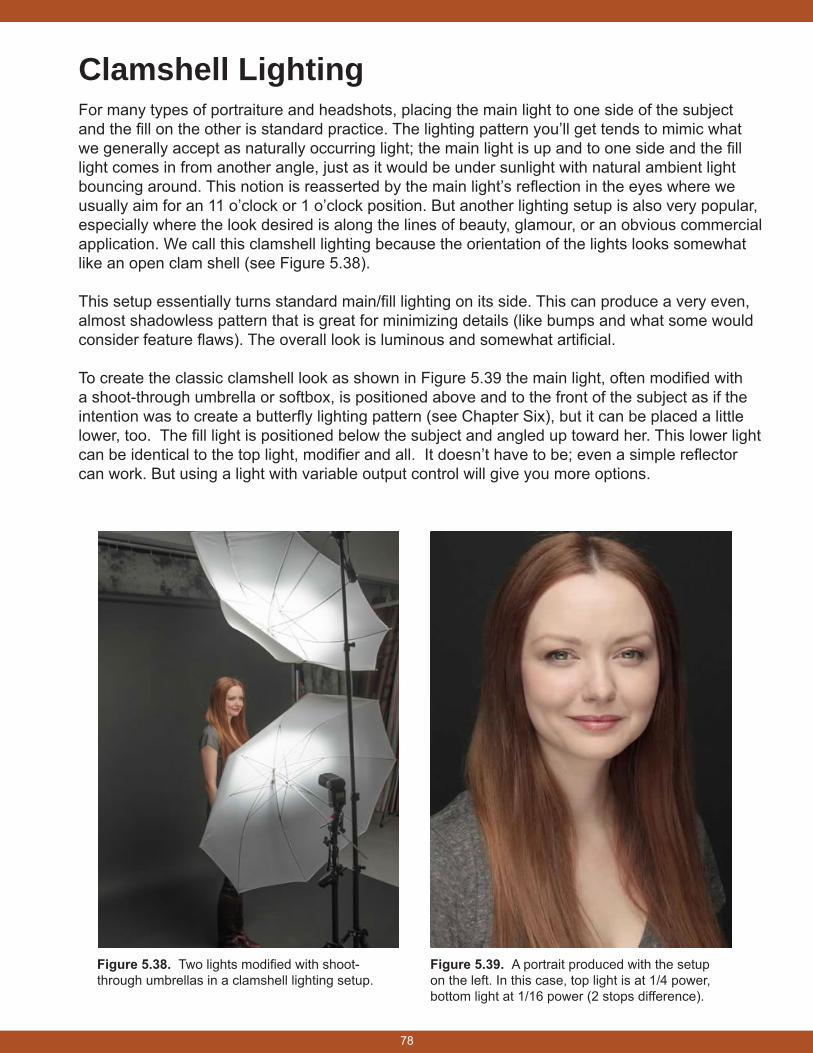
78
Clamshell Lighting For many types of portraiture and headshots, placing the main light to one side of the subject and the fill on the other is standard practice. The lighting pattern you’ll get tends to mimic what we generally accept as naturally occurring light; the main light is up and to one side and the fill light comes in from another angle, just as it would be under sunlight with natural ambient light bouncing around. This notion is reasserted by the main light’s reflection in the eyes where we usually aim for an 11 o’clock or 1 o’clock position. But another lighting setup is also very popular, especially where the look desired is along the lines of beauty, glamour, or an obvious commercial application. We call this clamshell lighting because the orientation of the lights looks somewhat like an open clam shell (see Figure 5.38).
This setup essentially turns standard main/fill lighting on its side. This can produce a very even, almost shadowless pattern that is great for minimizing details (like bumps and what some would consider feature flaws). The overall look is luminous and somewhat artificial.
To create the classic clamshell look as shown in Figure 5.39 the main light, often modified with a shoot-through umbrella or softbox, is positioned above and to the front of the subject as if the intention was to create a butterfly lighting pattern (see Chapter Six), but it can be placed a little lower, too. The fill light is positioned below the subject and angled up toward her. This lower light can be identical to the top light, modifier and all. It doesn’t have to be; even a simple reflector can work. But using a light with variable output control will give you more options.
Figure 5.38. Two lights modified with shoot-through umbrellas in a clamshell lighting setup.
Figure 5.39. A portrait produced with the setup on the left. In this case, top light is at 1/4 power, bottom light at 1/16 power (2 stops difference).
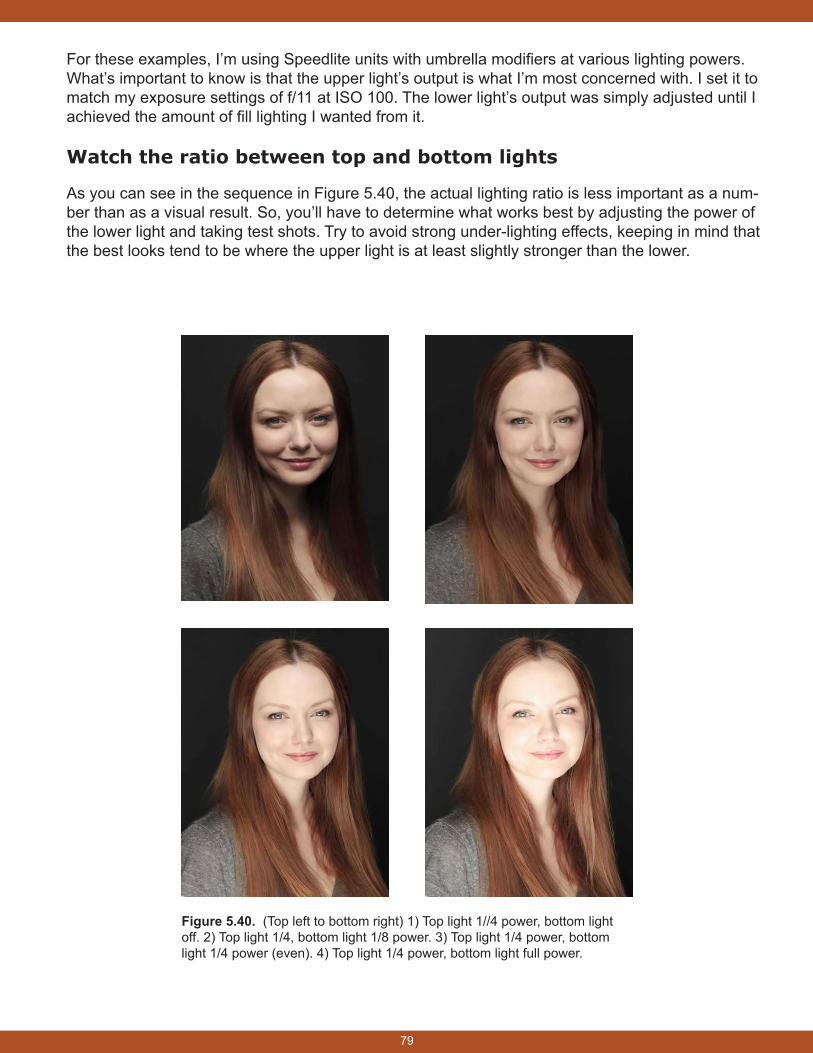
79
For these examples, I’m using Speedlite units with umbrella modifiers at various lighting powers. What’s important to know is that the upper light’s output is what I’m most concerned with. I set it to match my exposure settings of f/11 at ISO 100. The lower light’s output was simply adjusted until I achieved the amount of fill lighting I wanted from it.
Watch the ratio between top and bottom lights
As you can see in the sequence in Figure 5.40, the actual lighting ratio is less important as a num-ber than as a visual result. So, you’ll have to determine what works best by adjusting the power of the lower light and taking test shots. Try to avoid strong under-lighting effects, keeping in mind that the best looks tend to be where the upper light is at least slightly stronger than the lower.
Figure 5.40. (Top left to bottom right) 1) Top light 1//4 power, bottom light off. 2) Top light 1/4, bottom light 1/8 power. 3) Top light 1/4 power, bottom light 1/4 power (even). 4) Top light 1/4 power, bottom light full power.
Portrait Tips CHAPTER SIX
81
Have you ever noticed how some images are just so much better than others, but you can’t quite explain why? Point a camera at someone and snap the photo and you might have a pleasing image, but it doesn’t look like the better photos you’ve seen elsewhere. What makes one photographer’s images look so much better than another’s? Is it better cameras and lenses, or better photo editing techniques, experience, or skills that you haven’t yet mastered? Well, the answer is that all of the above can contribute to the quality of a photographer’s images. But there’s one thing that you can do right now that will improve your photography more than any piece of equipment or any other skill set; learn how to light faces effectively.
Lighting For Faces Most people just starting out in photography concentrate on getting a good photo in terms of what they see through their lens. But they see their subjects with their minds and emotions first and may not even think about how the resulting image is going to look as a frozen moment in time. They don’t consider the effect of the way the light and shadows fall across the face. So, they often end up with photos that just don’t look right or aren’t flattering to the subject. But when you start looking at the scene and subject in front of you in terms of shape and form, light and shadow, you’ll learn to see the potential of light in a whole new way. You’ll learn to change the angle of your subject’s head for the best look given the light you’re working with. And in situations where you have some control over the lighting and its position (for example when working with studio strobes or small flash units) you’ll be able to apply basic portraiture lighting principles to create outstand-ing images.
The Five Basic Lighting PatternsIn portraiture, there are five traditional ways to light a face. These are not the only ways, of course, and we don’t always strive to apply these methods precisely. They are simply guidelines and often good starting points for setting up portrait lighting. I’ll describe them here as basic examples us-ing a single light, where the main light (or key light) is the only light source we’re concerned with. Quite often, one light is all you need when applying these patterns to create classic portraits, but you can add one or more lights to the mix for more sophisticated looks.
Pattern #1: Short Lighting Short lighting is often used as a corrective technique to help make rounder faces look a little thin-ner. In this lighting pattern the main light illuminates the subject on the shorter side of the face (see Figure 6.1), where the distance seems shorter from nose to ear (or nose to the edge of the cheek), from the camera’s perspective. Another way to think about this is that when the subject has her head turned to one side, you are lighting the side of the face that is farthest from the camera.
When viewing a portrait, our attention is first given to the details we can see and to the brightest parts of the picture. Shadows recede and brighter areas are predominant. On a two-dimension-al plane, there is actually less surface area visible on the side of the face turned away from the camera. With short lighting, this is the area that is highlighted with illumination from the main light. Since more attention is given to the narrower surface area, a visual illusion is created that makes the subject’s face look thinner.
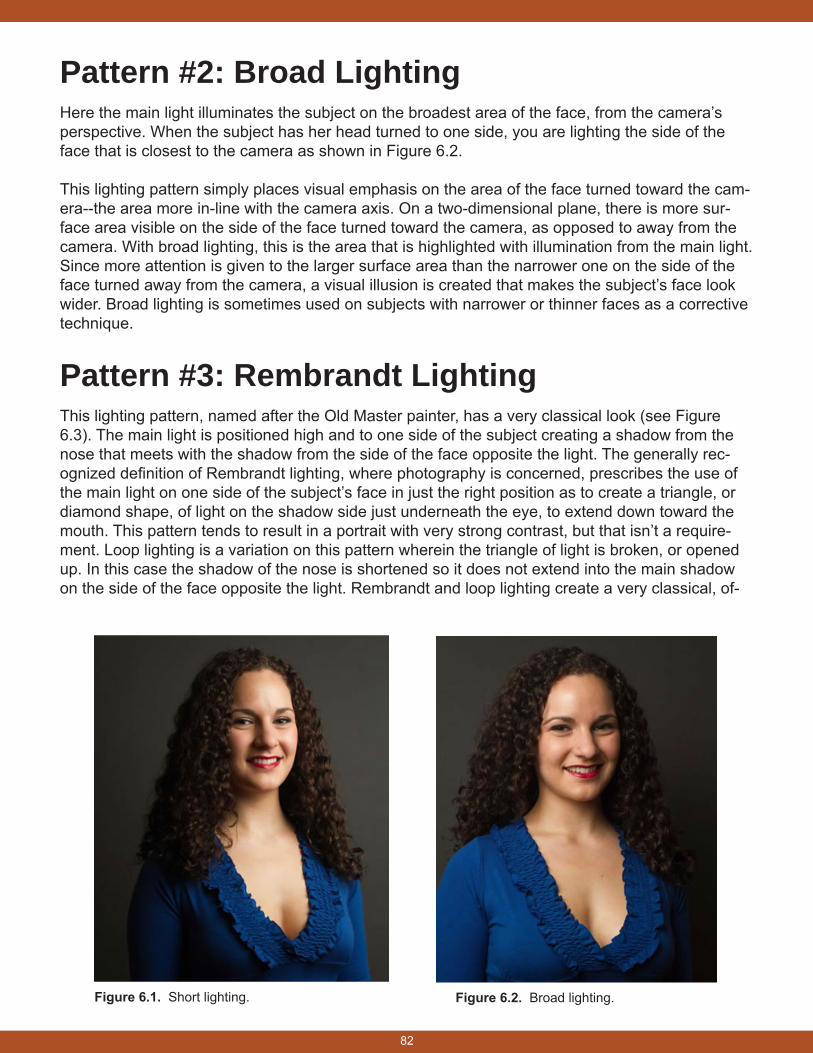
82
Pattern #2: Broad LightingHere the main light illuminates the subject on the broadest area of the face, from the camera’s perspective. When the subject has her head turned to one side, you are lighting the side of the face that is closest to the camera as shown in Figure 6.2.
This lighting pattern simply places visual emphasis on the area of the face turned toward the cam-era--the area more in-line with the camera axis. On a two-dimensional plane, there is more sur-face area visible on the side of the face turned toward the camera, as opposed to away from the camera. With broad lighting, this is the area that is highlighted with illumination from the main light. Since more attention is given to the larger surface area than the narrower one on the side of the face turned away from the camera, a visual illusion is created that makes the subject’s face look wider. Broad lighting is sometimes used on subjects with narrower or thinner faces as a corrective technique.
Pattern #3: Rembrandt Lighting This lighting pattern, named after the Old Master painter, has a very classical look (see Figure 6.3). The main light is positioned high and to one side of the subject creating a shadow from the nose that meets with the shadow from the side of the face opposite the light. The generally rec-ognized definition of Rembrandt lighting, where photography is concerned, prescribes the use of the main light on one side of the subject’s face in just the right position as to create a triangle, or diamond shape, of light on the shadow side just underneath the eye, to extend down toward the mouth. This pattern tends to result in a portrait with very strong contrast, but that isn’t a require-ment. Loop lighting is a variation on this pattern wherein the triangle of light is broken, or opened up. In this case the shadow of the nose is shortened so it does not extend into the main shadow on the side of the face opposite the light. Rembrandt and loop lighting create a very classical, of-
Figure 6.1. Short lighting. Figure 6.2. Broad lighting.
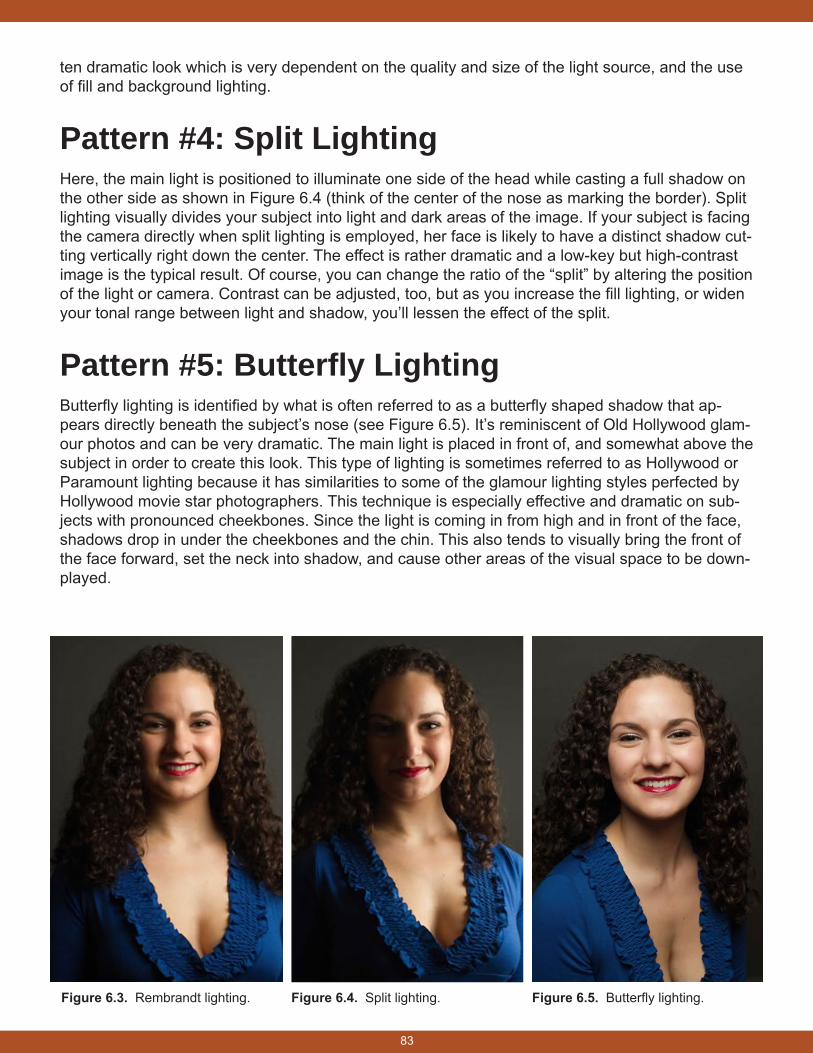
83
ten dramatic look which is very dependent on the quality and size of the light source, and the use of fill and background lighting.
Pattern #4: Split Lighting Here, the main light is positioned to illuminate one side of the head while casting a full shadow on the other side as shown in Figure 6.4 (think of the center of the nose as marking the border). Split lighting visually divides your subject into light and dark areas of the image. If your subject is facing the camera directly when split lighting is employed, her face is likely to have a distinct shadow cut-ting vertically right down the center. The effect is rather dramatic and a low-key but high-contrast image is the typical result. Of course, you can change the ratio of the “split” by altering the position of the light or camera. Contrast can be adjusted, too, but as you increase the fill lighting, or widen your tonal range between light and shadow, you’ll lessen the effect of the split.
Pattern #5: Butterfly LightingButterfly lighting is identified by what is often referred to as a butterfly shaped shadow that ap-pears directly beneath the subject’s nose (see Figure 6.5). It’s reminiscent of Old Hollywood glam-our photos and can be very dramatic. The main light is placed in front of, and somewhat above the subject in order to create this look. This type of lighting is sometimes referred to as Hollywood or Paramount lighting because it has similarities to some of the glamour lighting styles perfected by Hollywood movie star photographers. This technique is especially effective and dramatic on sub-jects with pronounced cheekbones. Since the light is coming in from high and in front of the face, shadows drop in under the cheekbones and the chin. This also tends to visually bring the front of the face forward, set the neck into shadow, and cause other areas of the visual space to be down-played.
Figure 6.3. Rembrandt lighting. Figure 6.5. Butterfly lighting.Figure 6.4. Split lighting.
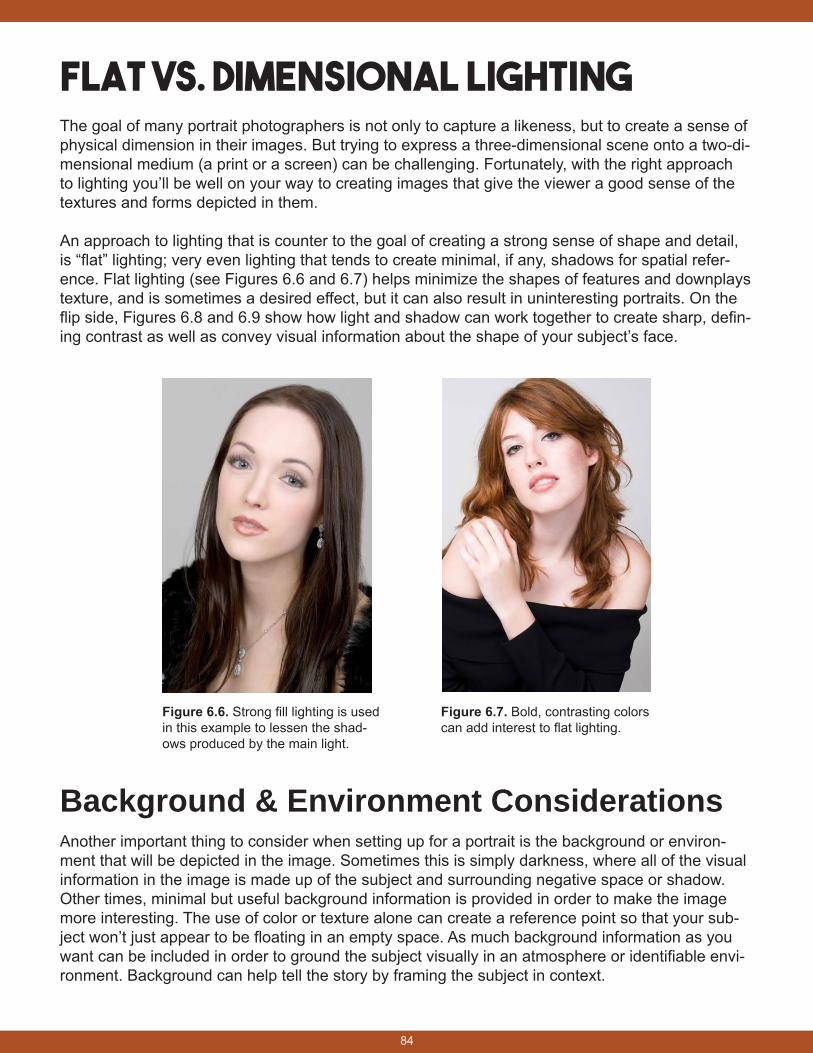
84
Flat vs. Dimensional Lighting The goal of many portrait photographers is not only to capture a likeness, but to create a sense of physical dimension in their images. But trying to express a three-dimensional scene onto a two-di-mensional medium (a print or a screen) can be challenging. Fortunately, with the right approach to lighting you’ll be well on your way to creating images that give the viewer a good sense of the textures and forms depicted in them.
An approach to lighting that is counter to the goal of creating a strong sense of shape and detail, is “flat” lighting; very even lighting that tends to create minimal, if any, shadows for spatial refer-ence. Flat lighting (see Figures 6.6 and 6.7) helps minimize the shapes of features and downplays texture, and is sometimes a desired effect, but it can also result in uninteresting portraits. On the flip side, Figures 6.8 and 6.9 show how light and shadow can work together to create sharp, defin-ing contrast as well as convey visual information about the shape of your subject’s face.
Background & Environment Considerations Another important thing to consider when setting up for a portrait is the background or environ-ment that will be depicted in the image. Sometimes this is simply darkness, where all of the visual information in the image is made up of the subject and surrounding negative space or shadow. Other times, minimal but useful background information is provided in order to make the image more interesting. The use of color or texture alone can create a reference point so that your sub-ject won’t just appear to be floating in an empty space. As much background information as you want can be included in order to ground the subject visually in an atmosphere or identifiable envi-ronment. Background can help tell the story by framing the subject in context.
Figure 6.6. Strong fill lighting is used in this example to lessen the shad-ows produced by the main light.
Figure 6.7. Bold, contrasting colors can add interest to flat lighting.
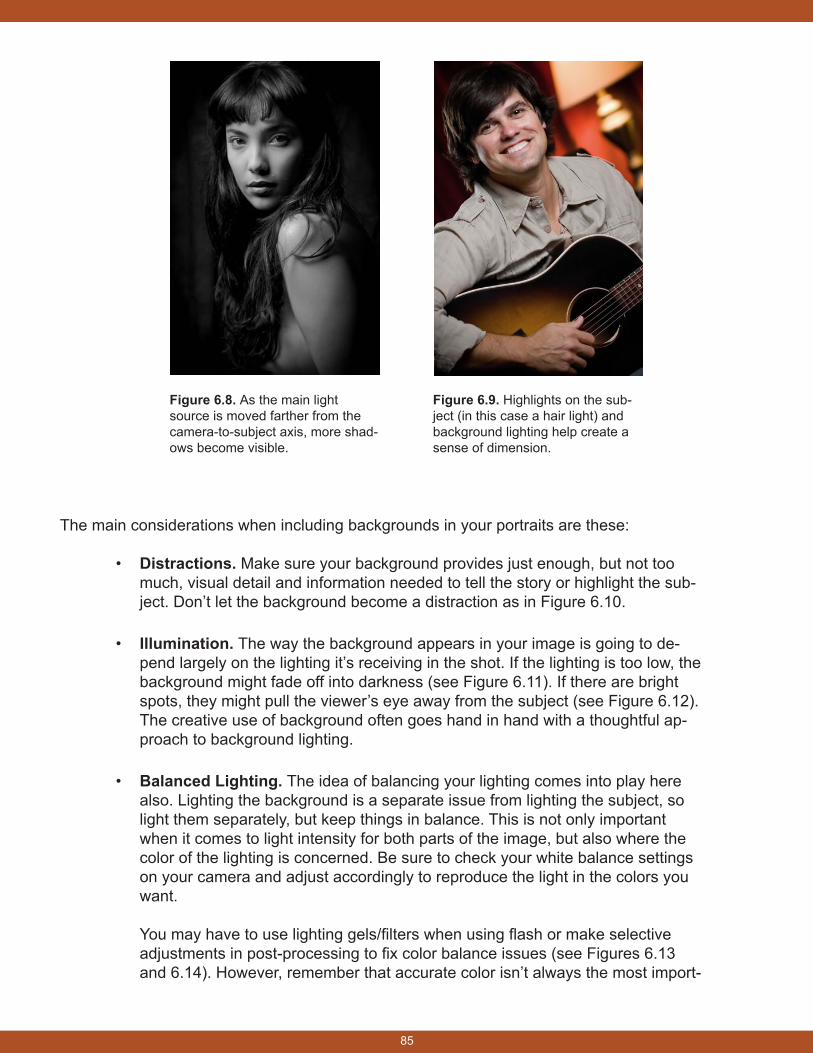
85
The main considerations when including backgrounds in your portraits are these:
• Distractions. Make sure your background provides just enough, but not too much, visual detail and information needed to tell the story or highlight the sub-ject. Don’t let the background become a distraction as in Figure 6.10.
• Illumination. The way the background appears in your image is going to de-pend largely on the lighting it’s receiving in the shot. If the lighting is too low, the background might fade off into darkness (see Figure 6.11). If there are bright spots, they might pull the viewer’s eye away from the subject (see Figure 6.12). The creative use of background often goes hand in hand with a thoughtful ap-proach to background lighting.
• Balanced Lighting. The idea of balancing your lighting comes into play here also. Lighting the background is a separate issue from lighting the subject, so light them separately, but keep things in balance. This is not only important when it comes to light intensity for both parts of the image, but also where the color of the lighting is concerned. Be sure to check your white balance settings on your camera and adjust accordingly to reproduce the light in the colors you want. You may have to use lighting gels/filters when using flash or make selective adjustments in post-processing to fix color balance issues (see Figures 6.13 and 6.14). However, remember that accurate color isn’t always the most import-
Figure 6.8. As the main light source is moved farther from the camera-to-subject axis, more shad-ows become visible.
Figure 6.9. Highlights on the sub-ject (in this case a hair light) and background lighting help create a sense of dimension.
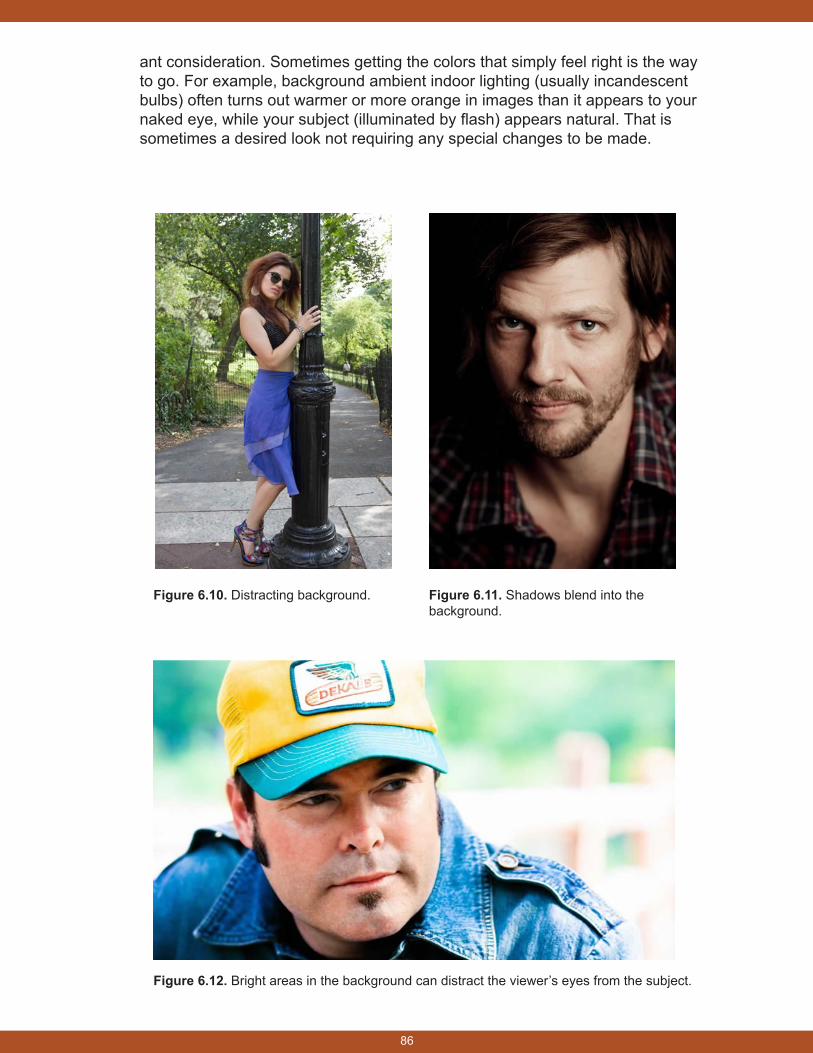
86
Figure 6.10. Distracting background. Figure 6.11. Shadows blend into the background.
Figure 6.12. Bright areas in the background can distract the viewer’s eyes from the subject.
ant consideration. Sometimes getting the colors that simply feel right is the way to go. For example, background ambient indoor lighting (usually incandescent bulbs) often turns out warmer or more orange in images than it appears to your naked eye, while your subject (illuminated by flash) appears natural. That is sometimes a desired look not requiring any special changes to be made.
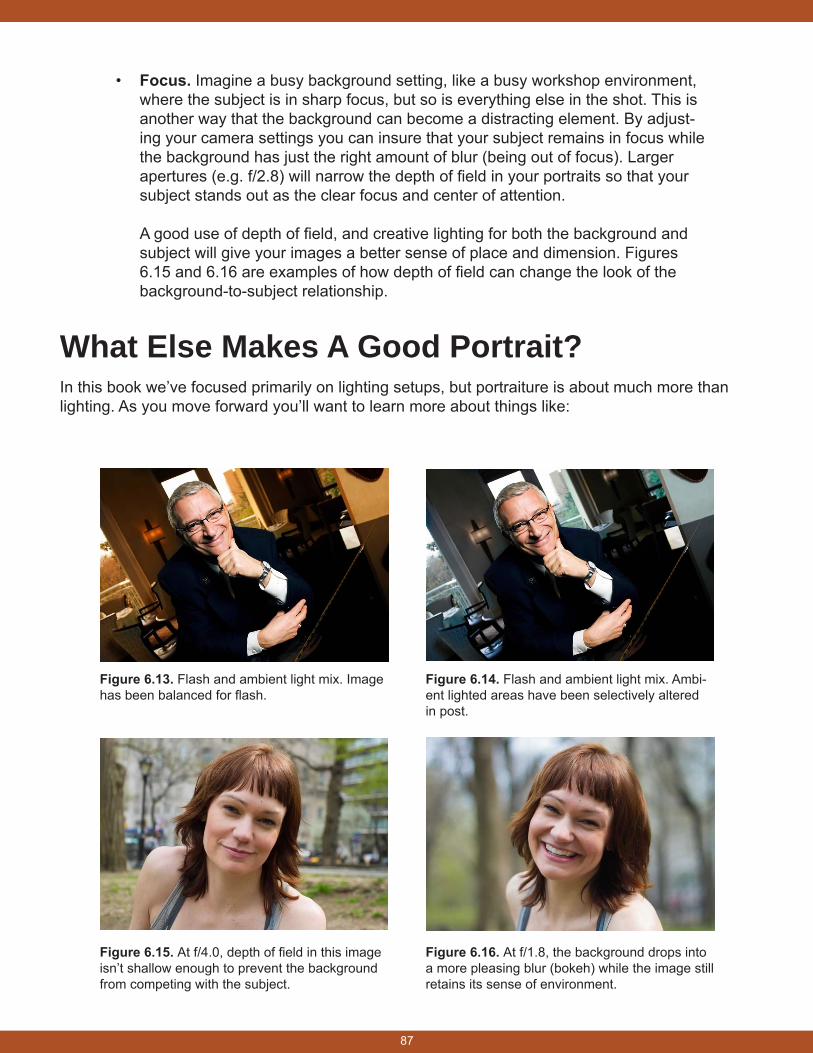
87
• Focus. Imagine a busy background setting, like a busy workshop environment, where the subject is in sharp focus, but so is everything else in the shot. This is another way that the background can become a distracting element. By adjust-ing your camera settings you can insure that your subject remains in focus while the background has just the right amount of blur (being out of focus). Larger apertures (e.g. f/2.8) will narrow the depth of field in your portraits so that your subject stands out as the clear focus and center of attention. A good use of depth of field, and creative lighting for both the background and subject will give your images a better sense of place and dimension. Figures 6.15 and 6.16 are examples of how depth of field can change the look of the background-to-subject relationship.
What Else Makes A Good Portrait? In this book we’ve focused primarily on lighting setups, but portraiture is about much more than lighting. As you move forward you’ll want to learn more about things like:
Figure 6.13. Flash and ambient light mix. Image has been balanced for flash.
Figure 6.14. Flash and ambient light mix. Ambi-ent lighted areas have been selectively altered in post.
Figure 6.15. At f/4.0, depth of field in this image isn’t shallow enough to prevent the background from competing with the subject.
Figure 6.16. At f/1.8, the background drops into a more pleasing blur (bokeh) while the image still retains its sense of environment.
88
• Which lenses work best for certain types of portraits
• Posing and directing your subject
• Composition and cropping (where best to crop in a portrait)
• Post-processing and retouching
The creative application of lighting is the most important thing you can learn when starting out with portraiture. With a confident approach to lighting, you can direct more of your attention toward your subject and spend less time making trial and error adjustments that break the flow of your session. This follows with the standardization principle discussed earlier; a way to minimize the guesswork and enjoy consistent quality by developing and standardizing your preferred lighting setups and camera settings.
89
Ed Verosky’s Guide toFlash Photography
Ed Verosky’s Guide to Flash Photography. Copyright 2015 Edward Verosky. All rights reserved. No part of this book may be reproduced in any form or by any means, electronic or mechanical,
including information storage and retrieval systems, without permission, in writing from the author/publisher. Product and services names are the Trademark or Registered Trademark of their
respective companies.