Embed Size (px)
Citation preview
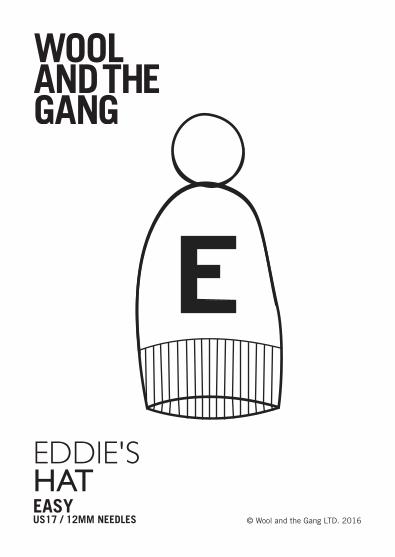
EDDIE'SHATEASYUS17 / 12MM NEEDLES © Wool and the Gang LTD. 2016

YOUR KNITTING ADVENTURESTARTS NOW
WE’LL BETHERE FOR YOU Find all the
video tutorials you need online.
IT’S FUNKnitting is the new yoga. Free your mind, the rest will follow.
Namaste.
YOU’RE GOING TOFEEL GOOD
Nothing will make you happier than holding your
finished project.

RECIPE FOR SUCCESS
GET YOUR TOOLS READY.Everything you need to get knitting.
FAMILIARISE YOURSELF WITH THE TECHNIQUES. Everything from the stitches used to the finishing touches for your project.
GET TO KNOW YOUR YARN.Before you start knitting your piece, playaround with your new yarn to get used to it,and to check your tension.
WOOL SCHOOLPick up your needles & yarn and make the magic happen! For a little extra help, check out our Wool School at:www.woolandthegang.com/videos
#SHAREYOURKNITSWhen you’re done - let the world know.
1
2
3
4
5

#SHAREYOURKNITS
LET’S GET KNITTING
Tool kit1 ball of WATG's Crazy Sexy Wool in Ivory White1 ball of WATG's Crazy Sexy Wool in Lipstick Red1 Say Eddie's Hat pattern1 pair of US17 / 12mm knitting needles1 sewing needle
TensionTo ensure your knitting has the same measurements as the pattern, it is a good idea to make a tension swatch before you start knitting your project. A tension swatch is a small sample of your knitting where you count the stitches and rows and check them against the measurements (cm/in) given in the pattern. If you get MORE stitches/rows than the pattern’s tension, it means your knitting is tighter. If you get FEWER stitches/rows than the pattern, your knitting is looser. Sometimes, it works to knit tighter or looser to compensate.
Stocking stitch:10 cm/4” = 7 stitches10 cm/4” = 10 rows
You can find all the knitting techniques at the back of the pattern.

EDDIE'S HAT
MEASUREMENTS
7CM
/2.7
5"27CM
/10.5"
22CM/8.5"
Pssst! Remember that you must not copy our patterns and sell, or even give
them away for free, in accordance with copyright law. Also, you must not sell
any articles made from our patterns without prior consent from WATG.
Help’s only a stitch away. Watch the video tutorialsonline at www.woolandthegang.com/videos Ø

HELP! WWW.WOOLANDTHEGANG.COM/VIDEOS
HOW TO KNIT YOUR EDDIE'S HAT
This hat is knitted as a flat piece from the bottom up, and then sewn together.
1 Using your Ivory White crazy sexy wool, cast on 32 stitches using the long tail cast on technique. (Leave a 50cm/20” tail – you will use this later for sewing up your hat.)
2 Work 5 rows in 1 x 1 rib stitch.
3 Work in stocking stitch for 16 rows, or the number of rows required for your knitting to measure 22 cm/9" from the cast on edge. Make sure the last row you work is a purl row. You will now start shaping the top of the hat.
4 Knit the first stitch. Knit 3 stitches, knit the next 2 stitches together. Repeat the section inside the little stars () until you have just 1 stitch left, knit this stitch. (You now have 26 stitches remaining.)
5 Purl 1 row.
6 Knit the first stitch. Knit 2 stitches, knit the next 2 stitches together. Repeat the section inside the stars until you have just 1 stitch left, knit this stitch. (20 stitches remaining.)
7 Purl 1 row.

EDDIE'S HAT
8 Knit the first stitch. Knit 1 stitch, knit the next 2 stitches together. Repeat the section inside the stars until you have just 1 stitch left, knit this stitch. (14 stitches remaining.)
9 Cut the yarn, leaving a 20 cm/8” tail. Thread your sewing needle with this, and insert the needle and yarn through each of the stitches on your knitting needle. Now remove the knitting needle, and pull on the yarn tail like a drawstring to close up the top of your hat.
ASSEMBLY AND FINISHING
1 With the right side of the fabric facing out, fold your hat so that the side edges meet.
2 Thread your sewing needle with the yarn tail from your cast on, and use the vertical invisible seam technique to sew the side edges together (forming the back seam of your hat).
3 Follow the graph to embroider on your motif, using the duplicate stitch technique.
4 Weave in the loose ends.

JOIN THE GANG - [email protected]
ADDING A POMPOM!
1 Cut 2 cardboard circles, 7.5cm/3” in diameter, with a 2.5cm/1” hole in the centre.
2 Thread your sewing needle with a long strand of yarn, hold the circles together and wind the yarn around the circle until it runs out.
3 Cut another length of yarn, and continue winding yarn around the cardboard circles until the card is covered and the hole closes up.
4 Using a pair of scissors, cut the yarn between the two pieces of card around the edge of the circle.

EDDIE'S HAT
5 Tie a strand of yarn between the two cardboard circles to secure the centre of the pompom, and fasten with a tight knot. Now remove the cardboard circles.
6 Tidy up your pompom by trimming the shape with scissors.
7 Sew the pompom to the top of your beanie.
8 Finishing off your pompom by weaving in the ends.

#SHAREYOURKNITS
KNITTING TECHNIQUES
Work! Work! Work!There are two main ways to ‘work’ stitches: they can be knitted or purled. When the pattern asks you to ‘work’ a number of stitches/rows/cm, it will always specify which stitch pattern to work in.
Long-tail cast on This creates a nice elastic edge, suitable for stretchy items like ribbed edges. To make sure that the edge isn’t too tight, you can cast on over two knitting needles held together.
1. Start by making a slipknot - the ‘yarn tail’ needs to be quite long for this cast on, hence the name! Place the slipknot on your knitting needle, and hold the needle in your right hand, with the yarn hanging straight down.
2. Now insert the thumb and index finger of your left hand between the two strands of yarn hanging from the needle, and then close your ring finger and little finger around the yarn to trap it.
Stretch out your thumb and index finger as far from each other as possible, stretching the yarn taut.

EDDIE'S HAT
3. You will be using three separate strands of yarn:
A: the strand which sits closest to you, in front of the thumbB: the strand that goes from the thumb to the slipknot on the needleC: the strand that goes from the needle to your index finger
4. Place the needle in front of A, then bring it under A and let it come up between A and B.
A
B
C

HELP! WWW.WOOLANDTHEGANG.COM/VIDEOS
5. Now bring the needle over and behind C, and scoop the yarn (C) up with the tip of your needle.
6. Bring the needle tip with the yarn back between A and B (the same way you came before), so that it ends up in front of A. Now pull your thumb out from the yarn that’s looped around it. Tug on the yarn to tighten up the new loop on your knitting needle, then insert your thumb again between the two yarn strands hanging down from the newly formed loop on your needle.
7. Repeat steps 4-6 to continue casting on stitches.
Stocking stitchA basic stitch pattern where all the stitches of the first row are knitted, and on the second row they are purled. These two rows are repeated to make the pattern. The ‘right’ side of the fabric looks like a series of ‘Vs’ and the ‘wrong’ side of the fabric looks like a series of ‘waves’.

EDDIE'S HAT
RIGHT SIDE WRONG SIDE
1x1 Rib stitchKnit the first stitch, purl the next. Continue alternating between knit and purl stitches to the end of your row. Repeat this row.

JOIN THE GANG - [email protected]
FINISHING TECHNIQUES
Vertical invisible seamThis technique is used to join the side edges of two pieces. Place the two knitted pieces side by side with the right sides up.
Insert your sewing needle under the first horizontal bar between the first two stitches on the edge you want to join. Pull the yarn through and insert the needle through the opposite horizontal bar on the other piece. Sew back and forth throuh the horizontal bars along the edge. To tighten the stitches, pull the yarn gently – and they will disappear.

EDDIE'S HAT
Weaving in the endsWeave the ends of your yarn into your knitting to finish it off and stop it from unravelling.
Thread the tail onto the sewing needle. Weave the yarn along the edge of your knitting as shown in the diagram. Where you have started a new ball, weave one tail in one direction and the other tail in the opposite direction. Weave in approximately 10 cm/4", then cut the tail.

#SHAREYOURKNITS
GRAPH
1
STITCHES/M
AILLES
ROWS/RANGS
1
10
20
26
STOCKING STITCH
1020
32
1 x 1 RIB STITCH
CAST OFF/ARRET DES MAILLES

EDDIE'S HAT
DUPLICATE STITCH
This technique allows you to create the effect of your motif being knitted into the piece, without the hassle of knitting with multiple colours at the same time! Simply knit up your hat in the base colour, and then embroider on your motif using the duplicate stitch technique.

HELP! WWW.WOOLANDTHEGANG.COM/VIDEOS
HOW TO SEW ON YOUR GOOGLY EYES
Duplicate stitchThis technique allows you to create the effect of your motif being knitted into the piece.
Instead of knitting with multiple colours at the same time, you simply knit up your piece in the background colour and then embroider on the motif afterwards. Easy as pie!
1. Secure your yarn on the wrong side of your fabric, in the place where you want to start sewing.
2. Bring the needle through to the right side of the fabric, at the bottom of the first stitch you’ll embroider over.

EDDIE'S HAT
3. Tug on the yarn until all of it has been pulled through to the right side.

JOIN THE GANG - [email protected]
4. The spot where you've pulled the yarn through is at the bottom of the little 'V' formed by the stitch in the knitted fabric. Your duplicate stitch will sit on top of this stitch, hiding the yarn under it, and it will look as if it was a knitted stitch. First, form the right-hand 'leg' of the stitch by inserting the needle at the top of the stitch, under both 'legs' of the stitch above it.

EDDIE'S HAT
5. Now pull the yarn through.

#SHAREYOURKNITS
6. Complete the stitch by inserting the needle in the same place where you started off.
EDDIE'S HAT
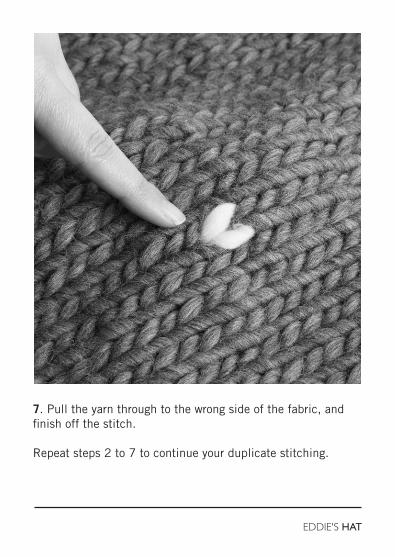
7. Pull the yarn through to the wrong side of the fabric, and finish off the stitch.
Repeat steps 2 to 7 to continue your duplicate stitching.

HELP! WWW.WOOLANDTHEGANG.COM/VIDEOS
DUPLICATE STITCH ALPHABET
Pick your letter and embroider it onto your beanie using yarn in your contrast colour. Place the letter on your hat so that the lower edge sits one row above the ribbed edge of the beanie.

EDDIE'S HAT

JOIN THE GANG - [email protected]

EDDIE'S HAT

STARTED ON
FINISHED ON
WHERE I MADE IT
-
-
-
MADE FOR
Me
COLOUR COMBO
THIS PROJECT WAS
( ) easy peasy ( ) nice ( ) challenging ( ) hardcore
I FEEL
OTHER THOUGHTS
MAKING MEMOIRS

NOTES
5 CM
10 CM

1"
2"
3"
4"
5"

EDHA 0131
LIL FOXY ROXY
GET IT
!
FIND THIS PRODUCT ON OUR WEBSITEWWW.WOOLANDTHEGANG.COM

# SHARE YOUR KNITS


![Untitled-2 [regtigblessed.co.za]regtigblessed.co.za/Floral_Fabric_Catalogue.pdf · F0002 Pattern Repeat Size: 50cm . F0003 Pattern Repeat Size: 50cm . F0004 Pattern Repeat Size: 50cm](https://img.pdfslide.net/doc/110x75/5f2be74d8f69417fe634bdb6/untitled-2-f0002-pattern-repeat-size-50cm-f0003-pattern-repeat-size-50cm.jpg)