Embed Size (px)
Citation preview

Page: 1
Copyright © 2018 all rights reserved.
ELD Support
Installation & Troubleshooting Manual

Page: 2
ELD Troubleshooting Manual
Table of Contents
System Preface 3 How do I know if the ELD is Malfunctioning 4 What to do if the ELD is Malfunctioning 5 What a Motor Carrier should do if the ELD Malfunctions 6 ELD Diagnostic Codes 7 ELD Support 8 ELD Troubleshooting - First Steps 9 Installing Remote Call 10 Low or No Internet Connectivity 11 BAFX Installation 12 BAFX Troubleshooting 14 CalAmp 4230 Installation 16 CalAmp Serial Installation 17 PT-30 Installation 18 PT-30 Troubleshooting 21 ST-20 Installation 22 WVA Installation 24 Printable Paper Driver Daily Logs 26 ELD Malfunction Report 27
e-Track Certified TM

Page: 3
ELD Troubleshooting Manual
System Preface The ELD (Electronic Logging Device) installed in your vehicle is made up of many components. A hardware device that connects to your ECM (Engine Control Module) via the vehicle diagnostic port is part of that ELD. This device not only reads engine information, but also relays that information to your mobile / tablet device using Bluetooth or cable connection. The data that is relayed to your mobile device is then used to record duty status changes as they occur directly on your (DDL’s) Driver Daily Logs. There are several things that can go wrong when setting up or interacting with the ELD which are caused most commonly by a faulty connection to your ECM. This document lists several of the ECM Link error message, the symptoms as well as the remedies for the most common problems that are encountered in the field. IMPORTANT The Motor Carrier is responsible to ensure that its drivers possess onboard a commercial motor vehicle, an ELD information packet containing the following items:
An instruction sheet for the driver describing ELD Malfunction Reporting Requirements and Record Keeping Procedures during ELD Malfunctions.
Troubleshooting Manual to assist the user when experiencing ELD Malfunctions. These guidelines are in accordance with FMCSA Regulation 395.34
e-Track Certified TM

Page: 4
ELD Troubleshooting Manual
How do I know if the ELD is Malfunctioning If your ELD is Malfunctioning, the system will let you know on the Dashboard of the Application. You will see a Red Box with some text in it indicating that there is an issue. (see below) If you click on that Red Box, you will be taken to a screen that tells you the type of Malfunction the ELD is experiencing. This same Red Box will also let you know what your next steps are in the proper operation of the application. These could include having to Create A Trip or perform a Pre-Trip Vehicle Inspection.
e-Track Certified TM
ECM Link!

Page: 5
ELD Troubleshooting Manual
What should I do if the ELD is Malfunctioning This manual has been created to provide the end user with some tools that can be useful when troubleshooting ELD Errors that occur in the Application. If after taking the steps outlined in this Manual for the particular issue you are experiencing, you are not able to correct the error, contact your ELD Provider to help troubleshoot the issue. The driver is required to provide written notice of the ELD Failure to the Motor Carrier within 24 hours and keep paper logs starting the day of the malfunction through the day when the ELD is repaired or replaced. There is a Paper DDL at the end of this Manual. You can print this out and make copies when necessary. You can also get a copy of the Paper Driver Logs (DDL) from this link: IMPORTANT: For Oil Well Drivers, simply use the REMARKS section on the grid to use as Waiting on Well or the 5th Line of the log. (See Below) Note: A copy of the ELD Malfunction Reporting Form is available from the back of this manual. You can also download a copy of this form using the following link:
e-Track Certified TM
Paper Driver Logs
Page: 6
ELD Troubleshooting Manual
What should a Motor Carrier do if the ELD is Malfunctioning The Motor Carrier must take action to correct an ELD Malfunction within 8 days of discovering the malfunction. This Manual may be used to first try and correct the Malfunction. Otherwise, the Motor Carrier can contact the ELD Provider for additional troubleshooting steps or device replacement. If the Motor Carrier needs a time extension past the allowable 8 days, they must contact the FMCSA Division Administrator for the state for the Motor Carrier’s principle place of business within 5 business days of the Driver’s notice of the malfunction, as per the guidelines in 395.34(2).
e-Track Certified TM

Page: 7
ELD Troubleshooting Manual
ELD Diagnostic Codes Here is a list of ECM Diagnostic Codes and Logged Issues. ECM Diagnostic Codes Description 1 Power Data Diagnostic Event 2 Engine Synchronization Data Diagnostic Event 3 Missing Required Data Elements Data Diagnostic Event 4 Data Transfer Data Diagnostic Event 5 Unidentified Driving Records Data Diagnostic Event 6 Other ELD Identified Diagnostic Event E Engine Synchronization Compliance Malfunction L Positioning Compliance Malfunction O Other ELD Detected Malfunction P Power Compliance Malfunction R Data Recording Compliance Malfunction S Data Transfer Compliance Malfunction T Timing Compliance Malfunction
e-Track Certified TM

Page: 8
ELD Troubleshooting Manual
ELD Support In accordance with FMCSA Regulation 395.34, this manual has been designed to assist with ELD Issues that may arise during installation or use. In order to use this manual correctly, the user will need to know some basic information including which type of device is connected to the Diagnostic Port in the vehicle. You can find installation instructions and basic troubleshooting steps under the section that is labeled with the ECM Device type you are using in the vehicle. If after following these steps, your issues have not been resolved, you must contact your Service Provider for further support.
Troubleshooting Page Contents ELD Support 8 ELD Troubleshooting - First Steps 9 Installing Remote Call 10 Low or No Internet Connectivity 11 BAFX Installation 12 BAFX Troubleshooting 14 CalAmp 4230 Installation 16 CalAmp Serial Installation 17 PT-30 Installation 18 PT-30 Troubleshooting 21 ST-20 Installation 22 WVA Installation 24
e-Track Certified TM
Page: 9
ELD Troubleshooting Manual
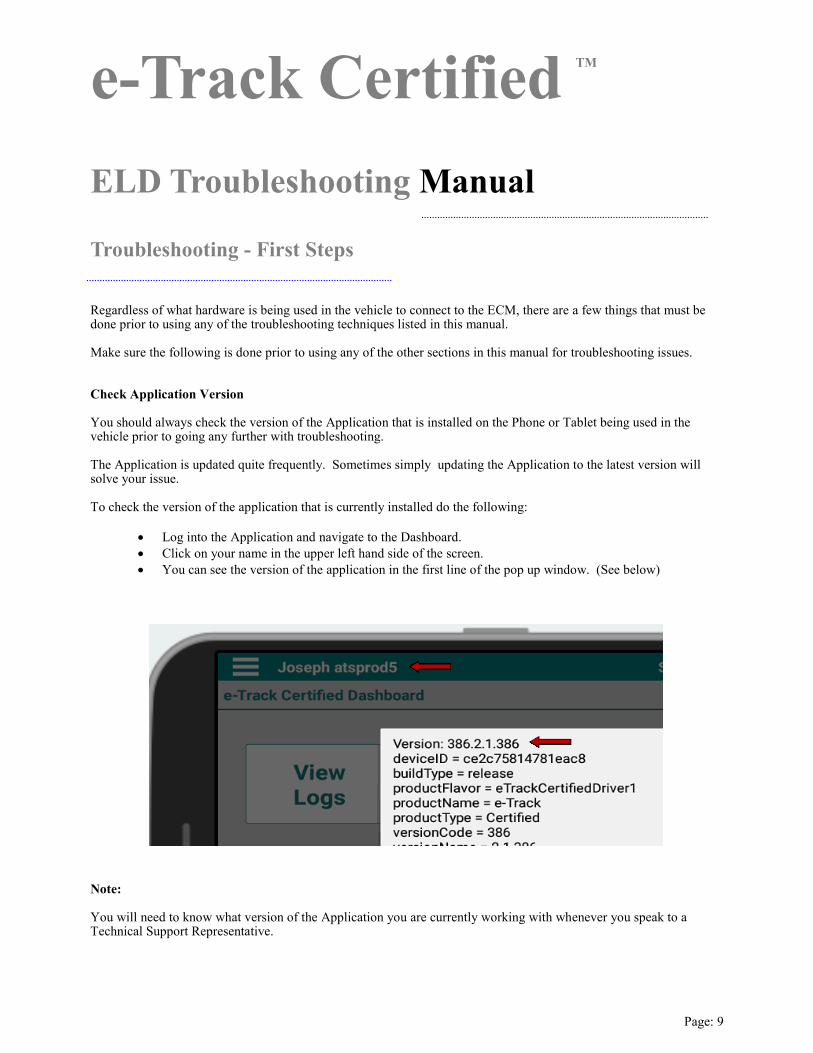
Troubleshooting - First Steps Regardless of what hardware is being used in the vehicle to connect to the ECM, there are a few things that must be done prior to using any of the troubleshooting techniques listed in this manual. Make sure the following is done prior to using any of the other sections in this manual for troubleshooting issues. Check Application Version You should always check the version of the Application that is installed on the Phone or Tablet being used in the vehicle prior to going any further with troubleshooting. The Application is updated quite frequently. Sometimes simply updating the Application to the latest version will solve your issue. To check the version of the application that is currently installed do the following:
Log into the Application and navigate to the Dashboard.
Click on your name in the upper left hand side of the screen.
You can see the version of the application in the first line of the pop up window. (See below) Note: You will need to know what version of the Application you are currently working with whenever you speak to a Technical Support Representative.
e-Track Certified TM

Page: 10
ELD Troubleshooting Manual
Troubleshooting - First Steps Regardless of what hardware is being used in the vehicle to connect to the ECM, there are a few things that must be done prior to using any of the troubleshooting techniques listed in this manual. Make sure the following is done prior to using any of the other sections in this manual for troubleshooting issues. Installing Remote Call Remote Call is a way for allowing Tech Support Representatives to connect to your mobile device to see exactly what is going on. There are different versions of Remote Call available from the Google Play Store. Make sure you install the correct version for the Mobile Device you are using. Note: When a Tech Support Representative wants to look at your screen, they will give you a 6 digit number which you will have to enter into Remote Call to enable the Tech to connect to your mobile device. Remote Call is very secure and once the session has ended, the Tech will not be able to connect again unless you give them permission by entering another newly generated 6 digit code.
e-Track Certified TM
Page: 11
ELD Troubleshooting Manual
Troubleshooting - First Steps Regardless of what hardware is being used in the vehicle to connect to the ECM, there are a few things that must be done prior to using any of the troubleshooting techniques listed in this manual. Make sure the following is done prior to using any of the other sections in this manual for troubleshooting issues. Low or No Internet Connectivity There are four functions that require Internet Connectivity. These are:
Initial Installation
Login
Trip Creation
Logout When the Driver logs in, the Application downloads the last 8 days of Driver Duty Logs (DDL). When the Driver logs out, the system must first upload any transactions that have not been applied to the server. Driver Duty Log Changes are all done locally. All other transactions are stored locally and uploaded to the server when Internet Connectivity has been restored. All communication with the ECM is done locally and does not require access to the internet. Note: Internet Connectivity is also required when a Support Technician must use Remote Call to connect to your mobile device.
e-Track Certified TM
Page: 12
ELD Troubleshooting Manual
BAFX Installation For best results, follow these instructions in the exact order they are listed below. Preparing the Android Device
1. Make sure the Android version is 4.4.2 or above; earlier versions may not work correctly 2. The tablet must have power coming into it all the time or it will go dark and stop sending data Connecting to the BAFX
1. Make sure that the BAFX is plugged into the ECM and is receiving power and the vehicle engine is running.
2. On the tablet, go to Bluetooth and turn it ON
3. Select the BAFX device; the name of the device should be OBDII
4. If the Android asks for a PIN, try 1234; if that doesn’t work, check with your equipment provider
5. The device should pause for a moment, then be listed under Paired Devices Installing the Applications
1. If you have not already done so, start vehicle engine, which is needed for device to receive data.
2. Make sure your BAFX is still Bluetooth paired to your Android.
3. Install e-Track Certified from the Google Play Store and click on Open to start the application.
4. Login to e-Track Certified.
5. If you see a message about “days to certify” ignore it for now and click Continue to Dashboard.
6. Click Trips and Inspections to add a New Trip and Pre-Trip Inspection.
a. Click Add Trip. Select your Trip Type and Truck, and click Save Trip.
b. Click Add Inspection. Click the Sign Off Sheet tab, then click the Sign Off button.
7. Click the 3 bars menu at top left and choose ECM Link Settings. Choose the correct Link Type for your vehicle, either BAFX OBDII or BAFX J1939. Click Set at the bottom of the screen.
Note If the Current Vehicle’s VIN is filled in with the correct VIN, click Set To VIN to copy it to the VIN textbox and THEN click Set at the bottom of the screen to save the VIN.
e-Track Certified TM

Page: 13
ELD Troubleshooting Manual
BAFX Installation
8. If you are using BAFX OBDII, at some point during this process you will be prompted to enter an Odometer read-
ing.
9. Check that the ECM Unit Time UTC on the Dashboard is current.
10. On the Dashboard you should see a 17 Character VIN Number.
11. Until you see a valid VIN, the application is not functioning properly. After Installation We suggest moving the application icon to the Android Home Screen for ease of use. To start moving an Android App Shortcut, long press (tap and hold the icon) you wish to move. The screen will tran-sition and the app shortcut will be moveable as long as you hold it. To move it to another home screen page, drag the app shortcut to the edge of the screen and wait for the page to shift. Note: If after a few minutes, a Yellow Diagnostic or Malfunction Button appears, this indicates that something is wrong and needs to be addressed before you can use the e-Track Certified Application. Please tap on the button and you will be re-directed to another screen that will show you the problem description.
e-Track Certified TM

Page: 14
ELD Troubleshooting Manual
BAFX Troubleshooting
When you first bring up the Dashboard, you will have to click the Red ECLink! Button (see below) to start the data connection. This ECMLink! Button will disappear once the connection has been established.
If the ECMLink! Button does NOT disappear, follow these steps… ECMLink is not getting any data, please correct! Steps to determine why ECMLink is not getting data 1. Make sure your vehicle engine is running
2. Make sure that the BAFX Device is securely connected and displaying a RED LIGHT on the side near the connect-or. If there is no light, connector is not seated correctly or your vehicle does not support ODBII (usually in older vehicles).
Steps to correct issue 1. Engine Running
2. Log out of e-Track Certified
3. In Bluetooth Settings, Un-pair OBDII
4. Disconnect BAFX and wait one (1) minute. Reconnect BAFX and verify minimum RED LIGHT on side of unit.
5. Restart your Android.
6. Pair the OBDII
7. Log into the e-Track Certified Application and go to the Dashboard Screen
e-Track Certified TM

Page: 15
ELD Troubleshooting Manual
BAFX Troubleshooting
Steps to correct issue (cont) 8. Select the ECMLink! Button shown above. Watch toast message to see if the application reports that the BAFX
OBDII link has been found.
9. Wait a moment and ECMLink is not getting any data message should disappear. 10. If you still get a warning message, contact your Service Provider for additional support. Please be sure to log out and power off the tablet at the end of your shift.
Frequently Asked Questions Can I leave the BAFX plugged in overnight when the vehicle is turned off? In MOST vehicles you will be ok leaving the adapter plugged in as long as the vehicle is driven every few days. How-ever, we make the following recommendations: 1. Do not leave the adapter plugged in if it will not be driven for 24-48 hours.
2. If your area is to be experiencing extreme cold, unplug the adapter as the cold will cause the power to drain much faster.
3. If your battery is more than 1-2 years old, you will want to be very careful about leaving the device plugged in as older batteries do not hold the same charge as the newer ones.
4. If you have an electronics heavy vehicle such as BMW’s tend to be, we do not recommend leaving it plugged in as the vehicles electronics do not always fully power down.
5. If you have any other devices plugged into the vehicle while it is off via cigarette or auxiliary ports, we then also recommend removing the adapter.
6. If after you have everything installed, the Dashboard is continuing to show your Vehicle ID as the VIN, this means that the Vehicle is not giving us the VIN information. To correct this, go to the ECM Link Settings Form from the Drop Down Menu and enter the correct VIN there. Click the Set Button at the bottom of the screen. Follow the instructions and give it a minute to ensure the VIN shows up correctly on the Dashboard.
e-Track Certified TM

Page: 16
ELD Troubleshooting Manual
CalAmp 4230 Installation
For best results, follow these instructions in the exact order they are listed below. Preparing the Android Device
1. Make sure the Android version is 4.4.2 or above; earlier versions may not work correctly 2. The tablet must have power coming into it all the time or it will go dark and stop sending data Connecting to the CalAmp 4230
1. Make sure that the 4230 is plugged into the ECM and is receiving power and the vehicle engine is running.
2. On the tablet, go to Bluetooth and turn it ON
3. Select the 4230 device; the name of the device should begin with LMU_
4. If the Android asks for a PIN, try 1234; if that doesn’t work, check with your equipment provider
5. The device should pause for a moment, then be listed under Paired Devices Installing the Applications
1. Make certain that you have a trip set up before logging in for the first time, and that the correct ECM Link Type
is set for the vehicle that will be used on that trip.
2. Make sure your 4230 is still Bluetooth paired to your Android.
3. Install e-Track Certified from the Google Play Store and click on Open to start the application.
4. Login to e-Track Certified.
5. If you see a message about “days to certify” ignore it for now and click Continue to Dashboard.
6. Check that the ECM Unit Time UTC on the Dashboard is current.
7. On the Dashboard you should see a 17 Character VN Number. Until you see the Vin, the Application is not func-tioning properly.
Troubleshooting Tip If after a few minutes, a yellow Diagnostic or Red Malfunction button appears, this indicates that some-thing is wrong and needs to be addressed before you can use the e-Track Certified Application. Please tap on the button and you will be re-directed to another screen that will show you the problem’s description.
e-Track Certified TM
Page: 17
ELD Troubleshooting Manual
CalAmp Serial Installation
For best results, follow these instructions in the exact order they are listed below. Preparing the Android Device
1. Make sure the Android version is 4.4.2 or above; earlier versions may not work correctly 2. The tablet must have power coming into it all the time or it will go dark and stop sending data 3. DO NOT INSERT THE StarTech CABLE into the Android until instructed to do so. Installing the Applications
1. Make certain that you have a trip set up before logging in for the first time, and that the correct ECM Link Type
is set for the vehicle that will be used on that trip. 2. Install e-Track Certified from the Google Play Store and click on Open to start the application. 3. Login to e-Track Certified.
4. If you see a message about “days to certify” ignore it for now and click Continue to Dashboard. 5. Close both apps using the Recent Apps button on the Android.
6. Insert the microUSB end of the StarTech Cable into the Android Device. 7. A prompt should appear asking you which app to run with the StarTech Driver; select e-Track Certified. 8. e-Track Certified should now open. Once it does, start e-Track Certified up again. 9. Check that the ECM Unit Time UTC on the Dashboard is current. 10. On Dashboard you should see a 17 Character VIN number. Until you see the VIN, the application is not function-
ing properly.
Troubleshooting Tip If after a few minutes, a yellow Diagnostic or Red Malfunction button appears, this indicates that some-thing is wrong and needs to be addressed before you can use the e-Track Certified Application. Please tap on the button and you will be re-directed to another screen that will show you the problem’s description.
e-Track Certified TM
Page: 18
ELD Troubleshooting Manual
Pacific Track - PT-30 Installation
For best results, follow these instructions in the exact order they are listed below. Preparing the Android Device
1. Make sure the Android version is 4.4.2 or above; earlier versions may not work correctly 2. The tablet must have power coming into it all the time or it will go dark and stop sending data Connecting to the PT-30
1. Make sure that the PT-30 is plugged into the ECM and is receiving power and the vehicle engine is running.
2. On the tablet, go to Bluetooth and turn it ON
3. You will be instructed to select the PT-30 device later in this document. Installing the Applications
1. If you have not already done so, start the vehicle engine, which is needed for the device to receive data.
2. Install e-Track Certified from the Google Play Store and click on Open to start the application.
3. Login to e-Track Certified.
4. If you see a message about “days to certify” ignore it for now and click Continue to Dashboard. 5. Click the “Trips and Inspections” Button to add a New Trip and Pre-Trip Vehicle Inspection.
A. Click Add Trip. Select your Trip Type and Truck. Then click Save Trip.
B. Click Add Inspection. Click the Sign Off Sheet Tab, then click the Sign Off Button.
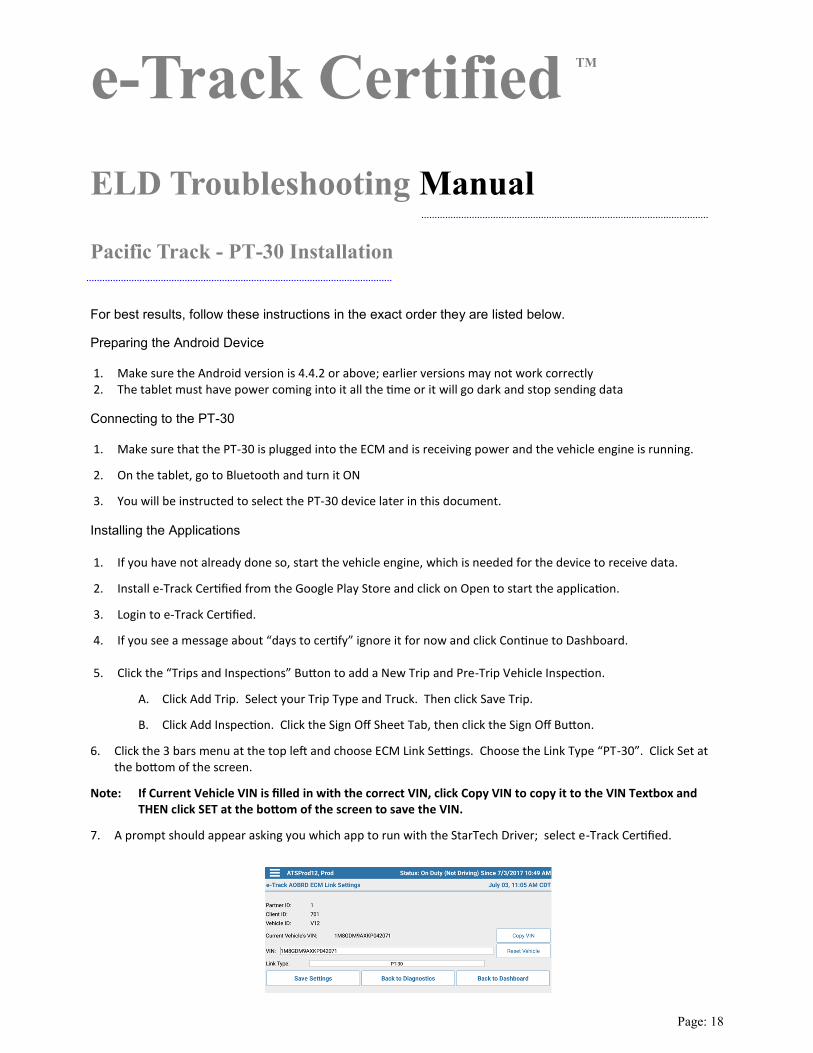
6. Click the 3 bars menu at the top left and choose ECM Link Settings. Choose the Link Type “PT-30”. Click Set at the bottom of the screen.
Note: If Current Vehicle VIN is filled in with the correct VIN, click Copy VIN to copy it to the VIN Textbox and THEN click SET at the bottom of the screen to save the VIN.
7. A prompt should appear asking you which app to run with the StarTech Driver; select e-Track Certified.
e-Track Certified TM

Page: 19
ELD Troubleshooting Manual
Pacific Track - PT-30 Installation
7. When you first bring up the Dashboard, you will have to click the RED ECMLink! Button to start the data connec-tion. This ECMLink! Button will disappear once the connection has been established.
8. Tap on the “Connect” Button 9. Select the proper device name
e-Track Certified TM
Page: 20
ELD Troubleshooting Manual
Pacific Track - PT-30 Installation
10. On Dashboard you should see a 17 Character VIN Number. Until you see the VIN, the Application is not func-tioning correctly.
11. Check that the ECM Unit Time UTC on the Dashboard is current.
Troubleshooting Tip If after a few minutes, a yellow Diagnostic or Red Malfunction button appears, this indicates that some-thing is wrong and needs to be addressed before you can use the e-Track Certified Application. Please tap on the button and you will be re-directed to another screen that will show you the problem’s description.
e-Track Certified TM

Page: 21
ELD Troubleshooting Manual
Pacific Track - PT-30 Troubleshooting
If the ECMLink! Button does NOT disappear, follow these steps… ECMLink is not getting any data, please correct! Steps to determine why ECMLink is not getting data 1. Make sure your vehicle engine is running
2. Make sure that the PT-30 Device is securely connected and displaying a RED LIGHT on the side near the con-nector. If there is no light, connector is not seated correctly.
Steps to correct issue 1. Engine Running
2. Log out of e-Track Certified
3. In Bluetooth Settings, make sure Bluetooth is enabled
4. Disconnect PT-30 and wait one (1) minute. Reconnect PT-30 and verify minimum ORANGE LIGHT on side.
5. Restart your Android.
6. Log into e-Track Certified Application and go to Dashboard Screen.
7. Select the ECMLink! Button shown above; watch toast messages to see if the application reports PT-30 Connec-tion found.
8. Wait a few moments and “ECM is not getting any data” message should disappear.
9. If ECMLink! Button does not disappear, tap it to go to the next screen and hit the “Connect” Button. 10. If you are still getting the warning message, contact your Support Representative. After Installation We suggest moving the application icon to the Android home screen for ease of use. To start moving an Android application shortcut, long press (tap and hold) the icon you wish to move. The screen will transition and the app shortcut will be moveable as long as you hold it. To move it to another home screen page, drag the app shortcut to the edge of the screen and wait for the page to shift. Please be sure you log out and power off the tablet at the end of your shift!
e-Track Certified TM

Page: 22
ELD Troubleshooting Manual
SunTech - ST-20 Installation
For best results, follow these instructions in the exact order they are listed below. Preparing the Android Device
1. Make sure the Android version is 4.4.2 or above; earlier versions may not work correctly 2. Make sure that the microUSB connector on the SunTech Cable is NOT plugged into the Android device. (Do Not
insert the SunTech Cable into the Android until instructed to). Installing the e-Track Certified Application
1. Install e-Track Certified from the Google Play Store (search “ATS Fleet”). Do NOT open or start the application yet.
Starting the e-Track Certified Application
1. Make certain that the microUSB Cable is unplugged from the Android device.
2. Make certain that there is no existing instance of the app recently running. Click the “Recent Apps” button on the Android device. If the e-Track Certified Application is displayed, close it.
3. Now insert the microUSB end of the SunTech Cable into the Android Device. (You may hear an audible to let you know that the cable was inserted). At this point one of two things may happen.
A. The e-Track Certified Application will automatically launch B. A dialog will appear listing the apps that are installed on your Android device that are capable of utilizing the SunTech Cable. If this occurs you should select the e-Track Certified Application by touching its icon. Also, at this point you may be offered an option to indicate that the application is to automatically be selected by Android on future cable insertions, i.e. you won’t see the selection dialog any longer. This option is up to you. 4. When the application launches, it will resume from wherever it was before. 5. If you are logging in for the first time:
A. Make certain that you have a trip set up before logging in and that the correct ECM Link Type is set for the vehicle that will be used on that trip.
B. Log into the e-Track Certified Application C. If you see a message about “days to certify”, ignore it for now and click “Continue To Dashboard” D. The Dashboard will appear.
e-Track Certified TM

Page: 23
ELD Troubleshooting Manual
SunTech - ST-20 Installation
6. When the Dashboard is visible:
A. The Application will begin its initialization sequence for the recovery of data. You may see a blinking Red “ECMLink!” Button and a text message off to the right indicating that ECMLink is not receiving any data. Both of these messages should disappear in approximately 15 seconds. B. Check that the “ECM Unit Time UTC” on the Dashboard is current. It should change every few seconds. C. The vehicle’s 17 Character VIN number will display.
Troubleshooting Tip If after a few minutes, a yellow Diagnostic or Red Malfunction button appears, this indicates that some-thing is wrong and needs to be addressed before you can use the e-Track Certified Application. Please tap on the button and you will be re-directed to another screen that will show you the problem’s description.
e-Track Certified TM
Page: 24
ELD Troubleshooting Manual
Digi - WVA Installation
For best results, follow these instructions in the exact order they are listed below. Configuring a new WVA using a tablet
1. Connect the WVA to a Deutsch 9-pin connector that is receiving power
2. Press and hold the button on the WVA for 10 seconds to return the WVA to factory defaults
3. On the tablet, go to Settings > Wi-Fi and find the device on the list that has the SSID of the WVA
4. Connect to the WVA device using the password listed on the label
5. Once connected to the WVA, use the tablet browser and go to: 192.168.100.1
6. If you get a warning screen that states “Your connection is not private” choose the “Advanced” link and then “Proceed to 192.168.43.1 (unsafe)”
7. When prompted, enter “admin” for the User Name and “admin” for the password
8. On the main screen, verify that the Firmware Version is 3.2.25.2 or higher. If it is not, contact your Support Rep-resentative
9. On the left-hand side, go to the link that reads “Network Services”
10. Set “Enable Web Server (HTTP)” to checked, with TCP Port: 80
11. Set “Enable Web Services (HTTPS)” to checked, with TCP Port: 443
12. Click Apply. A message will appear at the top of the page
13. Scroll up to see “Applying changes…” then “The device is currently saving its settings”
14. Once both of these messages appear, wait 30 seconds and click on the “Time” link on the left
15. Check the “Set Time” check box, then set the date, time, and time zone
16. Click Apply, then wait for the messages to appear as in step 9, then wait another 30 seconds
17. Click on the “CAN Bus” link on the left
18. Set both CAN Buses to 250000, then click Apply, wait for the messages and wait 30 seconds
19. Click on the “Wireless Network” link on the left
20. Click on the Wi-Fi Direct Button
21. Set the Device Name as desired and set the WPS Method to Push Button
22. “Reconfigure IP addresses for Wi-Fi Direct” should be checked
23. Click Finish
24. Wait for the device to issue several messages to the screen
25. Scroll down. If a button reading “Reboot” is displayed, click it.
e-Track Certified TM

Page: 25
ELD Troubleshooting Manual
Digi - WVA Installation
For best results, follow these instructions in the exact order they are listed below. Preparing the Android Device
1. Make sure the Android version is 4.4.2 or above; earlier versions may not work correctly
2. The tablet must have power coming into it all the time or it will go dark and stop sending data Connecting to the WVA
1. Plug the WVA into the ECM (be sure to line up the key in the plug)
2. On the tablet, go to Settings > Wi-Fi > Wi-Fi Direct (this may be located in another menu or using the Advanced Button)
3. Using Wi-Fi Direct, the device should scan and display the WVA
4. Select the WVA and wait for the message to go from “Connecting…” to “Connected” Installing the Applications
1. Make certain that you have a trip set up before logging in for the first time, and that the correct ECM Link Ty pe
is set for the vehicle that will be used on that trip
2. Make sure your Wi-Fi Direct is connected to your WVA device
3. Install e-Track Certified from the Google Play Store (search “ATS Fleet”) and click on Open to start the app
4. Login to e-Track Certified
5. If you see a message about “days to certify” ignore it for now and click “Continue to Dashboard”
6. Check that the ECM Unit Time UTC is current
7. On Dashboard you should see a 17 Character VIN Number. Until you see the VIN, the application is not function-ing properly.
Troubleshooting Tip If after a few minutes, a yellow Diagnostic or Red Malfunction button appears, this indicates that some-thing is wrong and needs to be addressed before you can use the e-Track Certified Application. Please tap on the button and you will be re-directed to another screen that will show you the problem’s description.
e-Track Certified TM
Page: 26
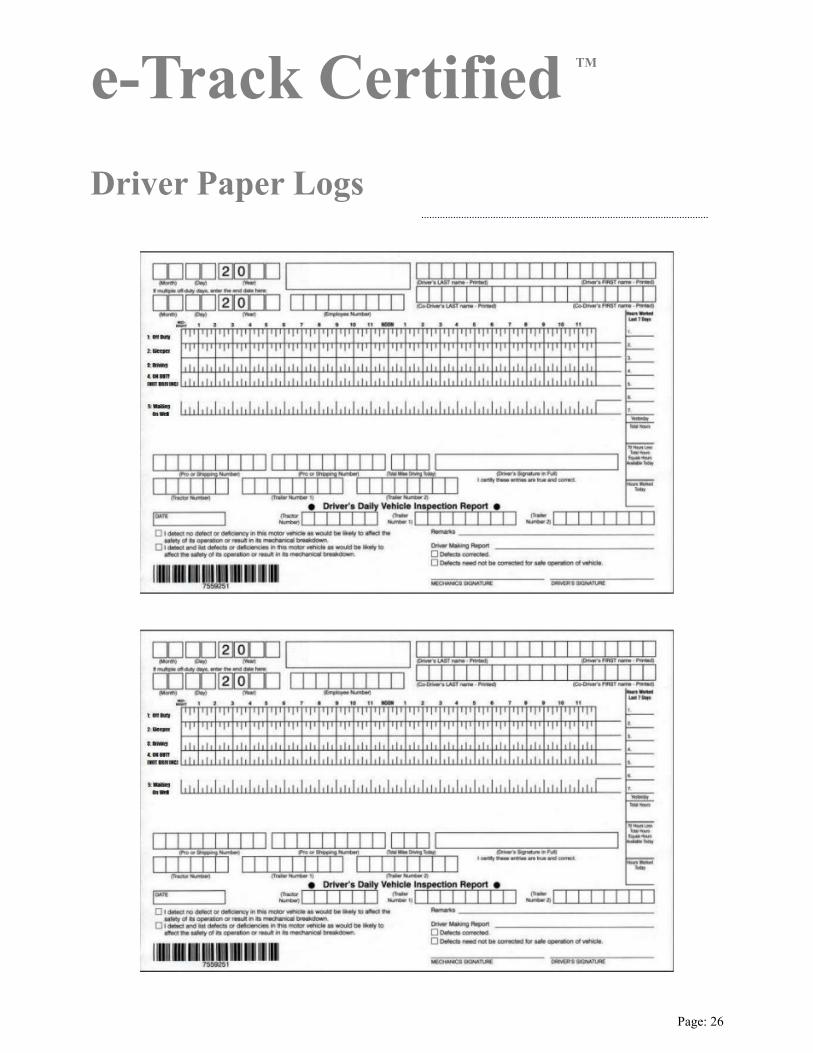
Driver Paper Logs
e-Track Certified TM

Page: 27
ELD Troubleshooting Manual
ELD Malfunction Report If an ELD malfunctions, a driver must note the malfunction of the ELD and provide written notice of the malfunction to the Motor Carrier within 24 hours. The driver must also reconstruct the RODS for the current 24 hour period and the previous 7 consecutive days re-cording the records of duty status on graph-grid paper logs that comply with 49 CFR 395.8 and continue to prepare paper logs until the ELD is serviced and back in compliance. The driver may only use paper logs for 8 days at most.
Fill out the following form within 24 hours ————————————————————————————————————————————————————
Malfunction Date & Time: Driver Name: ELD Provider: Motor Carrier: Vehicle ID: Year: Make: Model: Link Type: Software Version: Any Error Codes: Problem Description
e-Track Certified TM