Embed Size (px)
Citation preview
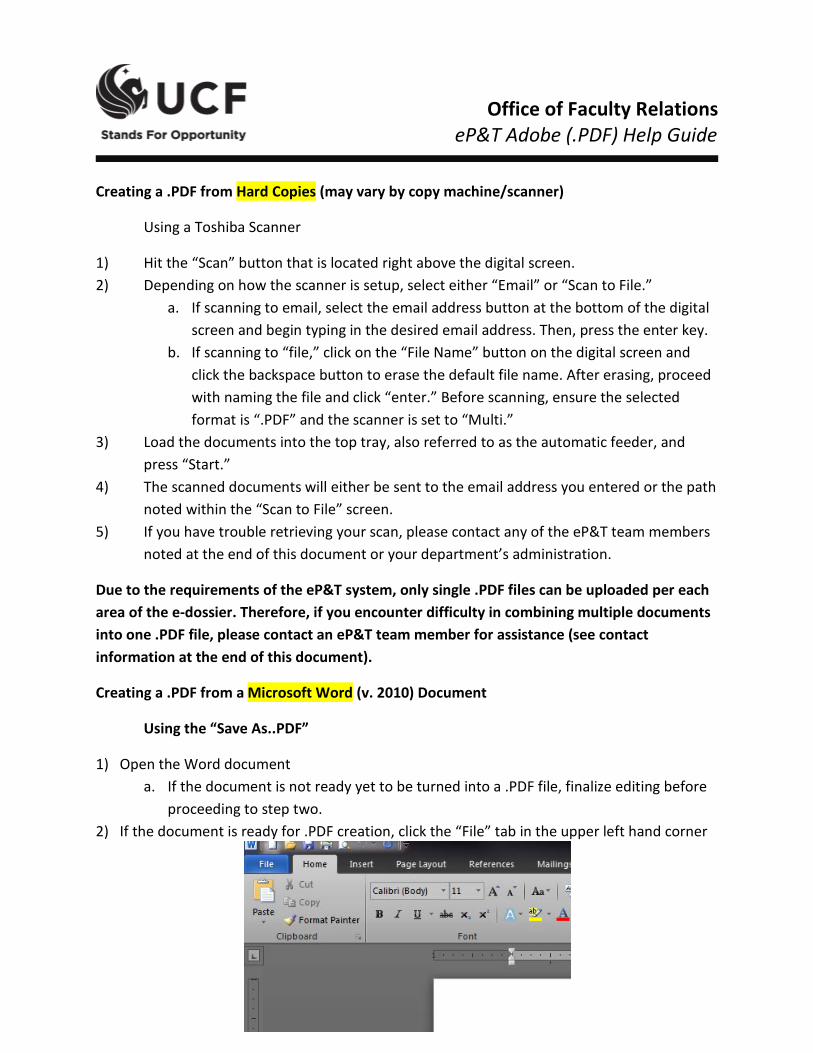
Office of Faculty Relations eP&T Adobe (.PDF) Help Guide
Creating a .PDF from Hard Copies (may vary by copy machine/scanner)
Using a Toshiba Scanner
1) Hit the “Scan” button that is located right above the digital screen. 2) Depending on how the scanner is setup, select either “Email” or “Scan to File.”
a. If scanning to email, select the email address button at the bottom of the digital screen and begin typing in the desired email address. Then, press the enter key.
b. If scanning to “file,” click on the “File Name” button on the digital screen and click the backspace button to erase the default file name. After erasing, proceed with naming the file and click “enter.” Before scanning, ensure the selected format is “.PDF” and the scanner is set to “Multi.”
3) Load the documents into the top tray, also referred to as the automatic feeder, and press “Start.”
4) The scanned documents will either be sent to the email address you entered or the path noted within the “Scan to File” screen.
5) If you have trouble retrieving your scan, please contact any of the eP&T team members noted at the end of this document or your department’s administration.
Due to the requirements of the eP&T system, only single .PDF files can be uploaded per each area of the e-dossier. Therefore, if you encounter difficulty in combining multiple documents into one .PDF file, please contact an eP&T team member for assistance (see contact information at the end of this document).
Creating a .PDF from a Microsoft Word (v. 2010) Document
Using the “Save As..PDF”
1) Open the Word document a. If the document is not ready yet to be turned into a .PDF file, finalize editing before
proceeding to step two. 2) If the document is ready for .PDF creation, click the “File” tab in the upper left hand corner
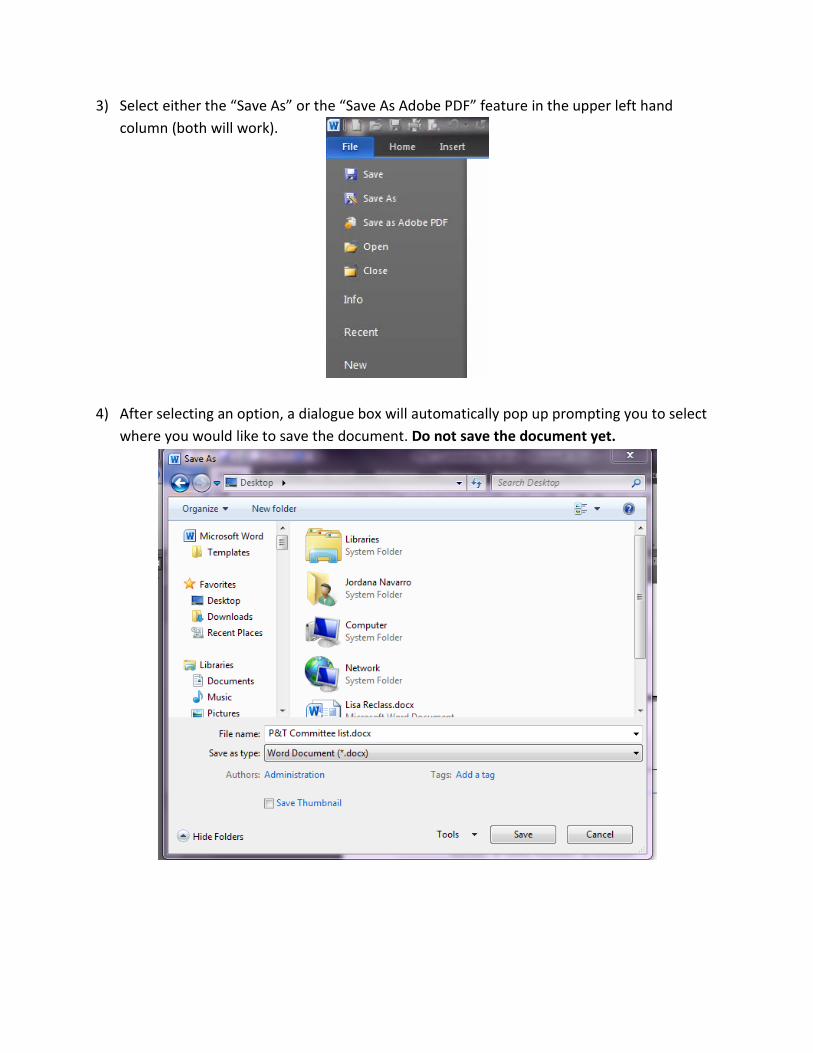
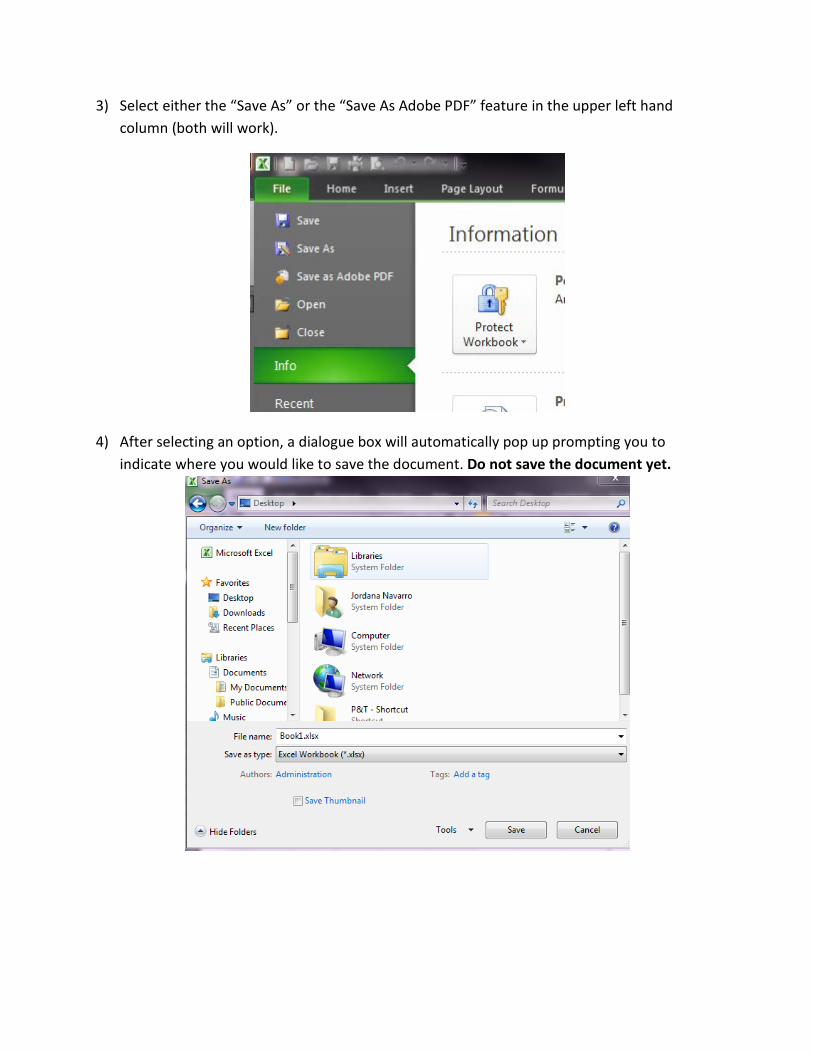
3) Select either the “Save As” or the “Save As Adobe PDF” feature in the upper left hand column (both will work).
4) After selecting an option, a dialogue box will automatically pop up prompting you to select where you would like to save the document. Do not save the document yet.
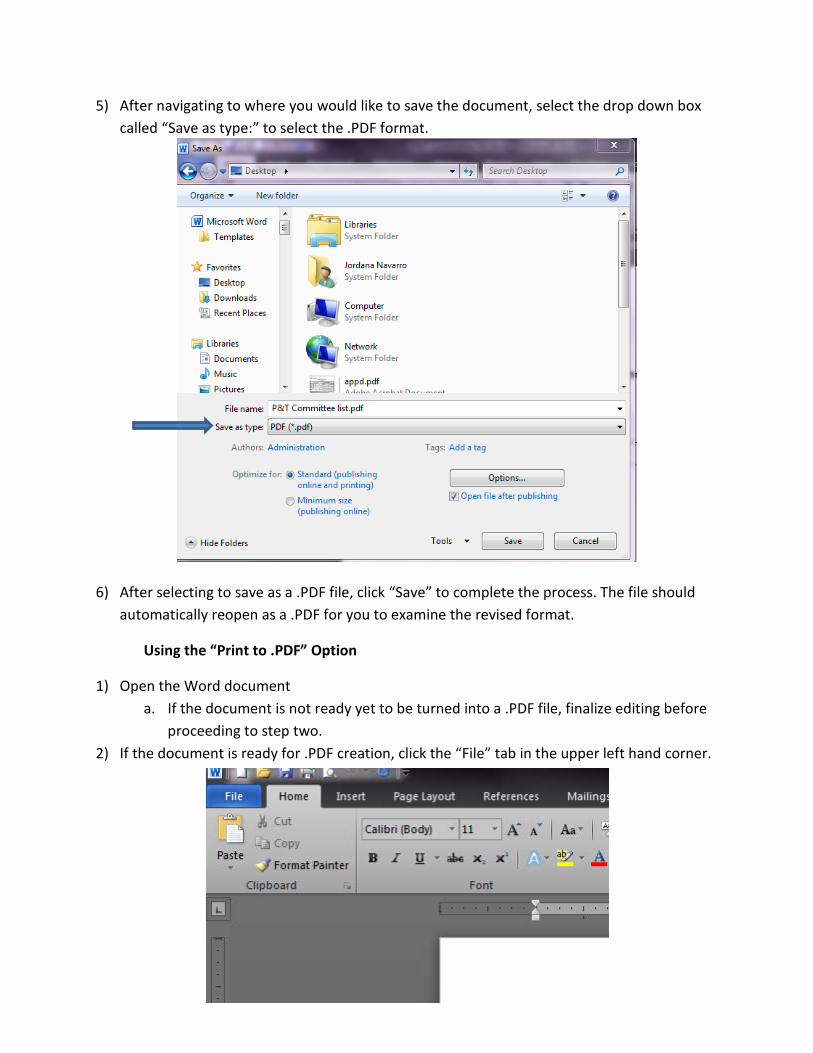
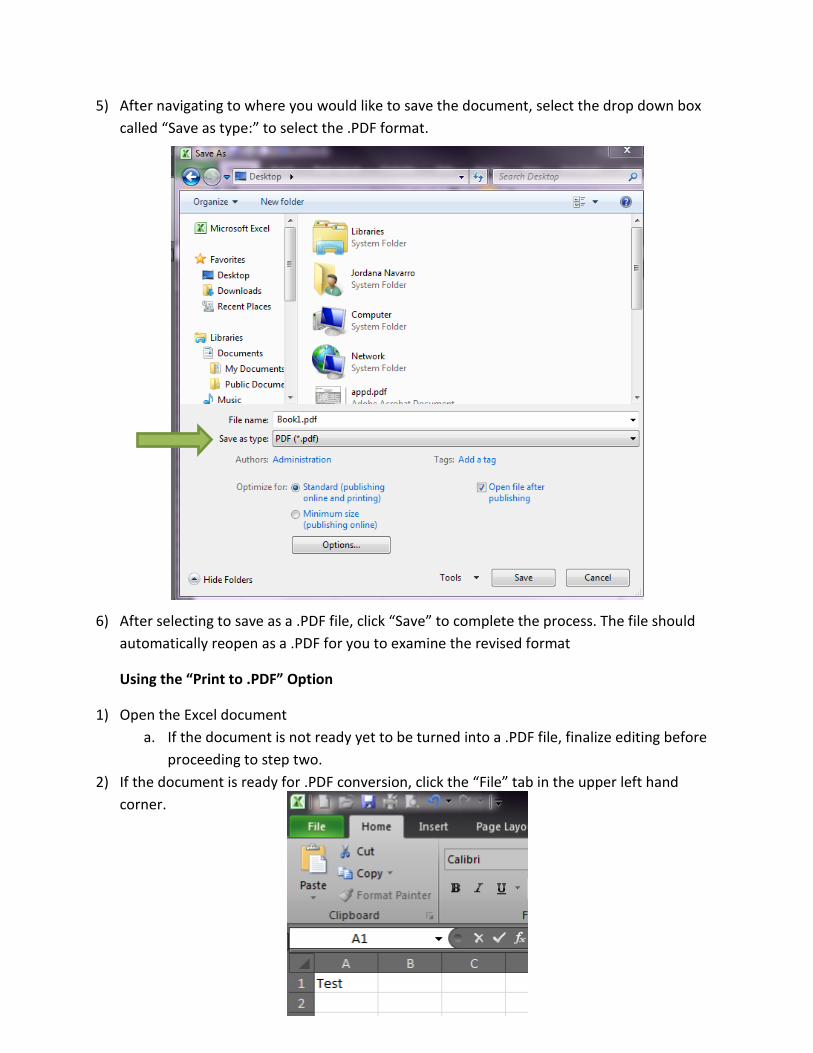
5) After navigating to where you would like to save the document, select the drop down box called “Save as type:” to select the .PDF format.
6) After selecting to save as a .PDF file, click “Save” to complete the process. The file should automatically reopen as a .PDF for you to examine the revised format.
Using the “Print to .PDF” Option
1) Open the Word document a. If the document is not ready yet to be turned into a .PDF file, finalize editing before
proceeding to step two. 2) If the document is ready for .PDF creation, click the “File” tab in the upper left hand corner.
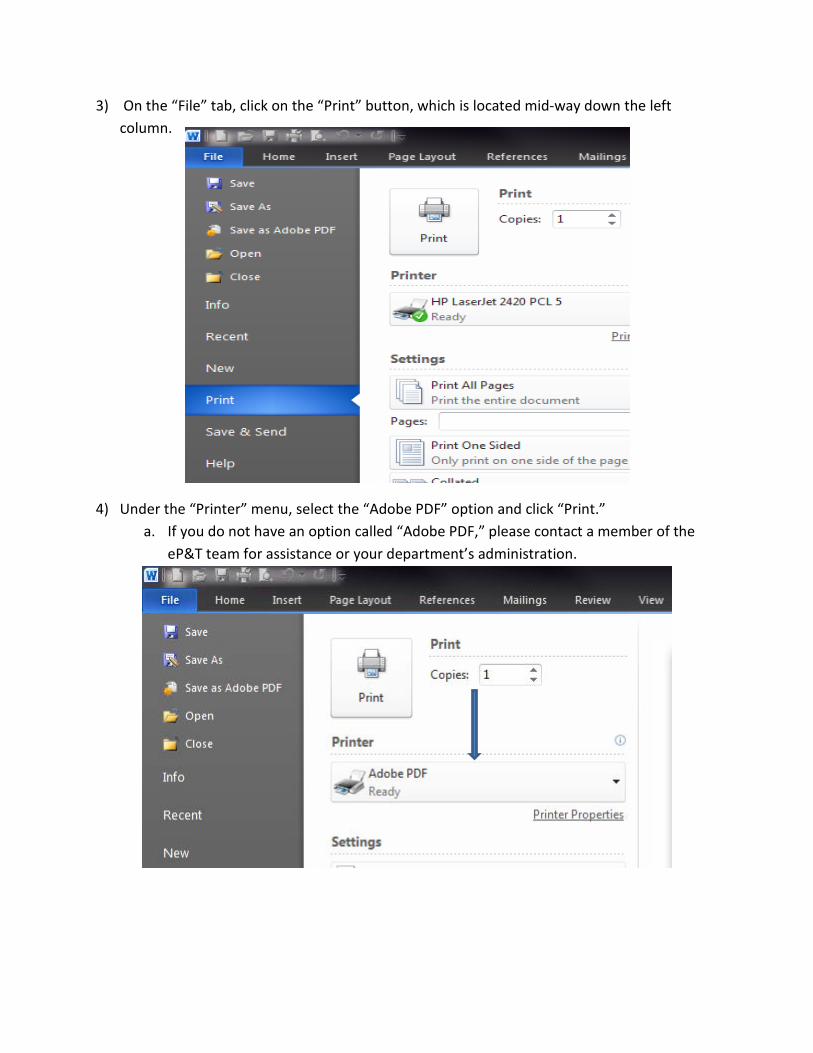
3) On the “File” tab, click on the “Print” button, which is located mid-way down the left column.
4) Under the “Printer” menu, select the “Adobe PDF” option and click “Print.” a. If you do not have an option called “Adobe PDF,” please contact a member of the
eP&T team for assistance or your department’s administration.
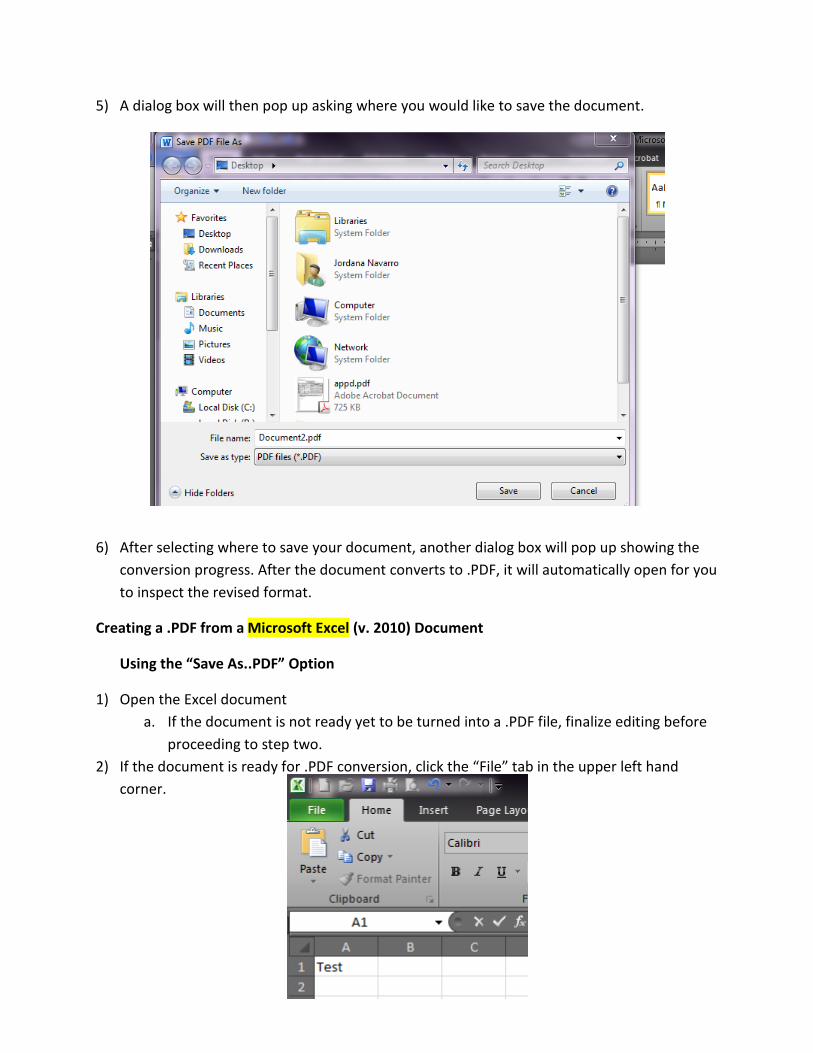
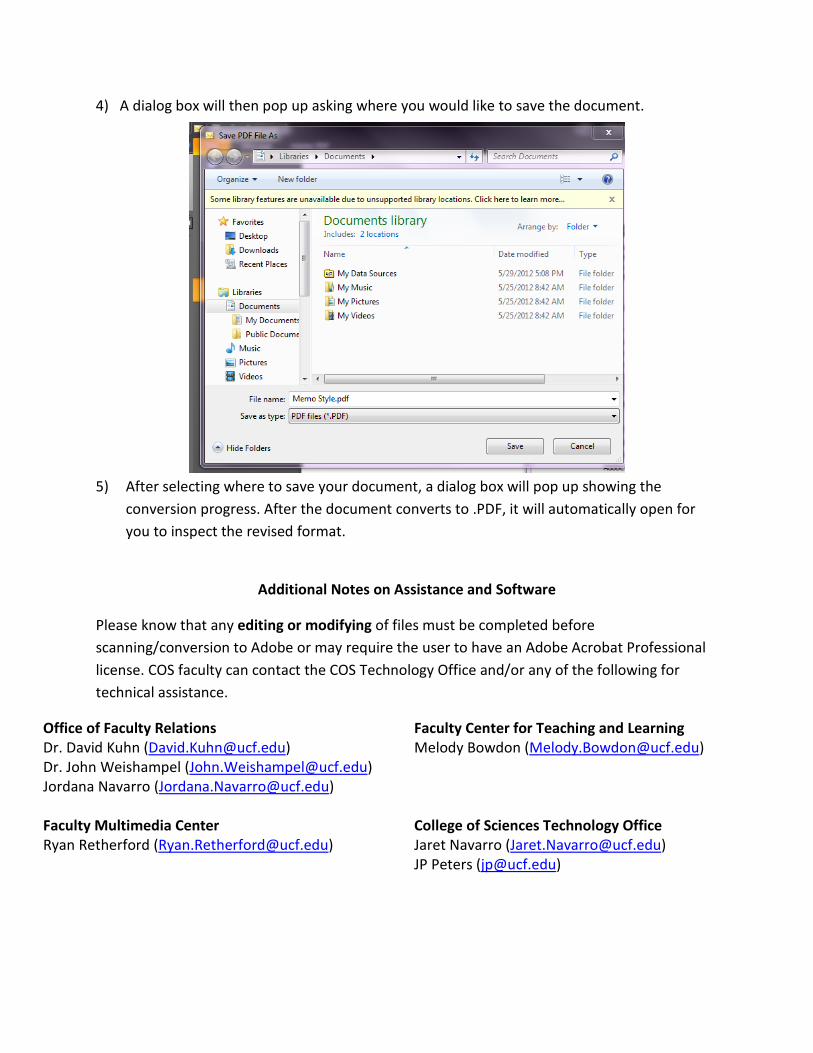
5) A dialog box will then pop up asking where you would like to save the document.
6) After selecting where to save your document, another dialog box will pop up showing the conversion progress. After the document converts to .PDF, it will automatically open for you to inspect the revised format.
Creating a .PDF from a Microsoft Excel (v. 2010) Document
Using the “Save As..PDF” Option
1) Open the Excel document a. If the document is not ready yet to be turned into a .PDF file, finalize editing before
proceeding to step two. 2) If the document is ready for .PDF conversion, click the “File” tab in the upper left hand
corner.
3) Select either the “Save As” or the “Save As Adobe PDF” feature in the upper left hand column (both will work).
4) After selecting an option, a dialogue box will automatically pop up prompting you to indicate where you would like to save the document. Do not save the document yet.
5) After navigating to where you would like to save the document, select the drop down box called “Save as type:” to select the .PDF format.
6) After selecting to save as a .PDF file, click “Save” to complete the process. The file should automatically reopen as a .PDF for you to examine the revised format
Using the “Print to .PDF” Option
1) Open the Excel document a. If the document is not ready yet to be turned into a .PDF file, finalize editing before
proceeding to step two. 2) If the document is ready for .PDF conversion, click the “File” tab in the upper left hand
corner.
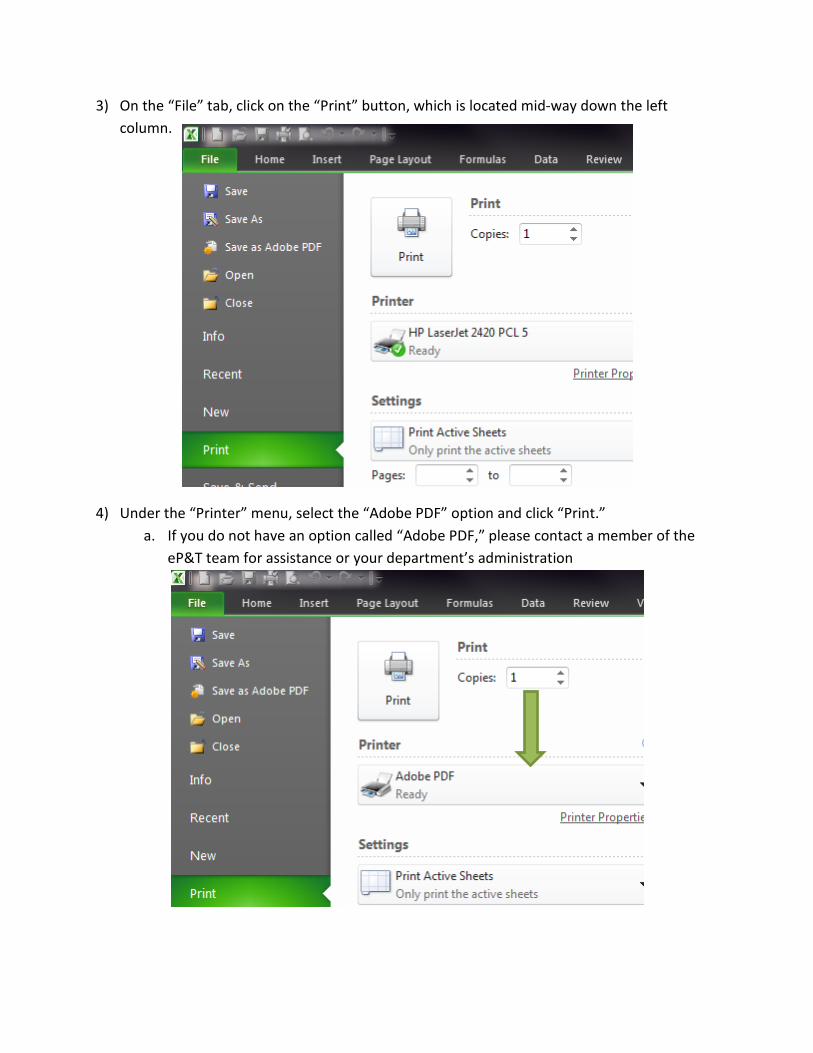
3) On the “File” tab, click on the “Print” button, which is located mid-way down the left column.
4) Under the “Printer” menu, select the “Adobe PDF” option and click “Print.” a. If you do not have an option called “Adobe PDF,” please contact a member of the
eP&T team for assistance or your department’s administration

5) A dialog box will then pop up asking where you would like to save the document.
6) After selecting where to save your document, a dialog box will pop up showing the conversion progress. After the document converts to .PDF, it will automatically open for you to inspect the revised format.
Creating a .PDF from a Microsoft Outlook (v. 2010) E-Mail Document
Using the “Save As..PDF” Option
1) Open the email document and click the “File” tab in the upper left hand corner.
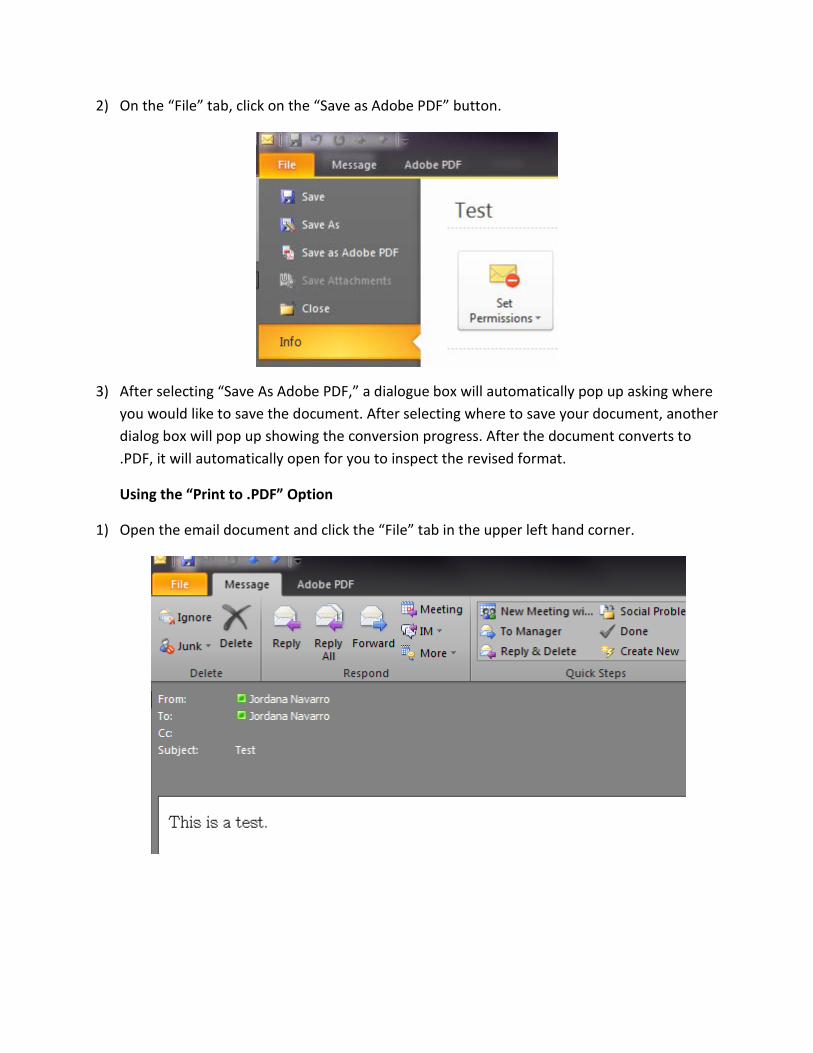
2) On the “File” tab, click on the “Save as Adobe PDF” button.
3) After selecting “Save As Adobe PDF,” a dialogue box will automatically pop up asking where you would like to save the document. After selecting where to save your document, another dialog box will pop up showing the conversion progress. After the document converts to .PDF, it will automatically open for you to inspect the revised format.
Using the “Print to .PDF” Option
1) Open the email document and click the “File” tab in the upper left hand corner.
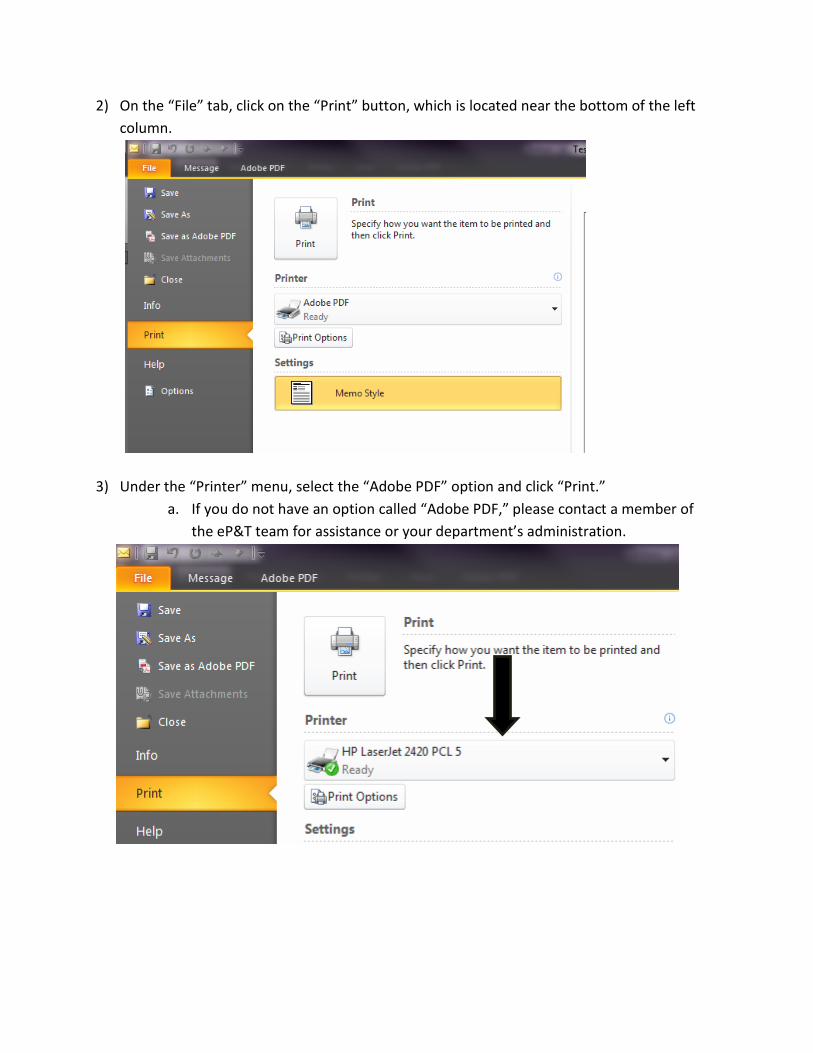
2) On the “File” tab, click on the “Print” button, which is located near the bottom of the left column.
3) Under the “Printer” menu, select the “Adobe PDF” option and click “Print.” a. If you do not have an option called “Adobe PDF,” please contact a member of
the eP&T team for assistance or your department’s administration.
4) A dialog box will then pop up asking where you would like to save the document.
5) After selecting where to save your document, a dialog box will pop up showing the conversion progress. After the document converts to .PDF, it will automatically open for you to inspect the revised format.
Additional Notes on Assistance and Software
Please know that any editing or modifying of files must be completed before scanning/conversion to Adobe or may require the user to have an Adobe Acrobat Professional license. COS faculty can contact the COS Technology Office and/or any of the following for technical assistance.
Office of Faculty Relations Dr. David Kuhn ([email protected]) Dr. John Weishampel ([email protected]) Jordana Navarro ([email protected])
Faculty Center for Teaching and Learning Melody Bowdon ([email protected])
Faculty Multimedia Center Ryan Retherford ([email protected])
College of Sciences Technology Office Jaret Navarro ([email protected]) JP Peters ([email protected])


![· 2019-04-23 · Slen61 nd 'ope60D0Jd 'opou.] len6! ep 'Jes opuepod 'SPIOO ep opelsa op ept;les ep e a 0 ope11D!J 'e õu ep ep op epue61A ep WOO opnoe ep '9 we 'sesew (ezop) ep](https://img.pdfslide.net/doc/110x75/5e31bcd76d54553d1d36e3a6/2019-04-23-slen61-nd-ope60d0jd-opou-len6-ep-jes-opuepod-spioo-ep-opelsa.jpg)


![saude.assis.sp.gov.br · ept)es ep lednunn euelê]oes epd opeA0Jde eluewep!Aep 'oqleqeu ep OUeld o woo opnoe ep 'sopeJIS!l-lll-u ep Jod sos]no sop O!ew Jod 'SISSY ep oqu!-lqos 9sor„](https://img.pdfslide.net/doc/110x75/5e31baa7a7c96377cc731da5/saudeassisspgovbr-eptes-ep-lednunn-eueloes-epd-opea0jde-eluewepaep-oqleqeu.jpg)