Embed Size (px)
Citation preview
1
English
Table of contents
For more information, please consult the FAQs on www.archos.com. Make sure to read them before considering any product return. As we are often updating and improving our products, your device’s software may have a slightly different appearance or modified functionality than presented in this Quick Start Guide. Consult the declaration of conformity on: http://www.archos.com/gb-en/support/support_tech/downloads.html
23610121416
Package contents.................................................................................................................Description of the phone..................................................................................................Getting started......................................................................................................................Mobile data & WiFi connection........................................................................................Outlook account & Contacts.............................................................................................Hints & tips with WindowsTM.............................................................................................Troubleshooting....................................................................................................................
ARCHOS 50 Cesium book.indd 1 12/11/2015 11:19:00
2
Package Contents
Check your product box for the following items: - ARCHOS 50 Cesium - Battery - Headset - USB cable - Charger - Quick start guide - Warranty Legal & Safety notices
The items supplied with your device and available accessories may vary depending on your region or service provider. The supplied items are designed only for your device and may not be compatible with other devices. Unapproved accessories may cause your device to malfunction.
ARCHOS 50 Cesium book.indd 2 12/11/2015 11:19:00

01-09-2015
last modification:
Archos 50 CesiumCONFIDENTIAL
DRAWING
Rev 1scale 1:1 mm
3
5
4
1 2
86
7 93
1 Micro-USB port
Headset jack
Front camera
Phone speaker
Light sensor
Back button
Start button
Search button
Microphone
2
3
4
Description of the phone
5
6
7
8
9
EnglishD
eutschEspañol
ItalianoN
ederlandsPortuguês
PусскийPolski
Magyar
ARCHOS 50 Cesium book.indd 3 12/11/2015 11:19:01

01-09-2015
last modification:
Archos 50 CesiumCONFIDENTIAL
DRAWING
Rev 1scale 1:1 mm
14
10
11
12
13
4
Description of the phone
Camera
Flash light
Volume buttons
ON/OFF button
Loudspeaker
10
11
12
13
14
ARCHOS 50 Cesium book.indd 4 12/11/2015 11:19:02

5
ON/OFF: when the device is off, long press to turn on. When the device is on, short press to turn off the screen and long press to display options.
Volume +/-: press +/- to adjust the volume. When you press the button, notification options are displayed. You can select the most appropriate one.
01-09-2015
last modification:
Archos 50 CesiumCONFIDENTIAL
DRAWING
Rev 1scale 1:1 mm
Back button: return to the previous screen/ long press to open the list of recent applications.
01-09-2015
last modification:
Archos 50 CesiumCONFIDENTIAL
DRAWING
Rev 1scale 1:1 mm
Start button: short press to return to the Home screen.
01-09-2015
last modification:
Archos 50 CesiumCONFIDENTIAL
DRAWING
Rev 1scale 1:1 mm
Search button/Cortana: short press to access Cortana/the search page.
Micro-USB port: plug the provided cable to charge the device or to connect it to a computer.
Headphone jack: connect the provided earphones to make hand-free calls.
Camera & Flash: take pictures or make movies. To extend movies duration, insert a micro-SD card. Activate the flash option in a dark environment and use it as a torch through the quick settings.
Light sensor: it turns off the screen when the device is close to your ear during a call.
English
ARCHOS 50 Cesium book.indd 5 12/11/2015 11:19:03
6
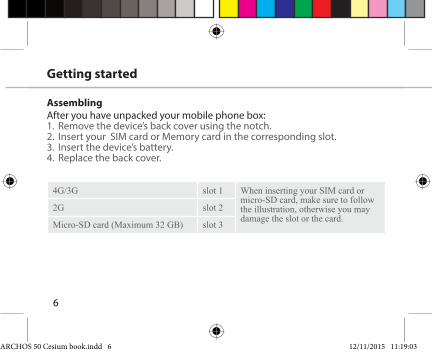
AssemblingAfter you have unpacked your mobile phone box:1. Remove the device’s back cover using the notch.2. Insert your SIM card or Memory card in the corresponding slot.3. Insert the device’s battery.4. Replace the back cover.
Getting started
4G/3G slot 1 When inserting your SIM card or micro-SD card, make sure to follow the illustration, otherwise you may damage the slot or the card.
2G slot 2
Micro-SD card (Maximum 32 GB) slot 3
ARCHOS 50 Cesium book.indd 6 12/11/2015 11:19:03

213
7
Lift the back cover using the notch
English
ARCHOS 50 Cesium book.indd 7 12/11/2015 11:19:04
8
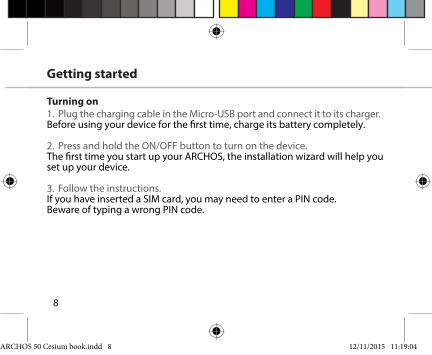
Turning on1. Plug the charging cable in the Micro-USB port and connect it to its charger.Before using your device for the first time, charge its battery completely.
2. Press and hold the ON/OFF button to turn on the device.The first time you start up your ARCHOS, the installation wizard will help you set up your device.
3. Follow the instructions.If you have inserted a SIM card, you may need to enter a PIN code. Beware of typing a wrong PIN code.
Getting started
ARCHOS 50 Cesium book.indd 8 12/11/2015 11:19:04
3
1
2
9
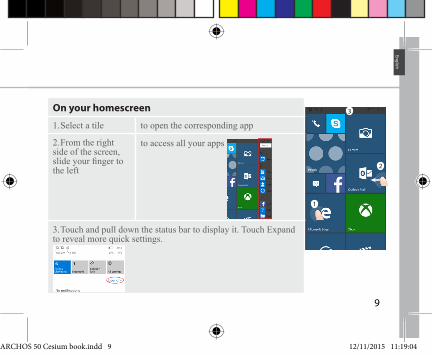
On your homescreen
1. Select a tile to open the corresponding app
2. From the right side of the screen, slide your finger to the left
to access all your apps
3. Touch and pull down the status bar to display it. Touch Expand to reveal more quick settings.
English
ARCHOS 50 Cesium book.indd 9 12/11/2015 11:19:04
3
2
4
10
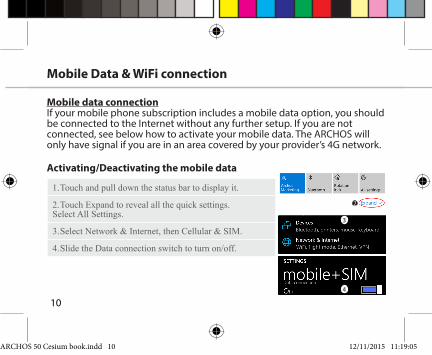
Mobile data connectionIf your mobile phone subscription includes a mobile data option, you should be connected to the Internet without any further setup. If you are not connected, see below how to activate your mobile data. The ARCHOS will only have signal if you are in an area covered by your provider’s 4G network.
Activating/Deactivating the mobile data
1. Touch and pull down the status bar to display it.
2. Touch Expand to reveal all the quick settings. Select All Settings.
3. Select Network & Internet, then Cellular & SIM.
4. Slide the Data connection switch to turn on/off.
Mobile Data & WiFi connection
ARCHOS 50 Cesium book.indd 10 12/11/2015 11:19:05

2
4
11
WiFi connectionWARNING: Make sure that you are in a WiFi zone. You can access the WiFi settings quickly from the status bar.
1. Touch and pull down the status bar to display it.
2. Touch Expand to reveal all the quick settings. Select WiFi to activate it.
3. Select WiFi a second time to display the WiFi settings.
4. Touch the name of the network you want to connect to. Private networks will require you to enter a password.
English
ARCHOS 50 Cesium book.indd 11 12/11/2015 11:19:05

12
Account & Contacts
Adding an account1. Go to ‘Settings’ > ‘Accounts’ > ‘Email & accounts’>’add an account’.2. Select the account type to add.3. Follow the onscreen instructions to enter information about the account.
ARCHOS 50 Cesium book.indd 12 12/11/2015 11:19:05
13
Saving your contactsWhen your contacts are saved, they are always available on the web and can be synced to any Windows phone that’s set up with your account.1. From Start or All Apps screen, select the People app2. Tap and then select Settings3. Select ‘Import from SIM card’. If you have mowre than one SIM card, select the one you want under Import contacts from. 4. Under Save contacts to, select the account you’d like to store the contacts in, and then tap Next.5. To import all of the contacts on your SIM card, tap Import. 6. If you want to select contacts to import individually, tap Clear, select the contacts you want to import, and then tap Import.7. Your contacts are then automatically imported into the Microsoft account set up on your phone. After saving your contacts on your Windows Phone to a Microsoft account in the Cloud, you’ll be able to keep your contacts synced between all the places you sign in with that account. And if you make a change in one place, it’ll show up everywhere else.
English
ARCHOS 50 Cesium book.indd 13 12/11/2015 11:19:05
14
Making a call:Make a call in just a few taps. On the Start screen, tap the Phone Tile, touch the Keypad icon, enter a phone number, then tap Call . To call one of your contacts, touch the Phone book , then tap Search to find the one you want. To call someone back, just tap a name or number in History.
Sending a text: Limber up those thumbs- texting is a doodle on your Windows Phone. On Start , tap Messaging, then tap New.Enter a phone number or contact, type your message in the text box, then tap Send. To reply to a text, just tap the thread with the message that you want to answer.
Shopping the store:Browse free and paid apps and games in the Windows Phone Store. Make sure you’ve signed in to your phone with your Microsoft account. On Start Start , tap Store , then do one of the following: Swipe left or right to see top apps, browse by category and more. Tap Search to find a specific app or game.
Hints & tips for WindowsTM
ARCHOS 50 Cesium book.indd 14 12/11/2015 11:19:05
15
Finding your apps and pinning them to Start:Apps you’ve downloaded show up in the the App list. From there, you can pin your favourites to the Start screen. Note: You can pin apps, contacts and more to Start to keep them handy.
Locking the touchscreen:A lock screen password can help keep your phone more secure. Go to Settings < Lock screen and slide the Password switch to the “ON” position and then create a password. You can decide to remove this option at any time by sliding the Password switch to the “OFF”.
English
ARCHOS 50 Cesium book.indd 15 12/11/2015 11:19:05
16
Troubleshooting
My phone is frozen or cannot switch onCheck the battery contacts, remove and reinstall your battery, then turn your phone on. Check the battery power level, charge for at least 20 minutes.My phone cannot connect to a network or “No service” is displayedTry connecting in another location. Verify the network coverage with your operator. Unable to make outgoing callsMake sure your phone is connected to a network, and the network is not overloaded or unavailable.Unable to receive incoming callsMake sure your phone is switched on and connected to a network (check for overloaded or unavailable network). SIM card PIN lockedContact your network operator to obtain the PUK code (Personal Unblocking Key).To configure a new 4G network:On your device, tap Settings.Select Wireless & networks > More... > Mobile networks.Select Network settings. In Network operators, select your operator. In Access Point Names, select the correct access point name and enter the exact connection parameters provided by your 4G provider.
ARCHOS 50 Cesium book.indd 16 12/11/2015 11:19:05
17
Table des matières
Pour plus d'informations, veuillez consulter la FAQ sur www.archos.com. Consultez-les avant d’envisager un éventuel retour du produit. Comme nous mettons à jour et améliorons régulièrement nos produits, le logiciel de votre appareil peut présenter une interface ou des fonctionnalités légèrement différentes de celles décrites dans ce guide. Consultez la déclaration de conformité sur : http://www.archos.com/gb-en/support/support_tech/downloads.html
18192226283032
Contenu de la boîte..............................................................................................................Description du téléphone.................................................................................................Mise en route.........................................................................................................................Données mobiles et connexion WiFi.............................................................................Comptes et Contacts...........................................................................................................Trucs et astuces avec WindowsTM....................................................................................Dépannage.............................................................................................................................
Français
ARCHOS 50 Cesium book.indd 17 12/11/2015 11:19:05
18
Contenu de la boîte
Vérifiez que les éléments suivants sont bien dans la boîte : - ARCHOS 50 Cesium - Batterie - Écouteurs - Câble USB - Chargeur - Guide d’utilisation rapide - Guide des garanties et des mentions légales
Les éléments fournis avec votre appareil de même que les accessoires peuvent varier en fonction du pays et de votre opérateur télécom. Les éléments fournis sont conçus pour votre téléphone et ne sont pas obligatoirement compatibles avec d'autres appareils. Des accessoires non conformes peuvent être la source d’un mauvais fonctionnement.
ARCHOS 50 Cesium book.indd 18 12/11/2015 11:19:05
01-09-2015
last modification:
Archos 50 CesiumCONFIDENTIAL
DRAWING
Rev 1scale 1:1 mm
3
5
4
1 2
86
7 919
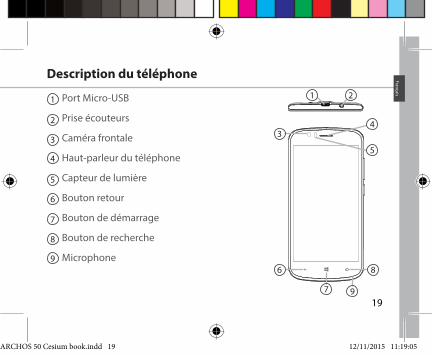
1 Port Micro-USB
Prise écouteurs
Caméra frontale
Haut-parleur du téléphone
Capteur de lumière
Bouton retour
Bouton de démarrage
Bouton de recherche
Microphone
2
3
4
Description du téléphone
5
6
7
8
9
Français
ARCHOS 50 Cesium book.indd 19 12/11/2015 11:19:05

01-09-2015
last modification:
Archos 50 CesiumCONFIDENTIAL
DRAWING
Rev 1scale 1:1 mm
14
10
11
12
13
20
Description du téléphone
Caméra
Flash
Boutons de volume
Bouton MARCHE/ARRET
Haut-parleur
10
11
12
13
14
ARCHOS 50 Cesium book.indd 20 12/11/2015 11:19:05
21
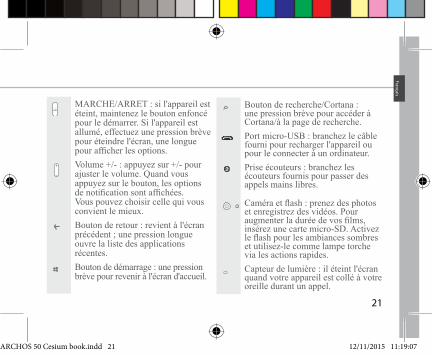
MARCHE/ARRET : si l'appareil est éteint, maintenez le bouton enfoncé pour le démarrer. Si l'appareil est allumé, effectuez une pression brève pour éteindre l'écran, une longue pour afficher les options.Volume +/- : appuyez sur +/- pour ajuster le volume. Quand vous appuyez sur le bouton, les options de notification sont affichées. Vous pouvez choisir celle qui vous convient le mieux.
01-09-2015
last modification:
Archos 50 CesiumCONFIDENTIAL
DRAWING
Rev 1scale 1:1 mm
Bouton de retour : revient à l'écran précédent ; une pression longue ouvre la liste des applications récentes.
01-09-2015
last modification:
Archos 50 CesiumCONFIDENTIAL
DRAWING
Rev 1scale 1:1 mm
Bouton de démarrage : une pression brève pour revenir à l'écran d'accueil.
01-09-2015
last modification:
Archos 50 CesiumCONFIDENTIAL
DRAWING
Rev 1scale 1:1 mm
Bouton de recherche/Cortana : une pression brève pour accéder à Cortana/à la page de recherche.Port micro-USB : branchez le câble fourni pour recharger l'appareil ou pour le connecter à un ordinateur.Prise écouteurs : branchez les écouteurs fournis pour passer des appels mains libres.
Caméra et flash : prenez des photos et enregistrez des vidéos. Pour augmenter la durée de vos films, insérez une carte micro-SD. Activez le flash pour les ambiances sombres et utilisez-le comme lampe torche via les actions rapides.Capteur de lumière : il éteint l'écran quand votre appareil est collé à votre oreille durant un appel.
Français
ARCHOS 50 Cesium book.indd 21 12/11/2015 11:19:07
22
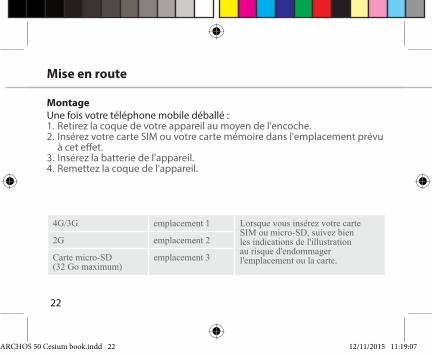
MontageUne fois votre téléphone mobile déballé :1. Retirez la coque de votre appareil au moyen de l'encoche.2. Insérez votre carte SIM ou votre carte mémoire dans l'emplacement prévu
à cet effet.3. Insérez la batterie de l'appareil.4. Remettez la coque de l'appareil.
Mise en route
4G/3G emplacement 1 Lorsque vous insérez votre carte SIM ou micro-SD, suivez bien les indications de l'illustration au risque d'endommager l'emplacement ou la carte.
2G emplacement 2
Carte micro-SD (32 Go maximum)
emplacement 3
ARCHOS 50 Cesium book.indd 22 12/11/2015 11:19:07

213
23
Retirez la coque au moyen de l'encoche.
Français
ARCHOS 50 Cesium book.indd 23 12/11/2015 11:19:07

24
Allumage1. Branchez le câble de recharge sur le port micro-USB et connectez-le au chargeur.Avant la première utilisation de l‘appareil, rechargez complètement sa batterie.
2. Appuyez sur le bouton MARCHE/ARRÊT et maintenez-le enfoncé pour allumer votre appareil.Lors de la première utilisation de votre ARCHOS, l’assistant d’installation vous aidera à configurer votre appareil.
3. Suivez les instructions.Si vous avez inséré une carte SIM, un code PIN peut vous être demandé. Faites attention à rentrer le bon code.
Mise en route
ARCHOS 50 Cesium book.indd 24 12/11/2015 11:19:07
3
1
2
25
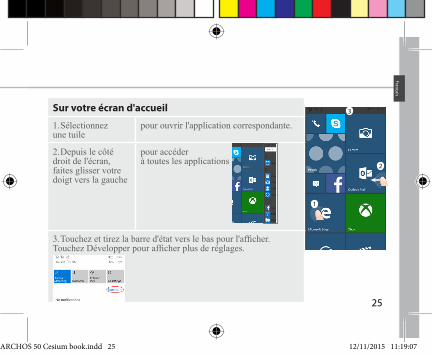
Sur votre écran d'accueil
1. Sélectionnez une tuile
pour ouvrir l'application correspondante.
2. Depuis le côté droit de l'écran, faites glisser votre doigt vers la gauche
pour accéder à toutes les applications
3. Touchez et tirez la barre d'état vers le bas pour l'afficher. Touchez Développer pour afficher plus de réglages.
Français
ARCHOS 50 Cesium book.indd 25 12/11/2015 11:19:07

3
2
4
26
Connexion données mobilesSi votre abonnement téléphonique inclut l'option données mobiles, vous devriez pouvoir vous connecter à Internet sans autres réglages. Si vous n'êtes pas connecté, suivez les instructions ci-dessous pour activer les données mobiles. L'ARCHOS ne reconnaîtra de signal que s'il est dans une zone de couverture 4G de votre opérateur.
Activer/Désactiver les données mobiles
1. Touchez et tirez la barre d'état vers le bas pour l'afficher.
2. Touchez Expand (Développer) pour afficher toutes les actions rapides. Sélectionnez Tous les paramètres.
3. Sélectionnez Réseau et Internet puis Réseau cellulaire et SIM.
4. Faites glisser l'interrupteur pour activer/désactiver la Connexion de données.
Données mobiles et connexion WiFi
ARCHOS 50 Cesium book.indd 26 12/11/2015 11:19:07

2
4
27
Connexion WiFiATTENTION : Vérifiez que vous êtes bien dans une zone WiFi. Vous pouvez accéder rapidement aux paramètres WiFi depuis la barre d'état.
1. Touchez et tirez la barre d'état vers le bas pour l'afficher.
2. Touchez Expand (Développer) pour afficher toutes les actions rapides. Sélectionnez l'option WiFi pour l'activer.
3. Sélectionnez une nouvelle fois WiFi pour afficher les réglages possibles.
4. Touchez le réseau auquel vous souhaitez vous connecter. Les réseaux privés nécessitent un mot de passe.
Français
ARCHOS 50 Cesium book.indd 27 12/11/2015 11:19:07
28
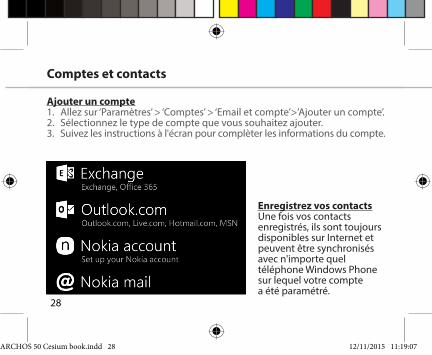
Enregistrez vos contactsUne fois vos contacts enregistrés, ils sont toujours disponibles sur Internet et peuvent être synchronisés avec n'importe quel téléphone Windows Phone sur lequel votre compte a été paramétré.
Comptes et contacts
Ajouter un compte1. Allez sur ‘Paramètres’ > ‘Comptes’ > ‘Email et compte’>’Ajouter un compte’.2. Sélectionnez le type de compte que vous souhaitez ajouter.3. Suivez les instructions à l'écran pour complèter les informations du compte.
ARCHOS 50 Cesium book.indd 28 12/11/2015 11:19:07
29
1. Depuis l'écran d'accueil ou celui de la Liste d'applications, sélectionnez l'application Contacts.2. Touchez et sélectionnez ensuite Paramètres3. Sélectionnez "Importer de la carte SIM". Si vous avez plusieurs cartes SIM, sélectionnez celle que vous souhaitez utiliser sous Importer les contacts de. 4. Sous Enregistrer les contacts dans, sélectionnez le compte dans lequel vous souhaitez stocker les contacts, puis appuyez sur Suivant.5. Pour importer tous les contacts figurant sur votre carte SIM, appuyez sur Importer. 6. Si vous voulez sélectionner certains contacts pour les importer individuellement, appuyez sur Effacer, sélectionnez les contacts à importer, puis appuyez sur Importer.7. Vos contacts sont alors automatiquement importés dans le compte Microsoft paramétré sur votre téléphone. Lorsque vous enregistrez les contacts de votre Windows Phone sur un compte Microsoft dans le cloud, ils peuvent être synchronisés sur tous les appareils sur lesquels vous vous connectez avec ce compte. Et si vous effectuez une modification à un endroit, elle apparaîtra partout ailleurs.
Français
ARCHOS 50 Cesium book.indd 29 12/11/2015 11:19:07
30
Passer un appel :Passez un appel en quelques gestes. Sur l'écran d'accueil, appuyez sur la tuile Téléphone, puis sur l'icône Clavier. Entrez un numéro de téléphone et appuyez sur Appeler . Pour appeler un de vos contacts, appuyez sur Répertoire , puis sur Rechercher pour trouver la personne que vous voulez. Pour rappeler quelqu'un, il vous suffit d'appuyer sur son nom ou sur son numéro dans l'Historique.
Envoyer un message : Échauffez vos pouces : la rédaction d'un SMS se fait en un clin d'œil sur votre Windows Phone. Sur l'écran d'accueil , appuyez sur Message, puis sur Nouveau.Entrez un numéro de téléphone ou un contact, tapez votre message, puis appuyez sur Envoyer. Pour répondre à un message, appuyez sur la conversation contenant le SMS que vous avez reçu.
Faire son shopping sur le Windows Phone Store :Vous pouvez découvrir des jeux et des apps, gratuits ou payants, dans le Windows Phone Store. Assurez-vous d'être connecté avec un compte Microsoft
Trucs et astuces avec WindowsTM
ARCHOS 50 Cesium book.indd 30 12/11/2015 11:19:07
31
sur votre appareil. Sur l'écran d'accueil , appuyez sur Store et effectuez une des actions suivantes : faites glisser l'écran vers la droite ou la gauche pour découvrir les meilleures applications, naviguer par catégorie et bien plus encore. Appuyez sur Rechercher pour trouver une application ou un jeu spécifique.
Trouver ses applications et les épingler sur l'écran d'accueil :Les apps que vous avez téléchargées apparaissent dans la liste d'applications. A partir de là, vous pouvez épingler vos préférées sur l'écran d'accueil. Remarque : Vous pouvez épingler pratiquement tout ce que vous voulez (apps, contacts...) sur l'écran d'accueil pour plus de confort.
Verrouiller l'écran tactile :Un mot de passe pour débloquer l'écran de verrouillage est une sécurité supplémentaire pour votre téléphone. Allez dans Paramètres > Écran de verrouillage, activez l'option mot de passe en faisant glisser le curseur de l'interrupteur et créez ensuite votre mot de passe. Vous pouvez décider à tout moment d'enlever cette sécurité en basculant l'interrupteur sur la position inverse.
Français
ARCHOS 50 Cesium book.indd 31 12/11/2015 11:19:07
32
Dépannage
Mon téléphone est bloqué et je ne réussis pas à l'allumer.Vérifiez les contacts de la batterie. Sortez et replacez votre batterie et rallumez votre téléphone. Vérifiez la charge de la batterie. Rechargez-la durant au moins 20 minutes.Mon téléphone se connecte à aucun réseau ou le message "pas de signal" s'affiche.Déplacez-vous et essayez de vous connecter depuis un autre endroit. Vérifiez la couverture réseau de votre opérateur. Impossible de passer des appelsAssurez-vous que votre téléphone soit connecté à un réseau et que ce dernier soit disponible et pas surchargé.Impossible de recevoir des appelsVérifiez que votre téléphone est bien allumé et connecté à un réseau. Assurez-vous que ce réseau est bien disponible et pas trop surchargé. Code de la carte SIM bloquéContactez votre opérateur pour obtenir le code PUK (code de déblocage personnel).Pour configurer un nouveau réseau 4G :Sur votre appareil, appuyez sur Paramètres.Sélectionnez Sans Fil & Réseaux > Plus... > Réseaux mobiles.Sélectionnez Paramètres réseau Dans Opérateurs réseau, sélectionnez votre opérateur. Dans APN (Access Point Names), sélectionnez le point d'accès de votre choix et entrez exactement les paramètres de connexion stipulés par votre opérateur 4G.
ARCHOS 50 Cesium book.indd 32 12/11/2015 11:19:07
33
Inhaltsverzeichnis
Weitere Informationen finden Sie in den FAQs auf www.archos.com. Vor einer Rückgabe des Produkts diese unbedingt durchlesen. Da unsere Produkte kontinuierlich aktualisiert und weiterentwickelt werden, kann die Software Ihres Gerätes in Erscheinung und Funktionalität geringfügige Abweichungen zu den Darstellungen in dieser Schnellstartanleitung aufweisen. Konsultieren Sie die Konformitätserklärung unter: http://www.archos.com/gb-en/support/support_tech/downloads.html
34353842444648
Verpackungsinhalt...............................................................................................................Beschreibung des Telefons...............................................................................................Erste Schritte..........................................................................................................................Mobildaten & WLAN-Verbindung...................................................................................Outlook-Konten & Kontakte.............................................................................................Hinweise & Tipps für WindowsTM.....................................................................................Fehlerbehebung...................................................................................................................
Deutsch
ARCHOS 50 Cesium book.indd 33 12/11/2015 11:19:07

34
Verpackungsinhalt
In der Verpackung müssen folgende Elemente enthalten sein: - ARCHOS 50 Cesium - Akku - Headset - USB-Kabel - Ladegerät - Schnellbedienungsanleitung - Garantie,- Rechts- und Sicherheitshinweise
Die mit Ihrem Gerät mitgelieferten Elemente und das verfügbare Zubehör können je nach Region oder Dienstleister abweichen. Die mitgelieferten Elemente wurden ausschließlich für Ihr Gerät entwickelt und sind mit anderen Geräten nicht kompatibel. Nicht genehmigtes Zubehör kann zu einer Fehlfunktion Ihres Geräts führen.
ARCHOS 50 Cesium book.indd 34 12/11/2015 11:19:07

01-09-2015
last modification:
Archos 50 CesiumCONFIDENTIAL
DRAWING
Rev 1scale 1:1 mm
3
5
4
1 2
86
7 935
1 Micro-USB-Anschluss
Kopfhöreranschluss
Frontkamera
Telefonlautsprecher
Lichtsensor
Back (Zurück)-Taste
Start-Taste
Suchen-Taste
Mikrofon
2
3
4
Beschreibung des Telefons
5
6
7
8
9
Deutsch
ARCHOS 50 Cesium book.indd 35 12/11/2015 11:19:07
01-09-2015
last modification:
Archos 50 CesiumCONFIDENTIAL
DRAWING
Rev 1scale 1:1 mm
14
10
11
12
13
36
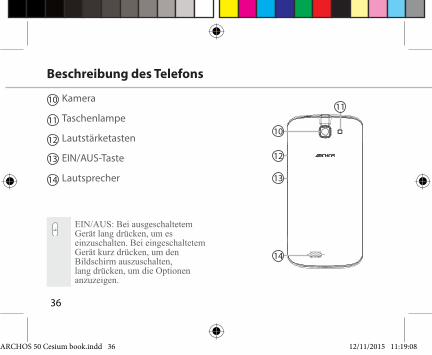
EIN/AUS: Bei ausgeschaltetem Gerät lang drücken, um es einzuschalten. Bei eingeschaltetem Gerät kurz drücken, um den Bildschirm auszuschalten, lang drücken, um die Optionen anzuzeigen.
Beschreibung des Telefons
Kamera
Taschenlampe
Lautstärketasten
EIN/AUS-Taste
Lautsprecher
10
11
12
13
14
ARCHOS 50 Cesium book.indd 36 12/11/2015 11:19:08

37
Drücken Sie auf Lautstärke +/-, um die Lautstärke einzustellen. Sobald Sie die Taste drücken, werden die Benachrichtigungsoptionen angezeigt. Wählen Sie die entsprechende Option aus.
01-09-2015
last modification:
Archos 50 CesiumCONFIDENTIAL
DRAWING
Rev 1scale 1:1 mm
Zurück-Taste: zurück zum vorherigen Bildschirm/lang drücken, um die Liste der zuletzt verwendeten Apps zu öffnen.
01-09-2015
last modification:
Archos 50 CesiumCONFIDENTIAL
DRAWING
Rev 1scale 1:1 mm
Start-Taste: kurz drücken, um zum Startbildschirm zurückzukehren.
01-09-2015
last modification:
Archos 50 CesiumCONFIDENTIAL
DRAWING
Rev 1scale 1:1 mm
Suchen-Taste /Cortana: Kurz drücken, um auf Cortana/die Suchen-Seite zuzugreifen.
Micro-USB-Anschluss: Das mitgelieferte Kabel einstecken, um das Gerät zu laden oder um es mit einem Computer zu verbinden.Kopfhöreranschluss: Anschluss des mitgelieferten Kopfhörers für Anrufe mit Freisprechfunktion.Kamera & Blitz: Aufnahme von Bildern oder Filmen. Für längere Filmaufnahmen eine micro-SD-Karte einstecken. Aktivieren Sie in einer dunklen Umgebung die Blitzoption und verwenden Sie das Gerät über die Schnelleinstellungen als Taschenlampe.Lichtsensor: Schaltet den Bildschirm ab, sobald sich das Gerät während eines Anrufs nahe an Ihrem Ohr befindet.
Deutsch
ARCHOS 50 Cesium book.indd 37 12/11/2015 11:19:09
38
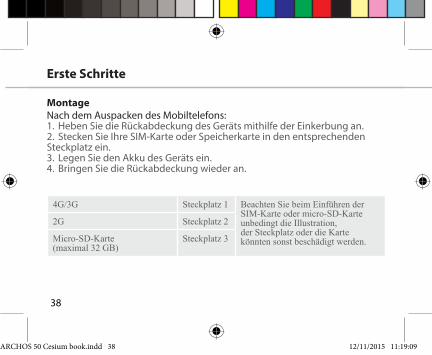
MontageNach dem Auspacken des Mobiltelefons:1. Heben Sie die Rückabdeckung des Geräts mithilfe der Einkerbung an.2. Stecken Sie Ihre SIM-Karte oder Speicherkarte in den entsprechenden Steckplatz ein.3. Legen Sie den Akku des Geräts ein.4. Bringen Sie die Rückabdeckung wieder an.
Erste Schritte
4G/3G Steckplatz 1 Beachten Sie beim Einführen der SIM-Karte oder micro-SD-Karte unbedingt die Illustration, der Steckplatz oder die Karte könnten sonst beschädigt werden.
2G Steckplatz 2
Micro-SD-Karte (maximal 32 GB)
Steckplatz 3
ARCHOS 50 Cesium book.indd 38 12/11/2015 11:19:09

213
39
Heben Sie die Rückabdeckung mithilfe der Einkerbung an
Deutsch
ARCHOS 50 Cesium book.indd 39 12/11/2015 11:19:09
40
Einschalten1. Stecken Sie das Ladekabel in den Micro-USB-Anschluss und verbinden Sie es mit dem Ladegerät.Vor der erstmaligen Verwendung des Geräts muss der Akku vollständig aufgeladen werden.
2. Drücken und halten Sie die EIN/AUS-Taste, um das Gerät einzuschalten.Beim ersten Einschalten des ARCHOS wird Sie der Installationsassistent bei der Konfiguration Ihres Geräts unterstützen.
3. Folgen Sie den Anweisungen.Haben Sie eine SIM-Karte eingesteckt, muss unter Umständen ein PIN-Code eingegeben werden. Geben Sie unbedingt die richtige PIN-Nummer ein.
Erste Schritte
ARCHOS 50 Cesium book.indd 40 12/11/2015 11:19:09
3
1
2
41
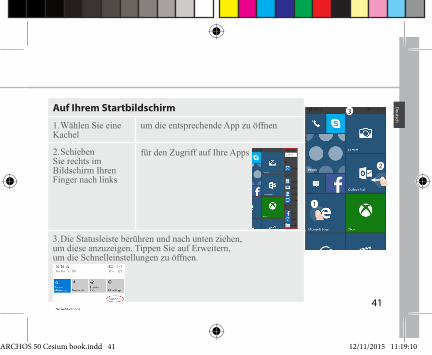
Auf Ihrem Startbildschirm
1. Wählen Sie eine Kachel
um die entsprechende App zu öffnen
2. Schieben Sie rechts im Bildschirm Ihren Finger nach links
für den Zugriff auf Ihre Apps
3. Die Statusleiste berühren und nach unten ziehen, um diese anzuzeigen. Tippen Sie auf Erweitern, um die Schnelleinstellungen zu öffnen.
Deutsch
ARCHOS 50 Cesium book.indd 41 12/11/2015 11:19:10
3
2
4
42
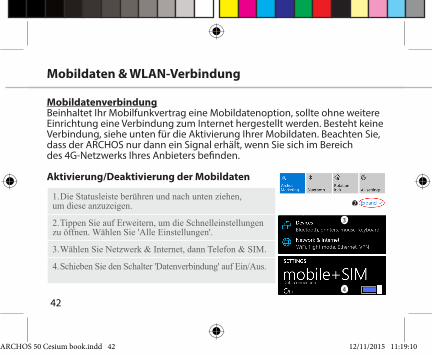
MobildatenverbindungBeinhaltet Ihr Mobilfunkvertrag eine Mobildatenoption, sollte ohne weitere Einrichtung eine Verbindung zum Internet hergestellt werden. Besteht keine Verbindung, siehe unten für die Aktivierung Ihrer Mobildaten. Beachten Sie, dass der ARCHOS nur dann ein Signal erhält, wenn Sie sich im Bereich des 4G-Netzwerks Ihres Anbieters befinden. Aktivierung/Deaktivierung der Mobildaten
1. Die Statusleiste berühren und nach unten ziehen, um diese anzuzeigen.
2. Tippen Sie auf Erweitern, um die Schnelleinstellungen zu öffnen. Wählen Sie 'Alle Einstellungen'.
3. Wählen Sie Netzwerk & Internet, dann Telefon & SIM.
4. Schieben Sie den Schalter 'Datenverbindung' auf Ein/Aus.
Mobildaten & WLAN-Verbindung
ARCHOS 50 Cesium book.indd 42 12/11/2015 11:19:10

2
4
43
WLAN-VerbindungVORSICHT! Überprüfen Sie, ob Sie sich in einer WLAN-Zone befinden. Über die Statusleiste kann schnell auf die WLAN-Einstellungen zugegriffen werden.
1. Die Statusleiste berühren und nach unten ziehen, um diese anzuzeigen.
2. Tippen Sie auf 'Erweitern', um die Schnelleinstellungen zu öffnen. Wählen Sie WLAN zur Aktivierung.
3. Wählen Sie ein zweites Mal WLAN, um die WLAN-Einstellungen anzuzeigen.
4. Tippen Sie auf den Namen des Netzwerks, mit dem eine Verbindung hergestellt werden soll. Bei privaten Netzwerken muss ein Passwort eingegeben werden.
Deutsch
ARCHOS 50 Cesium book.indd 43 12/11/2015 11:19:10
44
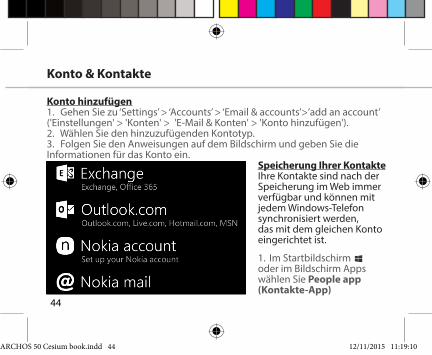
Speicherung Ihrer KontakteIhre Kontakte sind nach der Speicherung im Web immer verfügbar und können mit jedem Windows-Telefon synchronisiert werden, das mit dem gleichen Konto eingerichtet ist.
1. Im Startbildschirm oder im Bildschirm Apps wählen Sie People app (Kontakte-App)
Konto & Kontakte
Konto hinzufügen1. Gehen Sie zu ‘Settings’ > ‘Accounts’ > ‘Email & accounts’>’add an account’ ('Einstellungen' > 'Konten' > 'E-Mail & Konten' > 'Konto hinzufügen').2. Wählen Sie den hinzuzufügenden Kontotyp.3. Folgen Sie den Anweisungen auf dem Bildschirm und geben Sie die Informationen für das Konto ein.
ARCHOS 50 Cesium book.indd 44 12/11/2015 11:19:10
45
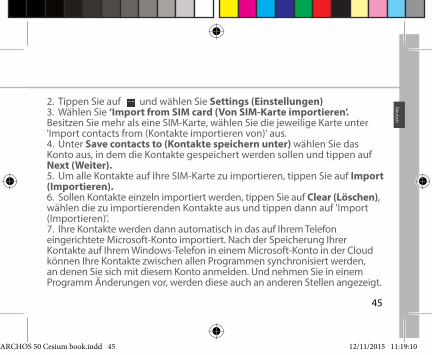
2. Tippen Sie auf und wählen Sie Settings (Einstellungen)3. Wählen Sie ‘Import from SIM card (Von SIM-Karte importieren’. Besitzen Sie mehr als eine SIM-Karte, wählen Sie die jeweilige Karte unter 'Import contacts from (Kontakte importieren von)' aus. 4. Unter Save contacts to (Kontakte speichern unter) wählen Sie das Konto aus, in dem die Kontakte gespeichert werden sollen und tippen auf Next (Weiter).5. Um alle Kontakte auf Ihre SIM-Karte zu importieren, tippen Sie auf Import (Importieren). 6. Sollen Kontakte einzeln importiert werden, tippen Sie auf Clear (Löschen), wählen die zu importierenden Kontakte aus und tippen dann auf 'Import (Importieren)'.7. Ihre Kontakte werden dann automatisch in das auf Ihrem Telefon eingerichtete Microsoft-Konto importiert. Nach der Speicherung Ihrer Kontakte auf Ihrem Windows-Telefon in einem Microsoft-Konto in der Cloud können Ihre Kontakte zwischen allen Programmen synchronisiert werden, an denen Sie sich mit diesem Konto anmelden. Und nehmen Sie in einem Programm Änderungen vor, werden diese auch an anderen Stellen angezeigt.
Deutsch
ARCHOS 50 Cesium book.indd 45 12/11/2015 11:19:10
46
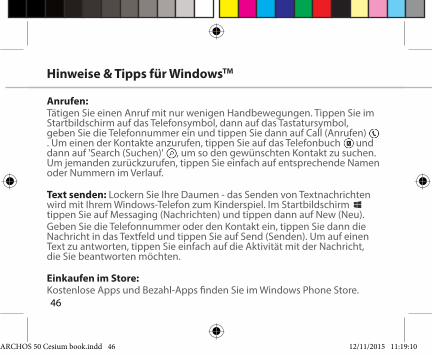
Anrufen:Tätigen Sie einen Anruf mit nur wenigen Handbewegungen. Tippen Sie im Startbildschirm auf das Telefonsymbol, dann auf das Tastatursymbol, geben Sie die Telefonnummer ein und tippen Sie dann auf Call (Anrufen) . Um einen der Kontakte anzurufen, tippen Sie auf das Telefonbuch und dann auf 'Search (Suchen)' , um so den gewünschten Kontakt zu suchen. Um jemanden zurückzurufen, tippen Sie einfach auf entsprechende Namen oder Nummern im Verlauf.
Text senden: Lockern Sie Ihre Daumen - das Senden von Textnachrichten wird mit Ihrem Windows-Telefon zum Kinderspiel. Im Startbildschirm tippen Sie auf Messaging (Nachrichten) und tippen dann auf New (Neu).Geben Sie die Telefonnummer oder den Kontakt ein, tippen Sie dann die Nachricht in das Textfeld und tippen Sie auf Send (Senden). Um auf einen Text zu antworten, tippen Sie einfach auf die Aktivität mit der Nachricht, die Sie beantworten möchten.
Einkaufen im Store:Kostenlose Apps und Bezahl-Apps finden Sie im Windows Phone Store.
Hinweise & Tipps für WindowsTM
ARCHOS 50 Cesium book.indd 46 12/11/2015 11:19:10
47
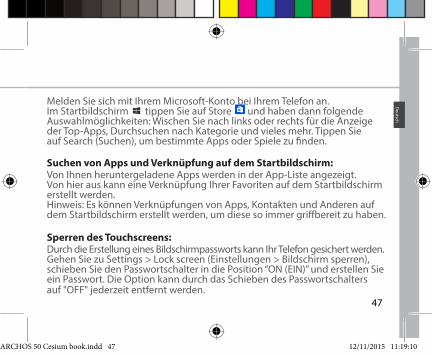
Melden Sie sich mit Ihrem Microsoft-Konto bei Ihrem Telefon an. Im Startbildschirm tippen Sie auf Store und haben dann folgende Auswahlmöglichkeiten: Wischen Sie nach links oder rechts für die Anzeige der Top-Apps, Durchsuchen nach Kategorie und vieles mehr. Tippen Sie auf Search (Suchen), um bestimmte Apps oder Spiele zu finden.
Suchen von Apps und Verknüpfung auf dem Startbildschirm:Von Ihnen heruntergeladene Apps werden in der App-Liste angezeigt. Von hier aus kann eine Verknüpfung Ihrer Favoriten auf dem Startbildschirm erstellt werden. Hinweis: Es können Verknüpfungen von Apps, Kontakten und Anderen auf dem Startbildschirm erstellt werden, um diese so immer griffbereit zu haben.
Sperren des Touchscreens:Durch die Erstellung eines Bildschirmpassworts kann Ihr Telefon gesichert werden. Gehen Sie zu Settings > Lock screen (Einstellungen > Bildschirm sperren), schieben Sie den Passwortschalter in die Position “ON (EIN)” und erstellen Sie ein Passwort. Die Option kann durch das Schieben des Passwortschalters auf "OFF" jederzeit entfernt werden.
Deutsch
ARCHOS 50 Cesium book.indd 47 12/11/2015 11:19:10
48
Fehlerbehebung
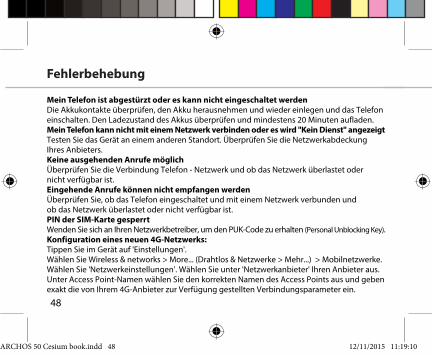
Mein Telefon ist abgestürzt oder es kann nicht eingeschaltet werdenDie Akkukontakte überprüfen, den Akku herausnehmen und wieder einlegen und das Telefon einschalten. Den Ladezustand des Akkus überprüfen und mindestens 20 Minuten aufladen.Mein Telefon kann nicht mit einem Netzwerk verbinden oder es wird "Kein Dienst" angezeigtTesten Sie das Gerät an einem anderen Standort. Überprüfen Sie die Netzwerkabdeckung Ihres Anbieters. Keine ausgehenden Anrufe möglichÜberprüfen Sie die Verbindung Telefon - Netzwerk und ob das Netzwerk überlastet oder nicht verfügbar ist.Eingehende Anrufe können nicht empfangen werdenÜberprüfen Sie, ob das Telefon eingeschaltet und mit einem Netzwerk verbunden und ob das Netzwerk überlastet oder nicht verfügbar ist. PIN der SIM-Karte gesperrtWenden Sie sich an Ihren Netzwerkbetreiber, um den PUK-Code zu erhalten (Personal Unblocking Key).Konfiguration eines neuen 4G-Netzwerks:Tippen Sie im Gerät auf 'Einstellungen'.Wählen Sie Wireless & networks > More... (Drahtlos & Netzwerke > Mehr...) > Mobilnetzwerke.Wählen Sie 'Netzwerkeinstellungen'. Wählen Sie unter 'Netzwerkanbieter' Ihren Anbieter aus. Unter Access Point-Namen wählen Sie den korrekten Namen des Access Points aus und geben exakt die von Ihrem 4G-Anbieter zur Verfügung gestellten Verbindungsparameter ein.
ARCHOS 50 Cesium book.indd 48 12/11/2015 11:19:10

49
Índice
Para más información, consulte la sección de preguntas y respuestas en www.archos.com. Examínela detenidamente antes de pensar en realizar cualquier devolución. Al estar actualizando y mejorando constantemente nuestros productos, la apariencia o el software de su dispositivo pueden variar ligeramente con respecto a lo descrito en esta Guía Rápida de Inicio. Consulte la declaración de conformidad en: http://www.archos.com/gb-en/support/support_tech/downloads.html
50515458606264
Contenido de la caja...........................................................................................................Descripción del teléfono...................................................................................................Primeros pasos......................................................................................................................Datos móviles y conexión WiFi........................................................................................Cuenta y contactos...............................................................................................................Trucos y consejos con WindowsTM..................................................................................Resolución de problemas..................................................................................................
Español
ARCHOS 50 Cesium book.indd 49 12/11/2015 11:19:10

50
Contenido de la caja
Compruebe que en la caja se incluyan los siguientes artículos: - ARCHOS 50 Cesium - Batería - Auriculares - cable USB - Cargador - Guía rápida de inicio - Garantía legal y aviso de seguridad
Los artículos suministrados con el dispositivo y los accesorios disponibles pueden variar dependiendo del país o del proveedor de servicios. Los artículos suministrados han sido diseñados sólo para su dispositivo y pueden no ser compatibles con otros productos. La utilización de accesorios no homologados puede provocar un funcionamiento incorrecto del dispositivo.
ARCHOS 50 Cesium book.indd 50 12/11/2015 11:19:10
01-09-2015
last modification:
Archos 50 CesiumCONFIDENTIAL
DRAWING
Rev 1scale 1:1 mm
3
5
4
1 2
86
7 951
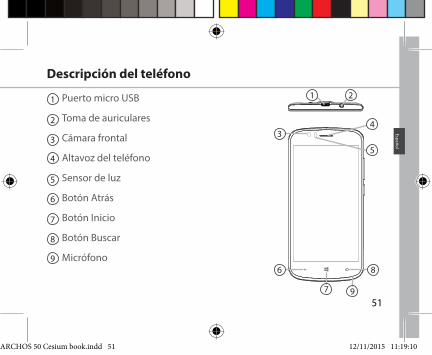
1 Puerto micro USB
Toma de auriculares
Cámara frontal
Altavoz del teléfono
Sensor de luz
Botón Atrás
Botón Inicio
Botón Buscar
Micrófono
2
3
4
Descripción del teléfono
5
6
7
8
9
Español
ARCHOS 50 Cesium book.indd 51 12/11/2015 11:19:10

01-09-2015
last modification:
Archos 50 CesiumCONFIDENTIAL
DRAWING
Rev 1scale 1:1 mm
14
10
11
12
13
52
Descripción del teléfono
Cámara
Flash
Botones de volumen
Botón encender/apagar
Altavoz
10
11
12
13
14
ARCHOS 50 Cesium book.indd 52 12/11/2015 11:19:10
53
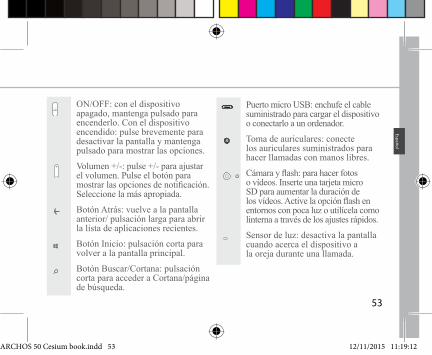
ON/OFF: con el dispositivo apagado, mantenga pulsado para encenderlo. Con el dispositivo encendido: pulse brevemente para desactivar la pantalla y mantenga pulsado para mostrar las opciones.
Volumen +/-: pulse +/- para ajustar el volumen. Pulse el botón para mostrar las opciones de notificación. Seleccione la más apropiada.
01-09-2015
last modification:
Archos 50 CesiumCONFIDENTIAL
DRAWING
Rev 1scale 1:1 mm
Botón Atrás: vuelve a la pantalla anterior/ pulsación larga para abrir la lista de aplicaciones recientes.
01-09-2015
last modification:
Archos 50 CesiumCONFIDENTIAL
DRAWING
Rev 1scale 1:1 mm
Botón Inicio: pulsación corta para volver a la pantalla principal.
01-09-2015
last modification:
Archos 50 CesiumCONFIDENTIAL
DRAWING
Rev 1scale 1:1 mm
Botón Buscar/Cortana: pulsación corta para acceder a Cortana/página de búsqueda.
Puerto micro USB: enchufe el cable suministrado para cargar el dispositivo o conectarlo a un ordenador.
Toma de auriculares: conecte los auriculares suministrados para hacer llamadas con manos libres.
Cámara y flash: para hacer fotos o vídeos. Inserte una tarjeta micro SD para aumentar la duración de los vídeos. Active la opción flash en entornos con poca luz o utilícela como linterna a través de los ajustes rápidos.
Sensor de luz: desactiva la pantalla cuando acerca el dispositivo a la oreja durante una llamada.
Español
ARCHOS 50 Cesium book.indd 53 12/11/2015 11:19:12

54
MontajeUna vez el teléfono móvil fuera de su caja:1. Retire la cubierta posterior del dispositivo utilizando la muesca.2. Inserte su tarjeta SIM o tarjeta de memoria en la ranura correspondiente.3. Inserte la batería del dispositivo.4. Vuelva a colocar la cubierta posterior.
Primeros pasos
4G/3G ranura 1 Al insertar una tarjeta SIM o una tarjeta micro SD, asegúrese de hacerlo conforme a la ilustración, de lo contrario podría dañar la ranura o la tarjeta.
2G ranura 2
tarjeta micro-SD (máximo 32 GB) ranura 3
ARCHOS 50 Cesium book.indd 54 12/11/2015 11:19:12

213
55
Levante la cubierta posterior utilizando la muesca
Español
ARCHOS 50 Cesium book.indd 55 12/11/2015 11:19:12
56
Encendido1. Enchufe el cable de carga al puerto micro USB y conéctelo al cargador.Antes de utilizar el dispositivo por primera vez, cargue completamente la batería.
2. Mantenga pulsado el botón ON/OFF para encender el dispositivo.La primera vez que encienda el ARCHOS, el asistente de instalación le ayudará a configurar su dispositivo.
3. Siga las instrucciones.Si ha introducido una tarjeta SIM, deberá teclear el código PIN. Tenga cuidado de no introducir un código PIN incorrecto.
Primeros pasos
ARCHOS 50 Cesium book.indd 56 12/11/2015 11:19:12
3
1
2
57
En la pantalla principal
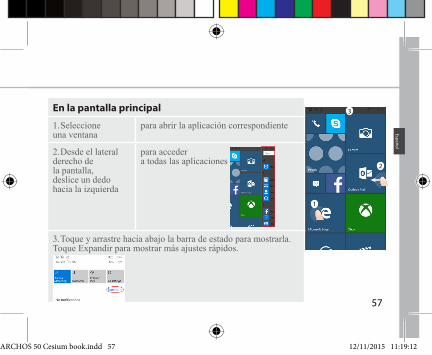
1. Seleccione una ventana
para abrir la aplicación correspondiente
2. Desde el lateral derecho de la pantalla, deslice un dedo hacia la izquierda
para acceder a todas las aplicaciones
3. Toque y arrastre hacia abajo la barra de estado para mostrarla. Toque Expandir para mostrar más ajustes rápidos.
Español
ARCHOS 50 Cesium book.indd 57 12/11/2015 11:19:12
3
2
4
58
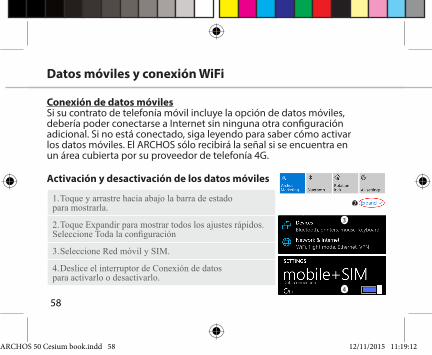
Conexión de datos móvilesSi su contrato de telefonía móvil incluye la opción de datos móviles, debería poder conectarse a Internet sin ninguna otra configuración adicional. Si no está conectado, siga leyendo para saber cómo activar los datos móviles. El ARCHOS sólo recibirá la señal si se encuentra en un área cubierta por su proveedor de telefonía 4G.
Activación y desactivación de los datos móviles
1. Toque y arrastre hacia abajo la barra de estado para mostrarla.
2. Toque Expandir para mostrar todos los ajustes rápidos. Seleccione Toda la configuración
3. Seleccione Red móvil y SIM.
4. Deslice el interruptor de Conexión de datos para activarlo o desactivarlo.
Datos móviles y conexión WiFi
ARCHOS 50 Cesium book.indd 58 12/11/2015 11:19:12

2
4
59
Conexión WiFiADVERTENCIA: Asegúrese de que se encuentra en una zona con cobertura WiFi. Puede acceder rápidamente a los ajustes WiFi desde la barra de estado.
1. Toque y arrastre hacia abajo la barra de estado para mostrarla.
2. Toque Expandir para mostrar todos los ajustes rápidos. Seleccione WiFi para activarla.
3. Seleccione WiFi una segunda vez para mostrar la configuración WiFi.
4. Toque el nombre de la red a la que se desee conectar. Las redes privadas requieren la introducción de una contraseña.
Español
ARCHOS 50 Cesium book.indd 59 12/11/2015 11:19:12
60
Cuenta y contactos
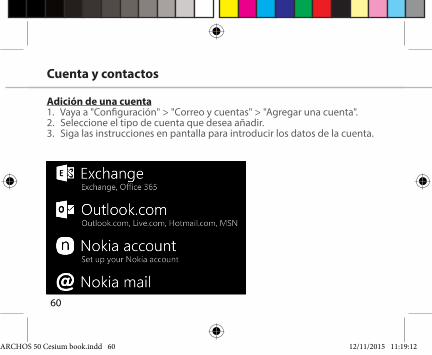
Adición de una cuenta1. Vaya a "Configuración" > "Correo y cuentas" > "Agregar una cuenta".2. Seleccione el tipo de cuenta que desea añadir.3. Siga las instrucciones en pantalla para introducir los datos de la cuenta.
ARCHOS 50 Cesium book.indd 60 12/11/2015 11:19:12
61
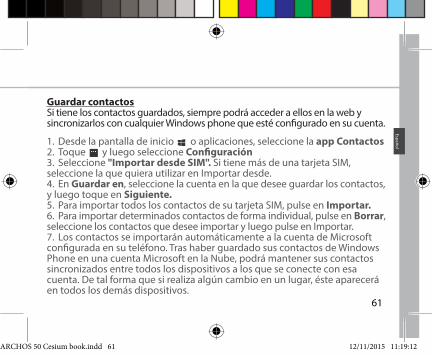
Guardar contactosSi tiene los contactos guardados, siempre podrá acceder a ellos en la web y sincronizarlos con cualquier Windows phone que esté configurado en su cuenta.
1. Desde la pantalla de inicio o aplicaciones, seleccione la app Contactos2. Toque y luego seleccione Configuración3. Seleccione "Importar desde SIM". Si tiene más de una tarjeta SIM, seleccione la que quiera utilizar en Importar desde. 4. En Guardar en, seleccione la cuenta en la que desee guardar los contactos, y luego toque en Siguiente.5. Para importar todos los contactos de su tarjeta SIM, pulse en Importar. 6. Para importar determinados contactos de forma individual, pulse en Borrar, seleccione los contactos que desee importar y luego pulse en Importar.7. Los contactos se importarán automáticamente a la cuenta de Microsoft configurada en su teléfono. Tras haber guardado sus contactos de Windows Phone en una cuenta Microsoft en la Nube, podrá mantener sus contactos sincronizados entre todos los dispositivos a los que se conecte con esa cuenta. De tal forma que si realiza algún cambio en un lugar, éste aparecerá en todos los demás dispositivos.
Español
ARCHOS 50 Cesium book.indd 61 12/11/2015 11:19:12

62
Hacer una llamada:Bastan unas cuantas pulsaciones para hacer una llamada. En la pantalla de inicio, toque la ventana de teléfono, pulse el icono de teclado, introduzca un número de teléfono y luego toque en Llamar . Para llamar a uno de sus contactos, toque en la Agenda de teléfonos y luego pulse en Buscar
para localizar el número deseado. Para devolver una llamada, basta con pulsar un nombre o un número en el historial de llamadas.
Enviar un mensaje de texto: Escribir con los pulgares en un Windows Phone es un juego de niños. En Inicio , pulse en Mensajes y luego en Nuevo.Introduzca un número de teléfono o un contacto, teclee el mensaje en el cuadro de texto, y luego pulse Enviar. Para responder a un mensaje de texto, toque en el hilo del mensaje al que quiera responder.
Comprar en la tienda:Explore las aplicaciones y juegos gratuitos y de pago de la Windows Phone Store. Asegúrese de haber iniciado sesión en el teléfono con su cuenta de Microsoft.
Trucos y consejos con WindowsTM
ARCHOS 50 Cesium book.indd 62 12/11/2015 11:19:13
63
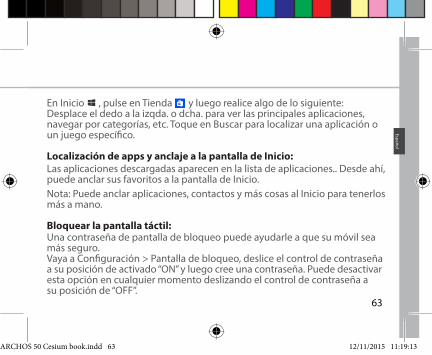
En Inicio , pulse en Tienda y luego realice algo de lo siguiente: Desplace el dedo a la izqda. o dcha. para ver las principales aplicaciones, navegar por categorías, etc. Toque en Buscar para localizar una aplicación o un juego específico.
Localización de apps y anclaje a la pantalla de Inicio:Las aplicaciones descargadas aparecen en la lista de aplicaciones.. Desde ahí, puede anclar sus favoritos a la pantalla de Inicio. Nota: Puede anclar aplicaciones, contactos y más cosas al Inicio para tenerlos más a mano.
Bloquear la pantalla táctil:Una contraseña de pantalla de bloqueo puede ayudarle a que su móvil sea más seguro. Vaya a Configuración > Pantalla de bloqueo, deslice el control de contraseña a su posición de activado “ON” y luego cree una contraseña. Puede desactivar esta opción en cualquier momento deslizando el control de contraseña a su posición de “OFF”.
Español
ARCHOS 50 Cesium book.indd 63 12/11/2015 11:19:13
64
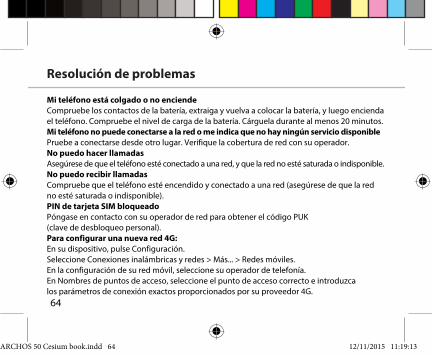
Resolución de problemas
Mi teléfono está colgado o no enciendeCompruebe los contactos de la batería, extraiga y vuelva a colocar la batería, y luego encienda el teléfono. Compruebe el nivel de carga de la batería. Cárguela durante al menos 20 minutos.Mi teléfono no puede conectarse a la red o me indica que no hay ningún servicio disponiblePruebe a conectarse desde otro lugar. Verifique la cobertura de red con su operador. No puedo hacer llamadasAsegúrese de que el teléfono esté conectado a una red, y que la red no esté saturada o indisponible.No puedo recibir llamadasCompruebe que el teléfono esté encendido y conectado a una red (asegúrese de que la red no esté saturada o indisponible). PIN de tarjeta SIM bloqueadoPóngase en contacto con su operador de red para obtener el código PUK (clave de desbloqueo personal).Para configurar una nueva red 4G:En su dispositivo, pulse Configuración.Seleccione Conexiones inalámbricas y redes > Más... > Redes móviles.En la configuración de su red móvil, seleccione su operador de telefonía. En Nombres de puntos de acceso, seleccione el punto de acceso correcto e introduzca los parámetros de conexión exactos proporcionados por su proveedor 4G.
ARCHOS 50 Cesium book.indd 64 12/11/2015 11:19:13
65
Sommario
Per ulteriori informazioni, consultare la sezione FAQ su www.archos.com. Leggerla attentamente prima di decidere di effettuare un reso. Poiché aggiorniamo e miglioriamo con frequenza i nostri prodotti, il software del dispositivo potrebbe avere un aspetto leggermente differente o funzionalità modificate rispetto a quelle mostrate nella presente Guida rapida. Consultare la dichiarazione di conformità sul sito web: http://www.archos.com/gb-en/support/support_tech/downloads.html
66677074767880
Contenuto della confezione.............................................................................................Descrizione del telefono....................................................................................................Introduzione...........................................................................................................................Connessione dati e Wi-Fi....................................................................................................Account e Contatti................................................................................................................Consigli e suggerimenti per WindowsTM......................................................................Risoluzione dei problemi...................................................................................................
Italiano
ARCHOS 50 Cesium book.indd 65 12/11/2015 11:19:13

66
Contenuto della confezione
Verifica la presenza dei seguenti articoli all'interno della confezione: - ARCHOS 50 Cesium - Batteria - Auricolari - Cavo USB - Caricabatterie - Guida rapida - Garanzia: Informazioni legali e sulla sicurezza
Gli articoli forniti con il dispositivo e gli accessori a disposizione possono variare in base alla regione o al fornitore del servizio. Tali articoli sono progettati solo per questo dispositivo e potrebbero non essere compatibili con altri dispositivi. Gli accessori non approvati possono causare il malfunzionamento del dispositivo.
ARCHOS 50 Cesium book.indd 66 12/11/2015 11:19:13

01-09-2015
last modification:
Archos 50 CesiumCONFIDENTIAL
DRAWING
Rev 1scale 1:1 mm
3
5
4
1 2
86
7 967
1 Porta micro-USB
Jack per auricolari
Fotocamera anteriore
Altoparlante
Sensore di luminosità
Pulsante Indietro
Pulsante Start
Pulsante Cerca
Microfono
2
3
4
Descrizione del telefono
5
6
7
8
9
Italiano
ARCHOS 50 Cesium book.indd 67 12/11/2015 11:19:13
01-09-2015
last modification:
Archos 50 CesiumCONFIDENTIAL
DRAWING
Rev 1scale 1:1 mm
14
10
11
12
13
68
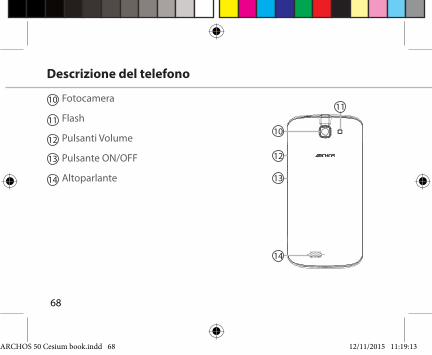
Descrizione del telefono
Fotocamera
Flash
Pulsanti Volume
Pulsante ON/OFF
Altoparlante
10
11
12
13
14
ARCHOS 50 Cesium book.indd 68 12/11/2015 11:19:13

69
ON/OFF: quando il dispositivo è spento, premere a lungo per accenderlo. Quando il dispositivo è acceso, premere brevemente per spegnere lo schermo e premere a lungo per visualizzare le opzioni.Volume +/-: premere +/- per regolare il volume. Premendo il pulsante, verranno visualizzate le opzioni di notifica e sarà possibile selezionare la più appropriata.
01-09-2015
last modification:
Archos 50 CesiumCONFIDENTIAL
DRAWING
Rev 1scale 1:1 mm
Pulsante Indietro: per tornare alla schermata precedente/premere a lungo per aprile l'elenco delle applicazioni recenti.
01-09-2015
last modification:
Archos 50 CesiumCONFIDENTIAL
DRAWING
Rev 1scale 1:1 mm
Pulsante Start: premere brevemente per tornare alla schermata principale.
01-09-2015
last modification:
Archos 50 CesiumCONFIDENTIAL
DRAWING
Rev 1scale 1:1 mm
Pulsante Cerca/Cortana: premere brevemente per accedere a Cortana/alla pagina di ricerca.Porta micro-USB: collegare il cavo in dotazione per caricare il dispositivo o per connetterlo al computer.Jack per auricolari: collegare gli auricolari in dotazione per effettuare chiamate in viva voce.Fotocamera e flash: per scattare foto o registrare video. Per aumentare la durata dei video, inserire una scheda micro-SD. Attivare il flash in ambienti bui e utilizzarlo come torcia tramite le impostazioni rapide.Sensore di luce: oscura lo schermo quando il dispositivo si trova vicino all'orecchio durante una chiamata.
Italiano
ARCHOS 50 Cesium book.indd 69 12/11/2015 11:19:14
70
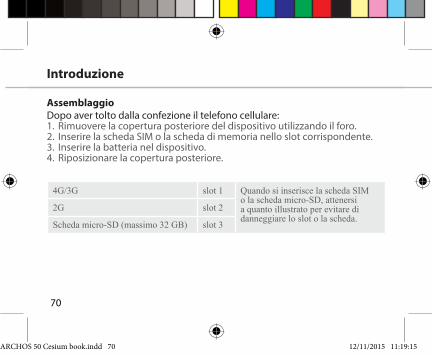
AssemblaggioDopo aver tolto dalla confezione il telefono cellulare:1. Rimuovere la copertura posteriore del dispositivo utilizzando il foro.2. Inserire la scheda SIM o la scheda di memoria nello slot corrispondente.3. Inserire la batteria nel dispositivo.4. Riposizionare la copertura posteriore.
Introduzione
4G/3G slot 1 Quando si inserisce la scheda SIM o la scheda micro-SD, attenersi a quanto illustrato per evitare di danneggiare lo slot o la scheda.
2G slot 2
Scheda micro-SD (massimo 32 GB) slot 3
ARCHOS 50 Cesium book.indd 70 12/11/2015 11:19:15

213
71
Sollevare la copertura posteriore dal foro
Italiano
ARCHOS 50 Cesium book.indd 71 12/11/2015 11:19:15
72
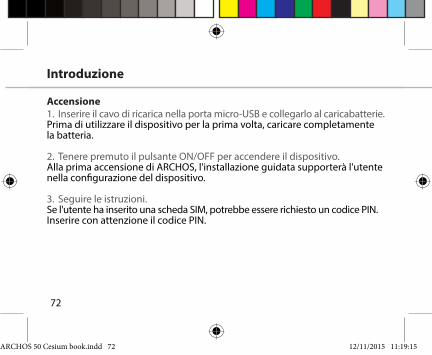
Accensione1. Inserire il cavo di ricarica nella porta micro-USB e collegarlo al caricabatterie.Prima di utilizzare il dispositivo per la prima volta, caricare completamente la batteria.
2. Tenere premuto il pulsante ON/OFF per accendere il dispositivo.Alla prima accensione di ARCHOS, l'installazione guidata supporterà l'utente nella configurazione del dispositivo.
3. Seguire le istruzioni.Se l'utente ha inserito una scheda SIM, potrebbe essere richiesto un codice PIN. Inserire con attenzione il codice PIN.
Introduzione
ARCHOS 50 Cesium book.indd 72 12/11/2015 11:19:15
3
1
2
73
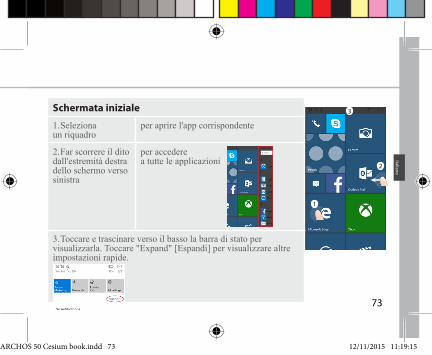
Schermata iniziale
1. Seleziona un riquadro
per aprire l'app corrispondente
2. Far scorrere il dito dall'estremità destra dello schermo verso sinistra
per accedere a tutte le applicazioni
3. Toccare e trascinare verso il basso la barra di stato per visualizzarla. Toccare "Expand" [Espandi] per visualizzare altre impostazioni rapide.
Italiano
ARCHOS 50 Cesium book.indd 73 12/11/2015 11:19:15
3
2
4
74
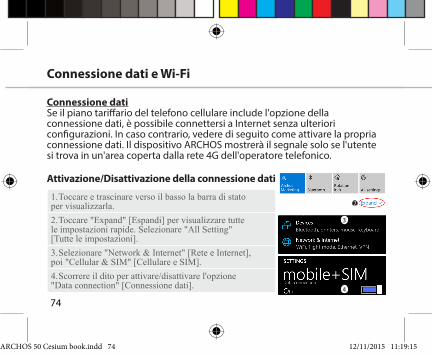
Connessione datiSe il piano tariffario del telefono cellulare include l'opzione della connessione dati, è possibile connettersi a Internet senza ulteriori configurazioni. In caso contrario, vedere di seguito come attivare la propria connessione dati. Il dispositivo ARCHOS mostrerà il segnale solo se l'utente si trova in un'area coperta dalla rete 4G dell'operatore telefonico.
Attivazione/Disattivazione della connessione dati
1. Toccare e trascinare verso il basso la barra di stato per visualizzarla.2. Toccare "Expand" [Espandi] per visualizzare tutte le impostazioni rapide. Selezionare "All Setting" [Tutte le impostazioni]. 3. Selezionare "Network & Internet" [Rete e Internet], poi "Cellular & SIM" [Cellulare e SIM].4. Scorrere il dito per attivare/disattivare l'opzione "Data connection" [Connessione dati].
Connessione dati e Wi-Fi
ARCHOS 50 Cesium book.indd 74 12/11/2015 11:19:15
2
4
75
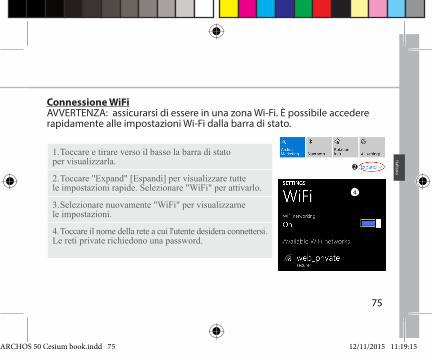
Connessione WiFiAVVERTENZA: assicurarsi di essere in una zona Wi-Fi. È possibile accedere rapidamente alle impostazioni Wi-Fi dalla barra di stato.
1. Toccare e tirare verso il basso la barra di stato per visualizzarla.
2. Toccare "Expand" [Espandi] per visualizzare tutte le impostazioni rapide. Selezionare "WiFi" per attivarlo.
3. Selezionare nuovamente "WiFi" per visualizzarne le impostazioni.
4. Toccare il nome della rete a cui l'utente desidera connettersi. Le reti private richiedono una password.
Italiano
ARCHOS 50 Cesium book.indd 75 12/11/2015 11:19:15

76
Account e Contatti
Aggiunta di un account1. Andare in "Settings" [Impostazioni]> "Accounts" > "Email & accounts" [E-mail e account]> "Add an account" [Aggiungi un account].2. Selezionare il tipo di account da aggiungere.3. Seguire le istruzioni sullo schermo per inserire le informazioni relative all'account.
ARCHOS 50 Cesium book.indd 76 12/11/2015 11:19:15
77
Salvataggio dei contattiI contatti, una volta salvati, saranno sempre disponibili sul Web e potranno essere sincronizzati a qualsiasi telefono Windows configurato con il proprio account.
1. Dalla schermata Start o "Tutte le app", selezionare l'app People [app Contatti].2. Toccare e selezionare "Settings" [Impostazioni].3. Selezionare "Import from SIM card" [Importa da scheda SIM]. Se si possiede più di una scheda SIM, selezionare quella desiderata in "Import contacts from" [Importa contatti da]. 4. In "Save contacts to" [Salva contatti in] selezionare l'account in cui si desidera memorizzare i contatti, quindi toccare "Next" [Avanti].5. Per importare tutti i contatti sulla scheda SIM, toccare "Import" [Importa]. 6. Se si desidera selezionare uno a uno i contatti da importare, toccare "Clear" [Cancella], selezionare i contatti da importare, quindi "Import" [Importa].7. I contatti verranno automaticamente importati sull'account Microsoft configurato sul proprio telefono. Dopo aver salvato i contatti del Windows Phone su un account Microsoft nel Cloud, sarà possibile sincronizzarli con tutti i dispositivi collegati a quell'account. Le modifiche apportate da un dispositivo verranno visualizzate su tutti i dispositivi.
Italiano
ARCHOS 50 Cesium book.indd 77 12/11/2015 11:19:15
78
Effettuare una chiamata:È possibile effettuare una chiamata in pochissimi passaggi. Sulla schermata Start, toccare il riquadro Telefono, poi l'icona del tastierino, quindi digitare il numero di telefono e chiamare col tasto . Per chiamare uno dei propri contatti, toccare la rubrica e il pulsante di ricerca per trovare il nome desiderato. Per richiamare qualcuno, basta toccare un nome o un numero nella cronologia.
Inviare un SMS: Inviare messaggi è semplicissimo con Windows Phone. Nella schermata Start , toccare "Messaging" [Messaggi], quindi "New" [Nuovo].Inserire un numero di telefono o un contatto, digitare il messaggio nella casella di testo e toccare "Send" [Invia]. Per rispondere a un messaggio, basta toccare la conversazione con il messaggio a cui si desidera rispondere.
Acquistare nello store:Nel Windows Phone Store sono presenti applicazioni e giochi gratuiti e a pagamento. Assicurarsi di aver effettuato l'accesso all'account Microsoft
Consigli e suggerimenti per WindowsTM
ARCHOS 50 Cesium book.indd 78 12/11/2015 11:19:15

79
con il proprio telefono. Sulla schermata Start , toccare Store , quindi procedere con una delle seguenti azioni: Scorrere verso destra o sinistra per vedere le applicazioni più popolari, cercare per categoria e molto altro. Toccare "Search" [Cerca] per trovare un'app o un gioco specifico.
Trovare app e aggiungerle a Start:Le app scaricate vengono visualizzate nell'elenco delle app, da cui è possibile aggiungere le tue preferite alla schermata Start. Nota: è possibile aggiungere a Start applicazioni, contatti e molto altro per averli sempre a portata di mano.
Bloccare il touchscreen:Una password per la schermata di blocco aiuta a proteggere le informazioni contenute nel telefono. Andare in "Settings" [Impostazioni] > "Lock screen" [Schermata di blocco] e attivare l'opzione della password, quindi creare una password. Si può rimuovere questa opzione in qualsiasi momento disattivandola.
Italiano
ARCHOS 50 Cesium book.indd 79 12/11/2015 11:19:15
80
Risoluzione dei problemi
Il telefono è bloccato o non si accendeVerificare i contatti della batteria, rimuovere e reinserire la batteria, quindi accendere il telefono. Controllare il livello di carica della batteria, ricaricarla per almeno 20 minuti.Il telefono non si connette alla rete o compare "No service" (Nessun servizio)Provare a connettersi in un'altra posizione. Verificare la copertura di rete con il proprio operatore. Impossibile effettuare chiamateAssicurarsi che il telefono sia connesso a una rete e che la rete non sia sovraccarica o non disponibile.Impossibile ricevere chiamateAssicurarsi che il telefono sia acceso e connesso a una rete (controllare che la rete non sia sovraccarica o non disponibile). PIN della scheda SIM bloccatoContattare il proprio operatore telefonico per ottenere il codice PUK (Personal Unblocking Key).Per configurare una nuova rete 4G:Sul dispositivo, toccare "Settings" [Impostazioni].Selezionare "Wireless & networks" [Wireless e reti] > "More..." [Altro...] > "Mobile networks" [Reti di telefonia mobile].Selezionare "Network settings" [Impostazioni di rete]. In "Network operators" [Operatori di rete], selezionare il proprio operatore. In "Access Point Names" [Nomi del punto di accesso], selezionare il nome del punto di accesso corretto e inserire i parametri esatti di connessione forniti dal provider 4G.
ARCHOS 50 Cesium book.indd 80 12/11/2015 11:19:15
81
Inhoud
Raadpleeg voor meer informatie de veelgestelde vragen (FAQ's) op www.archos.com. Lees eerst de antwoorden op deze vragen voordat u het product terugstuurt. Aangezien wij onze producten regelmatig updaten en verbeteren, kunnen de afbeeldingen en/of de functies van uw apparaatsoftware afwijken van de software in deze Verkorte handleiding. Raadpleeg de conformiteitsverklaring op: http://www.archos.com/gb-en/support/support_tech/downloads.html
82838690929496
Inhoud van de verpakking...............................................................................................Beschrijving van de telefoon...........................................................................................Aan de slag.............................................................................................................................Mobiele data & WiFi-verbinding.....................................................................................Account & Contacten...........................................................................................................Tips voor WindowsTM............................................................................................................Probleemoplossing.............................................................................................................
Nederlands
ARCHOS 50 Cesium book.indd 81 12/11/2015 11:19:15
82
Inhoud van de verpakking
Controleer of de volgende onderdelen in de verpakking zitten: - ARCHOS 50 Cesium - Batterij - Headset - USB-kabel - Oplader - Verkorte handleiding - Garantieverklaring en veiligheidsinformatie
De onderdelen die bij het apparaat zijn meegeleverd en de accessoires die verkrijgbaar zijn, verschillen per land en per service provider. De meegeleverde onderdelen zijn uitsluitend bestemd voor uw apparaat en zijn mogelijk niet compatibel met andere apparaten. Niet goedgekeurde accessoires kunnen tot storingen van het apparaat leiden.
ARCHOS 50 Cesium book.indd 82 12/11/2015 11:19:16
01-09-2015
last modification:
Archos 50 CesiumCONFIDENTIAL
DRAWING
Rev 1scale 1:1 mm
3
5
4
1 2
86
7 983
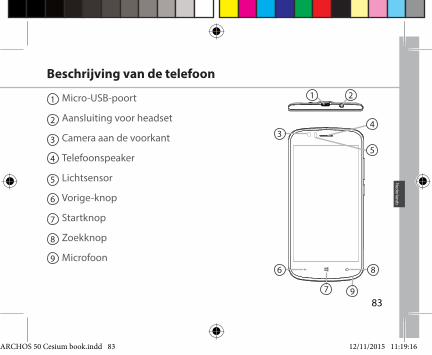
1 Micro-USB-poort
Aansluiting voor headset
Camera aan de voorkant
Telefoonspeaker
Lichtsensor
Vorige-knop
Startknop
Zoekknop
Microfoon
2
3
4
Beschrijving van de telefoon
5
6
7
8
9
Nederlands
ARCHOS 50 Cesium book.indd 83 12/11/2015 11:19:16
01-09-2015
last modification:
Archos 50 CesiumCONFIDENTIAL
DRAWING
Rev 1scale 1:1 mm
14
10
11
12
13
84
Beschrijving van de telefoon
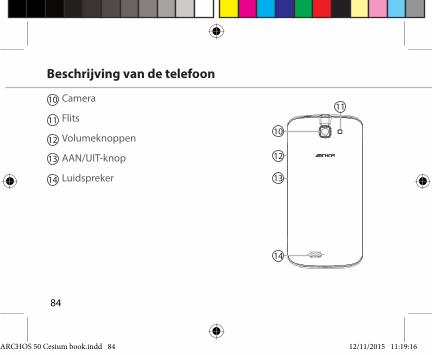
Camera
Flits
Volumeknoppen
AAN/UIT-knop
Luidspreker
10
11
12
13
14
ARCHOS 50 Cesium book.indd 84 12/11/2015 11:19:16

85
AAN/UIT: wanneer het apparaat is uitgeschakeld: ingedrukt houden om in te schakelen. Wanneer het apparaat is ingeschakeld: kort indrukken om het scherm uit te schakelen en ingedrukt houden om de opties weer te geven.Volume +/-: druk op +/- om het volume te regelen. Wanneer u op de knop drukt worden de waarschuwingsopties weergegeven. U kunt de gewenste opties kiezen.
01-09-2015
last modification:
Archos 50 CesiumCONFIDENTIAL
DRAWING
Rev 1scale 1:1 mm
Terug-knop: kort indrukken om terug te keren naar het vorige scherm. Ingedrukt houden om het overzicht van recente toepassingen weer te geven.
01-09-2015
last modification:
Archos 50 CesiumCONFIDENTIAL
DRAWING
Rev 1scale 1:1 mm
Startknop: kort indrukken om terug te keren naar het beginscherm.
01-09-2015
last modification:
Archos 50 CesiumCONFIDENTIAL
DRAWING
Rev 1scale 1:1 mm
Zoekknop/Cortana: kort indrukken voor toegang tot Cortana/de zoekpagina.Micro-USB-poort: sluit de meegeleverde kabel aan om het apparaat op te laden of om het aan te sluiten op een computer.Hoofdtelefoonaansluiting: sluit de meegeleverde oortjes aan om handsfree te bellen.Camera & flits: maak foto's of filmpjes. Om langere filmpjes op te nemen, kunt u een micro-SD-kaart plaatsen. Schakel in donkere omgevingen de flitsoptie in en gebruik de flits als zaklamp via de snelinstellingen.Lichtsensor: schakelt het scherm uit wanneer het apparaat zich dicht bij uw oor bevindt tijdens een telefoongesprek.
Nederlands
ARCHOS 50 Cesium book.indd 85 12/11/2015 11:19:18
86
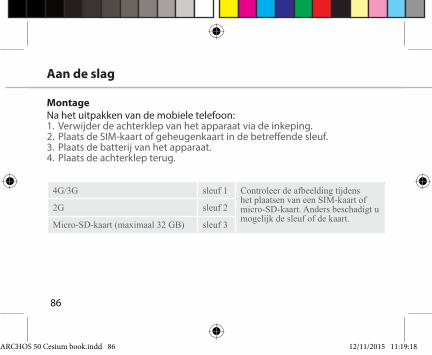
MontageNa het uitpakken van de mobiele telefoon:1. Verwijder de achterklep van het apparaat via de inkeping.2. Plaats de SIM-kaart of geheugenkaart in de betreffende sleuf.3. Plaats de batterij van het apparaat.4. Plaats de achterklep terug.
Aan de slag
4G/3G sleuf 1 Controleer de afbeelding tijdens het plaatsen van een SIM-kaart of micro-SD-kaart. Anders beschadigt u mogelijk de sleuf of de kaart.
2G sleuf 2
Micro-SD-kaart (maximaal 32 GB) sleuf 3
ARCHOS 50 Cesium book.indd 86 12/11/2015 11:19:18

213
87
Breng de achterklep voorzichtig omhoog via de inkeping.
Nederlands
ARCHOS 50 Cesium book.indd 87 12/11/2015 11:19:18

88
Inschakelen1. Sluit de oplaadkabel aan op de Micro-SB-poort en sluit de kabel aan op de oplader.Voordat u het apparaat gaat gebruiken, moet u eerst de batterij helemaal opladen.
2. Houd de AAN/UIT-knop ingedrukt om het apparaat in te schakelen.De eerste keer dat u uw ARCHOS opstart, helpt de installatiewizard u bij het instellen van uw apparaat.
3. Volg de aanwijzingen.Wanneer u een SIM-kaart heeft geplaatst, moet u mogelijk een PIN-code invoeren. Voorkom de invoer van een onjuiste pincode.
Aan de slag
ARCHOS 50 Cesium book.indd 88 12/11/2015 11:19:18
3
1
2
89
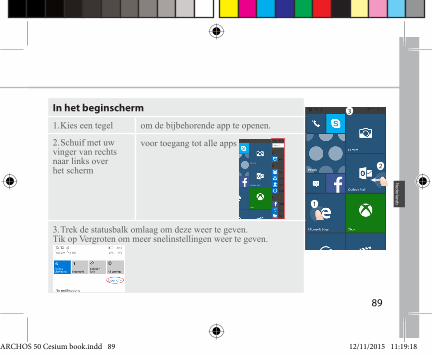
In het beginscherm
1. Kies een tegel om de bijbehorende app te openen.
2. Schuif met uw vinger van rechts naar links over het scherm
voor toegang tot alle apps
3. Trek de statusbalk omlaag om deze weer te geven. Tik op Vergroten om meer snelinstellingen weer te geven.
Nederlands
ARCHOS 50 Cesium book.indd 89 12/11/2015 11:19:18
3
2
4
90
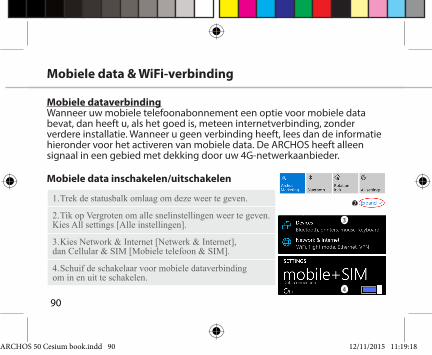
Mobiele dataverbindingWanneer uw mobiele telefoonabonnement een optie voor mobiele data bevat, dan heeft u, als het goed is, meteen internetverbinding, zonder verdere installatie. Wanneer u geen verbinding heeft, lees dan de informatie hieronder voor het activeren van mobiele data. De ARCHOS heeft alleen signaal in een gebied met dekking door uw 4G-netwerkaanbieder.
Mobiele data inschakelen/uitschakelen
1. Trek de statusbalk omlaag om deze weer te geven.
2. Tik op Vergroten om alle snelinstellingen weer te geven. Kies All settings [Alle instellingen].
3. Kies Network & Internet [Netwerk & Internet], dan Cellular & SIM [Mobiele telefoon & SIM].
4. Schuif de schakelaar voor mobiele dataverbinding om in en uit te schakelen.
Mobiele data & WiFi-verbinding
ARCHOS 50 Cesium book.indd 90 12/11/2015 11:19:18
2
4
91
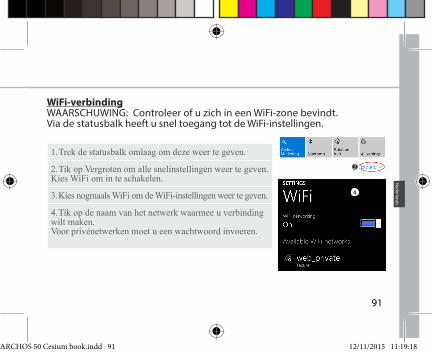
WiFi-verbindingWAARSCHUWING: Controleer of u zich in een WiFi-zone bevindt. Via de statusbalk heeft u snel toegang tot de WiFi-instellingen.
1. Trek de statusbalk omlaag om deze weer te geven.
2. Tik op Vergroten om alle snelinstellingen weer te geven. Kies WiFi om in te schakelen.
3. Kies nogmaals WiFi om de WiFi-instellingen weer te geven.
4. Tik op de naam van het netwerk waarmee u verbinding wilt maken. Voor privénetwerken moet u een wachtwoord invoeren.
Nederlands
ARCHOS 50 Cesium book.indd 91 12/11/2015 11:19:18

92
Contacten opslaanDe contacten die u opslaat, zijn altijd beschikbaar op internet en kunnen worden gesynchroniseerd met alle Windows-telefoons die via uw account zijn geconfigureerd.
Account & Contacten
Een account toevoegen1. Ga naar "Settings" [Instellingen] > "Accounts" > "Email & accounts"> "Add an account" [Account toevoegen].2. Selecteer het accounttype dat u wilt toevoegen.3. Volg de aanwijzingen op het scherm om de accountgegevens in te voeren.
ARCHOS 50 Cesium book.indd 92 12/11/2015 11:19:18

93
1. In het Startscherm of in het scherm "Alle Apps" kiest u de app People [Contacten].2. Tik op en kies Settings [Instellingen]3. Kies ‘Import from SIM card’. [Importeren vanaf SIM-kaart] Wanneer u meer dan één SIM-kaart heeft, kies dan de SIM-kaart waarvan u de contacten wilt importeren. 4. Kies bij Save contacts to [Contacten opslaan naar] de account waarin u de contacten wilt opslaan en tik dan op Next [Volgende].5. Om alle contacten op uw SIM-kaart te importeren, tikt u op Import [Importeren]. 6. Om slechts een paar contacten te selecteren, tikt u op Clear [Wissen], kiest u de contacten die u wilt importeren en tikt u op Import [Importeren].7. Uw contacten worden dan automatisch geïmporteerd naar de Microsoft-account die is ingesteld op uw telefoon. Nadat u de contacten op uw Windows-telefoon heeft opgeslagen in een Microsoft-account in de Cloud, kunt u uw contacten voortaan synchroniseren op alle plaatsen waar u inlogt met uw account. Een wijziging die u op één plaats maakt, wordt op alle andere plaatsen weergegeven.
Nederlands
ARCHOS 50 Cesium book.indd 93 12/11/2015 11:19:18
94
Telefoneren:U kunt met slechts een paar tikken op het scherm telefoneren. Tik in het Startscherm op de tegel van de telefoon, tik op het pictogram van het toetsenbord, voer een telefoonnummer in en tik op Call [Bellen] . Om één van uw contacten te bellen, tikt u op het adresboek en vervolgens tikt u op Search [Zoeken] om het betreffende contact te zoeken. Om iemand terug te bellen, tikt u gewoon op de naam of het nummer bij History [Recent].
Tekstbericht verzenden: Op de Windows-telefoon is sms-en met uw duimen kinderspel. Tik in het Startscherm op Messaging [Berichten] en tik op New [Nieuw].Voer een telefoonnummer of contact in, typ uw bericht in het tekstvak en tik dan op Send [Versturen]. Om een tekstbericht te beantwoorden, tikt u op het bericht waarop u wilt reageren.
Shoppen in de store:In de Windows Phone Store kunt u zoeken naar gratis en betaalde apps en games. Meld u eerst aan op uw telefoon met uw Microsoft-account. Tik in het
Tips voor WindowsTM
ARCHOS 50 Cesium book.indd 94 12/11/2015 11:19:18
95
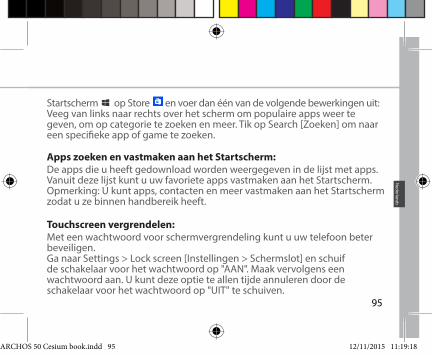
Startscherm op Store en voer dan één van de volgende bewerkingen uit: Veeg van links naar rechts over het scherm om populaire apps weer te geven, om op categorie te zoeken en meer. Tik op Search [Zoeken] om naar een specifieke app of game te zoeken.
Apps zoeken en vastmaken aan het Startscherm:De apps die u heeft gedownload worden weergegeven in de lijst met apps. Vanuit deze lijst kunt u uw favoriete apps vastmaken aan het Startscherm. Opmerking: U kunt apps, contacten en meer vastmaken aan het Startscherm zodat u ze binnen handbereik heeft.
Touchscreen vergrendelen:Met een wachtwoord voor schermvergrendeling kunt u uw telefoon beter beveiligen. Ga naar Settings > Lock screen [Instellingen > Schermslot] en schuif de schakelaar voor het wachtwoord op "AAN". Maak vervolgens een wachtwoord aan. U kunt deze optie te allen tijde annuleren door de schakelaar voor het wachtwoord op "UIT" te schuiven.
Nederlands
ARCHOS 50 Cesium book.indd 95 12/11/2015 11:19:18
96
Problemen oplossen
Mijn telefoon doet niets meer of kan niet worden ingeschakeldControleer de batterijcontacten, verwijder de batterij, plaats de batterij weer terug en zet dan uw telefoon aan. Controleer uw batterijlading en laad de batterij ten minste 20 minuten lang op.Mijn telefoon kan geen verbinding maken met een netwerk of "Geen service" wordt weergegevenProbeer op een andere locatie verbinding te maken. Informeer bij uw beheerder naar uw netwerkdekking. Ik kan geen uitgaande gesprekken voerenControleer of uw telefoon is verbonden met een netwerk en of het netwerk overbelast of niet beschikbaar is.Ik kan geen inkomende gesprekken ontvangenControleer of uw telefoon is ingeschakeld en is verbonden met een netwerk (controleer of het netwerk overbelast of niet beschikbaar is). PIN-code van SIM-kaart geblokkeerdNeem contact op met uw netwerkbeheerder voor de PUK-code (Personal Unblocking Key).Een nieuw 4G-netwerk configureren:Tik op Settings [Instellingen] op het apparaat. Kies Wireless & Networks [Draadloos en netwerken] > More [Meer] > Mobile networks [Mobiele netwerken].Kies Network settings [Netwerkinstellingen]. Bij Network operators [Netwerkbeheerders] kiest u uw beheerder. Bij Access Point Names [Toegangspunten] kiest u de naam van het gewenste toegangspunt en voert u de verbindingsparameters in van uw 4G-provider.
ARCHOS 50 Cesium book.indd 96 12/11/2015 11:19:18
97
Índice
Para obter mais informações, consulte as perguntas frequentes (FAQ) em www.archos.com. Lembre-se de consultá-las antes de considerar a devolução de qualquer produto. Como estamos constantemente a atualizar e a melhorar os nossos produtos, o software do seu dispositivo poderá ter um aspeto ou funcionalidades ligeiramente diferentes das apresentadas neste guia de introdução. Consulte a declaração de conformidade em: http://www.archos.com/pt-en/support/support_tech/downloads.html
9899102106108110112
Conteúdos do pacote.......................................................................................................Descrição do telemóvel...................................................................................................Introdução.............................................................................................................................Dados móveis e ligação Wi-Fi.........................................................................................Conta e contactos...............................................................................................................Truques e dicas para o WindowsTM...............................................................................Resolução de problemas..................................................................................................
Português
ARCHOS 50 Cesium book.indd 97 12/11/2015 11:19:18

98
Conteúdos do pacote
Verifique a presença dos seguintes itens na embalagem do produto: - ARCHOS 50 Cesium - Bateria - Auscultadores - Cabo USB - Carregador - Guia de introdução - Avisos legais de garantia e segurança
Os itens fornecidos com o seu dispositivo, bem como os acessórios disponíveis, poderão variar mediante a sua região e/ou o fornecedor do serviço. Os itens fornecidos foram concebidos especificamente para o seu dispositivo e poderão não ser compatíveis com outros dispositivos. Acessórios não autorizados poderão causar uma avaria no seu dispositivo.
ARCHOS 50 Cesium book.indd 98 12/11/2015 11:19:19

01-09-2015
last modification:
Archos 50 CesiumCONFIDENTIAL
DRAWING
Rev 1scale 1:1 mm
3
5
4
1 2
86
7 999
1 Porta Micro USB
Entrada para auscultadores
Câmara dianteira
Altifalante do telemóvel
Sensor de luz
Botão Voltar
Botão Iniciar
Botão Pesquisar
Microfone
2
3
4
Descrição do telemóvel
5
6
7
8
9
Português
ARCHOS 50 Cesium book.indd 99 12/11/2015 11:19:19
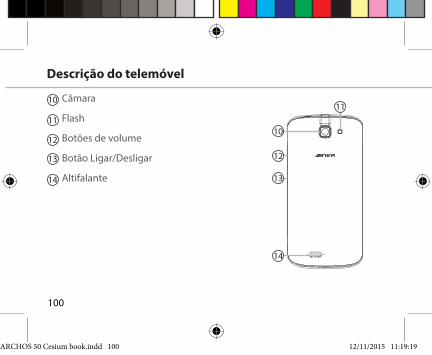
01-09-2015
last modification:
Archos 50 CesiumCONFIDENTIAL
DRAWING
Rev 1scale 1:1 mm
14
10
11
12
13
100
Descrição do telemóvel
Câmara
Flash
Botões de volume
Botão Ligar/Desligar
Altifalante
10
11
12
13
14
ARCHOS 50 Cesium book.indd 100 12/11/2015 11:19:19

101
Ligar/Desligar: quando o dispositivo está desligado, mantenha premido para ligá-lo. Quando o dispositivo está ligado, prima para desligar o ecrã, ou mantenha premido para exibir as opções.Volume +/-: prima os botões +/- para ajustar o volume. Ao premir o botão, as opções de notificações serão exibidas. Pode selecionar a mais adequada.
01-09-2015
last modification:
Archos 50 CesiumCONFIDENTIAL
DRAWING
Rev 1scale 1:1 mm
Botão Voltar: regressa ao ecrã anterior. Ao manter premido, exibe a lista das aplicações usadas mais recentemente.
01-09-2015
last modification:
Archos 50 CesiumCONFIDENTIAL
DRAWING
Rev 1scale 1:1 mm
Botão Iniciar: prima para regressar ao ecrã inicial.
01-09-2015
last modification:
Archos 50 CesiumCONFIDENTIAL
DRAWING
Rev 1scale 1:1 mm
Botão Pesquisar/Cortana: prima para aceder à página de pesquisa/Cortana.
Porta Micro USB: ligue o cabo fornecido para carregar o dispositivo ou para ligá-lo a um computador.Entrada para auscultadores: ligue os auscultadores fornecidos para efetuar chamadas com "mãos livres".Câmara e flash: tire fotos ou faça vídeos. Para aumentar a duração dos vídeos, introduza um cartão Micro-SD. Ative o flash em ambientes escuros ou use-o como uma lanterna através das definições rápidas.Sensor de luz: desliga o ecrã quando o dispositivo está encostado à sua orelha durante uma chamada.
Português
ARCHOS 50 Cesium book.indd 101 12/11/2015 11:19:20
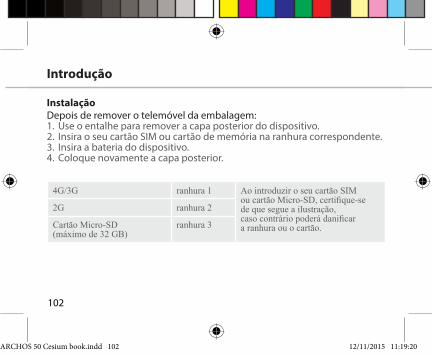
102
InstalaçãoDepois de remover o telemóvel da embalagem:1. Use o entalhe para remover a capa posterior do dispositivo.2. Insira o seu cartão SIM ou cartão de memória na ranhura correspondente.3. Insira a bateria do dispositivo.4. Coloque novamente a capa posterior.
Introdução
4G/3G ranhura 1 Ao introduzir o seu cartão SIM ou cartão Micro-SD, certifique-se de que segue a ilustração, caso contrário poderá danificar a ranhura ou o cartão.
2G ranhura 2
Cartão Micro-SD (máximo de 32 GB)
ranhura 3
ARCHOS 50 Cesium book.indd 102 12/11/2015 11:19:20
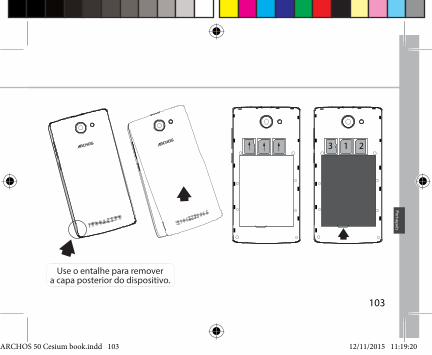
213
103
Use o entalhe para remover a capa posterior do dispositivo.
Português
ARCHOS 50 Cesium book.indd 103 12/11/2015 11:19:20
104
Ligar o telemóvel1. Ligue o cabo de carregamento à entrada Micro USB e ao seu carregador.Antes de utilizar o seu dispositivo pela primeira vez, carregue totalmente a bateria.
2. Prima e mantenha premido o botão Ligar/Desligar para ligar o dispositivo.Quando iniciar o ARCHOS pela primeira vez, o assistente de instalação irá ajudá-lo a configurar o dispositivo.
3. Siga as instruções.Se tiver introduzido um cartão SIM, poderá ser necessário introduzir o código PIN. Tenha cuidado para não introduzir o código PIN incorreto.
Introdução
ARCHOS 50 Cesium book.indd 104 12/11/2015 11:19:21
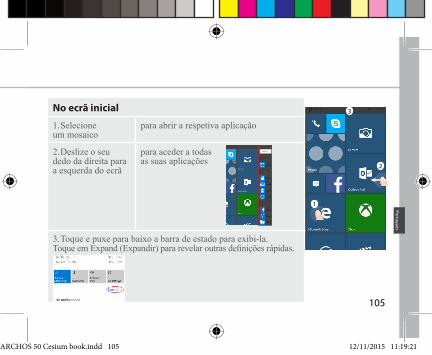
3
1
2
105
No ecrã inicial
1. Selecione um mosaico
para abrir a respetiva aplicação
2. Deslize o seu dedo da direita para a esquerda do ecrã
para aceder a todas as suas aplicações
3. Toque e puxe para baixo a barra de estado para exibi-la. Toque em Expand (Expandir) para revelar outras definições rápidas.
Português
ARCHOS 50 Cesium book.indd 105 12/11/2015 11:19:21
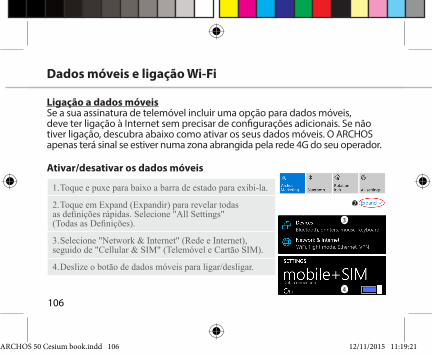
3
2
4
106
Ligação a dados móveisSe a sua assinatura de telemóvel incluir uma opção para dados móveis, deve ter ligação à Internet sem precisar de configurações adicionais. Se não tiver ligação, descubra abaixo como ativar os seus dados móveis. O ARCHOS apenas terá sinal se estiver numa zona abrangida pela rede 4G do seu operador.
Ativar/desativar os dados móveis
1. Toque e puxe para baixo a barra de estado para exibi-la.
2. Toque em Expand (Expandir) para revelar todas as definições rápidas. Selecione "All Settings" (Todas as Definições).
3. Selecione "Network & Internet" (Rede e Internet), seguido de "Cellular & SIM" (Telemóvel e Cartão SIM).
4. Deslize o botão de dados móveis para ligar/desligar.
Dados móveis e ligação Wi-Fi
ARCHOS 50 Cesium book.indd 106 12/11/2015 11:19:21

2
4
107
Ligação Wi-FiATENÇÃO: Certifique-se de que se encontra num local com Wi-Fi. Pode aceder rapidamente às definições de Wi-Fi através da barra de estado.
1. Toque e puxe para baixo a barra de estado para exibi-la.
2. Toque em Expand (Expandir) para revelar todas as definições rápidas. Selecione Wi-Fi para ativá-la.
3. Selecione novamente Wi-Fi para exibir as definições de Wi-Fi.
4. Toque no nome da rede à qual pretende ligar-se. Terá de introduzir uma palavra-passe para aceder a redes privadas.
Português
ARCHOS 50 Cesium book.indd 107 12/11/2015 11:19:21

108
Guardar contactosAo guardar contactos, estes estarão sempre disponíveis na Web e podem ser sincronizados com qualquer telemóvel Windows que esteja configurado com a sua conta.
Conta e contactos
Adicionar uma conta1. Dirija-se a "Settings" (Definições) > "Accounts" (Contas) > "Email & accounts" (Email e Contas) > "add an account" (Adicionar Conta).2. Selecione o tipo de conta a adicionar.3. Siga as instruções no ecrã para introduzir as informações da conta.
ARCHOS 50 Cesium book.indd 108 12/11/2015 11:19:21
109
1. Selecione a aplicação People (Pessoas) através dos ecrãs Start (Iniciar) ou "All Apps" (Todas as Aplicações).2. Toque em e depois selecione Settings (Definições).3. Selecione "Import from SIM card" (Importar do Cartão SIM). Se tiver mais do que um cartão SIM, selecione o relevante em "Import contacts from" (Importar contactos de). 4. Por baixo de Save contacts to (Guardar contactos para), selecione a conta onde deseja guardar os contactos, depois toque em Next (Seguinte).5. Para importar todos os contactos do cartão SIM, toque em Import (Importar). 6. Se desejar selecionar contactos para importar individualmente, toque em Clear (Limpar), selecione os contactos que deseja importar, e depois toque em "Import" (Importar).7. Os seus contactos serão importados automaticamente para a conta Microsoft configurada no seu telemóvel. Depois de guardar os contactos do seu Windows Phone numa conta Microsoft na Cloud, poderá manter os contactos sincronizados entre todos os locais onde inicie sessão com essa conta. E se fizer alguma alteração num dos locais, ela será aplicada em todos os locais onde use a conta.
Português
ARCHOS 50 Cesium book.indd 109 12/11/2015 11:19:21
110
Fazer uma chamada:Faça uma chamada em poucos toques. No ecrã inicial, toque no mosaico "Phone" (Telefone), toque no ícone do teclado, introduza um número e depois toque em "Call" (Fazer Chamada) . Para ligar a um dos seus contactos, toque em "Phone book" (Lista telefónica) e de seguida toque em "Search" (Procurar) para encontrar quem procura. Para telefonar novamente a alguém, basta ir a "History" (Histórico) e tocar no nome ou no número em questão.
Enviar uma mensagem: Prepare esses polegares, pois o Windows Phone torna as mensagens mais práticas do que nunca. Em "Start" (Iniciar) , toque em "Messaging" (Mensagens), depois toque em "New" (Nova).Introduza o número de telemóvel ou nome do contacto, escreva a sua mensagem na caixa de texto e depois toque em "Send" (Enviar). Para responder a uma mensagem, basta tocar na conversa que inclui a mensagem à qual pretende responder.
Fazer compras na loja:Consulte as aplicações e os jogos gratuitos ou disponíveis para compra na Loja do Windows Phone. Certifique-se de que iniciou a sessão no telemóvel com a sua conta
Truques e dicas para WindowsTM
ARCHOS 50 Cesium book.indd 110 12/11/2015 11:19:21
111
Microsoft. Em "Start" (Iniciar) , toque em "Store" (Loja) e proceda de um dos modos seguintes: Deslize para a esquerda ou para a direita para ver as aplicações mais populares, pesquisar por categoria e muito mais. Toque em "Search" (Pesquisar) para encontrar uma aplicação ou um jogo concretos.
Localizar as suas aplicações e afixá-las em "Start" (Iniciar):As aplicações que transferiu serão exibidas na "App list" (Lista de Aplicações). É aqui que poderá afixar as suas aplicações favoritas no ecrã "Start" (Iniciar). Nota: Pode afixar aplicações, contactos e muito mais ao ecrã "Start" (Iniciar) para tê-los sempre à mão.
Bloquear o ecrã de toque:Pode manter o seu telemóvel mais seguro através de um ecrã bloqueado por palavra-passe. Dirija-se a "Settings" (Definições) > "Lock screen" (Bloquear ecrã) e deslize o botão "Password" (Palavra-passe) para a posição "ON" (Ligado). De seguida crie uma palavra-passe. Pode optar por remover esta opção em qualquer momento, deslizando o botão "Password" (Palavra-passe) para a posição "OFF" (Desligado).
Português
ARCHOS 50 Cesium book.indd 111 12/11/2015 11:19:21

112
Resolução de problemas
O meu telemóvel encravou ou não ligaVerifique os contactos da bateria, remova e volte a introduzir a bateria e depois ligue o telemóvel. Verifique o nível de carga da bateria e carregue-a durante, pelo menos, 20 minutos.O meu telemóvel não consegue ligar-se a uma rede, ou apresenta a mensagem "Sem serviço”Experimente fazer a ligação a partir de outro local. Verifique junto do seu operador se se encontra num local com cobertura de rede. Não consigo fazer chamadasVerifique se o seu telemóvel está ligado a uma rede e se esta poderá estar sobrecarregada ou indisponível.Não consigo receber chamadasVerifique se o seu telemóvel está ligado e se tem rede (e se esta poderá estar sobrecarregada ou indisponível). O PIN do cartão SIM ficou bloqueadoContacte o seu operador de rede para obter o código PUK (Código Pessoal de Desbloqueio).Para configurar uma nova rede 4G:Toque em "Settings" (Definições) no seu dispositivo. Selecione "Wireless & networks" (Sem Fios e Redes) > "More..." (Mais...) > "Mobile networks" (Redes móveis). Selecione "Network settings" (Definições de rede). Selecione o seu operador em "Network operators" (Operadores de rede). Em "Access Point Names" (Nomes de Pontos de Acesso), selecione o ponto de acesso correto e introduza os parâmetros de ligação exatos fornecidos pelo seu operador 4G.
ARCHOS 50 Cesium book.indd 112 12/11/2015 11:19:21
113
Содержание
Дополнительные сведения см. в разделе вопросов и ответов на сайте www.archos.com. Обязательно прочитайте их, прежде чем рассматривать вариант возврата изделия. Поскольку мы часто обновляем и совершенствуем свои изделия, программное обеспечение на вашем устройстве может незначительно отличаться по внешнему виду или функциональности от представленного в данном кратком руководстве. Ознакомьтесь с заявлением о соответствии, приведенном по адресу: http://www.archos.com/gb-en/support/support_tech/downloads.html
114115118122124126128
Содержимое упаковки...................................................................................................Описание телефона.........................................................................................................Начало работы...................................................................................................................Мобильные данные и подключение Wi-Fi.............................................................Учетная запись и контакты...........................................................................................Советы по использованию ОС WindowsTM.............................................................Устранение неполадок...................................................................................................
Pусский
ARCHOS 50 Cesium book.indd 113 12/11/2015 11:19:21

114
Содержимое упаковки
Проверьте, входят ли в комплект поставки следующие компоненты: - ARCHOS 50 Cesium - Аккумулятор - Гарнитура - Кабель USB - Зарядное устройство - Краткое руководство - Гарантия и паспорт безопасности
Компоненты, входящие в комплект поставки устройства, и доступные аксессуары могут различаться в зависимости от региона или поставщика услуг. Компоненты, входящие в комплект, предназначены для использования только с данным устройством и могут быть несовместимыми с другими устройствами. Использование аксессуаров, которые не были разрешены к применению с данным устройством, может привести к его неисправности.
ARCHOS 50 Cesium book.indd 114 12/11/2015 11:19:21

01-09-2015
last modification:
Archos 50 CesiumCONFIDENTIAL
DRAWING
Rev 1scale 1:1 mm
3
5
4
1 2
86
7 9115
1 Порт micro-USB
Гнездо для гарнитуры
Фронтальная камера
Динамик телефона
Датчик освещенности
Кнопка «Назад»
Кнопка Start (Пуск)
Кнопка поиска
Микрофон
2
3
4
Описание телефона
5
6
7
8
9
Pусский
ARCHOS 50 Cesium book.indd 115 12/11/2015 11:19:21
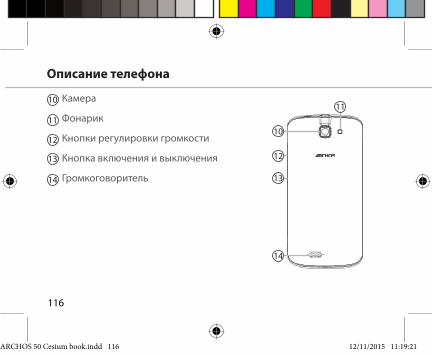
01-09-2015
last modification:
Archos 50 CesiumCONFIDENTIAL
DRAWING
Rev 1scale 1:1 mm
14
10
11
12
13
116
Описание телефона
Камера
Фонарик
Кнопки регулировки громкости
Кнопка включения и выключения
Громкоговоритель
10
11
12
13
14
ARCHOS 50 Cesium book.indd 116 12/11/2015 11:19:21

117
Кнопка включения и выключения: если устройство отключено, удерживайте данную кнопку, чтобы включить его. Если устройство включено, нажмите кратковременно, чтобы отключить экран; удерживайте кнопку, чтобы отобразить возможные действия.Кнопка регулировки громкости +/–: нажмите кнопку +/–, чтобы отрегулировать громкость. При нажатии кнопки отображаются варианты уведомлений. При этом можно выбрать наиболее подходящий вариант.
01-09-2015
last modification:
Archos 50 CesiumCONFIDENTIAL
DRAWING
Rev 1scale 1:1 mm
Кнопка Back (Назад): нажмите один раз для возврата на предыдущий экран; нажмите и удерживайте для открытия списка последних приложений.
01-09-2015
last modification:
Archos 50 CesiumCONFIDENTIAL
DRAWING
Rev 1scale 1:1 mm
Кнопка Start (Пуск): нажмите один раз, чтобы вернуться на главный экран.
01-09-2015
last modification:
Archos 50 CesiumCONFIDENTIAL
DRAWING
Rev 1scale 1:1 mm
Кнопка поиска/Cortana: нажмите один раз, чтобы открыть страницу поиска/Cortana.
Порт Micro-USB: вставьте входящий в комплект кабель, чтобы зарядить устройство либо подсоединить устройство к компьютеру.
Гнездо для подключения наушников: подсоедините входящие в комплект наушники, чтобы осуществлять вызовы с помощью гарнитуры.
Камера и вспышка: съемка фотографий или видеофильмов. Для увеличения продолжительности видеофильмов необходимо вставить карту micro-SD. Активируйте вспышку в условиях недостаточного освещения. Вспышку также можно использоваться в качестве фонарика (меню быстрых настроек).
Датчик освещенности отключает экран, если во время вызова устройство находится возле уха.
Pусский
ARCHOS 50 Cesium book.indd 117 12/11/2015 11:19:23

118
СборкаПосле извлечения мобильного телефона из коробки:1. Снимите заднюю крышку устройства с помощью паза.2. Вставьте SIM-карту или карту памяти в соответствующее гнездо.3. Вставьте аккумулятор в устройство.4. Установите на место заднюю крышку.
Начало работы
4G/3G гнездо 1 При установке SIM-карты или карты micro-SD следует точно сверять свои действия с изображением, в противном случае можно повредить гнездо или карту.
2G гнездо 2
Карта памяти Micro-SD (максимальный объем - 32 ГБ)
гнездо 3
ARCHOS 50 Cesium book.indd 118 12/11/2015 11:19:23

213
119
Снимите заднюю крышку с помощью паза
Pусский
ARCHOS 50 Cesium book.indd 119 12/11/2015 11:19:23
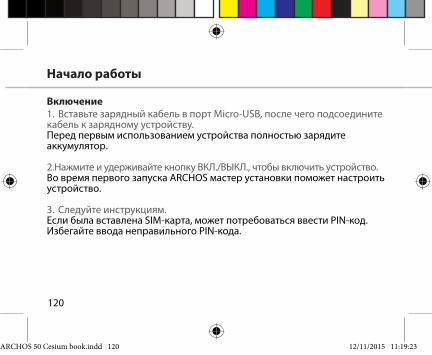
120
Включение1. Вставьте зарядный кабель в порт Micro-USB, после чего подсоедините кабель к зарядному устройству.Перед первым использованием устройства полностью зарядите аккумулятор.
2. Нажмите и удерживайте кнопку ВКЛ./ВЫКЛ., чтобы включить устройство.Во время первого запуска ARCHOS мастер установки поможет настроить устройство.
3. Следуйте инструкциям.Если была вставлена SIM-карта, может потребоваться ввести PIN-код. Избегайте ввода неправильного PIN-кода.
Начало работы
ARCHOS 50 Cesium book.indd 120 12/11/2015 11:19:23
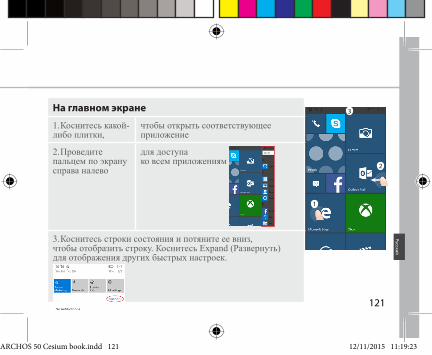
3
1
2
121
На главном экране
1. Коснитесь какой-либо плитки,
чтобы открыть соответствующее приложение
2. Проведите пальцем по экрану справа налево
для доступа ко всем приложениям
3. Коснитесь строки состояния и потяните ее вниз, чтобы отобразить строку. Коснитесь Expand (Развернуть) для отображения других быстрых настроек.
Pусский
ARCHOS 50 Cesium book.indd 121 12/11/2015 11:19:23
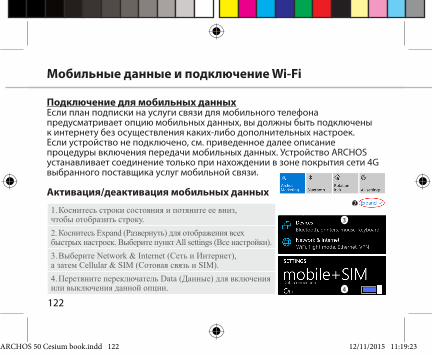
3
2
4
122
Подключение для мобильных данныхЕсли план подписки на услуги связи для мобильного телефона предусматривает опцию мобильных данных, вы должны быть подключены к интернету без осуществления каких-либо дополнительных настроек. Если устройство не подключено, см. приведенное далее описание процедуры включения передачи мобильных данных. Устройство ARCHOS устанавливает соединение только при нахождении в зоне покрытия сети 4G выбранного поставщика услуг мобильной связи.
Активация/деактивация мобильных данных
1. Коснитесь строки состояния и потяните ее вниз, чтобы отобразить строку.2. Коснитесь Expand (Развернуть) для отображения всех быстрых настроек. Выберите пункт All settings (Все настройки). 3. Выберите Network & Internet (Сеть и Интернет), а затем Cellular & SIM (Сотовая связь и SIM).4. Перетяните переключатель Data (Данные) для включения или выключения данной опции.
Мобильные данные и подключение Wi-Fi
ARCHOS 50 Cesium book.indd 122 12/11/2015 11:19:23

2
4
123
Подключение Wi-FiПРЕДУПРЕЖДЕНИЕ! Убедитесь, что вы находитесь в области с покрытием Wi-Fi. Используйте строку состояния для быстрого доступа к настройкам Wi-Fi.
1. Коснитесь строки состояния и потяните ее вниз, чтобы отобразить строку.
2. Коснитесь Expand (Развернуть) для отображения всех быстрых настроек. Выберите Wi-Fi для включения этой функции.
3. Выберите Wi-Fi еще раз для отображения настроек Wi-Fi.
4. Коснитесь имени сети, к которой необходимо подключиться. Для подключения к закрытым сетям необходимо будет ввести пароль.
Pусский
ARCHOS 50 Cesium book.indd 123 12/11/2015 11:19:23

124
Сохранение контактовПосле сохранения контактов все ваши контакты будут в любой момент доступны в сети и могут быть синхронизированы с любым телефоном Windows, в котором выполнен вход в ту же учетную запись Google.
Учетная запись и контакты
Добавление учетной записи1. Последовательно нажмите Settings (Настройки) > Accounts (Учетные записи) > Email & accounts (Эл. почта и учетные записи) > Add an account (Добавить учетную запись).2. Выберите тип учетной записи, которая будет добавлена.3. Выполняйте инструкции на экране для ввода информации об учетной записи.
ARCHOS 50 Cesium book.indd 124 12/11/2015 11:19:23

125
1. На экране Start (Пуск) или All Apps (Все приложения) выберите приложение People (Люди)2. Коснитесь и выберите Settings (Настройки)3. Выберите Import from SIM card (Импортировать с SIM-карты). Если у вас несколько SIM-карт, выберите нужную в списке Import contacts from (Импортировать контакты с). 4. В поле Save contacts to (Сохранить контакты в) выберите учетную запись, в которую требуется сохранить контакты, а затем нажмите Next (Далее).5. Чтобы импортировать все контакты, имеющиеся на SIM-карте, нажмите Import (Импортировать). 6. Если требуется выбрать контакты для импорта по одному, нажмите Clear (Снять выделение), выберите контакты, которые требуется импортировать, после чего нажмите Import (Импортировать).7. После этого ваши контакты будут автоматически импортированы в учетную запись Microsoft, настроенную на вашем телефоне. После сохранения контактов, имеющихся на вашем телефоне Windows Phone, в учетную запись Майкрософт в облаке вы сможете синхронизировать свои контакты между всеми устройствами, с которых вы выполняете вход в эту учетную запись. После внесения изменения на одном устройстве, оно будет реализовано на всех остальных.
Pусский
ARCHOS 50 Cesium book.indd 125 12/11/2015 11:19:23
126
Совершение вызоваЧтобы произвести вызов, нужно сделать всего несколько касаний. На экране Start (Пуск), нажмите плитку Phone (Телефон), коснитесь значка клавиатуры, введите номер телефона, после чего нажмите Call (Вызов). Чтобы произвести вызов одного из ваших контактов, нажмите Phone book (Телефонная книга), затем коснитесь Search (Поиск), чтобы найти нужный контакт. Чтобы перезвонить кому-то, просто коснитесь имени или номера в списке вызовов.
Отправка текстовых сообщений Разомните свои большие пальцы – набирать текст на вашем телефоне Windows Phone проще простого. На экране Start (Пуск), нажмите Messaging (Сообщения), а затем коснитесь New (Новое).Введите номер телефона или контакт, введите сообщение в текстовое поле, а затем нажмите Send (Отправить). Чтобы ответить на текстовое сообщение, просто коснитесь диалога, содержащего сообщение, на которое требуется ответить.
Покупки в магазинеПросмотрите бесплатные и платные приложения и игры в магазине Windows Phone.
Советы по использованию ОС WindowsTM
ARCHOS 50 Cesium book.indd 126 12/11/2015 11:19:24
127
Необходимо выполнить вход в учетную запись Microsoft с телефона. На экране Start (Пуск), коснитесь Store (Магазин). Для просмотра приложений и их категорий листайте экран влево или вправо. Нажмите Search (Поиск), чтобы найти определенное приложение или игру.
Поиск приложений и их закрепление на экране Start (Пуск)Загруженные приложения отображаются в списке приложений. Любое из них можно закрепить на экране Start (Пуск). Обратите внимание: на экране Start (Пуск) можно закрепить приложения, контакты и другие элементы, чтобы они всегда были под рукой.
Блокировка сенсорного экранаПароля для блокировки экрана может сохранить ваши данные в телефоне в безопасности. Выберите Settings (Настройки) > Lock screen (Блокировка экрана) и переведите переключатель Password (Пароль) в положение ON (Вкл.), после чего задайте пароль. От использования пароля всегда можно отказаться, переведя переключатель Password (Пароль) в положение OFF (Выкл.).
Pусский
ARCHOS 50 Cesium book.indd 127 12/11/2015 11:19:24
128
Устранение неисправностей
Телефон не реагирует на действия или не включаетсяПроверьте контакты аккумулятора, извлеките и повторно установите аккумулятор, затем снова включите телефон. Проверьте уровень заряда аккумулятора, выполните зарядку в течение не менее 20 минут.Не удается подключить телефон к сети, или отображается сообщение No service (Нет сети)Попытайтесь установить соединение в другом месте. Проверьте у оператора наличие покрытия сети. Не удается выполнять исходящие вызовыУбедитесь, что телефон подключен к сети и что сеть доступна и не перегружена.Не удается принимать входящие вызовыУбедитесь, что телефон включен и подключен к сети (проверьте, что сеть доступна и не перегружена). Заблокирован PIN-код SIM-картыОбратитесь к оператору мобильной связи для получения PUK-кода (личный код разблокирования).Настройка новой сети 4GНа экране устройства коснитесь пункта Settings (Настройки). Выберите Wireless & Networks (Беспроводные и проводные сети) > More... (Больше...) > Mobile networks (Мобильные сети).Выберите пункт Network settings (Сетевые настройки). В разделе Network operators (Операторы сети) выберите своего поставщика услуг. В разделе Access Point Names (Имена точек доступа) выберите правильное имя точки доступа и введите точные параметры подключения, предоставленные поставщиком услуг связи 4G.
ARCHOS 50 Cesium book.indd 128 12/11/2015 11:19:24
129
Spis treści
Aby uzyskać więcej informacji, należy zapoznać się z najczęściej zadawanymi pytaniami opublikowanymi na stronie www.archos.com. Należy obowiązkowo zapoznać się ze wspomnianym działem w przypadku rozważania dokonania zwrotu dowolnego produktu. Często aktualizujemy i wprowadzamy udoskonalenia w naszych produktach, dlatego też oprogramowanie może nieznacznie różnić się wyglądem lub dostępnością funkcji od tego, co zaprezentowano w skróconej instrukcji obsługi. Deklaracja zgodności dostępna jest do wglądu pod adresem: http://www.archos.com/gb-en/support/support_tech/downloads.html
130131134138140142144
Zawartość opakowania ...................................................................................................Opis telefonu .......................................................................................................................Pierwsze uruchomienie ...................................................................................................Dane mobilne i połączenie Wi-Fi ..................................................................................Konto i kontakty .................................................................................................................Wskazówki i porady dotyczące systemu WindowsTM ............................................Rozwiązywanie problemów ...........................................................................................
Polski
ARCHOS 50 Cesium book.indd 129 12/11/2015 11:19:24
130
Zawartość opakowania
Sprawdź, czy w opakowaniu znajdują się następujące elementy: - ARCHOS 50 Cesium - Akumulator - Słuchawki - Kabel USB - Ładowarka - Skrócona instrukcja obsługi - Gwarancja oraz oświadczenia prawne i informacje dotyczące bezpieczeństwa
Elementy dołączone do urządzenia oraz oferta akcesoriów mogą różnić się w zależności od regionu i dostawcy usług. Elementy dołączone do urządzenia są przeznaczone dla konkretnego modelu i mogą być niekompatybilne z innymi urządzeniami. Korzystanie z niezatwierdzonych akcesoriów może spowodować awarię urządzenia.
ARCHOS 50 Cesium book.indd 130 12/11/2015 11:19:24
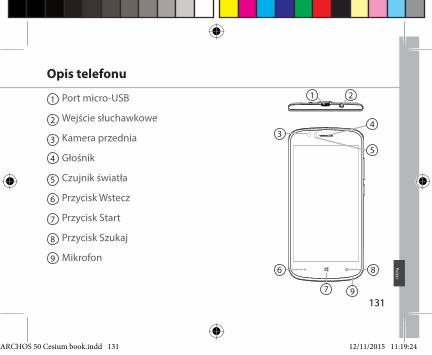
01-09-2015
last modification:
Archos 50 CesiumCONFIDENTIAL
DRAWING
Rev 1scale 1:1 mm
3
5
4
1 2
86
7 9131
1 Port micro-USB
Wejście słuchawkowe
Kamera przednia
Głośnik
Czujnik światła
Przycisk Wstecz
Przycisk Start
Przycisk Szukaj
Mikrofon
2
3
4
Opis telefonu
5
6
7
8
9
Polski
ARCHOS 50 Cesium book.indd 131 12/11/2015 11:19:24
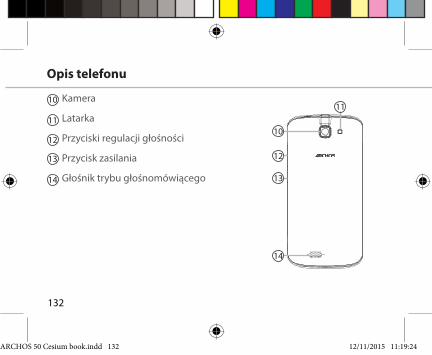
01-09-2015
last modification:
Archos 50 CesiumCONFIDENTIAL
DRAWING
Rev 1scale 1:1 mm
14
10
11
12
13
132
Opis telefonu
Kamera
Latarka
Przyciski regulacji głośności
Przycisk zasilania
Głośnik trybu głośnomówiącego
10
11
12
13
14
ARCHOS 50 Cesium book.indd 132 12/11/2015 11:19:24
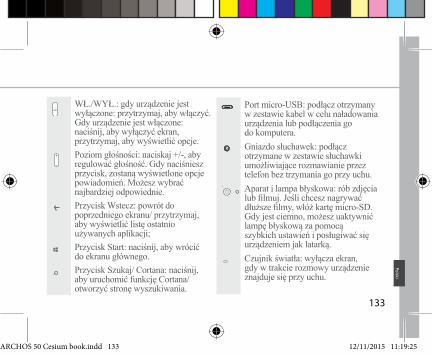
133
WŁ./WYŁ.: gdy urządzenie jest wyłączone: przytrzymaj, aby włączyć. Gdy urządzenie jest włączone: naciśnij, aby wyłączyć ekran, przytrzymaj, aby wyświetlić opcje.Poziom głośności: naciskaj +/-, aby regulować głośność. Gdy naciśniesz przycisk, zostaną wyświetlone opcje powiadomień. Możesz wybrać najbardziej odpowiednie.
01-09-2015
last modification:
Archos 50 CesiumCONFIDENTIAL
DRAWING
Rev 1scale 1:1 mm
Przycisk Wstecz: powrót do poprzedniego ekranu/ przytrzymaj, aby wyświetlić listę ostatnio używanych aplikacji;
01-09-2015
last modification:
Archos 50 CesiumCONFIDENTIAL
DRAWING
Rev 1scale 1:1 mm
Przycisk Start: naciśnij, aby wrócić do ekranu głównego.
01-09-2015
last modification:
Archos 50 CesiumCONFIDENTIAL
DRAWING
Rev 1scale 1:1 mm
Przycisk Szukaj/ Cortana: naciśnij, aby uruchomić funkcję Cortana/ otworzyć stronę wyszukiwania.
Port micro-USB: podłącz otrzymany w zestawie kabel w celu naładowania urządzenia lub podłączenia go do komputera.Gniazdo słuchawek: podłącz otrzymane w zestawie słuchawki umożliwiające rozmawianie przez telefon bez trzymania go przy uchu.Aparat i lampa błyskowa: rób zdjęcia lub filmuj. Jeśli chcesz nagrywać dłuższe filmy, włóż kartę micro-SD. Gdy jest ciemno, możesz uaktywnić lampę błyskową za pomocą szybkich ustawień i posługiwać się urządzeniem jak latarką.Czujnik światła: wyłącza ekran, gdy w trakcie rozmowy urządzenie znajduje się przy uchu.
Polski
ARCHOS 50 Cesium book.indd 133 12/11/2015 11:19:25

134
MontażGdy rozpakujesz opakowanie z telefonem komórkowym:1. Zdejmij klapkę tylną urządzenia, korzystając z przeznaczonego do tego rowka.2. Włóż kartę SIM lub kartę pamięci w odpowiednie gniazdo.3. Włóż akumulator urządzenia.4. Załóż klapkę tylną.
Pierwsze uruchomienie
4G/3G gniazdo 1 Kartę SIM i kartę micro-SD należy wkładać dokładnie tak, jak jest pokazane na ilustracji, aby nie uszkodzić gniazda ani karty.
2G gniazdo 2
Karta micro-SD (maks. 32 GB) gniazdo 3
ARCHOS 50 Cesium book.indd 134 12/11/2015 11:19:26

213
135
Podważ klapkę tylną, korzystając z przeznaczonych
do tego rowków
Polski
ARCHOS 50 Cesium book.indd 135 12/11/2015 11:19:26
136
Włączanie urządzenia1. Włóż wtyczkę kabla ładowania do portu micro-USB i podłącz go do ładowarki.Przed pierwszym uruchomieniem urządzenia należy całkowicie naładować akumulator.
2. Naciśnij i przytrzymaj przycisk zasilania, aby uruchomić urządzenie.Po pierwszym uruchomieniu urządzenia ARCHOS kreator instalacji pomaga skonfigurować najważniejsze ustawienia.
3. Postępuj według instrukcji.Po włożeniu karty SIM może być wymagane wpisanie kodu PIN. Uważaj, aby nie wprowadzić błędnego kodu PIN.
Pierwsze uruchomienie
ARCHOS 50 Cesium book.indd 136 12/11/2015 11:19:26
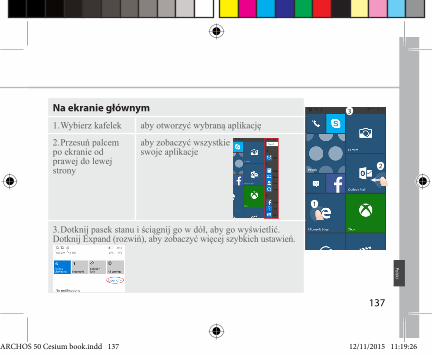
3
1
2
137
Na ekranie głównym
1. Wybierz kafelek aby otworzyć wybraną aplikację
2. Przesuń palcem po ekranie od prawej do lewej strony
aby zobaczyć wszystkie swoje aplikacje
3. Dotknij pasek stanu i ściągnij go w dół, aby go wyświetlić. Dotknij Expand (rozwiń), aby zobaczyć więcej szybkich ustawień.
Polski
ARCHOS 50 Cesium book.indd 137 12/11/2015 11:19:26
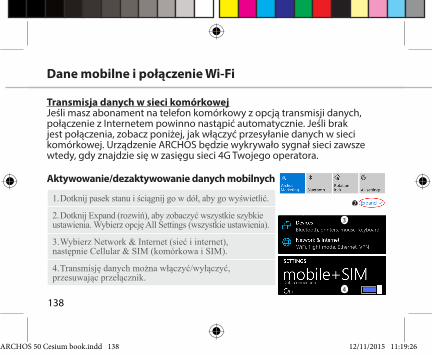
3
2
4
138
Transmisja danych w sieci komórkowejJeśli masz abonament na telefon komórkowy z opcją transmisji danych, połączenie z Internetem powinno nastąpić automatycznie. Jeśli brak jest połączenia, zobacz poniżej, jak włączyć przesyłanie danych w sieci komórkowej. Urządzenie ARCHOS będzie wykrywało sygnał sieci zawsze wtedy, gdy znajdzie się w zasięgu sieci 4G Twojego operatora.
Aktywowanie/dezaktywowanie danych mobilnych
1. Dotknij pasek stanu i ściągnij go w dół, aby go wyświetlić.
2. Dotknij Expand (rozwiń), aby zobaczyć wszystkie szybkie ustawienia. Wybierz opcję All Settings (wszystkie ustawienia).
3. Wybierz Network & Internet (sieć i internet), następnie Cellular & SIM (komórkowa i SIM).
4. Transmisję danych można włączyć/wyłączyć, przesuwając przełącznik.
Dane mobilne i połączenie Wi-Fi
ARCHOS 50 Cesium book.indd 138 12/11/2015 11:19:26
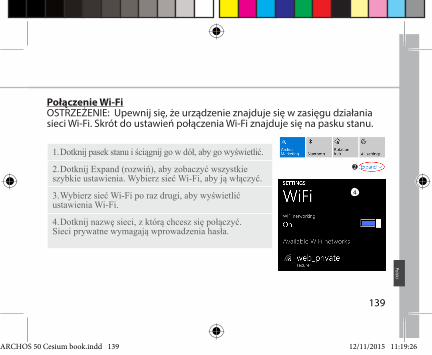
2
4
139
Połączenie Wi-FiOSTRZEŻENIE: Upewnij się, że urządzenie znajduje się w zasięgu działania sieci Wi-Fi. Skrót do ustawień połączenia Wi-Fi znajduje się na pasku stanu.
1. Dotknij pasek stanu i ściągnij go w dół, aby go wyświetlić.
2. Dotknij Expand (rozwiń), aby zobaczyć wszystkie szybkie ustawienia. Wybierz sieć Wi-Fi, aby ją włączyć.
3. Wybierz sieć Wi-Fi po raz drugi, aby wyświetlić ustawienia Wi-Fi.
4. Dotknij nazwę sieci, z którą chcesz się połączyć. Sieci prywatne wymagają wprowadzenia hasła.
Polski
ARCHOS 50 Cesium book.indd 139 12/11/2015 11:19:26
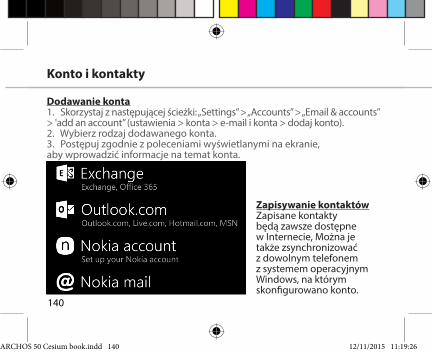
140
Zapisywanie kontaktówZapisane kontakty będą zawsze dostępne w Internecie, Można je także zsynchronizować z dowolnym telefonem z systemem operacyjnym Windows, na którym skonfigurowano konto.
Konto i kontakty
Dodawanie konta1. Skorzystaj z następującej ścieżki: „Settings” > „Accounts” > „Email & accounts” > 'add an account” (ustawienia > konta > e-mail i konta > dodaj konto).2. Wybierz rodzaj dodawanego konta.3. Postępuj zgodnie z poleceniami wyświetlanymi na ekranie, aby wprowadzić informacje na temat konta.
ARCHOS 50 Cesium book.indd 140 12/11/2015 11:19:26
141
1. Na ekranie początkowym lub ekranie wszystkich aplikacji wybierz aplikację „People” (kontakty).2. Naciśnij , a następnie wybierz „Settings” (ustawienia).3. Wybierz opcję „Import from SIM card” (importuj z karty SIM). Jeżeli korzystasz z więcej niż jednej karty SIM, wybierz tę, z której chcesz zaimportować kontakty. 4. W opcji „Save contacts to”(miejsce zapisu kontaktów) wskaż konto, w którym chcesz zapisać kontakty, a następnie naciśnij „Next” (dalej).5. Aby zaimportować wszystkie kontakty z karty SIM, naciśnij „Import” (importuj). 6. Aby wybrać kontakty do zaimportowania, naciśnij „Clear” (wyczyść), wskaż kontakty, które chcesz zaimportować, a następnie naciśnij „Import” (importuj).7. Kontakty zostaną automatycznie zaimportowane do ustawionego w telefonie konta Microsoft. Po zapisaniu kontaktów z telefonu Windows Phone na koncie Microsoft dostępnym w chmurze możliwe będzie zachowanie pełnej synchronizacji kontaktów pomiędzy wszystkimi aplikacjami, do których logujesz się za pośrednictwem tego konta. Zmiana dokonana w jednej zostanie uwzględniona we wszystkich pozostałych.
Polski
ARCHOS 50 Cesium book.indd 141 12/11/2015 11:19:26
142
Wykonywanie połączeń:Nawiązanie połączenia wymaga wykonania zaledwie kilku prostych czynności. Na ekranie początkowym naciśnij kafelek telefonu, dotknij ikonę klawiatury, wprowadź numer telefonu, a następnie dotknij przycisk połączenia . Aby połączyć się z osobą z listy kontaktów, dotknij książkę telefoniczną , naciśnij przycisk wyszukiwania i wprowadź nazwę poszukiwanego kontaktu. Aby oddzwonić, naciśnij nazwę lub numer kontaktu w obszarze historii.
Wysyłanie wiadomości SMS: Interfejs telefonu Windows Phone sprawia, że wprowadzanie wiadomości SMS jest niezwykle proste. Na ekranie początkowym naciśnij ikonę wiadomości, a następnie ikonę nowej wiadomości.Wprowadź numer telefonu lub nazwę kontaktu, w polu tekstowym wprowadź treść wiadomości, a następnie naciśnij przycisk wysyłania. Aby odpowiedzieć na wiadomość, wystarczy nacisnąć wątek wiadomości, na który chcesz odpowiedzieć.
Zakupy w sklepie:Sklep Windows Phone umożliwia pobieranie bezpłatnych i płatnych aplikacji oraz gier. Zaloguj się wcześniej w telefonie za pośrednictwem swojego konta
Wskazówki i porady dotyczące systemu WindowsTM
ARCHOS 50 Cesium book.indd 142 12/11/2015 11:19:26
143
Microsoft. Na ekranie początkowym naciśnij ikonę sklepu , a następnie wykonaj jedną z poniższych czynności: Przeciągnij palcem w lewo lub w prawo, aby zobaczyć najpopularniejsze aplikacje. Produkty można także przeszukiwać według kategorii lub innych kryteriów. Naciśnij przycisk wyszukiwania, aby odnaleźć określoną aplikację lub grę.
Wyszukiwanie aplikacji i przypinanie ich do ekranu początkowego:Pobrane aplikacje są wyświetlane na liście aplikacji. Każda z dostępnych tam aplikacji może zostać przypięta do ekranu początkowego. Uwaga: dla wygody dostępu do ekranu początkowego mogą być przypinane aplikacje, kontakty i inne elementy.
Blokowanie ekranu głównego:Hasło blokady ekranu służy podniesieniu bezpieczeństwa telefonu. Skorzystaj z następującej ścieżki: „Settings” > „Lock screen” (ustawienia > blokuj ekran) i przesuń przełącznik hasła do położenia „ON” (włączone), aby następnie utworzyć hasło. Opcję tę można wyłączyć w dowolnej chwili poprzez przesunięcie przełącznika hasła do położenia „OFF” (wyłączone).
Polski
ARCHOS 50 Cesium book.indd 143 12/11/2015 11:19:26
144
Rozwiązywanie problemów
Telefon zawiesił się lub nie można go uruchomićSprawdź styki akumulatora, wyjmij i włóż akumulator, a następnie ponownie uruchom telefon. Sprawdź stan naładowania akumulatora i podłącz urządzenie do ładowarki przynajmniej na 20 minut.Telefon nie łączy się z siecią lub wyświetlany jest komunikat o braku dostępnych usługSpróbuj połączyć się z innego miejsca. Sprawdź zasięg sieci u swojego operatora. Nie mogę wykonywać połączeń wychodzącychUpewnij się, że telefon jest połączony z siecią oraz że sieć nie jest przeładowana lub niedostępna.Nie mogę odbierać połączeń przychodzącychUpewnij się, że telefon jest włączony i połączony z siecią (sprawdź, czy sieć nie jest przeładowana lub niedostępna). Kod PIN karty SIM został zablokowanySkontaktuj się z operatorem sieci, aby otrzymać kod PUK, który umożliwi odblokowanie karty SIM.Aby skonfigurować nową sieć 4G:Dotknij ikonę ustawień na ekranie urządzenia. Wybierz Wireless & networks > More... > Mobile networks (usługi bezprzewodowe i sieci > więcej... > sieci komórkowe).Wybierz opcję Network settings (ustawienia sieci). W części Network operators (operatorzy sieci) wybierz swojego operatora. W części Access Point Names (nazwy punktów dostępu) wybierz nazwę odpowiedniego punktu dostępu i wprowadź dokładne parametry połączenia otrzymane od operatora sieci 4G.
ARCHOS 50 Cesium book.indd 144 12/11/2015 11:19:26
145
Tartalomjegyzék
Ha további információra van szüksége, keresse a FAQ [GYIK] részt a www.archos.com weboldalon. Feltétlenül olvassa el, mielőtt visszaküldené a terméket. Termékeink rendszeres frissítése és fejlesztése miatt előfordulhat, hogy az Ön készülékének szoftvere némiképp eltérően jelenik meg, vagy kismértékben eltérőek a funkciói a jelen Rövid felhasználói útmutatóban olvasottakhoz képest. A megfelelőségi nyilatkozatot itt találja: http://www.archos.com/gb-en/support/support_tech/downloads.html
146147150154156158160
A csomag tartalma.............................................................................................................A telefon bemutatása........................................................................................................Első lépések...........................................................................................................................Mobil adat- és Wi-Fi kapcsolat........................................................................................Fiók és névjegyek................................................................................................................Ötletek és tippek az WindowsTM-hoz............................................................................Hibaelhárítás.........................................................................................................................
Magyar
ARCHOS 50 Cesium book.indd 145 12/11/2015 11:19:26
146
A csomag tartalma
Ellenőrizze, hogy az alábbiak megvannak-e a készülék dobozában: - ARCHOS 50 Cesium - Akkumulátor - Fejhallgató - USB-kábel - Töltő - Rövid felhasználói útmutató - Garanciára vonatkozó jogi és biztonsági információk
A készülékhez kapott alkatrészek és az elérhető tartozékok a régiótól, illetve a szolgáltatótól függően eltérőek lehetnek. A mellékelt alkatrészek kifejezetten az Ön készülékéhez valók, következésképp nem feltétlenül kompatibilisek más készülékekkel. A jóvá nem hagyott tartozékok használata a készülék hibás működését okozhatja.
ARCHOS 50 Cesium book.indd 146 12/11/2015 11:19:26
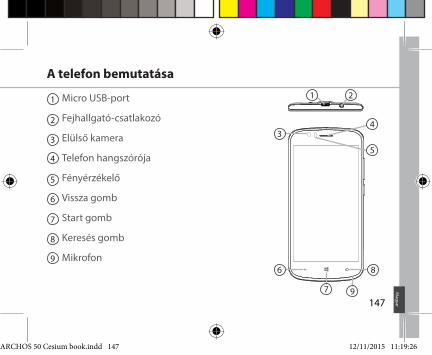
01-09-2015
last modification:
Archos 50 CesiumCONFIDENTIAL
DRAWING
Rev 1scale 1:1 mm
3
5
4
1 2
86
7 9147
1 Micro USB-port
Fejhallgató-csatlakozó
Elülső kamera
Telefon hangszórója
Fényérzékelő
Vissza gomb
Start gomb
Keresés gomb
Mikrofon
2
3
4
A telefon bemutatása
5
6
7
8
9
Magyar
ARCHOS 50 Cesium book.indd 147 12/11/2015 11:19:26
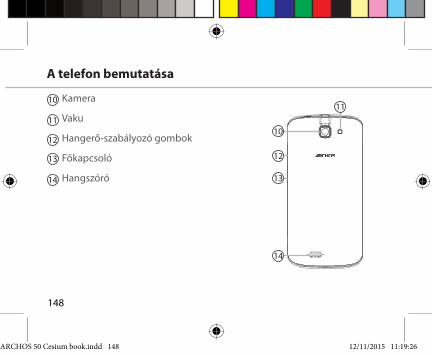
01-09-2015
last modification:
Archos 50 CesiumCONFIDENTIAL
DRAWING
Rev 1scale 1:1 mm
14
10
11
12
13
148
A telefon bemutatása
Kamera
Vaku
Hangerő-szabályozó gombok
Főkapcsoló
Hangszóró
10
11
12
13
14
ARCHOS 50 Cesium book.indd 148 12/11/2015 11:19:26
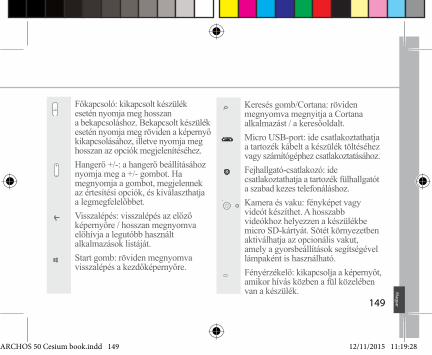
149
Főkapcsoló: kikapcsolt készülék esetén nyomja meg hosszan a bekapcsoláshoz. Bekapcsolt készülék esetén nyomja meg röviden a képernyő kikapcsolásához, illetve nyomja meg hosszan az opciók megjelenítéséhez.Hangerő +/-: a hangerő beállításához nyomja meg a +/- gombot. Ha megnyomja a gombot, megjelennek az értesítési opciók, és kiválaszthatja a legmegfelelőbbet.
01-09-2015
last modification:
Archos 50 CesiumCONFIDENTIAL
DRAWING
Rev 1scale 1:1 mm
Visszalépés: visszalépés az előző képernyőre / hosszan megnyomva előhívja a legutóbb használt alkalmazások listáját.
01-09-2015
last modification:
Archos 50 CesiumCONFIDENTIAL
DRAWING
Rev 1scale 1:1 mm
Start gomb: röviden megnyomva visszalépés a kezdőképernyőre.
01-09-2015
last modification:
Archos 50 CesiumCONFIDENTIAL
DRAWING
Rev 1scale 1:1 mm
Keresés gomb/Cortana: röviden megnyomva megnyitja a Cortana alkalmazást / a keresőoldalt.Micro USB-port: ide csatlakoztathatja a tartozék kábelt a készülék töltéséhez vagy számítógéphez csatlakoztatásához.Fejhallgató-csatlakozó: ide csatlakoztathatja a tartozék fülhallgatót a szabad kezes telefonáláshoz.Kamera és vaku: fényképet vagy videót készíthet. A hosszabb videókhoz helyezzen a készülékbe micro SD-kártyát. Sötét környezetben aktiválhatja az opcionális vakut, amely a gyorsbeállítások segítségével lámpaként is használható.Fényérzékelő: kikapcsolja a képernyőt, amikor hívás közben a fül közelében van a készülék. M
agyar
ARCHOS 50 Cesium book.indd 149 12/11/2015 11:19:28
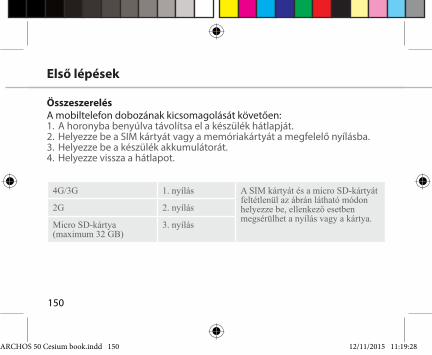
150
ÖsszeszerelésA mobiltelefon dobozának kicsomagolását követően:1. A horonyba benyúlva távolítsa el a készülék hátlapját.2. Helyezze be a SIM kártyát vagy a memóriakártyát a megfelelő nyílásba.3. Helyezze be a készülék akkumulátorát.4. Helyezze vissza a hátlapot.
Első lépések
4G/3G 1. nyílás A SIM kártyát és a micro SD-kártyát feltétlenül az ábrán látható módon helyezze be, ellenkező esetben megsérülhet a nyílás vagy a kártya.
2G 2. nyílás
Micro SD-kártya (maximum 32 GB)
3. nyílás
ARCHOS 50 Cesium book.indd 150 12/11/2015 11:19:28
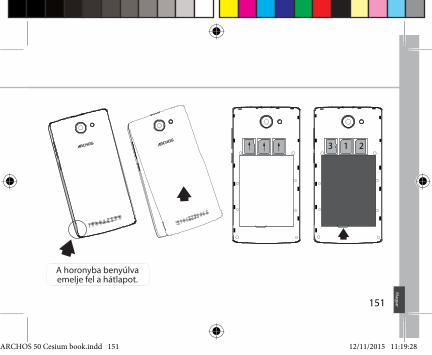
213
151
A horonyba benyúlva emelje fel a hátlapot.
Magyar
ARCHOS 50 Cesium book.indd 151 12/11/2015 11:19:28
152
Bekapcsolás1. Csatlakoztassa a töltőkábelt Micro USB-portba, és csatlakoztassa a töltőhöz.A készülék első használata előtt töltse fel teljesen az akkumulátort.
2. A készülék bekapcsolásához tartsa lenyomva a főkapcsolót.Az ARCHOS első indításakor a telepítési varázsló segít a készülék beállításában.
3. Kövesse az utasításokat.Ha behelyezett SIM kártyát a készülékbe, lehet, hogy meg kell adnia a PIN kódot. Ügyeljen rá, hogy a helyes PIN kódot adja meg.
Első lépések
ARCHOS 50 Cesium book.indd 152 12/11/2015 11:19:28
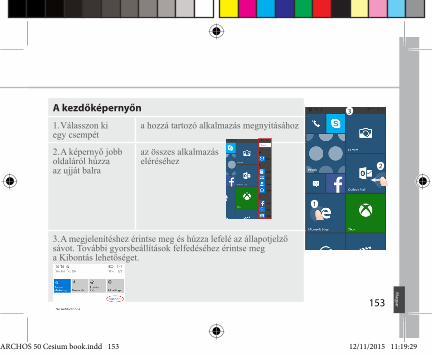
3
1
2
153
A kezdőképernyőn
1. Válasszon ki egy csempét
a hozzá tartozó alkalmazás megnyitásához
2. A képernyő jobb oldaláról húzza az ujját balra
az összes alkalmazás eléréséhez
3. A megjelenítéshez érintse meg és húzza lefelé az állapotjelző sávot. További gyorsbeállítások felfedéséhez érintse meg a Kibontás lehetőséget.
Magyar
ARCHOS 50 Cesium book.indd 153 12/11/2015 11:19:29
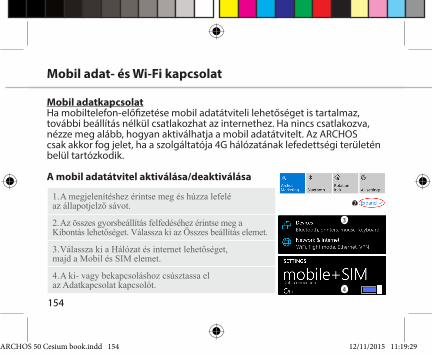
3
2
4
154
Mobil adatkapcsolatHa mobiltelefon-előfizetése mobil adatátviteli lehetőséget is tartalmaz, további beállítás nélkül csatlakozhat az internethez. Ha nincs csatlakozva, nézze meg alább, hogyan aktiválhatja a mobil adatátvitelt. Az ARCHOS csak akkor fog jelet, ha a szolgáltatója 4G hálózatának lefedettségi területén belül tartózkodik. A mobil adatátvitel aktiválása/deaktiválása
1. A megjelenítéshez érintse meg és húzza lefelé az állapotjelző sávot.
2. Az összes gyorsbeállítás felfedéséhez érintse meg a Kibontás lehetőséget. Válassza ki az Összes beállítás elemet.
3. Válassza ki a Hálózat és internet lehetőséget, majd a Mobil és SIM elemet.
4. A ki- vagy bekapcsoláshoz csúsztassa el az Adatkapcsolat kapcsolót.
Mobil adat- és Wi-Fi kapcsolat
ARCHOS 50 Cesium book.indd 154 12/11/2015 11:19:29
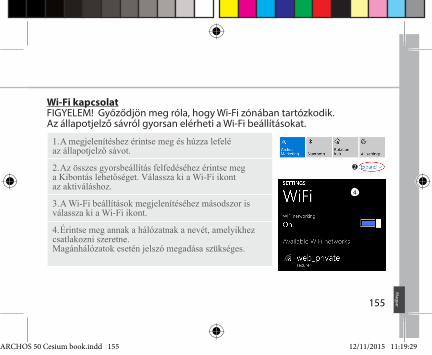
2
4
155
Wi-Fi kapcsolatFIGYELEM! Győződjön meg róla, hogy Wi-Fi zónában tartózkodik. Az állapotjelző sávról gyorsan elérheti a Wi-Fi beállításokat.
1. A megjelenítéshez érintse meg és húzza lefelé az állapotjelző sávot.
2. Az összes gyorsbeállítás felfedéséhez érintse meg a Kibontás lehetőséget. Válassza ki a Wi-Fi ikont az aktiváláshoz.
3. A Wi-Fi beállítások megjelenítéséhez másodszor is válassza ki a Wi-Fi ikont.
4. Érintse meg annak a hálózatnak a nevét, amelyikhez csatlakozni szeretne. Magánhálózatok esetén jelszó megadása szükséges.
Magyar
ARCHOS 50 Cesium book.indd 155 12/11/2015 11:19:29
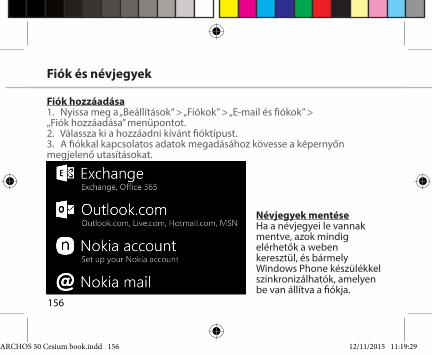
156
Névjegyek mentéseHa a névjegyei le vannak mentve, azok mindig elérhetők a weben keresztül, és bármely Windows Phone készülékkel szinkronizálhatók, amelyen be van állítva a fiókja.
Fiók és névjegyek
Fiók hozzáadása1. Nyissa meg a „Beállítások” > „Fiókok” > „E-mail és fiókok” > „Fiók hozzáadása” menüpontot.2. Válassza ki a hozzáadni kívánt fióktípust.3. A fiókkal kapcsolatos adatok megadásához kövesse a képernyőn megjelenő utasításokat.
ARCHOS 50 Cesium book.indd 156 12/11/2015 11:19:29
157
1. A Start vagy az Összes alkalmazás képernyőn válassza ki a Személyek alkalmazást.2. Érintse meg a ikont, majd válassza a Beállítások lehetőséget.3. Válassza az „Importálás SIM-kártyáról” lehetőséget. Ha több SIM-kártya is van a készülékben, azt válassza ki, amelyikről a névjegyeket importálni kívánja. 4. A Névjegyek mentési helye lehetőségnél válassza ki a fiókot, amelyben a névjegyeket tárolni kívánja, majd érintse meg a Tovább lehetőséget.5. A SIM-kártyán lévő valamennyi névjegy importálásához érintse meg az Importálás lehetőséget. 6. Ha egyesével kíván névjegyeket kiválasztani az importáláshoz, koppintson a Törlés gombra, válassza ki az importálni kívánt névjegyeket, majd koppintson az Importálás lehetőségre.7. A készülék automatikusan importálja a névjegyeket a telefonon beállított Microsoft-fiókba. Miután a Windows Phone telefonon lévő névjegyeket elmentette a felhőben lévő Microsoft-fiókba, az összes olyan helyen szinkronizálva lesznek a névjegyek, ahonnan ebbe a fiókba bejelentkezik. Ha az adatokat egy helyen módosítja, azok a többi helyen ugyanúgy módosulni fognak. M
agyar
ARCHOS 50 Cesium book.indd 157 12/11/2015 11:19:29

158
Hívás indítása:Hívás indításához mindössze néhányszor kell a képernyőre koppintania. A kezdőképernyőn koppintson a Telefon csempére, majd a billentyűzet ikonra, írjon be egy telefonszámot, majd koppintson a Hívás gombra . A névjegyzékben lévő személy hívásához érintse meg a telefonkönyvet , majd koppintson a Keresés lehetőségre , és keresse meg a kívánt nevet. Ha valakit vissza szeretne hívni, a híváselőzményeknél koppintson a kívánt névre vagy telefonszámra.
Szöveges üzenet küldése: Windows Phone telefonján gyerekjáték az üzenetek írása. A kezdőképernyőn koppintson az Üzenetek, majd az Új elemre.Írja be a telefonszámot vagy a személy nevét, írja meg az üzenetet a szövegbeviteli mezőben, majd koppintson a Küldés gombra. Szöveges üzenetre való válaszadáshoz koppintson a megválaszolni kívánt üzenet előzményeire.
Vásárlás az áruházban:A Windows Phone áruházában ingyenes és fizetős alkalmazások között
Ötletek és tippek a WindowsTM-hoz
ARCHOS 50 Cesium book.indd 158 12/11/2015 11:19:29
159
válogathat. A telefonra Microsoft-fiókjával kell bejelentkeznie. A Kezdőképernyőn koppintson az Áruház lehetőségre, majd végezze el a következő műveletek
egyikét: A legnépszerűbb alkalmazásokhoz, a kategóriák böngészéséhez és egyéb lehetőségekhez húzza ujját balra vagy jobbra. Adott alkalmazásra a Keresés lehetőségre koppintva kereshet rá.
Alkalmazások megkeresése és a kezdőképernyőre rögzítése:A letöltött alkalmazások az Alkalmazások listában jelennek meg. A listából egyszerűn rögzítheti kedvenc alkalmazásait a kezdőképernyőre. Megjegyzés: A gyors hozzáférhetőség érdekében a kezdőképernyőre nemcsak alkalmazásokat, hanem partnereket és sok minden mást is rögzíthet.
Az érintőképernyő lezárása:A képernyő zárolását jelszóval teheti igazán biztonságossá. Lépjen a Beállítások < Zárolás képernyőre, és a Jelszó kapcsolót csúsztassa a BE helyzetbe, majd hozzon létre jelszót. A beállítás a Jelszó kapcsoló KI helyzetbe csúsztatásával bármikor kikapcsolható.
Magyar
ARCHOS 50 Cesium book.indd 159 12/11/2015 11:19:29
160
Hibaelhárítás
A telefonom lefagyott vagy nem lehet bekapcsolniEllenőrizze az akkumulátor érintkezőit, vegye ki, majd tegye vissza az akkumulátort, majd kapcsolja be a telefont. Ellenőrizze az akkumulátor töltöttségi szintjét, töltse legalább 20 percig.A telefonom nem kapcsolódik a hálózathoz, vagy a „Nincs hálózat” üzenet jelenik meg a képernyőnPróbáljon máshonnan csatlakozni. Ellenőrizze a hálózati lefedettséget a szolgáltatójánál. Nem tudok hívást indítaniEllenőrizze, hogy a telefonja csatlakozik-e hálózathoz, illetve a hálózat elérhető és nem túlterhelt-e.Nem tudok hívást fogadniEllenőrizze, hogy a telefonja be van-e kapcsolva és csatlakozik-e hálózathoz (ellenőrizze, hogy a hálózat elérhető és nem túlterhelt-e). SIM-kártya PIN-kódja blokkolvaKérje szolgáltatójától a PUK-kódot (személyi feloldó kód).Új 4G hálózat beállítása:A készüléken koppintson a Beállítások elemre.Válassza a Vezeték nélküli és hálózatok > Továbbiak... > Mobilhálózatok menüpontot.Válassza ki a Hálózati beállítások elemet. A Szolgáltatók pontban válassza ki szolgáltatóját. A „Hozzáférési pontok nevei” pontban válassza ki a megfelelő hozzáférési pont nevét, és írja be a 4G szolgáltatója által megadott pontos csatlakozási paramétereket.
ARCHOS 50 Cesium book.indd 160 12/11/2015 11:19:29
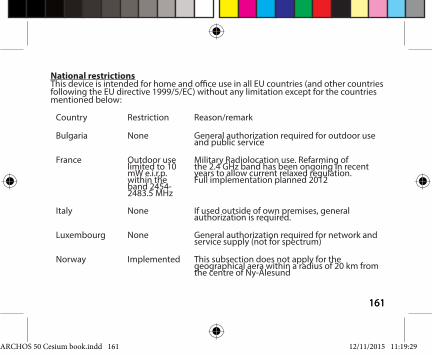
161161
National restrictionsThis device is intended for home and office use in all EU countries (and other countries following the EU directive 1999/5/EC) without any limitation except for the countries mentioned below:
Country Restriction Reason/remark
Bulgaria None General authorization required for outdoor use and public service
France Outdoor use limited to 10 mW e.i.r.p. within the band 2454-2483.5 MHz
Military Radiolocation use. Refarming of the 2.4 GHz band has been ongoing in recent years to allow current relaxed regulation. Full implementation planned 2012
Italy None If used outside of own premises, general authorization is required.
Luxembourg None General authorization required for network and service supply (not for spectrum)
Norway Implemented This subsection does not apply for the geographical aera within a radius of 20 km from the centre of Ny-Alesund
ARCHOS 50 Cesium book.indd 161 12/11/2015 11:19:29
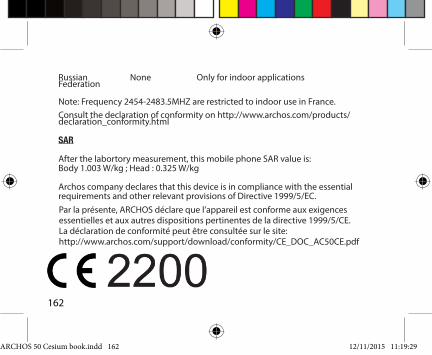
162
Russian Federation
None Only for indoor applications
Note: Frequency 2454-2483.5MHZ are restricted to indoor use in France.Consult the declaration of conformity on http://www.archos.com/products/declaration_conformity.html
SAR
After the labortory measurement, this mobile phone SAR value is: Body 1.003 W/kg ; Head : 0.325 W/kg
Archos company declares that this device is in compliance with the essential requirements and other relevant provisions of Directive 1999/5/EC.Par la présente, ARCHOS déclare que l’appareil est conforme aux exigences essentielles et aux autres dispositions pertinentes de la directive 1999/5/CE. La déclaration de conformité peut être consultée sur le site:http://www.archos.com/support/download/conformity/CE_DOC_AC50CE.pdf
ARCHOS 50 Cesium book.indd 162 12/11/2015 11:19:29