Embed Size (px)
Citation preview

Anatomy of the mobile home pageA mobile page is based on a javascript library called “iui”. It is built “larger” than what will display on the screen. What may seem like clicking a link to go to a different screen is really a process of hiding the current content and revealing the new content. Therefore you can write anything you can “pre-ordain” into the main home.html file. But there are times when you can’t know what will display, so for content that will require you to run a query based on user input (Students with last names beginning with “A”...) then you write that code in a separate file, but just as a small snippet of code and NOT as a complete html page.
Here is the admin/mobile/home.html page broken down and explained:
<!DOCTYPE html><html><head><title>~[text:psx.html.admin_mobile.home.powerschool]</title><meta name="viewport" content="width=device-width; initial-scale=1.0; maximum-scale=5.0; user-scalable=1;"/>
The “viewport” tag is supported by many mobile browsers. It helps us by letting the device tell us how wide the page should be instead of hard-coding a width. We keep things from getting too zoomed in with the maximum-scale setting and user-scalable=1 (1=yes) means we are going to allow the user to zoom with the pinch gesture. Setting it to 0 would disable zooming.
<link rel="apple-touch-icon" href="/images/mobile/ps6-logo-touch-icon.png" /><meta name="apple-mobile-web-app-capable" content="yes" />
These two tags are special iOS (Apple) tags that define the icon to use on the home screen if the user bookmarks the mobile page to their home screen. We’re also telling Apple that it can consider this a web app, which means if launched from a home screen icon, it will run in full-screen mode and really look like a native app. However, it is recommended to run mobile pages from the browser and NOT from home screen icons due to usability issues surrounding losing your session state when you leave the app and try to come back.
<link href="/scripts/mobile/ps-iui.css" rel="stylesheet"><link rel="stylesheet" title="~[text:psx.html.admin_mobile.home.default]" href="/scripts/mobile/ps-iui.css" type="text/css" /><link rel="alternate stylesheet" title="~[text:psx.html.admin_mobile.home.android]" href="/scripts/mobile/android-theme.css" type="text/css">
Here we are loading several css and javascript files. CSS is what defines the look and feel of the content, and Javascript is what defines how everything will work. This is the foundation of modern web programming. You avoid formatting “inline” or inside the code, you don’t decide how the animation to move to the next screen will happen embedded halfway in your page somewhere, you keep look and function split from the content.
Enhanced Mobile Web Pages Page 1 of 33
<script type="application/x-javascript" src="/scripts/mobile/ps-iui.js"></script><SCRIPT type="application/x-javascript" src="/scripts/iui/0.31/iui-theme-switcher.js"></SCRIPT><script type="text/javascript"> iui.animOn = true; var uagent = navigator.userAgent.toLowerCase(); if(uagent.indexOf('android') != -1) { iui.ts.setTheme("android"); } else { iui.ts.setTheme("default"); }</script>
More script loading... including detecting if we are on an android device and loading a whole different theme which will make mobile web pages look different for you droid users than for iOS users. If you want mobile pages to look like iphone pages on your droid, you could change setTheme(“android”) to setTheme(“default”).... or vice versa. Maybe you even want to explore creating your own theme.
<script type="text/javascript"> ~[if.pref.mobilepages_enable=1] [else] location.href = "../home.html"; [/if]
~[if.prefschool.mobiledisable_admin=1]location.href = "../home.html";[/if] ~[if.pref.mobile_access-U~[x:userid]=false]location.href = "../home.html";[/if]</script></head>
One last script to close out the head portion. This script is like the security guard. We’re checking to see if you really are allowed in here. Are the mobile pages enabled for the district? No? Then go back to the regular home page (../home.html). Have the admin mobile pages been disabled for the school? Sorry. Has the user been “banned”? Sorry buddy, you’re not on the list. Keep in mind the user will still be able to use PowerSchool, it will just be the regular pages which aren’t as usable on a small device.
Enhanced Mobile Web Pages Page 2 of 33
<body> <div class="toolbar"> <h1 id="pageTitle">~[text:psx.html.admin_mobile.home.powerschool1]</h1> <a id="backButton" class="button" href="#" type="backlink"></a> <a id="otherButton" class="button" href="#"></a> </div>
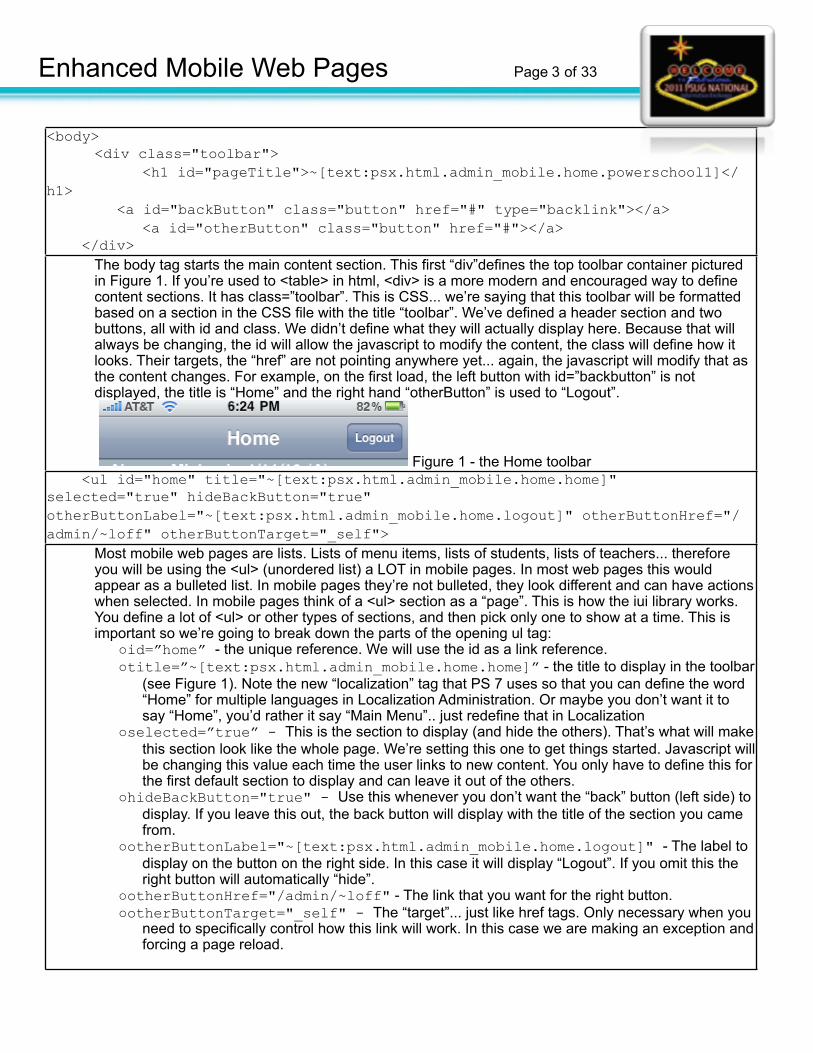
The body tag starts the main content section. This first “div”defines the top toolbar container pictured in Figure 1. If you’re used to <table> in html, <div> is a more modern and encouraged way to define content sections. It has class=”toolbar”. This is CSS... we’re saying that this toolbar will be formatted based on a section in the CSS file with the title “toolbar”. We’ve defined a header section and two buttons, all with id and class. We didn’t define what they will actually display here. Because that will always be changing, the id will allow the javascript to modify the content, the class will define how it looks. Their targets, the “href” are not pointing anywhere yet... again, the javascript will modify that as the content changes. For example, on the first load, the left button with id=”backbutton” is not displayed, the title is “Home” and the right hand “otherButton” is used to “Logout”.
Figure 1 - the Home toolbar <ul id="home" title="~[text:psx.html.admin_mobile.home.home]" selected="true" hideBackButton="true" otherButtonLabel="~[text:psx.html.admin_mobile.home.logout]" otherButtonHref="/admin/~loff" otherButtonTarget="_self">
Most mobile web pages are lists. Lists of menu items, lists of students, lists of teachers... therefore you will be using the <ul> (unordered list) a LOT in mobile pages. In most web pages this would appear as a bulleted list. In mobile pages they’re not bulleted, they look different and can have actions when selected. In mobile pages think of a <ul> section as a “page”. This is how the iui library works. You define a lot of <ul> or other types of sections, and then pick only one to show at a time. This is important so we’re going to break down the parts of the opening ul tag:
○id=”home” - the unique reference. We will use the id as a link reference.○title=”~[text:psx.html.admin_mobile.home.home]” - the title to display in the toolbar
(see Figure 1). Note the new “localization” tag that PS 7 uses so that you can define the word “Home” for multiple languages in Localization Administration. Or maybe you don’t want it to say “Home”, you’d rather it say “Main Menu”.. just redefine that in Localization
○selected=”true” - This is the section to display (and hide the others). That’s what will make this section look like the whole page. We’re setting this one to get things started. Javascript will be changing this value each time the user links to new content. You only have to define this for the first default section to display and can leave it out of the others.
○hideBackButton="true" - Use this whenever you don’t want the “back” button (left side) to display. If you leave this out, the back button will display with the title of the section you came from.
○otherButtonLabel="~[text:psx.html.admin_mobile.home.logout]" - The label to display on the button on the right side. In this case it will display “Logout”. If you omit this the right button will automatically “hide”.
○otherButtonHref="/admin/~loff" - The link that you want for the right button.○otherButtonTarget="_self" - The “target”... just like href tags. Only necessary when you
need to specifically control how this link will work. In this case we are making an exception and forcing a page reload.
Enhanced Mobile Web Pages Page 3 of 33
<!-- <div class="username">~[x:username]</div> --> <li class="group">~[x:username] - ~[eaodate;dayabbr]</li>
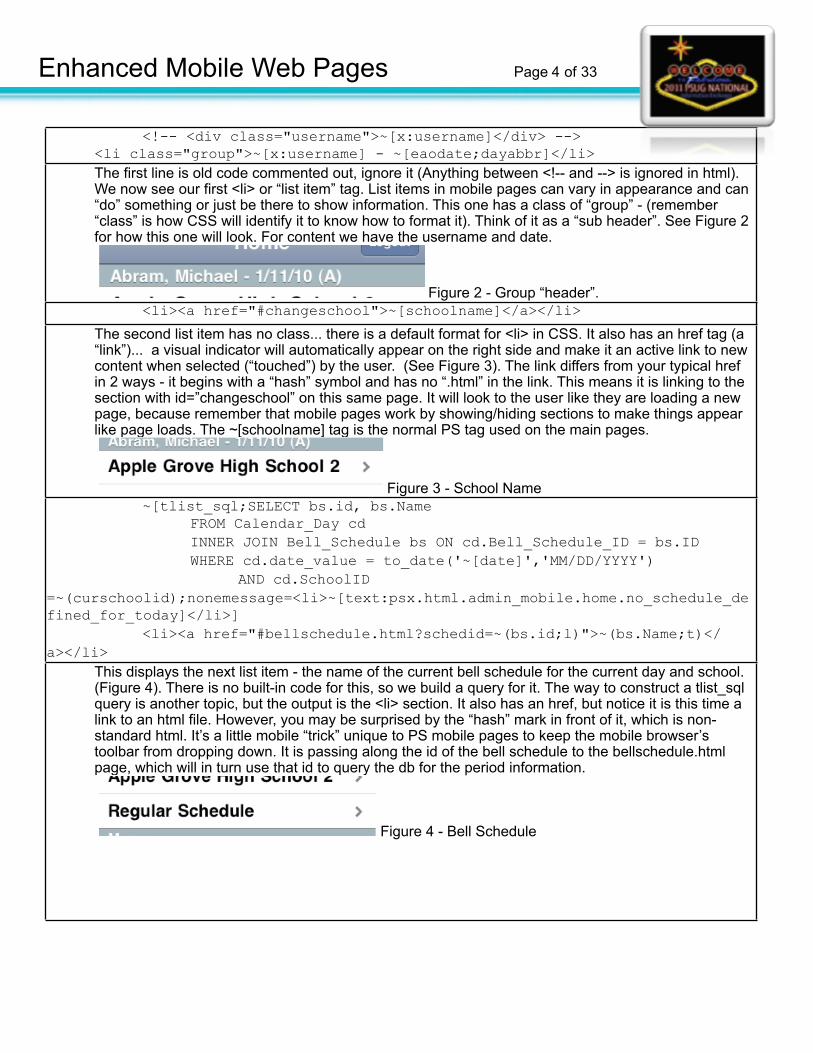
The first line is old code commented out, ignore it (Anything between <!-- and --> is ignored in html). We now see our first <li> or “list item” tag. List items in mobile pages can vary in appearance and can “do” something or just be there to show information. This one has a class of “group” - (remember “class” is how CSS will identify it to know how to format it). Think of it as a “sub header”. See Figure 2 for how this one will look. For content we have the username and date.
Figure 2 - Group “header”. <li><a href="#changeschool">~[schoolname]</a></li>
The second list item has no class... there is a default format for <li> in CSS. It also has an href tag (a “link”)... a visual indicator will automatically appear on the right side and make it an active link to new content when selected (“touched”) by the user. (See Figure 3). The link differs from your typical href in 2 ways - it begins with a “hash” symbol and has no “.html” in the link. This means it is linking to the section with id=”changeschool” on this same page. It will look to the user like they are loading a new page, because remember that mobile pages work by showing/hiding sections to make things appear like page loads. The ~[schoolname] tag is the normal PS tag used on the main pages.
Figure 3 - School Name ~[tlist_sql;SELECT bs.id, bs.Name FROM Calendar_Day cd INNER JOIN Bell_Schedule bs ON cd.Bell_Schedule_ID = bs.ID WHERE cd.date_value = to_date('~[date]','MM/DD/YYYY') AND cd.SchoolID =~(curschoolid);nonemessage=<li>~[text:psx.html.admin_mobile.home.no_schedule_defined_for_today]</li>] <li><a href="#bellschedule.html?schedid=~(bs.id;l)">~(bs.Name;t)</a></li> [/tlist_sql]This displays the next list item - the name of the current bell schedule for the current day and school.
(Figure 4). There is no built-in code for this, so we build a query for it. The way to construct a tlist_sql query is another topic, but the output is the <li> section. It also has an href, but notice it is this time a link to an html file. However, you may be surprised by the “hash” mark in front of it, which is non-standard html. It’s a little mobile “trick” unique to PS mobile pages to keep the mobile browser’s toolbar from dropping down. It is passing along the id of the bell schedule to the bellschedule.html page, which will in turn use that id to query the db for the period information.
Figure 4 - Bell Schedule
Enhanced Mobile Web Pages Page 4 of 33
<li class="group">~[text:psx.html.admin_mobile.home.menu]</li> <li><a href="#students">~[text:psx.html.admin_mobile.home.students]</a></li> <li><a href="#teachers.html">~[text:psx.html.admin_mobile.home.teachers]</a></li>
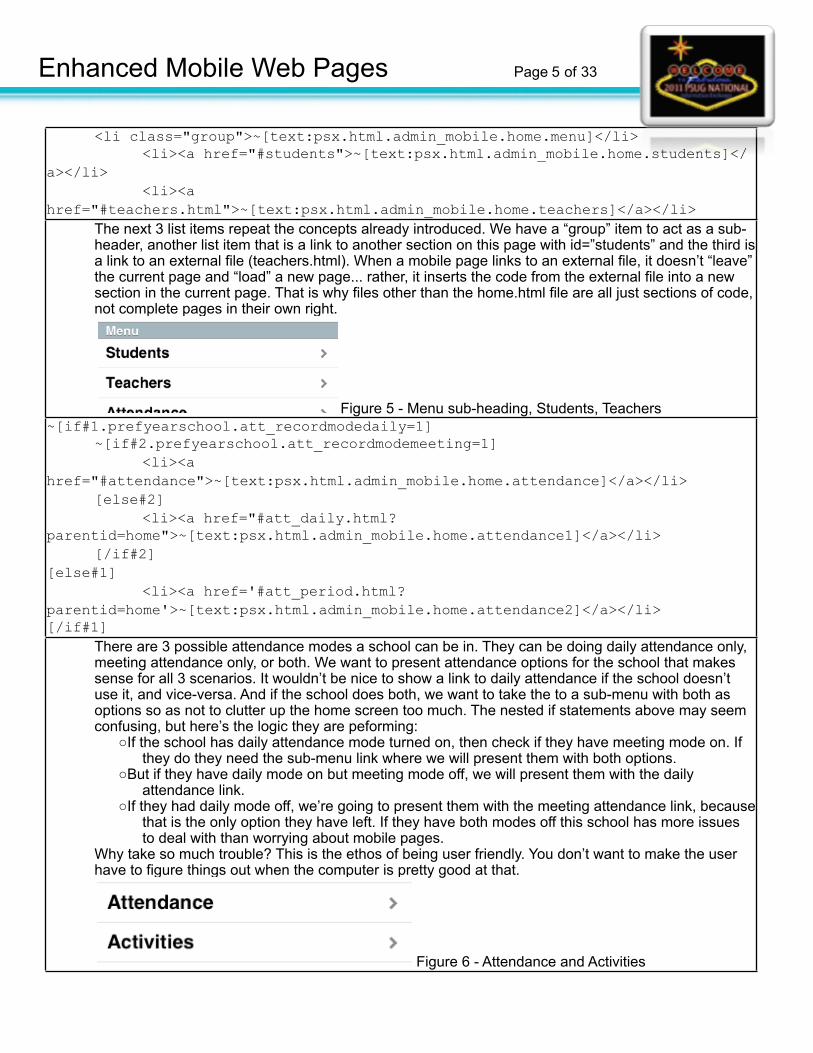
The next 3 list items repeat the concepts already introduced. We have a “group” item to act as a sub-header, another list item that is a link to another section on this page with id=”students” and the third is a link to an external file (teachers.html). When a mobile page links to an external file, it doesn’t “leave” the current page and “load” a new page... rather, it inserts the code from the external file into a new section in the current page. That is why files other than the home.html file are all just sections of code, not complete pages in their own right.
Figure 5 - Menu sub-heading, Students, Teachers~[if#1.prefyearschool.att_recordmodedaily=1] ~[if#2.prefyearschool.att_recordmodemeeting=1] <li><a href="#attendance">~[text:psx.html.admin_mobile.home.attendance]</a></li> [else#2] <li><a href="#att_daily.html?parentid=home">~[text:psx.html.admin_mobile.home.attendance1]</a></li> [/if#2][else#1] <li><a href='#att_period.html?parentid=home'>~[text:psx.html.admin_mobile.home.attendance2]</a></li>[/if#1]
There are 3 possible attendance modes a school can be in. They can be doing daily attendance only, meeting attendance only, or both. We want to present attendance options for the school that makes sense for all 3 scenarios. It wouldn’t be nice to show a link to daily attendance if the school doesn’t use it, and vice-versa. And if the school does both, we want to take the to a sub-menu with both as options so as not to clutter up the home screen too much. The nested if statements above may seem confusing, but here’s the logic they are peforming:
○If the school has daily attendance mode turned on, then check if they have meeting mode on. If they do they need the sub-menu link where we will present them with both options.
○But if they have daily mode on but meeting mode off, we will present them with the daily attendance link.
○If they had daily mode off, we’re going to present them with the meeting attendance link, because that is the only option they have left. If they have both modes off this school has more issues to deal with than worrying about mobile pages.
Why take so much trouble? This is the ethos of being user friendly. You don’t want to make the user have to figure things out when the computer is pretty good at that.
Figure 6 - Attendance and Activities
Enhanced Mobile Web Pages Page 5 of 33

~[if.~(studentscreenaccess;activities.html)=1] <li><a href="#activities.html">~[text:psx.html.admin_mobile.home.activities]</a></li> [/if]
The list item for Activities. This is the first time we’ve seen an if statement that checks if this user has access to the main activities screen. If they don’t, they won’t be shown this item. (Figure 6)
<li><a href="#birthdaylist.html?dateselect=~[eaodate;i18n]" buildSel="false">~[text:psx.html.admin_mobile.home.birthdays]</a></li>
The list item for Birthdays. (Figure 7) We’re going to load in the contents of birthdaylist.html with a parameter value of the current date passed along to the code. There is a new option here - buildSel="false". This can be ignored. In the first iteration of mobile pages, it was necessary to have a parameter of buildSel="true" when you wanted the result of a tlist_sql query to be the current selection of students. Now there is a parameter that can be added directly to the tlist_sql to better accomplish the same objective. This parameter could be just as easily left out and ignored for future mobile page development.
Figure 7 - Birthdays and Daily Bulletin <li><a href="#bulletin.html">~[text:psx.html.admin_mobile.home.daily_bulletin]</a></li> <li><a href="/admin/home.html?mobileHome=main" target="_self" id="exitlink">~[text:psx.html.admin_mobile.home.exit_to_main_ps_site]</a> </ul>
The last list item for the home section - “Daily Bulletin”. (Figure 7). The last list item is a specially constructed link (“Exit to Main PS site”) that the javascript will handle in a certain way to exit the user from mobile pages and set a session cookie that will force the loading of the main PowerSchool pages until the user resets the cookie by logging off and logging back on again. The mobile pages are limited in functionality and the user may need access to more areas of PowerSchool that are not mobile optimized yet.We’re done with our first <ul> section. Here’s what the “page” might look like (the “Exit to main PS site” link is not pictured here)
Figure 8 - Home screen
Enhanced Mobile Web Pages Page 6 of 33
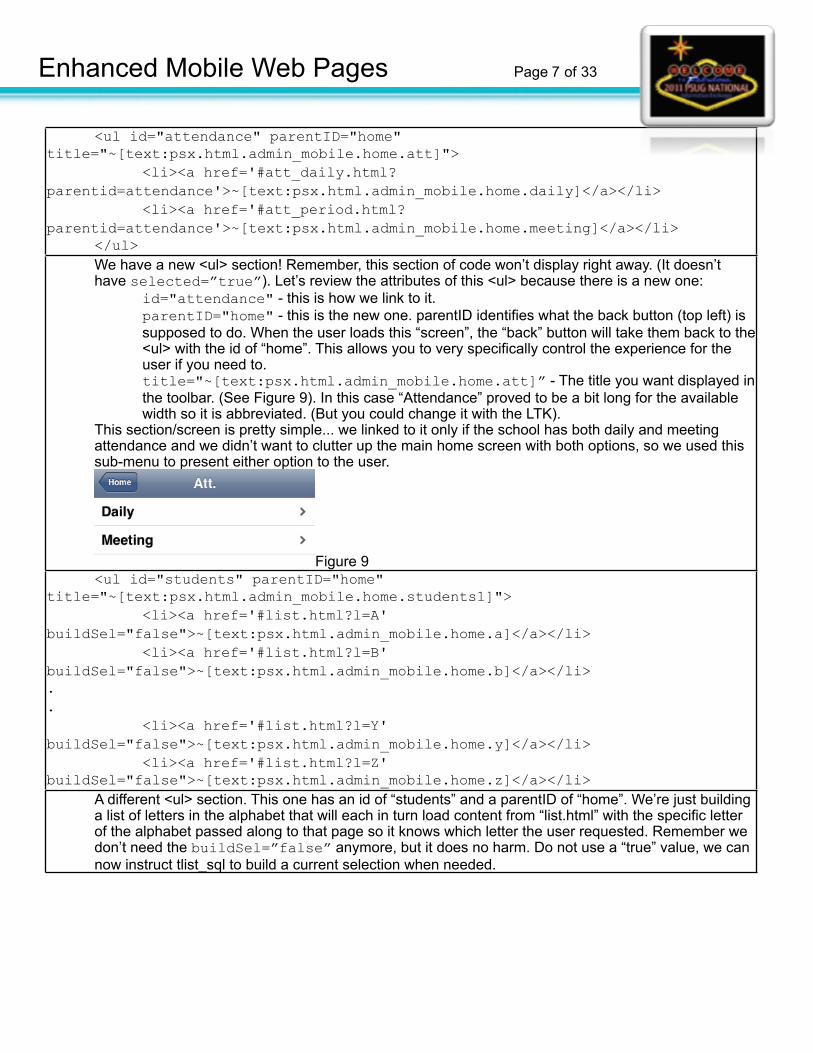
<ul id="attendance" parentID="home" title="~[text:psx.html.admin_mobile.home.att]"> <li><a href='#att_daily.html?parentid=attendance'>~[text:psx.html.admin_mobile.home.daily]</a></li> <li><a href='#att_period.html?parentid=attendance'>~[text:psx.html.admin_mobile.home.meeting]</a></li> </ul>
We have a new <ul> section! Remember, this section of code won’t display right away. (It doesn’t have selected=”true”). Let’s review the attributes of this <ul> because there is a new one:
id="attendance" - this is how we link to it.parentID="home" - this is the new one. parentID identifies what the back button (top left) is supposed to do. When the user loads this “screen”, the “back” button will take them back to the <ul> with the id of “home”. This allows you to very specifically control the experience for the user if you need to.title="~[text:psx.html.admin_mobile.home.att]” - The title you want displayed in the toolbar. (See Figure 9). In this case “Attendance” proved to be a bit long for the available width so it is abbreviated. (But you could change it with the LTK).
This section/screen is pretty simple... we linked to it only if the school has both daily and meeting attendance and we didn’t want to clutter up the main home screen with both options, so we used this sub-menu to present either option to the user.
Figure 9 <ul id="students" parentID="home" title="~[text:psx.html.admin_mobile.home.students1]"> <li><a href='#list.html?l=A' buildSel="false">~[text:psx.html.admin_mobile.home.a]</a></li> <li><a href='#list.html?l=B' buildSel="false">~[text:psx.html.admin_mobile.home.b]</a></li>.. <li><a href='#list.html?l=Y' buildSel="false">~[text:psx.html.admin_mobile.home.y]</a></li> <li><a href='#list.html?l=Z' buildSel="false">~[text:psx.html.admin_mobile.home.z]</a></li>
A different <ul> section. This one has an id of “students” and a parentID of “home”. We’re just building a list of letters in the alphabet that will each in turn load content from “list.html” with the specific letter of the alphabet passed along to that page so it knows which letter the user requested. Remember we don’t need the buildSel=”false” anymore, but it does no harm. Do not use a “true” value, we can now instruct tlist_sql to build a current selection when needed.
Enhanced Mobile Web Pages Page 7 of 33
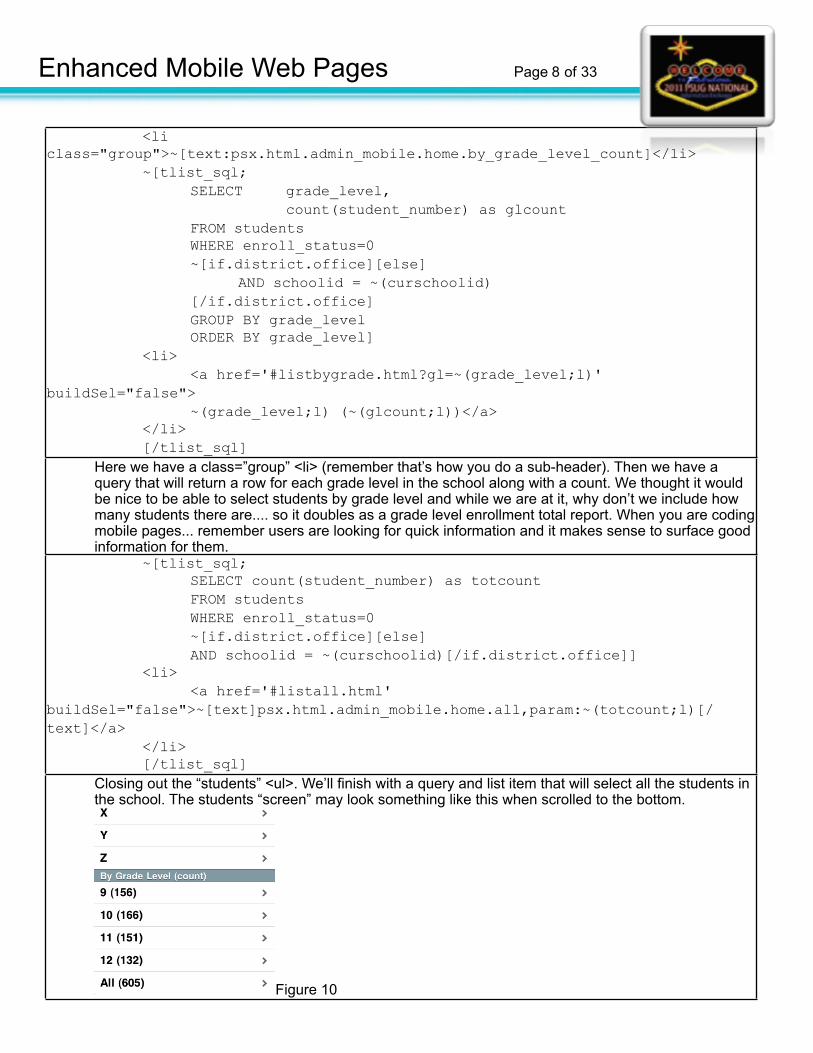
<li class="group">~[text:psx.html.admin_mobile.home.by_grade_level_count]</li> ~[tlist_sql; SELECT grade_level, count(student_number) as glcount FROM students WHERE enroll_status=0 ~[if.district.office][else] AND schoolid = ~(curschoolid) [/if.district.office] GROUP BY grade_level ORDER BY grade_level] <li> <a href='#listbygrade.html?gl=~(grade_level;l)' buildSel="false"> ~(grade_level;l) (~(glcount;l))</a> </li> [/tlist_sql]
Here we have a class=”group” <li> (remember that’s how you do a sub-header). Then we have a query that will return a row for each grade level in the school along with a count. We thought it would be nice to be able to select students by grade level and while we are at it, why don’t we include how many students there are.... so it doubles as a grade level enrollment total report. When you are coding mobile pages... remember users are looking for quick information and it makes sense to surface good information for them.
~[tlist_sql; SELECT count(student_number) as totcount FROM students WHERE enroll_status=0 ~[if.district.office][else] AND schoolid = ~(curschoolid)[/if.district.office]] <li> <a href='#listall.html' buildSel="false">~[text]psx.html.admin_mobile.home.all,param:~(totcount;l)[/text]</a> </li> [/tlist_sql] </ul>Closing out the “students” <ul>. We’ll finish with a query and list item that will select all the students in
the school. The students “screen” may look something like this when scrolled to the bottom.
Figure 10
Enhanced Mobile Web Pages Page 8 of 33
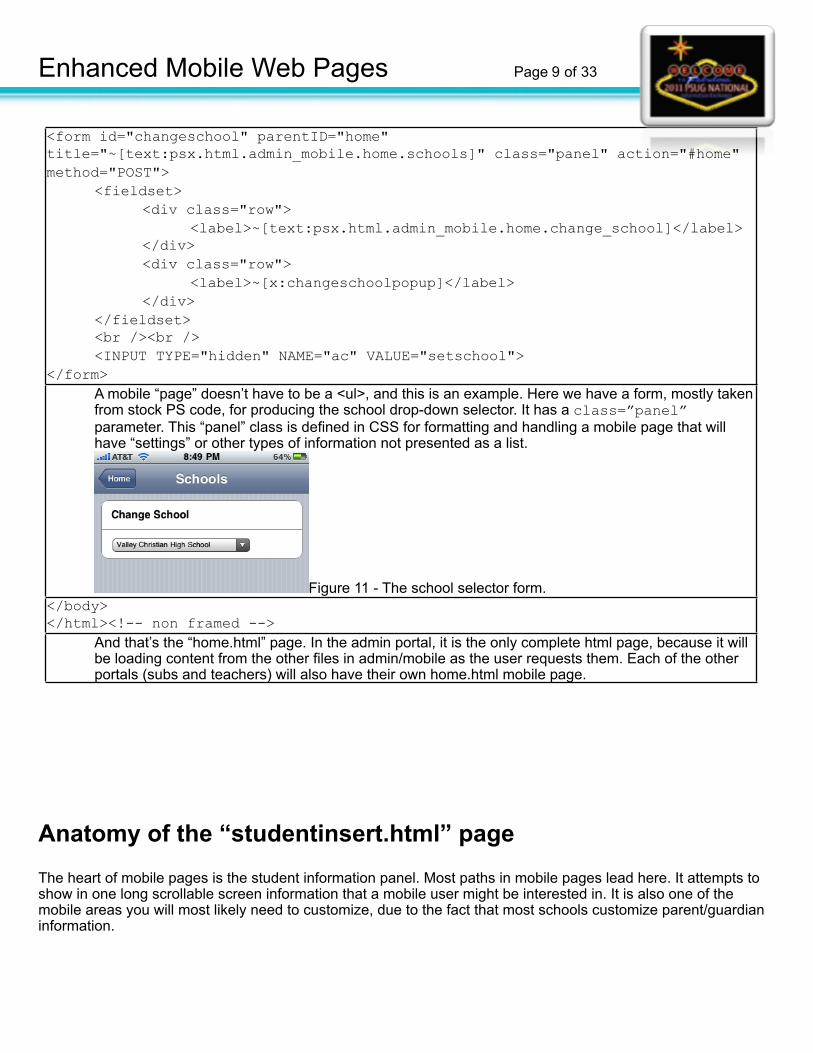
<form id="changeschool" parentID="home" title="~[text:psx.html.admin_mobile.home.schools]" class="panel" action="#home" method="POST"> <fieldset> <div class="row"> <label>~[text:psx.html.admin_mobile.home.change_school]</label> </div> <div class="row"> <label>~[x:changeschoolpopup]</label> </div> </fieldset> <br /><br /> <INPUT TYPE="hidden" NAME="ac" VALUE="setschool"></form>
A mobile “page” doesn’t have to be a <ul>, and this is an example. Here we have a form, mostly taken from stock PS code, for producing the school drop-down selector. It has a class=”panel” parameter. This “panel” class is defined in CSS for formatting and handling a mobile page that will have “settings” or other types of information not presented as a list.
Figure 11 - The school selector form.</body></html><!-- non framed -->
And that’s the “home.html” page. In the admin portal, it is the only complete html page, because it will be loading content from the other files in admin/mobile as the user requests them. Each of the other portals (subs and teachers) will also have their own home.html mobile page.
Anatomy of the “studentinsert.html” pageThe heart of mobile pages is the student information panel. Most paths in mobile pages lead here. It attempts to show in one long scrollable screen information that a mobile user might be interested in. It is also one of the mobile areas you will most likely need to customize, due to the fact that most schools customize parent/guardian information.
Enhanced Mobile Web Pages Page 9 of 33
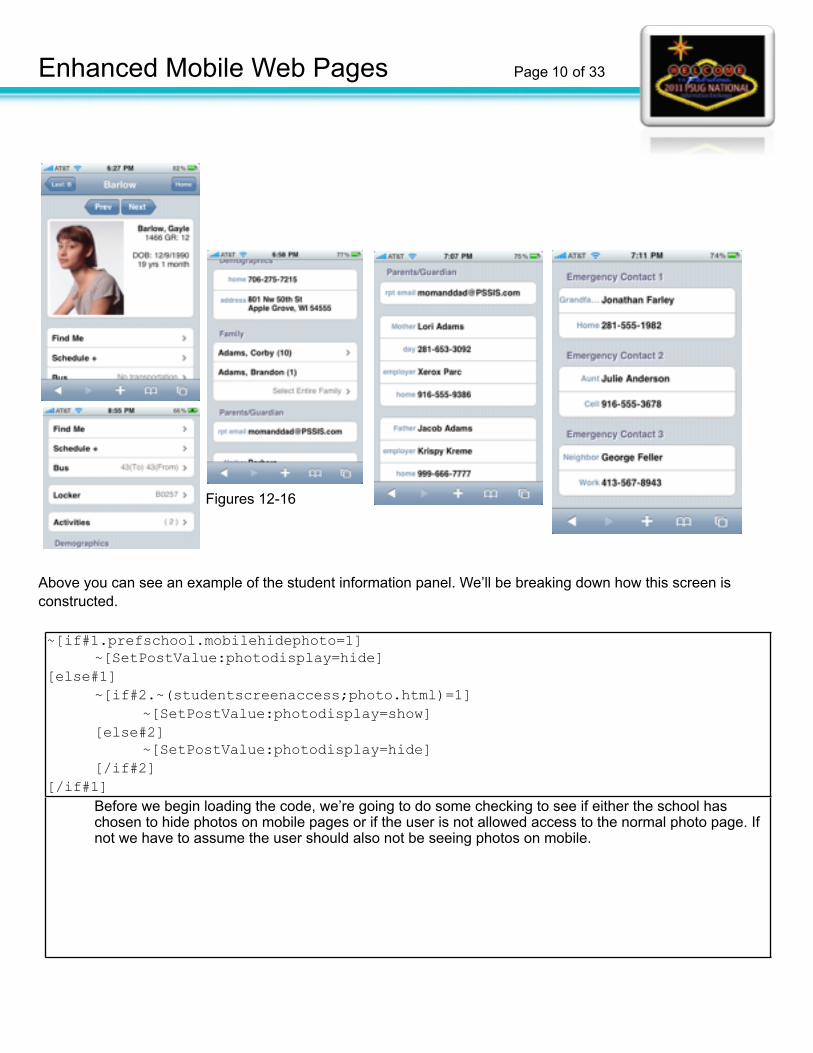
Figures 12-16
Above you can see an example of the student information panel. We’ll be breaking down how this screen is constructed.
~[if#1.prefschool.mobilehidephoto=1] ~[SetPostValue:photodisplay=hide][else#1] ~[if#2.~(studentscreenaccess;photo.html)=1] ~[SetPostValue:photodisplay=show] [else#2] ~[SetPostValue:photodisplay=hide] [/if#2][/if#1]
Before we begin loading the code, we’re going to do some checking to see if either the school has chosen to hide photos on mobile pages or if the user is not allowed access to the normal photo page. If not we have to assume the user should also not be seeing photos on mobile.
Enhanced Mobile Web Pages Page 10 of 33
<div id="~[gpv:divIdA]" parentID="~[gpv:parentID]" title="~(last_name)" class="panel" otherButtonLabel="~[text:psx.html.admin_mobile.studentinsert.home]" otherButtonHref="#home">
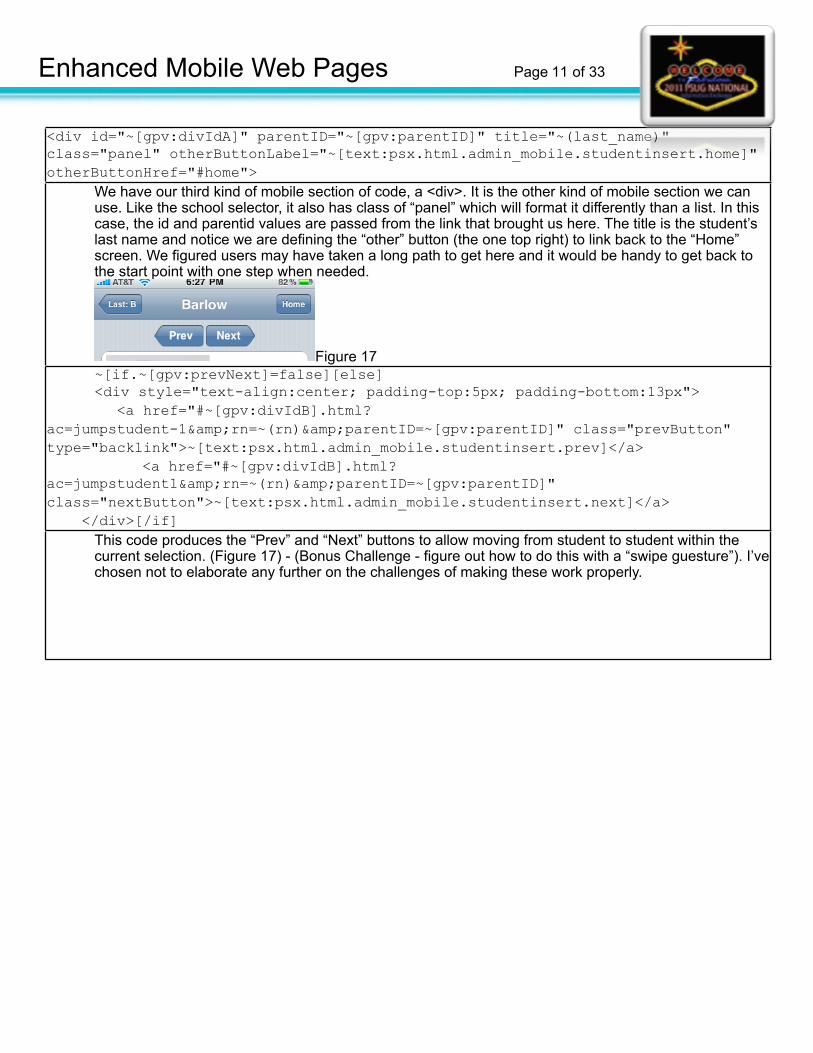
We have our third kind of mobile section of code, a <div>. It is the other kind of mobile section we can use. Like the school selector, it also has class of “panel” which will format it differently than a list. In this case, the id and parentid values are passed from the link that brought us here. The title is the student’s last name and notice we are defining the “other” button (the one top right) to link back to the “Home” screen. We figured users may have taken a long path to get here and it would be handy to get back to the start point with one step when needed.
Figure 17 ~[if.~[gpv:prevNext]=false][else] <div style="text-align:center; padding-top:5px; padding-bottom:13px"> <a href="#~[gpv:divIdB].html?ac=jumpstudent-1&rn=~(rn)&parentID=~[gpv:parentID]" class="prevButton" type="backlink">~[text:psx.html.admin_mobile.studentinsert.prev]</a> <a href="#~[gpv:divIdB].html?ac=jumpstudent1&rn=~(rn)&parentID=~[gpv:parentID]" class="nextButton">~[text:psx.html.admin_mobile.studentinsert.next]</a> </div>[/if]
This code produces the “Prev” and “Next” buttons to allow moving from student to student within the current selection. (Figure 17) - (Bonus Challenge - figure out how to do this with a “swipe guesture”). I’ve chosen not to elaborate any further on the challenges of making these work properly.
Enhanced Mobile Web Pages Page 11 of 33
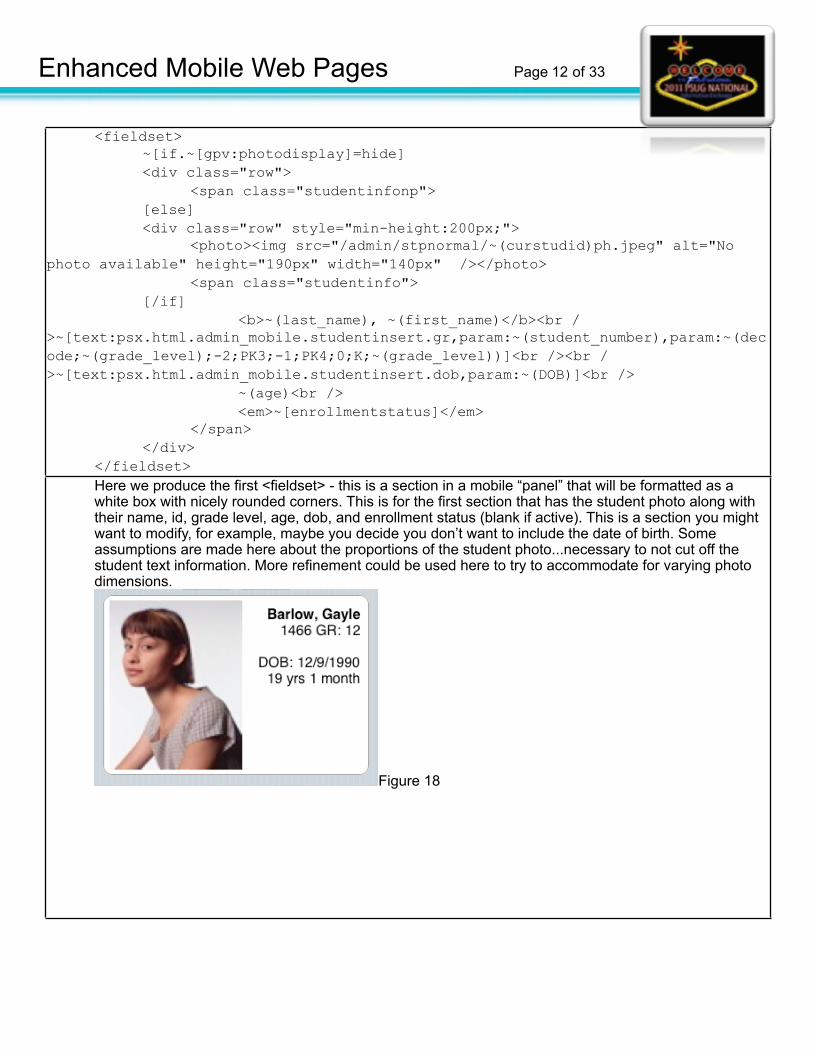
<fieldset> ~[if.~[gpv:photodisplay]=hide] <div class="row"> <span class="studentinfonp"> [else] <div class="row" style="min-height:200px;"> <photo><img src="/admin/stpnormal/~(curstudid)ph.jpeg" alt="No photo available" height="190px" width="140px" /></photo> <span class="studentinfo"> [/if] <b>~(last_name), ~(first_name)</b><br />~[text:psx.html.admin_mobile.studentinsert.gr,param:~(student_number),param:~(decode;~(grade_level);-2;PK3;-1;PK4;0;K;~(grade_level))]<br /><br />~[text:psx.html.admin_mobile.studentinsert.dob,param:~(DOB)]<br /> ~(age)<br /> <em>~[enrollmentstatus]</em> </span> </div> </fieldset>
Here we produce the first <fieldset> - this is a section in a mobile “panel” that will be formatted as a white box with nicely rounded corners. This is for the first section that has the student photo along with their name, id, grade level, age, dob, and enrollment status (blank if active). This is a section you might want to modify, for example, maybe you decide you don’t want to include the date of birth. Some assumptions are made here about the proportions of the student photo...necessary to not cut off the student text information. More refinement could be used here to try to accommodate for varying photo dimensions.
Figure 18
Enhanced Mobile Web Pages Page 12 of 33
<ul> <li><a href="#findmeiui.html?frn=~(studentfrn)">~[text:psx.html.admin_mobile.studentinsert.find_me]</a></li> <li><a href="#scheduleplus.html?frn=~(studentfrn)">~[text:psx.html.admin_mobile.studentinsert.schedule_]</a></li>
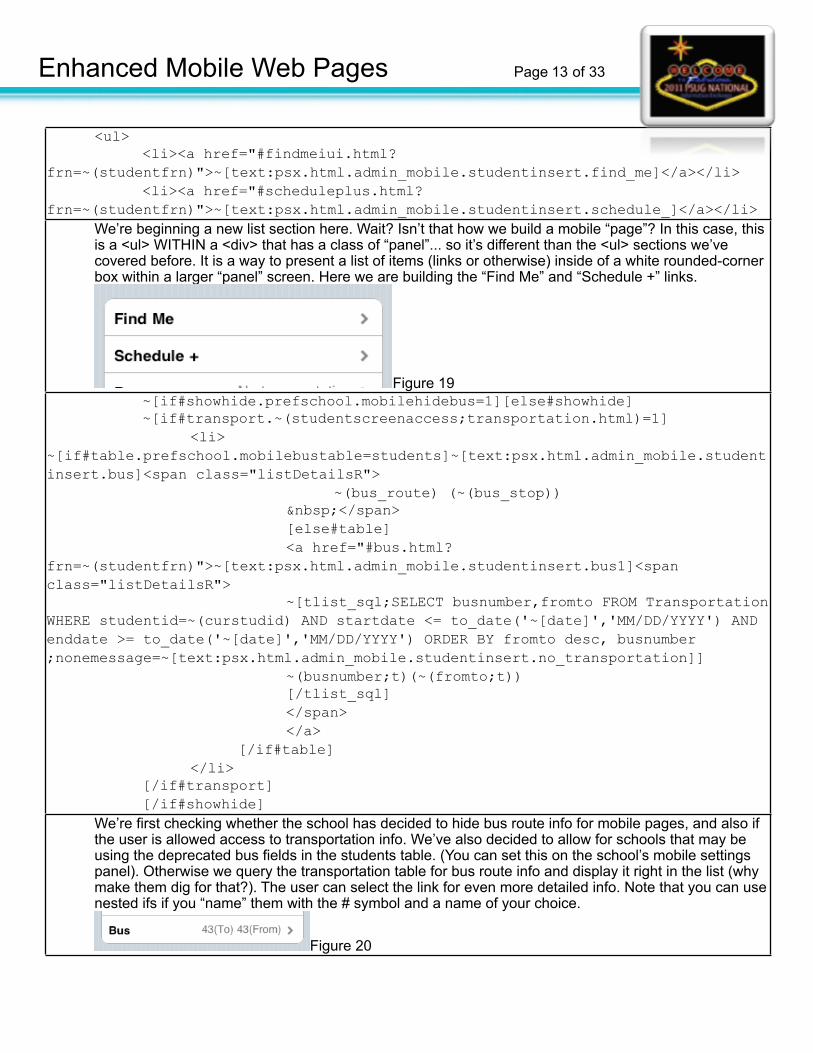
We’re beginning a new list section here. Wait? Isn’t that how we build a mobile “page”? In this case, this is a <ul> WITHIN a <div> that has a class of “panel”... so it’s different than the <ul> sections we’ve covered before. It is a way to present a list of items (links or otherwise) inside of a white rounded-corner box within a larger “panel” screen. Here we are building the “Find Me” and “Schedule +” links.
Figure 19 ~[if#showhide.prefschool.mobilehidebus=1][else#showhide] ~[if#transport.~(studentscreenaccess;transportation.html)=1] <li>~[if#table.prefschool.mobilebustable=students]~[text:psx.html.admin_mobile.studentinsert.bus]<span class="listDetailsR"> ~(bus_route) (~(bus_stop)) </span> [else#table] <a href="#bus.html?frn=~(studentfrn)">~[text:psx.html.admin_mobile.studentinsert.bus1]<span class="listDetailsR"> ~[tlist_sql;SELECT busnumber,fromto FROM Transportation WHERE studentid=~(curstudid) AND startdate <= to_date('~[date]','MM/DD/YYYY') AND enddate >= to_date('~[date]','MM/DD/YYYY') ORDER BY fromto desc, busnumber;nonemessage=~[text:psx.html.admin_mobile.studentinsert.no_transportation]] ~(busnumber;t)(~(fromto;t)) [/tlist_sql] </span> </a> [/if#table] </li> [/if#transport] [/if#showhide] </ul>We’re first checking whether the school has decided to hide bus route info for mobile pages, and also if
the user is allowed access to transportation info. We’ve also decided to allow for schools that may be using the deprecated bus fields in the students table. (You can set this on the school’s mobile settings panel). Otherwise we query the transportation table for bus route info and display it right in the list (why make them dig for that?). The user can select the link for even more detailed info. Note that you can use nested ifs if you “name” them with the # symbol and a name of your choice.
Figure 20
Enhanced Mobile Web Pages Page 13 of 33
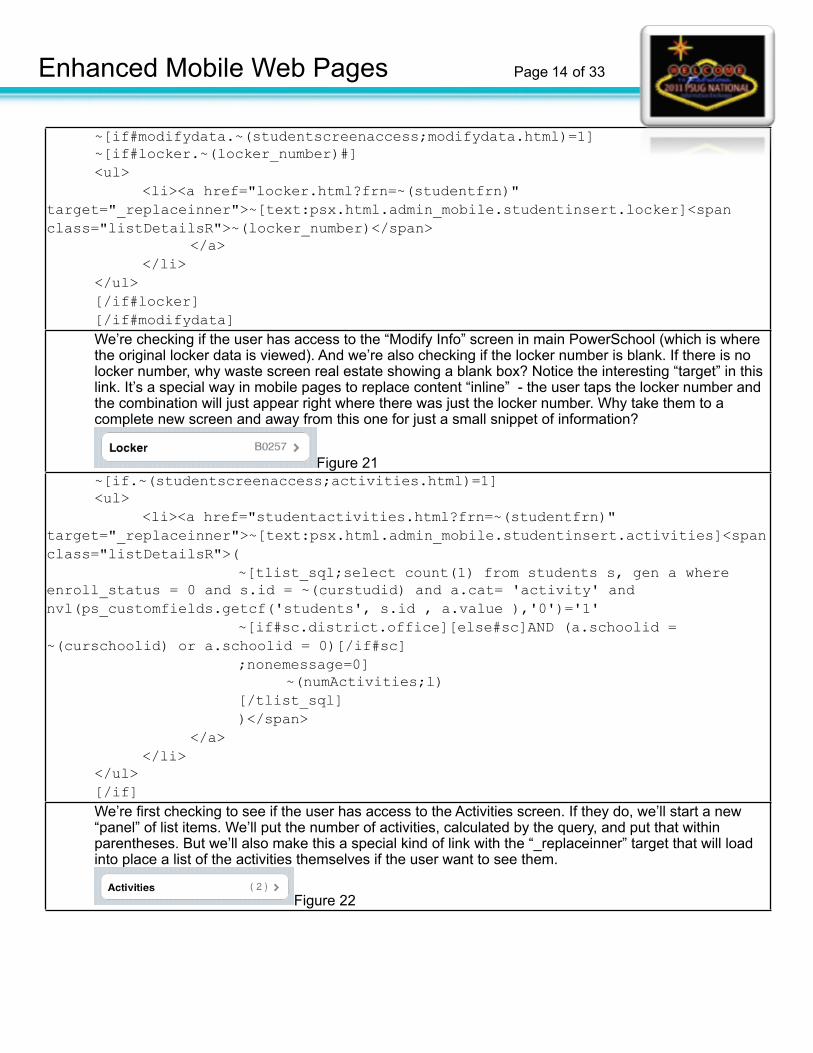
~[if#modifydata.~(studentscreenaccess;modifydata.html)=1] ~[if#locker.~(locker_number)#] <ul> <li><a href="locker.html?frn=~(studentfrn)" target="_replaceinner">~[text:psx.html.admin_mobile.studentinsert.locker]<span class="listDetailsR">~(locker_number)</span> </a> </li> </ul> [/if#locker] [/if#modifydata]
We’re checking if the user has access to the “Modify Info” screen in main PowerSchool (which is where the original locker data is viewed). And we’re also checking if the locker number is blank. If there is no locker number, why waste screen real estate showing a blank box? Notice the interesting “target” in this link. It’s a special way in mobile pages to replace content “inline” - the user taps the locker number and the combination will just appear right where there was just the locker number. Why take them to a complete new screen and away from this one for just a small snippet of information?
Figure 21 ~[if.~(studentscreenaccess;activities.html)=1] <ul> <li><a href="studentactivities.html?frn=~(studentfrn)" target="_replaceinner">~[text:psx.html.admin_mobile.studentinsert.activities]<span class="listDetailsR">( ~[tlist_sql;select count(1) from students s, gen a where enroll_status = 0 and s.id = ~(curstudid) and a.cat= 'activity' and nvl(ps_customfields.getcf('students', s.id , a.value ),'0')='1' ~[if#sc.district.office][else#sc]AND (a.schoolid = ~(curschoolid) or a.schoolid = 0)[/if#sc] ;nonemessage=0] ~(numActivities;l) [/tlist_sql] )</span> </a> </li> </ul> [/if]
We’re first checking to see if the user has access to the Activities screen. If they do, we’ll start a new “panel” of list items. We’ll put the number of activities, calculated by the query, and put that within parentheses. But we’ll also make this a special kind of link with the “_replaceinner” target that will load into place a list of the activities themselves if the user want to see them.
Figure 22
Enhanced Mobile Web Pages Page 14 of 33
~[if#1.~(studentscreenaccess;generaldemographics.html)=1] <h2>~[text:psx.html.admin_mobile.studentinsert.demographics]</h2> <fieldset> ~[if#2.~(guardianship)#] <div class="row"> <span class="clabel">~[text:psx.html.admin_mobile.studentinsert.guardian]</span> <span class="cinfo">~(guardianship)</span> </div> [/if#2]
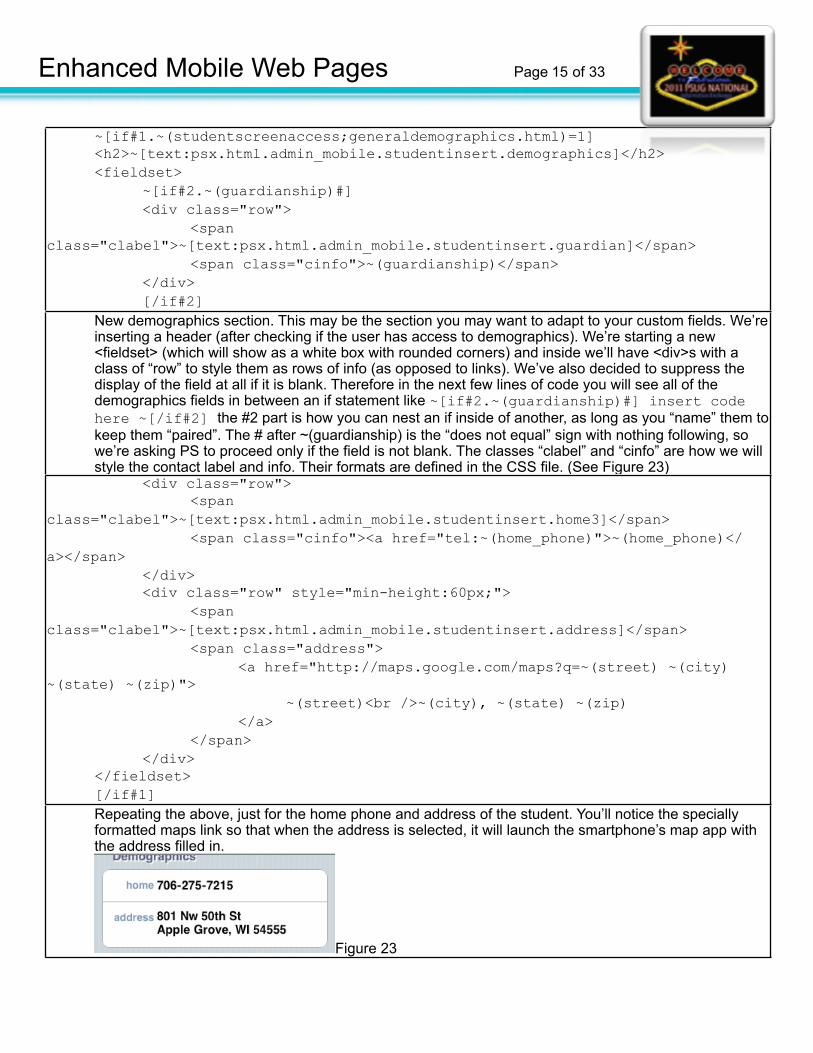
New demographics section. This may be the section you may want to adapt to your custom fields. We’re inserting a header (after checking if the user has access to demographics). We’re starting a new <fieldset> (which will show as a white box with rounded corners) and inside we’ll have <div>s with a class of “row” to style them as rows of info (as opposed to links). We’ve also decided to suppress the display of the field at all if it is blank. Therefore in the next few lines of code you will see all of the demographics fields in between an if statement like ~[if#2.~(guardianship)#] insert code here ~[/if#2] the #2 part is how you can nest an if inside of another, as long as you “name” them to keep them “paired”. The # after ~(guardianship) is the “does not equal” sign with nothing following, so we’re asking PS to proceed only if the field is not blank. The classes “clabel” and “cinfo” are how we will style the contact label and info. Their formats are defined in the CSS file. (See Figure 23)
<div class="row"> <span class="clabel">~[text:psx.html.admin_mobile.studentinsert.home3]</span> <span class="cinfo"><a href="tel:~(home_phone)">~(home_phone)</a></span> </div> <div class="row" style="min-height:60px;"> <span class="clabel">~[text:psx.html.admin_mobile.studentinsert.address]</span> <span class="address"> <a href="http://maps.google.com/maps?q=~(street) ~(city) ~(state) ~(zip)"> ~(street)<br />~(city), ~(state) ~(zip) </a> </span> </div> </fieldset> [/if#1]
Repeating the above, just for the home phone and address of the student. You’ll notice the specially formatted maps link so that when the address is selected, it will launch the smartphone’s map app with the address filled in.
Figure 23
Enhanced Mobile Web Pages Page 15 of 33
~[if#family.~(studentscreenaccess;family.html)=1] <h2>~[text:psx.html.admin_mobile.studentinsert.family]</h2> <ul> ~[tlist_sql;SELECT ~[if#district.district.office] ('enable') allowaccess, [else#district] CASE instr((SELECT (','||replace(dbms_lob.substr(canchangeschool,dbms_lob.getlength(canchangeschool),1),CHR(59),',')||',') FROM Teachers WHERE id = ~[x:userid]),(','||s.schoolid||',')) WHEN 0 THEN 'disabled' ELSE 'enabled' END allowaccess, [/if#district] s.dcid, s.last_name, s.first_name, CASE s.grade_level WHEN -2 THEN 'PK3' WHEN -1 THEN 'PK4' WHEN 0 THEN 'K' WHEN 99 THEN 'GR' ELSE TO_CHAR(s.grade_level) END grade, CASE s.enroll_status WHEN 0 THEN ' ' WHEN -1 THEN 'Pre-reg' WHEN 2 THEN 'Transferred' WHEN 3 THEN 'Grad ' || TO_CHAR(s.sched_yearofgraduation) ELSE 'Other' END status FROM relationship rel INNER JOIN students s ON s.person_id = rel.person_id WHERE rel.relatedperson_id = ~(person_id) ORDER BY s.grade_level desc;;nonemessage=<li><em>~[text:psx.html.admin_mobile.studentinsert.no_other_students_linked]</em></li>] <li>~[if#pn.~[gpv:prevNext]=false][else#pn]<a name="~(allowaccess;t)" href="#~[gpv:divIdB].html?frn=001~(dcid)&prevNext=false&parentID=~[gpv:divIdA]">[/if#pn] ~(last_name;t), ~(first_name;t) (~(grade;t)) <em>~(status;t)</em>~[if#pn.~[gpv:prevNext]=false][else#pn]</a>[/if#pn]</li> [/tlist_sql] <li> <a href="#familylist.html?personID=~(person_id)&studentDCID=~(rn)" buildSel="false"> <span class="listDetailsR">~[text:psx.html.admin_mobile.studentinsert.select_entire_family]</span> </a> </li> </ul>
Enhanced Mobile Web Pages Page 16 of 33
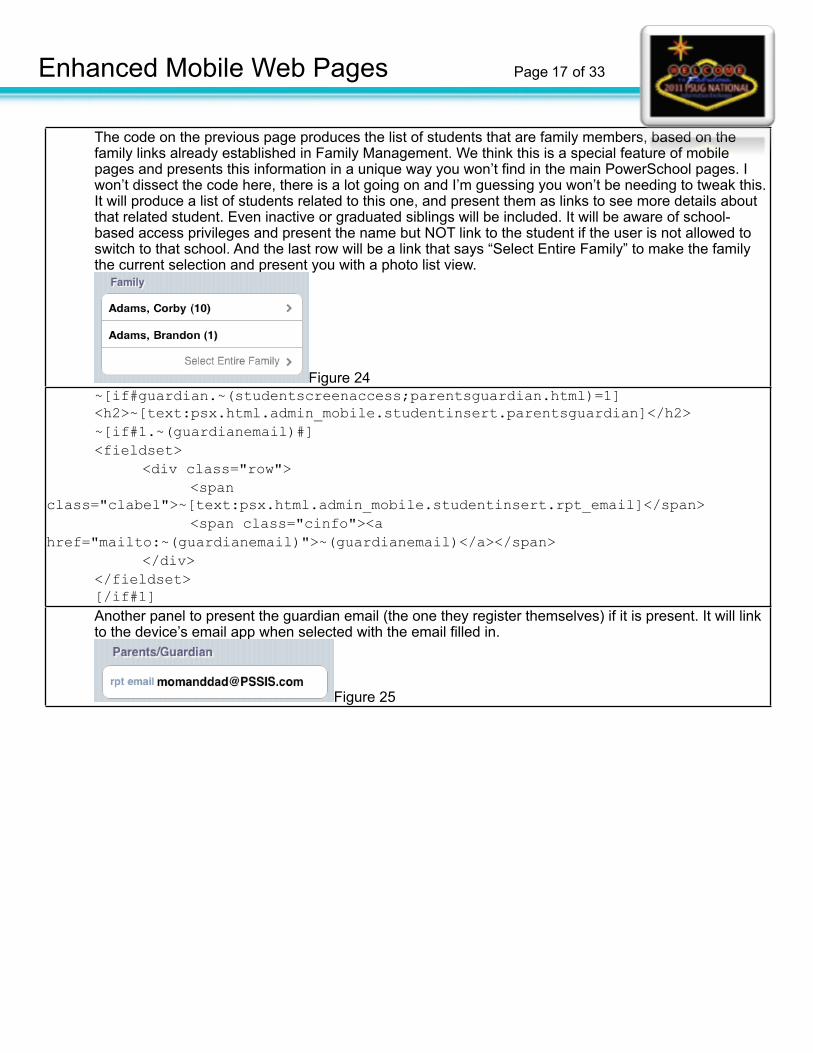
The code on the previous page produces the list of students that are family members, based on the family links already established in Family Management. We think this is a special feature of mobile pages and presents this information in a unique way you won’t find in the main PowerSchool pages. I won’t dissect the code here, there is a lot going on and I’m guessing you won’t be needing to tweak this. It will produce a list of students related to this one, and present them as links to see more details about that related student. Even inactive or graduated siblings will be included. It will be aware of school-based access privileges and present the name but NOT link to the student if the user is not allowed to switch to that school. And the last row will be a link that says “Select Entire Family” to make the family the current selection and present you with a photo list view.
Figure 24 ~[if#guardian.~(studentscreenaccess;parentsguardian.html)=1] <h2>~[text:psx.html.admin_mobile.studentinsert.parentsguardian]</h2> ~[if#1.~(guardianemail)#] <fieldset> <div class="row"> <span class="clabel">~[text:psx.html.admin_mobile.studentinsert.rpt_email]</span> <span class="cinfo"><a href="mailto:~(guardianemail)">~(guardianemail)</a></span> </div> </fieldset> [/if#1]
Another panel to present the guardian email (the one they register themselves) if it is present. It will link to the device’s email app when selected with the email filled in.
Figure 25
Enhanced Mobile Web Pages Page 17 of 33
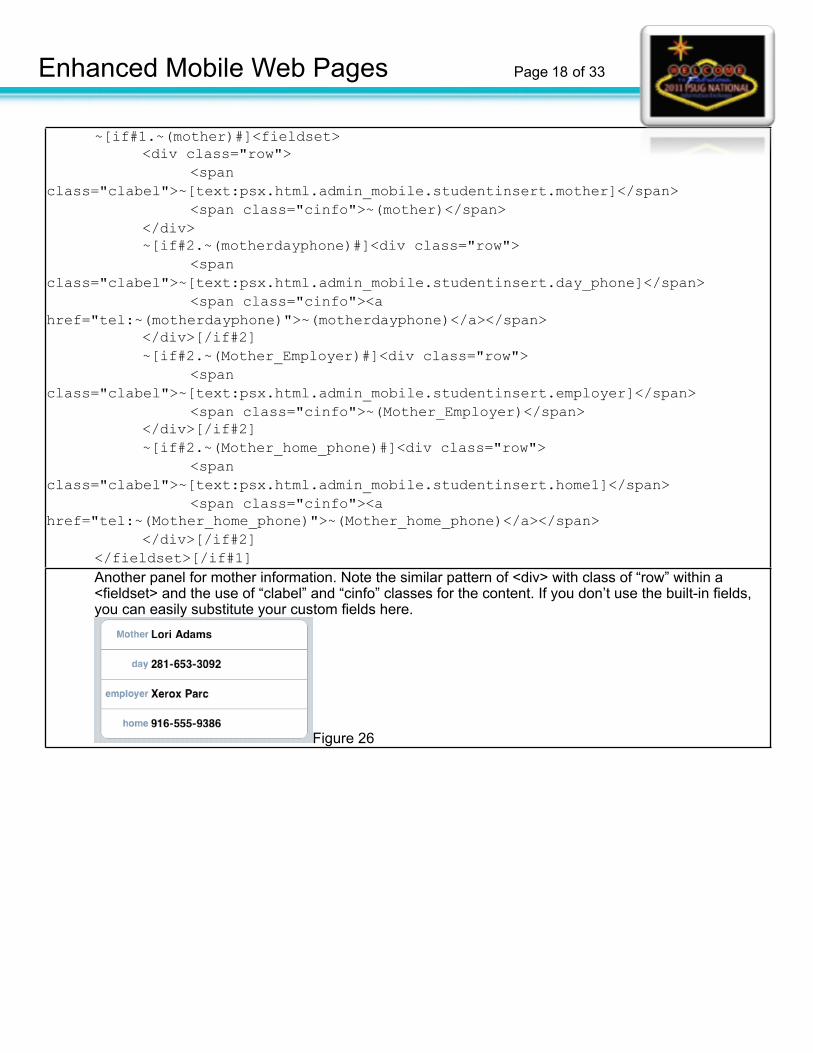
~[if#1.~(mother)#]<fieldset> <div class="row"> <span class="clabel">~[text:psx.html.admin_mobile.studentinsert.mother]</span> <span class="cinfo">~(mother)</span> </div> ~[if#2.~(motherdayphone)#]<div class="row"> <span class="clabel">~[text:psx.html.admin_mobile.studentinsert.day_phone]</span> <span class="cinfo"><a href="tel:~(motherdayphone)">~(motherdayphone)</a></span> </div>[/if#2] ~[if#2.~(Mother_Employer)#]<div class="row"> <span class="clabel">~[text:psx.html.admin_mobile.studentinsert.employer]</span> <span class="cinfo">~(Mother_Employer)</span> </div>[/if#2] ~[if#2.~(Mother_home_phone)#]<div class="row"> <span class="clabel">~[text:psx.html.admin_mobile.studentinsert.home1]</span> <span class="cinfo"><a href="tel:~(Mother_home_phone)">~(Mother_home_phone)</a></span> </div>[/if#2] </fieldset>[/if#1]
Another panel for mother information. Note the similar pattern of <div> with class of “row” within a <fieldset> and the use of “clabel” and “cinfo” classes for the content. If you don’t use the built-in fields, you can easily substitute your custom fields here.
Figure 26
Enhanced Mobile Web Pages Page 18 of 33
~[if#1.~(father)#]<fieldset> <div class="row"> <span class="clabel">~[text:psx.html.admin_mobile.studentinsert.father]</span> <span class="cinfo">~(father)</span> </div> ~[if#2.~(fatherdayphone)#]<div class="row"> <span class="clabel">~[text:psx.html.admin_mobile.studentinsert.day]</span> <span class="cinfo"><a href="tel:~(fatherdayphone)">~(fatherdayphone)</a></span> </div>[/if#2] ~[if#2.~(Father_Employer)#]<div class="row"> <span class="clabel">~[text:psx.html.admin_mobile.studentinsert.employer1]</span> <span class="cinfo">~(Father_Employer)</span> </div>[/if#2] ~[if#2.~(Father_home_phone)#]<div class="row"> <span class="clabel">~[text:psx.html.admin_mobile.studentinsert.home2]</span> <span class="cinfo"><a href="tel:~(Father_home_phone)">~(Father_home_phone)</a></span> </div>[/if#2] </fieldset>[/if#1] [/if#guardian]
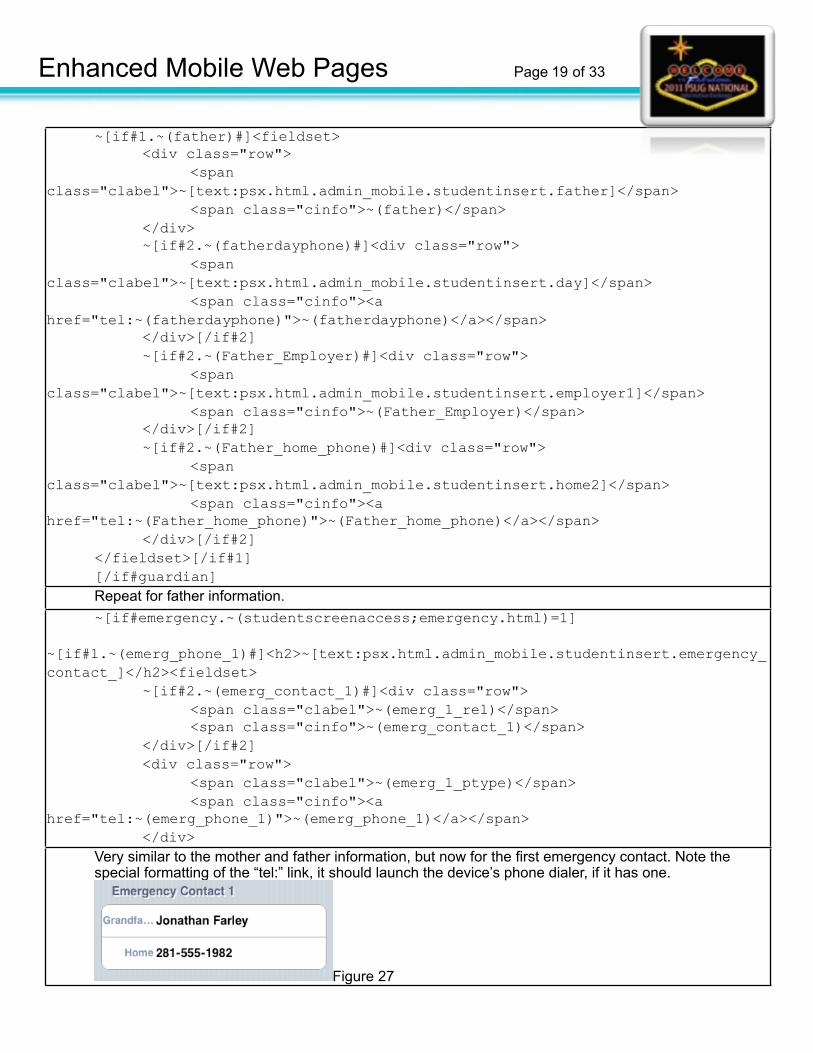
Repeat for father information. ~[if#emergency.~(studentscreenaccess;emergency.html)=1] ~[if#1.~(emerg_phone_1)#]<h2>~[text:psx.html.admin_mobile.studentinsert.emergency_contact_]</h2><fieldset> ~[if#2.~(emerg_contact_1)#]<div class="row"> <span class="clabel">~(emerg_1_rel)</span> <span class="cinfo">~(emerg_contact_1)</span> </div>[/if#2] <div class="row"> <span class="clabel">~(emerg_1_ptype)</span> <span class="cinfo"><a href="tel:~(emerg_phone_1)">~(emerg_phone_1)</a></span> </div> </fieldset>[/if#1]Very similar to the mother and father information, but now for the first emergency contact. Note the
special formatting of the “tel:” link, it should launch the device’s phone dialer, if it has one.
Figure 27
Enhanced Mobile Web Pages Page 19 of 33
~[if#1.~(emerg_phone_2)#]<h2>~[text:psx.html.admin_mobile.studentinsert.emergency_contact_1]</h2><fieldset> ~[if#2.~(emerg_contact_2)#]<div class="row"> <span class="clabel">~(emerg_2_rel)</span> <span class="cinfo">~(emerg_contact_2)</span> </div>[/if#2] <div class="row"> <span class="clabel">~(emerg_2_ptype)</span> <span class="cinfo"><a href="tel:~(emerg_phone_2)">~(emerg_phone_2)</a></span> </div> </fieldset>[/if#1]
~[if#1.~(emerg_3_phone)#]<h2>~[text:psx.html.admin_mobile.studentinsert.emergency_contact_2]</h2><fieldset> ~[if#2.~(emerg_contact_2)#]<div class="row"> <span class="clabel">~(emerg_3_rel)</span> <span class="cinfo">~(emerg_contact_3)</span> </div>[/if#2] <div class="row"> <span class="clabel">~(emerg_3_ptype)</span> <span class="cinfo"><a href="tel:~(emerg_3_phone)">~(emerg_3_phone)</a></span> </div> </fieldset>[/if#1] [/if#emergency]
Repeat for Emergency Contacts 2 and 3. And we’re done! Since this was an externally loaded section of content called by the main mobile “home.html” page, we don’t need to add all the closing html.
There are many more mobile pages that we haven’t discussed, but hopefully the breakdown of the two pages above help understand the inner workings of mobile pages.
In the rest of the document we’ll discuss additional enhancements that we can add and some fixes to known issues. Hopefully these will provide a template of sorts for you to imagine whole new ways to present information for mobile users.
Enhancement #1 - Student/Guardian Mobile Pages
There are a set of mobile pages written for students and guardians available as a customization. In this section we will cover their functionality, but not go into depth as to how they work. All the enhancements and patches discussed in this document and the complete set of student pages are available for download at www.powerdatasolutions.org/mobile
Enhanced Mobile Web Pages Page 20 of 33
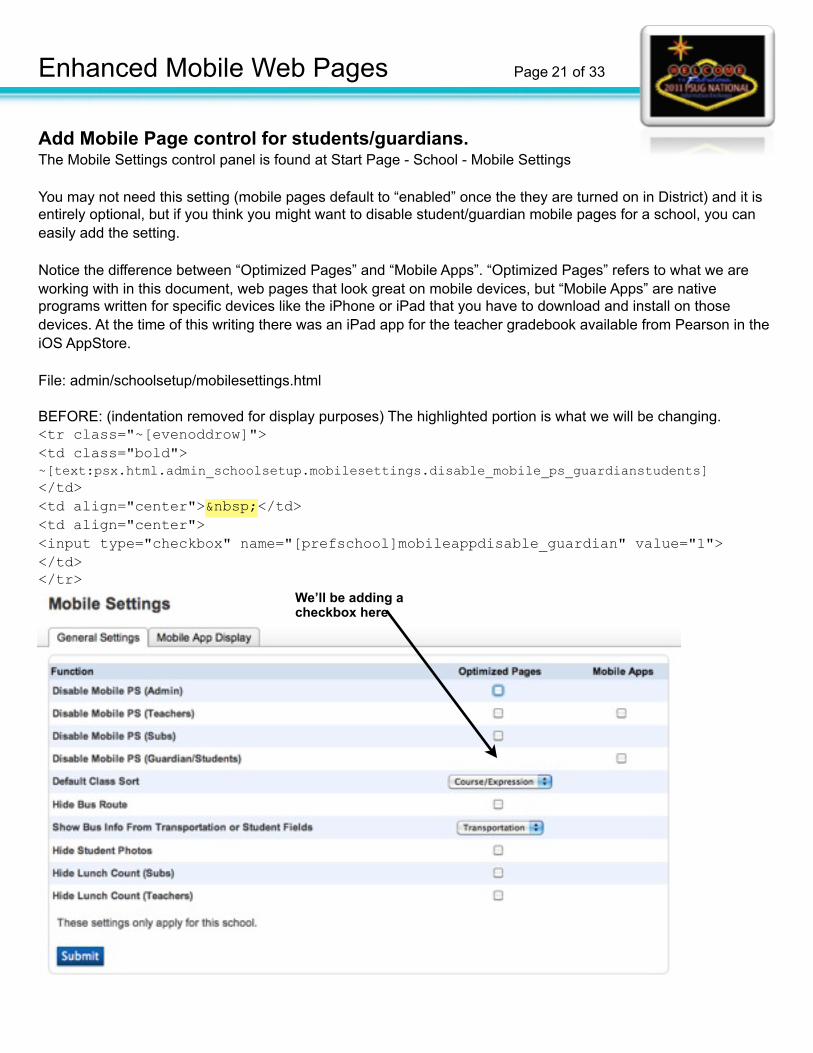
Add Mobile Page control for students/guardians.The Mobile Settings control panel is found at Start Page - School - Mobile Settings
You may not need this setting (mobile pages default to “enabled” once the they are turned on in District) and it is entirely optional, but if you think you might want to disable student/guardian mobile pages for a school, you can easily add the setting.
Notice the difference between “Optimized Pages” and “Mobile Apps”. “Optimized Pages” refers to what we are working with in this document, web pages that look great on mobile devices, but “Mobile Apps” are native programs written for specific devices like the iPhone or iPad that you have to download and install on those devices. At the time of this writing there was an iPad app for the teacher gradebook available from Pearson in the iOS AppStore.
File: admin/schoolsetup/mobilesettings.html
BEFORE: (indentation removed for display purposes) The highlighted portion is what we will be changing.<tr class="~[evenoddrow]"><td class="bold">~[text:psx.html.admin_schoolsetup.mobilesettings.disable_mobile_ps_guardianstudents]</td><td align="center"> </td><td align="center"><input type="checkbox" name="[prefschool]mobileappdisable_guardian" value="1"></td></tr>
We’ll be adding a checkbox here
Enhanced Mobile Web Pages Page 21 of 33
AFTER: (Changes highlighted)<tr class="~[evenoddrow]"><td class="bold">~[text:psx.html.admin_schoolsetup.mobilesettings.disable_mobile_ps_guardianstudents]</td><td align="center"><input type="checkbox" name="[prefschool]mobiledisable_guardian" value="1"></td><td align="center"><input type="checkbox" name="[prefschool]mobileappdisable_guardian" value="1"></td></tr>
FILE: guardian/home.html
We need to add some code toward the top of the student/guardian main home page that will be doing some automatic checking to see if the user is on a mobile device that is supported and if so, automatically redirect them to the mobile version of the pages. So toward the top, AFTER the <title>...</title> line and BEFORE the ~[wc:guardian_header_yui] line, add the following 7 lines of code:
~[if#mdistrict.pref.mobilepages_enable=1]<script language="JavaScript">var pref=1;</script>~[if#mschool.prefschool.mobiledisable_guardian=1][else#mschool]<script language="JavaScript" src="/scripts/mobile/detectMobileWebkit.js"></script>[/if#mschool]
FOLDER: guardian/mobile/(9 files)
It’s beyond the scope of this document to detail all the code in the student/guardian mobile pages. You can download them from www.powerdatasolutions.org/mobile and simply add them to the server and you’re set.
The next few pages describe the functionality of the student and guardian mobile pages.
Enhanced Mobile Web Pages Page 22 of 33
Enhanced Mobile Web Pages Page 23 of 33
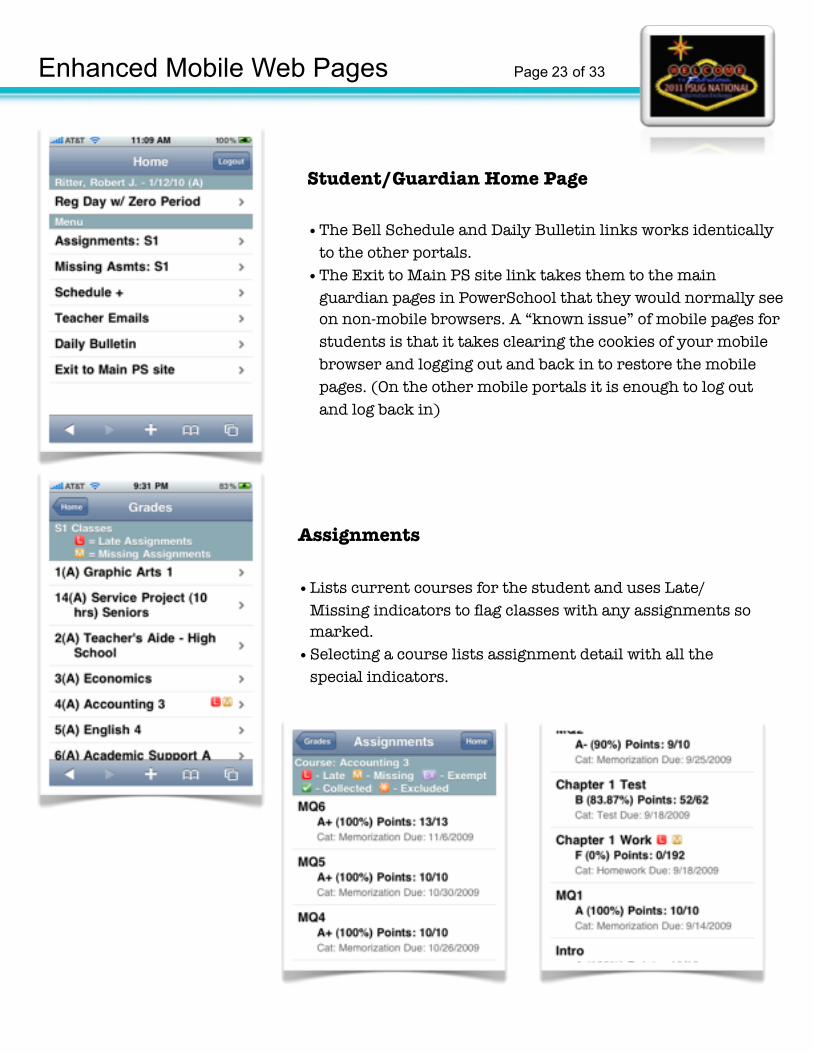
Student/Guardian Home Page
•The Bell Schedule and Daily Bulletin links works identically to the other portals.
•The Exit to Main PS site link takes them to the main guardian pages in PowerSchool that they would normally see on non-mobile browsers. A “known issue” of mobile pages for students is that it takes clearing the cookies of your mobile browser and logging out and back in to restore the mobile pages. (On the other mobile portals it is enough to log out and log back in)
Assignments
•Lists current courses for the student and uses Late/Missing indicators to flag classes with any assignments so marked.
•Selecting a course lists assignment detail with all the special indicators.
Enhanced Mobile Web Pages Page 24 of 33
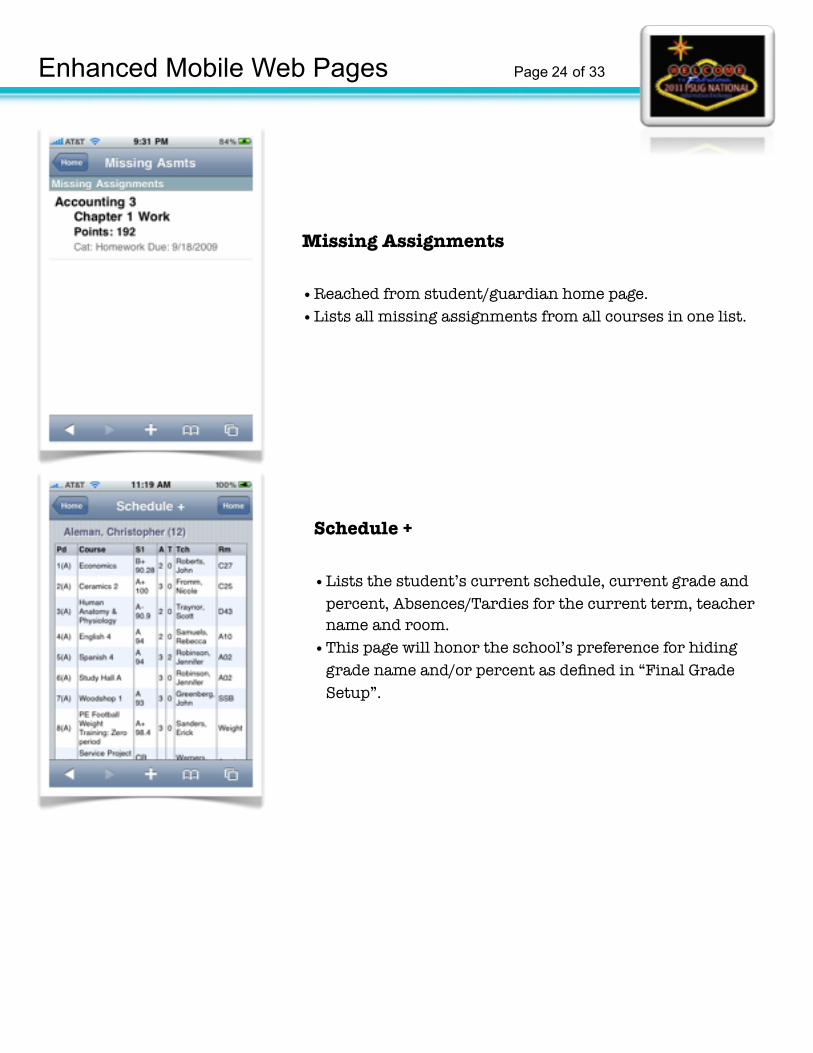
Missing Assignments
•Reached from student/guardian home page.•Lists all missing assignments from all courses in one list.
Schedule +
•Lists the student’s current schedule, current grade and percent, Absences/Tardies for the current term, teacher name and room.
•This page will honor the school’s preference for hiding grade name and/or percent as defined in “Final Grade Setup”.
Enhanced Mobile Web Pages Page 25 of 33
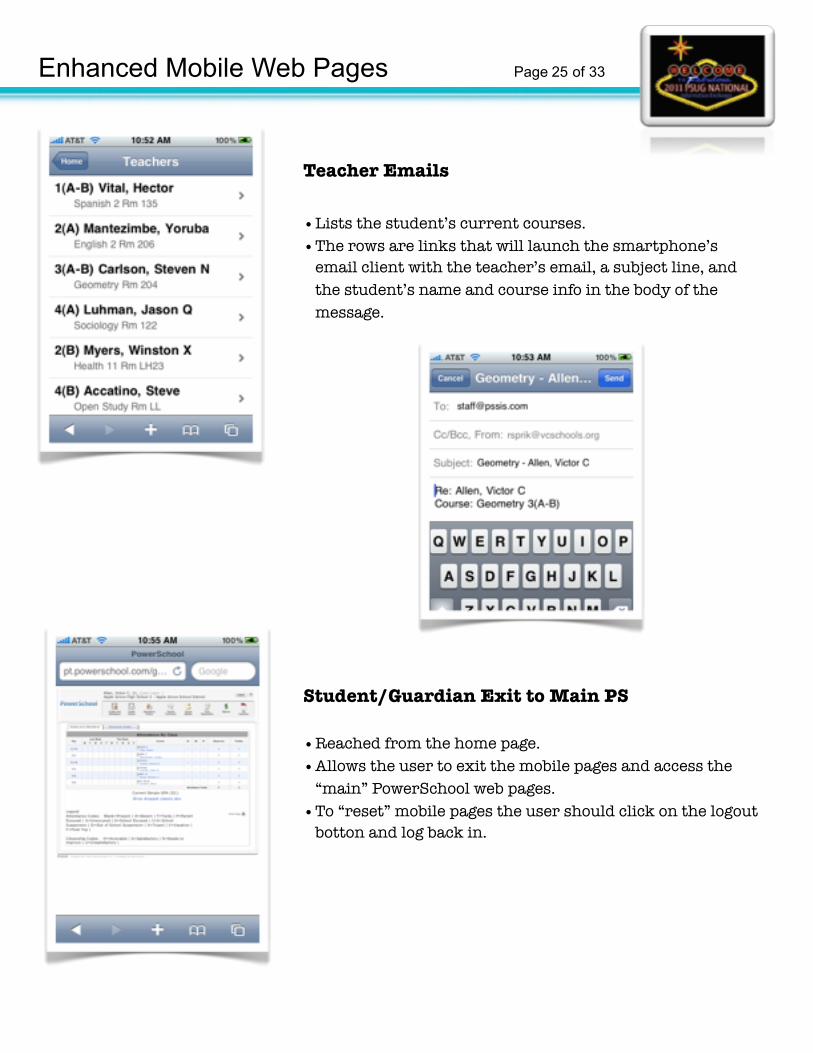
Teacher Emails
•Lists the student’s current courses.•The rows are links that will launch the smartphone’s
email client with the teacher’s email, a subject line, and the student’s name and course info in the body of the message.
Student/Guardian Exit to Main PS
•Reached from the home page.•Allows the user to exit the mobile pages and access the
“main” PowerSchool web pages.•To “reset” mobile pages the user should click on the logout
botton and log back in.
Enhancement #2 - Add “Last Login” to admin and teachersShowing the user the last time they logged in can be a security enhancement. If the user notes that the last time logged in is not a time they logged in, it can be a flag that someone has gained access to their username and password.
FILE: admin/mobile/home.html
Find the following line of code on or near line 44: <li class="group">~[x:username] - ~[eaodate;dayabbr]</li>
Change it to: (changes highlighted) <li class="group">~[x:username] - ~[eaodate;dayabbr]<br /> <font style="font-size:11px;">(Last Login: ~[x:lastlogin])</font></li>
Before After
FILE: teachers/mobile/home.htmlThe same enhancement can be added to the teachers’ mobile home page.
Enhancement #3 - Stored Searches and SelectionsMobile pages can have a wide variety of usefulness, and it would be impossible to imagine and code for all of them. On the main PS home page there are two useful features, Stored Searches and Stored Selections where admins can save a search or a custom selection of students for others to use. We are going to extend the existing usefulness of stored searches and selections and include them on mobile pages. That way mobile users can access searches and lists that can be created on an ad-hoc basis.
Home screen with Stored Searches and Stored Selections
Enhanced Mobile Web Pages Page 26 of 33
FILE: admin/mobile/home.htmlLook for the following lines of code. On the stock page they are at about line 70.
<li><a href="#bulletin.html">~[text:psx.html.admin_mobile.home.daily_bulletin]</a></li><li><a href="/admin/home.html?mobileHome=main" target="_self" id="exitlink">~[text:psx.html.admin_mobile.home.exit_to_main_ps_site]</a>
We are going to insert the following code highlighted in yellow:
<li><a href="#bulletin.html">~[text:psx.html.admin_mobile.home.daily_bulletin]</a></li><li><a href="#storedsearch">Stored Search</a></li><li><a href="#storedselections">Stored Selections</a></li><li><a href="/admin/home.html?mobileHome=main" target="_self" id="exitlink">~[text:psx.html.admin_mobile.home.exit_to_main_ps_site]</a>
Review: Remember that a link in mobile pages that begins with a # and with no “.html” at the end is a link to another section of code on this same page. When selected, the mobile framework will “hide” the home screen and “show” the new section, using sliding animations to make it look like we are moving from page to page.
So a little later on the same page, we’re going to add these two sections.
Look for the line that reads:
<form id="changeschool" parentID="home" title="~[text:psx.html.admin_mobile.home.schools]" class="panel" action="#home" method="POST">
We are going to insert the following code immediately BEFORE the <form..> tag above:(line breaks vary from included files for readability)
<ul id="storedsearch" parentID="home" title="Stored Search">~[tlist_sql;select Gen.Name from Gen where Gen.Cat = 'storedsearch' order by Name asc;nonemessage=<li>No Stored Searches</li>]<li><a href='#curselection.html?ac=dbquery&parentid=storedsearch&stored_query=~(Gen.Name;t)'>~(Gen.Name;t)</a></li>[/tlist_sql]</ul>
Enhanced Mobile Web Pages Page 27 of 33
<ul id="storedselections" parentID="home" title="Stored Selection">~[tlist_sql; select Name, NOfRecs, CASE WHEN UserID=-1 THEN ' - P' ELSE '' END P from selections where schoolid=~(curschoolid) and (userid=~[x:userid] or userid=-1) order by Name asc; nonemessage=<li>No Stored Selections</li>]<li><a href='#curselection.html?ac=dbselection&parentid=storedselections&stored_selection=~(name)'>~(name) (~(nofrecs))~(p)</a></li>[/tlist_sql]</ul>
Note that both <ul> sections will produce a list of links to a “curselection.html” file. This file is included with the mobile set of pages referenced earlier in this handout.
Enhancement #4 - Modify Parent/Guardian data if your school uses custom fieldsIf your school, like many, implemented custom fields to capture more parent/guardian data, then you will be very interested in modifying the student information screen to reflect your setup.
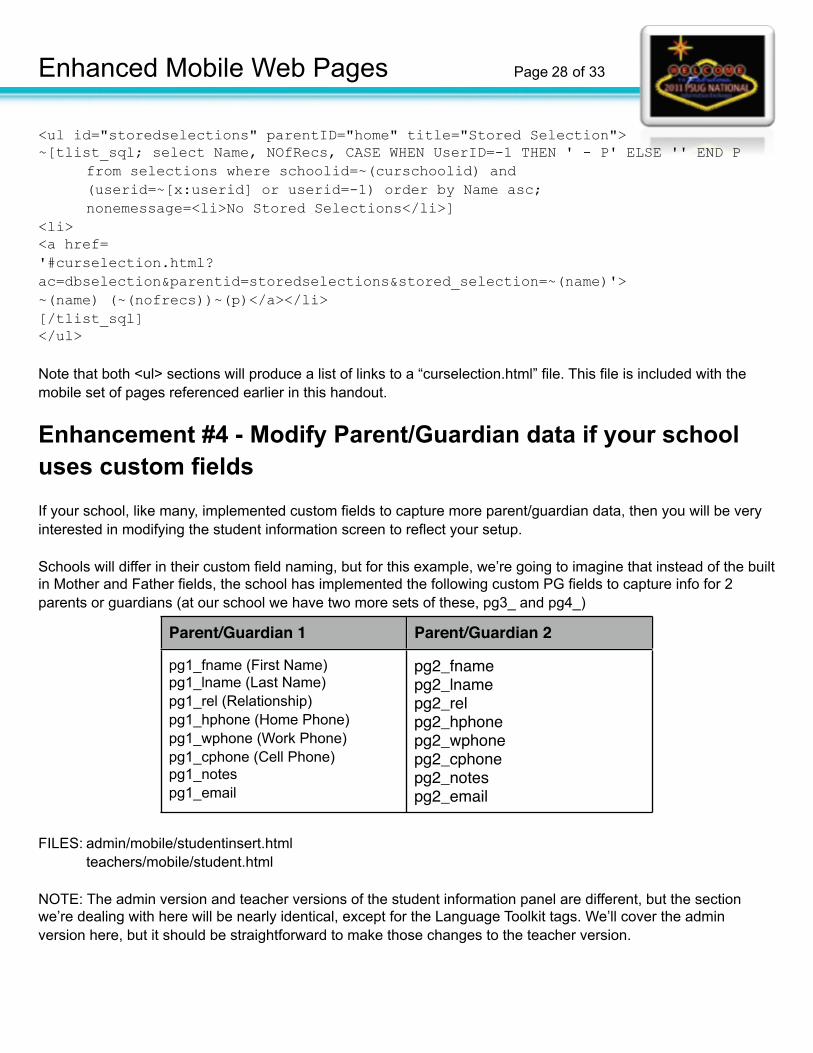
Schools will differ in their custom field naming, but for this example, we’re going to imagine that instead of the built in Mother and Father fields, the school has implemented the following custom PG fields to capture info for 2 parents or guardians (at our school we have two more sets of these, pg3_ and pg4_)
Parent/Guardian 1 Parent/Guardian 2
pg1_fname (First Name)pg1_lname (Last Name)pg1_rel (Relationship)pg1_hphone (Home Phone)pg1_wphone (Work Phone)pg1_cphone (Cell Phone)pg1_notespg1_email
pg2_fnamepg2_lnamepg2_relpg2_hphonepg2_wphonepg2_cphonepg2_notespg2_email
FILES: admin/mobile/studentinsert.html teachers/mobile/student.html
NOTE: The admin version and teacher versions of the student information panel are different, but the section we’re dealing with here will be nearly identical, except for the Language Toolkit tags. We’ll cover the admin version here, but it should be straightforward to make those changes to the teacher version.
Enhanced Mobile Web Pages Page 28 of 33
The following code appears in admin/mobile/studentinsert.html to display Mother information. Note the use of “ifs” to hide the display of any type of container if there is no data to display. “~[if#1.~(mother)#]” begins the if statement. It is given a number (#1) because there will be a nested if inside and must be paired with a closing if tag with the same number. If you look for the closing ~[/if#1] you’ll see that this entire block of code is set to be ignored if there is no data in the “mother” field. The # symbol indicates “not equal to” and nothing follows it, therefore we are instructing PS to only display the info if “mother is not blank”. You’ll notice that the nested ifs all have #2 assigned to them, this is because once you close an if statement, it’s “label” can be reused.
~[if#1.~(mother)#]<fieldset> <div class="row"> <span class="clabel">~[text]psx.html.teachers_mobile.student.mother[/text]</span> <span class="cinfo">~(mother)</span> </div> ~[if#2.~(motherdayphone)#]<div class="row"> <span class="clabel">~[text]psx.html.teachers_mobile.student.day_phone[/text]</span> <span class="cinfo"><a href="tel:~(motherdayphone)">~(motherdayphone)</a></span> </div>[/if#2] ~[if#2.~(Mother_Employer)#]<div class="row"> <span class="clabel">~[text]psx.html.teachers_mobile.student.employer[/text]</span> <span class="cinfo">~(Mother_Employer)</span> </div>[/if#2] ~[if#2.~(Mother_home_phone)#]<div class="row"> <span class="clabel">~[text]psx.html.teachers_mobile.student.home1[/text]</span> <span class="cinfo"><a href="tel:~(Mother_home_phone)">~(Mother_home_phone)</a></span> </div>[/if#2] </fieldset>[/if#1]
For this example we’re going to replace this “mother” section with our custom “pg1_” fields. We’re going to choose the first name field as the one to evaluate for blank... so we’ll begin with the following to open the “fieldset” (the white rounded corner information panel) and the first row of information in it:
~[if#1.~(pg1_fname)#]<fieldset> <div class="row">
Enhanced Mobile Web Pages Page 29 of 33
Now we’ll populate the first row with the first parent guardian’s first and last name and their relationship to the student. We’re going to make the whole row a label, so we’re going to use a special “label” tag to indicate how this will look:
<label>~(pg1_fname) ~(pg1_lname) <em>(~(pg1_rel))</em></label> </div>
Now we’ll populate the next row with the home phone, checking first to make sure it’s not blank. The classes clabel and cinfo will handle how to display a label and the information on the same row. Note the special kind of href=”tel...” tag that smartphones will recognize as a direct link to the phone’s dialer:
~[if#2.~(pg1_hphone)#]<div class="row"> <span class="clabel">home</span> <span class="cinfo"><a href="tel:~(pg1_hphone)">~(pg1_hphone)</a></span> </div>[/if#2]
Let’s repeat that for the cell phone and work phone information. ~[if#2.~(pg1_cphone)#]<div class="row"> <span class="clabel">cell</span> <span class="cinfo"><a href="tel:~(pg1_cphone)">~(pg1_cphone)</a></span> </div>[/if#2] ~[if#2.~(pg1_wphone)#]<div class="row"> <span class="clabel">work</span> <span class="cinfo"><a href="tel:~(pg1_wphone)">~(pg1_wphone)</a></span> </div>[/if#2]
Next we’ll display the notes if there are any. We’ll use a paragraph tag and some special CSS classes to help with the wrapping and indentation of notes that will likely wrap to several lines:
~[if#2.~(pg1_notes)#]<div class=”wraprow”> <p class=”hanging-indent”>notes ~(pg1_notes)</p> </div>[/if#2]
Then we’ll finish up with the email and close the fieldset:
~[if#2.~(pg1_email)#]<div class=”row”> <span class=”clabel”>email</span> <span class=”cinfo”><a href=”mailto:~(pg1_email)”>~(pg1_email)</a></span> </div>[/if#2] </fieldset>[/if#1]
Enhanced Mobile Web Pages Page 30 of 33
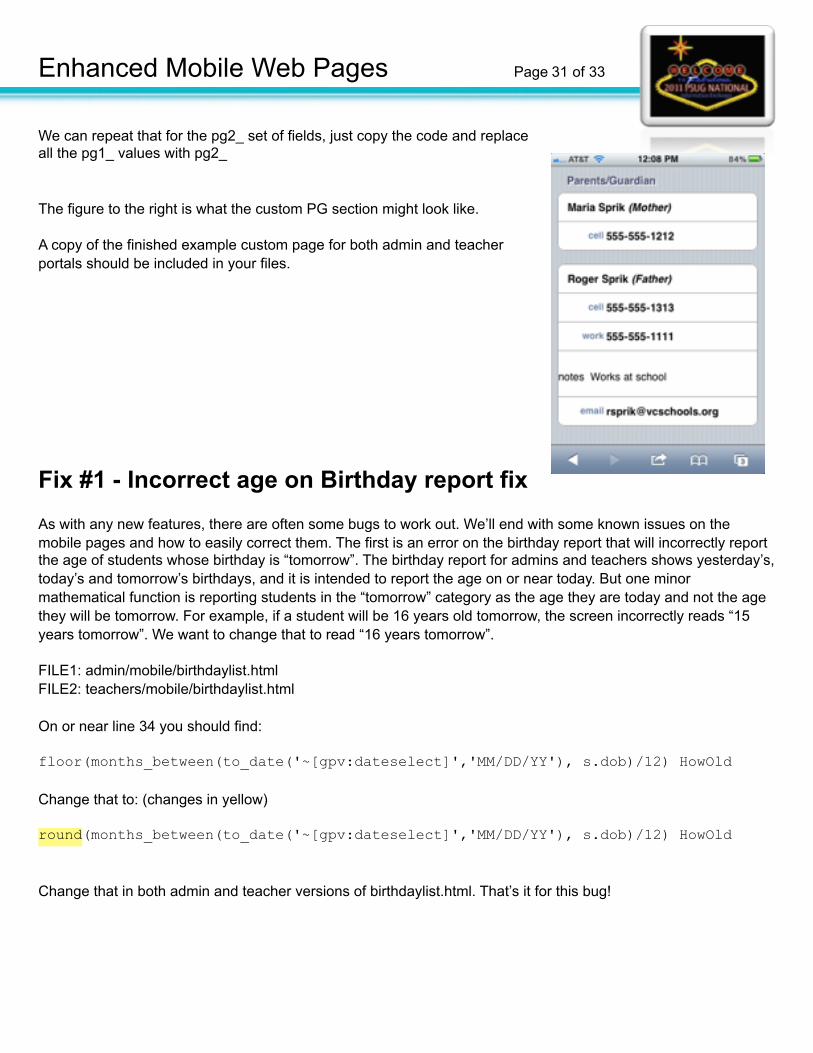
We can repeat that for the pg2_ set of fields, just copy the code and replace all the pg1_ values with pg2_
The figure to the right is what the custom PG section might look like.
A copy of the finished example custom page for both admin and teacher portals should be included in your files.
Fix #1 - Incorrect age on Birthday report fixAs with any new features, there are often some bugs to work out. We’ll end with some known issues on the mobile pages and how to easily correct them. The first is an error on the birthday report that will incorrectly report the age of students whose birthday is “tomorrow”. The birthday report for admins and teachers shows yesterday’s, today’s and tomorrow’s birthdays, and it is intended to report the age on or near today. But one minor mathematical function is reporting students in the “tomorrow” category as the age they are today and not the age they will be tomorrow. For example, if a student will be 16 years old tomorrow, the screen incorrectly reads “15 years tomorrow”. We want to change that to read “16 years tomorrow”.
FILE1: admin/mobile/birthdaylist.htmlFILE2: teachers/mobile/birthdaylist.html
On or near line 34 you should find:
floor(months_between(to_date('~[gpv:dateselect]','MM/DD/YY'), s.dob)/12) HowOld
Change that to: (changes in yellow)
round(months_between(to_date('~[gpv:dateselect]','MM/DD/YY'), s.dob)/12) HowOld
Change that in both admin and teacher versions of birthdaylist.html. That’s it for this bug!
Enhanced Mobile Web Pages Page 31 of 33
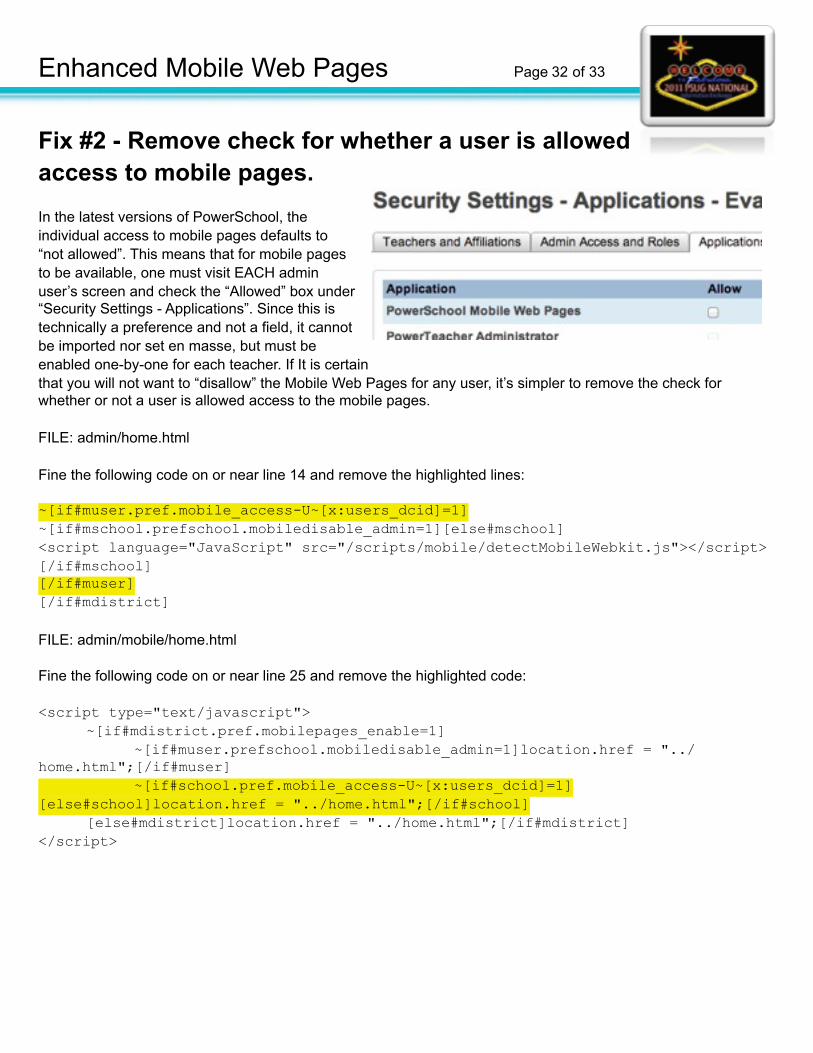
Fix #2 - Remove check for whether a user is allowedaccess to mobile pages.In the latest versions of PowerSchool, the individual access to mobile pages defaults to “not allowed”. This means that for mobile pages to be available, one must visit EACH admin user’s screen and check the “Allowed” box under “Security Settings - Applications”. Since this is technically a preference and not a field, it cannot be imported nor set en masse, but must be enabled one-by-one for each teacher. If It is certain that you will not want to “disallow” the Mobile Web Pages for any user, it’s simpler to remove the check for whether or not a user is allowed access to the mobile pages.
FILE: admin/home.html
Fine the following code on or near line 14 and remove the highlighted lines:
~[if#muser.pref.mobile_access-U~[x:users_dcid]=1]~[if#mschool.prefschool.mobiledisable_admin=1][else#mschool]<script language="JavaScript" src="/scripts/mobile/detectMobileWebkit.js"></script>[/if#mschool][/if#muser][/if#mdistrict]
FILE: admin/mobile/home.html
Fine the following code on or near line 25 and remove the highlighted code:
<script type="text/javascript"> ~[if#mdistrict.pref.mobilepages_enable=1] ~[if#muser.prefschool.mobiledisable_admin=1]location.href = "../home.html";[/if#muser] ~[if#school.pref.mobile_access-U~[x:users_dcid]=1][else#school]location.href = "../home.html";[/if#school] [else#mdistrict]location.href = "../home.html";[/if#mdistrict]</script>
Enhanced Mobile Web Pages Page 32 of 33
Fix #3 - Schedule+ screen may incorrectly display grade and percent in certain situations.The effects of the following issue have not been tested, but there is a small error on the scheduleplus.html pages for admin and teachers.
FILE1: admin/mobile/scheduleplus.htmlFILE2: teachers/mobile/scheduleplus.html
Find the following code on or near line 16 in both files:
case when tb.suppressltrgrd = 0 and tb.suppresspercentscr = 0then '<br />' END||
Simply insert a space between the last 0 and the word “then”, it should read:
case when tb.suppressltrgrd = 0 and tb.suppresspercentscr = 0 then '<br />' END||
Fix #4 - Non-standard characters may cause display issues on Student Information Panel.In certain situations where a student or parent’s name may have non-standard characters such as a semicolon or apostrophe, the non-standard character may cause display issues. It has to do with the if statements that evaluate whether or not there is content in the field before displaying. There are many instances of the fix, so we’ll just show an example and you can find the complete fixes in the included files.
Note: ASCII codes 48-57 are the numbers 0-9, codes 65-90 are the letters A-Z in caps, and codes 97-122 are a-z in lower caps. In the following example we are going to pull the locker field and only keep numbers 0-9 and letters in the alphabet. This is only for the if statement, we are not displaying anything here.
FILE1: admin/mobile/studentinsert.htmlFILE2: teachers/mobile/student.html
Below is an example from admin/mobile/studentinsert.html on or near line 55:
~[if#locker.~(locker_number;keep_ascii=48-57,65-90,97-122)#]
To exclude special characters from interrupting the code, you can add the following:
~[if#locker.~(locker_number;keep_ascii=48-57,65-90,97-122)#]
Add the “keep_ascii” code to any field in an if statement that may possibly ever contain special characters.
Enhanced Mobile Web Pages Page 33 of 33


![Enhanced intelligent tutoring system with mobile support.ppt [autosaved]](https://img.pdfslide.net/doc/110x75/55a43be41a28abf7738b4728/enhanced-intelligent-tutoring-system-with-mobile-supportppt-autosaved.jpg)