Embed Size (px)
Citation preview
ENSAT Registry User Guide
About the Registry
The ENSAT registry is a data repository for clinical and biomaterial information for adrenal
cancer patients worldwide. It is a system designed to facilitate the exchange of information
about adrenal cancer research between clinical professionals, and provides mechanisms to
conduct, connect and grow clinical studies in this area. The technical development team is
situated at the University of Melbourne in Australia, and is supported by the European Union
FP7 initiative (grant agreement 259735), and the European Science Foundation (ESF).
Contents
1. Landing page
2. Logging in and navigation
3. Managing your account information
4. Summary page
4.1 Center code and PI information
4.2 Biobank features
4.2.1 Biomaterial freezer inventory
4.2.2. Biomaterial manifest upload
5. Detailed information summary
6. Create a record
7. Update a record
7.1 Updating form details
7.2 Timeline visualisation
7.3 ACC – patient status report
7.4 Pheo/NAPACA – transfer to PMT
7.5 NAPACA – transfer to other sections
8. Delete a record
9. Search records
10. Export records
Please note that some of the features described in this document may not be available to you
because of the security settings implemented. If you do not have access to any feature but wish
to use it, please contact Anthony Stell ([email protected]).
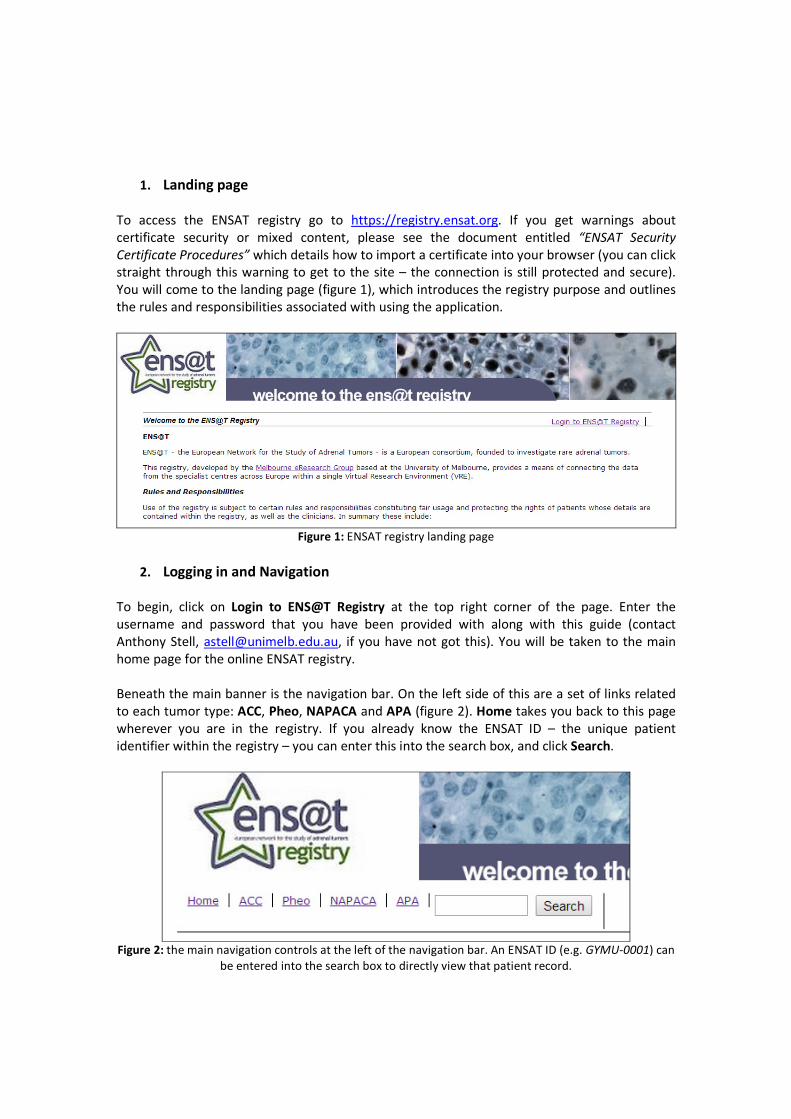
1. Landing page
To access the ENSAT registry go to https://registry.ensat.org. If you get warnings about
certificate security or mixed content, please see the document entitled “ENSAT Security
Certificate Procedures” which details how to import a certificate into your browser (you can click
straight through this warning to get to the site – the connection is still protected and secure).
You will come to the landing page (figure 1), which introduces the registry purpose and outlines
the rules and responsibilities associated with using the application.
Figure 1: ENSAT registry landing page
2. Logging in and Navigation
To begin, click on Login to ENS@T Registry at the top right corner of the page. Enter the
username and password that you have been provided with along with this guide (contact
Anthony Stell, [email protected], if you have not got this). You will be taken to the main
home page for the online ENSAT registry.
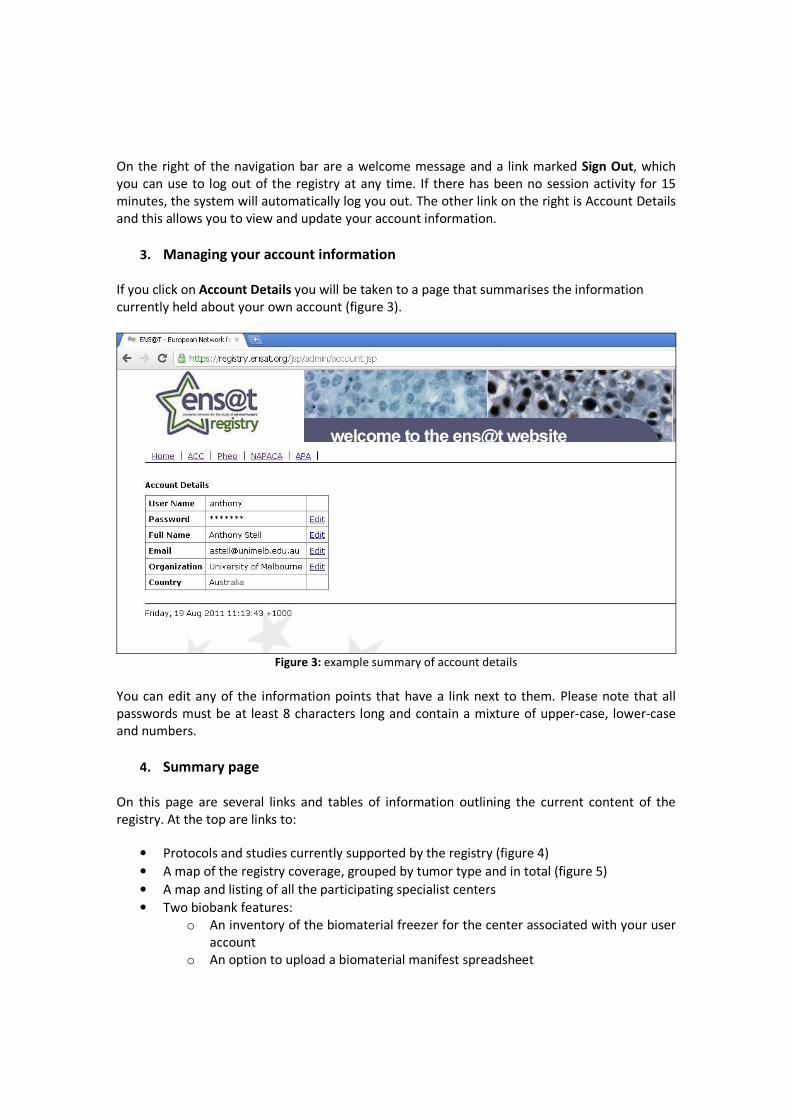
Beneath the main banner is the navigation bar. On the left side of this are a set of links related
to each tumor type: ACC, Pheo, NAPACA and APA (figure 2). Home takes you back to this page
wherever you are in the registry. If you already know the ENSAT ID – the unique patient
identifier within the registry – you can enter this into the search box, and click Search.
Figure 2: the main navigation controls at the left of the navigation bar. An ENSAT ID (e.g. GYMU-0001) can
be entered into the search box to directly view that patient record.
On the right of the navigation bar are a welcome message and a link marked Sign Out, which
you can use to log out of the registry at any time. If there has been no session activity for 15
minutes, the system will automatically log you out. The other link on the right is Account Details
and this allows you to view and update your account information.
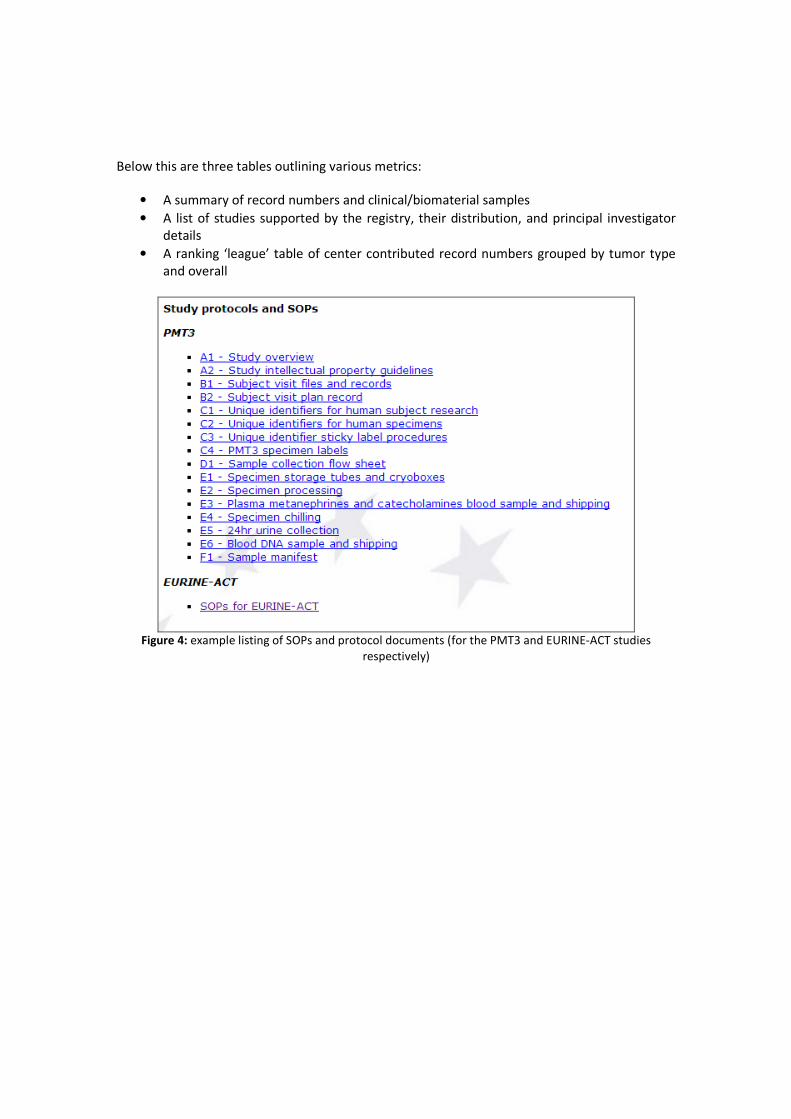
3. Managing your account information
If you click on Account Details you will be taken to a page that summarises the information
currently held about your own account (figure 3).
Figure 3: example summary of account details
You can edit any of the information points that have a link next to them. Please note that all
passwords must be at least 8 characters long and contain a mixture of upper-case, lower-case
and numbers.
4. Summary page
On this page are several links and tables of information outlining the current content of the
registry. At the top are links to:
• Protocols and studies currently supported by the registry (figure 4)
• A map of the registry coverage, grouped by tumor type and in total (figure 5)
• A map and listing of all the participating specialist centers
• Two biobank features:
o An inventory of the biomaterial freezer for the center associated with your user
account
o An option to upload a biomaterial manifest spreadsheet
Below this are three tables outlining various metrics:
• A summary of record numbers and clinical/biomaterial samples
• A list of studies supported by the registry, their distribution, and principal investigator
details
• A ranking ‘league’ table of center contributed record numbers grouped by tumor type
and overall
Figure 4: example listing of SOPs and protocol documents (for the PMT3 and EURINE-ACT studies
respectively)
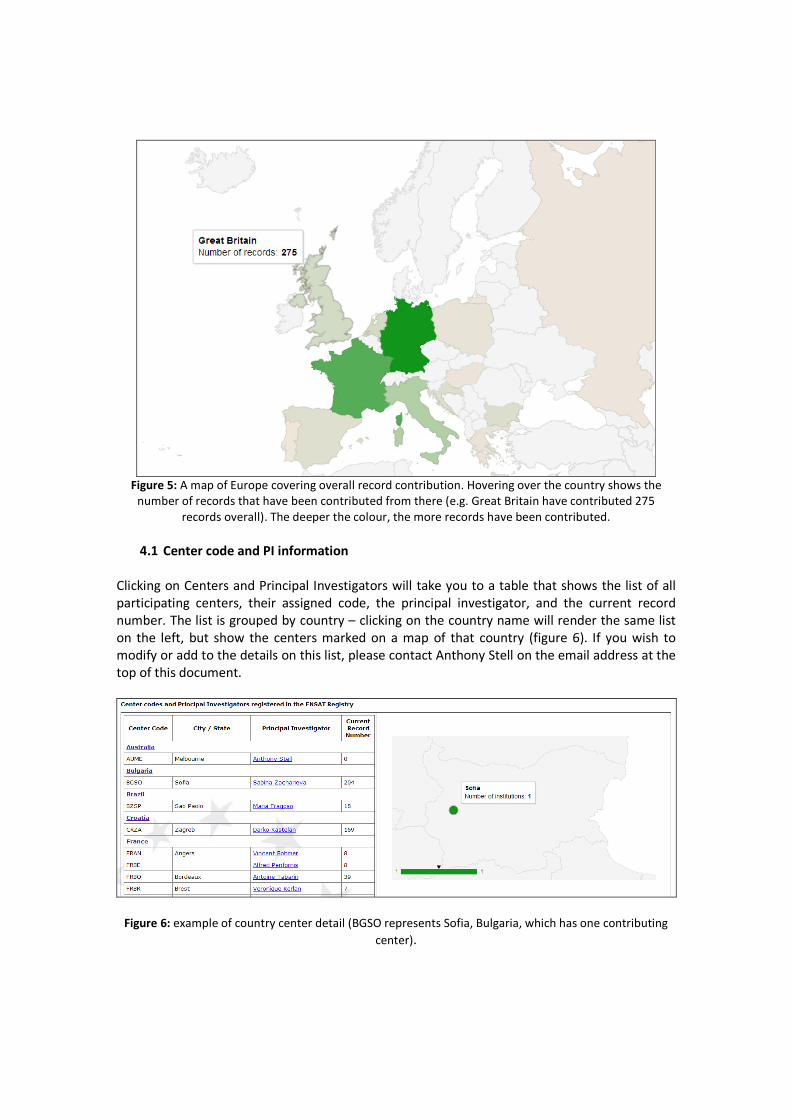
Figure 5: A map of Europe covering overall record contribution. Hovering over the country shows the
number of records that have been contributed from there (e.g. Great Britain have contributed 275
records overall). The deeper the colour, the more records have been contributed.
4.1 Center code and PI information
Clicking on Centers and Principal Investigators will take you to a table that shows the list of all
participating centers, their assigned code, the principal investigator, and the current record
number. The list is grouped by country – clicking on the country name will render the same list
on the left, but show the centers marked on a map of that country (figure 6). If you wish to
modify or add to the details on this list, please contact Anthony Stell on the email address at the
top of this document.
Figure 6: example of country center detail (BGSO represents Sofia, Bulgaria, which has one contributing
center).
4.2 Biobank features
4.2.1 Biomaterial freezer inventory
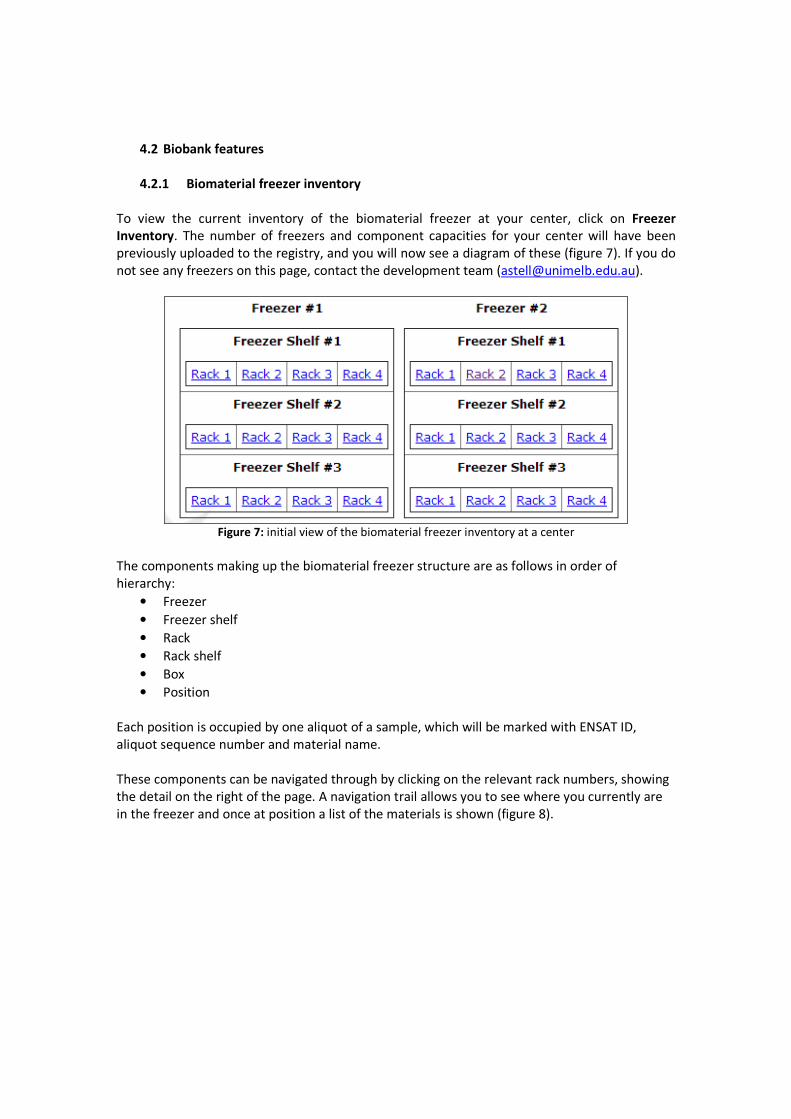
To view the current inventory of the biomaterial freezer at your center, click on Freezer
Inventory. The number of freezers and component capacities for your center will have been
previously uploaded to the registry, and you will now see a diagram of these (figure 7). If you do
not see any freezers on this page, contact the development team ([email protected]).
Figure 7: initial view of the biomaterial freezer inventory at a center
The components making up the biomaterial freezer structure are as follows in order of
hierarchy:
• Freezer
• Freezer shelf
• Rack
• Rack shelf
• Box
• Position
Each position is occupied by one aliquot of a sample, which will be marked with ENSAT ID,
aliquot sequence number and material name.
These components can be navigated through by clicking on the relevant rack numbers, showing
the detail on the right of the page. A navigation trail allows you to see where you currently are
in the freezer and once at position a list of the materials is shown (figure 8).
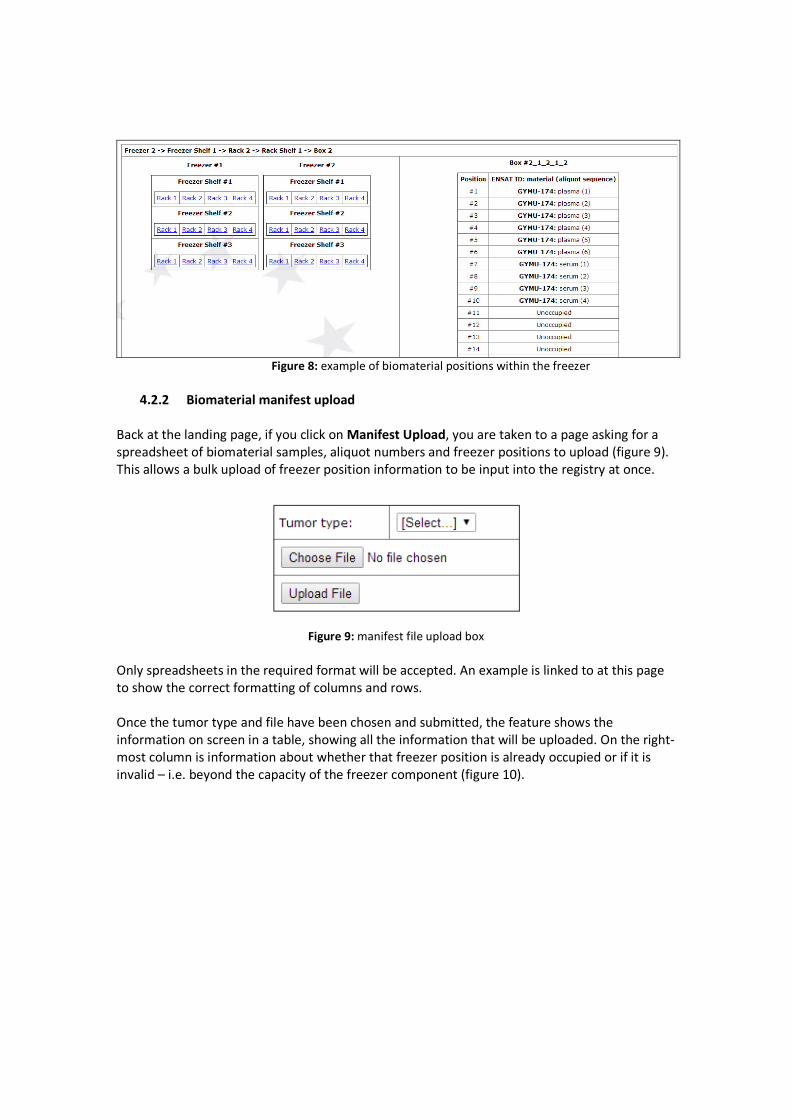
Figure 8: example of biomaterial positions within the freezer
4.2.2 Biomaterial manifest upload
Back at the landing page, if you click on Manifest Upload, you are taken to a page asking for a
spreadsheet of biomaterial samples, aliquot numbers and freezer positions to upload (figure 9).
This allows a bulk upload of freezer position information to be input into the registry at once.
Figure 9: manifest file upload box
Only spreadsheets in the required format will be accepted. An example is linked to at this page
to show the correct formatting of columns and rows.
Once the tumor type and file have been chosen and submitted, the feature shows the
information on screen in a table, showing all the information that will be uploaded. On the right-
most column is information about whether that freezer position is already occupied or if it is
invalid – i.e. beyond the capacity of the freezer component (figure 10).
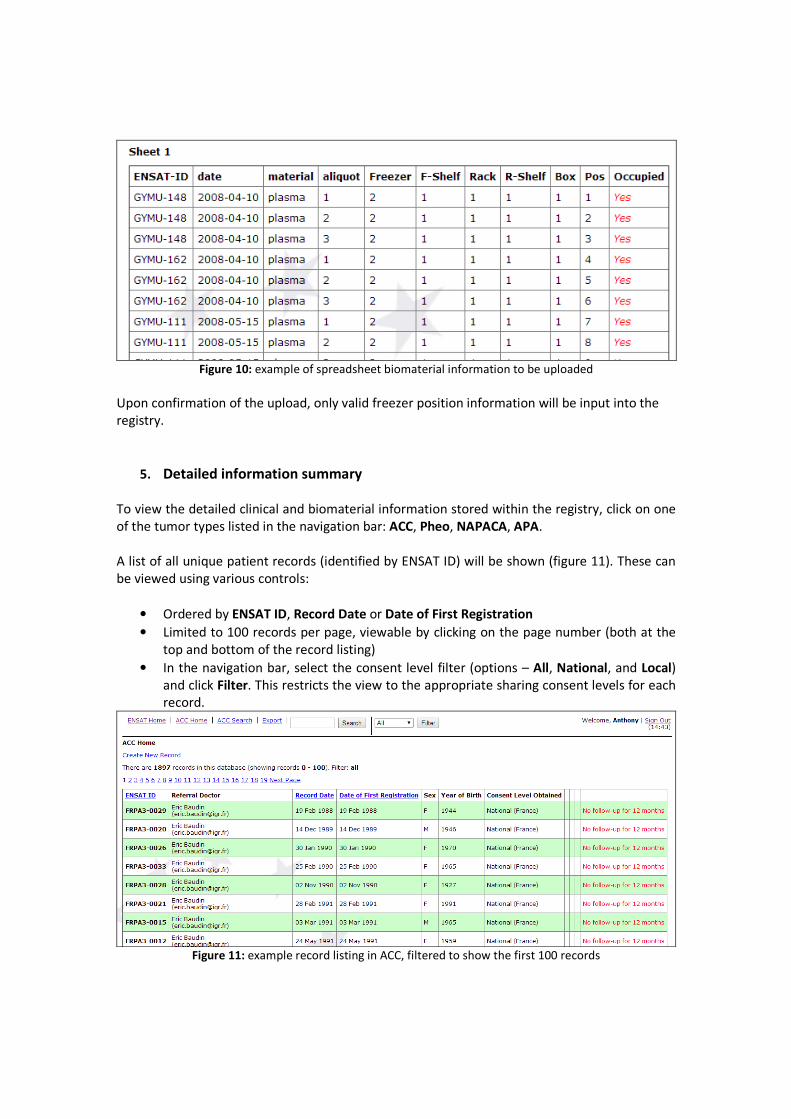
Figure 10: example of spreadsheet biomaterial information to be uploaded
Upon confirmation of the upload, only valid freezer position information will be input into the
registry.
5. Detailed information summary
To view the detailed clinical and biomaterial information stored within the registry, click on one
of the tumor types listed in the navigation bar: ACC, Pheo, NAPACA, APA.
A list of all unique patient records (identified by ENSAT ID) will be shown (figure 11). These can
be viewed using various controls:
• Ordered by ENSAT ID, Record Date or Date of First Registration
• Limited to 100 records per page, viewable by clicking on the page number (both at the
top and bottom of the record listing)
• In the navigation bar, select the consent level filter (options – All, National, and Local)
and click Filter. This restricts the view to the appropriate sharing consent levels for each
record.
Figure 11: example record listing in ACC, filtered to show the first 100 records
In this mode, the navigation bar also has a clock timer underneath the Sign Out option, which
shows how much time remains for the user to make some action before the session times out.
The record list shows summary information for every record in that database (ID, center ID,
referral doctor, dates, sex, year of birth and level of consent sharing). In the right-most column
are shown extra information about patients, such as candidacy for other sections, extended
periods without follow-up, possible double inclusions and data completeness.
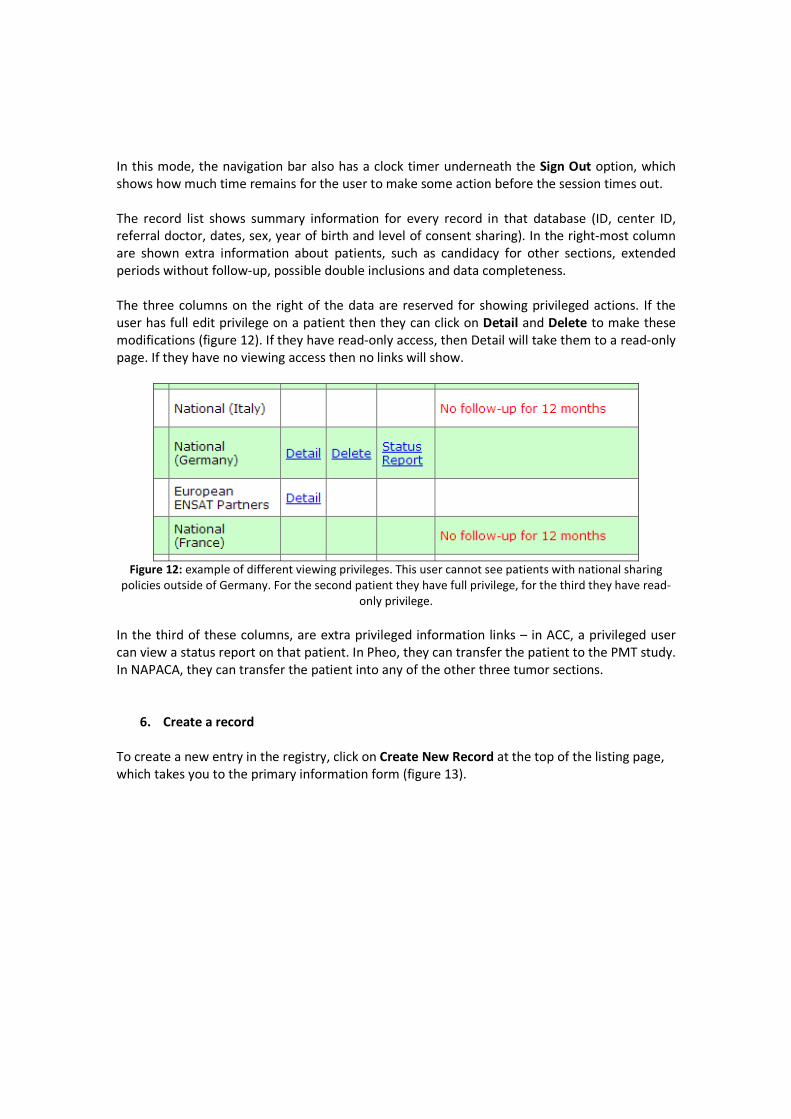
The three columns on the right of the data are reserved for showing privileged actions. If the
user has full edit privilege on a patient then they can click on Detail and Delete to make these
modifications (figure 12). If they have read-only access, then Detail will take them to a read-only
page. If they have no viewing access then no links will show.
Figure 12: example of different viewing privileges. This user cannot see patients with national sharing
policies outside of Germany. For the second patient they have full privilege, for the third they have read-
only privilege.
In the third of these columns, are extra privileged information links – in ACC, a privileged user
can view a status report on that patient. In Pheo, they can transfer the patient to the PMT study.
In NAPACA, they can transfer the patient into any of the other three tumor sections.
6. Create a record
To create a new entry in the registry, click on Create New Record at the top of the listing page,
which takes you to the primary information form (figure 13).
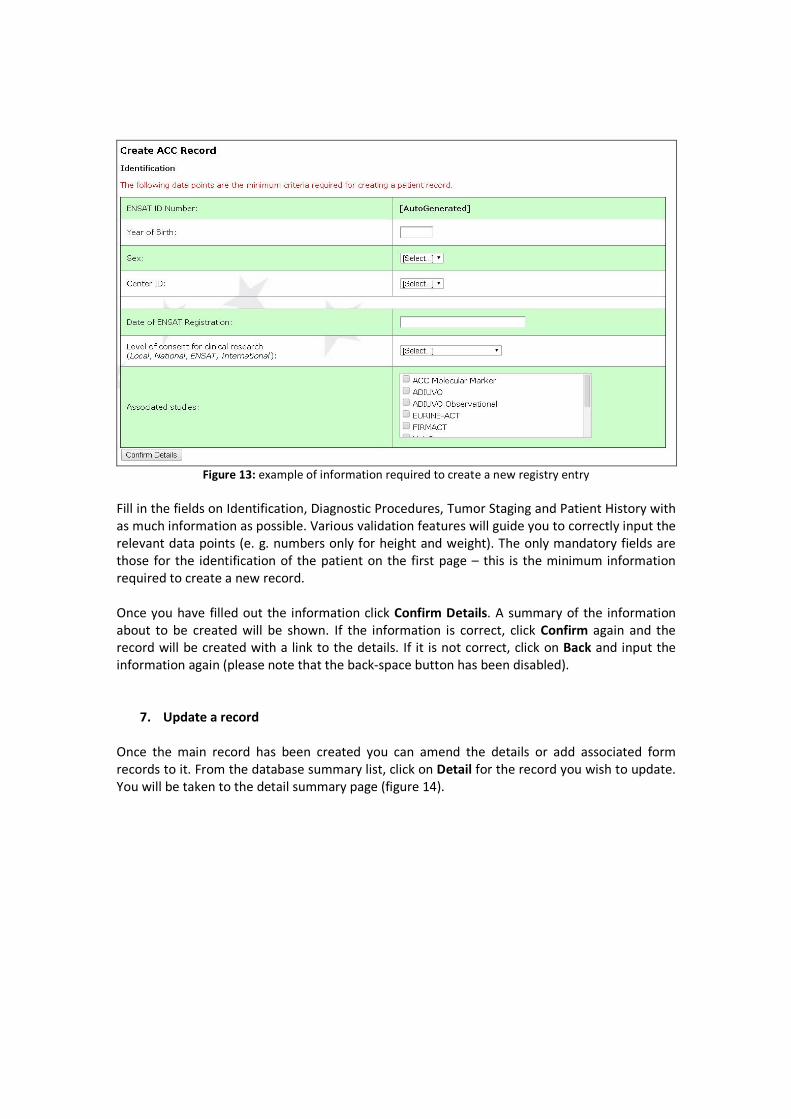
Figure 13: example of information required to create a new registry entry
Fill in the fields on Identification, Diagnostic Procedures, Tumor Staging and Patient History with
as much information as possible. Various validation features will guide you to correctly input the
relevant data points (e. g. numbers only for height and weight). The only mandatory fields are
those for the identification of the patient on the first page – this is the minimum information
required to create a new record.
Once you have filled out the information click Confirm Details. A summary of the information
about to be created will be shown. If the information is correct, click Confirm again and the
record will be created with a link to the details. If it is not correct, click on Back and input the
information again (please note that the back-space button has been disabled).
7. Update a record
Once the main record has been created you can amend the details or add associated form
records to it. From the database summary list, click on Detail for the record you wish to update.
You will be taken to the detail summary page (figure 14).
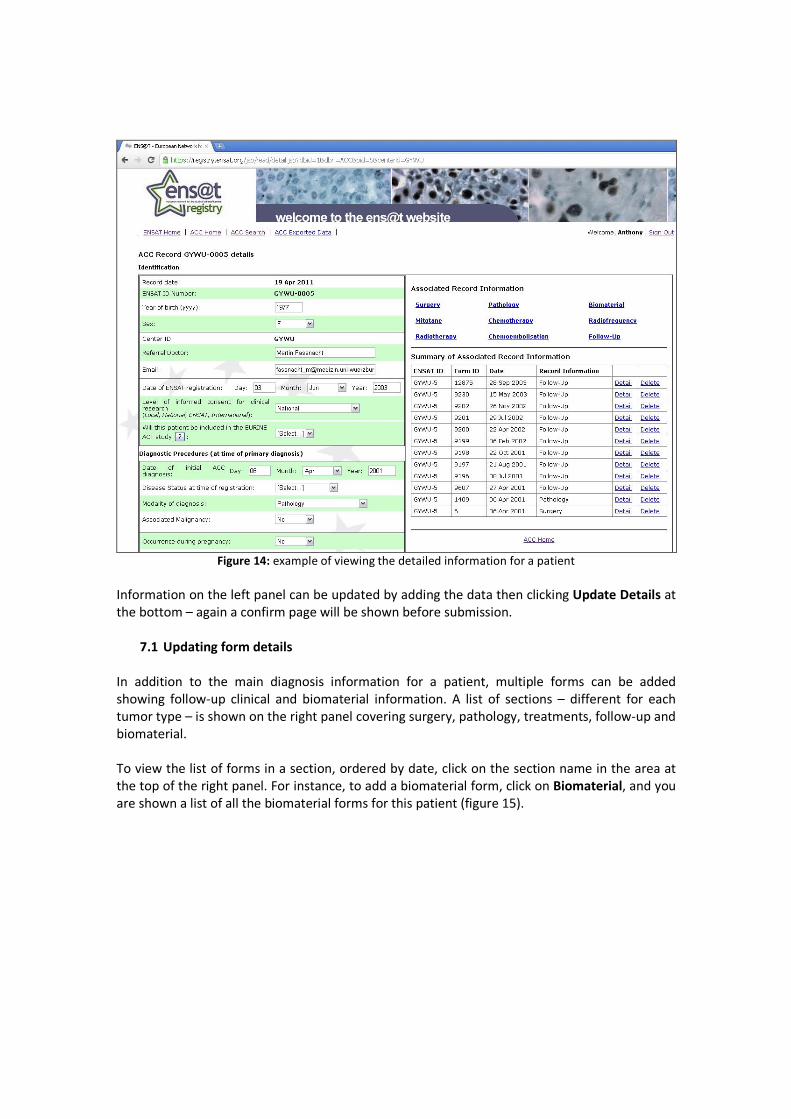
Figure 14: example of viewing the detailed information for a patient
Information on the left panel can be updated by adding the data then clicking Update Details at
the bottom – again a confirm page will be shown before submission.
7.1 Updating form details
In addition to the main diagnosis information for a patient, multiple forms can be added
showing follow-up clinical and biomaterial information. A list of sections – different for each
tumor type – is shown on the right panel covering surgery, pathology, treatments, follow-up and
biomaterial.
To view the list of forms in a section, ordered by date, click on the section name in the area at
the top of the right panel. For instance, to add a biomaterial form, click on Biomaterial, and you
are shown a list of all the biomaterial forms for this patient (figure 15).

Figure 15: example list of biomaterial forms for a patient
By clicking on Create new Biomaterial record, you will then be presented with a form to fill out
the relevant details for the biomaterial section (figure 16).
Figure 16: example of biomaterial form input, with date entry box shown
Fill out the relevant details, confirm and submit. The new record can now be seen in the
biomaterial summary list (figure 17).
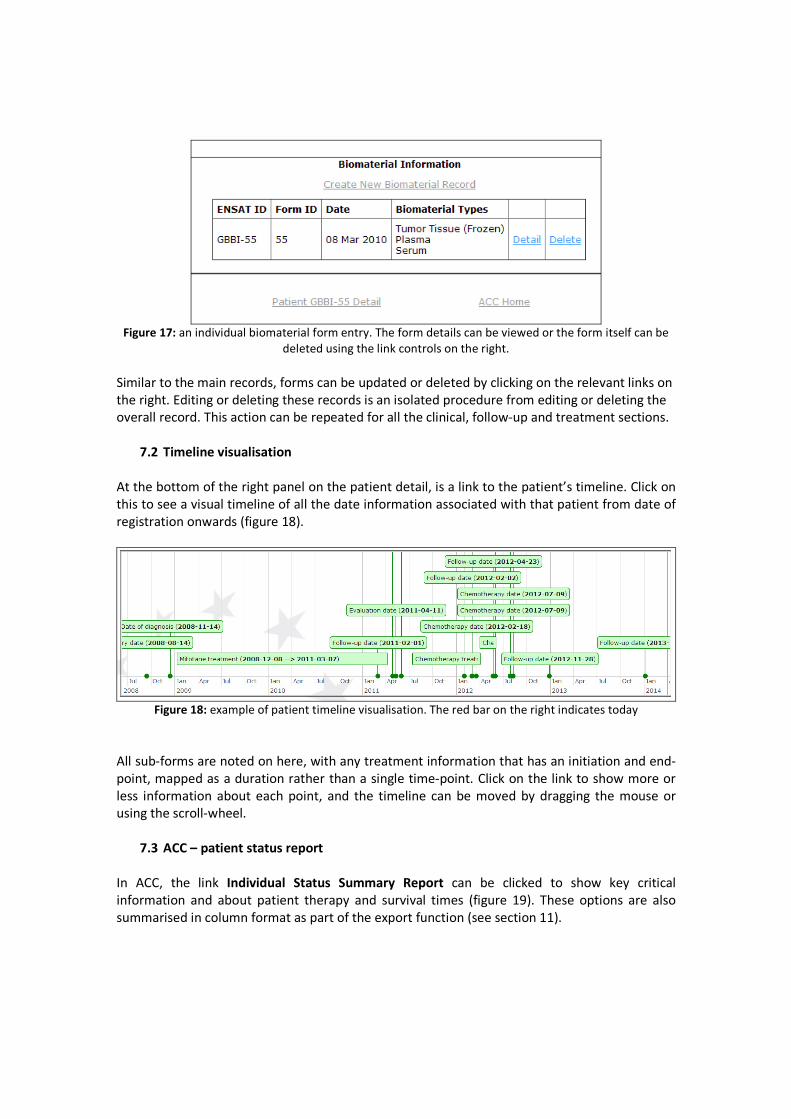
Figure 17: an individual biomaterial form entry. The form details can be viewed or the form itself can be
deleted using the link controls on the right.
Similar to the main records, forms can be updated or deleted by clicking on the relevant links on
the right. Editing or deleting these records is an isolated procedure from editing or deleting the
overall record. This action can be repeated for all the clinical, follow-up and treatment sections.
7.2 Timeline visualisation
At the bottom of the right panel on the patient detail, is a link to the patient’s timeline. Click on
this to see a visual timeline of all the date information associated with that patient from date of
registration onwards (figure 18).
Figure 18: example of patient timeline visualisation. The red bar on the right indicates today
All sub-forms are noted on here, with any treatment information that has an initiation and end-
point, mapped as a duration rather than a single time-point. Click on the link to show more or
less information about each point, and the timeline can be moved by dragging the mouse or
using the scroll-wheel.
7.3 ACC – patient status report
In ACC, the link Individual Status Summary Report can be clicked to show key critical
information and about patient therapy and survival times (figure 19). These options are also
summarised in column format as part of the export function (see section 11).
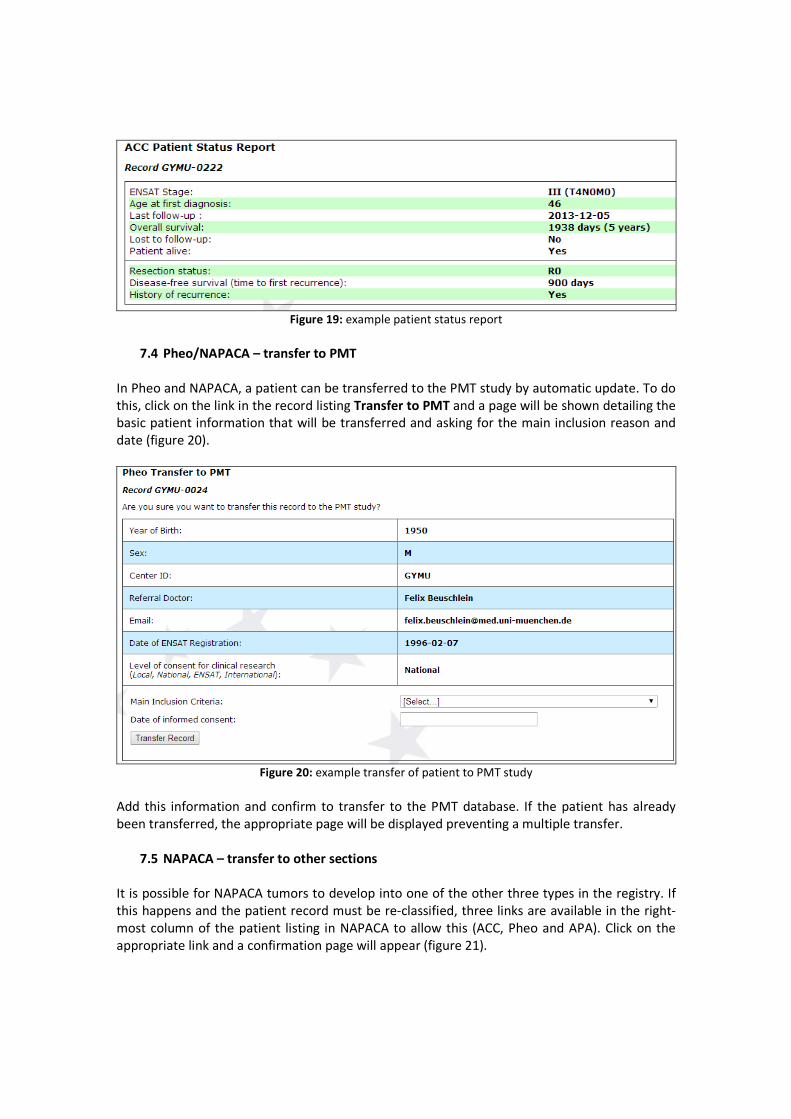
Figure 19: example patient status report
7.4 Pheo/NAPACA – transfer to PMT
In Pheo and NAPACA, a patient can be transferred to the PMT study by automatic update. To do
this, click on the link in the record listing Transfer to PMT and a page will be shown detailing the
basic patient information that will be transferred and asking for the main inclusion reason and
date (figure 20).
Figure 20: example transfer of patient to PMT study
Add this information and confirm to transfer to the PMT database. If the patient has already
been transferred, the appropriate page will be displayed preventing a multiple transfer.
7.5 NAPACA – transfer to other sections
It is possible for NAPACA tumors to develop into one of the other three types in the registry. If
this happens and the patient record must be re-classified, three links are available in the right-
most column of the patient listing in NAPACA to allow this (ACC, Pheo and APA). Click on the
appropriate link and a confirmation page will appear (figure 21).
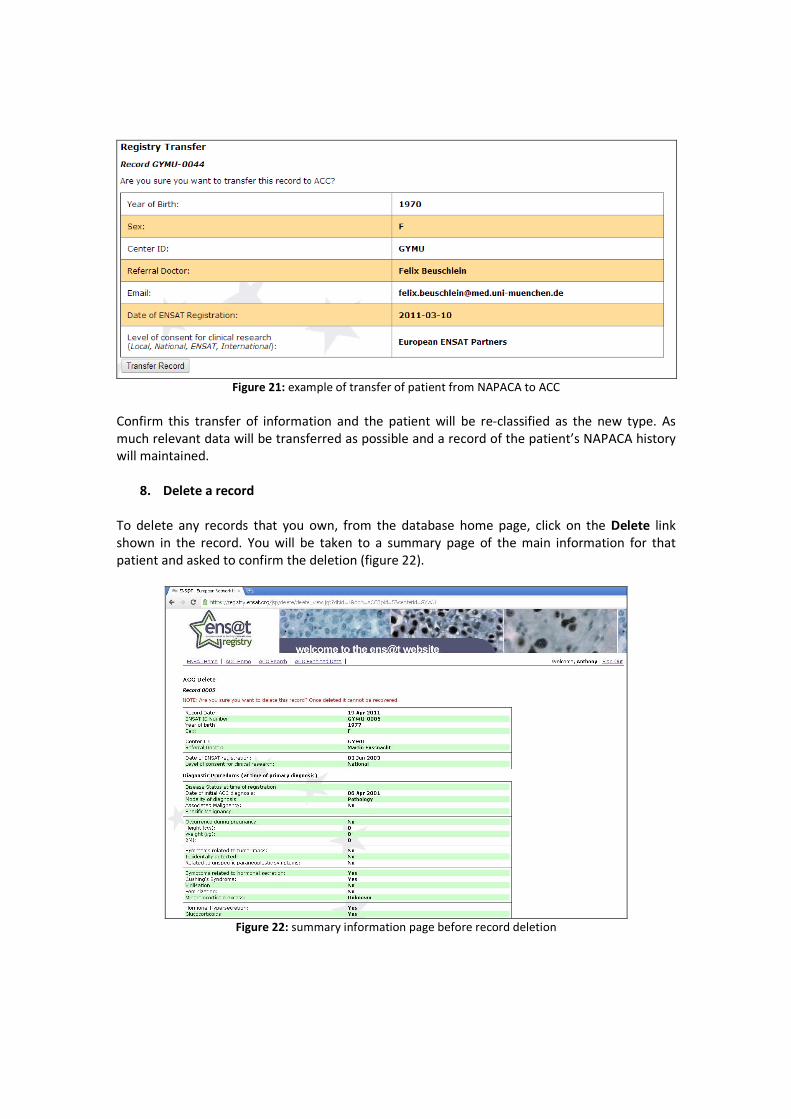
Figure 21: example of transfer of patient from NAPACA to ACC
Confirm this transfer of information and the patient will be re-classified as the new type. As
much relevant data will be transferred as possible and a record of the patient’s NAPACA history
will maintained.
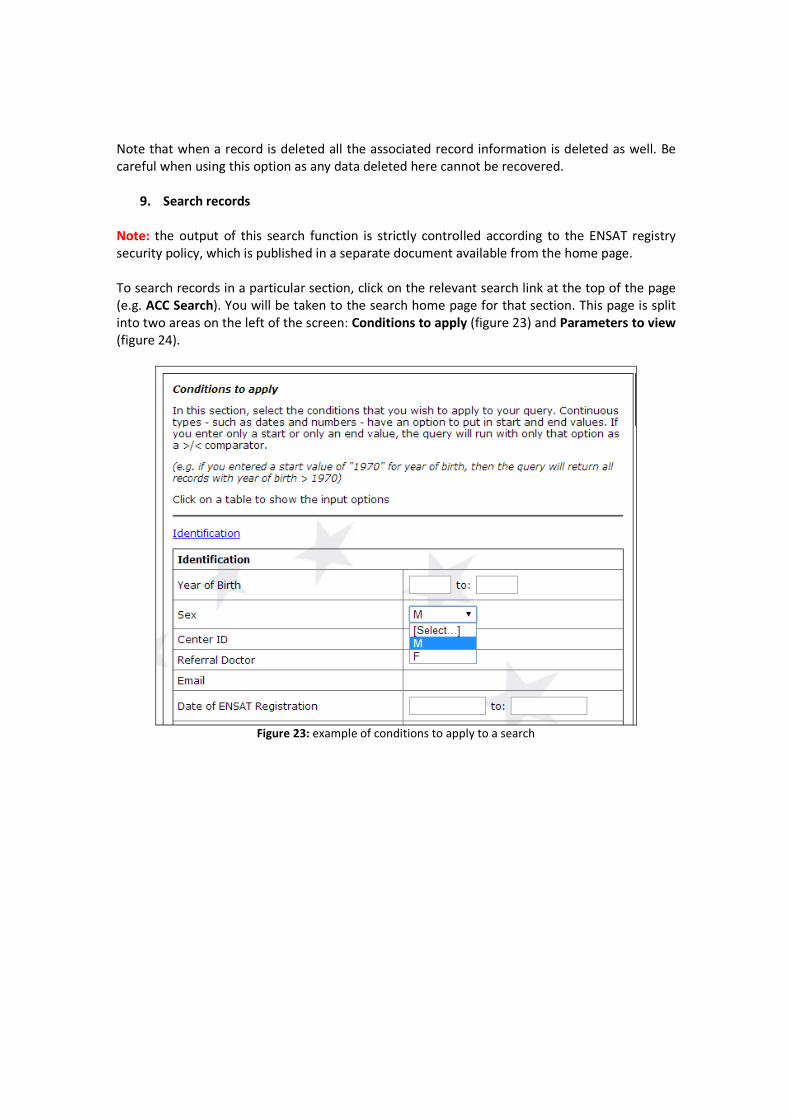
8. Delete a record
To delete any records that you own, from the database home page, click on the Delete link
shown in the record. You will be taken to a summary page of the main information for that
patient and asked to confirm the deletion (figure 22).
Figure 22: summary information page before record deletion
Note that when a record is deleted all the associated record information is deleted as well. Be
careful when using this option as any data deleted here cannot be recovered.
9. Search records
Note: the output of this search function is strictly controlled according to the ENSAT registry
security policy, which is published in a separate document available from the home page.
To search records in a particular section, click on the relevant search link at the top of the page
(e.g. ACC Search). You will be taken to the search home page for that section. This page is split
into two areas on the left of the screen: Conditions to apply (figure 23) and Parameters to view
(figure 24).
Figure 23: example of conditions to apply to a search
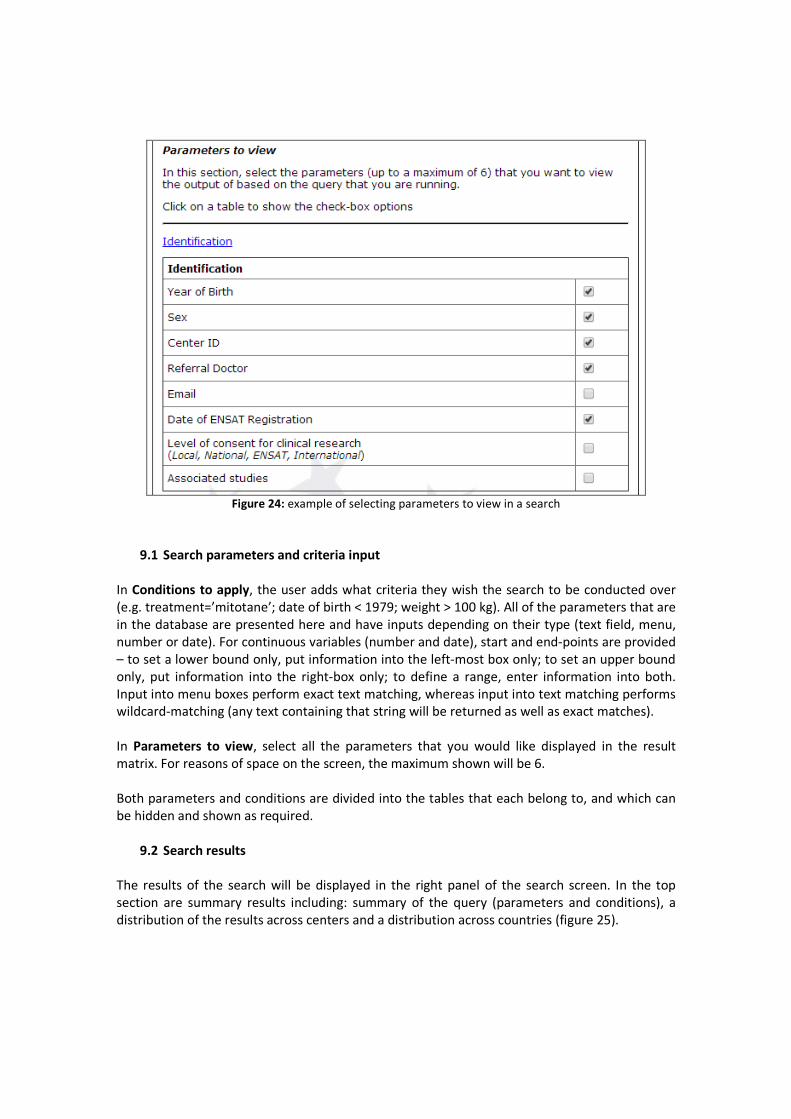
Figure 24: example of selecting parameters to view in a search
9.1 Search parameters and criteria input
In Conditions to apply, the user adds what criteria they wish the search to be conducted over
(e.g. treatment=’mitotane’; date of birth < 1979; weight > 100 kg). All of the parameters that are
in the database are presented here and have inputs depending on their type (text field, menu,
number or date). For continuous variables (number and date), start and end-points are provided
– to set a lower bound only, put information into the left-most box only; to set an upper bound
only, put information into the right-box only; to define a range, enter information into both.
Input into menu boxes perform exact text matching, whereas input into text matching performs
wildcard-matching (any text containing that string will be returned as well as exact matches).
In Parameters to view, select all the parameters that you would like displayed in the result
matrix. For reasons of space on the screen, the maximum shown will be 6.
Both parameters and conditions are divided into the tables that each belong to, and which can
be hidden and shown as required.
9.2 Search results
The results of the search will be displayed in the right panel of the search screen. In the top
section are summary results including: summary of the query (parameters and conditions), a
distribution of the results across centers and a distribution across countries (figure 25).
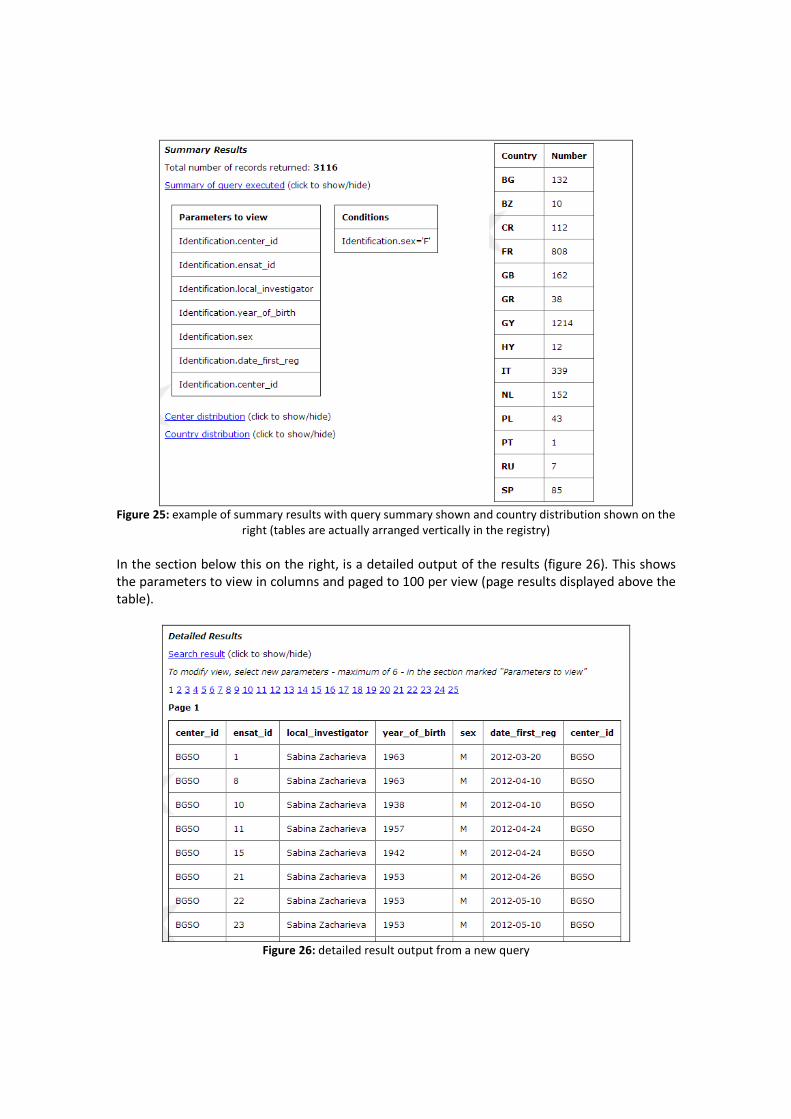
Figure 25: example of summary results with query summary shown and country distribution shown on the
right (tables are actually arranged vertically in the registry)
In the section below this on the right, is a detailed output of the results (figure 26). This shows
the parameters to view in columns and paged to 100 per view (page results displayed above the
table).
Figure 26: detailed result output from a new query
10. Export Records
Note: the output of this export function is strictly controlled according to the ENSAT registry
security policy, which is published in a separate document available from the home page. In
particular it may be the case that an export query appears to be available to you, but you are
only seeing a restricted view of it due to your privilege level.
To export data from the registry into a spreadsheet that you can view locally, click on Export in
the navigation bar. A set of options for bulk export are provided at the export home page:
• All your records
• All records belonging to your center
• All records belonging to your country
• All records belonging to a particular tumor type
• Records from a particular stored query (which has been set up previously)
• Records from a particular study (of those supported in the registry)
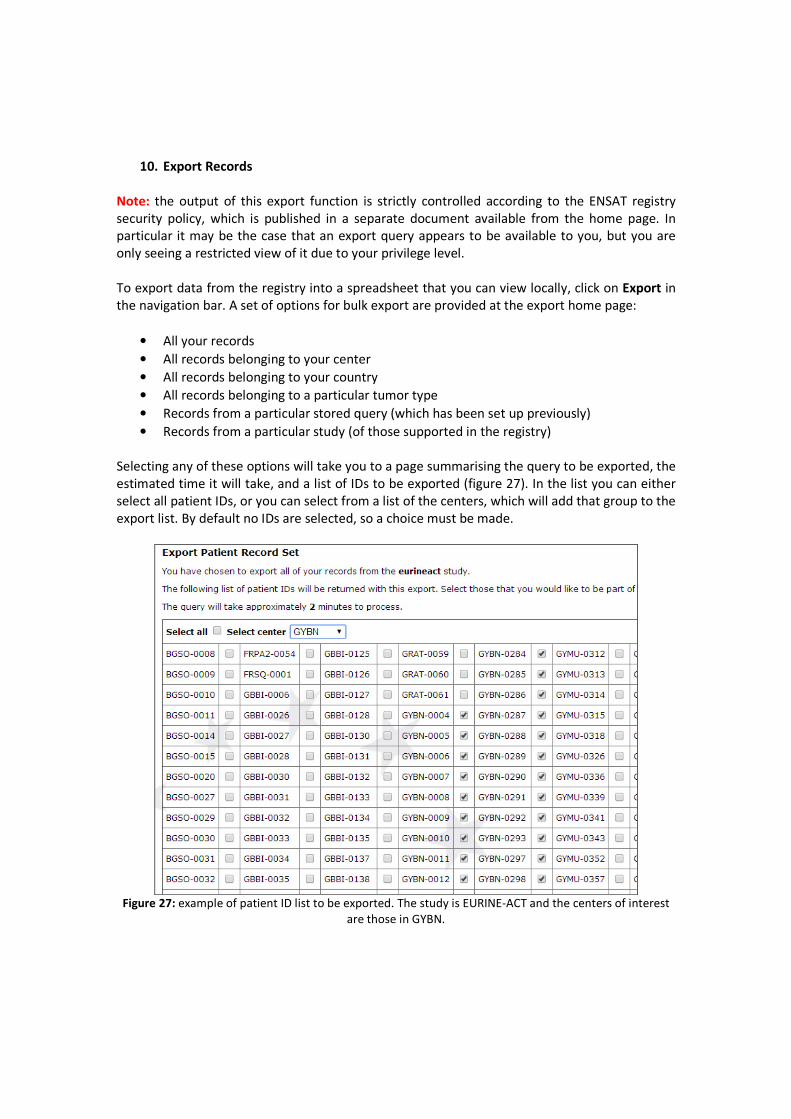
Selecting any of these options will take you to a page summarising the query to be exported, the
estimated time it will take, and a list of IDs to be exported (figure 27). In the list you can either
select all patient IDs, or you can select from a list of the centers, which will add that group to the
export list. By default no IDs are selected, so a choice must be made.
Figure 27: example of patient ID list to be exported. The study is EURINE-ACT and the centers of interest
are those in GYBN.
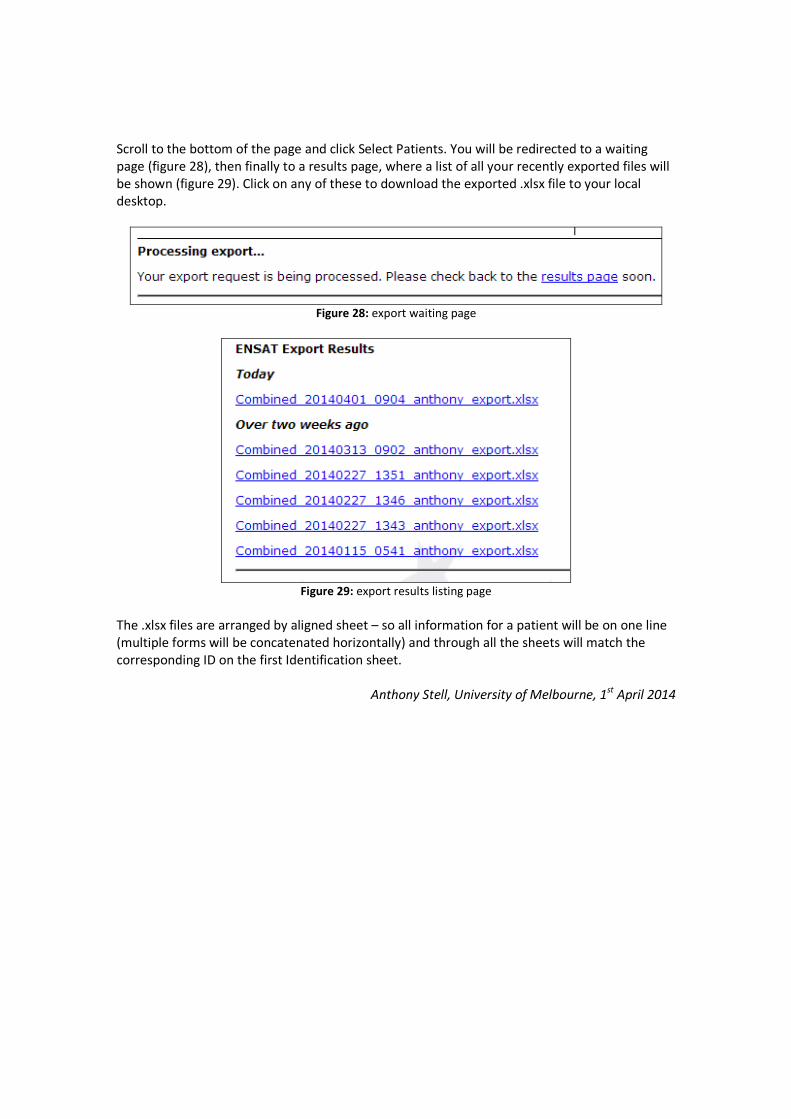
Scroll to the bottom of the page and click Select Patients. You will be redirected to a waiting
page (figure 28), then finally to a results page, where a list of all your recently exported files will
be shown (figure 29). Click on any of these to download the exported .xlsx file to your local
desktop.
Figure 28: export waiting page
Figure 29: export results listing page
The .xlsx files are arranged by aligned sheet – so all information for a patient will be on one line
(multiple forms will be concatenated horizontally) and through all the sheets will match the
corresponding ID on the first Identification sheet.
Anthony Stell, University of Melbourne, 1st
April 2014

![BIOMATERIAL [XRD and FTIR analysis]nuristianah.lecture.ub.ac.id/files/2016/09/Biomaterial-13.pdf · BIOMATERIAL [XRD and FTIR analysis] ... • Historical retrospective CHAPTER 3:](https://img.pdfslide.net/doc/110x75/5b0d75de7f8b9a952f8d8c05/biomaterial-xrd-and-ftir-analysis-xrd-and-ftir-analysis-historical-retrospective.jpg)