Embed Size (px)
Citation preview
IBM Software
IBM Enterprise Modernization Sandbox – RDi Lab 02 – Editing RPG source Page 1
Enterprise Modernization Sandbox for IBM i Lab Exercise Workbook
Rational Developer for i
Lab 02 – Editing RPG source
This exercise guides you through using the LPEX editor to edit RPG source code members.
Version 6, May 2019
The most up to date version of this document can be found on Rational Developer for i -
Hands-On Labs at http://ibm.biz/rdi_labs.
IBM Software
©2019 IBM Corporation
IBM Software
Page 2 IBM Enterprise Modernization Sandbox – RDi Lab 02 – Editing RPG source
© Copyright International Business Machines Corporation, 2019. All rights reserved.
US Government Users Restricted Rights - Use, duplication or disclosure restricted by GSA ADP Schedule Contract with IBM Corp.
IBM Software
IBM Enterprise Modernization Sandbox – RDi Lab 02 – Editing RPG source Page 3
LAB 02 – EDITING RPG SOURCE ............................................................................................................. 4
Overview............................................................................................................................................. 4
Learning objectives ........................................................................................................................... 4 Skill level and prerequisites .............................................................................................................. 4
Conventions used in this workbook ................................................................................................. 5
Client System requirements ............................................................................................................. 5 Host System requirements ............................................................................................................... 5
1 OPENING SOURCE MEMBERS IN THE REMOTE SYSTEMS EXPLORER ................................................. 6
1.1 Opening a source member ..................................................................................................... 6
1.2 Opening a second source member and multiple views ....................................................... 7 1.3 Using the Outline view of a source member ........................................................................12
2 WORKING WITH THE LPEX EDITOR .................................................................................................14
2.1 Changing default editor settings ...........................................................................................15
2.2 Autosave while editing source ..............................................................................................16 2.3 Changing the editor’s appearance ........................................................................................16
2.4 Changing key behavior in the editor .....................................................................................18
2.5 Testing the editor customization ...........................................................................................20 2.6 Using SEU commands in the LPEX editor...........................................................................21
2.7 Requesting undo and redo operations .................................................................................22
2.8 Invoking language-sensitive help..........................................................................................24
2.9 Prompting language specifications .......................................................................................28 2.10 Indenting source .................................................................................................................30
2.11 Finding and replacing text ..................................................................................................32
2.12 Filtering lines by string........................................................................................................35 2.13 Filtering lines by type ..........................................................................................................37
2.14 Searching multiple files ......................................................................................................40
2.15 Comparing files using the Remote Systems Explorer .....................................................43
2.16 Checking syntax..................................................................................................................50 CONGRATULATIONS! ...............................................................................................................................53
APPENDIX A NOTICES .........................................................................................................................54
APPENDIX B TRADEMARKS AND COPYRIGHTS .....................................................................................56
IBM Software
Page 4 IBM Enterprise Modernization Sandbox – RDi Lab 02 – Editing RPG source
Lab 02 – Editing RPG source
Overview
This tutorial teaches you how to maintain an IBM i application written in ILE RPG using the Remote
Systems Explorer.
Learning objectives
Use tools and views in the Remote Systems Explorer (RSE) perspective to edit, a source member.
Skill level and prerequisites
Introductory.
Important!
You should complete RDi Lab01 ‘Getting started’ before you work on this lab. Lab01
contains the following information and instructions:
• Which IBM i server to connect to
• Which User ID to use
• How to start RDi, create a connection and connect
• How to setup the correct library list for this lab
Knowledge of basic Microsoft Windows operations such as working with the desktop, mouse operations
such as opening folders and drag-and-drop is assumed. It will also be helpful if you understand DDS and
ILE RPG.
IBM Software
IBM Enterprise Modernization Sandbox – RDi Lab 02 – Editing RPG source Page 5
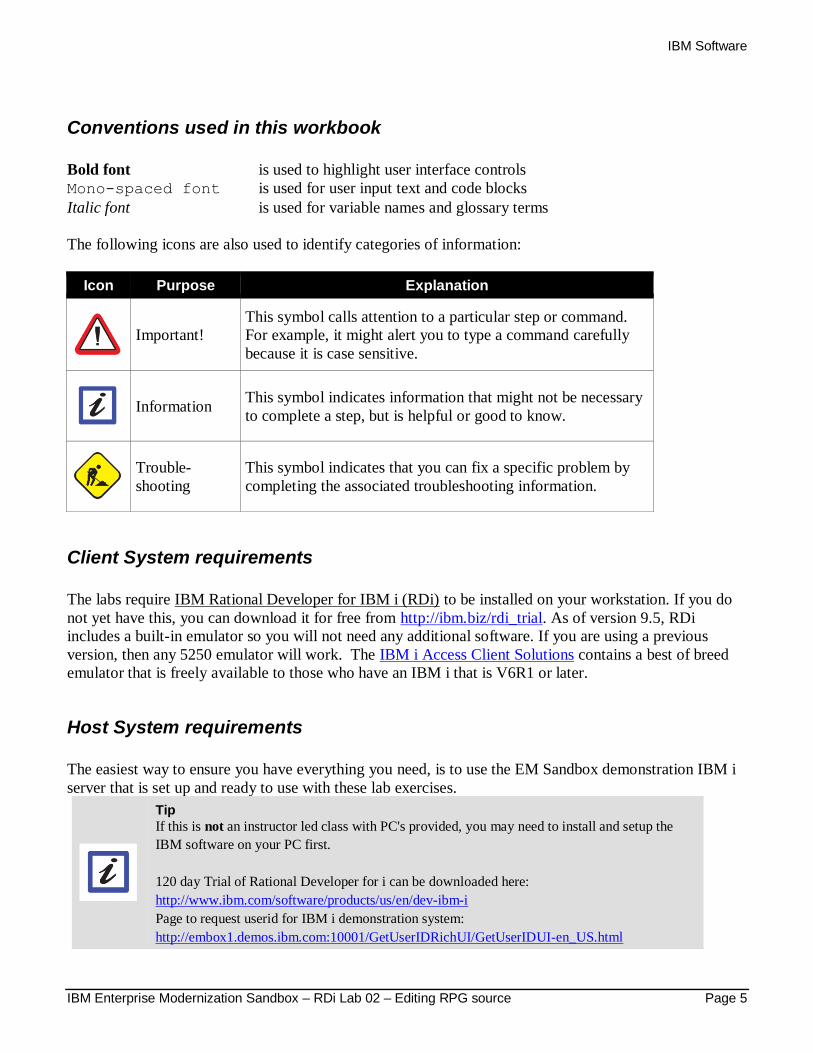
Conventions used in this workbook
Bold font is used to highlight user interface controls
Mono-spaced font is used for user input text and code blocks
Italic font is used for variable names and glossary terms
The following icons are also used to identify categories of information:
Icon Purpose Explanation
Important!
This symbol calls attention to a particular step or command.
For example, it might alert you to type a command carefully
because it is case sensitive.
Information This symbol indicates information that might not be necessary
to complete a step, but is helpful or good to know.
Trouble-
shooting
This symbol indicates that you can fix a specific problem by
completing the associated troubleshooting information.
Client System requirements
The labs require IBM Rational Developer for IBM i (RDi) to be installed on your workstation. If you do
not yet have this, you can download it for free from http://ibm.biz/rdi_trial. As of version 9.5, RDi
includes a built-in emulator so you will not need any additional software. If you are using a previous
version, then any 5250 emulator will work. The IBM i Access Client Solutions contains a best of breed
emulator that is freely available to those who have an IBM i that is V6R1 or later.
Host System requirements
The easiest way to ensure you have everything you need, is to use the EM Sandbox demonstration IBM i
server that is set up and ready to use with these lab exercises.
Tip If this is not an instructor led class with PC's provided, you may need to install and setup the
IBM software on your PC first.
120 day Trial of Rational Developer for i can be downloaded here:
http://www.ibm.com/software/products/us/en/dev-ibm-i
Page to request userid for IBM i demonstration system:
http://embox1.demos.ibm.com:10001/GetUserIDRichUI/GetUserIDUI-en_US.html
IBM Software
Page 6 IBM Enterprise Modernization Sandbox – RDi Lab 02 – Editing RPG source
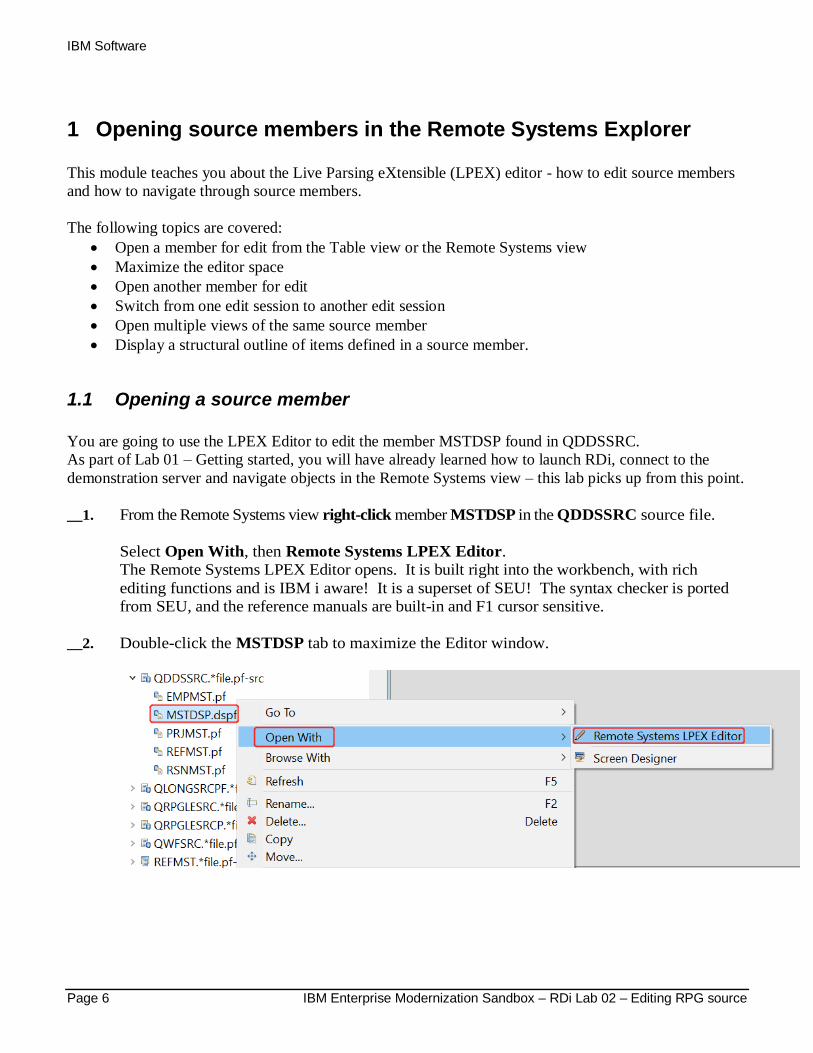
1 Opening source members in the Remote Systems Explorer
This module teaches you about the Live Parsing eXtensible (LPEX) editor - how to edit source members
and how to navigate through source members.
The following topics are covered:
• Open a member for edit from the Table view or the Remote Systems view
• Maximize the editor space
• Open another member for edit
• Switch from one edit session to another edit session
• Open multiple views of the same source member
• Display a structural outline of items defined in a source member.
1.1 Opening a source member
You are going to use the LPEX Editor to edit the member MSTDSP found in QDDSSRC.
As part of Lab 01 – Getting started, you will have already learned how to launch RDi, connect to the
demonstration server and navigate objects in the Remote Systems view – this lab picks up from this point.
__1. From the Remote Systems view right-click member MSTDSP in the QDDSSRC source file.
Select Open With, then Remote Systems LPEX Editor.
The Remote Systems LPEX Editor opens. It is built right into the workbench, with rich
editing functions and is IBM i aware! It is a superset of SEU! The syntax checker is ported
from SEU, and the reference manuals are built-in and F1 cursor sensitive.
__2. Double-click the MSTDSP tab to maximize the Editor window.

IBM Software
IBM Enterprise Modernization Sandbox – RDi Lab 02 – Editing RPG source Page 7
__3. Double-click the MSTDSP tab again to return the view to its original size.
Tip: To open IBM i™ members quickly, you can use the keyboard shortcut Ctrl+Alt+Q.
1.2 Opening a second source member and multiple views
Next let’s open a second member in the editor.
To open a second source member:
__1. In the Remote Systems view, double-click member PAYROLL in the QRPGLESRC source file.
You can easily switch between the two edit sessions.
IBM Software
Page 8 IBM Enterprise Modernization Sandbox – RDi Lab 02 – Editing RPG source
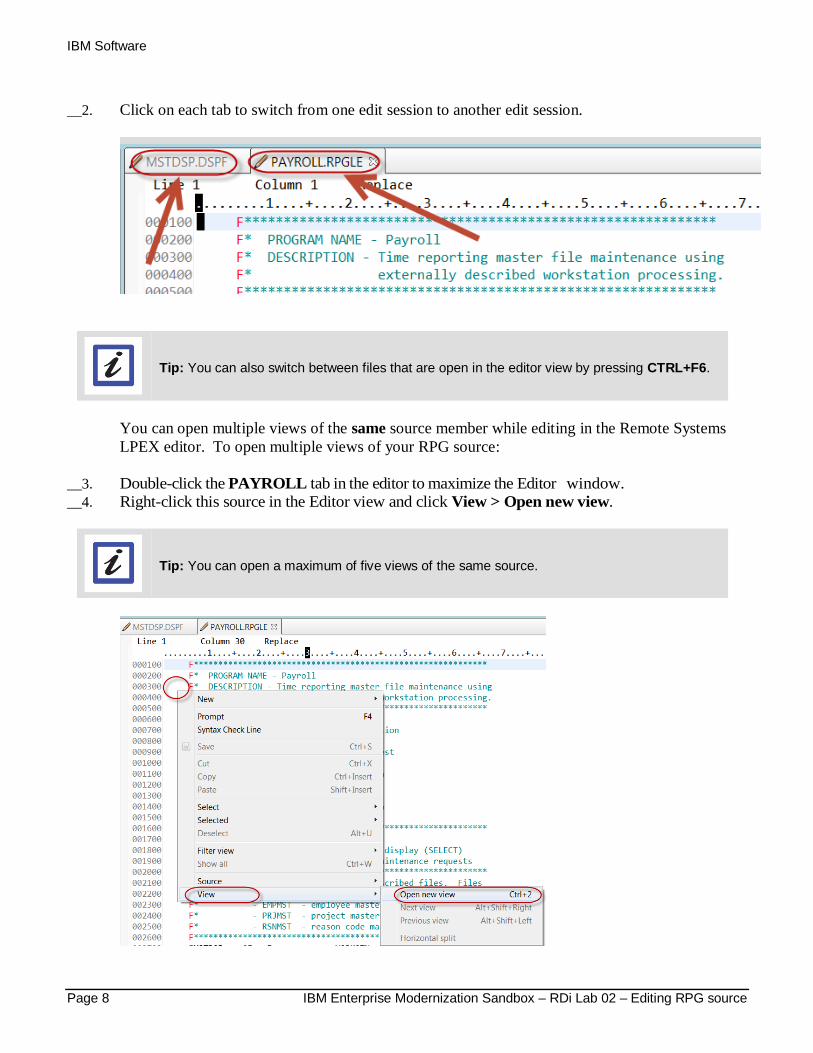
__2. Click on each tab to switch from one edit session to another edit session.
Tip: You can also switch between files that are open in the editor view by pressing CTRL+F6.
You can open multiple views of the same source member while editing in the Remote Systems
LPEX editor. To open multiple views of your RPG source:
__3. Double-click the PAYROLL tab in the editor to maximize the Editor window.
__4. Right-click this source in the Editor view and click View > Open new view.
Tip: You can open a maximum of five views of the same source.
IBM Software
IBM Enterprise Modernization Sandbox – RDi Lab 02 – Editing RPG source Page 9
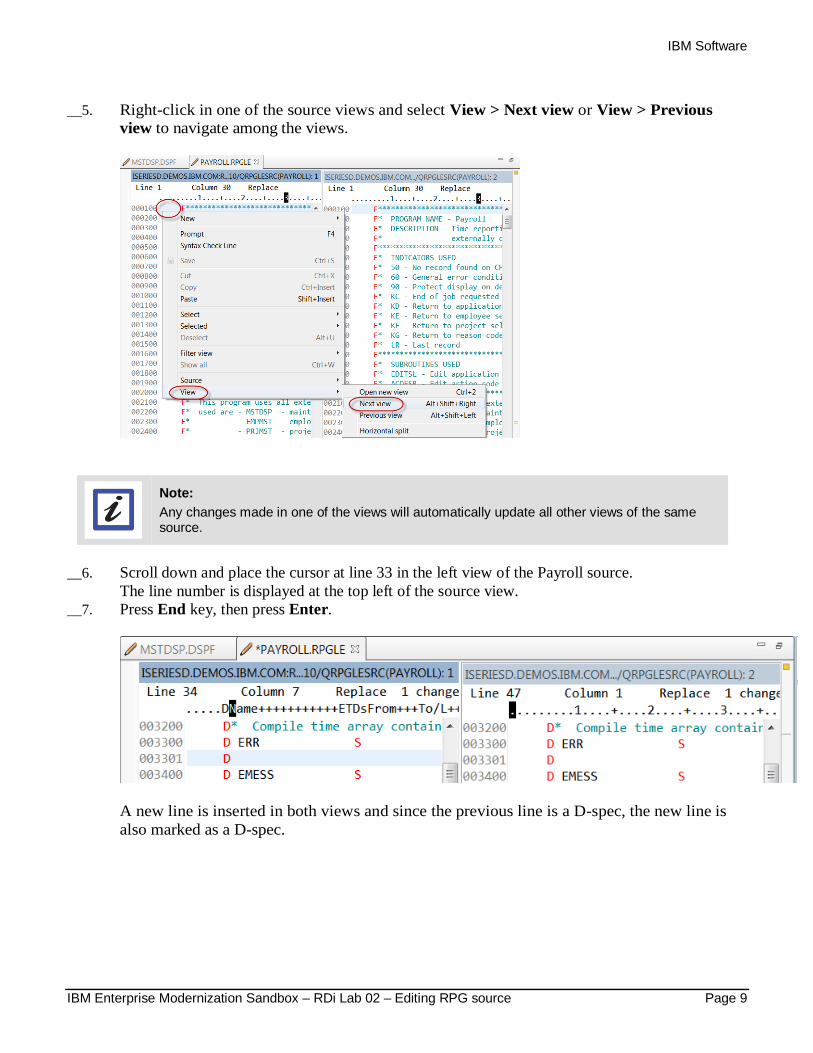
__5. Right-click in one of the source views and select View > Next view or View > Previous
view to navigate among the views.
__6. Scroll down and place the cursor at line 33 in the left view of the Payroll source.
The line number is displayed at the top left of the source view.
__7. Press End key, then press Enter.
A new line is inserted in both views and since the previous line is a D-spec, the new line is
also marked as a D-spec.
Note:
Any changes made in one of the views will automatically update all other views of the same source.
IBM Software
Page 10 IBM Enterprise Modernization Sandbox – RDi Lab 02 – Editing RPG source
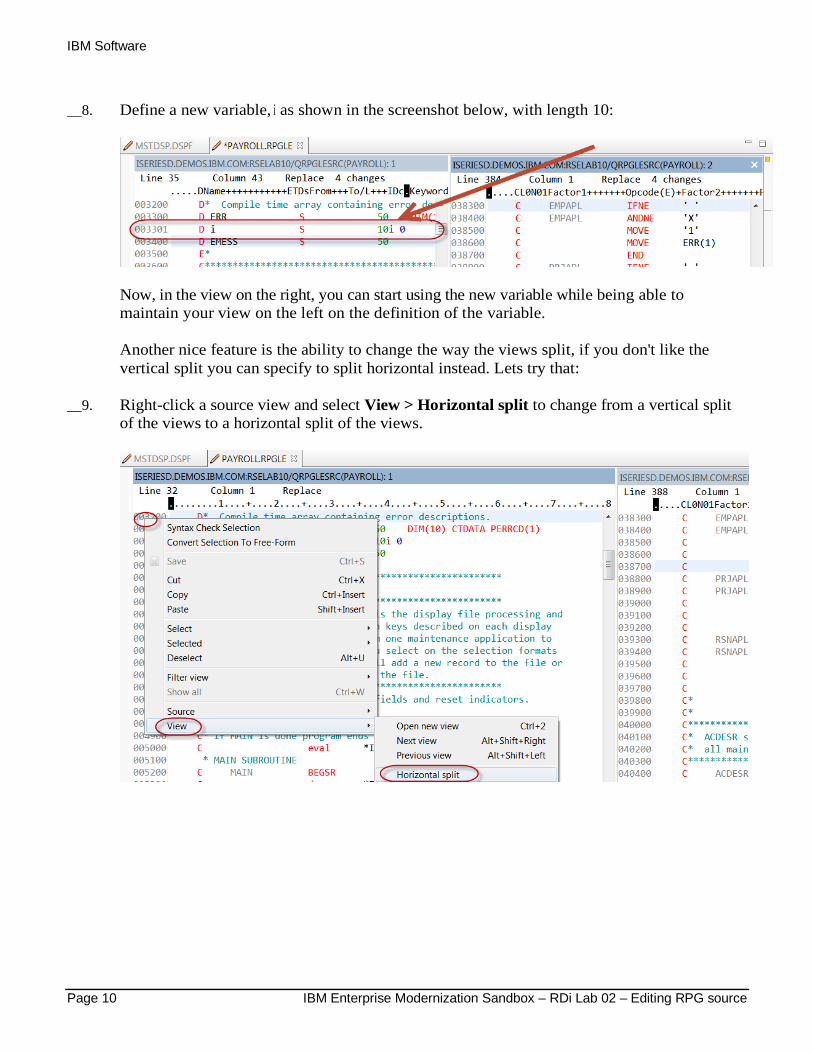
__8. Define a new variable, i as shown in the screenshot below, with length 10:
Now, in the view on the right, you can start using the new variable while being able to
maintain your view on the left on the definition of the variable.
Another nice feature is the ability to change the way the views split, if you don't like the
vertical split you can specify to split horizontal instead. Lets try that:
__9. Right-click a source view and select View > Horizontal split to change from a vertical split
of the views to a horizontal split of the views.
IBM Software
IBM Enterprise Modernization Sandbox – RDi Lab 02 – Editing RPG source Page 11
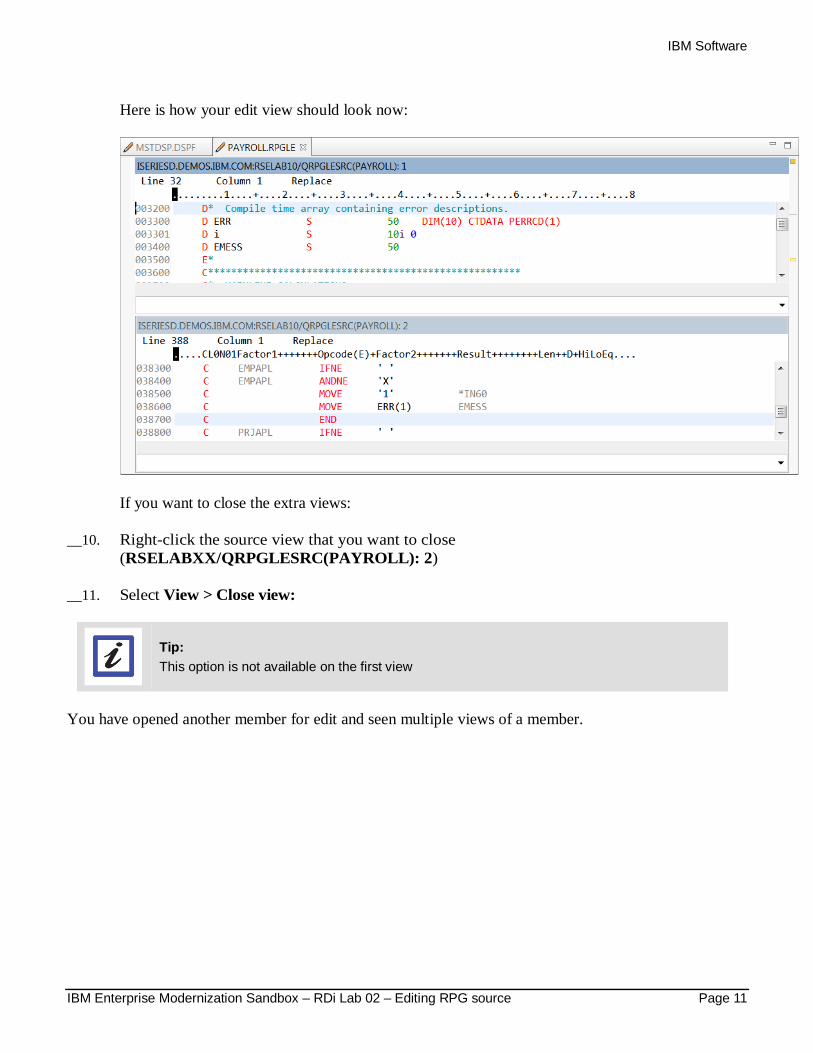
Here is how your edit view should look now:
If you want to close the extra views:
__10. Right-click the source view that you want to close
(RSELABXX/QRPGLESRC(PAYROLL): 2)
__11. Select View > Close view:
Tip:
This option is not available on the first view
You have opened another member for edit and seen multiple views of a member.

IBM Software
Page 12 IBM Enterprise Modernization Sandbox – RDi Lab 02 – Editing RPG source
1.3 Using the Outline view of a source member
The Outline view acts as an excellent resource when you want to navigate through RPG, COBOL and
DDS source in the Remote Systems LPEX editor. The Outline view displays a structural outline of items
defined in the file that you currently have opened in the Remote Systems LPEX editor window. With the
editor active, you can expand the file structure in the Outline view, and click various elements in the view
to jump to that location in the source itself.
To see an Outline view of your RPG source:
__1. Click the PAYROLL tab in the editor and click Refresh on the Outline view toolbar.
Tip:
If you have closed the Outline view previously, you can reset the perspective by selecting Window > Reset perspective from the workbench menu or Window > Show view > Other then expand General and click Outline in the Show view dialog.
The Outline view contains your source program in a tree view without the lines containing logic.
Now you want to see more details of your source member:
__2. Expand Files.
__3. Expand the MSTDSP workstation file.
__4. Expand the EMPSEL record format.
__5. Expand EMPNO.
IBM Software
IBM Enterprise Modernization Sandbox – RDi Lab 02 – Editing RPG source Page 13
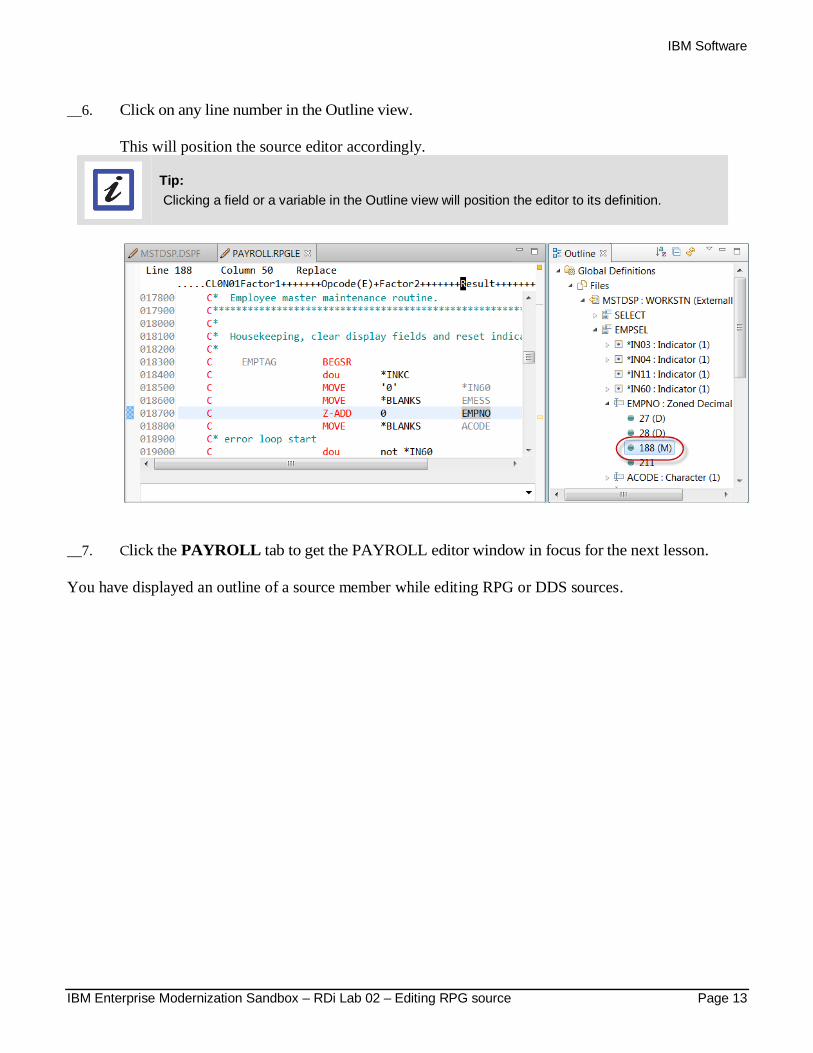
__6. Click on any line number in the Outline view.
This will position the source editor accordingly.
Tip:
Clicking a field or a variable in the Outline view will position the editor to its definition.
__7. Click the PAYROLL tab to get the PAYROLL editor window in focus for the next lesson.
You have displayed an outline of a source member while editing RPG or DDS sources.
IBM Software
Page 14 IBM Enterprise Modernization Sandbox – RDi Lab 02 – Editing RPG source
2 Working with the LPEX editor
This module teaches you how to edit a RPG source member, and learn about some of the Remote Systems
Explorer LPEX Editor’s language support features.
The following topics are covered:
• Change the default settings of the LPEX Editor Parsers
• Change the color settings and font used by the Editor
• Change the default behavior of the Enter key
• Use SEU commands to edit source
• Undo and redo source changes
• View language sensitive help for the MOVE operation code
• View a list of all help contents
• Limit the search of help to specific documents
• Search the help
• Request a prompt for a specification line
• Display context sensitive help for any field in the IBM i Source Prompter
• View the beginning and ending of constructs in your source
• Use the Find and Replace window to search for an item in your source
• Filter or subset your source
• Filter lines based on line type
• Search through members in a source physical file
• Compare different versions of a program and identify the differences
• Syntax check source by line
• View help on syntax errors
Your program editing tasks are simplified with the Remote Systems LPEX Editor. The editor can access
source files on your workstation or your IBM i system directly. When a compilation results in errors, you
can jump from the compiler messages to an editor containing the source. The editor opens with the cursor
positioned at the offending source statements so that you can correct them.
Here is a list of some of the basic editor features that you would expect in a workstation editor:
• Cut, copy, and paste
• Block marking of lines, characters, or rectangles with copy, move, and delete operations
• Powerful find and replace function
• Unlimited undo and redo
In addition there are a few more functions that you may not have seen in a workstation editor:
• Token highlighting where different language constructs are highlighted using different colors to
help identify them in a program
• SEU-like format-line rulers to show the purpose of each column for column-sensitive languages like
RPG and DDS. These rulers can automatically update themselves to reflect the current specification.
• SEU-like specification prompting for CL, RPG, and DDS
• Sequence numbers, which allow SEU-style commands in the prefix area
• Intelligent tabbing between columns for column-sensitive languages
IBM Software
IBM Enterprise Modernization Sandbox – RDi Lab 02 – Editing RPG source Page 15
• Automatic uppercasing for languages that expect uppercase
• Settings for column-sensitive languages that simplify text insertions and deletions
• On-line language reference
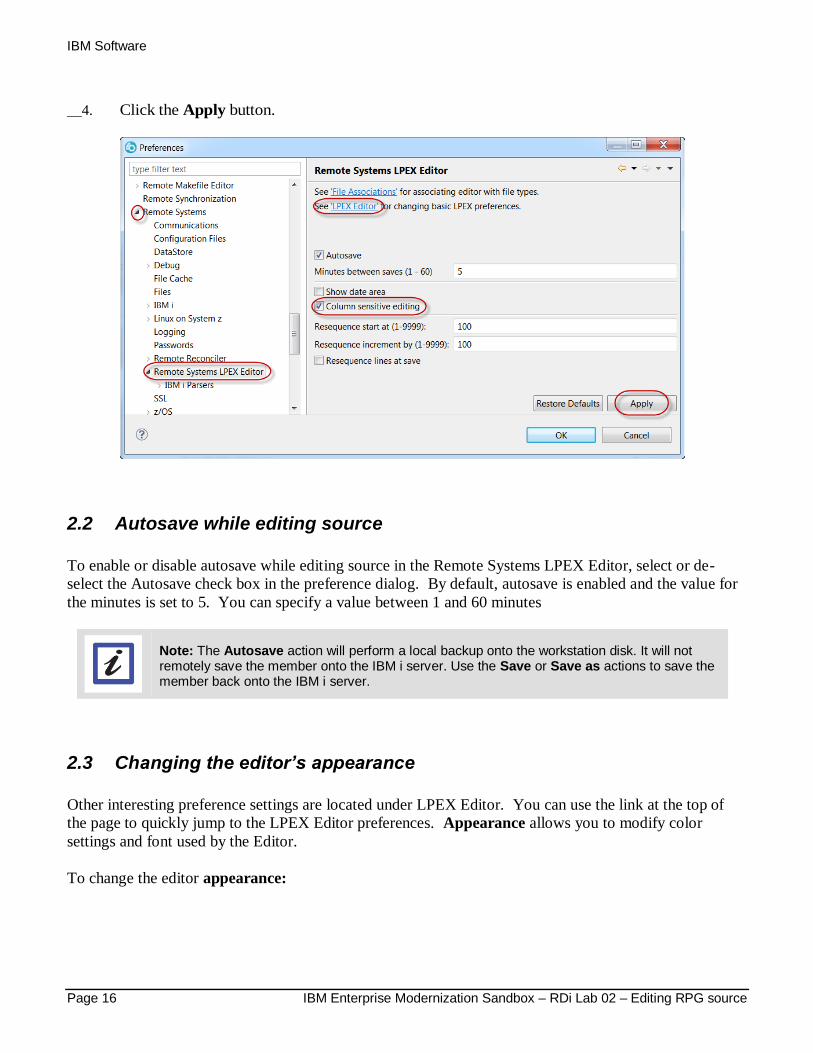
2.1 Changing default editor settings
The LPEX Editor has predefined settings, but also has an associated preferences page containing settings
that you can modify. The name of the preference category is LPEX Editor and it appears in the left pane
of the Preferences window.
You will change the default settings of LPEX Editor Parsers, Appearance and User Key Actions. LPEX
provides special support for insertion and deletion in column-sensitive languages. When column-
sensitive editing is selected, each column is considered as a separate entry space. For example, in an
RPG source member, if you are inserting into or deleting characters from a string that is in the Factor
2 entry, the Result field entry does not move. The default editor preference is that column-sensitive
editing is off. You can switch this support on by going to the workbench preferences window.
To set column sensitive editing:
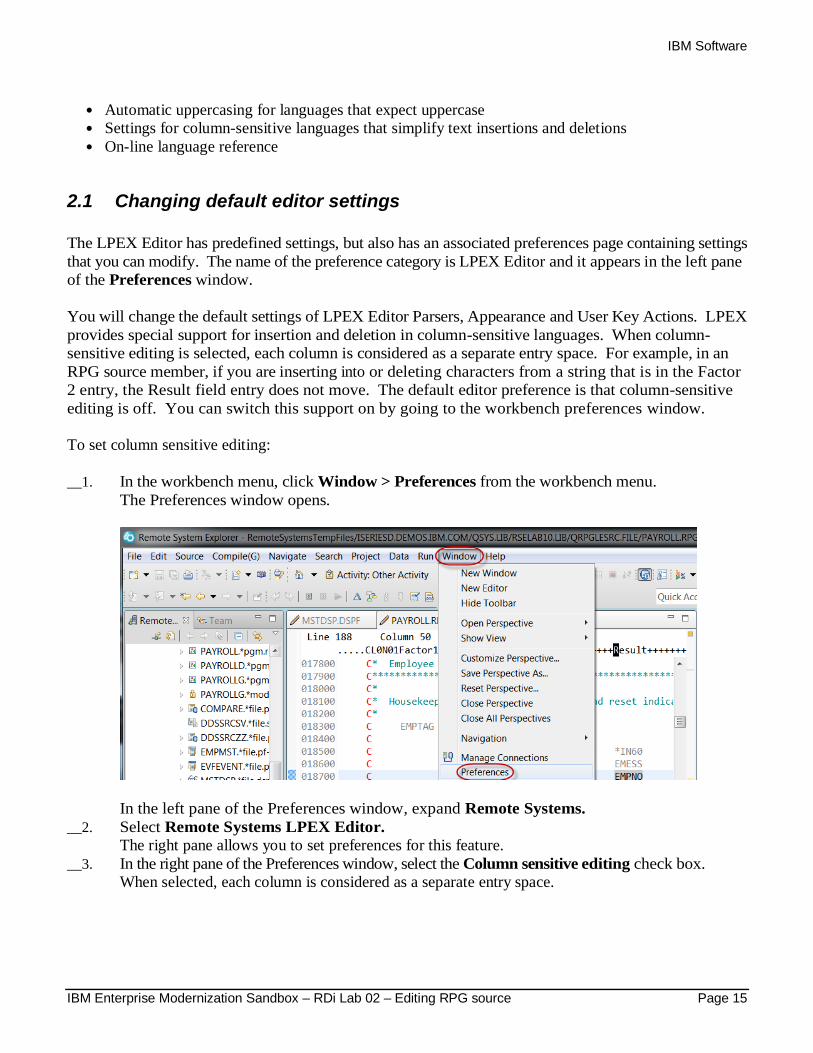
__1. In the workbench menu, click Window > Preferences from the workbench menu.
The Preferences window opens.
In the left pane of the Preferences window, expand Remote Systems.
__2. Select Remote Systems LPEX Editor.
The right pane allows you to set preferences for this feature.
__3. In the right pane of the Preferences window, select the Column sensitive editing check box.
When selected, each column is considered as a separate entry space.
IBM Software
Page 16 IBM Enterprise Modernization Sandbox – RDi Lab 02 – Editing RPG source
__4. Click the Apply button.
2.2 Autosave while editing source
To enable or disable autosave while editing source in the Remote Systems LPEX Editor, select or de-
select the Autosave check box in the preference dialog. By default, autosave is enabled and the value for
the minutes is set to 5. You can specify a value between 1 and 60 minutes
Note: The Autosave action will perform a local backup onto the workstation disk. It will not remotely save the member onto the IBM i server. Use the Save or Save as actions to save the member back onto the IBM i server.
2.3 Changing the editor’s appearance
Other interesting preference settings are located under LPEX Editor. You can use the link at the top of
the page to quickly jump to the LPEX Editor preferences. Appearance allows you to modify color
settings and font used by the Editor.
To change the editor appearance:
IBM Software
IBM Enterprise Modernization Sandbox – RDi Lab 02 – Editing RPG source Page 17
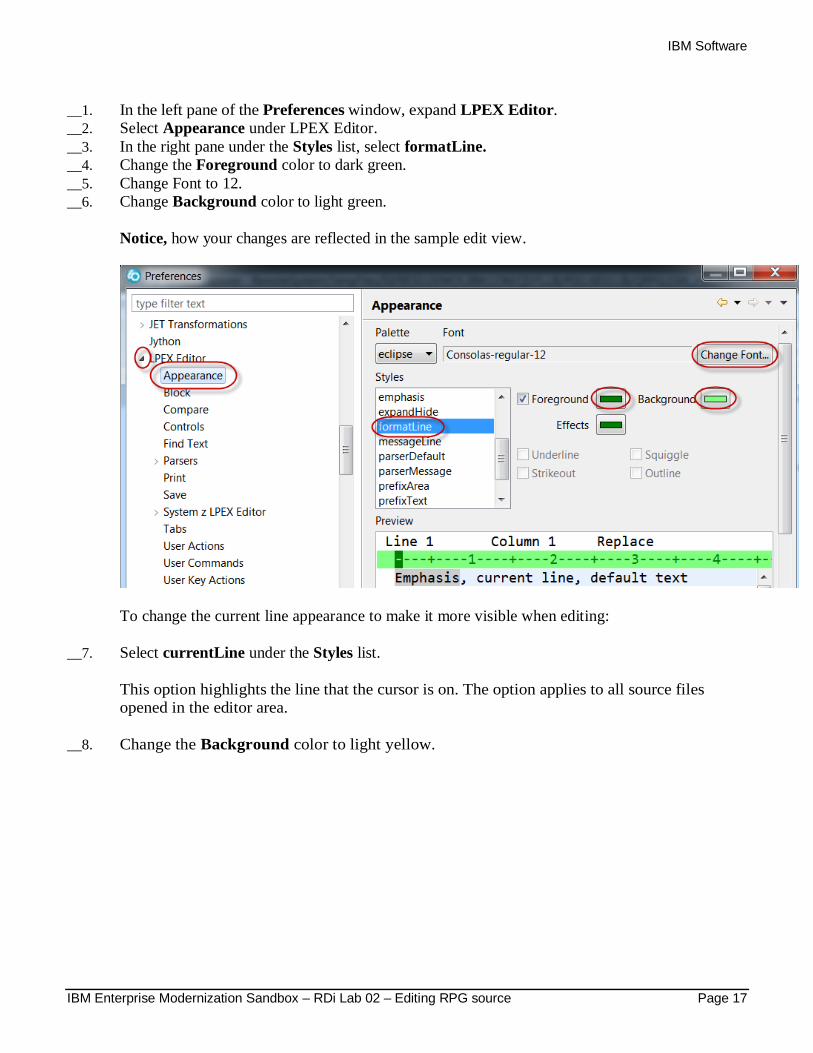
__1. In the left pane of the Preferences window, expand LPEX Editor.
__2. Select Appearance under LPEX Editor.
__3. In the right pane under the Styles list, select formatLine.
__4. Change the Foreground color to dark green.
__5. Change Font to 12.
__6. Change Background color to light green.
Notice, how your changes are reflected in the sample edit view.
To change the current line appearance to make it more visible when editing:
__7. Select currentLine under the Styles list.
This option highlights the line that the cursor is on. The option applies to all source files
opened in the editor area.
__8. Change the Background color to light yellow.
IBM Software
Page 18 IBM Enterprise Modernization Sandbox – RDi Lab 02 – Editing RPG source
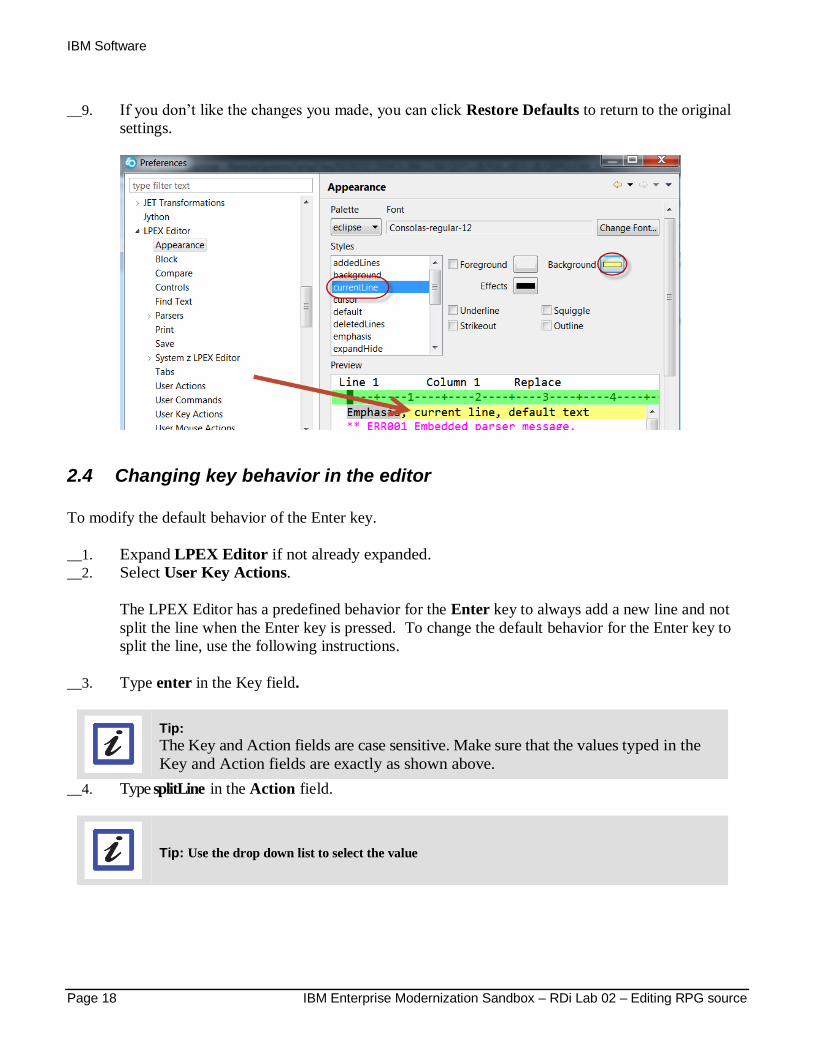
__9. If you don’t like the changes you made, you can click Restore Defaults to return to the original
settings.
2.4 Changing key behavior in the editor
To modify the default behavior of the Enter key.
__1. Expand LPEX Editor if not already expanded.
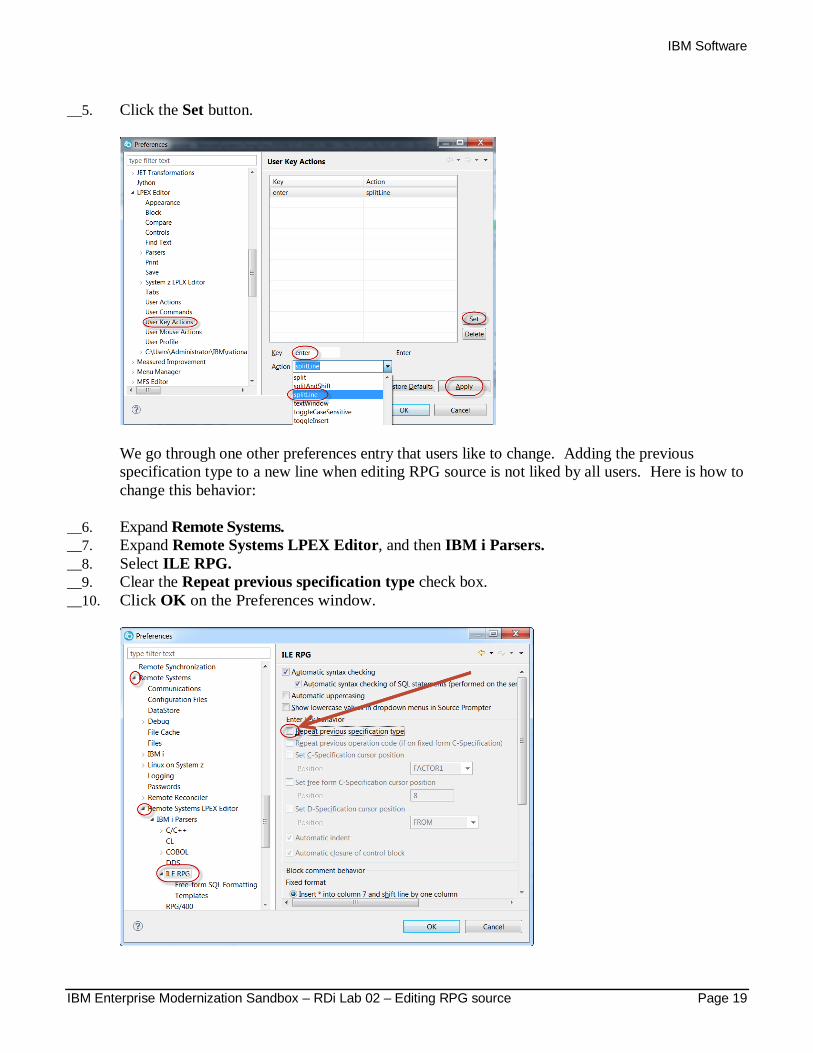
__2. Select User Key Actions.
The LPEX Editor has a predefined behavior for the Enter key to always add a new line and not
split the line when the Enter key is pressed. To change the default behavior for the Enter key to
split the line, use the following instructions.
__3. Type enter in the Key field.
Tip: The Key and Action fields are case sensitive. Make sure that the values typed in the
Key and Action fields are exactly as shown above.
__4. Type splitLine in the Action field.
Tip: Use the drop down list to select the value
IBM Software
IBM Enterprise Modernization Sandbox – RDi Lab 02 – Editing RPG source Page 19
__5. Click the Set button.
We go through one other preferences entry that users like to change. Adding the previous
specification type to a new line when editing RPG source is not liked by all users. Here is how to
change this behavior:
__6. Expand Remote Systems.
__7. Expand Remote Systems LPEX Editor, and then IBM i Parsers.
__8. Select ILE RPG.
__9. Clear the Repeat previous specification type check box.
__10. Click OK on the Preferences window.
IBM Software
Page 20 IBM Enterprise Modernization Sandbox – RDi Lab 02 – Editing RPG source
__11. Return to the Editor window.
Next let’s see the results of the customization.
2.5 Testing the editor customization
Notice that the line the cursor is on is now highlighted in the color you selected for it in the preference
setting for highlight current line.
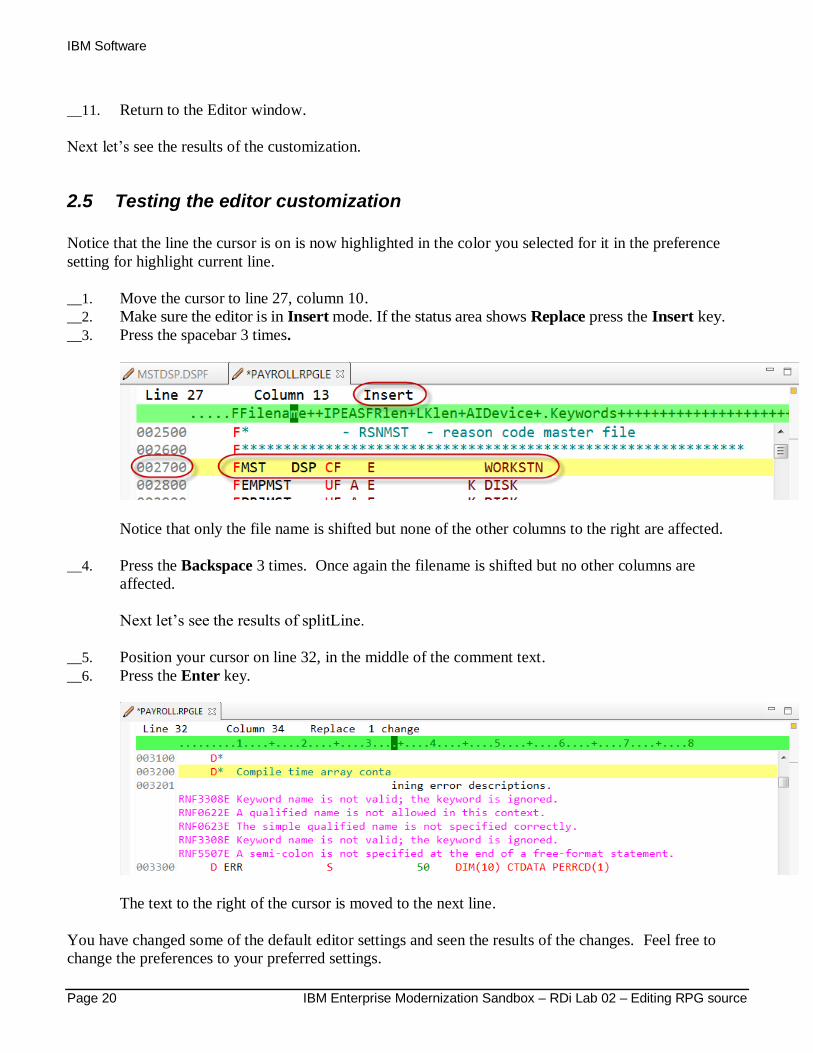
__1. Move the cursor to line 27, column 10.
__2. Make sure the editor is in Insert mode. If the status area shows Replace press the Insert key.
__3. Press the spacebar 3 times.
Notice that only the file name is shifted but none of the other columns to the right are affected.
__4. Press the Backspace 3 times. Once again the filename is shifted but no other columns are
affected.
Next let’s see the results of splitLine.
__5. Position your cursor on line 32, in the middle of the comment text.
__6. Press the Enter key.
The text to the right of the cursor is moved to the next line.
You have changed some of the default editor settings and seen the results of the changes. Feel free to
change the preferences to your preferred settings.
IBM Software
IBM Enterprise Modernization Sandbox – RDi Lab 02 – Editing RPG source Page 21
2.6 Using SEU commands in the LPEX editor
You can configure the LPEX Editor to adopt the keyboard and command personalities of many popular
editors. Most editor profiles differ only in the keys and commands used to perform various editor tasks.
Some base editor profiles, listed below, also add prefix information and a command area at the start of
each line:
• ispf
• seu
• xedit
The editor recognizes prefix commands used by these editor profiles. Depending on which profile you
are using, you can enter SEU, XEDIT, or ISPF commands when the prefix area is active. If you are an
SEU expert you will appreciate the ability to use SEU commands.
To enter SEU commands:
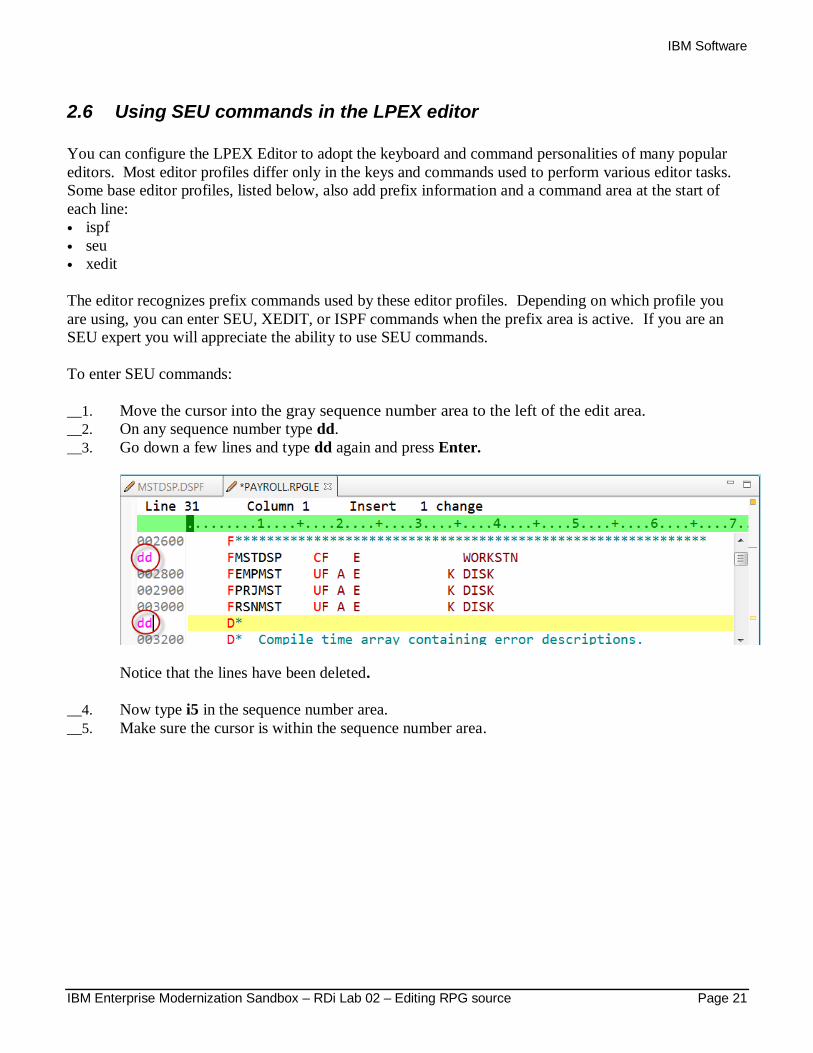
__1. Move the cursor into the gray sequence number area to the left of the edit area.
__2. On any sequence number type dd.
__3. Go down a few lines and type dd again and press Enter.
Notice that the lines have been deleted.
__4. Now type i5 in the sequence number area.
__5. Make sure the cursor is within the sequence number area.
IBM Software
Page 22 IBM Enterprise Modernization Sandbox – RDi Lab 02 – Editing RPG source
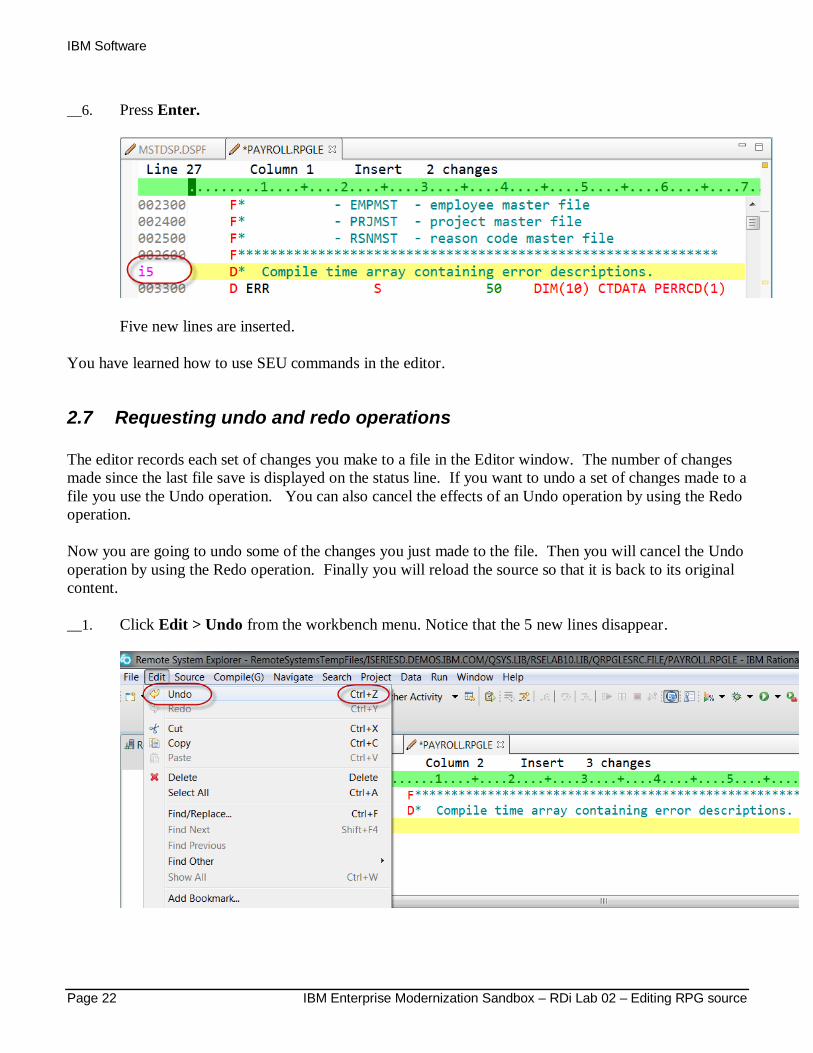
__6. Press Enter.
Five new lines are inserted.
You have learned how to use SEU commands in the editor.
2.7 Requesting undo and redo operations
The editor records each set of changes you make to a file in the Editor window. The number of changes
made since the last file save is displayed on the status line. If you want to undo a set of changes made to a
file you use the Undo operation. You can also cancel the effects of an Undo operation by using the Redo
operation.
Now you are going to undo some of the changes you just made to the file. Then you will cancel the Undo
operation by using the Redo operation. Finally you will reload the source so that it is back to its original
content.
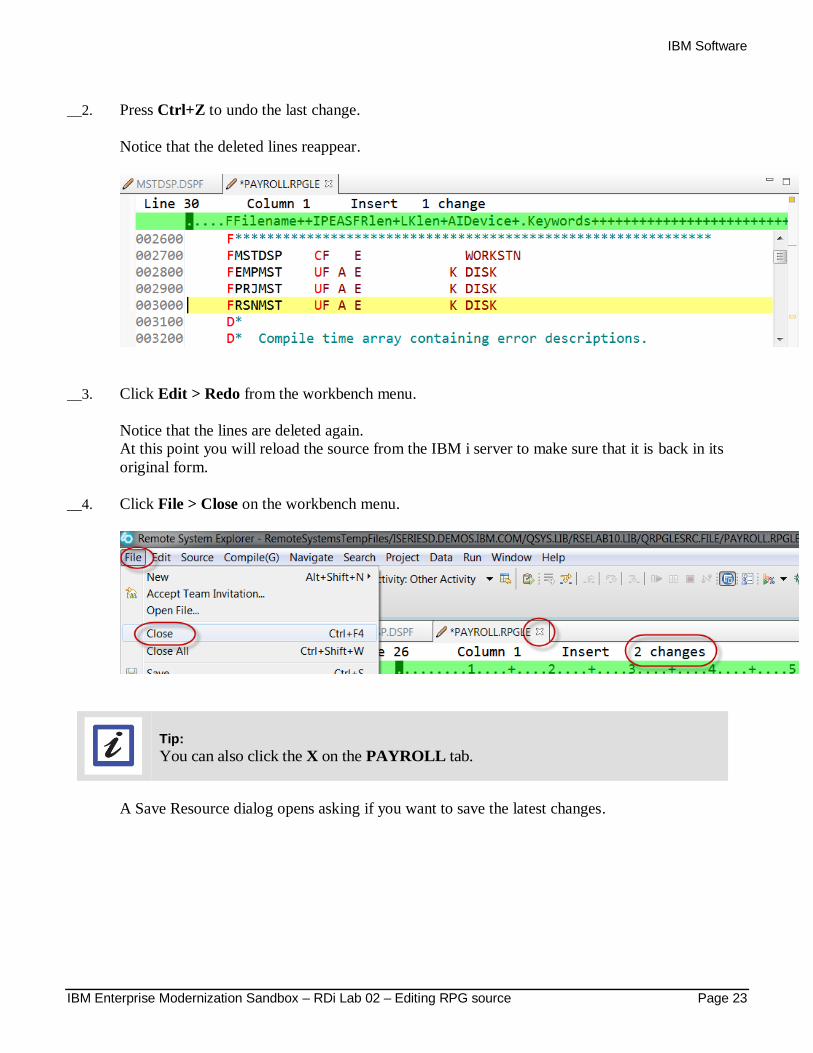
__1. Click Edit > Undo from the workbench menu. Notice that the 5 new lines disappear.
IBM Software
IBM Enterprise Modernization Sandbox – RDi Lab 02 – Editing RPG source Page 23
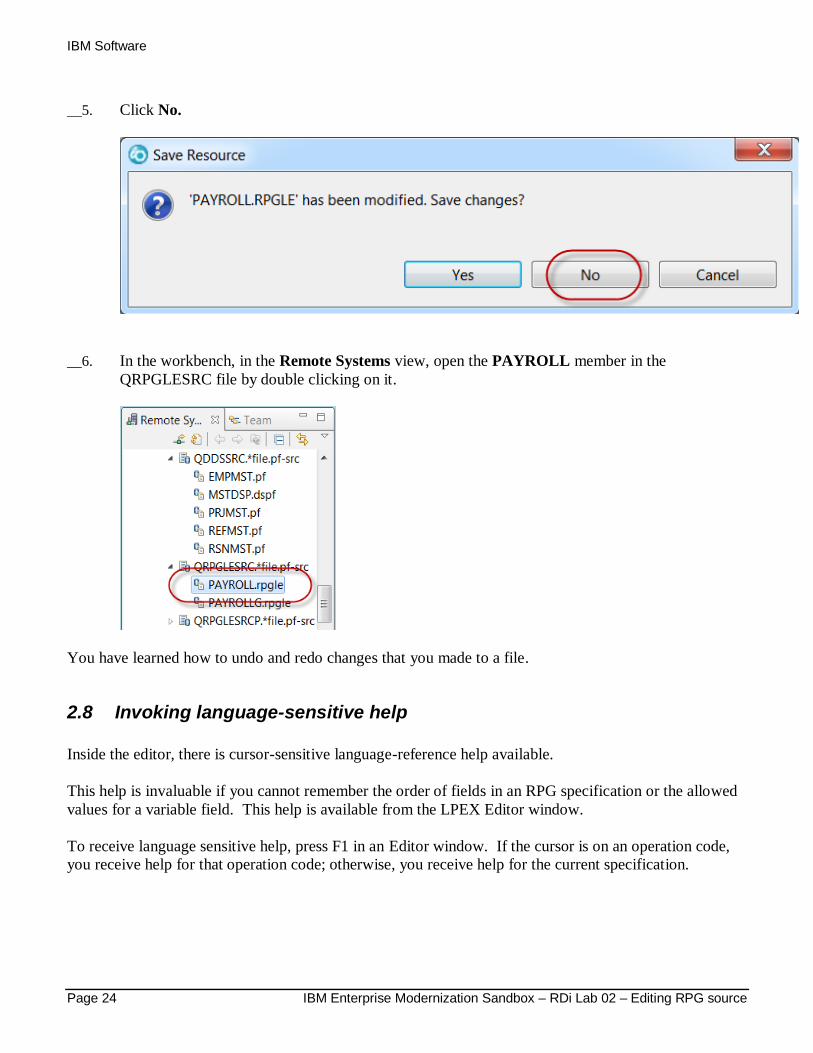
__2. Press Ctrl+Z to undo the last change.
Notice that the deleted lines reappear.
__3. Click Edit > Redo from the workbench menu.
Notice that the lines are deleted again.
At this point you will reload the source from the IBM i server to make sure that it is back in its
original form.
__4. Click File > Close on the workbench menu.
Tip:
You can also click the X on the PAYROLL tab.
A Save Resource dialog opens asking if you want to save the latest changes.
IBM Software
Page 24 IBM Enterprise Modernization Sandbox – RDi Lab 02 – Editing RPG source
__5. Click No.
__6. In the workbench, in the Remote Systems view, open the PAYROLL member in the
QRPGLESRC file by double clicking on it.
You have learned how to undo and redo changes that you made to a file.
2.8 Invoking language-sensitive help
Inside the editor, there is cursor-sensitive language-reference help available.
This help is invaluable if you cannot remember the order of fields in an RPG specification or the allowed
values for a variable field. This help is available from the LPEX Editor window.
To receive language sensitive help, press F1 in an Editor window. If the cursor is on an operation code,
you receive help for that operation code; otherwise, you receive help for the current specification.
IBM Software
IBM Enterprise Modernization Sandbox – RDi Lab 02 – Editing RPG source Page 25
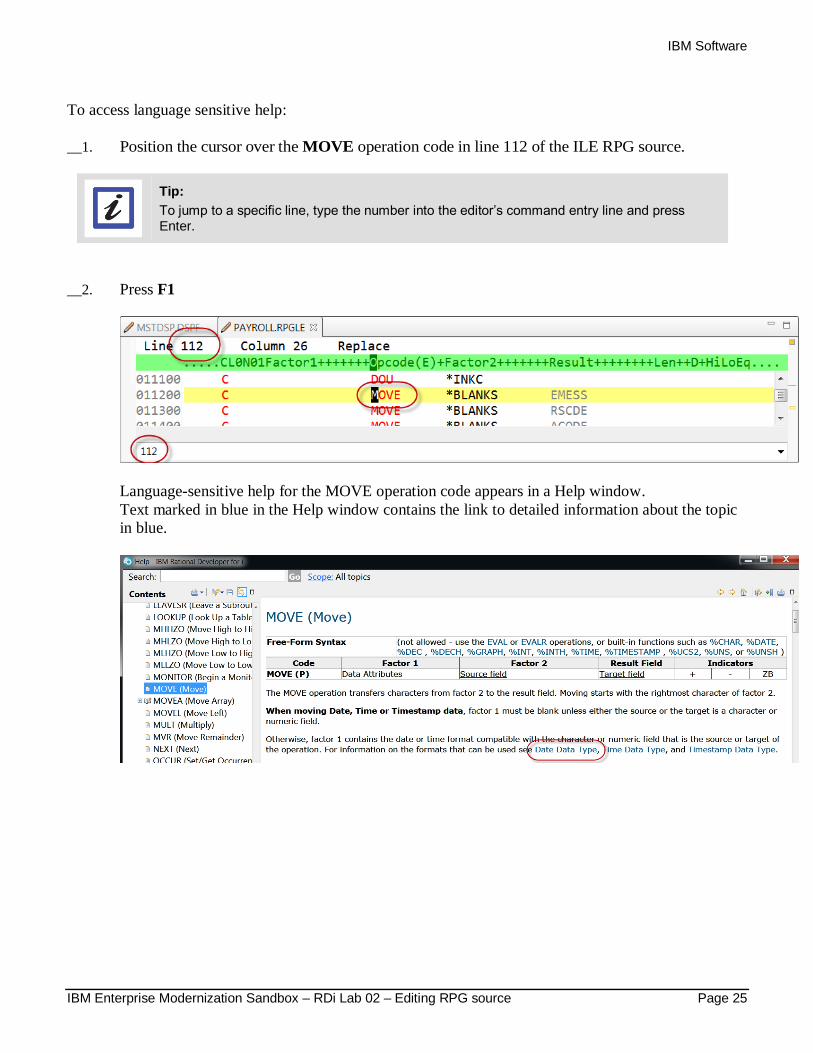
To access language sensitive help:
__1. Position the cursor over the MOVE operation code in line 112 of the ILE RPG source.
Tip:
To jump to a specific line, type the number into the editor’s command entry line and press Enter.
__2. Press F1
Language-sensitive help for the MOVE operation code appears in a Help window.
Text marked in blue in the Help window contains the link to detailed information about the topic
in blue.

IBM Software
Page 26 IBM Enterprise Modernization Sandbox – RDi Lab 02 – Editing RPG source
__3. Click the link Date Data Type.
.
The Help page for Date Data Type is displayed.
__4. Explore the Help window to see what else is available.
__5. Close the Help window.
__6. Select Help > Help Contents on the workbench menu.
You can see the help that is available in the product.
To locate the language reference information for ILE RPG, in the left pane of the Help window:
__7. Expand Rational Developer for i 9.X.
__8. Expand Reference.
__9. Expand Language reference.
__10. Expand IBM i programming information.
__11. Expand High-level languages.
__12. Expand ILE RPG.
IBM Software
IBM Enterprise Modernization Sandbox – RDi Lab 02 – Editing RPG source Page 27
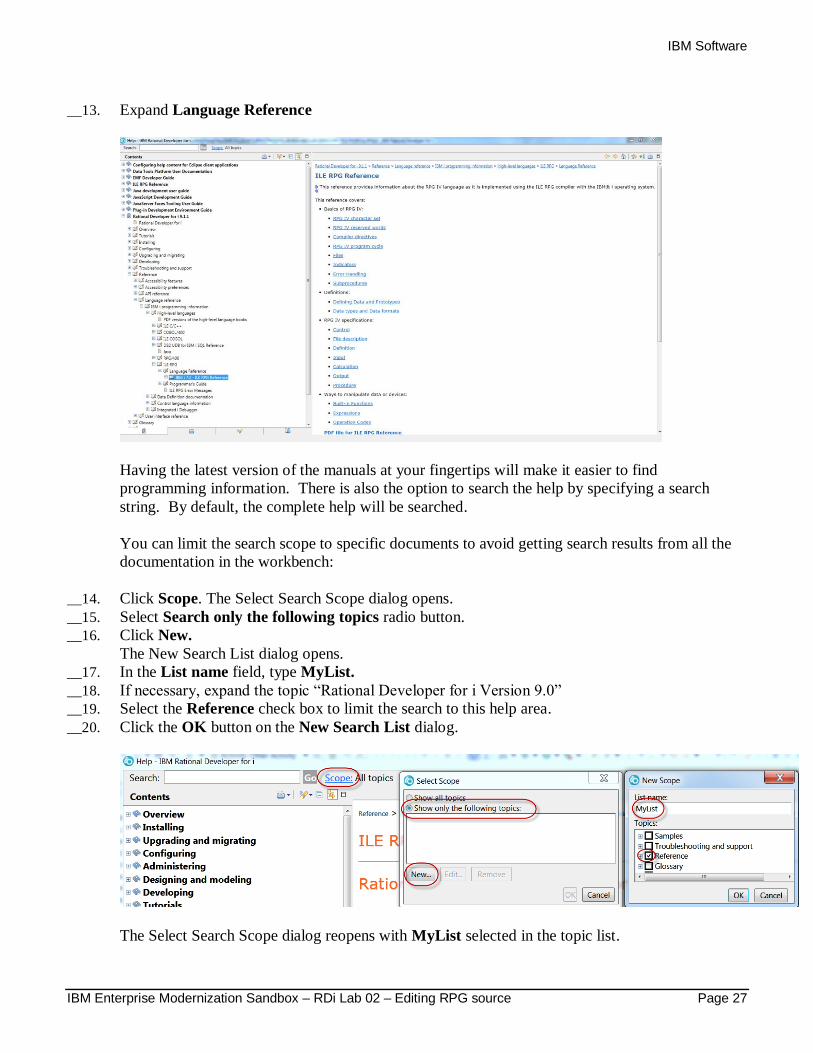
__13. Expand Language Reference
Having the latest version of the manuals at your fingertips will make it easier to find
programming information. There is also the option to search the help by specifying a search
string. By default, the complete help will be searched.
You can limit the search scope to specific documents to avoid getting search results from all the
documentation in the workbench:
__14. Click Scope. The Select Search Scope dialog opens.
__15. Select Search only the following topics radio button.
__16. Click New.
The New Search List dialog opens.
__17. In the List name field, type MyList.
__18. If necessary, expand the topic “Rational Developer for i Version 9.0”
__19. Select the Reference check box to limit the search to this help area.
__20. Click the OK button on the New Search List dialog.
The Select Search Scope dialog reopens with MyList selected in the topic list.
IBM Software
Page 28 IBM Enterprise Modernization Sandbox – RDi Lab 02 – Editing RPG source
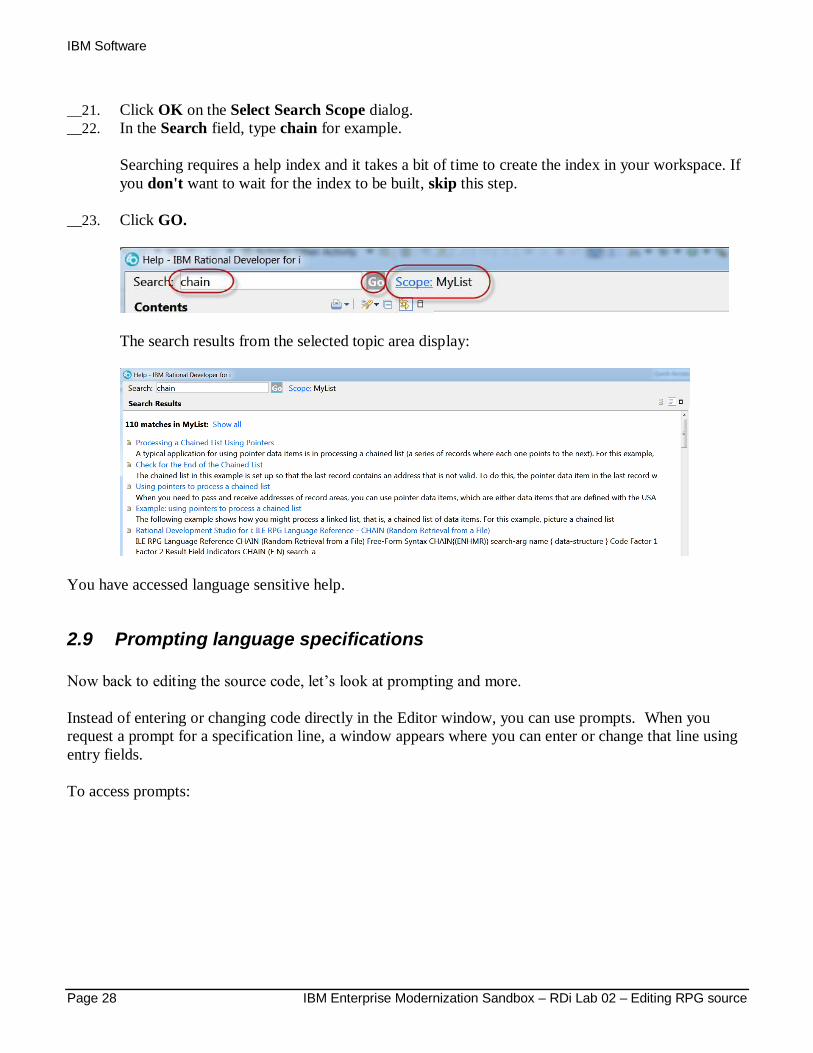
__21. Click OK on the Select Search Scope dialog.
__22. In the Search field, type chain for example.
Searching requires a help index and it takes a bit of time to create the index in your workspace. If
you don't want to wait for the index to be built, skip this step.
__23. Click GO.
The search results from the selected topic area display:
You have accessed language sensitive help.
2.9 Prompting language specifications
Now back to editing the source code, let’s look at prompting and more.
Instead of entering or changing code directly in the Editor window, you can use prompts. When you
request a prompt for a specification line, a window appears where you can enter or change that line using
entry fields.
To access prompts:
IBM Software
IBM Enterprise Modernization Sandbox – RDi Lab 02 – Editing RPG source Page 29
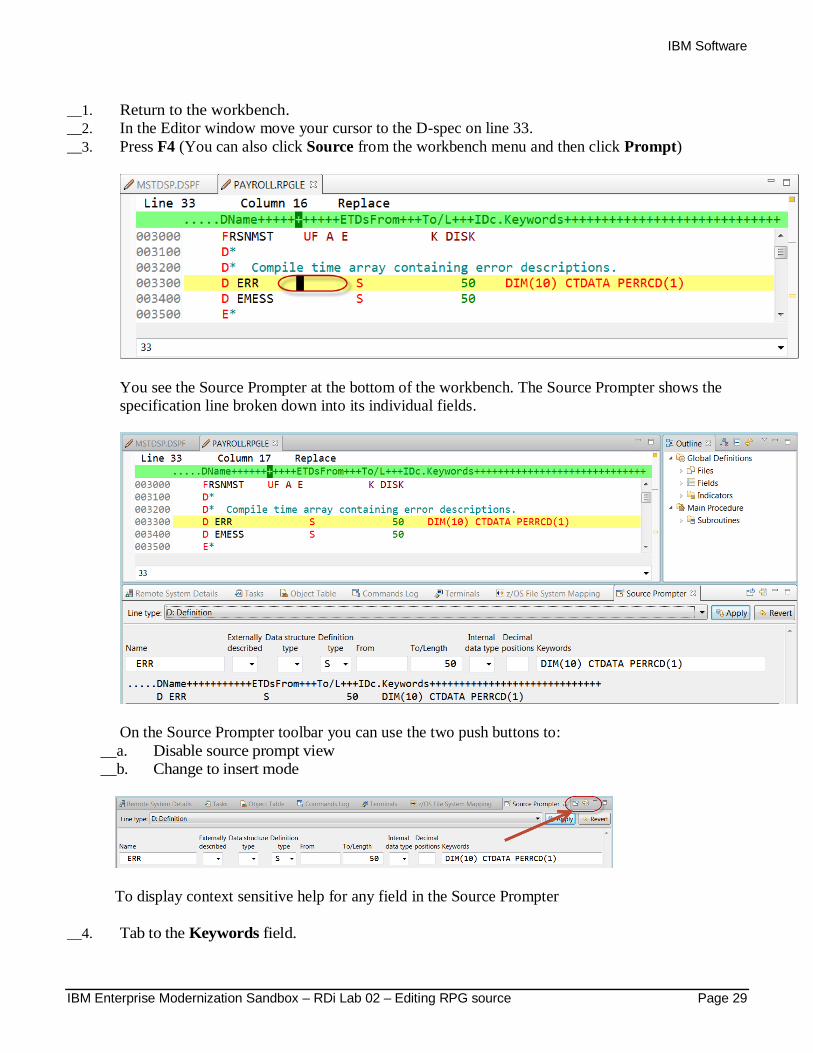
__1. Return to the workbench.
__2. In the Editor window move your cursor to the D-spec on line 33.
__3. Press F4 (You can also click Source from the workbench menu and then click Prompt)
You see the Source Prompter at the bottom of the workbench. The Source Prompter shows the
specification line broken down into its individual fields.
On the Source Prompter toolbar you can use the two push buttons to:
__a. Disable source prompt view
__b. Change to insert mode
To display context sensitive help for any field in the Source Prompter
__4. Tab to the Keywords field.
IBM Software
Page 30 IBM Enterprise Modernization Sandbox – RDi Lab 02 – Editing RPG source
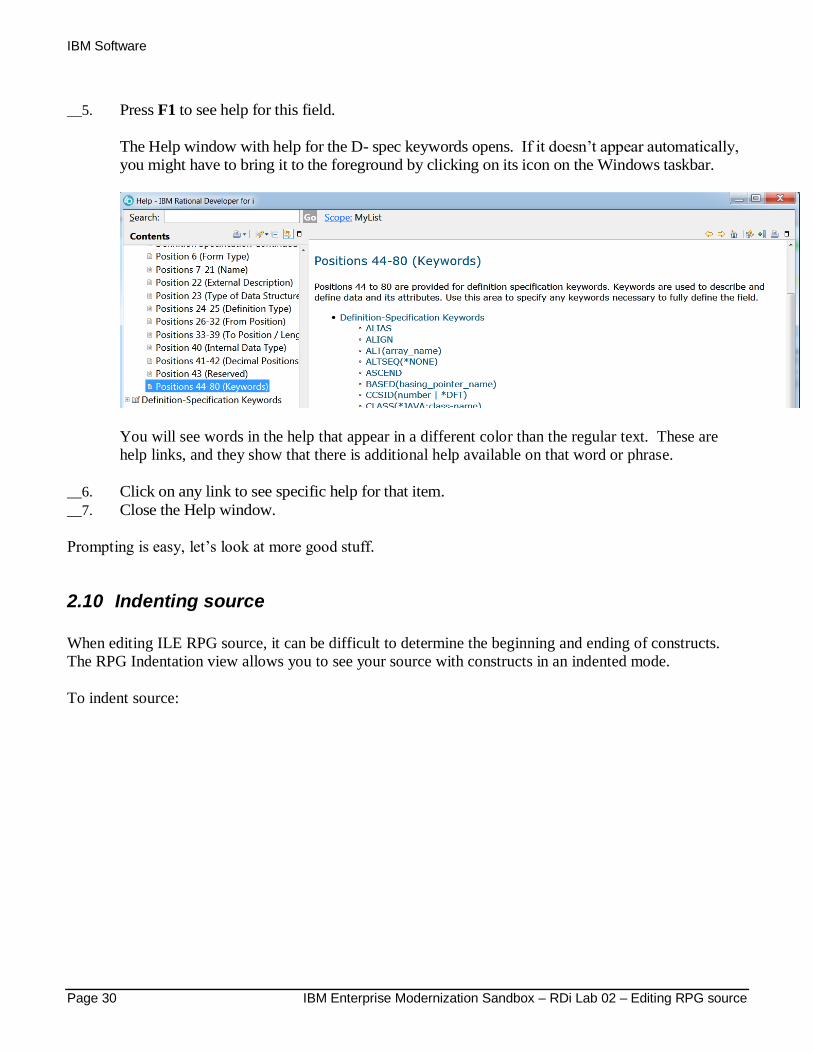
__5. Press F1 to see help for this field.
The Help window with help for the D- spec keywords opens. If it doesn’t appear automatically,
you might have to bring it to the foreground by clicking on its icon on the Windows taskbar.
You will see words in the help that appear in a different color than the regular text. These are
help links, and they show that there is additional help available on that word or phrase.
__6. Click on any link to see specific help for that item.
__7. Close the Help window.
Prompting is easy, let’s look at more good stuff.
2.10 Indenting source
When editing ILE RPG source, it can be difficult to determine the beginning and ending of constructs.
The RPG Indentation view allows you to see your source with constructs in an indented mode.
To indent source:
IBM Software
IBM Enterprise Modernization Sandbox – RDi Lab 02 – Editing RPG source Page 31
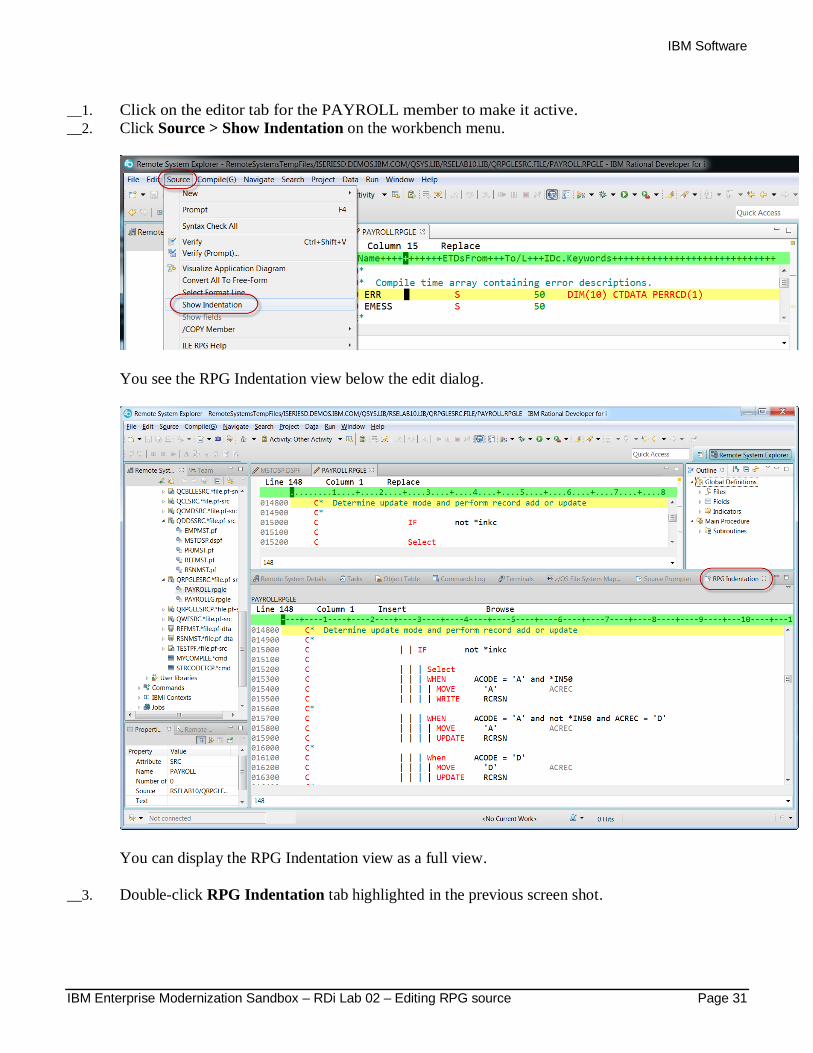
__1. Click on the editor tab for the PAYROLL member to make it active.
__2. Click Source > Show Indentation on the workbench menu.
You see the RPG Indentation view below the edit dialog.
You can display the RPG Indentation view as a full view.
__3. Double-click RPG Indentation tab highlighted in the previous screen shot.

IBM Software
Page 32 IBM Enterprise Modernization Sandbox – RDi Lab 02 – Editing RPG source
__4. Go to line 148.
The line shown on the status bar is the cursor position. In the Indent view you see some nested
conditions with indented lines. As you will notice this helps to recognize the beginning and
ending of these conditions.
Tip:
The RPG Indentation view is Browse mode only and cannot be edited.
__5. Click the X in the top right corner of the Indentation view to close it.
__6. If necessary, double-click on any of the tabs to restore the perspective from its maximized state.
__7. Click any of the tabs to show the editor again.
You have used the RPG Indentation view to see the beginning and ending of constructs.
2.11 Finding and replacing text
The LPEX Editor also has a powerful find and replace text feature. You use the Find and Replace
window to search for an item. You can search for a word, a partial word, or a sequence of such. You can
also enter a pattern you want to match, provided that the pattern follows the rules of regular expression.
You can replace the found search item. If the entered text or pattern is found, the cursor moves to either
the next or previous occurrence of the search item, according to your chosen search direction, and
replaces the found text according to your selections.
To find and replace text:
IBM Software
IBM Enterprise Modernization Sandbox – RDi Lab 02 – Editing RPG source Page 33
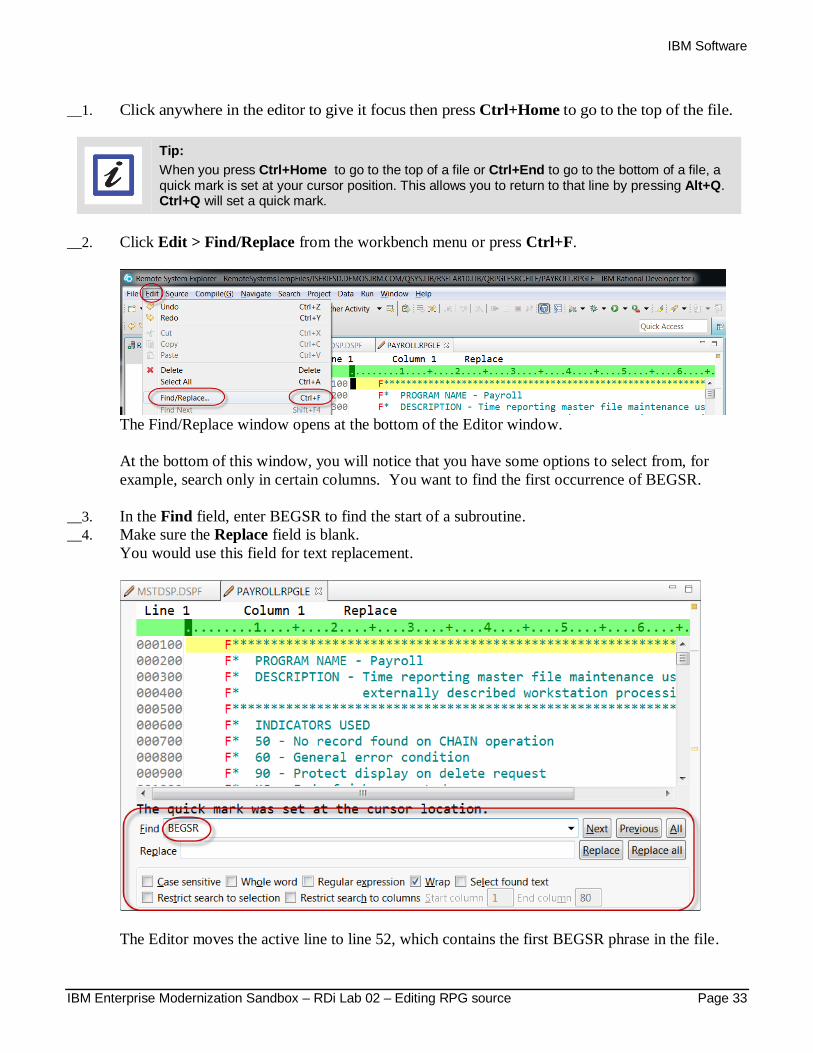
__1. Click anywhere in the editor to give it focus then press Ctrl+Home to go to the top of the file.
Tip:
When you press Ctrl+Home to go to the top of a file or Ctrl+End to go to the bottom of a file, a quick mark is set at your cursor position. This allows you to return to that line by pressing Alt+Q. Ctrl+Q will set a quick mark.
__2. Click Edit > Find/Replace from the workbench menu or press Ctrl+F.
The Find/Replace window opens at the bottom of the Editor window.
At the bottom of this window, you will notice that you have some options to select from, for
example, search only in certain columns. You want to find the first occurrence of BEGSR.
__3. In the Find field, enter BEGSR to find the start of a subroutine.
__4. Make sure the Replace field is blank.
You would use this field for text replacement.
The Editor moves the active line to line 52, which contains the first BEGSR phrase in the file.
IBM Software
Page 34 IBM Enterprise Modernization Sandbox – RDi Lab 02 – Editing RPG source
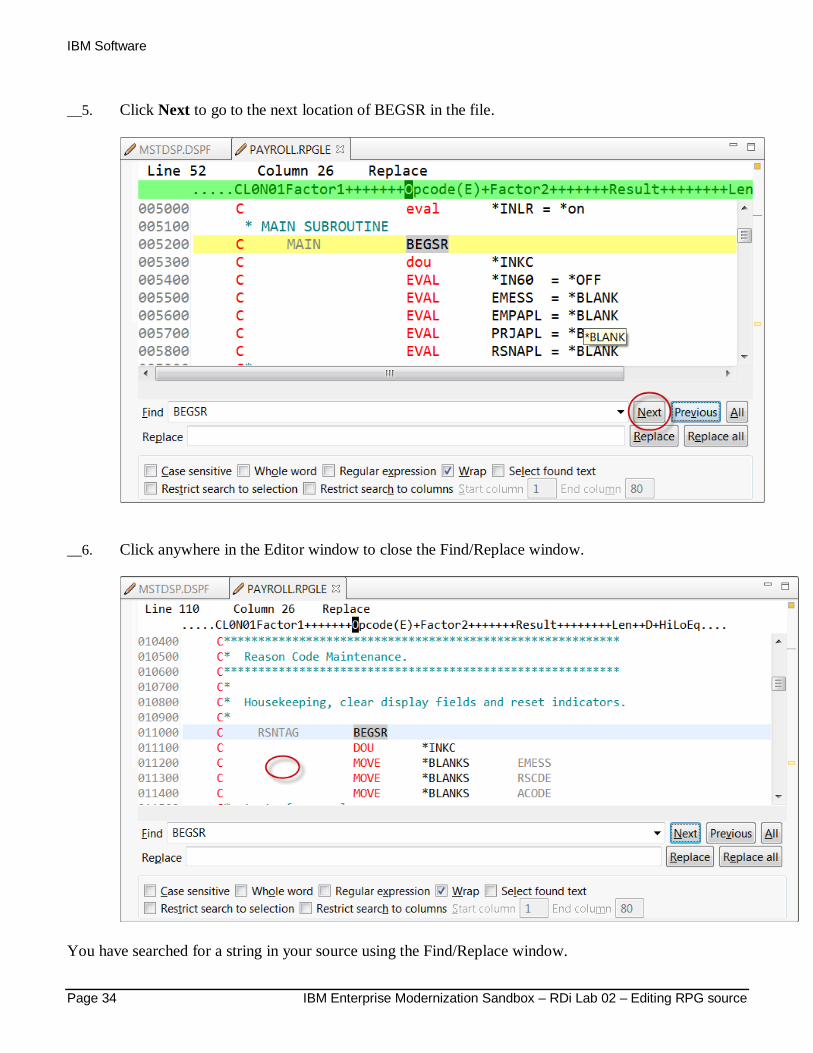
__5. Click Next to go to the next location of BEGSR in the file.
__6. Click anywhere in the Editor window to close the Find/Replace window.
You have searched for a string in your source using the Find/Replace window.
IBM Software
IBM Enterprise Modernization Sandbox – RDi Lab 02 – Editing RPG source Page 35
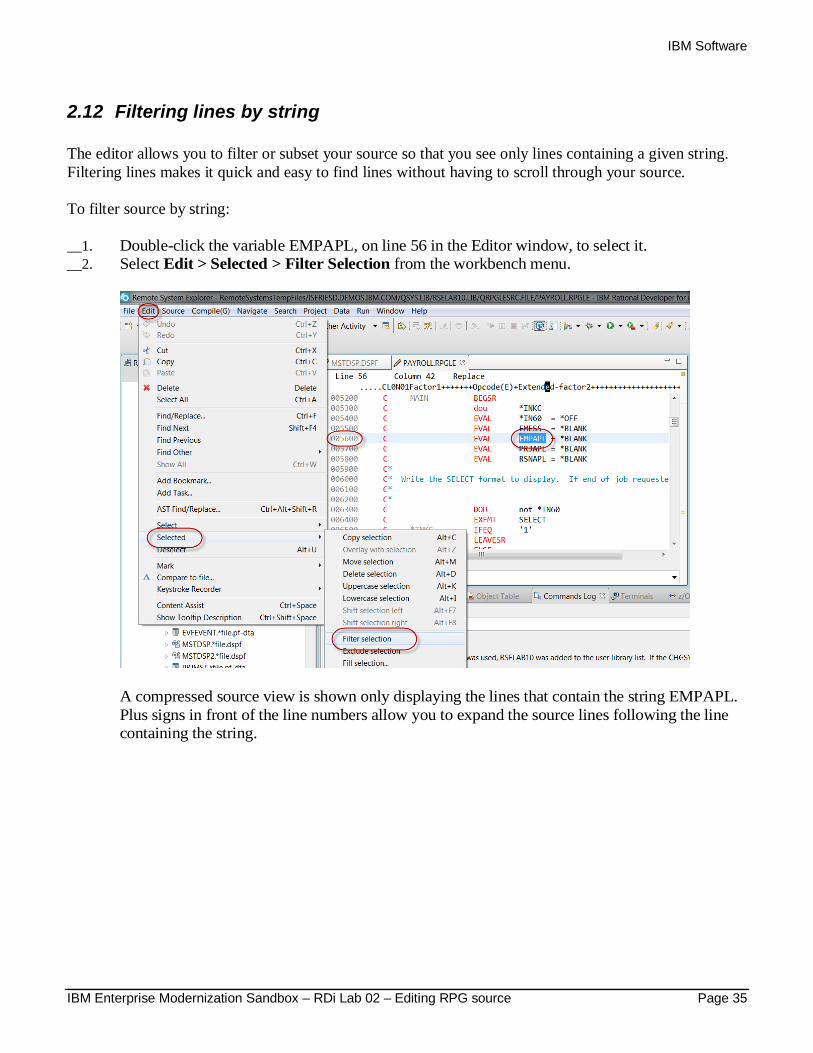
2.12 Filtering lines by string
The editor allows you to filter or subset your source so that you see only lines containing a given string.
Filtering lines makes it quick and easy to find lines without having to scroll through your source.
To filter source by string:
__1. Double-click the variable EMPAPL, on line 56 in the Editor window, to select it.
__2. Select Edit > Selected > Filter Selection from the workbench menu.
A compressed source view is shown only displaying the lines that contain the string EMPAPL.
Plus signs in front of the line numbers allow you to expand the source lines following the line
containing the string.
IBM Software
Page 36 IBM Enterprise Modernization Sandbox – RDi Lab 02 – Editing RPG source
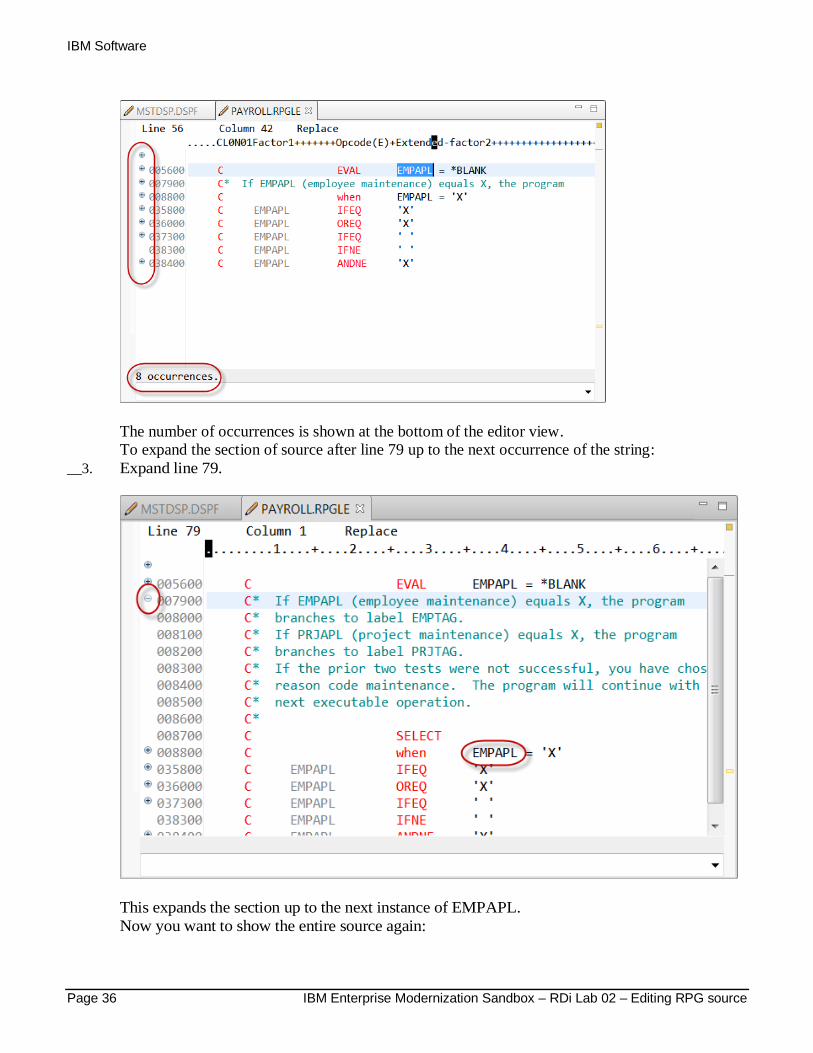
The number of occurrences is shown at the bottom of the editor view.
To expand the section of source after line 79 up to the next occurrence of the string:
__3. Expand line 79.
This expands the section up to the next instance of EMPAPL.
Now you want to show the entire source again:
IBM Software
IBM Enterprise Modernization Sandbox – RDi Lab 02 – Editing RPG source Page 37
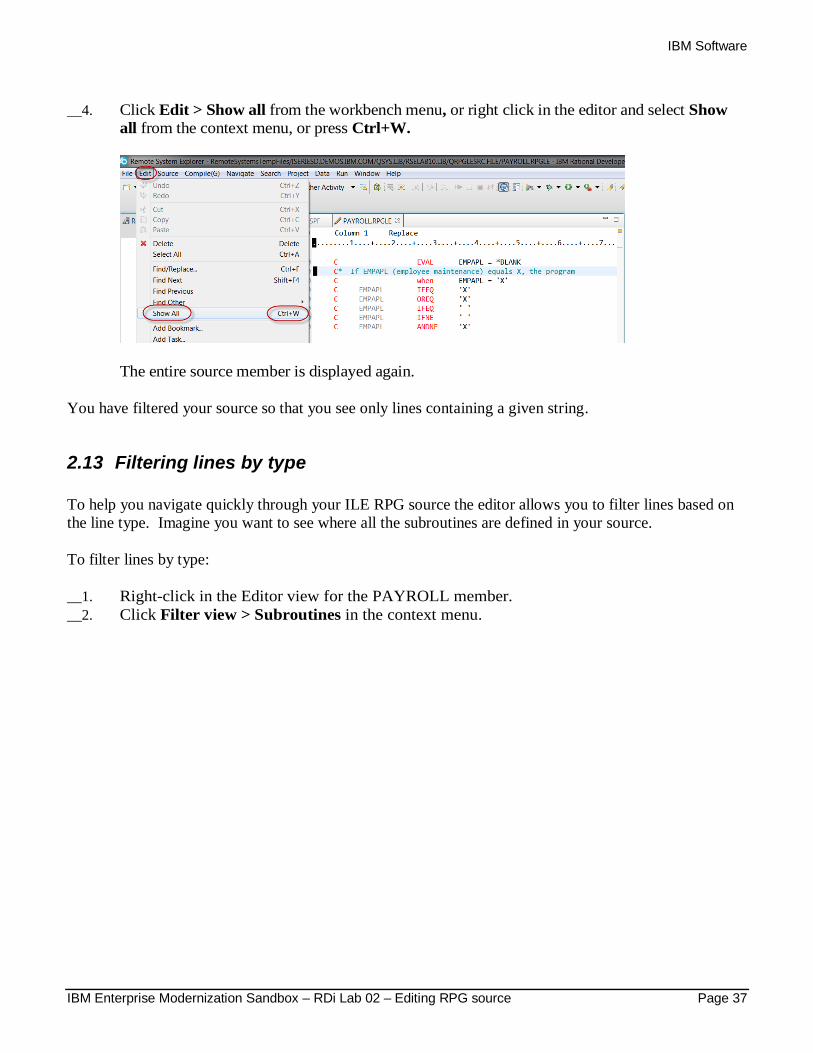
__4. Click Edit > Show all from the workbench menu, or right click in the editor and select Show
all from the context menu, or press Ctrl+W.
The entire source member is displayed again.
You have filtered your source so that you see only lines containing a given string.
2.13 Filtering lines by type
To help you navigate quickly through your ILE RPG source the editor allows you to filter lines based on
the line type. Imagine you want to see where all the subroutines are defined in your source.
To filter lines by type:
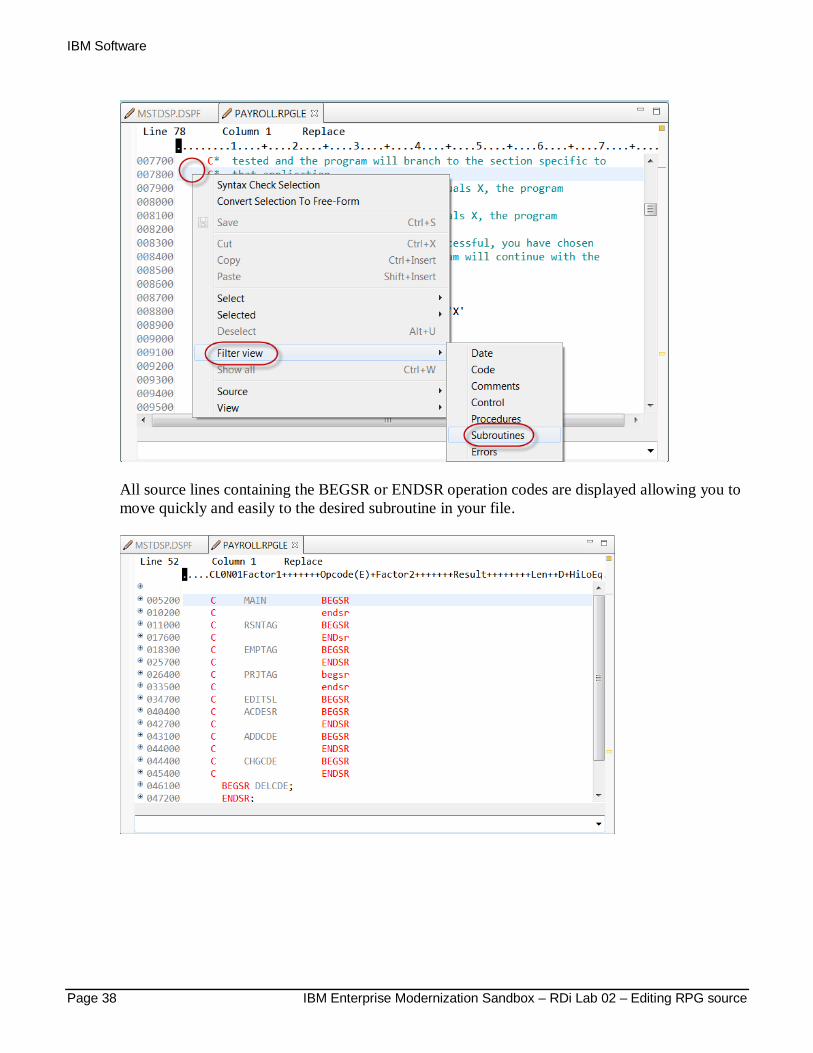
__1. Right-click in the Editor view for the PAYROLL member.
__2. Click Filter view > Subroutines in the context menu.
IBM Software
Page 38 IBM Enterprise Modernization Sandbox – RDi Lab 02 – Editing RPG source
All source lines containing the BEGSR or ENDSR operation codes are displayed allowing you to
move quickly and easily to the desired subroutine in your file.
IBM Software
IBM Enterprise Modernization Sandbox – RDi Lab 02 – Editing RPG source Page 39
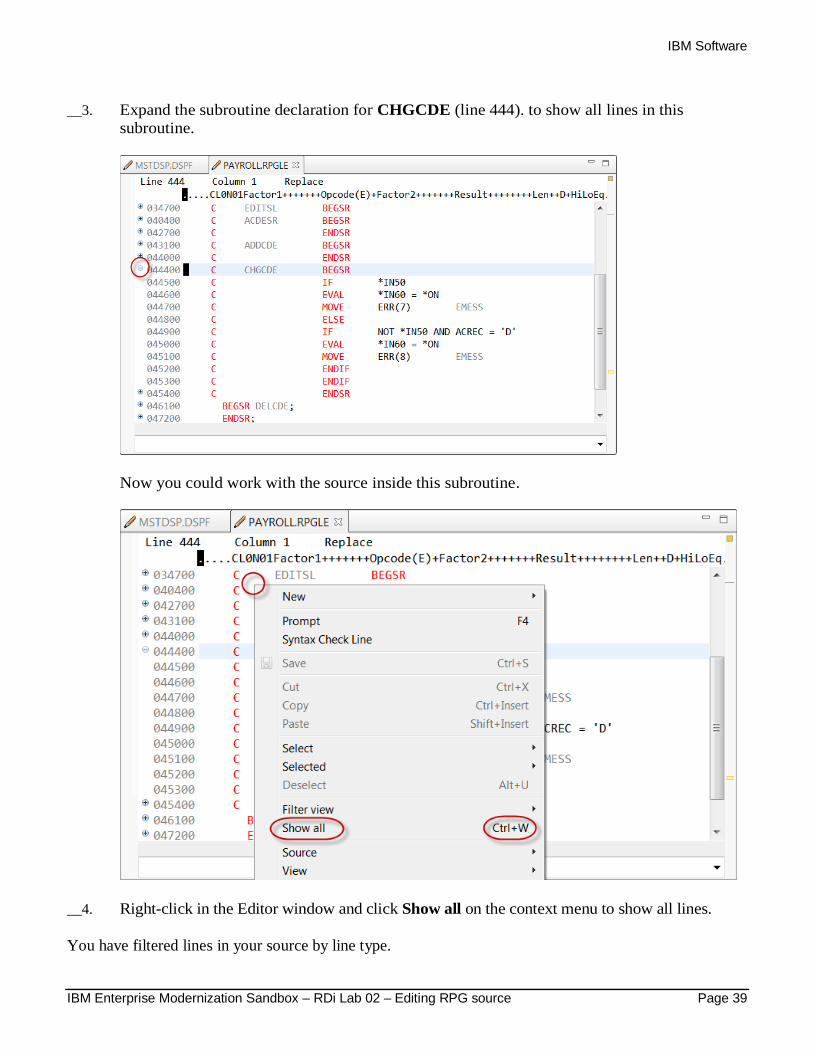
__3. Expand the subroutine declaration for CHGCDE (line 444). to show all lines in this
subroutine.
Now you could work with the source inside this subroutine.
__4. Right-click in the Editor window and click Show all on the context menu to show all lines.
You have filtered lines in your source by line type.
IBM Software
Page 40 IBM Enterprise Modernization Sandbox – RDi Lab 02 – Editing RPG source
2.14 Searching multiple files
If you would like to search through the members in a source physical file or through the files in a local
directory, you can use the Search tool. The Multi-File Search utility allows you to search for a particular
string of text in many members on the host. This function can also be used on local files.
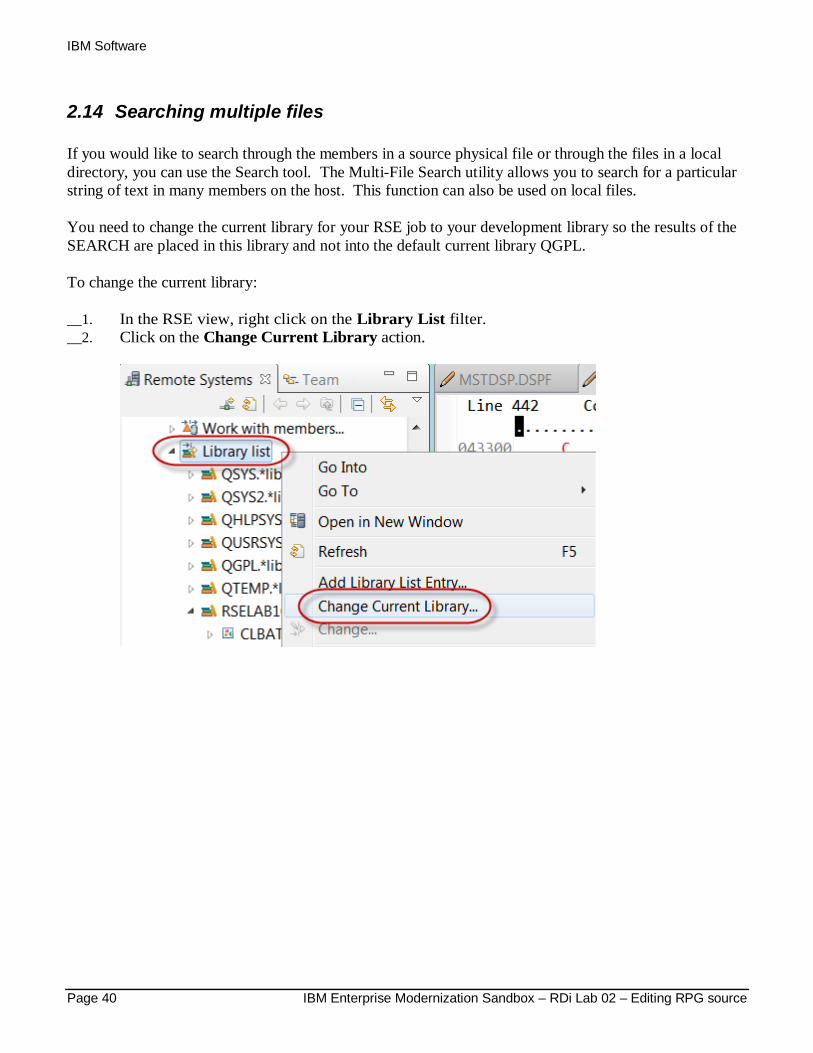
You need to change the current library for your RSE job to your development library so the results of the
SEARCH are placed in this library and not into the default current library QGPL.
To change the current library:
__1. In the RSE view, right click on the Library List filter.
__2. Click on the Change Current Library action.
IBM Software
IBM Enterprise Modernization Sandbox – RDi Lab 02 – Editing RPG source Page 41
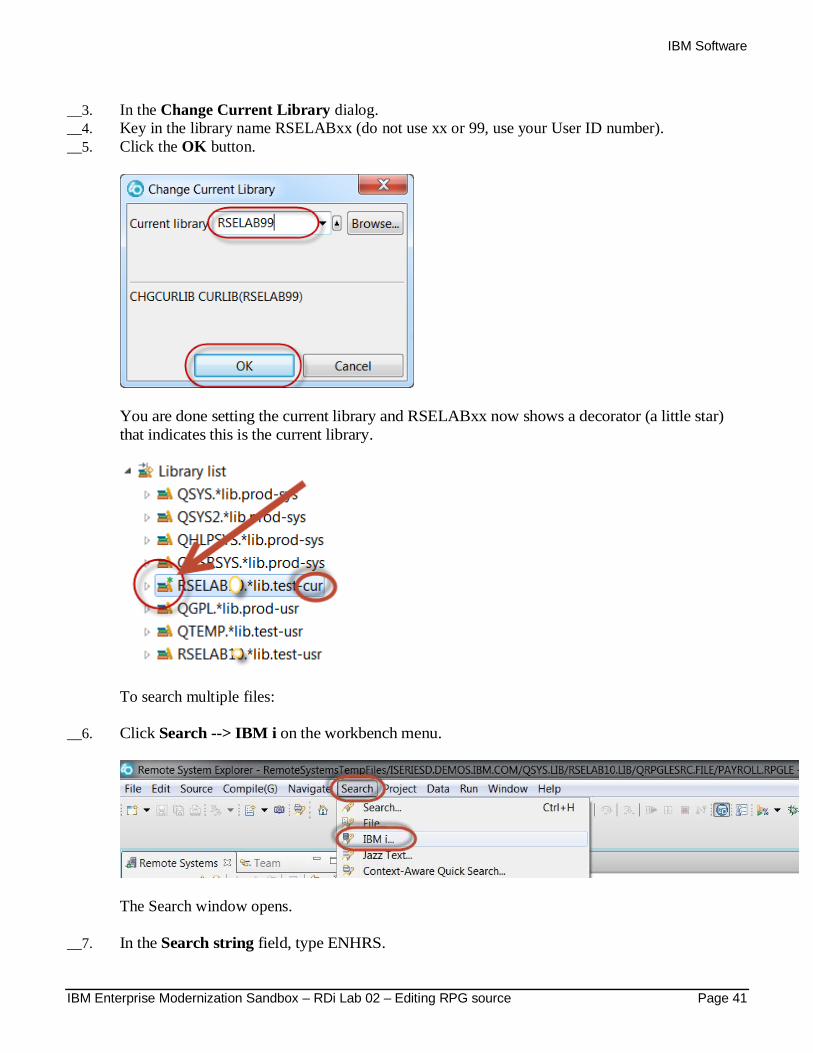
__3. In the Change Current Library dialog.
__4. Key in the library name RSELABxx (do not use xx or 99, use your User ID number).
__5. Click the OK button.
You are done setting the current library and RSELABxx now shows a decorator (a little star)
that indicates this is the current library.
To search multiple files:
__6. Click Search --> IBM i on the workbench menu.
The Search window opens.
__7. In the Search string field, type ENHRS.
IBM Software
Page 42 IBM Enterprise Modernization Sandbox – RDi Lab 02 – Editing RPG source
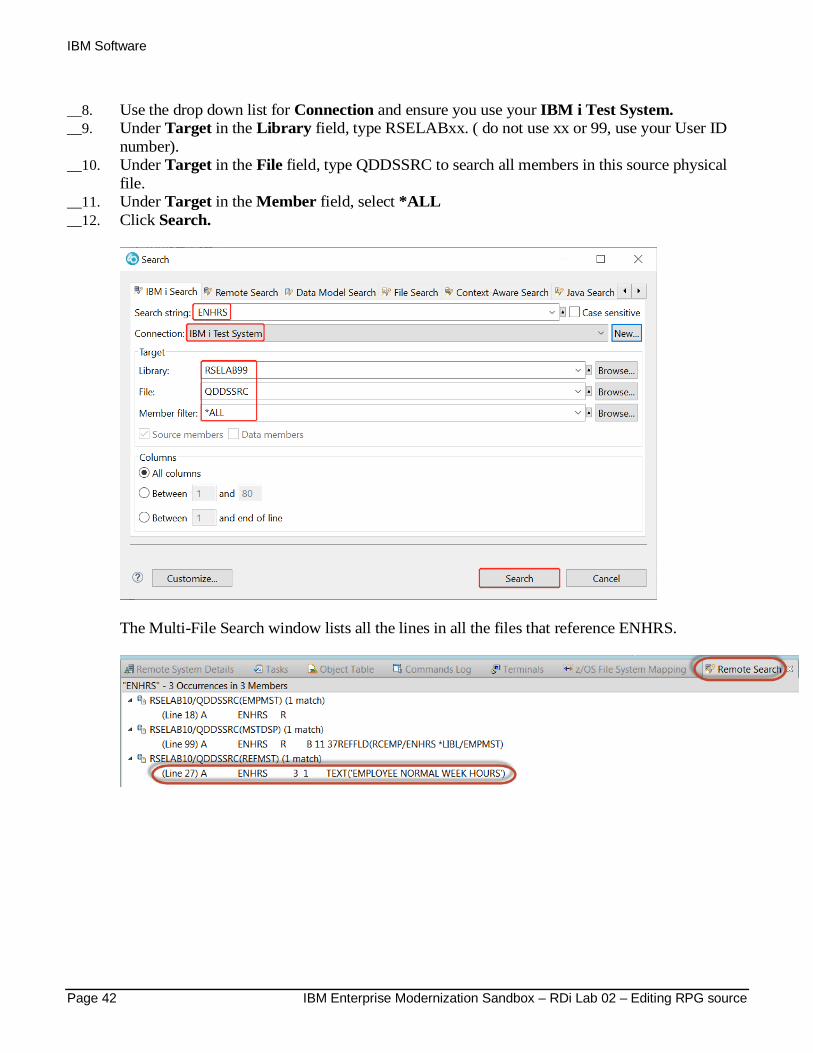
__8. Use the drop down list for Connection and ensure you use your IBM i Test System.
__9. Under Target in the Library field, type RSELABxx. ( do not use xx or 99, use your User ID
number).
__10. Under Target in the File field, type QDDSSRC to search all members in this source physical
file.
__11. Under Target in the Member field, select *ALL
__12. Click Search.
The Multi-File Search window lists all the lines in all the files that reference ENHRS.
IBM Software
IBM Enterprise Modernization Sandbox – RDi Lab 02 – Editing RPG source Page 43
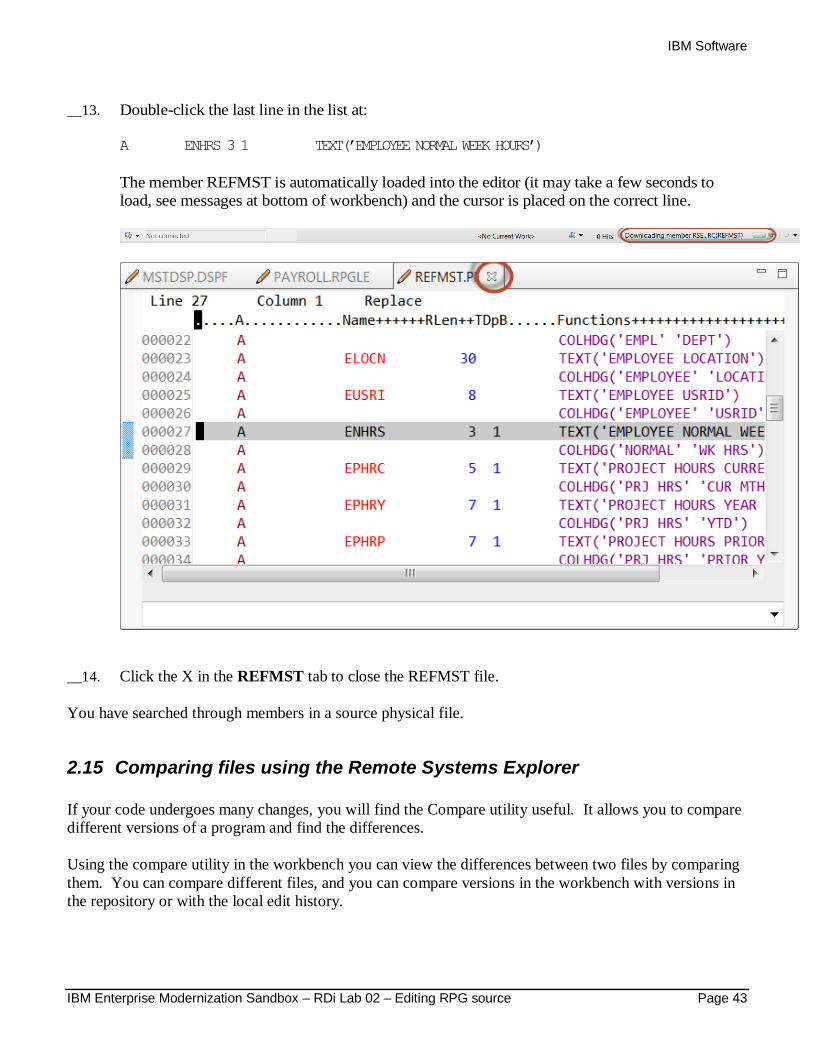
__13. Double-click the last line in the list at:
A ENHRS 3 1 TEXT(’EMPLOYEE NORMAL WEEK HOURS’)
The member REFMST is automatically loaded into the editor (it may take a few seconds to
load, see messages at bottom of workbench) and the cursor is placed on the correct line.
__14. Click the X in the REFMST tab to close the REFMST file.
You have searched through members in a source physical file.
2.15 Comparing files using the Remote Systems Explorer
If your code undergoes many changes, you will find the Compare utility useful. It allows you to compare
different versions of a program and find the differences.
Using the compare utility in the workbench you can view the differences between two files by comparing
them. You can compare different files, and you can compare versions in the workbench with versions in
the repository or with the local edit history.
IBM Software
Page 44 IBM Enterprise Modernization Sandbox – RDi Lab 02 – Editing RPG source
After a comparison is carried out, the Compare Editor opens in the editor area. In the compare Editor,
you can browse through all the differences and copy highlighted differences between the compared
resources. You can save changes to resources that are made in the comparison editor.
Tip:
Make sure all lines show in the source before starting the Compare tool.
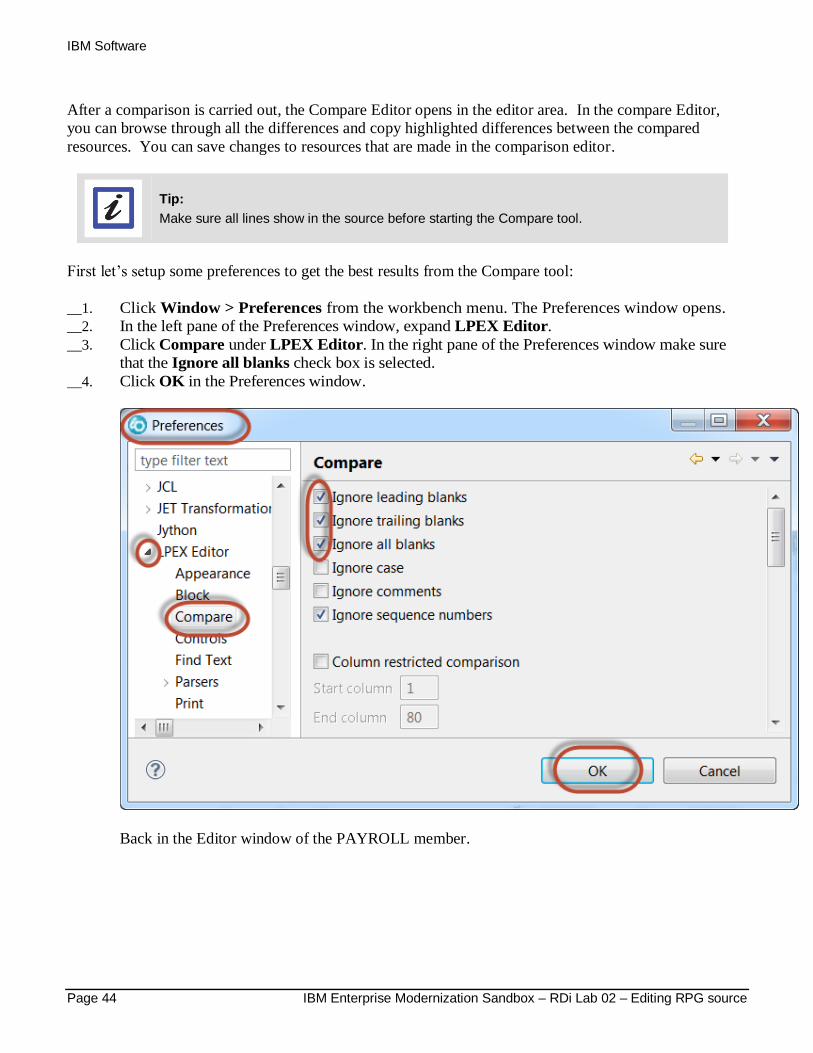
First let’s setup some preferences to get the best results from the Compare tool:
__1. Click Window > Preferences from the workbench menu. The Preferences window opens.
__2. In the left pane of the Preferences window, expand LPEX Editor.
__3. Click Compare under LPEX Editor. In the right pane of the Preferences window make sure
that the Ignore all blanks check box is selected.
__4. Click OK in the Preferences window.
Back in the Editor window of the PAYROLL member.
IBM Software
IBM Enterprise Modernization Sandbox – RDi Lab 02 – Editing RPG source Page 45
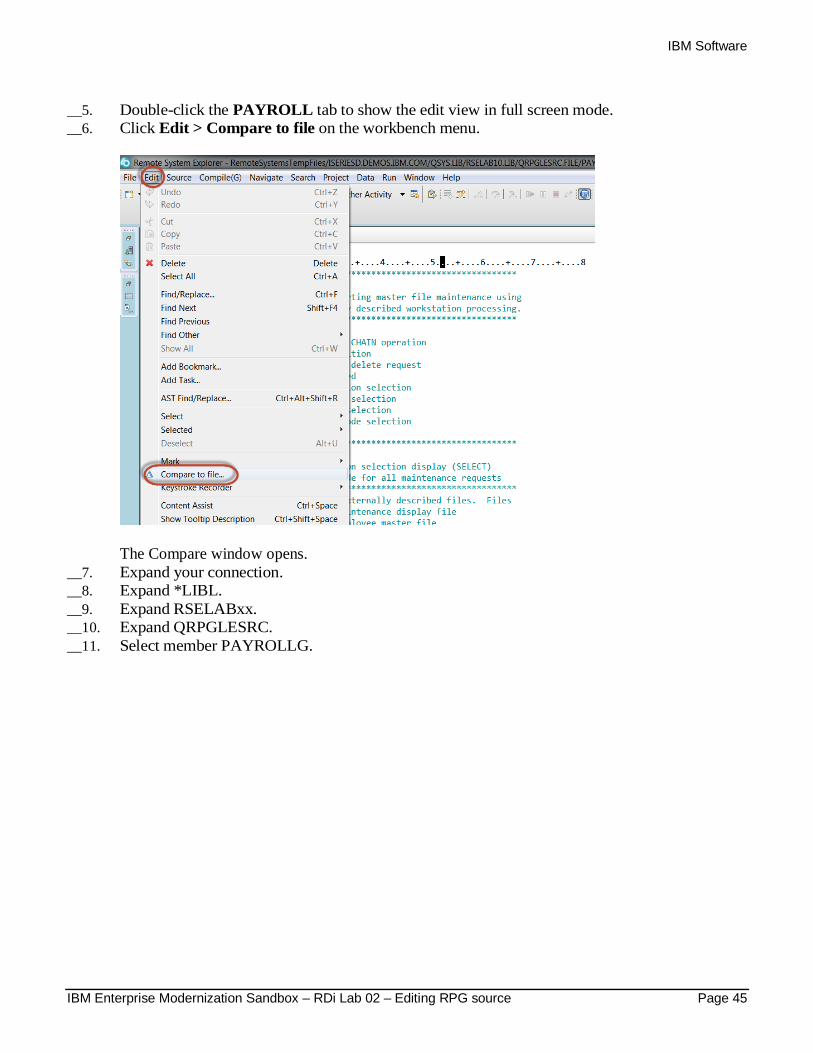
__5. Double-click the PAYROLL tab to show the edit view in full screen mode.
__6. Click Edit > Compare to file on the workbench menu.
The Compare window opens.
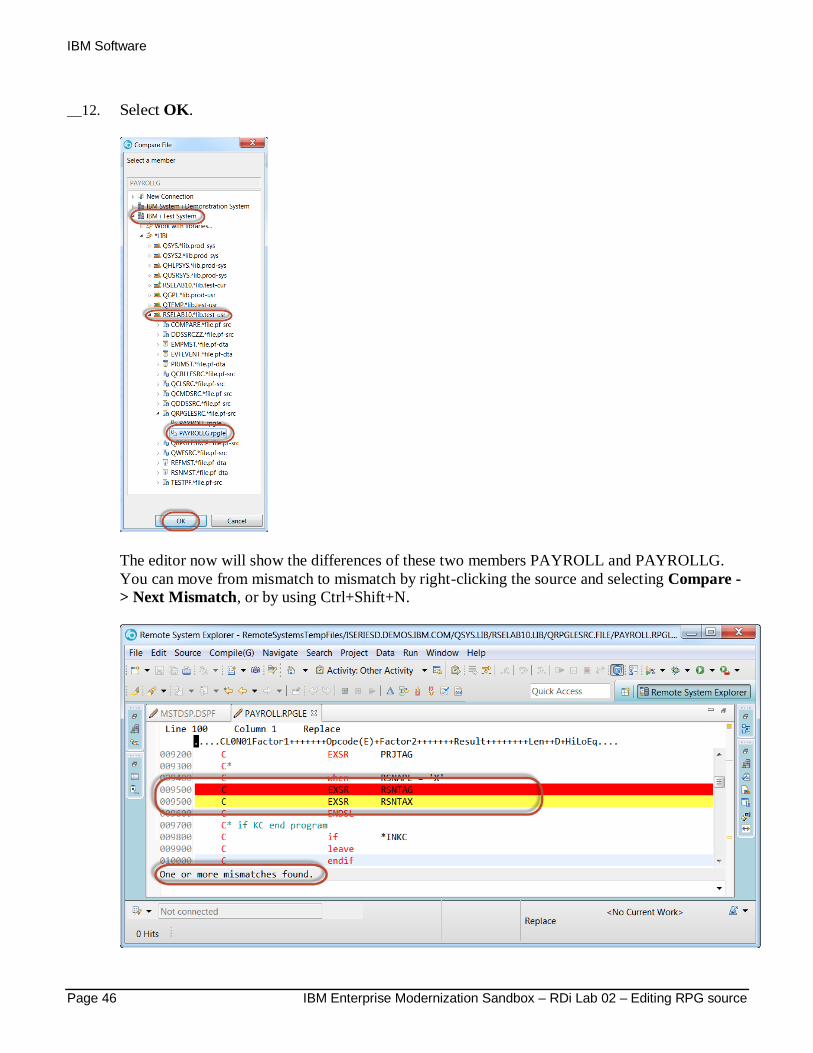
__7. Expand your connection.
__8. Expand *LIBL.
__9. Expand RSELABxx.
__10. Expand QRPGLESRC.
__11. Select member PAYROLLG.
IBM Software
Page 46 IBM Enterprise Modernization Sandbox – RDi Lab 02 – Editing RPG source
__12. Select OK.
The editor now will show the differences of these two members PAYROLL and PAYROLLG.
You can move from mismatch to mismatch by right-clicking the source and selecting Compare -
> Next Mismatch, or by using Ctrl+Shift+N.
IBM Software
IBM Enterprise Modernization Sandbox – RDi Lab 02 – Editing RPG source Page 47
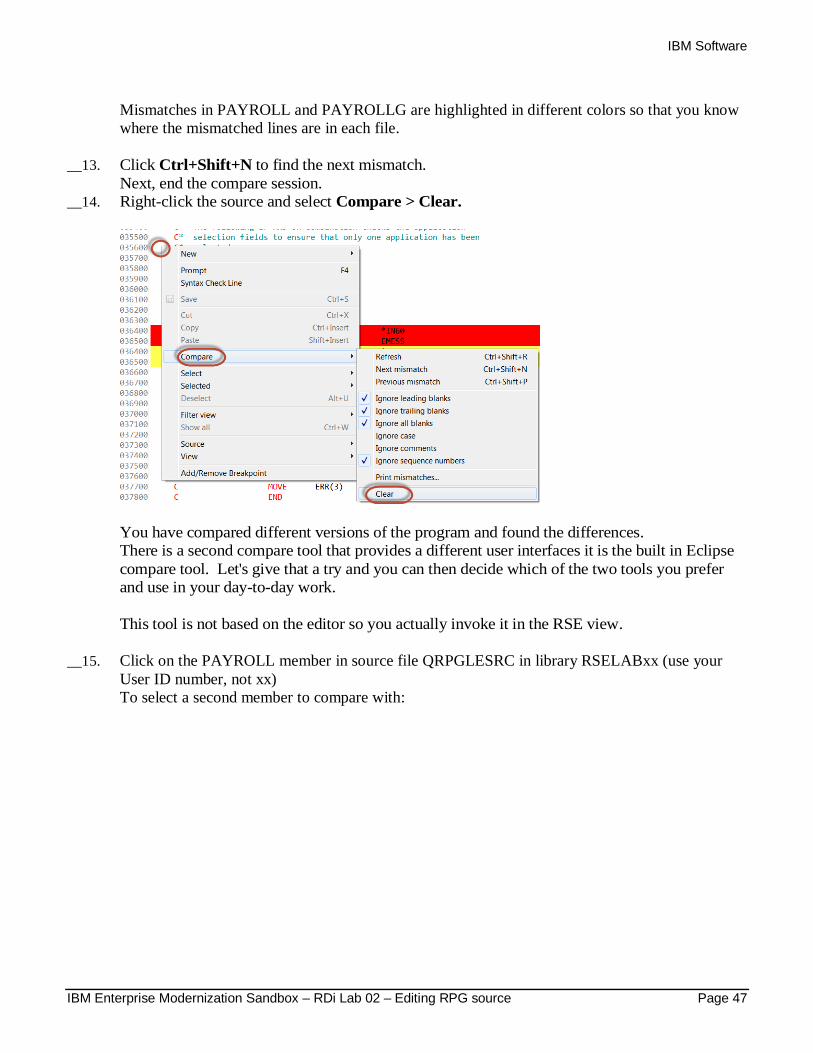
Mismatches in PAYROLL and PAYROLLG are highlighted in different colors so that you know
where the mismatched lines are in each file.
__13. Click Ctrl+Shift+N to find the next mismatch.
Next, end the compare session.
__14. Right-click the source and select Compare > Clear.
You have compared different versions of the program and found the differences.
There is a second compare tool that provides a different user interfaces it is the built in Eclipse
compare tool. Let's give that a try and you can then decide which of the two tools you prefer
and use in your day-to-day work.
This tool is not based on the editor so you actually invoke it in the RSE view.
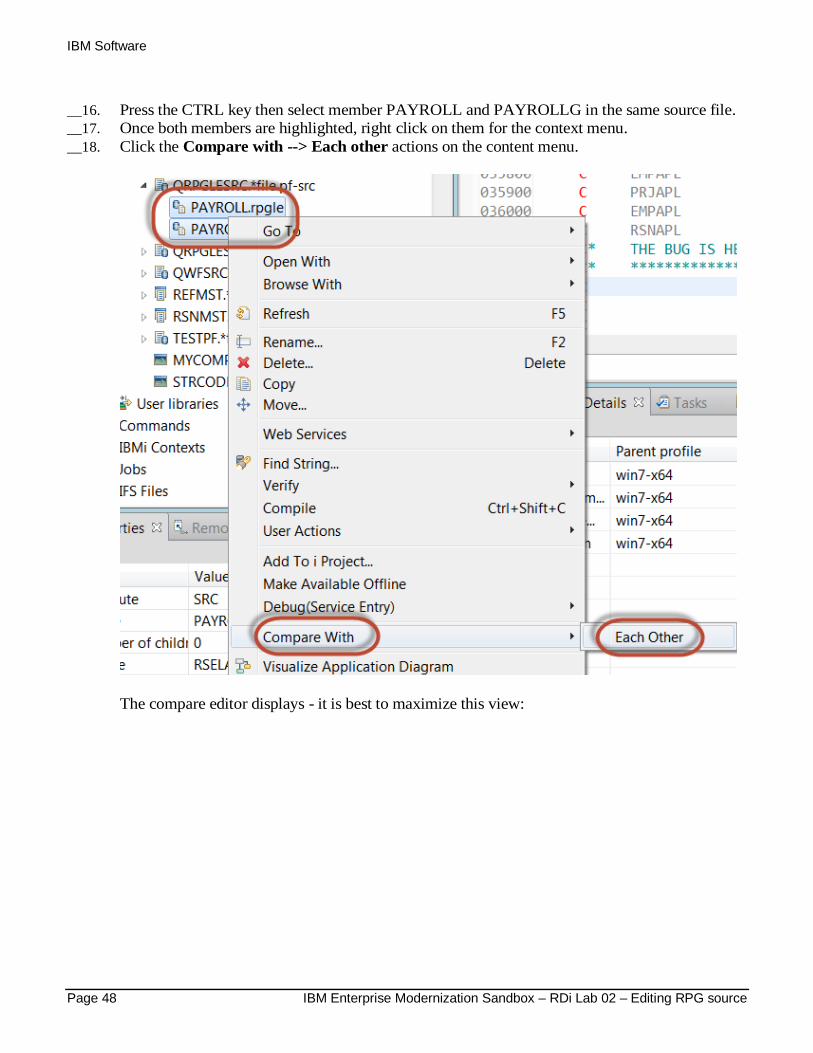
__15. Click on the PAYROLL member in source file QRPGLESRC in library RSELABxx (use your
User ID number, not xx)
To select a second member to compare with:
IBM Software
Page 48 IBM Enterprise Modernization Sandbox – RDi Lab 02 – Editing RPG source
__16. Press the CTRL key then select member PAYROLL and PAYROLLG in the same source file.
__17. Once both members are highlighted, right click on them for the context menu.
__18. Click the Compare with --> Each other actions on the content menu.
The compare editor displays - it is best to maximize this view:
IBM Software
IBM Enterprise Modernization Sandbox – RDi Lab 02 – Editing RPG source Page 49
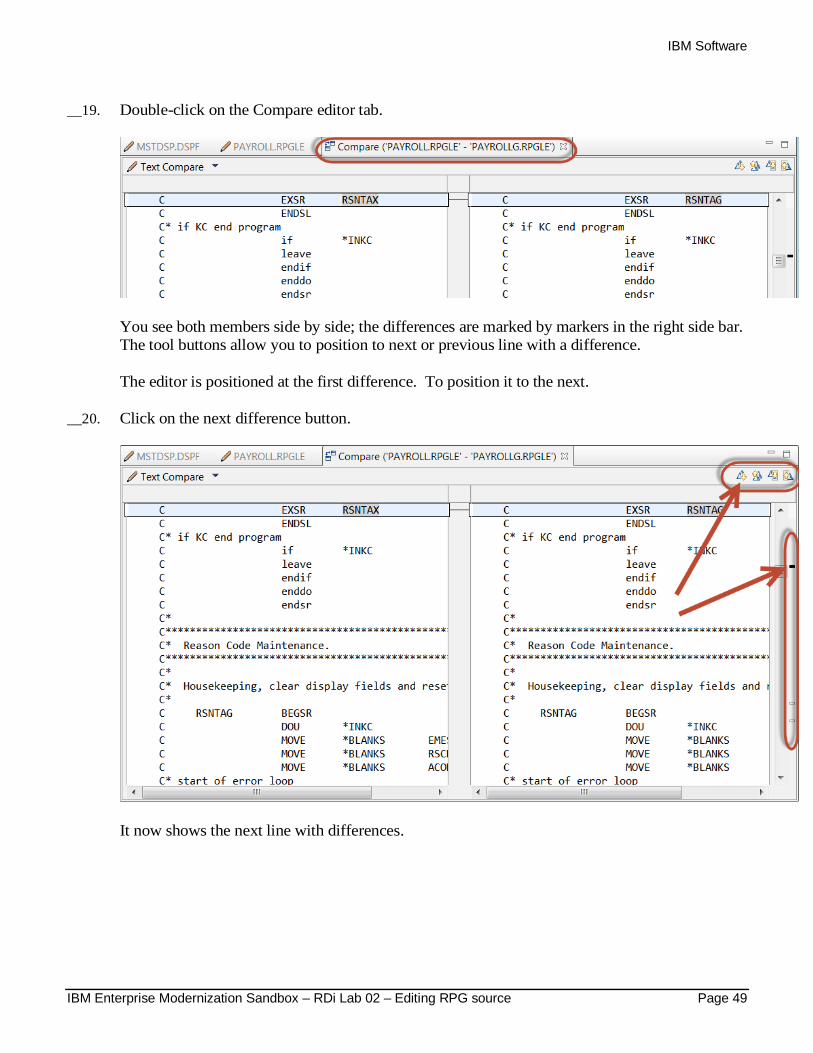
__19. Double-click on the Compare editor tab.
You see both members side by side; the differences are marked by markers in the right side bar.
The tool buttons allow you to position to next or previous line with a difference.
The editor is positioned at the first difference. To position it to the next.
__20. Click on the next difference button.
It now shows the next line with differences.
IBM Software
Page 50 IBM Enterprise Modernization Sandbox – RDi Lab 02 – Editing RPG source
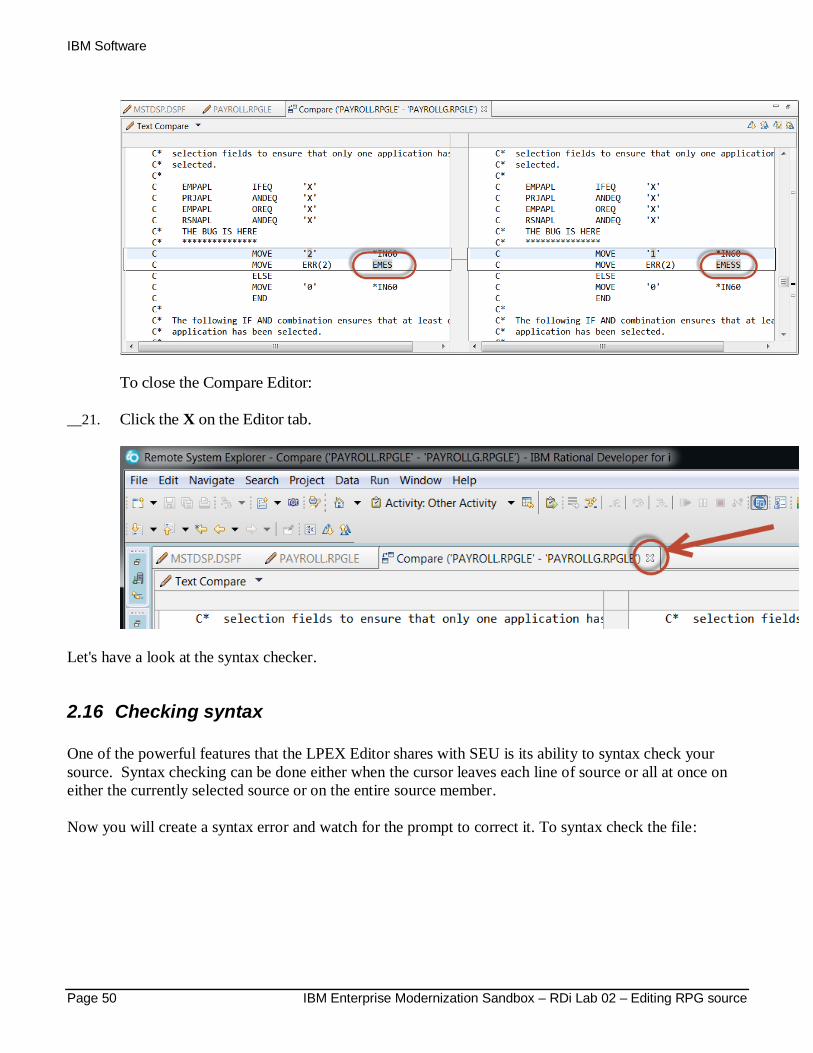
To close the Compare Editor:
__21. Click the X on the Editor tab.
Let's have a look at the syntax checker.
2.16 Checking syntax
One of the powerful features that the LPEX Editor shares with SEU is its ability to syntax check your
source. Syntax checking can be done either when the cursor leaves each line of source or all at once on
either the currently selected source or on the entire source member.
Now you will create a syntax error and watch for the prompt to correct it. To syntax check the file:
IBM Software
IBM Enterprise Modernization Sandbox – RDi Lab 02 – Editing RPG source Page 51
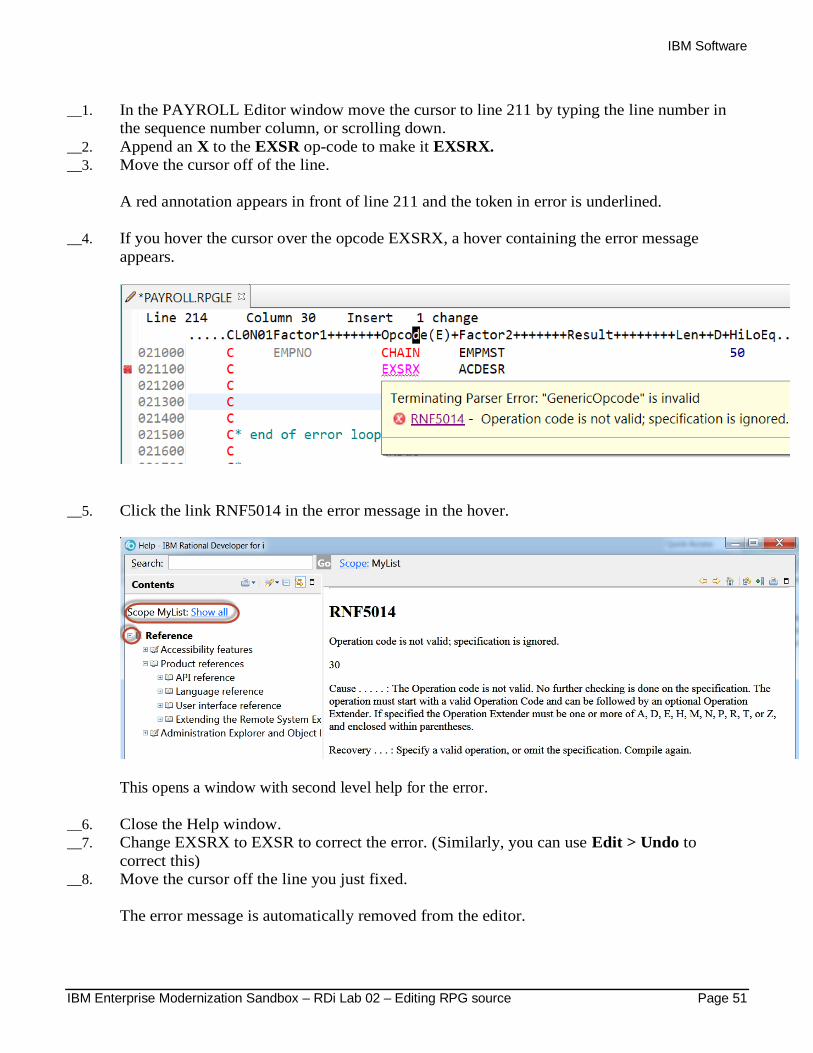
__1. In the PAYROLL Editor window move the cursor to line 211 by typing the line number in
the sequence number column, or scrolling down.
__2. Append an X to the EXSR op-code to make it EXSRX.
__3. Move the cursor off of the line.
A red annotation appears in front of line 211 and the token in error is underlined.
__4. If you hover the cursor over the opcode EXSRX, a hover containing the error message
appears.
__5. Click the link RNF5014 in the error message in the hover.
This opens a window with second level help for the error.
__6. Close the Help window.
__7. Change EXSRX to EXSR to correct the error. (Similarly, you can use Edit > Undo to
correct this)
__8. Move the cursor off the line you just fixed.
The error message is automatically removed from the editor.
IBM Software
Page 52 IBM Enterprise Modernization Sandbox – RDi Lab 02 – Editing RPG source
Tip:
You can toggle automatic syntax checking. Click Window > Preferences from the workbench menu and then expand Remote Systems > Remote Systems LPEX Editor > IBM i Parsers. Now, select the language you want to change the settings for in the left pane of the Preferences window, select or deselect the Automatic syntax checking check box and then click OK
Tip:
You can syntax check the whole source member currently in the editor by clicking Source > Syntax Check All.

IBM Software
IBM Enterprise Modernization Sandbox – RDi Lab 02 – Editing RPG source Page 53
Congratulations!
You have successfully completed the RDi Lab02 – “Editing RPG Source” lab exercises.
We recommend that you move on to the next lab in the sequence; browse the list of labs on Rational
Developer for i - Hands-On Labs at http://ibm.biz/rdi_labs to choose a lab of interest.
More information, material and opportunities to discuss the product can be found at our RDi Hub:
http://ibm.biz/rdi_hub
IBM Software
Page 54 IBM Enterprise Modernization Sandbox – RDi Lab 02 – Editing RPG source
Appendix A Notices
This information was developed for products and services offered in the U.S.A.
IBM may not offer the products, services, or features discussed in this document in other countries.
Consult your local IBM representative for information on the products and services currently available in
your area. Any reference to an IBM product, program, or service is not intended to state or imply that only
that IBM product, program, or service may be used. Any functionally equivalent product, program, or
service that does not infringe any IBM intellectual property right may be used instead. However, it is the
user's responsibility to evaluate and verify the operation of any non-IBM product, program, or service.
IBM may have patents or pending patent applications covering subject matter described in this document.
The furnishing of this document does not grant you any license to these patents. You can send license
inquiries, in writing, to:
IBM Director of Licensing
IBM Corporation
North Castle Drive
Armonk, NY 10504-1785
U.S.A.
For license inquiries regarding double-byte (DBCS) information, contact the IBM Intellectual Property
Department in your country or send inquiries, in writing, to:
IBM World Trade Asia Corporation
Licensing
2-31 Roppongi 3-chome, Minato-ku
Tokyo 106-0032, Japan
The following paragraph does not apply to the United Kingdom or any other country where such
provisions are inconsistent with local law: INTERNATIONAL BUSINESS MACHINES
CORPORATION PROVIDES THIS PUBLICATION "AS IS" WITHOUT WARRANTY OF ANY
KIND, EITHER EXPRESS OR IMPLIED, INCLUDING, BUT NOT LIMITED TO, THE IMPLIED
WARRANTIES OF NON-INFRINGEMENT, MERCHANTABILITY OR FITNESS FOR A
PARTICULAR PURPOSE. Some states do not allow disclaimer of express or implied warranties in
certain transactions, therefore, this statement may not apply to you.
This information could include technical inaccuracies or typographical errors. Changes are periodically
made to the information herein; these changes will be incorporated in new editions of the publication.
IBM may make improvements and/or changes in the product(s) and/or the program(s) described in this
publication at any time without notice.
Any references in this information to non-IBM Web sites are provided for convenience only and do not in
any manner serve as an endorsement of those Web sites. The materials at those Web sites are not part of
the materials for this IBM product and use of those Web sites is at your own risk.
IBM may use or distribute any of the information you supply in any way it believes appropriate without
incurring any obligation to you.
Any performance data contained herein was determined in a controlled environment. Therefore, the
results obtained in other operating environments may vary significantly. Some measurements may have
IBM Software
IBM Enterprise Modernization Sandbox – RDi Lab 02 – Editing RPG source Page 55
been made on development-level systems and there is no guarantee that these measurements will be the
same on generally available systems. Furthermore, some measurements may have been estimated through
extrapolation. Actual results may vary. Users of this document should verify the applicable data for their
specific environment.
Information concerning non-IBM products was obtained from the suppliers of those products, their
published announcements or other publicly available sources. IBM has not tested those products and
cannot confirm the accuracy of performance, compatibility or any other claims related to non-IBM
products. Questions on the capabilities of non-IBM products should be addressed to the suppliers of those
products.
All statements regarding IBM's future direction and intent are subject to change or withdrawal without
notice, and represent goals and objectives only.
This information contains examples of data and reports used in daily business operations. To illustrate
them as completely as possible, the examples include the names of individuals, companies, brands, and
products. All of these names are fictitious and any similarity to the names and addresses used by an actual
business enterprise is entirely coincidental. All references to fictitious companies or individuals are used
for illustration purposes only.
COPYRIGHT LICENSE:
This information contains sample application programs in source language, which illustrate programming
techniques on various operating platforms. You may copy, modify, and distribute these sample programs
in any form without payment to IBM, for the purposes of developing, using, marketing or distributing
application programs conforming to the application programming interface for the operating platform for
which the sample programs are written. These examples have not been thoroughly tested under all
conditions. IBM, therefore, cannot guarantee or imply reliability, serviceability, or function of these
programs.
IBM Software
Page 56 IBM Enterprise Modernization Sandbox – RDi Lab 02 – Editing RPG source
Appendix B Trademarks and copyrights
The following terms are trademarks of International Business Machines Corporation in the United States,
other countries, or both:
IBM AIX CICS ClearCase ClearQuest Cloudscape
Cube Views DB2 developerWorks DRDA IMS IMS/ESA
Informix Lotus Lotus Workflow MQSeries OmniFind
Rational Redbooks Red Brick RequisitePro System i
System z Tivoli WebSphere Workplace System p
Adobe, Acrobat, Portable Document Format (PDF), and PostScript are either registered trademarks or
trademarks of Adobe Systems Incorporated in the United States, other countries, or both.
Cell Broadband Engine is a trademark of Sony Computer Entertainment, Inc. in the United States, other
countries, or both and is used under license therefrom.
Java and all Java-based trademarks and logos are trademarks of Sun Microsystems, Inc. in the United
States, other countries, or both. See Java Guidelines
Microsoft, Windows, Windows NT, and the Windows logo are trademarks of Microsoft Corporation in
the United States, other countries, or both.
Intel, Intel logo, Intel Inside, Intel Inside logo, Intel Centrino, Intel Centrino logo, Celeron, Intel Xeon,
Intel SpeedStep, Itanium, and Pentium are trademarks or registered trademarks of Intel Corporation or its
subsidiaries in the United States and other countries.
UNIX is a registered trademark of The Open Group in the United States and other countries.
Linux is a registered trademark of Linus Torvalds in the United States, other countries, or both.
ITIL is a registered trademark and a registered community trademark of the Office of Government
Commerce, and is registered in the U.S. Patent and Trademark Office.
IT Infrastructure Library is a registered trademark of the Central Computer and Telecommunications
Agency which is now part of the Office of Government Commerce.
Other company, product and service names may be trademarks or service marks of others.
IBM Software
© Copyright IBM Corporation 2019
The information contained in these materials is provided for
informational purposes only, and is provided AS IS without
warranty of any kind, express or implied. IBM shall not be
responsible for any damages arising out of the use of, or otherwise
related to, these materials. Nothing contained in these materials is
intended to, nor shall have the effect of, creating any warranties or
representations from IBM or its suppliers or licensors, or altering
the terms and conditions of the applicable license agreement
governing the use of IBM software. References in these materials
to IBM products, programs, or services do not imply that they will
be available in all countries in which IBM operates. This
information is based on current IBM product plans and strategy,
which are subject to change by IBM without notice. Product
release dates and/or capabilities referenced in these materials may
change at any time at IBM’s sole discretion based on market
opportunities or other factors, and are not intended to be a
commitment to future product or feature availability in any way.
IBM, the IBM logo and ibm.com are trademarks or registered
trademarks of International Business Machines Corporation in the
United States, other countries, or both. If these and other IBM
trademarked terms are marked on their first occurrence in this
information with a trademark symbol (® or ™), these symbols
indicate U.S. registered or common law trademarks owned by IBM
at the time this information was published. Such trademarks may
also be registered or common law trademarks in other countries. A
current list of IBM trademarks is available on the Web at
“Copyright and trademark information” at
ibm.com/legal/copytrade.shtml
Other company, product and service names may be trademarks or
service marks of others.


![M3 Editor/Plug-In Editor Manuali.korg.com/uploads/Support/M3_Editor_OM_E2_63365295998473000… · 3 5 The M3 Editor screen will appear. Click [Next>]. 6 The “Welcome to the M3 Editor](https://img.pdfslide.net/doc/110x75/5ecee6079648e02c7b7f99f0/m3-editorplug-in-editor-3-5-the-m3-editor-screen-will-appear-click-next.jpg)