Embed Size (px)
Citation preview

dffdddfdf
Funeral Home Guide to Electronic Death Filing
ERAVE
Funeral Home
User Guide

i
Table of Contents 1 Creating & Completing a Death Case ..................................................................................................... 1
1.1 Tab 1 Decedent ............................................................................................................................. 2
1.2 Tab 2 Decedent Info ...................................................................................................................... 3
1.3 Tab 3 Place of Death ..................................................................................................................... 4
1.4 Tab 4 Parents/Informant............................................................................................................... 5
1.5 Tab 5 Disposition ........................................................................................................................... 6
1.6 Tab 6 Decedent History ................................................................................................................. 7
1.7 Tab 7 Funeral Home/Embalmer .................................................................................................... 8
2 How to Assign a Medical Certifier .......................................................................................................... 9
3 Understanding the ERAVE Warning Screen ......................................................................................... 10
4 How to Electronically Sign a Death Case .............................................................................................. 11
5 How to Print a Drop-To-Paper Certificate ............................................................................................ 12
6 How to Print a Draft Death Certificate ................................................................................................. 13
7 How to Print a Permit ........................................................................................................................... 14
8 Submitting a Death Case for Registration ............................................................................................ 15
8.1 Submitting a Death Case (After Printing a Draft) ........................................................................ 15
8.2 Submitting a Death Case (From the Open Cases Queue) ........................................................... 16
8.3 Submitting a Death Case (After Signing the Personal Information Section) .............................. 17
9 Checking the Status of a Submitted Death Case .................................................................................. 18
10 How to Modify a Death Case (Understanding the 3 Types of Changes) .............................................. 19
10.1 How to Use the Update Case Function ....................................................................................... 20
10.2 How to Use the Correct Record Function ................................................................................... 23
10.3 How to Use the Amend Record Function ................................................................................... 27
11 How to Take Control of a Death Case .................................................................................................. 30

1
1 Creating & Completing a Death Case
Step 1 – From the Main Menu click
“Death.”
Step 2 – Click “Create Case.”
Step 3 – On the Start Case Information
Screen enter:
Decedent’s First and Last name
Decedent’s Gender
Date of Death
Date of Birth
Place of Death
o Death County
Click the “Search” button.
Note: make sure to get the County of death correct on this screen. While you can change this later, it may introduce errors into the record.
Step 4 – Record list displays showing “(0
Records found).” Click the “Create Case” Button.
Record opens at Tab 1 Decedent. At this point you are ready to start entering and complete the
Personal Information Section.

2
1.1 Tab 1 Decedent
Now that you have successfully created the death case, you can start to enter the decedent’s Personal information. The information that was entered on the Start Case Information screen will auto-populate the same fields within the record on Tab 1 Decedent.
Section 1 – Decedent’s Legal Name.
Complete the decedent’s full name by adding the middle name or middle initial if necessary.
Section 3 – Date/Time of Death
To be completed by the Medical Certifier on Tab 8. The Date of death auto-populates here from the Search Criteria Screen.
Section 4 – Decedent’s Social Security Number
Enter the decedent’s Social Security Number.
Sections 5 – Decedent’s Age and Decedent’s Date of Birth
Age – Auto-calculated by ERAVE from the date of birth and date of death that was entered on the Search Criteria Screen.
Date of Birth – Field is auto populated from the Search Criteria Screen.
Decedent’s Reference (optional)
A field that can be used to enter the Funeral Home’s case number. This is not a mandatory field.
Once all mandatory fields have been completed click the “Next” button

3
1.2 Tab 2 Decedent Info
Section 7 – Birthplace
Select the decedent’s Birth Country from the drop down menu. (if necessary)
o If Birth Country is unknown select “Unknown” for the Country.
Select the decedent’s Birth State from the drop down menu.
o If Birth State is unknown select “Unknown” for the State/Province.
Select the decedent’s Birth City from the drop down menu.
o If Birth City is unknown select “Unknown” from the City List.
o If the Birth City is unknown user may enter the Birth County if known.
Section 8 – Residence
Enter the decedent’s Residence Address and click the “Validate” button to verify you have a valid address.
o If validation is unsuccessful then check the “Accept Address” checkbox.
Inside City Limits, select “Yes” or “No”
Section 9 US Armed Forces
Select “Yes” or “No” from the dropdown menu.
Section 10 Marital Status at Time of Death
Select decedent’s marital status at time of death from the dropdown menu.
Section 11 Surviving Spouse’s Name
Enter spouses full name o If decedent is married, and spouse is wife,
enter the wife’s maiden name. o If decedent is married but spouse is
unknown select marital status as married, then click the “Unknown” checkbox
Click the “Next” buttonNote: It’s recommended to complete
this section before completing Tab 4
Parents/Informant.

4
1.3 Tab 3 Place of Death
Section 12 Place of Death
Select the “Place of Death” from the first dropdown menu. The corresponding Death Facility list will become available.
Select the Death Facility from the appropriate facility list. Once the death facility has been selected, that facility’s physical address will auto-populate the remaining address fields.
Click the “Next” button

5
1.4 Tab 4 Parents/Informant
Section 13 – Father’s Name
Enter the decedent’s father’s full name. If unknown, click the “Unknown” checkbox.
Section 14 – Mothers Name Prior to First Marriage
Enter the decedent’s mother’s full name prior to first marriage. If unknown, click the “Unknown” checkbox.
Section 15 – Informant’s Name and Address
Select the informant’s relationship to the decedent from the dropdown menu. o If relationship is Wife or Husband,
then the spouses name will auto-populate from Tab 2 Decedent Info.
o If Wife is selected, Wife’s name will auto-populate from Tab 2 Decedent Info and user will be able to change the wife’s last name if necessary.
Address Same as Decedent’s Residence
If the informant’s residence address is the same as the decedents, select “Y-COPY” from the dropdown menu.
If the informant’s address is different select “N-CLEAR” from the dropdown menu, then enter the informant’s address then click the “Validate” button.
o Click the “Accept Address” checkbox is address validation is unsuccessful.
Click the “Next” button.

6
1.5 Tab 5 Disposition
Section 16a – Method of Disposition
Select the method(s) of disposition. If Cremation and/or Removal from State are selected complete the Transit/Cremation Instructions.
Transit/Cremation Instructions
If Cremation or Removal from state, then select Funeral Director from the “Permission is given to” dropdown. Funeral Director’s name and license number will populate here when the selected on Tab 7. (Later the user will be
asked to print the Burial/Transit Cremation
Permit).
Section 16b, c – Place of Disposition
Select the final Place of Disposition from one of the following; o Cemetery List o Crematory List o Mausoleum
If deceased final place of disposition is in another state:
o Select that state from the State/Province dropdown menu
o Select the city from the City List dropdown menu
o Manually enter the name of the cemetery in the “Name of cemetery of other place” text field.

7
1.6 Tab 6 Decedent History
Section 28 – Decedent’s Education
Select the highest level of education completed by the decedent from the “Education” dropdown menu.
Section 29 – Decedent’s Hispanic Origin
Click the appropriate checkbox for the decedent’s Hispanic Origin. Multiple boxes can be checked.
o If “Other Hispanic Origin” is selected, make sure to type the specific origin in the Specify text field.
Section 31-32 – Decedent’s Occupation and Industry
Enter decedent’s last known occupation
Enter the last known Business/Industry
Section 30 – Decedent’s Race
Click the check box that describes the decedent’s race. Multiple checkboxes can be selected.
If decedent’s race is one of the following, please specify in the text field provided:
o American Indian or Alaska o Other Asian o Other Pacific Islander o Other Race
If race is unknown, click the “Sought but Unknown” checkbox
If the race could not be obtained, click the “Not Obtainable” checkbox
If the informant refused to give information about the decedent’s race, click the “Refused” checkbox.
Click the “Next” button

8
1.7 Tab 7 Funeral Home/Embalmer
Section 17d, e – Funeral Home License
If your Funeral Home is handling a death case on behalf of another funeral home, click the “Trade Call” checkbox. The Trade Call Funeral Home list will open and you can select the funeral home you are working with from the dropdown list.
If not conducting a Trade Call there is nothing to complete in this section. The funeral home’s physical address and contact information will auto-populate all fields
Section 17c – Funeral Home Licensee or Agent
Select the Funeral Director that will sign this death case from the “List by Name” dropdown list.
Section 17a, b – Embalmer
If the Funeral Director is the same as the Embalmer, select “Y-COPY” from the “Same as funeral director” dropdown menu. The name field will auto-populate.
o Manually enter the License Number
If the Funeral Director is not the same as the Embalmer, select “N-CLEAR” from the “Same as funeral director” dropdown menu.
Select the Embalmer by either Name or License.
Click “Tab 12 Case Actions”

9
2 How to Assign a Medical Certifier
Note: Before a Funeral Director can sign on a death case, that death case must be assigned to a Medical
Certifier or Referred to the Coroner’s or Medical Examiner’s Office.
Section Assign/Transfer/Notify Medical Certifier
From the “Action” dropdown menu the user can select one of the following:
o Request Medical Certification
o Certifier Not Listed Drop to Paper
o Refer to Coroner
Request Medical Certification – Allows the funeral home to assign a Physician or Hospice RN as the Medical Certifier.
The “Select Hospice RN” list will only become available if the decedent’s Place of Death was a Hospice Facility or Hospice Patient checkbox is marked on Tab 3.
Certifier Not Listed Drop to Paper – Allows the user to print a legal size certificate for manual
completion by a certifier that is not filing death electronically
Refer to Coroner – Sends the death case to the Coroner’s Office in the decedent’s County of Death. (User cannot select a specific Coroner.)
Once selections have been made, click the “Finish” button at the bottom of the screen.
DO NOT ASSIGN THE CASE TO A MEDICAL CERTIFIER IF A MEDICAL CERTIFIER HAS CREATED
AND ASSIGNED THE DEATH CASE TO YOU.

10
3 Understanding the ERAVE Warning Screen
The ERAVE Warning Screen contains a list of exceptions within the death case that need to be either: reviewed, corrected or completed by the Funeral Home and/or Medical Certifier. There may also be items that need to be reviewed by someone in the Vital Records State Office, Registration Department. A Death Case cannot be signed and/or submitted for registration if any fields are left blank.
1st Section – Demographic Exceptions
Refers to information completed by the Funeral Home that needs to be reviewed. User clicks on the blue description and ERAVE automatically takes the users to the area of the death record were the listed item exists.
2nd Section – Required to Submit to State
This item is an indicator that the death record has not been signed by the funeral director selected on Tab 7 Funeral Home/Embalmer. Once the Funeral Director signs off, this item will disappear.
3rd Section – Personal Information that must be completed
This contains items that were left blank. ALL items listed in this section must be completed using the following method:
o Click the blue description of the item to return to that area of the record.
o Complete the item and click the “Finish” button.
o Repeat the steps until all items have been completed.
4th Section – Medical Information that must be
completed
Items that need to be completed by the Medical Certifier Only.
Click the “Save (as Pending)” button. (Successful Transaction
Screen Appears)

11
4 How to Electronically Sign a Death Case
Once all the Personal Information Exceptions have been cleared from the ERAVE Warning Screen the
Funeral Director can sign the Personal Information Section on the Successful Transaction Screen. Funeral
Directors will be required to sign their death cases electronically using the method below.
Step 1 – On the Successful Transaction Screen
click the “Sign Now” button.
Step 2 – On the Personal Certification Screen, read
the statement then click the “Continue” button.
Step 3 – On the Sign Death Case – Confirm
Screen, you will see that your case has been
successfully signed. Click the “Continue” button.
When you click the Continue button in step 3, the Successful Transaction screen will appear.
Now, if necessary, you can print a Drop to Paper Copy for manual completion by the Medical
Certifier or a Draft Copy.

12
5 How to Print a Drop-To-Paper Certificate
Drop to Paper Death Certificates are printed for the purpose of manual completion by a Medical
Certifier that does not complete their death certificates electronically. The Death Case must be
signed before you print this document
Step 1 – On the Successful Transaction
Screen:
Skip the Print Draft option.
Select “Drop to Paper.”
Skip the “Print Affidavit” option.
Click the “Print” button.
Step 2 – On the Report – Confirm screen
click the “Generate Document” button
and wait for the image to appear. (Image
should appear in Adobe PDF format.)
A full legal size Death Certificate image should appear. The Medical Section should be blank and all the Personal Information fields should be completed.
Print the image
Closeout the image window o This should put you
back in ERAVE
Click the “Continue” button.
Click the “Main Menu” button. o This should place you
back at the ERAVE Main Menu.
13
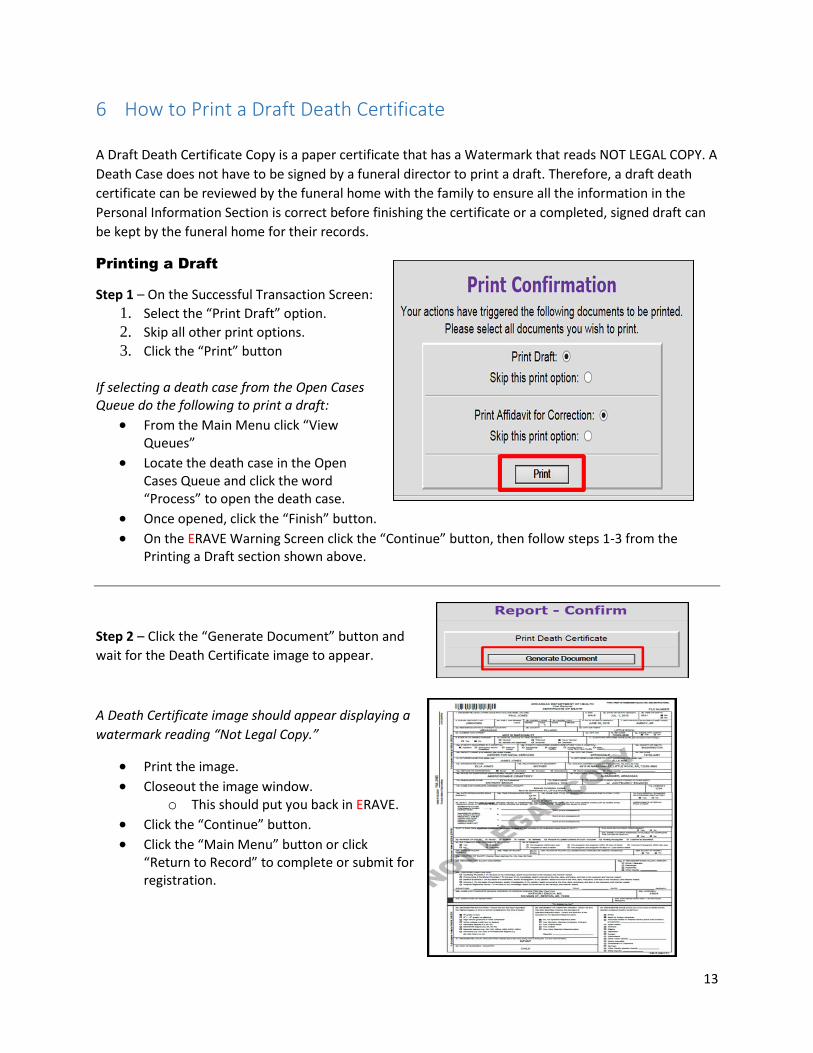
6 How to Print a Draft Death Certificate
A Draft Death Certificate Copy is a paper certificate that has a Watermark that reads NOT LEGAL COPY. A
Death Case does not have to be signed by a funeral director to print a draft. Therefore, a draft death
certificate can be reviewed by the funeral home with the family to ensure all the information in the
Personal Information Section is correct before finishing the certificate or a completed, signed draft can
be kept by the funeral home for their records.
Printing a Draft
Step 1 – On the Successful Transaction Screen:
1. Select the “Print Draft” option.
2. Skip all other print options.
3. Click the “Print” button
If selecting a death case from the Open Cases Queue do the following to print a draft:
From the Main Menu click “View Queues”
Locate the death case in the Open Cases Queue and click the word “Process” to open the death case.
Once opened, click the “Finish” button.
On the ERAVE Warning Screen click the “Continue” button, then follow steps 1-3 from the Printing a Draft section shown above.
Step 2 – Click the “Generate Document” button and
wait for the Death Certificate image to appear.
A Death Certificate image should appear displaying a
watermark reading “Not Legal Copy.”
Print the image.
Closeout the image window. o This should put you back in ERAVE.
Click the “Continue” button.
Click the “Main Menu” button or click “Return to Record” to complete or submit for registration.

14
7 How to Print a Permit
Funeral Directors must print the Burial/Transit Cremation Permit that is generated in ERAVE. The
Cremation Permit cannot be printed if the Cause of Death is not completed or pending, or the Manner
of Death is not completed or pending. The Cremation Permit must be printed before the record can be
submitted for registration.
Step 1 – User will see the Burial/Transit
Cremation Permit exception on the ERAVE
Warning Screen. Click the “Save (as Pending)
button.
Step 2 – On the “Successful Transaction Screen”
Select the “Print Permit” option and skip the other print option(s).
Click the “Print” button.
Step 3 – click the “Generate Document” button
and wait for the image to appear.
Step 4 – The Burial/Transit Cremation Permit image appears.
Print the image
Closeout the image window. o This should put you back in ERAVE.
Click the “Main Menu” button or click “Return to Record” to submit for registration.

15
8 Submitting a Death Case for Registration
Once both the Personal and Medical Information Sections have been completed, the Funeral
Home can submit that death record to the State Vital Records Registration Department for
registration.
There are 3 ways in which a Funeral Home can submit a death case for Registration:
1. After printing the Draft Death Copy. 2. From the Open Cases Queue 3. After Signing the Personal Information Section
8.1 Submitting a Death Case (After Printing a Draft)
Once the Death Case has been signed and the draft copy has been printed and you close the
Death Certificate image window. You should see the ERAVE Report-Confirm Screen.
Step 1. On the Report-Confirm Screen click the “Continue” button.
Step 2. On the Successful Transaction Screen click the “Return to Record” button. (Record open at Tab 1 Decedent.)
Step 3. Once the death record opens, click Tab 12 Case Actions.
Note: On Step 3, user may see two popup boxes once tab 12 has been clicked. Just click “OK” on both boxes
and click Tab 12 again.)
Step 4. On Tab 12 Case Actions, click the “Release for registration” checkbox.

16
Step 5. Click the “Finish” button.
Step 6. On the ERAVE Warning Screen click the “Save (as Pending)” button. Step 7. On the Successful Transaction Screen click the “Main Menu” button.
Your record has been successfully submitted for registration.
8.2 Submitting a Death Case (From the Open Cases Queue)
Step 1. From the ERAVE Main Menu click “View Queues.”
Step 2. Locate the decedent’s name in the Open Cases Queue and click the word “Process”
Step 3. Once the death record opens, click Tab 12 Case Actions.
Note: On Step 3, user may see two popup boxes once Tab 12 has been clicked. Just click “OK” on
both boxes and click Tab 12 again.)
Step 4. On Tab 12 Case Actions click the “Release for registration” checkbox.
Step 5. Click the “Finish” button.
Step 6. On the ERAVE Warning Screen click the “Save (as Pending)” button. Step 7. On the Successful Transaction Screen click the “Main Menu” button.
Your record has been successfully submitted for registration.

17
8.3 Submitting a Death Case (After Signing the Personal Information Section)
Step 1 – After going through the process of
signing a death record, click the “Return to
Record” button. (Record opens at Tab 1
Decedent.)
Step 2 – From Tab 1 Decedent, click Tab 12
Case Actions.
Note: On Step 2, user may see two popup boxes once Tab 12 has been clicked. Just click “OK” on both boxes
and click Tab 12 again.)
Step 3 – On Tab 12 Case Actions, in section
50/52 Registration Information, click the
“Release for registration” checkbox.
Step 4 – Click the “Finish” button.
Step 5 – On the ERAVE Warning Screen click the “Save (as Pending)” button.
Step 6 – On the Successful Transaction Screen click the “Main Menu” button.
Your record has been successfully submitted for registration.

18
9 Checking the Status of a Submitted Death Case
How to check the status of a Death Record that has been submitted to the State Vital Records
Office for registration.
Step 1 – From the ERAVE Main Menu click
“Death”
Step 2 – Click “Search”
Step 3 – On the Search Criteria Screen enter one of the following”
Decedent’s first and last name Or
Decedents Date of death
Click the “Search” button.
Note: In Step 3, the user can also search using a date range. User enters the start date in the “Date of Death” numeric field and the end date in the “TO” field, then clicks the search button.
Record List Screen appears displaying the number of records found.
If registered a certificate number will appear under the heading Certificate.
If not registered the word “Submitted” will appear under the heading Certificate.
To return to the Main Menu:
Click the “Cancel” button on the Record List Screen.
Click the “Cancel” button on the Death Record Search Criteria Screen.
Note: Writing the Certificate Number at the top right-hand corner of your death application can
help your Local Health Unit Clerk process your order more efficiently.

19
10 How to Modify a Death Case (Understanding the 3 Types of Changes)
There are 3 different functions a Funeral Home can use to make changes to a death record. Update Case, Correct Record and Amend Record. Before a user attempts to make a change to a death record they should use the DEATH>>SEARCH function to determine the status of a death record. Once the status has been determined, the user will know which one of the change functions to use.
1. Update Case Function – Is used when a Death Case has been submitted for registration but has not received a certificate number. There is no charge when changing or correcting information using the Update Case function. The Case Status for the death record should read “Submitted…” Once in the Death Case the user can change multiple items.
Note: Any changes made to the decedent’s first or last name using the Update Case function, will create a name discrepancy between the Personal and Medical Sections. Please contact the medical certifier whenever a change to the decedent’s first or last name occurs. The Medical Certifier must also change their name on Tab 11 Certifier to match what is listed on Tab 1 Decedent.
2. Correct Record Function – Allows the Funeral Home to make corrections to a Death Case up to 10 days after the Date of Registration. Once in the Death Case the user can change multiple items. When changes are made within in the 10-day time frame there is no charge and the changes made are not notated on the Death Certificate.
3. Amend Record Function – Any changes made to a Death Case 10-day after the Date Registered. Multiple items can be changed once in the Death Case and there is a $15 fee each time the Amend Record Function is used.
How to Determine Which Change Function to Use. (For records no longer in your Open Cases
Queue.)
Step 1. Click “Death.” Step 2. Click “Search.” Step 3. On the Search Criteria Screen enter the decedent’s first and last name. Step 4. Click the “Search” button. Step 5. On the Record List Screen click the word “Details”
a. On the Record List screen the PI status should say Signed, Med Status should say “Certified” and the Case Status should say either “Submitted” or “Registered”.
b. If the Case Status is “Submitted” then use Update Case to make changes.
Step 6. On the Record Details screen scroll to bottom of the screen to section “50/52 Registration Information” and locate the Date Registered.
a. If the record has been registered less than 10 days use the Correct Record Function.
b. If the record has been registered more than 10 days use the Amend Record Function.

20
10.1 How to Use the Update Case Function
Step 1 – From the ERAVE Main Menu click “Death.”
Step 2 – Next, click “Update Case.”
Step 3 – On the Search Criteria Screen Enter one of the following”
Decedent’s Date of Death
Decedent’s First and Last name
Step 4 – Click the “Search” button. Record appears on the Record Details Screen.
Note: In Step 4, the user can also search using a date range. User enters the start date in the “Date of Death” numeric field and the end date in the “TO” field, then clicks the search button.
Step 5 – Locate the decedent’s name on the Record Details Screen. To the far right of the decedent’s name click “Details.” (Record Details Screen appears.)
Step 6 – Scroll to the bottom of the Record Details Screen and click the “Continue” button. (Record Opens
at Tab 1 Decedent.)

21
Step 7 – Once the death record opens at Tab 1 Decedent, Click Tab 12 Case Actions.
Note: On Step 7, user may see two popup boxes once Tab 12 has been clicked. Just click “OK” on both boxes and click Tab 12 again.)
Step 8 – On Tab 12 Case Actions, In the Personal Information Action section.
Click the “Un-Sign” checkbox.
Click the “Finish” button. o ERAVE Warning Screen appears.
Step 9 – Scroll to the bottom of the ERAVE
Warning Screen and click the “Save (as pending)”
button. (Successful Transaction Screen appears.)
Step 10 – Click the “Return to Record” button. Disregard the Sign Now button. Record opens at Tab 1 Decedent.
Step 11 – Once the death record opens, click the tab that contains the field(s) that need to be changed.
Step 12 – Scenario 1: Change made to decedents Father’s name. Here the decedent’s father’s first name is
changed from Vince Vader to Dan Vader.
Once all the change(s) have been made, click the “Finish” button.
ERAVE Warning screen appears.

22
Step 13 – Scroll to the bottom of the ERAVE Warning Screen and click the “Save (as pending)” button.
Successful Transaction screen appears
Step 14 – Click the ‘Sign Now” button to Re-Sign the Death Case. (Re-sign the record using the signing process.
When you complete that process you will see the successful transaction screen.)
Step 15 – On the Successful Transaction Screen click the “Return to Record” button. (Record opens at Tab 1
Decedent.)
Step 16 – Once the death record opens click Tab 12 Case Actions and complete the following.
1) In section 50/52 Registration Information click the “Release for registration” checkbox.
2) Click the “Finish” button. (ERAVE
Warning screen appears.)
3) On the ERAVE Warning Screen click the “Save (as Pending)” button and return to the Main Menu.

23
10.2 How to Use the Correct Record Function
Step 1 – From the ERAVE Main Menu click Death.
Step 2 – Click “Modify Record.”
Step 3 – Click “Correct Record”
Step 4 – On the Search Criteria Screen enter one of the following:
Certificate Number
Decedent’s First and Last name
Decedent’s Date of Death
Step 5 – Click the “Search” button (Record List screen appears)
Step 6 – Death Case appears on the Record List Screen, click the word details. (Record Details Screen
appears)

24
Step 7 – Scroll to the bottom of the Record Details Screen and click the “Continue” button. (Basis/Reason
for Modification screen appears.)
Step 8 – Basis/Reason for Modification Screen complete as follows:
Basis Section – Defaults to “FH Correction.”
Reason Section – Enter a brief description of the item(s) being corrected
Click the “Finish” button when all fields are completed. (Record opens at Tab 1 Decedent.)
Note: User can correct multiple items within the death record. Make sure to enter here on the Basis/Reason screen a brief description of all the items that will be corrected in the death case.
Step 9 – Once in the Death Case, click the tab associated with the information that is to be corrected.
Scenario 2: A correction has to be made to the decedent’s Residence Address on Tab 2 Decedent Info. However, the Decedent’s Residence Address is the
same as the Informant’s Residence Address on Tab 4
Parents/Informant. In order to change the Decedent’s
Residence Address, you must first clear the fields for
the Informant’s Residence Address.
Note: The Accept Address checkbox associated with the Decedent’s Residence Address will be inaccessible until the Informant’s Residence Address fields have been cleared.
25
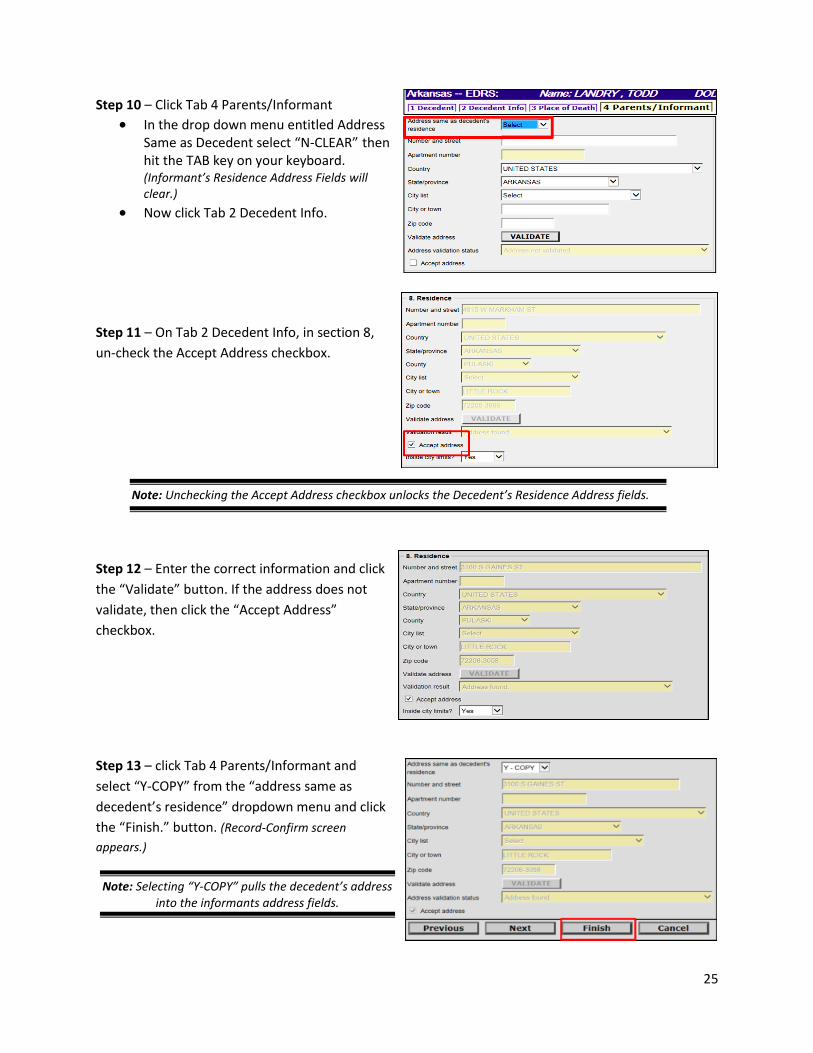
Step 10 – Click Tab 4 Parents/Informant
In the drop down menu entitled Address Same as Decedent select “N-CLEAR” then hit the TAB key on your keyboard. (Informant’s Residence Address Fields will clear.)
Now click Tab 2 Decedent Info.
Step 11 – On Tab 2 Decedent Info, in section 8,
un-check the Accept Address checkbox.
Note: Unchecking the Accept Address checkbox unlocks the Decedent’s Residence Address fields.
Step 12 – Enter the correct information and click
the “Validate” button. If the address does not
validate, then click the “Accept Address”
checkbox.
Step 13 – click Tab 4 Parents/Informant and
select “Y-COPY” from the “address same as
decedent’s residence” dropdown menu and click
the “Finish.” button. (Record-Confirm screen
appears.)
Note: Selecting “Y-COPY” pulls the decedent’s address into the informants address fields.

26
Step 14 – On the Record Modify-Confirm screen review the corrections that were made.
If additional changes are needed click the “Edit Additional Information” button
If no additional changes are needed click the “Continue” button. (successful Transaction screen
appears)
Step 15 – On the Successful Transaction Screen click
the “Print” button to print the Affidavit for Correction.
Step 16 – click the “Generate Document” button and
wait for the affidavit image to appear.
Step 17 – Affidavit for Correction image appears.
Print the affidavit, close out the image, click the
“Continue” button and click the Main Menu
button.
Printing the Affidavit serves 2 purposes:
1) Gives the Funeral Home a copy for their records
2) Attaches a copy of the Affidavit to the death record

27
10.3 How to Use the Amend Record Function
Step 1. From the ERAVE Main Menu click “Death.”
Step 2. Click “Modify Record.”
Step 3. Click “Amend Record.”
Step 4. User can search using one of the following search criteria’s:
a. Certificate Number b. Decedent’s First and Last
names. c. Decedent’s Date of Death
Click the SEARCH button
Step 5. Record list screen appears displaying decedent’s name, click “Details.’

28
Step 6. Scroll to the bottom of the Record Details screen and click the “Continue” button.
Step 7. Basis/Reason for Modification Screen
a. Basis Section defaults to Affidavit
b. Enter your reason for making your changes.
Click the FINISH button.
Step 8. Record opens at Tab 1 Decedent. Click the tab associated with the information that needs to be amended.
Step 9. Make the necessary Amendment(s) and click the FINISH button.

29
Step 10. On the Record Modify-Confirm screen review your changes.
a. If additional changes are needed, click the “Make Another Change” button.
b. If no additional changes are needed, click the “Continue” button.
Step 11. On the Successful Transaction Screen click the “Print” button.
Click the “Generate Document” button and wait
for the image to appear.
Step 12. Affidavit for Correction image appears. Print the Affidavit.
Printing the Affidavit serves 2
purposes:
1. Provides the Funeral Home a copy for their records
2. Attaches a copy of the Affidavit to the death record.
Close the image, click the “Continue” button and click
the Main Menu button.

30
11 How to Take Control of a Death Case
When a death case has been created by a Medical Certifier, a funeral home can take control of
the Personal Information Section. By using this process, the funeral home does not have to wait
for the Medical Certifier to assign the death case to them.
Note: The Personal Information entered by the funeral home must exactly match the Personal Information entered by the Medical Certifier.
Step 1. From the ERAVE Main Menu click “Death.”
Step 2. Click Create Case
Step 3. Start Case Information Screen – Enter the following information: a. Decedent’s First and Last names. b. Decedent’s Gender. c. Decedent’s Date of Death. d. Decedent’s Date of Birth e. Decedent’s County of Death.
Click the SEARCH button.

31
Step 4. On the Record List Screen click the word “Accept” under the heading Action for FH.
Step 5. On the Record Details Screen, scroll to the bottom of the screen and click the “Continue” button.
Record opens at Tab 1 Decedent. At this point you have taken control of the Death Case and can now
begin completing the Personal Information sections.