Embed Size (px)
Citation preview
eTime Candidate - User Guide
GRA: 0159/V09 Page 1 of 23
eTime Candidate User Guide
eTime Candidate - User Guide
GRA: 0159/V09 Page 2 of 23
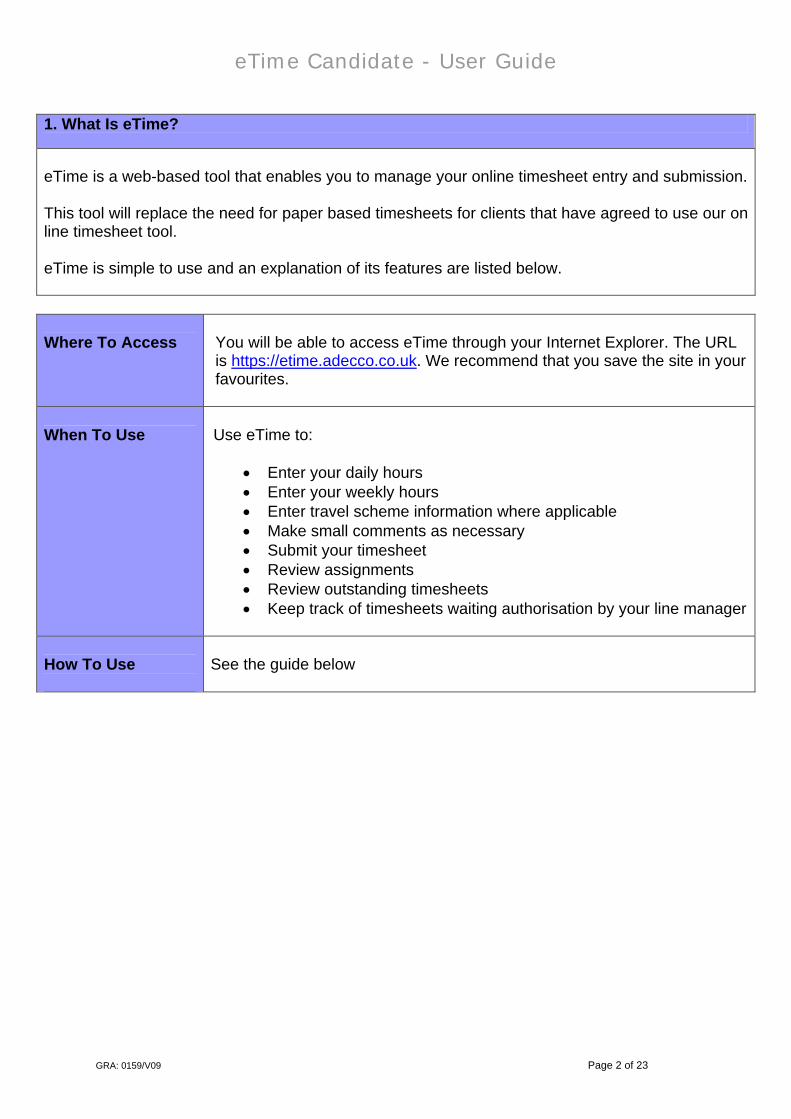
1. What Is eTime?
eTime is a web-based tool that enables you to manage your online timesheet entry and submission. This tool will replace the need for paper based timesheets for clients that have agreed to use our on line timesheet tool. eTime is simple to use and an explanation of its features are listed below.
Where To Access
You will be able to access eTime through your Internet Explorer. The URL is https://etime.adecco.co.uk. We recommend that you save the site in your favourites.
When To Use
Use eTime to:
• Enter your daily hours • Enter your weekly hours • Enter travel scheme information where applicable • Make small comments as necessary • Submit your timesheet • Review assignments • Review outstanding timesheets • Keep track of timesheets waiting authorisation by your line manager
How To Use
See the guide below
eTime Candidate - User Guide
GRA: 0159/V09 Page 3 of 23
Content
1. What is eTime? 2 2. Initial Information 4 3. Logging into eTime 5 4. Accessing Timesheets 8 5. Entering Hours 10 6. Travel Scheme 12 7. Submitting a timesheet 14 8. Past Timesheets 16 9. User Settings 17 10. Timesheet Rejection 20 11. Timesheet Authorisation 21 12. Unable to Access Internet 23
eTime Candidate - User Guide
GRA: 0159/V09 Page 4 of 23
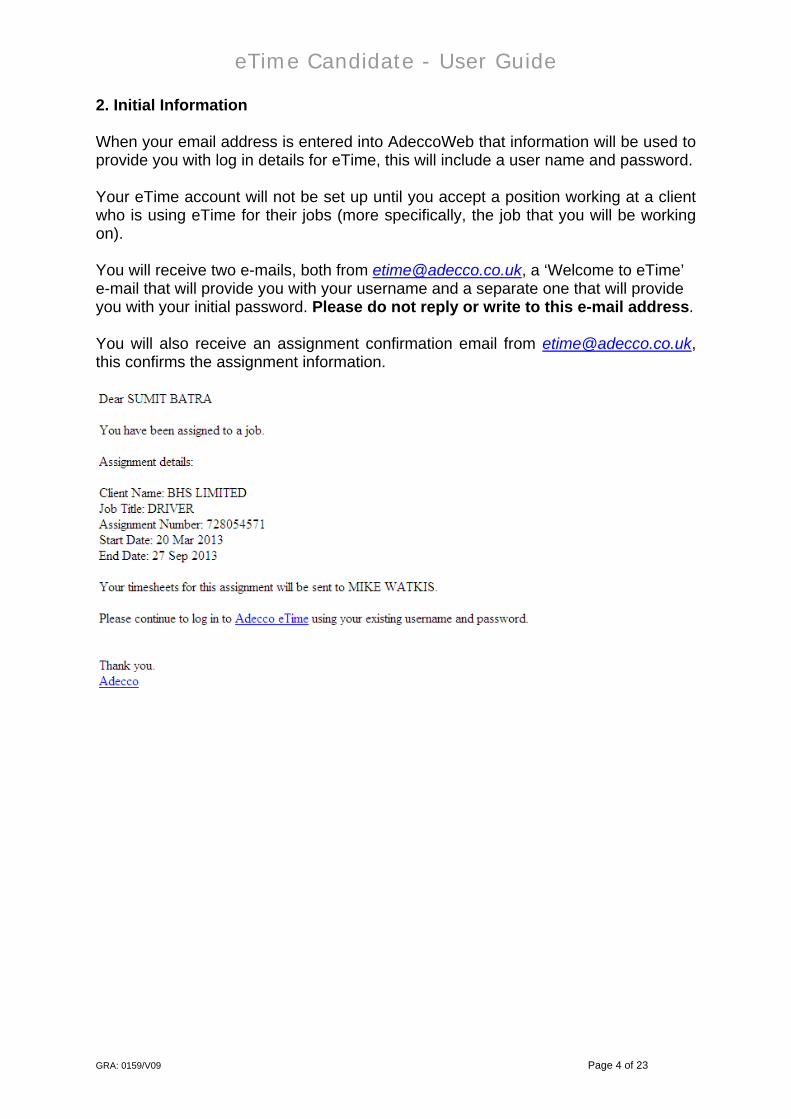
2. Initial Information When your email address is entered into AdeccoWeb that information will be used to provide you with log in details for eTime, this will include a user name and password. Your eTime account will not be set up until you accept a position working at a client who is using eTime for their jobs (more specifically, the job that you will be working on). You will receive two e-mails, both from [email protected], a ‘Welcome to eTime’ e-mail that will provide you with your username and a separate one that will provide you with your initial password. Please do not reply or write to this e-mail address. You will also receive an assignment confirmation email from [email protected], this confirms the assignment information.
eTime Candidate - User Guide
GRA: 0159/V09 Page 5 of 23
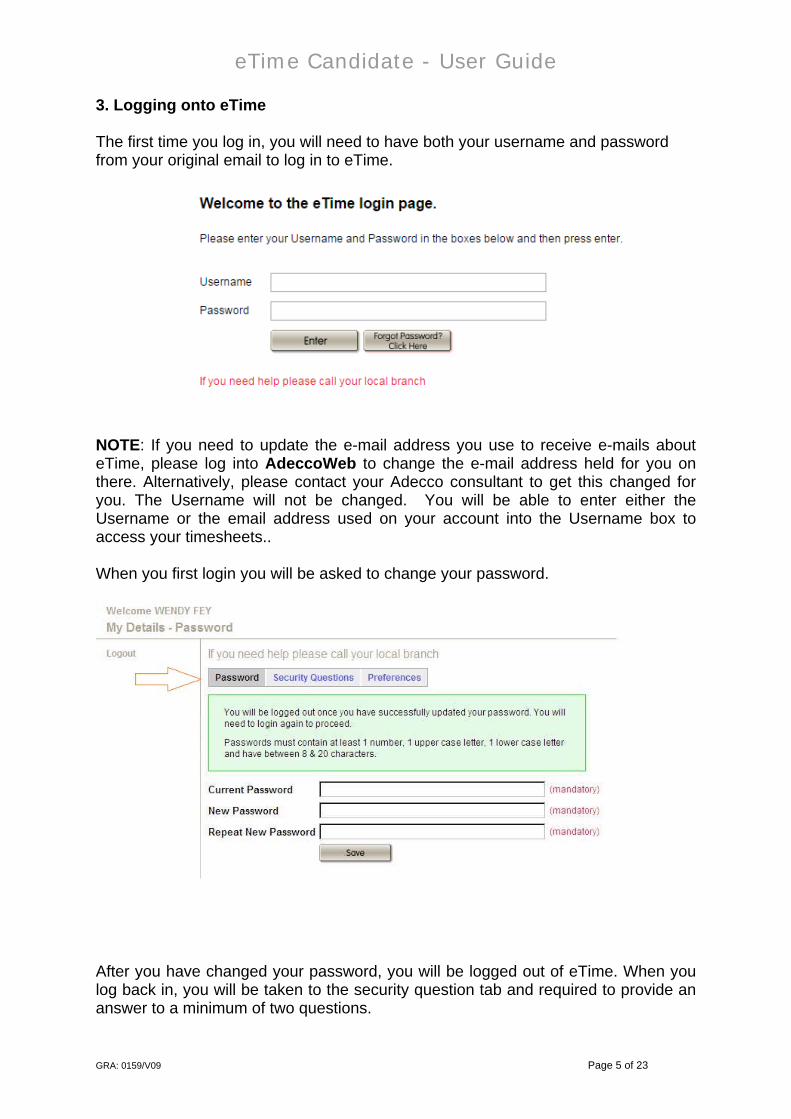
3. Logging onto eTime The first time you log in, you will need to have both your username and password from your original email to log in to eTime.
NOTE: If you need to update the e-mail address you use to receive e-mails about eTime, please log into AdeccoWeb to change the e-mail address held for you on there. Alternatively, please contact your Adecco consultant to get this changed for you. The Username will not be changed. You will be able to enter either the Username or the email address used on your account into the Username box to access your timesheets.. When you first login you will be asked to change your password.
After you have changed your password, you will be logged out of eTime. When you log back in, you will be taken to the security question tab and required to provide an answer to a minimum of two questions.
eTime Candidate - User Guide
GRA: 0159/V09 Page 6 of 23
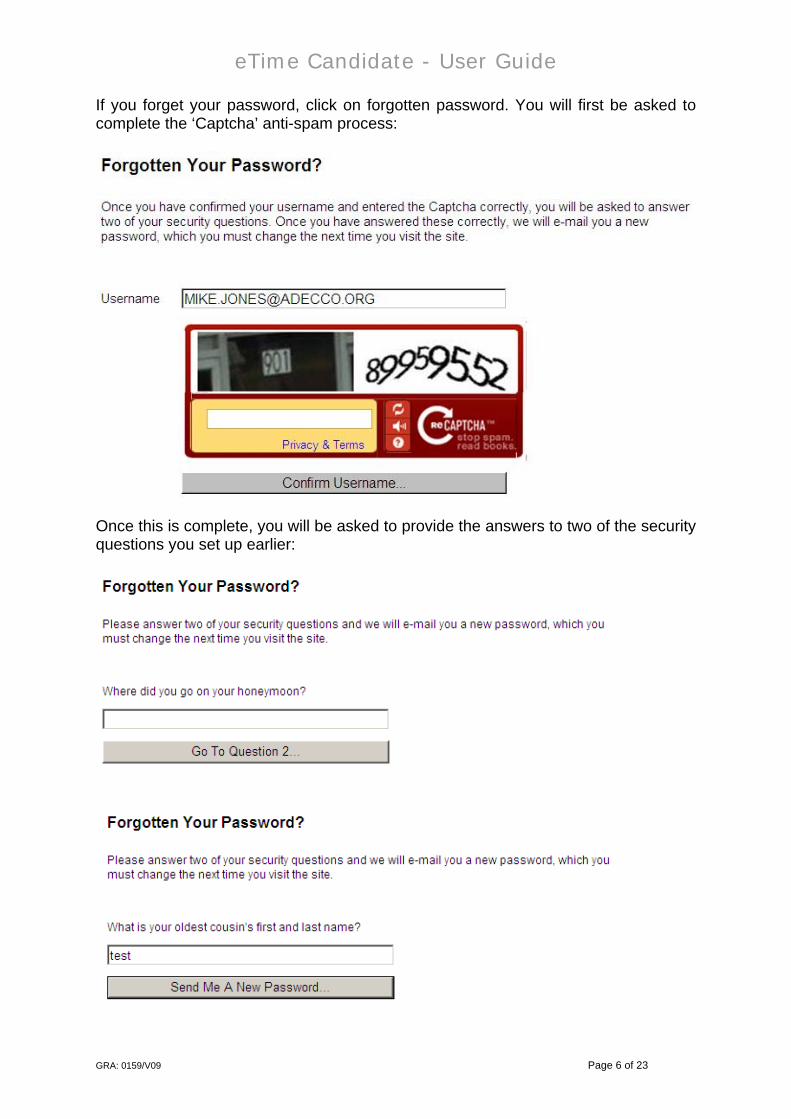
If you forget your password, click on forgotten password. You will first be asked to complete the ‘Captcha’ anti-spam process:
Once this is complete, you will be asked to provide the answers to two of the security questions you set up earlier:
eTime Candidate - User Guide
GRA: 0159/V09 Page 7 of 23
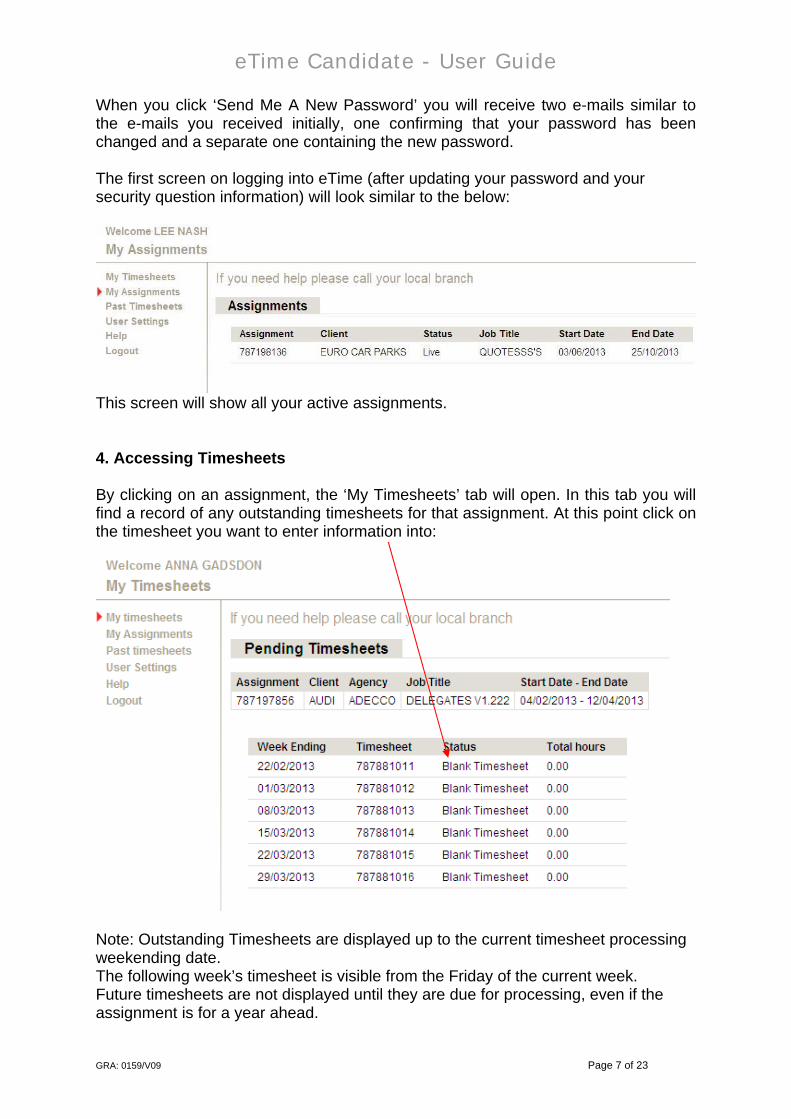
When you click ‘Send Me A New Password’ you will receive two e-mails similar to the e-mails you received initially, one confirming that your password has been changed and a separate one containing the new password. The first screen on logging into eTime (after updating your password and your security question information) will look similar to the below:
This screen will show all your active assignments.
4. Accessing Timesheets By clicking on an assignment, the ‘My Timesheets’ tab will open. In this tab you will find a record of any outstanding timesheets for that assignment. At this point click on the timesheet you want to enter information into:
Note: Outstanding Timesheets are displayed up to the current timesheet processing weekending date. The following week’s timesheet is visible from the Friday of the current week. Future timesheets are not displayed until they are due for processing, even if the assignment is for a year ahead.
eTime Candidate - User Guide
GRA: 0159/V09 Page 8 of 23
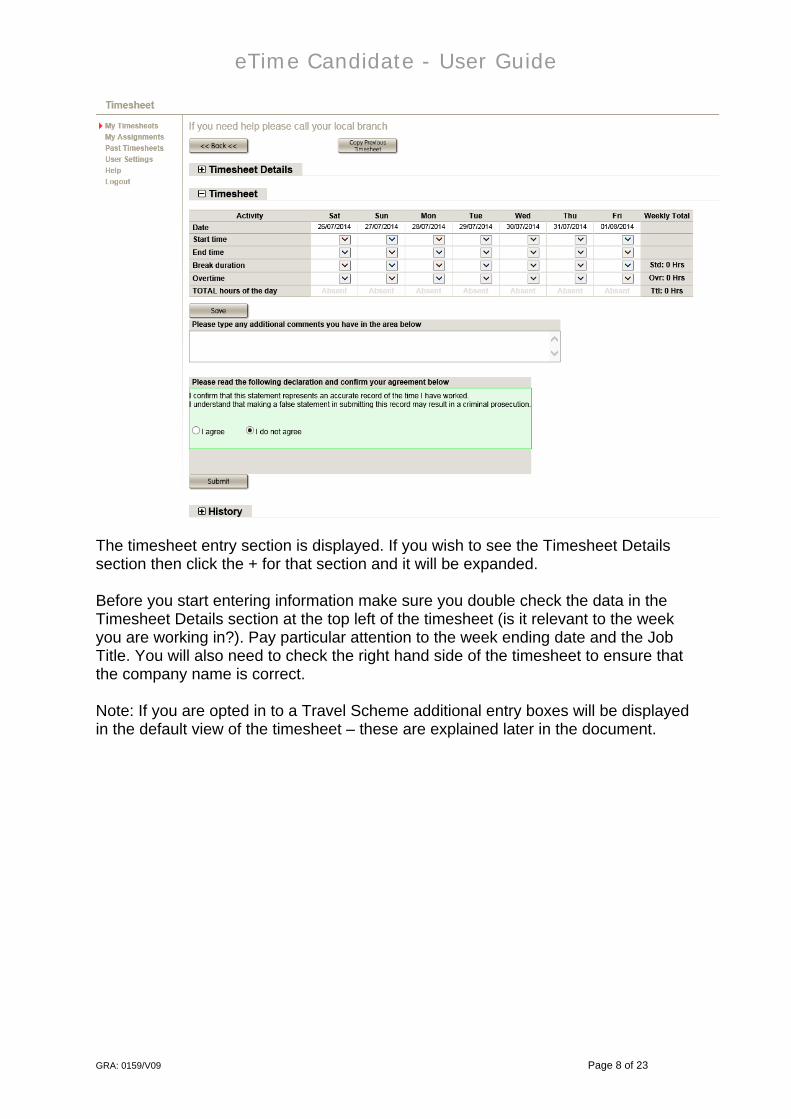
The timesheet entry section is displayed. If you wish to see the Timesheet Details section then click the + for that section and it will be expanded. Before you start entering information make sure you double check the data in the Timesheet Details section at the top left of the timesheet (is it relevant to the week you are working in?). Pay particular attention to the week ending date and the Job Title. You will also need to check the right hand side of the timesheet to ensure that the company name is correct. Note: If you are opted in to a Travel Scheme additional entry boxes will be displayed in the default view of the timesheet – these are explained later in the document.
eTime Candidate - User Guide
GRA: 0159/V09 Page 9 of 23
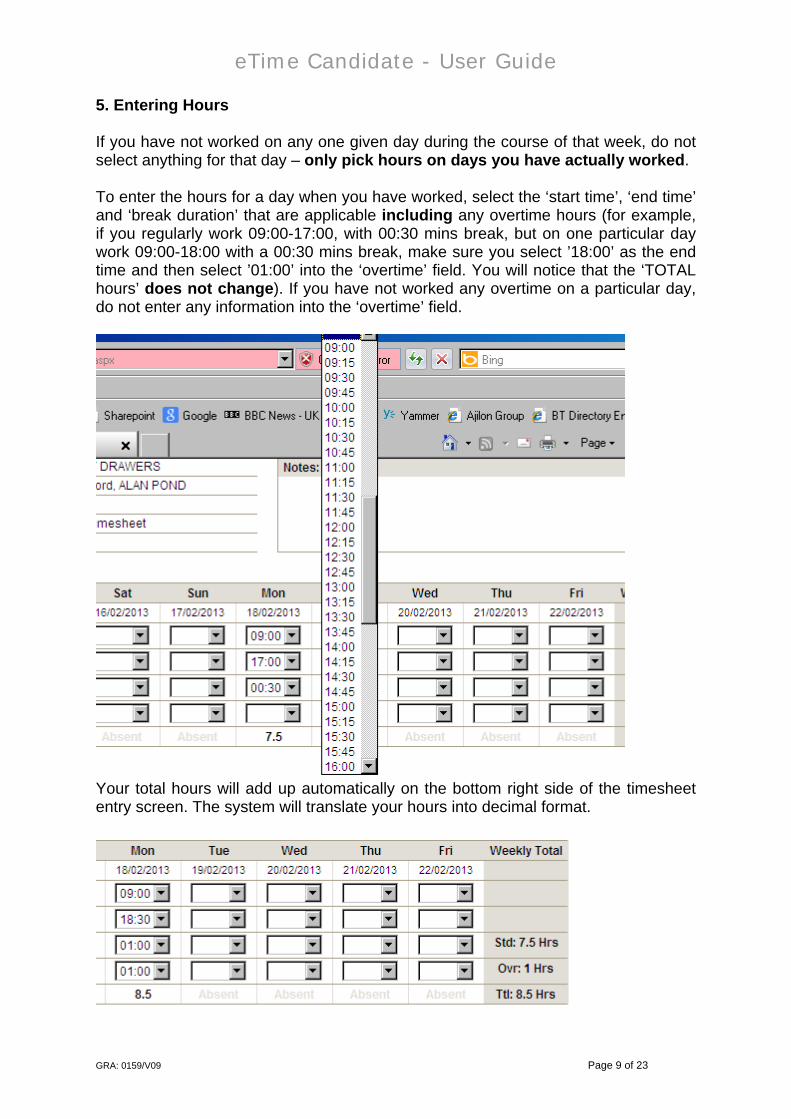
5. Entering Hours If you have not worked on any one given day during the course of that week, do not select anything for that day – only pick hours on days you have actually worked. To enter the hours for a day when you have worked, select the ‘start time’, ‘end time’ and ‘break duration’ that are applicable including any overtime hours (for example, if you regularly work 09:00-17:00, with 00:30 mins break, but on one particular day work 09:00-18:00 with a 00:30 mins break, make sure you select ’18:00’ as the end time and then select ’01:00’ into the ‘overtime’ field. You will notice that the ‘TOTAL hours’ does not change). If you have not worked any overtime on a particular day, do not enter any information into the ‘overtime’ field.
Your total hours will add up automatically on the bottom right side of the timesheet entry screen. The system will translate your hours into decimal format.

eTime Candidate - User Guide
GRA: 0159/V09 Page 10 of 23
You can enter your timesheet ‘daily’ if you prefer, just remember not to submit (explained in section 7). Once you enter the hours for the chosen day, click the ‘Save’ button.
eTime Candidate - User Guide
GRA: 0159/V09 Page 11 of 23
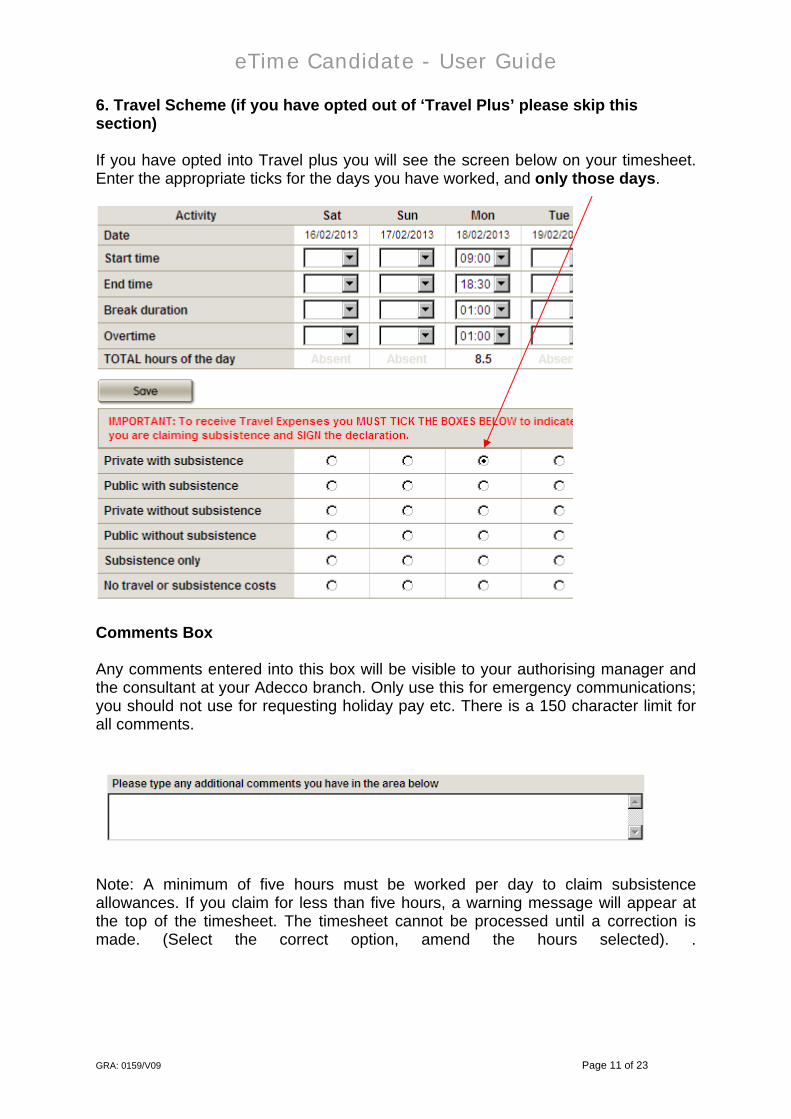
6. Travel Scheme (if you have opted out of ‘Travel Plus’ please skip this section) If you have opted into Travel plus you will see the screen below on your timesheet. Enter the appropriate ticks for the days you have worked, and only those days.
Comments Box Any comments entered into this box will be visible to your authorising manager and the consultant at your Adecco branch. Only use this for emergency communications; you should not use for requesting holiday pay etc. There is a 150 character limit for all comments.
Note: A minimum of five hours must be worked per day to claim subsistence allowances. If you claim for less than five hours, a warning message will appear at the top of the timesheet. The timesheet cannot be processed until a correction is made. (Select the correct option, amend the hours selected). .

eTime Candidate - User Guide
GRA: 0159/V09 Page 12 of 23
If you use the comment box, once you have submitted your timesheet, the message will appear at the top right of the timesheet page. All comments will appear in chronological order with the most recent first, and will include any comments made by the client, the consultant and you:
eTime Candidate - User Guide
GRA: 0159/V09 Page 13 of 23
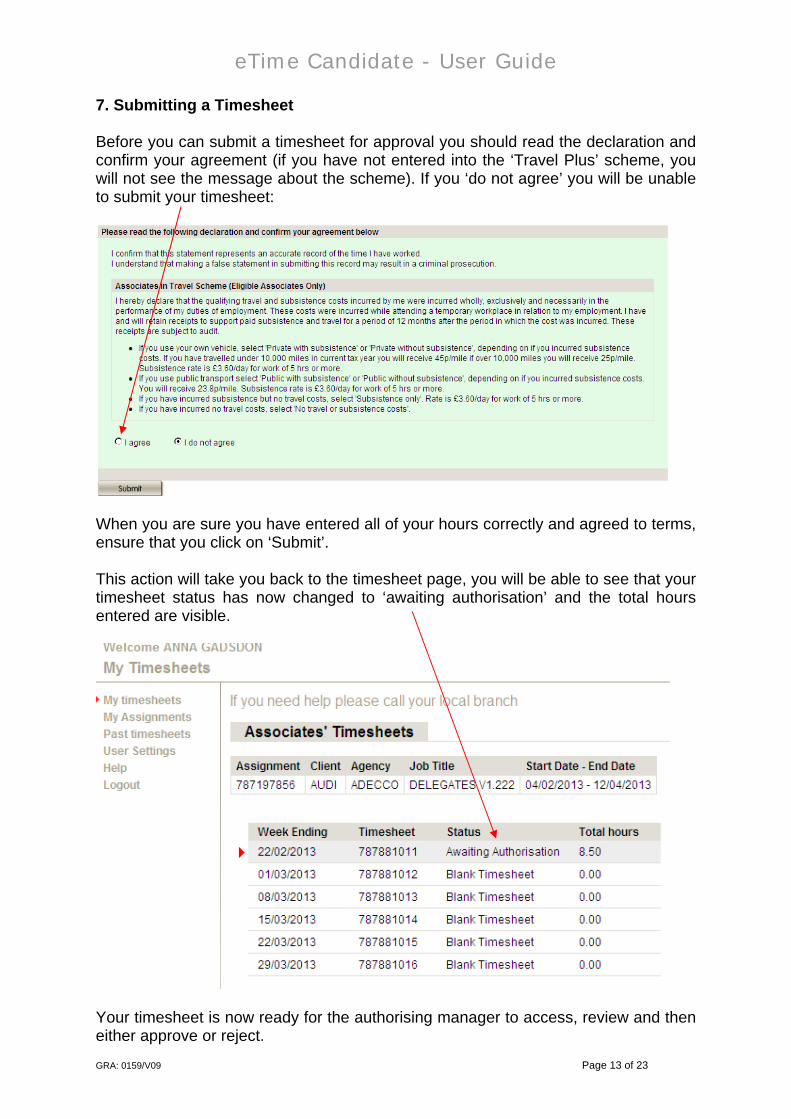
7. Submitting a Timesheet Before you can submit a timesheet for approval you should read the declaration and confirm your agreement (if you have not entered into the ‘Travel Plus’ scheme, you will not see the message about the scheme). If you ‘do not agree’ you will be unable to submit your timesheet:
When you are sure you have entered all of your hours correctly and agreed to terms, ensure that you click on ‘Submit’. This action will take you back to the timesheet page, you will be able to see that your timesheet status has now changed to ‘awaiting authorisation’ and the total hours entered are visible.
Your timesheet is now ready for the authorising manager to access, review and then either approve or reject.
eTime Candidate - User Guide
GRA: 0159/V09 Page 14 of 23
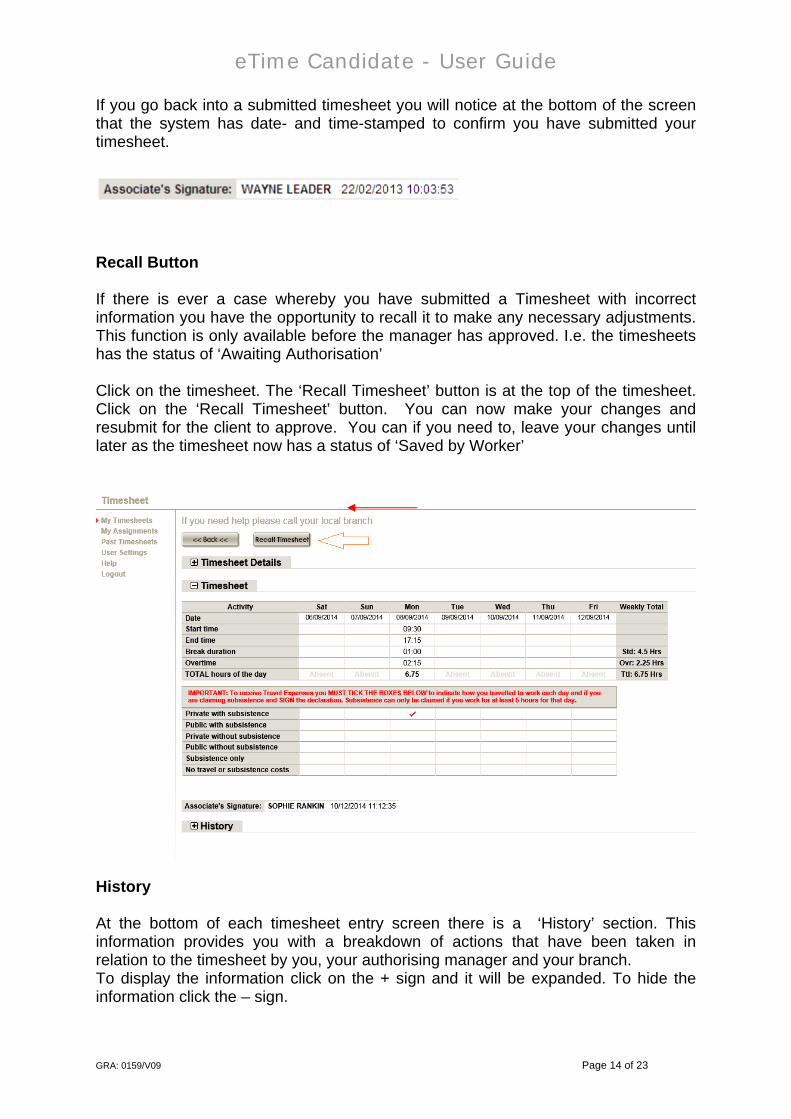
If you go back into a submitted timesheet you will notice at the bottom of the screen that the system has date- and time-stamped to confirm you have submitted your timesheet.
Recall Button If there is ever a case whereby you have submitted a Timesheet with incorrect information you have the opportunity to recall it to make any necessary adjustments. This function is only available before the manager has approved. I.e. the timesheets has the status of ‘Awaiting Authorisation’ Click on the timesheet. The ‘Recall Timesheet’ button is at the top of the timesheet. Click on the ‘Recall Timesheet’ button. You can now make your changes and resubmit for the client to approve. You can if you need to, leave your changes until later as the timesheet now has a status of ‘Saved by Worker’
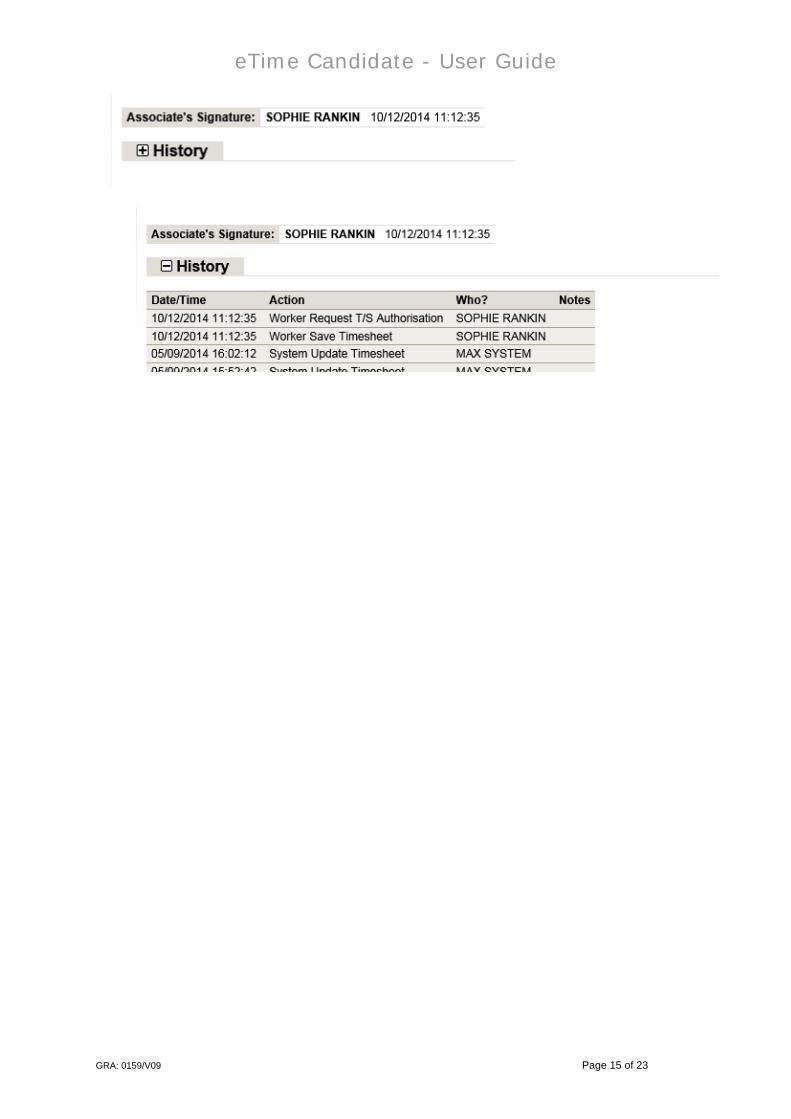
History At the bottom of each timesheet entry screen there is a ‘History’ section. This information provides you with a breakdown of actions that have been taken in relation to the timesheet by you, your authorising manager and your branch. To display the information click on the + sign and it will be expanded. To hide the information click the – sign.
eTime Candidate - User Guide
GRA: 0159/V09 Page 15 of 23
eTime Candidate - User Guide
GRA: 0159/V09 Page 16 of 23
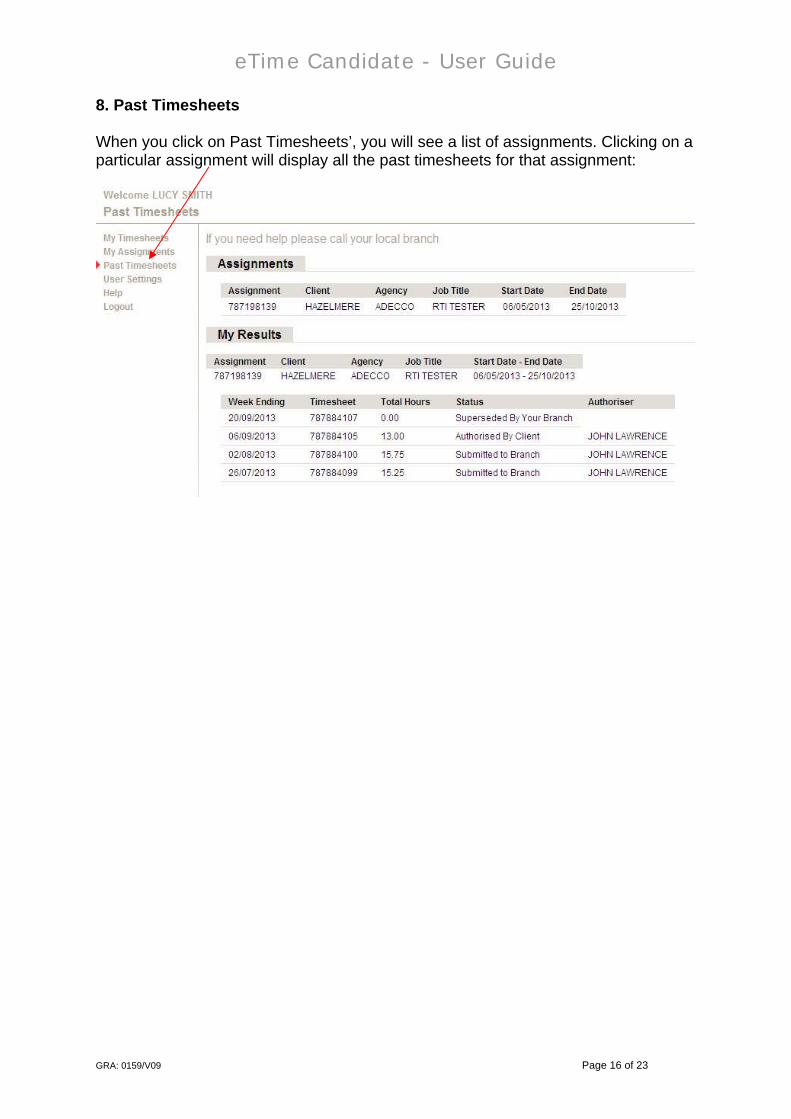
8. Past Timesheets When you click on Past Timesheets’, you will see a list of assignments. Clicking on a particular assignment will display all the past timesheets for that assignment:
eTime Candidate - User Guide
GRA: 0159/V09 Page 17 of 23
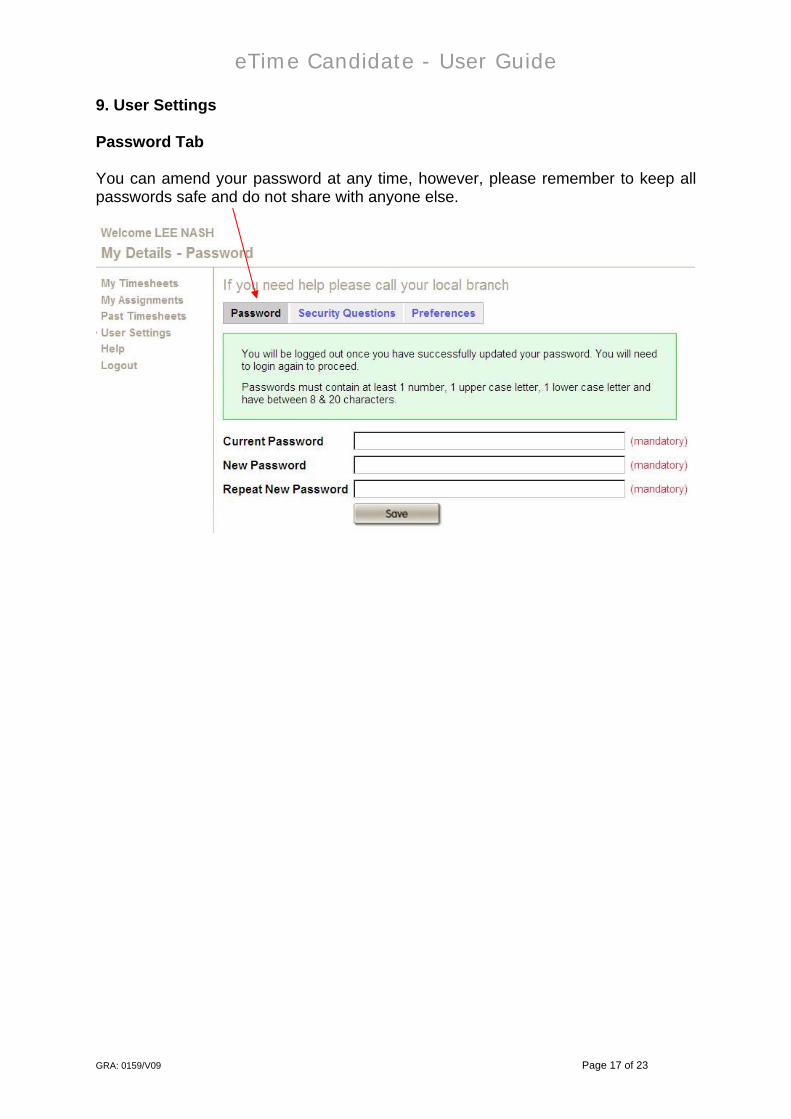
9. User Settings Password Tab You can amend your password at any time, however, please remember to keep all passwords safe and do not share with anyone else.
eTime Candidate - User Guide
GRA: 0159/V09 Page 18 of 23
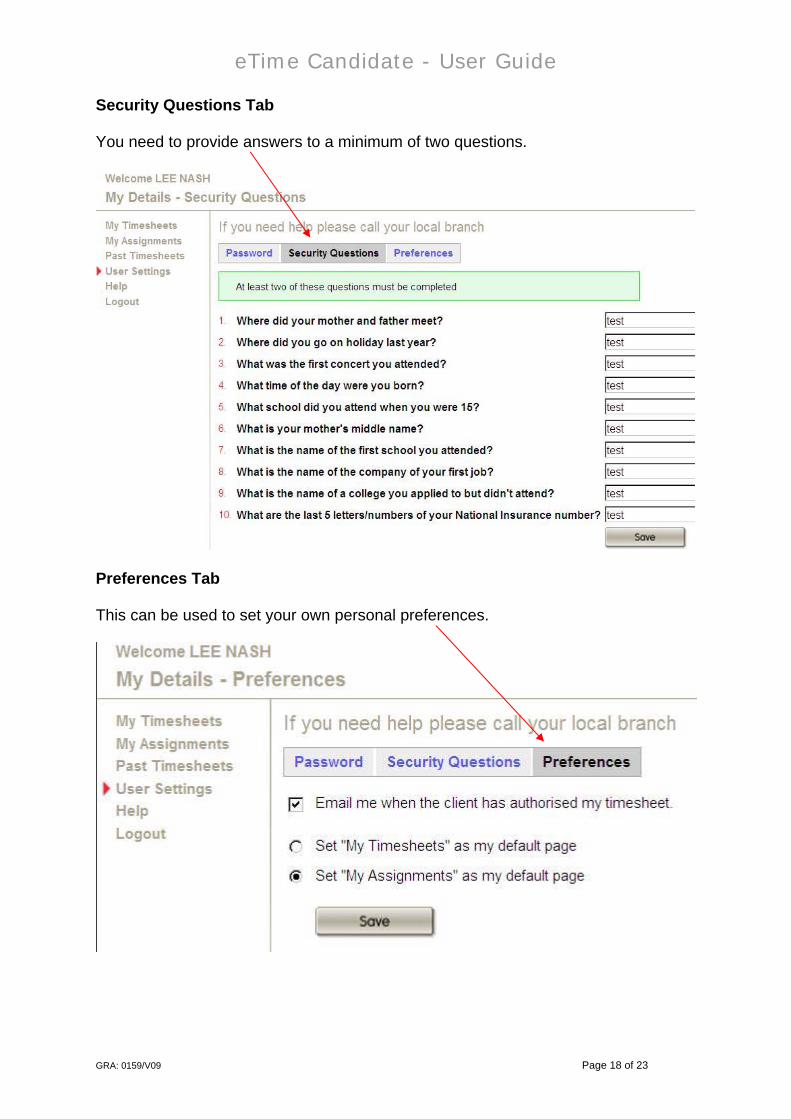
Security Questions Tab You need to provide answers to a minimum of two questions.
Preferences Tab This can be used to set your own personal preferences.
eTime Candidate - User Guide
GRA: 0159/V09 Page 19 of 23
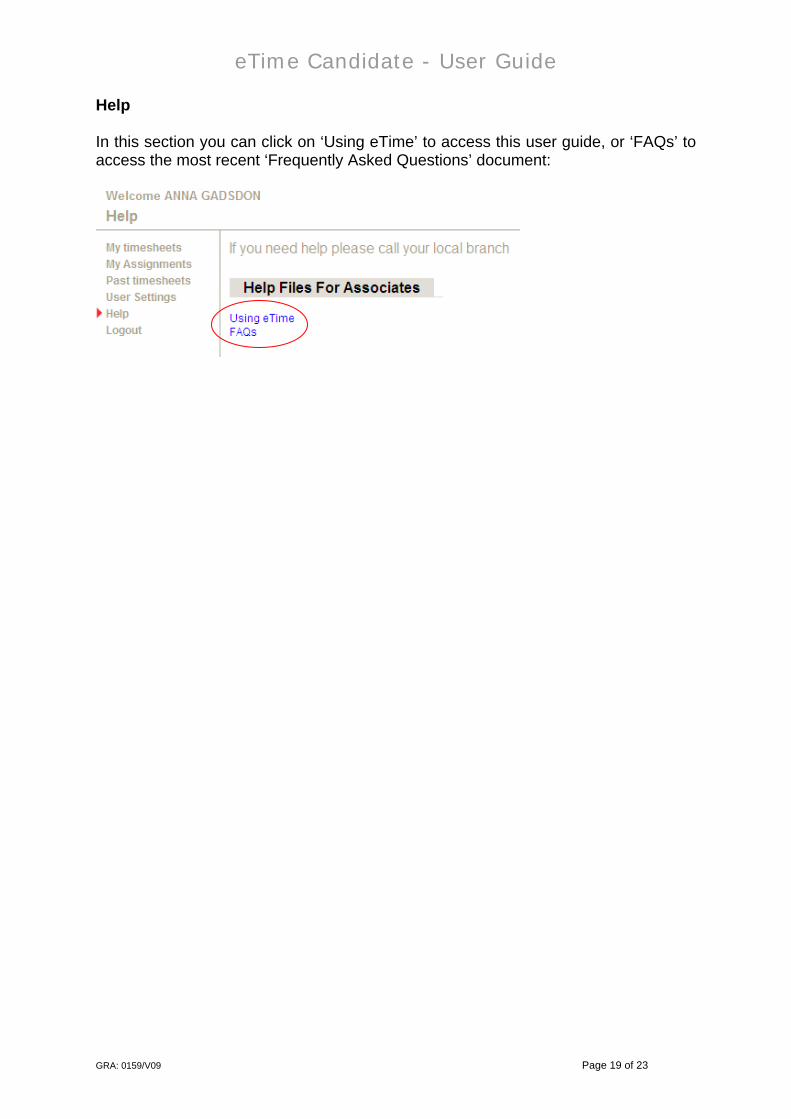
Help In this section you can click on ‘Using eTime’ to access this user guide, or ‘FAQs’ to access the most recent ‘Frequently Asked Questions’ document:
eTime Candidate - User Guide
GRA: 0159/V09 Page 20 of 23
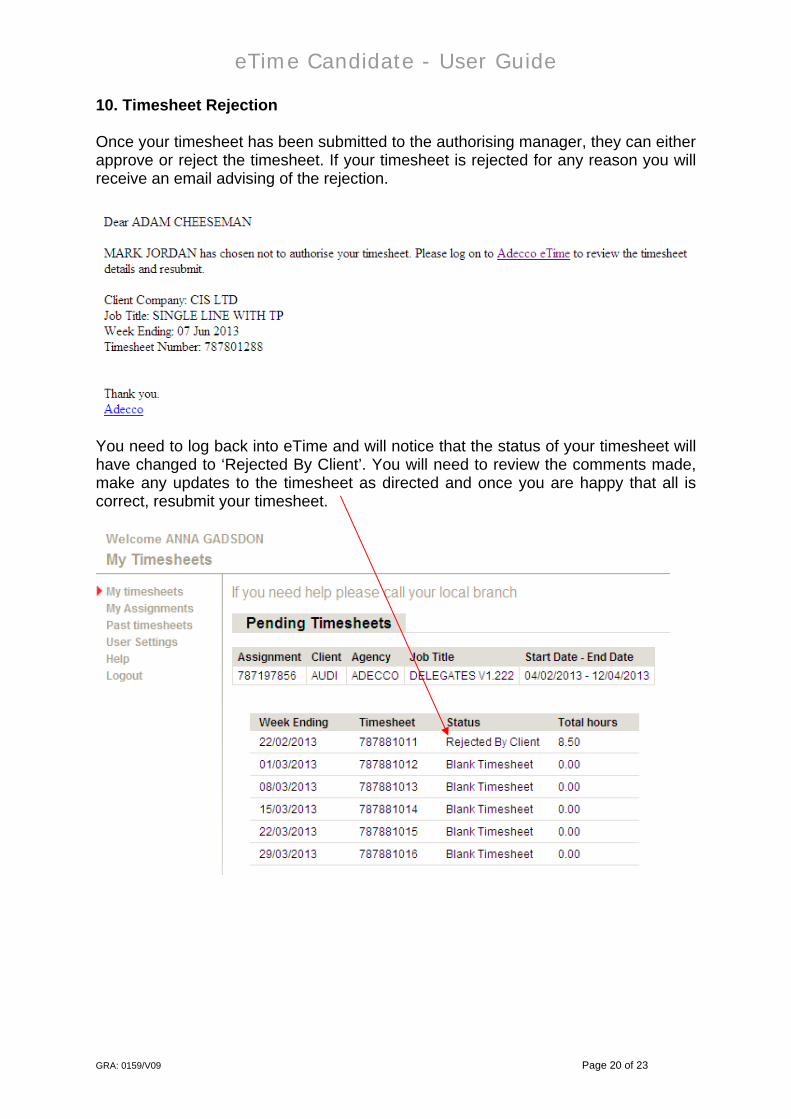
10. Timesheet Rejection Once your timesheet has been submitted to the authorising manager, they can either approve or reject the timesheet. If your timesheet is rejected for any reason you will receive an email advising of the rejection.
You need to log back into eTime and will notice that the status of your timesheet will have changed to ‘Rejected By Client’. You will need to review the comments made, make any updates to the timesheet as directed and once you are happy that all is correct, resubmit your timesheet.
eTime Candidate - User Guide
GRA: 0159/V09 Page 21 of 23
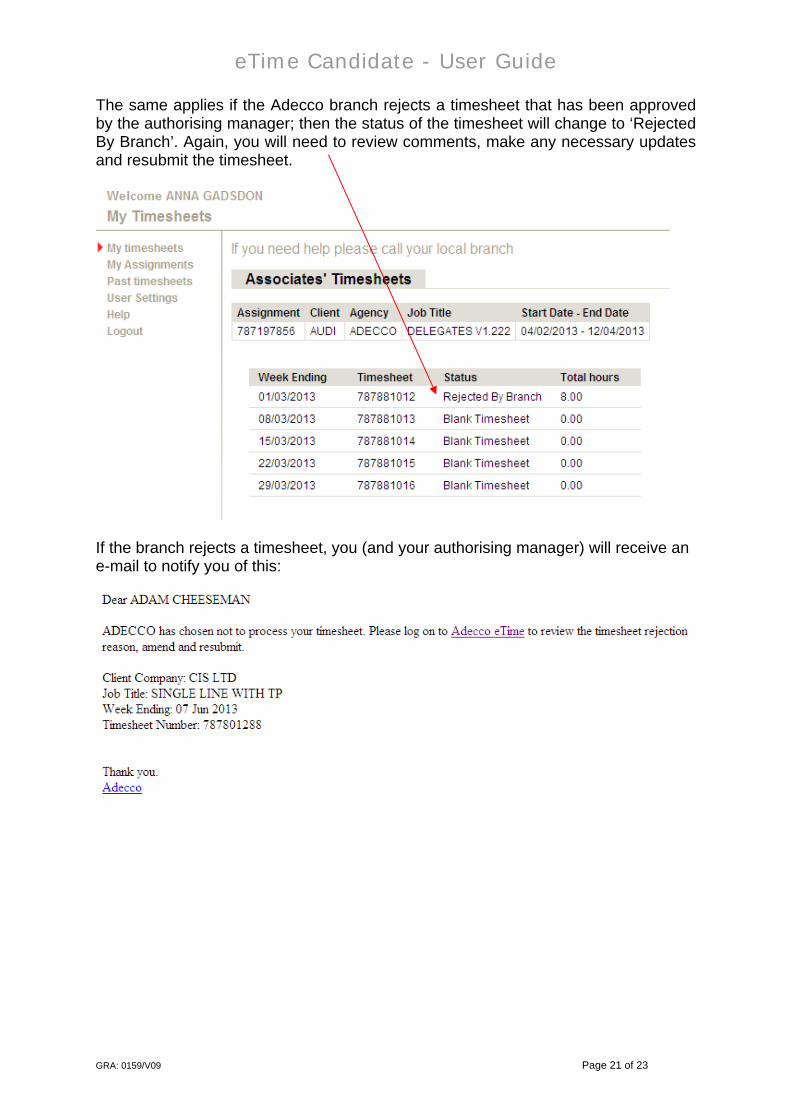
The same applies if the Adecco branch rejects a timesheet that has been approved by the authorising manager; then the status of the timesheet will change to ‘Rejected By Branch’. Again, you will need to review comments, make any necessary updates and resubmit the timesheet.
If the branch rejects a timesheet, you (and your authorising manager) will receive an e-mail to notify you of this:
eTime Candidate - User Guide
GRA: 0159/V09 Page 22 of 23
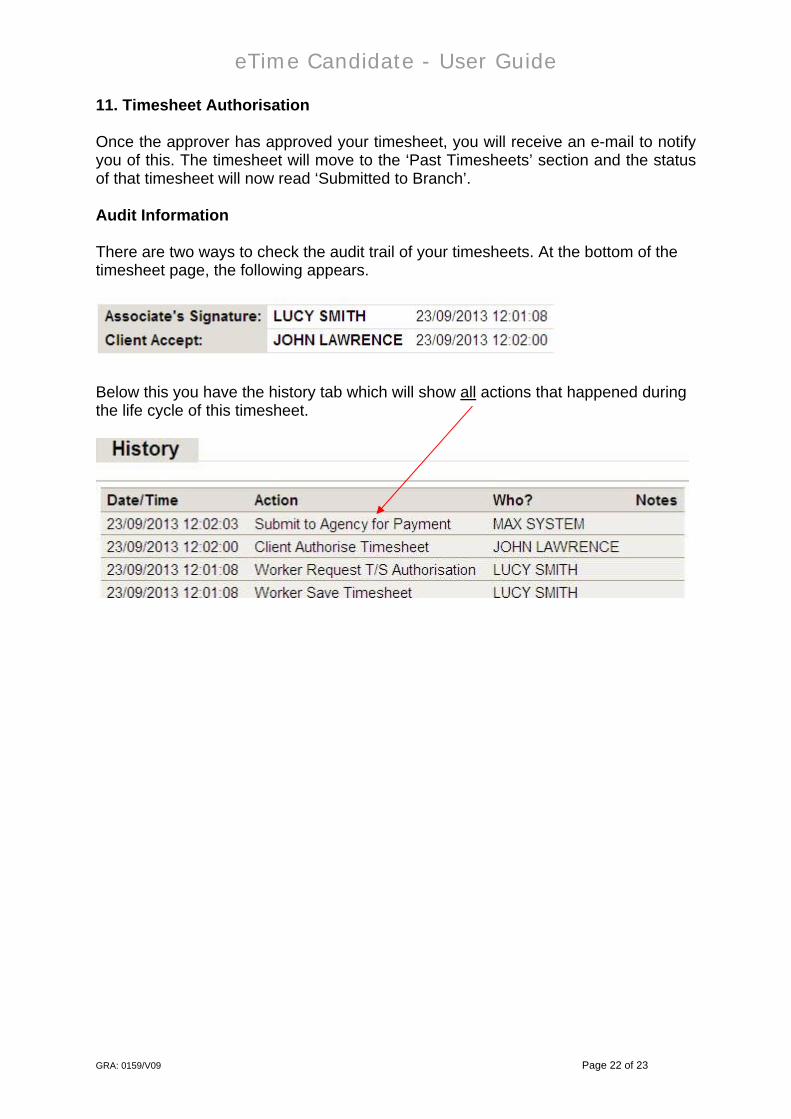
11. Timesheet Authorisation Once the approver has approved your timesheet, you will receive an e-mail to notify you of this. The timesheet will move to the ‘Past Timesheets’ section and the status of that timesheet will now read ‘Submitted to Branch’. Audit Information There are two ways to check the audit trail of your timesheets. At the bottom of the timesheet page, the following appears.
Below this you have the history tab which will show all actions that happened during the life cycle of this timesheet.
eTime Candidate - User Guide
GRA: 0159/V09 Page 23 of 23
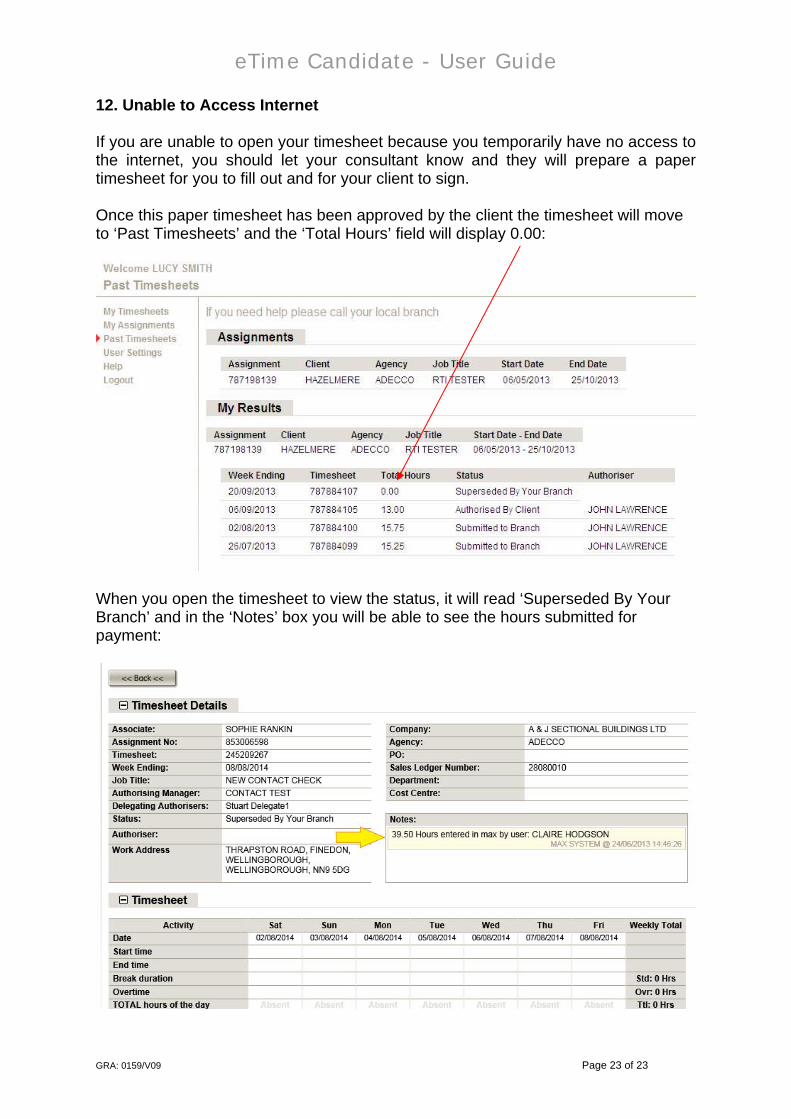
12. Unable to Access Internet If you are unable to open your timesheet because you temporarily have no access to the internet, you should let your consultant know and they will prepare a paper timesheet for you to fill out and for your client to sign. Once this paper timesheet has been approved by the client the timesheet will move to ‘Past Timesheets’ and the ‘Total Hours’ field will display 0.00:
When you open the timesheet to view the status, it will read ‘Superseded By Your Branch’ and in the ‘Notes’ box you will be able to see the hours submitted for payment: