Embed Size (px)
Citation preview

Open Learning Guide Access 2007 Advanced
Open Learning GuideOpen Learning GuideMicrosoft®
Access 2007Advanced
Note: Microsoft is a registered trademark and Access and Windows are trademarks of the Microsoft Corporation in the United States and other countries.
Release OL320v1
© CiA Training Ltd 2008 1

Open Learning Guide Access 2007 Advanced
Published by:
CiA Training LtdBusiness & Innovation CentreSunderland Enterprise ParkSunderland SR5 2THUnited Kingdom
Tel: +44 (0)191 549 5002Fax: +44 (0)191 549 9005
E-mail: [email protected]: www.ciatraining.co.uk
ISBN 13: 978-1-86005-539-3
Important NoteThis guide was written using Windows Vista with a screen resolution of 1024 x 768.
Using Windows XP will result in some dialog boxes looking different, although the content is the same.
Working in a different screen resolution, or with an application window which is not maximised, will change the look of the Office 2007 Ribbon. The ribbon appearance is dynamic, it changes to fit the space available. The full ribbon may show a group containing several options, but if space is restricted it may show a single button that you need to click to see the same options, e.g. the
Editing group may be replaced by the Editing button .
First published 2008
Copyright © 2008 CiA Training Ltd
All rights reserved. No part of this publication may be reproduced, stored in a retrieval system, or transmitted in any form or by any means (electronic, mechanical, photocopying, recording or otherwise) without the prior written permission of CiA Training Limited.
2 © CiA Training Ltd 2008
Open Learning Guide Access 2007 Advanced
CiA Training's Open Learning guides are a collection of structured exercises building into a complete open learning package, to teach how to use a particular software application. They are designed to take the user through the features to enhance, fulfil and instil confidence in the product.
ACCESS ADVANCED - The third guide in the Microsoft Access series contains exercises covering the following topics:
Macros AutoExec Macros
Conditional Macros Exporting
Formatting Forms Inserting Pictures and Charts
Adding Startup Controls Relationships and Joins
E-mail Database Utilities
Database Passwords Database Analysis
Database Tools and Operations Control Panels
This Open Learning Guide is suitable for:
Any individual wishing to further their knowledge of Microsoft Access following the Introductory and Intermediate guides or equivalent. The user works through the guide from start to finish.
Tutor led groups as reinforcement material.
Aims and Objectives
To further the user's knowledge and techniques for the successful creation and use of complicated database models using Access 2007.
After completing the guide the user will be able to: Create advanced macros Add form backgrounds, pictures and charts Apply conditional formatting Create data access (web) pages using wizards Send database objects as e-mail attachments Repair, compact, backup and restore a database Create a switchboard and control panel Set database passwords Analyse database performance
© CiA Training Ltd 2008 3

Open Learning Guide Access 2007 Advanced
Downloading the Data FilesThe data associated with these exercises must be downloaded from our website. Go to: www.ciatraining.co.uk/data. Follow the on screen instructions to download the appropriate data files.
By default, the data files will be downloaded to Documents\CIA DATA FILES\Open Learning\Access 2007 Advanced Data.
If you prefer, the data can be supplied on CD at an additional cost. Contact the Sales team at [email protected].
IntroductionThis guide assumes that the program has been correctly and fully installed on your personal computer, that the computer is already switched on, and that a printer and mouse are attached. The guide was created using Access 2007.
Accompanying text for the exercises is contained on disk. This avoids unnecessary typing and speeds up the learning process.
Notation Used Throughout This Guide
Key presses are included within <> e.g. <Enter>
The guide is split into individual exercises. Each exercise consists of a written explanation of the feature, followed by a stepped exercise. Read the Guidelines and then follow the Actions with reference to the Guidelines, if necessary.
Recommendations
It is suggested that the user add their name, the date and exercise number after completing each exercise that requires a printed copy.
Read the whole of each exercise before starting to work through it. This ensures understanding of the topic and prevents any unnecessary mistakes.
Measurements used throughout this guide are metric.
Some fonts used in this guide may not be available on all computers. If this is the case, select an alternative.
4 © CiA Training Ltd 2008

Open Learning Guide Access 2007 Advanced
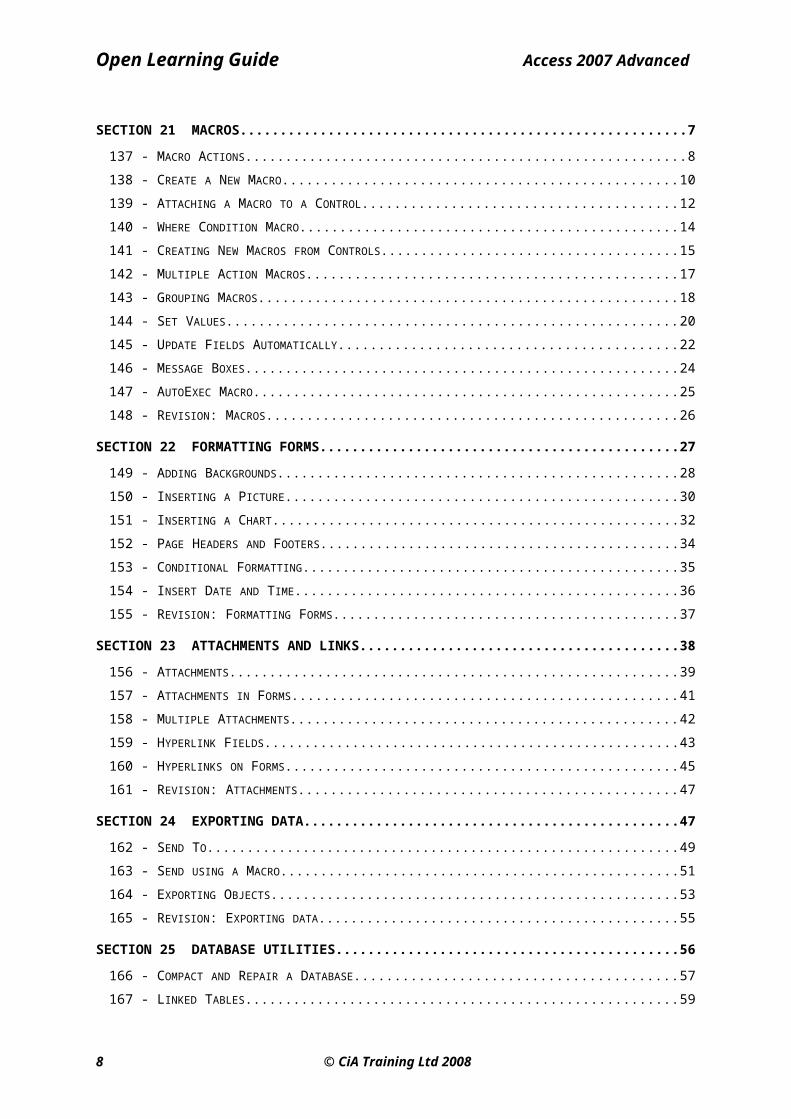
SECTION 21 MACROS............................................................................................................................... 7
137 - MACRO ACTIONS................................................................................................................................. 8138 - CREATE A NEW MACRO..................................................................................................................... 10139 - ATTACHING A MACRO TO A CONTROL...............................................................................................12140 - WHERE CONDITION MACRO............................................................................................................... 14141 - CREATING NEW MACROS FROM CONTROLS........................................................................................15142 - MULTIPLE ACTION MACROS............................................................................................................... 17143 - GROUPING MACROS........................................................................................................................... 18144 - SET VALUES...................................................................................................................................... 20145 - UPDATE FIELDS AUTOMATICALLY......................................................................................................22146 - MESSAGE BOXES............................................................................................................................... 24147 - AUTOEXEC MACRO........................................................................................................................... 25148 - REVISION: MACROS........................................................................................................................... 26
SECTION 22 FORMATTING FORMS.....................................................................................................27
149 - ADDING BACKGROUNDS.................................................................................................................... 28150 - INSERTING A PICTURE........................................................................................................................ 30151 - INSERTING A CHART.......................................................................................................................... 32152 - PAGE HEADERS AND FOOTERS........................................................................................................... 34153 - CONDITIONAL FORMATTING............................................................................................................... 35154 - INSERT DATE AND TIME..................................................................................................................... 36155 - REVISION: FORMATTING FORMS......................................................................................................... 37
SECTION 23 ATTACHMENTS AND LINKS..........................................................................................38
156 - ATTACHMENTS.................................................................................................................................. 39157 - ATTACHMENTS IN FORMS................................................................................................................... 41158 - MULTIPLE ATTACHMENTS.................................................................................................................. 42159 - HYPERLINK FIELDS............................................................................................................................ 43160 - HYPERLINKS ON FORMS..................................................................................................................... 45161 - REVISION: ATTACHMENTS.................................................................................................................. 47
SECTION 24 EXPORTING DATA........................................................................................................... 47
162 - SEND TO........................................................................................................................................... 49163 - SEND USING A MACRO....................................................................................................................... 51164 - EXPORTING OBJECTS.......................................................................................................................... 53165 - REVISION: EXPORTING DATA.............................................................................................................. 55
SECTION 25 DATABASE UTILITIES.....................................................................................................56
166 - COMPACT AND REPAIR A DATABASE..................................................................................................57167 - LINKED TABLES................................................................................................................................. 59168 - BACKUP/RESTORE A DATABASE......................................................................................................... 61169 - DATABASE SPLITTER.......................................................................................................................... 62170 - SET DATABASE PASSWORDS............................................................................................................... 64171 - REMOVE A PASSWORD....................................................................................................................... 65172 - REVISION: UTILITIES.......................................................................................................................... 66
© CiA Training Ltd 2008 5
Open Learning Guide Access 2007 Advanced
SECTION 26 DATABASE ANALYSIS.....................................................................................................67
173 - TABLE ANALYZER............................................................................................................................. 68174 - PERFORMANCE ANALYZER................................................................................................................. 71175 - DOCUMENTER.................................................................................................................................... 72176 - DEPENDENCIES.................................................................................................................................. 73177 - REVISION: DATABASE ANALYSIS........................................................................................................ 74
SECTION 27 DATABASE TOOLS AND OPERATIONS........................................................................75
178 - OPTIONS............................................................................................................................................ 76179 - CURRENT DATABASE OPTIONS........................................................................................................... 78180 - KEY PRESS CONTROLS....................................................................................................................... 80181 - PAGE NUMBERS FOR REPORTS............................................................................................................ 81182 - SWITCHBOARD MANAGER.................................................................................................................. 82183 - REVISION: DATABASE TOOLS............................................................................................................. 85
SECTION 28 CONTROL PANEL............................................................................................................. 86
184 - CONTROL PANEL............................................................................................................................... 87185 - MAIN CONTROL PANEL...................................................................................................................... 89186 - SUB CONTROL PANELS....................................................................................................................... 90187 - APPLY MACROS TO A CONTROL PANEL..............................................................................................91188 - APPLY MACROS TO SUB CONTROL PANELS........................................................................................92189 - CREATING AN OPTION GROUP............................................................................................................ 93190 - REVISION: CONTROL PANEL............................................................................................................... 96
SECTION 29 RELATIONSHIPS AND JOINS.........................................................................................97
191 - ONE-TO-MANY................................................................................................................................. 98192 - MANY-TO-MANY............................................................................................................................ 100193 - ONE-TO-ONE................................................................................................................................... 102194 - JOINS............................................................................................................................................... 103195 - REVISION: RELATIONSHIPS............................................................................................................... 106
ANSWERS................................................................................................................................................. 107
GLOSSARY............................................................................................................................................... 108
INDEX........................................................................................................................................................ 110
OTHER PRODUCTS FROM CIA TRAINING........................................................................................112
6 © CiA Training Ltd 2008

Open Learning Guide Access 2007 Advanced
Section 21
Macros
By the end of this Section you should be able to:
Create and Attach MacrosUse Where Conditions
Create Multiple Action MacrosGroup Macros
Set Values with MacrosUpdate Fields Automatically
Use Macros to Maximise/RestoreCreate AutoExec Macros
© CiA Training Ltd 2008 7
Open Learning Guide Access 2007 Advanced
Exercise 137 - Macro ActionsGuidelines:
A macro is an object in Access which is intended to automate database processes. It can be made up of a single action or multiple actions, which are activated every time the macro is run. Some actions have Action Arguments, which set the controls for the action, e.g. the Action Arguments for the OpenReport action will contain details of which report is to be opened, what view will be used, or if a filter/query is to be used to restrict the records for the report. Once created a macro can be run manually or more commonly, attached to a command button. They can also be activated automatically by an event such as a form opening or a field being updated.
Outlined below is a list of all the actions which do not require granting trusted status to the database. These are the actions that will be listed by default when creating a macro. Other actions can be used but these will have security implications when writing databases for other users.
Action Explanation
AddMenu Add a menu to a menu bar.
ApplyFilter Applies a Filter/Query to specified data.
Beep Make computer beep.
CancelEvent Cancels event that macro is attached to.
Close Close an object.
FindNext Find next record that meets specified criteria.
FindRecord Find a specific record.
GoToControl Move the cursor to a control.
GoToPage Move to a specific page.
GoToRecord Move to a specific record.
Hourglass Show the hourglass.
LockNavigationPane Prevents objects being deleted from the Navigation Pane
Maximize Maximise the current window.
Minimize Minimise the current window.
MoveSize Moves/resizes active window.
MsgBox Show a message box.
Navigate To Go to a specific Navigation Pane group or category.
On Error Defines error handling process.
OpenForm Open a form.
8 © CiA Training Ltd 2008

Open Learning Guide Access 2007 Advanced
© CiA Training Ltd 2008 9

Open Learning Guide Access 2007 Advanced
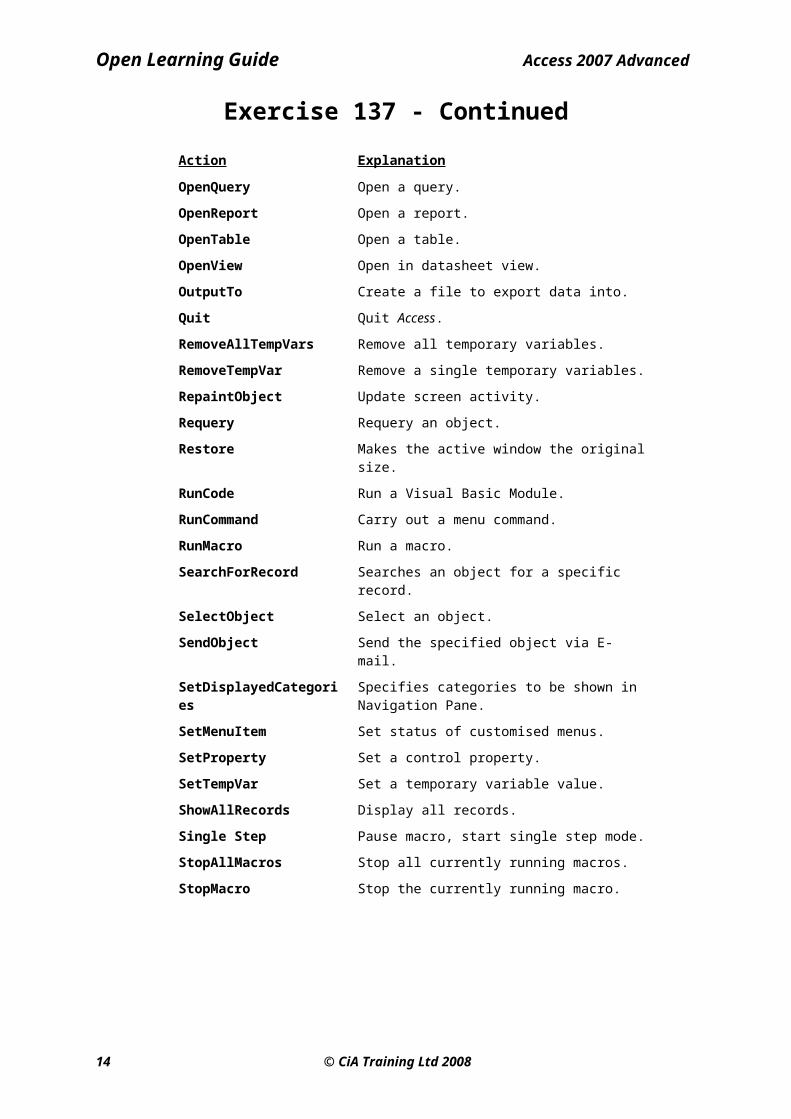
Exercise 137 - ContinuedAction Explanation
OpenQuery Open a query.
OpenReport Open a report.
OpenTable Open a table.
OpenView Open in datasheet view.
OutputTo Create a file to export data into.
Quit Quit Access.
RemoveAllTempVars Remove all temporary variables.
RemoveTempVar Remove a single temporary variables.
RepaintObject Update screen activity.
Requery Requery an object.
Restore Makes the active window the original size.
RunCode Run a Visual Basic Module.
RunCommand Carry out a menu command.
RunMacro Run a macro.
SearchForRecord Searches an object for a specific record.
SelectObject Select an object.
SendObject Send the specified object via E-mail.
SetDisplayedCategories Specifies categories to be shown in Navigation Pane.
SetMenuItem Set status of customised menus.
SetProperty Set a control property.
SetTempVar Set a temporary variable value.
ShowAllRecords Display all records.
Single Step Pause macro, start single step mode.
StopAllMacros Stop all currently running macros.
StopMacro Stop the currently running macro.
10 © CiA Training Ltd 2008

Open Learning Guide Access 2007 Advanced
Exercise 138 - Create a New MacroGuidelines:
Macros are easily created and this usually involves selecting the required Action or Actions and specifying Action Arguments to control the operation of each action. For example, an Open Form macro can be created to open a specified form whenever it is run. Action Arguments will have to be set up to state which form is to be opened and whether the form is to be viewed in Form, Design or Datasheet View.
Other Action Arguments can be used to set controls for the form, such as whether data can be added, edited or whether the form is to be read - only.
Different Actions will have a different set of Action Arguments available.
Actions:
1. Open the Transport database. Some macro actions require that the security setting is set to Enable this content. If the Security Warning message is displayed now, click Options. Select Enable this content and click OK. The message will disappear.
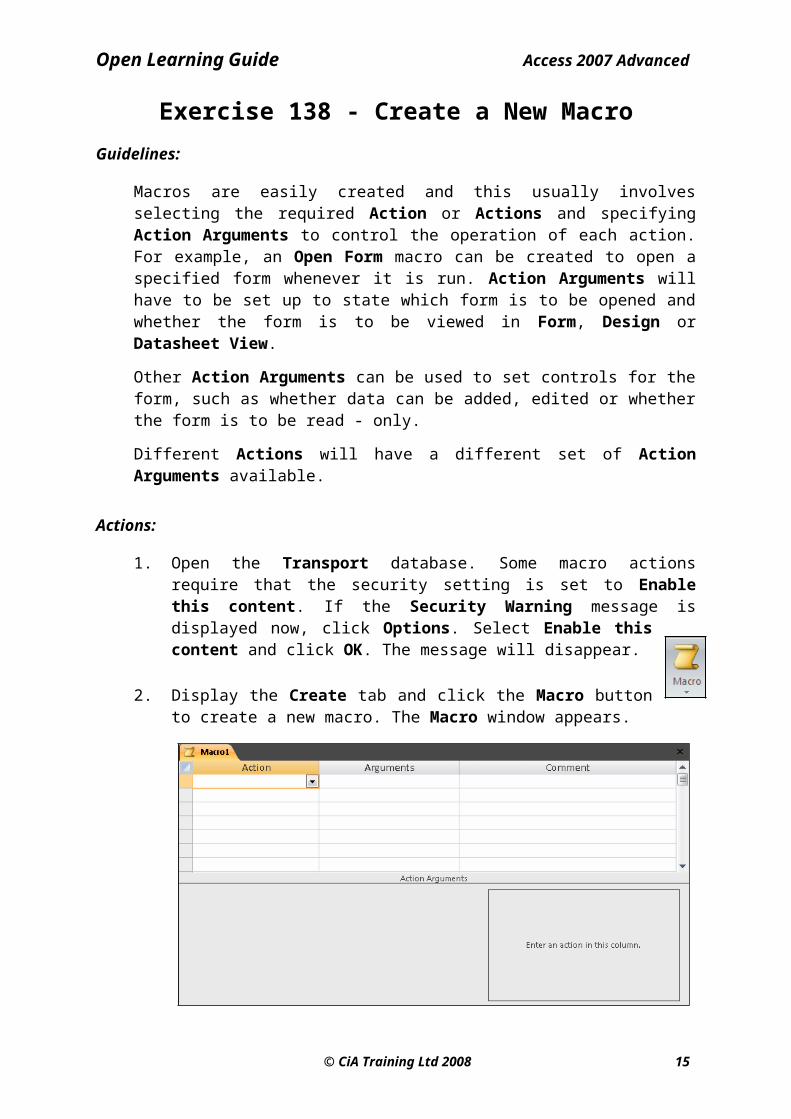
2. Display the Create tab and click the Macro button to create a new macro. The Macro window appears.
3. Click the drop down arrow in the Action column, scroll down the list of options and select OpenForm.
4. An Action Arguments window is displayed at the bottom of the page showing the parameters available for this action (different actions will have a different selection of action arguments). Click in each of the Action Argument fields and read the descriptive text which appears.
© CiA Training Ltd 2008 11

Open Learning Guide Access 2007 Advanced
12 © CiA Training Ltd 2008

Open Learning Guide Access 2007 Advanced
Exercise 138 - Continued5. Click in Form Name and choose the name of the form that is to be
opened – Servicing. Leave the View argument as Form.
6. Click in Data Mode and choose Read Only from the drop down list. When the Servicing form is opened using this macro, it will be for enquiry only, it will not be possible to amend any data.
7. In the Comment column for the macro, type Open the Servicing Form.
8. Right click on the Macro1 tab and select Close. Save the macro when prompted. Enter the name Read Service Records.
9. Click OK to save the macro, then leave the database open.
Note: Alternatively use File | Save As to save the macro and then it can be closed without the save prompt.
© CiA Training Ltd 2008 13
Open Learning Guide Access 2007 Advanced
Exercise 139 - Attaching a Macro to a ControlGuidelines:
Once a macro has been created, it can be attached to various controls on a form, such as a data field, image, command button or an option group. It can also be attached to the whole form. When it has been attached, an Event needs to be set up in the properties of the control. This will control when the macro will run, e.g. on a single or double click of the mouse, or when <Enter> is pressed, or when the form closes.
Actions:
1. From the Transport Database Window, open the Buses form in Design View. A button will be placed on this form to open the Servicing form.
2. Display the Design tab and ensure the Use Control Wizards option is
turned off, .
3. Click on Button (Form Control), in the Controls group of the Design tab and click once on the left side of the Form Footer area to create a button.
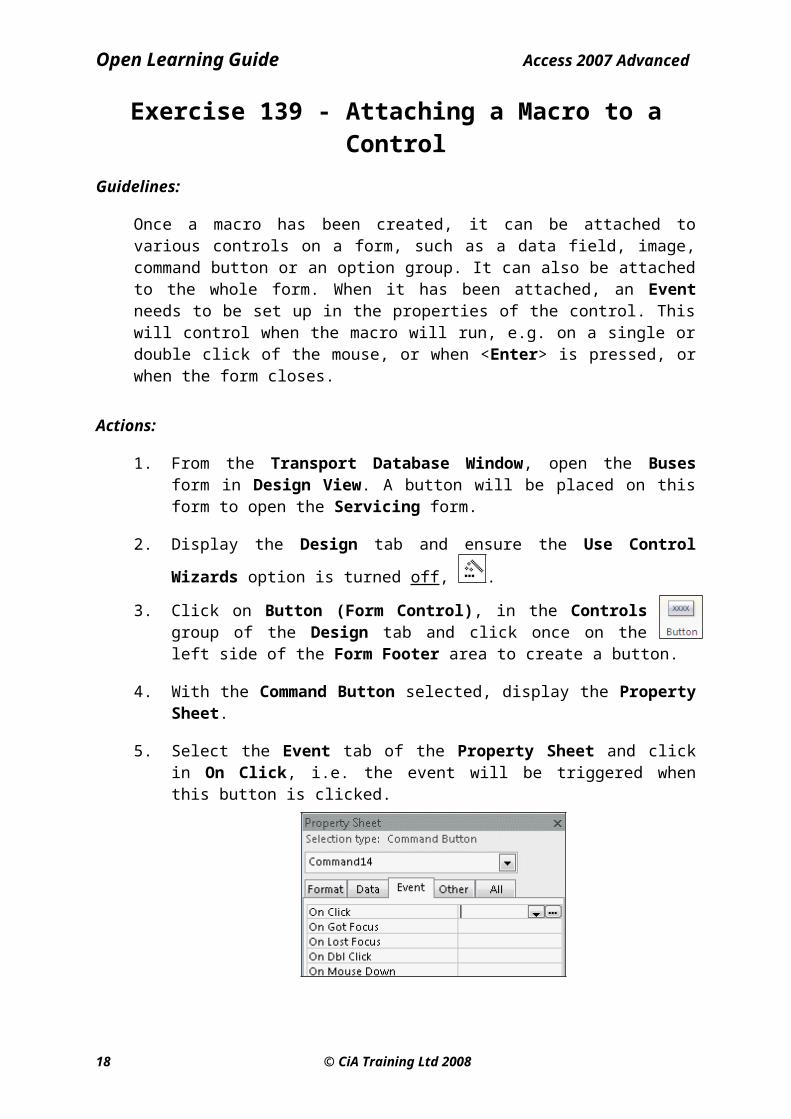
4. With the Command Button selected, display the Property Sheet.
5. Select the Event tab of the Property Sheet and click in On Click, i.e. the event will be triggered when this button is clicked.
6. To define what the event will be, click the drop down arrow - a list of all the available macros in this database is shown.
7. Select the Read Service Records macro.
8. Select the Format tab and in Caption, enter Servicing to put a name on the button.
9. Save the form then switch to Form View and click the Servicing button. The macro runs and the Servicing form opens. No data can be amended on the form because the macro has opened it in Read Only mode.
14 © CiA Training Ltd 2008
Open Learning Guide Access 2007 Advanced
© CiA Training Ltd 2008 15

Open Learning Guide Access 2007 Advanced
Exercise 139 - ContinuedNote: Notice that the Buses form is still open, and the Servicing form is not
necessarily showing the same vehicle that is selected in the Buses form.
10. Close the Servicing form.
11. Macros can be attached to any existing control on the form. View the Buses form in Design View, and click on the image in the centre of the page. The Property Sheet should still be displayed.
12. Select the Event tab and click On Dbl Click from the list, i.e. a double click on this object will be needed to start the event.
13. Click the drop down arrow and choose the Read Service Records macro. Save the form.
14. Switch to Form View and double click the central image. The macro runs and the Servicing form opens.
15. Close the Servicing form.
16. Macros can be attached to the form as a whole. View the Buses form in Design View and click on the Form Selection button at the top left.
17. The Property Sheet shows properties for the whole form. Notice there are many more possible events shown on the Event tab.
18. Click On Close, i.e. the event will be triggered when the form is closed.
19. Click the drop down arrow and choose the Read Service Records macro. Save the form.
20. Switch to Form View then close the form. The macro runs and the Servicing form opens.
21. Close the Servicing form then open the Buses form in Design View.
22. Make sure the Property Sheet for the whole form is displayed and delete the Read Service Records macro from the On Close event (so that the Servicing form does not open every time the Buses form is closed).
23. Close all open forms but leave the Transport database open.
16 © CiA Training Ltd 2008

Open Learning Guide Access 2007 Advanced
Exercise 140 - Where Condition MacroGuidelines:
In the previous exercise, the Servicing form was always opened at the first record, with all records available. Often when opening one form from another, it is desirable to specify which record (or records) will be seen in the second form. A common scenario is that the second form will show records related to the record currently displayed in the first form. This can be done using the Where Condition argument when defining the macro actions.
Actions:
1. From the Transport database, open the Read Service Records macro in Design View. This is the macro attached to the Open Servicing Form button on the Buses form. At present all records are available when the Servicing form is opened.
2. Make sure the OpenForm action is selected, and enter the following expression in the Where Condition Action Argument:
[Registration]=[Forms]![Buses]![Registration]
Note: This Where Condition causes the macro to open the Servicing form only for those Servicing Records where the Registration field is the same as that for the current record on the Buses form.
3. Save the macro, close it, and open the Buses form in Form View.
4. With the first bus record displayed (B478 MTK), click the Servicing button.
5. The Servicing form opens, displaying the Servicing record for bus B478 MTK. Notice that according to the navigation buttons only one record is available.
6. Close the Servicing form and use the Navigation buttons to find the record on the Buses form for registration number M09 TWS (record 18).
7. Click the Servicing button.
8. A servicing record for the appropriate vehicle is displayed but as there are 2 servicing records for this registration the navigation buttons indicate that this is record 1 of 2. Display the second record.
9. Close both the Servicing and the Buses forms.
© CiA Training Ltd 2008 17
Registration field in the Servicing Form
Current Registration field on the Buses
Open Learning Guide Access 2007 Advanced
Exercise 141 - Creating New Macros from ControlsGuidelines:
Instead of creating the macro then attaching it to the control, it is possible to create the macro as the control itself is being added to the form (or report). As before, the control can be a button, a field or the form itself. The created macro can be saved as a separate object or embedded with the form.
The Find macro, which is created in this exercise, uses the Find and Replace function to search for records using the field specified in the Action Argument for the command.
Actions:
1. From the Transport database, open the Buses form in Design View.
2. Ensure the Use Control Wizards option is turned off. Create a Form Control Button (Command Button) at the right of the Form Footer area and make sure the Property Sheet is displayed.
3. Select the Event tab and select On Click, i.e. the event will be triggered when the button is clicked.
4. Instead of selecting an existing macro, click on the Build button, . The Choose Builder dialog box appears.
5. Select Macro Builder and click OK. A new macro is opened in Design View.
6. In the Action column select GoToControl and in the Action Arguments, enter Registration as the Control Name, because this is the field that will be searched during the Find and Replace process.
7. Macros can contain more than one action. On the next Action line, select RunCommand, and in the Action Arguments click in Command to see a list of available commands. Select Find. This will run the Find and Replace command.
8. To save the macro as a separate object select the Save As option, either from the Design tab on the Ribbon or from the Office Button menu.
18 © CiA Training Ltd 2008
Open Learning Guide Access 2007 Advanced
Exercise 141 - Continued
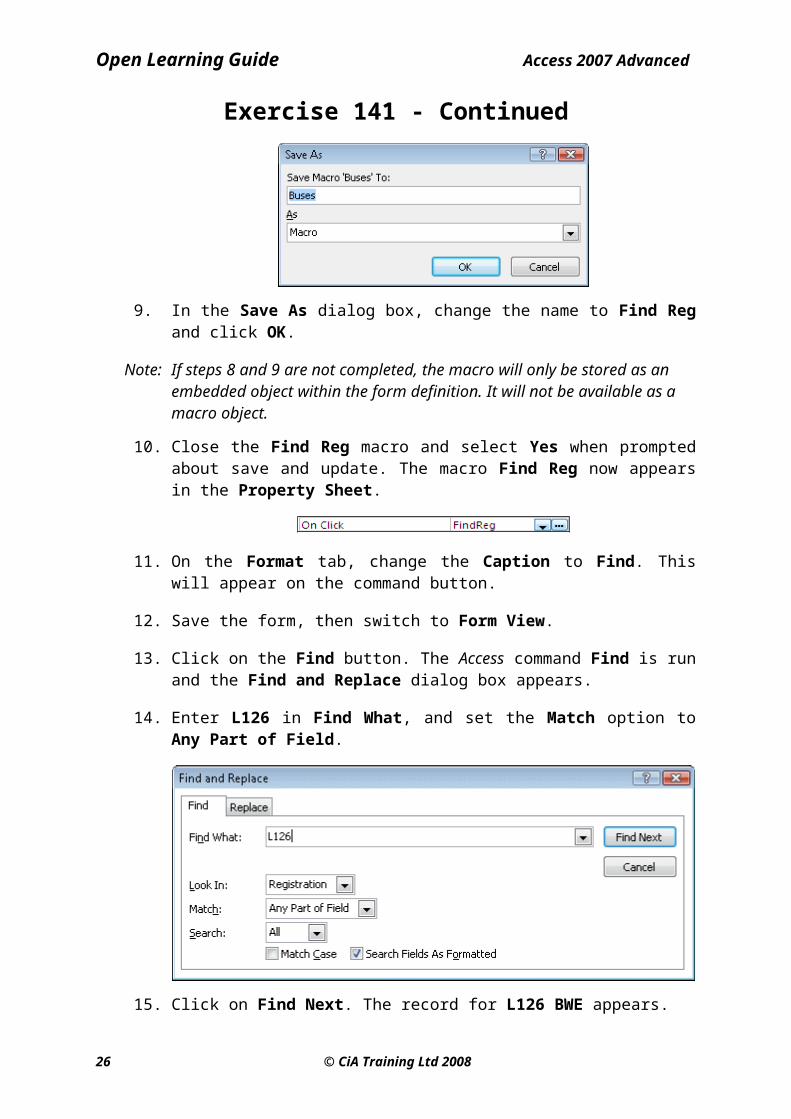
9. In the Save As dialog box, change the name to Find Reg and click OK.
Note: If steps 8 and 9 are not completed, the macro will only be stored as an embedded object within the form definition. It will not be available as a macro object.
10. Close the Find Reg macro and select Yes when prompted about save and update. The macro Find Reg now appears in the Property Sheet.
11. On the Format tab, change the Caption to Find. This will appear on the command button.
12. Save the form, then switch to Form View.
13. Click on the Find button. The Access command Find is run and the Find and Replace dialog box appears.
14. Enter L126 in Find What, and set the Match option to Any Part of Field.
15. Click on Find Next. The record for L126 BWE appears.
16. Close the Find and Replace dialog box.
17. Close the Buses form but leave the database open.
© CiA Training Ltd 2008 19

Open Learning Guide Access 2007 Advanced
Exercise 142 - Multiple Action MacrosGuidelines:
The macro created in the previous exercise contained two actions. It is an example of a multiple action macro. Macros can be built containing many actions in order to perform complex operations.
It is also possible to insert additional actions into an existing macro. For example, in the recently created macro to open a form, a prior action can be added to close down the current form.
Actions:
1. With the Transport database open, select the Read Service Records macro from the Navigation pane and open it in Design View. Another Action is to be added to close the Buses form before opening Servicing.
2. Click in the second row in the Action column and select the action Close from the drop down list.
Note: To insert a new action before an existing row, select the row and click the
Insert Rows button, , from the Design tab.
3. Set the Action Arguments to close the correct form. The Object Type is Form and from Object Name choose Buses. Leave the Save option as Prompt so that changes cannot be lost when closing the form.
4. Save and close the macro.
5. Open the Buses form in Form View.
6. Click on the Servicing button. The Servicing form is opened and the Buses form closes.
Note: In a practical database project there would probably be a button on the Servicing form to close it and re-open the Buses form.
7. Close the Servicing form but leave the database open.
20 © CiA Training Ltd 2008
Open Learning Guide Access 2007 Advanced
Exercise 143 - Grouping MacrosGuidelines:
As an aid to managing large numbers of macros within a database, several macros can be organised within one Grouped macro. All the macros for one form could be grouped under one name for example. The Group macro is named and saved in the usual manner but a new column is added to the macro window in which each macro can be named individually.
The format for referring to an individual macro within a group is,
group macro name . individual macro name
Actions:
1. From the Transport database, open the Servicing form in Design View.
2. Create a Command Button on the left of the Form Footer. View the Property Sheet, Event tab, and select the On Click property.
3. Click the Build button, choose Macro Builder, and click OK.
4. From the Design tab, click the Macro Names button, to insert the Macro Name column.
5. Enter the Macro Name as Open Buses.
6. Set the first Action to Close and Action Arguments to close the Servicing form, with a Save option of Prompt. Set the second Action to OpenForm and the Action Arguments to open the Buses form.
7. Leave a blank line after the OpenForm action and enter a second Macro Name of Print Record.
© CiA Training Ltd 2008 21

Open Learning Guide Access 2007 Advanced
22 © CiA Training Ltd 2008
Open Learning Guide Access 2007 Advanced
Exercise 143 - Continued8. Set the Action to RunCommand and in Action Arguments choose a
command of SelectRecord from the list. This selects the current record.
9. Click in the next action field. The action required here is not one of the default actions. Click Show All Actions from the Design tab to make more actions available.
10. Select PrintOut from the drop down list of actions. In Action Arguments, set the Print Range option to Selection. This action will print out the form for the current record only.
11. Click the Save As button and save the whole macro as Servicing Form, then close it, selecting Yes when prompted.
12. The Servicing Form group macro is now shown in the Property Sheet.
13. Click the drop down arrow and choose the macro Open Buses.
14. Use the Format tab to change the button Caption to Buses.
15. Create another Command Button on the right of the Form Footer and attach the Servicing Form.Print Record macro to it. Change the Caption to Print Record.
16. Save the form and switch to Form View then click the Print Record button to print the current record. Content must be enabled for this action to work.
17. Click the Buses button to close the Servicing form and open Buses.
18. Close the form without saving and close the database.
© CiA Training Ltd 2008 23

Open Learning Guide Access 2007 Advanced
Exercise 144 - Set ValuesGuidelines:
A useful macro action is the SetValue action which makes it possible to create a macro that will allow the value of a field to be set. The value set by the macro can be a specific value, e.g. 99, or a calculation, e.g. Price + 10%. By making the calculation Original Value + 1 (or Original Value - 1), a macro can be created to increase (or decrease) a quantity, every time a button is clicked.
SetValue is not one of the default actions and requires that content is enabled.
Actions:
1. Open the Household Plants database. If the Security Warning is displayed, click Options, select Enable this content and click OK.
2. Open the Customer Orders form in Design View. It is decided that no more than 100 plants can be supplied on any one order.
3. With the Use Control Wizards option switched off, draw a Command button to the right of the Quantity field.
4. View the Property Sheet for the new button. Select the Event tab, then OnClick and click the Build button.
5. Select the Macro Builder and create a new macro.
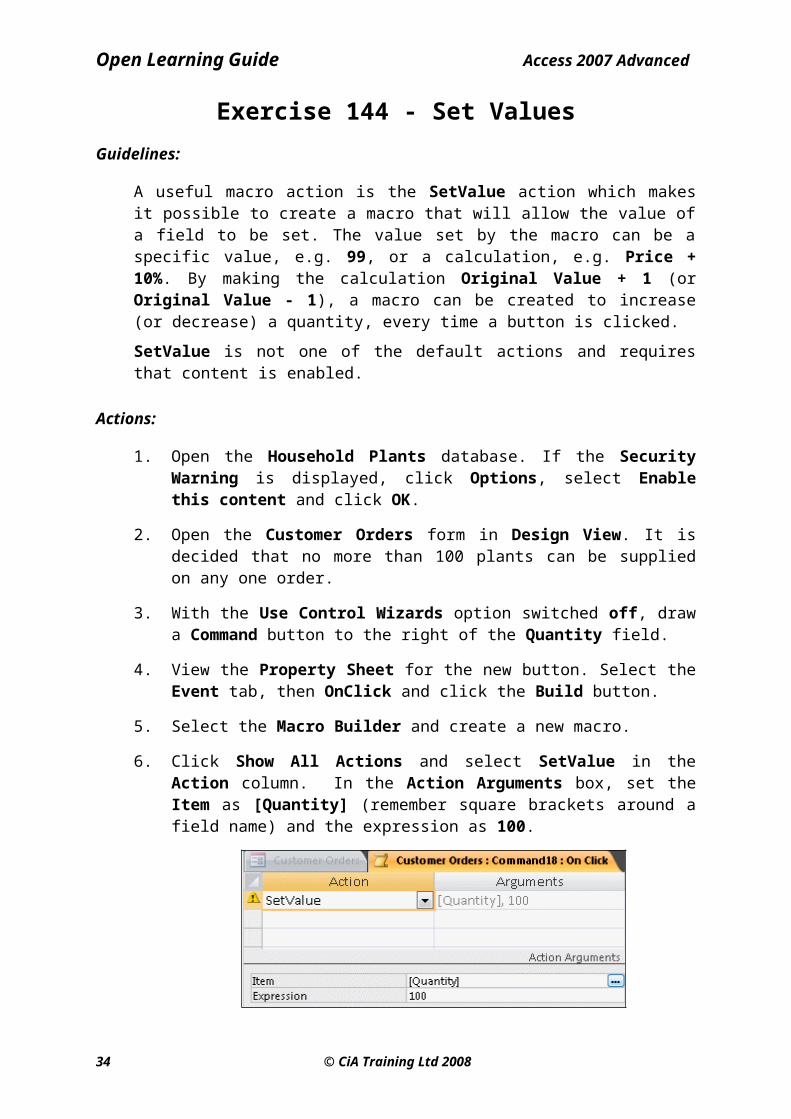
6. Click Show All Actions and select SetValue in the Action column. In the Action Arguments box, set the Item as [Quantity] (remember square brackets around a field name) and the expression as 100.
7. Save the macro as SetMaximum and close it. In the Property Sheet for the button, enter a caption of Set to Maximum.
8. Close the Properties box, switch to Form View, and view any record.
9. Click the Set to Maximum button. 100 appears in the Quantity field.
10. Save and close the form, then open the Plant Details form in Design View.
24 © CiA Training Ltd 2008

Open Learning Guide Access 2007 Advanced
© CiA Training Ltd 2008 25
Open Learning Guide Access 2007 Advanced
Exercise 144 - Continued11. Insert a Command button above the flower graphic.
12. View the Property Sheet for the new button and enter a Caption of Increase Quantity. Select the Event tab, then OnClick and click the Build button.
13. Select the Macro Builder. Make sure the Show All Actions option is selected then select SetValue in the Action column.
14. In the Action Arguments box, set the Item as [Stock] and the expression as [Stock]+1 (this increases the amount in the field by one).
15. Save the macro as Plus and close it. Switch to Form View and view the record for Bellflower.
16. Click on the Increase Quantity button. The number in the Stock field will increase by one.
17. Return to Design View. Create another Command button below the flower graphic and add a caption of Decrease Quantity.
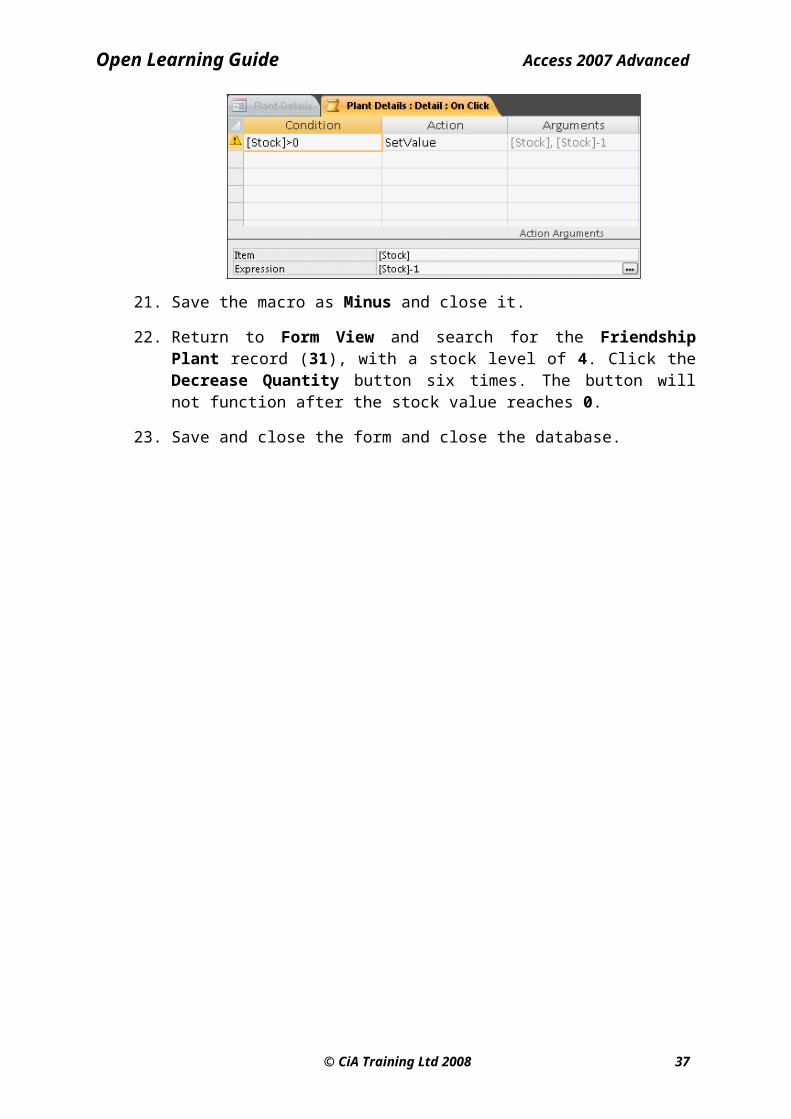
18. Build a macro for the Decrease Quantity button. The Action is SetValue, the Item is [Stock] and the expression is [Stock] -1.
Note: To prevent the number from decreasing to less than zero and becoming negative, a condition can be set in the Decrease Number macro.
19. Click the Conditions button to add a Condition column to the macro grid.
20. In the condition column enter [Stock]>0. The SetValue action will now only run if the conditions are true, i.e. when the current value of Stock is greater than zero.
21. Save the macro as Minus and close it.
22. Return to Form View and search for the Friendship Plant record (31), with a stock level of 4. Click the Decrease Quantity button six times. The button will not function after the stock value reaches 0.
23. Save and close the form and close the database.
26 © CiA Training Ltd 2008

Open Learning Guide Access 2007 Advanced
Exercise 145 - Update Fields AutomaticallyGuidelines:
SetValue can also be used to enter dates into field. A macro can be created to enter the current date automatically. This exercise will create a macro to test the value of a Yes/No field. Selecting Yes will enter today's date into a Date field; selecting No will leave it blank. The IIF function performs this test.
This is also an example of how a macro can be activated by an event other than clicking a button. This macro will run whenever a certain field is updated.
Actions:
1. Open the Transport database and enable the content if necessary.
2. Open the Servicing form in Design View. A macro is to be created that will automatically enter the current date into the Date field once the Yes option has been checked in the Logged field.
3. Select the Logged option group (to do this, select the frame around the entire group).
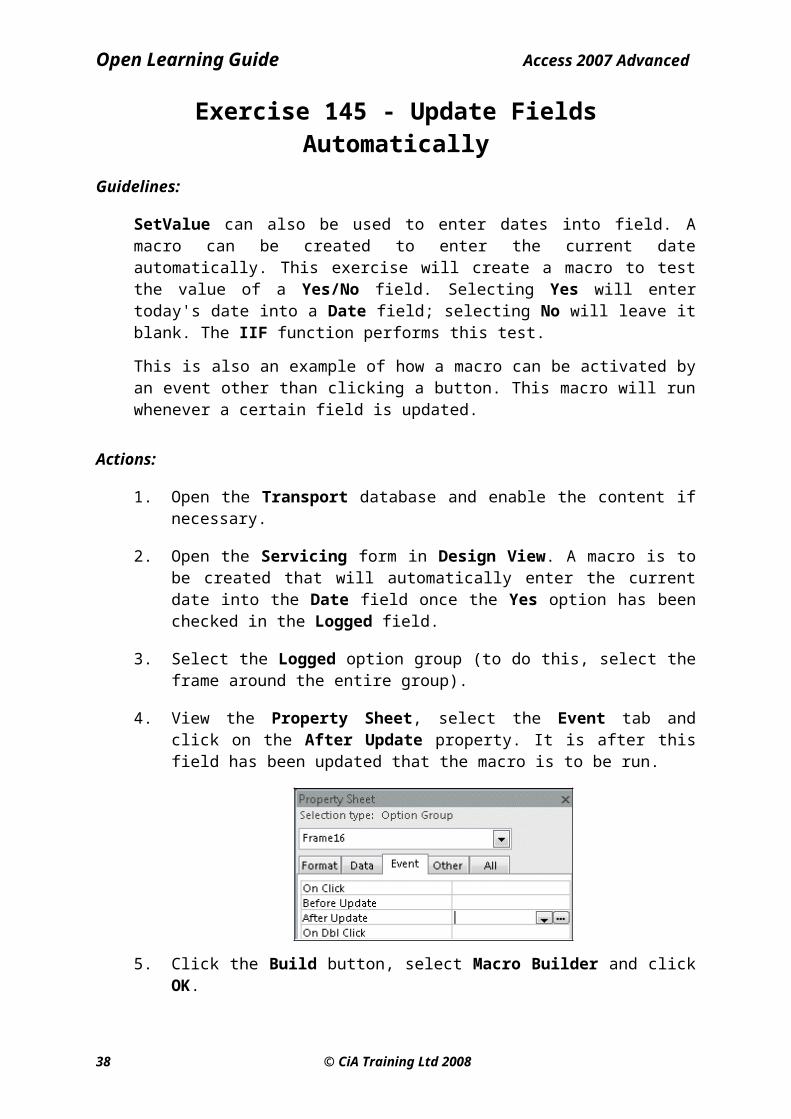
4. View the Property Sheet, select the Event tab and click on the After Update property. It is after this field has been updated that the macro is to be run.
5. Click the Build button, select Macro Builder and click OK.
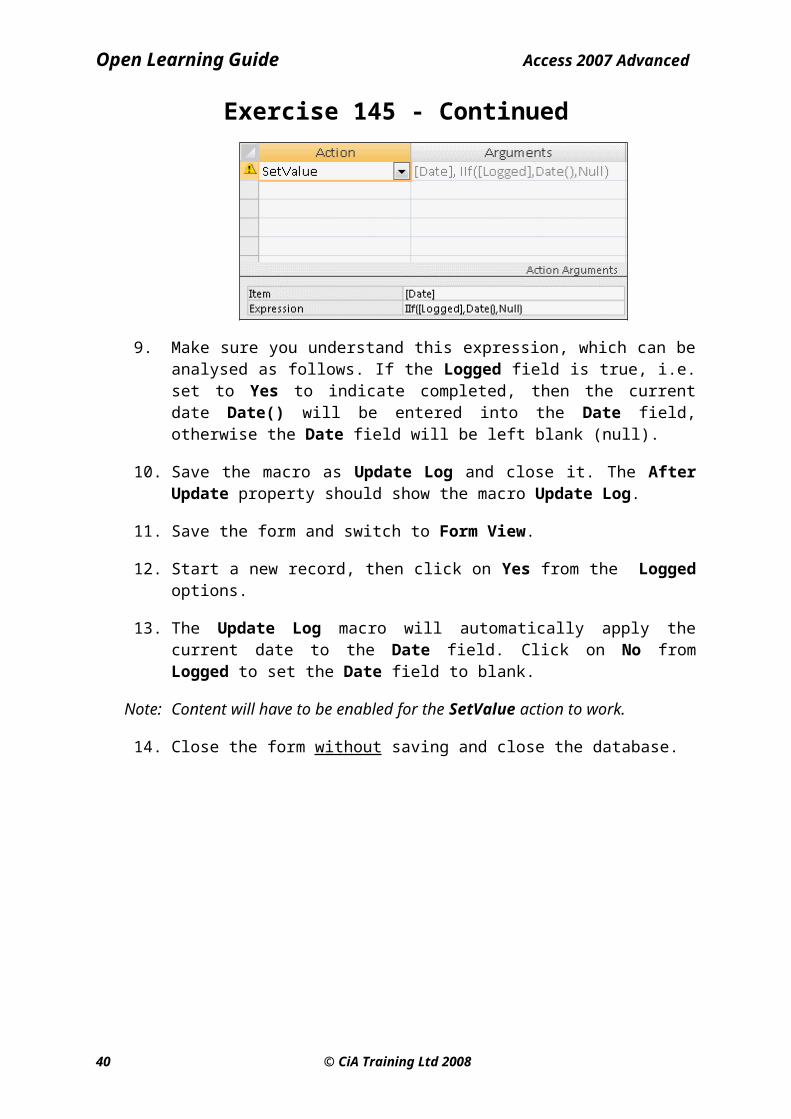
6. Select the SetValue Action.
7. In the Action Arguments, enter the Item as [Date] as this is the field that is to have its value set.
8. In the Expression property enter the following, taking care with the brackets:
IIF([Logged],Date(),Null)
© CiA Training Ltd 2008 27

Open Learning Guide Access 2007 Advanced
28 © CiA Training Ltd 2008

Open Learning Guide Access 2007 Advanced
Exercise 145 - Continued
9. Make sure you understand this expression, which can be analysed as follows. If the Logged field is true, i.e. set to Yes to indicate completed, then the current date Date() will be entered into the Date field, otherwise the Date field will be left blank (null).
10. Save the macro as Update Log and close it. The After Update property should show the macro Update Log.
11. Save the form and switch to Form View.
12. Start a new record, then click on Yes from the Logged options.
13. The Update Log macro will automatically apply the current date to the Date field. Click on No from Logged to set the Date field to blank.
Note: Content will have to be enabled for the SetValue action to work.
14. Close the form without saving and close the database.
© CiA Training Ltd 2008 29

Open Learning Guide Access 2007 Advanced
Exercise 146 - Message BoxesGuidelines:
It can often be useful to display messages when using a database. These can be general information messages displayed when a certain object is opened for example, or specific messages displayed when a specific event occurs such as an unusual entry in a critical field. Messages can be displayed using a macro action.
Actions:
1. Open the Household Plants database and then the Unpaid Invoices report in Design View. View the Property Sheet for the whole report.
2. On the Event tab, click the On Open field and then the Build button. Select the Macro Builder, click OK. A macro grid appears.
3. Select MsgBox in the Action column. The following Arguments are available.
4. Enter the following text as the Message: Make sure that today’s payments have been entered before printing this report.
5. Select Yes as the Beep argument and Warning! as the Type.
6. Enter Important as the Title.
7. Select Save As from the Design tab and save the macro with a name of Check.
8. Close the Check macro and select Yes when prompted about save and update. The macro Check now appears in the Property Sheet.
9. Close the Unpaid Invoices report, then double click on it in the Navigation pane to reopen it.
10. As the report opens the message will be displayed. Click OK to answer the message. The report will be displayed.
11. Close the report and the Household Plants database.
30 © CiA Training Ltd 2008

Open Learning Guide Access 2007 Advanced
Exercise 147 - AutoExec MacroGuidelines:
A macro that is saved with the name AutoExec will automatically run the macro actions as soon as the database is opened. This is often used to open a specific form when a database is opened.
Actions:
1. Open the Transport database, select the Create tab and click Macro.
2. In the macro window set out the following actions, which will open a new record in the Buses form as soon as the database is opened:
Action Argument Comment
RunCommand WindowHide Hide the Navigation Pane so no objects can be amended
OpenForm Servicing Open Servicing form
RunCommand RecordsGoToNew Displays a new blank record
3. Save the macro and call it Autoexec.
4. Close the macro. Close the database.
5. Open the database again, the Autoexec macro will automatically run and display the Servicing form ready to accept a new record.
6. The Navigation Pane is not displayed so only objects which are available using controls on the form can be accessed. To display the Navigation Pane again press <F11>.
Note: An AutoExec macro will run every time the database is opened. To stop it from running, hold down <Shift> when opening the database.
7. To remove the macro, right click on the Autoexec macro in the Navigation Pane, and select Delete. Click Yes in the confirmation message.
8. Close the Transport database.
© CiA Training Ltd 2008 31

Open Learning Guide Access 2007 Advanced
Exercise 148 - Revision: Macros1. Open the Household Plants database and the Customer Orders form
in Design View.
2. Create a Command Button on the left of the form footer area (click and drag to expand the form footer area if necessary).
3. Create a macro for the On Click property of the button.
4. Add a single action macro which will open the Plant Details form. What is the action used?
5. Set a Where condition so that the Plant Details form is opened for the plant shown on the currently open Customer Order record. That is when the Common Name field from the Plant Details form equals the Plant name on the Customer Orders form. What is the Where expression?
6. Save the macro Check Stock and update the property. Add a caption of Check Stock Level to the button.
7. View record 7 on the Customer Orders form, an order for 10 Leopard Lilies. Click the Check Stock Level button to see if there are enough in stock to meet the order.
8. Add a macro to the Paid option group so that when the group is updated, the value of the Paid field is examined. If it is true (= Yes) then the current date is to be added to the Date Paid field. Call the macro Paydate.
9. Select Paid =Yes for the first two records to set the Date Paid.
10. Save and close all forms and close the database.
11. Open the Wine database and open the Products Form in Design View.
12. Create a command button in the left of the Form Footer area with a caption of Discount.
13. Use Build to create a macro for the On Click property of the button.
14. Add an action to the macro to reduce the Price field by 20%. What action is used and what expression will perform the necessary calculation. Save the macro as Discount.
15. Switch to Form View for the Products form and view record 14. Click the Discount button to reduce the price. What is the new price?
16. Print a copy of the form for this record then close the form without saving and close the database.
Note: The answers to this exercise can be found in the Answers Section at the end of the guide.
32 © CiA Training Ltd 2008

Open Learning Guide Access 2007 Advanced
Section 22
Formatting Forms
By the end of this Section you should be able to:
Insert Pictures and BackgroundsInsert a Chart
Use Page Headers and FootersUnderstand Conditional Formatting
Use Date and Time Fields
© CiA Training Ltd 2008 33
Open Learning Guide Access 2007 Advanced
Exercise 149 - Adding BackgroundsGuidelines:
Backgrounds images can be added to forms or reports. The background needs to be in a picture format, e.g .jpg, .bmp, .ico, .dib, .wmf or .emf file, which can be embedded or linked. An embedded background is stored as part of each database object in which it appears. A linked background is stored once, so utilising storage space more efficiently. Another advantage of linking is that if the original linked background image is altered, e.g. a corporate logo change, this would automatically be seen in all database objects using this background.
Actions:
1. Open the Wine database and the Products Form in Design View.
2. Double click the Form Selector to open the Property Sheet for the form.
3. From the Format tab in the Property Sheet, click the Picture property and click the Build button.
4. From the Insert Picture dialog box, locate the Grapepicking file (this is a .jpg file supplied with the data for this guide). Select the file and click OK.
5. Choose a Picture Type of Embedded and a Picture Size Mode of Stretch. Switch to Form View.
6. The image fills the available space. Reduce the size of the Access window. The image changes to match the size of the window.
34 © CiA Training Ltd 2008
Form Selector Button

Open Learning Guide Access 2007 Advanced
Exercise 149 - Continued7. Notice that by default the data labels are transparent (the background can
be seen through them) but the data fields are not.
Note: Sometimes a background image can mask the displayed data and it may be advisable to use only light images for this purpose.
8. Maximise the window and switch back to Design View. Change the Form properties to Picture Size Mode = Clip, Picture Alignment = Top Left and Picture Tiling = Yes.
9. Switch to Form View to see the changed effect.
10. Close the form without saving.
11. Picture backgrounds can also be added to reports. Open the Products report in Design View.
12. Double click on the Report Selector (equivalent to the Form Selector) to open the report Property Sheet.
13. For the Picture property, locate the Champagne file from the supplied data folder.
14. Select a Picture Size Mode of Stretch and a Picture Type of Linked. Click No when asked if you want to remove the picture from the report.
15. Switch to Print Preview to see the effect. Notice the background image is seen on every report page.
16. Save the report and close it.
17. The background image is linked, so a change to the original picture will be seen in the form. Start the Windows Paint application. This can be found by clicking the Start button, selecting All Programs and opening the Accessories folder.
Note: Any image processing application can be used.
18. Open the Champagne image and change the fill colour to pale yellow.
19. Save the image, close it and close Paint.
20. In the Access window open the Products report. The background image will show the changed image.
21. Close the report without saving but leave the database open.
© CiA Training Ltd 2008 35

Open Learning Guide Access 2007 Advanced
Exercise 150 - Inserting a PictureGuidelines:
Objects such as pictures can also be added to the foreground of forms or reports either embedded or as linked objects. Objects can be pictures, images, media clips, charts or files from other applications, e.g. Excel. If an object is embedded, it will not change after insertion. If it is linked, it will change automatically as the source object changes, such as in a chart (covered later in this section).
Actions:
1. From the Wine database, open the Orders Form in Design View.
2. Display the Property Sheet for the Add Record button.
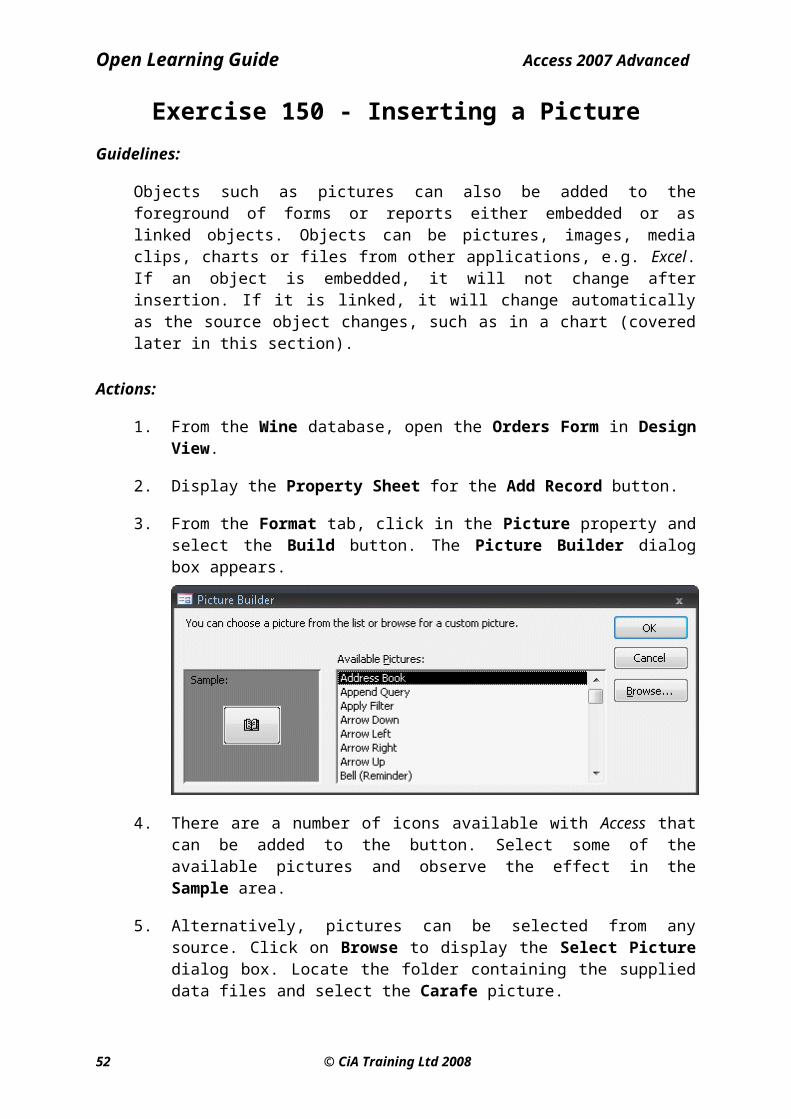
3. From the Format tab, click in the Picture property and select the Build button. The Picture Builder dialog box appears.
4. There are a number of icons available with Access that can be added to the button. Select some of the available pictures and observe the effect in the Sample area.
5. Alternatively, pictures can be selected from any source. Click on Browse to display the Select Picture dialog box. Locate the folder containing the supplied data files and select the Carafe picture.
6. Click Open.
7. Click OK on the Picture Builder dialog box. The image is added to the button. Extend the height of the button to see more of the image.
8. Save the form and switch to Form View. The picture does not affect the operation of the button. Click on the button to go to a new record form. Content will have to be enabled for this action to work.
36 © CiA Training Ltd 2008
Open Learning Guide Access 2007 Advanced
© CiA Training Ltd 2008 37
Open Learning Guide Access 2007 Advanced
Exercise 150 - Continued9. Close the Orders Form without saving and open the Products Form in
Design View.
10. Pictures can be inserted directly on to a form and not just on to a button. Increase the height of the Detail area, click the Image button, on the Design tab then click on the form below the Stock field.
11. The Insert Picture dialog box is displayed. Locate the supplied data folder and select the Bottle picture file. Click OK.
Note: To insert a clip art image, locate the folder containing the clips, e.g. Program Files | Microsoft Office | ClipArt | PUB60COR, and select an image from the list.
12. Make sure the Property Sheet for the image is displayed and set the Size Mode to Stretch.
Note: If a picture is to be linked and not embedded, the Picture Type property would be changed to Linked.
13. Click and drag a corner of the image frame to make it larger.
14. Save the form then switch to Form View. The picture now appears on the form as an embedded picture.
15. Switch to Design View, click on the picture to select it and press <Delete>. The picture is removed.
16. Close the form without saving and close the database.
38 © CiA Training Ltd 2008

Open Learning Guide Access 2007 Advanced
Exercise 151 - Inserting a ChartGuidelines:
Data can be displayed in a chart within a form or report. The chart wizard is usually used to create a chart.
Actions:
1. Open the Egypt database and open the Summary form in Design View. Make sure the Design tab is displayed.
2. In the Controls group, make sure the Use Control Wizards button is on,
then click the Insert Chart button, .
3. Click in the form Detail area below the Adults field. The Chart Wizard appears. In the first screen, select the Bookings table and click Next.
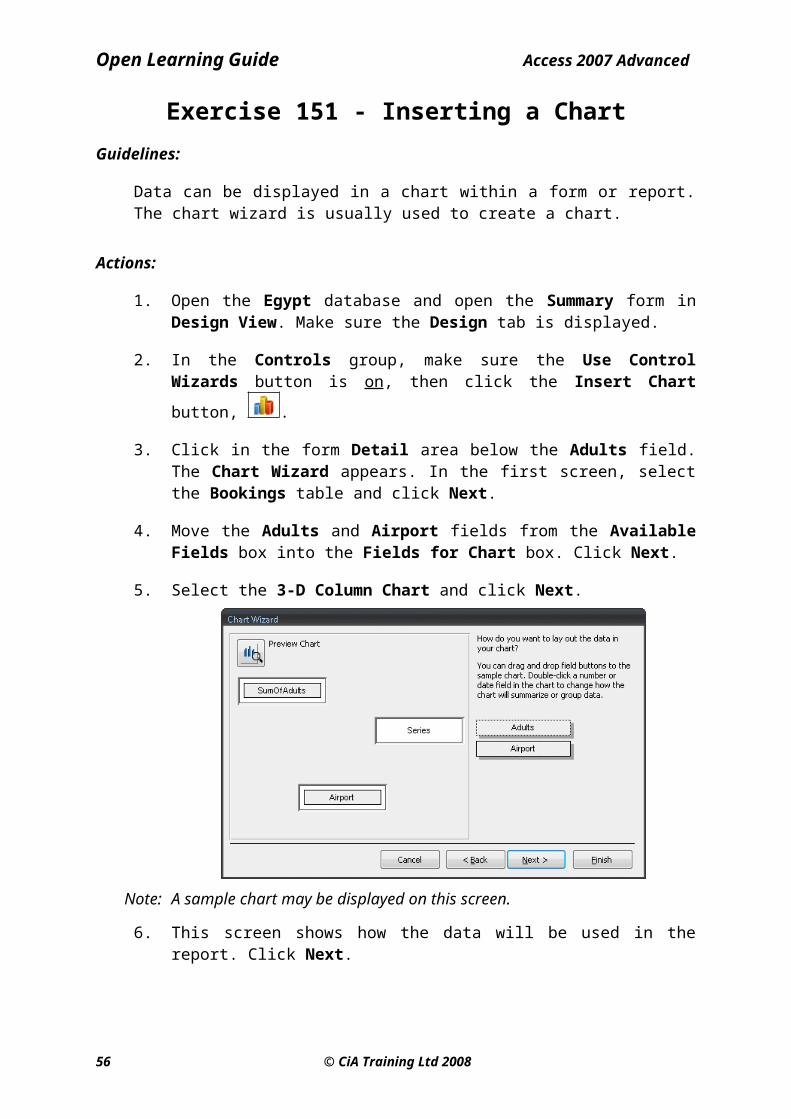
4. Move the Adults and Airport fields from the Available Fields box into the Fields for Chart box. Click Next.
5. Select the 3-D Column Chart and click Next.
Note: A sample chart may be displayed on this screen.
6. This screen shows how the data will be used in the report. Click Next.
7. This screen allows the chart to be linked to the individual record displayed on the form, but for this exercise delete both field names so that the chart contains data from all records. Click Next.
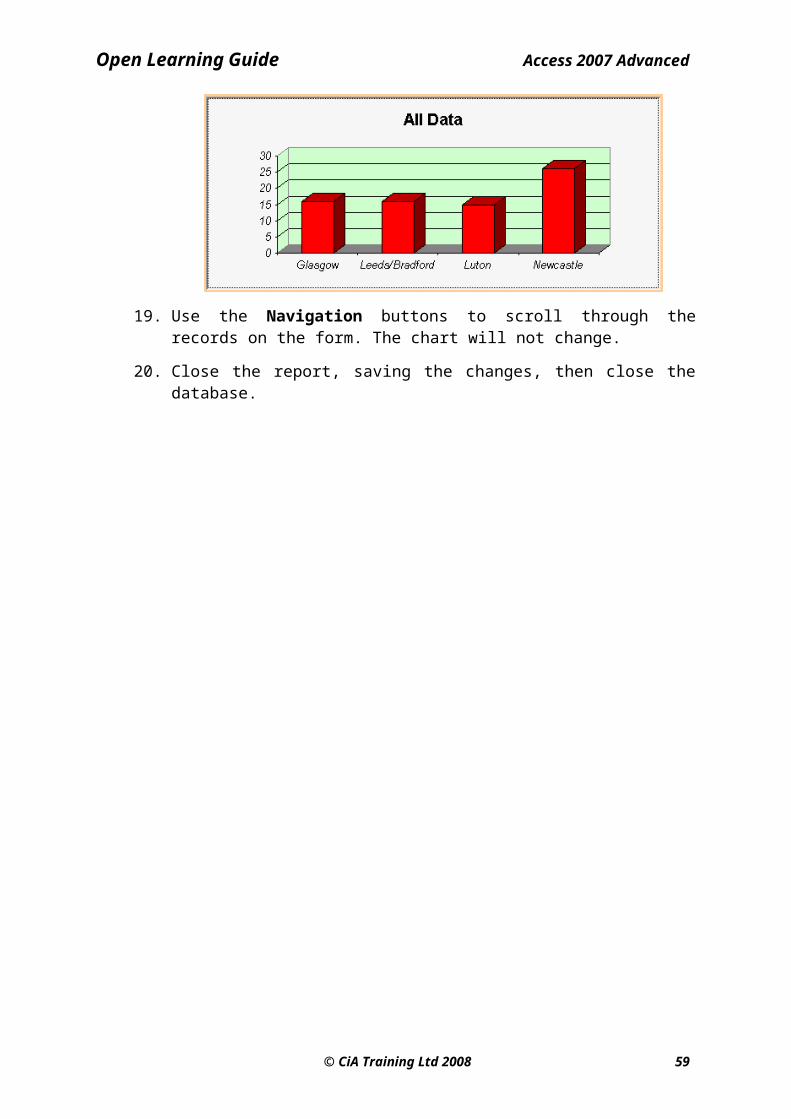
8. Enter a title of All Data, click the option No, don’t display a legend, then click Finish. A chart is displayed with sample (not actual) data.
© CiA Training Ltd 2008 39
Open Learning Guide Access 2007 Advanced
40 © CiA Training Ltd 2008

Open Learning Guide Access 2007 Advanced
Exercise 151 - Continued9. Drag the borders of the chart to make it 14cm wide by 6cm high. Increase
the size of the Detail area if necessary.
10. Switch to Form View and then back to Design View. The chart will now show the actual data.
11. Double click on the chart to open it in edit mode. This mode is indicated by a diagonally shaded border around the chart.
Note: If the Datasheet box appears when you double click, close it.
12. Right click on a blank (white) area of the chart and select the option Format Chart Area from the shortcut menu.
Note: If Format Chart Area is not an option, you have probably clicked in the wrong area. Try again.
13. The Format Chart Area dialog box is displayed. Change the Font to Arial, Italic and size 10pt. Click OK. All text on the chart is changed.
14. Right click on the chart title and select Format Chart Title. Change the font to Arial, Bold, 14pt.
15. Right click on the (grey) background to the chart and select Format Walls. Apply the palest green background area colour.
16. There is another way to format chart features. Double click on one of the data columns to display the Format Data Series dialog box.
17. Change the colour to red and click OK. All columns for this data series are changed.
18. Click anywhere away from the chart to deselect it then switch to Form View. If the chart is not shown, click in the white area where it should be.
19. Use the Navigation buttons to scroll through the records on the form. The chart will not change.
20. Close the report, saving the changes, then close the database.
© CiA Training Ltd 2008 41

Open Learning Guide Access 2007 Advanced
Exercise 152 - Page Headers and FootersGuidelines:
Page Headers and Footers are similar to Form Headers and Footers - they display titles, column headings, page numbers, etc. on every page but they only appear when the form is printed. They cannot be seen in Form View.
Actions:
1. From the Wine database, open the Orders Form in Design View.
2. Display the Arrange tab. Click the Page Header/Footer button, , from the Show/Hide group. The form now has two new areas, a Page Header area above the Detail and a Page Footer area below the Detail.
3. To add page numbers, click the Insert Page Number button, , from the Controls group on the Design tab. The Page Numbers dialog box appears.
Note: Page Header and Footer areas would be created automatically when page numbers are inserted.
4. Select Page N of M as the format and select options to place the entry in the Center of the Footer.
5. Click OK.
6. In Design View, select the Page Header, place a Label in the centre and enter the text Orders Form.
7. Click away from the label then reselect it. Centre the text, change the font to Calisto MT (or an alternative) and increase the size to 14pt.
8. Save the form, click the Office Button and select Print Preview from the Print options. This shows the page heading and numbering. Scroll through the pages to see the numbering change.
9. Close the form, but leave the database open.
42 © CiA Training Ltd 2008
Open Learning Guide Access 2007 Advanced
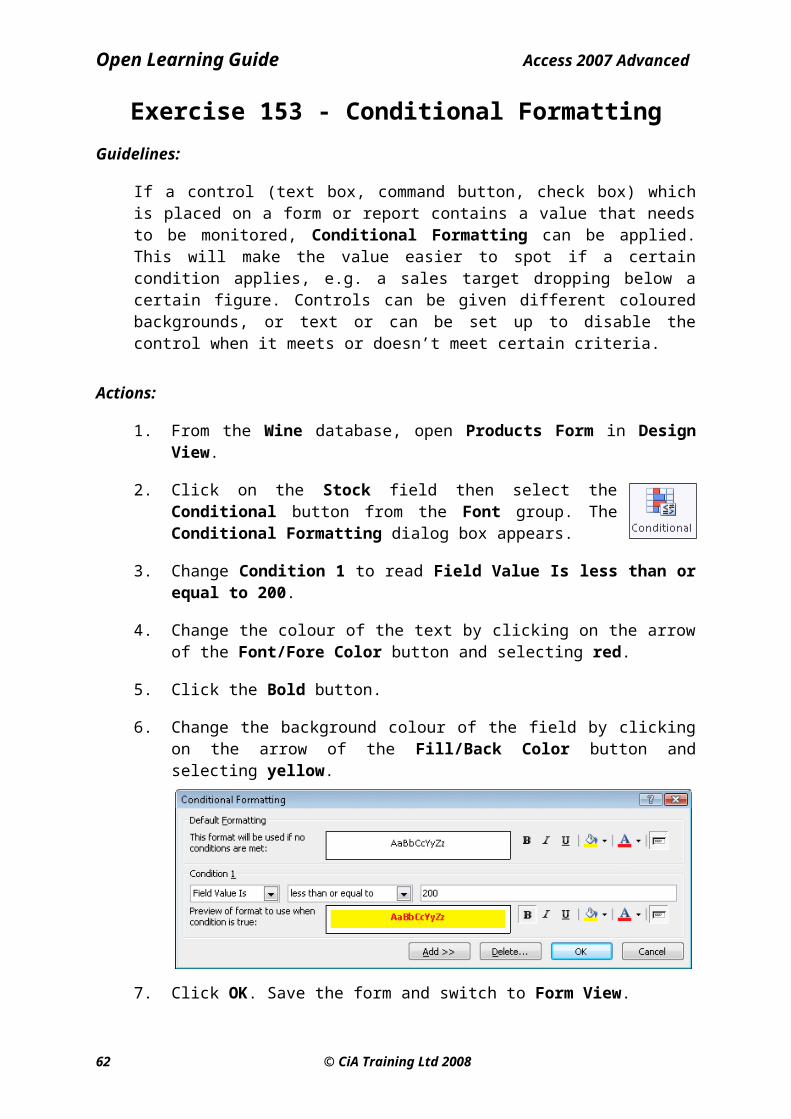
Exercise 153 - Conditional FormattingGuidelines:
If a control (text box, command button, check box) which is placed on a form or report contains a value that needs to be monitored, Conditional Formatting can be applied. This will make the value easier to spot if a certain condition applies, e.g. a sales target dropping below a certain figure. Controls can be given different coloured backgrounds, or text or can be set up to disable the control when it meets or doesn’t meet certain criteria.
Actions:
1. From the Wine database, open Products Form in Design View.
2. Click on the Stock field then select the Conditional button from the Font group. The Conditional Formatting dialog box appears.
3. Change Condition 1 to read Field Value Is less than or equal to 200.
4. Change the colour of the text by clicking on the arrow of the Font/Fore Color button and selecting red.
5. Click the Bold button.
6. Change the background colour of the field by clicking on the arrow of the Fill/Back Color button and selecting yellow.
7. Click OK. Save the form and switch to Form View.
8. Scroll through the records and notice that any stock quantity less than or equal to 200, will be immediately conspicuous.
9. Move to the record for Soave, reference 4. Increase the quantity to 300. Click in a different field. The value now appears black, as the conditional formatting no longer applies.
10. Leave the form open for the next exercise.
© CiA Training Ltd 2008 43

Open Learning Guide Access 2007 Advanced
Exercise 154 - Insert Date and TimeGuidelines:
The current date and time can be placed on a form or report as a text box. By default, Access will place the text box into the header section but it can then be moved or entered manually. The format of the date and time can be varied.
Actions:
1. The Products Form should be open. Switch to Design View.
2. Click the Date and Time button, , in the Controls group. The Date and Time dialog box appears.
3. Click on the first date format option and uncheck the Include Time box to deselect the time option.
4. Click OK. The date field appears in right of the Form Header.
5. Use the Text Box button to add a to the right of the image in the Detail area. Enter a field value of =Date() and a label of Current Date. Display the Property Sheet and set the Format to Long Date.
6. Add a field below this with a value of =Time() a label of Current Time. On the Property Sheet set the Format to Long Time. Save the form and switch to Form View. The time and date will appear for every record.
7. Use the navigation buttons to move through the records. Note that each time the form is redisplayed, the time is updated.
8. Close the form but leave the database open.
44 © CiA Training Ltd 2008

Open Learning Guide Access 2007 Advanced
Exercise 155 - Revision: Formatting Forms1. Use the Wine database.
2. Add an Embedded background to the Orders Form, using the Champagne picture supplied on the data disk.
3. Add page numbers to the Page Footer of the form.
4. Save the form, then print preview it.
5. Apply Conditional Formatting to the Quantity field, so that if 24 or more items are ordered, the field background becomes blue.
6. Insert the Date and Time to the bottom of the page footer on the form, selecting the medium format for each.
7. View the form in Form View, checking the Quantity field conditional formatting works.
8. Are the Command buttons and the Date and Time fields visible in Form View?
9. Print Preview the form. Are the Command buttons and the Date and Time fields visible now?
10. Explain the difference in views.
11. Save and close the form, then close the database.
Note: The answers to this exercise can be found in the Answers Section at the end of the guide.
© CiA Training Ltd 2008 45

Open Learning Guide Access 2007 Advanced
Section 23
Attachments and Links
By the end of this Section you should be able to:
Use Attachment Fields on RecordsView Attachments on FormsUse Multiple Attachments
Use Hyperlink Fields on RecordsUse Hyperlink Fields on Forms
46 © CiA Training Ltd 2008

Open Learning Guide Access 2007 Advanced
Exercise 156 - AttachmentsGuidelines:
Access 2007 includes a new type of data type called Attachment that can be used in tables. This data type allows different files such as documents or image files to be attached to each record in a table. Defining a file as an attachment includes a copy of that file within the database. That file can be amended from the database without altering the original. Similarly the original file can be changed or deleted without altering the copy in the database.
Actions:
1. Open the Pet Shop database, and open the Pets table in Design View.
2. Add a new field at the end of the list with a Field Name of Photo.
3. Select a Data Type of Attachment and in the Field Properties enter a Caption of Photograph.
4. Switch to Datasheet View. You will be prompted to save the table. Click Yes. The new field has been added to table.
5. Double click in the Photograph field for the first record (Grey Parrot). The Attachments dialog box is displayed.
6. Click the Add button to display the Choose File dialog box. Locate the supplied data folder, Access 2007 Advanced Data, select the file AGP1.jpg and click Open.
© CiA Training Ltd 2008 47

Open Learning Guide Access 2007 Advanced
48 © CiA Training Ltd 2008

Open Learning Guide Access 2007 Advanced
Exercise 156 - Continued7. Click OK. The field now shows that there is one attachment for this
record.
Note: Unlike other fields, field names are not used as column headings for Attachment fields. Captions must be defined if column headings are required.
8. Repeat the process to add the file BG1.jpg as an attachment to the second record.
9. Attachments can be viewed at any time. Double click in the Photograph field for the first record to display the Attachments dialog box again.
10. Double click on the AGP1 file in the Attachments dialog box. The file is opened in an appropriate application, e.g. Windows Photo Gallery.
11. The image can be edited here. Make any noticeable change to the image, for example in Photo Gallery, click Fix, select Adjust Color then change the Tint setting. Close the image application.
12. Click OK in the Attachments dialog box. A message is displayed.
13. Click Yes to save the changes to the file in the database.
Note: The original file AGP1 has not been affected by this, only the copy in the database.
14. Close the Pets table but leave the database open for the next exercise.
© CiA Training Ltd 2008 49
Open Learning Guide Access 2007 Advanced
Exercise 157 - Attachments in FormsGuidelines:
Probably the most useful place to see attachments, particularly image files is on forms. An image attachment on a form will display a version of the image before it is selected.
Actions:
1. In the Pet Shop database open the Add/Edit Pets form in Design View and make sure the Design tab is displayed.
2. Click Add Existing Fields from the Tools group to display the Field List panel.
3. Click on the Photo field to select the entire four line entry and drag it to the Detail area. Close the Field List panel.
4. Move the Photo field to the right of the form, resize it to 4cms square and delete the label.
5. Switch to Form View. The AGP1 image is shown on the form for the first record. Move to the second record. The image for that record is shown.
6. Double click on the image to display the Attachments dialog box. The image can be opened and amended as before.
7. Save the changes to the form and close it, then close the database.
50 © CiA Training Ltd 2008

Open Learning Guide Access 2007 Advanced
Exercise 158 - Multiple AttachmentsGuidelines:
More than one file can be attached to a record using the same Attachment field.
Actions:
1. Open the Wine database and open the Products table in Design View.
2. Add a new field with a Field Name of Reviews with a Data Type of Attachment. Enter Reviews as the Caption property.
3. Save the table and switch to Datasheet View.
4. Double click in the Reviews field for the first record to display the Attachments dialog box.
5. Click the Add button to display the Choose File dialog box.
6. Locate the supplied data folder and select the files Review176 and Review293. Click Open.
7. Click OK then close the Products table.
8. Open the Products Form in Design View and add the Reviews field to the right side of the form. Switch to Form View.
9. Double click on the Reviews icon, then double click on Review176. The document is opened in Word.
10. Close Word then double click Review293 to open this document in Word.
11. Close Word and click OK to close the Attachments dialog box.
Note: Different types of file can be attached in one field.
12. Close the form, saving the changes, and leave the database open.
© CiA Training Ltd 2008 51
Open Learning Guide Access 2007 Advanced
Exercise 159 - Hyperlink FieldsGuidelines:
As well as storing various types of data in tables, it is also possible to store Hyperlinks to objects such as documents, spreadsheets, images which are held elsewhere. Unlike Attachments, there is no copy of the file stored within the database, which keeps the size of the database to a minimum. Hyperlinked data cannot be amended from within the database and must be maintained separately. However, this also means that the most current version of the original data is always available.
Links can be activated whenever the link field is shown on the screen, in Table Datasheet view for example or when the record is displayed on a form.
Note: Later exercises in this guide will cover the different topic of linked tables, where the whole table is held elsewhere but can be accessed within the database.
Actions:
1. In the Wine database, open the Suppliers table in Design View.
2. Add a new field with a Field Name of Links with a Data Type of Hyperlink. Enter Reviews as the Caption property.
3. Save the table and switch to Datasheet View.
4. Right click in the Reviews column for the first record, select Hyperlink then Edit Hyperlink from the menus to display the Insert Hyperlink dialog box.
5. Make sure Link to shows Existing File or Web Page and Look in shows Current Folder.
52 © CiA Training Ltd 2008
Open Learning Guide Access 2007 Advanced
© CiA Training Ltd 2008 53

Open Learning Guide Access 2007 Advanced
Exercise 159 - Continued6. Scroll down and select Grapepicking from the list of files. Enter
Vineyard in the Text to display box and click OK.
7. Right click in the Links field for the second record, select Hyperlink then Edit Hyperlink from the menu.
8. Type www.ciatraining.co.uk in the Address box (Access adds http://) then type Sponsors in the Text to display box and click OK.
9. Right click in the Links field for the third record, select Hyperlink then Edit Hyperlink from the menu.
10. Select E-mail Address in the Link to panel then type [email protected] in the E-mail address box (Access adds mailto:). Type Contact in the Text to display box and click OK.
11. Close the table, saving the changes and open the Suppliers Form in Design View.
12. Add the field Links to the form, below the existing fields.
13. Switch to Form View. Click in the Links field for record 1.
14. Select Yes if a security message is displayed. The grape picking photo is opened in a browser window.
15. Close the browser window, move to record 2 and click the Links field.
16. If you have an active internet link, the CiA Training web site will be displayed in the browser.
17. Close the browser window, move to record 3 and click the Links field.
18. The designated e-mail application will open with a blank message already addressed to ciasupport, ready to be filled in and sent.
Note: These links are used to demonstrate the possibilities only. It would be more normal in a table, for all the links in one column to go to photos only (or web sites only, or e-mail addresses only).
19. Close the e-mail application without saving.
20. Save the form, close it and close the database.
54 © CiA Training Ltd 2008

Open Learning Guide Access 2007 Advanced
Exercise 160 - Hyperlinks on FormsGuidelines:
Hyperlinks can also be added to form design. They can link to files, web sites or e-mail addresses as before but they will not vary as different records are displayed.
Actions:
1. Open the Egypt database and open the Booking Form in Design View.
2. Select the picture of the Sphinx and display the Property Sheet.
Note: Hyperlinks can be added to any object on the form.
3. Select the Format tab in the Property Sheet and click the Build button for Hyperlink Address property.
4. The Insert Hyperlink dialog box is displayed. Select Existing File or Web Page and Current Folder and select Horus.doc from the list.
5. Click the ScreenTip button and enter Read more about the Company in the dialog box.
© CiA Training Ltd 2008 55
Open Learning Guide Access 2007 Advanced
56 © CiA Training Ltd 2008

Open Learning Guide Access 2007 Advanced
Exercise 160 - Continued6. This is the text that will appear when the pointer is held over the
hyperlink. Click OK to accept it, and OK again to add the link.
7. To create a link to an e-mail address, add a Label to the Form Footer with the text Contact us for further details.
8. Click away from the label then select it again. Insert a hyperlink using the Property Sheet. Select E-mail Address in the Link to panel then type [email protected] in the E-mail address box. Click OK.
9. A new hyperlink field can be added to a form. Click the Insert Hyperlink button from the Controls group on the Design tab. The Insert Hyperlink dialog box is displayed.
10. Select Existing File or Web Page in the Link to panel then type www.ciatraining.co.uk in the Address box. Type Visit our web site in the Text to Display box and click OK.
11. A new Label field is added to the currently selected area of the form. Drag it down below the existing link in the Footer area.
12. Switch to Form View.
13. Move the cursor over the Sphinx image. The cursor changes to a pointing hand, indicating that there is a hyperlink here.
14. Leave the cursor for a second and the ScreenTip will appear.
15. Click the mouse button and the document Horus.doc will open in Word.
Note: Depending on the security settings, there may be a prompt screen displayed before the document is opened. Select Yes.
16. Close Word and look and the Form Footer area.
17. Click on the Contact us link to display a blank e-mail addressed to ciasupport. Close the message application without saving.
18. Click on the Visit link. If you have an active internet link, the CiA Training web site will be displayed in the browser.
19. Close the browser window.
20. Move to a different record on the form and try all the links again. They will all be exactly the same.
21. Click the Office Buttton, select Save As, and save the form as Bookings2.
22. Close the form and the database.
© CiA Training Ltd 2008 57

Open Learning Guide Access 2007 Advanced
Exercise 161 - Revision: Attachments1. Open the Transport database and open the Buses table in Design
View.
2. Add a new Attachment field to the table with a name of Photo.
3. Add the image files Bus1, Bus2, Bus3 to the Photo field for the first three records on the Buses table.
4. Open the Buses form in Design View.
5. Delete the central image from the form and replace it with the Photo field from the Buses table.
6. Delete the label for the Photo field and resize the field to 4cm by 3cm.
7. Increase the height of the Detail area by about 4cm.
8. In the left side of the new space, insert an E-mail Address Hyperlink with the following settings:
Text to display Click here to send a Service RequestE-mail address [email protected] Service Request
9. Save the form as Fixit Wizard and close it.
10. In the right side of the new space, insert the image file logo.gif.
11. Use the Property Sheet to add a hyperlink address to this object which links to the document Smalltown.docx. This file can be found in the supplied data folder.
12. Add the ScreenTip, Read the Regulations.
13. Switch to Form View. Navigate through the records. What happens to the central image at record 4?
14. Test the E-mail link. What message text is inserted by default?
15. Test the Image hyperlink. What is the content of the document?
Note: A sample of this web page can be found in the Answers section at the end of this guide.
16. Save the form as Revision and close it.
17. Close the database.
58 © CiA Training Ltd 2008
Open Learning Guide Access 2007 Advanced
Section 24
Exporting Data
By the end of this Section you should be able to:
Send a Database Object as an E-mail AttachmentSend a Database Object using a Macro
Export Objects
© CiA Training Ltd 2008 59

Open Learning Guide Access 2007 Advanced
Exercise 162 - Send ToGuidelines:
Objects can be exported from databases in a variety of ways. For example, any database object can be sent as an e-mail attachment in several different formats. They can be e-mailed internally via an Intranet, or externally via the Internet. If an Internet or Intranet connection does not exist, it is not possible to send e-mail.
Actions:
1. Open the Household Plants database. Use the Query Design button on the Create tab to create a new Query based on the Plant Index table.
2. Include the fields Common Name, Latin Name and Stock. Select records with Stock less than 15. Run the query.
3. Click the Office Button, and select . The Send Object As dialog box is displayed.
4. Look at the options available. The results of the query can be sent as a spreadsheet, an html file (web page) or a text file (rtf or txt) depending on the intended use. For example if the recipient needs to manipulate numbers on the file it should be sent as a spreadsheet.
5. Select Excel Workbook (*.xlsx) and click OK.
60 © CiA Training Ltd 2008

Open Learning Guide Access 2007 Advanced
© CiA Training Ltd 2008 61
Open Learning Guide Access 2007 Advanced
Exercise 162 - Continued6. Your message handling application will start, with a blank message and
the file Query1.xlsx already present as an attachment.
Note: The version of the message window that appears will depend on the application that is currently in use to send e-mails. The application shown in this exercise is Microsoft Outlook.
7. Double click on the Attached file name and click Open if there is a security message. The results of the query are opened as a spreadsheet in Microsoft Excel. Close Excel.
8. Enter the recipient’s e-mail address in the To box and enter Test message in the Subject box.
9. Click in the message area and type in a brief message.
10. All of the features of the messaging application may be used.
11. Click the Send button to send the message with its attachment to the entered address, or if you do not wish to send it now, close the message and application without saving.
12. Close the query without saving but leave the database open for the next exercise.
62 © CiA Training Ltd 2008

Open Learning Guide Access 2007 Advanced
Exercise 163 - Send using a MacroGuidelines:
As well as manually sending a database object as an attachment, this can also be achieved by using a macro. The macro could be attached to a button with an option to send the e-mail immediately, with no further intervention.
Actions:
1. In the Household Plants database, open the Plant Details form in Design View.
2. Ensure the Use Control Wizards option is turned off and create a Command Button at the bottom of the Detail area.
3. Display the Property Sheet, select the Event tab and select On Click.
4. Click on the Build button, , select Macro Builder and click OK.
5. In the Macro window, select SendObject as the Action.
6. In the Action Argument area, select an Object Type of Table and an Object Name of Plant Index.
Note: Even though this macro is run from the Plant Details form, it does not have to send that form as the object. It can send any object in the database such as a table, form, query or report.
7. For this exercise, the Plant Index table will be sent as a web page so that the recipient can then put the page on their Intranet for general viewing. In Output Format select HTML as the required format for the attachment.
8. Enter the required e-mail destination address (for example [email protected]) in the To field.
© CiA Training Ltd 2008 63

Open Learning Guide Access 2007 Advanced
64 © CiA Training Ltd 2008

Open Learning Guide Access 2007 Advanced
Exercise 163 - Continued9. In Subject, enter Test Send, and in Message Text, enter Here is a list
of our current stock.
10. In Edit Message, select Yes. This means the message window will be displayed for possible amendment before sending. If No was selected, the e-mail and its attachment would be sent immediately after clicking the command button, the process would not require any further intervention.
11. Save the macro as SendList.
12. Close the macro and select Yes when prompted about save and update. The macro SendList now appears in the Property Sheet.
13. In the Property Sheet, enter a Caption of Send List then switch to Form View.
14. Click the Send List button. Because the Edit Message argument has been set to Yes, your messaging application will open (Outlook 2007 is assumed here)with the message and attachments already entered.
15. Close the messaging application without sending or saving.
16. Save and close the Plant Details form and close the Household Plants database.
© CiA Training Ltd 2008 65
Open Learning Guide Access 2007 Advanced
Exercise 164 - Exporting ObjectsGuidelines:
Database object can be exported in a variety of formats without having to be sent as attachments.
Actions:
1. Open the Transport database and open the Buses table in Datasheet View.
2. Select the External Data tab and click the Excel button in the Export group. The Export dialog box is displayed.
3. By default, the file will be saved in the Documents folder with a name of Buses and a format of Excel workbook (*.xlsx). Use the Browse button if you want to change the location of the exported file, otherwise leave the settings unchanged.
4. Select the options as shown below.
5. Click OK. The Buses.xlsx file is created and opened in Excel. This can be used like any other spreadsheet but remember it is now a separate file, not linked to the database. Any changes to the table will not be shown in the spreadsheet, and any changes made to the spreadsheet will not be applied back to the database table.
Note: Although it could be imported back into the database as a separate process.
6. Close the Excel window and close the Export dialog box without saving the export steps.
7. Objects can be exported in other formats. Close the Buses table and select the Routes report in the Navigation Pane (there is no need to open it).
8. Select the External Data tab and click the More button in the Export group.
66 © CiA Training Ltd 2008
Open Learning Guide Access 2007 Advanced
© CiA Training Ltd 2008 67

Open Learning Guide Access 2007 Advanced
Exercise 164 - Continued
9. Select from the list of options.
10. By default, the HTML file will be saved in the Documents folder with a name of Routes Use the Browse button if you want to change the location of the exported file, otherwise it unchanged.
11. Select the option to Open the destination file after the export operation is complete. Click OK.
12. An HTML Output Options dialog box is displayed. Leave Default encoding selected and click OK.
13. The Routes report is displayed in the web browser. It can now be viewed on-line, on the Internet or on an Intranet.
Note: This process only produces a static view of the report (or other object). It is possible to publish a database so that it can be accessed and amended online, but this requires the use of the Windows Share Point Services application and is beyond the scope of this guide.
14. Close the browser window and close the Export dialog box without saving the export steps.
15. Close the Transport database.
68 © CiA Training Ltd 2008

Open Learning Guide Access 2007 Advanced
Exercise 165 - Revision: Exporting Data1. Open the College database and the Courses table in Datasheet View.
2. You are the curriculum manager of a local college who has just received notification of some new courses to be provided this year. Send the table as an e-mail attachment in the form of an Excel spreadsheet.
3. The message is to be sent to a friend who runs a centre for the unemployed. Enter any e-mail address in the To box.
4. Enter the subject as New Courses and enter the following message in the message area:
I thought you might be interested in some of the following courses, which we are now able to offer. They are free for unemployed people. Please reply as soon as possible with provisional numbers, as places are limited.
Your name.
5. The message is urgent. Change the priority accordingly.
6. Send the message.
7. Create a Macro called Send Courses.
8. Include an action to send a copy of the Courses table to the same address as before. Send the data as HTML format and add a Subject and Message Text of your choice. Select the option to Edit the message before it is sent.
9. Save the macro and then run it. When the message window opens, right click on the attachment and open it. What application does the attachment open in?
10. Close the attachment and its application, then close the message window without sending.
11. Close the Courses table.
12. Export the Students table as an Excel spreadsheet. Save the spreadsheet as Students.xlsx in the supplied data folder.
13. Close the College database.
© CiA Training Ltd 2008 69

Open Learning Guide Access 2007 Advanced
Section 25
Database Tools
By the end of this Section you should be able to:
Compact and Repair a DatabaseUse Linked Tables
Backup/Restore the DatabaseSplit Databases
Set/Remove Database Passwords
70 © CiA Training Ltd 2008

Open Learning Guide Access 2007 Advanced
Exercise 166 - Compact and Repair a DatabaseGuidelines:
Whenever a database is in use, information and objects are regularly created, updated and deleted. This can drastically increase the amount of space taken up by the database and decrease its efficiency. To ensure a database is running efficiently, it is advisable to compact it once in a while, thereby improving the performance and reducing the size of the database.
Occasionally databases may become damaged. This may be because of a system crash during use, a power cut or hardware failure during use or simply because the database was not closed down properly. The database may be so damaged that it cannot be opened. If so, then it is still possible to repair it.
In Access the same option both repairs any damage to a database and compacts it to a more efficient form.
Actions:
1. Open the Documents window from the Start menu, locate the supplied data folder and note the size of the Egypt and Wine databases.
2. Ensure Access is active but no databases are open.
3. Click the Office Button, , move the cursor over , and select Compact and Repair Database from the options.
4. Locate the supplied data folder in the dialog box and select the Wine database.
© CiA Training Ltd 2008 71

Open Learning Guide Access 2007 Advanced
72 © CiA Training Ltd 2008

Open Learning Guide Access 2007 Advanced
Exercise 166 - Continued5. Click Compact. The Compact Database Into dialog box appears.
6. Select the Wine database again and click Save.
Note: The database can be compacted into the original folder and name, or given a new name and location. Compacting under a new name is a way of backing up a database.
.
7. Select Yes at the prompt. Compacting… appears in the Status Bar for a few seconds. The Wine database is now repaired and compacted.
8. In the Documents window, check the new size of the Wine database.
9. It is easier to Compact the current database. Open the Egypt database but make sure that no objects are open.
10. Click the Office Button, move the cursor over , and select Compact and Repair Database from the options.
11. By default the current database is the one processed and stored again under its own name. There are no prompts. After a short delay the database will be displayed again.
12. It is possible to automatically compact a database each time it is closed. With the Egypt database open, click the Office Button, and select
from the lower right corner of the panel.
13. Select Current Database from the left of the Access Options dialog box and check the option Compact on Close. This database will now be compacted every time it is closed. Click OK.
14. Click OK at the information message that appears.
15. Close the Egypt database and check the new size.
© CiA Training Ltd 2008 73
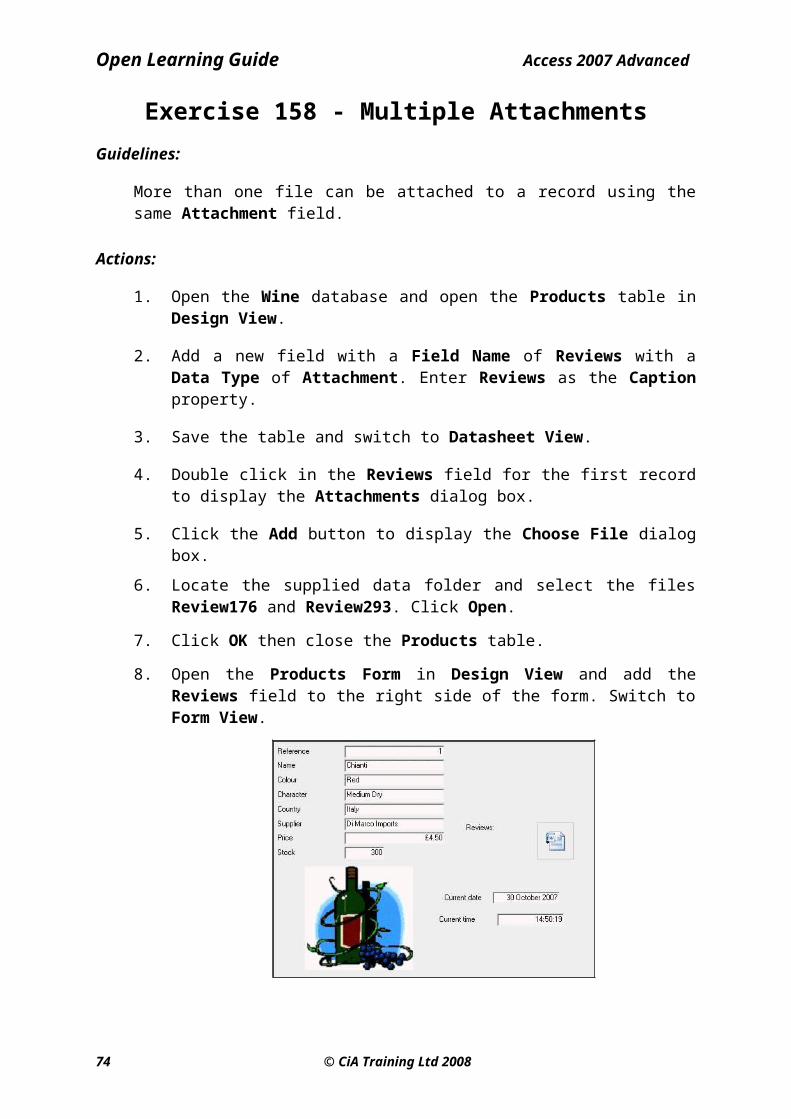
Open Learning Guide Access 2007 Advanced
Exercise 167 - Linked TablesGuidelines:
Data from a different application can be imported into an Access database by means of a Linked Table. This is a table created in Access, but based on an external object such as a spreadsheet or a table from another database.
The table is available for use within the database (in a query for example) but a Linked Table cannot be altered in Access. If alterations to the design are required, they will have to be made in the source object and saved. The alterations should then automatically be updated in the linked table.
The following exercise will look at importing an Excel spreadsheet into Access as a linked table.
When a table is linked to an Excel spreadsheet, the data cannot be amended in the database, only in Excel.
Actions:
1. Open the Transport database and select the External Data tab.
2. Look in the Import group and select the Excel button. A dialog box is displayed so that the source, destination and type of the imported file can be defined.
3. In the Get External Data dialog box, use the Browse button to locate the supplied data file folder and select the file Wages.xlsx. Click Open to return to the dialog box.
Note: To import Excel data, the spreadsheet should be a List type with the data arranged in columns. This is the type of spreadsheet used here.
4. There are options here to create a new table, add records to an existing table, or create a link to the data. Select the option to link to the source data by creating a linked table.
5. Click OK.
6. The Link Spreadsheet Wizard appears. Check that Show Worksheets is the selected option and Company Payroll is the selected worksheet.
74 © CiA Training Ltd 2008

Open Learning Guide Access 2007 Advanced
© CiA Training Ltd 2008 75
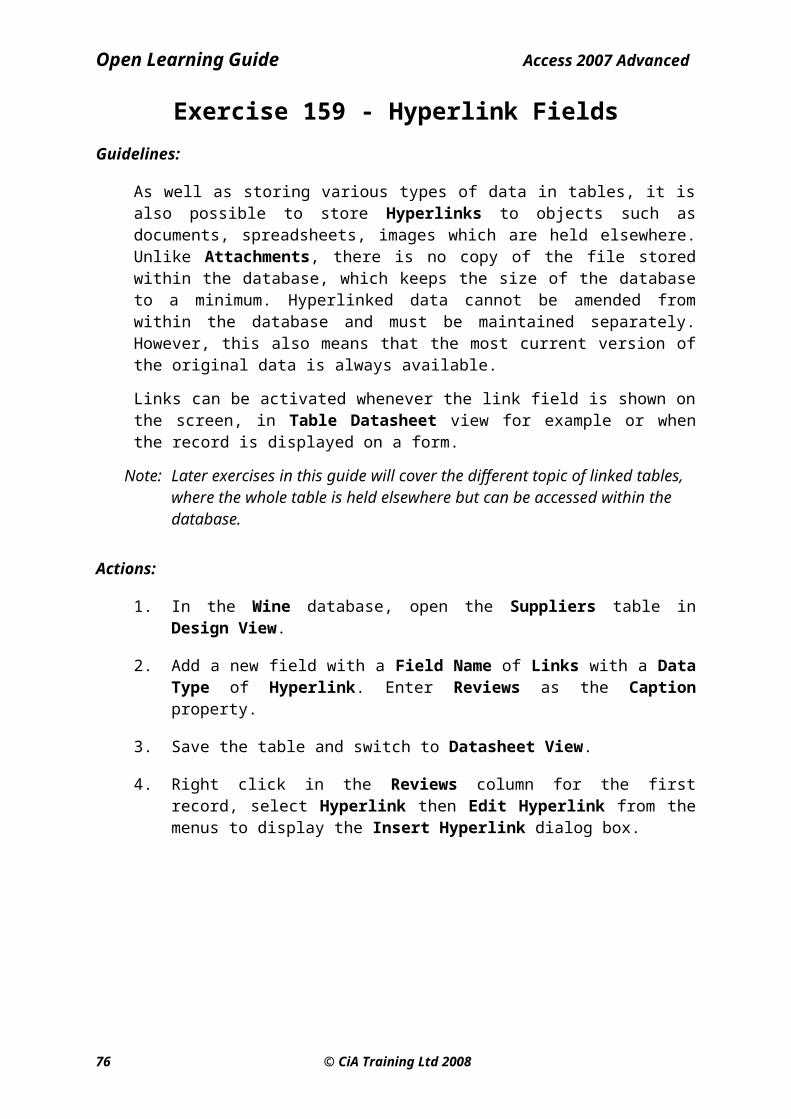
Open Learning Guide Access 2007 Advanced
Exercise 167 - Continued7. Click Next. Ensure First Row Contains Column Headings is checked
and click Next.
8. Accept the Linked Table Name of Company Payroll. Click Finish.
9. Click OK at the Finished linking table message.
10. A new Company Payroll table appears in the Navigation pane with the symbol indicating that it is linked to an Excel spreadsheet.
11. Open the Company Payroll table in Datasheet View and view all the records. Try to change any of the data in the table, this will not be allowed.
12. Switch to Design View. A warning message will be displayed. Click Yes to open the view anyway and see the design. Close the table without making any changes but leave the database open.
Note: Properties could be changed on the screen but it would not be possible to save them.
13. Start Excel and open the Wages spreadsheet from the supplied data files. The Hours Worked for the first employee is 100.
14. In Excel, change this figure to 75 then delete the last five records. Save and close the spreadsheet and close Excel.
15. In Access, open the Company Payroll table in Datasheet View. All the amendments have automatically been updated.
16. Save the table and close it, but leave the database open for the next exercise.
76 © CiA Training Ltd 2008
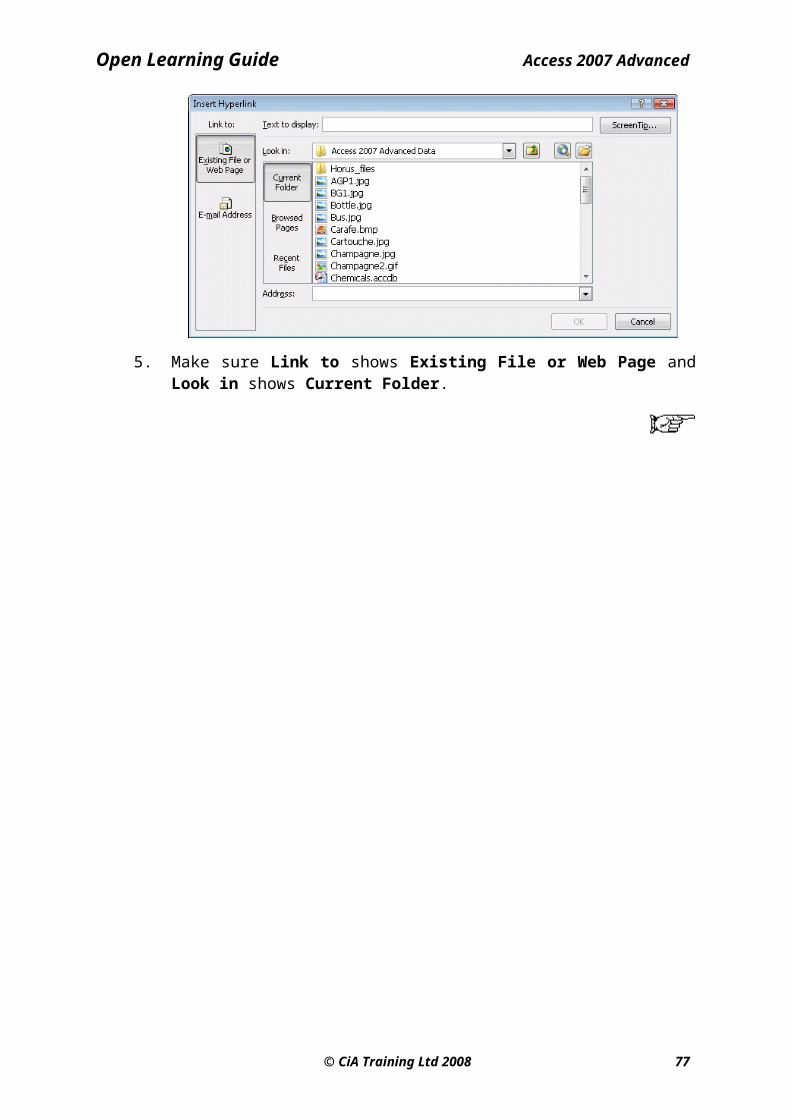
Open Learning Guide Access 2007 Advanced
Exercise 168 - Backup/Restore a DatabaseGuidelines:
It is important to backup a database to prevent the loss of data in the event of a catastrophe. It is also good practice to backup a working database before applying any updates, in case these cause unforeseen problems.
Unlike earlier versions, Access 2007 has a Backup function which allows copies to be easily made. The Backup process copies the database file (extension .accdb). All database information is stored in this single file, i.e. tables, queries, data, etc.
Note: Backups can also be made indirectly, either by using the Compact and Repair feature as described in a previous exercise, or by copying the database file in Windows.
Actions:1. With the Transport database open, click the Office Button.
2. Move the cursor over Manage, and select Backup Database from the options. The Save As dialog box is displayed.
3. The folder for the backup defaults to the original database folder, and the File name for the backup file defaults to the original name plus the date of the backup. Both of these can be changed but for this exercise accept the defaults and click Save. The backup copy is saved.
4. Leave the Transport database open.
Note: There is no specific Restore process other than to rename the backup database file back to the original name. The backup itself is a completely standard working database.
© CiA Training Ltd 2008 77

Open Learning Guide Access 2007 Advanced
Exercise 169 - Database SplitterGuidelines:
The Database Splitter function is usually used when a network is in place and more than one user needs access to the database. It splits a database into a new Back-end database, containing only data tables, and the original (Front-end) database which contains everything but the data tables. Instead of the data, the Front-end database contains Linked tables linked back to the single copy of the data on the Back-end database. Copies of the original database can then be given to a number of users, but only a single copy of the actual data is ever maintained.
Users of the original database can then create their own queries, forms, reports etc. and can add edit or delete data in the tables held in the Back-end database. They cannot however amend the design of the original tables.
Typically a database administrator will control the Back-end database which contains the single copy of the actual data. If alterations to the table’s design are required, for example the addition of a new field, the database administrator will make the necessary changes in the Back-end database, which will change the table design in all copies of the original database.
Note: It is wise to make a backup copy of a database before splitting it.
Actions:
1. With the Transport database open, select the Database Tools tab and select Access Database from the Move Data group. The wizard starts.
78 © CiA Training Ltd 2008

Open Learning Guide Access 2007 Advanced
© CiA Training Ltd 2008 79
Open Learning Guide Access 2007 Advanced
Exercise 169 - Continued2. Click on the Split Database button.
3. The Create Back-end Database dialog box appears. The folder location should default to the supplied data folder, if not locate it now.
4. Leave the file name as Transport_be, as suggested by Access and click Split. After a few seconds, the following message appears:
5. Click OK. The current database is now the Front-end database containing only linked tables. Notice how all tables in the Database Window now have arrows next to them, to show that they are linked.
6. Open the Buses table in Datasheet View. Data can be amended as before. Change the Capacity on the first record from 55 to 44.
7. Switch to Design View.
8. Because the tables are linked, design modifications are not allowed. Click No to cancel the process.
9. Close the table and the Transport database. Open the Back-end database Transport_be. Notice that this database only contains the data tables. Open the Buses table in Design View. There are no warning messages and the design could now be amended.
10. Switch to Datasheet View. The data amendments made previously to the Front-end database are seen here in the actual tables.
11. Close the table without saving and close the Transport_be database.
80 © CiA Training Ltd 2008

Open Learning Guide Access 2007 Advanced
Exercise 170 - Set Database PasswordsGuidelines:
If desired, a password can be set up on a database to prevent unauthorised access. Once set, any user attempting to open the database from any location, must enter the password.
Actions:
1. With all databases closed, click the Office Button and select Open.
2. Locate the supplied data folder Access 2007 Advanced Data and select (but do not open) the College database.
3. Click the drop down arrow at the right of the Open button and select Open Exclusive from the list.
Note: Open Exclusive prevents any other users accessing the database whilst you have it open. If your database is on a system where it can be accessed by other users it is necessary to use Open Exclusive before setting or removing passwords.
4. Select the Database Tools tab and click Encrypt with Password from the Database Tools group.
5. Enter Protected as the Password, then repeat it in the Verify box.
Note: Remember exactly how the password was entered. Passwords are case sensitive.
6. Click OK to set the password, then close the database.
7. Open the College database again. The following dialog box appears:
8. Enter the password and click OK to open the database.
9. Close the College database.
© CiA Training Ltd 2008 81
Open Learning Guide Access 2007 Advanced
Exercise 171 - Remove a PasswordGuidelines:
Once a password has been set up on a database, it can be removed when required. The removal process prompts for the password before it will function, so it follows that it is necessary to know the password in order to remove it.
Actions:
1. Open the College database using the Open Exclusive process as described in the previous exercise.
Note: Open Exclusive is necessary if your database is on a system where it can be accessed by other users.
2. Enter the password in the Password Required dialog box and click OK.
3. Select the Database Tools tab and click Decrypt Database from the Database Tools group.
4. Enter the password in the box provided and click OK.
5. The database is no longer password protected. Close it.
6. Reopen the database to ensure no password prompt appears. Close the database.
82 © CiA Training Ltd 2008
Open Learning Guide Access 2007 Advanced
Exercise 172 - Revision: Database Tools1. Make a backup copy of the Wine database. Save the copy in the supplied
data folder and name the backup Wine_Backup.
2. Close the Wine database and open Wine_Backup.
3. Using the Import feature, create a table in the database which is linked to the Students table in the College database.
Note: Linking to a database table is very similar to linking to a spreadsheet. Import from the database first, specifying the link option, then you will be prompted to select the required table.
4. Rename the linked table as Customers and open it.
5. Change the address for Dave Prescott to 4 Steeply Drive.
6. Close the table and close the database.
7. Open the College database and open the Students table. What is the address for Dave Prescott?
8. Close the table and close the database.
9. Without opening it, compact and repair the Pet Shop database, compacting it into a new database called Creatures.
10. Split the Creatures database, creating a new Back-end database, Creatures_be.
11. In which of the two databases Creatures or Creatures_be would you be able to add another field to the Pets table?
12. In which of the two databases Creatures or Creatures_be would you be able to change the layout of the Add/Edit Pets form?
13. Apply a password of pass to the Creatures_be database. What must be done to the database before a password can be applied?
14. Does the password apply when using the Creatures database?
15. Remove the password from the Creatures_be database and close it.
© CiA Training Ltd 2008 83
Open Learning Guide Access 2007 Advanced
Section 26
Database Analysis
By the end of this Section you should be able to:
Analyse a TableUse Performance AnalyserUnderstand Documenter
84 © CiA Training Ltd 2008

Open Learning Guide Access 2007 Advanced
Exercise 173 - Table AnalyzerGuidelines:
The Table Analyzer will analyse a table and make changes to improve its efficiency. In particular, it will even split an inefficient table into simpler related tables, if appropriate. This is sometimes known as Normalisation. It will not change the original table.
Actions:
1. Open the Chemicals database and view the information in the Elements table. There are 30 elements listed but many of the Classification and Colour values are repeated e.g. Gas, Colourless and Metal, Silvery-white. Close the table.
2. Select the Database Tools tab and select Analyze Table from the Analyze group.
3. Read the information and click on the first Show me an example button to see an example of how space is wasted.
4. Close the information box and click the second Show me an example button to see an example of how mistakes can arise.
5. Close the information box and click Next.
6. Read the information on this screen, including the two examples, then click Next.
7. Select the Elements table as the table to be analysed and click Next.
© CiA Training Ltd 2008 85

Open Learning Guide Access 2007 Advanced
86 © CiA Training Ltd 2008
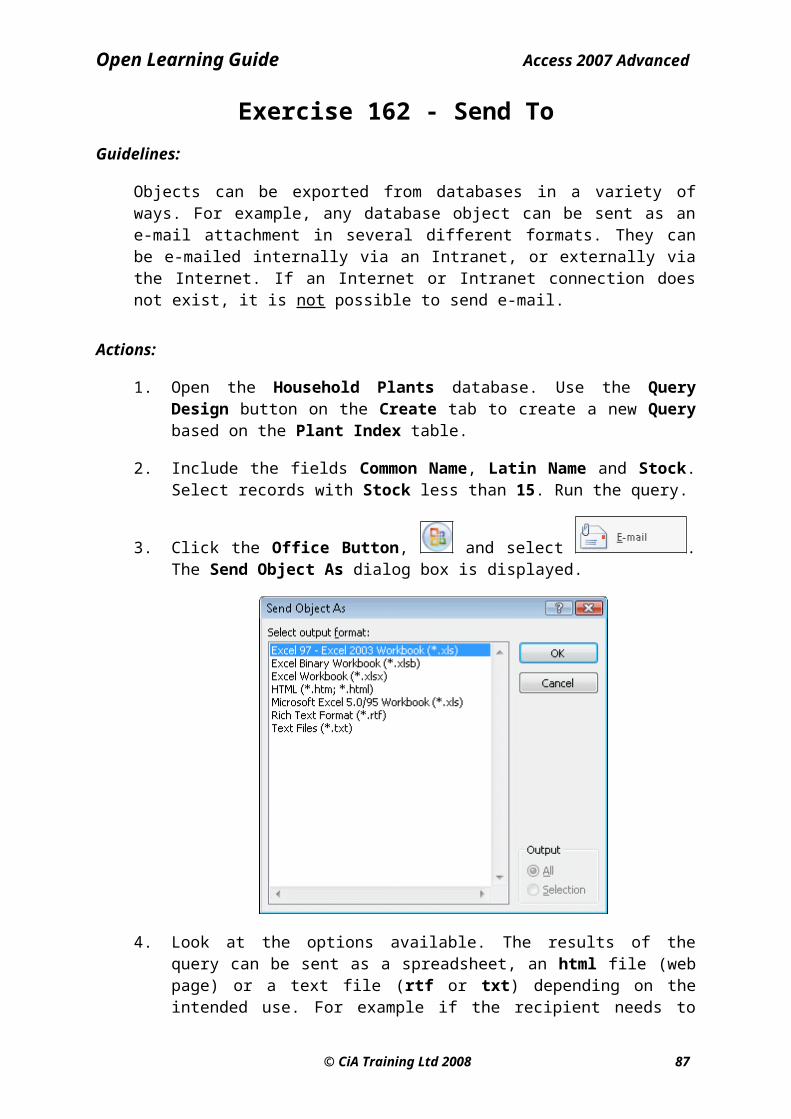
Open Learning Guide Access 2007 Advanced
Exercise 173 - Continued8. Select Yes, let the wizard decide so that the table will be split
automatically. Click Next.
9. The Wizard will then make a suggestion for the split of fields between the two new tables.
10. Make sure the split is as shown above. Enlarge the field lists if necessary to see all the entries. Fields could be moved from one table to the other by clicking and dragging if required.
11. Select Table1 and click the Rename Table button, . Call the table Symbols.
12. Click OK, then select Table2 and rename that as Classifications.
13. Click Next, read the text, then click Next again.
14. This screen highlights possible errors in the new tables, where similar values are possibly misspellings of the same value. Click Next without making any corrections. Click Yes at the warning message.
15. Read the text, select Yes, create the query and click on Finish.
© CiA Training Ltd 2008 87

Open Learning Guide Access 2007 Advanced
88 © CiA Training Ltd 2008
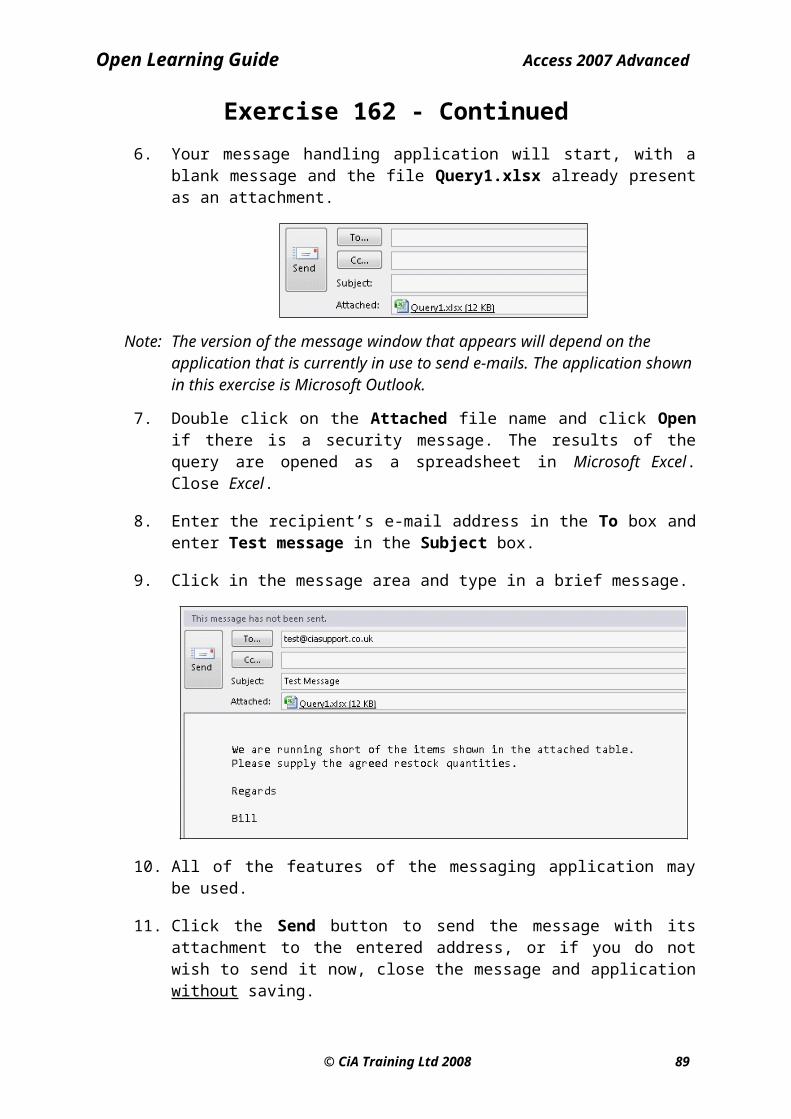
Open Learning Guide Access 2007 Advanced
Exercise 173 - ContinuedNote: The Analyser has split the original table into 2 smaller linked tables. It
also automatically creates a Query based on these two tables, which exactly reproduces the original table. The query is given the same name as the original table and replaces it in any existing forms, reports or pages. The original table is retained but given a new name.
16. If a help screen appears, close it.
17. The new query (Elements) is open. Close it and look at the Navigation Pane. There are three tables. Elements_OLD is a copy of the original table and can be deleted when the operation of the new structure has been checked. Any existing forms or reports which referenced this table, now reference the new Elements query.
18. Open the two new tables, Symbols and Classifications to see the new structure. There are only 15 different Classification/Colour values for the 30 Symbols records so the new format is now more efficient.
19. The Symbols table is a subdatasheet of the Classifications table. Expand the subdatasheet for the first classification to see all Colourless Gas elements.
20. Close the Symbols table. In the Symbols table enter a new record with Classification of Solid and Colour of Yellow. Close the table.
21. Open the Symbols table and enter a new record. Enter 16 as the Atomic No, Sulphur for the Element and S as the Symbol. Enter the Atomic Mass as 32, the Melting Point as 119 and the Boiling Point as 445.
22. In the Lookup to Classification field, a drop down arrow is displayed. Click the arrow to show a list of the available Classifications. Scroll down and click Solid - Yellow. The information is automatically retrieved.
23. Close both the tables but leave the database open.
© CiA Training Ltd 2008 89

Open Learning Guide Access 2007 Advanced
Exercise 174 - Performance AnalyzerGuidelines:
The Performance Analyzer tool will analyse the performance of every object in the database, making suggestions on how to improve the performance, if possible.
Actions:
1. With the Chemicals database open, display the Database Tools tab and select Analyze Performance. Click All Object Types in the dialog box.
2. All the objects in the database are listed. Click Select All then OK. After a moment the Analysis Results are displayed.
3. Read the results carefully. Notice different levels of importance can be assigned to the results. Click Close. Leave the database open for the next exercise.
90 © CiA Training Ltd 2008
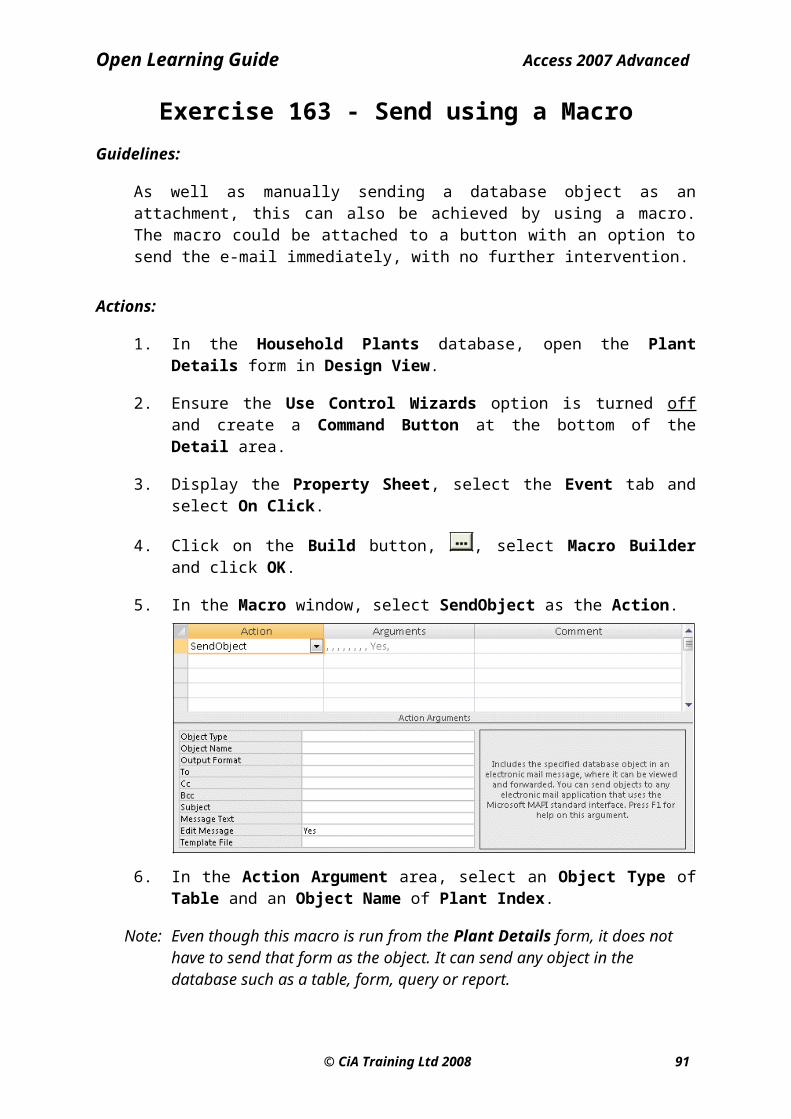
Open Learning Guide Access 2007 Advanced
Exercise 175 - DocumenterGuidelines:
The Documenter facility produces a printout of the design characteristics of selected objects within the database for reference purposes.
Actions:
1. With the Chemicals database open, select Database Documenter from the Database Tools tab.
2. Make sure the Tables tab is selected in the Documenter dialog box.
3. Click Select All to include all tables in the analysis.
4. Select the Current Database tab and then select Relationships.
5. Click OK. After a while, the report appears in Print Preview mode.
6. Use the features of Print Preview to view the different pages. There should be several pages of information on the 3 tables within the database and a page on the Relationships between the tables. Print the report, if required.
7. Close the report (it is not saved) but leave the database open.
© CiA Training Ltd 2008 91

Open Learning Guide Access 2007 Advanced
Exercise 176 - DependenciesGuidelines:
The Object Dependencies feature displays quickly which objects in a database are dependent on which other objects. This is particularly useful in a large complex database. For example, before the design of a table is altered, a list can be seen of every other object that will be affected.
Actions:
1. With the Chemicals database open, select the Elements query.
2. Select Object Dependencies from the Database Tools tab.
Note: If a prompt appears to enable an AutoCorrect option, click OK.
3. An Object Dependencies task pane appears on the right. By default it shows which other objects in the database obtain some or all of their data from the selected object.
4. Click Objects that I depend on in the task pane. The display changes to show those objects that supply data to the selected object.
5. Select the Properties form in the Navigation Pane and click Refresh in the task pane.
6. The display now shows that the only source of data to the Properties form is the Elements query.
7. Close the Object Dependencies task pane and close the database.
92 © CiA Training Ltd 2008
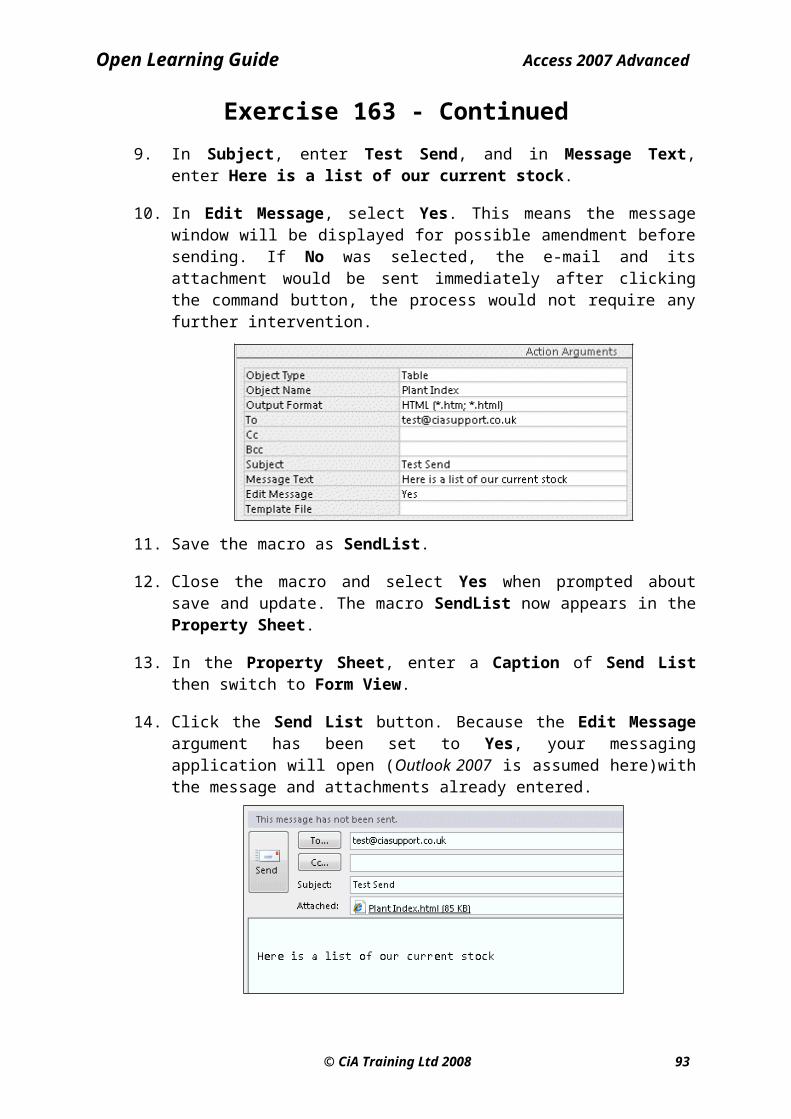
Open Learning Guide Access 2007 Advanced
Exercise 177 - Revision: Database Analysis1. If the Wine_Backup database was not created in exercise 172, backup
up the Wine database now with a name of Wine_Backup.
2. Open the database Wine_Backup.
3. Analyse the Products table using the following steps.
4. Let the wizard decide which fields go in which tables.
5. Leave the fields in Table1 and Table2 as suggested by the wizard.
6. Rename Table1, Wines and Table2, Origins.
7. Ignore the typographical errors.
8. Create a query. Close Help, if it opens.
9. Add the following record to the query:
Bouches du Rhone, Red, Smooth, Lookup to France Caves de Chouan, price £3.29, stock 400.
10. Close the query.
11. Analyse the performance of the Wine database, selecting All Object Types.
12. Click on each of the Ideas in the Analysis Results to see a description in the Analysis Notes.
13. Close the Performance Analyser.
14. Display the Documenter and from the Forms tab click Select All items.
15. Read some of the report, but don't print it.
16. Close the report and the database.
© CiA Training Ltd 2008 93

Open Learning Guide Access 2007 Advanced
Section 27
Database Options and Utilities
By the end of this Section you should be able to:
Use Option SettingsAdd Startup Controls
Create Key Press ControlsApply Report Page NumbersUse Switchboard Manager
94 © CiA Training Ltd 2008
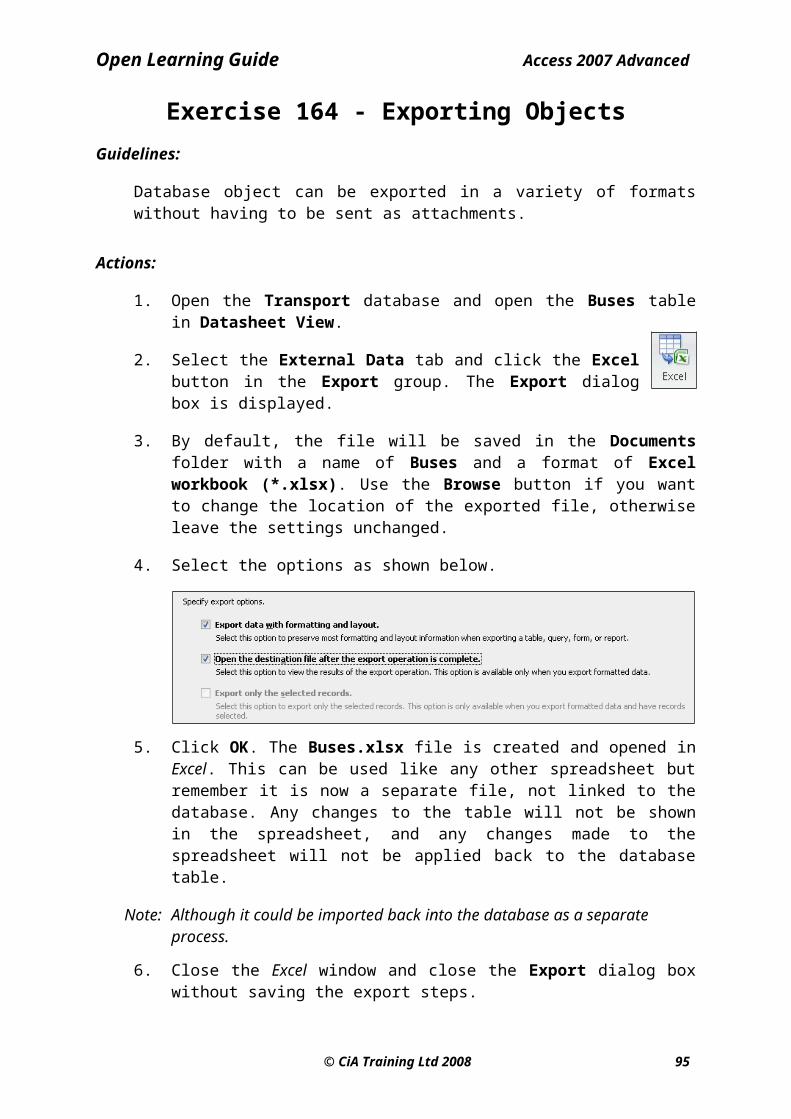
Open Learning Guide Access 2007 Advanced
Exercise 178 - OptionsGuidelines:
Many settings which control how Access operates can be set by using the Options dialog box. Most of the Option settings apply to the operation of Access in general, although some are specific to the currently selected database. If no database is open, these settings will not be available.
Actions:
1. Open the Wine database, click the Office Button and select Access Options at the lower right of the panel. The Access Options dialog box is displayed.
2. The options available are divided into ten headings which are listed down the left of the dialog box.
3. With Popular selected on the left, look at the options that are available in the main part of the screen. The Color Scheme setting changes the appearance of the Access screen surround but does not alter its operation in any way. All screen shots in this guide are taken with this option set to Black.
4. Select Datasheet on the left.
5. The settings here control the default appearance of the datasheets in all databases. Datasheet format can be changed for an individual datasheet by using commands on the Ribbon.
6. Under Default colors, click the drop down arrow on Background color and set it to pale blue. Set the Gridlines color to red.
© CiA Training Ltd 2008 95

Open Learning Guide Access 2007 Advanced
96 © CiA Training Ltd 2008

Open Learning Guide Access 2007 Advanced
Exercise 178 - Continued7. Under Default font, click the Italic option. Click OK.
8. Open the Orders and Products tables in Datasheet View to see the revised table format. All tables that have not been individually formatted will look like this. Close both tables.
9. Display Access Options again and make sure Datasheet is selected.
10. Under Default colors, click the drop down arrow on Background color and set it to Automatic.
11. Set the Gridlines color to Automatic as well, and remove the check from the Italic option. Click OK.
12. Open the Orders and Products tables in Datasheet View to see that tables have now resumed their original appearance. Close both tables.
13. Display Access Options again and select Object Designers. Look at the options. They control settings such as the default table design values and query settings.
14. Change the Default text field size to 60. The next time a new text field is defined in a table it would have a default length of 60 characters.
15. Select Proofing on the left of the Access Options dialog box. Settings here control the automatic correction feature in Access.
16. Select Advanced on the left of the Access Options dialog box. There are many options here grouped under various headings. Scroll down and read them all to see what settings are available.
17. Other options on the left of the dialog box include Customize, which allows the Quick Access Toolbar to be customised, and Trust Center which contains security statements and options.
18. Leave the Access Options dialog box open.
© CiA Training Ltd 2008 97
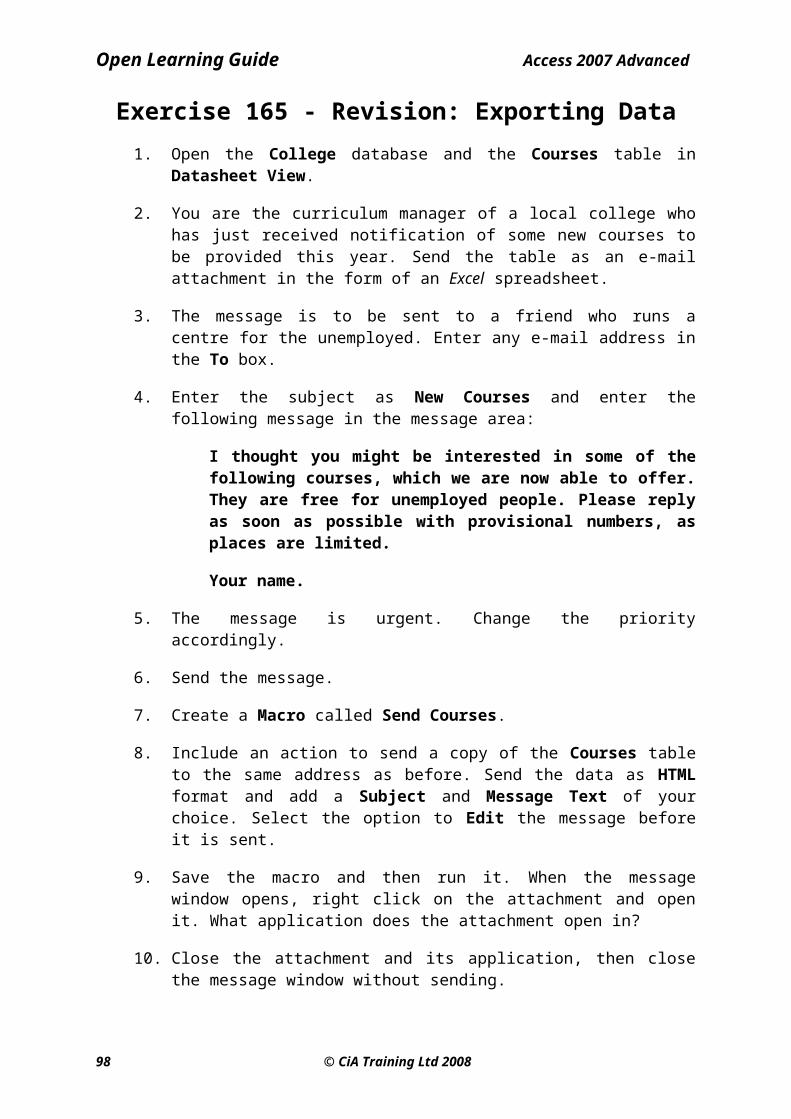
Open Learning Guide Access 2007 Advanced
Exercise 179 - Current Database OptionsGuidelines:
The Current Database settings in the Access Options dialog box are the only ones which apply to a single database. There are options to control how the current database is opened and closed. In particular it can be set up to open a form automatically when a database first opens. It is similar in this way to an AutoExec macro, although both features can do more than just open a form. If both features are present in a database, the Autoexec macro runs after the Startup controls have been applied.
Actions:
1. The Wine database should be open and the Access Options dialog box displayed. Select Current Database from the left of the dialog box.
2. Type your name in the Application Title, and in the Display Form box click on the down arrow key and select Orders Form.
3. Below this, remove the check from Display Status Bar. Make sure Tabbed Documents is checked under Document Window Options.
4. Further down, remove the check from Display Navigation Pane.
98 © CiA Training Ltd 2008

Open Learning Guide Access 2007 Advanced
© CiA Training Ltd 2008 99

Open Learning Guide Access 2007 Advanced
Exercise 179 - Continued5. Click OK. There will be a message. Click OK to remove it then close the
Wine database.
6. Open the Wine database. Notice your name appears in the Application Title Bar.
7. The Orders Form is displayed but the Navigation Pane is not, so the only way any other objects can be opened is via buttons on this form.
Note: Often the form which is displayed in this manner is a Switchboard or Control Panel form which acts as a menu to access specific objects. The database designer then controls which parts of the database a user can access. Switchboards and Control Panels are covered in a later exercise.
8. Display the Access Options dialog box, Current Database page, and under Document Windows Options select Overlapping Windows. Click OK and click OK at the message.
9. Close the Wine database and reopen it. Notice the change in the display of the opening form.
10. Display the Access Options dialog box, Current Database page. Select (none) as the Display Form option, check the Display Status Bar option, and under Document Windows Options select Tabbed Documents.
11. Select the Display Navigation Pane option and click OK.
12. Click OK at the message, close the Wine database and reopen it. The database opens in the original layout, with no form open and the Navigation Pane displayed.
13. Close the database.
100 © CiA Training Ltd 2008

Open Learning Guide Access 2007 Advanced
Exercise 180 - Key Press ControlsGuidelines:
Quick key presses can be assigned to forms, buttons, etc., instead of clicking buttons or menu commands. To assign a key press, switch to Design View and in the properties of the form or button, place the ampersand character, &, before the letter which is to be used for the key press.
Actions:
1. Using the Transport database, open the Buses form in Design View. Key presses are to be added to the three command buttons.
2. Select the Find button and view its Property Sheet. Select the Format tab and in the Caption property, insert an ampersand character before the F of Find.
3. Select the Print Report button and in the same way, place the ampersand character before the P of Print.
4. The Key Press does not have to be the first character of the caption. Select the Servicing button and view its Property Sheet. Select the Format tab and change the Caption to Open Servicing Form, then insert an ampersand character, &, before the S of Servicing.
5. Close the Property Sheet and save the form.
6. Switch to Form View. Notice that the buttons now have a letter underlined.
Note: Ensure the buttons are large enough for the underline to be viewed.
7. Press <Alt P> to print the entire Routes report.
8. Press <Alt F> to find a record. Cancel the dialog box.
9. Press <Alt S> to open the Servicing form.
10. Close the form and the database.
© CiA Training Ltd 2008 101
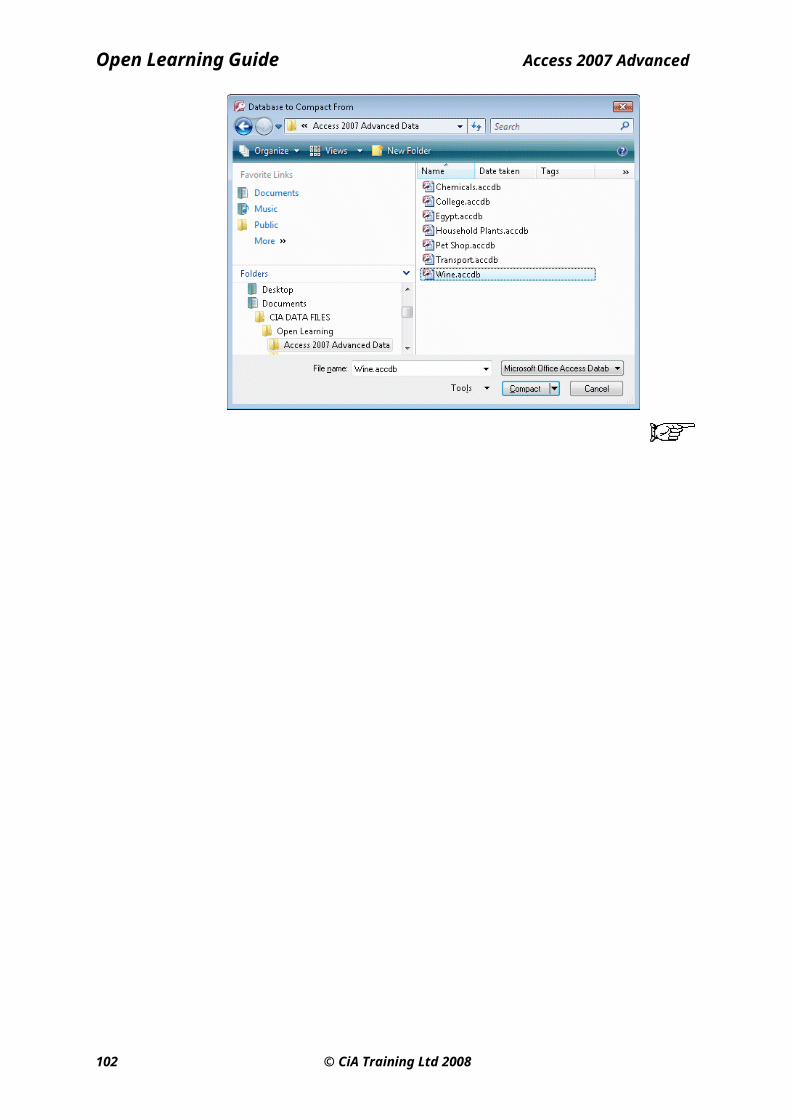
Open Learning Guide Access 2007 Advanced
Exercise 181 - Page Numbers for ReportsGuidelines:
Page numbers can be added to reports. They are only visible in Print Preview and the printed report.
Actions:
1. Using the Household Plants database, ensure that the Index Report is open in Design View.
2. Make sure the Report Design Tools - Design tab is displayed and from
the Controls group, select the Insert Page Number button, .
3. Choose Page N and Position at Bottom of Page [Footer], Alignment Center. Click OK.
4. Change to Print Preview. Zoom into the bottom of the report page to view the page number. View page 2 to ensure the number has changed.
5. Return to Design View and select the page number box in the footer, then press <Delete> to remove it.
6. To create a more advanced page number setting, display the Page Numbers dialog box again and choose the Page N of M from Format.
7. Click OK and view the results.
8. Save the report and close it.
9. Close the database.
102 © CiA Training Ltd 2008

Open Learning Guide Access 2007 Advanced
Exercise 182 - Switchboard ManagerGuidelines:
A Switchboard (sometimes called a menu) is a form containing links which open various objects within the database and so helps the user to navigate between forms and reports in a database. It can also help control which features in a database are available to the user.
Options on a switchboard can open other switchboards, so for large complex databases a structure of switchboards can be created. For example, one button on the Main switchboard may open a Reports switchboard, which has options to run each of the available reports, together with an option to return to the main switchboard.
If a new database is created using the wizard, a switchboard is automatically created. If forms and reports have been created independently, switchboards can be easily added using the Switchboard Manager.
Actions:
1. Open the Wine database and select the Database Tools tab.
2. Select Switchboard Manager from the Database Tools group. The following message appears:
3. Select Yes to display the Switchboard Manager dialog box, with a new blank switchboard inserted.
© CiA Training Ltd 2008 103

Open Learning Guide Access 2007 Advanced
104 © CiA Training Ltd 2008

Open Learning Guide Access 2007 Advanced
Exercise 182 - Continued4. Click Edit to begin creating items for the switchboard.
5. Enter Wine Switchboard in the Switchboard Name box, then click New to create a new switchboard item.
6. The first switchboard control will open the Orders form for editing. Type Orders in the Text box (this will be the caption for this option).
7. From the Command drop down list select Open Form in Edit Mode.
8. From the Form drop down list select Orders Form as the form to open.
9. Click OK to return to the Edit Switchboard Page dialog box.
10. Click New and repeat this process to add the following items to the switchboard:
An option called Products to open the Products Form in edit mode.
An option called Suppliers to open the Suppliers Form in edit mode.
11. Add another item, to run a report, using the following diagram as a guide:
12. Add a final item, which will close the database, using the following diagram as a guide:
© CiA Training Ltd 2008 105
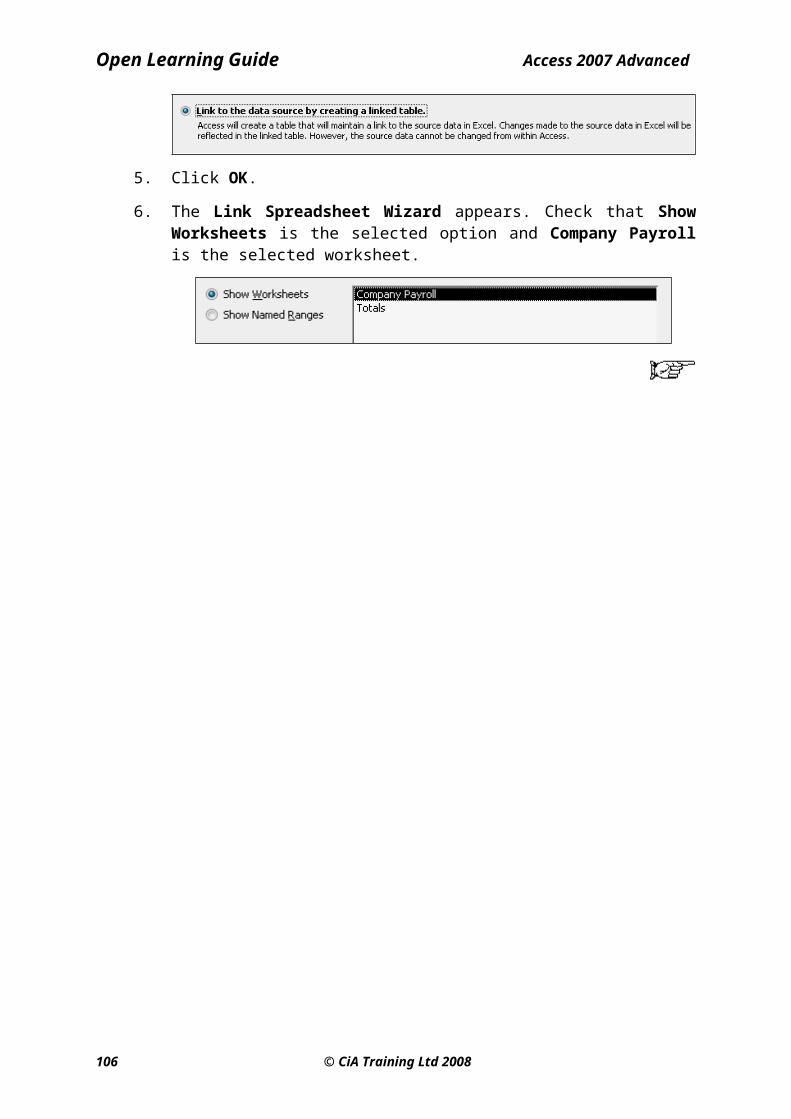
Open Learning Guide Access 2007 Advanced
106 © CiA Training Ltd 2008
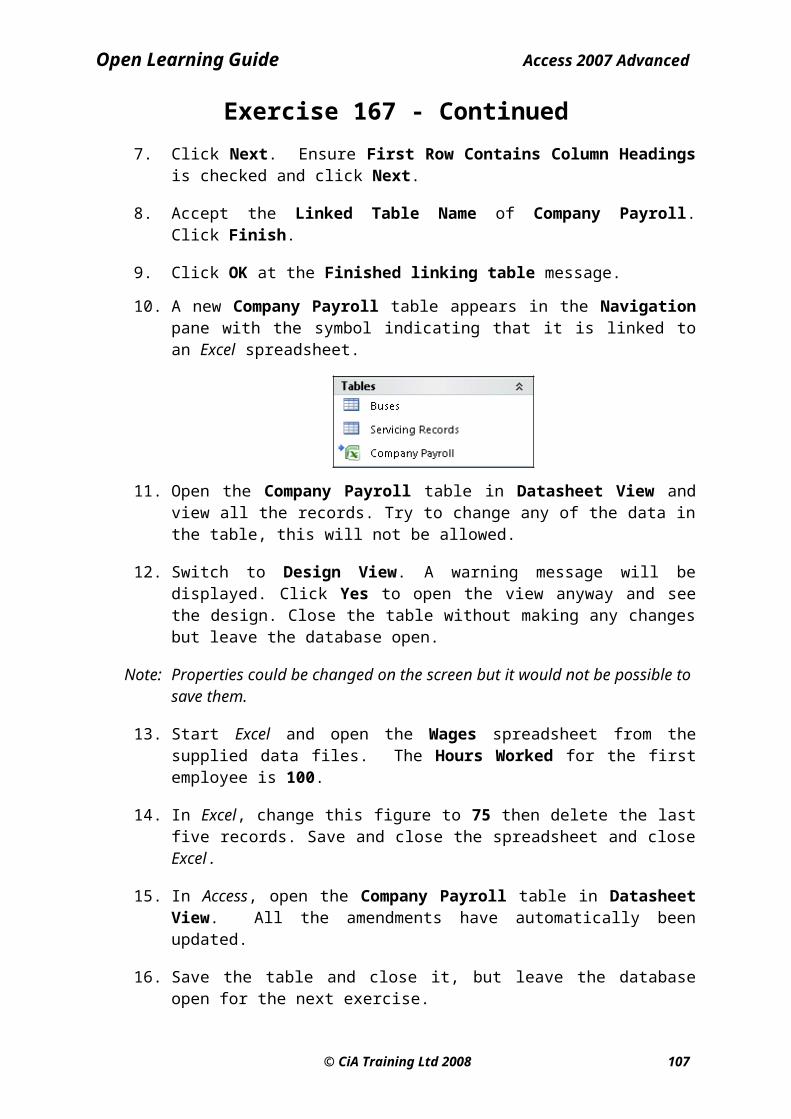
Open Learning Guide Access 2007 Advanced
Exercise 182 - Continued13. Click OK to return to the Edit Switchboard Page dialog box.
Note: The positions of items in the list can be changed by using the Move Up and Move Down buttons.
14. Click Close, then Close again, to create the switchboard form.
15. There are two new objects in the Navigation Pane, a Switchboard form and a Switchboard Items table which holds the definitions of the form buttons. Open the Switchboard form in Form view.
16. Click the Office Button, select Access Options then Current Database.
17. Set the Switchboard form to display as the database opens.
18. Click Exit on the switchboard to close the Wine database.
19. Open the database again. The switchboard appears. Test the buttons, then close the database, using the switchboard controls.
© CiA Training Ltd 2008 107

Open Learning Guide Access 2007 Advanced
Exercise 183 - Revision: Database Options1. Open the Household Plants database.
2. Use the Access Options feature to change the default font of all datasheet text to Tahoma, Dark Red and Italic.
3. Change the Gridlines Color to Dark Blue and remove the Horizontal gridlines.
4. Open the Orders table and print a copy in Landscape orientation.
Note: An example of the printed table is included in the Answers section at the back of the guide.
5. Reset the default datasheet font to Calibri, Black and not Italic. Reset the Font and Gridline colours to Automatic and replace the Horizontal gridlines.
6. Close the table and the database.
7. Open the Egypt database.
8. Open the Airport report in Design View and insert page numbers in the form Page N of M in the centre of the Page Footer.
9. Insert a field at the left of the Page Footer to show the current date (not time). Print Preview the report and save it.
10. Add a command button to the Form Footer of the Booking Form. Give the button a caption of Airport and an action to open the Airport report in Print Preview mode.
11. Create a Key Press control of <Alt A> for the button.
12. Create a Switchboard named Horus Tours for the database. The switch board should include items to open the forms Booking Form, Excursions, Summary in edit mode, and an item to close the database.
13. Use the Access Options feature to the database so that the Switchboard is always displayed when the database opens.
14. Save the form, close the database and re-open it.
15. Check that the Switchboard form is automatically opened then use one of the form options to open the Booking Form.
16. Use a key press to preview the Airport report. Check that page numbering has been inserted correctly.
17. Close the report and the form. Remove the feature that opens the Switchboard form automatically, then close the database.
108 © CiA Training Ltd 2008

Open Learning Guide Access 2007 Advanced
Section 28
Control Panel
By the end of this Section you should be able to:
Create a Control Panel FormCreate Sub Control Panel Forms
Create Navigational MacrosApply Macros to the Command Buttons
Create an Option Group including Macros
© CiA Training Ltd 2008 109
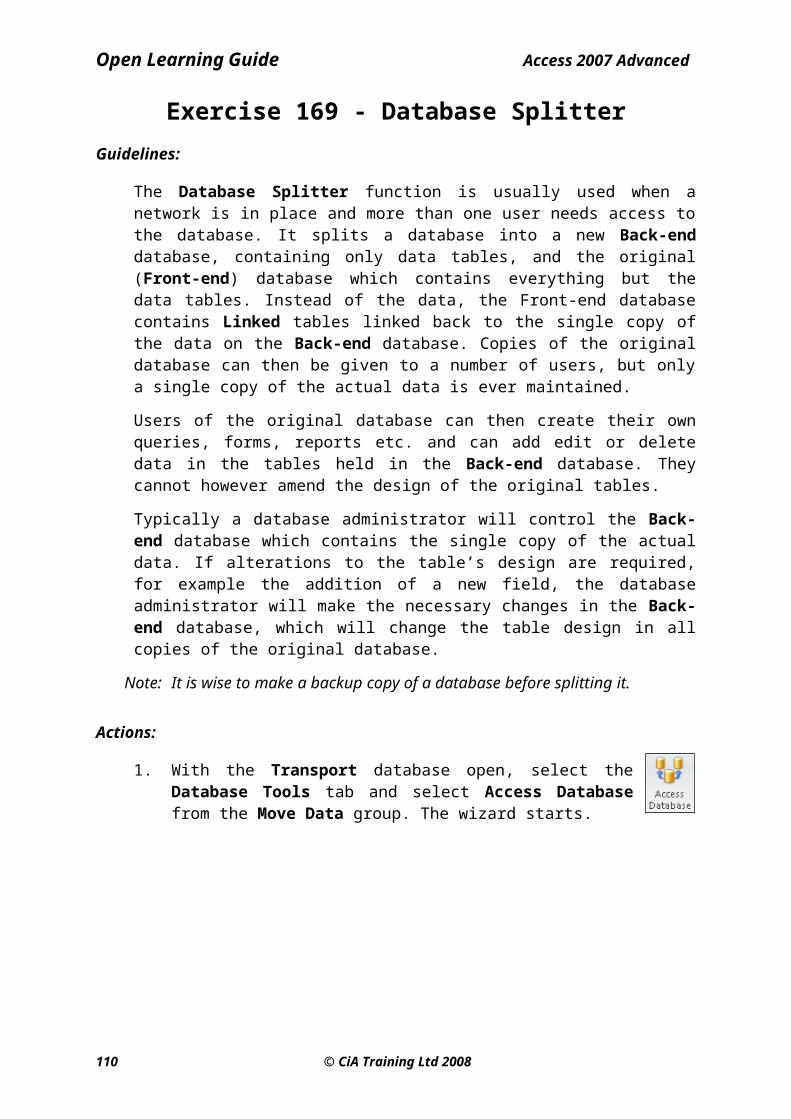
Open Learning Guide Access 2007 Advanced
Exercise 184 - Control PanelGuidelines:
It is often desirable to create a user-friendly interface, which will make a database into an application. This will allow users to move from one part of the database to another, without the need for a detailed understanding of Access, using what is known as a Control Panel. The control panel must be easy to use. All the user should need to know is which button to press. Buttons should open and close forms and close a database. Option groups can be used to preview or print reports.
A completed database application is typically constructed of 3 levels:
Main Control Panel Contains buttons which open further sub control panels and a button to close the database.
Sub Control Panel Contains buttons which open specific forms and return to the main control panel. It may contain option groups which print or preview specific reports.
Forms Contain a button to return to the main control panel.
Due to the natural progression of a database’s construction, the main control panel is the last form to be completed. This is because buttons can only be linked to forms that already exist.
The following diagram shows a very basic form design, representing the first 2 construction levels of a fully integrated database.
110 © CiA Training Ltd 2008
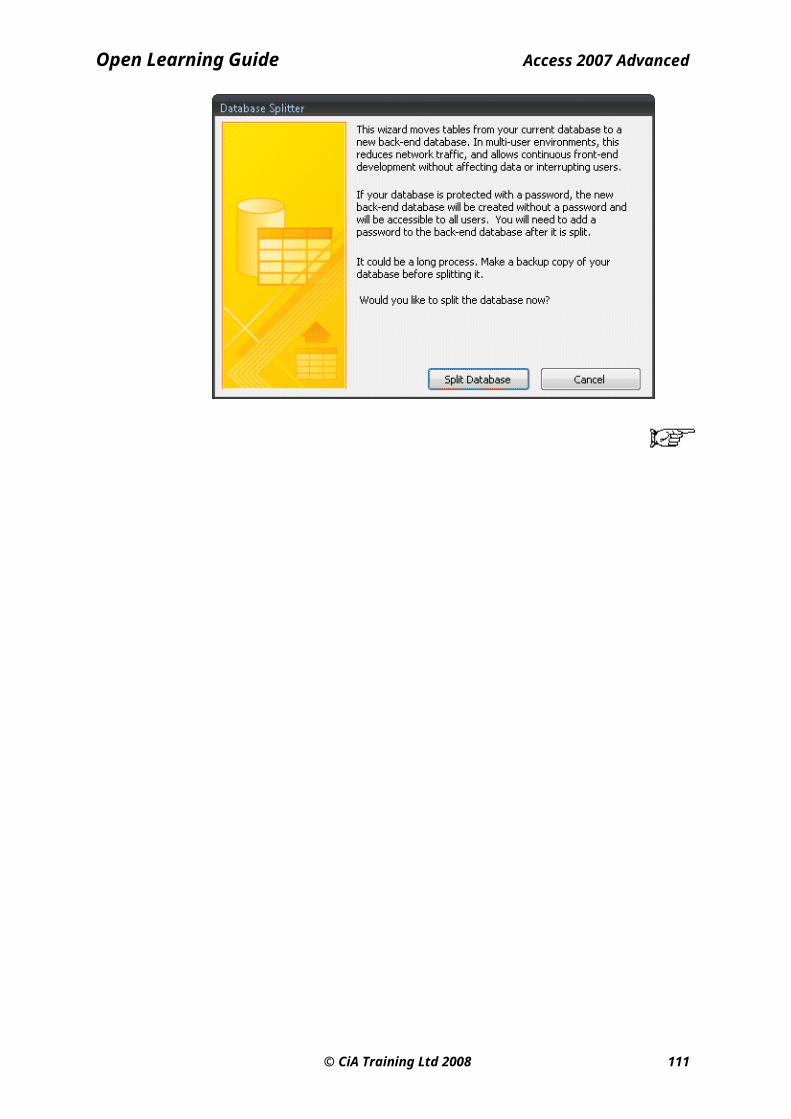
Open Learning Guide Access 2007 Advanced
© CiA Training Ltd 2008 111
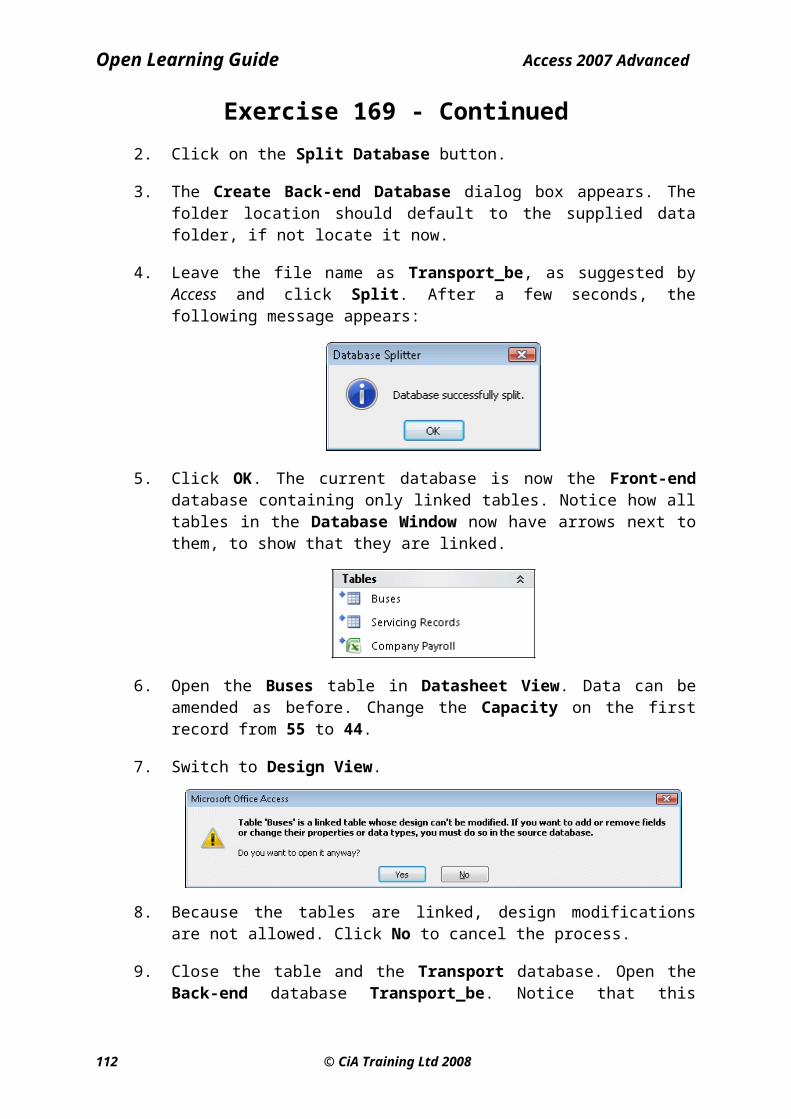
Open Learning Guide Access 2007 Advanced
Exercise 184 - ContinuedEach individual control panel then functions as follows, down to the Form level.
The following sections will demonstrate, using examples, how to create the main control panel, then each sub control panel. Macros will then be added to each button in the control panel, which will open one form and close another. Option groups will be added to each sub control panel, which will give options of what reports can be printed or viewed. A Return to Sub Control Panel button will be added to existing forms to complete the construction.
Note: A very similar effect could be obtained by using a series of interconnected Switchboards, with navigation controlled by menu options rather than manually created buttons. Switchboards were covered in exercise 182.
Switchboards are easier to create and maintain (because of Switchboard Manager) but can only contain simple buttons with text for their links. Manually produced control panels can contain any feature available for forms, such as option groups, backgrounds, etc.
Often Control Panels are not created as separate objects but are incorporated into existing objects. A common scenario is to have a main form where most of the database work is carried out and have links on this form to various other subsidiary forms.
112 © CiA Training Ltd 2008

Open Learning Guide Access 2007 Advanced
Exercise 185 - Main Control PanelGuidelines:
This exercise will create a main Control Panel, automating the main tasks to be performed by the user.
Actions:
1. Open the Pet Shop database and create a blank form but do not select a table or query to base it on. Resize the form to make it 15 x 10cm.
2. Draw a label at the top of the form. Type Main Control Panel in the label and increase the font size to 24. Centre the text.
3. On the Format tab of the Property Sheet for the label, set a Special Effect of Raised. Add a background colour to the form, and a different background colour to the label. Resize/reposition the label as appropriate.
4. Ensure the Control Wizard is switched off. Draw a command button below the label, at the left of the form.
5. Create a second command button to the right side of the form.
6. Create a third button below these two (see the picture below).
7. Add the following captions to the buttons Pets, Customers, and Quit respectively, until the form looks like the following picture:
8. Save the form as Main Control Panel then close the form.
Note: Macros will be added to the buttons in a later exercise, which link the main control panel to a sub control panel for each button. An exit macro will also be set up to close the database completely.
© CiA Training Ltd 2008 113
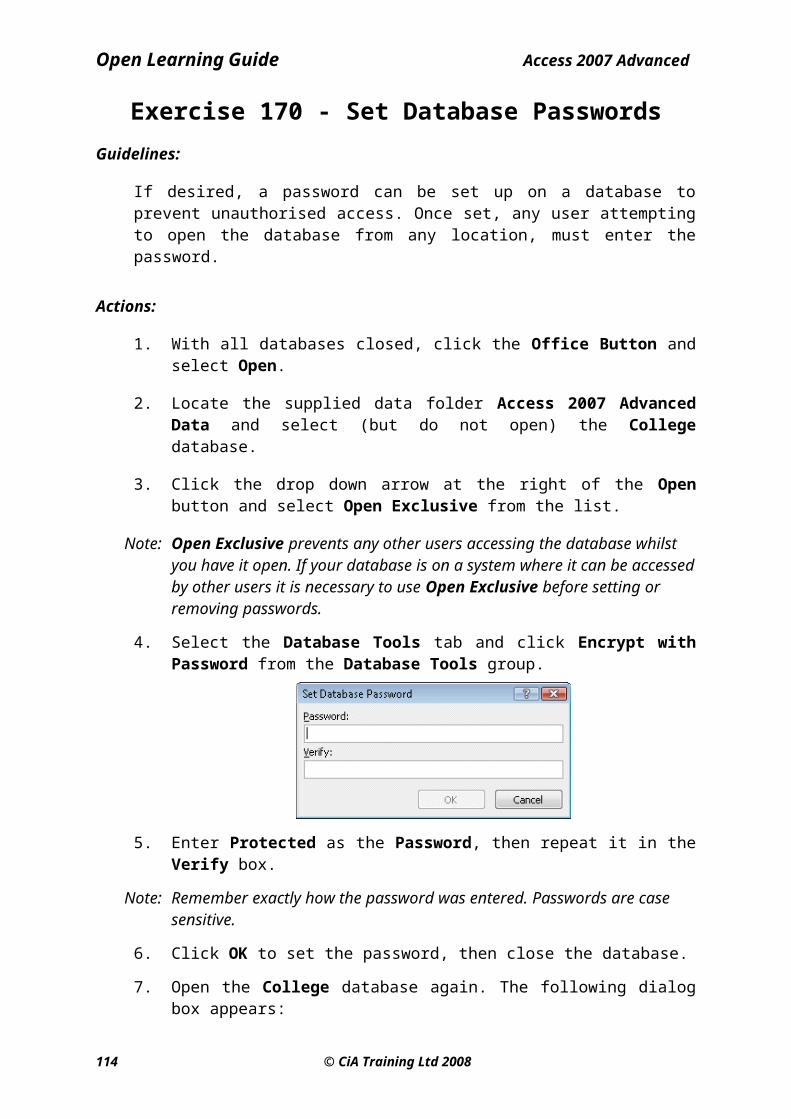
Open Learning Guide Access 2007 Advanced
Exercise 186 - Sub Control PanelsGuidelines:
When the main control panel form has been created, a sub form for each option on the main control panel can be created. This will contain buttons which when selected, will open further forms. Option groups may be added to give choices such as which reports are available, etc. Each sub control panel should contain a Return to Main Control Panel button.
Actions:
1. With the Pet Shop database open, create a new form but do not select a table or query to base it on. Resize the form to make it 15 x 10cm.
2. Draw a label at the top of the form. Type Pets Control Panel in the label and increase the font size to 24. Centre the text.
3. Apply a Special Effect of Raised, add a background colour to the form and a different background colour to the label to match the previous form. Resize/reposition the label as appropriate.
4. Ensure the Control Wizard is switched off. Draw a command button below the label, at the left of the form.
5. Create two more command buttons (see the picture below).
6. Add the captions Add/Edit Pets, Delete Pets and Return to Main Control Panel respectively.
7. Save the form as Pets Control Panel.
8. Change the three references to Pets (label and two buttons) to Customers. Use the Office Button and the Save As option to save the new form as Customer Control Panel, then close it.
114 © CiA Training Ltd 2008

Open Learning Guide Access 2007 Advanced
Exercise 187 - Apply Macros to a Control PanelGuidelines:
To automate a database, all control panels and forms should contain controls which when selected or clicked on, take the user to another specific form or control panel and back again. This is achieved by having macros attached to the various controls.
Actions:
1. Display the Create tab and select Macro.
2. A grouped macro is to be created, containing all the macros for the Main Control Panel form. Click Macro Names and create the following macro. The text in the Comment fields should be used to set up the action argument settings for each action. Enter these in the relevant action arguments; do not enter them as Comments.
Note: Unless a specific object is defined in the Action Argument, the Close action will always close the currently active window.
3. Save the macro as Main Control and close it.
4. Open the Main Control Panel form in Design View and view the properties of the Pets button.
5. From the Event tab, select the On Click property and click on the drop down arrow. Select Main Control.Pets as the macro to be run when this button is clicked.
6. In a similar manner apply the macro Main Control.Customers to the Customers button and Main Control.Close to the Quit button.
7. Save the form and switch to Form View. Click the Pets button - the Main Control.Pets macro runs and the Pets Control Panel is displayed.
8. Close the form and open the Main Control Panel. Click the Quit button in the Main Control Panel. The form and Access both close.
9. Reopen Access and the Pet Shop database.
© CiA Training Ltd 2008 115

Open Learning Guide Access 2007 Advanced
Exercise 188 - Apply Macros to Sub Control PanelsGuidelines:
Similar macros can be created for sub control panels to open the individual forms.
Actions:
1. Create the following grouped macro using the steps described in the previous exercise.
2. Save the macro as Pets Control and close it.
3. Open the Pets Control Panel form in Design View and view the properties of the Add/Edit Pets button.
4. From the Event tab, select the On Click property and click on the drop down arrow. Select Pets Control.Add/Edit as the macro to be run when this button is clicked.
5. In a similar manner apply the macro Pets Control.Delete to the Delete button and Pets Control.Main to the Return to Main Control Panel button.
6. Save the form and switch to Form View. Click the Add/Edit button - the Pets Control.Add/Edit macro runs and the Add/Edit Pets form is displayed.
7. Close that form and open the Main Control Panel. Click the Pets button.
8. When the Pets Control panel is displayed, click the Return to Main Control Panel button.
Note: To complete the system, buttons should be placed on the data forms (e.g. Add/Edit Pets) to return to the Control Panel that called them.
9. Close the form but leave the database open for the next exercise.
116 © CiA Training Ltd 2008

Open Learning Guide Access 2007 Advanced
Exercise 189 - Creating an Option GroupGuidelines:
Adding an option group to a form is a way of displaying information where choices are available, such as a choice of reports to print. Macros can be combined with an option group, so that the option group can select a target e.g. a specific report, and the macro can determine what action will be performed e.g. printing or previewing.
Actions:
1. Open the Pets Control Panel in Design View. In the Controls group of the Design tab, turn on the Use Control Wizards option.
2. Draw an Option Group to the right side of the form.
3. Enter the Label Names: Pets List and Customer List. Click Next.
4. Select No I don’t want a default and click Next and Next again.
5. Select Option buttons and the style Sunken.
6. Click Next.
7. Change the caption to read Pets Reports and click Finish.
8. From the Controls group, with the Use Control Wizards option off, select the Button control and draw two command buttons in the right of the option group. You may need to enlarge the option group first.
9. Enter the captions as View and Print respectively.
© CiA Training Ltd 2008 117

Open Learning Guide Access 2007 Advanced
118 © CiA Training Ltd 2008

Open Learning Guide Access 2007 Advanced
Exercise 189 - Continued10. Resize/reposition the buttons and option group as appropriate until the
form looks like the following diagram:
11. Select the Option Group and view its properties.
12. From the All tab select the Name property and name the option group Report Choice. Select the Default Value property and enter 1 so that the first option (Pets List) is selected by default when the form is opened.
13. Select the View button and view its properties. Select the On Click property and click the build button. Select Macro Builder.
14. Click the Macro Names and Conditions buttons from the macro window.
15. On the first row, enter a macro name of Preview and enter the first condition of [Report Choice]=1. The action is Open Report and the arguments are as shown below.
© CiA Training Ltd 2008 119
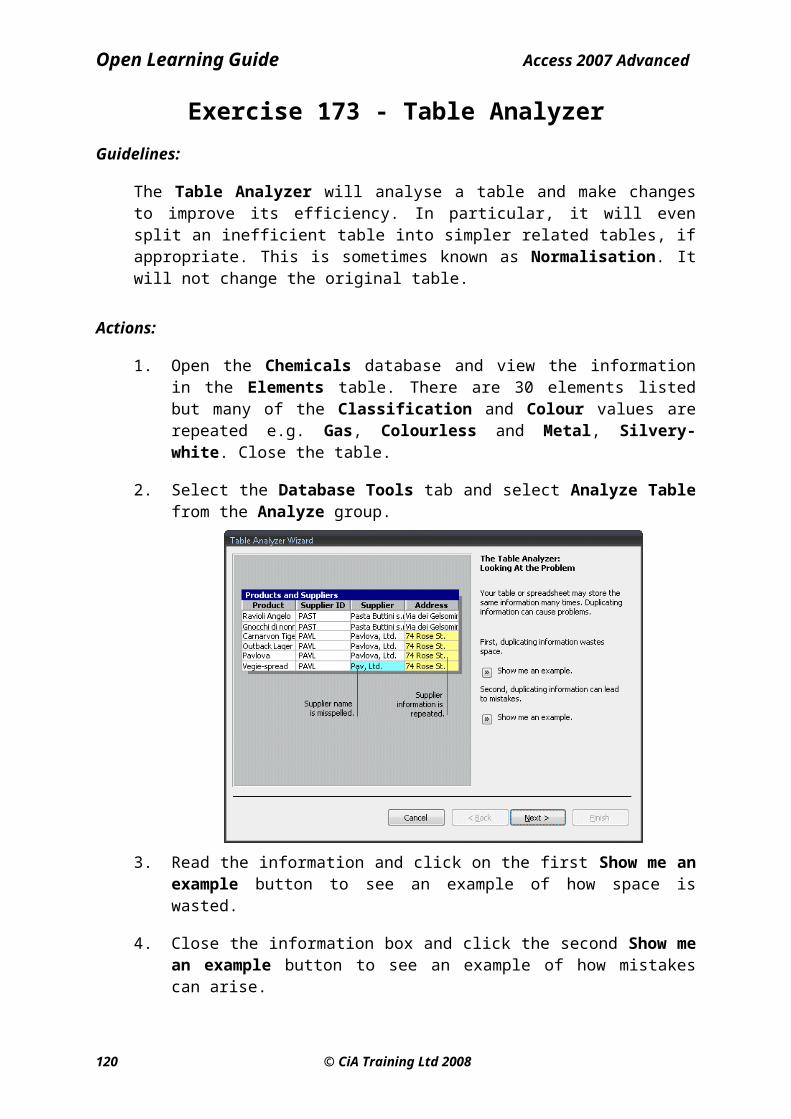
Open Learning Guide Access 2007 Advanced
120 © CiA Training Ltd 2008

Open Learning Guide Access 2007 Advanced
Exercise 189 - Continued16. On the next row enter the condition [Report Choice]=2, an action of
OpenReport, arguments of Customer List and Print Preview. This macro will Preview either the Pets List or the Customer List, depending on the setting of the option group.
17. Create an almost identical two line macro starting on row 4, with a name of Print, and both View arguments set to Print. This macro will Print either the Pets List or the Customer List, depending on the setting of the option group.
Note: The action arguments are shown in the Comment column for reference only.
18. Save the macro with a name of Reports. Close the macro, selecting Yes at the update prompt.
19. Display the Property Sheet for the View button and from the Event tab, change the On Click property to Reports.Preview.
20. Display the Property Sheet for the Print button and change the On Click property to Reports.Print.
21. Save the form.
22. Switch to Form View and use the option group buttons to preview both reports.
23. Make sure that all forms have a Return to Control Panel button and all sub control panels have a Return to Main Control Panel button. In addition, ensure that appropriate macros have been assigned to each button to complete the automatic system navigation.
24. Open the Main Control Panel and navigate through the forms entirely using the controls.
25. End by closing all forms and then close and the Pet Shop database.
© CiA Training Ltd 2008 121

Open Learning Guide Access 2007 Advanced
Exercise 190 - Revision: Control Panel1. Open the Wine database. This exercise will manually create a control
panel form which will duplicate many of the effects of the switchboard.
Note: In an earlier exercise, a switchboard form was created in the Wine database and set to be displayed on start up. If this happens, close the Switchboard form.
2. From the Wine database create a main control panel with options to open any of the 3 forms Orders, Products or Suppliers It should also contain an exit database button. Note that this is a simple system that does not involve any Sub Control Panels.
3. Create a Return to Control Panel button to the bottom left of the 3 forms mentioned above.
4. Add an option group to the control panel form. The option group is to be called List Choice, the option choices will be Print or Preview.
5. Add a control button to the option group, to be called List Products. Build a macro for this button that will either preview or print the Product List report depending on the setting of the option group buttons.
Note: This requires a single macro attached to the button. A listing of the macro is included in the Answer section at the back of this guide. Notice that this is the other way around to the example in exercise 189 where the control buttons decided between Print or Preview and the option group buttons set which report to run.
6. Create all necessary macros to automate the buttons and option groups.
7. Create an AutoExec macro to open the main control panel of the Wine database, every time the database is opened.
8. Save all objects and close the database.
9. Open the Wine database to check the operation of the Autoexec macro.
10. Delete the Autoexec macro and close the database.
122 © CiA Training Ltd 2008

Open Learning Guide Access 2007 Advanced
Section 29
Relationships and Joins
By the end of this Section you should be able to:
Use One-To-Many RelationshipsUse Many-To-Many Relationships
Use One-To-One RelationshipsUnderstand Join Types
© CiA Training Ltd 2008 123

Open Learning Guide Access 2007 Advanced
Exercise 191 - One-To-ManyGuidelines:
Applying relationships allows a database to store its data on many smaller tables which are linked together to form a complete system, improving its overall efficiency. The most common relationship type used in databases is One-To-Many.
For example a table of Orders may contain information on the product ordered. There is no need to have all the product details on every order record, a single field can link to a Product table where all the information for one product is held on only one record. One record on the Product table can be linked to many records on the Orders table, so the relationship is One-To-Many.
Actions:
1. Open the Wine database, close the control panel form or Switchboard if it opens, and display the Database Tools tab. Select the Relationships button. Relationships have already been set up between the Orders, Products and Suppliers tables.
2. Notice the linked field Reference in the Products table is a Primary Key (indicated by the key icon) so it must be unique. There can be only one record with a specific Reference. On the Orders table, Product Ref is not unique, many records can contain the same value. The relationship shown between Orders and Products is therefore One-To-Many.
Note: A similar argument applies to the relationship between the Products and Suppliers tables.
3. Display the Create tab and select Query Design.
4. In the Show Table dialog box, select the Orders table, click Add then select the Products table and click Add. Click Close. The two tables are added to the query with the link shown.
124 © CiA Training Ltd 2008
Open Learning Guide Access 2007 Advanced
© CiA Training Ltd 2008 125

Open Learning Guide Access 2007 Advanced
Exercise 191 - Continued5. Insert Date, Surname and Quantity from the Orders table into the query
grid.
6. Instead of using Product Ref, insert Name and Supplier from the Products table.
7. Sort the query by Date (Ascending).
8. Run the query. The name of the product and the supplier name are shown on the query although these are not included on the Orders table. The same product name, e.g. Macon Villages, can appear many times in the query, but it is only stored once on a single record on the Products table.
9. Chains of One-To-Many relationships can be built. Switch to Design View and select Show Table from the Query Setup group.
10. In the Show Table dialog box, select the Suppliers table, click Add then Close.
11. The Suppliers table is displayed already linked to the Orders table because a relationship exists. Data from the Suppliers table is now available in the query. Add the Address and Telephone Number fields to the grid.
12. Run the query. Once again the same supplier details may appear many times but each is held only once on the Suppliers table.
13. Save the query as Linked and close it.
14. Close the Wine database.
126 © CiA Training Ltd 2008

Open Learning Guide Access 2007 Advanced
Exercise 192 - Many-To-ManyGuidelines:
Sometimes a relationship exists between tables which is not One-To-Many. For example a database in a college may have a table for part time Courses and a table for Students. Any course may have many students enrolled, but any student may be on more than one course. The relationship is therefore Many-To-Many.
This type of relationship does not actually exist in Access, but has to be built from two One-To-Many relationships, using an intermediate table, sometimes called a Link table. In this case the Link table need only contain details of which students are on which course, in the form of Student ID and Course Ref.
Actions:
1. Open the College database. Open the Courses table to see a list of available courses and open the Students table to see a list of students.
2. Open the Register table to see a list of which students are on which courses. This table will be the Link table in creating a Many-To-Many relationship between the Courses and Students tables.
3. Switch to Design View. The register table has two fields which together make up the Primary Key. The same Student ID or Course Ref may appear several times but any specific combination is unique.
4. Close all tables.
5. Display the Database Tools tab and select the Relationships button. Add the tables Courses, Register and Students.
6. Drag the Ref field from Courses to the Course Ref field in Register.
7. In the Edit Relationships dialog box select Enforce Referential Integrity and click Create.
8. The Ref field is unique in the Courses table (it is the Primary Key), but is not unique in the Register table (it is only part of the Primary Key). This means that the link created is One-To-Many.
9. Drag the ID field from Students to the Student ID field in Register. Select Enforce Referential Integrity as before and click Create. Once again the link created is One-To-Many.
© CiA Training Ltd 2008 127
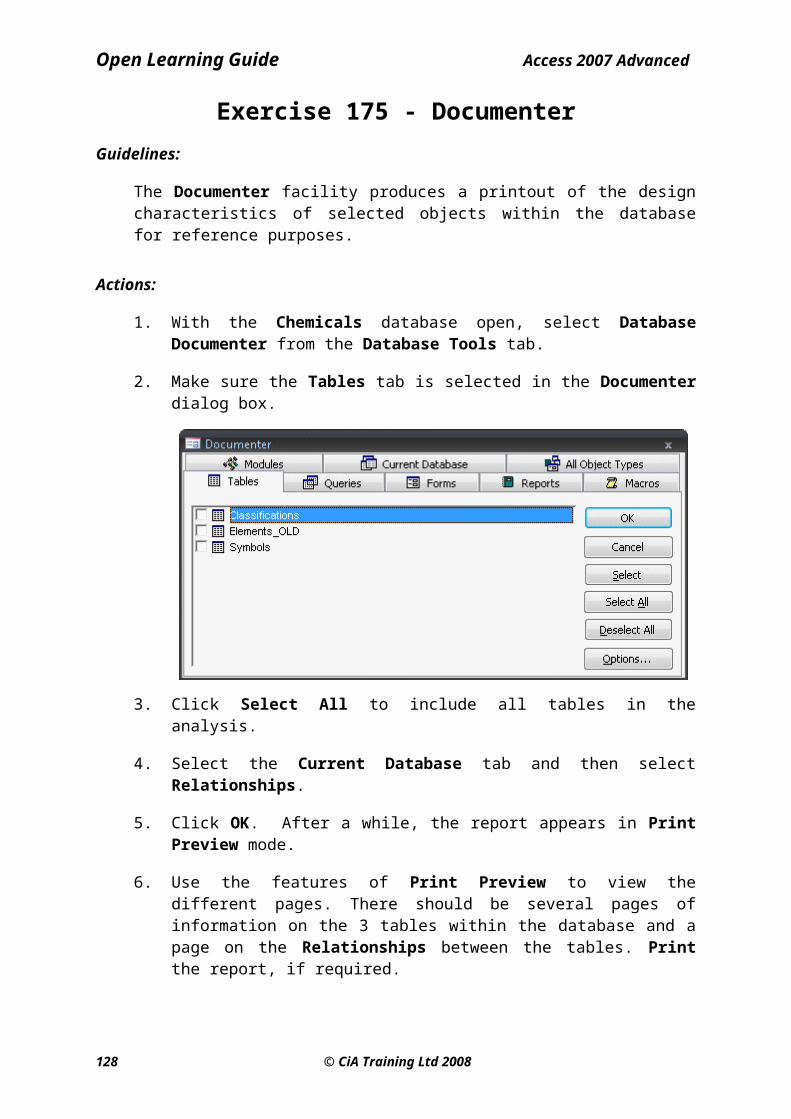
Open Learning Guide Access 2007 Advanced
128 © CiA Training Ltd 2008

Open Learning Guide Access 2007 Advanced
Exercise 192 - Continued
10. Two One-To-Many links have been created and the overall effect is a Many-To-Many relationship between Courses and Students.
11. Close the Relationship object, saving when prompted.
12. Create a query in Design View. Add all three tables.
13. Include the fields Ref, Course and Qualification from the Courses table.
14. Include the fields ID, Surname and Address from the Courses table.
15. Add the criteria E01EE to the Ref column.
16. Run the query to see all students on the Electrical Engineering course.
17. Switch back to Design View, remove the criteria from the Ref column and add the criteria Hunter to the Surname column.
18. Run the query to see all the courses that Ms Hunter has enrolled on.
19. Save the query as Linked2 and close it.
20. Leave the College database open.
© CiA Training Ltd 2008 129
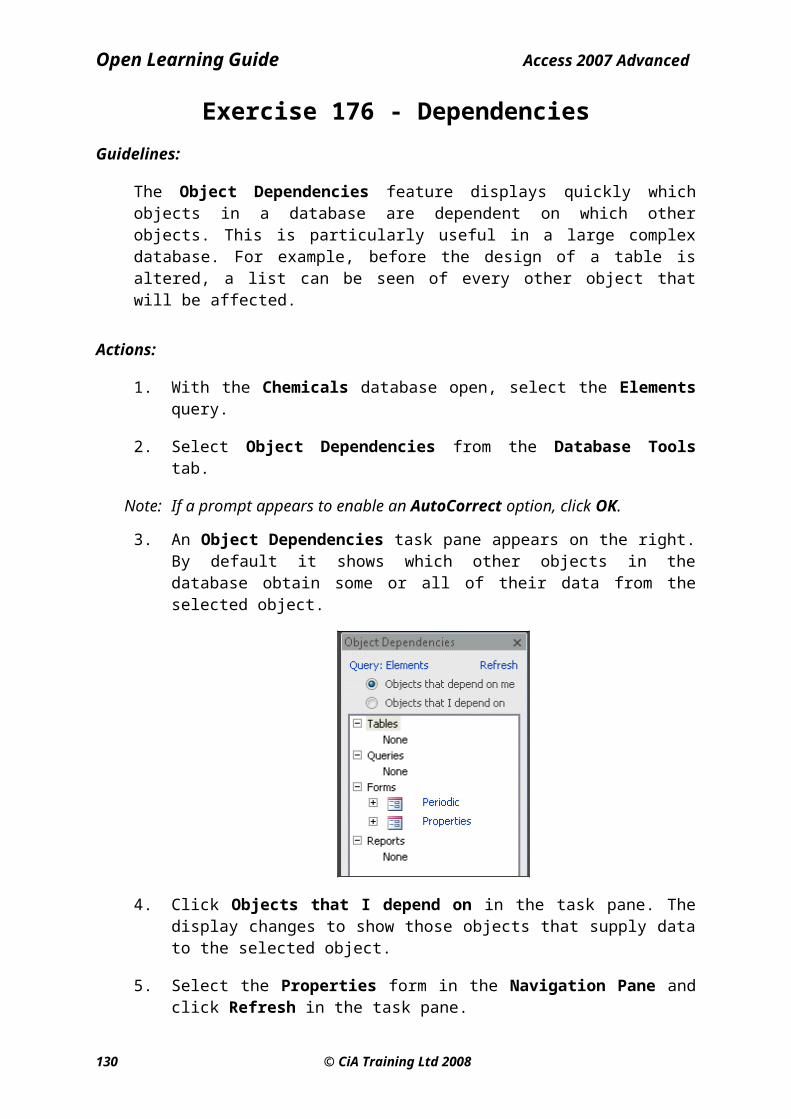
Open Learning Guide Access 2007 Advanced
Exercise 193 - One-To-OneGuidelines:
It is possible to have a One-To-One relationship between tables in which one record in one table is linked to one record in another table. This is not common as in effect it only splits one record over two tables, but occasionally it is used to keep parts of a record completely separate for organisational or security purposes.
Actions:
1. In the College database, create a new Table in Design View.
2. Add three fields; ID, a Number field; Nationality, a Text field; and Age, a Number field. Make the ID field the Primary Key.
3. Save the table as Info and close it.
4. Display the Database Tools tab and select the Relationships button.
5. Add the Info table and link it to the Student table by dragging the ID field from Info to the ID field in Students. Set Enforce Referential Integrity. Because both ends of the link are unique (Primary Keys) the relationship is One-To-One.
6. Right click on the link between the Students and Register tables and select Delete from the shortcut menu. Click Yes at the prompt to remove this link. Close the Relationship display, saving if prompted.
7. Open the Info table in Datasheet View. Add a record for an ID = 99, Nationality = British, Age = 32. Because this table is linked to the Students table this will not be allowed (there is no student ID 99).
8. Change the ID to 1. The record can now be added.
9. Close the Info table and open the Students table. Click the at the left of the first record. The linked record from the Info table is opened.
10. Close the table and the database.
130 © CiA Training Ltd 2008

Open Learning Guide Access 2007 Advanced
Exercise 194 - JoinsGuidelines:
Joins describe the links between tables. They affect the way queries select records when related tables are involved.
The default join type, which is applied by Access automatically, is an inner join. With this type of join, a query will only display records where there is a corresponding entry in both tables. For example, a query containing fields from linked Vehicles and Repairs tables would only show records where data existed in both tables. Any vehicles without a repair job record (or repairs without a vehicle record) would not be displayed. This is an important point to remember. Sometimes a query based on linked tables will not display all the records you expect it to because of this.
Using the above example, if you wanted to display all vehicles in a query, whether or not they had any repair records, you would redefine the link as an outer join based on the Vehicle table.
A self join describes the situation where a table needs to be linked to itself. For example, in a Staff table, with Employee Number as the primary key, there may be a field showing who each employee's manager is, using the manager's employee number. This employee number will already be a record in the table (managers are also employees). To display the manager's name instead of their number in a query, a link to a copy of the Staff table will need to be set up, using Manager as the link field.
Actions:
1. Open the Transport database and open the Buses table. Note that there are 30 records then close the table.
2. Create a new query in Design View. This is a query to list buses and their recent servicing records.
3. Add the Buses and Servicing Records tables. If the tables are not linked by default, link them now by dragging the Registration field from one table to the other.
4. From the Buses table, place Registration, Capacity and Size on the grid.
5. From the Servicing Records table, place Date and Repair on the grid.
6. Run the query. 18 records for 16 buses are shown (some buses have 2 repairs). Only buses with associated repair records are shown. 14 buses are not shown at all.
© CiA Training Ltd 2008 131
Open Learning Guide Access 2007 Advanced
132 © CiA Training Ltd 2008

Open Learning Guide Access 2007 Advanced
Exercise 194 - ContinuedNote: Although the discrepancy is fairly obvious in this example there may be
times when it is not so obvious and mistakes can be made.
7. Switch back to Design View and double click the relationship line to display the Join Properties dialog box.
Note: Alternatively, right click on the relationship line and select Join Properties from the menu.
8. Read the text for the selected Join option 1. This is an Inner Join.
9. Look at the other Join options. What is required here is one of the Outer Joins, Option 2. Select this option and click OK.
Note: The link graphic changes to an arrow. The join type is changed for this query only.
10. Run the query again. Now all bus records are shown. Fields are left blank where there are no servicing details.
11. Save the query as Outer and close it. Close the database.
12. Open the College database and the Students table. There is a column to contain the ID of any current student who has introduced the new student.
13. Instead of just showing the ID of the introducing student, it is possible to create a query showing their name by linking back to the same table (a self join).
14. Create a new query in Design View. Add the Student table twice.
Note: The table itself is not duplicated, it is just referred to by two different names.
15. The second table is given a different name, Students_1. To change this, right click on the table title and select Properties from the shortcut menu.
© CiA Training Ltd 2008 133
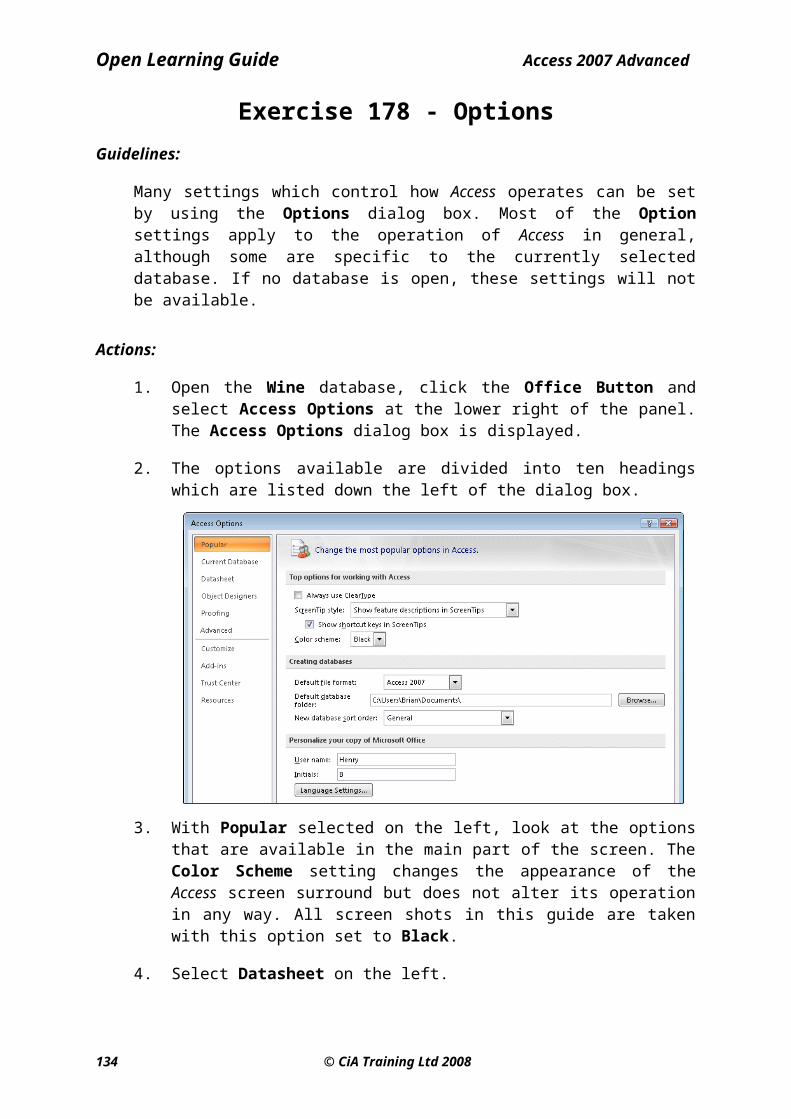
Open Learning Guide Access 2007 Advanced
134 © CiA Training Ltd 2008

Open Learning Guide Access 2007 Advanced
Exercise 194 - Continued16. Change the Alias entry to Introduced By and press <Enter>. Close the
Property Sheet panel.
17. Drag the Introduced field from Students to the ID field in Introduced By to create the link. Because the link is between copies of the same table it is a Self Join.
18. From Students, add Forename, Surname and Address to the grid and from Introduced By, add Surname to the grid again.
19. To change the last field title so that it displays Sponsor instead of Surname, click anywhere in the last field in the query grid to select it, then click from the Show/Hide area of the Design tab.
20. Change the Caption property to Sponsor. Close the Property Sheet and run the query.
21. Notice the student name and not their ID appears in the Sponsor field. The query however only shows records that have an entry in this field. As well as being a Self Join the link is also an Inner Join.
22. Switch back to Design View and double click the relationship line to display the Join Properties dialog box.
23. Select Join option 2 and click OK and run the query again. Now all Student records are shown, with sponsor details where appropriate.
24. Save the query as Self and close it.
25. Close the database.
© CiA Training Ltd 2008 135
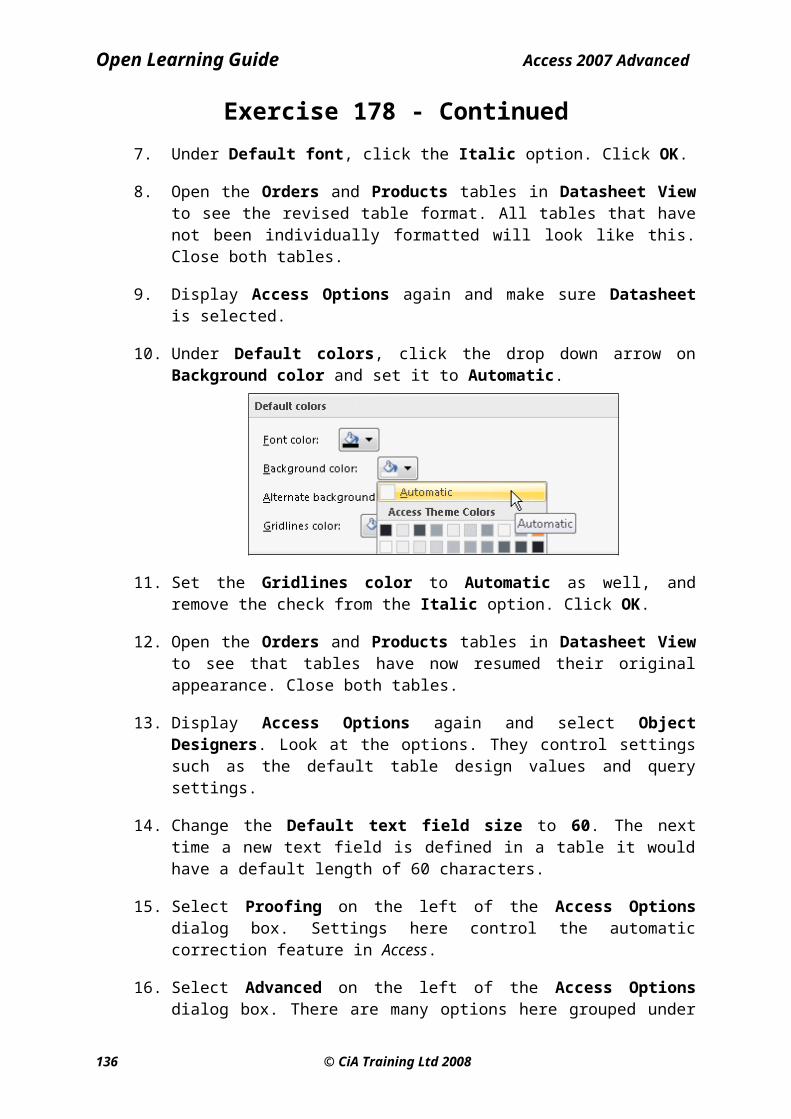
Open Learning Guide Access 2007 Advanced
Exercise 195 - Revision: Relationships1. Open the Pet Shop database and open the Orders table. This shows the
orders received by the shop in one day. Note how many orders are present.
2. Close the table and open the Relationships window. Add the tables Credit, Customers, Orders and Pets.
3. Create a link between the Credit and Customers tables using the Customer Ref field. Enforce Referential Integrity. What is the Relationship Type?
4. Create a link between the Customers and Orders tables using the Customer Ref field. Do not enforce Referential Integrity. What is the Relationship Type?
5. Create a link between the Pets and Orders tables using the Animal Ref field. Do not enforce Referential Integrity. What is the Relationship Type?
6. Create a query to list Orders, also using data from the Customer and Pets tables. Add the tables Orders, Customers and Pets to the query.
7. Use the following fields: Order Number, Order Date, Animal Ref and Quantity from the Orders table: Animal from the Pets table: Name from the Customers table.
8. Run the query. Only six records are shown. Why is one missing?
9. Return to Design View and change the Join Type for the join between the Orders and Pets tables so that all records from the Order table are shown. What is the new type of join called?
10. Run the query to verify all orders are shown.
11. Save the query as Order Details and close it.
12. Close the database.
13. Close Access.
136 © CiA Training Ltd 2008

Open Learning Guide Access 2007 Advanced
AnswersExercise 148
Step 4 OpenForm
Step 5 [Common Name]=[Forms]![Customer Orders]![Plant]or[Plant Index]![Common Name]=[Forms]![Customer Orders]![Plant]
Step 8 IIF([Paid],Date(),Null)
Step 14 SetValue, [Price]*0.8
Step 15 £4.40
Exercise 155Step 9 Command buttons can be seen, but not Date and Time
Step 10 Date and Time can be seen, but not Command buttonsStep 11 Form Footer only seen in Form View, Page Footer only seen in
Print Preview (or on printout)
Exercise 161Step 13 The space for the image is blank
Step 14 There is no default message
Step 15 This page is under construction
© CiA Training Ltd 2008 137
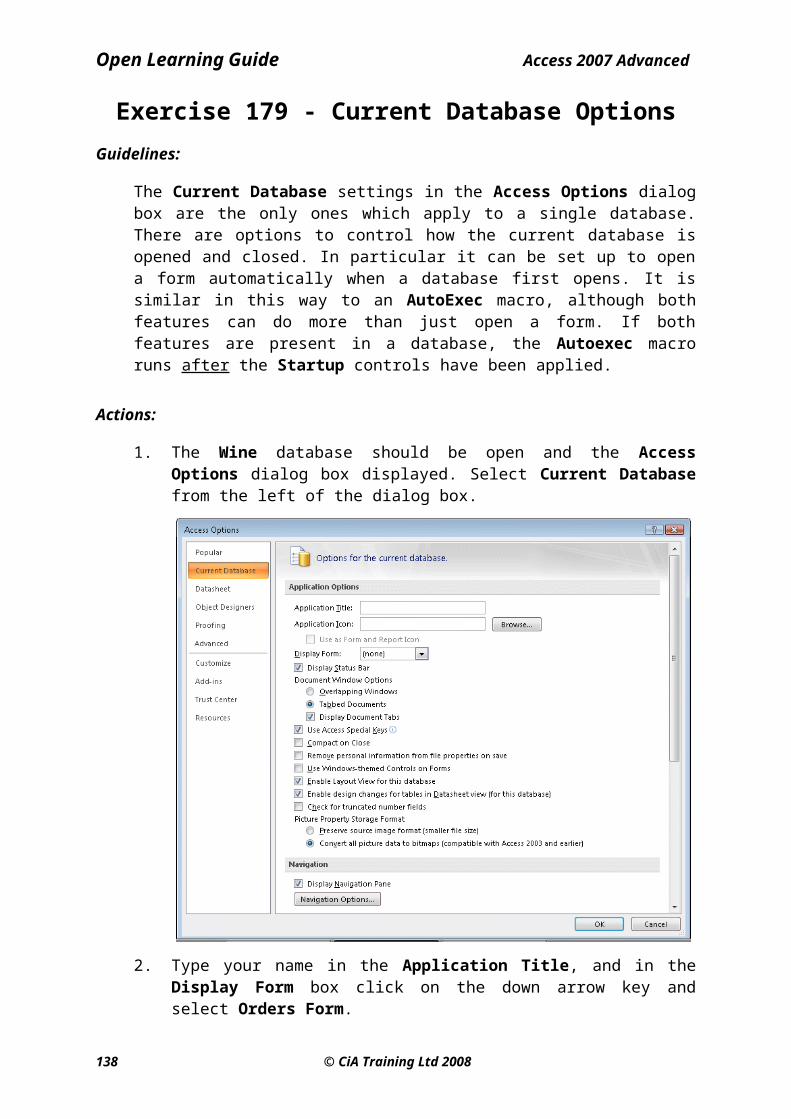
Open Learning Guide Access 2007 Advanced
Exercise 165Step 9 The attachment should open in your web browser application, e.g.
Internet Explorer or Netscape Navigator.
Exercise 172
Step 7 Because the table is linked to the one in the Wines_Backup database, this address is also changed to 4 Steeply Drive
Step 11 Table format can be amended in Creatures.be
Step 12 Forms can be amended in Creatures
Step 13 Database must be opened Exclusive
Step 14 The database can be opened without the password but no data can be accessed
Exercise 183
Step 4
Exercise 190
Step 5
Exercise 195
Step 3 One-To-One
Step 4 One-To-Many
Step 5 One-To-Many
Step 8 Because one Order record does not have a matching Pets record
Step 9 Outer Join
138 © CiA Training Ltd 2008

Open Learning Guide Access 2007 Advanced
GlossaryAction Arguments Settings which control the operation of a macro action.
Attachment Any separate file which is transmitted as part of an email message.
AutoNumber A data type that automatically enters a sequential number for each record that is added to a table.
Control Panel A form manually created to control navigation through a database system.
Control Wizard A feature that helps to automate the process of creating controls on a form or report. Can be switched off to allow manual control.
Event An operation that can trigger the running of a macro or other procedure. Clicking a button, updating a field, and opening a report are all examples of Events.
Hyperlink A link in a table or form that can be used to display the contents of another object such as an image, a document or a web site.
Linked Table A table where the data is not held in that database, but in some external location. This can be in another database or in a different application.
Macro Name Usually refers to the name of an individual macro within a grouped macro.
Normalisation The structuring of a database so that it meets the theoretical rules defining an efficient relational database.
Option Group A group of option controls, only one of which can be selected at any time.
SendObject A macro action that can transmit any database object as an e-mail attachment.
SetValue A useful macro action that assigns specific values to a field.
Size Mode A property of an inserted image. Can be Clip, Stretch or Zoom.
Switchboard A system generated menu system for navigating around a complex database system. Maintained by the Switchboard Manager function.
Walls The vertical background area of a 3-D chart. Called Plot Area on a 2-D chart.
© CiA Training Ltd 2008 139

Open Learning Guide Access 2007 Advanced
Index
ActionsClose 17
OpenForm 10
RunCommand 15, 25
SendObject 51
SetValue 20
Action Arguments 10
After Update Event 22
Analyser Performance 71
Table 68
AutoExec 25
Backgrounds 28
Backup/Restore Database 61
Charts 32
Conditional Formatting 35
Compact Database 61
Control Panel 86Apply Macros to 91, 92
Main Control Panel 89
Option Group 93
Overview 87
Revision 96
Sub Control Panels 90
Embedded Image 28
Database Analysis 67Dependencies 73
Documenter 72
Performance Analyzer 71
Revision 74
Table Analyzer 68
Database Tools and Operations 75Key Press Controls 80
Options 76
Page Numbers for Reports 81
Revision 85
Database Utilities 56Backup and Restore 61
Database Splitter 62
Linked Tables 59
Passwords 64, 65
Compact and Repair 57
Revision 66
Switchboard Manager 82
Date and Time 36
Documenter 72
E-mail 49Send Using Macro 51
Revision 55
Send To 49
EventsAfter Update 22
On Click 12
On Open 24
Formatting Forms 27Backgrounds 28
Charts 32
Conditional Formatting 35
Date and Time 36
Headers and Footers 34
Pictures 30
Revision 37
Grouped Macros 18
Headers and Footers 34
Hyperlinks 43, 45
Images 30
Image Hyperlink 45
InsertChart 32
Date and Time 36
Image 30
140 © CiA Training Ltd 2008
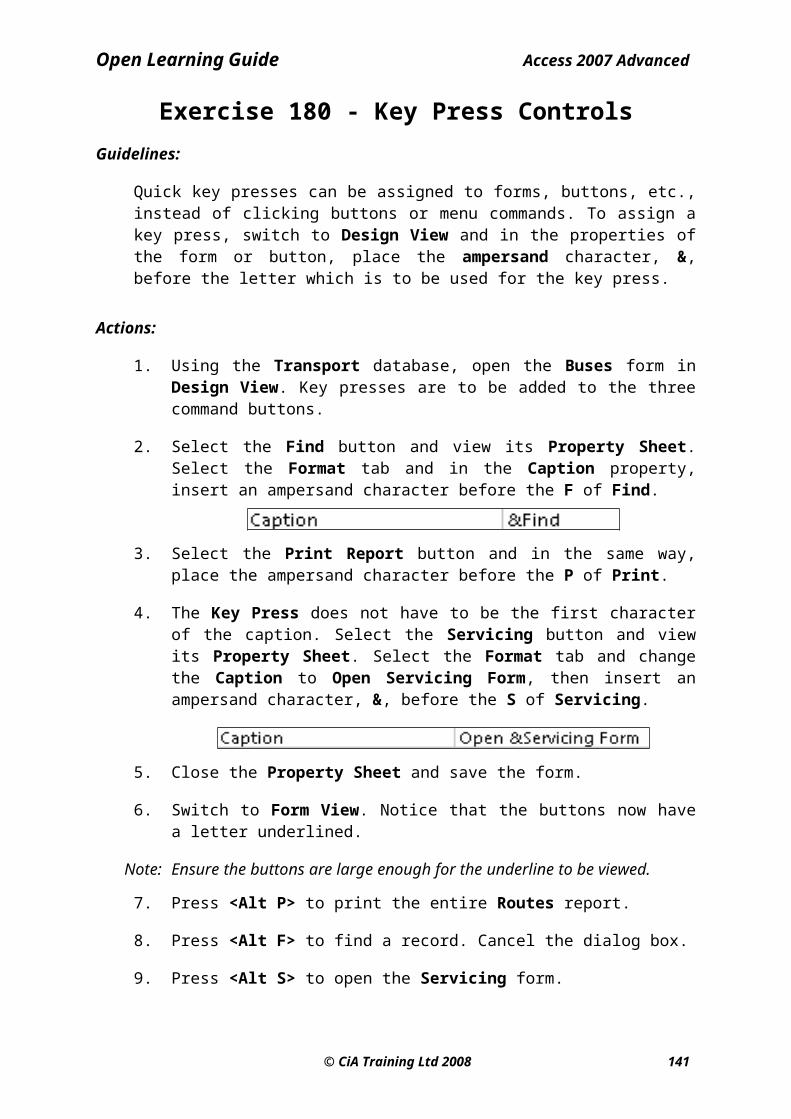
Open Learning Guide Access 2007 Advanced
Key Press Controls 80
Linked Tables 59
Macros Actions 8
Applying to Control Panel 91, 92
Attaching to Controls 12
AutoExec 25
Creating from Controls 15
Create New 10
Grouping 18
Key Press Controls 80
Multiple Action Macros 17
Revision 26
Open Form 10
Set Value 20
Update Fields Automatically 22
Where Condition 14
Multiple Action Macro 17
On Click Event 12
On Open Event 24
OpenForm Action 10
Option GroupCreating 97
Page NumbersAdding to Forms 34
Adding to Reports 86
PasswordsRemove 72
Set 71
Performance Analyzer 78
Repair Database 61
ReportsAdding Page Numbers 86
Maximise 24
RevisionControl Panel 96
Database Analysis 74
Database Tools 85
Database Utilities 66
Export Data 55
Formatting Forms 37
Macros 26
RunCommand Action 15, 25
Security 64, 65
Send To 49
SendObject 53
Set Value 20
Split Database 62
Startup Control 78
Start Value Counter 87
Switchboard Manager 82
Table Analyzer 68
Update Automatically 22
Where Condition 14
© CiA Training Ltd 2008 141

Open Learning Guide Access 2007 Advanced
Other Products from CiA TrainingCiA Training is a leading publishing company, which has consistently delivered the highest quality products since 1985. A wide range of flexible and easy to use self teach resources has been developed by CiA's experienced publishing team to aid the learning process. These include the following materials at the time of publication of this product:
Open Learning Guides
ECDL/ICDL & ECDL/ICDL Advanced (ECDL Foundation Qualification)
New CLAIT, CLAIT Plus & CLAIT Advanced (OCR Qualification)
CiA Revision Series
ITQs (Industry Standard Qualification)
e-Citizen (ECDL Foundation Qualification)
Trainer’s Packs with iCourse
Start IT (City & Guilds Qualification)
Skill for Life in ICT (Industry Standard Qualification)
iCourse - Course customising software
We hope you have enjoyed using our materials and would love to hear your opinions about them. If you’d like to give us some feedback, please go to:
www.ciatraining.co.uk/feedback.php
and let us know what you think.
New products are constantly being developed. For up to the minute information on our products, to view our full range, to find out more, or to be added to our mailing list, visit:
www.ciatraining.co.uk
142 © CiA Training Ltd 2008


![دستور العمل نگارش مقالاتprofdoc.um.ac.ir/articles/a/1080176.docx · Web viewCIA: [Al2O3/(Al2O3+CaO+Na20+K2O)]*100 در نمونههای مورد مطالعه،](https://img.pdfslide.net/doc/110x75/5fb84fa49c4a5f3eb2677367/-web-view-cia-al2o3al2o3caona20k2o100.jpg)