Embed Size (px)
Citation preview

Exercise Bike – MODEL LZ100 INSTRUCTION MANUAL
WARNING: Cycle should always be placed on a level surface for use
Please read these instructions carefully and keep for future reference
FOR DOMESTIC INDOOR USE ONLY

Important Warnings
WARNING: Injuries may happen to young children if the exercise cycle is operated
in their vicinity without properly fitted guards.
CAUTION:
• Exercise cycle, its guards and safety devices must be regularly maintained and
the integrity of guards and safety devices must be inspected prior to each use of
this machine.
• Before starting any exercise program you should consult your doctor to
determine if you have any physical or health conditions which could create a risk
to your health and safety, or prevent you from using the equipment properly.
Your doctor’s advice is essential if you are taking medication that affects your
heart rate, blood pressure or cholesterol level.
• Ensure you have tightened all of the bolts and nuts on this machine before
beginning your workout.
IMPORTANT:
• Read all instructions carefully before using this product.
• Be aware of your body’s signals incorrect or excessive exercise can damage your
health. Stop exercising if you experience any of the following symptoms: Pain,
tightness in your chest, irregular heartbeat, extreme shortness of health, feeling
light headed, dizzy or nauseous. if you do experience any of these conditions you
should consult your doctor before continuing with your exercise program.
• Keep children and pets away from the equipment. The equipment is designed for
adult use only.
• Use the equipment on a solid flat level surface with a protective cover for your
floor or carpet. For safety, the equipment should have at least 0.5 meters of free
space all around it.
• Before using the equipment, check the nuts and bolts are securely tightened.
• Always use the equipment as indicated. If you find any defective components
whilst assembling or checking the equipment, or if you hear any unusual noise
coming from the equipment during use, stop. Do not use the equipment until the
problem has been rectified.
• Wear suitable clothing whilst using the equipment. Avoid wearing loose clothing
which may get caught in the equipment or that may restrict or prevent
movement.
• Maximum weight of user is 120kg
• The equipment is not suitable for therapeutic use
• Pulse sensors are to be used for enjoyment purposes only and may not be
accurate. Should you feel unwell whilst using this product, immediately stop
using the product and seek medical assistance.
• Care must be taken when lifting or moving the equipment so as not to injure your
back. Always use proper lifting techniques and /or use assistance.

FEATURES

COMPONENTS -PARTS
Please check if you have all parts as listed below.
Note: Small components/parts may be pre-fitted to larger components to make it
easier for end users to assemble the bike. Please check carefully all the parts before
contacting us regarding any missing components.
EXPLODED-VIEW ASSEMBLY

PARTS LIST
NO. DESCRIPTION SPECIFICATION QTY
1 Main Frame 1PC
2 Front Stabilizer 30x60x500(included wheel) 1PC
3 Rear Stabilizer 30x60x500 1PCS
5 Hexagon Screw M8X16 4PCS
6 M8 Washer Φ20*Φ8.2*1.5T 4PCS
8 Pedal L+R 2PCS
9 Vertical Seat Post 1PC
10 Knob 1PC
11 Horizontal Seat Post 1PC
12 Saddle 1PC
13 Brake Knob 1PC
14 Bottle 1PC
15 Crank(R+L) 2PCS
16 Handle Bar 1PC
17 Bottle holder 1PC
18 Handle Bar Post 1PC
19 Screw M5 2PCS
20 Inside Hexagonal Screw M10x25 2PCS
21 M10 Washer M10 2PCS
22 Knob M16 1PC
24 Computer 1PC
25 Computer Holder 1PC
26 Computer Cable 1PC
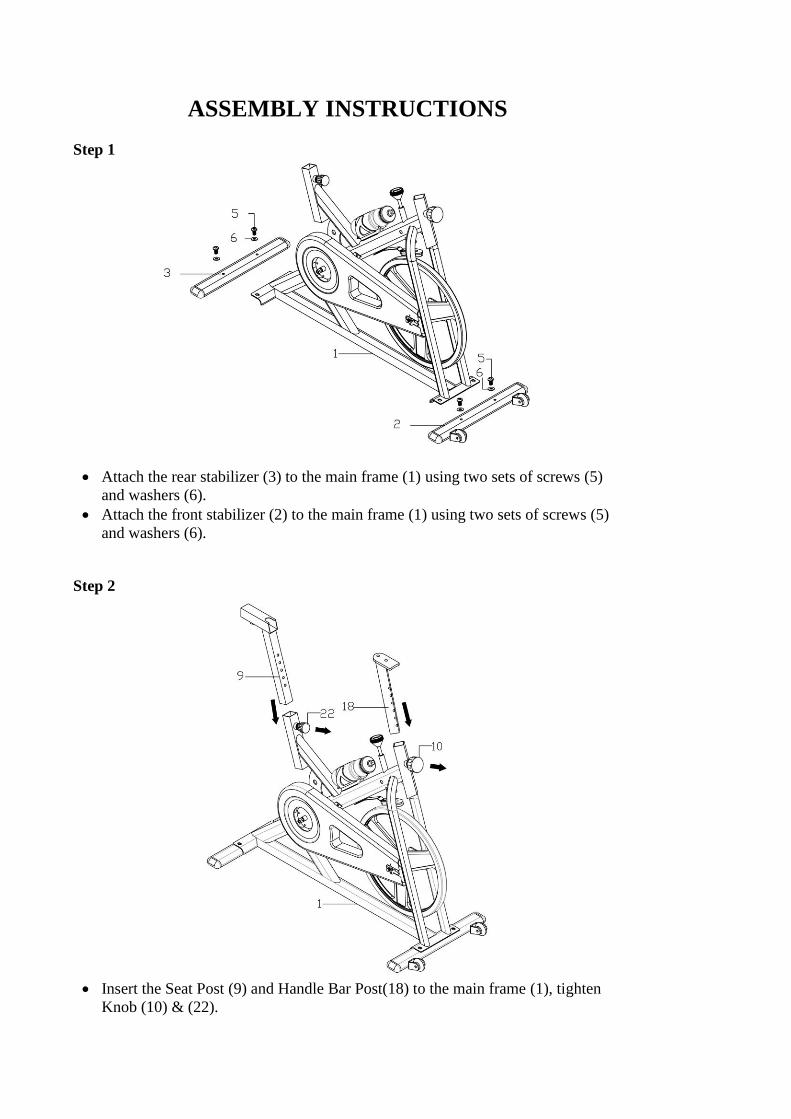
ASSEMBLY INSTRUCTIONS
Step 1
• Attach the rear stabilizer (3) to the main frame (1) using two sets of screws (5)
and washers (6).
• Attach the front stabilizer (2) to the main frame (1) using two sets of screws (5)
and washers (6).
Step 2
• Insert the Seat Post (9) and Handle Bar Post(18) to the main frame (1), tighten
Knob (10) & (22).
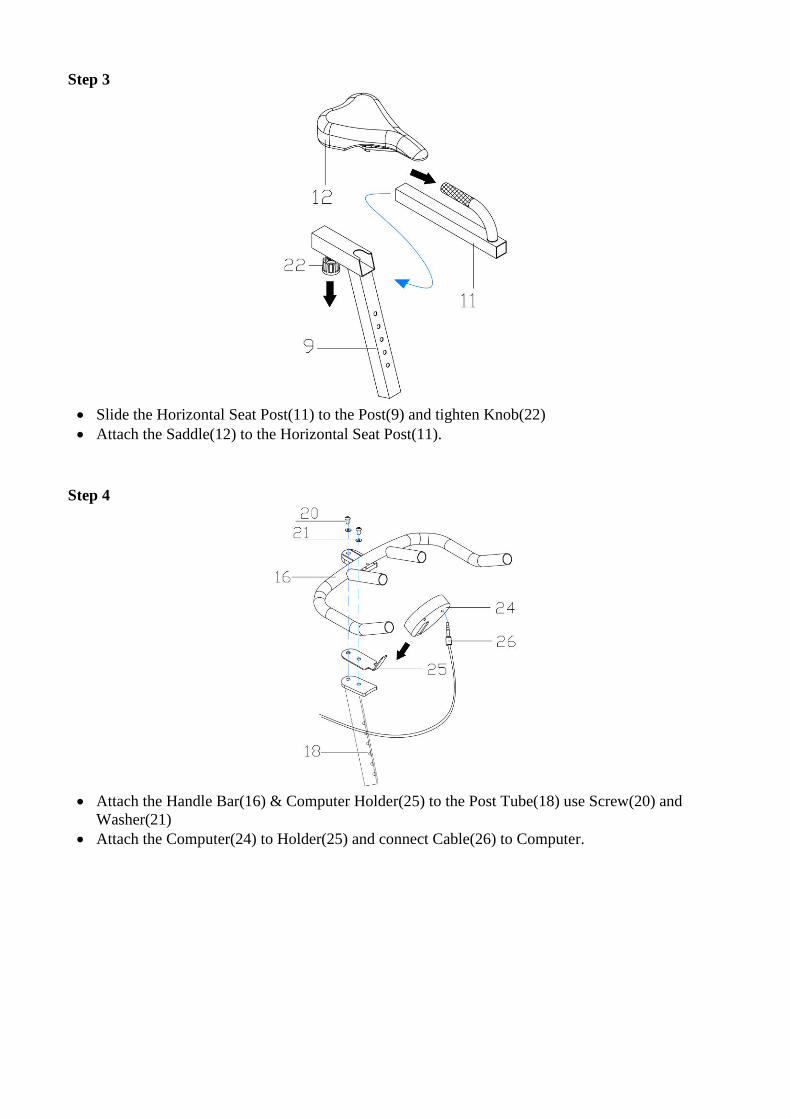
Step 3
• Slide the Horizontal Seat Post(11) to the Post(9) and tighten Knob(22)
• Attach the Saddle(12) to the Horizontal Seat Post(11).
Step 4
• Attach the Handle Bar(16) & Computer Holder(25) to the Post Tube(18) use Screw(20) and
Washer(21)
• Attach the Computer(24) to Holder(25) and connect Cable(26) to Computer.

Step 5
• Pedals (8) are marked “L” and “R”- (i.e. left and right).
• Connect them to their appropriate crank arms. For example, the right crank arm is on the right
hand side of the cycle as you sit on it.
• Note: Right pedal should be threaded on clockwise and left pedal anti-clockwise. Threading the
pedals in the wrong way is likely to damage them and will void the warranty.
Operating Instructions
Resistance Adjustment
• Pedalling resistance is controlled by the tension knob located under the handlebar. To increase
resistance, turn the tension knob clockwise, whereas to decrease the resistance, turn the tension
knob anti-clockwise.
• PRESS THE TENSION KNOB TO USE AS AN EMERGENCY BRAKE
Seat Adjustment
• Properly adjust the seat to ensure maximum exercise efficiency and comfort. The most
appropriate seat position is for the rider to have one knee slightly bent when one pedal is at a 90
degree angle to the ground.
• To adjust the seat height, simply turn the adjustable knob loose, then move the seat up or down to
the required height, then retighten the knob.
• To adjust the seat position, turn the adjustable knob loose, move the seat backward or forward to
the appropriate position, then retighten the knob.
Handlebar Adjustment To adjust the handlebar height, simply turn the adjustable knob loose, then adjust the bar to the
required height and retighten the knob.
Chain Adjustment
• The chain on the bike has been pre-adjusted and should not require immediate attention.
• Continuous use of the bike may cause the chain to stretch or become loose, needing adjustment.
• To adjust the chain, loosen the nuts on both sides of the main axle, then tighten the bolts and nuts
on the two sides of the axle.
EXERCISE COMPUTER
CAUTION: Computer readouts are to be used as a rough guide for exercise and is not to be regarded
as medically accurate.
Button Functions:
• Mode: Press to selection function and hold for 4 seconds to reset.
• Scan: Automatically scan through each function
• Time: Total cycling time up to 99.59
• Speed: Total speed up to 999.9km/h or ML/H. Value will stay constantly on the monitor
• Distance: Total cycling distance up to 99.9km or mi from 0.
• Calorie: Calorie consumption of maximum value of 999.9 calories
• Pulse (if applicable): Displays the heart rate during exercise. Put the ear clip on your left earlobe
before monitoring pulse. To obtain a more accurate pulse, rub your earlobe 15 times prior to
clipping on.
Note:
• Once exercise has stopped, there will be a stop sign displayed in the upper-left corner.
• Display unit will shut off with inactivity longer than 4 minutes.
• Monitor can be turned on by pressing the button or pedalling
• If the monitor is not displaying correct information re-install the batteries to correct.
• Battery specifications: 1.5V UM-3 or AA (2pcs)
Troubleshooting
• Changing the computer battery - slide the computer from the computer holder, remove the battery
cover on the back of the console and remove the batteries. Replace with 2xAA batteries. Replace
the cover on the console, and slide the computer back on to the computer holder.
• Computer not working correctly - If your computer is not working correctly, please check
whether the lower sensor wire is connected to the upper sensor wire, and make sure the upper
sensor wire is plugged into the computer. When you have checked the above, and the computer
still not working, then please make sure the batteries are installed correctly in the computer and
the batteries are still working.
• No resistance - If there is no tension resistance on the bike, please make sure the upper tension
cable is connected to the lower tension cable. Turn the tension knob anti-clockwise to its lowest
level, then go to the tension strap-buckle which is situated on top of the flywheel cover at the base
of the front post. Loosen the tension strap, pull it through the buckle until you can feel some

resistance on the strap then lock it back around the buckle. Now mount the cycle and turn the
pedals, the tension control knob should now be able to be used with a finer degree of adjustment..
MAINTENANCE
• Before using the bike, always make sure all bolts/nuts are fully tightened
• A spent battery is hazardous waste, please dispose of it correctly, and do not throw it in the trash.
• When eventually you want to scrap the machine, you should remove the batteries from the
computer, and dispose separately as hazardous waste.
Exercise Instructions
Using your Spin Bike provides you with several benefits such improving your physical fitness, toning
muscles and together with a calorie controlled diet may help you lose weight.
Warm-up Phase
This stage helps get the blood flowing around the body and the muscles working properly. It will also
reduce the risk of cramp and muscle injury. It is advisable to do a few stretching exercises as shown
below. Each stretch should be held for approximately 30 seconds, do not force or jerk your muscles
into a stretch - if it hurts, STOP.
Exercise Phase
This is the stage where you put the effort in. After regular use, the muscles in your legs will become
stronger. Work to your own pace, but it is very important to maintain a steady tempo throughout. The
rate of work should be sufficient to raise your heart beat into the target zone shown on the graph
below.
This stage should last for a minimum of 12 minutes,
although most people start at about 15-20 minutes.
As you get fitter you may need to train longer and
harder. It is advisable to train at least three times a
week, and if possible space your workouts evenly
throughout the week.

Muscle Toning
• To tone muscle while on your spin bike you will need to have the resistance set higher. This will
put more strain on your leg muscles and may mean you cannot train for as long as you would like.
• If you are also trying to improve your fitness you need to alter your training program. You should
train as normal during the warm up and cool down phases, but towards the end of the exercise
phase you should increase resistance, making your legs work harder than normal.
• You may have to reduce your speed to keep your heart rate in the target zone.
Weight Loss
• The important factor here is the amount of effort you put in. The harder and longer you work, the
more calories you will burn. Effectively, this is the same as if you were training to improve your
fitness, the only difference is your goal.
Use
• The tension control knob allows you to alter the resistance of the pedals. A high resistance makes
it more difficult to pedal, whereas a low resistance makes it easier.
• For the best results, set the tension while the bike is in use.
If you have any problems or concerns regarding this product, please contact the customer service team
of the retail outlet where this product was purchased.
Warranty and Contact Details
Kmate Pty Ltd provides a 12 month warranty for this product when used for domestic purposes. This product is not intended for commercial use and any such use will void all warranty. The benefits of this warranty are provided in addition to other rights and remedies you may have under a law in relation to the goods and services to which this warranty relates. Our goods come with guarantees that cannot be excluded under the Australian Consumer Law. You are entitled to a replacement or refund for a major failure and for compensation for any other reasonably foreseeable loss or damage. You are also entitled to have goods repaired or replaced if the goods fail to be of acceptable quality and the failure does not amount to a major failure.
Before making a claim under warranty, please refer to your user/installation manual to ensure that you have followed correct operating procedures of your product, and refer to the trouble shooting section (if such exists) to assist solving any problems.
The warranty period begins from the day of purchase. Your proof of purchase must be produced before assistance will be provided.
Where the Product is replaced pursuant to this Warranty, the replacement Product will be subject to the warranty terms and warranty commencement date of the original product.
This warranty is only valid if the product is operated and maintained in accordance with the manufacturer’s instructions.
Damage to property including but not limited to furniture, carpets, walls, ceilings or any other event either directly or indirectly are excluded from warranty as well as any losses or expenses incurred by you in relation to the product or making a claim under this warranty including without limitation any costs associated with installation, reinstallation or transporting the product.
Light globes, remote controls, batteries, filters or similar perishable parts are not covered under this warranty. A claim may be refused if the defective claim has arisen for reasons other than a manufacturers fault or defective parts or workmanship. Circumstances in which a warranty claim may be declined include, but are not limited to the following:
• Normal wear and tear; • Misuse or abuse, including failure to properly maintain or service; • Damages caused by improper or incorrect installation, force-majeure, electrical surges,
lightning, power grid fluctuations, water or by connection to alternative power supply sources (such as solar inverters etc), are not eligible for warranty repair;
• Insect or vermin infestation; • Failure to clean or improper cleaning and/or operation of the product; • If the product is modified without authorisation from Kmate Pty Ltd in writing; • If you are unable to supply a certificate of compliance for installation of any type as
required by State & Territory Laws
Contact Details Kmate Pty Ltd
PO Box 234, Mount Waverley VIC 3149 Email: [email protected]
Phone: 03 9790 0055


![Negative calorie foods: An empirical examination of what ...57 further popularized by recent dieting books including Foods That Cause You To Lose Weight [10] and The 58 Negative Calorie](https://img.pdfslide.net/doc/110x75/5f1d4b28b29f320c5975cbd8/negative-calorie-foods-an-empirical-examination-of-what-57-further-popularized.jpg)