Embed Size (px)
Citation preview

F9000 ON Demo KitUser Manual - Manuale UtenteEN - IT 01

2
ENGLISH• Introduction ................................................ 4
• System’s description ................................... 5
• Quick Start .................................................. 6
• Demo flow .................................................. 8
ITALIANO• Introduzione ............................................... 18
• Descrizione del sistema .............................. 19
• Per iniziare .................................................. 20
• Flusso demo ............................................... 22

3
F9000 ON Demo KitUser Manual

4
4
Introduction The F9000 ON Demo Kit allows to demonstrate the F9000 ON keys main functionalities.
Each demo Kit is a Partition of a V364 F9000 demo plant, hosted in a demo ATLAS Master controller
that you can reach with your tablet or smartphone at: v364.iseo.com.
The use of the F9000 ON Demo Kit and the correct understanding of this guide, needs a basic knowledge of the V364 System. For the complete system’s instructions refer to the V364 F9000 System Administrator Manual available at site: https://app.iseo.com.

5
5
System’s description The F9000 ON Demo Kit is composed by:
Graphic panel showing the system’s principle of working.
Display with two F9000 mechatronic cylinders and one F9 mechanical cylinder.
Three F9000 ON keys
One Programming key (PR key)
One Universal Padlock with F9000 mechatronic cylinder inside.
In the graphic panel is printed, in the lower left corner, the unique Demo Kit serial number.
Serial number: A001

6
6
Quick Start
Install ISEO V364 app
1. On both your tablet and smartphone download the ISEO V364 app from the Apple Store (iOS) or the Play Store (Android).
2. Open the ISEO V364 app and configure it writing the Plant Name and the Atlas Master IP as
showed below. At the end touch Done.
A001
v364.iseo.com
The plant name is the Demo Kit serial number printed in the graphic panel, in the lower left corner.
The Atlas Master IP is: v364.iseo.com.
Do not change those fields (advanced functions).

7
7
3. Wait the confirmation message and touch OK.
4. On your Tablet, touch one time and then Login to V364, to be ready to login into the system.
5. On your smartphone, touch two times to go to the validation screen mode.

8
8
Demo flow Once the ISEO V364 app as been installed and correctly configured on both tablet and smartphone devices, you are ready to operate with the system. A typical demo flow, recommended by ISEO, which shows in 10 minutes the features and the potential of the system, is represented in the following graphic:
1. Tablet
Key validation with auto-enrolling Open doors
2. Smartphone
Change doors
3. Tablet
4. Smartphone Validate in mobility Open the new assigned doors Validate to send transaction
View Events View Credential History
5. Tablet
6. Tablet
To know more about the F9000 V364 System and all its functions and features, read the V364 F9000 System Administrator Manual available at: https://app.iseo.com.
Revoke (validation expired) Delete User
Login to V364 Add Access User Assign doors Issue credential
(UID enrollment)

9
9
Demo flow execution
1. On your tablet open the ISEO V364 app then touch Login to V364.
2. Write as Login ID and Password the Demo Kit serial number and click Login to open the ISEO V364
main page.
For example: Demo Kit serial number = A001
Login ID = A001
Password = A001
Password is case sensitive.
1. Tablet

10
10
3. Touch Login Preferences to change your language if required, then enter Access Users menu.
4. Click on on the top right corner to add a new User.
5. Type all Access User data: Last name, First Name and Credential UID.
Validity is set by default in the system as 7 days and 2 minutes validation period, but you can manually change it as you like.

11
11
6. Assign a Role, if previously predefined, or click on on the top right, to manually add doors.
7. Add the required doors and then press to save the settings.
* In the above example have been manually assigned doors 01_A001 and 02_A001.

12
12
8. Open the V364 app installed in the smartphone and validate your F9000 ON key, by pressing the
Switch ON button.
9. On the display, open the F9000 mechatronic cylinders on which you have access (assigned doors).
2. Smartphone
Switch ON button Switch ON button

13
13
10. Change the access permissions to the Access User previously created, following the same procedure reported at points 6 and 7.
* In the above example doors 01_A001 and 02_A001 have been removed, while Padlock_A001 has been added.
3. Tablet

14
14
11. Open the V364 app installed in the smartphone and validate your F9000 ON key, by pressing the switch on button.
12. Open the Universal Padlock, with F9000 mechatronic cylinder inside (new assigned door).
13. Validate again the F9000 ON key on your smartphone to send the information to the Atlas server.
4. Smartphone
Switch ON button Switch ON button

15
15
14. Go to Access History menu to view the Access User events.
15. In Credential Status tap on icon to view the credential history.
5. Tablet

16
16
16. Tap in the top right and touch Revoke Credential, to revoke the Access User when validation
has expired.
17. Tap again and touch Delete User to delete the Access User from the database
6. Tablet

17
F9000 ON Demo KitManuale Utente

18
17
Introduzione L’ F9000 ON Demo Kit permette di presentare le principali funzionalità delle chiavi F9000 ON.
Ogni demo kit è una Partizione dell’impianto demo V364 F9000, situato in un controller ATLAS Master
demo che puoi raggiungere con il tuo tablet o smartphone all’indirizzo: v364.iseo.com.
L’utilizzo dell’F9000 ON Demo Kit e la corretta comprensione di questa guida, necessita di una conoscenza base del Sistema V364. Per le istruzioni complete del sistema riferire al V364 F9000 Manuale Amministratore di Sistema disponibile al sito: https://app.iseo.com.

19
18
Descrizione del sistema L’F9000 ON Demo Kit è composto da:
Pannello grafico che mostra la logica di funzionamento del Sistema.
Supporto con due cilindri meccatronici F9000 e un cilindro meccanico F9.
Tre chiavi F9000 ON
Una chiave Programmatrice (chiave PR)
Un lucchetto modello Universal con all’interno un cilindro meccatronico F9000.
Nel pannello grafico è stampato, nell’angolo in basso a sinistra, il Serial Number univoco del Demo Kit.
Serial number: A001
20
19
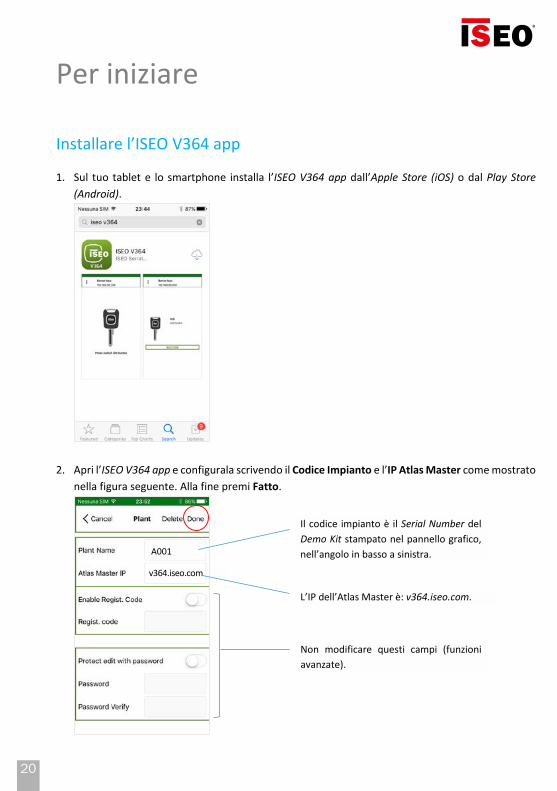
Per iniziare
Installare l’ISEO V364 app
1. Sul tuo tablet e lo smartphone installa l’ISEO V364 app dall’Apple Store (iOS) o dal Play Store (Android).
2. Apri l’ISEO V364 app e configurala scrivendo il Codice Impianto e l’IP Atlas Master come mostrato
nella figura seguente. Alla fine premi Fatto.
A001
v364.iseo.com
Il codice impianto è il Serial Number del Demo Kit stampato nel pannello grafico, nell’angolo in basso a sinistra.
L’IP dell’Atlas Master è: v364.iseo.com.
Non modificare questi campi (funzioni avanzate).

21
20
3. Attendi il messaggio di conferma e tocca OK.
4. Sul tuo tablet tocca una volta, quindi tocca Login a V364, per essere pronto a fare il login nel sistema.
5. Sul tuo smartphone, tocca due volte per andare direttamente nella schermata di validazione.

22
21
Flusso demo Quando l’ISEO V364 app è stata installata e configurata correttamente su entrambi i dispositivi tablet e telefono, sei pronto per utilizzare il sistema. Nel grafico seguente è rappresentato un tipico flusso demo, consigliato da ISEO, che permette di dimostrare in 10 minuti le caratteristiche e le potenzialità del sistema:
1. Tablet
Validazione chiave con auto-assegnazione Apertura porte
2. Smartphone
Modifica accessi
3. Tablet
4. Smartphone Validazione in mobilità Apri le nuove porte assegnate Validazione per inviare le
transazioni Guarda gli Eventi Guarda lo Storico
Credenziale
5. Tablet
6. Tablet
Per saperne di più sul Sistema V364 F9000 e su tutte le sue funzioni e caratteristiche, leggi il V364 F9000 Manuale Amministratore di Sistema, disponibile al sito: https://app.iseo.com.
Revoca (validazione scaduta) Cancellazione Utente
Login a V364 Aggiungi Utente Assegna le porte Assegna credenziale
(con UID)

23
22
Esecuzione del flusso demo
1. Sul tuo tablet apri l’ISEO V364 app quindi tocca Login a V364.
2. Scrivi come Login ID e Password il serial number del Demo Kit e premi Login per aprire la pagina
principale di ISEO V364.
Per esempio: serial number Demo Kit = A001
Login ID = A001
Password = A001
Il campo Password tiene conto delle lettere maiuscole e minuscole.
1. Tablet

24
23
3. Tocca Login Preferences per cambiare la lingua in Italiano. Poi entra nel menu Accesso Utenti.
4. Premi nell’angolo in alto a destra per aggiungere un nuovo Utente.
5. Digita tutti i dati dell’Utente: Cognome, Nome e UID Credenziale.
La Validità è pre-impostata nel sistema a 7 giorni con periodo di validazione 2 minuti, ma è sempre possibile cambiarla manualmente a piacere.

25
24
6. Assegna un Ruolo, se precedentemente programmato, oppure premi nel lato alto destro
dello schermo, per aggiungere porte manualmente.
7. Aggiungi le porte desiderate e premi per salvare le modifiche.
* Nell’esempio riportato sopra sono state assegnate manualmente le porte 01_A001 e 02_A001.

26
25
8. Apri l’app V364 installata nel tuo smartphone e valida la chiave F9000 ON, premendo il pulsante
di accensione.
9. Nel supporto apri i cilindri meccatronici F9000 ai quali hai accesso (porte assegnate).
2. Smartphone
Pulsante accensione Pulsante accensione

27
26
10. Cambia i permessi di accesso all’Utente creato in precedenza, seguendo la medesima procedura riportata ai punti 6 e 7.
* Nell’esempio riportato sopra sono state rimosse le porte 01_A001 e 02_A001, mentre è stato aggiunto il Padlock_A001.
3. Tablet

28
27
11. Apri l’app V364 installata nel tuo smartphone e valida la chiave F9000 ON, premendo il pulsante
di accensione.
12. Apri il lucchetto Universal, con all’interno il cilindro meccatronico F9000 (nuova porta assegnata).
13. Valida nuovamente la chiave F9000 ON con il tuo smartphone per inviare le informazioni al server Atlas.
4. Smartphone
Pulsante di accensione Switch ON button

29
28
14. Vai al menu Storico Accessi per vedere gli eventi dell’Utente.
15. Nello Stato Credenziali premi l’icona per vedere lo storico della credenziale.
5. Tablet

30
29
16. Premi in alto a destra e tocca Revoca Credenziale, per revocare l’Utente quando la validazione
è scaduta.
17. Premi ancora e tocca Cancella Utente per cancellare l’Utente dal database.
6. Tablet

31
30
Notes - Appunti

www.iseo.com
ISEO Serrature s.p.a.Via San Girolamo 1325055 Pisogne (BS)[email protected]
ELECTRONIC SUPPORT SERVICE
iseozero1.com
800-728722numero verde gratuito
F9000 O
N D
emo
Kit_
Use
r M
anua
l_K
W19080_E
N-IT
_02_2
01
81
01
2.
Not
con
trac
tual
doc
umen
t. S
ubje
ct t
o re
visi
on.
© 2
01
8 Is
eo S
erra
ture
S.p
.a.