Embed Size (px)
Citation preview
Facilitators’ guide book
for farmers’ field schools
Facilitators’ guide book
for farmers’ field schools
by
Dr. Shahida Sarker Parul
TCDC Consultant
Subregional Office for the Pacific Islands Food and Agriculture Organization of the United Nations
Apia, 2017

The designations employed and the presentation of material in this information product do not imply the expression of any opinion whatsoever on the part of the Food and Agriculture Organization of the United Nations (FAO) concerning the legal or development status of any country, territory, city or area or of its authorities, or concerning the delimitation of its frontiers or boundaries. The mention of specific companies or products of manufacturers, whether or not these have been patented, does not imply that these have been endorsed or recommended by FAO in preference to others of a similar nature that are not mentioned.
The views expressed in this information product are those of the author(s) and do not necessarily reflect the views or policies of FAO.
ISBN 978-92-5-109732-8 © FAO, 2017
FAO encourages the use, reproduction and dissemination of material in this information product. Except where otherwise indicated, material may be copied, downloaded and printed for private study, research and teaching purposes, or for use in non-commercial products or services, provided that appropriate acknowledgement of FAO as the source and copyright holder is given and that FAO’s endorsement of users’ views, products or services is not implied in any way.
All requests for translation and adaptation rights, and for resale and other commercial use rights should be made via www.fao.org/contact-us/licence-request or addressed to [email protected].
FAO information products are available on the FAO website (www.fao.org/publications) and can be purchased through [email protected].
Cover photo: © FAO / Shahida Sarker Parul

iii
Contents
Steps to be followed before starting FFS at any site; ............................................................ 1
A. Pre-FFS: Inauguration of FFS; Rice varieties, Seed sorting, Germination ......................... 1
Activity-1: Introduction to Rice varieties in Fiji .................................................................... 1
Activity-2: Sorting/cleaning of rice seed ............................................................................. 1
Activity-3: Hands-on: ......................................................................................................... 2
Activity-4: Cleaning of rice seed......................................................................................... 2
Facilitator's Note: ............................................................................................................... 3
1. Seed sorting/cleaning: ................................................................................................ 3
2. Ballot box test: ........................................................................................................... 3
3. Practice: Preparation of soil grade map of the village ................................................. 6
4. Testing soil texture: .................................................................................................... 7
5. Testing soil structure: ................................................................................................. 7
6. Testing water holding capacity of the soil: .................................................................. 8
B. FFS Session-1 (Week-1): Introduction to FFS trials and select trials ................................ 9
Activity-1: Introduction to FFS trials and select trials .......................................................... 9
Activity-2: Hands-on practice: Seedling preparation........................................................... 9
Activity-3: Hands-on: Seed bed preparation and sowing seeds ....................................... 10
Activity-4: Land Preparation and transplanting ................................................................. 10
C. FFS Session-2 (Week-3): (i) Nutrient management, (ii) Insect (Leaf Roller) ................... 11
Activity-1: Nutrient management ...................................................................................... 11
Activity-2: Fertilization Rice-Field: .................................................................................... 11
Activity-3: Insect pest management: Leaf roller ............................................................... 12
Activity-4: Hands-on practice-1: Nutrient flow chart.......................................................... 12
Activity5: Hands-on practice-2: Identification of fertilizers ................................................ 13
Activity-6: Fertilizer computation ...................................................................................... 14
Activity-7: Identification of fertilizers ................................................................................. 14
Activity-8: Hands-on practice-3: Layout of trial plots ........................................................ 15
D. FFS Session-3 (Week-5): (i) Growth stage; (ii) Urea application ..................................... 17
Activity-1: Growth stage ................................................................................................... 17
1. Vegetative phases ................................................................................................... 17
2. Reproductive phase ................................................................................................. 17
3. Ripening Phase ....................................................................................................... 18
Approximate dates of occurrence of some growth stages of rice .................................. 18
Approximate duration of the growth phases ................................................................. 18
iv
Growth phases in relation to yield ................................................................................ 18
Cultural practices in relation to growth phase ............................................................... 19
Activity-2: Urea Application (LCC) ................................................................................... 19
Activity-3: Hands-on practice-1: Transplantation in ICM plot: ........................................... 20
Activity-4: Hands-on practice-2: Mark a seed plot at farmers field: ................................... 20
Key points in Rice seed production .............................................................................. 20
E. FFS Session-4 (Week-7): Introduction to insecticide (Granular, liquid, powder) .............. 21
Activity-1: Introduction to insecticide (Granular, liquid, powder) ....................................... 21
Activity-2: Hands-on practice-1: Insect zoo: ..................................................................... 21
Activity-3: Hands-on practice-2: Gap filling ...................................................................... 23
F. FFS Session-5 (Week-8): (i) Weed; (ii) Water management ........................................... 23
Activity-1: Weed management ......................................................................................... 23
Activity-2: Water management in rice seed production .................................................... 23
Activity-3: Hands-on practice-1: Set up defoliation and detillering trials ........................... 23
DETILLERING TRIAL .................................................................................................. 23
DEFOLIATION TRIAL .................................................................................................. 24
Activity-4: Hands-on practice-2: 1st weeding ................................................................... 25
G. FFS Session-6 (Week-10): Agro-Ecosystem Analysis (AESA) ....................................... 26
Activity-1: Agro-Ecosystem Analysis (AESA) ................................................................... 26
Activity-2: Insect pest management: Brown Plant Hopper (BPH): .................................... 26
Activity-3: Hands-on practice: AESA-1............................................................................. 26
H. FFS Session-7 (Week-12): Integrated Pest Management (IPM) ..................................... 27
Activity-1: Integrated Pest Management (IPM) ................................................................. 27
Activity-2: Insect: Gall midge ........................................................................................... 29
Activity-3: Hands-on practice-1: 2nd Weeding ................................................................. 29
I. FFS Session-8 (Week-14): Seed production (Isolation + Roguing) .................................. 30
Activity-1: Isolation distance for seed production ............................................................. 30
Activity-2: Rouging for rice production ............................................................................. 30
J. FFS Session-9 (Week-17): (i) Compost preparation and use; (ii) Insect: Armyworm ....... 31
Activity-1: Compost preparation and use ......................................................................... 31
Activity-2: Insect pest management: Rice armyworm: ...................................................... 32
Management of Rice Insect Pest ................................................................................. 32
K. FFS Session-10 (Week-20): (i) Yield component, (ii) Yield calculation, (iii) Field day
preparation .......................................................................................................................... 34
Activity-1: Yield component ............................................................................................. 34
Activity-2: Yield calculation .............................................................................................. 35

v
Activity-3: Field day preparation....................................................................................... 35
Description of the booths: ............................................................................................ 35
L. Post-FFS Session: FIELD DAY: (i) Harvesting, threshing, cleaning, drying & storing; (ii)
Cost benefit (Exp: Trial Plots) .............................................................................................. 38
Activity-1: Seed processing and storing ........................................................................... 38
Activity-2: Cost benefit (Exp: Trial plots) .......................................................................... 38
FIELD DAY .................................................................................................................. 40
FFS Curriculum_Fiji_21-Dec 2014 ...................................................................................... 41
1
STEPS TO BE FOLLOWED BEFORE STARTING FFS AT ANY SITE;
Select the site of FFS session
Identify the rice production problems discussing with local farers
Select the site of trial plots
collect the seeds for trials
collect seeds for dyke crops
get prepared for ballot box test (Make the ballot boxes, ballots for the FFS farmers,
prepare questions and answer options with live samples
Collect/purchage all materials necessary to run FFS sessions
A. PRE-FFS: INAUGURATION OF FFS; RICE VARIETIES, SEED SORTING,
GERMINATION
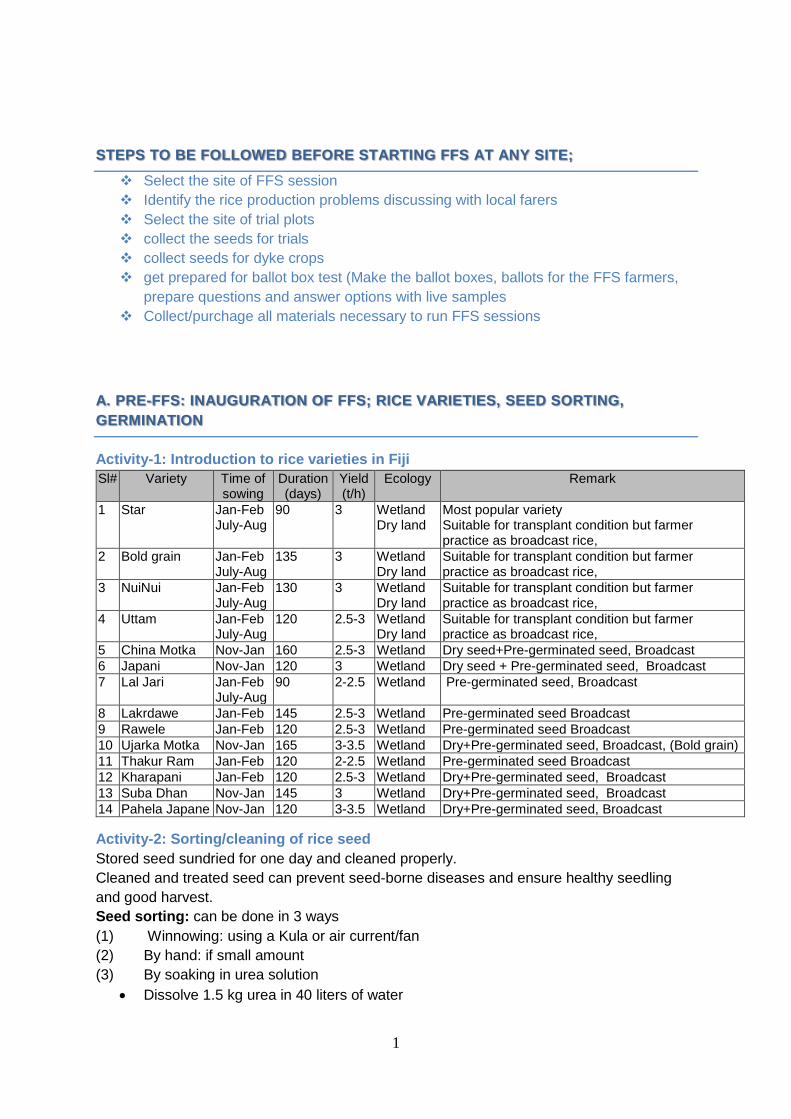
Activity-1: Introduction to rice varieties in Fiji
Sl# Variety Time of sowing
Duration (days)
Yield (t/h)
Ecology Remark
1 Star Jan-Feb July-Aug
90 3 Wetland Dry land
Most popular variety Suitable for transplant condition but farmer practice as broadcast rice,
2 Bold grain Jan-Feb July-Aug
135 3 Wetland Dry land
Suitable for transplant condition but farmer practice as broadcast rice,
3 NuiNui Jan-Feb July-Aug
130 3 Wetland Dry land
Suitable for transplant condition but farmer practice as broadcast rice,
4 Uttam Jan-Feb July-Aug
120 2.5-3 Wetland Dry land
Suitable for transplant condition but farmer practice as broadcast rice,
5 China Motka Nov-Jan 160 2.5-3 Wetland Dry seed+Pre-germinated seed, Broadcast
6 Japani Nov-Jan 120 3 Wetland Dry seed + Pre-germinated seed, Broadcast
7 Lal Jari Jan-Feb July-Aug
90 2-2.5 Wetland Pre-germinated seed, Broadcast
8 Lakrdawe Jan-Feb 145 2.5-3 Wetland Pre-germinated seed Broadcast
9 Rawele Jan-Feb 120 2.5-3 Wetland Pre-germinated seed Broadcast
10 Ujarka Motka Nov-Jan 165 3-3.5 Wetland Dry+Pre-germinated seed, Broadcast, (Bold grain)
11 Thakur Ram Jan-Feb 120 2-2.5 Wetland Pre-germinated seed Broadcast
12 Kharapani Jan-Feb 120 2.5-3 Wetland Dry+Pre-germinated seed, Broadcast
13 Suba Dhan Nov-Jan 145 3 Wetland Dry+Pre-germinated seed, Broadcast
14 Pahela Japane Nov-Jan 120 3-3.5 Wetland Dry+Pre-germinated seed, Broadcast
Activity-2: Sorting/cleaning of rice seed
Stored seed sundried for one day and cleaned properly.
Cleaned and treated seed can prevent seed-borne diseases and ensure healthy seedling
and good harvest.
Seed sorting: can be done in 3 ways
(1) Winnowing: using a Kula or air current/fan
(2) By hand: if small amount
(3) By soaking in urea solution
Dissolve 1.5 kg urea in 40 liters of water
2
Soak seeds in the urea solution & stir to float unfilled, broken & diseased seeds
Remove floating poor seeds by hands/sieves
Wash seeds properly 3-4 times with clean water.
Clean seed will have bright appearance with no spots & lesions.
Activity-3: Hands-on:
1. Seed sorting, Soaking and Incubation technique
2. Ballot Box Test (Benchmark)
3. Soil sampling
Seed sorting, Soaking and Incubation technique
Seed rate: Seed rate varies due to crop establishment method
Broadcasting 40-45 kg/ha
Line sowing/drum seeding 30-35 kg/ha
Seed Rate: Direct Dry Seeding
A. Broadcasting: About 60-70 kg ha-1 seed is needed
B. Furrow/ Line Sowing: 40-50 kg ha-1 seed is needed
C. Dibbling: About 30-40 kg ha-1 seed is needed
Seed Rate: Transplanting
Seed Rate: 80 to 100 g/m2 (Can be transplanted 20 times more area)
A. Transplanting 20-25 kg seed/ha
Germination Test: Should be done before sowing
Can easily be done by soaking 24 hours soaked seeds on wet-newspaper spread on a clay-
pot
After 4/5 days - sprouted seeds are counted to get germination percentage of any seed lot.
Incubation of rice seed
Soak a half-filled seed-sack in clean water for 24 hrs
Place the sack on top of a wooden platform in a shaded area and cover with rice
straw to facilitate incubation
Turn the seed once after 24 hrs for aeration and reduce the inner-heat of the heap
Incubate until white "dots" observed
Incubation time: 48 hrs (varies with whether)
Normal seeding: Healthy, strong, vigorous
Abnormal seedling: without root, thin and diseased
Activity-4: Cleaning of rice seed
Stored seed sundried for one day and cleaned properly.
Cleaned and treated seed can prevent seed-borne diseases and ensure healthy seedling
and good harvest.
Seed sorting: can be done in 3 ways
(1) Winnowing: using a Kula or air current/fan
(2) By hand: if small amount
(3) By soaking in urea solution
Dissolve 1.5 kg urea in 40 litters of water
Soak seeds in the urea solution & stir to float unfilled, broken & diseased seeds
Remove floating poor seeds by hands/sieves

3
Wash seeds properly 3-4 times with clean water.
Clean seed will have bright appearance with no spots & lesions.
Facilitator's note:
At the beginning of the session, Facilitator will ask some questions to the participants to
understand their knowledge base about today's topic. Based on this s/he will start the
discussion session. Facilitator will take special care to involve all participants in to discussion.
Some of the sample questions may be:
What is seed?
What are the characteristics of good seed?
What facilities we can get using quality seed?
Why do we need germination test?
How can we do seed sorting/cleaning?
What are the factors that needs attention while selecting seed to sow?
Facilitator's Roll:
Allow enough time to answer each question - give some real life example and always keep
the link of the discussion issue. Add more/necessary information after getting
response/answer by the participants.
1. Seed sorting/cleaning
Stored seed sundried for one day and cleaned & treated properly.
Cleaned and treated seed can prevent seed-borne diseases and ensure healthy seedling and good harvest. Seed sorting: can be done in 3 ways
(1) Winnowing: using a Kula or air current/fan
(2) By hand: if small amount
(3) By soaking in urea solution
a. Dissolve 1.5 kg urea in 40 liters of water
b. Soak seeds in the urea solution & stir to float unfilled, broken & diseased seeds
c. Remove floating poor seeds by hands/sieves
d. Wash seeds properly 3-4 times with clean water.
Clean seed will have bright appearance with no spots & lesions.
2. Ballot Box test
Activities for Ballot Box test: The Facilitator will prepare the Ballot Boxes along with "Ballots" before the session. S/he will explain how to use the ballots to answer specific question. More live sample/s should be used as "Answer option". All the FFS-members should join this session.
Facilitator's responsibility:
Collect all samples for answer option
Maintain the secrecy of the questions/answers;
Paste the correct answer options to the questions sheet;
4
Use live sample as much as possible;
Take care whether all aspect of rice is included in the questions that is necessary to
know by the FFS participants;
Prepare check list and result sheet
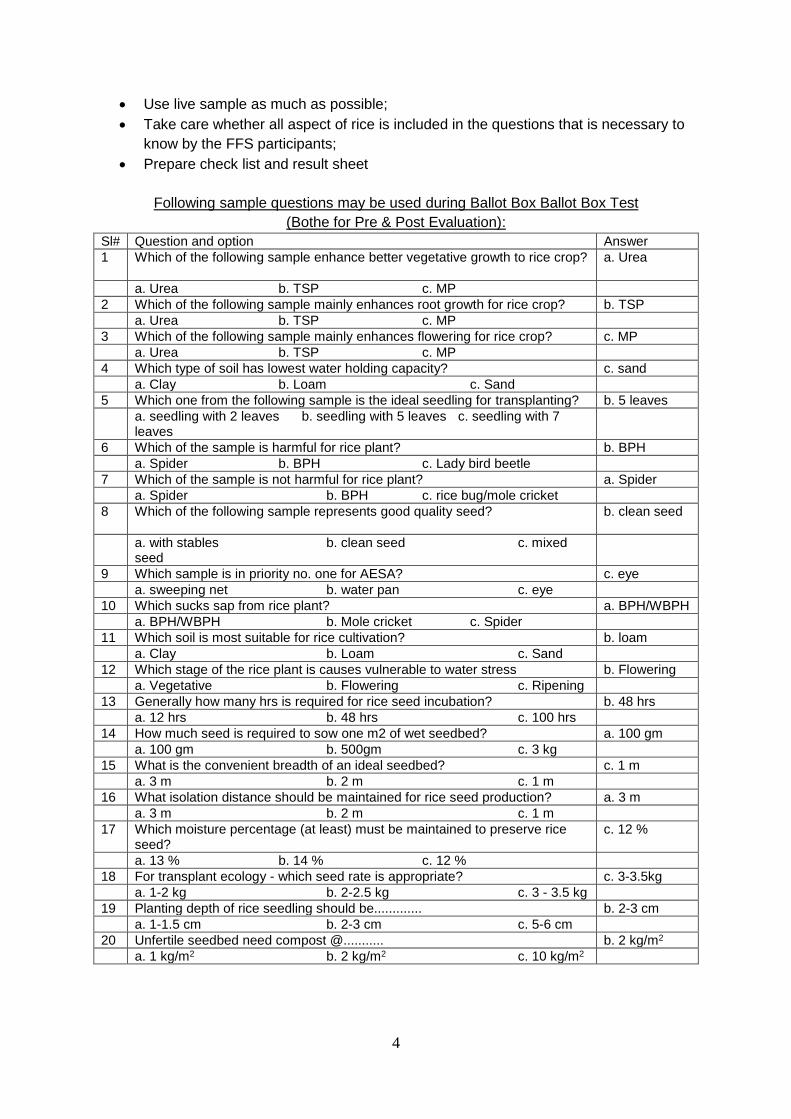
Following sample questions may be used during Ballot Box Ballot Box Test
(Bothe for Pre & Post Evaluation):
Sl# Question and option Answer
1 Which of the following sample enhance better vegetative growth to rice crop?
a. Urea
a. Urea b. TSP c. MP
2 Which of the following sample mainly enhances root growth for rice crop? b. TSP
a. Urea b. TSP c. MP
3 Which of the following sample mainly enhances flowering for rice crop? c. MP
a. Urea b. TSP c. MP
4 Which type of soil has lowest water holding capacity? c. sand
a. Clay b. Loam c. Sand
5 Which one from the following sample is the ideal seedling for transplanting? b. 5 leaves
a. seedling with 2 leaves b. seedling with 5 leaves c. seedling with 7 leaves
6 Which of the sample is harmful for rice plant? b. BPH
a. Spider b. BPH c. Lady bird beetle
7 Which of the sample is not harmful for rice plant? a. Spider
a. Spider b. BPH c. rice bug/mole cricket
8 Which of the following sample represents good quality seed? b. clean seed
a. with stables b. clean seed c. mixed seed
9 Which sample is in priority no. one for AESA? c. eye
a. sweeping net b. water pan c. eye
10 Which sucks sap from rice plant? a. BPH/WBPH
a. BPH/WBPH b. Mole cricket c. Spider
11 Which soil is most suitable for rice cultivation? b. loam
a. Clay b. Loam c. Sand
12 Which stage of the rice plant is causes vulnerable to water stress b. Flowering
a. Vegetative b. Flowering c. Ripening
13 Generally how many hrs is required for rice seed incubation? b. 48 hrs
a. 12 hrs b. 48 hrs c. 100 hrs
14 How much seed is required to sow one m2 of wet seedbed? a. 100 gm
a. 100 gm b. 500gm c. 3 kg
15 What is the convenient breadth of an ideal seedbed? c. 1 m
a. 3 m b. 2 m c. 1 m
16 What isolation distance should be maintained for rice seed production? a. 3 m
a. 3 m b. 2 m c. 1 m
17 Which moisture percentage (at least) must be maintained to preserve rice seed?
c. 12 %
a. 13 % b. 14 % c. 12 %
18 For transplant ecology - which seed rate is appropriate? c. 3-3.5kg
a. 1-2 kg b. 2-2.5 kg c. 3 - 3.5 kg
19 Planting depth of rice seedling should be............. b. 2-3 cm
a. 1-1.5 cm b. 2-3 cm c. 5-6 cm
20 Unfertile seedbed need compost @........... b. 2 kg/m2
a. 1 kg/m2 b. 2 kg/m2 c. 10 kg/m2
5
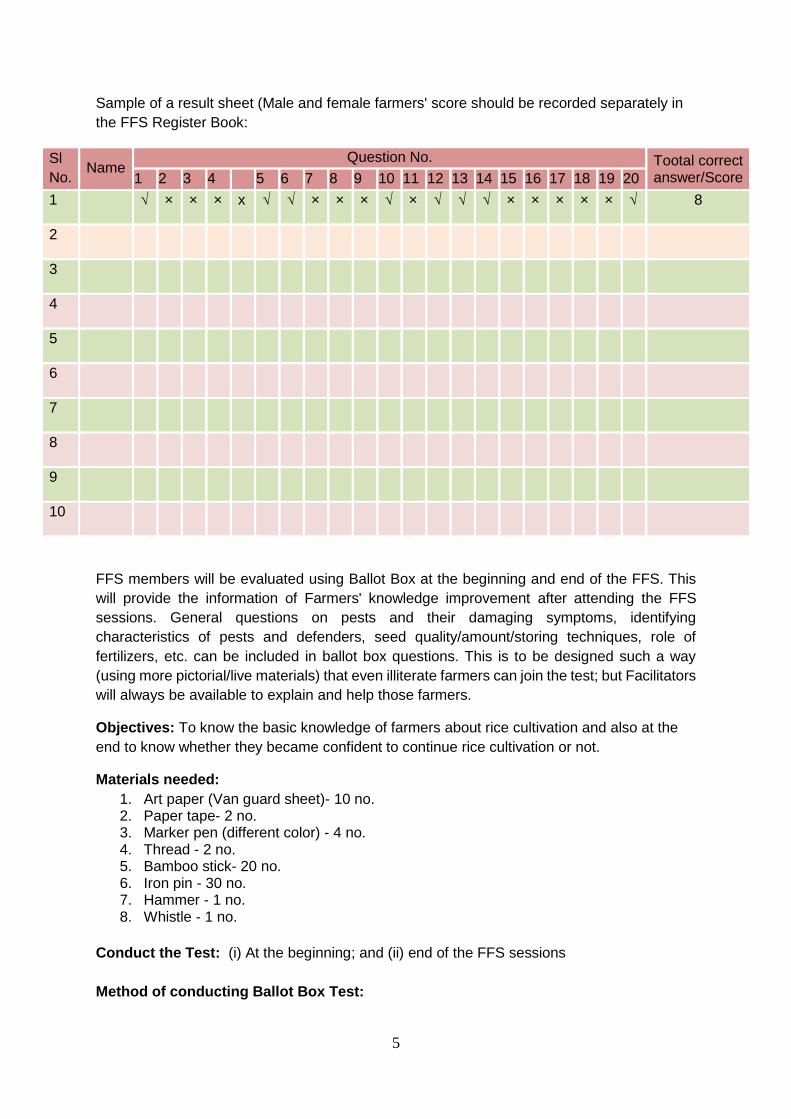
Sample of a result sheet (Male and female farmers' score should be recorded separately in
the FFS Register Book:
Sl
No. Name
Question No. Tootal correct answer/Score 1 2 3 4 5 6 7 8 9 10 11 12 13 14 15 16 17 18 19 20
1 √ × × × x √ √ × × × √ × √ √ √ × × × × × √ 8
2
3
4
5
6
7
8
9
10
FFS members will be evaluated using Ballot Box at the beginning and end of the FFS. This
will provide the information of Farmers' knowledge improvement after attending the FFS
sessions. General questions on pests and their damaging symptoms, identifying
characteristics of pests and defenders, seed quality/amount/storing techniques, role of
fertilizers, etc. can be included in ballot box questions. This is to be designed such a way
(using more pictorial/live materials) that even illiterate farmers can join the test; but Facilitators
will always be available to explain and help those farmers.
Objectives: To know the basic knowledge of farmers about rice cultivation and also at the
end to know whether they became confident to continue rice cultivation or not.
Materials needed:
1. Art paper (Van guard sheet)- 10 no. 2. Paper tape- 2 no. 3. Marker pen (different color) - 4 no. 4. Thread - 2 no. 5. Bamboo stick- 20 no. 6. Iron pin - 30 no. 7. Hammer - 1 no. 8. Whistle - 1 no.
Conduct the Test: (i) At the beginning; and (ii) end of the FFS sessions
Method of conducting Ballot Box Test:
6
1. 20 questions will be selected that will cover broader aspects of soil, fertilizer, water
management, weed management, rat, beneficial/harmful insects, post harvest
management, etc....
2. Some questions should be related to life cycle, damage symptom, management
related.
3. Locally understandable language should be used in ballot box test;
4. Samples of pest and defenders in small bottle (Vial); and weed sample, damaged
plant sample etc. should be collected earlier;
5. Small vials/plant samples/live samples can be pasted with the art paper (Ballot box);
6. Colored thread can also be used for pasting the materials;
7. Each question will have 3 answer option to vote by the FFS members;
8. Each answer will have one box where the participants will drop their vote (usually a
number - assigned to the participant)
9. The Ballot box along with the questions will be hanged with a bamboo stick that
nailed before and fixed with the soil.
10. Every two bamboo stick will have a gap of 10-15 m in between.
11. Each of the FFS member will carry 20 numbers (assigned to him/her) written on a
small piece of paper
12. Each of the participants will answer all 20 questions (put the number inside the ballot
box);
13. After each 30 sec, the Facilitator will whistle and the participants will move to the next
question;
14. Before starting the process - the participants will be briefed thoroughly about the test;
some
example may be used to make them understood;
15. Illiterate participants may have help from the Facilitator to understand what is written
in the question;
3. Practice: Preparation of soil-grade map of the village
All the soil of a certain locality is not same. Also all the lands are not suitable for rice
cultivation. Therefore, soil-fertility map will guide farmers to identify lands that are suitable for
rice growing.
Objectives of soil-grad map preparation of a village:
Identifying different areas with different soil fertility
Soil fertility based fertilizer recommendation (use soil testing kit) and comparative
discussion;
Identification of different water source, river, canal, land marks, etc.
After validation with all members insert the soil grading map into resource map;
Materials needed:
Previously prepared social map, colored pen, pencil, ruler etc.
How to draw a map:
Identify the border of the cultivable lands of the village
Ask farmers which part of the land grow better crop;
7
While identifying better fertile lands, farmers will consider- water holding capacity of
the soil, texture and structure of the soil, topography, soil color, presence of organic
matter, etc........
Moreover, farmer can inform the status of crop grown in a specific piece of land in
previous year - that may also an indicator of soil fertility;
During validation session, all the soils will be divided into 3 different grade: (i) Grade-
1 (use green marker/color to locate), (ii) Grade-2: Use yellow marker/color to trace,
(iii) Grade-3: Use red marker/color to mark;
Note Taker will guide farmers to insert the final information into social resource mak.
Soil sample collection:
Objective: To teach farmers how to collect soil sample;
Techniques of soil sampling:
Avoid lands that has standing crop;
Take sample 1 m far from the bund;
Random 9 spots will be selected to collect soil sample;
Avoid places where there are more organic matter in the crop field;
Avoid soil underneath the plow pan;
Materials needed: Spade, Bucket, Potato bag, paper/Hardboard, Hammer, Rubber band,
Marker pen, Tag-paper (farmers name & address, date of sampling etc will be recorded in
the tag-paper before sending to lab for testing the soil),
0 0 0 0
0 0
0 0 0
4. Testing soil texture:
Soil is the medium of plant growth. Only fertile soil can ensure better production. But in-fertilile soil can also be changed into fertile one following better management. Therefore, it is important to know the soil quality. Objective:
To know how many types of soil exists
To know different quality of soil
To know the techniques of soil improvement
To know which soil iis better for rice production Materilals needed: weighing Jar, Cloth duster, rubber band, plasticbottle, knife, different kinds of soil sample, glass, organic matter etc.
5. Testing soil structure:
Each group will be supplied 3 types of soil sample. They will try to observe /feel handful of soil from each group.
If the soil sample felt light and loose - then it may be sandy soil;
if the soil sample is felt hard/fine then it may be clay soil; on the other hand,
if the soil sample is felt in between of previous two then ifmay be loam soil. Now add water to those soil sample to make doe/pulp. Now try to make a solid sylindrical shape. Try to make a ring with the roll:
8
If 15 cm long with .5 cm diameter ring can't be made - before that some big cracks appeared - then the soil will be sandy one;
If 10-15 com long roll with .5 cm diameter roll can be made and the roll can be bent into a ring without any visible crack then the soil is loam;
If 10-15 cm long roll (.5 cm diameter) can easily be made and the roll can make a ring without any crack then the soil is clay;
Now the organic matter is to be mixed with each types of soil and do the tests once again. It will be found that now rings can be made more easily. Therefore, we can say that the organic matter improved the soil quality.
6. Testing water holding capacity of the soil:
We know that sandy soil has least water holding capacity, clay has the maximum and loam in between. We can easily examin with a simple test.
Take 100 gm soil. Cut the end of a 1 L water bottle. Tie the bottle mouth with thin cloth. Put the soil into the bottle and hang the botthe with thread (up side down). Add 200 ml water with the soil of the bottle (use cutt end of the bottle to put water). Keep a empty glass underneath the hanged bottle. Do this with all 3 types of soil samle in 3 different bottle. After some times, it will be found that:
minimum water was dropped down under the bottle with clay soil - means that clay soil has maximum water holding capacity.
maximum water was dropped down under the bottle with clay soil - means that clay soil has minimum water holding capacity.
the glass under loamy soil has been filled with water in between clay and sand - means that loam soil has medium imum water holding capacity.
the glass under organic matter mixed-sandy soil has been filled with water taking more time than sandy soil indicating the improvement of water holding capacity after mixing with organic matter with sandy soil.
Now the FFS members can be explained about the importance of adding organic matter to their rice field.
9
B. FFS SESSION-1 (WEEK-1): INTRODUCTION TO FFS TRIALS AND SELECT
TRIALS
Activity-1: Introduction to FFS Trials and select trials
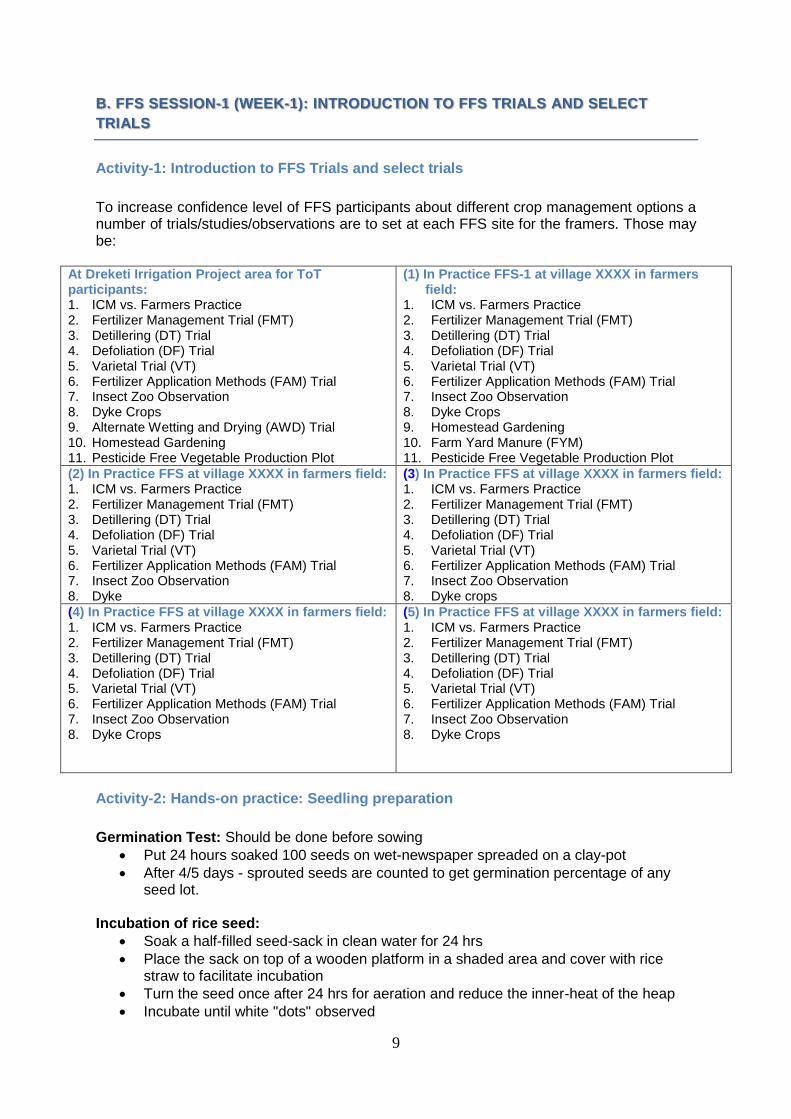
To increase confidence level of FFS participants about different crop management options a number of trials/studies/observations are to set at each FFS site for the framers. Those may be:
At Dreketi Irrigation Project area for ToT participants: 1. ICM vs. Farmers Practice 2. Fertilizer Management Trial (FMT) 3. Detillering (DT) Trial 4. Defoliation (DF) Trial 5. Varietal Trial (VT) 6. Fertilizer Application Methods (FAM) Trial 7. Insect Zoo Observation 8. Dyke Crops 9. Alternate Wetting and Drying (AWD) Trial 10. Homestead Gardening 11. Pesticide Free Vegetable Production Plot
(1) In Practice FFS-1 at village XXXX in farmers field:
1. ICM vs. Farmers Practice 2. Fertilizer Management Trial (FMT) 3. Detillering (DT) Trial 4. Defoliation (DF) Trial 5. Varietal Trial (VT) 6. Fertilizer Application Methods (FAM) Trial 7. Insect Zoo Observation 8. Dyke Crops 9. Homestead Gardening 10. Farm Yard Manure (FYM) 11. Pesticide Free Vegetable Production Plot
(2) In Practice FFS at village XXXX in farmers field: 1. ICM vs. Farmers Practice 2. Fertilizer Management Trial (FMT) 3. Detillering (DT) Trial 4. Defoliation (DF) Trial 5. Varietal Trial (VT) 6. Fertilizer Application Methods (FAM) Trial 7. Insect Zoo Observation 8. Dyke
(3) In Practice FFS at village XXXX in farmers field: 1. ICM vs. Farmers Practice 2. Fertilizer Management Trial (FMT) 3. Detillering (DT) Trial 4. Defoliation (DF) Trial 5. Varietal Trial (VT) 6. Fertilizer Application Methods (FAM) Trial 7. Insect Zoo Observation 8. Dyke crops
(4) In Practice FFS at village XXXX in farmers field: 1. ICM vs. Farmers Practice 2. Fertilizer Management Trial (FMT) 3. Detillering (DT) Trial 4. Defoliation (DF) Trial 5. Varietal Trial (VT) 6. Fertilizer Application Methods (FAM) Trial 7. Insect Zoo Observation 8. Dyke Crops
(5) In Practice FFS at village XXXX in farmers field: 1. ICM vs. Farmers Practice 2. Fertilizer Management Trial (FMT) 3. Detillering (DT) Trial 4. Defoliation (DF) Trial 5. Varietal Trial (VT) 6. Fertilizer Application Methods (FAM) Trial 7. Insect Zoo Observation 8. Dyke Crops
Activity-2: Hands-on practice: Seedling preparation
Germination Test: Should be done before sowing
Put 24 hours soaked 100 seeds on wet-newspaper spreaded on a clay-pot
After 4/5 days - sprouted seeds are counted to get germination percentage of any seed lot.
Incubation of rice seed:
Soak a half-filled seed-sack in clean water for 24 hrs
Place the sack on top of a wooden platform in a shaded area and cover with rice straw to facilitate incubation
Turn the seed once after 24 hrs for aeration and reduce the inner-heat of the heap
Incubate until white "dots" observed
10
Incubation time: 48 hrs (varies with whether) Normal seeding: Healthy, strong, vigorus Abnormal seedling: without root, thin and diseased
Activity-3: Hands-on: Seed bed preparation and sowing seeds Creating seed bed and sowing seed
Prepare raised bed 1-1.5 m wide with any convenient length
Level/ bund the bed properly
Keep 50 cm ally between beds for management
80-100 g seed m-2 is appropriate to get healthy seedling (One acre land can be sown by seedlings from 3-3.5 kg of cleaned, healthy seeds)
Seeds sown uniformly 5-7 hours after bed preparation. Maintenance of seed bed
Medium fertile soil does not require fertilizers
Unfertile soil needs compost/cow-manure @ 2 kg m-2
If seedlings are found dull green, apply 7 g urea m-2
In case of sulfur deficiency add 10 gm gypsum m-2
Weeding is required for healthy growth of rice seedlings
Spray recommended insecticides as and when necessary. Uprooting the seedlings: Irrigate bed before pulling to ensure minimize root damage.
Activity-4: Land Preparation and transplanting Select appropriate land (Seed bed/Main land)
Free from flood
Free from shade
Near to an irrigation channel
Medium fertile land with clay-loam soil
Permits frequent and easy inspection
Irrigate land 7 days before plowing to make soil soft & allow weed/unwanted rice seed germinated
Plow land 4/5 times followed by laddering to make well puddled and uniform level Clean stubble after every laddering Good land preparation ensures: Homogenous stand by receiving equal nutrient &
water and a strong initial start over weeds Depth of planting: 2-3 cm Spacing: Plant to plant: 20 - 30 cm Line to line: 15 - 20 cm
Plant only one seedling in a hill to ensure genetic purity Fill the gap within 7 days in case of seedling mortality
11
C. FFS SESSION-2 (WEEK-3): (I) NUTRIENT MANAGEMENT, (II) INSECT (LEAF
ROLLER)
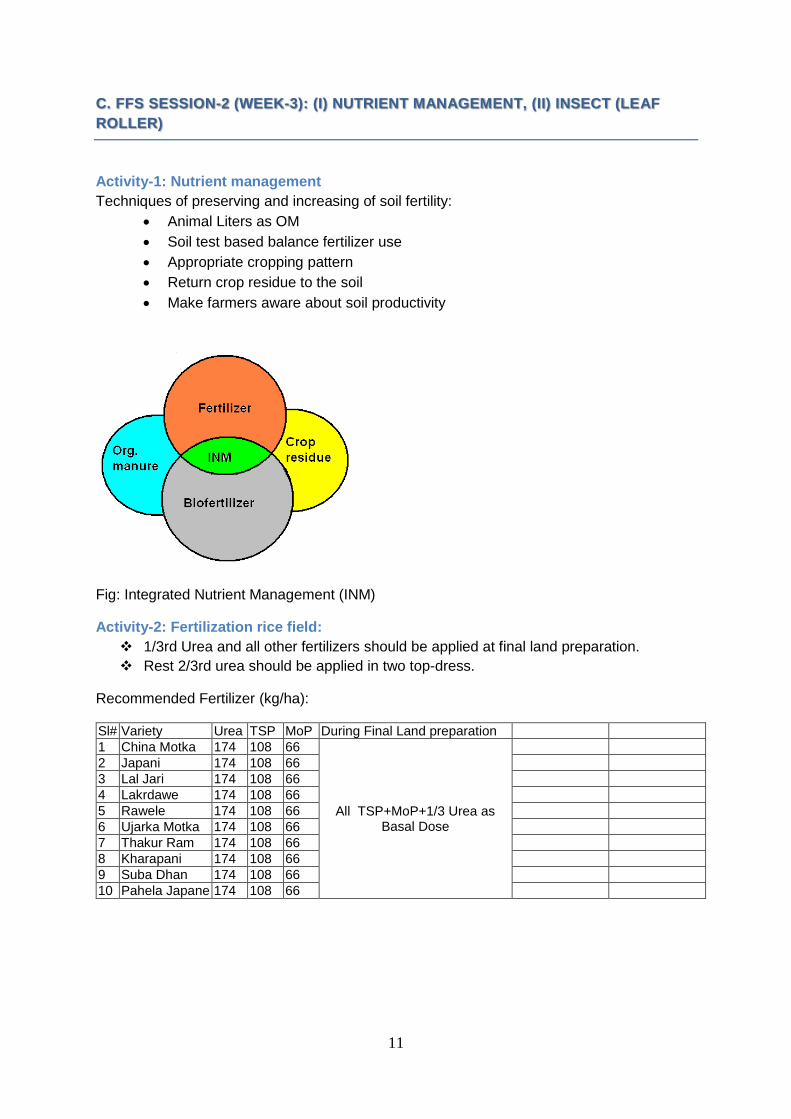
Activity-1: Nutrient management
Techniques of preserving and increasing of soil fertility:
Animal Liters as OM
Soil test based balance fertilizer use
Appropriate cropping pattern
Return crop residue to the soil
Make farmers aware about soil productivity
Fig: Integrated Nutrient Management (INM)
Activity-2: Fertilization rice field:
1/3rd Urea and all other fertilizers should be applied at final land preparation.
Rest 2/3rd urea should be applied in two top-dress.
Recommended Fertilizer (kg/ha):
Sl# Variety Urea TSP MoP During Final Land preparation
1 China Motka 174 108 66
All TSP+MoP+1/3 Urea as Basal Dose
2 Japani 174 108 66
3 Lal Jari 174 108 66
4 Lakrdawe 174 108 66
5 Rawele 174 108 66
6 Ujarka Motka 174 108 66
7 Thakur Ram 174 108 66
8 Kharapani 174 108 66
9 Suba Dhan 174 108 66
10 Pahela Japane 174 108 66
12
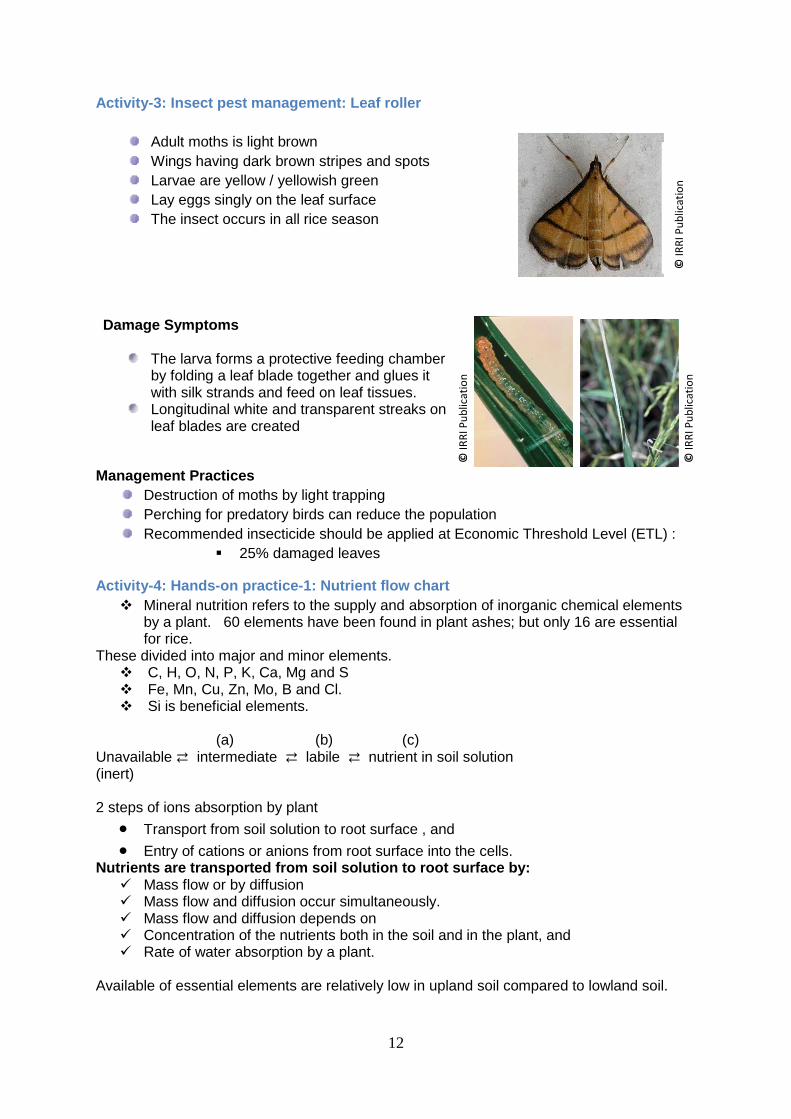
Activity-3: Insect pest management: Leaf roller
Adult moths is light brown
Wings having dark brown stripes and spots
Larvae are yellow / yellowish green
Lay eggs singly on the leaf surface
The insect occurs in all rice season
Damage Symptoms
The larva forms a protective feeding chamber by folding a leaf blade together and glues it with silk strands and feed on leaf tissues.
Longitudinal white and transparent streaks on leaf blades are created
Management Practices
Destruction of moths by light trapping
Perching for predatory birds can reduce the population
Recommended insecticide should be applied at Economic Threshold Level (ETL) :
25% damaged leaves
Activity-4: Hands-on practice-1: Nutrient flow chart
Mineral nutrition refers to the supply and absorption of inorganic chemical elements by a plant. 60 elements have been found in plant ashes; but only 16 are essential for rice.
These divided into major and minor elements. C, H, O, N, P, K, Ca, Mg and S Fe, Mn, Cu, Zn, Mo, B and Cl. Si is beneficial elements.
(a) (b) (c) Unavailable ⇄ intermediate ⇄ labile ⇄ nutrient in soil solution (inert) 2 steps of ions absorption by plant
Transport from soil solution to root surface , and
Entry of cations or anions from root surface into the cells. Nutrients are transported from soil solution to root surface by:
Mass flow or by diffusion Mass flow and diffusion occur simultaneously. Mass flow and diffusion depends on Concentration of the nutrients both in the soil and in the plant, and Rate of water absorption by a plant.
Available of essential elements are relatively low in upland soil compared to lowland soil.
© IR
RI P
ub
licat
ion
© IR
RI P
ub
licat
ion
©
IRR
I Pu
blic
atio
n
13
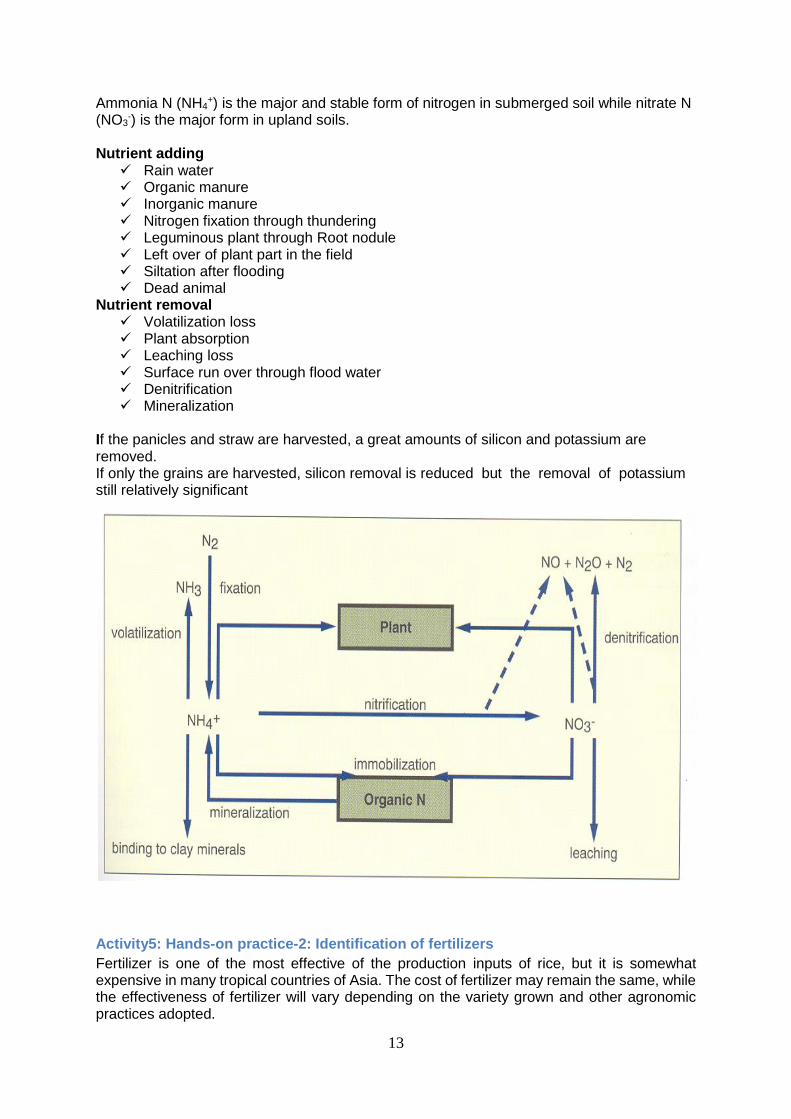
Ammonia N (NH4+) is the major and stable form of nitrogen in submerged soil while nitrate N
(NO3-) is the major form in upland soils.
Nutrient adding
Rain water Organic manure Inorganic manure Nitrogen fixation through thundering Leguminous plant through Root nodule Left over of plant part in the field Siltation after flooding Dead animal
Nutrient removal Volatilization loss Plant absorption Leaching loss Surface run over through flood water Denitrification Mineralization
If the panicles and straw are harvested, a great amounts of silicon and potassium are removed. If only the grains are harvested, silicon removal is reduced but the removal of potassium still relatively significant
Activity5: Hands-on practice-2: Identification of fertilizers
Fertilizer is one of the most effective of the production inputs of rice, but it is somewhat expensive in many tropical countries of Asia. The cost of fertilizer may remain the same, while the effectiveness of fertilizer will vary depending on the variety grown and other agronomic practices adopted.
14
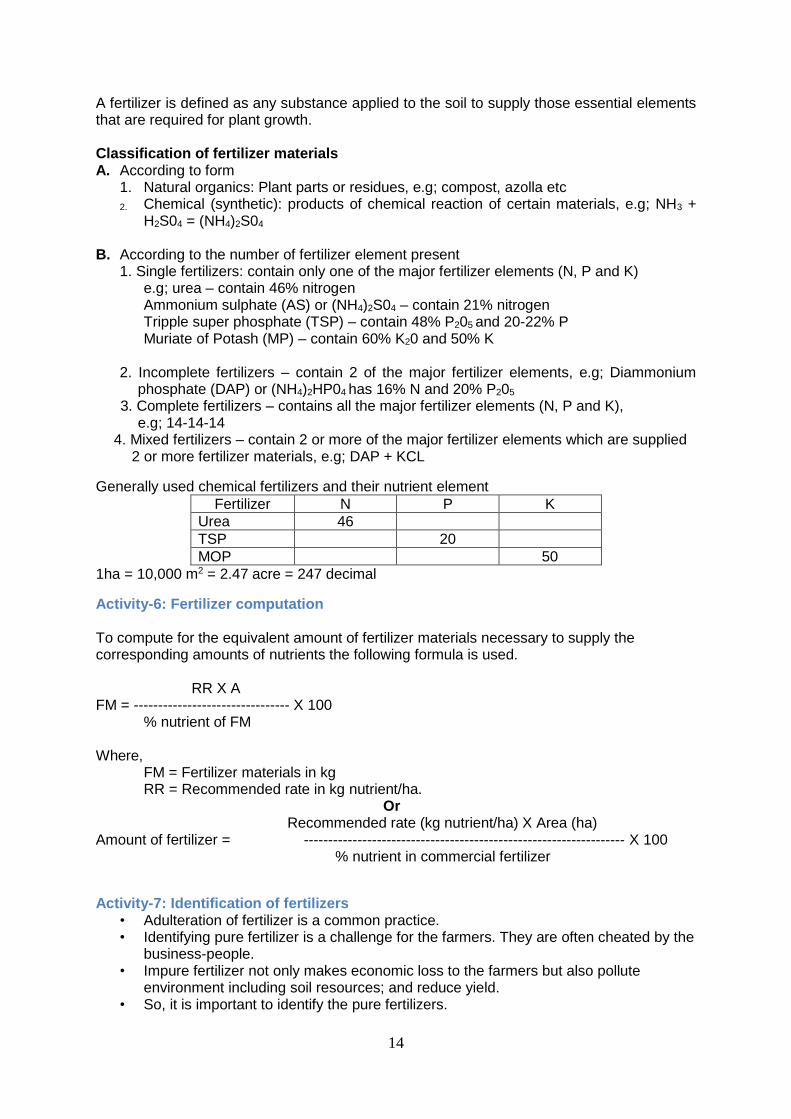
A fertilizer is defined as any substance applied to the soil to supply those essential elements that are required for plant growth. Classification of fertilizer materials A. According to form
1. Natural organics: Plant parts or residues, e.g; compost, azolla etc
2. Chemical (synthetic): products of chemical reaction of certain materials, e.g; NH3 + H2S04 = (NH4)2S04
B. According to the number of fertilizer element present
1. Single fertilizers: contain only one of the major fertilizer elements (N, P and K) e.g; urea – contain 46% nitrogen
Ammonium sulphate (AS) or (NH4)2S04 – contain 21% nitrogen Tripple super phosphate (TSP) – contain 48% P205 and 20-22% P Muriate of Potash (MP) – contain 60% K20 and 50% K 2. Incomplete fertilizers – contain 2 of the major fertilizer elements, e.g; Diammonium
phosphate (DAP) or (NH4)2HP04 has 16% N and 20% P205
3. Complete fertilizers – contains all the major fertilizer elements (N, P and K), e.g; 14-14-14
4. Mixed fertilizers – contain 2 or more of the major fertilizer elements which are supplied 2 or more fertilizer materials, e.g; DAP + KCL
Generally used chemical fertilizers and their nutrient element
Fertilizer N P K
Urea 46
TSP 20
MOP 50
1ha = 10,000 m2 = 2.47 acre = 247 decimal
Activity-6: Fertilizer computation To compute for the equivalent amount of fertilizer materials necessary to supply the corresponding amounts of nutrients the following formula is used. RR X A FM = -------------------------------- X 100 % nutrient of FM Where,
FM = Fertilizer materials in kg RR = Recommended rate in kg nutrient/ha.
Or Recommended rate (kg nutrient/ha) X Area (ha) Amount of fertilizer = ------------------------------------------------------------------ X 100 % nutrient in commercial fertilizer
Activity-7: Identification of fertilizers • Adulteration of fertilizer is a common practice. • Identifying pure fertilizer is a challenge for the farmers. They are often cheated by the
business-people. • Impure fertilizer not only makes economic loss to the farmers but also pollute
environment including soil resources; and reduce yield. • So, it is important to identify the pure fertilizers.
15
Points to observe during buying fertilizer: • The packet/bag should be properly packed and labeled (sealed). • Correct weight of the fertilizer bag • Manufacturing date and expiry date should be properly written. • Correct size of the fertilizer. • Condition of fertilizer inside the bag (melting? solid?)
DAP: • Heat a small amount of DAP on a metal spoon. If it melts with ammonia-smell within
one minutes then there is no impurity in it. – If melt partially then partially impure. – If doesn't melt al all then it is impure DAP.
• Hold a handful of DAP for a while. If your hand starts sweets then DAP is pure. • Make a solid ball with DAP and lime - if smells of ammonia come out then it is pure.
Urea: • Heat a small amount of urea on a metal spoon. If it melts with ammonia-smell within
one minutes then there is no impurity in it. • All the bits will be equal in size.
Potash: • Put one spoon potash in half-glass water. stire it. if totally melt then no impurity.
ZnSO4 • Small amount on hand with equal amount of potassium sulphate make the hand cool.
Activity-8: Hands-on practice-3: Layout of trial plots
Layout: Means the way in which the parts of something such as a garden or a building are arranged. Meaningful experimental / demonstration results depend partly on an exact plot layout. The most important things need to be consideration for laying out plots:
o the size of the entire area, o length, o width, o number of treatments/varieties, o replications, o objectives of the experiment/demonstration etc.
Selection of an experiment / demonstration site
Size of the site: can accommodate the number of treatments/varieties, alleys, guard rows etc.
Land and soil character: Representative of the environment and locality Adequate soil fertility Irrigation and drainage facilities Access to road Tall building trees, street light etc. should be avoided Topography, hydrology etc. must be consistent with the objectives of the
experiment/ Demonstration Avoid previous experimental plot e.g. green manure experiment where residual
effect may present.
Laying out of plot in the field
Materials needed: Thread, Stakes, and Measuring Tap etc.
Steps involved in laying out of plots 1. Establish the first base line
o a. Stake two point and tie thread between them o b. Preferably, make the 1 m base line parallel to one of the border levees

16
o c. Distance between the levees and the base line will depend upon the purpose of the planting.
2. Establish the second base line o a. Stake two other points and tie thread so that it is perpendicular to the 1 m
line o b. Right angles between the two base lines is to be established by using a
note book or applying the Pythagorean equation 32+42=52 o c. Distance between the levees and the base line varies depending upon the
purpose of the planting. 3. Measure the sides of the entire plot
o Measure the length and width along the established base lines and mark with stakes
o b. Then stake the fourth corner by measuring of the same length and width. 4. Measure the individual plot
o Measure the sides of treatment plots, alleyways, and replication, Mark them with stakes
o Do this on opposite length and width o Connect corresponding stakes with string.
Note: Levees may be constructed after the outline has been established. Good layout enhances
o Proper plant development can only be attained if the crop is well managed from planting to harvesting.
o Management will be much easier if the field is planted in straight rows.
17
D. FFS SESSION-3 (WEEK-5): (I) GROWTH STAGE; (II) UREA APPLICATION
Activity-1: Growth stage
The development of the rice plant may be divided into the following three phases: 1. Vegetative phases - from seed germination to panicle initiation. 2. Reproductive phases - from panicle initiation to flowering. 3. Ripening phases - from flowering to maturity.
These phases may be subsequently divided into different growth stages or period.
1. Vegetative Phases
During the vegetative phase, the plant undergoes the following stages: a. Germination stage: The vegetative phase begins with germination of seed. Rice seed
germinated by the emergence of radicle or coleoptile from the germinating embryo. b. Seedling stage: This stage follows seed germination and the seedling develops
seminal roots. Seedling stage is generally considered from germination until development of the fifth leaf. During this stage, the seedling absorbs most of the endosperm. Transplanting or recovery period: Only in the transplanting method have this stage. It covers the period from uprooting of the seedling to full recovery. Direct seeded rice plants do not have this stage.
c. Tillering stage: This starts with the appearance of the first tiller from the axillary bud in one of the lowermost nodes. The number of tillers increases, at a point more rapidly (active tillering stage), until the maximum tiller number (maximum tillering stage) is reached. Then some tillers die and the number of tillers declines and levels off. The plant stops tillering after the tertiary tillers have been produced.
d. Internode elongation stage: This stage started with elongation of internode.
Component phases of the vegetative growth
The vegetative phase is the most variable among all the growth phases of rice plant. This phase is markedly affected by the prevailing day length and temperature and can be subdivided into the following two component phases:
A. Basic Vegetative Phase (BVP) or Active Vegetative Phase (AVP). B. Photoperiod Sensitive Phase (PSP) or Lag Vegetative Phase (LVP).
The basic or active vegetative phase is the minimum period of vegetative growth required by the plant before it will initiate panicle primordium. The usual variations of day length have little or no effect on its duration. However, in certain varieties, temperature may either shorten or lengthen its duration. The photoperiod sensitive or lag vegetative phase is that portion of the vegetative phase in which the flowering date is determined by the day length to which the plant is exposed. It is therefore from the end of the basic vegetative phase to panicle initiation. Only the photoperiod sensitive varieties have this component phase.
2. Reproductive Phase
a. Panicle initiation to booting stage: The reproductive phase begins just before or after the maximum tillering stage, depending on variety and environment. This phase is marked by the initiation of the panicle primordium of microscopic dimension on the growth shoot. As the young panicle develops, it becomes visible to the naked eye in a few days. This stage somewhere included the booting stage also.
Booting is the latter part of the panicle development stage. About 16 days after visual panicle initiation, the sheath of the flag leaf swells. This swelling of the flag leaf sheath is called booting.
18
The time of occurrence of internode elongation stage differs among varieties. With late maturing varieties, the accelerated elongation of the upper internodes may begin considerably earlier than the reproductive phase. With early maturity varieties, elongation may begin after panicle initiation.
b. Heading stage: This stage is followed by the emergence of panicle out of the flag leaf sheath. Emergence continues until 90-100% of the panicles are out of the sheaths.
c. Flowering stage: Flowering (blooming) or anthesis begins with the production of the
first dehiscing anthers in the terminal spikelets on the panicle branches. Flowering continues successively until all spikelets in the panicles bloom. Pollination and fertilization then follow.
3. Ripening Phase
The rice grain develops after pollination and fertilization. Grain development is a continuous process and the grain undergoes distinct changes before it fully matures.
a. Milk stage: The contents of the caryopsis are first watery but later turn milky in
consistency. b. Dough stage: The milky caryopsis turn into soft dough and subsequently into hard
dough. c. Maturity stage: The individual grain is mature when the caryopsis is fully developed in
size and is hard, clear and free from greenish tint. This stage is complete when more than 90% of the grains are fully ripened.
Approximate dates of occurrence of some Growth stages of rice
Stage Date of occurrence from seeding Date of occurrence before maturity
Panicle initiation.
About 60-70 days after seeding for 130-days non-sensitive varieties and
variable in sensitive varieties.
70-75 days from date of maturity regardless of variety
Booting. About 75 days after seeding for 130-days non- sensitive varieties and
variable in sensitive varieties.
About 55 days from date of maturity regardless of variety
Flowering About 100 days after seeding for 130-days non- sensitive varieties and variable in sensitive varieties.
25-35 days from date of maturity regardless of variety.
Approximate duration of the Growth phases Phase Duration
Basic vegetative phase Lag vegetative phase
25-65 days for most varieties. Varies greatly according to day length in seasonal varieties.
Reproductive phase About 35 days regardless of variety.
Ripening phase 25-35 days regardless of variety.
Growth phases in relation to yield
Grain yield of the rice plant is a function of three yield components:
a. Number of panicle per hill or per unit area.
b. Number of filled spikelets per panicle.
c. Mean weight of individual grains.
Number of panicles per plant to a large degree is determined during the vegetative phase,
number of filled spikelets per panicle during the reproductive phase, and the weight of a single
grain during the ripening phase.
19
Cultural practices in relation to growth phase
a. Fertilizer application: Fertilizer is generally applied in the vegetative growth phase of the rice crop. Since our soil is not so deficient in Phosphorous and Potash, these two fertilizers are used as basal application. However, Nitrogen fertilizer is needed in a higher quantity particularly in case of high yielding varieties. Previously 50% of the total Nitrogen fertilizer was recommended to be applied as basal does and the rest splitted as top dress. But recent researches have shown that basal application of Nitrogen is not necessary. All Nitrogen can be applied as top dress provided it is thoroughly incorporated with the soil. Nitrogen application at the active tillering stage will increase the number of panicle per plant or unit area. When applied at maximum tillering or panicle initiation stage, this will increase the number of filled spikelets per panicle and the mean weight of individual rice grains. Nitrogen application after panicle initiation will not give economically higher yield.
b. Weeding: Weed control is extremely important for increasing rice yield. Weeding should also be done at the vegetative phase as and when necessary. Weeding after panicle initiation is almost useless. It is better to do weeding and incorporation of the top-dressed nitrogen fertilizer simultaneously.
c. Water requirement: Standing water is not necessary for rice production. Alternate wetting and drying through the growth phases is sufficient to produce a good harvest of a rice crop. But standing water is helpful in controlling weed, decreasing ineffective tillers and efficient utilization of the nitrogen fertilizer. Water stress at any stage of the crop growth is harmful. Maximum yield reduction will occur when the crop suffers from water stress at panicle initiation stage. On the other hand, water should be drained out at hard dough stage so that the field becomes almost dry at maturity. This will enhance ripening of the crop.
d. Pesticide application: Pesticide should be applied as and when necessary. But proper care should be taken at the time of anthesis, when the spikelets remain open. Either the anthesis period should be avoided for pesticide application or it should be done in the afternoon when spikelets close. If the contact poisons hit the floral parts inside the spikelets, severe sterility might occur.
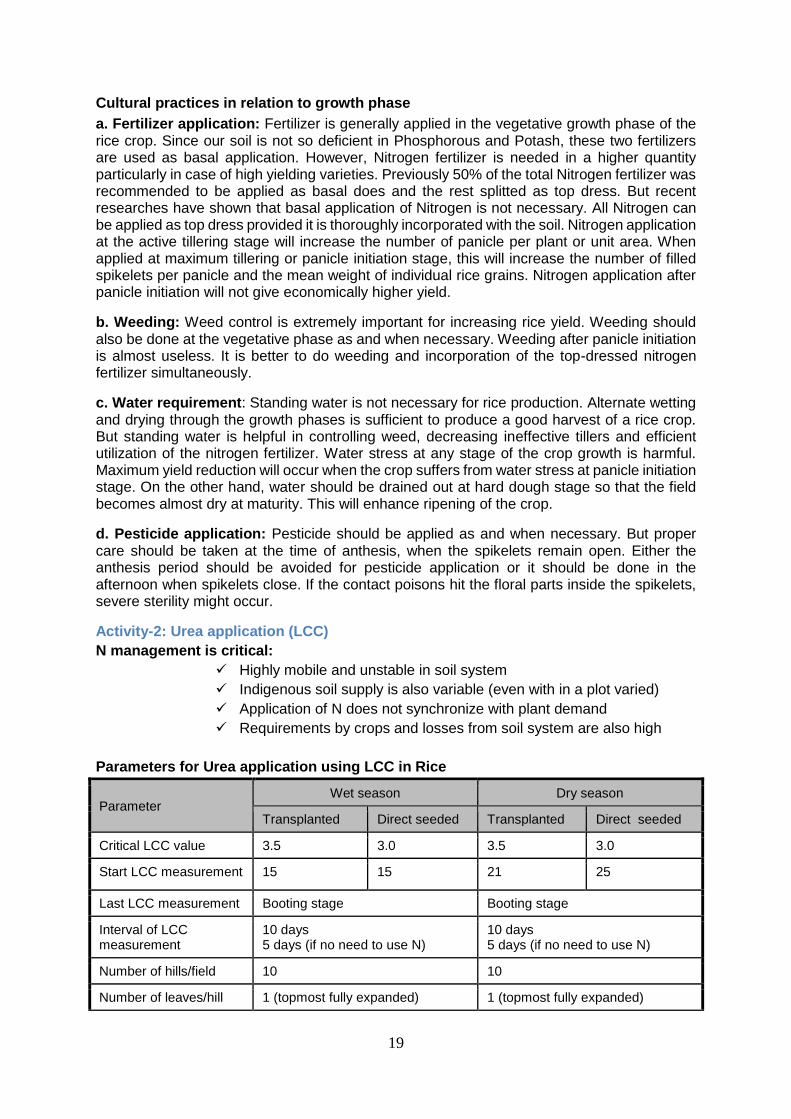
Activity-2: Urea application (LCC)
N management is critical:
Highly mobile and unstable in soil system
Indigenous soil supply is also variable (even with in a plot varied)
Application of N does not synchronize with plant demand
Requirements by crops and losses from soil system are also high
Parameters for Urea application using LCC in Rice
Parameter Wet season Dry season
Transplanted Direct seeded Transplanted Direct seeded
Critical LCC value 3.5 3.0 3.5 3.0
Start LCC measurement 15 15 21 25
Last LCC measurement Booting stage Booting stage
Interval of LCC measurement
10 days 5 days (if no need to use N)
10 days 5 days (if no need to use N)
Number of hills/field 10 10
Number of leaves/hill 1 (topmost fully expanded) 1 (topmost fully expanded)
20
Time of N application Bellow critical value (≥ 6 LCC reading out of 10)
Bellow critical value (≥ 6 LCC reading out of 10)
Amount of Urea (kg/h) 56 67 (170g)
Put the leaf under the shade of body during measurement
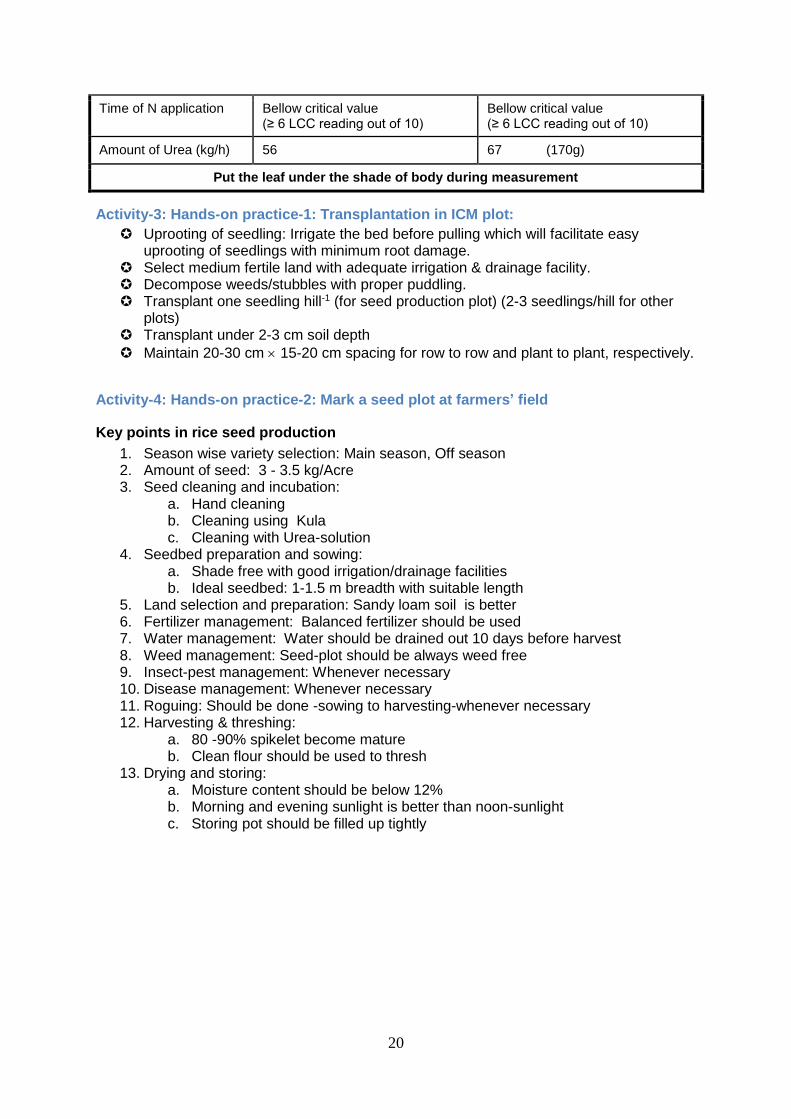
Activity-3: Hands-on practice-1: Transplantation in ICM plot:
Uprooting of seedling: Irrigate the bed before pulling which will facilitate easy uprooting of seedlings with minimum root damage.
Select medium fertile land with adequate irrigation & drainage facility. Decompose weeds/stubbles with proper puddling. Transplant one seedling hill-1 (for seed production plot) (2-3 seedlings/hill for other
plots) Transplant under 2-3 cm soil depth
Maintain 20-30 cm 15-20 cm spacing for row to row and plant to plant, respectively.
Activity-4: Hands-on practice-2: Mark a seed plot at farmers’ field
Key points in rice seed production
1. Season wise variety selection: Main season, Off season 2. Amount of seed: 3 - 3.5 kg/Acre 3. Seed cleaning and incubation:
a. Hand cleaning b. Cleaning using Kula c. Cleaning with Urea-solution
4. Seedbed preparation and sowing: a. Shade free with good irrigation/drainage facilities b. Ideal seedbed: 1-1.5 m breadth with suitable length
5. Land selection and preparation: Sandy loam soil is better 6. Fertilizer management: Balanced fertilizer should be used 7. Water management: Water should be drained out 10 days before harvest 8. Weed management: Seed-plot should be always weed free 9. Insect-pest management: Whenever necessary 10. Disease management: Whenever necessary 11. Roguing: Should be done -sowing to harvesting-whenever necessary 12. Harvesting & threshing:
a. 80 -90% spikelet become mature b. Clean flour should be used to thresh
13. Drying and storing: a. Moisture content should be below 12% b. Morning and evening sunlight is better than noon-sunlight c. Storing pot should be filled up tightly
21
E. FFS SESSION-4 (WEEK-7): INTRODUCTION TO INSECTICIDE (GRANULAR,
LIQUID, POWDER)
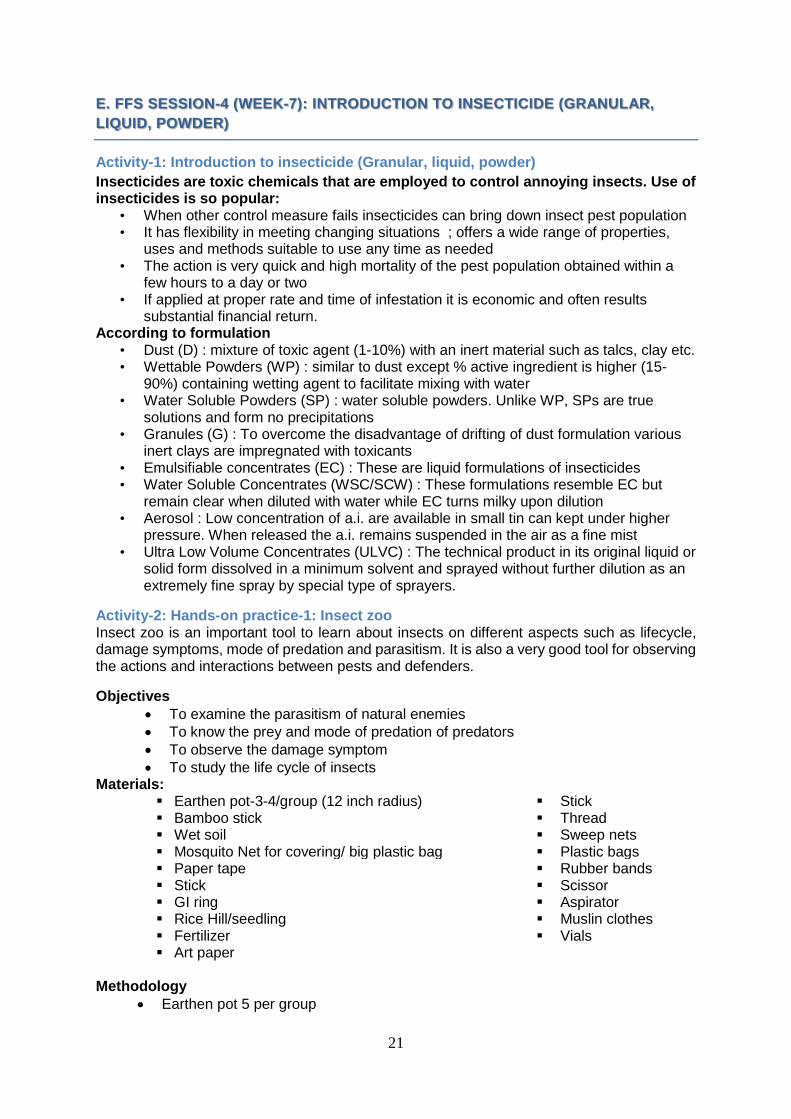
Activity-1: Introduction to insecticide (Granular, liquid, powder)
Insecticides are toxic chemicals that are employed to control annoying insects. Use of insecticides is so popular:
• When other control measure fails insecticides can bring down insect pest population • It has flexibility in meeting changing situations ; offers a wide range of properties,
uses and methods suitable to use any time as needed • The action is very quick and high mortality of the pest population obtained within a
few hours to a day or two • If applied at proper rate and time of infestation it is economic and often results
substantial financial return. According to formulation
• Dust (D) : mixture of toxic agent (1-10%) with an inert material such as talcs, clay etc. • Wettable Powders (WP) : similar to dust except % active ingredient is higher (15-
90%) containing wetting agent to facilitate mixing with water • Water Soluble Powders (SP) : water soluble powders. Unlike WP, SPs are true
solutions and form no precipitations • Granules (G) : To overcome the disadvantage of drifting of dust formulation various
inert clays are impregnated with toxicants • Emulsifiable concentrates (EC) : These are liquid formulations of insecticides • Water Soluble Concentrates (WSC/SCW) : These formulations resemble EC but
remain clear when diluted with water while EC turns milky upon dilution • Aerosol : Low concentration of a.i. are available in small tin can kept under higher
pressure. When released the a.i. remains suspended in the air as a fine mist • Ultra Low Volume Concentrates (ULVC) : The technical product in its original liquid or
solid form dissolved in a minimum solvent and sprayed without further dilution as an extremely fine spray by special type of sprayers.
Activity-2: Hands-on practice-1: Insect zoo Insect zoo is an important tool to learn about insects on different aspects such as lifecycle, damage symptoms, mode of predation and parasitism. It is also a very good tool for observing the actions and interactions between pests and defenders.
Objectives
To examine the parasitism of natural enemies
To know the prey and mode of predation of predators
To observe the damage symptom
To study the life cycle of insects Materials:
Earthen pot-3-4/group (12 inch radius) Stick Bamboo stick Thread Wet soil Sweep nets Mosquito Net for covering/ big plastic bag Plastic bags Paper tape Rubber bands Stick Scissor GI ring Aspirator Rice Hill/seedling Muslin clothes Fertilizer Vials Art paper
Methodology
Earthen pot 5 per group
22
Pot size (12 inch diameter)
Each member of a sub-group will be instructed to collect insect(s) or combination of insects after discussion with their respective facilitator, and accordingly those will be released to insect zoo for the study.
Data will be collected in a supplied format regularly, either in text or in picture or in both.
After completion of one study, they will be instructed to set up of another study.
All data collection, compilation and comparison of results will be made by the participants
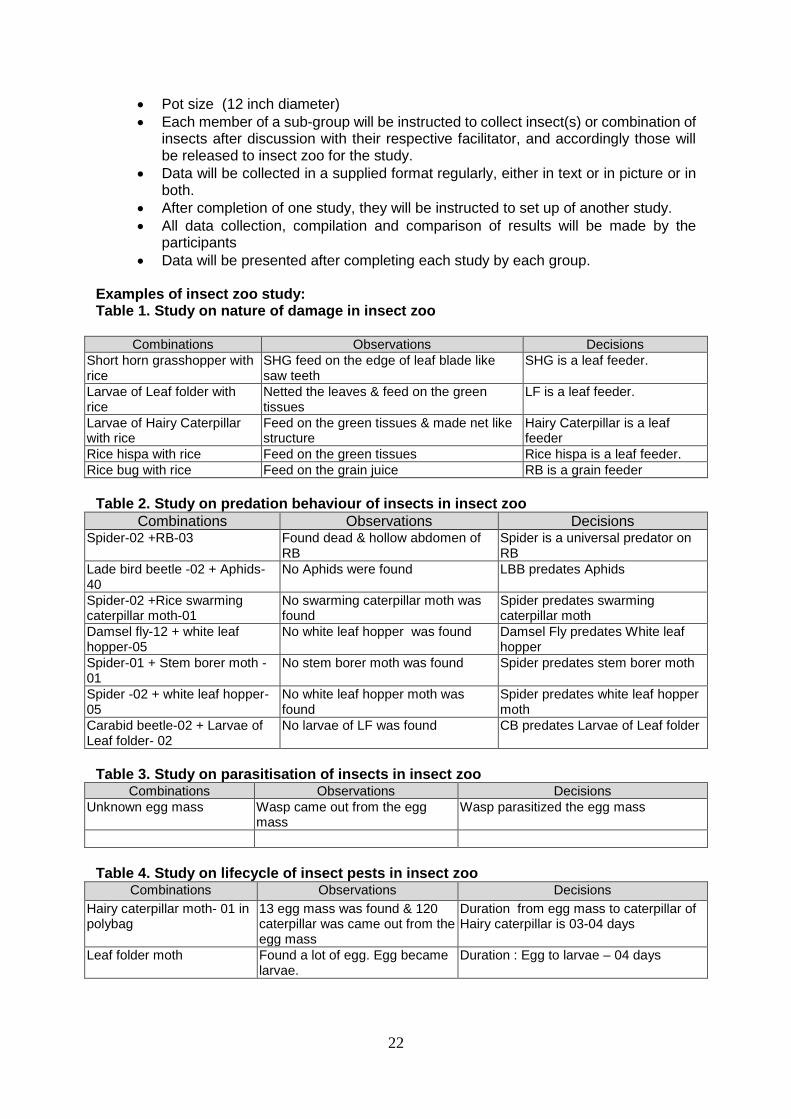
Data will be presented after completing each study by each group. Examples of insect zoo study: Table 1. Study on nature of damage in insect zoo
Combinations Observations Decisions
Short horn grasshopper with rice
SHG feed on the edge of leaf blade like saw teeth
SHG is a leaf feeder.
Larvae of Leaf folder with rice
Netted the leaves & feed on the green tissues
LF is a leaf feeder.
Larvae of Hairy Caterpillar with rice
Feed on the green tissues & made net like structure
Hairy Caterpillar is a leaf feeder
Rice hispa with rice Feed on the green tissues Rice hispa is a leaf feeder.
Rice bug with rice Feed on the grain juice RB is a grain feeder
Table 2. Study on predation behaviour of insects in insect zoo
Combinations Observations Decisions Spider-02 +RB-03 Found dead & hollow abdomen of
RB Spider is a universal predator on RB
Lade bird beetle -02 + Aphids-40
No Aphids were found LBB predates Aphids
Spider-02 +Rice swarming caterpillar moth-01
No swarming caterpillar moth was found
Spider predates swarming caterpillar moth
Damsel fly-12 + white leaf hopper-05
No white leaf hopper was found Damsel Fly predates White leaf hopper
Spider-01 + Stem borer moth -01
No stem borer moth was found Spider predates stem borer moth
Spider -02 + white leaf hopper-05
No white leaf hopper moth was found
Spider predates white leaf hopper moth
Carabid beetle-02 + Larvae of Leaf folder- 02
No larvae of LF was found CB predates Larvae of Leaf folder
Table 3. Study on parasitisation of insects in insect zoo
Combinations Observations Decisions
Unknown egg mass Wasp came out from the egg mass
Wasp parasitized the egg mass
Table 4. Study on lifecycle of insect pests in insect zoo
Combinations Observations Decisions
Hairy caterpillar moth- 01 in polybag
13 egg mass was found & 120 caterpillar was came out from the egg mass
Duration from egg mass to caterpillar of Hairy caterpillar is 03-04 days
Leaf folder moth Found a lot of egg. Egg became larvae.
Duration : Egg to larvae – 04 days
23
Activity-3: Hands-on practice-2: Gap filling Should be done within 10 days after transplanting
F. FFS SESSION-5 (WEEK-8): (I) WEED; (II) WATER MANAGEMENT
Activity-1: Weed management
Weeds deteriorate seed quality by sharing nutrient & water with rice plant and mixing seed with rice seed.
Timing of weed control: keep weed free up to 30-40 DAT in dry season and 40-50 DAT in winter season.
Weed impacts following way: Compete with plants for sunlight, moisture & soil nutrients Act as alternate hosts for insects- pests/disease pests. Reduce fertilizer use efficiency Reduce efficiency of irrigation system Reduce quality and quantity of harvest.
Weed management:
Stubble cleaning after every laddering can control weeds. Use of weed free seed Keep levees and irrigation canals free of weeds Keep tools and machinery clean Keep animal manure free of weed seed by proper decomposition Keep non-farm areas clean. Initial plowing buries weeds, allow germinate their seeds and decomposed by later
plowings. Rotary weeding followed by a hand weeding for weeds closer to the rice hills. Weedicides are very effective in weed control Starting from transplanting to harvesting weed should be removed as and when seen
in a seed plot.
Activity-2: Water management in rice seed production Water management techniques
Water stress from PI-early grain filling stage results under-weight grain Excess water after transplanting reduces tillering ability Too much water during grain filling reduces seed quality Irrigation water should be applied at 2-3 cm depth 3 days after transplanting (also control
weed) At tillering stage, alternate wetting and drying techniques can be applied to save
water. Water should be drained out from seed plot 7 days before harvest
Harvesting rain water: small pond of 2 m depth can facilitate 2/1 irrigation with stored rain water.
Levee management: A 15 cm high levee can hold rain water and help to face occasional drought in main season.
Activity-3: Hands-on practice-1: Set up Defoliation and Detillering trials DETILLERING TRIAL
There are some insects like stem borers and gall midges which feed inside the stem of the rice plant. From vegetative to reproductive stage, some insect species especially rice stem borer and gall midge cause damage to the tillers as well as heads which results in enormous
24
loss to the crop. Due to their infection, the tillers become unproductive or even die. Rice stem borer causes dead heart and white head symptoms whereas silver shoot symptom is caused by the gall midge. In most cases farmers become very much anxious with the damage symptoms on the plants and get worried for the subsequent yield losses. Usually they use chemical pesticides to control the pests. But with a few exceptions, use of chemical pesticide is just wastage of money and hazardous to the environment, as controlling internal feeders with pesticides is very difficult and usually not needed. In fact, rice plants have an enormous capacity to compensate its tiller loss by producing new tillers especially, when plant is affected at the early and mid tillering stage. This detillering trial is designed to see the simulation capacity of the plants by artificial cutting of the tillers as it would be happened by the internal feeders. It shows the participants that the rice plants can compensate by producing new tillers if some tillers are being damaged by internal feeders at early to mid tillering stage without affecting the yield significantly. Objectives
To understand that the rice plant has the tremendous capacity to compensate the certain amount of damaged tillers
To know that the rice plant is able to compensate its losses up to certain stage of life
To be aware of that the tiller damage at early growth stage has no effect on yield and therefore, there is no need to waste money for pesticide application
Materials
Rice field
Bamboo stick
Scissors
Plastic bags
Marker pen
Sign board
Tag for marking
Thread ball
Data collection format
Note book and ball pen
Scale for measuring height
Methodology
Treatment -3 (T1= 0% Tiller cut, T2 = 10% Tiller cut and T3 = 25% Tiller cut)
Plot size – 2m × 2m each plot Parameters for data collection
Name and number of pest from randomly selected 3 hills
Name and number of defender from randomly selected hills
Each time data will be collected from the previously selected 3 hills
Yield (kg/ha) from each plot
DEFOLIATION TRIAL
During vegetative stage, some insect species damage the leaves of the rice plants. For instance, Rice Hispa is the most important leaf feeder which causes enormous loss to the crop. Other than that whorl maggot, leaf folder, case worm, rice-swarming caterpillar, army worm, grasshopper and cricket can also cause leave damage at various stages of the crop. In most cases farmers become very much anxious with the damage symptoms on the plants and get worried for the subsequent yield losses. Usually they use chemical pesticides to control the pests. But with a few exceptions, use of chemical pesticide is just wastage of money and hazardous to the environment. Rice plants have an enormous capacity to compensate for damaged leaves. Especially, when plants become damaged during the early and mid tillering stage, it can quickly compensate by producing new leaves and extra tillers.
25
This defoliation trial is designed to see the simulation capacity of the plants by artificial leaf cutting as it would be happened by the leaf feeder. It shows the participants that the rice plants can compensate by producing new leaves after some leaves being damaged by leaf feeders at early to mid tillering stage without affecting the yield significantly. Objectives
To understand that the rice plant has the tremendous capacity to compensate the certain amount of damaged leaves
To know that the rice plant is able to compensate its losses up to certain stage of life
To be aware of that the leaf damage at early growth stage has no effect on yield and therefore, there is no need to waste money for pesticide application
Materials
Sign board
Bamboo stick
Scissors
Plastic bags
Marker pen
Tag for marking
Thread ball
Data collection format
Note book and ball pen
Scale for measuring height/length Methodology
Treatment - 3 (T1= 0% leaf cut, T2 = 25% leaf cut and T3 = 50% leaf cut)
Plot size – 2m × 2m each plot Parameters for data collection
Name and number of pest from randomly selected 3 hills
Name and number of defender from randomly selected hills
Each time data will be collected from the previously selected 3 hills
Yield (kg/ha) from each plot
Activity-4: Hands-on practice-2: 1st weeding
26
G. FFS SESSION-6 (WEEK-10): AGRO-ECOSYSTEM ANALYSIS (AESA)
Activity-1: Agro-Ecosystem Analysis (AESA)
Concept of AESA:
Ecology is the relationship between life and environment, and Agro-ecology is the ecology in relation to agriculture.
Ecosystem - is an interacting system in which an organism lives with other and cannot live with the absence of other (when it relates of agriculture is called agro-ecosystem).
Components of AESA:
Seeds/seedlings/plants, Soil, Nutrients, , Pests & Defender, Micro-organisms, Light Wind, Water, Humidity etc.
Benefit of AESA :
AESA provides an better understanding of Seeds/seedlings/plants, Soil, Nutrients, Pests & Defender, Micro-organisms, Light Wind, Water, Humidity etc.
It helps to know the current status of above components.
Through AESA, farmer could be able to take appropriate measures at different stages of plant growth.
It empowers farmer to make efficient decision maker for better farm practices.
AESA is a environment friendly practice that ensures and sustainable eco-system. Objectives of AESA are as follows:
Esurience of a better yield.
Learning process by seeing and doing.
Provide a good understanding about the inter relation of the elements of agro-ecosystem resulting an awareness about the influence of the same.
AESA helps farmers in taking decision for integrated crop management by observing and analyzing field situation.
Activity-2: Insect pest management: Brown Plant Hopper (BPH):
The adult hopper is brown colored
It may be long winged (macropterous or short-winged (brachypterous)
Both adult & nymph suck sap from the Stem
It is a serious pest of Rice
Photo
Damage Symptom • Nymphs are whitish and gradually tuning brown • Both adult and nymph crowded at the base of the rice plant and suck sap from
stem • Direct feeding by a large number of hoppers cause the plants to dry up and is
known as hopper burn
Photo
BPH transmit Grassy Stunt and Ragged stunt virus diseases
Control Measures • Light trapping • Using wider plant spacing • Draining out of water • Avoidance of top dressing of N fertilizer in endemic areas • Cultivation of early maturing varieties • Cultivation of BPH resistant variety (BRRI dhan 35) • Insecticide should be applied, if 2-4 gravid female or 10 nymph/hill are present in
50% hill.
Photo
Activity-3: Hands-on practice: AESA-1
27
H. FFS SESSION-7 (WEEK-12): INTEGRATED PEST MANAGEMENT (IPM)
Activity-1: Integrated Pest Management (IPM)
A pest management system that uses all suitable techniques and methods in as compatible manner as possible and maintains the pest populations at levels below those causing economic injury IPM: a broad interdisciplinary approach is taken using scientific principles of crop protection to combine into a single cropping system a variety of management strategies and tactics to reduce pest populations. Objective:
Conserve beneficial insects and other organisms
Judicial use of chemical pesticides
Reduce side effects and after effects of pesticide use
Not allowing pests to active resistance or tolerance to pests
Ensure ecological balance and pollution free environment
Reduce production cost.
IPM involve combinations of control techniques to optimize pest according to local conditions. Components of IPM are:
• Cultural • Mechanical • Biological • Chemical • Social, etc.
Total dependence upon any single control measure or management tactic will fail at times with devastating losses 1. CULTURAL CONTROLS
Crop rotation: BPH prone areas jute can be inserted Polyculture: strip cropping, which again creates the habitat diversity favorable to
natural control. Trap cropping: pickleworms will concentrate in squash planted near cucumbers, and
the squash plants can be destroyed. Appropriate cultural practices:
Keeping field weed free Changing time of application and quantity of fertilizers. Excessive use of urea can increase pest intensity e.g., yellow stemborer, leaf roller
etc. On the other hand application of urea can reduce thrips attack. Proper irrigation management: Flooding field can reduce swarming caterpillar
whereas drying field can control caseworm. Proper spacing: Narrow spacing increases brown plant hopper incidence.
2. MECHANICAL CONTROL
Perching: to aid insect feeding birds Light trapping: can attract moths and other insects Hand picking: picking of stem borer egg mass Plough down stubbles: can control stem borer Sweep netting: can control hispa Leaf clipping: Destroys eggs and grubs of rice hispa Scare birds: can control bird damage
3. BIOLOGICAL CONTROL
28
Host Plant Resistance: The property that enables a plant to avoid, tolerate or recover from injury by the insect population that would cause greater damage to other plants of the same species (that doesn’t have the resistant property) under similar environmental condition.
Conserving beneficial animals by Cultivating legume crops in levee Placing straw in levee after harvest Giving time to find out shelter by beneficial insects after harvest (not ploughing field
immediately after harvest) Perching for insect feeding birds Avoid misuse/overuse of pesticide
Steps to be followed:
Select a resistant or tolerant variety
Maintain proper distance between rows and lines
Monitor pest situation regularly: Sampling
% DH, WH, Onion shoot calculation
% Leaf damage/leaf area damage
% hill damage
Categories Insect ETL
Internal Feeder:
Stem borer 3 female moths or egg mass/m2
10 – 15% dead heart upto maximum tillering stage
5% white head after maximum tillering stage
75 deadhearts in 20 hills or 2 adults or 2 egg-masses/m²
Gall midge 5% Onion Shoot
Leaf Feeders Rice hispa 4 adults/hill or 35% damaged leaves
Whorl maggot
25% damaged leaves
Leaf roller
Caseworm
Swarming caterpillar
Grasshoppers
Long horned cricket
Leaf Suckers Green leafhopper 1 hopper/sweep and presence of Tungro virus occurred
Stem suckers Brown plant hopper 2-4 gravid female or 10 nymph/hill are present in 50% hill. OR 1 hopper/tiller
Mealy bug more than 5% hills are damaged
Grain sucker Rice bug 3 bugs or nymph/hill
Ear cutter Ear Cutting caterpillar
No Insecticides
29
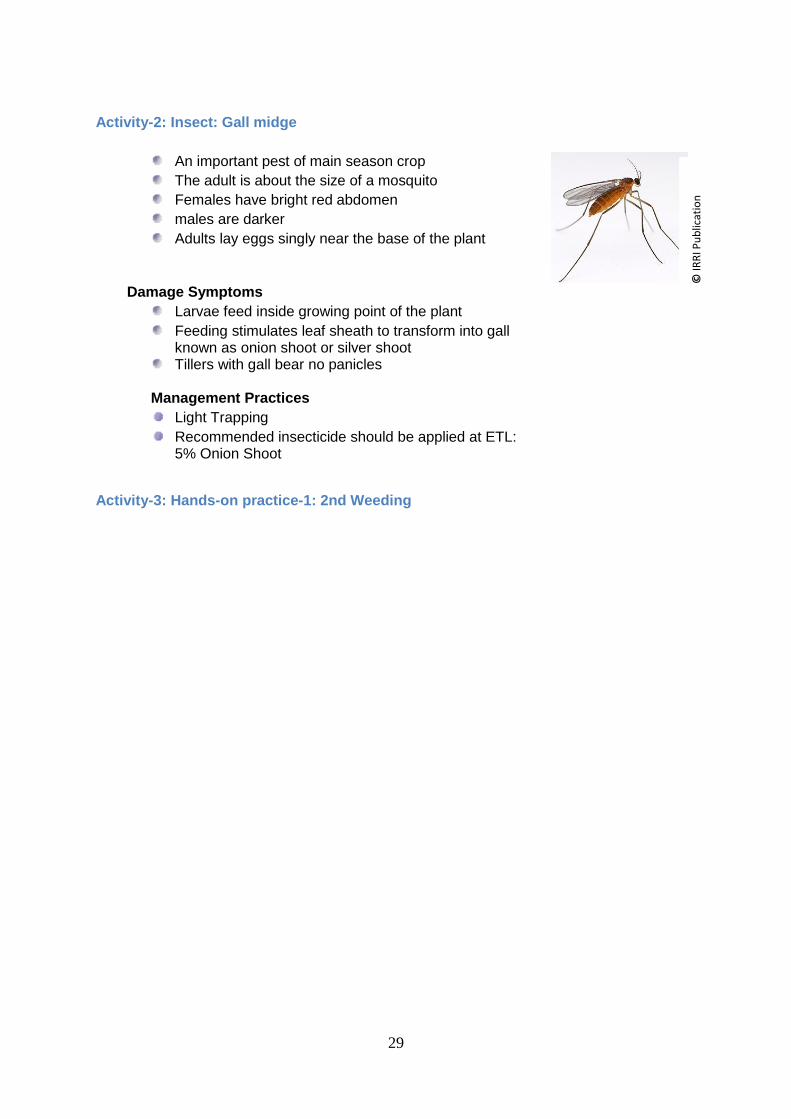
Activity-2: Insect: Gall midge
An important pest of main season crop
The adult is about the size of a mosquito
Females have bright red abdomen
males are darker
Adults lay eggs singly near the base of the plant
Damage Symptoms
Larvae feed inside growing point of the plant
Feeding stimulates leaf sheath to transform into gall known as onion shoot or silver shoot
Tillers with gall bear no panicles
Management Practices
Light Trapping
Recommended insecticide should be applied at ETL: 5% Onion Shoot
Activity-3: Hands-on practice-1: 2nd Weeding
© IR
RI P
ub
licat
ion
30
I. FFS SESSION-8 (WEEK-14): SEED PRODUCTION (ISOLATION + ROGUING)
Activity-1: Isolation distance for seed production
Isolation distance: keeping seed production plot separate from other nearby varieties to prevent cross- pollination.
Isolation distance is essential to maintain varietal purity. Although rice is a self-pollinated crop, cross pollination up to 5% may occur due to
wind blow, insects etc. The larger the seed plot the less the danger of out-crossing What is the isolation distance for rice seed production? 3 meter The isolation distance is compulsory for seed producers if they wish their multiplied
seeds certified by the appropriate authority.
Activity-2: Rouging for rice production
Removal of off-types plants is the most major aspect of rice seed production. It is essential
to eradicate all off-types to stop deterioration of seed quality by cross pollination and mixture.
Points to be considered
1. Definition and importance of rouging
2. Concept, source and identifying characters of off-types
3. Time of rouging
Definition and importance of Rouging
Rouging means removal of off-types or mixtures. Rouging in seed production plot is extremely
important as pollen from off-type plants can cause irreparable damage through cross-pollination.
Concept, source and identifying characters of off-types
Plants with heterogeneous characters in a seed production plots may be called off-types.
Sources of such off-types are
volunteer plants from previous crop in seedbed/main field,
natural out-crossing, mutation,
minor genetic variation,
developmental variation, and
mechanical mixtures during harvesting, threshing, drying, processing and packing..
Identifying characters of off-types: Off-types can be identified by observing the following
characteristics of plants:
Plant height: Plants taller and shorter than most of the population in the field.
Plants with different color of leaves, sheaths, and straws
Presence or absence of awns: if majority of plants are with awns then those without awns are off-types and vice versa.
Panicle exertion: Plants with earlier or later panicle emergence are to be considered as off-types (only those with a flowering range 2-3 days should be kept).
Angle of flag leaf: If erect flag leaf is dominant then horizontal and droopy leaves are off types.
Size, shape, and color of grains: If most of the panicles have long grains then those with medium grains are off-types. If slender grains are dominant, then bold grains are off types etc.
Diseased or insect-damaged plant.
Time of rouging
Rouging should be made continuously over the whole growing season (as and when
noticed off-types) with a special emphasis during the period of panicle emergence to early
seed development. Usually rouging is done during
Vegetative growth, Flowering,
Post flowering and Pre-harvest times.
31
J. FFS SESSION-9 (WEEK-17): (I) COMPOST PREPARATION AND USE; (II) INSECT:
ARMYWORM
Activity-1: Compost preparation and use
Organic materials as fertilizer: A mixture of all kind of organic wastes such as agril-crop by products (straw, leaves, manure etc), agril-industry by-products, ash, manure and kitchen waste, green manure etc..
• Crops residues, green manures, animal wastes, food processed by-products, agricultural industry by-products, household waste, dead-animal-body etc. can be used as alternative or supplementary sources of plant nutrient.
• Organic fertilizers can improve soil qualities and prevent soil degradation. Benefit of compost use
• Improve soil structure and texture • Improve the chemical properties of soil • Improve micro-organism activities in soil • Improve water holding capacity of soil • Balance soil temperature, aeration and toxicity due to chemical application • Supply plant nutrient for long time • Cost-effective • Environment friendly
Composting • Composting allows a mixture of organic materials to decompose under more or less
controlled conditions to produce a stable end-product which is used as fertilizer. • The materials commonly used are crop residues (rice straw, corn stubbles, grass
trimmings, or leaves), animal manures (cattle, duck, or chicken) and other farm or urban wastes.
Procedures for making compost
1. Choose a shady level area (The best place to pile the compost is a compost room with a roof)
2. Collect all waste materials (Straw, Grass, Any crop residue, Kitchen waste, Cow/goat/sheep manure, Leaves/branches/dead roots/other parts of plants, Wood dust, Ash, etc.)
3. Pile by layering different composting materials a. After every 10-15 cm layer – put 200g urea and 200g TSP evenly on the layer b. Continue until 1.2 meter height of the heap c. 7days after heap preparation, insert a stick to check the moisture inside (watery
condition) d. If more moisture – make some holes to dry out e. If more dry – put water mixed with cow-manure through the holes
4. Water the pile evenly but avoid overwatering 5. Cover the pile with plastic sheet 6. Turn the pile upside down when it has cooled down (1st turning – after 1 month ; 2nd
turning: 1 month after 1st turning a. The objectives of turning over are improving the compost aeration, radiating the
fermentation heat and turning the unfermented portion over to the inside of the compost to make full fermentation.
b. After 1-2 weeks of a high temperature stage the temperature will be go down gradually.
c. One should practice turning it over, that is turning the outer portion over to inside and inner portion to outside to let the compost temperature go down and stay
between 113ºF (45℃) to 140ºF (60℃).
32
d. If the temperature is beyond this range, one should continue turning the compost over.
e. 7. Determine full-fermented compost
a. Below 102ºF (40℃) b. The appearance of compost becomes dark brown c. No unpleasant smell but with soil aroma d. The materials become soft and fragile e. Height of the heap will be 1/3 of the initial
Composting under soil
a. Dig a hole of 3 m long x1.25 m breadth x 1 m deep b. Make a bund of 15-20 cm height from soil surface c. Base of the hole should be pressed to hard d. Spread a straw-mat (7-10 cm thick) e. Follow the composting as stated above
Activity-2: Insect pest management: Rice armyworm:
• The adult of ECC is medium sized pale brownish color • Full grown larvae have four longitudinal black stripes • Larvae cut rice panicles • Incidence occur in T. Aman season •
Damage Symptoms • Young larvae eat rice leaves or grasses from the edges • The insect is nocturnal in habit • 5-6th instar larvae require large amount of food and become
gregarious. • They cut ripe or half ripen rice panicles
INSECT CONTROL MEASURES
Brown Plant Hoppers
Spray basal portions of plants with – ORTHENE 75% a.i. - 1kg a.i. /ha or 20gm formulation/14 liters of water when spraying with knapsack sprayer or 75g/Mistblower.
Rice Armyworm Spray DIPTEREX 80% W.P. 1.12kg a.i/ha or 28ml/14 liters of water when using a knapsack sprayer, and use 8ml in a Mist blower.
Rice Leaf Roller Spray leaves with SEVIN 80% a.i 1kg a.i/ha or 17gm formulation/14 liters of water when using a knapsack sprayer and 50gm formulation/10 liters of water when using a mist blower. CARBACIDE 85 (800g/kg Carbaryl WP) at 27 gms per 14 liters of water when using knapsack sprayer and 18 gms/10 liters water when using mist blower. Spray every 2-3 week intervals.
Management of Rice Insect Pest
Cultural Control • Draining out of standing Water Whorl maggot Caseworm, BPH, WBPH • Flooding of field Swarming caterpillar, Soil insects • Destruction of infested plants Mealy bug • Early maturing variety BPH, WBPH • Wider plant spacing BPH, WBPH • Top dressing of N fertilizer Thrips

33
• Resistant variety GLH, BPH, WBPH, Tungro • Light trap All insects attracted to light • Collection & destruction Stem borer of egg masses • By Sweep net Hispa & all other insect • Burning of stubbles Stem borer, ECC, Swarming caterpillar
Mechanical Control • Leaf clipping Rice hispa (75-92% grubs can be
removed) Biological Control
• Perching Placing of branches in the field to provide perching site for predatory bird Chemical Control If necessary
34
K. FFS SESSION-10 (WEEK-20): (I) YIELD COMPONENT, (II) YIELD CALCULATION,
(III) FIELD DAY PREPARATION
Activity-1: Yield component Rice production means the total rice harvested from
a farm an area a country
Rice production can be increased in two ways: 1. Increase land area under rice cultivation (Horizontal/Extensive Expansion)
Increase rice yield (Vertical/Intensive Expansion) Yield components:
• Panicle # per unit area (usually per m2) • Spikelet # per panicle • Wt. of each individual grain (usually wt of 1000 grains calculated)
To increase rice yield, we need to increase the above components For this - use of modern technology is necessary No. of panicle
• Rice variety • Duration • Production process • Right time of sowing/transplanting • Fertilizer management • Water management • Weed management • Soil nutrient management • Insect pest/disease management
No. of spikelet • Filled grain in each panicle • Total filled grains depends on ICM • Usually 15% unfilled grain remains with a panicle • Spikelet no. determined during booting stage • Abnormal weather (Extreme high & low temp) increase unfilled grain no.
Weight of rice grains • Usually calculated with 1000 grain weight • Depends on varietal characteristics • Usually variation is minimum within a variety • Depends on:
Nutrient management Water management Insect-pest/disease management Abnormal weather
35
Activity-2: Yield calculation Calculating rice yield
= x kg
Activity-3: Field day preparation
Description of the Booths:
There are at least 7 booths in ICM-FFS Field Day. The following are the details of the booth
activities:
1. ICM Component Booth: a. 9 colored stick surrounded by colored rope b. ICM Banner hanging in the behind c. Establish ICM and FP plot at the front side of the booth d. A board describing points to increase rice yield e. A small board mentioning the booth no. f. ICM plot- Good quality rice seed in one pot; different chemical fertilizer; Cow-manure; AWD pipe; Dyke crop; bamboo Bushter; A bird and its resting tree-branch; Light trap; Hand -net; Poison-bottle; Spray-machine; Rat trap; Rice Seedling; g. Farmers plot
panicle #/m2
spikelet # per panicale 1000 grain wt (g)
Rice yield (m2
) = ------------------------------------------------------------------------
1000
panicle #/m2
spikelet # per panicale 1000 grain wt (kg)
Rice yield (m2)= ------------------------------------------------------------------------
1000 x 1000
x 10,000
Rice yield = -------------------------t/ha = x 10 t/ha
(wet grain) 1000
100 – moisture content of wet grain
Wt of dry yield = ----------------------------------- yield of wet grain
(at 14% Moisture) 100 - Moisture of dry grain
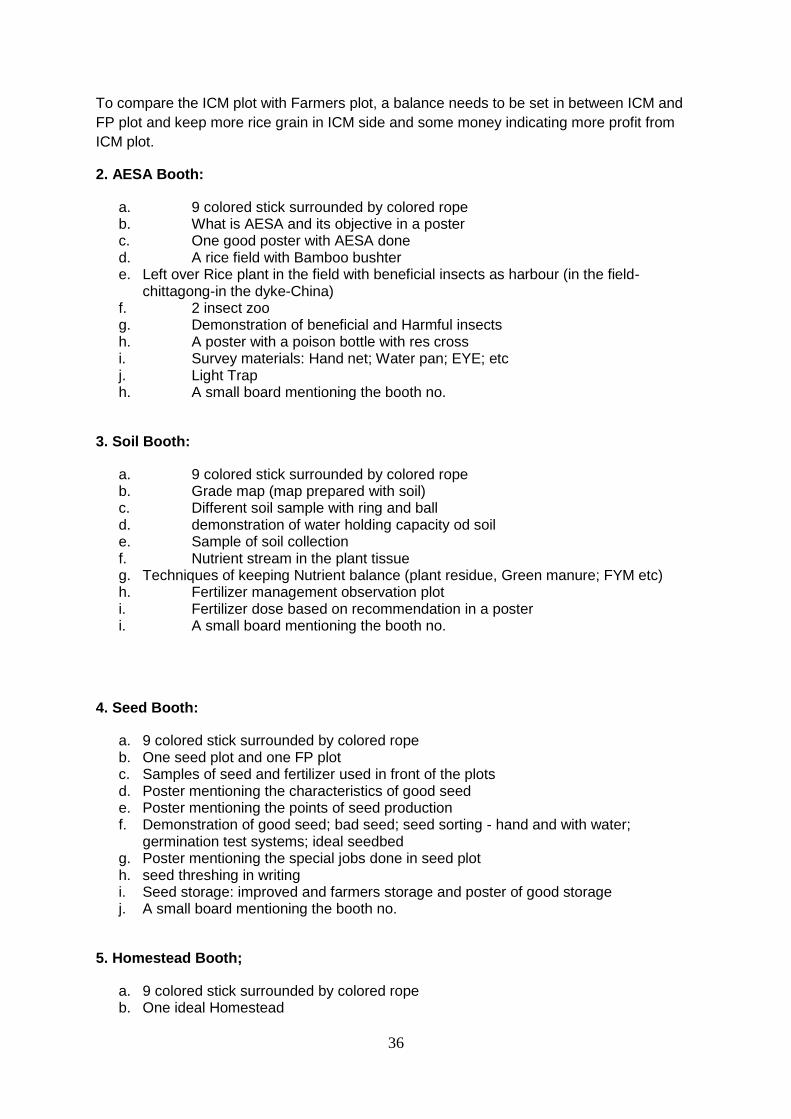
36
To compare the ICM plot with Farmers plot, a balance needs to be set in between ICM and
FP plot and keep more rice grain in ICM side and some money indicating more profit from
ICM plot.
2. AESA Booth:
a. 9 colored stick surrounded by colored rope b. What is AESA and its objective in a poster c. One good poster with AESA done d. A rice field with Bamboo bushter e. Left over Rice plant in the field with beneficial insects as harbour (in the field-
chittagong-in the dyke-China) f. 2 insect zoo g. Demonstration of beneficial and Harmful insects h. A poster with a poison bottle with res cross i. Survey materials: Hand net; Water pan; EYE; etc j. Light Trap h. A small board mentioning the booth no.
3. Soil Booth:
a. 9 colored stick surrounded by colored rope b. Grade map (map prepared with soil) c. Different soil sample with ring and ball d. demonstration of water holding capacity od soil e. Sample of soil collection f. Nutrient stream in the plant tissue g. Techniques of keeping Nutrient balance (plant residue, Green manure; FYM etc) h. Fertilizer management observation plot i. Fertilizer dose based on recommendation in a poster i. A small board mentioning the booth no.
4. Seed Booth:
a. 9 colored stick surrounded by colored rope b. One seed plot and one FP plot c. Samples of seed and fertilizer used in front of the plots d. Poster mentioning the characteristics of good seed e. Poster mentioning the points of seed production f. Demonstration of good seed; bad seed; seed sorting - hand and with water;
germination test systems; ideal seedbed g. Poster mentioning the special jobs done in seed plot h. seed threshing in writing i. Seed storage: improved and farmers storage and poster of good storage j. A small board mentioning the booth no.
5. Homestead Booth;
a. 9 colored stick surrounded by colored rope b. One ideal Homestead
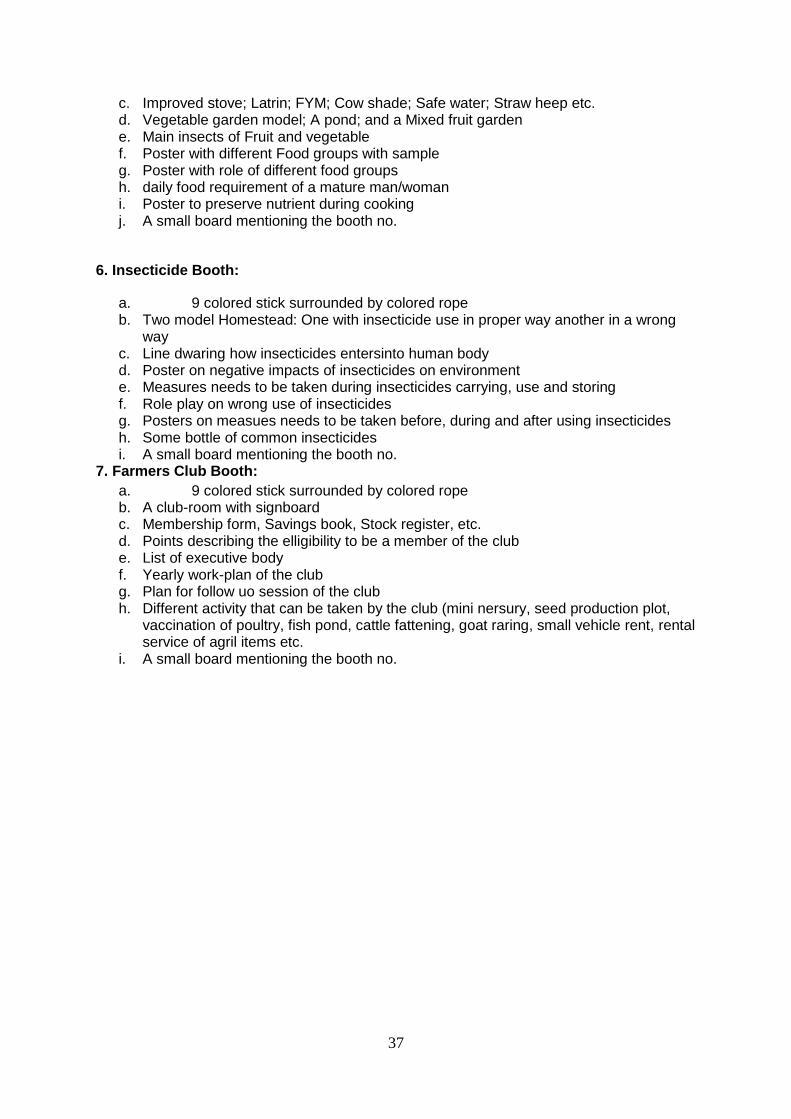
37
c. Improved stove; Latrin; FYM; Cow shade; Safe water; Straw heep etc. d. Vegetable garden model; A pond; and a Mixed fruit garden e. Main insects of Fruit and vegetable f. Poster with different Food groups with sample g. Poster with role of different food groups h. daily food requirement of a mature man/woman i. Poster to preserve nutrient during cooking j. A small board mentioning the booth no.
6. Insecticide Booth:
a. 9 colored stick surrounded by colored rope b. Two model Homestead: One with insecticide use in proper way another in a wrong
way c. Line dwaring how insecticides entersinto human body d. Poster on negative impacts of insecticides on environment e. Measures needs to be taken during insecticides carrying, use and storing f. Role play on wrong use of insecticides g. Posters on measues needs to be taken before, during and after using insecticides h. Some bottle of common insecticides i. A small board mentioning the booth no.
7. Farmers Club Booth:
a. 9 colored stick surrounded by colored rope b. A club-room with signboard c. Membership form, Savings book, Stock register, etc. d. Points describing the elligibility to be a member of the club e. List of executive body f. Yearly work-plan of the club g. Plan for follow uo session of the club h. Different activity that can be taken by the club (mini nersury, seed production plot,
vaccination of poultry, fish pond, cattle fattening, goat raring, small vehicle rent, rental service of agril items etc.
i. A small board mentioning the booth no.
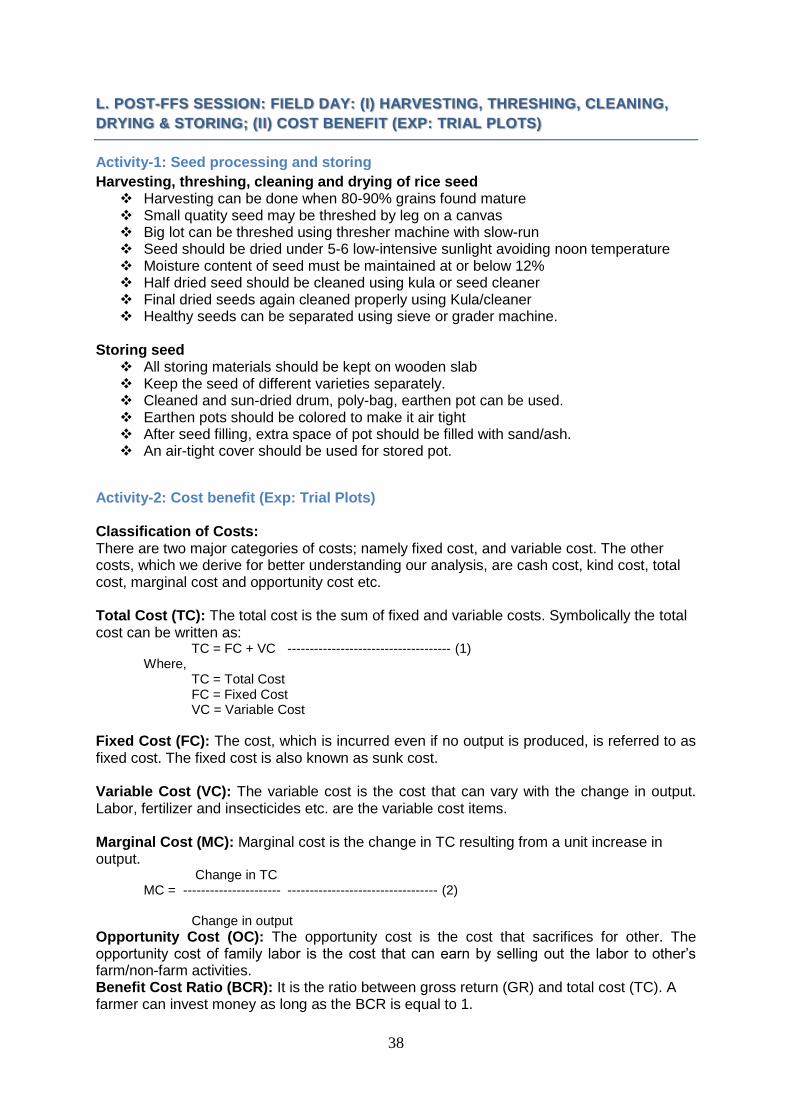
38
L. POST-FFS SESSION: FIELD DAY: (I) HARVESTING, THRESHING, CLEANING,
DRYING & STORING; (II) COST BENEFIT (EXP: TRIAL PLOTS)
Activity-1: Seed processing and storing
Harvesting, threshing, cleaning and drying of rice seed Harvesting can be done when 80-90% grains found mature Small quatity seed may be threshed by leg on a canvas Big lot can be threshed using thresher machine with slow-run Seed should be dried under 5-6 low-intensive sunlight avoiding noon temperature Moisture content of seed must be maintained at or below 12% Half dried seed should be cleaned using kula or seed cleaner Final dried seeds again cleaned properly using Kula/cleaner Healthy seeds can be separated using sieve or grader machine.
Storing seed
All storing materials should be kept on wooden slab Keep the seed of different varieties separately. Cleaned and sun-dried drum, poly-bag, earthen pot can be used. Earthen pots should be colored to make it air tight After seed filling, extra space of pot should be filled with sand/ash. An air-tight cover should be used for stored pot.
Activity-2: Cost benefit (Exp: Trial Plots) Classification of Costs: There are two major categories of costs; namely fixed cost, and variable cost. The other costs, which we derive for better understanding our analysis, are cash cost, kind cost, total cost, marginal cost and opportunity cost etc. Total Cost (TC): The total cost is the sum of fixed and variable costs. Symbolically the total cost can be written as: TC = FC + VC ------------------------------------- (1)
Where, TC = Total Cost
FC = Fixed Cost VC = Variable Cost
Fixed Cost (FC): The cost, which is incurred even if no output is produced, is referred to as fixed cost. The fixed cost is also known as sunk cost. Variable Cost (VC): The variable cost is the cost that can vary with the change in output. Labor, fertilizer and insecticides etc. are the variable cost items.
Marginal Cost (MC): Marginal cost is the change in TC resulting from a unit increase in output.
Change in TC MC = ---------------------- ---------------------------------- (2) Change in output
Opportunity Cost (OC): The opportunity cost is the cost that sacrifices for other. The opportunity cost of family labor is the cost that can earn by selling out the labor to other’s farm/non-farm activities. Benefit Cost Ratio (BCR): It is the ratio between gross return (GR) and total cost (TC). A farmer can invest money as long as the BCR is equal to 1.
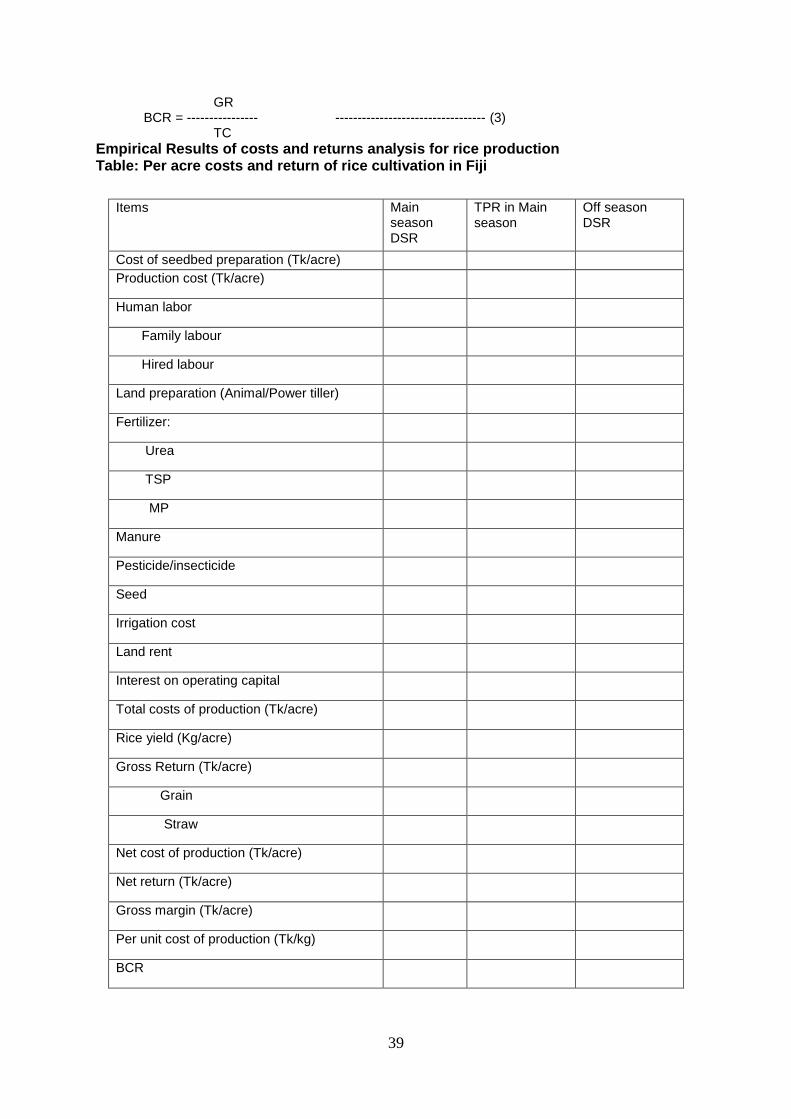
39
GR BCR = ---------------- ---------------------------------- (3) TC
Empirical Results of costs and returns analysis for rice production Table: Per acre costs and return of rice cultivation in Fiji
Items Main season DSR
TPR in Main season
Off season DSR
Cost of seedbed preparation (Tk/acre)
Production cost (Tk/acre)
Human labor
Family labour
Hired labour
Land preparation (Animal/Power tiller)
Fertilizer:
Urea
TSP
MP
Manure
Pesticide/insecticide
Seed
Irrigation cost
Land rent
Interest on operating capital
Total costs of production (Tk/acre)
Rice yield (Kg/acre)
Gross Return (Tk/acre)
Grain
Straw
Net cost of production (Tk/acre)
Net return (Tk/acre)
Gross margin (Tk/acre)
Per unit cost of production (Tk/kg)
BCR
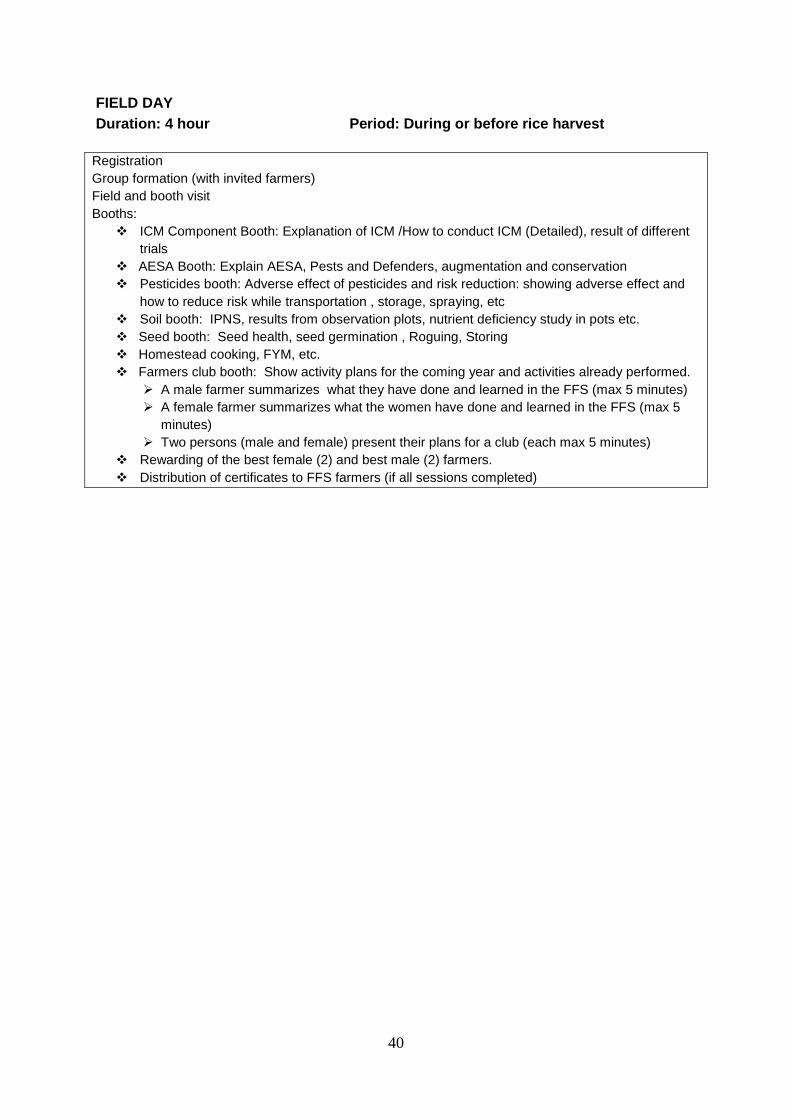
40
FIELD DAY
Duration: 4 hour Period: During or before rice harvest
Registration
Group formation (with invited farmers)
Field and booth visit
Booths:
ICM Component Booth: Explanation of ICM /How to conduct ICM (Detailed), result of different
trials
AESA Booth: Explain AESA, Pests and Defenders, augmentation and conservation
Pesticides booth: Adverse effect of pesticides and risk reduction: showing adverse effect and
how to reduce risk while transportation , storage, spraying, etc
Soil booth: IPNS, results from observation plots, nutrient deficiency study in pots etc.
Seed booth: Seed health, seed germination , Roguing, Storing
Homestead cooking, FYM, etc.
Farmers club booth: Show activity plans for the coming year and activities already performed.
A male farmer summarizes what they have done and learned in the FFS (max 5 minutes)
A female farmer summarizes what the women have done and learned in the FFS (max 5
minutes)
Two persons (male and female) present their plans for a club (each max 5 minutes)
Rewarding of the best female (2) and best male (2) farmers.
Distribution of certificates to FFS farmers (if all sessions completed)
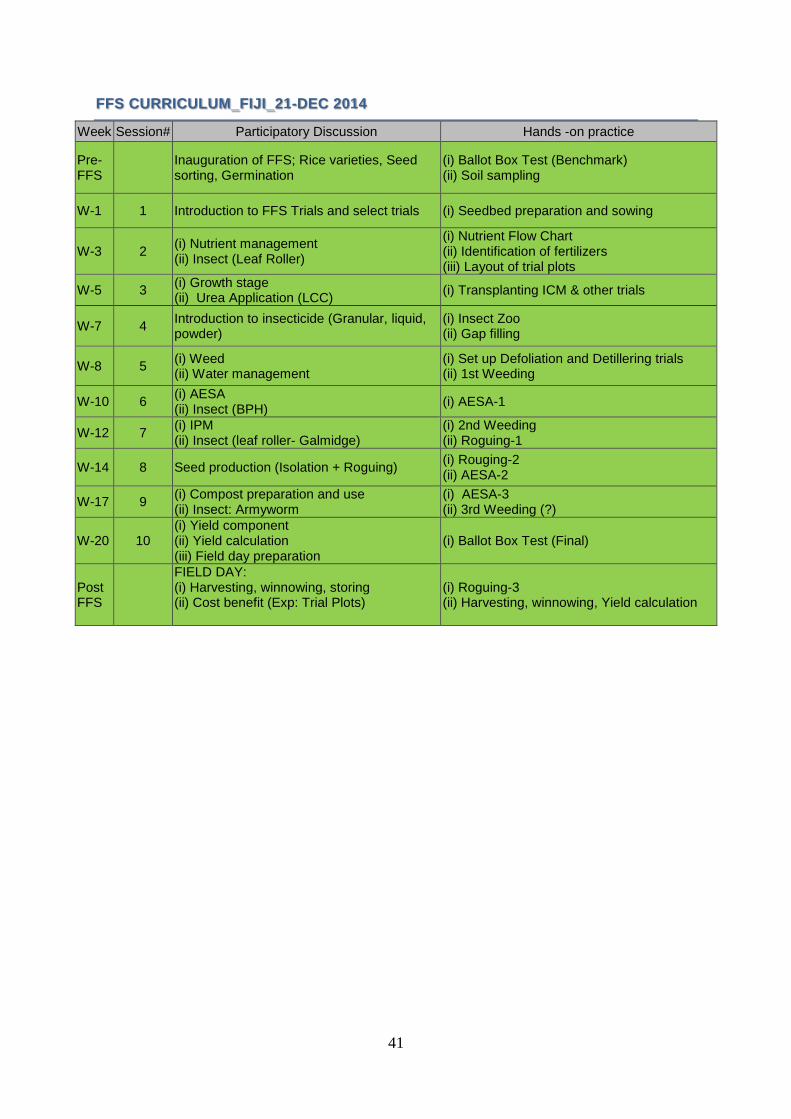
41
FFS CURRICULUM_FIJI_21-DEC 2014
Week Session# Participatory Discussion Hands -on practice
Pre-FFS
Inauguration of FFS; Rice varieties, Seed sorting, Germination
(i) Ballot Box Test (Benchmark) (ii) Soil sampling
W-1 1 Introduction to FFS Trials and select trials (i) Seedbed preparation and sowing
W-3 2 (i) Nutrient management (ii) Insect (Leaf Roller)
(i) Nutrient Flow Chart (ii) Identification of fertilizers (iii) Layout of trial plots
W-5 3 (i) Growth stage (ii) Urea Application (LCC)
(i) Transplanting ICM & other trials
W-7 4 Introduction to insecticide (Granular, liquid, powder)
(i) Insect Zoo (ii) Gap filling
W-8 5 (i) Weed (ii) Water management
(i) Set up Defoliation and Detillering trials (ii) 1st Weeding
W-10 6 (i) AESA (ii) Insect (BPH)
(i) AESA-1
W-12 7 (i) IPM (ii) Insect (leaf roller- Galmidge)
(i) 2nd Weeding (ii) Roguing-1
W-14 8 Seed production (Isolation + Roguing) (i) Rouging-2 (ii) AESA-2
W-17 9 (i) Compost preparation and use (ii) Insect: Armyworm
(i) AESA-3 (ii) 3rd Weeding (?)
W-20 10 (i) Yield component (ii) Yield calculation (iii) Field day preparation
(i) Ballot Box Test (Final)
Post FFS
FIELD DAY: (i) Harvesting, winnowing, storing (ii) Cost benefit (Exp: Trial Plots)
(i) Roguing-3 (ii) Harvesting, winnowing, Yield calculation

42
In Fiji rice, is a major source of food and has contributed to the
improvement of the livelihood of thousands of farmers relying on rice as a
main source of income. Rice has multi-dimension roles as the foundations
of food security, economic growth as well as social and political stability.
However, the Fiji rice industry increasingly weakened over the years as the
rice area and production declined while the rice yield growth has been
stagnant or marginal.
The Government has given supportive policies and incentives along with
increased investment from public and private sector to promote the rice
industry development.
This publication offers facilitators technical guidance to manage field farm
schools to support local famers in all aspects of rice crop management.
Technical knowledge gained by farmers will revitalize the rice industry in
Fiji and assist food security by alleviating dependence on rice imports.