Embed Size (px)
Citation preview

FAVORIT 34030VI EN User manual
www.devic
eman
uals.
eu
CONTENTS1. SAFETY INSTRUCTIONS . . . . . . . . . . . . . . . . . . . . . . . . . . . . . . . . . . . . . . . . . . . . . . . . . . . . . . 32. PRODUCT DESCRIPTION . . . . . . . . . . . . . . . . . . . . . . . . . . . . . . . . . . . . . . . . . . . . . . . . . . . . . 53. CONTROL PANEL . . . . . . . . . . . . . . . . . . . . . . . . . . . . . . . . . . . . . . . . . . . . . . . . . . . . . . . . . . . 54. PROGRAMMES . . . . . . . . . . . . . . . . . . . . . . . . . . . . . . . . . . . . . . . . . . . . . . . . . . . . . . . . . . . . . 65. OPTIONS . . . . . . . . . . . . . . . . . . . . . . . . . . . . . . . . . . . . . . . . . . . . . . . . . . . . . . . . . . . . . . . . . . 76. BEFORE FIRST USE . . . . . . . . . . . . . . . . . . . . . . . . . . . . . . . . . . . . . . . . . . . . . . . . . . . . . . . . . . 77. DAILY USE . . . . . . . . . . . . . . . . . . . . . . . . . . . . . . . . . . . . . . . . . . . . . . . . . . . . . . . . . . . . . . . . 108. CARE AND CLEANING . . . . . . . . . . . . . . . . . . . . . . . . . . . . . . . . . . . . . . . . . . . . . . . . . . . . . . 129. TROUBLESHOOTING . . . . . . . . . . . . . . . . . . . . . . . . . . . . . . . . . . . . . . . . . . . . . . . . . . . . . . . 13
10. TECHNICAL INFORMATION . . . . . . . . . . . . . . . . . . . . . . . . . . . . . . . . . . . . . . . . . . . . . . . . . 1611. ENVIRONMENT CONCERNS . . . . . . . . . . . . . . . . . . . . . . . . . . . . . . . . . . . . . . . . . . . . . . . . . 16
FOR PERFECT RESULTSThank you for choosing this AEG product. We have created it to give you impeccableperformance for many years, with innovative technologies that help make life simpler –features you might not find on ordinary appliances. Please spend a few minutes reading to getthe very best from it.Visit our website for:
Get usage advice, brochures, trouble shooter, service information:www.aeg.com
Register your product for better service:www.aeg.com/productregistration
Buy Accessories, Consumables and Original spare parts for your appliance:www.aeg.com/shop
CUSTOMER CARE AND SERVICEWe recommend the use of original spare parts.When contacting Service, ensure that you have the following data available.The information can be found on the rating plate. Model, PNC, Serial Number.
Warning / Caution-Safety information
General information and tips
Environmental information
Subject to change without notice.
2 www.aeg.com
www.devicemanuals.eu
have created it to give you impeccable
www.devic
eman
uals.
eu
have created it to give you impeccabletechnologies that help make life simpler –
www.devic
eman
uals.
eu
technologies that help make life simpler –features you might not find on ordinary applia
www.devic
eman
uals.
eu
features you might not find on ordinary appliances. Please spend a few minutes reading to get
www.devic
eman
uals.
eu
nces. Please spend a few minutes reading to get
Get usage advice, brochures, trouble shooter, service information:
www.devic
eman
uals.
eu
Get usage advice, brochures, trouble shooter, service information:
Register your product for better service:
www.devic
eman
uals.
eu
Register your product for better service:www.aeg.com/productregistration
www.devic
eman
uals.
eu
www.aeg.com/productregistration
Buy Accessories, Consumables and Origwww.devic
eman
uals.
eu
Buy Accessories, Consumables and Origwww.aeg.com/shopwww.de
vicem
anua
ls.eu
www.aeg.com/shop
1. SAFETY INSTRUCTIONS
Before the installation and use of the ap-pliance, carefully read the supplied in-structions. The manufacturer is not re-sponsible if an incorrect installation anduse causes injuries and damages. Alwayskeep the instructions with the appliancefor future reference.
1.1 Children and vulnerablepeople safety
WARNING!Risk of suffocation, injury or per-manent disability.
• Do not let persons, children included,with reduced physical sensory, re-duced mental functions or lack of ex-perience and knowledge use the ap-pliance. They must have supervision orinstruction for the operation of the ap-pliance by a person who is responsiblefor their safety. Do not let childrenplay with the appliance.
• Keep all packaging away from chil-dren.
• Keep all detergents away from chil-dren.
• Keep children and pets away from theappliance door when it is open.
1.2 Installation• Remove all the packaging.• Do not install or use a damaged appli-
ance.• Do not install or use the appliance
where the temperature is less than 0°C.
• Obey the installation instruction sup-plied with the appliance.
• Make sure that the appliance is instal-led below and adjacent to safe struc-tures.
Water connection• Make sure not to cause damage to the
water hoses.• Before you connect the appliance to
new pipes or pipes not used for a longtime, let the water flow until it is clean.
• The first time you use the appliance,make sure that there is no leakage.
• The water inlet hose has a safety valveand a sheath with an inner mains ca-ble.
WARNING!Dangerous voltage.
• If the water inlet hose is damaged, im-mediately disconnect the mains plugfrom the mains socket. Contact theservice to replace the water inlet hose.
Electrical connectionWARNING!Risk of fire and electrical shock.
• The appliance must be earthed.• Make sure that the electrical informa-
tion on the rating plate agrees withthe power supply. If not, contact anelectrician.
• Always use a correctly installed shock-proof socket.
• Do not use multi-plug adapters andextension cables.
• Make sure not to cause damage to themains plug and to the mains cable.Contact the service or an electrician tochange a damaged mains cable.
• Connect the mains plug to the mainssocket only at the end of the installa-tion. Make sure that there is access tothe mains plug after the installation.
• Do not pull the mains cable to discon-nect the appliance. Always pull themains plug.
• Only for UK and Ireland. The appli-ance has a 13 amp mains plug. If it isnecessary to change the fuse in the
ENGLISH 3
www.devicemanuals.eu
pliance by a person who is responsible
www.devic
eman
uals.
eu
pliance by a person who is responsible
• Keep all packaging away from chil-
www.devic
eman
uals.
eu
• Keep all packaging away from chil-
• Keep all detergents away from chil-
www.devic
eman
uals.
eu
• Keep all detergents away from chil-
• Keep children and pets away from the
www.devic
eman
uals.
eu
• Keep children and pets away from theappliance door when it is open.
www.devic
eman
uals.
eu
appliance door when it is open.
Installation
www.devic
eman
uals.
eu
Installation• Remove all the packaging.www.de
vicem
anua
ls.eu
• Remove all the packaging.• Do not install or use a damaged appli-www.de
vicem
anua
ls.eu
• Do not install or use a damaged appli-www.devicemanuals.eu
www.devicemanuals.euWARNING!
www.devic
eman
uals.
euWARNING!Dangerous voltage.
www.devic
eman
uals.
euDangerous voltage.
• If the water inlet hose is damaged, im-
www.devic
eman
uals.
eu• If the water inlet hose is damaged, im-
mediately disconnect the mains plug
www.devic
eman
uals.
eumediately disconnect the mains plugfrom the mains socket. Contact the
www.devic
eman
uals.
eu
from the mains socket. Contact theservice to replace the water inlet hose.
www.devic
eman
uals.
eu
service to replace the water inlet hose.
www.devicemanuals.eu
www.devicemanuals.eu
mains plug, use a 13 amp ASTA (BS1362) fuse.
1.3 Use• This appliance is intended to be used
in household and similar applicationssuch as:– Staff kitchen areas in shops, offices
and other working environments– Farm houses– By clients in hotels, motels and oth-
er residential type environments– Bed and breakfast type environ-
ments.
WARNING!Risk of injury.
• Do not change the specification of thisappliance.
• Put knives and cutlery with sharppoints in the cutlery basket with thepoints down or in a horizontal posi-tion.
• Do not keep the appliance door openwithout supervision to prevent to fallon it.
• Do not sit or stand on the open door.• Dishwasher detergents are dangerous.
Obey the safety instructions on thedetergent packaging.
• Do not drink and play with the water inthe appliance.
• Do not remove the dishes from theappliance until the programme iscompleted. There can be detergenton the dishes.
WARNING!Risk of electrical shock, fire orburns.
• Do not put flammable products oritems that are wet with flammableproducts in, near or on the appliance.
• Do not use water spray and steam toclean the appliance.
• The appliance can release hot steam ifyou open the door while a programmeoperates.
1.4 DisposalWARNING!Risk of injury or suffocation.
• Disconnect the appliance from themains supply.
• Cut off the mains cable and dispose ofit.
• Remove the door catch to preventchildren and pets to get closed in theappliance.
4 www.aeg.com
www.devicemanuals.eu
you open the door while a programme
www.devic
eman
uals.
euyou open the door while a programmeoperates.
www.devic
eman
uals.
euoperates.
www.devicemanuals.eu
• Do not keep the appliance door open
www.devic
eman
uals.
eu
• Do not keep the appliance door openwithout supervision to prevent to fall
www.devic
eman
uals.
eu
without supervision to prevent to fall
• Do not sit or stand on the open door.
www.devic
eman
uals.
eu
• Do not sit or stand on the open door.• Dishwasher detergents are dangerous.
www.devic
eman
uals.
eu
• Dishwasher detergents are dangerous.Obey the safety instructions on the
www.devic
eman
uals.
eu
Obey the safety instructions on thedetergent packaging.
www.devic
eman
uals.
eu
detergent packaging.
Disposal
www.devic
eman
uals.
euDisposal
www.devicemanuals.eu
www.devicemanuals.eu
www.devicemanuals.eu
www.devicemanuals.eu
WARNING!
www.devic
eman
uals.
euWARNING!Risk of injury or suffocation.
www.devic
eman
uals.
euRisk of injury or suffocation.
• Disconnect the appliance from the
www.devic
eman
uals.
eu
• Disconnect the appliance from the
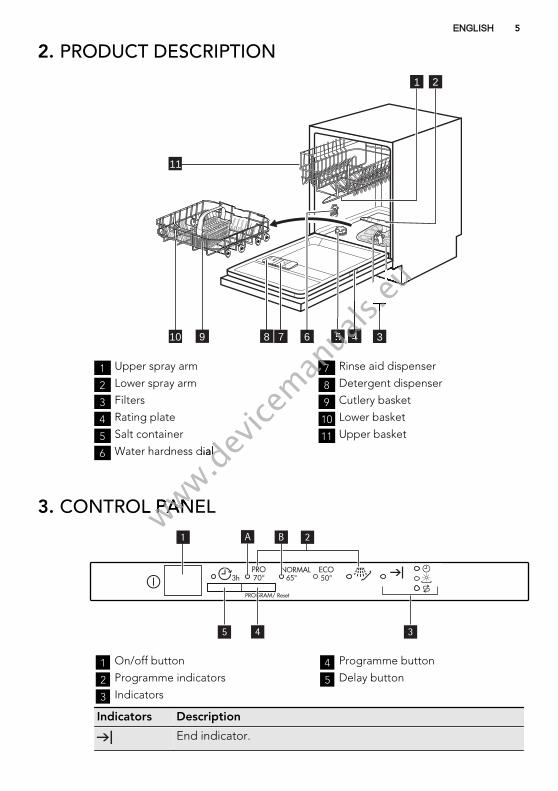
2. PRODUCT DESCRIPTION
1 2
4 379 56
11
8 10
1 Upper spray arm
2 Lower spray arm
3 Filters
4 Rating plate
5 Salt container
6 Water hardness dial
7 Rinse aid dispenser
8 Detergent dispenser
9 Cutlery basket
10 Lower basket
11 Upper basket
3. CONTROL PANEL21
345
BA
1 On/off button
2 Programme indicators
3 Indicators
4 Programme button
5 Delay button
Indicators Description
End indicator.
ENGLISH 5
www.devicemanuals.eu
www.devicemanuals.eu
www.devicemanuals.eu
www.devicemanuals.eu
www.devicemanuals.eu
4
www.devic
eman
uals.
eu4
www.devicemanuals.eu
www.devicemanuals.eu
5
www.devic
eman
uals.
eu5
www.devicemanuals.eu
www.devicemanuals.eu
www.devicemanuals.eu
www.devicemanuals.eu
www.devicemanuals.eu
www.devicemanuals.eu
www.devicemanuals.eu
www.devicemanuals.eu
Water hardness dial
www.devic
eman
uals.
eu
Water hardness dial
www.devicemanuals.eu
7
www.devic
eman
uals.
eu
7
CONTROL PANELwww.devic
eman
uals.
eu
CONTROL PANEL
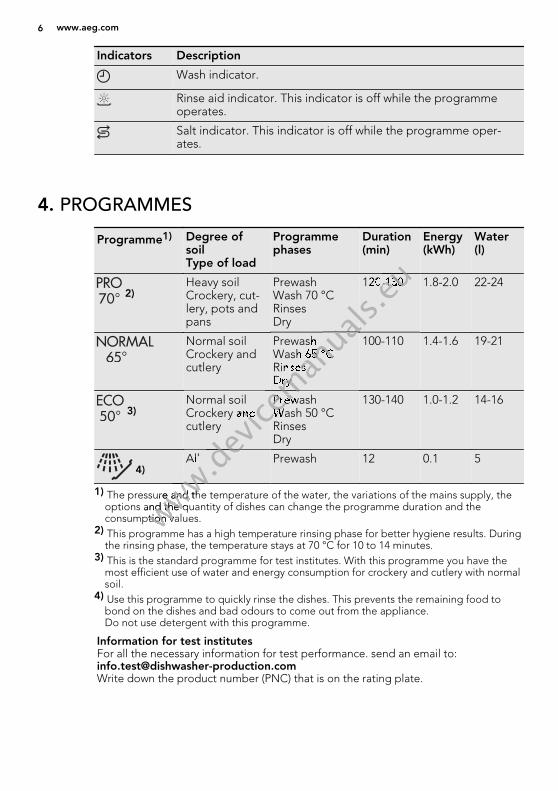
Indicators Description
Wash indicator.
Rinse aid indicator. This indicator is off while the programmeoperates.
Salt indicator. This indicator is off while the programme oper-ates.
4. PROGRAMMES
Programme1) Degree ofsoilType of load
Programmephases
Duration(min)
Energy(kWh)
Water(l)
2)Heavy soilCrockery, cut-lery, pots andpans
PrewashWash 70 °CRinsesDry
120-130 1.8-2.0 22-24
Normal soilCrockery andcutlery
PrewashWash 65 °CRinsesDry
100-110 1.4-1.6 19-21
3)Normal soilCrockery andcutlery
PrewashWash 50 °CRinsesDry
130-140 1.0-1.2 14-16
4)All Prewash 12 0.1 5
1) The pressure and the temperature of the water, the variations of the mains supply, theoptions and the quantity of dishes can change the programme duration and theconsumption values.
2) This programme has a high temperature rinsing phase for better hygiene results. Duringthe rinsing phase, the temperature stays at 70 °C for 10 to 14 minutes.
3) This is the standard programme for test institutes. With this programme you have themost efficient use of water and energy consumption for crockery and cutlery with normalsoil.
4) Use this programme to quickly rinse the dishes. This prevents the remaining food tobond on the dishes and bad odours to come out from the appliance.Do not use detergent with this programme.
Information for test institutesFor all the necessary information for test performance. send an email to:[email protected] down the product number (PNC) that is on the rating plate.
6 www.aeg.com
www.devicemanuals.eu
www.devicemanuals.eu
www.devicemanuals.eu
www.devicemanuals.eu120-130
www.devic
eman
uals.
eu120-130
www.devicemanuals.eu
www.devicemanuals.eu
Prewash
www.devic
eman
uals.
euPrewashWash 65 °C
www.devic
eman
uals.
eu
Wash 65 °CRinses
www.devic
eman
uals.
eu
RinsesDry
www.devic
eman
uals.
eu
Dry
www.devicemanuals.eu
Crockery and
www.devic
eman
uals.
eu
Crockery and
www.devicemanuals.eu
Prewash
www.devic
eman
uals.
eu
PrewashWash 50 °C
www.devic
eman
uals.
eu
Wash 50 °C
www.devicemanuals.eu
www.devicemanuals.eu
All
www.devic
eman
uals.
eu
All
www.devicemanuals.eu
www.devicemanuals.eu
www.devicemanuals.eu
www.devicemanuals.eu
www.devicemanuals.eu
www.devicemanuals.eu
www.devicemanuals.eu
www.devicemanuals.eu
The pressure and the temperature of the water, the variations of the mains supply, the
www.devic
eman
uals.
eu
The pressure and the temperature of the water, the variations of the mains supply, theoptions and the quantity of dishes can change the programme duration and thewww.de
vicem
anua
ls.eu
options and the quantity of dishes can change the programme duration and theconsumption values.www.de
vicem
anua
ls.eu
consumption values.This programme has a high temperature rinsing phase for better hygiene results. During
www.devic
eman
uals.
eu
This programme has a high temperature rinsing phase for better hygiene results. During
5. OPTIONS
5.1 Acoustic signalsThe acoustic signals operate in theseconditions:• When the programme is completed.• A malfunction occurs to the appliance.
Factory setting: on.You can deactivate the acousticsignals.
Deactivating the acoustic signals1. Press the on/off button to activate
the appliance.2. Make sure that the appliance is in
setting mode. Refer to ‘SETTINGAND STARTING A PROGRAMME’.
3. Press and hold the programme but-ton until the programme indicator (A)flashes and the programme indicator(B) comes on.
4. Press immediately the programmebutton.• The programme indicator (A)
comes on with a fixed light.• The programme indicator (B) starts
to flash.
5. Wait until the programme indicator(A) goes off and the end indicatorcomes on (the programme indicator(B) continues to flash).• The acoustic signals are on.
6. Press the programme button. Theend indicator goes off.• The acoustic signals are off.
7. Deactivate the appliance to confirmthe setting.
Activating the acoustic signals1. Refer to ‘Deactivating the acoustic
signals’, step (1) through (4).2. Wait until the programme indicator
(A) goes off. The end indicator is offand programme indicator (B) contin-ues to flash.• The acoustic signals are off.
3. Press the programme button. Theend indicator comes on.• The acoustic signals are on.
4. Deactivate the appliance to confirmthe setting.
6. BEFORE FIRST USE1. Make sure that the set level of the
water softener agrees with the waterhardness in your area. If not, adjustthe water softener. Contact your localwater authority to know the waterhardness in your area.
2. Fill the salt container.3. Fill the rinse aid dispenser.4. Open the water tap.5. Processing residues can stay in the
appliance. Start a programme to re-move them. Do not use detergentand do not load the baskets.
6.1 Adjusting the watersoftenerHard water contains a high quantity ofminerals that can cause damage to the
appliance and bad washing results. Thewater softener neutralises these miner-als.The dishwasher salt keeps the watersoftener clean and in good conditions.Refer to the table to adjust the watersoftener to the right level. It makes surethat the water softener uses the correctquantity of dishwasher salt and water.
You must adjust the water soft-ener manually and electronically.
ENGLISH 7
www.devicemanuals.eu
comes on with a fixed light.
www.devic
eman
uals.
eu
comes on with a fixed light.• The programme indicator (
www.devic
eman
uals.
eu
• The programme indicator (B
www.devic
eman
uals.
eu
B) starts
www.devic
eman
uals.
eu
) starts
Wait until the programme indicator
www.devic
eman
uals.
euWait until the programme indicator
) goes off. The end indicator is off
www.devic
eman
uals.
eu) goes off. The end indicator is offand programme indicator (
www.devic
eman
uals.
euand programme indicator (ues to flash.
www.devic
eman
uals.
euues to flash.• The acoustic signals are off.
www.devic
eman
uals.
eu• The acoustic signals are off.
3.
www.devic
eman
uals.
eu3. Press the programme button. The
www.devic
eman
uals.
euPress the programme button. Theend indicator comes on.
www.devic
eman
uals.
eu
end indicator comes on.
BEFORE FIRST USE
www.devic
eman
uals.
eu
BEFORE FIRST USEMake sure that the set level of the
www.devic
eman
uals.
eu
Make sure that the set level of thewater softener agrees with the waterwww.de
vicem
anua
ls.eu
water softener agrees with the waterhardness in your area. If not, adjustwww.de
vicem
anua
ls.eu
hardness in your area. If not, adjust
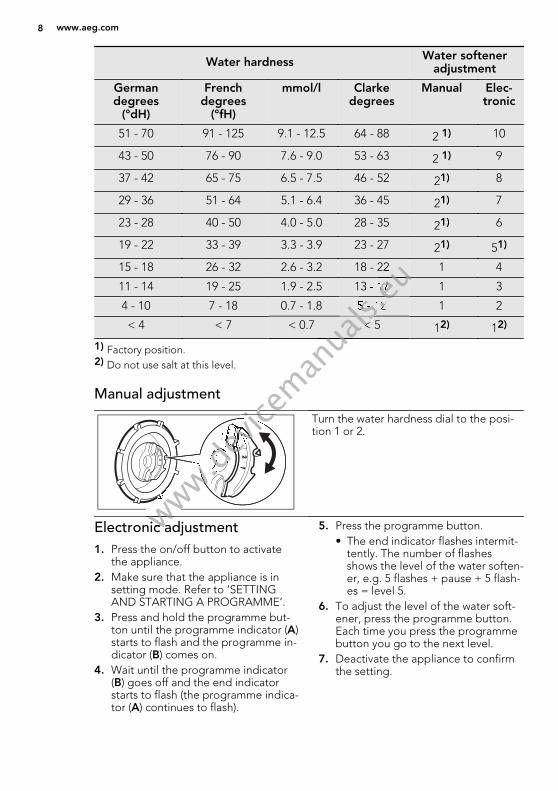
Water hardness Water softeneradjustment
Germandegrees
(°dH)
Frenchdegrees
(°fH)
mmol/l Clarkedegrees
Manual Elec-tronic
51 - 70 91 - 125 9.1 - 12.5 64 - 88 2 1) 10
43 - 50 76 - 90 7.6 - 9.0 53 - 63 2 1) 9
37 - 42 65 - 75 6.5 - 7.5 46 - 52 21) 8
29 - 36 51 - 64 5.1 - 6.4 36 - 45 21) 7
23 - 28 40 - 50 4.0 - 5.0 28 - 35 21) 6
19 - 22 33 - 39 3.3 - 3.9 23 - 27 21) 51)
15 - 18 26 - 32 2.6 - 3.2 18 - 22 1 4
11 - 14 19 - 25 1.9 - 2.5 13 - 17 1 3
4 - 10 7 - 18 0.7 - 1.8 5 - 12 1 2
< 4 < 7 < 0.7 < 5 12) 12)
1) Factory position.2) Do not use salt at this level.
Manual adjustment
Turn the water hardness dial to the posi-tion 1 or 2.
Electronic adjustment1. Press the on/off button to activate
the appliance.2. Make sure that the appliance is in
setting mode. Refer to ‘SETTINGAND STARTING A PROGRAMME’.
3. Press and hold the programme but-ton until the programme indicator (A)starts to flash and the programme in-dicator (B) comes on.
4. Wait until the programme indicator(B) goes off and the end indicatorstarts to flash (the programme indica-tor (A) continues to flash).
5. Press the programme button.• The end indicator flashes intermit-
tently. The number of flashesshows the level of the water soften-er, e.g. 5 flashes + pause + 5 flash-es = level 5.
6. To adjust the level of the water soft-ener, press the programme button.Each time you press the programmebutton you go to the next level.
7. Deactivate the appliance to confirmthe setting.
8 www.aeg.com
www.devicemanuals.eu
www.devicemanuals.eu
18 - 22
www.devic
eman
uals.
eu18 - 22
www.devicemanuals.eu
www.devicemanuals.eu13 - 17
www.devic
eman
uals.
eu13 - 17
www.devicemanuals.eu
www.devicemanuals.eu
5 - 12
www.devic
eman
uals.
eu5 - 12
www.devicemanuals.eu
www.devicemanuals.eu
< 5
www.devic
eman
uals.
eu< 5
www.devicemanuals.eu
www.devicemanuals.eu
www.devicemanuals.eu
www.devicemanuals.eu
www.devicemanuals.eu
www.devicemanuals.eu
www.devicemanuals.eu
www.devicemanuals.eu
www.devicemanuals.eu
www.devicemanuals.eu
www.devicemanuals.eu
www.devicemanuals.eu
www.devicemanuals.eu
www.devicemanuals.eu
www.devicemanuals.eu
www.devicemanuals.eu
www.devicemanuals.eu
www.devicemanuals.eu
www.devicemanuals.eu
www.devicemanuals.eu
www.devicemanuals.eu
www.devicemanuals.eu
www.devicemanuals.eu
www.devicemanuals.eu
www.devicemanuals.eu
www.devicemanuals.eu
www.devicemanuals.eu
www.devicemanuals.eu
www.devicemanuals.eu
www.devicemanuals.eu
www.devicemanuals.eu
www.devicemanuals.eu
www.devicemanuals.eu
www.devicemanuals.eu
www.devicemanuals.eu
www.devicemanuals.eu
www.devicemanuals.eu
www.devicemanuals.eu
www.devicemanuals.eu
www.devicemanuals.eu
www.devicemanuals.eu
www.devicemanuals.eu
www.devicemanuals.eu
www.devicemanuals.eu
www.devicemanuals.eu
www.devicemanuals.eu
www.devicemanuals.eu
www.devicemanuals.eu
www.devicemanuals.eu
www.devicemanuals.eu
www.devicemanuals.eu
Electronic adjustmentwww.devic
eman
uals.
eu
Electronic adjustment
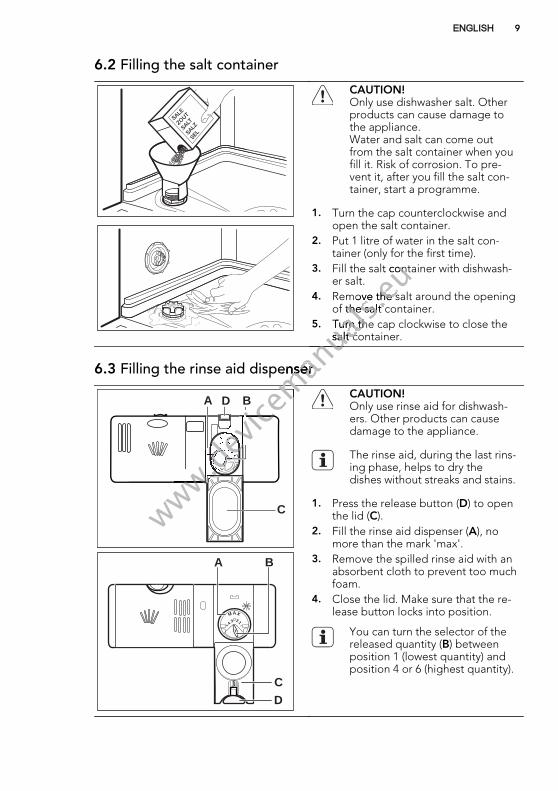
6.2 Filling the salt container
CAUTION!Only use dishwasher salt. Otherproducts can cause damage tothe appliance.Water and salt can come outfrom the salt container when youfill it. Risk of corrosion. To pre-vent it, after you fill the salt con-tainer, start a programme.
1. Turn the cap counterclockwise andopen the salt container.
2. Put 1 litre of water in the salt con-tainer (only for the first time).
3. Fill the salt container with dishwash-er salt.
4. Remove the salt around the openingof the salt container.
5. Turn the cap clockwise to close thesalt container.
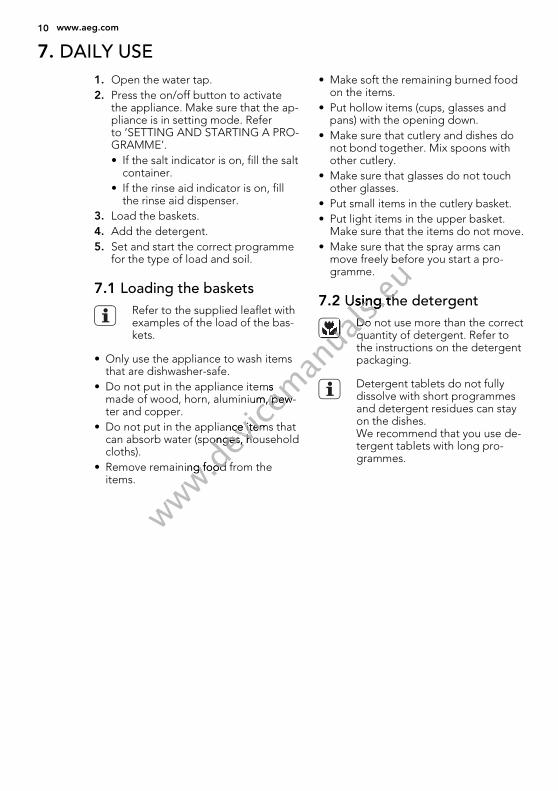
6.3 Filling the rinse aid dispenser
A BD
C
M AX
1234+ -
A B
DC
CAUTION!Only use rinse aid for dishwash-ers. Other products can causedamage to the appliance.
The rinse aid, during the last rins-ing phase, helps to dry thedishes without streaks and stains.
1. Press the release button (D) to openthe lid (C).
2. Fill the rinse aid dispenser (A), nomore than the mark 'max'.
3. Remove the spilled rinse aid with anabsorbent cloth to prevent too muchfoam.
4. Close the lid. Make sure that the re-lease button locks into position.
You can turn the selector of thereleased quantity (B) betweenposition 1 (lowest quantity) andposition 4 or 6 (highest quantity).
ENGLISH 9
www.devicemanuals.eu
Fill the salt container with dishwash-
www.devic
eman
uals.
euFill the salt container with dishwash-
Remove the salt around the opening
www.devic
eman
uals.
euRemove the salt around the openingof the salt container.
www.devic
eman
uals.
euof the salt container.Turn the cap clockwise to close the
www.devic
eman
uals.
euTurn the cap clockwise to close thesalt container.
www.devic
eman
uals.
eusalt container.
www.devicemanuals.eu
www.devicemanuals.eu
Filling the rinse aid dispenser
www.devic
eman
uals.
eu
Filling the rinse aid dispenser
www.devicemanuals.eu
www.devicemanuals.eu
www.devicemanuals.eu
www.devicemanuals.eu
www.devicemanuals.eu
www.devicemanuals.eu
www.devicemanuals.eu
www.devicemanuals.eu
www.devicemanuals.eu
www.devicemanuals.eu
www.devicemanuals.eu
www.devicemanuals.eu
www.devicemanuals.eu
www.devicemanuals.eu
www.devicemanuals.eu
www.devicemanuals.eu
www.devicemanuals.eu
www.devicemanuals.eu
www.devicemanuals.eu
www.devicemanuals.eu
www.devicemanuals.eu
www.devicemanuals.eu
www.devicemanuals.eu
www.devicemanuals.eu
www.devicemanuals.eu
www.devicemanuals.eu
www.devicemanuals.eu
www.devicemanuals.eu
www.devicemanuals.eu
www.devicemanuals.eu
www.devicemanuals.eu
www.devicemanuals.eu
www.devicemanuals.eu
www.devicemanuals.eu
www.devicemanuals.eu
www.devicemanuals.eu
www.devicemanuals.eu
www.devicemanuals.eu
www.devicemanuals.eu
www.devicemanuals.eu
www.devicemanuals.eu
www.devicemanuals.eu
www.devicemanuals.eu
www.devicemanuals.eu
www.devicemanuals.eu
www.devicemanuals.eu
www.devicemanuals.eu
www.devicemanuals.eu
www.devicemanuals.eu
www.devicemanuals.eu
www.devicemanuals.eu
www.devicemanuals.eu
www.devicemanuals.eu
www.devicemanuals.eu
www.devicemanuals.eu
www.devicemanuals.eu
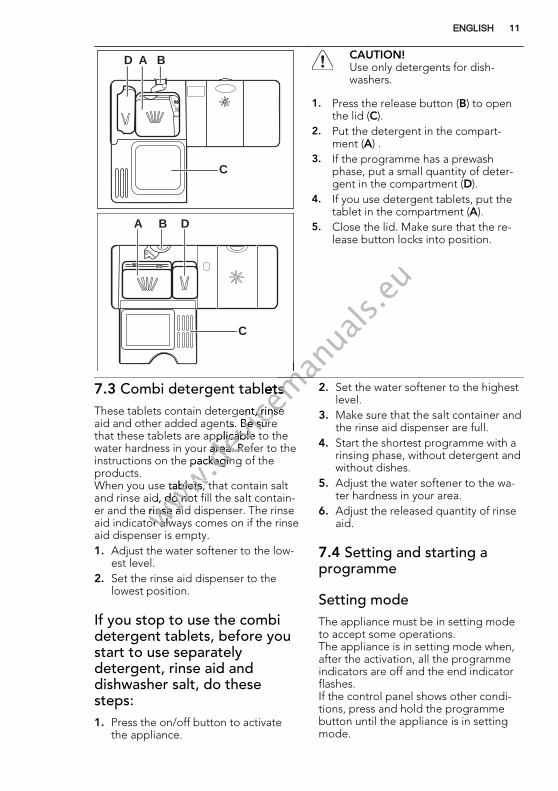
7. DAILY USE1. Open the water tap.2. Press the on/off button to activate
the appliance. Make sure that the ap-pliance is in setting mode. Referto ’SETTING AND STARTING A PRO-GRAMME’.• If the salt indicator is on, fill the salt
container.• If the rinse aid indicator is on, fill
the rinse aid dispenser.3. Load the baskets.4. Add the detergent.5. Set and start the correct programme
for the type of load and soil.
7.1 Loading the basketsRefer to the supplied leaflet withexamples of the load of the bas-kets.
• Only use the appliance to wash itemsthat are dishwasher-safe.
• Do not put in the appliance itemsmade of wood, horn, aluminium, pew-ter and copper.
• Do not put in the appliance items thatcan absorb water (sponges, householdcloths).
• Remove remaining food from theitems.
• Make soft the remaining burned foodon the items.
• Put hollow items (cups, glasses andpans) with the opening down.
• Make sure that cutlery and dishes donot bond together. Mix spoons withother cutlery.
• Make sure that glasses do not touchother glasses.
• Put small items in the cutlery basket.• Put light items in the upper basket.
Make sure that the items do not move.• Make sure that the spray arms can
move freely before you start a pro-gramme.
7.2 Using the detergentDo not use more than the correctquantity of detergent. Refer tothe instructions on the detergentpackaging.
Detergent tablets do not fullydissolve with short programmesand detergent residues can stayon the dishes.We recommend that you use de-tergent tablets with long pro-grammes.
10 www.aeg.com
www.devicemanuals.eu
• Only use the appliance to wash items
www.devic
eman
uals.
eu
• Only use the appliance to wash items
• Do not put in the appliance items
www.devic
eman
uals.
eu
• Do not put in the appliance itemsmade of wood, horn, aluminium, pew-
www.devic
eman
uals.
eu
made of wood, horn, aluminium, pew-
• Do not put in the appliance items that
www.devic
eman
uals.
eu
• Do not put in the appliance items thatcan absorb water (sponges, household
www.devic
eman
uals.
eu
can absorb water (sponges, household
• Remove remaining food from the
www.devic
eman
uals.
eu
• Remove remaining food from the
move freely before you start a pro-
www.devic
eman
uals.
eumove freely before you start a pro-
Using the detergent
www.devic
eman
uals.
euUsing the detergent
www.devicemanuals.eu
www.devicemanuals.eu
www.devicemanuals.eu
www.devicemanuals.eu
Do not use more than the correct
www.devic
eman
uals.
euDo not use more than the correctquantity of detergent. Refer to
www.devic
eman
uals.
euquantity of detergent. Refer to
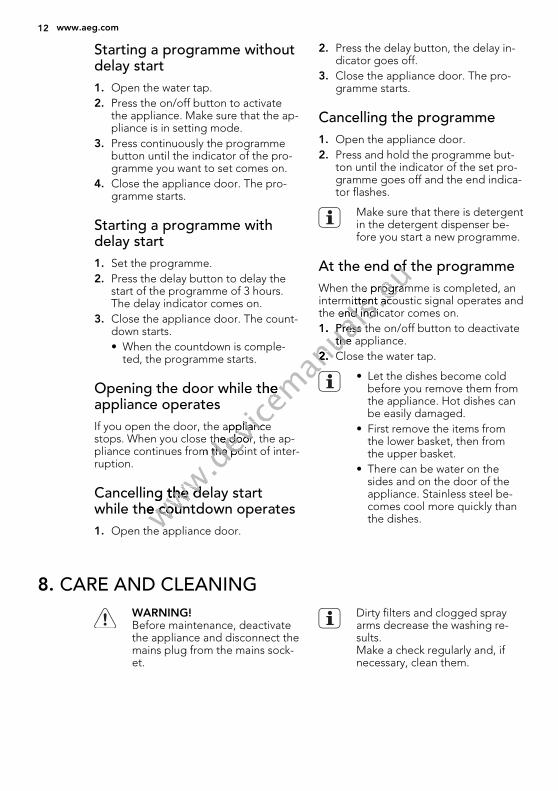
A BD
C
+ -
BA D
C
CAUTION!Use only detergents for dish-washers.
1. Press the release button (B) to openthe lid (C).
2. Put the detergent in the compart-ment (A) .
3. If the programme has a prewashphase, put a small quantity of deter-gent in the compartment (D).
4. If you use detergent tablets, put thetablet in the compartment (A).
5. Close the lid. Make sure that the re-lease button locks into position.
7.3 Combi detergent tabletsThese tablets contain detergent, rinseaid and other added agents. Be surethat these tablets are applicable to thewater hardness in your area. Refer to theinstructions on the packaging of theproducts.When you use tablets, that contain saltand rinse aid, do not fill the salt contain-er and the rinse aid dispenser. The rinseaid indicator always comes on if the rinseaid dispenser is empty.1. Adjust the water softener to the low-
est level.2. Set the rinse aid dispenser to the
lowest position.
If you stop to use the combidetergent tablets, before youstart to use separatelydetergent, rinse aid anddishwasher salt, do thesesteps:1. Press the on/off button to activate
the appliance.
2. Set the water softener to the highestlevel.
3. Make sure that the salt container andthe rinse aid dispenser are full.
4. Start the shortest programme with arinsing phase, without detergent andwithout dishes.
5. Adjust the water softener to the wa-ter hardness in your area.
6. Adjust the released quantity of rinseaid.
7.4 Setting and starting aprogramme
Setting modeThe appliance must be in setting modeto accept some operations.The appliance is in setting mode when,after the activation, all the programmeindicators are off and the end indicatorflashes.If the control panel shows other condi-tions, press and hold the programmebutton until the appliance is in settingmode.
ENGLISH 11
www.devicemanuals.eu
www.devicemanuals.eu
www.devicemanuals.eu
www.devicemanuals.eu
Combi detergent tablets
www.devic
eman
uals.
eu
Combi detergent tabletsThese tablets contain detergent, rinse
www.devic
eman
uals.
eu
These tablets contain detergent, rinseaid and other added agents. Be sure
www.devic
eman
uals.
eu
aid and other added agents. Be surethat these tablets are applicable to the
www.devic
eman
uals.
eu
that these tablets are applicable to thewater hardness in your area. Refer to the
www.devic
eman
uals.
eu
water hardness in your area. Refer to theinstructions on the packaging of the
www.devic
eman
uals.
eu
instructions on the packaging of the
When you use tablets, that contain salt
www.devic
eman
uals.
eu
When you use tablets, that contain saltand rinse aid, do not fill the salt contain-
www.devic
eman
uals.
eu
and rinse aid, do not fill the salt contain-
www.devicemanuals.eu
er and the rinse aid dispenser. The rinsewww.devic
eman
uals.
eu
er and the rinse aid dispenser. The rinseaid indicator always comes on if the rinsewww.de
vicem
anua
ls.eu
aid indicator always comes on if the rinseaid dispenser is empty.
www.devic
eman
uals.
eu
aid dispenser is empty.
Starting a programme withoutdelay start1. Open the water tap.2. Press the on/off button to activate
the appliance. Make sure that the ap-pliance is in setting mode.
3. Press continuously the programmebutton until the indicator of the pro-gramme you want to set comes on.
4. Close the appliance door. The pro-gramme starts.
Starting a programme withdelay start1. Set the programme.2. Press the delay button to delay the
start of the programme of 3 hours.The delay indicator comes on.
3. Close the appliance door. The count-down starts.• When the countdown is comple-
ted, the programme starts.
Opening the door while theappliance operatesIf you open the door, the appliancestops. When you close the door, the ap-pliance continues from the point of inter-ruption.
Cancelling the delay startwhile the countdown operates1. Open the appliance door.
2. Press the delay button, the delay in-dicator goes off.
3. Close the appliance door. The pro-gramme starts.
Cancelling the programme1. Open the appliance door.2. Press and hold the programme but-
ton until the indicator of the set pro-gramme goes off and the end indica-tor flashes.
Make sure that there is detergentin the detergent dispenser be-fore you start a new programme.
At the end of the programmeWhen the programme is completed, anintermittent acoustic signal operates andthe end indicator comes on.1. Press the on/off button to deactivate
the appliance.2. Close the water tap.
• Let the dishes become coldbefore you remove them fromthe appliance. Hot dishes canbe easily damaged.
• First remove the items fromthe lower basket, then fromthe upper basket.
• There can be water on thesides and on the door of theappliance. Stainless steel be-comes cool more quickly thanthe dishes.
8. CARE AND CLEANINGWARNING!Before maintenance, deactivatethe appliance and disconnect themains plug from the mains sock-et.
Dirty filters and clogged sprayarms decrease the washing re-sults.Make a check regularly and, ifnecessary, clean them.
12 www.aeg.com
www.devicemanuals.eu
Opening the door while the
www.devic
eman
uals.
eu
Opening the door while the
If you open the door, the appliance
www.devic
eman
uals.
eu
If you open the door, the appliancestops. When you close the door, the ap-
www.devic
eman
uals.
eu
stops. When you close the door, the ap-pliance continues from the point of inter-
www.devic
eman
uals.
eu
pliance continues from the point of inter-
Cancelling the delay start
www.devic
eman
uals.
eu
Cancelling the delay startwhile the countdown operateswww.de
vicem
anua
ls.eu
while the countdown operatesOpen the appliance door.www.de
vicem
anua
ls.eu
Open the appliance door.
At the end of the programme
www.devic
eman
uals.
euAt the end of the programmeWhen the programme is completed, an
www.devic
eman
uals.
euWhen the programme is completed, anintermittent acoustic signal operates and
www.devic
eman
uals.
euintermittent acoustic signal operates andthe end indicator comes on.
www.devic
eman
uals.
euthe end indicator comes on.1.
www.devic
eman
uals.
eu1. Press the on/off button to deactivate
www.devic
eman
uals.
euPress the on/off button to deactivatethe appliance.
www.devic
eman
uals.
euthe appliance.
2.
www.devic
eman
uals.
eu
2. Close the water tap.
www.devic
eman
uals.
eu
Close the water tap.
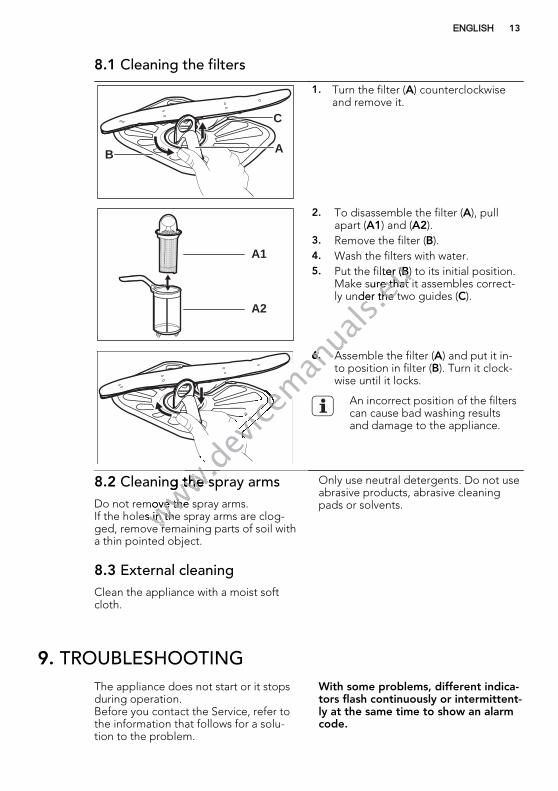
8.1 Cleaning the filters
C
B A
1. Turn the filter (A) counterclockwiseand remove it.
A1
A2
2. To disassemble the filter (A), pullapart (A1) and (A2).
3. Remove the filter (B).4. Wash the filters with water.5. Put the filter (B) to its initial position.
Make sure that it assembles correct-ly under the two guides (C).
6. Assemble the filter (A) and put it in-to position in filter (B). Turn it clock-wise until it locks.
An incorrect position of the filterscan cause bad washing resultsand damage to the appliance.
8.2 Cleaning the spray armsDo not remove the spray arms.If the holes in the spray arms are clog-ged, remove remaining parts of soil witha thin pointed object.
8.3 External cleaningClean the appliance with a moist softcloth.
Only use neutral detergents. Do not useabrasive products, abrasive cleaningpads or solvents.
9. TROUBLESHOOTINGThe appliance does not start or it stopsduring operation.Before you contact the Service, refer tothe information that follows for a solu-tion to the problem.
With some problems, different indica-tors flash continuously or intermittent-ly at the same time to show an alarmcode.
ENGLISH 13
www.devicemanuals.eu
Put the filter (
www.devic
eman
uals.
euPut the filter (B
www.devic
eman
uals.
euB) to its initial position.
www.devic
eman
uals.
eu) to its initial position.
Make sure that it assembles correct-
www.devic
eman
uals.
euMake sure that it assembles correct-ly under the two guides (
www.devic
eman
uals.
euly under the two guides (
www.devicemanuals.eu
www.devicemanuals.eu
www.devicemanuals.eu
www.devicemanuals.eu
www.devicemanuals.eu
www.devicemanuals.eu
www.devicemanuals.eu
www.devicemanuals.eu
www.devicemanuals.eu
www.devicemanuals.eu
www.devicemanuals.eu
www.devicemanuals.eu
6.
www.devic
eman
uals.
eu
6. Assemble the filter (
www.devic
eman
uals.
eu
Assemble the filter (
www.devicemanuals.eu
www.devicemanuals.eu
Cleaning the spray arms
www.devic
eman
uals.
eu
Cleaning the spray armsDo not remove the spray arms.www.de
vicem
anua
ls.eu
Do not remove the spray arms.If the holes in the spray arms are clog-www.de
vicem
anua
ls.eu
If the holes in the spray arms are clog-ged, remove remaining parts of soil withwww.de
vicem
anua
ls.eu
ged, remove remaining parts of soil with
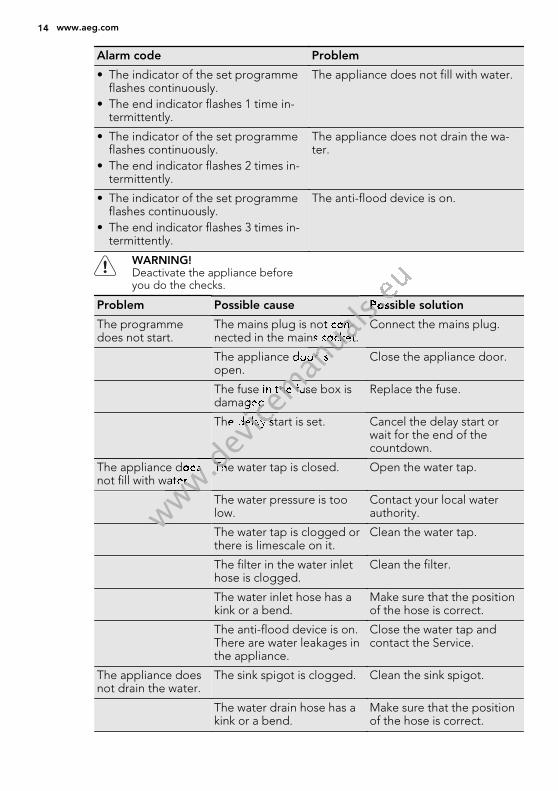
Alarm code Problem
• The indicator of the set programmeflashes continuously.
• The end indicator flashes 1 time in-termittently.
The appliance does not fill with water.
• The indicator of the set programmeflashes continuously.
• The end indicator flashes 2 times in-termittently.
The appliance does not drain the wa-ter.
• The indicator of the set programmeflashes continuously.
• The end indicator flashes 3 times in-termittently.
The anti-flood device is on.
WARNING!Deactivate the appliance beforeyou do the checks.
Problem Possible cause Possible solution
The programmedoes not start.
The mains plug is not con-nected in the mains socket.
Connect the mains plug.
The appliance door isopen.
Close the appliance door.
The fuse in the fuse box isdamaged.
Replace the fuse.
The delay start is set. Cancel the delay start orwait for the end of thecountdown.
The appliance doesnot fill with water.
The water tap is closed. Open the water tap.
The water pressure is toolow.
Contact your local waterauthority.
The water tap is clogged orthere is limescale on it.
Clean the water tap.
The filter in the water inlethose is clogged.
Clean the filter.
The water inlet hose has akink or a bend.
Make sure that the positionof the hose is correct.
The anti-flood device is on.There are water leakages inthe appliance.
Close the water tap andcontact the Service.
The appliance doesnot drain the water.
The sink spigot is clogged. Clean the sink spigot.
The water drain hose has akink or a bend.
Make sure that the positionof the hose is correct.
14 www.aeg.com
www.devic
eman
uals.
eu
www.devicemanuals.eu
www.devicemanuals.euPossible solution
www.devic
eman
uals.
euPossible solution
www.devicemanuals.eu
The mains plug is not con-
www.devic
eman
uals.
euThe mains plug is not con-nected in the mains socket.
www.devic
eman
uals.
eunected in the mains socket.
www.devicemanuals.eu
Connect the mains plug.
www.devic
eman
uals.
euConnect the mains plug.
www.devicemanuals.eu
The appliance door is
www.devic
eman
uals.
eu
The appliance door is
www.devicemanuals.eu
www.devicemanuals.eu
www.devicemanuals.eu
www.devicemanuals.eu
www.devicemanuals.eu
www.devicemanuals.eu
www.devicemanuals.eu
The fuse in the fuse box is
www.devic
eman
uals.
eu
The fuse in the fuse box isdamaged.
www.devic
eman
uals.
eu
damaged.
www.devicemanuals.eu
www.devicemanuals.eu
www.devicemanuals.eu
The delay start is set.
www.devic
eman
uals.
eu
The delay start is set.
www.devicemanuals.eu
www.devicemanuals.eu
The appliance does
www.devic
eman
uals.
eu
The appliance doesnot fill with water.
www.devic
eman
uals.
eu
not fill with water.
www.devicemanuals.eu
The water tap is closed.
www.devic
eman
uals.
eu
The water tap is closed.
www.devicemanuals.eu
www.devicemanuals.eu
www.devicemanuals.eu
www.devicemanuals.eu
www.devicemanuals.eu
www.devicemanuals.eu
www.devicemanuals.eu
www.devicemanuals.eu
www.devicemanuals.eu
www.devicemanuals.eu
After the checks are completed, activatethe appliance. The programme contin-ues from the point of interruption.If the problem occurs again, contact theService.
If other alarm codes show, contact theService.
9.1 The washing results and drying results are not satisfactory
Problem Possible cause Possible solution
The dishes are notclean.
The filters are clogged. Clean the filters.
The filters are not correctlyassembled and installed.
Make sure that the filtersare correctly assembled andinstalled.
The spray arms are clog-ged.
Remove remaining soil witha thin pointed object.
The programme was notapplicable for the type ofload and soil.
Make sure that the pro-gramme is applicable forthe type of load and soil.
Incorrect position of theitems in the baskets. Watercould not wash all items.
Make sure that the positionof the items in the baskets iscorrect and that the watercan easily wash all items.
The spray arms could notturn freely.
Make sure that the positionof the items in the baskets iscorrect and does not causethe blockage of the sprayarms.
The quantity of detergentwas not sufficient.
Make sure that you add thecorrect quantity of deter-gent in the dispenser be-fore you start a programme.
There was no detergent inthe detergent dispenser.
Make sure that you add de-tergent in the dispenser be-fore you start a programme.
Limescale particleson the dishes.
The salt container is emp-ty.
Make sure that there is dish-washer salt in the salt con-tainer.
The set level of the watersoftener is incorrect.
Make sure that the set levelof the water softener agreeswith the water hardness inyour area.
The cap of the salt contain-er is loose.
Tighten the cap.
Whitish streaks andstains or bluish lay-ers on glasses anddishes.
The released quantity ofrinse aid is too much.
Decrease the releasedquantity of rinse aid .
ENGLISH 15
www.devic
eman
uals.
eu
www.devicemanuals.eu
a thin pointed object.
www.devic
eman
uals.
eua thin pointed object.
www.devicemanuals.eu
www.devicemanuals.euMake sure that the pro-
www.devic
eman
uals.
euMake sure that the pro-gramme is applicable for
www.devic
eman
uals.
eugramme is applicable forthe type of load and soil.
www.devic
eman
uals.
euthe type of load and soil.
www.devicemanuals.eu
Incorrect position of the
www.devic
eman
uals.
euIncorrect position of theitems in the baskets. Water
www.devic
eman
uals.
euitems in the baskets. Watercould not wash all items.
www.devic
eman
uals.
eu
could not wash all items.
www.devicemanuals.eu
Make sure that the position
www.devic
eman
uals.
euMake sure that the position
www.devicemanuals.eu
www.devicemanuals.eu
The spray arms could not
www.devic
eman
uals.
eu
The spray arms could notturn freely.
www.devic
eman
uals.
eu
turn freely.
www.devicemanuals.eu
www.devicemanuals.eu
The quantity of detergent
www.devic
eman
uals.
eu
The quantity of detergentwas not sufficient.
www.devic
eman
uals.
eu
was not sufficient.
www.devicemanuals.eu
www.devicemanuals.eu
www.devicemanuals.eu
www.devicemanuals.eu
www.devicemanuals.eu
www.devicemanuals.eu
www.devicemanuals.eu
www.devicemanuals.eu
www.devicemanuals.eu
Problem Possible cause Possible solution
The quantity of detergentwas too much.
Make sure that you add thecorrect quantity of deter-gent in the dispenser be-fore you start a programme.
Dry water dropstains on glassesand dishes.
The released quantity ofrinse aid was not suffi-cient .
Increase the released quan-tity of rinse aid.
The quality of the deter-gent can be the cause.
Try a different brand of de-tergent.
The dishes are wet. The programme had nodrying phase.
Set a programme with thedrying phase.
The dishes are wetand matt.
The rinse aid dispenser isempty.
Make sure that there is rinseaid in the rinse aid dispens-er.
The quality of the rinse aidcan be the cause.
Try a different brand ofrinse aid.
10. TECHNICAL INFORMATION
Dimensions Width / Height / Depth(mm)
596 / 818-898 / 555
Electrical connection Refer to the rating plate.
Voltage 220-240 V
Frequency 50 Hz
Water supply pressure Min. / max. (bar / MPa) (0.5 / 0.05 ) / (8 / 0.8 )
Water supply 1) Cold water or hot water2) max. 60 °C
Capacity Place settings 12
Power consumption Left-on mode 0.99 W
Off-mode 0.10 W
1) Connect the water inlet hose to a water tap with a 3/4'' thread.2) If the hot water comes from alternative sources of energy, (e.g. solar panels, aeolian
energy), use the hot water supply to decrease energy consumption.
11. ENVIRONMENT CONCERNSRecycle the materials with thesymbol . Put the packaging inapplicable containers to recycle it.
Help protect the environment andhuman health and to recycle wasteof electrical and electronicappliances. Do not dispose
16 www.aeg.com
www.devicemanuals.eu
www.devicemanuals.eu
aid in the rinse aid dispens-
www.devic
eman
uals.
euaid in the rinse aid dispens-
www.devicemanuals.eu
www.devicemanuals.euTry a different brand of
www.devic
eman
uals.
euTry a different brand ofrinse aid.
www.devic
eman
uals.
eurinse aid.
www.devicemanuals.eu
www.devicemanuals.eu
www.devicemanuals.eu
TECHNICAL INFORMATION
www.devic
eman
uals.
eu
TECHNICAL INFORMATION
www.devicemanuals.eu
www.devicemanuals.eu
www.devicemanuals.eu
Width / Height / Depth
www.devic
eman
uals.
eu
Width / Height / Depth(mm)
www.devic
eman
uals.
eu
(mm)
www.devicemanuals.eu
www.devicemanuals.eu
Refer to the rating plate.
www.devic
eman
uals.
eu
Refer to the rating plate.
www.devicemanuals.eu
www.devicemanuals.eu
www.devicemanuals.eu
www.devicemanuals.eu
Voltage
www.devic
eman
uals.
eu
Voltage
www.devicemanuals.eu
www.devicemanuals.eu
www.devicemanuals.eu
www.devicemanuals.eu
Water supply pressure
www.devic
eman
uals.
eu
Water supply pressure
www.devicemanuals.eu
www.devicemanuals.eu
Water supply www.devic
eman
uals.
eu
Water supply 1)www.devic
eman
uals.
eu
1)www.devicemanuals.eu
www.devicemanuals.eu
www.devicemanuals.eu
www.devicemanuals.eu
www.devicemanuals.eu
www.devicemanuals.eu
www.devicemanuals.eu
www.devicemanuals.eu
www.devicemanuals.eu
www.devicemanuals.eu
appliances marked with the symbol with the household waste. Return theproduct to your local recycling
facility or contact your municipaloffice.
ENGLISH 17
www.devicemanuals.eu

18 www.aeg.com
www.devicemanuals.eu

ENGLISH 19
www.devicemanuals.eu
www.aeg.com/shop
1569
5929
1-A
-222
012
www.devicemanuals.eu