Embed Size (px)
DESCRIPTION
D.I.Y. D.I.Y. I n s t r u c t i o n m a n u a l LEARN: Fundamentals of Solar Energy Go GoGo Go This series is D.I.Y (do-it-yourself) educational series that provides concepts of environmental protection. You will be amazed to use and learn various sources of alternate fuel and energy. Go Go Car Working of Solar Powered Car Science behind Solar energy:
Citation preview
Go Go – Car
I n s t r u c t i o n m a n u a l
D.I.Y.D.I.Y.
LEARN: Fundamentals of Solar Energy
Go Go – Car
Go GoGo Go
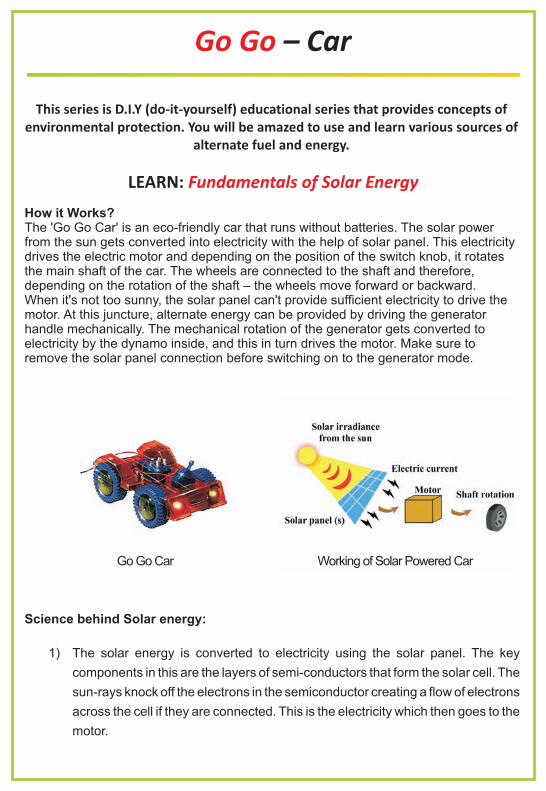
How it Works?The 'Go Go Car' is an eco-friendly car that runs without batteries. The solar power from the sun gets converted into electricity with the help of solar panel. This electricity drives the electric motor and depending on the position of the switch knob, it rotates the main shaft of the car. The wheels are connected to the shaft and therefore, depending on the rotation of the shaft – the wheels move forward or backward.When it's not too sunny, the solar panel can't provide sufficient electricity to drive the motor. At this juncture, alternate energy can be provided by driving the generator handle mechanically. The mechanical rotation of the generator gets converted to electricity by the dynamo inside, and this in turn drives the motor. Make sure to remove the solar panel connection before switching on to the generator mode.
Go Go Car Working of Solar Powered Car
Science behind Solar energy:
1) The solar energy is converted to electricity using the solar panel. The key
components in this are the layers of semi-conductors that form the solar cell. The
sun-rays knock off the electrons in the semiconductor creating a flow of electrons
across the cell if they are connected. This is the electricity which then goes to the
motor.
This series is D.I.Y (do-it-yourself) educational series that provides concepts of environmental protection. You will be amazed to use and learn various sources of
alternate fuel and energy.
Go Go – Car
LEARN: Fundamentals of Solar Energy
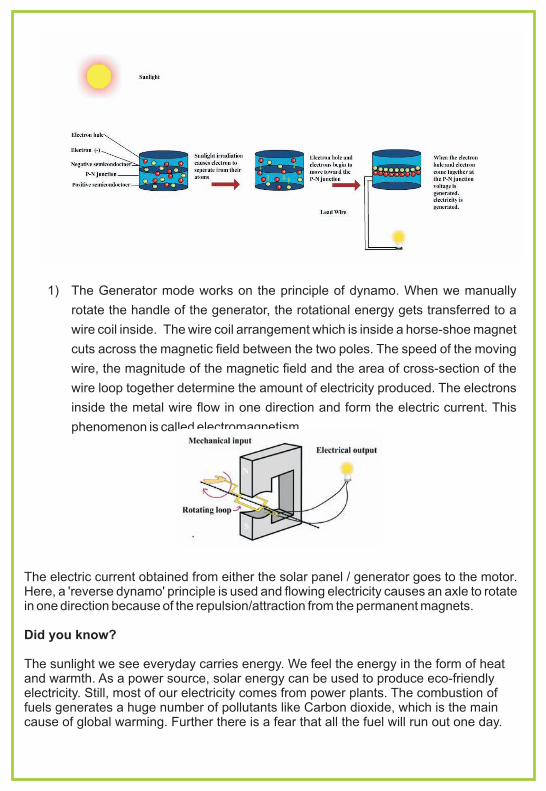
1) The Generator mode works on the principle of dynamo. When we manually
rotate the handle of the generator, the rotational energy gets transferred to a
wire coil inside. The wire coil arrangement which is inside a horse-shoe magnet
cuts across the magnetic field between the two poles. The speed of the moving
wire, the magnitude of the magnetic field and the area of cross-section of the
wire loop together determine the amount of electricity produced. The electrons
inside the metal wire flow in one direction and form the electric current. This
phenomenon is called electromagnetism.
The electric current obtained from either the solar panel / generator goes to the motor. Here, a 'reverse dynamo' principle is used and flowing electricity causes an axle to rotate in one direction because of the repulsion/attraction from the permanent magnets.
Did you know?
The sunlight we see everyday carries energy. We feel the energy in the form of heat and warmth. As a power source, solar energy can be used to produce eco-friendly electricity. Still, most of our electricity comes from power plants. The combustion of fuels generates a huge number of pollutants like Carbon dioxide, which is the main cause of global warming. Further there is a fear that all the fuel will run out one day.
Global warming will cause excessive heating of Earth, leading to melting of ice.
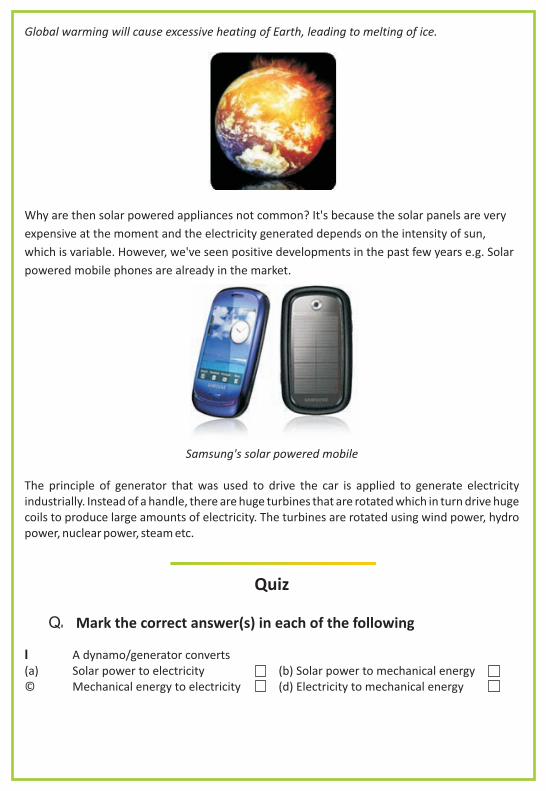
Why are then solar powered appliances not common? It's because the solar panels are very
expensive at the moment and the electricity generated depends on the intensity of sun,
which is variable. However, we've seen positive developments in the past few years e.g. Solar
powered mobile phones are already in the market.
Samsung's solar powered mobile
The principle of generator that was used to drive the car is applied to generate electricity industrially. Instead of a handle, there are huge turbines that are rotated which in turn drive huge coils to produce large amounts of electricity. The turbines are rotated using wind power, hydro power, nuclear power, steam etc.
Quiz
Q. Mark the correct answer(s) in each of the following
I A dynamo/generator converts(a) Solar power to electricity (b) Solar power to mechanical energy© Mechanical energy to electricity (d) Electricity to mechanical energy
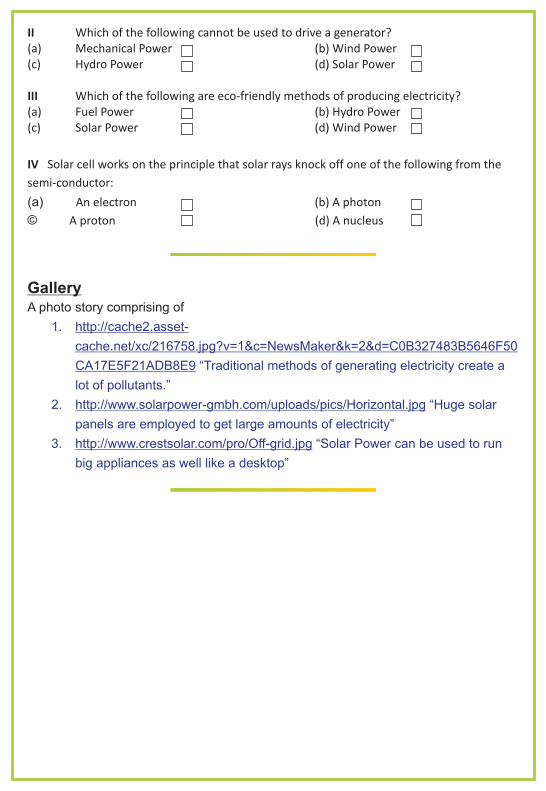
II Which of the following cannot be used to drive a generator?(a) Mechanical Power (b) Wind Power(c) Hydro Power (d) Solar Power
III Which of the following are eco-friendly methods of producing electricity?(a) Fuel Power (b) Hydro Power(c) Solar Power (d) Wind Power
IV Solar cell works on the principle that solar rays knock off one of the following from the
semi-conductor:
(a) An electron (b) A photon
© A proton (d) A nucleus
GalleryA photo story comprising of
1. http://cache2.asset-
cache.net/xc/216758.jpg?v=1&c=NewsMaker&k=2&d=C0B327483B5646F50
CA17E5F21ADB8E9 “Traditional methods of generating electricity create a
lot of pollutants.”
2. http://www.solarpower-gmbh.com/uploads/pics/Horizontal.jpg “Huge solar
panels are employed to get large amounts of electricity”
3. http://www.crestsolar.com/pro/Off-grid.jpg “Solar Power can be used to run
big appliances as well like a desktop”
connects to the environmentCongratulations on the purchase of this DIY kit suitable for children of 8 year old and up. “You’ll be amazed” to find what you can learn because after you have correctly assembled the collection you will master the basic knowledge of modern mechanic and electronic. The series is an exciting learning experience, and is smartly designed that it is easy to build-it-yourself. Most importantly, the main concept of this collection series is environmental protection. Children will be amazed to use the solar power or handle generator to operate the product. series is targeted at encouraging children to learn how to protect and look after the environment. Therefore, children can discover and play in an eco-friendly way .
D.I.Y. GO GO
Have a great eco-friendly experience!!!WARNING : Only for use by children aged 8 years and older
Adult supervision and assistance is required.This unit is only for use by children aged 8 years and older.Not suitable for children under age 3 years old due to small part(s) and component(s).Read and follow all instructions in the manual before use.This toy contains small parts and functional sharp points on components.Keep away from children under age 3 years.Please retain the information and this manual for future reference.Follow the instruction manual to perform the circuit connection.Improper connection may cause serious injuries such as burns and explosion of battery.(if required)Instructions for parents are included and have to be observed.
WARNING
CAUTION !
CAUTION !
Before setting up any experiment, please double check and make sure all wiring connections you have made are correct before connecting the solar panel or generator and switching on the unit, as failure may result in damage to components or circuit board unit.When experiment is finished, make sure that the solar panel or generator is disconnected and switch off the unit before you clear away the wires.Do not apply any components or parts to the experiment other than those provided in this kit.
READ & SAVEASSEMBLY AND OPERATING INSTRUCTIONS
To correctly construct this DIY kit please make sure all instructions are carefully read and review the illustrated diagram for easy following.
front wheel hub on front shaft
4 3
65
2
1
21
2222
101
101
25
ASSEMBLY
PARTS LIST
(1) BODY
(2) GEARBOX
(3) TIRE
(4) HUB
(5) SCREW
(6) FRONT SHAFT
(7) FRONT BRACKET
(8) FRONT COVER
(9) REAR WING
(10) SPRING
(11) SWITCH
(12) ADAPTER
(13) SOLAR PANEL
(131) SOLAR PANEL ROD
(14) SCREW DRIVER
(15) GENERATOR
1
2
3
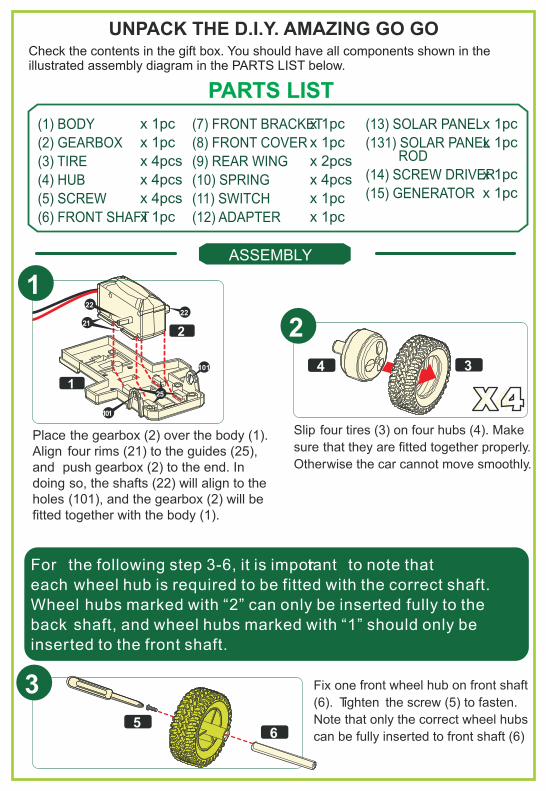
Place the gearbox (2) over the body (1). Align four rims (21) to the guides (25), and push gearbox (2) to the end. In doing so, the shafts (22) will align to the holes (101), and the gearbox (2) will be fitted together with the body (1).
Fix one
(6). Tighten the screw (5) to fasten.
Note that only the correct wheel hubs
can be fully inserted to front shaft (6)
For the following step 3-6, it is impotrant to note that
each wheel hub is required to be fitted with the correct shaft. Wheel hubs marked with “2” can only be inserted fully to the
back shaft, and wheel hubs marked with “1” should only be
inserted to the front shaft.
Slip four tires (3) on four hubs (4). Make
sure that they are fitted together properly.
Otherwise the car cannot move smoothly.
X4
x 1pc
x 1pc
x 4pcs
x 4pcs
x 4pcs
x 1pc
x 1pc
x 1pc
x 2pcs
x 4pcs
x 1pc
x 1pc
x 1pc
x 1pc
x 1pc
x 1pc
UNPACK THE D.I.Y. AMAZING GO GOCheck the contents in the gift box. You should have all components shown in theillustrated assembly diagram in the PARTS LIST below.
5
7
76
5101
4
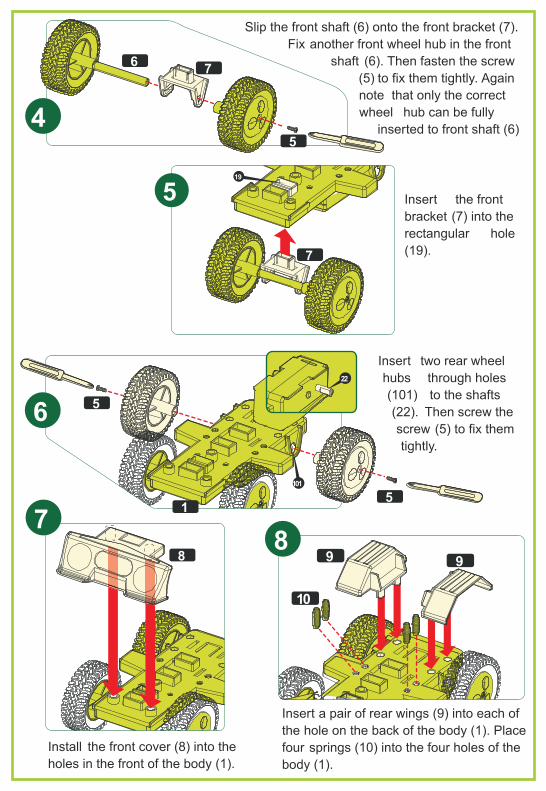
Slip the front shaft (6) onto the front bracket (7).
Fix another front wheel hub in the front
shaft (6). Then fasten the screw
(5) to fix them tightly. Again
note that only the correct
wheel hub can be fully
inserted to front shaft (6)
22
5
Insert two rear wheel
hubs through holes
(101) to the shafts
(22). Then screw the
screw (5) to fix them
tightly.
Install the front cover (8) into the
88
99
10
Insert a pair of rear wings (9) into each of
the hole on the back of the body (1). Place
four springs (10) into the four holes of the
Insert the front
bracket (7) into the
rectangular hole
(19).7
19
6
5
1
holes in the front of the body (1). body (1).
18
4 3
12
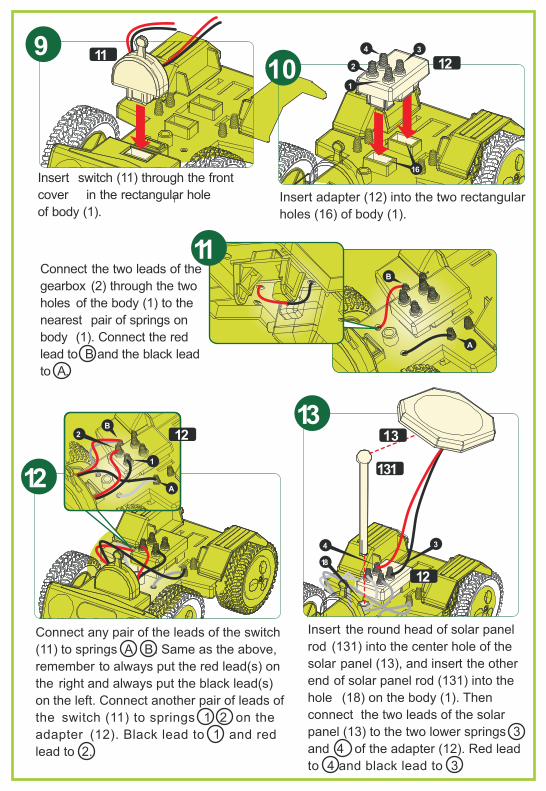
Insert switch (11) through the front
cover in the rectangular hole
of body (1).
9 11
Insert adapter (12) into the two rectangular
holes (16) of body (1).
16
Connect the two leads of the
gearbox (2) through the two
holes of the body (1) to the
nearest pair of springs on
body (1). Connect the red
lead to B and the black lead
to A.
Connect any pair of the leads of the switch
(11) to springs A B. Same as the above,
remember to always put the red lead(s) on
the right and always put the black lead(s)
on the left. Connect another pair of leads of
the switch (11) to springs 1 2 on the
adapter (12). Black lead to 1 and red
lead to 2.
12A
B
1
Insert the round head of solar panel
rod (131) into the center hole of the
solar panel (13), and insert the other
end of solar panel rod (131) into the
hole (18) on the body (1). Then
connect the two leads of the solar
panel (13) to the two lower springs 3
and 4 of the adapter (12). Red lead
to 4 and black lead to 3.
A
B
131
1313
11
10 1234
2
1
122
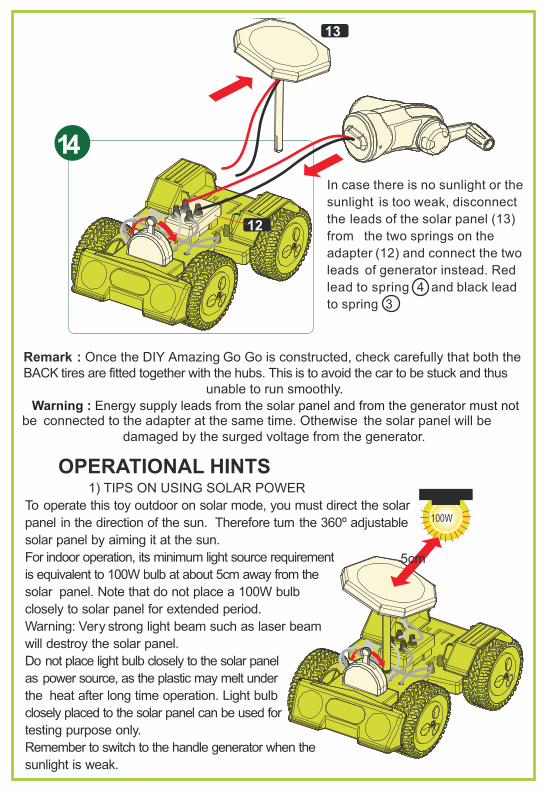
Remark : Once the DIY Amazing Go Go is constructed, check carefully that both the BACK tires are fitted together with the hubs. This is to avoid the car to be stuck and thus
unable to run smoothly.
be connected to the adapter at the same time. Otherwise the solar panel will be damaged by the surged voltage from the generator.
OPERATIONAL HINTS
In case there is no sunlight or the
sunlight is too weak, disconnect
the leads of the solar panel (13)
from the two springs on the
adapter (12) and connect the two
leads of generator instead. Red
lead to spring 4 and black lead
to spring 3
14
100W
5cm
13
12
1) TIPS ON USING SOLAR POWER
To operate this toy outdoor on solar mode, you must direct the solar
panel in the direction of the sun. Therefore turn the 360º adjustable
solar panel by aiming it at the sun.
For indoor operation, its minimum light source requirement
is equivalent to 100W bulb at about 5cm away from the
solar panel. Note that do not place a 100W bulb
closely to solar panel for extended period.
Warning: Very strong light beam such as laser beam
will destroy the solar panel.
Do not place light bulb closely to the solar panel
as power source, as the plastic may melt under
the heat after long time operation. Light bulb
closely placed to the solar panel can be used for
testing purpose only.
Remember to switch to the handle generator when the
sunlight is weak.
Warning : Energy supply leads from the solar panel and from the generator must not
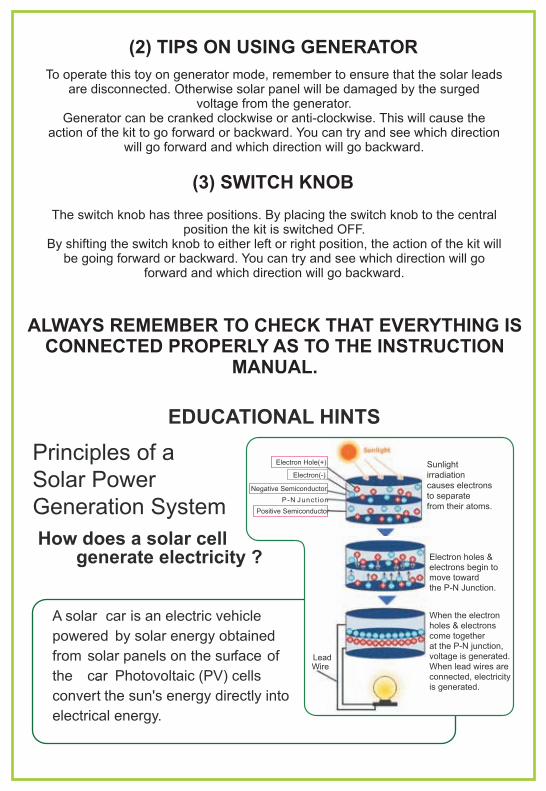
A solar car is an electric vehicle
powered by solar energy obtained
from solar panels on the surface of
the ca. r Photovoltaic (PV) cells
convert the sun's energy directly into
electrical energy.
EDUCATIONAL HINTS
Principles of aSolar PowerGeneration System
How does a solar cell generate electricity ?
Sunlightirradiationcauses electronsto separate
Electron Hole(+)
from their atoms.
Electron(-)
Negative Semiconductor
Positive Semiconductor
P-N Junct ion
Electron holes &electrons begin tomove towardthe P-N Junction.
When the electronholes & electronscome togetherat the P-N junction,voltage is generated.When lead wires areconnected, electricity
Lead
is generated.
Wire
To operate this toy on generator mode, remember to ensure that the solar leadsare disconnected. Otherwise solar panel will be damaged by the surged
voltage from the generator.Generator can be cranked clockwise or anti-clockwise. This will cause the
action of the kit to go forward or backward. You can try and see which directionwill go forward and which direction will go backward.
(2) TIPS ON USING GENERATOR
The switch knob has three positions. By placing the switch knob to the centralposition the kit is switched OFF.
By shifting the switch knob to either left or right position, the action of the kit willbe going forward or backward. You can try and see which direction will go
forward and which direction will go backward.
(3) SWITCH KNOB
ALWAYS REMEMBER TO CHECK THAT EVERYTHING IS CONNECTED PROPERLY AS TO THE INSTRUCTION
MANUAL.
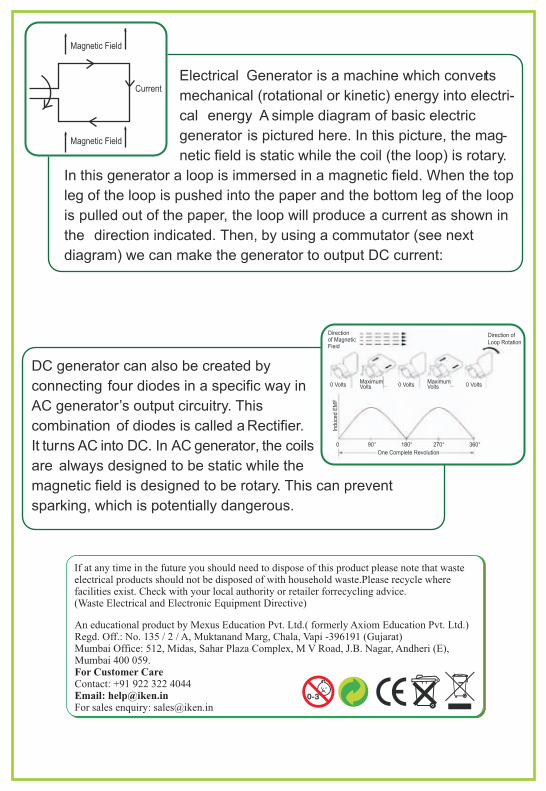
Electrical Generator is a machine which converts
mechanical (rotational or kinetic) energy into electri-
cal energy. A simple diagram of basic electric
generator is pictured here. In this picture, the mag-
netic field is static while the coil (the loop) is rotary.
In this generator a loop is immersed in a magnetic field. When the top
leg of the loop is pushed into the paper and the bottom leg of the loop
is pulled out of the paper, the loop will produce a current as shown in
the direction indicated. Then, by using a commutator (see next
diagram) we can make the generator to output DC current:
DC generator can also be created by
connecting four diodes in a specific way in
AC generator’s output circuitry. This
combination of diodes is called a Rectifier.
It turns AC into DC. In AC generator, the coils
are always designed to be static while the
magnetic field is designed to be rotary. This can prevent
sparking, which is potentially dangerous.
Directionof MagneticFieid
Direction of Loop Rotation
0 Volts
Induce
d E
MF
MaximumVolts
MaximumVolts0 Volts 0 Volts
0 90°
One Complete Revolution
180° 270° 360°
Magnetic Field
Magnetic Field
Current
If at any time in the future you should need to dispose of this product please note that waste electrical products should not be disposed of with household waste.Please recycle where facilities exist. Check with your local authority or retailer forrecycling advice. (Waste Electrical and Electronic Equipment Directive)
An educational product by Mexus Education Pvt. Ltd.( formerly Axiom Education Pvt. Ltd.)Regd. Off.: No. 135 / 2 / A, Muktanand Marg, Chala, Vapi -396191 (Gujarat) Mumbai Office: 512, Midas, Sahar Plaza Complex, M V Road, J.B. Nagar, Andheri (E), Mumbai 400 059. For Customer CareContact: +91 922 322 4044 Email: [email protected] sales enquiry: [email protected]


