Embed Size (px)
Citation preview

1 of 20
FX-EForensic Optical Comparator
User’s Guide
Distributed By:
SIRCHIE®
Products • Vehicles • Training100 Hunter Place, Youngsville, NC 27596919.544.2244, [email protected]
www.sirchie.comManufactured by SIRCHIE & Freedom ScientificCopyright© 2011 SIRCHIE & Freedom Scientific. All Rights Reserved.

2 of 20
Published by:
SIRCHIE®
100 Hunter Place, Youngsville, NC 27596Ph: 919.544.2244, 800.356.7311Fax: 919.554.2266, 800.899.8181Email: [email protected]
www.sirchie.com
Information in this document is subject to change without notice. No part of this publication may be re-produced or transmitted in any form or by any means electronic or mechanical, for any purpose, without the express written permission of SIRCHIE.
Copyright© 2011 by SIRCHIE. All Rights Reserved.
Federal Communications Commission NoticeThis equipment has been tested and found to comply with the limits for a Class B digital device, pursuant to Part 15 of the FCC Rules. These limits are designed to provide reasonable protection against harmful interference in a residential installation. This equipment generates, uses, and can radiate radio frequency energy and, if not installed and used in accordance with the instructions, may cause harmful interference to radio communications. However, there is no guarantee that interference will not occur in a particular installation. If this equipment does cause harmful interference to radio or television reception, which can be determined by turning the equipment off and on, the user is encouraged to try to correct the interfer-ence by one or more of the following measures:
• Increase the separation between the equipment and receiver.
• Connect the equipment into an outlet on a circuit different from that to which the receiver is con-nected.
• Reorient or relocate the receiving antenna.
• Consult the dealer or an experienced radio or television technician for help.
• Changes or modifications not expressly approved by Freedom Scientific could void the user’s author-ity to operate the equipment.
Industry Canada ICES-003 NoticeThis Class B digital apparatus complies with Canadian ICES-003.
Cet appareil numérique de la classe B est conforme à la norme NMB-003 du Canada.
Regulatory Compliance
Wavelengths: 400 nm to 780 nm
Power: 100-240V~ 1A 47-63Hz
Safety: IEC 60950-1 IEC 60950-1 / UL 60950-1 / CSA C22.2.60950-1 / EN 60950-1: 2006 + A11:2009 + A1:2010
EMC: FCC (CFR-47, part 15) Class B; Industry Canada ICES-003; EN 55022 Class B; EN 55024

3 of 20
TABLE of CONTENTSTransporting and Moving FX-E ................................................................................................................................. 4
Steps to Use FX-E ....................................................................................................................................................... 5
Advanced Operation ............................................................................................................................................... 7
Focus Lock and Position Locator Beam ...................................................................................................................7
Turning LED Reading Lights On or Off .......................................................................................................................7
Reading Lines and Reading Masks ...........................................................................................................................7
Selecting Lines or Masks .............................................................................................................................................8
Moving Both Lines or Masks on the Screen ..............................................................................................................8
Adjusting Width between Lines or Masks .................................................................................................................9For horizontal lines or masks ..........................................................................................................................9For vertical lines or masks ..............................................................................................................................9
Appendix A—Changing FX-E Settings .................................................................................................................. 10
FX-E Settings ...............................................................................................................................................................10
Opening Configuration Mode and Editing FX-E Settings .....................................................................................10
Customizing Magnification Settings ........................................................................................................................11
Selecting A Magnification Table .............................................................................................................................11
Changing the Magnification Display Number ......................................................................................................12
Reset Factory Default Settings .................................................................................................................................13
Display Firmware Version Number ...........................................................................................................................13
Appendix B—Using FX-E as Your Computer Monitor .......................................................................................... 14
Computer to FX-E through VGA ..............................................................................................................................14
Appendix C—FX-E Software User Manual ............................................................................................................ 15
Computer Requirements ..........................................................................................................................................15
Software Driver Install Procedure ............................................................................................................................15
1. Setup for Windows 7 ................................................................................................................................15
2. Execute The Setup Software ...................................................................................................................16
3. Install The Device Driver ...........................................................................................................................16
4. Connect The FX-E .....................................................................................................................................16
5. Run the Software ......................................................................................................................................17
6. Using the Software ...................................................................................................................................17
Appendix D—Rear Panel Connectors ................................................................................................................... 18
Safety And Maintenance ....................................................................................................................................... 18
Important Safety Instructions ...................................................................................................................................18
12-Month Warranty .................................................................................................................................................. 19

4 of 20
TrANSpOrTiNG AND MOviNG FX-EUse this image and the text to lift, carry, and position the FX-E.
1. Lock the monitor arm to secure and prevent the monitor from moving to the left or right.
2. Lock the XY reading table to stop it from moving by pushing the red brake lock toward the FX-E.
3. Lift and transport the FX-E by the rear post to move it to a sturdy surface such as a table, desk, or countertop. One suggested method is to wrap your forearm around the rear post and then lift.
Important! Do not lift FX-E by the LED reading lights.
4. Use the repositioning grips on both sides of the reading table to move and position FX-E to your liking once it is on a sturdy surface.
Monitor Arm Must be in Center Position before Pin Locks.
5 of 20
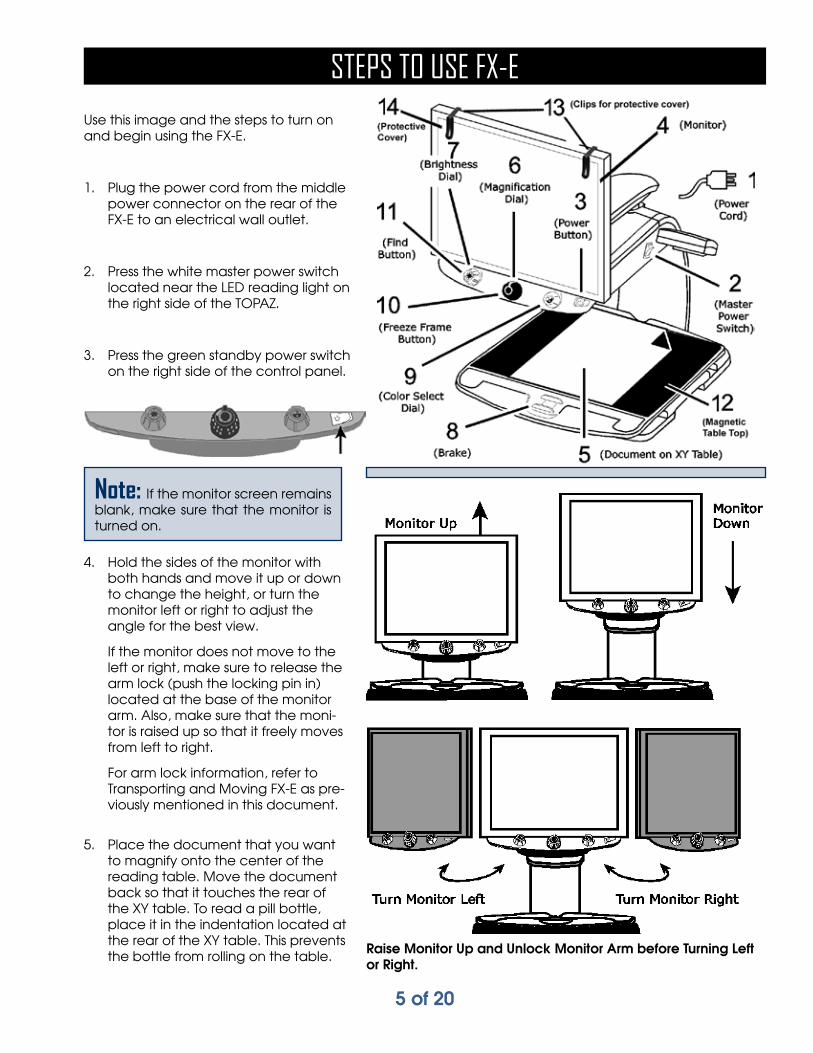
STEpS TO USE FX-EUse this image and the steps to turn on and begin using the FX-E.
1. Plug the power cord from the middle power connector on the rear of the FX-E to an electrical wall outlet.
2. Press the white master power switch located near the LED reading light on the right side of the TOPAZ.
3. Press the green standby power switch on the right side of the control panel.
Note: If the monitor screen remains blank, make sure that the monitor is turned on.
4. Hold the sides of the monitor with both hands and move it up or down to change the height, or turn the monitor left or right to adjust the angle for the best view.
If the monitor does not move to the left or right, make sure to release the arm lock (push the locking pin in) located at the base of the monitor arm. Also, make sure that the moni-tor is raised up so that it freely moves from left to right.
For arm lock information, refer to Transporting and Moving FX-E as pre-viously mentioned in this document.
5. Place the document that you want to magnify onto the center of the reading table. Move the document back so that it touches the rear of the XY table. To read a pill bottle, place it in the indentation located at the rear of the XY table. This prevents the bottle from rolling on the table. Raise Monitor Up and Unlock Monitor Arm before Turning Left
or Right.

6 of 20
6. Turn the black Magnification dial (illustrated to the right) to adjust magnification.
7. Turn the blue/yellow Brightness dial to adjust brightness.
8. Unlock the reading table to move a document so that its text moves back and forth across the screen to make reading easier.
9. Turn the blue Color Select dial (illustrated below)to choose a color mode that best suits your vision needs. Default color modes are full color; black on white; white on black; yellow on blue; and yellow on black.
10. Press the Freeze Frame button (il-lustrated to the right) located in the center of the black Magnification dial to freeze the current image on the screen. Press it again to return to the live view.
11. Press and hold the Find button located in the center of the yellow Brightness dial to zoom out and see more of the document. A set of crosshairs display on the monitor screen. Move the XY table and use the crosshairs to center and view a new area of the document.
Release the Find button to turn off the crosshairs and zoom back in on the new area of the document.

7 of 20
ADvANCED OpErATiON
Focus Lock and Position Locator BeamBy default, the camera automatically focuses on the closest object in view. However, if you want focus to remain on a specific object such as a document on the XY table, you can turn on the Focus Lock feature. This prevents the camera from accidentally focusing on your hand or any other item that moves in front of the camera. During normal operation, it is recommended that you leave Focus Lock off.
The Position Locator beam projects a red dot onto the XY table. Use it to help you pinpoint your location on the XY table and what you see on the monitor.
1. Press the red Focus Lock button once to turn on Focus Lock. The padlock icon appears on the screen:
2. Press the button a second time to turn on the Position Locator beam and remain in Focus Lock mode.
3. Press it a third time to turn off both the beam and Focus Lock mode. Automatic focus is restored.
Turning LED Reading Lights On or Off
Note: FX-E has two lights designed to illuminate documents and other items that you place on the reading table. This lighting is diffused to reduce glare and reflections. However, some items, such as pho-tographs or glossy magazine pages, may be too shiny or reflective to view easily. When viewing such items, you can turn off the reading lights if you like.
1. To turn off the LED reading lights, press the center of the yellow Brightness dial and the red Focus Lock button simultaneously.
2. Press both again when you want to turn the reading lights on.
Reading Lines and Reading MasksReading lines display as two horizontal or vertical lines on the screen. Reading masks block part of the screen to show only a horizontal or vertical slice of the screen. Use these items to help you maintain your place while reading text. You can move either lines or masks together to change their position on the screen, or move one line or mask to adjust the distance between these items.
Note: The switch and dials that control reading lines and reading masks are located under the plastic cover on the bottom of the control panel. Press the two recessed tabs on the backside of the cover to remove it to access the purple switch and dials.

8 of 20
• Use the center purple switch to select horizontal or vertical reading lines and masks.
• Use the left purple Adjustment wheel to move both lines and masks up and down or left and right.
• Use the right purple Width wheel to change the width between reading lines and masks.
Selecting Lines or MasksUse the center purple switch to cycle through and display lines or masks on the screen. To do this:
• Press the center purple switch to the right to cycle through the following options: horizontal lines, verti-cal lines, vertical masks, horizontal masks, and none.
• Press the center purple switch to the left to cycle through the following options: horizontal masks, verti-cal masks, vertical lines, horizontal lines, and none.
Moving Both Lines or Masks on the Screen• Turn the left purple Adjustment wheel
to the left or right to move both reading lines or reading masks up and down or left and right on the screen.

9 of 20
Adjusting Width between Lines or Masks
For horizontal lines or masks:• Turn the right purple Width wheel to
the left or right to move the top line or mask up or down. This increases or decreases the distance between horizontal lines or masks.
For vertical lines or masks:• Turn the right purple Width wheel to
the left or right. This moves the right line or mask to the left or right. This increases or decreases the distance between vertical lines or masks.

10 of 20
AppENDiX A—ChANGiNG FX-E SETTiNGSFX-E Settings• FX-E can be configured for up to 12 color mode settings known as positions 1 through 12. Color modes
are used to show text for best readability, for example, yellow text against a blue background.
• Positions 1 through 3 are Full Color (true color), Black on White, and White on Black. The color settings for these positions cannot be changed.
• Positions 4 through 12 can be customized or turned off. By default, positions 4 and 5 are Yellow on Blue and Yellow on Black, but they can be changed.
Opening Configuration Mode and Editing FX-E Settings1. When configuring color modes, it is best to have both a page of text and a color photo to place un-
der the FX-E camera.
2. Press and hold the red Focus Lock button for approximately 10 seconds to enter the Configuration menu. (Press and hold the button again at any time to exit the Configuration menu and save your set-tings.) The letter T, which stands for text enhancement, displays in the lower left corner of the screen. Position 1 always displays first. A hollow T displays for positions 1 through 3. This means that color settings can-not be changed; however, other settings can be edited for these positions. A solid T displays for positions that can be edited. The position number also displays on the screen as the rightmost icon.
3. Turn the blue Color Select dial to select the customizable positions 4 through 12.
4. Turn the blue/yellow Brightness dial to view the 33 available color settings. There are 30 two-color text enhancement modes, as well as True Color (which is position 1), grayscale, and high color. Once you get to the mode that you want to set for that position, press the center of the black Magnification dial to select () that position. An X icon ( ) means that the position is disabled.
5. Press the red Focus Lock button to step to Freeze Frame: . You can turn off the Freeze Frame fea-ture by pressing the center of the black Magnification dial, which changes the check box icon to an X icon.
6. Press the red Focus Lock button to step to Focus Lock: . You can turn off the Focus Lock feature by pressing the center of the black Magnification dial, which changes the check box icon to an X icon.
7. Press the red Focus Lock button again to step to Magnification Levels: . The default setting is 1. Setting 2 gives you finer adjustment at the lower magnification range (positions 1 through 5); set-ting 3 gives you finer adjustment in the middle magnification range (positions 6 through 10). Press the center of the black Magnification dial to select setting 1, 2, or 3.

11 of 20
8. Press the red Focus Lock button again to step to Magnification Display Number: . Press the center of the black Magnification dial to select how the magnification level is displayed on the screen:
Position number (1 through 16)
No display
X value (Magnification power—3.5X, 6X, 10X, and so on)
9. Press and hold the red Focus Lock button for 10 seconds to exit the configuration settings and save changes.
Customizing Magnification SettingsThe FX-E can display 16 levels of magnification. To increase magni-fication, turn the black Magnification dial clockwise. To decrease magnification, turn it counterclockwise.
To get the most out of TOPAZ, there are three magnification tables from which you can choose the best magnification power for you.
• Table 1 is the default magnification table and is ideal for most users. Turn the black Magnification dial to step through positions 1 through 16.
• Table 2 is ideal if you are comfortable with lower magnification. It provides finer adjustments be-tween positions 1 through 5.
• Table 3 provides finer adjustments for midrange magnification available between positions 6 through 10. This table is good if you need greater magnification.
Experiment with the different magnification tables and use the one that is best for you. You can always revert to table 1 at any time if you are not comfortable with the magnification available in tables 2 and 3. The following describes how to select and edit your viewing preferences.
Selecting A Magnification Table10. Press and hold the red Focus Lock button for approximately 10 seconds until the letter T displays in the
lower left corner of the screen.
11. Continue to press the red Focus Lock button until the video magnification icon displays on the screen.
12. Press the center of the black Magnification dial to select one of the three magnification tables. For an overview of magnification tables, refer to the descriptions provided earlier in this appendix.

12 of 20
13. Do one of the following:
• To save the change and exit configuration mode, press and hold the red Focus Lock button for approximately 10 seconds until the on-screen display at the bottom of the screen closes.
• To customize how magnification values display on the screen, perform the steps in the next sec-tion.
Changing the Magnification Display Number
Note: The following assumes that you are continuing from the magnification table procedure. If not, press and hold the red Focus Lock button for approximately 10 seconds to open the FX-E settings. Next, continue to press the red Focus Lock button until the magnifying glass icon displays on the screen.
Once you have selected a magnification table, you can choose whether or not the current magnification value displays on the screen as you turn the black Magnifica-tion dial. To set your preference, do the following:
14. Press the red Focus Lock button until the magnifying glass icon displays on the screen.
15. Press the center of the black Magnification dial to select how magnification values display. This is represented by the magnifying glass icon.
Select one of three options:
• Select the icon with the number 88 to display the magnification in use rela-tive to the 16 positions of the black Magnification dial.
• Select the icon with an X to display the actual magnification value, for example, 2.2, 3.9, 7.5, and so on.
• Select the icon with the clear magnifying glass if you do not want to see a magnification value display as you turn the black Magnification dial.
16. To save changes and exit configuration mode, press and hold the red Focus Lock button for approxi-mately 10 seconds until the on-screen display at the bottom of the screen closes.
To discard any changes made while configuration mode is open, do not touch any control panel di-als, buttons, switches, or wheels for approximately 30 seconds. This closes configuration mode without saving changes.
MAGNIFICATION TABLE
POSI-TION
MAGNI-FICATION
1 3
2 3.7
3 4.5
4 5.4
5 6.5
6 7.8
7 9.4
8 11
9 12
10 14
11 16
12 20
13 25
14 32
15 41
16 54

13 of 20
Reset Factory Default SettingsPress and hold the following dials and buttons simultaneously for 10 seconds to reset FX-E to its default fac-tory settings. Release the dials and buttons when the screen goes blank.
• Red Focus Lock button
• Center of blue/yellow Brightness dial
• Center of black Magnification dial
• Center of blue Color Select dial
Display Firmware Version NumberPress and hold the following dials and buttons simultaneously for five seconds to display the firmware version number. The word Ver. followed by three sets of numbers, which represent the major and minor firmware numbers, flash one at a time on the screen.
• Red Focus Lock button
• Center of black Magnification dial
• Center of blue Color Select dial
14 of 20
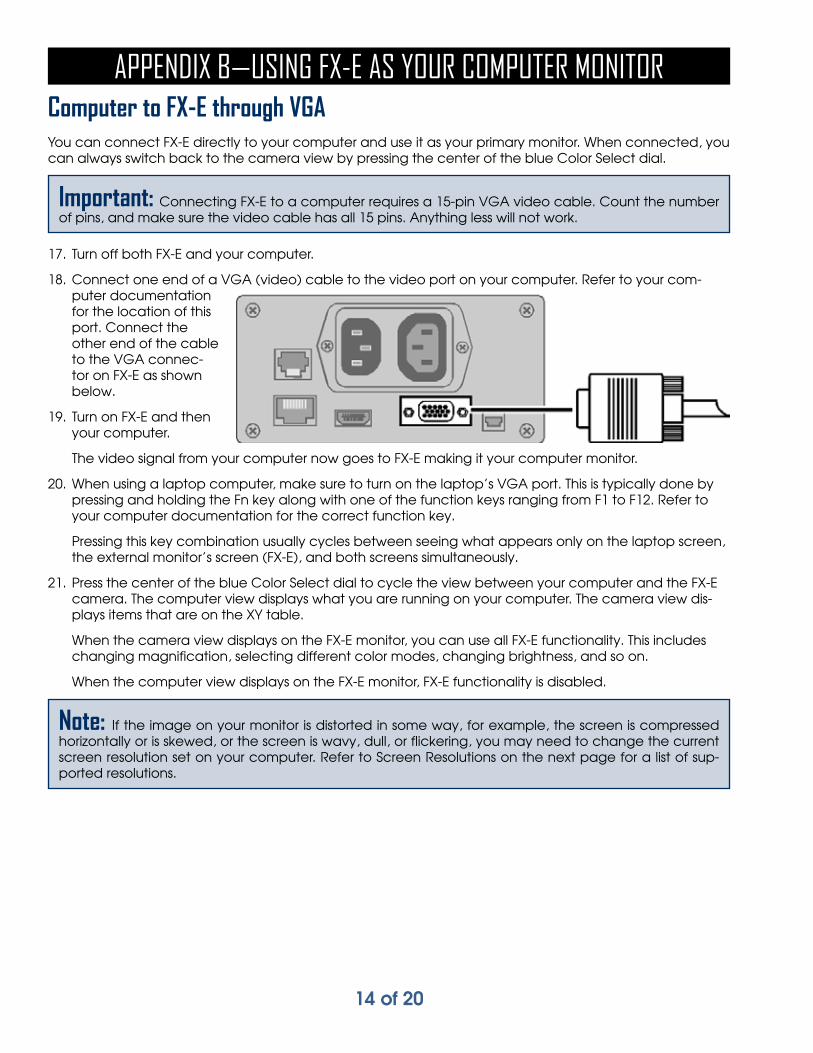
AppENDiX B—USiNG FX-E AS YOUr COMpUTEr MONiTOr Computer to FX-E through VGAYou can connect FX-E directly to your computer and use it as your primary monitor. When connected, you can always switch back to the camera view by pressing the center of the blue Color Select dial.
Important: Connecting FX-E to a computer requires a 15-pin VGA video cable. Count the number of pins, and make sure the video cable has all 15 pins. Anything less will not work.
17. Turn off both FX-E and your computer.
18. Connect one end of a VGA (video) cable to the video port on your computer. Refer to your com-puter documentation for the location of this port. Connect the other end of the cable to the VGA connec-tor on FX-E as shown below.
19. Turn on FX-E and then your computer.
The video signal from your computer now goes to FX-E making it your computer monitor.
20. When using a laptop computer, make sure to turn on the laptop’s VGA port. This is typically done by pressing and holding the Fn key along with one of the function keys ranging from F1 to F12. Refer to your computer documentation for the correct function key.
Pressing this key combination usually cycles between seeing what appears only on the laptop screen, the external monitor’s screen (FX-E), and both screens simultaneously.
21. Press the center of the blue Color Select dial to cycle the view between your computer and the FX-E camera. The computer view displays what you are running on your computer. The camera view dis-plays items that are on the XY table.
When the camera view displays on the FX-E monitor, you can use all FX-E functionality. This includes changing magnification, selecting different color modes, changing brightness, and so on.
When the computer view displays on the FX-E monitor, FX-E functionality is disabled.
Note: If the image on your monitor is distorted in some way, for example, the screen is compressed horizontally or is skewed, or the screen is wavy, dull, or flickering, you may need to change the current screen resolution set on your computer. Refer to Screen Resolutions on the next page for a list of sup-ported resolutions.

15 of 20
Computer Requirements:Operating System: Windows XP, Vista, or 7 (32 or 64 bit)
RAM: 1GB
USB Port (USB2.0)
CD/DVD Drive: for installation
Software Driver Install ProcedureThe following instructions will guide you through installing the USB device driver and setting up the USB interface.
Install the device drivers BEFORE you connect the USB cable to the FX-E.
1. Setup for Windows 7At this time, SIRCHIE's FX-E USB Driver is unsigned by Microsoft®. You must reconfigure your system's re-quirement for digitally signed drivers by the following steps:
Note: If your operating system is NOT Windows 7, proceed to Step 2.
Open the Run Dialog Box and type gpedit.msc and click “OK” to open the Local Groups Policy Editor.
Expand “Administrative Templates” (located “Driver Installation”. In the right panel, double click “Code Signing for Device Drivers”.
AppENDiX C—FX-E SOFTWArE USEr MANUAL
Run Dialog
Local Group Policy Editor

16 of 20
Choose “Enabled” in the editor window. In the options window, choose “Warn”.
Click Apply. Click OK, and restart your computer. Continue with Step 2 below.
2. Execute The Setup Software1. Log on to your computer as an administrator.
2. Close all open applications.
3. Insert the “FX-E Capture Unit Software” CD.
4. For Windows XP, Windows Vista, Windows 7 (32-bit) operating systems, double click on the folder “FX-E 32”. For Windows 7 64-bit, double click on the folder “FX-E 64”.
5. Run the setup program “Setup”.
3. Install The Device DriverDo not connect the FX-E to the computer using the provided USB cable during the installation process. If connected, disconnect before continuing.
To install the device driver, follow the steps in the installer application. Follow the instructions as necessary and select Next, Yes, Accept, Allow, Continue, or Finish to continue or Cancel to halt the installation.
4. Connect The FX-EConnect the USB cable provided to an available USB port on your computer and the connector as shown in the illustration to the right.
Code Signing for Device Drivers

17 of 20
This field must agree with the setup of the Mag-nification Level as set in “Configura-tion Mode” pg. 11.
MagnificationDisplays the magni-fication level of the image displayed. If this does not agree with the level displayed on the FX-E, the field is incorrect.
Brightness Adjusts the contrast on screen image
Color ModeSelects the color to view of 5 user defined color com-binations (as set up in the Configura-tion Mode found in Appendix A).
Enhanced ColorsAllows the selec-tion of one of the 33 available color settings indepen-dent of the user defined color mode.
LightingToggles the table LED lights on and off.
SpotlightToggles the red spot posi-tioning light on and off.
Freeze FrameAllows the user to Freeze the image on the computer screen. When fro-zen, the user can then use the FX-E to display a sec-ond image allow-ing for two images to be compared.
Focus LockLocks the camera focus.
5. Run The SoftwareDouble click the FX-E icon located on your desktop to launch the program (see Main Screen below).
6. Using The Software
Save Image Saves i mage as a bitmap file (.bmp)

18 of 20
AppENDiX D—rEAr pANEL CONNECTOrSUse this image and the descriptions on the next page to identify FX-E connectors.
1. Control panel jack: Modular jack that connects the control panel to the FX-E camera. Do not disconnect cable unless servicing the unit.
2. AC power connector: Plug pow-er cord from wall outlet to FX-E.
3. Monitor power connector: Plug power cord from monitor to FX-E.
4. Test port: Do not connect to this port.
5. Monitor DVI connector: Connects the FX-E monitor to the FX-E cam-era. There is no need to remove this monitor cable under normal operation. However, if you later decide to connect a TV or larger monitor to FX-E, then use this con-nector.
6. VGA In video connector (15-pin): Connects a computer to FX-E.
7. USB connector: Connects a computer to FX-E for operation with FX-E image manaFX-Eent software.
SAFETY AND MAiNTENANCEDo not stare at the lamp as it may be harmful to the eyes.
Important Safety InstructionsRead and follow all warning notices and instructions marked on the product or included in the manual.
Slots and openings in the product are provided for ventilation. To ensure reliable operation of the product and to protect it from overheating, these slots and openings must not be blocked or covered.
Do not allow anything to rest on the power cord, and do not locate the product where persons will walk on the power cord.
Do not attempt to service this product yourself, as opening or removing covers may expose you to haz-ardous voltage or to other risks. Refer all servicing to qualified service personnel.
When installed, the product must comply with the applicable Safety Standards and regulatory require-ments of the country in which it is installed. If necessary, consult with the appropriate regulatory agencies and inspection authorities to ensure compliance.
Always operate the product in a place where the temperature is between 10o and 35so C (50o and 95o F).
Keep it away from wet areas, rain, and other sources of liquids. Do not submerge the product.
Do not stare directly at the light emitted by the reading lamp as the bright light may be harmful to the eyes.
Do not attempt to move the product without first locking the monitor arm and reading table.

19 of 20
LIMITED WARRANTYon
SIRCHIE®
CRIME SCENEINVESTIGATIVE PRODUCTS
Sirchie® warrants to the original purchaser that this Product shall be free from all defects, both in materials or workmanship, for a period of twelve (12) months from the date of shipment to the purchaser. At its option, Sirchie® will repair or replace any Product or part(s) that proves to be defective, free of charge including shipping cost to purchaser during the stated warranty periods.
This limited warranty shall not apply if the Product and/or any part has been damaged or caused to be defective by unreasonable use, accident, negligence, service or modification by anyone other than Sirchie® or a Sirchie® authorized agent, or by any causes unrelated to defective materials or workmanship. Additionally, this warranty does not apply to batteries or damage caused by their failure.
To receive in-warranty service, a defective Product and/or any part must be received at Sirchie® no later than one (1) week after the end of the warranty period and must be accompanied with proof of date of purchase satisfactory to Sirchie®. A RMA (Return Merchandise Authorization) number issued by Sirchie® must accompany all returned items. To obtain a RMA number and information for return shipment contact Sirchie® Customer Service, 100 Hunter Place, Youngsville, NC 27596, (919) 554-2244. All items returned must be properly packaged and insured prior to shipment. Sirchie® assumes no liability for loss or damage incurred during shipment to Sirchie®.
This warranty gives you specific legal rights, and you may also have other rights which vary from state to state (or jurisdiction to jurisdiction). All expressed and implied warranties for the Product, including, but not limited to, any implied warranties and conditions of merchantability and fitness for a particular purpose, are limited in time to the term of the limited warranty period.
Sirchie®’s warranty obligations and purchaser’s remedies thereunder are solely and exclusively as stated herein. In no case will Sirchie® be liable for consequential damages or any loss incurred because of interruption of service.
999-242-12m (7/11)

20 of 20FXE_MA09-653ENG-REV5
100 Hunter Place, Youngsville, NC 27596 U.S.A.Phone: (919) 554-2244 , (800) 356-7311 • Fax: (919) 554-2266, (800) 899-8181
Email: [email protected] • Website: www.sirchie.com
®
Products • Vehicles • Training