Embed Size (px)
Citation preview
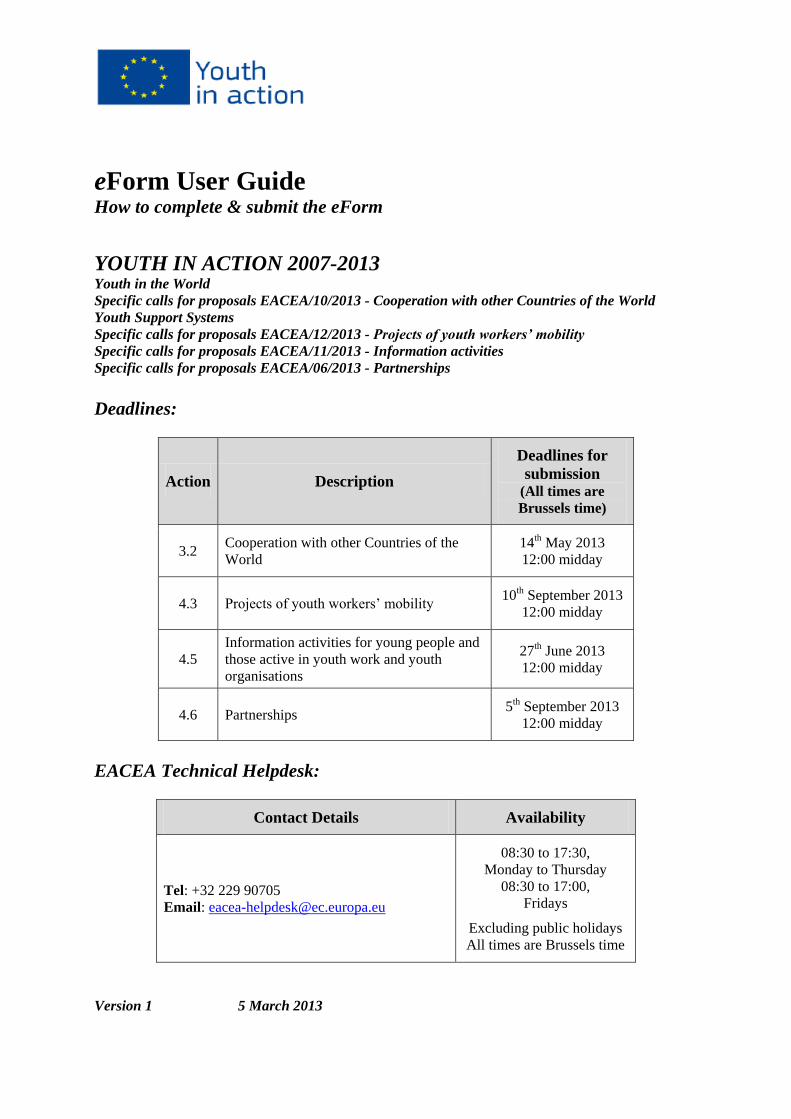
eForm User Guide How to complete & submit the eForm
YOUTH IN ACTION 2007-2013 Youth in the World
Specific calls for proposals EACEA/10/2013 - Cooperation with other Countries of the World
Youth Support Systems
Specific calls for proposals EACEA/12/2013 - Projects of youth workers’ mobility
Specific calls for proposals EACEA/11/2013 - Information activities
Specific calls for proposals EACEA/06/2013 - Partnerships
Deadlines:
Action Description
Deadlines for
submission (All times are
Brussels time)
3.2 Cooperation with other Countries of the
World
14th May 2013
12:00 midday
4.3 Projects of youth workers’ mobility 10th September 2013
12:00 midday
4.5
Information activities for young people and
those active in youth work and youth
organisations
27th June 2013
12:00 midday
4.6 Partnerships 5th September 2013
12:00 midday
EACEA Technical Helpdesk:
Contact Details Availability
Tel: +32 229 90705
Email: [email protected]
08:30 to 17:30,
Monday to Thursday
08:30 to 17:00,
Fridays
Excluding public holidays
All times are Brussels time
Version 1 5 March 2013
[Version 1]
Page 2 of 22
Table of Contents
1 Introduction ........................................................................................................................ 3
2 Technical Requirements & Considerations ........................................................................ 3
3 The Online Application Process – Overview ..................................................................... 5
4 Working with the eForm .................................................................................................... 5
4.1 Download the eForm from EACEA ......................................................................................... 5 4.2 Adobe Reader – a brief introduction to some key features of the pdf form ............................. 5 4.3 eForm completion .................................................................................................................... 7 4.4 Mandatory, optional and calculated fields .............................................................................. 8 4.5 Saving your form ..................................................................................................................... 9 4.6 Entering Dates and Numbers .................................................................................................. 9 4.7 Formatting ............................................................................................................................... 9 4.8 Character Limits .................................................................................................................... 10
5 Guidance for specific Parts of the form ........................................................................... 11
5.1 Cover Page ............................................................................................................................ 11 5.2 Part A – Organisations .......................................................................................................... 11 5.3 Part B.3 – Summary budget .................................................................................................. 13
6 Attaching Documents to your eForm ............................................................................... 14
7 Validation of your eForm ................................................................................................. 16
8 Submission of your eForm ............................................................................................... 18
8.1 The mandatory save BEFORE submission ............................................................................ 18 8.2 Submission ............................................................................................................................. 19 8.3 The mandatory save AFTER submission ............................................................................... 20
9 Printing your eForm ......................................................................................................... 21
10 How to obtain Technical assistance – EACEA Technical HelpDesk .............................. 21

[Version 1]
Page 3 of 22
1 Introduction
Applications for the Actions of the Youth in Action programme listed on page 1 of this guide must be
made using the eForm. This online submission is considered to be the master copy. However, in order
to provide safeguards for both applicants and for the Agency, 1 paper copy must also be sent by post
together with the other documents referred to in the application form.
The purpose of this document is to provide guidance on the technical aspects of completing and
submitting the eForm. It does not replace the Call and the Applicants' Guidelines which must be read
and consulted by applicants for all guidance on the content of the application form, the application
procedure and the rules that must be respected. This documentation can be found for each action on
the relevant webpage:
http://eacea.ec.europa.eu/youth/funding/2013/index_en.php
Please note that the terms 'eForm', 'form', 'application form' and 'online application form' are used
interchangeably throughout this guide.
You are strongly advised not to leave the preparation and submission of your application form until
the last days before the deadline for applications
Please read all of this User Guide before beginning your application
2 Technical Requirements & Considerations
The eForm is an interactive PDF form that requires Adobe Reader software to be installed on your
computer for you to be able to complete and submit it.
The retrieval and submission of the form are ‘online’ activities but completion of the form and its
validation are ‘offline’ activities. This is explained in more detail in the process overview below.
Adobe Reader
The minimum version i.e. lowest version of Adobe Reader that you must have installed on your
computer is version 8.1.5. You may also use a higher version than this e.g. 8.2, 9.0, 9.1, X, XI etc. If
you have a lower version than 8.1.5, you will not be able to complete and submit the eForm.
Follow the link below to be directed to Adobe's website to download the software free of charge or to
upgrade your existing copy of the software. If you do not have administrator rights on your computer
this activity may require the intervention of your IT department. You will need to specify your
operating system before the download can commence.
http://get.adobe.com/reader/otherversions/
If you are using Adobe Acrobat (Standard) or Adobe Acrobat Professional, the version must likewise
be 8.1.5 or higher.
The screenshots in this User Guide are based on version 8.1.6 of Adobe Reader.
You can check the system requirements for Adobe Reader – i.e. the minimum required specification of
your computer – through the following link:
http://www.adobe.com/uk/products/reader/systemreqs/

[Version 1]
Page 4 of 22
Internet Connection & Browser software
You will require an internet connection and standard browser software to retrieve and submit the
online application form.
Security settings in some versions of Adobe Reader and Adobe Acrobat
If you are using a version of Adobe Reader or Adobe Acrobat that incorporates Enhanced Security, it
is very likely that the enhanced security settings will block the submission of your eForm. The
involved versions of Adobe Reader and Adobe Acrobat are:
8.2 or any higher version 8 than this (including any sub-versions e.g. 8.2.1, 8.2.2 etc);
9.3 or any higher version 9 than this (and including any sub-versions e.g. 9.3.1, 9.4.2 etc;
any version X (including any sub-versions e.g. 10.0.1);
any version or sub-version higher than version X e.g. version XI.
The disabling of the Enhanced Security is performed from the following Adobe Reader menu path:
Edit > Preferences > Security (Enhanced)
Uncheck the box Enable Enhanced Security and click OK. Once the submission has been performed
you can re-enable the Enhanced Security. For more detailed instructions (including screenshots),
please refer to the relevant 'Known Issue' on the following webpage:
http://eacea.ec.europa.eu/eforms/index_en.php#issues
Here you will also find instructions on how to leave Enhanced Security enabled but identify your
eForm as a trusted item so that its submission is not blocked.
Test eForm
A test eForm is available on the EACEA eForm index page:
http://eacea.ec.europa.eu/eforms/index_en.php
The test form contains a small number of questions and functions. It has been designed to help
applicants understand how the main fields in the eForm work and also to ensure that their own
software and internet connection allow an application form to be submitted. It is NOT mandatory to
use this test form; it is provided as a help tool for applicants who are using electronic submission for
the first time.
Advice for Macintosh Users
The eForm can only be opened and completed using Adobe Reader or one of the Adobe Acrobat
products. It is not possible to open and work with the eForm using the Mac Preview viewer.
Please therefore ensure that if your default viewer is set as Mac Preview, you nonetheless open the
eForm with one of the Adobe products mentioned above. This advice applies to both the download of
the form – if you try to open it before downloading – and to the opening of the form for its general
completion and submission. For more detailed advice, please visit the ‘Known Issues’ section of the
EACEA eForm index page:
http://eacea.ec.europa.eu/eforms/index_en.php#issues

[Version 1]
Page 5 of 22
3 The Online Application Process – Overview
(i) You download the eForm from the agency website, saving it to your own computer or local
network drive. Do not try to fill in the form directly on the website. The form can only be
filled in once you have saved it to your local computing environment.
(ii) You complete the eForm on your own computer (as an ‘offline’ document). You do not need
to be connected to the internet for this and no connection to the EACEA website or any
Commission server is required. Completion of the form includes the attachment of the
mandatory annexes.
(iii) You validate the form (on your own computer) to ensure that it is ready for submission.
(iv) You connect to the internet and press the submit button to submit your form. You do not need
to be connected to the EACEA website or to any particular webpage – this connection to the
Agency’s server happens automatically. (The submission process includes a mandatory save
both before and after the submission. These save operations are instigated by the form itself.
This is explained in detail in section 8.)
(v) If the submission is successful, a submission number will be automatically generated and
added to your form.
(vi) You print your form.
(vii) An email acknowledging receipt of your form is automatically sent to the email address that
you entered for the contact person of the Applicant Organisation (Part A.2).
4 Working with the eForm
4.1 Download the eForm from EACEA
A link to a read-only copy of the form can be found on the EACEA eForm index page:
http://eacea.ec.europa.eu/eforms/index_en.php
Save the form to your local computer or network drive.
You can now open, save, close, print etc the file in the same way you would any other document you
had saved or created on your own computer.
4.2 Adobe Reader – a brief introduction to some key features of the pdf form
Activate the
Highlight Fields
facility
VERY
USEFUL!
Attach facility
DO NOT USE!
The eForm has its
own attach facility
Activate
Page Thumbnails
(see below)
Adobe Help for
common features Navigation panel,
on the left-hand
side of the screen

[Version 1]
Page 6 of 22
Toolbar
From the Tools menu you can customise your toolbar e.g. you can add the Save button if it is not
already displayed. There are also various display and navigation options that you can add.
Explained here are some of the commonly used display and navigation options:
Toolbar
Customise
toolbar
selection
menu
(partial view)
Zoom In
(reduce
image size)
Zoom Out
(enlarge
image size)
Fit form to width
of screen and
scroll across page
boundaries
Turn on ‘Page
View’ –
1 whole page
displayed at a
time
Move
back 1
page
Move
forward 1
page

[Version 1]
Page 7 of 22
Page Thumbnails
If you activate the Page Thumbnails option, a new panel is opened up on the lefthand side of the
screen. It contains miniature previews (‘thumbnails’) of each page:
Zoom in / Zoom out
To rapidly zoom in or out, press CTRL on your keyboard and move the scroll wheel on your mouse:
Scroll up to zoom out, increasing the size of the image
Scroll down to zoom in, decreasing the size of the image
4.3 eForm completion
The eForm is an interactive PDF form that contains form fields that are either selected from a
restricted list or filled in using free text:
Click inside a text field to enter data.
Click to select options from e.g. dropdown menus, radio buttons, checkboxes and pop-up
calendars.
Press Tab to move forward one field or Shift+Tab to move backward one field.
Point and click with the mouse to select a specific field.
Use the
thumbnails to
jump to different
areas of the form.
A box outlined in
red indicates
where you are in
the document.
Right click on the
panel to access
options to enlarge
or reduce the
thumbnails.
Red box
indicating
your
location

[Version 1]
Page 8 of 22
4.4 Mandatory, optional and calculated fields
Field Type Characteristics Examples
Mandatory
Field label is
accompanied by an
asterisk *
Optional Field label has no
asterisk
Calculated
automatically
Field contains diagonal
grey lines.
How to highlight mandatory fields
Click on the purple button in the navigation panel and this will activate the Document message
bar which incorporates the Highlight Fields feature.
Mandatory fields – red border and a light blue background
Optional fields – light blue background (and a black border when you hover the cursor over them).
Please note: if any mandatory field remains incomplete the eForm will not validate successfully and it
will not be possible to submit your form.
Once you have activated the highlighting you can click the purple button again to remove the
Document message bar (and maximise the display of your form).
Unhighlighted fields Highlighted fields
Click on the Highlight Fields button and all
mandatory and optional fields will gain
highlighting that makes them easier to identify
(and easier to differentiate from one another).

[Version 1]
Page 9 of 22
4.5 Saving your form
To save your form, click on the Save button on the toolbar or select Save from the File menu or press
CTRL and S.
Please ensure that you save your form on a regular basis. If you encounter a problem in your local
computing environment and your form or your computer crashes, the Adobe Reader auto-recovery
function will only restore your form to the point of the most recent save.
4.6 Entering Dates and Numbers
Please respect the following rules when entering dates and numbers on the form:
Rule Example
Numbers Commas act as decimal commas. 50,75 for fifty euros and
seventy-five cents
Dates All date fields are in the format dd/mm/yyyy 01/10/2011 for 1st October
2011
Telephone numbers No rules - this is a free text field. -
4.7 Formatting
If you enter formatted content into the form e.g. through copy-and-paste from other document sources,
the eForm will remove the formatting and plain text only will be pasted into the form.
Please do not copy bullet points into your form. The formatting of some bullets can trigger the
requirement to download add-ons to your Adobe Reader software (so that it can handle those bullets).
You may use dashes to represent bullets in a list of points or items.

[Version 1]
Page 10 of 22
4.8 Character Limits
The free text fields in the eForm have character limits that restrict the amount of text you can enter.
These limits include both characters AND spaces. If you try to enter more characters than the limit
allows the form will simply restrict the text to the predefined limit. Many word processing packages
have a 'count' tool that can help you respect the limits.
For the major fields, the limits are displayed in the headings and sub-headings of the eForm. For other
fields, please consult the following table:
Part Field Character Limit
Page 1 Project Title 300
Project Acronym 7
A
Full name of the organisation 62
Name in latin characters 62
Acronym 62
Department / Faculty 40
Street 57
Street Number 5
Postcode 12
Town 60
Internet address 60
Telephone 1 and Telephone 2 60
Fax 60
Title 25
Family name 62
First name 62
Role in the organisation 32
E-mail address 100

[Version 1]
Page 11 of 22
5 Guidance for specific Parts of the form
5.1 Cover Page
Important!
Please ensure that you complete all the fields of the Cover Page (page 1) before going on to
complete the rest of the form!
This is because the selections that you make, dictate how the rest of the form appears. For example,
the type of budget table that appears in Part B.3, is dependent upon the Action that you selected.
The Project acronym field is limited to 7 characters. If you require an acronym that is longer than this,
please include the full acronym of your project at the start of your Project title and then enter the first
7 characters of the acronym in the Project acronym field.
5.2 Part A – Organisations
For each participating organisation you must complete a Part A.
To add an additional block of fields for a partner or coorganiser organisation use the green Add
organisation(s) button found in the Partner Controls section of the form:
To delete a partner or coorganiser and all of its accompanying fields, use the orange button that
appears at the top of the block:
Please note the following:
For all Actions
P1 is automatically set to have the role of Applicant Organisation. It is not possible to change
this and it is not possible to delete this block of fields:
(i) Enter the number of
organisations you wish to add
Click to delete an
organisation
(ii) Click the add button

[Version 1]
Page 12 of 22
For Actions 3.2, 4.3 and 4.5 only
For the subsequent organisations – P2, P3 etc – the role is automatically set to Partner.
For Action 4.6 only
For the subsequent organisations – P2, P3 etc – the role is automatically set to Coorganiser.
Please note: only the 'co-organising partner(s)' who are extensively involved in the design and
implementation of the project and designated by the applicant at the time of submitting the
application (procedure B), should be recorded in the eForm.
The field ‘Internet address’ in Part A.1 relates to the organisation’s website address.
The field A.3 – details of the Legal Representative – is only required to be completed for the
Applicant Organisation. Consequently, it only appears in the form for the Applicant
Organisation (P1). For all subsequent organisations, the field A.3 is omitted and only fields
A.1 and A.2 are presented for completion.
The Registered address you enter in Part A.1 is automatically copied to Parts A.2 and A.3.
Check the relevant checkbox in order to write different address details in Parts A.2 or A.3.
As you record your organisation details, a summary table – ‘List of Partner Organisations’ – is
built up automatically in the form:
The table appears after the end of the details of the last partner organisation that you have
entered. The table is protected and cannot be used for adding or deleting partners. This can
only be done by using the green add buttons and the orange delete buttons.

[Version 1]
Page 13 of 22
Tip
When selecting a country value, instead of deploying the dropdown menu, enter the initial letter of the
country into the field. This will take you to the first country code in the list that begins with that letter.
Press the same letter again to bring up the next country. For example, entering the letter ‘s’ three times
in succession would bring up:
Slovakia
then Slovenia
then Spain.
The up and down arrow keys on the keyboard can also be used to navigate the list – without deploying
the dropdown menu – once an initial selection has been made.
5.3 Part B.3 – Summary budget
The summary budget table only appears in the form once you have selected your Action on page 1.

[Version 1]
Page 14 of 22
6 Attaching Documents to your eForm
The following mandatory annexes, which are a formal part of your grant application, must be attached
to your eForm:
Description of the project;
Detailed budget table;
Declaration of Honour By Legal Representative of Applicant Organisation;
Please use the following filenames for your attachments and respect the cited format restrictions:
Annex filename Permitted formats
Description of the project .doc, .docx
Budget table .xls, .xlsx
Declaration of Honour .pdf, .TIFF
Attachment size limitation
There is a limit to the total (combined) size of your attachments. This is 5MB. If you receive a
message advising you that the total size of documents exceeds the maximum allowed, please reduce
the size of the image-based document e.g. by reducing its resolution.
To carry out the attach function, click on the relevant Attach a document button and a window will
pop up enabling you to browse, locate and select the file you wish to attach:
Click on the ‘Open’
button to attach the
selected file to your
application.
[Version 1]
Page 15 of 22
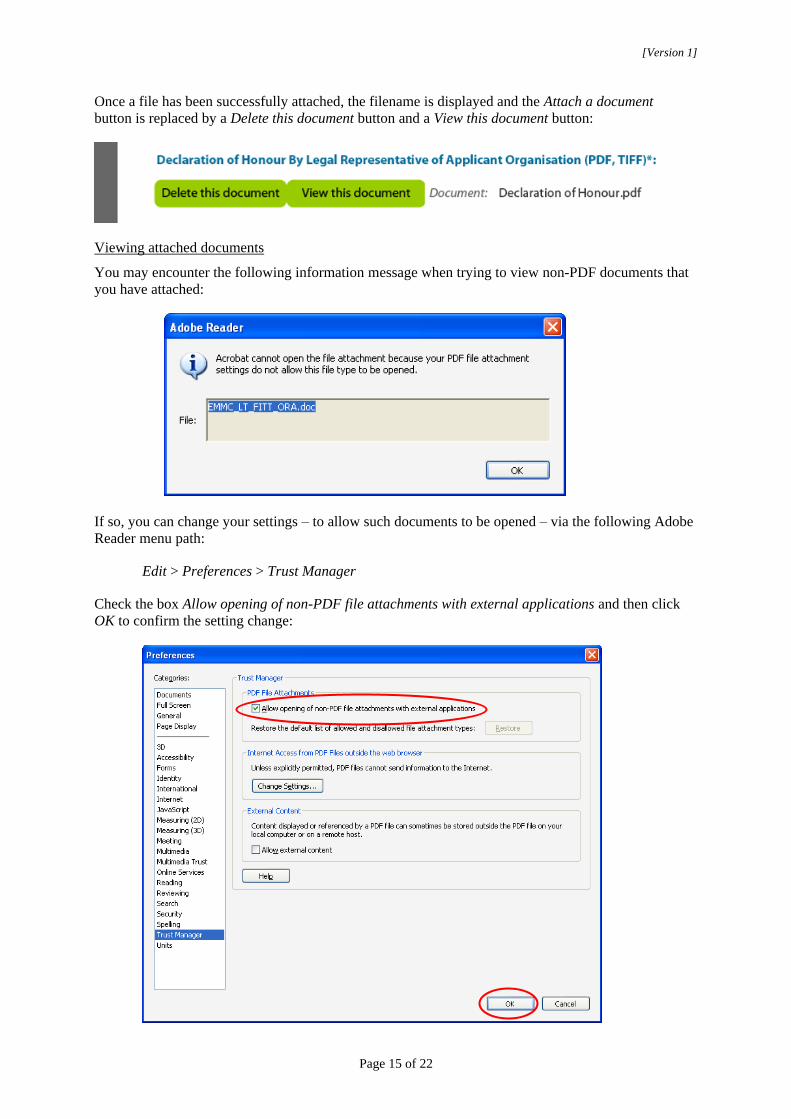
Once a file has been successfully attached, the filename is displayed and the Attach a document
button is replaced by a Delete this document button and a View this document button:
Viewing attached documents
You may encounter the following information message when trying to view non-PDF documents that
you have attached:
If so, you can change your settings – to allow such documents to be opened – via the following Adobe
Reader menu path:
Edit > Preferences > Trust Manager
Check the box Allow opening of non-PDF file attachments with external applications and then click
OK to confirm the setting change:

[Version 1]
Page 16 of 22
7 Validation of your eForm
The Validate Form button appears at the bottom right of every page of the form.
It is recommended that you do not validate your form until you have finished completing it as
validation slightly alters the look of the form.
When you are ready, click on the button and various checks will be automatically performed to
ascertain whether your form is ready for submission. For example, the validation will verify that all
mandatory fields have been completed and that the mandatory attachments are present.
If there are any errors present, the total number of them will be listed on the last page of your form. If
there are any attachment errors these will be itemised separately in the same list:
The errors themselves will be highlighted in pink. In the example that follows the mandatory field
‘Summary of the project’ has not been completed:

[Version 1]
Page 17 of 22
When you validate, an additional button – the Go to next error button – appears next to the Validate
form button.
Use this button to jump from error to error in your form. The function starts with the error nearest the
top of the form i.e. nearest to Page 1 and descends the form moving to the next error with each click.
Please note the following:
When you fix the errors that are highlighted, the Errors list is not dynamically updated. It is
only updated i.e. refreshed when you perform another validation.
The Go to next error function works best when you fix errors one by one, following the top-
to-bottom sequence used by the Go to next error button. If you fix errors out of sequence e.g.
fix an error further down the form, the Go to next error function will still follow the original
sequence of errors reported by the validation.
If you have fixed errors out of sequence, you are recommended to perform a fresh validation
so that the errors you have fixed are removed from the sequence (and you would then start
again from the error nearest the top of the form).
If you prefer, you can simply do a visual search for the pink errors in your form. If you do
this, it is recommended that you first turn off the highlighting for mandatory fields (see
Section 4.4). You may find the thumbnail view a useful aid to quickly detecting the pink
highlighted fields (see Section 4.2).
Whichever method you use, fix the errors that are present and validate your form again. If all errors
have been resolved you will see the following pop-up message:
Until your form validates successfully the Submit button is disabled and it will not be possible to
submit your form. The Submit button turns from grey to green when validation has been carried out
successfully.

[Version 1]
Page 18 of 22
8 Submission of your eForm
On the final page of the form is the Submit this form button. Once your form has been successfully
validated the button is enabled (as confirmed by its green colour). Before proceeding with the
submission, please ensure you have consulted and, where necessary, followed the advice on Adobe
security settings found in section 2 of this user guide.
Please note: the submission process includes the locking of the data and attachments in your form.
You may therefore wish to take a backup copy of your form before you begin the submission process.
When you are ready, click on the Submit this form button to launch the submission.
The following message will appear:
If for any reason you do not want to continue, you may click No and carry out the submission at a later
time. The submission process will end. Once you click Yes your form will be locked and it will no
longer be possible to modify its content or change the attachments.
Should you encounter any error messages during the submission of your form, please refer in the first
place to the ‘Known Issues’ section of the eForm home page:
http://eacea.ec.europa.eu/eforms/index_en.php#issues
8.1 The mandatory save BEFORE submission
If you click Yes, the next step of the submission process is a mandatory save. The following message
appears:
When you click OK, the form triggers a Save As operation. You will see the classic Save As window as
appears in the screenshot which follows.
(Please note: this screenshot is simply an example of the Save As window. The window that you see,
will reflect the filename and directory name that you have been using.)

[Version 1]
Page 19 of 22
You must now perform the Save As by clicking on the Save button.
Very Important!
You must NOT change the filename of your eForm.
You must keep the same filename that the file had when you began the submission operation!
Click Yes when you are asked if you want to replace the existing file:
8.2 Submission
Depending upon your security settings, the following pop-up window may now appear:
Example screenshot

[Version 1]
Page 20 of 22
If the window appears, click on the Allow button in order to proceed with the submission.
When the submission is complete you will see a pop-up message similar to the one that follows:
Click ‘OK’.
8.3 The mandatory save AFTER submission
When you click OK, the form triggers another Save As operation. This is so that you cannot
mistakenly close the form without saving (and so lose the submission number).
Once again you will see the classic Save As window appear:
You must now perform the Save As by clicking on the Save button.
Very Important!
You must NOT change the filename of your eForm.
You must keep the same filename that the file had when you began the submission operation!
Example screenshot

[Version 1]
Page 21 of 22
Click Yes when you are asked if you want to replace the existing file:
When you click ‘Yes’, the submission number is automatically added to the ‘Submission number’
box:
It is also inserted into the footer of your form.
The form has also been saved and this save included the submission number.
Your submitted form is now ‘locked’. That is to say, it has been converted to a read-only document:
changes cannot be made to it and it cannot be re-submitted.
As part of the submission process, an email message acknowledging receipt of your eForm is
automatically sent to the email address you entered for the contact person of the Applicant
Organisation (Part A.2).
As indicated by the earlier pop-up message, you may now print the form before closing it.
Please consult the Applicant's Guidelines for the relevant Action for details of how to submit the paper
version of your form.
9 Printing your eForm
The eForm can be printed using Adobe Reader’s standard menu-driven print function. The Print
button is found on the tool bar, or the Print menu can be selected from the File menu.
10 How to obtain Technical assistance – EACEA Technical HelpDesk
If this User Guide does not provide answers to all of the technical questions or problems you
encounter in completing the application form, a telephone HelpDesk service is available to assist you
further:
EACEA Technical HelpDesk: +32 229 90705
Monday to Thursday 08:30 to 17:30
Fridays 08:30 to 17:00
Excluding public holidays
All times are Brussels time

[Version 1]
Page 22 of 22
Should you experience what you believe to be a significant technical issue with the eForm it will be
worth checking the Youth in Action website since, in the event of a general technical problem, an
update bulletin would be posted.
You may also visit the Agency’s dedicated eForm webpage which contains the latest versions of all
published forms along with the Test eForm and other items of information:
http://eacea.ec.europa.eu/eforms/index_en.php
Non-technical assistance
If you require assistance with a query or problem that is not technical in nature, please do not contact
the EACEA Technical Helpdesk. This Helpdesk team are only authorised and trained to help
applicants who are encountering technical problems.
Please refer instead to the funding opportunities webpage of the programme/action that you are
applying for. On this webpage you will find details of how to obtain non-technical assistance e.g.
assistance with questions on:
the content of the eForm;
the application process;
the rules of the programme / Call that you are applying for.
Generally speaking, the funding opportunities webpage will include the mailbox address of the
programme team that is responsible for the programme/action that you are applying for. The page will
also contain documentation that may already provide an answer to your non-technical question e.g. an
Application Guidelines or Instructions for Applicants document or a link to an in-country Helpdesk
which can help you. If you cannot find the answer to your question, please contact the mailbox of the
programme team cited on the funding opportunities webpage.
The following table provides some examples of technical and non-technical questions.
Technical Questions
(handled by the EACEA Technical Helpdesk)
Non-technical Questions
(handled by the programme team)
I can’t download the form. What is required to be entered for the field Venues?
A dropdown list isn’t working. Why isn’t country A in the dropdown list?
I can’t attach my Declaration of Honour (or
other attachment). I need help with completing my budget table.
I can’t delete a partner that I added. What is the minimum / maximum number of partners that
is allowed?
My form freezes/crashes. Why is this field mandatory?
My form is working slowly. I need more characters for my answer!
My form won’t validate. What do you mean by the term ‘acronym’?
My form won’t submit. Where are the templates for the attachments and
additional documents?
I think there is a bug in the form. What should I enter in the form for my project start and
end dates?