Embed Size (px)
Citation preview

Free Toast Host 2.0


What is FTH 2.0?
FreeToastHost 2.0 is the replacement for FreeToastHost
1.0. It is not a competitor of FTH, or a alternative for FTH. It
is a complete rebuild using the latest web technology and
Toastmasters branding guidelines. When you create your
new FTH 2.0 website, you are starting a NEW website
while your OLD FTH 1.0 website is still live. Once your new
website is complete, you can move over your custom
domain (if you have one) or simply start using the new
domain, as well as redirect your old domain.

Check out the Sample Club Website

Check out what Admin and Member Access
Look Like on the Club Demo site

Getting Started Guide

Getting Started $

Step 1:
Request Your FreeToastHost 2.0 Website
� Visit http://www.toastmastersclubs.org
� Follow the instructions on the
homepage to request your
website.
� Once confirmed, you will
receive an e-mail with the
details of your new website.

Email the Club Contact Receives

Email confirmation you receive
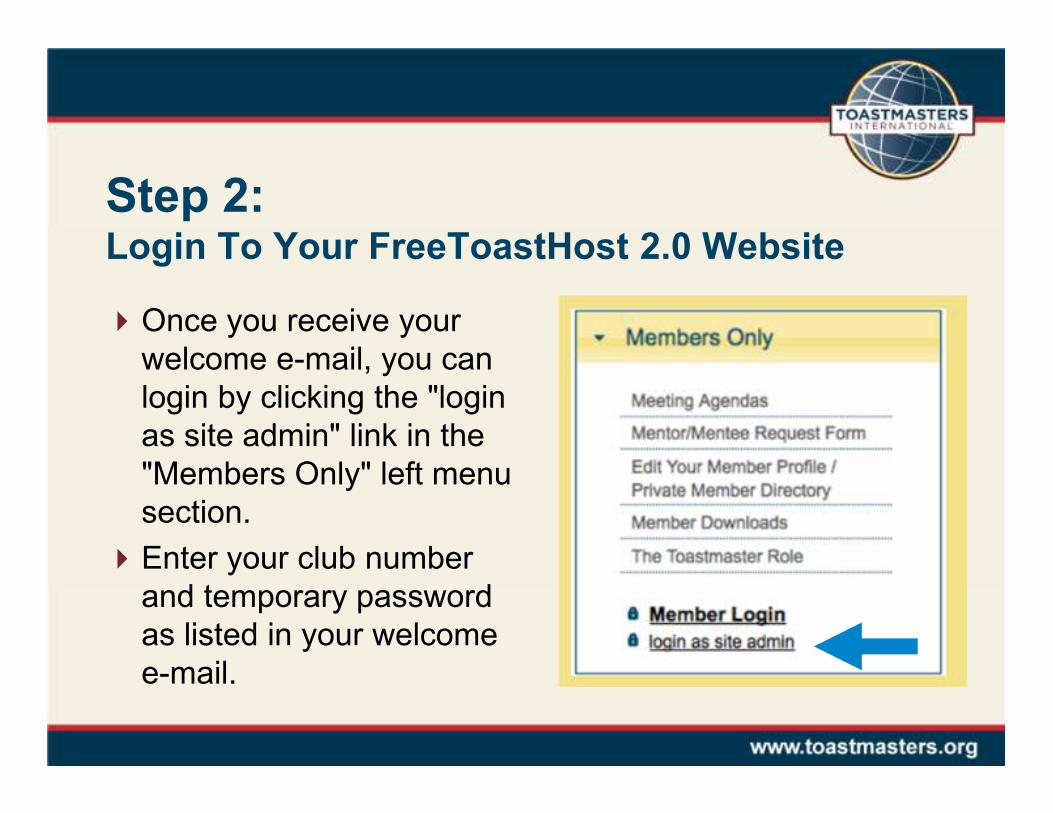
Step 2: Login To Your FreeToastHost 2.0 Website
�Once you receive your
welcome e-mail, you can
login by clicking the "login
as site admin" link in the
"Members Only" left menu
section.
�Enter your club number
and temporary password
as listed in your welcome
e-mail.

May take several
tries 0
Tip:
take the leading zero
off the club number.
Login as Site Administrator

Step 3: Launch the Admin Console
To Setup Your Site
�Once you are logged in,
the links at the bottom of
the "Members Only" menu
will change to show that
you are logged in, and
show the link to launch
the admin console.
�Click the "launch admin
console" link.

Step 4:
Club Website Settings
� Go through the options in your
club website settings and
customize the settings.
� Each field has an explanation
under it, if you are not sure
what to enter.
� If you require more information
or details, check the FAQ.
When you are done, click the
"Save" button at the bottom of the
admin console window.

Change Your Admin Password

Web Settings: Alias
A. Website Alias - This is what you will use if you are NOT using a custom
domain. An alias is what comes before the
toastmastersclubs.org/toastmastersdistricts.org domain -- it is what replaces
your club number in the URL. Example:
http://12345.toastmastersclubs.org
would become
http://myclub.toastmastersclubs.org
Once you establish an alias, your site will still be accessible by the club number
in the URL as well, but each URL will require the member/admin to login again,
since they are recognized as two separate URLs by the browser.
You can change your alias at any time. As more clubs register, fewer aliases
will be available. It is first come, first serve, so all of you "talk of the town" ers
better hurry up! When you change your alias, the old one goes back in the pool
of available aliases.

Change Your Website Name –Website Alias
(replaces the club number in the web address)

Club Settings: Color Themes
� Your Club Website Color Theme - This allows for you to use one of the
three approved club/district templates. This changes all colors and the base
header. You can switch these as many times as you like -- it does not
affect any of your content.
� Note: Your club name is automatically added to the banner at the top of the
website -- there is no need for, or no ability to, upload your own header.

Describe your website and
Pick your Color Theme

Theme 1
Themes
Theme 2
Theme 3

Step 5:
Administrator Information
� Using the pulldown menu at the top center
of the admin console, select the
"Administrator Information". This will
automatically take you to the "Administrator
Information" screen, within the admin
console.
� Go through the options and customize the
settings. Each field has an explanation
under it, if you are not sure what to enter. If
you require more information or details,
check the FAQ.
� When you are done, click the "Save" button
at the bottom of the admin console window.
This will take you back to the main screen -
- the Club Website Settings.

Step 6:
Membership Management
�Using the pulldown menu at the top center of the
admin console, select the "Membership
Management". This will automatically take you to
that screen, within the admin console.
�Go through the options and customize the
settings. Each field has an explanation under it,
if you are not sure what to enter. If you require
more information or details, check the FAQ.

Add Members—Drop Down Box
“Membership Management”
Name - email - phone
Example: Joan Smith, DTM [email protected] 612-306-1234
(no spaces in phone number)

Get Member Roster from TI site

Export to Excel or Do “Manually”
Note:
Highlight the three
columns needed
Paste into the Member
Screen
Name - email - phone
Example: Joan Smith, DTM [email protected] 612-
306-1234
(no spaces in phone number)

Membership – assignments
� Now that you have entered members, you will be able to choose
which members will be the club contacts.
� Select the member(s) from the list of available members, and
choose to include their phone numbers or not (get permission first
from them!)
� Select the member in charge of your club's mentor program.
� When you are done, click the "Save" button at the bottom of the
admin console window. This will take you back to the main screen --
the Club Website Settings.

Hit save after each person (unless
you are just adding a member)
Assign Officer, Guest, Former Member
Status (Member Status is default)

Inactive Members
� Make them "Former Members" by changing
their membership status using the pull
down.
� When you do this, it will be as if they are no
longer members, but all their historical data
will be preserved. They will NOT get any e-
mails*, be on any lists, or be
inconvenienced in any way.
� * Do make sure if the member you are now
making a former member is listed as one of
the contacts in the contact / mentor form,
you remove them from there as well, or they
will get e-mail still from those forms.If you delete a member from your
website, all their data will be removed.
Speech info, agenda info, photo, etc.

Step 7:
Default Website Pages / Forms
Club Contacts for the "Contact Us" Form
� Select up to 3 contacts for your club.
� The order in which you select the members, will be the order in
which they are listed.
� Generally speaking, this means that the first contact will be called
the most, if the phone number option is checked.
� Otherwise, the contact form submissions will go to all the contacts.
� The club contact who responds is encouraged to "reply-all", so the
other contacts can see the reply and know the prospect is not
waiting for an answer.

Contact Us

More Default Pages - Mentors
Mentor / Mentee Requests
�Select the member of your club who will
be handling these requests.
�This is traditionally the VPED, but does
not have to be.
�Unlike the contact form, this form is seen
by members only.

More Default Pages – Meeting Info
Meeting Information / Directions
�This is the page where you want to tell
prospects all about your club.
�You use the custom HTML editor to
design an attractive page for that purpose.
�Follow the on screen directions to get the
Google maps iframe code and paste it into
the area below the text area.

Step 8:
Social Networking Links
� You might find it beneficial to your club
to start social networking accounts.
� If you do, enter in the URLs in this
section, the logos/links will appear in the
bottom left menu.
� There’s a place to record the password
information – which is very helpful when
transitioning responsibility.
� When you are done, click the "Save"
button at the bottom of the admin
console window. This will take you back
to the main screen -- the Club Website
Settings.

Social Networking – Which to Use
�Facebook is great for hosting discussions
�Twitter is ideal for short notices and updates
�YouTube is for club videos
�Flickr is for photos
�LinkedIn is for contacts and networking

Step 9:
Custom Webpages
� Create as many custom webpages
as you like.
� It is a requirement that the
webpages you create are linked to
either the public or members only
menu (this is done automatically).
� When you are done, click the "Save"
button at the bottom of the admin
console window. This will take you
back to the main screen -- the Club
Website Settings.

Custom Webpage – process
�Visuals make pages
more interesting
�Add Photos
� Select from the
Toastmasters Library
� Or Upload your own
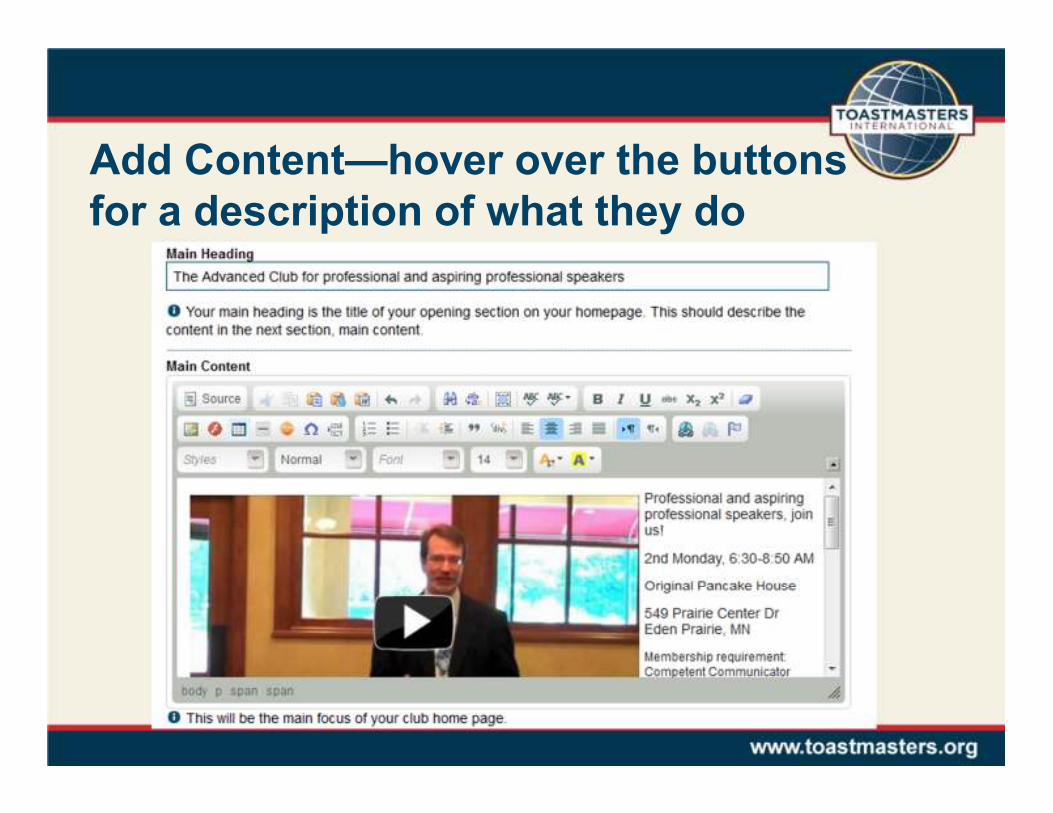
Add Content—hover over the buttons
for a description of what they do

Step 9:
Floater Messages
� You can enter messages
that appear at the top of
the browser window for
both members and
guests (two different
messages).
� These messages show
up only once per session
-- as to not annoy
members and guests.
When you are done, click the
"Save" button at the bottom of the
admin console window. This will
take you back to the main screen --
the Club Website Settings.

Step 10:
File Manager
� Upload files that you would like
guests and/or members to have the
ability to download. By default, the
file is member only, but it can be
made public by clicking the lock
icon.
� By default, the file name is used for
the description. You can change
these, then click the "save" button.
You don't need to save for just
uploading files, changing to or from
private, or removing.

Step 11:
Meeting Agenda Settings
�There are two primary
types of Agendas:
� Templates
� Custom
�This template will be used
as the basis for all your
future meetings.
When you are done, click the "Save" button at
the bottom of the admin console window. This
will take you back to the main screen -- the
Club Website Settings.

Agenda Tips � 1) Make sure you are logged
in as administrator or logged
in as a member, if you are
VPED.
� 2) Click the "Create New" link
in the Members Only menu.
� 3) Click the "+" button to
create the new agenda.
� 4) Select the template you
would like to use as a starting
point for your new agenda.
Tip:
Use the Default templates to get
started quickly.

Edit / Role Assignment an Agenda
�Use the pencil Button
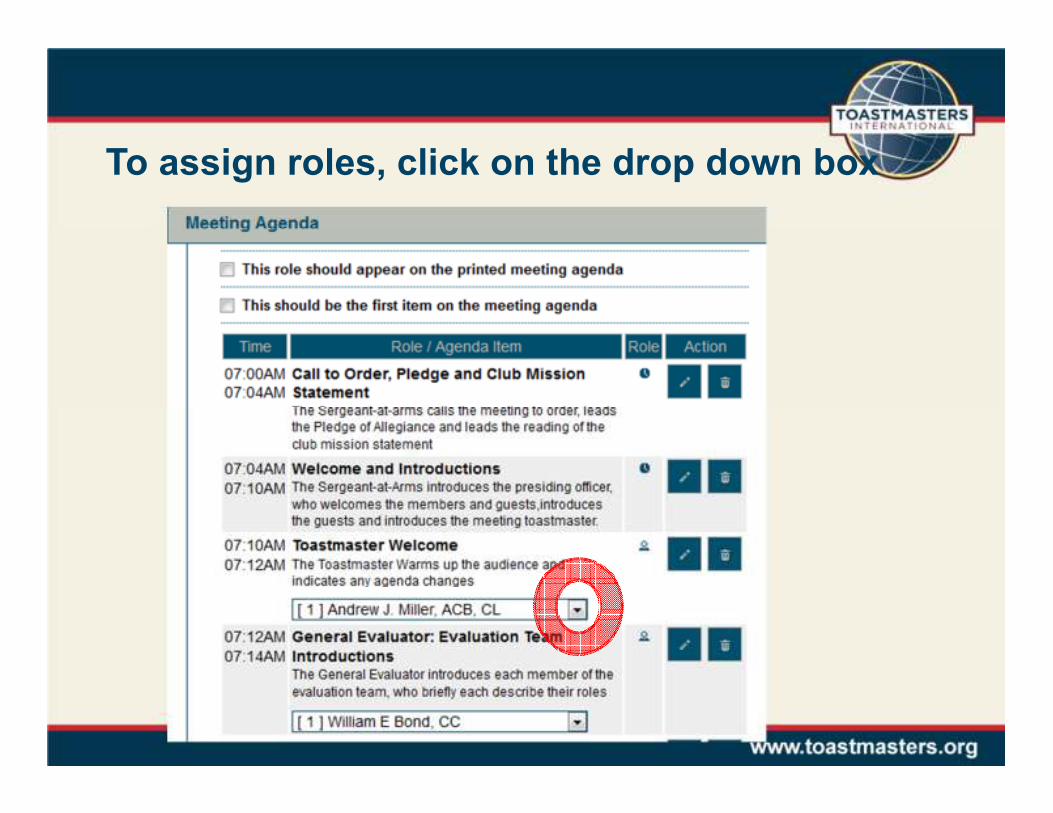
To assign roles, click on the drop down box
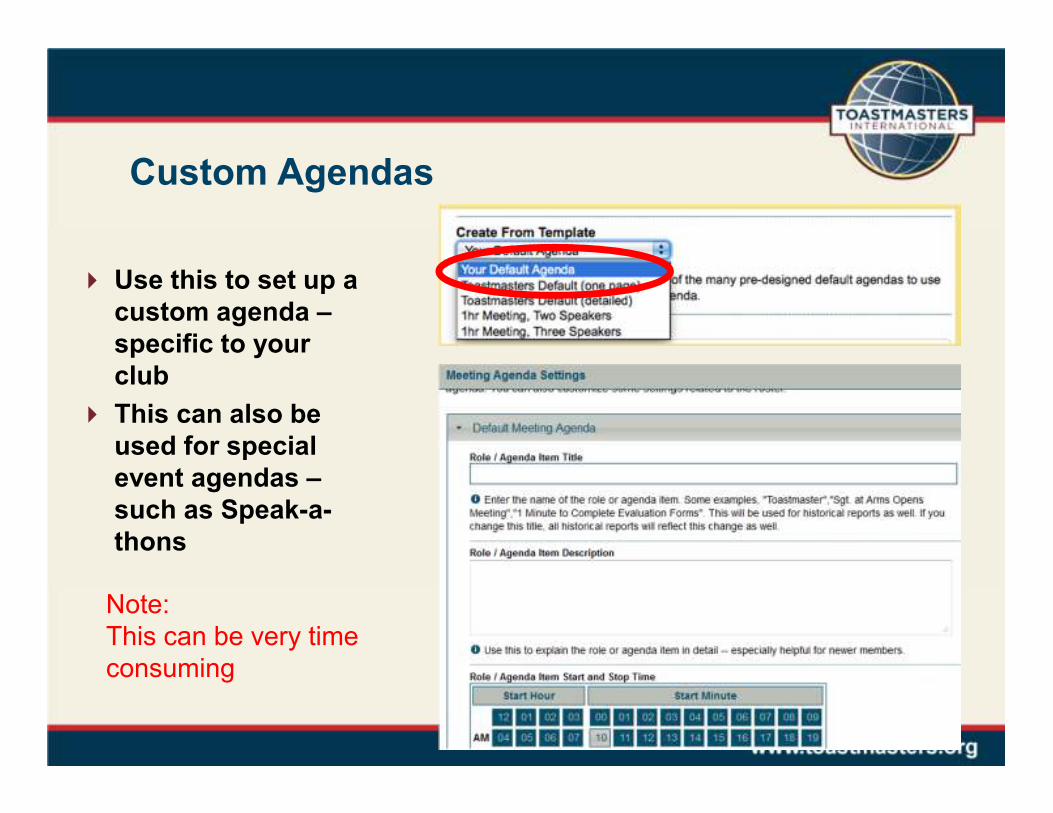
Custom Agendas
� Use this to set up a
custom agenda –
specific to your
club
� This can also be
used for special
event agendas –
such as Speak-a-
thons
Note:
This can be very time
consuming

How do I $
Get Agendas on the Calendar
�When you create a new agenda and
assign a date the meeting is automatically
entered on the calendar.

Step 12:
Notify Your Members!
�Notify your members!
Let them know your
URL.
�Once a member visits
the site, they will be able
to authorize their
account and create a
custom password.

Let Your Members Know!
You have to send each welcome
message one at a time. Click
“Save” to send.

Update your Club Meeting
information at TI

Put in Your New Website

Check Your Listing in “Find a Club”
(give it a little time)

Once Your FTH 2.0 Site Is
Complete and Live...
�Log into your admin console on your OLD FTH 1.0 site. At
the top, you will see where you redirect to your new site:
� Enter in your club number or alias (it does not matter which), then
click the arrow to save. The server will check to make sure you have
entered a valid FTH 2.0 site, and redirect all web traffic going to your
old FTH 1.0 URL to your new FTH 2.0 URL.

Before You Forward:
�If you copied and pasted your website
from FTH 1.0 to 2.0, make sure you have
corrected all your links (pictures), as the
redirect will cause them not to be seen.
�Updated your contact list
�Downloaded your historical data (post
as a file sharing item if appropriate)

Where to get help
www.freetoasthost.org

Next Steps
�Claim your site:
� http://www.toastmastersclubs.org
� www.freetoasthost.org
�Keep this manual!