Embed Size (px)
Citation preview
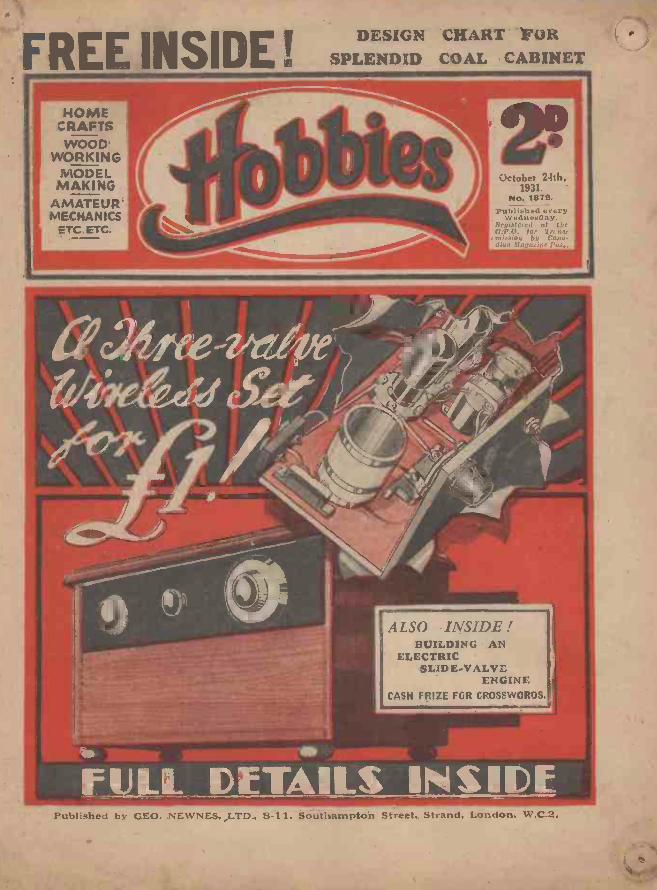
FREE INSIDE!DESIGN CHART FOR
SPLENDID COAL CABINET
HOMECRAFTSWOOD
WORKINGMODELMAKING
AMATEURMECHANICS
ETC. ETC.
October 24th,1931.
No. 1879.Published every
Wednesday.'registered St t h.C.P.O. formission 1,7,diug if 410.1.111E
ALSO INSIDE !BUILDING AN
ELECTRICSLIDE -VALVE
ENGINECASH FR1ZE FOR CROSSWORDS.
FULL DETAILS INSIDEPublished by GEO. NEWNES. LTD., 8-11, Southampton Street. Strand. London. W.C.2.
ii HOBBIES October 24th, 1931
Decorative Mouldings for all kinds ofWOODWORK.
=
sup , weemeeoeireeeeo.PO iiiMos 00iNNOIll WO@ 0111M
4100000/49 -10414,4, -
POSTAGEis extra to allabove prices.Order inshort lengthswherepossible.
GET IN
No. 108 --Supplied in Beech, in. wide,lid. per ft., 1/3 fur 12 ft.
\o 109-Small Beech Moulding,5-16 in. wide, id. per ft,
Half -round Beading-No. ,52-3-16 in. od. for 12 ft.No. 53-: in. 9d. for 12 ft.
Ball and Sausage Beading, half -round,in three sizes, kin. and l in. 9d. for12 ft. No. 64-I in. 10d. for 12 ft.
Half -round Twist-No. 67-1 in. 10d. for 12 ft.No. 68-i in. 1/2 for 12 ft.No. 69-4 in. 1/3 for 12 ft.
Beech Fancy Moulding-No. 126-lin. wide, 21d. per ft., 2/3for 12 ft., 18/- for 100 ft,
A STOCK-ALWAYS HANDY.
Hobbies Branches in London, Glasgow, Manchester,Birmingham, Sheffield, Leeds, Southampton, Brighton,
or post fromHOBBIES LTD., DEREHAM, NORFOLK.
FREE
AN interesting Bookletgiving illustrations
and all particulars of awide Hinge of moulding,legs, fa ilea ornaments,etc. Free on ,equest atany Hobbies branch as
below.
CliIIIHM11111111111111111111111011111iii LI NI1111111110111111111111111111111111111111111111112:1111111SIMIC.111,14
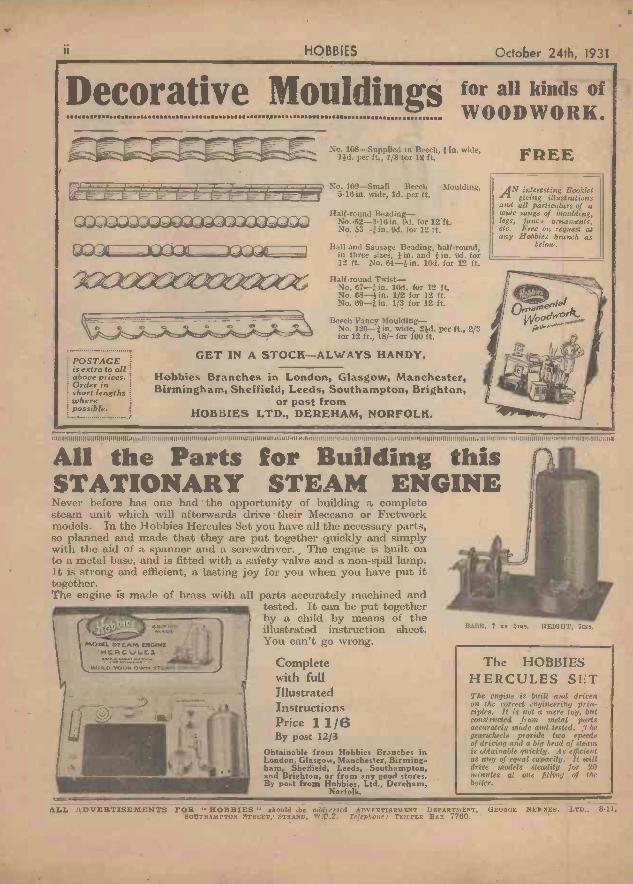
All the Parts for Building thisSTATIONARY STEAM ENGINENever before has one had the opportunity of building a completesteam unit which will afterwards drive their Meccano or Fretworkmodels. In the Hobbies Hercules Set you have all the necessary parts,so planned and made that they are put together quickly and simplywith the aid of a spanner and a screwdriver. The engine is built onto a metal base, and is fitted with a safety valve and a non -spill lamp.It is strong and efficient, a lasting joy for you when you have put ittogether.The engine is made of brass with all parts accurately machined and
tested. It can be put togetherby a child by means of theillustrated instruction sheet.You can't go wrong.
Completewith fullIllustratedInstructionsPrice 1 1/6By post 12/3
Obtainable from Hobbies Branches inLondon, Glasgow, Manchester, Birming.ham, Sheffield, Leeds, Southampton,and Brighton, or from any good stores.By post from Hobbies, Ltd., Dcreham,
Norfolk.
01131,15..AnAOS.
FRODEI. ST [AM EVIGINC
OR> YOUR OW. S
BASH, 7 Er :min. H (SIlT, 7nis.
The HOBBIESHERCULES SETThe engine is built and drivenon the correct engineering prin-ciples. It is not a mere toy, butconstructed from metal partsaccurately made and tested. ,Thegearwheels provide two speedsof driving and a big head of steamis obtainable quickly. As efficientas any of equal capacity, It willdrive models steadily for 20minutes at one filling of theboiler.
ALL ADVERTISEMENTS FOR " HOBBIES' should to addressed ADv EETIS EM ENT DEPARTMENT, GEORGE NEWNES. LTD.. 811,SOIITHAMPTON STREET, STRAND, W.C.2. Telephone: TEMPLE BAR 7760.
7.7100 HOBBIES October 24th, 1931
6N&,.4
QUERIES AND REPLIES
Let Your Editor Help You. Address your letters and queries to The Editor,Hobbies," Geo. Newnes. Ltd.. 841, Southampton Street, Strand, London, W.C.2.,
enclosing a stamped, addressed envelope. All letters and queries must bear thefull name and address of the sender.
" Austin " and " Vauxhall " Com-petitions. -
HERE is still tune to enter forT our Austin and Vauxhall model -making competitions, the rulesgoverning which were set forthin our issues dated October 3rdand 10th respectively. The formercontains our free gift set of parts formaking a splendid model of theAustin Seven, and the latter adesign sheet for the Vauxhall car.These issues are obtainable from theBack Number Department, ExeterStreet, Strand, W.C.2.
Title -Page and Index to Vol. 72.pOW quickly time flies ! It seemed
but yesterday that I wrote aparagraph concerning the index andtitle -page to Vol. 71. I am remindedof this by the fact that we have nowpublished an eight -page title -pageand index for Vol. 72 ; copies of thisindex are obtainable for 4d. separ-ately, or complete with binding casefor 2s. 9d., from newsagents, orfor 3s. by post from us. A boundvolume of HOBBIES constitutes auencyclopaedia of practical arts anderafts, and the very full indexenables you rapidly to locate thepiece of infomation you want.
The " Hobbies Telescope."TT is with great pleasure that I inform
readers that Mr. E. W. Twining,a model -maker and art craftsman ofconsiderable experience and versa-tility, has joined our staff of con-tributors. Mr. Twining will makehis debut in these pages next weekwith the first of a series of articlesexplaining how to make the HobbiesAstronomical Telescope. I have thedrawings of this telescope before menow, and I can assure my readersthat it is a really clever and at thesame time easily -constructed pieceof work. It is not a toy, for it hasa barrel 33ins. long and 3?.,ins. bore.
Mr. Twining has had long experi-ence in every branch of model -making,including model aeroplanes (he wonseveral important competitions in
the early days of model aeroplanes),model locomotives, telescopes, archi-tectural models, etc. If you addto this wealth of experience hisaccomplished style of writing andhis skill as a draughtsman, youwill appreciate that his contributionsare something worth looking forwardto. By means of his telescope youwill be able to observe the heavenlybodies with the same degree ofaccuracy as the skilled astronomer.
NEXT WEEK.
DESIGNSFOR ATTRACTIVE
TRUMP INDICATORFUN WITH
FIREWORKSMAKING
WIRELESS COILSHOW TO BECOMEA VENTRILOQUISTMAKING A
TABLE POND
Stamps, Electrics, Model AeroplaneTopics, Model Railways, Coins,
Etc., Etc.
These articles Mr. Twining willfollow up with articles on othersubjects.
Our Christmas Number.WITHIN a few weeks my Christ-
mas Number will be in yourhands. It has been the subject ofcareful consideration for many weekspast, and I think I have now arrivedat the correct proportions of its in-gredients. It will be an enlargedChristmas Number, and its contentswill be directed towards entertain-ment as well as practical things.
Aqua Regia Correction.In our issue dated Oct. 3rd. page 2,4,tie
wrongly stated that Chlorine is called AquaRegia. This latter substance is really amixture of hydrochloric acid and nitric acid.
A Request for Tram Tickets.Ralph Kendrick. Junior, 28, .Nelson Street.
Rochdale Road, Manchester, would like to hearfrom other readers who have for disposalunused or used train and 'bus tickets, andpictures and photographs of trains and 'Lases.as his hobby is making as complete a collectionas possible.
Making Firework Fuses.Make a saturated solution of saltpct
water, C. I,. C. (Westminster); then dip fideblue tissue paper in Caine, roll it up into thefuse shape and allots to dry thoroughly.
Colouring Electric Light Bulbs.Electric light -bulbs are frequently colml, . I
by the application of a coloured spirit varnishobtainable from the larger oil and colourstores, L. W. H. (West Kilburn). It shouldbe applied quickly with a soft brush, and itdries in about half au hour,
Mountant for Photographs.Add a little water for one ounce of dextrine.
break it up With a teaspoon. then ,Md a wine -glassful of water, W. H. (Sheffield) : stir overthe fire until it boils and when cold it is readyfor use.
Black Liquid Polish for Leather.Take ioz. of isinglass or gelatine,
powdered indigo, 4oz. of soft sap, 4oz,logwood, and 5oz. of glue. L. N. (Llandudno,.Boil in 2pt, of vinegar until the glue is dissolved,then strain through a cloth and bottle for use.
The First Bible.The first Bible was printed by Cuter,l,rg
between 1450 and 1455. - Gutenberg was; ofcourse, the first printer.
Wax for Artificial Flowers.Heat together equal quantities of wax (as
used for best white wax candles) and whitelead in a vessel in an oven ; regulate the stiff-ness by using more or less wax, M. -1).
(Halifax),
Frame Aerial Data.The following information regarding frame
aerials is given in reply to L, U. (Bridport) :
4'`xie"
t ''''
c, ,,,,
4VI-
8ft.6 ,,4 -3 ,,
3- 4
68
pin.1 .
96121154193
-75665549
169170175155
Varnish Hint.Streakiness in. the varnish, L. J. (Leicester),
may be caused by the imperfect mixing ofdriers, oil, or turpentine with the varnish.When it appears on unpainted wood, it maybe due to uneven planing or filling -up. 'Veryoften an Etta coat of varnish will put thething right.
printed by NEWNES & PEARSON PRINTING CO., LTD., Exmoor Street, Ladbroke Grove, W.10, and published by. C. EOPGE N Rae LTG., 8-11., soutb-atepton Street, Strand, W.C.2. Sole Agents for Australia and New Zealand: 00x005 & Goren, LTD, - S..011t 11 Africa ceneui New A.seney,
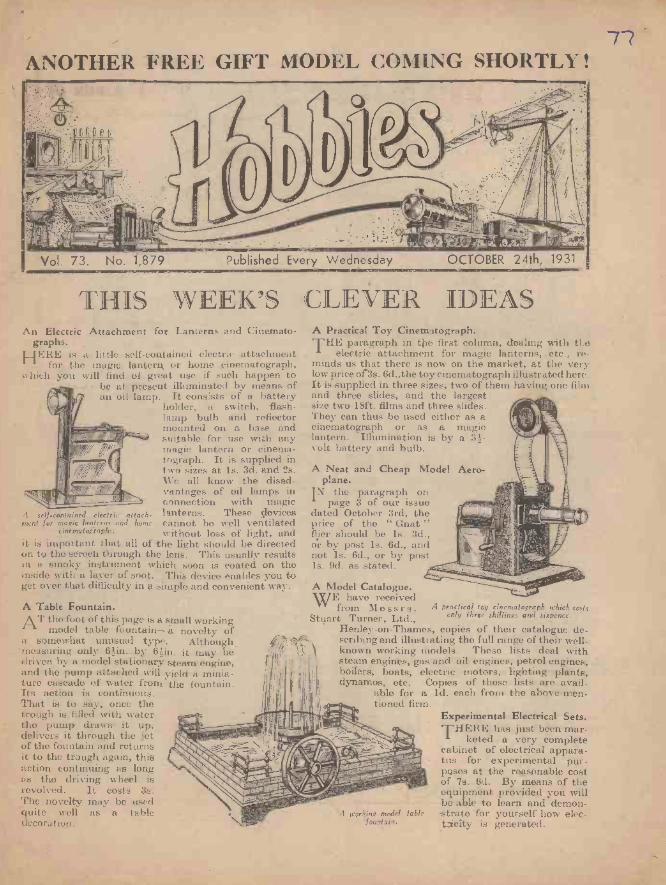
ANOTHER FREE GIFT MODEL COMING SHORTLY !
Vol. 73. No. 1,879 Published Every Wednesday OCTOBER 24th, 1931
THIS WEEK'S CLEVER IDEASAn Electric Attachment for Lanterns and Cinemato-
graphs.HERE is a lilt -le , s,d Leen:aim:, electric, attachment
for the magic lantern or home cinematograph,which you will find of great use if such happen to
be at- present illuminated by means ofcm oil lamp. It consists of a battery
holder, a switch, flash -lamp bulb and reflectormounted on a base andsuitable for use withmagic lantern or cinema-tograph. It is supplied intwo sizes at is. 3d. and 2s.We all know the disad-vantages of oil lamps inconnection with magic
A self-contained der/ de attach- lanterns. These devicesmen! for magic lanterns and home cannot be well ventilated
cinematoiraphs. without loss of light, andit is important that all of the light should be directedmu to the screen through- the lens. This usually resultsin a smoky instrument which soon is coated on theinside with a layer of soot. This device enables you toget over that difficulty in a simple and convenient way.
A Table Fountain.AT the foot of this page is a small working
model table fountain-a novelty ofa somewhat unusual type. Although_'measuring only .6iin. by 61in, it may bedriven by a model stationary steam- engine,and the pump attached will yield a minia-ture cascade of water from the fountain.Its action is continuous.That is to say, once thetrough is filled with waterthe pump draws it up,delivers it through the jetof the fountain and returnsit to the trough again, thisaction continuing as longas the driving wheel isrevolved. It costs 3s.The- novelty may be usedquite well as a tabledecora lion.
A Practical Toy Cinematograph.THE paragraph in the first column, dealing with Its
electric attachment for magic lanterns, etc., re-minds us that there is now on the market, at the verylow price of3s. 6d.,the toy cinematograph illustrated here.It is supplied in three sizes, two of them having one filmand three slides, and the largestsize two 18ft. films and three slides.They can thus be used either as acinematograph or as a magiclantern. Illumination is by a 31 -volt battery and bulb.
A Neat and Cheap Model Aero-plane.
IN the paragraph onL page 3 of our issuedated October 3rd, theprice of the " Gnat "flier should be ls. 3d.,or by post Is. 6d., andnot Is. 6d., or by postIs. 9d. as stated.
A Model Catalogue.WE have received
from Messrs. A oraclical tog cinematograph which costsStuart Turner, Ltd., ally three shillings and sixpence.
Henley-on-Thames, copies of their catalogue de-scribing and illustrating the full range of their well-known working models. These lists deal withsteam engines, gas and oil engines, petrol engines,boilers, boats, electric motors, lighting plants,dynamos, etc. Copies of these lists are avail-
able for a Id. each from the above -men-tioned firm.
Experimental Electrical Sets.THERE has just been mar-
keted a very completecabinet of electrical appara-tus for experimental pur-poses at the reasonable costof 7s. 6d. By means of theequipment provided you willbe able to learn and demon-strate for yourself how elec.ticity is generated.
A working model tablefountain.
78 HOBBIES
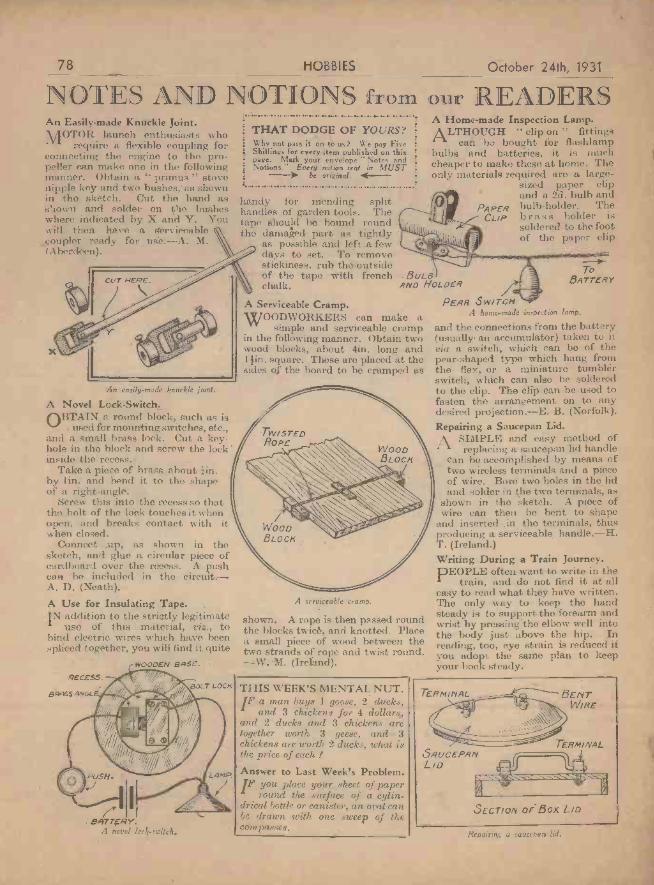
NOTES AND NOTIONS from ourAn Easily -made Knuckle Joint.MOTOR launch enthusiasts who
require a flexible coupling forconnecting the engine to the pro-peller can make one in the followingmanner. Obtain is " primus " stovenipple key and two hushes, as shownin the sketch. Cut the hand asis!town and solder on the busheswhere indicated by X and Y. Youwill then have a serviceablecoupler ready for use.-A. M.(Aberdeen).
Cur HERE.
An easily -made knuckle joist.
A Novel Lock -Switch.OBTAIN a round block, such as is
used for mounting switches, etc.,and a small brass lock. Cut a key.hole in the block and screw the lock'inside the recess.
Take a piece of brass about 1,in.by lin. and bend it to the shapeof a right-angle.
Screw this into the recess so thatthe bolt of the lock touches it whenopen, and breaks contact with itwhen closed.
Connect up, as shown in thesketch, and glue a circular piece ofcardboard over the recess. A pushcaps be included in the circuit.-A. D. (Neath).A Use for Insulating Tape.IN addition to the strictly legitimate
use of this material, viz., tobind electric wires which have beenspliced together, you will find it quite
BATTERYA novel lock -switch
THAT DODGE OF YOURS?Why not pass it on to us? We pay Five
4 Shillings for every item published on thispage. Mark your envelope Notes andNotions." Every notion sent in MUST
I be original. E -.-
handy for mending splithandles of garden tools. Thetape should ho bound roundthe damaged part as tightly
as possible and left a fewdays to set. To removestickiness, rub the outsideof the tape with frenchchalk.
October 24th, 1931
I 11)
I \ EADE SA Home-made Inspection Lamp.ALTHOUGH " clip on " fittings
can be bought for flashlampbulbs and batteries, it is muchcheaper to snake these at home. Theonly materials required are a large -
sized paper clipand a 2c1. bulb andbulb -holder. Thebrass holder issoldered to the footof the paper clip
ButeAND HOLDER
A Serviceable Cramp.WOODWORKERS can make a
simple and serviceable crampin the following manner. Obtain twowood blocks, about 4in. long andlain. square. These are placed at thesides of the hoard to be cramped as
A serviceable cramp.
shown. A rope is then passed roundthe blocks twick and knotted. Placea small piece of wood between thetwo strands of rope and twist round.-W. M. (Ireland).
THIS WEEK'S MENTAL NUT.IP a man buys 1 goose, 2 ducks.
and 3 chickens for 4 dollars,and 2 ducks and 3 chickens aretogether worth 3 geese, and 3chickens are worth 2 ducks, what isthe price of each
Answer to Last Week's Problem.IF you place your sheet of paper
round the surface of a cylin-drical bottle or canister, an oval canbe drawn with one sweep of thecompasses.
PAPERCLIP
PEAR SWITCH
ToBATTERY
,4 home-made inspection lamp.
and the connections from the battery(usually an accumulator) taken to itvia a switch, which can be of thepear-shaped type which hang fromthe flex, or a miniature tumblerswitch, which can also be solderedto the clip. The clip can be used tofasten the arrangement on to anydesired projection.-E. B. (Norfolk).Repairing a Saucepan Lid.ASIMPLE and easy method of
replacing a saucepan lid handlecan be accomplished by means oftwo wireless terminals and a pieceof wire. Bore two holes in the lidand solder in the two terminals, as
- shown in the sketch. A piece ofwire can then be bent to shape
and inserted .in the terminals, thusproducing a serviceable handle.-H.T. (Ireland.)Writing During a Train journey.PEOPLE often want to write in the
train, and do not find it at alleasy to read what they have written.The only way to keep the handsteady is to support the forearm andwrist by pressing the elbow well intothe body just above the hip. Inreading, too, eye strain is reduced ifyou adopt the same plan to keepyour book steady.
Repairing a saucepan lid.
October 24th, 1931
THEN-PRESENTATION FRETWORK OESICU WITH THIS NUMBER,
tes jr: elourrial
ON October 16th,1895, waspublished the
very first issue ofHOBBIES. You willseo on this page a
For Amateurs of Both Sexes. reproduction of thefirst cover. It wasin black and white,and, compared withmodern issues, looksa trifle flat. Thatvery fact, I think,indicates the pro-gressive policy wehave always adopted,for thirty-six yearsago, the process ofphotographic illustra-tion was practicallyunknown ; it did notcome into general use
mtil about four years later. It is, therefore, worthrecording that HOBBIES was one of the first journals toadopt what was then a new illustrative process. Inpoint of fact, all illustrations in those days were executedby one of two processes-by lithography (a process westill use for reproducing our fretwork designs), and bywoodcut, a laborious process of copying all drawings onto boxwood and chipping away that part of the surfacewhich was not required to take the ink. Thirty-sixyears is a long time, for not every paper can claim to havestood four-square to the adverse conditions encompassedby that period. HOBBIES was the first paper solelydevoted to hobbies, and although to have been firstcan, in some cases merely indicate antiquity, it does,in our case, also bear witness to the fact that we havebecome first. The fathers of many of you who read thistook and read HOBBIES when they were boys, andthe fact that the first generation continues to do so is aninvigorating and stimulating influence on those ofus behind the scenes whose pleasure it is to supply youwith practical instructions in all the arts and crafts.The paper had its early difficulties, of course. No. 1,for example, was edited in a disused railway carriagenear the site upon which now stands the great sawmillsof Hobbies Ltd. In point of fact., three old railwaycarriages were formed into three sides of a square ; verysoon, of course, a more imposing building had beencompleted.
HOBBIES has been a leader in every new field ofpractical thought and scientific discoveries-the bicycle,the gramophone, the aeroplane, wireless, as each newera came along, bringing in its train a new hobby withthousands of followers, we supplied them, in languagedevoid of technical jargon and Patent Office patois, withpractical instructions on the new subject. You willsee from the illustration that fretwork, stamps, photo-graphy are features which have been continued withouta break ever since No. I of HOBBIES. In 1897 aweekly journal entitled " Live Stock Hobbies " wasstarted which dealt with birds, beasts, insects, etc.
or - No. I. (Act. 111,1893% ONE PENNY.
fretworking and Inlaying in Wood.Photography for Amateurs.
Hobbies that Pay.Stamps and Stamp Collecting.
The Magic Lantern, and how to make the SlidesBazaars and how to Decorate them,
An Electric Scarf Pin.
Cycling, Football, and Athletics.Decorative Use of Waste Material, --Mosaic.
Venetian Ribbon or Bent Iron Work.Weekly Presentation Design.
Prize Competitions, Correspondence, Etc,
HOBBIES
A 0 t:T OL-1' SELVESIi
99
A brief survey of our beginning and developmentBy the Editor
During the War, the then Editor of the paper formed atoy association, the objects of which were to encouragea form of industry which had been long in existence inGermany, Bavaria, and Switzerland, namely, the snakingof toys in the home. The early issues of the papercontained articles on botany and natural history, andeven one on how to fbld dinner napkins. Mr. F. T.Bidlake, doyen of cyclists and cycling journalists, waswriting for the paper in 1913 and in that year Mr. G. H.Westwood contributed a series on model aeroplanes.The fretwork design has always been a popular feature.
The issues covering the War period reflect the men-tality and atmosphere of the times in many of thefeatures and the models. For example, Mr. GilliePotter, well-known to every listener, contributed a shortplay to our issue No. 1,000, dated December 12th,1914, entitled " The Secret Code," a tale of the Great Warin two scenes. Complete instructions were given forstaging and playing it, as well as hints on successful make-up, and playing " The Secret Code " for the NationalRelief Fund, of which the Prince of Wales was President.This play brought a letter from the Secretary of thefund thanking the.;Editor for his efforts.
With the restriction of paper, the issue came down tosixteen pages during one period. Many readers were inthe Services, of course, and interesting extracts fromletters were published from time to time. Before theWar the late Mons. Antonini introduced to HOBBIESthe antofret system of fretwork. He was an Italianpriest, and the system consisted of bevel cutting into asingle piece of wood so that when the cut-out piece waspushed up it had an overlaid, and in some cases, a carvedappearance. At one period in our history sections weredevoted to hobbies of special interest to ladies and girls.At anotherperiod fictionwas introduced,but neitherproved popularand tho featureswere dis-continued. I twould be im-possible in ashort survey ofthis kindthoroughly t oreview the entirecontents of ourseventy-twovolumes, b u tsufficient h a sbeen said toindicate the im-mense populari-ty enjoyed bythe paper. Itis with extremepleasure that weare able torecord that thiscontinues.
Have your issuesbound. Bindingeases, title pageand index cost, for
vol. 72 (from issues dated April 4th, to Sept. 26th)2/9 (by post 31-). Indexes separately cost 4d.
98 HOBBIES October 24th, 1931
FINGER PLATES ANDBOOK MARKS
A little time ago we had an article on cutting metal with the fret -saw. The outlines given here are suggestions for articles carriedout in metal or in thin plywood, or even ivorinc or xylonite. Thelarge pattern is for a finger plate for a door, the one just belowis-
for a decoration to a cabinet or box, whilst the two smaller ones atthe bottom are book marks. All are easily cut with a fine fret sailarid fixed where required with -tiny fretn ails through the holes shown
on the drawing,.
.*\\Ai;S
N''.\N,,,\ \\\\\\\ \ , \ \
October 24th, 1931
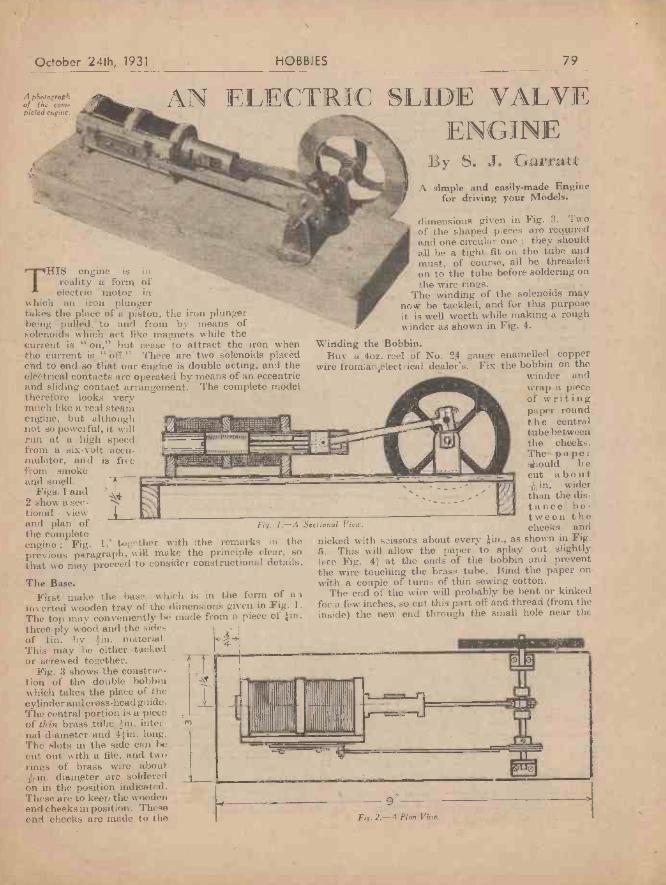
A photographof th.., cow -Pieta engine.
THIS engine is inreality a form ofelectric motor in
winch an iron plungertakes the place of a piston, the iron plungerbeing pulled to and from by means ofsolenoids which act like ma nets while thecurrent is " on," but cease to attract the iron whenthe current is " off." There are two solenoids placedend to end so that our engine is double acting, and theelectrical contacts are operated by means of an eccentricand sliding contact arrangement. The complete modeltherefore looks verymuch like a real steamengine, but althoughnot so powerful, it willrun at a high speedfrom a six -volt accu-mulator, and is ficefront smokeand'smell.
Figs. 1 and2 show a see-tional viewand plan ofthe completeengine ; Fig. 1,' together with !the remarks in theprevious paragraph, will snake the principle clear, sothat we may proceed to consider constructional details.
The Base.
HOBBIES 79
AN ELECTRIC SLID K VALVEENGIN E
By S. J. GarraftA simple and easily -made Engine
for driving- your Models.
dimensions given in Fig. 3. Twoof the shaped pieces are required.and one circular one ; they shouldall be a tight fit on the tube andmust, of course, all be threadedon to the tube before soldering onthe wire rings.
The winding of the solenoids maynow be tackled, and for this purposeit is well worth while making a roughwinder as shown in Fig. 4.
Winding the Bobbin.Buy a 4oz. reel of No. 24 gauge enamelled copper
wire frommipleetrical dealer's. Fix the bobbin on thewinder andwrap a pieceof writingpaper roundthe centraltube betweenthe cheeks.The- papershould b ecut aboutAin. widerthan the dis-tance be-tween the
Fig. 1.-A Sectional View, cheeks andnicked with s2issors about every lin., as shown in Fig.5. This will allow the paper to splay out slightly(see Fig. 4) at the ends of the bobbin and preventthe wire touching the brass tube. Bind the paper onwith a couple of turns of thin sewing cotton.
First make the base, which is in the form of a s The end of the wire will probably be bent or kinkedinverted wooden tray of the dimensions given in Fig. 1. for a few inches, so cut this part off and thread (from the'he top may conveniently be made from a piece of lin. inside) the new end through the small hole near thethree-ply wood and the sidesof lin. by lin. material.This may be either .tackedor screwed together.
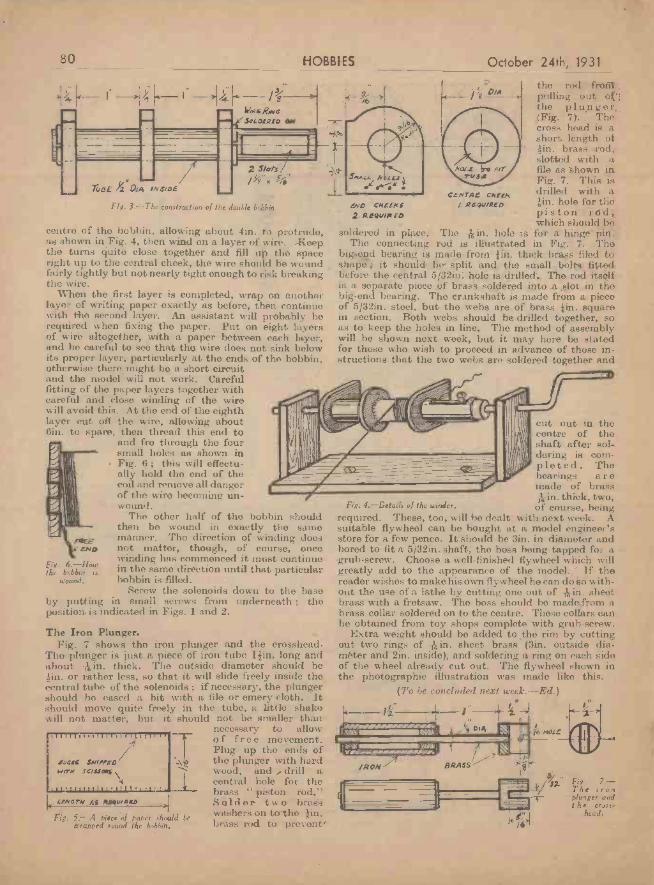
Fig. 3 shows -the constriir-tion of the double bobbinwhich takes the place of thecylinder and cross -head guide.The central portion is a pieceof Hain brass tithe lip. inter-nal diameter and 4}in. long.The slots in the side can becut out with a file, and tworings of brass wire about-kin. diameter are solderedOn in the position indicated.These are to keep the woodenend cheeks in position. TheAoend cheeks are made to the.
J1111111111111111 11 1111111111 111
'111111 II 11 '111111111 IIIIII
Fig. 2.--A Plan View.
44.
80
>kiWIKE Reif30(.01.1710 ON
HOBBIES
rues )1' 01A INSIDEamm. AlleMh.
2 SlotsMI 5-:rer.
Fig. 3. -The construction of the double bobbin
centre of the bobbin, allowing about 4in. to protrude,as shown in Fig. 4, then wind on a layer of wire. Keepthe turns quite close together and fill up the spaceright up to the central cheek, the wire should be woundfairly tightly but not nearly tight enough to risk breaking,the wire.
When the first layer is completed, wrap on anotherlayer of writing paper exactly as before, then continuewith the second layer. An assistant will probably berequired when fixing the paper. Put on eight layersof wire altogether, with a paper between each layer,and be careful to see that the wire does not sink belowits proper layer, particularly at the ends of the bobbin,otherwise there might bo a short circuitand the model will not work. Carefulfitting of the paper layers together withcareful and close winding of the wirewill avoid this. At the end of the eighthlayer cut off the wire, allowing aboutGin. to spare, then thread this end to
and fro through the foursmall holes as shown inFig. 6 ; this will effectu-ally hold the end of thecoil and remove all dangerof the wiro becoming un-wound.
Tho other half of the bobbin shouldthen be wound in exactly the samemanner. The direction of winding doesnot matter, though, of course, oncewinding has commenced it must continuein the same direction until that particularbobbin is filled.
Screw the solenoids down to the baseby putting in small screws from underneath ; theposition is indicated in Figs. 1 and 2.
The Iron Plunger.Fig. 7 shows the iron plunger and the crosshead.
The plunger is just a piece of iron tube lfin. long andabout -Ain. thick. The outside diameter should befin. or rather less, so that it will slide freely inside thecentral tube of the solenoids ; if necessary, the plungershould be eased a bit with a file or emery cloth. Itshould move quite freely in the tube, a little shakewill not, matter, but it should not be smaller than
necessary to allowof free movement.Plug up the ends ofthe plunger with hardwood, and drill acentral hole for thebrass " piston rod."
1 LENGTH 4s Re:wags)1
Solder two brassFig. 5.- A piece of paper should be washers on to the fin.
wrapped round the bobbin, brass rod to prevent.
Fig. 6. --Howthe bobbin is
wound.
1111111111111 11111111.1 i
EPOS'S SNIPPEDwing SCISSORS
0/44the rod from ,pulling out of.;the plunger,(Fig. 7). Thecross head is ashort length offin. brass rod,slotted with afile as shown inFig. 7. This isdrilled with aLin. hole for thepiston rod,which should be
soldered in place. The ,16 in. hole 1s for a hinge' pin.The connecting rod is illustrated in Fig. 7. The
big -end bearing is made from fin. thick brass filed toshape"; it should be split and the small bolts fitted-before the central 5/32in. hole is drilled. The rod itselfis a separate piece of brass soldered into a slot in thebig -end bearing. The crankshaft is made from a pieceof 5/32in. steel, but the webs are of brass fin. squarein section. Both webs should he drilled together, soas to keep the holes in line. The method of assemblywill be shown next week, but it may here be statedfor those who wish to proceed in advance of those in-structions that the two webs are soldered together and
cut out in thecentre of theshaft after sol-dering is com-pleted. Thehearings a r emade of brassis in. thick, two,
Fig. 4. -Details of the winder. of course, beingrequired. These, too, will be dealt with next week. Asuitable flywheel can be bought at a model engineer'sstore for a few pence. It should he 3th. in diameter andbored to fit a 5/32in. shaft, the boss being tapped for agrub -screw. Choose a well -finished flywheel which willgreatly add to the appearance of the model. If thereader wishes to make his own flywheel he can do so with-out the use of a lathe by cutting one out of Ain. sheetbrass with a fretsaw. The boss should be made from abrass collar soldered on to the centre. These collars canbe obtained from toy shops complete with grub -screw.
Extra weight should be added to the rim by cuttingout two rings of Ain. sheet brass (3M. outside dia-meter and 2in. inside), and soldering a ring on each sideof the wheel already cut out. The flywheel shown inthe photographic illustration was made like this.
(To be concluded next week. -Ed.)
1'.
, DIA/7/7/f//
END CHEEKS2. StSQVIR SO
October 24th, 1931
I. REDVIRED
IRON
t
BRASS 1
4,/3/2
. Fig. 7. -The ironplunger andthe ClJSS.,
head.
October 24th, 1931 HOBBIES 97
A SIMPLE FLOW II -1:R
HERE is quite an attractive stand suitable for aflower bowl or small plant pot for indoors. Thearticle is easy to make, the work of construction
being simplified by the use of theHobbies' grooved corner moulding.First of all you will need four piecesof corner moulding Gin. long withthe ends cut square. The mouldingfor this article needs grooves ofand this is obtained from HobbiesLtd. (No. 45). To snake the workof cutting the ends quite square, itis best to use a mitre block. If youdo not already possess a block witha right-angle cutting guide, youwill do well to invest in one ofHobbies.
Having cut the four pieces ofmoulding 6in. long, the next thingto get along with is the sides of thestand. The general appearance ofthe sides is shown in the illustrationof the finished stand, and details of the sides are givenin Fig. 1. The thickness of the wood for the sides isAin., to fit into the grooves in the moulding, andan inspection of Hobbies' catalogue will reveal achoice of wood suitable for the stand, but as the orna-ments recommended are in oak it is best to completethe whole thing in this wood.Marking the Work.
When you have got the materials to commence work,first cut a piece of the wood 71 in. by 6in. Mark a centreline down the board and a line at right -angles to it 28in.from the top edge, as shown in Fig. 1. At this stagemention is made that four plain raised diamond orna-ments (No. 207) are required, and the position for theseis indicated by the dotted lines. Mark off the positionon the wood, and then it is a simple matter to markthe shape of the remainder.
OWL STANDMake a point along the bottom edge *yin. from each
corner, and Suother point 2in. up on the centre line.Lay a rule from the points on the bottom edge to thepoints of the diamond and draw lines. Draw two morelines to meet these from the point 2in. up on the centreline and parallel with the sides of the diamond.
Get the Stand Square.One side being cut, it is quite simple to mark off
the other three from this and cut out in the usualmanner. Be quite sure you keep all sides parallel in
order to make the stand squarewhen fitted into the moulding.
4The four diamonds, one on eachside, are now glued in position asalready stated, and then the sidesput together by gluing them intothe corner moulding.
A top is required (see Fig. 2),cut from wood fin. thick and 9in.square. Polish the surface and
' edges of the top when cut, and thenfix a raised wood ornament (No.212), on each corner of the topsurface. Finally, fix strips of -Ain.half round beading (No. 52) along
t
mark out one side.
the edges between theornaments as shownin Fig. 2. The top,when finished, is fixedin position with theaid of a little glueapplied along the topof the corner mould-ing and top edges ofthe sides. Take careto get the top fixedon centrally, so thatthe edges overlap thesides evenly all round.The whole of the surface is given a final rub overwith fine grade sandpaper and then coated with stainand polished.
- -
F!
The patterns for this
NOV 'RUMPINDICATORfree with next week's issue.
Fig. 2. -The size of the top and itsdecorations.
96 HOBBIES October 24th, 1931
SECCOTI(REGD. TRADE MARE)
THE MARVELLOUS MENDERAsk for Seccotme and you'll get the world's best adhesive. Theproved best. Seccotine is the choice of all who cannot afford tomake mistakes-the R.A.F. and The Admiralty, for example.There is a giant's grip in every spot of Seccotine. It sticks forever! Obtainable everywhere in tubes, 4'd., 6d. and 9d.
Write for interesting free booklet to Dept. L.MCCAW, STEVENSON & ORR, LTD., The Lincnhall Works, Belfast
FIRMAS(HEAT SECCOTINEI
Use this when the articles mustwithstand hot liquids.
Rol. Trod" Mark 6d. a tube.
AMAZING VALUE IS OFFERED IN THISCYCLE ELECTRIC LIGHTING SETThis remarkable set has many outstanding advan-tages and has been specially recommended in Sept.
26th issue of " Hobbies."1. It produces a brilliant light to head and rear lamps even at
low speed, and it is operated by contact with f rout 'wheelthrough a dynamo, in which is incorporatedan automatic regulator which controls thevoltage, preventing the bulbs being over -run.
2. A standard Saab lamp battery installed hihead lamp provides illumination whencycle Is atationart-.
3. A dipping device controlled from handlebarby Bowden cable and thumb lever control.
4. The complete outfit is sturdily built andhas all chromium plated fittings.
L. WILKINSON,8, CITY ROAD,LONDON, C.C.I.
ONLY
21f-Post Free.
GUARANTEED FOR ONE YEAR.
MAKE IT: GRAMOPHONEat Quarter Price.
Order set as shown. Double spring motor, 12 in. VelvetTable, Swan Arm. Metal Sound Boa, Horn, Needle Cups,E1 - 18 - 0, or buy Ritancophone. Pedestal 3 ft. high,commete for 64, earr. paid. Motors 7/6. Repair parte.Lista tree. 64 p. 1931 Catalogue No. 220 with reducedprices. Drawing and how to make Gramophones 35.Fatah 27 years.
PORTABLE REGENT FITTINGS CO.. NOBBY.GRAMOPHONES 15/6. 120, Old Street, LONDON, E.C.I.
GROSE'S, LUDGATE CIRCUSFOOTBALL JERSEYS
IN ALL COLOURS AND 1DESIGNS. British Made J. e.-14 DOZ.
FOOTBALL KNICKERSNI in Swansdown Lined 10/6 DOZ.NAVY OR WillTE
Send for Illustrated Catalogue (H) Pest FreeGEO. GROSE & CO., 8. NEW BRIDGE ST., LONDON
From Crystal to Televisionby Y. Richards, wills a foreword by J. L. Baird. A simpleaccount of all the processes and problems of wireless andtelevision.. It explains what actually happens in the set.Illustrated. Published (1928) at 9/.. Offered at 2/. post free
on approval. Quote offer 193.
Home Soldering and BrazingBy Yates. The author r 'spin ins with great clearness and simplicitywith the help. of numerous illustrations, all that the amateurshould know. Published at 3/6 net. Offered al 2'4 post free
on approval. Quote Offer 193.
FOYLES FOR BOOKS119/125, Charing Cross Road. London, W.C.2.
THE TURK PACKET FREE.All applicants for my new approval sheets sending 1Id. postage willreceive 15 TURKISH stamps free, Pictorial, War, Jubilee, Surcharged,etc., usually sold at ls. 3d. Additional free Set to customers givingcollectors' addresses.
H. WATIL1NS(Dept. H.2), 60. Leicester Road. East Finchley, N.2.ABYSSINIA PACKET FREE.
A fine packet of all different stamps containing the new 1231 is,ue of Abyssinia.a large pictorial Ruanaa-ffrardi. Another 1931 issue, large pictorial, Japan Earth.quake Stamp. Albania 1930 pictorial, a fine setota Dutch West Indies, Koneng-Tebecm.Lebanon pictorial, Monaco, Cameroon, Ceylon. etc., free to all asking to see m y famotiapproval sheets and enclosing 2ff. for postage and packing (abroad 34.1. Albums 1.4,1110, 3/., 47., 6,., 7/6, 10., upwards.-S. HAMMOND, 2, gingham Fields, Bury.
SALE andsoul EXCHANGEAdrerticcmcals are accepted for Oils column of the rate of 4s1. per tcArd.prep&dAddress eanananiastions to the Adrerlisemene 'Heaney', "Ifolkees,"
Southampton Street, Strand, Lando., W.C.2.
CINE5LATOGRAPII FILMS, Machines. Accessorie,. Lists Free.Sample Films, ls.-Filmeries, 57, Laneaster 'toad, Leytonstone.
PATENTING INVENTIONS.-Handbook tree.-king's PatentAgency, Ltd., Wardrobe Chambers, E.C.4.
FRET WOOD of all kinds. Superior to plywood. Planed both sides.Beautifully figured. Free from knots and shakes. Also cheap
parcels.-Write for list, Hobbies Ltd., Denham, Norfolk.
BUILD OWN GRAMOPHONE. Save pounds. Instructions 3d.Gramophones; Motors, Fittings, Records. lists Free. Cash
or terms.-H. Burt, 185, High St., Deptford, S.E.S.
HAVE A FACTORY at home with Hobbies fret machine. From35s. upwards-ready to use. Makes money in your spare time.
Cuts wood and metal for all kinds of jobs. Try one at anyHobbies branch.-Free illustrated list from Hobbies Ltd., Dereham,Norfolk.
GRAMOPHONE Fittings.-Wholesale prices, 61 -page catalogue,
London.
A LI, SMALL FITTINGS for the handyman. Hinges, knobs. hooks,L"1 bolts, locks, etc. Reliable and cheap, Call at Hobbies Branchesor send requirements to Hobbies Ltd., Dereham, Norfolk.
MI% /TAKE MONEY Picture Framing, Tray and Furniture Making.Fully illustrated list and Guide Post Free 6d.-Watkins Provider,
Exchange Works, Newport, Mon.
EW DESIGNS in Flash Steam Boilers.. Model catalogue now ready.N -Bolsover Brothers, 55, Castle Rd., Whitby.
STAMPS.FREE! 25 Unused Colonials to genuine applicants for approvals.
Send lid. postage. Hodder, 34. Second Avenue, London, W.10.
SUPER DOUBLE -MAGNET
The latest and most Improved type ofChassis and Cone, complete with 4 -PoleBalanced Armature Adjustable Unit,ready to t into any cabinet The dountemagnets are of specially prepared Tinwa-
res, Steel, and the richness and vol.
before been offered at such a
mile of the deep bass reproductionis comparable with the bestmOS ing coil reproduction.
awe Nothing nearly no good has ever
/4/9"14.T remarkably low price. - BENDk
ONLY 28 and get it ou approval.If satisfed, complete purchase by live monthly paymentsof a-. No extra fur packing and postage. Cash price 25;s.
GET ITON
APPROVAL
Our new -DELUXE" Speaker ei it liextra special 4 -poleUnit fitted inside eroutside chassis, on ap-proval for 2s. 6d. ifsatisfied completePurchase by 7 month-ly payments of(Cash Price 35.'-.1 anordering be sure tostate "SUPER"er" LUXE " Osrequired.
E. J. HERAUD (Dept. 11.21, NUMBER ONE, EDMONTON, LONDON, N.18Established 32 yore. Braucher 78-82, Fore St., Edmonton; 77, West Greco Rd.Tottenham; 34, Si. James's St., Walthanalow and 139, Hertford Rd., Enficht Wren
SUBSCRIPTION RATES." Hobbies " will be forwarded by post to any reader at thefollowing prepaid rates: Twelve months, 13 - ; Six months.6'6; Three months, 3 3.Registered at the G.P.O. for transmission by CanadianMagazine Post.
ata
l
October 24th, 1931 HOBBIES
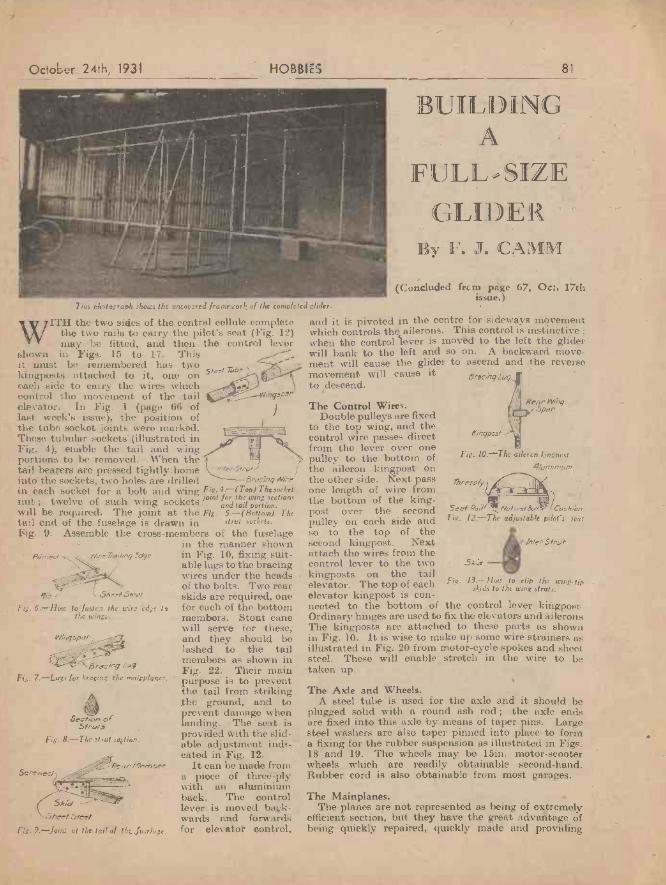
This photograph shows the uncovered framework of the completed
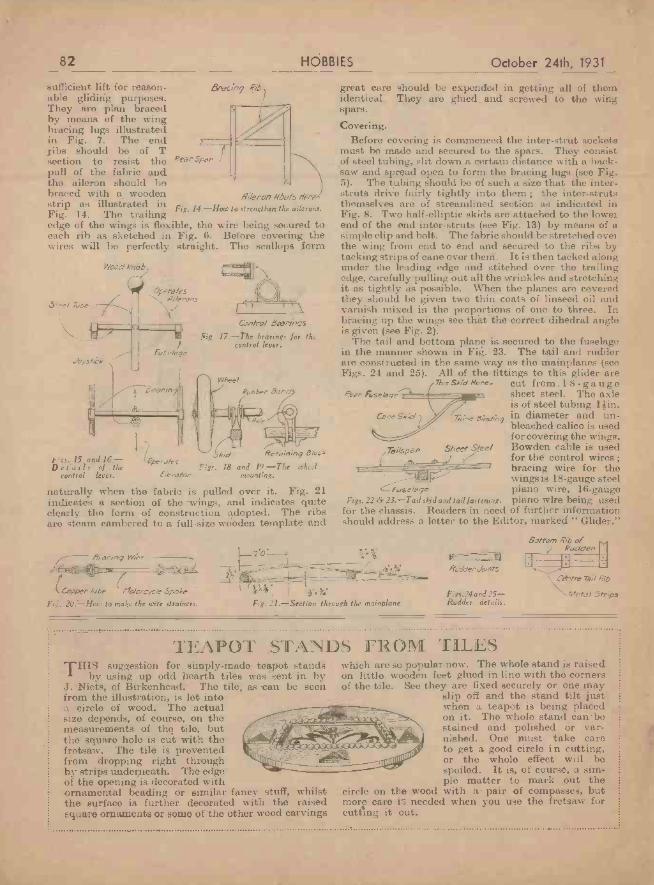
WITH the two sides of the central cellule completethe two rails to carry the pilot's seat (Fig. 12)may be fitted, and then the control lever
shown in Figs. 15 to 17. Thisit must be remembered has twokingposts attached to it, one oneach side to carry the wires whichcontrol the movement of the tailelevator. In Fig. 1 (page 66 oflast week's issue), the position ofthe tube socket joints were marked.These tubular sockets' (illustrated inFig. 4), enable the tail and wingportions to be removed. When the
We'into the sockets, two holes are drilled Bracingtail bearers arc pressed tightly home i'le^56-a
in each socket for a bolt and wingnut ; twelve of such wing joint
LhT escotri 51
so krcketswill be required. The joint at the Fig. 5.-(Bottom) Thetail end of the fuselage is drawn in strut sockets.
Fig. 9. Assemble the cross -members of the fuselagein the manner shownin Fig. 10, fixing suit-able lugs to the bracingwires under the headsof the bolts. Two rearskids are required, onefor each of the bottommembers. Stout canewill serve for these,and they should belashed to the tailmembers as shown inFig. 22. Their mainpurpose is to preventthe tail from strikingthe ground, and toprevent damage whenlanding. The seat isprovided with the slid -able adjustment indi-cated in Fig. 12.
It can be made froma piece of three-plywith an aluminiumback. The control The Mainplanes.lover is moved bask- The planes are not represented as being of extremelywards and forwards efficient section, but they have the great advantage offor elevator control, being quickly repaired, quickly made and providing
Penned --.. linne7insenaej `dg=
C'rO SheelSmee
6.-How:tolasten the 1.1::/%1. edge tothe wings.
Wirig.:parfi Bracirg 144Fig. 7. --Lugs for bracing the mainplanes.
oection of5fatae's
Fig. 8.-The strut section.
Rear/lryneseccrie. ,sec/
Skr'ed
heel Steel
9. --Joint at the tail of the fuselage.
81
BUILDINGA
FULL SIZEGLID IF R
By F. J. CAMM
5reel Tube
__--VVingspar
)
(Concluded &cm page 67, Oct. 17thissue.)
glider.
and it is pivoted in the centre for sideways movementwhich controls the ailerons. This control is instinctive ;when the control 'lever is moved to the left the gliderwill hank to the left and so on. A backward move-ment will cause the glider to ascend and the reveres,movement will cause itto descend.
The Control Wires.Double pulleys are fixed
to the top wing, and thecontrol wire passes directfrom the lever over onepulley to the bottom ofthe aileron kingpost onthe other side. Next passone length of wire fromthe bottom of the king -post over the secondpulley on each side andso to the top of thesecond kingpost. Nextattach the wires from thecontrol lever to the twokingposts on the tailelevator. The top of eachelevator kingpost is con-nected to the bottom of the control lever kingpost.Ordinary hinges are used to fix the elevators and aileronsThe kingposts are attached to these parts as shownin Fig. 10. It is wise to make up some wire strainers asillustrated in Fig. 20 from motor -cycle spokes and sheetsteel. These will enable stretch in the wire to betaken up.
erec7;79, Lug
The Axle and Wheels.A steel tube is used for the axle and it should be
plugged solid with a round ash rod ; the axle endsare fixed into this axle by means of taper pins. Largesteel washers are also taper pinned into place to forma fixing for the rubber suspension as illustrated in Figs.18 and 19. The wheels may be 15in. motor -scooterWheels which are readily obtainable second-hand.Rubber cord is also obtainable from most garages.
l(rhypost
Fig. I0.-The a lercn kingpost.
4/urninnr..7
Threeply
Sea/ Pa,"I Bo/,
Fig. 12.-The adjustable Pilot's scat
inters/rut
.5.Cat
Fig. 13.-Flow to clip the tc;ng-tIn -skids to the wing struts.
82 HOBBIES
sufficient lift for reason- erac;n9able gliding purposes.They are plan bracedby means of the wingbracing lugs illustratedin Fig. 7. The endribs should be of Tsection to resist thopull of the fabric andthe aileron should hobraced with a wooden Aileron ttbuts destrip as illustrated inFig. 14. The trailing Fig' 14.-How to strengthen the ailerons.
edge of the wings is flexible, the wire being secured toeach rib as sketched in Fig. 6. Before covering thewires will bo perfectly straight. The scallops form
October 24th, 1931
Wood Knob
The
t go. 15 and 16.-Details of the
control lever.
Rear 5par-
OperalesAilerons
Control BsvrinqsI7.-The bearings for the
} control lever.1:,selege
Reed,./1,79 13/0G.4
Figs. 18 and 19.-The wheelmounting.
naturally when the fabric is pulled over it. Fig. 21indicates a section of the wings, and indicates quiteclearly the form of construction adopted. The ribsare steam cambered to a full-sizo wooden template and
eiaciing W4ie
1VPIE137=( Copper 7irbe Haforcycle Spoke
Fig. 20-1ow to makc the wire strainers.
-t -.1 ---
great care should be expended in getting all of themidentical. They are glued. and screwed to the wingspars.
Covering.Before covering is conunenced the inter -strut sockets
must be made and secured to the spars. They consistof steel tubing, slit down a certain distance with a hack-saw and spread open to form the bracing lugs (see Fig.5). The tubing should be of such a size that the inter -struts drive fairly tightly into them ; the inter -strutsthemselves are of streamlined section as indicated inFig. 8. Two half -elliptic skids are attached to the lowerend of the end inter -struts (see Fig. 13) by means of asimple clip and bolt. The fabric should be stretched overthe wing from end to end and secured to the ribs bytacking strips of cane over them. It is then tacked alongunder the leading edge and stitched over the trailingedge, carefully pulling out all the wrinkles and stretchingit as tightly as possible. When the planes are coveredthey should be given two thin coats of linseed oil andvarnish mixed in the proportions of one to three. Inbracing up the wings see that the correct dihedral angleis given (see Fig. 2).
The tail and bottom plane is secured to the fuselagein the manner shown in Fig. 23. The tail and rudderare constructed in the same way as the mainplanes (seeFigs. 24 and 25). All of the fittings to this glider are
7his Skier Nene- cut from 1 8 -gaugeRoan Fuselage sheet steel. The axle
is of steel tubing liin.1,-,;",;,,,,,,9 in diameter and un-cap,- S/Jci un-
bleached calico is usedfor covering the wings.
Tedspe flee/ Bowden cable is usedfor the control wires ;
n
bracing wire for thewings is 18 -gauge steel
Cfrrfasea9e piano wire, 16 -gaugeFigs. 22 6, 23.- Tail skid and tail fastening. piano wire being used
for the chassis. Readers in need of further informationshould address a letter to the Editor, marked " Glider."
1-1;28Aw
1,4Fig. 21.-Section through the mainplane.
Rudder Joints
Figs.24 and 25-Rudder details.
avitom Rib ofRudders
\rehlre Tad Rib
\--Metal Strips
TEAPOT STANDS FROM TILESTHIS suggestion for simply -made teapot stands
by using up odd hearth tiles was sent in byJ. Niets, of Birkenhead. Tho tile, as can be seenfrom the illustration, is let intoa circle of wood. The actualsizo depends, of course, on themeasurements of the tile, butthe square hole is cut with thefrotsaw. The tile is preventedfrom dropping right throughby strips underneath. The edgeof the opening is decorated withornamental beading or similar fancy stuff, whilstthe surface is further decorated with the raisedsquare ornaments or some of the other wood carvings
which are so popular now. The whole stand is raisedon little wooden feet glued in line with the cornersof the tile. See they are fixed securely or one may
slip off and the stand tilt justwhen a teapot is being placedon it. Tho whole stand can .bestained and polished or var-nished. One must take careto get a good circle i n cutting,or the whole effect will bospoiled. It is, of course, a sim-ple matter to mark out the
circle on the wood with a pair of compasses, butmore care is needed when you use the fretsaw forcutting it out.
tap
October 24th, 1931
PIGEON RACING is always in-creasing in popularity, andthe number of homer pigeons
kept is now very large. The King,like some of his poorest subjects, hasa loft, and the pigeon Derby drawsan entry of some hundreds of first-class birds. As a hobbythe sport is delightful, and not the least interesting partabout it is the training of the birds, The trainingcannot begin at too early an age. As soon as a bird cansupport itself on its wings the work may begin. Musculardevelopment is of great importance, and this should beproduced as the bird grows and matures. For my ownpart I like the evening best for the training. Theair resistance is then nearing its lowest ebb. It is, more-over, the time of the day when the bird feels the hominginstinct most strongly. If it is out of the question totrain in the evening, then the early morning is the nextmost suitable time. The work does not take long evenwhen one is keeping a large number of birds. At firstdo not take the youngster more than a quarter of amile, if so far, and about a quarter of an hour before theevening meal is given. Hold it loosely and stroke it asyou carry it from the loft to where you intend to liberateit, and do not make any noise when you let it go. Placeit on the palm of the left hand ; don't throw it into theair. It is not a bad plan to let it be accompanied by anolder bird, say, one of its parents. Give it a daily flightuntil it is six months old. The flights then may bedecreased to one or two a week, though, as with race
HOBBIES
TRAINING AHOMER PIGEON
In y J. G. I ristow Noble
95
horses, the more regular exercisethe birds have the more fit theykeep. But in the case of themajority of pigeon keepers it isdifficult to find time to keep morethan a certain number of all in
their lofts exercised oftener than this. It is rather abusiness to take all out at one time.
The youngsters soon thoroughly enjoy the spins anddo their best to reach home ahead of their companions.In a short time the flights may be lengthened to a mileor so and then to any reasonable distance. The exercisethe birds get in the loft and on the roof of your home willbe found enough to keep them in good health, but it isnot enough to keep them in the condition successfulracing demands. When on a long flight the birds rushthrough the air without discretion, and if not in first-rate condition they are likely to be lost. They may falldead from exhaustion, or, not being able to get fartherthan a certain distance, they may be stolen. Cleanlinessis also of importance. The lofts must be kept as clean aspossible. They should be swept out every week -end andlime -washed once a month. Good and correct feeding isanother thing to.be particular about. The best food arepeas, and as a change, wheat, tares and sprouted oats.The food should be placed in clean, earthenware vessels,not on the floor of the loft. It should also be watchedthat the loft is kept free of mice. One or two will preventthe birds from sleeping and cause them to go out of con-dition.
WIRELESS (continued from page 90).Please note that these figures cannot
taken as exact, as so much depends uponthe actual type of set with which theyare used, particularly the layout of thecomponents. The figures given are foruse when the coil is a closed circuit,without an aerial tapped on to it. Theaerial should, in any case, be looselycoupled by means of another coil, inthese enlightened days !
A Reaction Receiver.Where the coils are to be used in a
reaction receiver, it is well to make thewhole set once only, and it will usuallybe found that for a giveireoil in the gridcircuit, the next smaller coil will servefor reaction.
possibly be As regards the mounting of the coils, tie them downto a strip of ebonite with a plug at eachend, as shown in Fig. 3. This makesquite a rigid job for experimental pur-poses, and the wide spacing between theplugs makes for greater efficiency thanone generally associates with two -pincoil mounting.
If it is not desired to use a series ofplug-in coils, naturally one large basket -weave coil may be wound, and tappingsbrought out at the necessary places.For this purpose it is best to give thewire an outward twist where it takes aturn round one of the nails. The loopformed may be bared afterwards, andconnection made by a crocodile clip inthe usual way.Fig. 3.-The roil mounted on a strip
of ebonite.
THREE NKWTHE name of Sid G. Hedges is familiar to readers
of HOBBIES. He is, of course, well-known asan authority on swimming, but besides that he
knows a great deal about indoor games. Now, also,he is blossoming into a popular writer of detective novels.Three new hooks by him have just appeared.
" The Pendlecliffe Swimmers " (Sheldon Press, 3s. fid.),is a bumper volume which will form an ideal Christmaspresent for any boy or girl interested in swimming. Itis a gripping story of school life, in which the hero,Jakeman, sets out to bring back the enthusiasm forswimming which Pendlecliffe has lost. Jakeman is amagnificent swimmer, and a whole text -book full oftechnical swimming description is scattered through thetale.
" More Games for Socials " (National Sunday SchoolUnion, ls.). This is a companion volume to '`Games
OOKSfor Socials." If you would like fresh, games and stuntsto brighten your Christmas and New Year partiesthen let your bookseller get you a copy of thiS at once.Mr. Hedges describes in this new little book about 120games. You need never have a dull party or socialgathering again. The section headings give some ideaof the contents : Ice -Breaker Gaines, Moving -AboutGames, Sitting -Still Gaines, Musical Games, SurpriseGames, Spectator Games, Brain -Test Games, TeamGames.
" The Channel Tunnel Mystery " (Herbert Jenkins,7s. 6d.). A wealthy newspaper -owner, who has stronglysupported the Channel Tunnel scheme, disappears.His car is found wrecked between Folkestone and Dover.A strong murder mystery rapidly develops, with plentyof thrills. The setting alternates between Englandand France.
94
ANOTHER tt
EASYPUZZLE 10 8411
-31'9
a
a
a
October 24th, 1931
FOR BOYS`>----OLD BOYS
ANDALL BOYS CASH
PRIZE
S20 U 3S
5
R A E t9
E L,,
0
,
A 1111
E
20
M1 4 15
16 17 1 19
21 22 23
R 2E FL
26
27 28 29
30 31 32
yf AFFIX
fr 11-d.O STAMP
LIGHTLY BY
THECORNER ONLY
(
CLUES.
Name
Address
1S 20 U3^4 5
R A E ELF9
ELF I
10
1 I 12
R1. 15
2320
17 18
22
, 9
21
28
T25 26
27 29
L30 31 32
/AFFIX
11d.STAMP
LIGHTLY BY
THECORNER ONLY
Name
Address
I 11.C.V7.14)
ACROSS.1. French coins.4. To exchange.7. Take a part.9. Neuter pronoun.
10. A bluejacket.11. One who wears anything.14. A vagrant.16. As well.19. Yes.20. Cook in a frying -pan.21. A silly fellow.25. The ocean.27. A notion.29. Warning signal.30. Behold31. Boy's name.
DOWN.1, This tapers to a point.2. A grassy plant.3. Animals seen on a farm.4. A woman's garment.5. Plural of " I."6. A pod vegetable.8. To catch.
10. A salver.12. Periods.13. To spoil.15. Myself.17. Musical instrument.18. A dolt.20. To disappoint.22. ReinaM.23. Renown.24. Organ of hearing.25. A toothed tool.26. Before.
32. --'tiny. 28. Achieve.- Post your entries to reach us not later than Friday, Nov. 6th, addressed " Hobbies,"'' Crosswords," No. 14, Competition Dept., 39, King Street, Covent Garden, W.C.2.,RESULT OF No. 11 APPEARS ON PAGE 93.
RULES.1. Attempts must be on coupons
from this or next week's " Hobbies."2. Postage stamp value 10. must beattached, by the corner only, to eachcoupon. 3. In the event of ties the prizewill be equally divided. 4. Employes (ormembers of their families) of GeorgeNewnes, Ltd., or its associated companies.are not allowed to compete. 5. TheEditor's decision is final in all mattersrelating to this competition,
YOU MAY SENDANY NUMBEROF ATTEMPTS
on Coupons from this or next week'sHOBBIES.
October 24th 1931
Specially designed fortie amateur carpenterand fretworker. Pat-terns free on the
design chart.
HOBBI ES 83
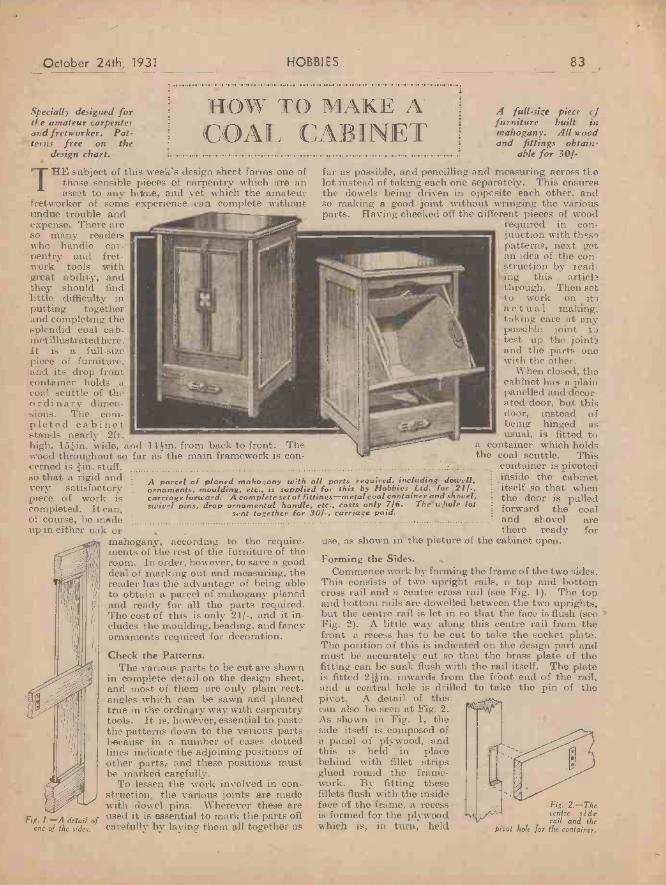
HOW TO MAKE ACOAL CA
THE subject of this week's design sheet forms one ofthose sensible pieces of carpentry which are anasset to any httme, and yet which the amateur
fretworker of some experience can complete withoutundue trouble andexpense. There areso many readerswho handle car-
- gentry and fret-work tools withgreat ability, andthey should findlittle difficulty inputting togetherand completing thesplendid coal cab-i net illustrated here.It is a full-size,piece of furniture,and its drop frontcontainer holds acoal scuttle of theordinary dimen-sions. The com-pleted cabinetstands nearly 2ft.high, 151in. wide, and 14 kin. from back to front. Thewood throughout so far as the main framework is con-cerned is /in. stuff,so that a rigid andvery satisfactorypiece of work iscompleted. It can,of course, be madeup in either oak or
mahogany, according to the require.ment.s of the rest of the furniture of theroom. In order, however, to save a gooddeal of marking out and measuring, thereader has the advantage of being ableto obtain a parcel of mahogany planedand ready for all the parts required.The cost of this is only 21/-, and it in-cludes the moulding, beading, and fancyornaments required for decoration.
Check the Patterns.The various parts to be cut are shown
in complete detail on the design sheet,and most of them are only plain rect-angles which can be sawn and planedtrue in the ordinary way with carpentrytools. It is, however, essential to pastethe patterns clown to the various partsbecause in a number of cases dottedlines indicate the adjoining positions ofother parts,- and these positions mustbe marked carefully.
To lessen the work involved in con-struction, the various joints are madewith dowel pins. Wherever these areused it is essential to mark the parts offcarefully by laying them all together as
Fig. 1.-A detail ofone of the sides.
A parcel of planed mahogany with alt parts required, including dowel!.ornaments, moulding, etc., is supplied for this by Hobbies Ltd. for 211.,carriage forward. A complete set of fittings -metal coal container and shovel,swivel pins, drop ornamental handle, etc., costs only 7/6. The whole lot
sent together for 30/-, carriage paid.
A full-size piece cffurniture built inmahogany. All woodand fittings obtain-
able for 30/.
far as possible, and pencilling and measuring across thelot instead of taking each one separately. This ensuresthe dowels being driven in opposite each other, andso making a good joint without wringing the variousparts. Having checked off the different pieces of wood
required in con-junction with thes"patterns, next getau idea of the con-struction by lead-ing this artiebthrough. Then setto work on itsactual making,taking care at anypossible joint tJtest up the jointsand the parts onowith the other.
When closed, thecabinet has a plainpanelled and decor-ated door, but thisdoor, instead ofbeing hinged asusual, is fitted to
a container which holdsthe coal scuttle. This
container is pivotedinside the cabinetitself so that whenthe door is pulledforward the coaland shovel arethere ready for
use, as shown in the picture of the cabinet open.
Forming the Sides.Commence work by forming the frame of the two sides.
This consists of two upright rails, a top and bottomcross rail and a centre cross rail (see Fig. 1). The topand bottom rails are dowelled between the two uprights,but the centre rail is let in so that the face is flush (seeFig. 2). A little way along this centre rail from thefront a recess has to be cut to take the socket plate.The position of this is indicated on the design part andmust be accurately cut so that the brass plate of thefitting can be sunk flush with the rail itself. The plateis fitted 21 in. inwards from the frbnt end of the rail,and a central hole is drilled to take the pin of thepivot. A detail of thiscan also be seen at Fig. 2.As shown in Fig. 1, theside itself is composed ofa panel of plywood, andthis is held in placebehind with fillet stripsglued round the frame-work. By fitting thesefillets flush with the insideface of the frame, a recessis formed for the plywoodwhich is, in turn, held
Fig. 2. -Thecentre siderail and the
moot hole for the container.
a
84 HOBBIES October 24th, 1931
by strips of the No. 24 moulding glued and nailedround.
Mark Positions Clearly.Before cleaning off the paper pattern mark clearly-
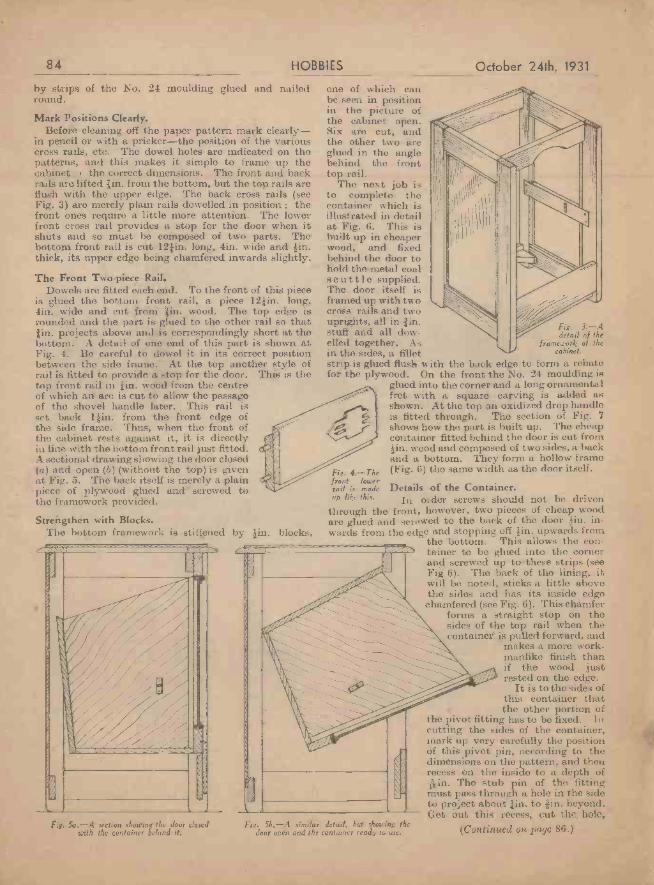
in pencil or with a pricker-the position of the variouscross rails, etc. The dowel holes are indicated on thepatterns, and this makes it simple to frame up thecabinet the correct dimensions. The front and backrails are lifted tin. from the bottom, but the top rails areflush with the upper edge. The back cross rails (seeFig. 3) are merely plain rails dowelled in position ; thefront ones require a little more attention. The lowerfront cross rail provides a stop for the door when itshuts and so must he composed of two parts. Thebottom front rail is cut 121in. long, 4in. wide and Bin.thick, its upper edge being chamfered inwards slightly.
The Front Two-piece Rail.Dowels are fitted each end. To the front of this piece
is glued the bottom front rail, a piece I21in. long,4in. wide and cut from tin. wood. The top edge isrounded and the part is glued to the other rail so thattin. projects above and is correspondingly short at thebottom. A detail of one end of this part is shown atFig. 4. Be careful to dowel it in its correct positionbetween the side frame. At the top another style ofrail is fitted to provide a stop for the door. This is thetop front rail in sin. wood from the centreof which an arc is cut to allow the passageof the shovel handle later. This rail isset back I tin. from the front edge ofthe side frame. Thus, when the front ofthe cabinet is directlyin line with the bottom front rail just fitted.A sectional drawing showing the door closed(a) and open (b) (without the top) is givenat Fig. 5. The back itself is merely a plainpiece of plywood glued and screwed tothe framework provided.
Strengthen with Blocks.The bottom framework is stiffened by tin. blocks,
Fig. 50.-A section showing the door closedwith the container behind it.
Fig. 5k-.4 similar detail', but showing thedoor open and the container ready so use.
one of which canbe seen in positionin the picture ofthe cabinet open.Six are cut, andthe other two areglued in the anglebehind the fronttop rail.
The next job isto complete thecontainer which isillustrated in detailat Fig. 6. This isbuilt up in cheaperwood, and fixedbehind the door tohold the metal coalscuttle supplied.The door itself isframed up with twocross rails and twouprights, all in tin.stuff and all dow-elled together. Asin the sides, a filletstrip is glued flush with the back edge to form a rebatefor the plywood. On the front the No. 24 moulding is
glued into the corner and a long ornamentalfret with a square carving is added asshown. At the top an oxidized drop handleis fitted through. The section of Fig. 7shows how the part is built up. The cheapcontainer fitted behind the door is cut from-tin. wood and composed of two sides, a backand a bottom. They form a hollow frame
Fig. 4.-The (Fig. 6) the same width as the door itself.front lowerrail is made Details of the Container.up like this. In order screws should not be driven
through the front, however, two pieces of cheap woodare glued and screwed to the back of the door tin. in-wards from the edge and stopping off Bin. upwards from
the bottom. This allows the con-tainer to be glued into the cornerand screwed up to these strips (seeFig 6). The back of the lining, itwill be noted, sticks a little abovethe sides and has its inside edgechamfered (see Fig. 6). This chamfer
forms a straight stop on thesides of the top rail when thecontainer' is pulled forward, and
makes a more work-manlike finish thanif the wood justrested on the edge.
It is to the sides ofthis container thatthe other portion of
the pivot fitting has to be fixed. Incutting the sides of the container,mark up very carefully the positionof this pivot pin, according to thedimensions on the pattern, and thenrecess on the inside to a depth of-kin. The stub pin of the fittingmust pass through a hole in the sideto project about Bin. to tin. beyond.Get out this recess, cut the, hole,
(Continued on page 86.)
Fig. 3.-oldetail of the
framework of thecabinet.
October 24th, 1931 HOBBIES 93
pictures taken with them cannot be viewed in standard instantaneous, you can manage by connecting the capsstereoscopes unless the latter are provided with adjust- of your two lenses by a bar. But it is preferable to have
a stereoscopic shutter operating both lenses, and, if ofthe roller -blind variety, it need not be very expensive.
. In printing from negatives intended to be viewed inthe stereoscope it is .necessary to transpose the twopictures, i.e., to make the right-hand picture the left-hand one. There are printing -frames which enable thisto be done without any cutting, and they are certainlyvery convenient, but rather expensive. However, it isno great matter, after having made your print, to trimit carefully, cut it in halves, and mount the transposedpictures. This is absolutely necessary, as otherwiseyou will have a false stereoscopic effect. There should bea separation of 116in. to in. between the two mountedpictures.
In conclusion it may be mentioned that it is possiblenow to buy for aguinea a stereoscopicroll -film camera endviewer, made by a verywell-known firm, withwhich excellent resultsin a small size can beobtained with t heminimum of trouble.The apparatus in ques-tion is a " T. P." production, turned out,that is to say, by the Two photographs shown in position on a
Thornton -Pickard stereoscope.
Manufacturing Co., whose cameras and shutters areof world-wide repute, and it can be bought throughany dealer. It is called the T.P. Stereo Puck and takesany 3/in. by 21in. 8 -exposure spool.
able eye-piece's, andeven then notalways satis-factorily.
StereoscopicLenses.You can
make stereopictures with asingle lensmounted on aI on g sliding
The camera used for 'taking stereoscopic photographs.panel, whichenables the
two exposures to be made successively by bringing the lensopposite first to one half of the plate and then to theother half. But it is more satisfactory to have twoseparate lenses of exactly the same focal length, withwhich simultaneous exposures can be given to eachsection of the plate or film. The " pairing " of lensesfor stereoscopic work is an optician's job, and is usuallydone by the makers, in whose catalogues you will oftensee a quotation for pairing lenses-as a rule about fiveshillings. The focal length of the lenses is very important.It depends upon the distance they are separated on thepanel front of the camera, or, you can put it the otherway and say that the separation of the lenses dependsupon their focal length. For stereoscopic pictures takenwith a half-plate camera, the separation being 31in.,the focal length should be about 4tin.
For simultaneous exposures which are not absolutely
Correct Solution 1/5. 11.
HOBBIES
CROSSWORDS
NO. 11 Result
PRIZE £5-Divided amongst three com-petitors with Correct Solutions.
ROBINSON, W, R.,17, Tower Street, Enisworth.
WATERMAN, W. C.,39, Kenton Park Crescent, Keaton,
Middlesex.
WOODLIFFE, B. G.,Gorphwysfa, Port Dinorwic, N. Wales.
Poyments,to all prizewinnerg will be sent in tine course.
Another Easy Puzzle appears en page 94.Solve it and Win £5 Pocket Money.
This is ITHERE is a new and better way to fix trousers. A British
invention. Just a neat and supple HALF -Belt worn acrossthe small of your back. Amazingly comfortable, Leavesshoulders gloriously free. Trousers bang perfectly, underpants
ore securely held, and shirt cannot " ride up." One SPAN "Bracer can be used for any number of Trousers. Fitted in a jiffy,and instantly interchangeable. Does away with constant buttoning.Ideal for business, sport and evening wear. Thousands of testimonials,Ask your outfitter, or order by post to -day. Satisfaction guaranteed.Illustrated folder sent free on request. In BLACK, BROWN, GREYor WHITE, with set of self -fixing threadless buttons (additional setof buttons 3d. per set) and our guarantee of satistMetion. Give waistmeasurement and state colour. Enclose Cheque or Postal Order.
The "SPAN" Bracer" Juniormodel for boys,in WHITE andGREY only. Inlarge and smallsizes. Price 2.9complete. Yourboy will behealthier if hewears one.
Post Free4/9
Abroad 3d. extra.Details sent free
on request.
The SPAN BRACER Co (Dept. 8), Castle Green, Bristol.51111111111111W
92 HOBBIES October 24th, 1931
arOGAPHow to Take
Stereoscopic Pictures.BY OWEN WHEEL.R.
IN HOBBIES for July 18th, readers were shown how tomake a stereoecope. Stereoscopic photographs canbe bought pretty cheaply, but it is, of course, much
more interesting to make them oneself, and, while it isnot quite as simple and easy as ordinary snapshot work,it is well within the capacity of anyone who will takethe trouble to understand what stereoscopy means, andthe care needed to fulfil its requirements.
What Stereoscopy Is. .
The trouble with an ordinary photograph, apart fromthe lack".of colour, is that it differs from what we seewith our eyes in being flat. It has length and breadth,but no depth, such as the eye perceives in a solid objectlike an orange, forinstance. if youwant to get areally true pictureof an orange.showing it notonly round butstanding out i nbold relief, youmust imitate theaction of humanvision in whichthe two eyes viewone object fromslightly differentangles, the viewsbeing combined toform one which isfuller and in moreperfect relief thaneither of theseparate ones. If you first shut one eye, next open thatand shut the other, and then open both eyes, you willget a very fair idea of what is known as the BinocularParallax. It will sound a little less terrifying, perhaps,if, with the Chief Scout's permission, we call it the B.P.In order to get the B.P. effect in photography you musttake two photographs of the same scene or object fromdifferent angles, and then combine these in a stereoscope.This, as you saw from the HOBBIES article quoted in myfirst sentence, is an instrument fitted with two lensesat the same distance apart as human eyes, which blendthe two photographs into one and make the differentobjects in the picture stand out in wonderful relief.
Stereoscopic Cameras.You can make stereoscopic photographs with an
ordinary camera by boring two41oles, large enough toadmit a tripod screw and 6in. or l'in. apart, in a boardabout 10in. by 4in. by fin. Between these two holesbore a third, and fit it with a tripod bush, which you canget for a few pence from any photographic dealer. Fixthe board firmly to a tripod stand, and arrange the latter
A typical example of a stereorccpic photograph.
Mark all en-velopes containingQueries with theword "Photo-graphy" in thetop left-hand
corner.
so that the length of the board faces your object. Nowfix your camera to the right-hand hole, focus, andexpose. Take off the camera, transfer to the left handhole and expose again, taking care that your lens ispointed in the same direction as in the first instance.This you can generally ensure by drawing a pencilline on the board along the side of your camera basebefore transferring from the first hole, and making thisline a guide for the second photograph.
A Worthwhile Hobby.But, if you are going in at all seriously for stereoscopic
work -which is a very interesting and well " worth-while hobby -you will find it mueh more satisfactory,
either to buy astereoscopiccamera, or to con-vert an ordinaryhalf-plate camerainto one as de-scribed in the nextparagraph. Regu-lar stereoscopiccameras have twochambers, each ofwhich is practical-ly a little camerawith its ownseparate lens, butboth pictures arotaken on the sameplate or section ofroll film. In somemodels there areactually two
separate bellows, but it is more usual to have one bellowswith a partition which expands and contracts in accordwith the camera extension.
Stereoscopic Sizes.The " standard " stereoscopic size is Qin. by 31in.
and, if you draw a rectangle this size, divide it into twohalves, find the centre of each half, and measure thedistance between the two centres, you will find it to bebetween 31in. and nin., which is about the separationof two average human eyes. But you can get quitenear enough to it by taking your two photographs on ahalf-plate (6lin. by 41in.) and, if you want a stereooutfit which is both serviceable and cheap, you cannotdo better than buy secondhand a single -extension square -form half-plate camera, and either fit it yourself, or gelyour dealer to have it fitted, pith the necessary expandingpartition. The latter should preferably, of course, bedetachable so that, if you wish, you can use the camerafor ordinary half-plate pictures. Stereo cameras aremade in sinaller sizes than the standard, and verybeautiful little instruments some of them area But the
October 24th, 1931 HOBBIES 85
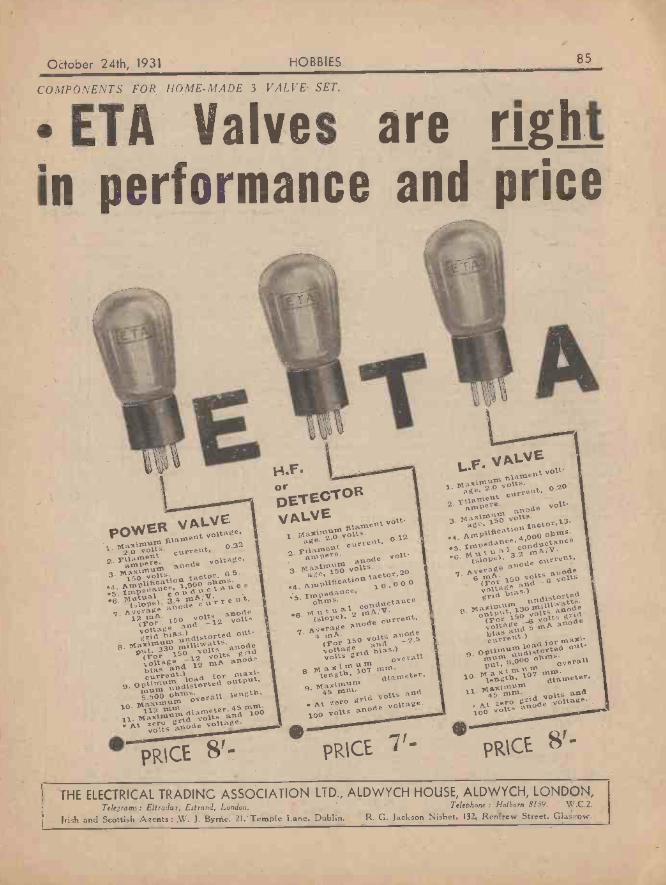
COMPONENTS FOR HOME-MADE 3 VALVE SET.
ETA Valves are rightin performance and price
POWER VALVEvoltage,
con
4.5. 673.1.11xopiPtigplEelt
linrsiabu.
.8orsadii0taeaiio?nal ortt
voltstl'iotsoertarr0tass.
u.in43eneco0:g2.crag).
Maxim utillivratts. anodet.
v
xi-
8.
d 101. um,
r5oo ounisc;verall
v°Itage a 12 utit. anodebias ancurrent.)
ted output
2Filament
anode voltage,
lA"verag;I"'
anode
*At 7oro ls anode vol ag
8'mPRICE
orDETECTORVALVE
1. Iffaximuro vfiolts.lament volt.
age, 2.0 current, 0.12
2. Filament
IVLagnj.151:anode volt-anipere.
Amplificationfactor,20.
.5.1.0,000
Irridgrce,.6. %ilt u adclifictanceJ
7. Ai:1erleanode current,
(For vZI,tds. atiltvolts grid bias.) "
1Kalciraurnoverall
8. length, 107 01111.
IVIZiarndiameter.
9.
. At zerogrid volts and
100 volts anode voltage
PRICE T.
L.F. V ALVE
plaxiinurnfilaraent volt-
age, 2.0 voltrsr.e.dt,
Filanient2" ampere. anode volt.
14"i' Vg volts.age, 3. or
.4. Amplific cu.tact,13'
nc 4,000 ohnis.
:11.9e da)ale3'.c2o rixaduxerrne
s"; anode eurren
A.ver2lts anode
6
grid11C)teal:
:1° a°31;icd4to;lisitti
16:ItIas.)grid
Visr:;11:1.) 5inA anode
Viiirrn11)gorVer-out-
put,e. 9,000 °ions. verali10. NI:axgtg.la_li
11. Maximdiaraeter,
At zero grid...1_10,1talt:z2)1.1.
I volts I I
PRICE8' -
THE ELECTRICAL TRADING ASSOCIATION LTD., ALDWYCH HOUSE, ALDWYCH, LONDON,Telegrams: Eltradax, Est rand, London. Telephone: Holborn 8139. W.C.2.
Irish and Scottish Agents: W. J. Byrne, 21, Temple Lane, Dublin. R. G. Jackson Nisbet, 132, Renfrew Street. Glasgow.
86
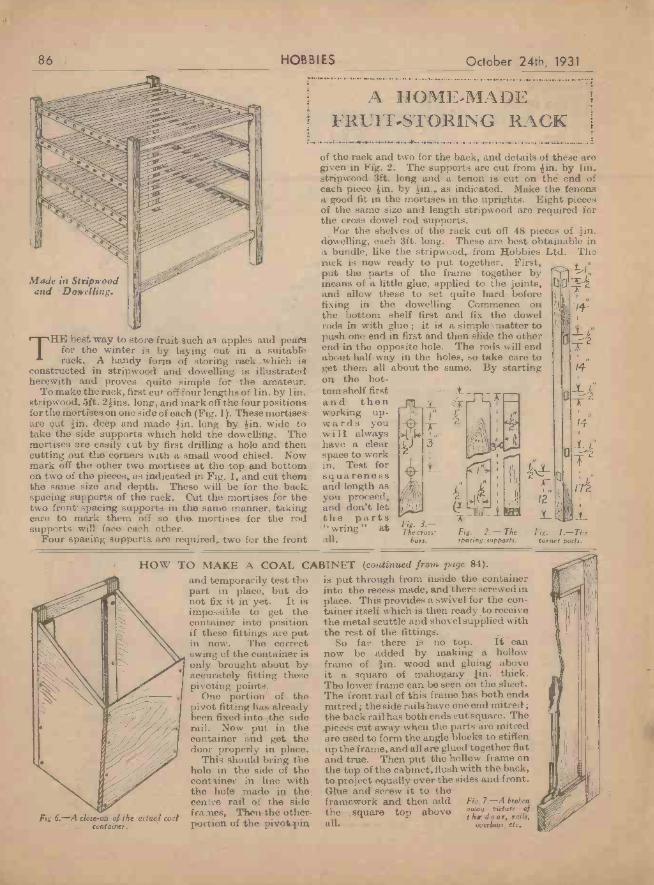
Made in Stripwoodand Dowelling.
HOBBIES October 24th, 1931..--.........-.........-.................................................................................,i
.
A IIOME,MA IDE ,i,
THE best way to store fruit such as apples and pearsfor the winter is by laying out in a suitablerack. A handy form of storing rack which is
constructed in stripwood and dowelling is illustratedherewith and proves quite simple for the amateur.
To make the rack, first cut off four lengths of 1 in. by 1 in.stripwood, 5ft. 2fins. long, and mark off the four positionsfor the mortises on one side of each (Fig. 1). These mortisesaro out Ain. deep and made fin. long by fin. wide totake the side supports which hold the dowelling. Themortises are easily tut by first drilling a hole and thencutting out the corners with a small wood chisel. Nowmark off the other two mortises at the top and bottomon two of the pieces, as indicated in Fig. 1, and cut themthe same size and depth. These will be for the backspacing supports of the rack. Cut the mortises for thetwo front spacing supports in the same manner, takingcare to mark them off so the mortises for the rodsupports will face each other.
Four spacing supports are required, two for the front
FRUIT,STORING RACK
of the rack and two for the back, and details of these aregiven in Fig. 2. The supports are cut from fin. by lin.stripwood 3ft. long and a tenon is cut on the end ofeach piece fin. by fin as indicated. Make the tenonsa good fit in the mortises in the uprights. Eight piecesof the same size and length stripwood are required forthe cross dowel rod supports.
For the shelves of the rack cut off 48 pieces of fin.dowelling, each 3ft. long. These are best obtainable ina bundle, like the stripwood, from Hobbies Ltd. Thorack is now ready to put together. First,put the parts of the frame together bymeans of a little glue, applied to the joints,and allow these to set quite hard beforefixing in the dowelling. Commence onthe bottom shelf first and fix the dowelrods in with glue ; it is a simple matter topush one end in first and then slide the otherend in the opposite hole. The rods will endabout half -way in the holes, so take care toget them all about the same. By startingon the bot-tom shelf firstand thenworking up-wards youwill alwayshave a clearspace to workin. Test forsquarenessand length asyou proceed,and don't letthe parts
wring " atall.
Fig, 3.-The cross-
bar,
_t(
-Fig. 2. - Thespacing supports.
If
17212t
Fig. I -Thecorner posts.
HOW TO MAKE A COAL CABINET (continued front page 84).
Fig 6.-A close -or of the actual coalcontainer.
and temporarily test thepart in place, but donot fix it in yet. It isimpossible to get thecontainer into positionif these fittings are putin now. The. correctswing of the container isonly brought about byaccurately fitting thesepivoting points.
One portion of thepivot fitting has alreadybeen fixed into .the siderail. Now put in thecontainer and get thedoor properly in place.
This should bring thehole in the side of thecontainer in line withthe hole made in thecentre rail of the sidefra nes, Then the otherportion of the pivot pin
is put through from inside the containerinto the recess made, and There screwed inplace. This provides a swivel for the con-tainer itself which is then ready to receivethe metal scuttle and shovel supplied withthe rest of the fittings.
So far there is no top. It' cannow be added by snaking a hollowframe of fin. wood and gluing aboveit a square of mahogany fin. thick.The lower frame can be seen on the sheet.The front rail of this frame has both endsmitred ; the side rails have one end mitred ;the back rail has both ends cut square. Thepieces cut away when the parts aro mitredare used to form the angle blocks to stiffenup the frame, and all are glued together flatand true. Then put the hollow frame onthe top of the cabinet, flush with the back,to project equally over the sides and front.Glue and screw it to theframework and then addthe square top aboveall.
Fig.7.-A brokenaway picture ofthe door, rails,
overlays. etc.
October 24th, 1931
TREBLE DUTYTERMINALS
X., and improved type T2LC Ter-minal. Here are the specifications t -(I) H&c in top to take any standard I
plug.(2) Engraved top. Positive, Red, 2
Negative, Black, 40 types, all 3inter changeable.
(3) Pillar Terminal, to take spade 4wire on similar connection.
(4) 'Phone type terminal for connect-ing 'phone on similar ends.
(5) Soldering tag to enable wire to besoldered if necessary.
(6) !slot in shank to take square wire,so that soldering may be dis-pensed with.
THE 2DMSIDE -ENTRYPLUG.
This plug hasmany uses in thyhome constructedset, Supplied in 6colours. Type2D3L, side -entry. L NDARDISED PLUGS & SOCKETS.Price 2d. each, - Plug 2DM Type, 2d. each. 2DW Types, 2d,
Writs for free, each. Sockets, Type SS 2d. each.illustrated list ast.p.s. Series. For mains. Plugs, 4d. each.
Sockets, 2d, each, Red and Black only.J. J. EASTICK & SONS,E ELEX HOUSE. 118, Bunhill Row, London, E.C.1
Ilaie: Metropolitan 0314,3i.),
HOBBIES
MAKE MONEYIN YOUR SPARE TIME
" BABY ADANA
10'6
NIIIM111111111111111111111111h.
VISITING CARDS
CONCERT TICKETS
BUSINESS CARDS
PRICE TICKETS
SMALL LABELS
PROGRAMMES,&c.
CAN BE PRINTEDWITH EASE ANDWITHOUT ANY
r REA, iou$EXPERIENCE
COMPLETE PRINTING PLANT INCLUDES REAL METALPRINTER'S TYPE
ILLUSTRATED SCHOOL MAGAZINES,PAMPHLETS, NOTICES. BILLHEADS. &c.. CAN BE PRINTED PERFECTLY
THE OUT"SENIOR ADANA" COMPLETE 5716ON SALE AT ALL LARGE STORES A. TOY SINES If any difficulty write toFRANK PITCHFORD & CO. LTD., WELL STREET, LONDON, E.C.I
91
WHATEVERARE YOURINTERESTS-
MODERNYOUTH
CATERS FOR THEMNo matter what are your in-terests, in 4 Modern Youth" youwill find them fully catered for.Never before has there been ajournal devoted entirely to theneeds of the youth of to -day. Thefirst number gives you an indica-tion of the standard this journalsets. Among the contributors aresuch famous names as Sir MaxPemberton, Lord Lloyd, R.Vaughan Williams, I. A. R.Peebles, Hon. Victor Bruce,Professor A. M. Low, etc., etc.For vigorous and helpful articles, forexpert advice on every interesting sub-ject, for stories that tingle with life andaction ... there's nothing to compare
with " Modern Youth."
1WEEKLY FEATURES:
Rugger, Soccer, PublicSchool Sports, GolfOUT Hints, Aeronautics,
°cr. 29TH. Motoring Notes, Wire-less, Book Review,3D. Stage, Film and ConcertNotes, Competitions,
WEEKLY.' etc., etc.ORDER YOUR COPYFROM YOUR NEWSAGENT
TO -DAY!
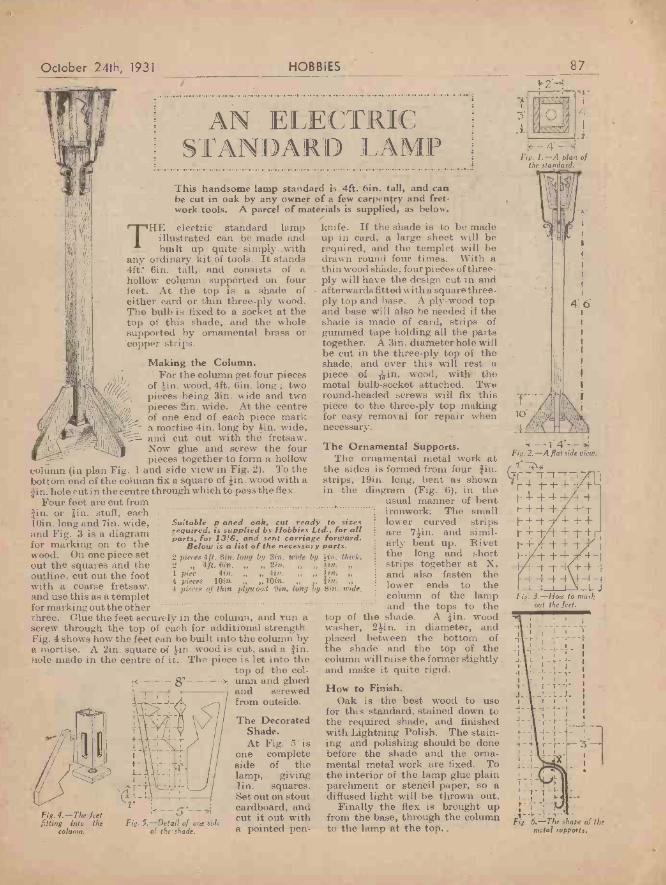
90 HOBBIES
"Hobbies" RadioExpert gives yousome useful information a n dreplies to your
queries.
October 24th, 1931
EFFICIENTHOMEMADE COILS
A second article on this subject will appearnext week. -Ed.
WHEN we come down to brass tacks, we have toadmit that there really are not many radiocomponents that can be made at home, and yet
can be guaranteed to give results equal to those expectedfrom the factory -produced article. ,
We can almost count them on the fingers of onehand ; yet the " finger of honour," so to speak, mustcertainly be given to our friend the inductance coil.
Hero is unlimited scope for one's ingenuity andpatience, with a reward at the end. And that rewardis the fact that a well -made coil, even if turned out withthe help of nothing more ambitious than a pair of pliersand a screwdriver, can be just as efficient as the heft thatcan be bought.
The Basket -weaver Coil.The first type of coil I propose to describe is known as
the " basket -weave " variety. It should not be confusedwith the basket coil, generally wound on cardboard.The " basket -weave " coil is self-support-ing, very easy to make, and probably thepost efficient of all.
It was introduced by an American ama-teur some years ago, when the ' low -loss "craze was at its height, and it becamedeservedly popular, though it seems tohave disappeared for a while.
Fig. 1 shows the only " apparatus " neces-sary. This is a circular wooden block, 21in.in diameter (to standardize the turn num-bers), round the edge of one flat surface ofwhich are a number of nails. These nailsshould be driven in lin. from the circum-ference, and should be equglly spaced. Forthe purpose of this article we will take itthat there are eleven of them, although youmay use any number that is not divisible by 2 or 3.
The best way to space out these nails evenly is todraw a circle of 2in. diameter, concentric, of course,with the circumference of the block. If you then markthe positions for your nails, just under lin. apart,starting from any given point, you will find thempractically regular.
If you like to operate with a protractor and drawangles of 33 degrees all round you will be still moreaccurate.
Knock the nails in sufficiently hard to prevent themfrom bending inward under pressure, but not so hardthat they cannot be extracted.
4,
Winding the Coil.The actual winding is simple. Take the end of your
wire, twist it round any given nail, and go off round thecircle as follows. Take it inside the second nail, outsidethe third, inside the fourth, and so on. When you havegot back to the starting point you will find the second
turn naturally goes outside the nail that it was previouslyinside, and, when you have continued for ten turns orso, you will see a very business -like coil corning to life.
On reaching the desired number of turns, simply, bindthe coil round with cotton in six places (it, is, best to tiethe cotton round the " thin " portions where two setsof turns cross -that is, midway between any two nails),pluck the nails out, and the coil is complete. The endsare simply twisted once round the nearest nail.
Reference to Fig. 2 will show the general idea and,roughly, the appearance of the finished coil.
Previously I said that the number of nails must notbe a multiple of three. This is because it is possible tomake, an even neater coil, as a " de luxe " job, by takingyour wire inside two nails, outside the next one, insidetwo again, outside one once more, and so on. You mayexperiment with various methods of winding, sincethese slight alterations will not seriously affect the turnnumbers given further on.
These " basket -weave " coils are particu-larly suitable for short-wave work, since notwo adjacent turns are really concentric. -Any turn is only touching its next-doorneighbours at the points that were half -waybetween the nails when the winding was
being carried out. In the case of, the firsttype, concentric turns are spaced fromeach other by one other turn, and, with thesecond type, we have three different kindsof turns before we return to the first one
Fig...I.-The wooden block andnails for making a basket -weave
coil.
made.
The " Sub -100 -Metre " Coi'.Now for more detailed particulars. For
wavelengths above 100 metres, the coilswill be rigid enough with No. 22 D.C.C.
wire. Naturally D.S.C. may be used, but it hardly war-rants the extra expense. For the " sub -I00 -metre " coils,No. 18 should be used, since they have few turns and arenot too rigid otherwise. Further, the use of thick wire hasthe desirable effect of increasing the spacing between turns.
The following table gives a rough indication of the turnnumbers required for various ranges. It is made out fora .0005 condenser above 100metres, and a .0001 below :-
Turn <% Wavelength -Range.2 8-14 metres.5 13-27 metres.9 25-42 metres.
12 30-60 metres.18 55-125 metres.25 100-180 metres.50 160-400 metres.75 220-560 metres.
100 360-74, metres.(Continued on page 9g.) Fig. 2. -The finished coil.
October 24th, 1931 HOBBIES 87
AN ELECTRICSTANDARD LAMP
This handsome lamp standard is 4ft. 6in. tall, and canbe cut in oak by any owner of a few carpentry and fret-work tools. A parcel of materials is supplied, as below.
THE electric standard lamp knife. If the shade is to be madeillustrated can be made and up in card, a large sheet will bebuilt up quite simply with required, and the templet will be
any ordinary kit of tools. It stands drawn round four times. With a4ft: 6in. tall, and consists of a thin wood shitcle, four pieces of three -hollow column supported on four ply will have the design cut in andfeet. At the top is a shade of afterwards fitted with a square three -either card or thin three-ply wood. ply top and base. A ply -wood topThe bulb is fixed to a socket at the and base will also be needed if thetop of this shade, and the whole shade is made of card, strips ofsupported by ornamental brass or gummed tape holding all the parts'copper strips. together. A 3M. diameter hole will
be cut in the three-ply top of theMaking the Column. shade, and over this will rest a
For the column get four pieces piece of ifin. wood, with the;', of in. wood, 4ft. 6in. long ; two metal bulb -socket attached. Twe
pieces being 3M. wide and two round -headed screws will fix this',h pieces 2in. wide. At the centre piece to the three-ply top making
of one end of each piece mark for easy removal for repair whena mortise 4in. long by tin. wide, necessary.and cut out with the fretsaw.Now glue and screw the four The Ornamental Supports.pieces together to form a hollow The ornamental metal work at
column (in plan Fig. 1 and side view in Fig. 2). To the the sides is formed from four fin.bottom end of the column fix a square of lin. wood with a strips, 19in. long, bent as shown-3in hole cut in the centre through which to pass the flex. in the diagram (Fig. 6), in the
Four feet are cut from usual manner of bentlin. or in. stuff, each ironwork; The small10in. long and 7in. wide, Suitable p aned oak. cur ready to sizes lower curved stripsand Fig. 3 is a diagram required. is supplied by Hobbies Ltd., for all are 7lin. and simil-parts. for 1316, and sent carriage forward.for marking on to the arty bent up. RivetBelow is a list of the necessary parts.wood. On one piece set 2 pieces 4ft. 6in. long by 3in. wide by lin. thick. the long and shortout the squares and the 2 411. Pin. 2in. tin. strips together at X,outline, cut out the foot 1 piec 4in. , and also fasten thewith a coarse fretsaw, 4 pieces 10in. 10in. lin.
4 pieces of thin plywood 9in. long by Bin. wide lower ends to the.and use this as a templet column of the lampfor marking out the other and the tops to thethree. Glue the feet securely in the column, and tun ascrew through the top of each for additional strength.Fig. 4 shows how the feet can be built into the column bya mortise. A 2in. square of tin. wood is cut, and a fin.hole made in the centre of it. The piece is let into the
Fig. 4. -The f.etfitting into the
column.
- - - 8"- - -
Fig. 5. -Detail of one sideof the shade.
top of the col-umn and gluedand screwedfrom outside.
The DecoratedShade.At Fig. 5 is
one completeside of thelamp, givinglin. squares.Set out on stoutcardboard, andcut it out witha pointed pen -
top of the shade. A lin. woodwasher, 2lin. in diameter, andplaced between the bottom ofthe shade and the top of thecolumn will raise the former slightlyand make it quite rigid.
How to Finish.Oak is the best wood to use
for this standard, stained down tothe required shade, and finishedwith Lightning Polish. The stain-ing and polishing should be donebefore the shade and the orna-mental metal work are fixed. Tothe interior of the lamp glue plainparchment or stencil paper, so adiffused light will be thrown out.
Finally the flex is brought upfrom the base, through the columnto the lamp at the top..
-f
*-Flg. 1.-A plan of
the standard.
Pg. 2.-A flat side view.
"- 7 -T-r 4 l --t-++
-Et- 4 4 +I-1- -1-t1- 4-
4 --h -I- -
-4 -L
Fig. 3. -How to markout the feet.
I
I I
- -1' T
I ItI- 1"
Fig. 6. -The shape of themetal supports.
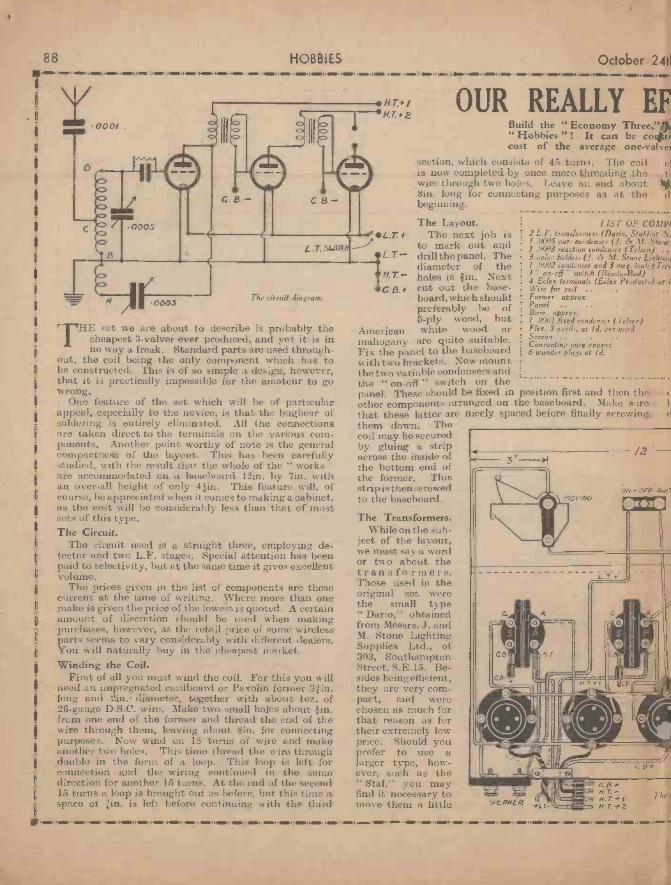
88 HOBBIES October 24th, 1931 HOBBIES 89
7....., ....,........,1.=11,41118.(141111 0.111P CIAO. OW 1./0 (POW IMMI1411011411.10.0411,11.1.11/111.1001.04111114 / 4111.11.1.1111.0M.141./.0.11041M11411.0.4110.0411111.01MINI.MIHMN111W 1011.NO(141IIPI )4.1.1.m.004M,IIMIN.01...4 ....011.......,,4.00a.,,...,..... '''',V.............1"....,,.................04,..., ...........04..,...,..... ...........,,...., ...' ',...........,.. , ,...., ...,., p
i .T.+ I OUR REALLY EFFICIENT gl THREE-VALVER k____ 2 :%/ia. --ti. i I.. ...-- 9/./.7:4-2 UI I ' , 1 i Wit 00001.IMF
P., ILEII
...C>KD
Build the " Economy Three,".0 n amazing new set which has been specially designed for" Hobbies " ! It can be cotipt;ucted in an hour or two by any reader for less than the
-,.. cost of the average one-valver ! The complete set is featured on this week's cover.
I
II
I
I
0005
II C.8.-
I. T.5141
The Layout. L.77 + The next job is
to mark out anddrill the panel. The
0003 The circuit diagram.
THE set we are about to describe is probably thecheapest 3-valver ever produced, and yet it is inno way a freak. Standard parts are used through-
out, the coil being the only component which has tobe constructed. This is of so simple a design, however,that it is practically impossible for the amateur to gowrong.
One feature of the set which will be of particularappeal, especially to the novice, is that the bugbear ofsoldering is entirely eliminated. All the connectionsare taken direct to the terminals on the various com-ponents. Another point worthy of note is the generalcompactness of the layout. This has been carefullystudied, with the result that the whole of the " works "are accommodated on a baseboard 12in. by 7in. withan over-all height of only 41in. This feature will, ofcourse, be appreciated when it comes to making a cabinet,as the cost will be considerably less than that of mostsets of this type.The Circuit.
The circuit used is a straight three, employing de.tector and two L.F. stages. Special attention has beenpaid to selectivity, but at the same time it gives excellentvolume.
The prices given in the list of components are thosecurrent at the time of writing. Where more than onemake is given the price of the lowest is quoted. A certainamount of discretion should be used when makingpurchases, however, as the retail price of some wirelessparts seems to vary considerably with different dealers.You will naturally buy in the cheapest market.Winding the Coil.
First of all you must wind the coil. For this you willneed an impregnated cardboard or Paxolin former 3in.long and 2in.' diameter, together with about loz. of26 -gauge D.S.C. wire. Make two small holes about -'sin.from one end of the former and thread the end of thewire through them, leaving about 8in. for connectingpurposes. Now wind on 15 turns of wire and makeanother two holes. This time thread the wire throughdouble in the form of a loop. This loop is left forconnection and the wiring continued in the samedirection for another 15 turns. At the end of the second15 turns a loop is brought out as before, but this time aspace of lin. is left before continuing with the third
section, which consists of 45 turns. The coil closer to the valve holders in order to avoid fouling theis now completed by once more threading the tuning condenser. In the case of very large transformerswire through two holes. Leave an end about Vie suggest you use a Telsen Bakelite dielectric tuning con-8in. long for connecting purposes as at the denser. This is a similar ins' rument to the Telsen bakelitebeginning. dielectric condenser used for
the reaction control Besides
diameter of theholes is lin. Nextcut out the base-board, which shouldpreferably be of5 -ply wood, but
American white wood ormahogany are quite suitable.. ;Fix the panel to the baseboardwith two brackets. Now mountthe two variable condensers and ;
4 Eelex terminals (Eelex Products) at Id.Wire for coil ..Former aPProXPanelBase approx. . . . .
I .000! fixed condenser ( Telsen)Flex, 3 yards, at Id. per yardScrewsConnecting wire apprnx.6 wander plugs at Id. .
LIST OF COMPONENTS. s. d.2 L.F. transformers (Dario, Stal).at 2s. 111d. .. 5 II1 .0005 var. condenser (J. M. Stone Lighting Supplies) .. 2 911 .0003 reaction condenser (Telsen) .. . 2 03 valve holders (J. cS M. Stone Lighting Supplies) at 31d.. 0 1011 .0002 condenser and 3 meg. leak (Telsen) . . . I 31 switch (Ready-Rad) .. . . 0 10
.. 0 4
.. 1 0
.. 0 6
.. 2 0
.. 0 6.. 0 6.. 0 3.. 0 6.. 0 6.. 0 6
panel. These should be fixed in position first and then theother components arranged on the baseboard. Make sure,.that these latter are nicely spaced before finally screwingthem down. Thecoil may be securedby gluing a stripacross the inside ofthe bottom end ofthe former. Thisstrip is then screwedto the baseboard.
The Transformers.While on the sub-
ject of the layout,we must say a wordor two about thetransformers.Those used in theoriginal set werethe small type" Dario," obtainedfrom Messrs. J. andM. Stone LightingSupplies Ltd., of303, SouthamptonStreet, S.E .15. Be-sides being efficient,they are very com-pact, and werechosen as much forthat reason as fortheir extremely lowprice. Should youprefer to use alarger type, how-ever, such as the" Stal," you mayfind it necessary tomove them a little
Total £1 0 3
being cheap (it retails at 2s.),it takes up very little room,thus allowing plenty of spacefor the transformers.
The Wiring.The next job is the wiring.
It is best to use insulated wiresuch as Glazite, but if you usebare copper wire make sure itis fairly stout, and he carefulthe wires do not touch oneanother. If you follow the dia-gram carefully you should haveno difficulty. A good idea is tocross off each wire in the
diagram with blue pencil as soon as the corresponding wirehas been connected in the set, then there will be littlechance of a wire being left out or joined to the wrong ter-
minal. The wires from
CB -
SPE/4HE R
AtlL
/2
'ON- OFFSWITCH
- H. T.c. +
H.T.-+ tH.T
C r -
The wiring diagram.CART/. RERIRL
the coil are, of course,connected direct tothe various compon-ents. The connectionsare as follows : " A "goes to the moving
4,,,k" vane of the reaction/ condenser. " B " is
joined to the earthterminal. " C " to oneterminal of the .0001fixed condenser, and" D " to one terminalof the .0002 grid con-denser. "B " and "C"being in the form ofloops, the loop shouldbe cut in the centreand the ends of thetwo halves bared andboth joined to the
I terminal. The bat -7/2 tery leads are made
from ordinary light-ing flex. If you use thetwo-coloured varietyit will be easier todetermine the pol-arity. A lead about4ft. long will berequired for the con-nection to the low-tension battery,which can then veryconveniently beplaced on the floor
out of sight. Wesuggest that in mak-ing a cabinet tohouse the set a spaceshould be providedbelow the baseboard .
to accommodate theH.T. battery or mainsunit. The three H.T.leads would thenneed to be only about ill I i Alft. long. They aremade of single flexmade by unravelling the twin lighting flex. The fourbattery leads should be fixed down on the baseboard -witha small strip of brass as shown to prevent them beingaccidentally wrenched from their connections.
The connections to the transformers shown on thediagram are those generally employed, but most con-structors try the effect of changing round the wires tothe primary of the first transformer. To do this connectthe wire from the plate of the detector valve, which isshown joined to the terminal marked " P " on thetransformer to the terminal H.T." on the transformer,instead. The H.T. connection then goes to the terminal" P." The object of this alteration is to prevent low -frequency howling, to which any set with two trans-formers may be liable. Of course, the effect cannot betried until the set is tested out. It is a wise plan to leavethe leads long enough to make the change if necessary.
If you happen to live a long way from a wirelessstation, where interference is unlikely, you will findthis dodge of short-circuiting the series aerial condenserworth trying.
Testing Out.The set is now ready for testing. First connect up the
aerial. This should preferably be a short one. Flatdwellers will find an indoor one quite suitable. Thenjoin up the earth and loud speaker. The L.T. and H.T.connections come next, suitable voltages for H.T.-b1and H.T. ± 2 being 60 v. and 100 v. respectively. Gridbias is dependent on the H.T. voltage and the make ofvalves used, but 6 volts for the second valve and 7 voltsfor the last should be about right. Lastly, plug in thevalves. The one nearest the coil is the detector. The nextshould be an L.F. valve and the last one a power valve.The valves recommended for use in this set are Eta valvesNos. BY2010 (detector), BW1304 (L.F), and BW 602 (L.F.power) obtainable from wireless dealers (see also p. 85).
Tuning is carried out by the right-hand dial. The leftis the volume or reaction control. Should you find diffi-culty in tuning out your local station, that is to say, ifyou can still hear it slightly when you have tuned inanother station, your aerial is probably too long. Tryshortening it. Don't forget that the judicious use ofreaction sharpens the tuning. If you turn the reactionknob so that the set is near the oscillation point it notonly gives greater volume but cuts down interference.Do not overdo it, however, or the set will " howl." Ifyou use a very short aerial, such as a length of wireround the room, the tuning will be very sharp.
45 TURNS
How the coil is wound.
IS WENS
LS TURNS
$
I
I
IP Nms.11.0.41,smot,,ms..,..mo.amilan....m.e1410.0.0411. I i(141=4).M11.1M.11:41110.1....(1-011141111. 1.mau1..1......,N=1.1.MM.11-134111111. 1.1111.0411110,/ 1.0111..RIMP (HMV 1.01. lit 14M11.(1 ..110, I 14M.-, .......4 0 n, I ll 11 ,/ 0 0 I , I I 1,1 »I, I 1).M111.041.0041M.11.1=.1...1.111N. 1.111.1141111.0. o 4 ma. I.M.0.114,6111414M.,L
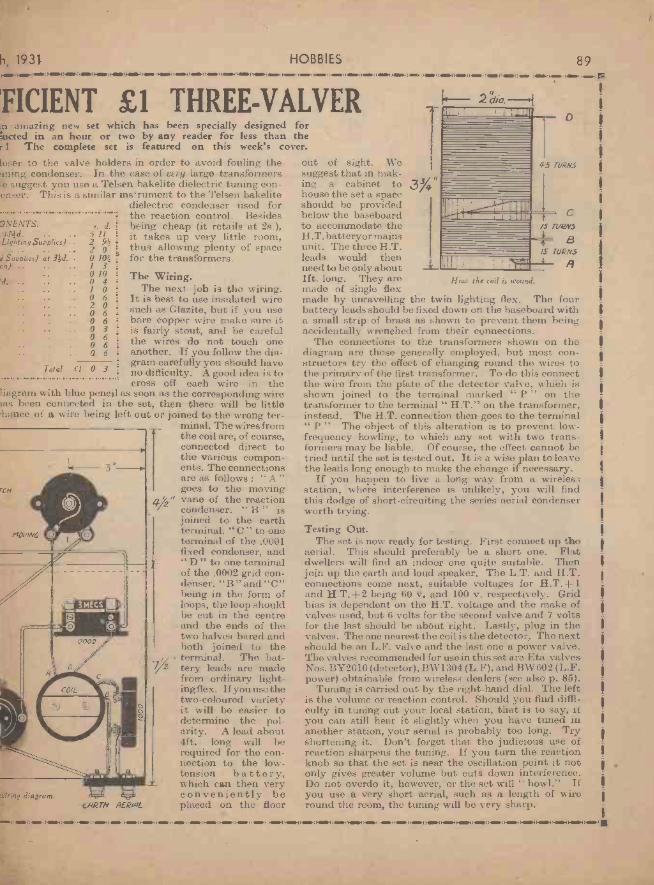
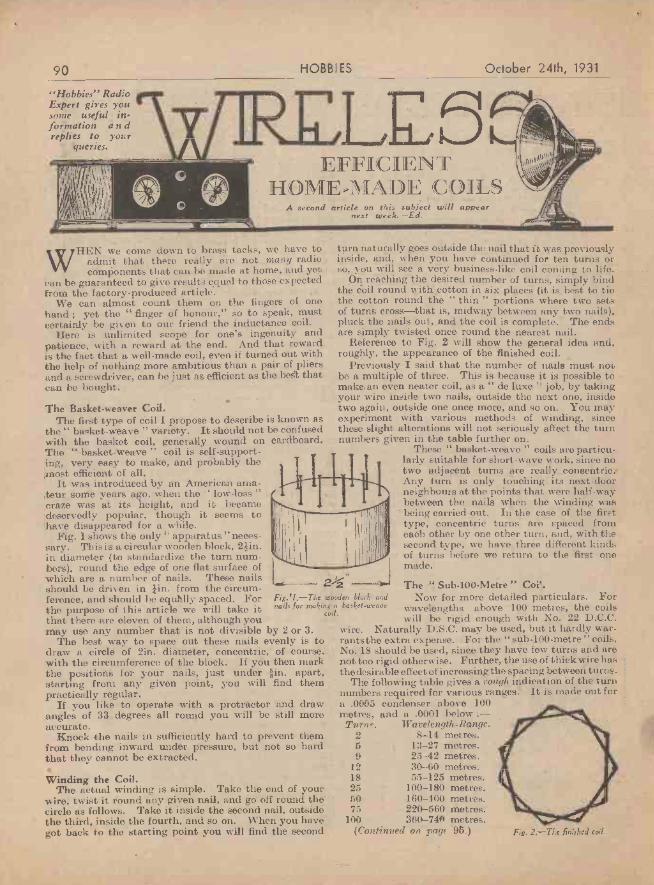
90 HOBBIES
"Hobbies" RadioExpert gives yousome useful information a n dreplies to your
queries.
October 24th, 1931
EFFICIENTHOMEMADE COILS
A second article on this subject will appearnext week. -Ed.
WHEN we come down to brass tacks, we have toadmit that there really are not many radiocomponents that can be made at home, and yet
can be guaranteed to give results equal to those expectedfrom the factory -produced article. ,
We can almost count them on the fingers of onehand ; yet the " finger of honour," so to speak, mustcertainly be given to our friend the inductance coil.
Hero is unlimited scope for one's ingenuity andpatience, with a reward at the end. And that rewardis the fact that a well -made coil, even if turned out withthe help of nothing more ambitious than a pair of pliersand a screwdriver, can be just as efficient as the heft thatcan be bought.
The Basket -weaver Coil.The first type of coil I propose to describe is known as
the " basket -weave " variety. It should not be confusedwith the basket coil, generally wound on cardboard.The " basket -weave " coil is self-support-ing, very easy to make, and probably thepost efficient of all.
It was introduced by an American ama-teur some years ago, when the ' low -loss "craze was at its height, and it becamedeservedly popular, though it seems tohave disappeared for a while.
Fig. 1 shows the only " apparatus " neces-sary. This is a circular wooden block, 21in.in diameter (to standardize the turn num-bers), round the edge of one flat surface ofwhich are a number of nails. These nailsshould be driven in lin. from the circum-ference, and should be equglly spaced. Forthe purpose of this article we will take itthat there are eleven of them, although youmay use any number that is not divisible by 2 or 3.
The best way to space out these nails evenly is todraw a circle of 2in. diameter, concentric, of course,with the circumference of the block. If you then markthe positions for your nails, just under lin. apart,starting from any given point, you will find thempractically regular.
If you like to operate with a protractor and drawangles of 33 degrees all round you will be still moreaccurate.
Knock the nails in sufficiently hard to prevent themfrom bending inward under pressure, but not so hardthat they cannot be extracted.
4,
Winding the Coil.The actual winding is simple. Take the end of your
wire, twist it round any given nail, and go off round thecircle as follows. Take it inside the second nail, outsidethe third, inside the fourth, and so on. When you havegot back to the starting point you will find the second
turn naturally goes outside the nail that it was previouslyinside, and, when you have continued for ten turns orso, you will see a very business -like coil corning to life.
On reaching the desired number of turns, simply, bindthe coil round with cotton in six places (it, is, best to tiethe cotton round the " thin " portions where two setsof turns cross -that is, midway between any two nails),pluck the nails out, and the coil is complete. The endsare simply twisted once round the nearest nail.
Reference to Fig. 2 will show the general idea and,roughly, the appearance of the finished coil.
Previously I said that the number of nails must notbe a multiple of three. This is because it is possible tomake, an even neater coil, as a " de luxe " job, by takingyour wire inside two nails, outside the next one, insidetwo again, outside one once more, and so on. You mayexperiment with various methods of winding, sincethese slight alterations will not seriously affect the turnnumbers given further on.
These " basket -weave " coils are particu-larly suitable for short-wave work, since notwo adjacent turns are really concentric. -Any turn is only touching its next-doorneighbours at the points that were half -waybetween the nails when the winding was
being carried out. In the case of, the firsttype, concentric turns are spaced fromeach other by one other turn, and, with thesecond type, we have three different kindsof turns before we return to the first one
Fig...I.-The wooden block andnails for making a basket -weave
coil.
made.
The " Sub -100 -Metre " Coi'.Now for more detailed particulars. For
wavelengths above 100 metres, the coilswill be rigid enough with No. 22 D.C.C.
wire. Naturally D.S.C. may be used, but it hardly war-rants the extra expense. For the " sub -I00 -metre " coils,No. 18 should be used, since they have few turns and arenot too rigid otherwise. Further, the use of thick wire hasthe desirable effect of increasing the spacing between turns.
The following table gives a rough indication of the turnnumbers required for various ranges. It is made out fora .0005 condenser above 100metres, and a .0001 below :-
Turn <% Wavelength -Range.2 8-14 metres.5 13-27 metres.9 25-42 metres.
12 30-60 metres.18 55-125 metres.25 100-180 metres.50 160-400 metres.75 220-560 metres.
100 360-74, metres.(Continued on page 9g.) Fig. 2. -The finished coil.
October 24th, 1931 HOBBIES 87
AN ELECTRICSTANDARD LAMP
This handsome lamp standard is 4ft. 6in. tall, and canbe cut in oak by any owner of a few carpentry and fret-work tools. A parcel of materials is supplied, as below.
THE electric standard lamp knife. If the shade is to be madeillustrated can be made and up in card, a large sheet will bebuilt up quite simply with required, and the templet will be
any ordinary kit of tools. It stands drawn round four times. With a4ft: 6in. tall, and consists of a thin wood shitcle, four pieces of three -hollow column supported on four ply will have the design cut in andfeet. At the top is a shade of afterwards fitted with a square three -either card or thin three-ply wood. ply top and base. A ply -wood topThe bulb is fixed to a socket at the and base will also be needed if thetop of this shade, and the whole shade is made of card, strips ofsupported by ornamental brass or gummed tape holding all the parts'copper strips. together. A 3M. diameter hole will
be cut in the three-ply top of theMaking the Column. shade, and over this will rest a
For the column get four pieces piece of ifin. wood, with the;', of in. wood, 4ft. 6in. long ; two metal bulb -socket attached. Twe
pieces being 3M. wide and two round -headed screws will fix this',h pieces 2in. wide. At the centre piece to the three-ply top making
of one end of each piece mark for easy removal for repair whena mortise 4in. long by tin. wide, necessary.and cut out with the fretsaw.Now glue and screw the four The Ornamental Supports.pieces together to form a hollow The ornamental metal work at
column (in plan Fig. 1 and side view in Fig. 2). To the the sides is formed from four fin.bottom end of the column fix a square of lin. wood with a strips, 19in. long, bent as shown-3in hole cut in the centre through which to pass the flex. in the diagram (Fig. 6), in the
Four feet are cut from usual manner of bentlin. or in. stuff, each ironwork; The small10in. long and 7in. wide, Suitable p aned oak. cur ready to sizes lower curved stripsand Fig. 3 is a diagram required. is supplied by Hobbies Ltd., for all are 7lin. and simil-parts. for 1316, and sent carriage forward.for marking on to the arty bent up. RivetBelow is a list of the necessary parts.wood. On one piece set 2 pieces 4ft. 6in. long by 3in. wide by lin. thick. the long and shortout the squares and the 2 411. Pin. 2in. tin. strips together at X,outline, cut out the foot 1 piec 4in. , and also fasten thewith a coarse fretsaw, 4 pieces 10in. 10in. lin.
4 pieces of thin plywood 9in. long by Bin. wide lower ends to the.and use this as a templet column of the lampfor marking out the other and the tops to thethree. Glue the feet securely in the column, and tun ascrew through the top of each for additional strength.Fig. 4 shows how the feet can be built into the column bya mortise. A 2in. square of tin. wood is cut, and a fin.hole made in the centre of it. The piece is let into the
Fig. 4. -The f.etfitting into the
column.
- - - 8"- - -
Fig. 5. -Detail of one sideof the shade.
top of the col-umn and gluedand screwedfrom outside.
The DecoratedShade.At Fig. 5 is
one completeside of thelamp, givinglin. squares.Set out on stoutcardboard, andcut it out witha pointed pen -
top of the shade. A lin. woodwasher, 2lin. in diameter, andplaced between the bottom ofthe shade and the top of thecolumn will raise the former slightlyand make it quite rigid.
How to Finish.Oak is the best wood to use
for this standard, stained down tothe required shade, and finishedwith Lightning Polish. The stain-ing and polishing should be donebefore the shade and the orna-mental metal work are fixed. Tothe interior of the lamp glue plainparchment or stencil paper, so adiffused light will be thrown out.
Finally the flex is brought upfrom the base, through the columnto the lamp at the top..
-f
*-Flg. 1.-A plan of
the standard.
Pg. 2.-A flat side view.
"- 7 -T-r 4 l --t-++
-Et- 4 4 +I-1- -1-t1- 4-
4 --h -I- -
-4 -L
Fig. 3. -How to markout the feet.
I
I I
- -1' T
I ItI- 1"
Fig. 6. -The shape of themetal supports.
86
Made in Stripwoodand Dowelling.
HOBBIES October 24th, 1931..--.........-.........-.................................................................................,i
.
A IIOME,MA IDE ,i,
THE best way to store fruit such as apples and pearsfor the winter is by laying out in a suitablerack. A handy form of storing rack which is
constructed in stripwood and dowelling is illustratedherewith and proves quite simple for the amateur.
To make the rack, first cut off four lengths of 1 in. by 1 in.stripwood, 5ft. 2fins. long, and mark off the four positionsfor the mortises on one side of each (Fig. 1). These mortisesaro out Ain. deep and made fin. long by fin. wide totake the side supports which hold the dowelling. Themortises are easily tut by first drilling a hole and thencutting out the corners with a small wood chisel. Nowmark off the other two mortises at the top and bottomon two of the pieces, as indicated in Fig. 1, and cut themthe same size and depth. These will be for the backspacing supports of the rack. Cut the mortises for thetwo front spacing supports in the same manner, takingcare to mark them off so the mortises for the rodsupports will face each other.
Four spacing supports are required, two for the front
FRUIT,STORING RACK
of the rack and two for the back, and details of these aregiven in Fig. 2. The supports are cut from fin. by lin.stripwood 3ft. long and a tenon is cut on the end ofeach piece fin. by fin as indicated. Make the tenonsa good fit in the mortises in the uprights. Eight piecesof the same size and length stripwood are required forthe cross dowel rod supports.
For the shelves of the rack cut off 48 pieces of fin.dowelling, each 3ft. long. These are best obtainable ina bundle, like the stripwood, from Hobbies Ltd. Thorack is now ready to put together. First,put the parts of the frame together bymeans of a little glue, applied to the joints,and allow these to set quite hard beforefixing in the dowelling. Commence onthe bottom shelf first and fix the dowelrods in with glue ; it is a simple matter topush one end in first and then slide the otherend in the opposite hole. The rods will endabout half -way in the holes, so take care toget them all about the same. By startingon the bot-tom shelf firstand thenworking up-wards youwill alwayshave a clearspace to workin. Test forsquarenessand length asyou proceed,and don't letthe parts
wring " atall.
Fig, 3.-The cross-
bar,
_t(
-Fig. 2. - Thespacing supports.
If
17212t
Fig. I -Thecorner posts.
HOW TO MAKE A COAL CABINET (continued front page 84).
Fig 6.-A close -or of the actual coalcontainer.
and temporarily test thepart in place, but donot fix it in yet. It isimpossible to get thecontainer into positionif these fittings are putin now. The. correctswing of the container isonly brought about byaccurately fitting thesepivoting points.
One portion of thepivot fitting has alreadybeen fixed into .the siderail. Now put in thecontainer and get thedoor properly in place.
This should bring thehole in the side of thecontainer in line withthe hole made in thecentre rail of the sidefra nes, Then the otherportion of the pivot pin
is put through from inside the containerinto the recess made, and There screwed inplace. This provides a swivel for the con-tainer itself which is then ready to receivethe metal scuttle and shovel supplied withthe rest of the fittings.
So far there is no top. It' cannow be added by snaking a hollowframe of fin. wood and gluing aboveit a square of mahogany fin. thick.The lower frame can be seen on the sheet.The front rail of this frame has both endsmitred ; the side rails have one end mitred ;the back rail has both ends cut square. Thepieces cut away when the parts aro mitredare used to form the angle blocks to stiffenup the frame, and all are glued together flatand true. Then put the hollow frame onthe top of the cabinet, flush with the back,to project equally over the sides and front.Glue and screw it to theframework and then addthe square top aboveall.
Fig.7.-A brokenaway picture ofthe door, rails,
overlays. etc.
October 24th, 1931
TREBLE DUTYTERMINALS
X., and improved type T2LC Ter-minal. Here are the specifications t -(I) H&c in top to take any standard I
plug.(2) Engraved top. Positive, Red, 2
Negative, Black, 40 types, all 3inter changeable.
(3) Pillar Terminal, to take spade 4wire on similar connection.
(4) 'Phone type terminal for connect-ing 'phone on similar ends.
(5) Soldering tag to enable wire to besoldered if necessary.
(6) !slot in shank to take square wire,so that soldering may be dis-pensed with.
THE 2DMSIDE -ENTRYPLUG.
This plug hasmany uses in thyhome constructedset, Supplied in 6colours. Type2D3L, side -entry. L NDARDISED PLUGS & SOCKETS.Price 2d. each, - Plug 2DM Type, 2d. each. 2DW Types, 2d,
Writs for free, each. Sockets, Type SS 2d. each.illustrated list ast.p.s. Series. For mains. Plugs, 4d. each.
Sockets, 2d, each, Red and Black only.J. J. EASTICK & SONS,E ELEX HOUSE. 118, Bunhill Row, London, E.C.1
Ilaie: Metropolitan 0314,3i.),
HOBBIES
MAKE MONEYIN YOUR SPARE TIME
" BABY ADANA
10'6
NIIIM111111111111111111111111h.
VISITING CARDS
CONCERT TICKETS
BUSINESS CARDS
PRICE TICKETS
SMALL LABELS
PROGRAMMES,&c.
CAN BE PRINTEDWITH EASE ANDWITHOUT ANY
r REA, iou$EXPERIENCE
COMPLETE PRINTING PLANT INCLUDES REAL METALPRINTER'S TYPE
ILLUSTRATED SCHOOL MAGAZINES,PAMPHLETS, NOTICES. BILLHEADS. &c.. CAN BE PRINTED PERFECTLY
THE OUT"SENIOR ADANA" COMPLETE 5716ON SALE AT ALL LARGE STORES A. TOY SINES If any difficulty write toFRANK PITCHFORD & CO. LTD., WELL STREET, LONDON, E.C.I
91
WHATEVERARE YOURINTERESTS-
MODERNYOUTH
CATERS FOR THEMNo matter what are your in-terests, in 4 Modern Youth" youwill find them fully catered for.Never before has there been ajournal devoted entirely to theneeds of the youth of to -day. Thefirst number gives you an indica-tion of the standard this journalsets. Among the contributors aresuch famous names as Sir MaxPemberton, Lord Lloyd, R.Vaughan Williams, I. A. R.Peebles, Hon. Victor Bruce,Professor A. M. Low, etc., etc.For vigorous and helpful articles, forexpert advice on every interesting sub-ject, for stories that tingle with life andaction ... there's nothing to compare
with " Modern Youth."
1WEEKLY FEATURES:
Rugger, Soccer, PublicSchool Sports, GolfOUT Hints, Aeronautics,
°cr. 29TH. Motoring Notes, Wire-less, Book Review,3D. Stage, Film and ConcertNotes, Competitions,
WEEKLY.' etc., etc.ORDER YOUR COPYFROM YOUR NEWSAGENT
TO -DAY!
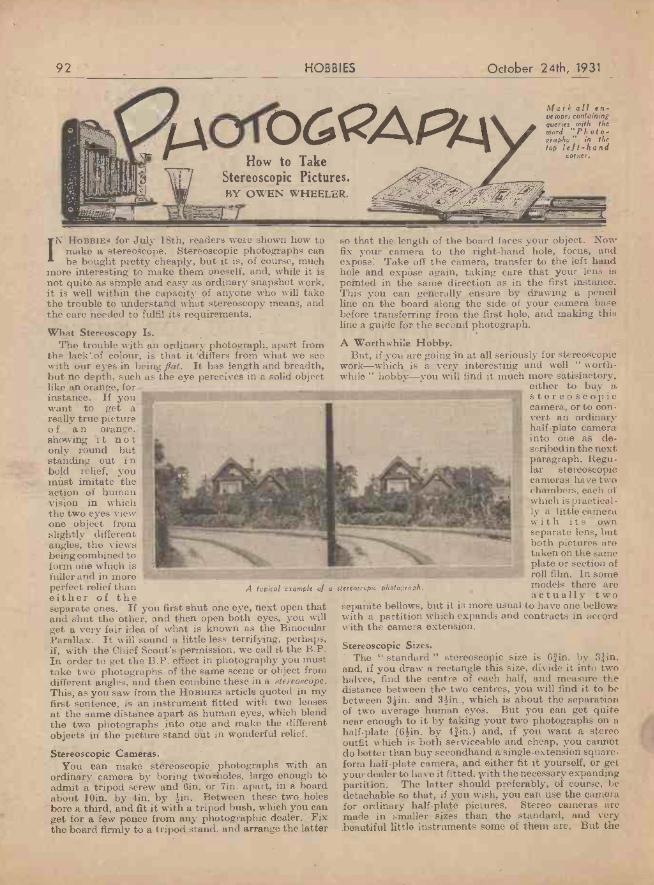
92 HOBBIES October 24th, 1931
arOGAPHow to Take
Stereoscopic Pictures.BY OWEN WHEEL.R.
IN HOBBIES for July 18th, readers were shown how tomake a stereoecope. Stereoscopic photographs canbe bought pretty cheaply, but it is, of course, much
more interesting to make them oneself, and, while it isnot quite as simple and easy as ordinary snapshot work,it is well within the capacity of anyone who will takethe trouble to understand what stereoscopy means, andthe care needed to fulfil its requirements.
What Stereoscopy Is. .
The trouble with an ordinary photograph, apart fromthe lack".of colour, is that it differs from what we seewith our eyes in being flat. It has length and breadth,but no depth, such as the eye perceives in a solid objectlike an orange, forinstance. if youwant to get areally true pictureof an orange.showing it notonly round butstanding out i nbold relief, youmust imitate theaction of humanvision in whichthe two eyes viewone object fromslightly differentangles, the viewsbeing combined toform one which isfuller and in moreperfect relief thaneither of theseparate ones. If you first shut one eye, next open thatand shut the other, and then open both eyes, you willget a very fair idea of what is known as the BinocularParallax. It will sound a little less terrifying, perhaps,if, with the Chief Scout's permission, we call it the B.P.In order to get the B.P. effect in photography you musttake two photographs of the same scene or object fromdifferent angles, and then combine these in a stereoscope.This, as you saw from the HOBBIES article quoted in myfirst sentence, is an instrument fitted with two lensesat the same distance apart as human eyes, which blendthe two photographs into one and make the differentobjects in the picture stand out in wonderful relief.
Stereoscopic Cameras.You can make stereoscopic photographs with an
ordinary camera by boring two41oles, large enough toadmit a tripod screw and 6in. or l'in. apart, in a boardabout 10in. by 4in. by fin. Between these two holesbore a third, and fit it with a tripod bush, which you canget for a few pence from any photographic dealer. Fixthe board firmly to a tripod stand, and arrange the latter
A typical example of a stereorccpic photograph.
Mark all en-velopes containingQueries with theword "Photo-graphy" in thetop left-hand
corner.
so that the length of the board faces your object. Nowfix your camera to the right-hand hole, focus, andexpose. Take off the camera, transfer to the left handhole and expose again, taking care that your lens ispointed in the same direction as in the first instance.This you can generally ensure by drawing a pencilline on the board along the side of your camera basebefore transferring from the first hole, and making thisline a guide for the second photograph.
A Worthwhile Hobby.But, if you are going in at all seriously for stereoscopic
work -which is a very interesting and well " worth-while hobby -you will find it mueh more satisfactory,
either to buy astereoscopiccamera, or to con-vert an ordinaryhalf-plate camerainto one as de-scribed in the nextparagraph. Regu-lar stereoscopiccameras have twochambers, each ofwhich is practical-ly a little camerawith its ownseparate lens, butboth pictures arotaken on the sameplate or section ofroll film. In somemodels there areactually two
separate bellows, but it is more usual to have one bellowswith a partition which expands and contracts in accordwith the camera extension.
Stereoscopic Sizes.The " standard " stereoscopic size is Qin. by 31in.
and, if you draw a rectangle this size, divide it into twohalves, find the centre of each half, and measure thedistance between the two centres, you will find it to bebetween 31in. and nin., which is about the separationof two average human eyes. But you can get quitenear enough to it by taking your two photographs on ahalf-plate (6lin. by 41in.) and, if you want a stereooutfit which is both serviceable and cheap, you cannotdo better than buy secondhand a single -extension square -form half-plate camera, and either fit it yourself, or gelyour dealer to have it fitted, pith the necessary expandingpartition. The latter should preferably, of course, bedetachable so that, if you wish, you can use the camerafor ordinary half-plate pictures. Stereo cameras aremade in sinaller sizes than the standard, and verybeautiful little instruments some of them area But the
October 24th, 1931 HOBBIES 85
COMPONENTS FOR HOME-MADE 3 VALVE SET.
ETA Valves are rightin performance and price
POWER VALVEvoltage,
con
4.5. 673.1.11xopiPtigplEelt
linrsiabu.
.8orsadii0taeaiio?nal ortt
voltstl'iotsoertarr0tass.
u.in43eneco0:g2.crag).
Maxim utillivratts. anodet.
v
xi-
8.
d 101. um,
r5oo ounisc;verall
v°Itage a 12 utit. anodebias ancurrent.)
ted output
2Filament
anode voltage,
lA"verag;I"'
anode
*At 7oro ls anode vol ag
8'mPRICE
orDETECTORVALVE
1. Iffaximuro vfiolts.lament volt.
age, 2.0 current, 0.12
2. Filament
IVLagnj.151:anode volt-anipere.
Amplificationfactor,20.
.5.1.0,000
Irridgrce,.6. %ilt u adclifictanceJ
7. Ai:1erleanode current,
(For vZI,tds. atiltvolts grid bias.) "
1Kalciraurnoverall
8. length, 107 01111.
IVIZiarndiameter.
9.
. At zerogrid volts and
100 volts anode voltage
PRICE T.
L.F. V ALVE
plaxiinurnfilaraent volt-
age, 2.0 voltrsr.e.dt,
Filanient2" ampere. anode volt.
14"i' Vg volts.age, 3. or
.4. Amplific cu.tact,13'
nc 4,000 ohnis.
:11.9e da)ale3'.c2o rixaduxerrne
s"; anode eurren
A.ver2lts anode
6
grid11C)teal:
:1° a°31;icd4to;lisitti
16:ItIas.)grid
Visr:;11:1.) 5inA anode
Viiirrn11)gorVer-out-
put,e. 9,000 °ions. verali10. NI:axgtg.la_li
11. Maximdiaraeter,
At zero grid...1_10,1talt:z2)1.1.
I volts I I
PRICE8' -
THE ELECTRICAL TRADING ASSOCIATION LTD., ALDWYCH HOUSE, ALDWYCH, LONDON,Telegrams: Eltradax, Est rand, London. Telephone: Holborn 8139. W.C.2.
Irish and Scottish Agents: W. J. Byrne, 21, Temple Lane, Dublin. R. G. Jackson Nisbet, 132, Renfrew Street. Glasgow.
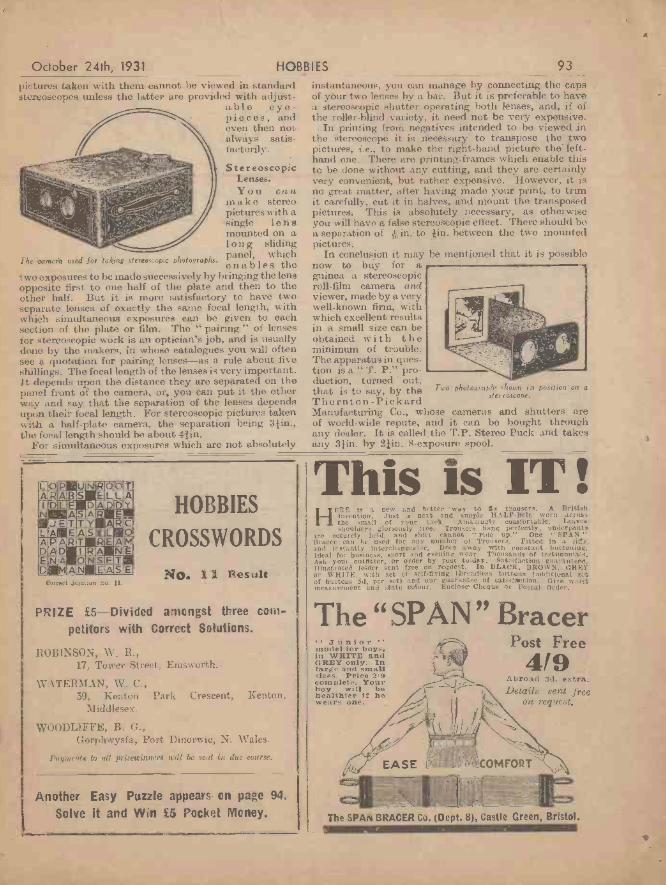
a
84 HOBBIES October 24th, 1931
by strips of the No. 24 moulding glued and nailedround.
Mark Positions Clearly.Before cleaning off the paper pattern mark clearly-
in pencil or with a pricker-the position of the variouscross rails, etc. The dowel holes are indicated on thepatterns, and this makes it simple to frame up thecabinet the correct dimensions. The front and backrails are lifted tin. from the bottom, but the top rails areflush with the upper edge. The back cross rails (seeFig. 3) are merely plain rails dowelled in position ; thefront ones require a little more attention. The lowerfront cross rail provides a stop for the door when itshuts and so must he composed of two parts. Thebottom front rail is cut 121in. long, 4in. wide and Bin.thick, its upper edge being chamfered inwards slightly.
The Front Two-piece Rail.Dowels are fitted each end. To the front of this piece
is glued the bottom front rail, a piece I21in. long,4in. wide and cut from tin. wood. The top edge isrounded and the part is glued to the other rail so thattin. projects above and is correspondingly short at thebottom. A detail of one end of this part is shown atFig. 4. Be careful to dowel it in its correct positionbetween the side frame. At the top another style ofrail is fitted to provide a stop for the door. This is thetop front rail in sin. wood from the centreof which an arc is cut to allow the passageof the shovel handle later. This rail isset back I tin. from the front edge ofthe side frame. Thus, when the front ofthe cabinet is directlyin line with the bottom front rail just fitted.A sectional drawing showing the door closed(a) and open (b) (without the top) is givenat Fig. 5. The back itself is merely a plainpiece of plywood glued and screwed tothe framework provided.
Strengthen with Blocks.The bottom framework is stiffened by tin. blocks,
Fig. 50.-A section showing the door closedwith the container behind it.
Fig. 5k-.4 similar detail', but showing thedoor open and the container ready so use.
one of which canbe seen in positionin the picture ofthe cabinet open.Six are cut, andthe other two areglued in the anglebehind the fronttop rail.
The next job isto complete thecontainer which isillustrated in detailat Fig. 6. This isbuilt up in cheaperwood, and fixedbehind the door tohold the metal coalscuttle supplied.The door itself isframed up with twocross rails and twouprights, all in tin.stuff and all dow-elled together. Asin the sides, a filletstrip is glued flush with the back edge to form a rebatefor the plywood. On the front the No. 24 moulding is
glued into the corner and a long ornamentalfret with a square carving is added asshown. At the top an oxidized drop handleis fitted through. The section of Fig. 7shows how the part is built up. The cheapcontainer fitted behind the door is cut from-tin. wood and composed of two sides, a backand a bottom. They form a hollow frame
Fig. 4.-The (Fig. 6) the same width as the door itself.front lowerrail is made Details of the Container.up like this. In order screws should not be driven
through the front, however, two pieces of cheap woodare glued and screwed to the back of the door tin. in-wards from the edge and stopping off Bin. upwards from
the bottom. This allows the con-tainer to be glued into the cornerand screwed up to these strips (seeFig 6). The back of the lining, itwill be noted, sticks a little abovethe sides and has its inside edgechamfered (see Fig. 6). This chamfer
forms a straight stop on thesides of the top rail when thecontainer' is pulled forward, and
makes a more work-manlike finish thanif the wood justrested on the edge.
It is to the sides ofthis container thatthe other portion of
the pivot fitting has to be fixed. Incutting the sides of the container,mark up very carefully the positionof this pivot pin, according to thedimensions on the pattern, and thenrecess on the inside to a depth of-kin. The stub pin of the fittingmust pass through a hole in the sideto project about Bin. to tin. beyond.Get out this recess, cut the, hole,
(Continued on page 86.)
Fig. 3.-oldetail of the
framework of thecabinet.
October 24th, 1931 HOBBIES 93
pictures taken with them cannot be viewed in standard instantaneous, you can manage by connecting the capsstereoscopes unless the latter are provided with adjust- of your two lenses by a bar. But it is preferable to have
a stereoscopic shutter operating both lenses, and, if ofthe roller -blind variety, it need not be very expensive.
. In printing from negatives intended to be viewed inthe stereoscope it is .necessary to transpose the twopictures, i.e., to make the right-hand picture the left-hand one. There are printing -frames which enable thisto be done without any cutting, and they are certainlyvery convenient, but rather expensive. However, it isno great matter, after having made your print, to trimit carefully, cut it in halves, and mount the transposedpictures. This is absolutely necessary, as otherwiseyou will have a false stereoscopic effect. There should bea separation of 116in. to in. between the two mountedpictures.
In conclusion it may be mentioned that it is possiblenow to buy for aguinea a stereoscopicroll -film camera endviewer, made by a verywell-known firm, withwhich excellent resultsin a small size can beobtained with t heminimum of trouble.The apparatus in ques-tion is a " T. P." production, turned out,that is to say, by the Two photographs shown in position on a
Thornton -Pickard stereoscope.
Manufacturing Co., whose cameras and shutters areof world-wide repute, and it can be bought throughany dealer. It is called the T.P. Stereo Puck and takesany 3/in. by 21in. 8 -exposure spool.
able eye-piece's, andeven then notalways satis-factorily.
StereoscopicLenses.You can
make stereopictures with asingle lensmounted on aI on g sliding
The camera used for 'taking stereoscopic photographs.panel, whichenables the
two exposures to be made successively by bringing the lensopposite first to one half of the plate and then to theother half. But it is more satisfactory to have twoseparate lenses of exactly the same focal length, withwhich simultaneous exposures can be given to eachsection of the plate or film. The " pairing " of lensesfor stereoscopic work is an optician's job, and is usuallydone by the makers, in whose catalogues you will oftensee a quotation for pairing lenses-as a rule about fiveshillings. The focal length of the lenses is very important.It depends upon the distance they are separated on thepanel front of the camera, or, you can put it the otherway and say that the separation of the lenses dependsupon their focal length. For stereoscopic pictures takenwith a half-plate camera, the separation being 31in.,the focal length should be about 4tin.
For simultaneous exposures which are not absolutely
Correct Solution 1/5. 11.
HOBBIES
CROSSWORDS
NO. 11 Result
PRIZE £5-Divided amongst three com-petitors with Correct Solutions.
ROBINSON, W, R.,17, Tower Street, Enisworth.
WATERMAN, W. C.,39, Kenton Park Crescent, Keaton,
Middlesex.
WOODLIFFE, B. G.,Gorphwysfa, Port Dinorwic, N. Wales.
Poyments,to all prizewinnerg will be sent in tine course.
Another Easy Puzzle appears en page 94.Solve it and Win £5 Pocket Money.
This is ITHERE is a new and better way to fix trousers. A British
invention. Just a neat and supple HALF -Belt worn acrossthe small of your back. Amazingly comfortable, Leavesshoulders gloriously free. Trousers bang perfectly, underpants
ore securely held, and shirt cannot " ride up." One SPAN "Bracer can be used for any number of Trousers. Fitted in a jiffy,and instantly interchangeable. Does away with constant buttoning.Ideal for business, sport and evening wear. Thousands of testimonials,Ask your outfitter, or order by post to -day. Satisfaction guaranteed.Illustrated folder sent free on request. In BLACK, BROWN, GREYor WHITE, with set of self -fixing threadless buttons (additional setof buttons 3d. per set) and our guarantee of satistMetion. Give waistmeasurement and state colour. Enclose Cheque or Postal Order.
The "SPAN" Bracer" Juniormodel for boys,in WHITE andGREY only. Inlarge and smallsizes. Price 2.9complete. Yourboy will behealthier if hewears one.
Post Free4/9
Abroad 3d. extra.Details sent free
on request.
The SPAN BRACER Co (Dept. 8), Castle Green, Bristol.51111111111111W
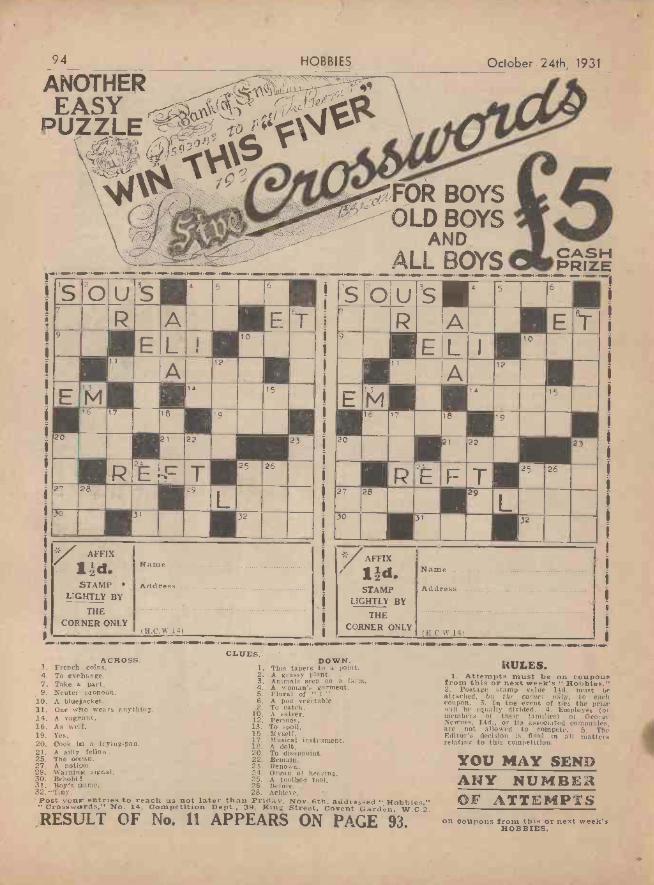
94
ANOTHER tt
EASYPUZZLE 10 8411
-31'9
a
a
a
October 24th, 1931
FOR BOYS`>----OLD BOYS
ANDALL BOYS CASH
PRIZE
S20 U 3S
5
R A E t9
E L,,
0
,
A 1111
E
20
M1 4 15
16 17 1 19
21 22 23
R 2E FL
26
27 28 29
30 31 32
yf AFFIX
fr 11-d.O STAMP
LIGHTLY BY
THECORNER ONLY
(
CLUES.
Name
Address
1S 20 U3^4 5
R A E ELF9
ELF I
10
1 I 12
R1. 15
2320
17 18
22
, 9
21
28
T25 26
27 29
L30 31 32
/AFFIX
11d.STAMP
LIGHTLY BY
THECORNER ONLY
Name
Address
I 11.C.V7.14)
ACROSS.1. French coins.4. To exchange.7. Take a part.9. Neuter pronoun.
10. A bluejacket.11. One who wears anything.14. A vagrant.16. As well.19. Yes.20. Cook in a frying -pan.21. A silly fellow.25. The ocean.27. A notion.29. Warning signal.30. Behold31. Boy's name.
DOWN.1, This tapers to a point.2. A grassy plant.3. Animals seen on a farm.4. A woman's garment.5. Plural of " I."6. A pod vegetable.8. To catch.
10. A salver.12. Periods.13. To spoil.15. Myself.17. Musical instrument.18. A dolt.20. To disappoint.22. ReinaM.23. Renown.24. Organ of hearing.25. A toothed tool.26. Before.
32. --'tiny. 28. Achieve.- Post your entries to reach us not later than Friday, Nov. 6th, addressed " Hobbies,"'' Crosswords," No. 14, Competition Dept., 39, King Street, Covent Garden, W.C.2.,RESULT OF No. 11 APPEARS ON PAGE 93.
RULES.1. Attempts must be on coupons
from this or next week's " Hobbies."2. Postage stamp value 10. must beattached, by the corner only, to eachcoupon. 3. In the event of ties the prizewill be equally divided. 4. Employes (ormembers of their families) of GeorgeNewnes, Ltd., or its associated companies.are not allowed to compete. 5. TheEditor's decision is final in all mattersrelating to this competition,
YOU MAY SENDANY NUMBEROF ATTEMPTS
on Coupons from this or next week'sHOBBIES.
October 24th 1931
Specially designed fortie amateur carpenterand fretworker. Pat-terns free on the
design chart.
HOBBI ES 83
HOW TO MAKE ACOAL CA
THE subject of this week's design sheet forms one ofthose sensible pieces of carpentry which are anasset to any httme, and yet which the amateur
fretworker of some experience can complete withoutundue trouble andexpense. There areso many readerswho handle car-
- gentry and fret-work tools withgreat ability, andthey should findlittle difficulty inputting togetherand completing thesplendid coal cab-i net illustrated here.It is a full-size,piece of furniture,and its drop frontcontainer holds acoal scuttle of theordinary dimen-sions. The com-pleted cabinetstands nearly 2ft.high, 151in. wide, and 14 kin. from back to front. Thewood throughout so far as the main framework is con-cerned is /in. stuff,so that a rigid andvery satisfactorypiece of work iscompleted. It can,of course, be madeup in either oak or
mahogany, according to the require.ment.s of the rest of the furniture of theroom. In order, however, to save a gooddeal of marking out and measuring, thereader has the advantage of being ableto obtain a parcel of mahogany planedand ready for all the parts required.The cost of this is only 21/-, and it in-cludes the moulding, beading, and fancyornaments required for decoration.
Check the Patterns.The various parts to be cut are shown
in complete detail on the design sheet,and most of them are only plain rect-angles which can be sawn and planedtrue in the ordinary way with carpentrytools. It is, however, essential to pastethe patterns clown to the various partsbecause in a number of cases dottedlines indicate the adjoining positions ofother parts,- and these positions mustbe marked carefully.
To lessen the work involved in con-struction, the various joints are madewith dowel pins. Wherever these areused it is essential to mark the parts offcarefully by laying them all together as
Fig. 1.-A detail ofone of the sides.
A parcel of planed mahogany with alt parts required, including dowel!.ornaments, moulding, etc., is supplied for this by Hobbies Ltd. for 211.,carriage forward. A complete set of fittings -metal coal container and shovel,swivel pins, drop ornamental handle, etc., costs only 7/6. The whole lot
sent together for 30/-, carriage paid.
A full-size piece cffurniture built inmahogany. All woodand fittings obtain-
able for 30/.
far as possible, and pencilling and measuring across thelot instead of taking each one separately. This ensuresthe dowels being driven in opposite each other, andso making a good joint without wringing the variousparts. Having checked off the different pieces of wood
required in con-junction with thes"patterns, next getau idea of the con-struction by lead-ing this artiebthrough. Then setto work on itsactual making,taking care at anypossible joint tJtest up the jointsand the parts onowith the other.
When closed, thecabinet has a plainpanelled and decor-ated door, but thisdoor, instead ofbeing hinged asusual, is fitted to
a container which holdsthe coal scuttle. This
container is pivotedinside the cabinetitself so that whenthe door is pulledforward the coaland shovel arethere ready for
use, as shown in the picture of the cabinet open.
Forming the Sides.Commence work by forming the frame of the two sides.
This consists of two upright rails, a top and bottomcross rail and a centre cross rail (see Fig. 1). The topand bottom rails are dowelled between the two uprights,but the centre rail is let in so that the face is flush (seeFig. 2). A little way along this centre rail from thefront a recess has to be cut to take the socket plate.The position of this is indicated on the design part andmust be accurately cut so that the brass plate of thefitting can be sunk flush with the rail itself. The plateis fitted 21 in. inwards from the frbnt end of the rail,and a central hole is drilled to take the pin of thepivot. A detail of thiscan also be seen at Fig. 2.As shown in Fig. 1, theside itself is composed ofa panel of plywood, andthis is held in placebehind with fillet stripsglued round the frame-work. By fitting thesefillets flush with the insideface of the frame, a recessis formed for the plywoodwhich is, in turn, held
Fig. 2. -Thecentre siderail and the
moot hole for the container.
82 HOBBIES
sufficient lift for reason- erac;n9able gliding purposes.They are plan bracedby means of the wingbracing lugs illustratedin Fig. 7. The endribs should be of Tsection to resist thopull of the fabric andthe aileron should hobraced with a wooden Aileron ttbuts destrip as illustrated inFig. 14. The trailing Fig' 14.-How to strengthen the ailerons.
edge of the wings is flexible, the wire being secured toeach rib as sketched in Fig. 6. Before covering thewires will bo perfectly straight. The scallops form
October 24th, 1931
Wood Knob
The
t go. 15 and 16.-Details of the
control lever.
Rear 5par-
OperalesAilerons
Control BsvrinqsI7.-The bearings for the
} control lever.1:,selege
Reed,./1,79 13/0G.4
Figs. 18 and 19.-The wheelmounting.
naturally when the fabric is pulled over it. Fig. 21indicates a section of the wings, and indicates quiteclearly the form of construction adopted. The ribsare steam cambered to a full-sizo wooden template and
eiaciing W4ie
1VPIE137=( Copper 7irbe Haforcycle Spoke
Fig. 20-1ow to makc the wire strainers.
-t -.1 ---
great care should be expended in getting all of themidentical. They are glued. and screwed to the wingspars.
Covering.Before covering is conunenced the inter -strut sockets
must be made and secured to the spars. They consistof steel tubing, slit down a certain distance with a hack-saw and spread open to form the bracing lugs (see Fig.5). The tubing should be of such a size that the inter -struts drive fairly tightly into them ; the inter -strutsthemselves are of streamlined section as indicated inFig. 8. Two half -elliptic skids are attached to the lowerend of the end inter -struts (see Fig. 13) by means of asimple clip and bolt. The fabric should be stretched overthe wing from end to end and secured to the ribs bytacking strips of cane over them. It is then tacked alongunder the leading edge and stitched over the trailingedge, carefully pulling out all the wrinkles and stretchingit as tightly as possible. When the planes are coveredthey should be given two thin coats of linseed oil andvarnish mixed in the proportions of one to three. Inbracing up the wings see that the correct dihedral angleis given (see Fig. 2).
The tail and bottom plane is secured to the fuselagein the manner shown in Fig. 23. The tail and rudderare constructed in the same way as the mainplanes (seeFigs. 24 and 25). All of the fittings to this glider are
7his Skier Nene- cut from 1 8 -gaugeRoan Fuselage sheet steel. The axle
is of steel tubing liin.1,-,;",;,,,,,,9 in diameter and un-cap,- S/Jci un-
bleached calico is usedfor covering the wings.
Tedspe flee/ Bowden cable is usedfor the control wires ;
n
bracing wire for thewings is 18 -gauge steel
Cfrrfasea9e piano wire, 16 -gaugeFigs. 22 6, 23.- Tail skid and tail fastening. piano wire being used
for the chassis. Readers in need of further informationshould address a letter to the Editor, marked " Glider."
1-1;28Aw
1,4Fig. 21.-Section through the mainplane.
Rudder Joints
Figs.24 and 25-Rudder details.
avitom Rib ofRudders
\rehlre Tad Rib
\--Metal Strips
TEAPOT STANDS FROM TILESTHIS suggestion for simply -made teapot stands
by using up odd hearth tiles was sent in byJ. Niets, of Birkenhead. Tho tile, as can be seenfrom the illustration, is let intoa circle of wood. The actualsizo depends, of course, on themeasurements of the tile, butthe square hole is cut with thefrotsaw. The tile is preventedfrom dropping right throughby strips underneath. The edgeof the opening is decorated withornamental beading or similar fancy stuff, whilstthe surface is further decorated with the raisedsquare ornaments or some of the other wood carvings
which are so popular now. The whole stand is raisedon little wooden feet glued in line with the cornersof the tile. See they are fixed securely or one may
slip off and the stand tilt justwhen a teapot is being placedon it. Tho whole stand can .bestained and polished or var-nished. One must take careto get a good circle i n cutting,or the whole effect will bospoiled. It is, of course, a sim-ple matter to mark out the
circle on the wood with a pair of compasses, butmore care is needed when you use the fretsaw forcutting it out.
tap
October 24th, 1931
PIGEON RACING is always in-creasing in popularity, andthe number of homer pigeons
kept is now very large. The King,like some of his poorest subjects, hasa loft, and the pigeon Derby drawsan entry of some hundreds of first-class birds. As a hobbythe sport is delightful, and not the least interesting partabout it is the training of the birds, The trainingcannot begin at too early an age. As soon as a bird cansupport itself on its wings the work may begin. Musculardevelopment is of great importance, and this should beproduced as the bird grows and matures. For my ownpart I like the evening best for the training. Theair resistance is then nearing its lowest ebb. It is, more-over, the time of the day when the bird feels the hominginstinct most strongly. If it is out of the question totrain in the evening, then the early morning is the nextmost suitable time. The work does not take long evenwhen one is keeping a large number of birds. At firstdo not take the youngster more than a quarter of amile, if so far, and about a quarter of an hour before theevening meal is given. Hold it loosely and stroke it asyou carry it from the loft to where you intend to liberateit, and do not make any noise when you let it go. Placeit on the palm of the left hand ; don't throw it into theair. It is not a bad plan to let it be accompanied by anolder bird, say, one of its parents. Give it a daily flightuntil it is six months old. The flights then may bedecreased to one or two a week, though, as with race
HOBBIES
TRAINING AHOMER PIGEON
In y J. G. I ristow Noble
95
horses, the more regular exercisethe birds have the more fit theykeep. But in the case of themajority of pigeon keepers it isdifficult to find time to keep morethan a certain number of all in
their lofts exercised oftener than this. It is rather abusiness to take all out at one time.
The youngsters soon thoroughly enjoy the spins anddo their best to reach home ahead of their companions.In a short time the flights may be lengthened to a mileor so and then to any reasonable distance. The exercisethe birds get in the loft and on the roof of your home willbe found enough to keep them in good health, but it isnot enough to keep them in the condition successfulracing demands. When on a long flight the birds rushthrough the air without discretion, and if not in first-rate condition they are likely to be lost. They may falldead from exhaustion, or, not being able to get fartherthan a certain distance, they may be stolen. Cleanlinessis also of importance. The lofts must be kept as clean aspossible. They should be swept out every week -end andlime -washed once a month. Good and correct feeding isanother thing to.be particular about. The best food arepeas, and as a change, wheat, tares and sprouted oats.The food should be placed in clean, earthenware vessels,not on the floor of the loft. It should also be watchedthat the loft is kept free of mice. One or two will preventthe birds from sleeping and cause them to go out of con-dition.
WIRELESS (continued from page 90).Please note that these figures cannot
taken as exact, as so much depends uponthe actual type of set with which theyare used, particularly the layout of thecomponents. The figures given are foruse when the coil is a closed circuit,without an aerial tapped on to it. Theaerial should, in any case, be looselycoupled by means of another coil, inthese enlightened days !
A Reaction Receiver.Where the coils are to be used in a
reaction receiver, it is well to make thewhole set once only, and it will usuallybe found that for a giveireoil in the gridcircuit, the next smaller coil will servefor reaction.
possibly be As regards the mounting of the coils, tie them downto a strip of ebonite with a plug at eachend, as shown in Fig. 3. This makesquite a rigid job for experimental pur-poses, and the wide spacing between theplugs makes for greater efficiency thanone generally associates with two -pincoil mounting.
If it is not desired to use a series ofplug-in coils, naturally one large basket -weave coil may be wound, and tappingsbrought out at the necessary places.For this purpose it is best to give thewire an outward twist where it takes aturn round one of the nails. The loopformed may be bared afterwards, andconnection made by a crocodile clip inthe usual way.Fig. 3.-The roil mounted on a strip
of ebonite.
THREE NKWTHE name of Sid G. Hedges is familiar to readers
of HOBBIES. He is, of course, well-known asan authority on swimming, but besides that he
knows a great deal about indoor games. Now, also,he is blossoming into a popular writer of detective novels.Three new hooks by him have just appeared.
" The Pendlecliffe Swimmers " (Sheldon Press, 3s. fid.),is a bumper volume which will form an ideal Christmaspresent for any boy or girl interested in swimming. Itis a gripping story of school life, in which the hero,Jakeman, sets out to bring back the enthusiasm forswimming which Pendlecliffe has lost. Jakeman is amagnificent swimmer, and a whole text -book full oftechnical swimming description is scattered through thetale.
" More Games for Socials " (National Sunday SchoolUnion, ls.). This is a companion volume to '`Games
OOKSfor Socials." If you would like fresh, games and stuntsto brighten your Christmas and New Year partiesthen let your bookseller get you a copy of thiS at once.Mr. Hedges describes in this new little book about 120games. You need never have a dull party or socialgathering again. The section headings give some ideaof the contents : Ice -Breaker Gaines, Moving -AboutGames, Sitting -Still Gaines, Musical Games, SurpriseGames, Spectator Games, Brain -Test Games, TeamGames.
" The Channel Tunnel Mystery " (Herbert Jenkins,7s. 6d.). A wealthy newspaper -owner, who has stronglysupported the Channel Tunnel scheme, disappears.His car is found wrecked between Folkestone and Dover.A strong murder mystery rapidly develops, with plentyof thrills. The setting alternates between Englandand France.
96 HOBBIES October 24th, 1931
SECCOTI(REGD. TRADE MARE)
THE MARVELLOUS MENDERAsk for Seccotme and you'll get the world's best adhesive. Theproved best. Seccotine is the choice of all who cannot afford tomake mistakes-the R.A.F. and The Admiralty, for example.There is a giant's grip in every spot of Seccotine. It sticks forever! Obtainable everywhere in tubes, 4'd., 6d. and 9d.
Write for interesting free booklet to Dept. L.MCCAW, STEVENSON & ORR, LTD., The Lincnhall Works, Belfast
FIRMAS(HEAT SECCOTINEI
Use this when the articles mustwithstand hot liquids.
Rol. Trod" Mark 6d. a tube.
AMAZING VALUE IS OFFERED IN THISCYCLE ELECTRIC LIGHTING SETThis remarkable set has many outstanding advan-tages and has been specially recommended in Sept.
26th issue of " Hobbies."1. It produces a brilliant light to head and rear lamps even at
low speed, and it is operated by contact with f rout 'wheelthrough a dynamo, in which is incorporatedan automatic regulator which controls thevoltage, preventing the bulbs being over -run.
2. A standard Saab lamp battery installed hihead lamp provides illumination whencycle Is atationart-.
3. A dipping device controlled from handlebarby Bowden cable and thumb lever control.
4. The complete outfit is sturdily built andhas all chromium plated fittings.
L. WILKINSON,8, CITY ROAD,LONDON, C.C.I.
ONLY
21f-Post Free.
GUARANTEED FOR ONE YEAR.
MAKE IT: GRAMOPHONEat Quarter Price.
Order set as shown. Double spring motor, 12 in. VelvetTable, Swan Arm. Metal Sound Boa, Horn, Needle Cups,E1 - 18 - 0, or buy Ritancophone. Pedestal 3 ft. high,commete for 64, earr. paid. Motors 7/6. Repair parte.Lista tree. 64 p. 1931 Catalogue No. 220 with reducedprices. Drawing and how to make Gramophones 35.Fatah 27 years.
PORTABLE REGENT FITTINGS CO.. NOBBY.GRAMOPHONES 15/6. 120, Old Street, LONDON, E.C.I.
GROSE'S, LUDGATE CIRCUSFOOTBALL JERSEYS
IN ALL COLOURS AND 1DESIGNS. British Made J. e.-14 DOZ.
FOOTBALL KNICKERSNI in Swansdown Lined 10/6 DOZ.NAVY OR WillTE
Send for Illustrated Catalogue (H) Pest FreeGEO. GROSE & CO., 8. NEW BRIDGE ST., LONDON
From Crystal to Televisionby Y. Richards, wills a foreword by J. L. Baird. A simpleaccount of all the processes and problems of wireless andtelevision.. It explains what actually happens in the set.Illustrated. Published (1928) at 9/.. Offered at 2/. post free
on approval. Quote offer 193.
Home Soldering and BrazingBy Yates. The author r 'spin ins with great clearness and simplicitywith the help. of numerous illustrations, all that the amateurshould know. Published at 3/6 net. Offered al 2'4 post free
on approval. Quote Offer 193.
FOYLES FOR BOOKS119/125, Charing Cross Road. London, W.C.2.
THE TURK PACKET FREE.All applicants for my new approval sheets sending 1Id. postage willreceive 15 TURKISH stamps free, Pictorial, War, Jubilee, Surcharged,etc., usually sold at ls. 3d. Additional free Set to customers givingcollectors' addresses.
H. WATIL1NS(Dept. H.2), 60. Leicester Road. East Finchley, N.2.ABYSSINIA PACKET FREE.
A fine packet of all different stamps containing the new 1231 is,ue of Abyssinia.a large pictorial Ruanaa-ffrardi. Another 1931 issue, large pictorial, Japan Earth.quake Stamp. Albania 1930 pictorial, a fine setota Dutch West Indies, Koneng-Tebecm.Lebanon pictorial, Monaco, Cameroon, Ceylon. etc., free to all asking to see m y famotiapproval sheets and enclosing 2ff. for postage and packing (abroad 34.1. Albums 1.4,1110, 3/., 47., 6,., 7/6, 10., upwards.-S. HAMMOND, 2, gingham Fields, Bury.
SALE andsoul EXCHANGEAdrerticcmcals are accepted for Oils column of the rate of 4s1. per tcArd.prep&dAddress eanananiastions to the Adrerlisemene 'Heaney', "Ifolkees,"
Southampton Street, Strand, Lando., W.C.2.
CINE5LATOGRAPII FILMS, Machines. Accessorie,. Lists Free.Sample Films, ls.-Filmeries, 57, Laneaster 'toad, Leytonstone.
PATENTING INVENTIONS.-Handbook tree.-king's PatentAgency, Ltd., Wardrobe Chambers, E.C.4.
FRET WOOD of all kinds. Superior to plywood. Planed both sides.Beautifully figured. Free from knots and shakes. Also cheap
parcels.-Write for list, Hobbies Ltd., Denham, Norfolk.
BUILD OWN GRAMOPHONE. Save pounds. Instructions 3d.Gramophones; Motors, Fittings, Records. lists Free. Cash
or terms.-H. Burt, 185, High St., Deptford, S.E.S.
HAVE A FACTORY at home with Hobbies fret machine. From35s. upwards-ready to use. Makes money in your spare time.
Cuts wood and metal for all kinds of jobs. Try one at anyHobbies branch.-Free illustrated list from Hobbies Ltd., Dereham,Norfolk.
GRAMOPHONE Fittings.-Wholesale prices, 61 -page catalogue,
London.
A LI, SMALL FITTINGS for the handyman. Hinges, knobs. hooks,L"1 bolts, locks, etc. Reliable and cheap, Call at Hobbies Branchesor send requirements to Hobbies Ltd., Dereham, Norfolk.
MI% /TAKE MONEY Picture Framing, Tray and Furniture Making.Fully illustrated list and Guide Post Free 6d.-Watkins Provider,
Exchange Works, Newport, Mon.
EW DESIGNS in Flash Steam Boilers.. Model catalogue now ready.N -Bolsover Brothers, 55, Castle Rd., Whitby.
STAMPS.FREE! 25 Unused Colonials to genuine applicants for approvals.
Send lid. postage. Hodder, 34. Second Avenue, London, W.10.
SUPER DOUBLE -MAGNET
The latest and most Improved type ofChassis and Cone, complete with 4 -PoleBalanced Armature Adjustable Unit,ready to t into any cabinet The dountemagnets are of specially prepared Tinwa-
res, Steel, and the richness and vol.
before been offered at such a
mile of the deep bass reproductionis comparable with the bestmOS ing coil reproduction.
awe Nothing nearly no good has ever
/4/9"14.T remarkably low price. - BENDk
ONLY 28 and get it ou approval.If satisfed, complete purchase by live monthly paymentsof a-. No extra fur packing and postage. Cash price 25;s.
GET ITON
APPROVAL
Our new -DELUXE" Speaker ei it liextra special 4 -poleUnit fitted inside eroutside chassis, on ap-proval for 2s. 6d. ifsatisfied completePurchase by 7 month-ly payments of(Cash Price 35.'-.1 anordering be sure tostate "SUPER"er" LUXE " Osrequired.
E. J. HERAUD (Dept. 11.21, NUMBER ONE, EDMONTON, LONDON, N.18Established 32 yore. Braucher 78-82, Fore St., Edmonton; 77, West Greco Rd.Tottenham; 34, Si. James's St., Walthanalow and 139, Hertford Rd., Enficht Wren
SUBSCRIPTION RATES." Hobbies " will be forwarded by post to any reader at thefollowing prepaid rates: Twelve months, 13 - ; Six months.6'6; Three months, 3 3.Registered at the G.P.O. for transmission by CanadianMagazine Post.
ata
l
October 24th, 1931 HOBBIES
This photograph shows the uncovered framework of the completed
WITH the two sides of the central cellule completethe two rails to carry the pilot's seat (Fig. 12)may be fitted, and then the control lever
shown in Figs. 15 to 17. Thisit must be remembered has twokingposts attached to it, one oneach side to carry the wires whichcontrol the movement of the tailelevator. In Fig. 1 (page 66 oflast week's issue), the position ofthe tube socket joints were marked.These tubular sockets' (illustrated inFig. 4), enable the tail and wingportions to be removed. When the
We'into the sockets, two holes are drilled Bracingtail bearers arc pressed tightly home i'le^56-a
in each socket for a bolt and wingnut ; twelve of such wing joint
LhT escotri 51
so krcketswill be required. The joint at the Fig. 5.-(Bottom) Thetail end of the fuselage is drawn in strut sockets.
Fig. 9. Assemble the cross -members of the fuselagein the manner shownin Fig. 10, fixing suit-able lugs to the bracingwires under the headsof the bolts. Two rearskids are required, onefor each of the bottommembers. Stout canewill serve for these,and they should belashed to the tailmembers as shown inFig. 22. Their mainpurpose is to preventthe tail from strikingthe ground, and toprevent damage whenlanding. The seat isprovided with the slid -able adjustment indi-cated in Fig. 12.
It can be made froma piece of three-plywith an aluminiumback. The control The Mainplanes.lover is moved bask- The planes are not represented as being of extremelywards and forwards efficient section, but they have the great advantage offor elevator control, being quickly repaired, quickly made and providing
Penned --.. linne7insenaej `dg=
C'rO SheelSmee
6.-How:tolasten the 1.1::/%1. edge tothe wings.
Wirig.:parfi Bracirg 144Fig. 7. --Lugs for bracing the mainplanes.
oection of5fatae's
Fig. 8.-The strut section.
Rear/lryneseccrie. ,sec/
Skr'ed
heel Steel
9. --Joint at the tail of the fuselage.
81
BUILDINGA
FULL SIZEGLID IF R
By F. J. CAMM
5reel Tube
__--VVingspar
)
(Concluded &cm page 67, Oct. 17thissue.)
glider.
and it is pivoted in the centre for sideways movementwhich controls the ailerons. This control is instinctive ;when the control 'lever is moved to the left the gliderwill hank to the left and so on. A backward move-ment will cause the glider to ascend and the reveres,movement will cause itto descend.
The Control Wires.Double pulleys are fixed
to the top wing, and thecontrol wire passes directfrom the lever over onepulley to the bottom ofthe aileron kingpost onthe other side. Next passone length of wire fromthe bottom of the king -post over the secondpulley on each side andso to the top of thesecond kingpost. Nextattach the wires from thecontrol lever to the twokingposts on the tailelevator. The top of eachelevator kingpost is con-nected to the bottom of the control lever kingpost.Ordinary hinges are used to fix the elevators and aileronsThe kingposts are attached to these parts as shownin Fig. 10. It is wise to make up some wire strainers asillustrated in Fig. 20 from motor -cycle spokes and sheetsteel. These will enable stretch in the wire to betaken up.
erec7;79, Lug
The Axle and Wheels.A steel tube is used for the axle and it should be
plugged solid with a round ash rod ; the axle endsare fixed into this axle by means of taper pins. Largesteel washers are also taper pinned into place to forma fixing for the rubber suspension as illustrated in Figs.18 and 19. The wheels may be 15in. motor -scooterWheels which are readily obtainable second-hand.Rubber cord is also obtainable from most garages.
l(rhypost
Fig. I0.-The a lercn kingpost.
4/urninnr..7
Threeply
Sea/ Pa,"I Bo/,
Fig. 12.-The adjustable Pilot's scat
inters/rut
.5.Cat
Fig. 13.-Flow to clip the tc;ng-tIn -skids to the wing struts.
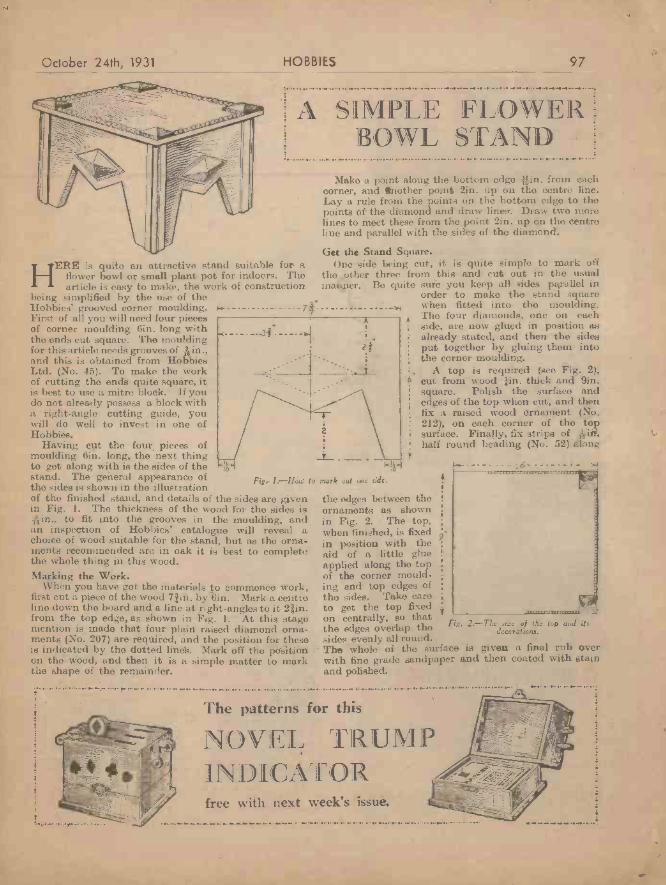
44.
80
>kiWIKE Reif30(.01.1710 ON
HOBBIES
rues )1' 01A INSIDEamm. AlleMh.
2 SlotsMI 5-:rer.
Fig. 3. -The construction of the double bobbin
centre of the bobbin, allowing about 4in. to protrude,as shown in Fig. 4, then wind on a layer of wire. Keepthe turns quite close together and fill up the spaceright up to the central cheek, the wire should be woundfairly tightly but not nearly tight enough to risk breaking,the wire.
When the first layer is completed, wrap on anotherlayer of writing paper exactly as before, then continuewith the second layer. An assistant will probably berequired when fixing the paper. Put on eight layersof wire altogether, with a paper between each layer,and be careful to see that the wire does not sink belowits proper layer, particularly at the ends of the bobbin,otherwise there might bo a short circuitand the model will not work. Carefulfitting of the paper layers together withcareful and close winding of the wirewill avoid this. At the end of the eighthlayer cut off the wire, allowing aboutGin. to spare, then thread this end to
and fro through the foursmall holes as shown inFig. 6 ; this will effectu-ally hold the end of thecoil and remove all dangerof the wiro becoming un-wound.
Tho other half of the bobbin shouldthen be wound in exactly the samemanner. The direction of winding doesnot matter, though, of course, oncewinding has commenced it must continuein the same direction until that particularbobbin is filled.
Screw the solenoids down to the baseby putting in small screws from underneath ; theposition is indicated in Figs. 1 and 2.
The Iron Plunger.Fig. 7 shows the iron plunger and the crosshead.
The plunger is just a piece of iron tube lfin. long andabout -Ain. thick. The outside diameter should befin. or rather less, so that it will slide freely inside thecentral tube of the solenoids ; if necessary, the plungershould be eased a bit with a file or emery cloth. Itshould move quite freely in the tube, a little shakewill not, matter, but it should not be smaller than
necessary to allowof free movement.Plug up the ends ofthe plunger with hardwood, and drill acentral hole for thebrass " piston rod."
1 LENGTH 4s Re:wags)1
Solder two brassFig. 5.- A piece of paper should be washers on to the fin.
wrapped round the bobbin, brass rod to prevent.
Fig. 6. --Howthe bobbin is
wound.
1111111111111 11111111.1 i
EPOS'S SNIPPEDwing SCISSORS
0/44the rod from ,pulling out of.;the plunger,(Fig. 7). Thecross head is ashort length offin. brass rod,slotted with afile as shown inFig. 7. This isdrilled with aLin. hole for thepiston rod,which should be
soldered in place. The ,16 in. hole 1s for a hinge' pin.The connecting rod is illustrated in Fig. 7. The
big -end bearing is made from fin. thick brass filed toshape"; it should be split and the small bolts fitted-before the central 5/32in. hole is drilled. The rod itselfis a separate piece of brass soldered into a slot in thebig -end bearing. The crankshaft is made from a pieceof 5/32in. steel, but the webs are of brass fin. squarein section. Both webs should he drilled together, soas to keep the holes in line. The method of assemblywill be shown next week, but it may here be statedfor those who wish to proceed in advance of those in-structions that the two webs are soldered together and
cut out in thecentre of theshaft after sol-dering is com-pleted. Thehearings a r emade of brassis in. thick, two,
Fig. 4. -Details of the winder. of course, beingrequired. These, too, will be dealt with next week. Asuitable flywheel can be bought at a model engineer'sstore for a few pence. It should he 3th. in diameter andbored to fit a 5/32in. shaft, the boss being tapped for agrub -screw. Choose a well -finished flywheel which willgreatly add to the appearance of the model. If thereader wishes to make his own flywheel he can do so with-out the use of a lathe by cutting one out of Ain. sheetbrass with a fretsaw. The boss should be made from abrass collar soldered on to the centre. These collars canbe obtained from toy shops complete with grub -screw.
Extra weight should be added to the rim by cuttingout two rings of Ain. sheet brass (3M. outside dia-meter and 2in. inside), and soldering a ring on each sideof the wheel already cut out. The flywheel shown inthe photographic illustration was made like this.
(To be concluded next week. -Ed.)
1'.
, DIA/7/7/f//
END CHEEKS2. StSQVIR SO
October 24th, 1931
I. REDVIRED
IRON
t
BRASS 1
4,/3/2
. Fig. 7. -The ironplunger andthe ClJSS.,
head.
October 24th, 1931 HOBBIES 97
A SIMPLE FLOW II -1:R
HERE is quite an attractive stand suitable for aflower bowl or small plant pot for indoors. Thearticle is easy to make, the work of construction
being simplified by the use of theHobbies' grooved corner moulding.First of all you will need four piecesof corner moulding Gin. long withthe ends cut square. The mouldingfor this article needs grooves ofand this is obtained from HobbiesLtd. (No. 45). To snake the workof cutting the ends quite square, itis best to use a mitre block. If youdo not already possess a block witha right-angle cutting guide, youwill do well to invest in one ofHobbies.
Having cut the four pieces ofmoulding 6in. long, the next thingto get along with is the sides of thestand. The general appearance ofthe sides is shown in the illustrationof the finished stand, and details of the sides are givenin Fig. 1. The thickness of the wood for the sides isAin., to fit into the grooves in the moulding, andan inspection of Hobbies' catalogue will reveal achoice of wood suitable for the stand, but as the orna-ments recommended are in oak it is best to completethe whole thing in this wood.Marking the Work.
When you have got the materials to commence work,first cut a piece of the wood 71 in. by 6in. Mark a centreline down the board and a line at right -angles to it 28in.from the top edge, as shown in Fig. 1. At this stagemention is made that four plain raised diamond orna-ments (No. 207) are required, and the position for theseis indicated by the dotted lines. Mark off the positionon the wood, and then it is a simple matter to markthe shape of the remainder.
OWL STANDMake a point along the bottom edge *yin. from each
corner, and Suother point 2in. up on the centre line.Lay a rule from the points on the bottom edge to thepoints of the diamond and draw lines. Draw two morelines to meet these from the point 2in. up on the centreline and parallel with the sides of the diamond.
Get the Stand Square.One side being cut, it is quite simple to mark off
the other three from this and cut out in the usualmanner. Be quite sure you keep all sides parallel in
order to make the stand squarewhen fitted into the moulding.
4The four diamonds, one on eachside, are now glued in position asalready stated, and then the sidesput together by gluing them intothe corner moulding.
A top is required (see Fig. 2),cut from wood fin. thick and 9in.square. Polish the surface and
' edges of the top when cut, and thenfix a raised wood ornament (No.212), on each corner of the topsurface. Finally, fix strips of -Ain.half round beading (No. 52) along
t
mark out one side.
the edges between theornaments as shownin Fig. 2. The top,when finished, is fixedin position with theaid of a little glueapplied along the topof the corner mould-ing and top edges ofthe sides. Take careto get the top fixedon centrally, so thatthe edges overlap thesides evenly all round.The whole of the surface is given a final rub overwith fine grade sandpaper and then coated with stainand polished.
- -
F!
The patterns for this
NOV 'RUMPINDICATORfree with next week's issue.
Fig. 2. -The size of the top and itsdecorations.
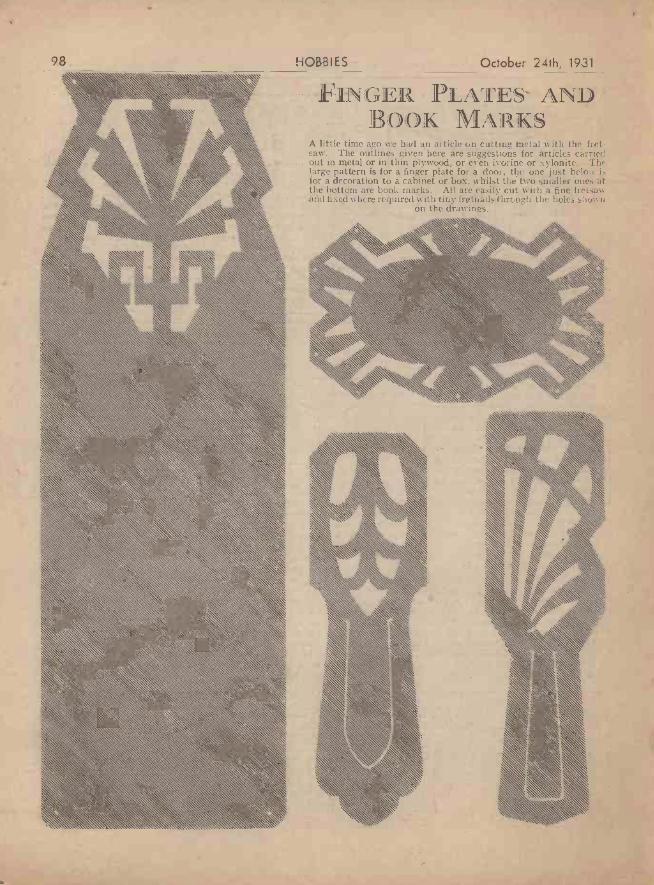
98 HOBBIES October 24th, 1931
FINGER PLATES ANDBOOK MARKS
A little time ago we had an article on cutting metal with the fret -saw. The outlines given here are suggestions for articles carriedout in metal or in thin plywood, or even ivorinc or xylonite. Thelarge pattern is for a finger plate for a door, the one just belowis-
for a decoration to a cabinet or box, whilst the two smaller ones atthe bottom are book marks. All are easily cut with a fine fret sailarid fixed where required with -tiny fretn ails through the holes shown
on the drawing,.
.*\\Ai;S
N''.\N,,,\ \\\\\\\ \ , \ \
October 24th, 1931
A photographof th.., cow -Pieta engine.
THIS engine is inreality a form ofelectric motor in
winch an iron plungertakes the place of a piston, the iron plungerbeing pulled to and from by means ofsolenoids which act like ma nets while thecurrent is " on," but cease to attract the iron whenthe current is " off." There are two solenoids placedend to end so that our engine is double acting, and theelectrical contacts are operated by means of an eccentricand sliding contact arrangement. The complete modeltherefore looks verymuch like a real steamengine, but althoughnot so powerful, it willrun at a high speedfrom a six -volt accu-mulator, and is ficefront smokeand'smell.
Figs. 1 and2 show a see-tional viewand plan ofthe completeengine ; Fig. 1,' together with !the remarks in theprevious paragraph, will snake the principle clear, sothat we may proceed to consider constructional details.
The Base.
HOBBIES 79
AN ELECTRIC SLID K VALVEENGIN E
By S. J. GarraftA simple and easily -made Engine
for driving- your Models.
dimensions given in Fig. 3. Twoof the shaped pieces are required.and one circular one ; they shouldall be a tight fit on the tube andmust, of course, all be threadedon to the tube before soldering onthe wire rings.
The winding of the solenoids maynow be tackled, and for this purposeit is well worth while making a roughwinder as shown in Fig. 4.
Winding the Bobbin.Buy a 4oz. reel of No. 24 gauge enamelled copper
wire frommipleetrical dealer's. Fix the bobbin on thewinder andwrap a pieceof writingpaper roundthe centraltube betweenthe cheeks.The- papershould b ecut aboutAin. widerthan the dis-tance be-tween the
Fig. 1.-A Sectional View, cheeks andnicked with s2issors about every lin., as shown in Fig.5. This will allow the paper to splay out slightly(see Fig. 4) at the ends of the bobbin and preventthe wire touching the brass tube. Bind the paper onwith a couple of turns of thin sewing cotton.
First make the base, which is in the form of a s The end of the wire will probably be bent or kinkedinverted wooden tray of the dimensions given in Fig. 1. for a few inches, so cut this part off and thread (from the'he top may conveniently be made from a piece of lin. inside) the new end through the small hole near thethree-ply wood and the sidesof lin. by lin. material.This may be either .tackedor screwed together.
Fig. 3 shows -the constriir-tion of the double bobbinwhich takes the place of thecylinder and cross -head guide.The central portion is a pieceof Hain brass tithe lip. inter-nal diameter and 4}in. long.The slots in the side can becut out with a file, and tworings of brass wire about-kin. diameter are solderedOn in the position indicated.These are to keep the woodenend cheeks in position. TheAoend cheeks are made to the.
J1111111111111111 11 1111111111 111
'111111 II 11 '111111111 IIIIII
Fig. 2.--A Plan View.
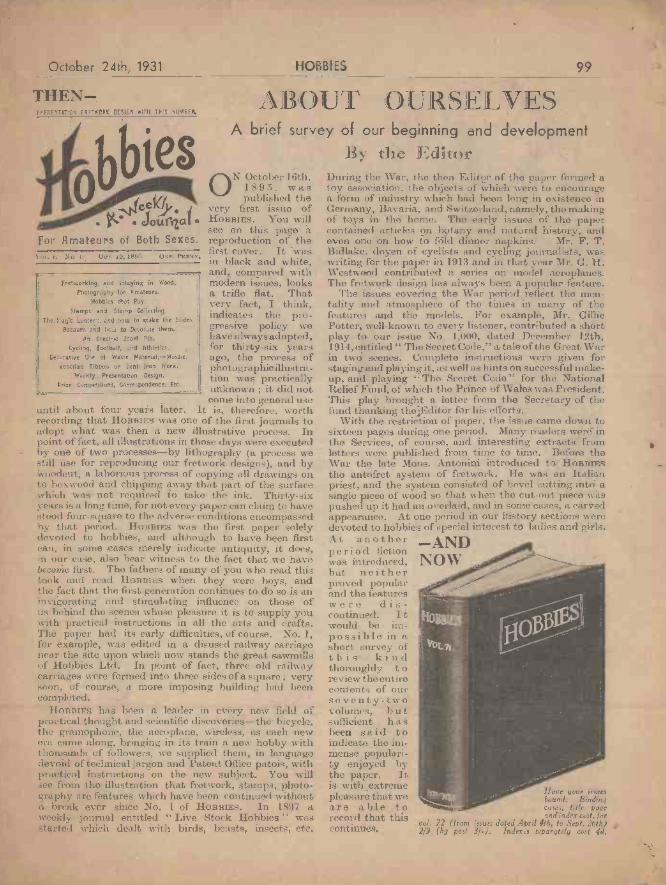
78 HOBBIES
NOTES AND NOTIONS from ourAn Easily -made Knuckle Joint.MOTOR launch enthusiasts who
require a flexible coupling forconnecting the engine to the pro-peller can make one in the followingmanner. Obtain is " primus " stovenipple key and two hushes, as shownin the sketch. Cut the hand asis!town and solder on the busheswhere indicated by X and Y. Youwill then have a serviceablecoupler ready for use.-A. M.(Aberdeen).
Cur HERE.
An easily -made knuckle joist.
A Novel Lock -Switch.OBTAIN a round block, such as is
used for mounting switches, etc.,and a small brass lock. Cut a key.hole in the block and screw the lock'inside the recess.
Take a piece of brass about 1,in.by lin. and bend it to the shapeof a right-angle.
Screw this into the recess so thatthe bolt of the lock touches it whenopen, and breaks contact with itwhen closed.
Connect up, as shown in thesketch, and glue a circular piece ofcardboard over the recess. A pushcaps be included in the circuit.-A. D. (Neath).A Use for Insulating Tape.IN addition to the strictly legitimate
use of this material, viz., tobind electric wires which have beenspliced together, you will find it quite
BATTERYA novel lock -switch
THAT DODGE OF YOURS?Why not pass it on to us? We pay Five
4 Shillings for every item published on thispage. Mark your envelope Notes andNotions." Every notion sent in MUST
I be original. E -.-
handy for mending splithandles of garden tools. Thetape should ho bound roundthe damaged part as tightly
as possible and left a fewdays to set. To removestickiness, rub the outsideof the tape with frenchchalk.
October 24th, 1931
I 11)
I \ EADE SA Home-made Inspection Lamp.ALTHOUGH " clip on " fittings
can be bought for flashlampbulbs and batteries, it is muchcheaper to snake these at home. Theonly materials required are a large -
sized paper clipand a 2c1. bulb andbulb -holder. Thebrass holder issoldered to the footof the paper clip
ButeAND HOLDER
A Serviceable Cramp.WOODWORKERS can make a
simple and serviceable crampin the following manner. Obtain twowood blocks, about 4in. long andlain. square. These are placed at thesides of the hoard to be cramped as
A serviceable cramp.
shown. A rope is then passed roundthe blocks twick and knotted. Placea small piece of wood between thetwo strands of rope and twist round.-W. M. (Ireland).
THIS WEEK'S MENTAL NUT.IP a man buys 1 goose, 2 ducks.
and 3 chickens for 4 dollars,and 2 ducks and 3 chickens aretogether worth 3 geese, and 3chickens are worth 2 ducks, what isthe price of each
Answer to Last Week's Problem.IF you place your sheet of paper
round the surface of a cylin-drical bottle or canister, an oval canbe drawn with one sweep of thecompasses.
PAPERCLIP
PEAR SWITCH
ToBATTERY
,4 home-made inspection lamp.
and the connections from the battery(usually an accumulator) taken to itvia a switch, which can be of thepear-shaped type which hang fromthe flex, or a miniature tumblerswitch, which can also be solderedto the clip. The clip can be used tofasten the arrangement on to anydesired projection.-E. B. (Norfolk).Repairing a Saucepan Lid.ASIMPLE and easy method of
replacing a saucepan lid handlecan be accomplished by means oftwo wireless terminals and a pieceof wire. Bore two holes in the lidand solder in the two terminals, as
- shown in the sketch. A piece ofwire can then be bent to shape
and inserted .in the terminals, thusproducing a serviceable handle.-H.T. (Ireland.)Writing During a Train journey.PEOPLE often want to write in the
train, and do not find it at alleasy to read what they have written.The only way to keep the handsteady is to support the forearm andwrist by pressing the elbow well intothe body just above the hip. Inreading, too, eye strain is reduced ifyou adopt the same plan to keepyour book steady.
Repairing a saucepan lid.
October 24th, 1931
THEN-PRESENTATION FRETWORK OESICU WITH THIS NUMBER,
tes jr: elourrial
ON October 16th,1895, waspublished the
very first issue ofHOBBIES. You willseo on this page a
For Amateurs of Both Sexes. reproduction of thefirst cover. It wasin black and white,and, compared withmodern issues, looksa trifle flat. Thatvery fact, I think,indicates the pro-gressive policy wehave always adopted,for thirty-six yearsago, the process ofphotographic illustra-tion was practicallyunknown ; it did notcome into general use
mtil about four years later. It is, therefore, worthrecording that HOBBIES was one of the first journals toadopt what was then a new illustrative process. Inpoint of fact, all illustrations in those days were executedby one of two processes-by lithography (a process westill use for reproducing our fretwork designs), and bywoodcut, a laborious process of copying all drawings onto boxwood and chipping away that part of the surfacewhich was not required to take the ink. Thirty-sixyears is a long time, for not every paper can claim to havestood four-square to the adverse conditions encompassedby that period. HOBBIES was the first paper solelydevoted to hobbies, and although to have been firstcan, in some cases merely indicate antiquity, it does,in our case, also bear witness to the fact that we havebecome first. The fathers of many of you who read thistook and read HOBBIES when they were boys, andthe fact that the first generation continues to do so is aninvigorating and stimulating influence on those ofus behind the scenes whose pleasure it is to supply youwith practical instructions in all the arts and crafts.The paper had its early difficulties, of course. No. 1,for example, was edited in a disused railway carriagenear the site upon which now stands the great sawmillsof Hobbies Ltd. In point of fact., three old railwaycarriages were formed into three sides of a square ; verysoon, of course, a more imposing building had beencompleted.
HOBBIES has been a leader in every new field ofpractical thought and scientific discoveries-the bicycle,the gramophone, the aeroplane, wireless, as each newera came along, bringing in its train a new hobby withthousands of followers, we supplied them, in languagedevoid of technical jargon and Patent Office patois, withpractical instructions on the new subject. You willsee from the illustration that fretwork, stamps, photo-graphy are features which have been continued withouta break ever since No. I of HOBBIES. In 1897 aweekly journal entitled " Live Stock Hobbies " wasstarted which dealt with birds, beasts, insects, etc.
or - No. I. (Act. 111,1893% ONE PENNY.
fretworking and Inlaying in Wood.Photography for Amateurs.
Hobbies that Pay.Stamps and Stamp Collecting.
The Magic Lantern, and how to make the SlidesBazaars and how to Decorate them,
An Electric Scarf Pin.
Cycling, Football, and Athletics.Decorative Use of Waste Material, --Mosaic.
Venetian Ribbon or Bent Iron Work.Weekly Presentation Design.
Prize Competitions, Correspondence, Etc,
HOBBIES
A 0 t:T OL-1' SELVESIi
99
A brief survey of our beginning and developmentBy the Editor
During the War, the then Editor of the paper formed atoy association, the objects of which were to encouragea form of industry which had been long in existence inGermany, Bavaria, and Switzerland, namely, the snakingof toys in the home. The early issues of the papercontained articles on botany and natural history, andeven one on how to fbld dinner napkins. Mr. F. T.Bidlake, doyen of cyclists and cycling journalists, waswriting for the paper in 1913 and in that year Mr. G. H.Westwood contributed a series on model aeroplanes.The fretwork design has always been a popular feature.
The issues covering the War period reflect the men-tality and atmosphere of the times in many of thefeatures and the models. For example, Mr. GilliePotter, well-known to every listener, contributed a shortplay to our issue No. 1,000, dated December 12th,1914, entitled " The Secret Code," a tale of the Great Warin two scenes. Complete instructions were given forstaging and playing it, as well as hints on successful make-up, and playing " The Secret Code " for the NationalRelief Fund, of which the Prince of Wales was President.This play brought a letter from the Secretary of thefund thanking the.;Editor for his efforts.
With the restriction of paper, the issue came down tosixteen pages during one period. Many readers were inthe Services, of course, and interesting extracts fromletters were published from time to time. Before theWar the late Mons. Antonini introduced to HOBBIESthe antofret system of fretwork. He was an Italianpriest, and the system consisted of bevel cutting into asingle piece of wood so that when the cut-out piece waspushed up it had an overlaid, and in some cases, a carvedappearance. At one period in our history sections weredevoted to hobbies of special interest to ladies and girls.At anotherperiod fictionwas introduced,but neitherproved popularand tho featureswere dis-continued. I twould be im-possible in ashort survey ofthis kindthoroughly t oreview the entirecontents of ourseventy-twovolumes, b u tsufficient h a sbeen said toindicate the im-mense populari-ty enjoyed bythe paper. Itis with extremepleasure that weare able torecord that thiscontinues.
Have your issuesbound. Bindingeases, title pageand index cost, for
vol. 72 (from issues dated April 4th, to Sept. 26th)2/9 (by post 31-). Indexes separately cost 4d.
7.7100 HOBBIES October 24th, 1931
6N&,.4
QUERIES AND REPLIES
Let Your Editor Help You. Address your letters and queries to The Editor,Hobbies," Geo. Newnes. Ltd.. 841, Southampton Street, Strand, London, W.C.2.,
enclosing a stamped, addressed envelope. All letters and queries must bear thefull name and address of the sender.
" Austin " and " Vauxhall " Com-petitions. -
HERE is still tune to enter forT our Austin and Vauxhall model -making competitions, the rulesgoverning which were set forthin our issues dated October 3rdand 10th respectively. The formercontains our free gift set of parts formaking a splendid model of theAustin Seven, and the latter adesign sheet for the Vauxhall car.These issues are obtainable from theBack Number Department, ExeterStreet, Strand, W.C.2.
Title -Page and Index to Vol. 72.pOW quickly time flies ! It seemed
but yesterday that I wrote aparagraph concerning the index andtitle -page to Vol. 71. I am remindedof this by the fact that we have nowpublished an eight -page title -pageand index for Vol. 72 ; copies of thisindex are obtainable for 4d. separ-ately, or complete with binding casefor 2s. 9d., from newsagents, orfor 3s. by post from us. A boundvolume of HOBBIES constitutes auencyclopaedia of practical arts anderafts, and the very full indexenables you rapidly to locate thepiece of infomation you want.
The " Hobbies Telescope."TT is with great pleasure that I inform
readers that Mr. E. W. Twining,a model -maker and art craftsman ofconsiderable experience and versa-tility, has joined our staff of con-tributors. Mr. Twining will makehis debut in these pages next weekwith the first of a series of articlesexplaining how to make the HobbiesAstronomical Telescope. I have thedrawings of this telescope before menow, and I can assure my readersthat it is a really clever and at thesame time easily -constructed pieceof work. It is not a toy, for it hasa barrel 33ins. long and 3?.,ins. bore.
Mr. Twining has had long experi-ence in every branch of model -making,including model aeroplanes (he wonseveral important competitions in
the early days of model aeroplanes),model locomotives, telescopes, archi-tectural models, etc. If you addto this wealth of experience hisaccomplished style of writing andhis skill as a draughtsman, youwill appreciate that his contributionsare something worth looking forwardto. By means of his telescope youwill be able to observe the heavenlybodies with the same degree ofaccuracy as the skilled astronomer.
NEXT WEEK.
DESIGNSFOR ATTRACTIVE
TRUMP INDICATORFUN WITH
FIREWORKSMAKING
WIRELESS COILSHOW TO BECOMEA VENTRILOQUISTMAKING A
TABLE POND
Stamps, Electrics, Model AeroplaneTopics, Model Railways, Coins,
Etc., Etc.
These articles Mr. Twining willfollow up with articles on othersubjects.
Our Christmas Number.WITHIN a few weeks my Christ-
mas Number will be in yourhands. It has been the subject ofcareful consideration for many weekspast, and I think I have now arrivedat the correct proportions of its in-gredients. It will be an enlargedChristmas Number, and its contentswill be directed towards entertain-ment as well as practical things.
Aqua Regia Correction.In our issue dated Oct. 3rd. page 2,4,tie
wrongly stated that Chlorine is called AquaRegia. This latter substance is really amixture of hydrochloric acid and nitric acid.
A Request for Tram Tickets.Ralph Kendrick. Junior, 28, .Nelson Street.
Rochdale Road, Manchester, would like to hearfrom other readers who have for disposalunused or used train and 'bus tickets, andpictures and photographs of trains and 'Lases.as his hobby is making as complete a collectionas possible.
Making Firework Fuses.Make a saturated solution of saltpct
water, C. I,. C. (Westminster); then dip fideblue tissue paper in Caine, roll it up into thefuse shape and allots to dry thoroughly.
Colouring Electric Light Bulbs.Electric light -bulbs are frequently colml, . I
by the application of a coloured spirit varnishobtainable from the larger oil and colourstores, L. W. H. (West Kilburn). It shouldbe applied quickly with a soft brush, and itdries in about half au hour,
Mountant for Photographs.Add a little water for one ounce of dextrine.
break it up With a teaspoon. then ,Md a wine -glassful of water, W. H. (Sheffield) : stir overthe fire until it boils and when cold it is readyfor use.
Black Liquid Polish for Leather.Take ioz. of isinglass or gelatine,
powdered indigo, 4oz. of soft sap, 4oz,logwood, and 5oz. of glue. L. N. (Llandudno,.Boil in 2pt, of vinegar until the glue is dissolved,then strain through a cloth and bottle for use.
The First Bible.The first Bible was printed by Cuter,l,rg
between 1450 and 1455. - Gutenberg was; ofcourse, the first printer.
Wax for Artificial Flowers.Heat together equal quantities of wax (as
used for best white wax candles) and whitelead in a vessel in an oven ; regulate the stiff-ness by using more or less wax, M. -1).
(Halifax),
Frame Aerial Data.The following information regarding frame
aerials is given in reply to L, U. (Bridport) :
4'`xie"
t ''''
c, ,,,,
4VI-
8ft.6 ,,4 -3 ,,
3- 4
68
pin.1 .
96121154193
-75665549
169170175155
Varnish Hint.Streakiness in. the varnish, L. J. (Leicester),
may be caused by the imperfect mixing ofdriers, oil, or turpentine with the varnish.When it appears on unpainted wood, it maybe due to uneven planing or filling -up. 'Veryoften an Etta coat of varnish will put thething right.
printed by NEWNES & PEARSON PRINTING CO., LTD., Exmoor Street, Ladbroke Grove, W.10, and published by. C. EOPGE N Rae LTG., 8-11., soutb-atepton Street, Strand, W.C.2. Sole Agents for Australia and New Zealand: 00x005 & Goren, LTD, - S..011t 11 Africa ceneui New A.seney,
ANOTHER FREE GIFT MODEL COMING SHORTLY !
Vol. 73. No. 1,879 Published Every Wednesday OCTOBER 24th, 1931
THIS WEEK'S CLEVER IDEASAn Electric Attachment for Lanterns and Cinemato-
graphs.HERE is a lilt -le , s,d Leen:aim:, electric, attachment
for the magic lantern or home cinematograph,which you will find of great use if such happen to
be at- present illuminated by means ofcm oil lamp. It consists of a battery
holder, a switch, flash -lamp bulb and reflectormounted on a base andsuitable for use withmagic lantern or cinema-tograph. It is supplied intwo sizes at is. 3d. and 2s.We all know the disad-vantages of oil lamps inconnection with magic
A self-contained der/ de attach- lanterns. These devicesmen! for magic lanterns and home cannot be well ventilated
cinematoiraphs. without loss of light, andit is important that all of the light should be directedmu to the screen through- the lens. This usually resultsin a smoky instrument which soon is coated on theinside with a layer of soot. This device enables you toget over that difficulty in a simple and convenient way.
A Table Fountain.AT the foot of this page is a small working
model table fountain-a novelty ofa somewhat unusual type. Although_'measuring only .6iin. by 61in, it may bedriven by a model stationary steam- engine,and the pump attached will yield a minia-ture cascade of water from the fountain.Its action is continuous.That is to say, once thetrough is filled with waterthe pump draws it up,delivers it through the jetof the fountain and returnsit to the trough again, thisaction continuing as longas the driving wheel isrevolved. It costs 3s.The- novelty may be usedquite well as a tabledecora lion.
A Practical Toy Cinematograph.THE paragraph in the first column, dealing with Its
electric attachment for magic lanterns, etc., re-minds us that there is now on the market, at the verylow price of3s. 6d.,the toy cinematograph illustrated here.It is supplied in three sizes, two of them having one filmand three slides, and the largestsize two 18ft. films and three slides.They can thus be used either as acinematograph or as a magiclantern. Illumination is by a 31 -volt battery and bulb.
A Neat and Cheap Model Aero-plane.
IN the paragraph onL page 3 of our issuedated October 3rd, theprice of the " Gnat "flier should be ls. 3d.,or by post Is. 6d., andnot Is. 6d., or by postIs. 9d. as stated.
A Model Catalogue.WE have received
from Messrs. A oraclical tog cinematograph which costsStuart Turner, Ltd., ally three shillings and sixpence.
Henley-on-Thames, copies of their catalogue de-scribing and illustrating the full range of their well-known working models. These lists deal withsteam engines, gas and oil engines, petrol engines,boilers, boats, electric motors, lighting plants,dynamos, etc. Copies of these lists are avail-
able for a Id. each from the above -men-tioned firm.
Experimental Electrical Sets.THERE has just been mar-
keted a very completecabinet of electrical appara-tus for experimental pur-poses at the reasonable costof 7s. 6d. By means of theequipment provided you willbe able to learn and demon-strate for yourself how elec.ticity is generated.
A working model tablefountain.

,er 24th, 1931 HOBBIES iii
doss",EsLTD.
BRANCHES AND AGENCIES.Below are the addresses where Hobbies goods can bepurchased. In addition all leading stores and iron-mongers stock or can obtain your requirements infretwork and woodwork, designs, wood, turned legs,
moulding, polish, wireless accessories, etc., etc.HOBBIES OWN BRANCHES-
LONDON - 65 NEW OXFORD STREET, W.C.LONDON - . 147 BISHOPSGATE, E.C.LONDON 83 NEWINGTON BUTTS, S.E.11.GLASGOW - - - - 326 ARGYLE STREET.MANCHESTER. - - 10a PICCADILLY.BIRMINGHAM - - 9a HIGH STREET.SHEFFIELD - - - - 214 WEST STREET.LEEDS - - 10 QUEEN VICTORIA STREET.SOUTHAMPTON . 25 BERNARD STREET.BRIGHTON - 68 LONDON ROAD.CANADA 844 YONGE STREET, TORONTO.
HOBBIES AGENCIES-Aberdeen.-Jae. Match, Ltd.,47 Broad Street; Bedford.-Messrs.T. S. Carpenter & Co., 105 Midland Road; Blackburn.-Mr. H.Melecr, 65 Damen Street; Bradford.-Messrs. T. Underwood 8eCo., 13 and 15 Manchester Road; Cambridge.-Mr. H. S. Driver,28, Hills Road; Canterbury.-Mr. T. D. Goodman, 33 BurgateStreet and 16 St. George's Street; Cardiff.-J. Halls (Tools), Ltd.,31 Morgan Arcade; Croydon.-L. H. Turtle, Ltd., 6 Crown Hill;Dover.-Mr. E. F. Bockhain, Queen's Gardens; Dublin. -31r.J. J. McQuillan, 36 Carel Street; Dundee.-Mr, J. Plan, 45Murray Gate; Folkestone.-Mr. W. Allsworth, 16 & 18, GuildhallStreet; Hastings.-Mr. W. H. Mosley, 4 York Buildings; Hull.-Mr. 0. F. Walker, 17 & 18 George Street; Leicester.-Mr. FrankBerry, 3 Loseby Lane; Liverpool.-Mr. C. Lucas, 35 ManchesterStreet; London.-Messrs. H. Osman, 166 Aldersgate Street, E.C.;Newport, 1iIon.--j. Halls (Tools), Ltd., 81, High Street;Reading.-Mr. NV. J. Sarjent, 44 West Street; Swansea.-J. Halls (Tools), Ltd., 8 (lower Street; Wigan.-Mr. Thos. J. S.Cleplian, 22 Standishgate; York-Messrs. J. H. shouksmith &
Sons, 132 Micklegate.
HEAD OFFICE AND WORKS:
DEREHAM, NORFOLK
HOBBIES BRITISH MADE
CARPENTRYTOOL SETS
Chisels that cut-Saws that saw-Hanuners that don't flatten out-They are the tools an amateurwants but doesn't get in a cheapforeign set. Hobbies CarpentrySets can be relied upon to giveservice and contain only prac-tical tools fit for any workman.
No. I Outfit.Islet the thing fort it s: handyman.Contains a 10in.Handsaw, W a r -rington PatternHammer,Chisel, S c r w -driver, 2ft. Fold-ing Role, Bradawl,Gimlet. and Car-penter's Pencil.
Price 7/6Postage 9d.
EVERY aepc-.2716,TOOL 2616, andOther Outfits., 116,
BRITISH 45/ -Ask for Bobbies Sets at the leading ironmongers, stores or any
(lobbies Branch. By post direct from
HOBBIES LTD., DEREHAM, NORFOLK
HOME MADEMUSICAL DESIGNSA particularly interesting set of designs which can be madeup by any fretworker. Every one has sold in thousandsalready and costs about half the emu price, although
equal to it in other ways.
GRAMOPHONEA full-size playing instrument, built inlIahog-any with the fretsaw. Can be made in veryshort time from the wood and fittings sup-plied. Design No. 1690, Price 4d., or Lid.,post free, A parcel of planed mahogany,with Moulding, the motor andaccessories as illustrated. 27/6Carriage 1/6
UKULELE BANJO PowDESIGN No. 1825. Price 4d. Postage Id.A full-sized Ukulele made in mahogany with
pine for the sound box.Wood, strings, and l egs.A special cheap A 13parcel.
l'ost **
A UKULELEDesign No. 156 SpeciaLPrice 6d. Post Free 7d.Designs for making a fullsize instrument. Aparcel of selected ma-
hogany, padouk andInstrument pine, set ofstrings and pegs and a 20 -page handbook Ahow to play.
Post 6d, 'tBUYNOW
UKULELENECKS
A specially shaped'trek suitable forsillier of the abovedesigns, cut andfinished ready to fitsupplied ,for 119 or
21- post
A ONESTRING
JAPANESEFIDDLE
This parcel includes specialparts of beech (for the neck),pine, and selected wood forall parts required. The neces-
sary key and "E" string, a bow,and an instruction manual how toplay the instrument.
Design No. 768. 7/9 Post 6d.Price 4d.
Obtainable from Hobbies Ltd.,Dereham. Norfolk, or from any oftheir branches in London, Glasgow,Manchester, Birmingham, Shef.field, Leeds, Southampton,Brighton.
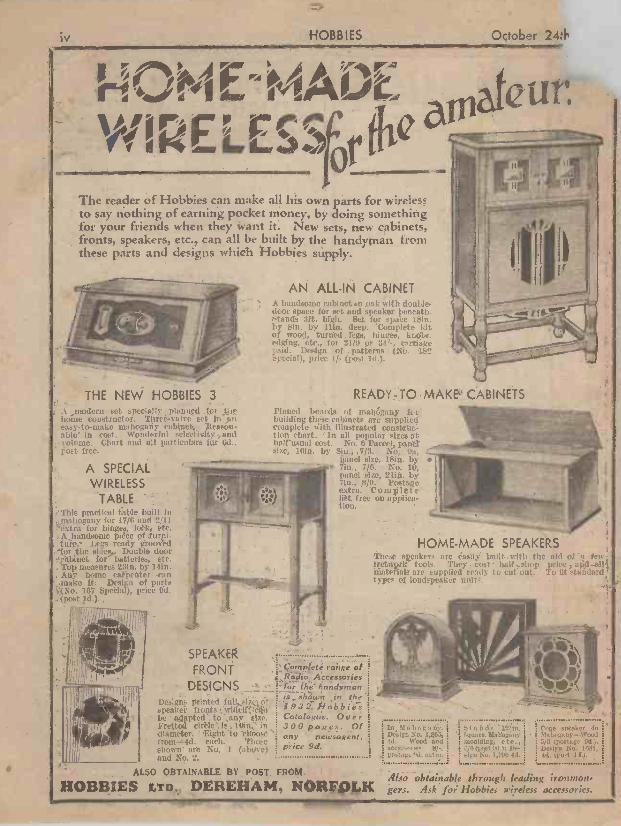
n.
iv HOBBIES October 24+
140"4.4-1E:4'tvgifrik'' DE
WIRF" rccit thelor 0../ r0
utaro
The reader of Hobbies can make all his own parts for wirelessto say nothing of earning pocket money, by doing somethingfor your friends when they want it. New sets, new cabinets,fronts, speakers, etc., can all be built by the handyman fromthese parts and designs which Hobbies supply.
THE NEW HOBBIES 3A modern set specially planned for thehoine constructor. Three -Mahe ;et in aneasy -to -make mahogafiy cabinet. Iteasomable in cost. NVorghrftil selectivity andvolume. Chart and all par! ',Ma for
ost tree.
A SPECIALWIRELESS
TABLE,'This practical table built in:mahogany for 17/6 and 2 I 1
."extra for hinges, lock, etc.,A handsome piece of 'furni-ture.' Leers ready grooved
'for the sides. Double door,cabinet for' batteries, etc.-Top measures 231n. by 14in.Auy home carpenter canmake it. Design of part-
`:.(No. 167 Special), price Pd.
l!111/1
SPEAKER
FRONTDESIGNS
.11/1'
t It q11- hit it.t ti WO
I muted cir. le b. loindiane ter. Light to ell1:01ii -4,1 (,1:1,, T,slio)% it a!, NA,: I (,1 ,,and No. 2.
AN ALL -IN CABINEThand -C1111. cal.hu Min oak with ri I,.,
6001' tItaec fur out and si.eak(r)..).)0,1- eft. Mgt. 84 fur ),1,..0-5I I,y Iiin. deep.
wood, I lit fled lev.s, 11115Q-
for !if ur it -. .
:61). I), r,, -pie, Ill
READY -TO -MAKE CABINETSManed boards. of mahogany forbuilding these cabinets are suppli.dicomplete with illustrated custrmtion chart. In all popular siz,:s
usual cost. No. 6 Parcel. ',midsize, 16in. by Sin., 7/3. No. 9:1.
pastel size, 18in. byA 7i0.. 7/0. No. 10,
pallet size, 21in. by7ist., 8/8. h mtcxf Cone f, .t .list free 011 jt.itlit,-
Corrtniete range ofRadio Accessoriesfor the handymanIS- shown in the.1932 flobbiesCatalogue. Over300 pages. Ofany newsagent,Price 9d.
ALSO OBTAINABLE BY POST FROM
HOBBIES LTD., DEREHAM, NORFOIK
HOME-MADE SPEAKERS1.111 will the aid of a foe
P. :.10/, price and :lit Stilt . TO tit .1)001ard
Sr, m )..11,4tt. 1` t :tea
it it if,11,1Jlnl
1.7od 4d.
11.do am-Wood(tdo,tat, I'd:.
Ido,NR No. 1.1161,
4.1. 1101 51.1.
Also obtainable through leading irontnon,gers. Ask for Hobbies wireless accessories.