Embed Size (px)
Citation preview

E L I T E®
Gas Double Oven Range
Estufa a gas de deble homoc!e o y otx_o_o
!:_F_:i_i
_ii@,
W10206015A Sears Roebuck and Co., Hoffman Estates, tL 60179 U.S.A. www.sears.com

TABLE OF CONTENTSKENMORE ELITE_ APPLIANCE WARRANTY ............................... 2
RANGE SAFETY ..............................................................................................3
The Anti-Tip Bracket ...............................................................................................................................4
COOKTOP USE ...................................................................................... 5
Cooktop Controls ..........................................................................................................................................5Power Failure .......................................................................................................................................................5
Sealed Surface Burners .........................................................................................................................6
Home Canning .............................................................................................................................................6Cookware .................................................................................................................................................................6
ELECTRONIC OVEN CONTROLS ..........................................................7
Display ..................................................................................................................................................................7Cancel ..............................................................................................................................................................................7Clock ..............................................................................................................................................................................7
Range Lights ..........................................................................................................................................................8Tones ...........................................................................................................................................................................8Fahrenheit and Celsius .........................................................................................................................8Timer ..................................................................................................................................................................................8
Control Panel and Oven Door Lock ...................................................................................812-Hour Shut-Off .............................................................................................................................................8
Oven Temperature Control ..............................................................................................................g
OVEN USE .................................................................................................... 9
Power Failure ...............................................................................................................................................9Aluminum Foil .............................................................................................................................................g
Positioning Racks and Bakeware ......................................................................................9RollerGlide _MRack ........................................................................................................................10
Bakeware .............................................................................................................................................................11Meat Thermometer ................................................................................................................................11
Oven Vent .............................................................................................................................................................12
Baking ..........................................................................................................................................................................12Broiling (Upper Oven Only) ......................................................................................................12Convection Cooking (on some models) .....................................................................13
Keep Warm TMFeature .......................................................................................................................14Cook & Hold ........................................................................................................................................................14
Automatic Shut-Off/Sabbath Mode ..................................................................................15Favorite ...............................................................................................................................................................15
RANGE CARE ................................................................................... 16
Seff-Cleaning Cycle (on some models) ......................................................................16
General Cleaning ..............................................................................................................................................17
Oven Ughts .......................................................................................................................................................18Oven Door ...................................................................................................................................................18
TROUBLESHOOTING ........................................................................ 19
PROTECTION AGREEMENTS ...................................................... 20
KENMORE ELITEAPPL ,,NCE WARRANTY
ONE YEAR LIMITED WARRANT't"
When installed, operated and maintained according to allinstructions supplied with this product, if this appliance fails dueto a defect in material or workmanship within one year from thedate of purchase, call 1-B00-4-MY-HOME* to arrange for freerepair.
If this appliance is used for other than private family purposes,this warranty applies for only £0 days from the date of purchase..
FIVE-YEAR LIMITED WARRANTY ON COOKTOP PARTS
For five years from the date of purchase, if the cooktop glass failsdue to thermal shock or the eooktop elements are defective, call1-800-4-MY-HOME* to arrange for free part rep[acement Afterthe first year from the purchase date, you must pay the labor costof part installation..
If this appliance is used for other than private family purposes,this warranty applies for only 90 days from the date of purchase..
THIS WARRANTY COVERS ONLY DEFECTS IN MATERIALAND WORKMANSHIP. SEARS WiLL NOT PAY FOR:
1o Cracks in a ceramic glass cooktop that are not a result ofthermal shock..
2. Stains and scratches on a ceramic glass cooktop resultingfrom accident or improper operation or maintenance..
3. Expendable items that can wear out from normal use,including but not limited to filters, belts, light bulbs, and bags..
4. A service technician to instruct the user in correct productinstallation, operation or maintenance.
5o A service technician to clean or maintain this product..
6. Damage to or failure of this product if it is not installed,operated or maintained according to the all instructionssupplied with the product..
7. Damage to or failure of this product resuiting from accident,abuse, misuse or use for other than its intended purpose
Bo Damage to or failure of this product caused by the use ofdetergents, cleaners, chemicals or utensils other than thoserecommended in all instructions supplied with the product.
9. Damage to or failure of parts or systems resulting fromunauthorized modifications made to this product..
DISCLAIMER OF IMPLIED WARRANTIES; LIMITATION OFREMEDIES
Customer's sole and exclusive remedy under this limitedwarranty shall be product repair as provided herein.. Impliedwarranties, including warranties of merchantability or fitness for aparticular purpose, are timited to one year or the shortest penodallowed by law_ Sears shall not be liable for incidental orconsequential damages Some states and provinces do not allowthe exclusion or limitation of incidental or consequentialdamages, or limitation on the duration of implied warranties ofmerchantability or fitness, so these exclusions or limitations maynot apply to you..
This warranty applies only while this appliance is used in theUnited States or Canada..
This warranty gives you specific legal rights, and you may alsohave other rights which vary from state to state,.
Sears, Roebuck and Co,.Dept. 817WA, Hoffman Estates, IL 60179
Sears Canada Inc,Toronto, Ontario, Canada M5B 2B8
PRODUCT RECORD
In the space below, record your complete model number, serialnumber, and purchase date.. You can find this information on themodel and serial number label located on the product.
Have this information available to help you obtain assistance orservice more quickly whenever you contact Sears concerningyour appliance.
Modes number _ __
Serial number
Purchase date
Save these instructions and your sales receipt for futurereference°
2

Your safety and the safety of others are very important.We have provided many important safety messages in this manual and on your appliance Always read and obey at! safety
messages.
This is the safety alert symbol
This symbol alerts you to potential hazards that can kill or hurt you and others..
All safety messages will follow the safety alert symbol and either the word "DANGER" or "WARNING/'These words mean:
You can be killed or seriously injured if you don't immediatelyfollow instructions.
You can be killed or seriously injured if you don't followinstructions°
All safety messages will tell you what the potential hazard is, tell you how to reduce the chance of injury, and tell you what can
happen if the instructions are not followed.
WARNING: If the information in this manual is not followed exactly, a fire or explosionmay result causing property damage, personal injury or death.
- Do not store or use gasoline or other flammable vapors and liquids in the vicinity of thisor any other appliance.
- WHAT TO DO IF YOU SMELL GAS:
e Do not try to light any appliance.
e Do not touch any electrical switch.
= Do not use any phone in your building.
e Immediately call your gas supplier from a neighbor's phone. Follow the gas supplier'sinstructions.
e If you cannot reach your gas supplier, call the fire department.
- Installation and service must be performed by a qualified installer, service agency orthe gas supplier.
WARNING: Gas leaks cannot always be detected by smell..
Gas suppliers recommend that you use a gas detector approved by UL or CSA,
For more information, contact your gas supplier.
If a gas leak is detected, follow the "What to do if you smell gas" instructions.,
The California Safe Drinking Water and Toxic Enforcement Act requires the Governor of California to publish a list of substancesknown to the State of California to cause cancer, birth defects, or other reproductive harm, and requires businesses to warn ofpotential exposure to such substances
WARNING: This product contains a chemical known to the State of California to cause cancer, birth defects, or otherreproductive harm
This appliance can cause towqevel exposure to some of the substances listed, including benzene, formaldehyde, carbonmonoxide, toluene, and soot

TherangewillnottipduringnormaluseHowever,therangecantipifyouapplytoomuchforceorweighttotheopendoorwithouttheanti-tipbracketfasteneddownproperly
_ Anti-Tip
Ra_ Bracket
Tip Over Hazard
A child or adult can tip the range and be killed..
Connect anti-tip bracket to rear range foot.
Reconnect the anti-tip bracket, if the range is moved.
See the installation instructions for details°
Failure to follow these instructions can result in death or serious burns to children and adults.i i i ul ill i
Making sure the anti-tip bracket is installed:
- Slide range forward.
- Look for the anti-tip bracket securely attached to floor or wall.
- Slide range back so rear range foot is under anti-tip bracket.
IMPORTANT SAFETY INSTRUCTIONSWARNING: To reduce the risk of fire, electrical shock, injury topersons, or damage when using the range, follow basicprecautions, including the following:m WARNING: TO REDUCE THE RISK OF TIPPING OF THE
RANGE, THE RANGE MUST BE SECURED BY PROPERLYINSTALLED ANTI-TIP DEVICES. TO CHECK IFTHE DEVICESARE INSTALLED PROPERLY, SLIDE RANGE FORWARD, LOOKFOR ANTI-TIP BRACKET SECURELY ATTACHED TO FLOOR,AND SLIDE RANGE BACK SO REAR RANGE FOOT IS UNDERANTI-TIP BRACKET_
[] WARNING: NEVER use this appliance as a space heater toheat or warm the room. Doing so may result in carbon monoxidepoisoning and overheating of the oven,
[] WARNING: NEVER cover any stots, holes or passages in theoven bottom or cover an entire rack with materials such as
aluminum foil, Doing so blocks air flow through the oven and maycause carbon monoxide poisoning.. Aluminum foil linings may alsotrap heat, causing a fire hazard..
[] CAUTION: Do not store items of interest to children in cabinets
above a range or on the backguard of a range - children climbingon the range to reach items could be seriously injured..
u Proper Installation -The range, when instaUed, must be electricallygrounded in accordance with local codes or, in the absence oflocal codes, with the National Efectdcal Code, ANSI/NFPA 70..inCanada, the range must be electrically grounded in accordancewith Canadian Electrical Code. Be sure the range is properlyinstalled and grounded by a qualified technician.
SAVE
= This range is equipped with a three-prong groundingplug for your protection against shock hazard andshould be plugged directly into a properly groundedreceptacle,. Do not cut or remove the groundingprong from this plug.
a Disconnect power before servicing.
a Injuries may result from the misuse of appliancedoors or drawers such as stepping, leaning, orsitting on the doors or drawer&.
[] Maintenance - Keep range area clear and free fromcombustible materials, gasoline, and otherflammable vapors and liquids_
m Storage in or on the Range - Flammable materialsshould not be stored in an oven or near surfaceunits.
[] Top bumer flame size should be adjusted so it doesnot extend beyond the edge of the cooking utensil.,
For self-cleaning ranges -
Before Self-Cleaning the Oven - Remove broiler panand other utensils. Wipe off all excessive spillagebefore initiating the cleaning cycle.
THESE INSTRUCTIONS
4

A .....................................oo @
B ...................................o o <@
o%
.............................O@O0o __
_" I 000
...........7......o o "--.._/"
A.. Right rear control knobB, Left rear control knob
C, Center burner
D., Right front control knob_, Left front control knob
E Surface burner locator
. _¢_._ _,_
Fire Hazard
Do not let the burner flame extend beyond the edge of
the pan.
Turn off all controls when not cooking.
Failure to follow these instructions can result in deathor fire.
IMPORTANT: Your range is factory-set for use with Natural gas, Ifyou wish to use LP gas, an LP Gas Conversion Kit is includedwith your new range.. See the "Gas Conversions" section of theInstallation Instructions for details on making this conversion.
Electric igniters automatically light the surface burners whencontrol knobs are turned to LIGHT
The large burners (16,000, 14,000 and 12,500 Btu/h [BritishThermal Units]) provide the highest heat setting, and are ideal forcooking large quantities of food or liquid, using large pots andpans.. The small burners (9,200 and 5,000 BtWh) allow moreaccurate simmer control at the lowest setting, and are ideal forcooking smaller quantities of food, using smaller pots and pans..
Before setting a control knob, place filled cookware on the grate.Do not operate a burner while using empty cookware or withoutany cookware on the grate.
NOTE: Visually check that the burner has lit. If the burner doesnot ignite, listen for a clicking sound.. If you do not hear the igniterclick, turn the burner off.. Check for a tripped circuit breaker orblown household fuse..
Check that the control knob is pressed completely down on thevalve shaft. If the spark igniter still does not operate, call a trainedrepair specialist..
To Set:1. Push in and turn knob counterclockwise to LIGHT.
All four surface burners will click, Only the burner with the _.:_-::control knob turned to LIGHT will produce a flame.
2. Turn knob anywhere between HI and LQ Use the following
LSETTING RECOMMENDED USE I:5:7:]:!
LIGHT _ Light the burner,. _,'
HI a Start food cooking..
Bring liquid to a boil,.
MED (Medium) a Hold a rapid boil,
Quickly brown or sear food..
[] Fry or saut_ foods..
Cook soups, sauces and gravies.
[] Stew or steam foods
LO [] Keep food warm,.
m Simmer..
REMEMBER: When range is in use or (on some models)during the Self-Cleaning cycle, the enlire cooktop area maybecome hot
Surface Burners
In case of prolonged power failure, the surface burners can be litmanually. Hold a lit match near a burner and turn knobcounterclockwise to ignite.. After burner lights, turn knob todesired setting.

B riS_r .1o
C ,,_;d;-_
A, Burner capB., Burner base
C Alignment pins
D, Igniter
E Gas tube opening
IMPORTANT: Do not obstruct the flow of combustion and
ventilation air around the burner grate edges..
Burner cap: Always keep the burner cap in place when using asurface burner.. A clean burner cap will help avoid poor ignitionand uneven flames. Always clean the burner cap after a spiltoverand routinely remove and clean the caps according to the"General Cleaning" section
Gas tube opening: Gas must flow freely throughout the gas tubeopening for the burner to light properly. Keep this area free of soiland do not allow spills, food, cleaning agents or any othermatedal to enter the gas tube opening. Keep spiltovers out of thegas tube by always using a burner cap..
B
A..t-7',_" 125-38 ram)B..Burner ports
Burner ports: Check burner flames occasionally for proper sizeand shape as shown above. A good flame is blue in color, notyellow.. Keep this area free of soil and do not allow spills, food,cleaning agents or any other material to enter the burner ports..
To Clean:
IMPORTANT: Before cleaning, make sure all controls are off andthe oven and cooktop are cool Do not use oven cleaners, bleachor rust removers.
1. Remove the burner cap from the burner base and cleanaccording to "General Cleaning" section_
2. Clean the gas tube opening with a damp cloth,.
3_
4_
Clean clogged burner ports with a straight pin as shown. Donot enlarge or distort the port.. Do not use a woodentoothpick.. If the burner needs to be adjusted, contact atrained repair specialist.
t
Replace the burner cap, making sure the alignment pins arepropedy aligned with the burner cap.
5_
A incorrectB Correct
Turn on the burner., if the burner does not light, check capalignment., If the burner still does not light, do not service thesealed burner yourself.. Contact a trained repair specialist,.
When canning for long periods, alternate the use of surfaceburners between batches. This allows time for the most recentlyused areas to coot
m Center the canner on the grate.
m Do not place canner on 2 surface burners at the same time..
m For more information, contact your local agriculturaldepartment. Companies that manufacture home canningproducts can also offer assistance.
OOOIr&_/_:[_',9
IMPORTANT: Do not leave empty cookware on a hot surfacecooking area, element or surface burner
Ideal cookware should have a flat bottom, straight sides and awell-fitting lid, and the material should be of medium-to-heavythickness.
Rough finishes may scratch the cooktop or grates,. Aluminum andcopper may be used as a core or base in cookware.. However,when used as a base they can leave permanent marks on thecooktop or grates..
Cookware material is a factor in how quickly and evenly heat istransferred, which affects cooking results.. A nonstick finish hasthe same characteristics as its base material. For example,aluminum cookware with a nonstick finish will take on the
properties of aluminum_
Cookware with nonstick surfaces should not be used under thebroiler..
6

Use the following chart as a guide for cookware material characteristics.
COOKWARE CHARACTERISTICS
Aluminum I= Heats quickiy and evenly
[] Suitable for all types of cooking.,
m Medium or heavy thickness is best formost cooking tasks,.
Cast iron e Heats slowly and evenly
u Good for browning and frying.,
a Maintains heat for slow cooking.
Ceramic or u Follow manufacturer's instructions..
Ceramic glass [] Heats slowly, but unevenly,
I= Ideal results on low to medium heat
settings.,
Earthenware • Follow manufacturer's instructions
[] Use on low heat settings,,
Porcelainenamel-on-steel or castiron
e See stainless stee_ or cast iron.
Stainless steel []
[]
Heats quickly, but unevenly.
A core or base of aluminum or copperon stainless steel provides evenheating.
ELECTRONIC OVEN CONTROLSA
UPPEROVEN
@®@@@ @@
B
"lim_r l_rn_r Clock
LOWEROVEN v _ _
O N M L
C D E
!
L@ 4 s 6
Cook& DelayHoldv v
K J
!$7Pavorit_
1 H G
8 9
Aut_€-__
J
A Upper oven settingsB. Oven displayC. Upper oven lightD..Upper oven stopE.Number pads
F. Autoset
G, Favorite setting
H, Lower oven stop
I, Lower oven light
J Delay
K. Cook & HoldL, Clock
M, Timer 2N, 7TruerI
0 Lower oven settings
i_]t:;_!!:
ii3i:i .:Z::'
DisplayWhen power is supplied to the range or after a powerinterruption, the last clock time before power was interrupted willflash,. See "Clock" section to set time of day
Bake or Lock may flash rapidly in the display to alert you if thereis an error or problem. Press STOP and reset clock if needed.
When the oven is in use, the display shows the temperature andoven setting,,
When the oven is not in use, the display shows the time of day..
Cancel
The Cancel pad stops any function except the Clock, Timer,Control Lock.
CtockThe clock can be set to display time in a 12-hour or 24-hourformat.. The crock is set at the factory for the !2-hour format.
To change the clock to 24-hour format:
1o Press and hold the upper oven STOP pad and FAVORITE padfor 3 seconds,, "12 Hr" will flash in the display.,
2. Press AUTOSET to select "24 Hr"; press again to select"12 Hr.."
3o Set the time of day by following the "To Set" instructions.
ToSet:Beforesetting,makesuretheovenand_merareoff..1. PressCLOCK..Thetimeofdayandcolonflashinthedisplay2,,Pressthenumberpadstosetthetimeofday.3. PressCLOCKagainorwait4secondsThecolonwillremain
on..Torecallthetimeofdaywhenanothertimefunctionisshowing,pressCLOCK..
To Cancel:
Press and hoid upper oven STOP and CLOCK for 3 seconds The
time of day will disappear from the display,
When the clock display is canceled, press CLOCK to brieflydisplay the time of day
To Restore:
Press and hold upper oven STOP and CLOCK for 3 seconds.. Thetime of day will reappear in the display..
Oven Ught
While the oven door is closed, press UPPER or LOWER OVENLIGHT to turn the light on and off., The oven light will come onwhen the oven door is opened The oven [ight will not come onduring the SelFCtean cycle,
Tones are audible signals, indicating the foftowing:
Basic Functions
One tone
a Valid pad press
m Oven has reached preheat temperature (long tone)
Function has been entered
Two tones
a invalid pad press
Four tones
a End of cycle
Adjusting Sound Level
The oven is factory set for medium (MEd) but can be changed totow (LO) or high (HI)
1o Press and hold DELAY and upper oven STOP for3 seconds A beep will sound,, "bEEP" and the currentsound level will be displayed,,
2. Press AUTOSET to increase or decrease the sound level,Wait 4 seconds for the new setting to be accepted,,
if AUTOSET is not pressed within 30 seconds, the control wi!lreturn to the existing setting,,
Fshrenh÷R snd Celsk sThe temperature is preset at Fahrenheit, but can be changed toCelsius,,
1., Press and hold the upper oven BAKE and STOP padsfor 3 seconds, A beep will sound, and the current setting(°F or °C) will appear in the display,
2,, Press AUTOSET to change the setting., Wait 4 seconds for thenew setting to be accepted.,
If AUTOSET is not pressed within 30 seconds, the control willreturn to the existing setting,
Each Timer can be set in hours or minutes up to 99 hours and59 minutes, and counts down the set time,, The Timer does notstart or stop the oven,,
To Set:1_, Press TIMER ! or TIMER 2,,
"00:00" and "TIMER 1" or "TIMER 2" will flash in the display,
2., Press the number pads to select the desired time.
The colon and "TIMER 1" or "TIMER 2" will continue to flash_If both timers are active, "TIMER 1" and "TIMER 2" will bedisplayed,,
3,, Press TIMER t or TIMER 2 again or wait 4 seconds. Thecolon stops flashing and the time begins counting down,,
The last minute of the timer countdown will be displayed inseconds..
At the end of the set time, one long beep will sound, and"End" will be displayed..
4. Press TIMER to clear the display.
To Cancel:
Press and hold Timer pad for 3 seconds or press the limer padand "0" using the number pads
The oven door and controls can be locked out to avoidunintended use of the oven.
The oven doors and controls cannot be locked if the oven is in
use, or the oven temperature is 400°F (205°C) or above.
The current time of day will remain in the display when thecontrols and oven doors are locked..
To Lock Control Panel and Both Oven Doors:1. Press and release STOP,
2. Press and hold upper oven STOP and COOK & HOLD for3 seconds.. "OFF" appears in the display and "LOCK" flasheswhile the controls and oven doors are locking..
Both oven doors lock. "LOCK" remains lit in the display.
To!.
Unlock Control Panel and Both Oven Doors:
Press and hold upper oven STOP and COOK & HOLD for3 seconds., "OFF" disappears from the display and "LOCK"flashes while the controls and oven doors are unlocking.,
12-Flour SIsL o The oven control is set to automatically shut off the oven12 hours after the oven turns on. This will not interfere with anytimed or delayed cook function.
To cancel the 12-hour shutoff function and enable SabbathMode, see the "Sabbath Mode" section

IMPORTANT:DonotuseathermometertomeasureoventemperaturebecauseopeningtheovendoormaycauseburnercyclingtogiveincorrectreadingsTheovenprovidesaccuratetemperatures;however,it maycookfasterorslowerthanyourpreviousoven,sothetemperaturecalibrationcanbeadjusted..ItcanbechangedinFahrenheitorCelsiusTemperatureadjustmentappliestoBake,ConvectBakeandConvectRoastinthelowerovenonly.Aminussignmeanstheovenwillbecoolerbythedisplayedamount,.Theabsenceofaminussignmeanstheovenwiltbewarmerbythedisplayedamount..Usethefollowingchartasaguide..ADJUSTMENT°F COOKSFOOD(ADJUSTMENT °C)
5 ° to IO"F (3° to 6°C) .......a little more
I5" to 20°F (9° to 12°C) ......moderately more
25 ° to 35°F (15" to 21°C) .....much more
;,_,_:_r_,_'_,_,,_ "_:* _n: r_ ,÷_,,¸, :_x,_,_:,_"_;_,':, ,,::, ,':_-,:"_,,,:::::'_,,,,: ,*,,:,-,:, ,:,::'._,,"_,_:_,,:_'_,"_,_,,,'_r, ::.,:_,:,:_,_"__,:_,_ _,,:',,":_,,_,':,, _:"r:::*,,,':,',,_",
ADJUSTMENT "F COOKS FOOD
(ADJUSTMENT °C)
_5° to -IO°F (_3° to -6°C) .....a little less
-!5" to -20°F (-9" to -12"C) ......moderately less
-25" to -35_F (_15"C to -21 °C) ......much less
To Adjust Oven Temperature Calibration:
1. Press the appropriate BAKE pad
2. Enter 550 using the number pads.
3o Press and hold BAKE for several seconds or until 00" appearsin the display
If the oven temperature was previously adjusted, that changewill appear in the display.. For example, if the oventemperature was previously reduced by 15°F, the display willshow "_I5°."
4. Press AUTOSET to increase or decrease the temperature in5 ° (3_C) amounts.. The adjustment can be set between35°F (2I_C) and -35°F (-21 °C)..
5. The time of day will automatically appear in the display
OVEN USEOdors and smoke are normal when the oven is used the first few
times, or when it is heavily soiled.
IMPORTANT: The health of some birds is extremely sensitive tothe fumes given off. Exposure to the fumes may result in death tocertain birds.. Always move birds to another closed and well-ventilated room.
_owe_" Fsi[uFeOven Burners
Your range is equipped with pilotless ignition. With this type ofignition system, the gas automatically shuts off and the oven wiltnot operate during a power failure..
A lighted match will not light the oven bake or broil burner. Noattempt should be made to operate the oven during a powerfailure..
AIum[num FoilIMPORTANT: To avoid permanent damage to the oven bottomfinish, do not line the oven bottom with any type of foil, liners orcookware
On those models with bottom vents, do not block or coverthe oven bottom vents.
w
m
For best cooking results, do not cover entire rack with foilbecause air must be able to move freely.
To catch spills, place foil on rack below dish. Make sure foil isat least V_"(!.3 cm) larger than the dish and that it is turnedup at the edges..
PosF oning Racks and BakewareIMPORTANT: To avoid permanent damage to the porcelainfinish, do not place food or bakeware directly on the oven door orbottom.
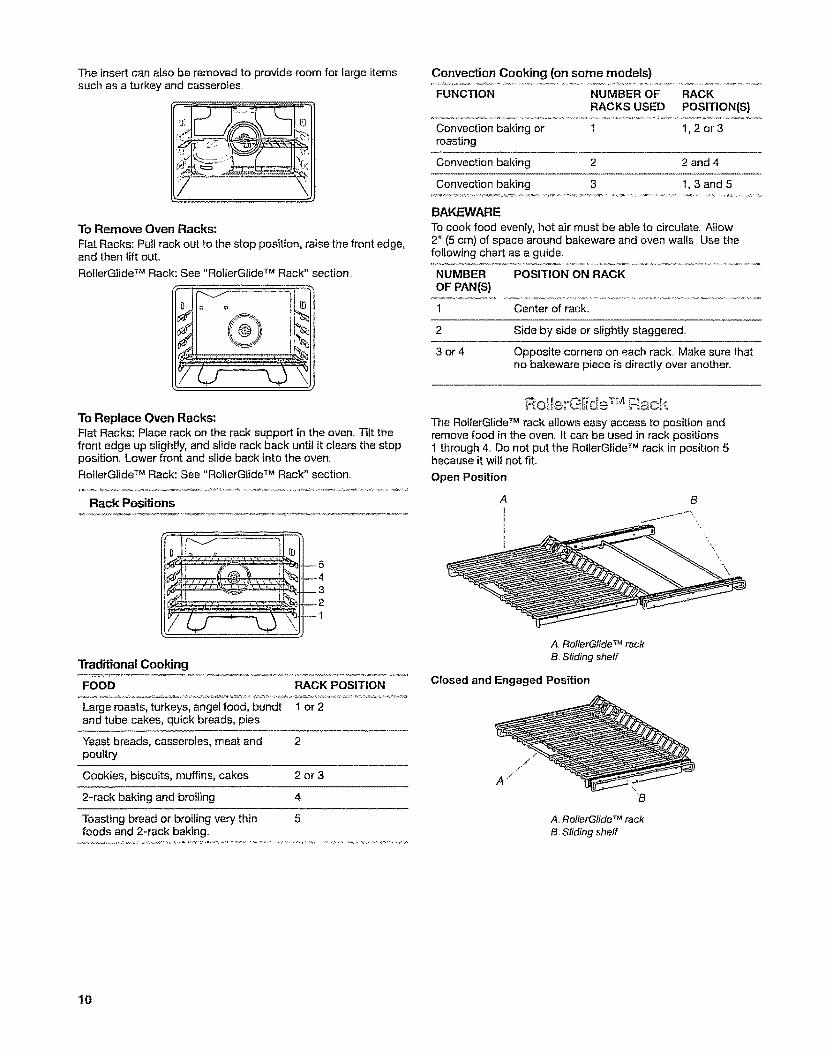
Racks
[] Position racks before turning on the oven
Do not position racks with bakeware on them..
Make sure racks are level
The upper oven is equipped with 1 rack..
[] The lower oven may be equipped with a RolferGfide TM, a halfrack and/or regular flat racks,.
RollerGlide TM Rack
[] For best cooking results, when baking on 1 rack, use theRollerGtide TM rack
[] When baking on 2 racks, use the RollerGiide TM rack in thebottom rack position, and a flat rack in the upper rackposition..
When roasting large cuts of meat and poultry, use theRollerGfide TM rack for ease of movement..
Half Rack
The half rack with removable insert is a space maximizer.. Whenthe 2 are attached, they make a full rack..
A Removable insert
b:::'rF:_
i::
The insert can also be removed to provide room for large itemssuch as a turkey and casseroles,.
To Remove Oven Racks:
Flat Racks: Putl rack out to the stop position, raise the front edge,and then lift out..
RollerGlide TM Rack: See "RolferGlide TM Rack" section..
To Replace Oven Racks:Flat Racks: Place rack on the rack support in the oven Tilt thefront edge up slightly, and slide rack back until it clears the stopposition. Lower front and slide back into the oven,.
RollerGlide TM Rack: See "RollerGlide TM Rack" section..
Rack Positions
T ?
_5
_4
__3
_2
--1
TraditionalCooking
FOOD RACK POSITION
Large roasts, turkeys, angel food, bundt 1 or 2and tube cakes, quick breads, pies
"feast breads, casseroles, meat and 2
poultry
Cookies, biscuits, muffins, cakes 2 or 3
2-rack baking and broiling 4
Toasting bread or broiling very thin 5foods and 2-rack baking..
Convection Cooking (on some models)
FUNCTION NUMBER OF RACK
RACKS USED POSITION(S)
Convection baking or 1 1,2 or 3roasting
Convection baking 2 2 and 4
Convection baking 3 1, 3 and 5
BAKEWARE
To cook food evenly, hot air must be able to circulate, Allow2" (5 cm) of space around bakeware and oven walls Use thefollowing chart as a guide_
NUMBER POSITION ON RACKOFPAN(S)
1 Center of rack..
2 Side by side or slightly staggered,
3 or 4 Opposite corners on each rack.. Make sure thatno bakeware piece is directly over another..
Ro Ie °GIide TM Ra ckThe RollerGlide TM rack allows easy access to position andremove food in the oven.. It can be used in rack positions1 through 4.. Do not put the RollerGfide TM rack in position 5because it will not fit..
Open Position
A B
A RollerGlide TM rack
B, Sliding shelf
Closed and Engaged Position
A, RellerGlide TM rack
B Sliding shelf
10
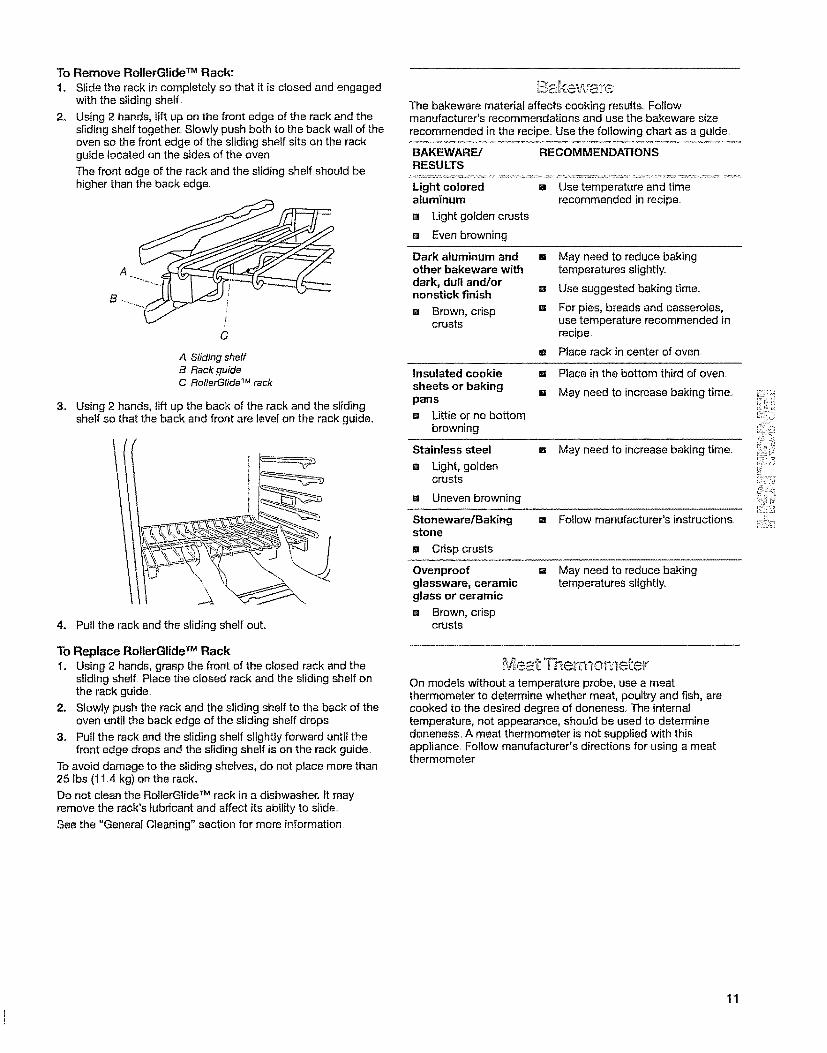
To Remove RollerGlide TM Rack:
1. Slide the rack in completely so that it is closed and engagedwith the sliding shelf,.
2,, Using 2 hands, lift up on the front edge of the rack and thesliding shelf together.. Slowly push both to the back wall of theoven so the front edge of the sliding shelf sits on the rackguide located on the sides of the oven,
The front edge of the rack and the sliding shelf should behigher than the back edge.
C
A Sfiding shelfB. Rack guideC, RollerGtide TM rack
3. Using 2 hands, lift up the back of the rack and the slidingshelf so that the back and front are level on the rack guide.
4. Pull the rack and the sliding shelf out,.
To Replace RollerGlide TM Rack
1. Using 2 hands, grasp the front of the closed rack and thesliding shelf, Place the closed rack and the sliding shelf onthe rack guide
2. Slowly push the rack and the sliding shelf to the back of theoven until the back edge of the sliding shelf drops.
3. Pull the rack and the sliding shelf slightly forward until thefront edge drops and the sliding shelf is on the rack guide,
To avoid damage to the sliding shelves, do not place more than25 Ibs (I1,4 kg) on the rack,,
TMDo not clean the RollerGlide rack in a dishwasher, tt mayremove the rack's lubricant and affect its ability to slide.,
See the "General Cleaning" section for more information.
The bakeware material affects cooking results,, Followmanufacturer's recommendations and use the bakeware size
recommended in the recipe.. Use the following chart as a guide.,
BAKEWARE/ RECOMMENDATIONSRESULTS
Light colored a Use temperature and timealuminum recommended in recipe,,
m Ught golden crusts
,_ Even browning
Dark aluminum and []other bakeware withdark, dull and/ornonstick finish
m Brown, crisp mcrusts
May need to reduce bakingtemperatures slightly,
Use suggested baking time,,
For pies, breads and casseroles,use temperature recommended inrecipe,,
m Place rack in center of oven,
Insulated cookie
sheets or bakingpans
= Uttfe or no bottombrowning
Stainless steel
m Light, goldencrusts
=1 Uneven browning
Stoneware/Bakingstone
= Crisp crusts
Ovenproofglassware, ceramicglass or ceramic
a Brown, crispcrusts
[] Place in the bottom third of oven.
B May need to increase baking time..
m May need to increase baking time.
= Follow manufacturer's instructions "i:::-
m May need to reduce bakingtemperatures slightly,,
On models without a temperature probe, use a meatthermometer to determine whether meat, poultry and fish, arecooked to the desired degree of donenes&. The internaltemperature, not appearance, should be used to determinedoneness. A meat thermometer is not supplied with thisappliance. Follow manufacturer's directions for using a meatthermometer,
11

A
A. Oven vent
The oven vent releases hot air and moisture from the oven, andshould not be blocked or covered.. Blocking or covedng the ovenvent wilt cause poor air circulation, affecting cooking andcleaning results Do not set plastics, paper or other items thatcould melt or burn near the oven vent..
Before baking, position racks according to the "PositioningRacks and Bakeware" section..
u If the lower oven is not in use, the upper oven wilt preheatmore quickly.
m Allow at least V_" (1.3 cm) between the baking pan orcasserole and the top element in the upper oven.. Loaf, angelfood or bundt pans are not recommended in the upper oven..
When baking frozen, self-rise pizza in the upper oven, placethe pizza on a cookie sheet to avoid overbrowning.
When preheating with a baking/pizza stone inside the upperoven, do not set oven above 400°F (205°C). To use baking/pizza stones at temperatures above 400°F (205°C) in theupper oven, put stone in after the preheat beep.
To Bake or Roast:
1. Press the BAKE keypad for desired oven..
"BAKE" and "000" witt flash in the display.
2_
3_
Select the oven temperature
Press AUTOSET for 350°F (I75°C) or the appropriate numberpads.. Each additional press of the Autoset pad will increasethe temperature by 25_F (I5"C)..
The oven temperature can be set between 170°F and 550°F(75°C and 288"C)..
Press BAKE again or wait 4 seconds.
"BAKE" will stop flashing and light in the display PREHEATwilt light in the display,.
100°F (35°C) or the actual oven temperature if over100°F (35°C) will display The temperature wilt rise in5" increments until the preset temperature is reached.,
Allow 4 to 10 minutes for the upper oven to preheat and7 to 12 minutes for the lower oven to preheat..
When the set oven temperature is reached, one long beep willsound and "PREHEAT" will disappear from the display.,
To recalt the set temperature during preheat, press BAKE.
To change the oven temperature during preheat, press theBake pad twice, then press the Autoset pad or appropdatenumber pads until the desired temperature is displayed
4_
5_
6o
Place food in the oven..
To change the oven temperature during cooking, press Bake,then press the Autoset or appropriate number pads until thedesired temperature is displayed..
Press CANCEL or STOP when finished
Remove food from the oven..
(Vpp_r Oven Only)Broiling uses direct radiant heat to cook food. Changing thetemperature when broiling allows more precise control whencooking. The lower the temperature, the slower the cooking..Thicker cuts and unevenly shaped pieces of meat, fish andpoultry may cook better at lower broiling temperatures.
= For best results, use a broiler pan and grid. They aredesigned to drain juices and help avoid spatter and smoke
l
IZI
If you would like to purchase a broiler pan, one may beordered See back cover to order. Ask for Part Number12500100,.
For proper draining, do not cover the grid with foil. Thebottom of the pan may be lined with aluminum foil for easiercleaning.
Trim excess fat to reduce spattering.. Slit the remaining fat onthe edges to avoid cuding.
Pull out oven rack to stop position before turning or removingfood.. Use tongs to turn food to avoid the loss of juices. Verythin cuts of fish, poultry or meat may not need to be turned..
After broiling, remove the pan from the oven when removingthe food. Drippings will bake on the pan if left in the heatedoven, making cleaning more difficult..
Before broiling, position rack according to the Broiling Chart..Preheat broil about 4 minutes Position food on grid in the broilerpan, then place it in the center of the oven rack.. Close the door
To Broil:
1. Press BROIL.. "BROIL," "UPPER," and "SEt" wil! flash in thedisplay until the door is closed..
2. Press the AUTOSET pad once to set HI Broil or twice to setLO Broil. "HI" or "LO" will be displayed..
Select HI Broil (550°F/288°C) for normal broiling or LO Broil(450°F/232"C) for low-temperature broiling,.
After 4 seconds, the oven will start.. "BROIL," "UPPER," and"HI" or "LO" will remain lit..
3. Press Upper Oven CANCEL or UPPER STOP when finishedbroiling..
12

BROILINGCHART
For best results, place food 3" (7.,0 cm) or more from the broilelement,. Times are guidefines only and may need to be adjustedfor individual tastes.
FOOD RACK APPROX, TIMEPOSITION (minutes)
Steak1" (2.,5 cm) thick Hl Broilmedium t 8-t4
Ground meat patties_A" (2.0 cm) thick HI Broilup to 6 welFdone 1 12-t5up to 12 well-done oven bottom 15-19
Pork chopst" (25 cm) thick HI BroilwelFdone 1 18-25
Chicken
bone-in pieces LO Broilwell-done oven bottom 25-35
Fish* LO BroilFilets oven bottom 8-I 1
Steaks, 1" (2.5 cm) thick oven bottom 10-15
*When broiling fish, spray pan insert with cooking oil. Do not turnfish filets.
CoLq:vection Cooki sg(on some mode_s}
During convection cooking, the fan provides increased hot aircirculation continuously and more consistently throughout theoven,, The movement of heated air around the food helps tospeed up cooking by penetrating the cooler outer surfaces Foodcooks more evenly, browning and crisping outer surfaces whilesealing moisture inside,
During the Convect function, the ring element operates, alongwith the fan, to provide an indirect source of heat in the ovencavity., If the oven door is opened during convection cooking orpreheating, the element(s) and fan will turn off immediately. Oncethe door is closed, they wit[ come back on•,
u It is important not to cover foods so that surface areas remainexposed to the circulating air, allowing browning and crisping.
Keep heat toss to a minimum by only opening the oven doorwhen necessary,
m Choose cookie sheets without sides and roasting pans withlower sides to allow air to move freely around the food,,
m Test baked goods for doneness a few minutes before theminimum cooking time with a method such as a toothpick°
m Use a meat thermometer to determine the doneness of meatsand poultry,. Check the temperature of pork and poultry in 2 or3 different places, including the thickest part,,
B Before convection cooking, position the rack(s) according tothe "Positioning Racks and Bakeware" section,,
When using more than one rack, position bakeware/cookware on the racks to allow movement of the fan
circulated air around the food. See the "Positioning Racksand Bakeware" section.
m
If the oven is full, extra cooking time may be needed,
For optimal cooking results, do not cover food.
When roasting poultry and meat, use a broiler pan and grid., Itis not necessary to wait for the oven to preheat, unlessrecommended in the recipe,
A, Broiler grid
B Broiler#an
Preheating
During the CONVECT preheating cycle, the fan, and the bake andbroil elements heat the oven cavity., When preheating is finished,the ring element cycles to maintain the oven temperature whilethe fan continues to constantly circulate the heated air..
Convection Baking (lower oven only)
Use Convect for single or multiple rack baking,. When convectionbaking, enter your normal baking temperature., The control willautomatically reduce the set oven temperature by 25°F (15°C)(even though normal baking temperature is displayed).
To Set Oonvect Bake;t. Press CONVECT BAKE,,
2.
3_
"LOWER," "BAKE," and the Fan icon will flash "000" willflash in the display,
Select the oven temperature.,
Press AUTOSET for 350°F (!75°C) or the appropriate numberpads,, Each additional press of the Autoset pad will increasethe temperature by 25°F (15"C)..
The oven temperature can be set between 170"F and 550°F(75_C and 288°C).,
Press CONVECT BAKE again or wait 4 seconds,
"LOWER" and "BAKE" will stop flashing,, "PREHEAT" and"LOWER" will appear in the display,
"t00 °'' (35°C) or the actual oven temperature if overI00°F (35°C) will display. The temperature will rise in5 ° increments until the preset temperature is reached..
The Fan icon will start to rotate
Allow the oven to preheat for 7 to 12 minutes.
When the set oven temperature is reached, one long beep willsound. "PREHEAT" will disappear from the display and theset temperature will display,
To recall the set temperature during preheat, press CONVECTBAKE
4, Place food in the oven,.
5., Press Lower Oven CANCEL or LOWER STOP when finished.
6o Remove food from the oven
_:i:iT::
13

ConvectionRoasting (lower oven only)
When convection roasting, enter your normal roasting time andtemperature. The control will automatically prompt you to checkthe food for doneness at 75% of the set time.. The convection fan
will come on immediately after the oven has turned on..
NOTE: When convection roasting, the cooking time must be setbefore setting the temperature
To Set Convect Roast:
1. Press CONVECT ROAST.
"LOWER," "ROAST," and the Fan icon will flash. "000" willflash in the display.
2_
3.
4.
5_
6.
Enter the roasting time using the number pads.. Time can beset from t0 minutes (00:10) to !1 hours, 59 minutes (11:59).
If preheating is required, add 15 minutes to the programmedcooking time
Press CONVECT ROAST again or wait 4 seconds..
"LOWER," "ROAST," and the fan icon will flash in the display."000" will flash in the display.
Select the oven temperature.
Press AUTOSET for 325"F (165°C) or the appropriate numberpads.. Each additional press of the Autoset pad will increasethe temperature by 25"F (15"C)..
The oven temperature can be set between 170°F and 550°F(75°C and 288°C)
Press CONVECT ROAST again or wait 4 seconds.
"ROAST" wile stop flashing and light in the display.
IO0°F (35°C) or the actual oven temperature if over100°F (35°C) will display. The temperature wil! rise in5 ° increments until the preset temperature is reached_
The Fan icon will start to rotate.
7. Place food in the oven.
8=
Time wi!t start counting down once oven starts heating up.. Torecall the set temperature during preheat, press the ConvectRoast pad..
When 75% of the set cooking time has elapsed, the oven willsignal you to check the cooking progress Cook longer ifneeded..
Press any pad to recall the cook time remaining..
9. Press Lower Oven CANCEL or LOWER STOP when finished.
10. Remove food from the oven.
Food Poisoning Hazard
Do not let food sit in oven more than one hour beforeor after cooking,,
Doing so can result in food poisoning or sickness°
IMPORTANT: Food must be at serving temperature beforeplacing it in the warmed oven. Food may be held up to i hour;however, breads and casseroles may become too dry if left in theoven during the Keep Warm TM function.
The Keep Warm TM feature allows hot cooked foods to stay atserving temperature, tt can also be used at the end of a timedcook..
Follow manufacturer's recommendations when warming emptyserving bowls and plates..
To Use:1. Press appropriate KEEP WARM TM pad
"WARM," °'000," and either UPPER or LOWER flashes in thedisplay.
2. Press AUTOSET or number pads to select a temperature.
"170 "" will light when Autoset is first pressed. Each press ofthe Autoset pad will increase the temperature by 5°..
The Keep Warm temperature can be set from 145_F (63"C) toI90°F (85°C).
"WARM" and the temperature will be displayed while KeepWarm TM setting is active..
To Cancel Keep Warm TM Feature:
Press CANCEL or STOP. Remove food from oven.
Food Poisoning Hazard
Do not let food sit in oven more than one hour before
or after cooking.
Doing so can result in food poisoning or sickness.
Cook & Hold allows the oven to be set to cook for a set length oftime, followed by a t-hour Keep Warm cycle.
Delay Cook & Hold allows the oven to be set to start cookingafter a length of time you set, cook for a set length of time,followed by a 1-hour Keep Warm cycle..
Delay start should not be used for food such as breads andcakes because they may not bake properly, Do not use delayedbaking if oven is already hot.
To Set Cook & Hold:
1. Press COOK & HOLD once for the upper oven and twice forthe lower oven. "HOLD," "00:00," and either "UPPER" or"LOWER" will flash in the display.
2. Press the appropriate number pads to select an amount oftime to cook.. The time selected will show in the display while"HOLD" continues to flash. Time can be set from 10 minutesto 11 hours and 59 minutes
3.
4,
5_
While "HOLD" is still flashing press BAKE (upper or lowerovens), CONVECT BAKE or CONVECT ROAST (lower ovenonly)
Press AUTOSET for 350°F (1750C) or the appropriate numberpads to select the oven temperature. The selected function,"000," and either "UPPER" or "LOWER" will flash,.
The oven temperature can be set between 170°F and 550°F(75°C and 288°C),.
Press the selected function pad again or wait 4 seconds..
The selected function will remain lit in the display, and thecooking time will be displayed,
"PREHEAT" will appear in the display.. The actual oventemperature wilt display during preheat. The set temperaturewill display when preheating is completed.
When the cooking time has elapsed;
Four beeps will sound, "WARM" and "HOLD" will light and"!70 °'' ("75 °" Celsius) will appear in the display.
14
After 1 hour in Hold Warm:
The oven turns off automatically Press CANCEL or STOP whenremoving food from the oven pdor to 1 hour..
To cancel Cook & Hold at any time:
Press CANCEL or STOR Remove food from oven..
To Set a Delayed Cook & Hold cycle:
Before setting, make sure the clock is set to the correct time ofday. See "Clock" section,.
I. Press DELAY once for the upper oven and twice for the loweroven "DELAY," "00:00," and "UPPER" or "LOWER" will flashin the display,.
2o Press the appropriate number pads to set the length of timeyou want to delay the cooking time..
3_ While "DELAY" is still flashing, press COOK & HOLD."HOLD," "DELAY," "00:00," and "UPPER" or "LOWER" willflash in the display..
4. Press the appropriate number pads to set the baking time..
Time can be set between 10 minutes and 11 hours and59 minutes..
5_
6o
Press BAKE (upper and lower ovens), CONVECT BAKE orCONVECT ROAST (lower oven only).
Set the oven temperature desired by pressing AUTOSET orappropriate number pads.
"350 °" ("175 °" Celsius) wiil light when Autoset is pressed.After 4 seconds, the entered delay time wil! appear in thedisplay.
The selected function and "DELAY" remain lit to remind youthat a delayed Cook & Hold cycle has been programmed.
When the Delay time has expired:
"DELAY" wilt turn off. The selected function and the baking timewill be displayed,. Baking will begin..
When the cooking time has elapsed:
Four beeps will sound, the selected function will turn off and"HOLD," "WARM," and "170 °" ("75 °" Celsius) will appear in thedisplay.
After 1 hour in Hold Warm:
The oven turns off automatically. Press CANCEL or STOP andremove food from the oven.
To cancel:
Press the appropriate CANCEL or STOP pad. All timed anduntimed cooking functions will be canceled.. The time of day willreappear in the display..
ALr :ems¢dcSIsutoh"iSsbbsth Ri oe The even control is set to automatically shut off the oven12 hours after the oven is turned on.. This feature can be turnedoff to enable Sabbath Mode.
u Sabbath Mode can be turned on at any time with or withoutthe oven on..
m Sabbath Mode cannot be turned on if the touchpads arelocked out or when the door is locked.,
m
m
If the oven is baking when Sabbath Mode is set, "BAKE" willgo out at the end of the baking cycle or when Cancel or Stopis pressed.. There will be no audible beeps..
if the oven light is desired while in Sabbath Mode, it must beturned on before the Sabbath Mode is started,.
In When the Sabbath Mode is started, the temperature displaywill immediately show the set temperature, rather than theactual oven cavity temperature No preheat beep will sound.
m All prompts, messages and beeps are deactivated whenSabbath Mode is active
The self-clean cycle and automatic door lock does notoperate during the Sabbath Mode.
t_ Pressing Cancel or Stop will cancel a Bake cycle, howeverthe control will stay in the Sabbath Mode.
a If power fails, the oven will power up in Sabbath Mode with72 hours remaining and no cycle active
To cancel the 12-hour shut-off and run the oven continuouslyfor 72 hours (Sabbath Mode):
1. Press and hoid CLOCK for 3 seconds.
"Sab bATH" will be displayed and flash for 5 seconds
"Sab bATH" will then be displayed continuously until turnedoff or until the 72-hour time limit is reached_
BAKE will also be displayed if a bake cycle is in use while theoven is in Sabbath Mode,.
BAKE is the only function that operates during the SabbathMode, Atl function keys (except Cancel, Stop and Clock) arelocked out during the Sabbath Mode.
To cancel the Sabbath Mode=
Press and hold CLOCK for 3 seconds "Sab bATH" will flash for5 seconds. The time of day will return to the display.
OR
After 72 hours, the Sabbath Mode will end. "Sab bATH" will flashfor 5 seconds.. The time of day will return to the display,
Fsvo ' e
Food Poisoning Hazard
Do not let food sit in oven more than one hour before
or after cooking,
Doing so can result in food poisoning or sickness.,
The Favorite feature allows you to save the time and temperaturefrom a Cook & Hold Bake, Cook & Hold Convect Bake or Cook &Hold Convect Roast (lower oven only) function.
To set a Favorite cycle, a Cook & Hold function must be eitheractive or just programmed..
To Set a Favorite Cycle:
1. Program a Cook & Hold cycle as described in the "Cook &Hold" section.
2o Press and hold FAVORITE for 3 seconds.
The newly set or currently running Cook & Hold cycle will besaved.
A double, then single beep will sound to indicate that thecontrol has accepted the Favorite setting..
To Start a Favorite Cycle:1o Press FAVORITE,
2_
Time and temperature for the set Cook & hold cycle will bedisplayed (If no Cook & Hold cycle has been set, "nonE" willbe displayed.)
Press BAKE, CONVECT BAKE or CONVECT ROAST (loweroven only).
The Favorite cycle will begin immediately. The selected cycleand cooking time will appear in the display.
15

When the Cooking Time has Elapsed:
The selected function will turn off and "HOLD," "WARM," and"170 °'' ("75 °" Celsius) wilt appear in the display.
After I hour in Hold Warm:
The oven turns off automatically, tf you want to remove foodbefore I hour, press CANCEL or STOP and remove food from theoveR,,
To cancel a Favorite cycle:
1. Press CANCEL or STO£
The stored Favorite cycle will not be affected..
2, Remove food from the oven..
RANGE CARE
i i lull IJJJJJJIlUNJJUJUlJJJUI_IUlJIIJIUI
Burn Hazard
Do not touch the oven during the Self-Cleaning cycle.
Keep children away from oven duringSelf-Cleaning cycle.
Failure to follow these instructions can result in burns.
IMPORTANT:
Oven temperature must be below 400°F (205°C) to program aclean cycle
Only I oven can be cleaned at a timeM
Both oven doors lockwhen eitheroven isbeing cIeaned,_
IMPORTANT: The health of some birds is extremely sensitive tothe fumes given off during the Self-Cleaning cycle. Exposure tothe fumes may result in death to certain birds.. Always move birdsto another closed and well-ventilated room.
Self-clean the oven before it becomes heavily soiled.. Heavy soilresults in longer cleaning and more smoke.
Keep the kitchen welt-ventilated during the Self-Cleaning cycle tohelp get rid of heat, odors, and smoke..
Do not block the oven vent(s) during the Self-Cleaning cycte. Airmust be able to move freely. Depending on your model, see"Oven Vent" or "Oven Vents" section.
Do not clean, rub, damage or move the oven door gasket. Thedoor gasket is essential for a good seal.
Prepare Oven:m Remove the broiler pan, grid, cookware and bakeware and,
on some models, the temperature probe from the oven,
Remove oven racks to keep them shiny and easy to slide..See "General Cleaning" section for more information.
Remove any foi! from the oven because it may burn or melt,damaging the oven..
Hand clean inside door edge and the 1V2" (3.8 cm) areaaround the inside oven cavity frame, being certain not tomove or bend the gasket.. This area does not get hot enoughduring self-cleaning to remove soil Do not tot water, cleaner,etc. enter slots on door frame Use a damp cloth to clean thisarea..
Wipe out any loose soil to reduce smoke and avoid damage.At high temperatures, foods react with porcelain, Staining,etching, pitting or faint white spots can result. This wilt notaffect cooking performance,.
18
Prepare Cooktop:Remove plastic items from the cooktop because they maymett
How the Cycle Works
IMPORTANT: The heating and cooling of porcelain on steel in theoven may result in discoloring, loss of gloss, hairline cracks andpopping sounds..
The Self-Cleaning cycle uses very high temperatures, burning soilto a powdery ash_
The oven is preset for a 3 hour clean cycle, however the time canbe changed.. Suggested clean times are 2 hours for light soil andbetween 3 hours and 4 hours for average to heavy soil..
Once the oven has completely cooled, remove ash with a dampcloth.. Do not wipe down any of the inside surfaces until the ovenhas completely cooled down. Applying a cool damp cloth to theinner door glass before it has completely cooled could result inthe glass breaking,.
The oven light wilt not work during the Self-Cleaning cycle.
When "LOCK" shows in the display, the door cannot be opened.To avoid damage to the door, do not force the door open when"LOCK" is displayed..
If an oven door is left open, "door" will appear in the display anda signal will beep until the door is cfosed and CLEAN is pressedagain..
To Self-Clean:
1,, Close the oven door,
2. Press CLEAN. "CLEAN," "SET," and "UPPER" or "LOWER"wit{ flash in the display.
3. Press AUTOSET.
4.
5_
MEd (Medium soil, 3 hours) appears in the display..
If the door is not closed, oven will beep and "door" wil!appear in the display until the door is closed and the Cleanpad is pressed again° If the door is not closed within30 seconds, the self-cleaning operation will be canceledand the display will return to the time of day,.
To choose a clean setting other than medium, pressAUTOSET to scroll through the self-cleaning settings
HVy (heavy soil 4 hours)MEd (medium soil, 3 hours)LtTE (light soil, 2 hours)
Choosing the soil level of the oven automatically programsthe self-cleaning time.
After 4 seconds, the oven will start cleaning
"CLEAN" will appear in the display.. "LOCK" wilt flash in thedisplay. Once both the oven doors lock, "LOCK" will remainlit.. The cleaning time will count down in the display..
16

When the self-clean cycle ends:
"LOCK" wilt turn off approximately 1 hour after the end of theclean cycle.. The door can then be opened
To Delay Start Self-Clean;
Before delay starting Self-Clean, make sure the door is closedcompletely or it wilt not lock and the cycle will not begin..
1. Press DELAY once for upper oven or twice for lower oven.
"DELAY," "00:00," and "UPPER" or "LOWER" will flash in thedisplay..
2_
3,,
4_
5o
Using the number pads, enter the amount of time you want todelay the cycle.. Delay time can be set from t0 minutes(00:10) to 11 hours and 59 minutes (11:59)..
Press CLEAN..
"SET" flashes in the display..
Press AUTOSET.
"MEd" (medium soil level) is displayed.
To choose a clean setting other than medium, press theAUTOSET to scroll through the self-cleaning settings.
HVy (hea W soi!, 4 hours)MEd (medium soil, 3 hours)LITE (light soil, 2 hours)
Choosing the soil level of the oven automatically programsthe self-cleaning time.
After 4 seconds, "CLEAN," "DELAY," and "UPPER" or"LOWER" will light and "LOCK" will flash in the display.Whenboth oven doors lock, "LOCK" wilt stop flashing and stay lit toshow that the oven is set for a delayed clean operation. Thedelay time is displayed,
To change the delay self-clean time;
1. Press DELAY
2,,
"DELAY" flashes and "00:00" will appear in the display.
Press the number pads to enter the amount of time you wantto delay the cycle..
After 4 seconds, "CLEAN," "DELAY," and "LOCK" wilt appearin the display to show that the oven is set for a delayed cleanoperation. The delay time is displayed..
W'nen the self-clean cycle starts:
"DELAY" will turn off and the clean time will appear in the display.
When the self-clean cycle ends:
"LOCK" will turn off approximately 1 hour after the end of theclean cycle. The door can then be opened.
To Stop Self-Clean Anytime:
Press CANCEL or STOR All words disappear from the display. Allfunctions are canceled.. The time of day appears in the display
Depending on the actual oven temperature when self-clean iscanceled, the oven door may remain locked until the oven cools..
IMPORTANT: Before cleaning, make sure all controls are off andthe oven and cooktop are cool. Always follow tabe! instructionson cleaning product&
Soap, water and a soft cloth or sponge are suggested first unlessotherwise noted.
EXTERIOR PORCELAIN ENAMEL SURFACES
Food spills containing acids, such as vinegar and tomato, shouldbe cleaned as soon as the entire range is cool. These spills mayaffect the finish°
Cleaning Method:
Glass cleaner, mild liquid cleaner or nonabrasive scrubbingpad: Gently clean around the model and serial number platebecause scrubbing may remove numbers,,
AIFPurpose Appliance Cleaner Part Number 3t682 (notincluded):
See back cover to order..
STAINLESS STEEL (on some models)
COOKTOP CONTROLS
To avoid damage to the cooktop controls, do not use steel wool,abrasive cleansers or oven cleane[.
To avoid damage, do not soak knobs_
When removing or replacing knobs, make sure knobs are in theOff position.
Do not remove seals under knobs, if present.
Cleaning Method:
m Warm, soapy water or dishwasher:Pull knobs straight away from control panel to remove..
CONTROL PANEL
To avoid damage to the control panel, do not use abrasivecleaners, steel-wool pads, gritty washcloths or abrasive papertowels.
To avoid turning the controls on while cleaning, you may activatethe Control Lock feature (on some models) See "Control Paneland Oven Door Lock" section.
Cleaning Method:
Rub in direction of grain to avoid damaging..
Stainless Steel Cleaner and Polish Part Number 31462 (notincluded): See back cover to order..
B Uquid detergent or all-purpose cleaner: Rinse with cleanwater and dry with soft, lint-free cloth..
Cleaning Method:
m Glass cleaner and soft cloth or sponge: Apply glass cleanerto soft cloth or sponge, not directly on panel
m All-Purpose Appliance Cleaner Part Number 31682 (notincluded):
See back cover to order.
To avoid damage to finish, do not use soap4i!led scouringpads, abrasive cleaners, Cooktop Polishing Creme, steel-wool pads, gritty washcloths or abrasive paper towels..
!?:1:"!:]1:;
i!=
_:/:':_
17

PORCELAIN-COATED GRATES AND CAPS
Food spills containing acids, such as vinegar and tomato, shouldbe cleaned as soon as the cooktop, grates and caps are cool..These spills may affect the finish.
To avoid chipping, do not bang grates and caps against eachother or hard surfaces such as cast iron cookware.
Do not reassemble caps on burners while they are wet.
Cleaning Method:
a Nonabrasive plastic scrubbing pad and mildly abrasivecleanser:
Clean as soon as cooktop, grates and caps are cool
a Dishwasher (grates only, not caps):
Use the most aggressive cycle.. Cooked-on soils should besoaked or scrubbed before going into a dishwasher,
e= Gas Grate and Drip Pan Cleaner Part Number 31617:See back cover to order..
SURFACE BURNERS
See "Sealed Surface Burners" section.
OVEN DOOR EXTERIOR
Cleaning Method:
Glass cleaner and paper towels or nonabrasive plasticscrubbing pad: Apply glass cleaner to soft cloth or sponge,not directly on panel,.
a All-Purpose Appliance Cleaner Part Number 31682 (notincluded):
See back cover to order.
OVEN CAVITY
Do not use oven cleaners
Food spills should be cleaned when oven cools. At hightemperatures, foods react with porcelain and staining, etching,pitting or faint white spots can resulL
Cleaning Method:
a Self-Cleaning cycle: See "Self-Cleaning Cycle" first
OVEN RACKS
Cleaning Method:
e_ Self-Cleaning cycle: See "Self-Cleaning Cycle" first. Removeracks, or they will discolor and become harder to slide.. If thishappens, a light coating of vegetable oil applied to the rackguides will help them slide.
Steebwcol pad
To Replace Standard Oven Ught:
Before replacing, make sure the oven is off and cool
1o Unplug range or disconnect power..
2o Turn the glass bulb cover in the back of the ovencounterclockwise to remove,.
3, Turn bulb counterclockwise to remove from socket,.
4° Replace bulb and bulb cover by turning clockwise..
5. Plug in range or reconnect power.
To Replace Halogen Light:
Before replacing, make sure the oven is off and cool..
1o Unplug range or disconnect power
2, Use fingertips to grasp edge of bulb cover, Pull out andremove,.
3_
4.
5_
6.
Remove bulb from socket by pulling straight out of theceramic base,
Replace bulb, using tissue or wearing cotton gloves to handlebulb. To avoid damage or decreasing the life of the new bulb,do not touch bulb with bare fingers.
Replace bulb cover by snapping back into place,.
Plug in range or. reconnect power,,
Oven DoerFor normal range use, it is not suggested to remove the ovendoor.. However, if removal is necessary, make sure the oven is offand coo!, Then, follow these instructions. The oven door is heavy.,
To Remove:
1. Open oven door to the first stop position (opened about4" (10.0 cm).
2. Grasp door at each side,, Do not use the door handle to liftdoor
3. Lift up evenly until door clears hinge arms,
Oven LightsThe ovens use either a 120-volt, 2g-watt maximum halogen bulband/or a standard 40-watt appliance bulb..
To Replace:
1o Grasp door at each side.
2. Align slots in the door with the hinge arms on the range
& Slide the door down onto the hinge arms until the door iscompletely seated on the hinges Push down on the topcorners of the door to completely seat door on hinges.. Doorshould not appear crooked..
18

TROUBLESHOOTING
Nothing wiltoperate
Trythe solutions suggested here first in orderto avoid the cost of an unnecessary service call.
Surface burner makes popping noises
ls the burner wet?Let it dry
Electrical Shock Hazard
Plug into a grounded 3 prong outlet,,
Do not remove ground prong_
Do not use an adapter.
Do not use an extension cord,,
Failure to follow these instructions can result in death,fire, or electrical shock.
Excessive heat around cookware on cooktop
Is the cookware the proper size?Use cookware about the same size as the surface cookingarea, element or surface burne_, Cookware should not extendmore than V_° (t.3 cm) outside the cooking area_,
Cooktop cooking results not what expected
a Is the proper cookware being used?See "Cookware" section,
[]
[]
Is the control knob set to the proper heat level?See "Cooktop Controls" section
Is the range level?Level the range, See the Installation Instructions,,
[]
[]
[]
[]
Is the power supply cord unplugged?Ptug into a grounded 3 prong outlet,,
Household fuse blown or circuit breaker tripped?Replace the fuse or reset the circuit breaker, If the problemcontinues, call an electrician,.
Is the main or regulator gas shutoff valve in the offposition?See |nstaliation Instructions,
Is the range properly connected to the gas supply?.Contact a trained repair specialist or see InstallationInstructions.,
Surface burners will not operate
[]
[]
[]
[]
[]
is this the first time the surface burners have been used?
Turn on any one of the surface burner knobs to release airfrom the gas lines.,
Is the control knob set correctly?Push in knob before turning to a setting,,
Are the burner ports clogged?See "Sealed Surface Burners" section_,
Surface burner flames are uneven,yellow and/or noisy
Are the burner ports clogged?See "Sealed Surface Burners" section.,
Are the burner caps positioned properly?See Sealed Surface Burners section,
Is propane gas being used?The range may have been converted improperly. Contact aservice technician or see back cove_,
Oven will not operate
Is this the first time the oven has been used? _!!=::::':'::°;;i[]
Turn on any one of the surface burner knobs to release airfrom the gas lines,
[] is the electronic oven control set correctly? i":i:.!!:,iSee "Electronic Oven Controls" section,
[] On some models, is the Control Lock set?See "Control Panef and Oven Door Lock" section,
Oven burner flames are yellow or noisy
[] Is propane gas being used?The range may have been converted improperly. Contact aservice technician or see back cove_
Cooling fan runs during baking, broiling or cleaning
[] It is normal for the fan to automatically run while the oven is inuse and for some time after to coo! the electronic control
Oventemperat_Jretoo highor too low
[] Does the oven temperature calibration need adjustment?.See Oven Temperature Control section.,
Display shows messages
Is the display showing a flashing time?There has been a power failure. Clear the display See"Display(s)" section, On some models, reset the clock, ifneeded.. See "C!ock" section.
[]
ts the display showing a letter followed by a number?.Depending on your model, press CANCEL to clear thedisplay See "Display(s)" section,, If it reappears, call forservice., See back cover
19

................. _ ....................... _._ ,,, _:= _.==_ _............ _,_7,,_ ,,_....................... _............... ,_ ........ _=-_ _, ,_ _,,,, ,=_,i,
Self-Cleaning cycle will not operate
is the overt door open?The display will show "door." Close the oven door all the way
Has the function been entered?
See "Self_Cfeaning Cycle" section.
m On some models, has a delay start Self-Clean cyclebeen set?.
See "Self-Cleaning Cycle" section..
E Has a delay start been set?See "Cook & Hold" section.
w Is the oven temperature above 400°F (205"0)?Let the oven cool before using the seff-clean cycle..
Oven cooking results not what expected
= lsthe range level?Level the range.. See the Installation Instructions..
is the proper temperature set?Double-check the recipe in a reliable cookbook
B Is the proper oven temperature calibration set?See "Oven Temperature Control" section..
Was the oven preheated?See "Baking" section..
= Is the proper bakeware being used?See "Bakeware" section,.
Are the racks positioned properly?.See "Positioning Racks and Bakeware" section..
Is there proper air circulation around bakeware?See "Positioning Racks and Bakeware" section.
ls the batter evenly distributed in the pan?Check that batter is level in the pan.
t_ Is the proper length of time being used?Adjust cooking time.
ml Has the oven door been opened while cooking?Oven peeking releases oven heat and can result in longercooking times.
a Are baked items too brown on the bottom?Move rack to higher position in the oven..
m Are pie crust edges browning early?Use aluminum foi! to cover the edge of the crust and/orreduce baking temperatures.
PROTECTION AGREEMENTS
Master Protection AgreementsCongratulations on making a smart purchase Your newKenmore _ product is designed and manufactured for years ofdependable operation. But like all products, it may requirepreventive maintenance or repair from time to time That's whenhaving a Master Protection Agreement can save you money andaggravation..
The Master Protection Agreement also helps extend the life ofyour new product Here's what the Agreement* includes:
v" Parts and labor needed to help keep products operatingproperly under normal use, not just defects_ Our coveragegoes well beyond the product warranty.. No deductibles, nofunctional failure excluded from coverage_ real protection
v' Expert service by a force of more than 10,000 authorizedSears service technicians, which means someone you cantrust will be working on your product.
v' Unlimited service calls and nationwide service, as often asyou want us, whenever you want us
v' "No-lemon" guarantee - replacement of your coveredproduct if four or more product failures occur within twelvemonths°
v' Product replacement if your covered product can't be f_xed.
v" Annual Preventive Maintenance Check at your request - noextra charge°
v' Fast help by phone - we cal! it Rapid Resolution - phonesupport from a Sears representative on all products Think ofus as a "talking owner's manual.."
v" Power surge protection against electrical damage due topower fluctuations.
v" $250 Food Loss Protection annually for any food spoilagethat is the result of mechanical failure of any coveredrefrigerator or freezer_.
v" Rental reimbursement if repair of your covered product takeslonger than promised.
v' 10% discount off the regular price of any non-covered repairservice and related installed parts..
Once you purchase the Agreement, a simple phone call is all thatit takes for you to schedule service You can calf anytime day ornight, or schedule a service appointment online..
The Master Protection Agreement is a risk free purchase., If youcancel for any reason during the product warranty period, we wiltprovide a full refund Or, a prorated refund anytime after theproduct warranty period expires Purchase your MasterProtection Agreement today!
Some limitations and exclusions apply. For prices andadditional information in the U.S.A., call 1-800-B27-6655o
Sears Installation Service
For Sears professional installation of home appliances, garagedoor openers, water heaters, and other major home items, in theU..S.A. call 1-800-4-MY-HOME _
2O

iNDUCEG.&.RA_ DE LOS ELECTRODOME.STICOS KF-.NMORE BJTE%..21
SEGURIDAD DE LA ESTUFA ............................................................... 22
El soporte antivuelco .....................................................................................................................23
USO DE LA SUPERFICIE DE COGC!ON ......................................... 25
Controles de la superficie de cocci6n ........................................................................25Corte de corriente .......................................................................................................................26Quemadores exteriores seilados ........................................................................................26
Enlatado casero ...............................................................................................................................26Utensilios de cocina ...........................................................................................................................26
CONTROLES ELECTRONICOS DEL HORNO ............................ 27
Pantalla ...............................................................................................................................................................27
Anulaci6n ...........................................................................................................................................................28
Re]oj ........................................................................................................................................................................28Luces de la estufa .......................................................................................................................................28Tonos .....................................................................................................................................................................28
Fahrenheit y centigrados ........................................................................................................28
Temporizador ............................................................................................................................................28Panel de control y seguro de ta puerta del homo .......................................29
Apagado de 12 horas .................................................................................................................29Control de la temperatura del homo ....................................................................29
USO DEL HORNO ........................................................................... 30
Corte de corriente .......................................................................................................................................30
Papel de aluminio ...................................................................................................................................30
C6mo colocar tas pardllas y los utensilios para homear ...............30Parritta RollerGlide TM .........................................................................................................................31
Utensilios para hornear ...................................................................................................................32Term6metro para cames ................................................................................................................32
Ducto de escape del homo ......................................................................................................32C6mo homear .......................................................................................................................................32
C6mo asar (Homo superior unicamente) ..................................................................33Cocci6n pot convecci6n (en algunos modelos) ........................................34
Caractefistica Keep WanTI TM (Mantener caliente) ........................................35
Cocinar y mantener caliente ...........................................................................................................36Apagado autom&tico/Modo sab_tico ..........................................................................37Favorito ........................................................................................................................................................................37
CUIDADO DE LA ESTUFA .................................................................... 38
Ciclo de autolimpieza (en algunos modeios) ...................................................38
Umpieza genera! ....................................................................................................................................39Luces del homo ........................................................................................................................................40Puerta del homo ...............................................................................................................................................41
SOLUCION DE PROBLEMAS ........................................................... 41
CONTRATOS DE PROTECCION ............................................................43
GARANTiA DE LOSr
ELECTRODOMESTaCOSKENMORE EUTE
GARANTIA LIMITADA DE UN AI_IO
Cuando este electrodom_stico haya sido instalado, operado ymantenido segl3n las instrucciones provistas con el producto, sieste electrodom6stico falta por defectos de material o de manode obra dentro de un a_o a partir de Ia fecha de compra, flame af1-800-4-M"(-HOME '_para gestionar ta reparaci6n libre de cargo
Si este electrodom6stico es empleado para algun otro uso queno sea el dom_stico familiar, esta garantfa s61o tiene vigencia por90 d[as a partir de la fecha de compra..
GARANTIA LIMITADA DE CINCO AltOS EN LAS PIEZAS DELA SUPERFIClE DE COCCtON
Durante cinco a_os a partir de ]a fecha de compra, si el vidrio dela superficie de cocci6n fatla debido a un choque t_rmico, o si Iose]ementos de la superficie de cocci6n est_n defectuosos, ltameal 1-800-4-MY-HOME _ para solicitar el reemplazo de la pieza sincargo.. Despu_s del primer ar3o de la fecha de compra, usteddeber_ pagar por el costo de mano de obra para ta instalaci6n dela pieza.,
Si este electrodom_stico es empleado para algun otro uso queno sea el dom_stico familiar, esta garantia solo tiene vigencia por90 dias a partir de la fecha de compra
ESTA GARANTIA CUBRE SOLAMENTE LOS DEFECTOS DEMATERIAL Y MANO DE OBRA, SEARS NO PAGARA POR LOSIGUIENTE:
1_ Rajaduras en la superficie de cocci6n de vidrio de cer_mica,que no sean resultado de un choque t_rmico.
2. Manchas y rayaduras en la superficie de cocci6n de vidrio decer,_mica que sean resultado de un accidente o delfuncionamiento o mantenimiento inadecuado_
3. Los artfculos no reutilizables que pueden gastarse por el usonormal, incluyendo, pero sin limitaci6n, filtros, correas, focosy bolsas..
4. Un t_cnico de servicio para enseRade al usuario c6moinstalar, operar o mantener el producto adecuadamente
5. Un t_cnico de servicio para limpiar o mantener esteproducto
6. DaRos a este producto o fallas dei mismo en caso de no serinstalado, operado o mantenido eonforme a todas lasinstrucciones provistas con el producto..
7. Da_os a este producto o fallas de! mismo como resuttado deaccidente, abuso, uso indebido o un uso diferente de aquelpara el cual fue creado..
8. Daff_os a este producto o fallas del mismo causados por eluso de detergentes, limpiadores, productos qu_micos outensilios diferentes de los recomendados en todas las
instrucciones provistas con el producto..
9. Da_os a piezas o sistemas o falias de los mismos comoresultado de modificaciones no autorizadas que se hayanefectuado en este producto.
EXCLUSION DE GARANTIAS IMPLICtTAS; LIMITACION DERECURSOS
El 0nico y exclusivo recurso del cliente seg0n los t_rminos deesta garant_a limitada ser& el de reparar el producto segC]n seestipula en ta presente.. Las garantias implicitas, incluyendo [asgarant_as de comerciabilidad o de capacidad para un prop6sitoparticular, ser_n limitadas a un ar3o o al pen'odo m_s cortopermitido por ley. Sears no se har,_ responsable por da_osincidentales o consecuentes. Algunos estados y provincias nopermiten la exclusi6n o ]imitaciSn de da_os incidentales oconsecuentes, o limitaciones acerca de cu_nto debe durar unagarant[a implicita de comerciabilidad o capacidad, de modo quelas fimitaciones o exclusiones arriba mencionadas pueden noaplicarse en su caso..
Esta garantia se aplica s61o mientras este efectrodom_stico seusa en los Estados Unidos y Canada..
Esta garantfa le otorga derechos legales especfficos, yes posibleque usted tenga tambi_n otros derechos, los cuales var_an de unestado a otro..
Sears, Roebuck and Co.Dept.. 817WA, Hoffman Estates, IL 60179
Sears Canada inc.Toronto, Ontario, Canada M5B 2B8
i;i;:'i:i=
21
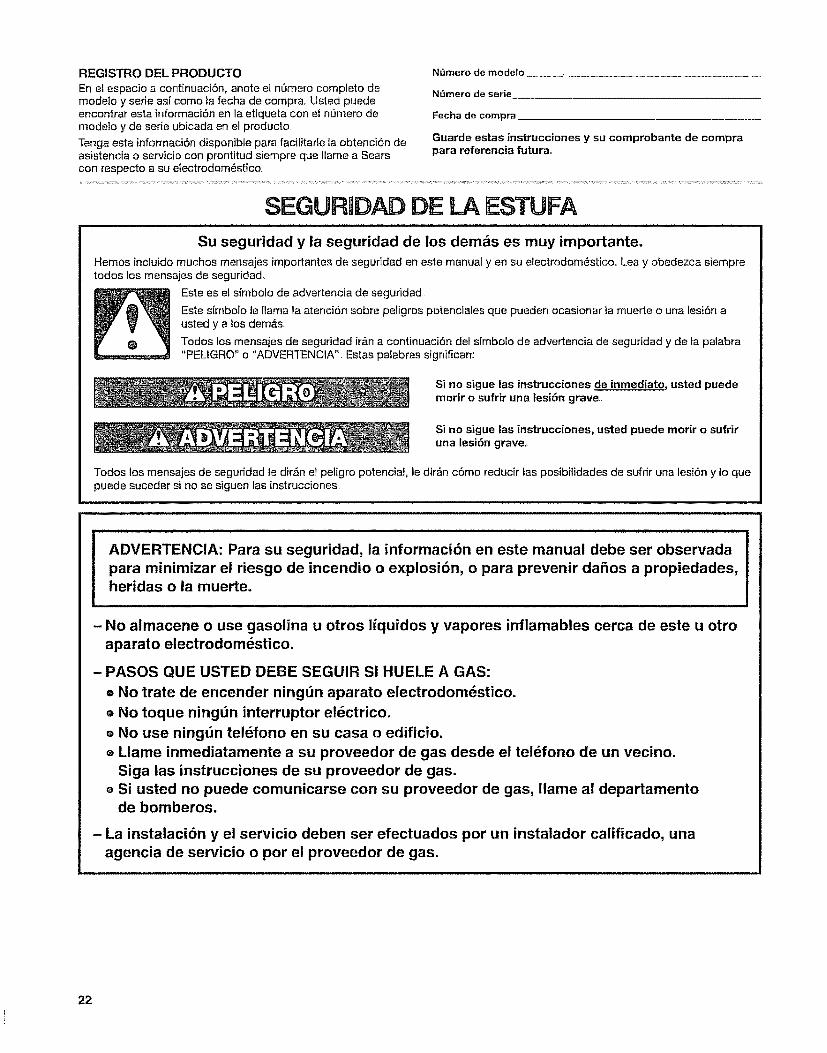
REGISTRO DEL PRODUCTO
En eI espacio a continuaci6n, anote el n0mero complete demodeJo y serie as[ come la fecha de compra,. Usted puedeencontrar esta informaci6n en la etiqueta con el nSmero demode_o y de serie ubicada en el producto
Tenga esta informaci6n disponible para facilitarle la obtenci6n deasistencia o servicio con prontitud siempre que Itame a Searscon respecto a su eiectrodom_stico.,
N_tmero de mode;o
N,3mero de serie
Fecha de compra
Guarde estas instr_Jcciones y su comprobante de comprapara referencia futura,,
SEGURIDAD DE LA ESTUFAi i i i ,,, ,,ll i, i,l, i ,, ,l,, ,, i i,,l,,, ,l,,,,l,,,ll, ,, ,l ,,,,, ,,, ll,,,ll ,,l, ,, ,,l, , ,l ,,l, , , ii, ,,,Hi , ,,, i,l,,l,,l,i i , ii iHi , i i ii i ,,, , i i
Su seguridad y la seguridad de los dem&s es muy importante.
Heroes inciuido muchos mensajes importantes de seguridacl en este manual yen su electrodom_stico.. Lea y obedezca siempretodos los mensajes de seguridad_
Este es el sfmbolo de advertencia de seguridad
Este simbolo le Hama la atenci6n sobre peiigros potenciates que pueden ocasionar ia muerte o una lesi6n austed y a Ios dem_,s..
Todos los mensajes de seguridad iron a continuaci6n del sfmbolo de advertencia de seguridad y de la palabra"PELIGRO" o "ADVERTENCIA".. Estas palabras significan:
Si no sigue las instrucciones de inmediato, usted puedemerit o sufrir una lesiSn grave,,
Si no sigue |as instrucciones, usted puede merit o sufriruna lesi6n grave,,
Todos los mensajes de seguridad le dir&n el peJigro potencial, le dir&n c6mo reducir Ias posibilidades de sufdr L_nalesi6n y to quepuede suceder si no se siguen tas instruccienes.
ADVERTENCIA: Para su seguridad, la informaci6n en este manual debe ser observadapara minimizar el riesgo de incendio o explosi6n, o para prevenir daSos a propiedades,heridas o la muerte.
- No almacene o use gasolina u otros Ifquidos y vapores inflamables cerca de este u otroaparato electrodom_stico.
- PASOS QUE USTED DEBE SEGUIR Sl HUELE A GAS:
= No trate de encender ning_n aparato electrodom_stico.
® No toque ning_n interrupter el_ctrico.
® No use ning_n tel_fono en su casa o edificio.
Llame inmediatamente a su proveedor de gas desde el tel_fono de un vecino.Siga las instrucciones de su proveedor de gas.
o Si usted no puede comunicarse con su proveedor de gas, Ilame al departamentode bomberos.
- La instalaci6n y el servicio deben ser efectuados per un instalador calificado, una
agencia de servicio o per el proveedor de gas.
22

ADVERTENCIA:Lasp_rdidasdegasnosiempresepuedendetectarpore!olfato_.LosproveedoresdegasrecomiendanqueusteduseundetectordegasaprobadoporUL(Laboratoriodenormalizaci6n)oCSA(Asociaci6ncanadiensedeseguridad),,Paraobtenerm&sinformaci6n,p6ngaseencontactoconsuproveedordegas,Sisedetectaunafugadegas,sigatasinstruccionesde"Pasosqueusteddebeseguirsihuelea gas"
La California Safe Drinking Water and Toxic Enforcement Act (La fey de fa protecci6n de[ agua potable y la eliminaci6n desustancias tSxicas de California) exige que el gobemador de California publique una lista de aqueltas sustancias identificadaspor et estado de California como causantes de cancer, defectos cong6nitos o algL]n otro tipo de da5os en la funci6n reproductoray exige a los comerciantes que adviertan de los posibles riesgos de exposiciSn a tales sustancias
ADVERTENCIA: Este producto contiene una sustancia quimica identificada pot el estado de California como causante dec_ncer, defectos cong_nitos o afgtJn otro tipo de daSos en la funciSn reproductora
Este electrodomestico puede producir una exposiciSn de bajo nivel a aIguna de las sustancias enumeradas, incluyendo elbenceno, formaldeh[do, mon6xido de carbono, tofueno y holtin
La estufa no se voltear& durante el uso normal, Sin embargo, si usted aplica mucha fuerza o peso a ia puerta abierta sin haber fijadoadecuadamente e! soporte antivuelco, ta estufa puede voltearse,,
_EI soporte
-_i_,
La pata trasera
Peligro de Vuelco
Un niSo o un adulto puede volcar accidentalmente la estufa y resultar muerto.
Conecte el soporte anti-vuelco a ia pata trasera de la estufa,.
Si traslada de lugar la estufa, vuelva a conectar el soporte anti-vuelco,.
Consulte las instrucciones de instalaci6n para m_s detalles.
No seguir estas instrucciones puede ocasionar ta muerte o quemaduras graves en ni_osy aduitos,
Asegr_rese de que el soporte anti-vuetco haya sido instatado:
= Destice la estufa hacia adelante.
• Verifique que el soporte anti-vuelco est6 bien sujeto al piso o a la pared,
o Deslice la estufa para cotocarla de nuevo en su lugar asegur_ndose de que ia pata traseraquede debajo del soporte antFvuelco.
='C:?_
23

RNSTRUCCIONES UMPORTANTES DE SEGURIDADADVERTENClA: Para reducir e! riesgo de incendio,
etectrocuciSn, lesiones a personas o da£=os al usar la estufade gas, siga precauciones bAsicas, incluyendo tas siguientes:
m ADVERTENClA: PARA REDUCIR EL RIESGO DE
VOLTEO DE LA ESTUFA DE GAS, I_STA DEBEASEGURARSE EN EL PISO MEDtANTE LAINSTALACION DE DISPOSITIVOS DE ANTFVUELCO.PARA VERIFICAR SI LOS DISPOSITIVOS EST,&.N
INSTALADOS ADECUADAMENTE, DESLICE LA ESTUFADE GAS HACtA ADELANTE, CERCIORESE QUE ELSOPORTE ANTI-VUELCO ESTE BIEN FIJO EN EL PISOY DESLICE LA ESTUFA DE GAS HACIA ATR,_S DEMANERA QUE LA PATA TRASERA DE LA ESTUFA DE
GAS QUEDE FIJA DEBAJO DEL SOPORTE DEANTf-VUELCO.
m ADVERTENClA: NUNCA use este efectrodom_stico
como calefactor de ambientes para calentar o entibiar lahabitaci6n. El hacerlo puede res'Jltar en la contaminaci_ncon mon6xido de carbono y el sobrecalentamiento delhomo.
ADVERTENCiA: NUNCA cubra ranuras, orificios o
pasajes en la parte inferior del homo ni cubra una rejillaentera con materiales tales como papel de atuminio Ethacerlo bloquea et ftujo de aire en el horno y puede causarla contaminaciSn con mon6xido de carbono. Los forros de
papel de aluminio tambi_n pueden atrapar el calor yprovocar un riesgo de incendio
u AVlSO: No almacene articulos que interesen a los niSos
en los armarios que estAn encima de una estufa de gas oen el respaldo de protecci6n de una estufa de gas - altrepar los niSos encima de la estufa para alcanzar afgunobjeto, podfian lastimarse sedamente..
Instalaci6n Apropiada - Af instalar la estufa de gas debehacer la conexiSn el6ctrica a tierra de acuerdo con las
normas locales o, en ausencia de normas locales, con et
Cddigo El_ctrico Nacionat (National Electrical Code),ANSf/NFPA 70 Cerci6rese que la instalaci6n y puesla atierra de la estufa de gas sean efectuadas adecuadamentepor un t6cnico competente.
Esta estufa de gas est_ equipada con un enchufe de trespuntas con contacto a tierra para su protecciSn contrariesgo de electrocuciSn y debefia enchufarse directamentea un tomacorriente que tiene conexi0n a tierra No corte niquite la punta para conexiSn a tierra de este enchufe.
Desconecte el suministro de energia antes de darmantenimiento
El mat uso de fas puertas o gavetas del aparatoelectrodom_stico, tales como pisar, recoslarse o sentarse
en tas puertas o gavetas, puede ocasionar heridas..
m Mantenimiento - Mantenga el _rea de la estufa de gas
despejada y iibre de matedales combustibles, gasolina yotros vapores y Ifquidos inflamables
m Almacenaje dentro o encima de la estufa de gas - No sedebe atmacenar matedales inflamables en el homo o cerca
de las unidades que estAn en la superficie_
n El tama5o de la llama de! quemador superior debe
ajustarse de manera que no se extienda mAs alia de losbordes del utensilio de estufa.
Para estufas de gas de ]impieza autom,=Stica-
m Antes de efectuar la limpieza automAtica del homo - quitela charofa para asar y otros utensilios Limpie con un trapoht_medo todo derrame excesivo antes de iniciar el ciclo de
autolimpieza.
GUARDE ESTAS UNSTRUCCaONES
24
!

USO DE LA SUPERRC E DE COCCIION
D_"_' ...........................O0000 "_
F .........!..........,°oo°
A Perflta de controlposterior derecha
B Per!lie de control
posterior izquierdaC. Quemador central
D,.Perilla de control frontalderecha
E. Perifla de control frontal
izquierdaF. Localizador det
quernador de superficie
i ilU iiil,l,Ulllll, ii.................. i,ilU,11i,i i iii i, i1,11
Peligro de Incendio
No permita que la llama del quemador se extienda m_isall_ que la orilla de la cacerolao
Apague todas las periltas de los controles cuando noest6 cocinando.,
No seguir estas instrucciones puede ocasionarla muerte o incendio.
"Conversiones de gas" de las Instrucciones de instalaci6n paravet los detatles sobre c6mo hacer dicha conversi6n,,
Los encendedores el6ctricos encienden automAticamente los
quemadores de ia superficie cuando las perillas de control segiran a la posici6n de LIGHT (Encender)..
Los quemadores grandes (t6.000, 14,000 y 12.500 Btu/hr[Unidades t6rmicas brit_nicas]), proveen el nivel de calor m_ts altoy son ideales para ta cocci6n de cantidades grandes dealimentos o liquidos en ollas y cacerolas grandes Losquemadores pequeSos (9,200 y 5,000 Btu/h), permiten tenet unmejor control de la cocci6n a fuego lento en el ajuste m&s bajo, yson ideales para ]a cocci6n de cantidades menores de alimentosen ollas y cacerolas m_ts pequelhas.
Coloque el utensilio de cocina Ileno sobre la parriila antes de fijaruna perilla de control, No use un quemador mientras userecipientes vac[os o sin tener un recipiente sobre la parritla,
NOTA: Revise si el quemador se ha encendido. Si el quemadorno se enciende, escuche para ver si se est_ emitiendo unchasquido., Si no escucha que el encendedor haga un chasquido,apague el quemadoE, Revise si se ha disparado un cortacircuitoso si se ha fund!do un fusible.
Revise que la perilla de control se haya empujado hacia dentroen el eje de la v&Ivuta completamente, Si el encendedor dechispa sigue sin funcionar, Ilame a un especiaiista de serviciocapacitado,.
Para fijar.
1. Empuje hacia adentro y gire Ia perilla hacia la izquierda haciaLIGHT (Encender)..
Los cuatro quemadores de [a superficie harsh un ruido seco.,Solamente producirA una llama el quemador cuya perilta decontrol est6 girada a LIGHT.,
2. Gire la perilla en cualquier posici6n entre HI (Alto) y LO (Bajo),Utitice la tabla siguiente como gu[a euando fije los niveles decalor,,
AJUSTE USO RECOMENDADO
LIGHT(ENCENDER) _ Encender el quemador
HI (Alto) a Para comenzar a cocinar losalimentos,,
Para hacer hervir iiquidos,
MED (Mediano) m Para mantener un hervor r_pido,
m Para dorar los alimentos
r_pidamente o a fuego muy vivo,
Pare freir o sofreir los alimentos.
Para cocer sopas y salsa&
Cocer afimentos a fuego lento o aivapor.,
LO (Bajo) r_ Para mantener el alimentocaliente
Para cocinar a fuego lento.
tMPORTANTE: Su estufa est_ preparada de f&brica para uso congas natural. Si desea usar gas LP, se incluye un juego deconversi6n a gas LP con su nueva estufa.. Consulte la secci6n
RECUERDE: Cuando se est6 usando la estufa o (enatgunos modelos) durante el cicto de auto limpieza, toda fasuperficie de cocci6n se calienta,
_:_'_:_::,_
25

OOY_®' " "Quemadores de superficie
En el case de un corte de corriente prolongado, los quemadoresde ta superficie pueden encenderse manualmente. Co!oque uncedllo encendido cerca del quemador y gire la peril]a en elsentido contrario alas manecillas del retoj para encender elquemador.. Gire la pedlla a la posiciOn deseada luego de que seencienda el quemado_:
....._>d'_J_@ £_Ec _'_
A Tapa def quemador
B. Base del quemador
C,, Espigas de afineacidnD, Encendeder
EL.Abertura del tube de gas
IMPORTANTE: No obstruya el flujo de aire de ventilaci6n ycombustion alrededor de los bordes de la parrilla del quemador..
Tapa del quemadoc Mantenga siempre la tapa def quemador ensu tugar cuando use un quemador exterior. Una tapa dequemador limpia ayudar,_ a prevenir un encendido inadecuado yuna llama desigual., Umpie siempre ta tapa de! quemadordespu_s de un derrame y come rutina quite fas tapas y limpielasde acuerdo con fa secciOn "Limpieza general"..
Abertura del tube de gas-' El gas debe fluir con libertad a tray, sde la abertura del tube de gas para que el quemador se enciendaadecuadamente.. Mantenga esta _rea libre de suciedad y nopermita que derrames, alimentos, productos de limpieza ocualquier otro material se introduzca en la abertura dei tube degas.. Use siempre la tapa clef quemador para protegerla dederrames.
B
A. t-t ½" (25-38 rnrn)B..Otifictos det quemador
Orificios del quemador: Verifique de vez en cuando que lasllamas del quemador sean del tamaOo y forma apropiada talcome se ilustra a continuaciOn.. Una buena llama es de color azul,
no amarillo.. Mantenga esta &rea tibre de suciedad y no permitaque los derrames, alimentos, productos de limpieza o cualquierotto material se introduzca en los odficios del quemador..
Para lirnpiar.
IMPORTANTE: Antes de fimpiar, asegurese de que todos loscontroles est_n apagados y que el homo y la superflcie decocciOn est_n fries.. No use timpiadores de homo, blanqueador oproductos para quitar Oxido..
1o Quite la tapa del quemador de la base del mismo y limpie deacuerdo con la secciOn "Umpieza general"..
2., Limpie la abertura del tube de gas con un pa_o hLimedo.
3o Limpie los orificios obstruidos dei quemador con un affilerrecto tal come se ilustra. No agrande ni distorsione el orificio.No use palillos de dientes de madera. Si el quemadornecesita ser regulado, Ilame a un t_cnico competente paradarle servicio..
f
4. Vuetva a colocar la tapa de! quemador, asegur&ndose de quetas espigas de afineamiento est_n debidamente alineadascon la tapa de! quemador,
5.
A. lncerrectoB..Correcto
Encienda el quemador.. Si el quemador no se enciende,verifique la alineaci6n de la tapa. Si el quemador todavia nose enciende, no intente reparar el quemador sellado ustedmismo; pOngase en contacto con un t@cnico de serviciodesignado,.
_8 LS__O08SeYO
Af preparar enlatados durante periodos pro!ongados, alterne eluso de los quemadores de superficie entre cada lore., Esto datiempo para que las &teas usadas recientemente se enfrien..
1_ Centre el envasador en la parrilla.
No coloque el envasador sobre 2 _reas de quemadores desuperficie a la vez_
Para obtener m_s informaciOn, p6ngase en contacto con eldepartamento de agficultura de su Iocalidad Tambi@npueden ofrecer ayuda las compariias que fabrican productospara enlatado casero..
U ens, i ios " "_e COC_R_IMPOFtTANTE: No deje utensilios de cocina vacfos encima de un&rea de cocciOn de superficie, elemento o quemador desuperficie caliente..
Los utensilios de cocina ideales deben tener un fondo plane,lades rectos, una tapa que encaje bien y et material debe ser deun espesor mediano a gmeso
I_as superficies r_speras pueden rayar la superficie de cocciOn otas parriflas.. El alurninio y el cobre pueden emplearse comen_cleo o base en los utensilios de cocina.. Sin embargo, al serusados come base, pueden dejar marcas permanentes en tasuperficie de cocciOn o ias parrillas.
26
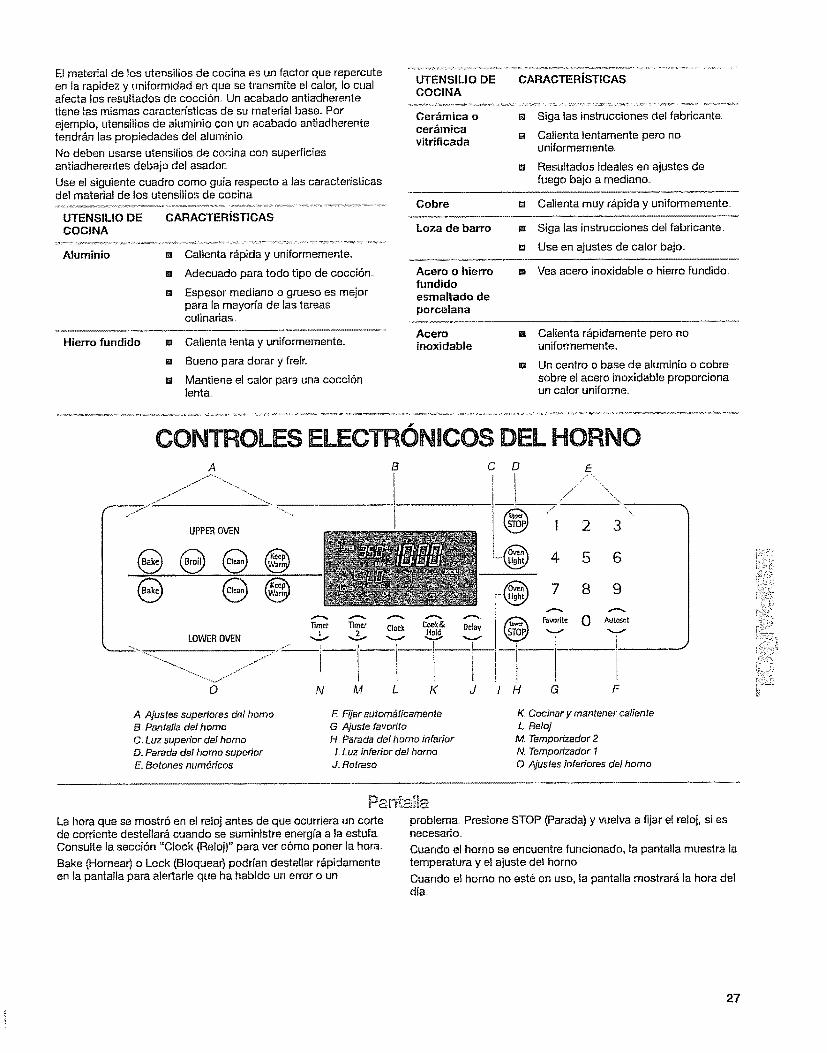
El material de los utensilios de cocina es un factor que repercuteen la rapidez y uniformidad en que se transmite el calor0 Io cualafecta los resultados de cocciCn, Un acabado antiadherentetiene fas mismas caractefisticas de su material base, Por
ejemplo, utensilios de atuminio con un acabado antiadherentetendr&n las propiedades del aluminio,
No deben usarse utensitios de cocina con superficiesantiadherentes debaio del asador,
Use el siguiente euadro como gufa respecto a tas caracteffsticasde1 material de los utensilios de cocina,
UTENSILIO DE CARACTERISTiCASCOClNA
A|uminio [] Calienta rz_pida y uniformemente,
u Adecuado para todo tipo de cocciCn.,
m Espesor mediano o grueso es mejorpara la mayorfa de las tareasculinadas.
Hierro fundido m Calientalenta y uniformemente,
la Bueno para dorar y freir,,
_t Mantiene el calor para una cocciCnlent&
UTENSILIO DE CARAOTERISTIOASCOC1NA
Cer_mica o u Siga las instrucciones del fabr_cante.,cer_micavitHficada u Calientalentamente pero no
uniformemente
m ResuItados ideales en ajustes defuego bajo a mediano
Ochre [] Calienta muy r.4pida y uniformemente,,
Loza de barro _ Siga tas instrucciones del fabricante,
[] Use en ajustes de calor bajo..
Acero o hierro m Vea acero inoxidable o hierro fundido,fundidoesmaltado de
porcelana
Acero I_ Calienta r&pidamente pero noinoxidable uniformemente.,
[] Un centro o base de aluminio o cobra
sobre el acero inoxidabte proporcionaun calor uniforme,,
CONTROLES ELECTRCN COS DEL HORNOA
UPPEROVEN
B C D
®
LOWEROVEN
O
_m_t _m_f
I'i i
N M
Cl_ck C._k&v v
L K
v
d
E
/_ %%.
1 2 3
-@ 4
i®t H G
5 6
8 9
Aut_l_
F
A Ajusfes supedores de/homo
B Pantafla def homo
0 Luz supedor de! homo
[1 Parada del homo supedor
_, Botones num#ricos
F, R]ar autom_ticamente
Gr,Ajusfe fevoritoH, Parada de/homo inferior
1.Luz inferior de/homo
J.. Retraso
K Cocinar y mantener caliente
L Reloj
M, Temporizador 2
N, Temporizador I
0 Ajusfes inferiores de! homo
>_ii!:=
La hora que se mostr6 en el reloj antes de que ocurriera un cortede corriente destellar_ cuando se suministre energia a la estufa,,Consulte ta secci5n "Clock (Reloj)" para ver c6mo poner ta hora,,
Bake (Hornear) o Lock (Bloquear) podrian destellar r&pidamenteen la pantafla para alertade que ha habido un error o un
problema,, Presione STOP (Parada) y vuelva a fijar e! reloj, si esnecesafio..
Cuando el homo se encuentre funcionado, la pantalla muestra latemperatura y el ajuste del homo.
Cuando e! homo no est_ en uso, la pantalla mostrar_ la hora deldia..
27

El bot6n Cancel (Anular) detiene todas las funciones, conexcepci6n de Clock (Reloj), Timer (Temporizador) y Control Lock(Bloqueo de control).
_'_ it ,t
El reloi se puede fijar para mostrar la hora en un formato de 12 624 horas El reloj se flja de f&brica en el formato de 12 horas.
Para cambiar el reloj al formato de 24 horas:
% Presione y sostenga el bot6n det homo superior de STOP(Parada) y el de FAVORITE (Favorito) def homo por 3segundos,, Destellar& "12 Hr" en la pantalla.
2. Presione AUTOSET (Figar automAticamente) para e]egir"24 Hr"; presione nuevamente para elegir '_12 Hr".,
3. Ponga la hora del dia siguiendo las instrucciones de "To Set(Para fijar)".,
P_tFa fijar:.
Antes de fijarlo, cerci6rese de que el homo y el temporizadorest_n apagados,
1, Presione CLOCK (Reloj),. Aparecer&n la hora del d(a y dospuntos en ta pantatl&
2. Presione los botones num6ricos para fijar la hora del dia.
3. Presione CLOCK (Reloj) nuevamente o espere 4 segundos,Los dos puntos permanecer_n en la pantafla..
Para ver la hora del dia cuando est_ funcionando otra funci6n,
presione CLOCK.
C6mo cancelaflo:
Presione y sostenga el bot6n del homo superior deSTOP (Parada) y el de CLOCK (Reloj) por 3 segundos., Lahora det dfa desaparecer_ de la pantalla,,
Cuando se cancele la pantalla del reloj, presione CLOCK paramostrar brevemente la hora del dia,
Para reestablecerlo:
Presione y sostenga e! bot6n del homo superior deSTOP (Parada) y e! de CLOCK (Reloj) por 3 segundos.,Volver& a aparecer la hora del dia en fa pantall&
Luces de Is estLFaLuz del homo
Mientras que la puerta del homo est@ cerrada, presione UPPER(Superior) o LOWER OVEN LIGHT (Luz del homo inferior) paraencender y apagar la luz., La fuz del homo se encender& cuandose abra la puerta del homo,, La luz del homo no se encender&durante el ciclo de Self-Clean (Autolimpieza).
TOF_OS
Los tonos son se5ales audibles que indican Io siguiente:
Funciones b_sicas
Un tono
e lngreso v_lido
El homo ha alcanzado la temperatura del precalentado (tonolargo)
e Se ha ingresado una funci6n
Dos tonos
a AI presionar un bot6n inv&lido
Cuatro tonos
m SePal de fin de cicfo
C6mo ajustar el nivel de sonido
En homo se ha fijado de fAbrica en medio (MEd) pero se puedecambiar a bajo (LO) o alto (HI),
1, Presione y sostenga el bot6n de DELAY (Retraso) ySTOP (Parada) del homo superior por 3 segundos.. Sonar_un pitido,. Aparecer_n "bEEP" (Pitido) y el nivel de sonidoactual en la pantalla..
2,, Presione AUTOSET (Fijar autom&ticamente) para subir obajar el nivel de sonido,, Espere 4 segundos para que elnuevo ajuste sea aceptado,.
Si no se presiona AUTOSET en 30 segundos, el controf regresar&al ajuste actual.
La temperatura est_ prefijada en Fahrenheit, pero puedecambiarse a centigrados,
1., Presione y sostenga los botones del homo superior deBAKE (Hornear) y STOP (Parada) por 3 segundos. Sonar&un pitido y el ajuste actual (°F o °C) aparecer& en la pantalla.
2,, Presione AUTOSE-T para cambiar el ajuste Espere4 segundos para que el nuevo ajuste sea aceptado,
Si no se presiona AUTOSET en 30 segundos, el control regresarb.al ajuste actual
Cada temporizador puede ser fijado en horas o minutos, hasta99 horas y 59 minutos, y hace [a cuenta regresiva del tiempofijado., El temporizador no pone en marcha ni detiene el homo,,
Para fijan
1_ Presione TIMER 1 (Temporizador 1) oTIMER 2 (Temporizador 2),,
"00:00" y "TIMER 1" o "TIMER 2" destellar&n en la pantall&
2_
3_
Presione los botones num_ricos para seleccionar la horadeseada,
Los dos puntos y "TIMER 1" o "TIMER 2" continuar&ndestellando. Si los dos temporizadores est&n activos,"TIMER t"y "TIMER 2" aparecer&n en la pantall&
Presione TIMER 1 o TIMER 2 nuevamente o espere4 segundos° Los dos puntos dejan de destellar y empiezafa cuenta regresiv&
El _Jltimo minuto de la cuenta regresiva del temporizadoraparecer,_ en segundos,,
Af final de! tiempo fijado, un pitido largo sonar& y "End" (Fin)aparecer& en la pantaita,
4o Presione TIMER (Tempodzador) para despejar la panta!la.
C6mo cancetarlo:
Presione y sostenga el bot6n del temporizador por 3 segundos, opresione el bot6n del temporizador y el "0" usando los botonesnum_ricos
28

_-_*> _ _ _t'r_. .'_',_'t,_'_ ¸_ ,_ ",f_ _._., _m, t'_,_"_ _ _':_:__ _'_m_,
La puerta y los controles del homo se pueden bloquear paraevitar et use accidental def homo..
Las puertas y los controles del homo no se pueden bfoquear sise est& usando et homo, o sJ la temperatura del homo es de400°F (205°C) o m_s
La hera actual de dia permanecer_ en la pantalla cuando loscontroles y las puertas det homo est&n bloqueados.
Para bloquear e! panel de control y ambas puertas delhomo:
1o Presione y suelte STOP (Parada),.
2., Presione y sostenga el bot6n def homo superior deSTOP (Parada) y et de COOK & HOLD (Cocinar y mantenercaliente) per 3 segundos, Aparece "OFF" (Apagar} en lapanta[la y "LOCK" (Bloqueo) destella mientras que sebloquean los controles y la puerta del homo..
Ambas puertas det homo se bloquean.. "LOCK" (Btoqueo)permanece iluminado en la pantalla.
Para desbloquear el panel de control y ambas puertas delhomo:
1_ Presione y sostenga el bot6n del homo superior de STOP(Parada) y el de COOK & HOLD (Cocinar y mantener caliente)per 3 segundos. Desaparece "OFF" (Apagar) de la pantalla y"LOCK" (Bloqueo) destella mientras que se desbloquean loscontrotes y la puerta def homo.
El control deI homo ha side fijado para apagar el homoautom&ticamente t2 horas despu_s de que el homo se encienda.Esto no interferir& con ninguna funci6n de cocci6n programada nide retraso..
Para cancelar ]a funci6n de apagado de t2 horas y encender elmode Sabbath (Sab&tico), yea fa secciSn "Mode sab&tico".
IMPORTANTE: No use un term6metro para medir fa temperaturadel homo, ya que el abdr la puerta del mismo puede producir queel ciclo det quemador d_ una lectura incorrecta
El homo proporciona temperaturas acertadas; sin embargo, esposible que cocine m_s r_pido o m&s despacio que su homoanterior, de manera que se puede ajustar el cafibrado de latemperatur& Puede cambiarse a Fahrenheit o a centi'grados.
La regulaci6n de la temperatura se aplica a Bake {Hornear),Convect Bake (Hornear per convecci6n) y Convect Roast (Asarper convecciSn) en el homo inferior _3nicamente.
Un signo de menos significa que el homo estar_ m_s frio con lacantidad que se muestra en ta pantalla La ausencia de signo demenos significa que et homo estar& a una temperatura mAscaliente con la cantidad que aparece en la pantalla. Use comeguia la siguiente tabla.
A,JUSTE en °F COCINA LOS ALIMENTOS
(AJUSTE en °C)
5 ° a t0°F (3° a 6_C) .....un poce m&s
15 ° a 20°F (9_ a t2_C) ......moderadamente m_s
25 ° a 35°F (15_ a 21°C) ......mucho m&s
-5 ° a -10_F (°3 ° a _6°C) ......un poco menos
_15° a -20=F (-9 ° a -12°C) .....moderadamente menos
-25 ° a -35°F (-15°C a -21 "C) .....touche menos
Para ajustar el calibrado de la temperatura del homo:
1. Presione el bot6n adecuado de BAKE (Hornear)..
2. tngrese 550 usando los botones hum@rices.
3. Presione y sostenga BAKE (Hornear) for unos segundos ohasta que aparezca 00 ° en la pantalla.
Si la temperatura del homo se regul6 previamente, esecambio aparecer_, en la panta!la.. Per ejemp!o, si latemperatura def homo se habia disminuido per 15°F, lapantalla mostrar_. "-15 _"
4. Presione AUTOSET (Fijar autom_.ticamente) para aumentar odisminuir la temperatura en 5" (3°C) E! ajuste puede fijarseentre 35°F (21_C) y -35°F (-21°C)..
5. La hera del dia aparecerA autom_ticamente en la pantalla.
29

USO DEL HORNOLos olores y el humo son normales cuando el homo se usa lasprimeras veces o cuando 6ste tiene suciedad pesada,
IMPORTANTE: La salud de algunas aves es sumamente sensiblea los gases emanados. La exposici6n a los gases puedeocasionar la muerte de ciertas aves., Mude siempre las aves aotro cuarto cerrado y bien ventilado,,
Quemadores del homo
Su estufa est#. equipada con un encendido sin piloto Con estesistema de encendido, fa entrada del gas se cierraautom_ticamente y el homo no funcionar& durante un corte decorriente
Un cerillo prendido no encender_ el quemador de harnear o el deasar. No se debe intentar usar el homo durante un corte decorriente_
P pe! de [un" inioIMPORTANTE: No forre el fondo del horno can ningun tipa depapel de aluminia, revestimiento a utensilio de cocina ya queda_affa permanentemente el acabado del fonda del horna..
la En aquellos modelos con ductos de escape inferiores, noobstruya ni tape los ductos de escape inferiores del homo
[] Para obtener 6ptimos resultados de cocci6n, no cubra todala pardlla con papel de atuminio, ya que el aire debe circularcon libertad
El Para recoger los derrames, coloque papel de afuminio en taparrilla que est& debajo del recipiente de hornear,. Asegt)resede que e! pape! de alumino sea per Io menos 1/=.(1,3 cm) m&sgrande que el recipiente de hornear y que los bordes est6ndoblados hacia ardba
IMPORTANTE: Para evitar dafios permanentes en el acabado deporcelana, no coloque alimentos ni utensilios de harneardirectamente sobre la puerta o la base del homo,
Media parrilla
La media pardlla con inserto desmontable ayuda a proveer elma'ximo espacio, Cuando ambos est&n sujetos forman unaparrilla completa.,
A lnserto desmontable
Et inserto se puede quitar para que haya mAs espacio paraarticulos grandes, tales como pavos y cazuelas
Para quitar las parrillas del homo:
Parrillas planas: Jate la parrilla hacia afuera hasta el tope, levantela ofilfa delantera, y luego fev_ntela para sacada.,Parrilta RollerGlideTM:Vea la secci6n "Parrilta RolferGlideT_"..
Parrillas
B Cotoque las parrillas antes de encender el horno.,
]= No coloque las parrillas con los utensilios para hornear sobreelias.,
[] Cerci6rese de que las parrillas est6n niveladas,,
= El homo superior est_ equipado con t parrilla,,
Et homo inferior se puede equipar con una parrillaRollerGlide TM, una media parritta y/o parrillas normatesplanas,
Parrilla RollerGlide TM
la Para obtener los mejores resuttados de cocci6n, cuandohornee en t parrilla, use la pardlta RoflerGlide_,,
m Cuando homee en 2 parrillas, use la parrifla RofterGlide TM enla posici6n inferior, y una parrilta plana en la posici6n superior,,
El Cuando ase trozos grandes de came y ayes, use fa parrillaRolterGlide TM para facilitar el movimiento
Para volver a colocar las parrillas del homo:
Parrilfas planas: Coloque la papilla en el soporte para papilla enel homo, Levante ligeramente la orilla delantera y deslice lapapilla hacia adentro hasta que se libre del tope., Baje el frente ydeslicela en el homo.,
Pamlla RotlerGlide_: Vea la secci6n "Parrilla RollerGlide;_"..
Posiciones de la parrilla
_5
_4
__3
_2
--1
30
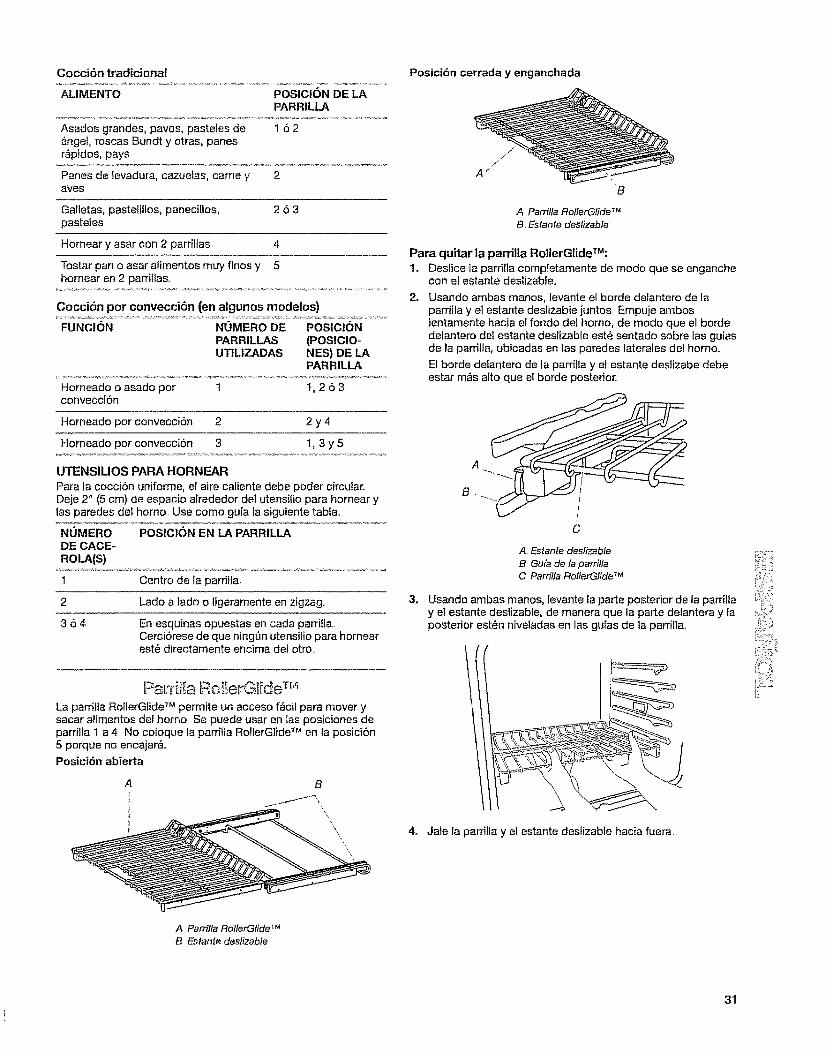
Cocci6n tradicional
ALIMENTO POSICION DE LAPARR|LLA
Asados grandes, pavos, pasteles de t 6 2Angel, roscas Bundt y otras, panesMpidos, pays
Panes de levadura, cazuelas, came y 2ayes
Galletas, pastelillos, panecillos, 2 6 3pasteles
Hornear y asar con 2 parriltas 4
Tostar pan o asar alimentos muy finos y 5hornear en 2 parrillas.
Cocci6n por convecci6n (on algunos modelos)
FUNCION NUMERO DE POSIGION
PARRILLAS (POSICIO-UTILIZADAS NES} DE LA
PARRILLA
Homeado o asado por 1 t, 2 6 3convecci6n
Homeado por convecci6n 2 2 y 4
Horneado por convecci6n 3 1, 3 y 5
UTENSIUOS PARA HORNEAR
Para la cocci6n uniforme, el aire caliente debe poder circular.Deje 2" (5 cm) de espacio alrededor de1 utensilio para hornear ylas paredes del homo. Use como gu/a la siguiente tabla..
NUMERO POSlOION EN LA PARRILLADE CAGE-ROLA(S)
1 Centro de la parrilla.
2 Lade a ]ado o ligeramente en zigzag.
3 6 4 En esquinas opuestas en cada parritlaCerci6rese de que ningt)n utensifio para horneareste directamente encima del otro..
Ps ' lia Ro Ie, 'Glide TM
La parrilia RollerGlide TM permite un acceso fAcil para mover ysacar alimentos del homo,, Se puede usar en tas posiciones deparrilla 1 a 4. No coloque ta parrilla RollerGlide TM en la posici6n5 porque no encajar&
Posici6n abierta
A
\\
Posici6n cerrada y enganchada
A Pan'ilia Ro!lerGlide TM
B. Estante destizabte
Para quitar la parrilla RollerGlide_:
1. Deslice la parriila compfetamente de modo que se enganchecon el estante deslizable
2_ Usando ambas manos, levante el borde delantero de laparrilta y el estante deslizable juntos Empuje amboslentamente hacia el fondo del homo, de modo que el bordedelantero del estante deslizable este sentado sobre las gufasde la parrilla, ubicadas en las paredes taterales de! horno..
El borde delantero de la parrilla y e! estante deslizabe debeestar m_s alto que el borde posteriot:
3_
4.
C
A Estante deslizable
B Gufa de la parrillaC Panilia RollerGtide TM
Usando ambas manos, levante la parte posterior de la parriliay el estante deslizable, de manera que la parte delantera y faposterior esten niveladas en las guias de la parrilla,
Jale fa parrilla y el estante deslizable hacia fuera
i:>: :>;:
]::'=i!7.TiiL:_
A. Parrilla RollerGfide TM
B Estante destizable
31

Para votver a colocar la parritla RollerGlidem:
1° Usando ambas manes, sujete el frente de la parrillaenganchada y e! estante deslizable.. Coloque la parritlaenganchada y e! estante deslizable en las gufas de la parrill&
2. Empuje ta parrilla y el estante deslizable lentamente hacia elfondo deI homo, hasta que el borde posterior del estantedesfizabte descienda
3. Jale la parrilla y el estante deslizable ligeramente hacia fuera,hasta que el borde delantero descienda y el estantedeslizable est_ sobre las guias de ia parrilla
Para evitar que se daSen los estantes deslizables, no coloquem&s de 25 lb (11,4 kg) de peso sobre la parrilla.
No lave ia parrilla RollerGlide TM en una lavavajitlas Podfiaremover el fubricante de fa parrilla y afectar su deslizamiento
Vea la secci6n "Umpieza general" para obtener m_s informaci6n..
El material de los utensilios para hornear afecta los resultados decocci6n.. Siga las recomendaciones det fabficante y emplee eltamafio de utensilio para hornear recomendado en la receta decocina. Use el siguiente cuadro come gufa
UTENSILIO PARA RECOMENDACIONESHORNEAR/
RESULTADOS
Aluminio de color claro _= Use la temperatura y el tiempo
= Cortezas doradas recomendados en fa recetaclaras
e= Dorado uniforme
Aluminio oscuro y ==otros utensilios parahornear con acabadooscuro, mate y!o aantiadherente
a Cortezas bien adoradas, crujientes
Puede necesitar reducir un pocota temperatura para hornea_.
Use el tiempo recomendado dehorneado,,
Para pays, panes y guisados,use la temperaturarecomendada en la recet&
Coloque la parrilta en ef centredel homo
Moldes o bandejas mpara horneartermoaistados
Poco o nada dedorado en el rondo
Col6quelos en fa terceraposici6n inferior del homo.
Puede necesitar aumentar e!
tiempo de horneado..
Acero inoxidable = Puede necesitar aumentar el
Cortezas doradas, tiempo de horneado.claras
m Dorado desigual
Cerfimica de gres/ _ Siga las instrucciones delPiedra para hornear fabdcante..
la Cortezas crujientes
Utensilios de vidrio m Puede necesitar reducir un pocoresistentes al homo, ta temperatura para hornear..cerfimica vitrificada ocer_mica
Cortezas doradas,crujientes
Para los modelos que no tengan una sonda de temperatura, useun term6metro para carnes para determinar si las carnes, aves ypescado est&n cocidos al t_rmino deseado.. Lo que cuenta es latemperatura intema, no la apadenci& Este electrodom6stico noviene provisto de un term6metro para carnes Siga lasinstrucciones del fabricante sobre la utilizaci6n de un termOmetro
para came&
A
A. Ducto de escape det homo
El ducto de escape def homo libera aire ca[iente y humedad delhomo y no debe bloquearse ni taparse El hacerlo dar_ fugar auna circulaci6n de aire insatisfactoria, afectando los resultadosde cocci6n y de limpieza.. No coloque objetos de pl_stico, papelu otros art[cutos que podrian derretirse o quemarse cerca delducto de escape del homo.
C@-no hol:'nea:Antes de hornear, co!oque las parritfas segt]n la secci6n"Posici6n de las parrillas y los utensifios para hornear"
Si el homo inferior no se est_ utilizando, el homo superior seprecalentar_ m&s r_,pido.
Deje un espacio minimo de _/_."(1,3 cm) entre la bandeja parahornear o la cacerola y el eIemento superior en et homosuperior,. No se recomienda colocar bandejas para pan,pasteles de &ngel o roscas Bundt en el homo superior.
Cuando se hornee pizza congelada en el homo superior,coloque la pizza en una bandeja para ga[letas, para evitar quese dore de re&s,.
Cuando precaliente con una piedra para hornear/pizzaadentro de[ homo superior, no fiie el homo en unatemperatura mayor a los 400_F (205°C).. Para usar piedraspara horneadpizza en temperaturas mayores a _os 400°F(205"C) en el homo superior, introduzca la piedra despu_s delpitido de precalentado
Para homear o asar:
1,, Presione et bot6n de BAKE (Hornear) para elegir el homo desu preferencia,.
DestellarAn "BAKE" y "000" en la pantalla
2_ Seteccione ]a temperatura del homo..
Presione AUTOSET (Fijar autom#,ticamente) para unatemperatura de 350°F (175°C) o los botones num_ricosapropiados. Cada vez que presione el bot6n de Autoset, latemperatura aumentar_, en 25"F (15°C).
La temperatura del homo puede fijarse entre t70"F y 550_F(75°C y 288°C)_.
32

3_
4.
6°
Presione BAKE (Hornear) nuevamente o espere 4 segundos
"BAKE" dejar,_ de destellar y permanecer_, iluminado en fapantalfa PREHEAT (Precalentar) se iluminar& en la pantatl&
AparecerA t00°F (35°C) o la temperatura actual del homo, sies mayor a 100°F (35"C). La temperatura aumentar_ enincrementos de 5 _ hasta que se alcance la temperaturaprefijada
Espere de 4 a 10 minutos para que se precaliente el homosuperior y 7 a 12 minutos para que se precaliente el homoinferior.
Cuando se alcance Ia temperatura fijada del homo, sonar& unpitido largo y "PREHEAT (Precalentar}" desaparecer& de fapantall&
Para vet la temperatura fljada durante el precalentamiento,presione BAKE (Hornear).
Para cambiar la temperatura del homo durante elprecalentamiento, presione el bot6n de Bake (Homear) dosveces, luego presione el bot6n de Autoset (Fijarautom_ticamente) o los botones num_ricos apropiados,hasta que se muestre ta temperatura deseada en la pantalla.
Coloque los alimentos en el horno
Para cambiar ta temperatura del homo durante la cocci6n,presione Bake (Hornear), luego presione el bot6n de Autoset(Fijar autom_ticamente) o los botones num6ricos apropiados,hasta que se muestre la temperatura deseada en la pantalta.
Presione CANCEL (Anular) o STOP (Parada) cuando hayaterminado.
Retire los alimentos del homo.
O6mo ss r_do:'no SL!pSi"iOr Onicsmente}
Et asador usa calor radiante directo para cocinar los atimentos..Para obtener un control m6s preciso al cocinar, cambie tatemperatura mientras est_ asando. Cuanto m_s baja sea latemperatura, m&s tenta set& fa cocci6n.. Los cortes m&s espesosy los pedazos de came, pescado y ayes con forma irregular sepueden cocinar mejor a temperaturas para asar m_s bajas.
m Para obtener los rnejores resultados, utilice una sart6n y unareji!ta para asa[. Se han disefiado para drenar el jugo y ayudara evitar salpicaduras y humo..
Z
Ill
Si 16 gustaria comprar una charola para asar, puede hacer unpedido de la misma. Vea fa contraportada para encargarlo..Pida la pieza n_imero I2500100..
Para un drenaje adecuado, no cubra la parrilla con papel dealuminio. La base de ta charola puede cubrirse con papeI dealuminio para facilitar la limpieza.
Recorte el exceso de grasa para reducir las salpicaduras.Corte la grasa restante en los extremos para evitar que securven..
M Jale la parrilta del homo hasta ta posici6n de tope antes dedar vuelta o de quitar los alimentos.. Use pinzas para darvuelta los atimentos, y as[ evitar que 6stos pierdan el jugo..Los cortes muy delgados de pescado, ayes o came tal vezno necesiten darse vuelta.
H Despu_s de asar, saque la charola del homo cuando retire lacomida. Si se dejan derrames, _stos se hornear&n en lacharola al dejarse en el homo caliente, Io que har_ la limpiezam_s dificil
Antes de asar, coloque la pardfla en su posici6n segun la Tabtapara asar, Precaliente el asador por aproximadamente 4 minutosColoque el alimento sobre la parrilla, en la charola para asar,despu_s col6quelo en e! centro de la parrilla de1 homo.. Cierre lapuerta..
C6mo asar:
1. Presione BROIL (Asar). DestellarAn "BROIL" (Asar), "UPPER"(Superior) y "SEt" (Fijar) en la pantalla hasta que se cierre lapuerta.
2. Presione el bot6n AUTOSET (Fijar autom&ticamente) una vezpara seleccionar H1 Broil (Asar a temperatura atta} o dosveces para seleccionar LO Broil (Asar a temperatura baja)..AparecerA "HI" o "LO" en ]a pantalla
Seleccione HI Broil (550"F/288°0) para asar a temperaturanormal o LO Broil {450°F/232°C) para asar a temperaturabaja.
Despu_s de 4 segundos e! homo comenzar,_ a funcionar."BROIL" (Asar), "UPPER" (Superior) y "HI" (Temperatura alta)o "LO" (Temperatura baja) permanecer&n encendidos en lapantalla,
3. Presione Upper Oven CANCEL (Anular homo superior) oUPPER STOP (Parada del homo superior) cuando hayaterminado de asar,
CUADRO PAPA ASAR
Para obtener mejores resuttados, coloque los atimentos a3" (7,0 cm) o m&s del elemento para asar, Los tiempos sonsolamente una guia y pueden necesitar ajustarse para los gustosindividuales..
ALIMENTO POSiCION DE PERIODO
LA PARRILI._ APROX. lenminutos)
Bistec Asar a temperatura1 "(2,5 cm) de grueso HI (Alta)termino medio 1 8-14
Tortitas de came
molida Asar a temperatura_A" (2,0 cm) de grueso HI (Alta)
hasta 6 bien cocidas I 12-t5
hasta 12 bien cocidas parte inferiordel 15-I9homo
Chuletas de cerdo Asar a temperatura1" (2,5 cm) de grosor HI (Alta)bien cocidas 1 18-25
Polio Asar a temperaturapiezas con hueso parte inferior del LO (baja)bien cocidas homo 25-35
Pescado* Asar a temperaturaFiletes parte infedor del LO (baja)
homo 8-I I
Bistecs, I" (2,5 cm) parte inferior del 10-15de grueso homo
*Cuando ase pescado, rode el inserto de la cacerola con aceitede cocina. No d6 vuelta a los filetes de pescado
_:;ii:;,;i̧ :_¸
33

;_ ..... _ _.,'_ F'._'_'_'_r_.,'_A_¸ " _ _. 1- _,_
Durante la cocci6n per convecci6n, el ventilador provee unamayor circulaci6n del aire caliente continuamente y m_sconstante en todo el homo. El movimiento def aire caliente
alrededor de los alimentos ayuda a apresurar fa cocci6n,penetrando en las superficies exteriores m_s frias.. Los alimentosse cuecen de una forma m&s uniforrne, dorando y tostando lassuperficies exteriores mientras que se atrapa la humedad en elinterior,.
Durante la funci6n de convecci6n, el elemento en forma de arefunciona junto con el ventilador, para proveer una fuente de calorindirecta en la cavidad det homo° Si se abre la poerta del homodurante ta cocci6n per convecci6n o el precalentamiento, el(los)etemento(s) y el ventilador se apagar&n inmediatamente. Una vezque se cierre la puerta, se volver&n a encende[.
m Es importante que no cubra los alimentos, de manera que lassuperficies permanezcan expuestas al aire que circufa,permitiendo que se doren y tuesten..
m Mantenga la p_rdida de calor a] minimo abriendo la puertadel homo sSfo cuando sea necesario.
a Elija bandeias par,a galletas completamente lisas y charolaspara asar con lades bajos para permitir qua el aire se muevalibremente alrededor de los alimentos.
El
Revise si ya est_n cocidos los alimentos horneados unoscuantos minutes antes de que el tiempo minimo de cocci6nhaya pasado, usando un m6todo come un palitto.
Use un termSmetro para carnes para determinar el punto decocciBn de carnes y aves. Revise ta temperatura de la camede puerco y de las aves en 2 6 3 lugares diferentes,inctuyendo la parte m_s grues&
Antes de cocinar per convecci6n, cofoque fa(s) parrilla(s)segL)n la secci6n "Posici6n de las parrillas y los utensiliospara hornear".
Cuando use m_s de una parritla, co!oque los utensilios parahornearicocinar en las parriltas de manera que permitan elmovimiento del aire que circuta del ventilador alrededor delos alimentoso Vea la secciSn "Posici6n de las par#llas y losutensilios para hornear",,
Si se llena el homo, podda necesitar mayor tiempo decocci6n..
= Para obtener 6ptimos resultados de cocci6n, no cubra losatimentos..
m Cuando ase ayes y came, use una charola para asar y unaparrilla_ No es necesario esperar a que el homo seprecaliente, a menos que la receta Io recomiende,
Precalentamiento
Durante el ciclo de precafentamiento para CONVECT(Convecci6n), el ventilador y los elementos para hornear y asarcafientan la cavidad del homo. Cuando se ha Ilevado a cabo e!
precalentamiento, el elemento en forma de are se enciende yapaga intermitentemente mientras el venti[ador continuacircufando el aire caliente constantemente..
Homear per convecci_n (s61o en el homo inferior)
Use Convect (ConvecciSn) para hornear con una o mbs pardtlas.Cuando hornee per convecciSn, ingrese su temperatura normalpara hornear,. El control disminuir_, autom&ticamente latemperatura del homo que se haya fijado en 25°F (15°C) (a pesarde que se muestre la temperatura normal en [a pantalla)..
Para fijar Convect Bake (Hornear per convecci6n):
1, Presione CONVECT BAKE (Homear per convecci6n)..
Destellar&n "LOWER" (M_.s bajo), "BAKE" (Hornear) y el iconodel ventilador. Destellar& "000" en la pantall&.
2=
3°
4°
5.
Seleccione ta temperatura del homo..
Presione AUTOSET (Fijar autorn_ticamente) para unatemperatura de 350°F (175°C) o los botones num6ricosapropiados. Cada vez que presione el bot6n de Autoset, latemperatura aumentar& en 25°F (15"C),.
La temperatura dei homo puede fijarse entre t70°F y 550"F(75°C y 288°C),.
Presione CONVECT BAKE (Hornear per convecci6n)nuevamente o espere 4 segundos,
"LOWER" (M_s bajo) y "BAKE" (Hornear) dejar&n de destella_."PREHEAT" (Precalentar) y "LOWER" (M,_s bajo) aparecer,_nen la pantalla.
Aparecerr_ "I00"" (35"C) o la temperatura actual def homo, sies mayor a t00"F (35°C).. La temperatura aumentarA enincrementos de 5 ° hasta que se alcance la temperaturaprefijada..
El icono del ventilador comenzar_ a girar,.
Deje que el homo precaliente durante 7 a 12 minutes
Cuando se alcance ta temperatura fijada del homo, sonar& unpitido largo. "PREHEAT" (Precalentar) desaparecer_ de [apantalla y aparecer& la temperatura fijada..
Para ver la temperatura fijada durante el precalentamiento,presione CONVECT BAKE (Hornear per convecciSn).
Coloque los alimentos en el homo.,
Presione Lower Oven CANCEL (Anufar, homo inferior) oLOWER STOP (Parada del homo inferior) cuando hayaterminado.
6. Retire los alimentos del homo,.
A., Pan'ilia de/asador
B. Charola de/asador
34
Asar per convecci6n (s61o el homo inferior)
Cuando ase per convecci6n, ingrese su tiempo y temperaturanormales para asar. El control ie avisar_ autom6ticamente quetiene que revisar el punto de cocci6n de los aiimentos al 75% deltiempo fijado.. El ventilador a convecci6n se encender&inmediatamente despu6s de que et homo se haya encendido.
NOTA: Cuando ase per convecci6n, el tiempo de cocci6n sedebe fijar antes de fijar la temperatur&
Para fijar Convect Roast (Asar per convecci6n):
1. Presione CONVECT ROAST (Asar per convecci6n)..
Desteltar_n "LOWER" (M6s bajo), "ROAST' (Asar) y el iconodel ventidalor. Destellar#, "000" en ia pantalfa.
2_
3_
4_
5.
6o
7°
8.
lngrese el tiempo para asar usando los botones num6ricos. Eltiempo se puede fijar de 10 minutes (00:10) a 1t horas,59 minutes (1t:59)..
Si se requiere precalentamiento, agregue t5 minutes attiempo de cocci6n programado.
Presione CONVECT ROAST (Asar per convecci6n)nuevamente o espere 4 segundos
Destellar&n "LOWER" (M&s bajo), "ROAST" (Asar) y et fconode Fan (Ventilador) desteflar&n en la pantalla.. Destetlar=5 "000"en la pantall&
Seleccione la temperatura del homo
Presione AUTOSET (Fijar autom&ticamente) para unatemperatura de 325"F (165"C) o los botones num_ricosapropiados. Cada vez que presione el bot6n de Autoset, latemperatura aumentar_ en 25°F (15°C).
La temperatura del homo puede fljarse entre t70°F y 550°F(75_C y 288°C).
Presione CONVECT ROAST (Asar per convecci6n)nuevamente o espere 4 segundos..
"ROAST" dejar& de destellar y permanecer& iluminado en lapanta!la
AparecerA 100"F (350C) ota temperatura actual de! homo, sies mayor a 100°F (35°C) La temperatura aumentar& enincrementos de 5 ° hasta que se alcance la temperaturaprefijada
El fcomo del ventilador comenzar& a girar.
Coloque los alimentos en el homo.
La cuenta regresiva comenzar_ una vez que el homo secomience a cafenta[ Para ver la temperatura fijada durante elprecafentamiento, presione el bot6n de Convect Roast (Asarper convecci6n)..
Una vez que haya transcurrido 75% del tiempo fijado, elhomo emitir_ una seSal para que revise el progreso de lacocci6n.. Si es necesario, permita que se hornee per m&stiempo
Presione cualquier botSn para ver el tiempo de cocciSnrestante.
9_ Presione Lower Oven CANCEL (Anutar homo inferior) oLOWER STOP (Parada del homo inferior) cuando hayaterminado.,
10. Retire los alimentos del homo.
Peligro de Into×icacidn A|imentaria
No deje sus alimentos en el homo per m_s de una heraantes o despu_s de su cocci6n_
No seguir esta instrucci6n puede ocasionarintoxicaci6n atimentaria o enfermedad.
IMPORTANTE: Los alimentos deber,_n estar a una temperaturacome para ser servidos antes de colocarlos en el homo caliente.Los alimentos se pueden mantener adentro hasta per 1 hera. Sinembargo, los panes y guisados se pueden secar mucho si sedejan en el homo durante Keep Warm TM (Mantener caliente}
La caracteristica de Keep Warm TM le permite mantener losalimentos cocidos a una temperatura tista para ser¢irse,. Tambi_npuede usarse al final de la cocci6n programada..
Siga las recomendaciones del fabricante cuando caliente platesy tazones para serdr vacios
C6mo usar:
%, Presione el bot6n apropiado de KEEP WARM (Mantenercaliente)
Destellar,_n en la pantalla "WARM" (Caliente), "000" y"UPPER" (Superior) o "LOWER" (Inferior),,
2,, Presione AUTOSET (Fijar autom&ticamente) o los botonesnum6ricos para elegir una temperatura..
Se iluminar#, "170"" cuando se presione Autoset per primeravez.. Cada vez que presione el bot6n de Autoset, latemperatura aumentar& en 5 _
La temperatura de Keep Warm TM se puede fijar entre 145°F(63°C) y 190°F (85°C)
"WARM" (Caliente) y la temperatura aparecer_fin en la pantallamientras Keep Warm TM est& active..
Para cancelar la caracteristica Keep Warm TM (Mantenercaliente);
Presione CANCEL (Anular) o STOP (Parada).. Retire los atimentosdel horno_
35

Peligro de lntoxicaci6n Alimentaria
No deje sus alimentos en el homo por mds de una horaantes o despu_s de su cocci6n,,
No seguir esta instrucci6n puede ocasionarintoxicaci6n alimentaria o enfermedad.
Cocinar y Mantener caliente permite que se fije un determinadotiempo de cocci6n para el homo, seguido por un ciclo de KeepWarm (Mantener caliente) de 1 hera.
La funci6n Delay Cook & Hold (Retraso de cocinar y mantenercaliente), permite que se fije e! homo para comenzar ta cocci6ndespu_s de cierto tiempo que Ud fija, cocinar per un tiempoprefjado, seguido por un cicto de Keep Warm (Mantener caliente)de thor&
El inicio diferido no debe usarse para alimentos tales comopanes y pasteles, ya que tel vez no se horneen como es debido..No use e! retraso de horneo si el homo ya se eneuentra catiente..
C6mo fijar la funci6n de Cocinar y mantener caliente:
1. Presione COOK & HOLD (Cocinar y mantener caliente) unavez para el homo superior, y dos veces para el homo inferior,Destellar&n en ta pantalla "HOLD" (Mantener catiente),"00:00" y "UPPER" (Superior) o "LOWER" (Inferior)..
2_ Presione los botones num_ricos apropiados para sefeccionaret tiempo de cocci6n. El tiempo seleccionado aparecer& en lapantalla mientras "HOLD" continua destetlando. Et tiempo sepuede fijar de 10 minutos a tl horas y 59 minutos.,
3o Mientras "HOLD" (Mantener caliente) est& destellando,presione BAKE (Hornear) (homo superior o inferior),CONVECT BAKE (Hornear por convecci6n) o CONVECTROAST (Asar por convecci6n) (s61o el homo inferior).
4o Presione AUTOSET (Fijar autom&ticamente) para 350"F(175"C) o los botones numbricos apropiados paraseleccionar la temperatura del homo.. La funci6nseleccionada, "000" y "UPPER" (Superior) o "LOWER"(inferior) destellar&n.
La temperatura del homo puede fijarse entre I70°F y 550°F(75_C y 288°C/).,
5_ Presione el bot6n de la funci6n seleccionada o espere4 segundos,
La funci6n seleccionada permanecerA en la pantatla y eltiempo de cocci6n aparecer& en la pantalfa,,
Aparecer& "PREHEAT" (Precalentar) en la pantalfa. Latemperatura actual del homo aparecer_ en la panta]ladurante el precalentamiento. La temperatura fijada aparecer&en la pantalla cuando se haya terminado el precalentamiento
Cuando el tiempo de cocci6n haya transcurrido:
Sonar_n 4 pitidos, "WARM" (Tibio) y "HOLD" (Mantener caliente)se iluminar&n y aparecer_t "170 _" ("75 °" centigrados) en tapantallao
Despu6s de 1 hora en Hold Warm (Mantener caliente):
Et homo se apaga autom&ticamente. Presione CANCEL (Anular)o STOP (Parada) cuando retire los alimentos del homo antes deI hora
Para cancelar Cook & Hold (Cocinar y Mantener caliente) encualquier momento:
Presione STOP (Parada) o CANCEL (Anular).. Retire los alimentosdel homo
Para fijar un retraso en el ciclo de Cocinar y Mantenercatiente:
Antes de fijar el refoj, asegurese de que est@ en la hora correctadel dfa. Vea la secci6n "Refoj'L
1. Presione DELAY (Retraso) una vez para el homo superior, ydos veces para el homo inferior. "DELAY" (Retraso), "00:00" y"UPPER" (Superior) o "LOWER" (Inferior) destellar,_n en lapanta!la
2. Presione los botones num_ricos apropiados para fijar eltiempo que quiere retrasar la hora en que se va a llevar acabo la cocci6n
3. Mientras "DELAY" est_ destellando, presione COOK & HOLD(Cocinar y mantener caliente),. "HOLD" (Mantener caliente),"DELAY" (Retraso), "00:00" y "UPPER" (Superior) o "LOWER"(Inferior) destellar&n en la panta!la.
4. Presiane los botones con numeros apropiados para fijar lahora en la que se va a hornear
El tiempo se puede fijar entre 10 minutos a 11 horas y59 minutos_
5_
6,,
Presione BAKE (Hornear) (para los hornos superior e inferior),CONVECT BAKE (Hornear por convecciSn) o CONVECTROAST (Asar pot convecci6n) (s01o el homo inferior).
Fije la temperatura deseada del homo presionandoAUTOSET (Fijar autom&ticamente) o los botones numbricosapropiados.
Se iluminar_ "350 °" ("175 °" centigrados) cuando se presioneAutoset.. Despubs de 4 segundos, el tiempo de retrasoingresado aparecer& en la pantalla.
La funci6n seleccionada y "DELAY" permanecer&niluminados para recordarle que un ciclo de retraso decocci6n Cook & Hold (Cocinar y mantener caliente), ha sidoprogramado..
Cuando el tiempo de retraso ha terminado:
"DELAY" se apagar& La funci6n y el tiempo de horneadoseleccionados aparecer,_n en la panta!la. El horneadocomenzar_,,
Cuando et tiempo de cocci6n haya transcurrido:
Sonar_n 4 pitidos, la funci6n seteccionada se apagarA yaparecer_n "HOLD" (Mantener caliente), "WARM" (Tibio) y "t70 °"("75 °" centigrados) en la pantalla.
Despu_s de I hora en Hold Warm (Mantener caliente):
El homo se apaga automAticamente. Presione CANCEL (Anular)o STOP (Parada) y retire los alimentos del homo..
C6mo cancelarlo:
Presione el bot6n apropiado de CANCEL (Anular) o STOP(Parada). Todas las funciones de cocci6n programadas o noprogramadas se anular_n Volver& a aparecer la hora del dia en fapantall&
36
El control del homo se fij6 para apagar autom&ticamente el homo!2 horas despu6s de que el homo se encienda, Estacaracteristica se puede apagar para activar el mode Sabbath(Sab,_tico).
E1mode Sabbath (Sab&tico) se puede encender en cualquiermemento con el homo encendido o apagado,
13
m
R
m
H
[]
m
El mode Sabbath (Sab_tico) no se puede encender si losbotones est&n btoqueados o cuando la puerta est&asegurada.
Si el homo se encuentra horneando cuando se fija el modeSabbath, "BAKE" (Hornear) desaparecer_ de la pantalla alfinal del ciclo de horneado o cuando se presione Cancel(Anular) o Stop (Parada)., No sonar. 4,ningt3n pitido audible,
Si se quiere tenet la luz del homo encendida mientras elmode Sabbath est6 encendido, _sta se debe encender antesde que se fije el mode Sabbath.,
Cuando se enciende el mode Sabbath, la pantalla de latemperatura mostrar& inmediatamente ta temperatura fijada,en lugar de la temperatura actual de la cavidad del homo Nosonar& ning0n pitido de precatentamiento,,
Todas las alertas, mensajes y pitidos se desactivan cuando elmode Sabbath (SabAtico) estA active
El ciclo de autolimpieza y e! seguro autom&tico de ta puertano funcionan durante el mode Sabbath.,
AI presionar Cancel (Anular) o Stop (Parada) cancelar& unciclo de Bake (Hornear), Sin embargo, el control permanecer&en el mode Sabbath..
m Si ocurre un corte de corriente, et homo se encender_ en elmode Sabbath con 72 horas restantes y con ning0n cicloactive.
Para cancelar el apagado en 12 horas y hacer que el homotrabaje continuamente per 72 horas (mode Sabbath -Sab_tico):
1. Presione y scstenga CLOCK (Reloj) per 3 segundos
Aparecer& "Sab bATH" y destellar_, per 5 segundos en lapantalfa
"Sab bATH" se mostrar& despu#s continuamente hasta quesea apagado, o hasta que el tiempo I[mite de 72 horastermine
Tambi_n BAKE (Hornear) aparecer& en la pantalla si un ciclode horneo se est& utilizando mientras et homo est_ en elmode Sabbath.,
BAKE es la unica funci6n que trabaja durante el modeSabbath, Todos los botones de funciones (con la excepci6nde Cancel - Anular, Stop - Parada y Clock - Reloj) sebfoquean durante el mode Sabbath.,
Para cancelar el mode Sabbath (Sab&tico):
Presione y sostenga CLOCK (Retoj) per 3 segundos, "Sab BATH"destellarA per 5 segundos. Volver_. a la pantalla la hera del dia,
O BIEN
Despu_s de 72 horas, el mode Sabbath se dar& per terminado,"Sab BATH" destellar_ per 5 segundos.. Volver& a la pantalla tahera del diao
Peligro de lntoxicaci6n Alimentaria
No deje sus alimentos en el homo per mrs de una hera
antes o despuds de su cocci6n.
No seguir esta instrucci6n puede ocasionarintoxicaci6n alimentaria o enfermedad.
La caracter[stica de Favorite (Favorite) fe permite guardar (en lamemoria) el tiempo y temperatura que se haya usado en unafunci6n de Cook & Hold (Cocinar y mantener caliente) parahornear, hornear per convecci6n y asar per convecci6n (s6to enet homo inferior).,
Para fijar un ciclo favorite, una funci6n de Cook & Hold (Cocinar ymantener caliente) debe estar activa o programadarecientemente,
Par',] fijar un ciclo favorite:
1. Programe un ciclo de Cook & Hold (Cocinar y mantenercaliente), come se describe en la secci6n "Cocinar ymantener caliente".,
2. Presione y sostenga FAVORITE per 3 segundos,.
El ciclo que se acaba de fijar o que se encuentra funcionandoactualmente de Cook & Hold se guardar,5 (en fa memoria),,
SenatOr un pitido doble, seguido per uno simple para indicarque el control ha aceptado el ajuste de Favorite (Favorite)..
Para poner a funcionar un cicto favorite:
1. Presione FAVORITE (Favorite),,
La temperatura para el ciclo de Cook & hold (Cocinar ymantener caliente) aparecer_ en la pantalla, (Si no se hafijado un ciclo de Cook & Hold, "nonE" (ninguno) aparecer&en fa pantatla.,)
2. Presione BAKE (Hornear), CONVECT BAKE (Hornear perconvecci6n) o CONVECT ROAST (Asar per convecci6n) (s6Ioen el homo inferior)..
El ciclo favorite comenzar& inmediatamente. El ciclo
seleccionado y el tiempo de cocci6n aparecer,_n en lapantall&
Cuando el tiempe de cocci6n haya transcurrido:
La funci6n seleccionada se apagar& y aparecer&n "HOLD"(Mantener caliente), "WARM" (-13bio)y "170 "" ("75 °" centigrades}en la pantalta.,
Despu_s de 1 hera en Hold Warm (Mantener caliente):
El homo se apaga autom&ticamente,. Si usted desea sacar losalimentos antes de ! hera, presione CANCEL (Anular) o STOP(Parada) y retire los alimentos del homo,
Para anular un ciclo favorite:
1. Presione CANCEL (Anular) o STOP (Parada),
El ciclo favorite guardado no ser_,afectado
2. Retire los alimentos del homo.,
;;:,:,.%
37

CUHDADO DE LA ESTUFA
.... C]_$-8L!ZOIIFRI,_IeZ8 :e_:_alcju_o:s mo,de!os)
u Limpie manualmente et borde interior de la puerta y el _,rea de1W' (3,8 cm) alrededor del marco de la cavidad interna delhomo, asegur_ndose de no mover ni doblar la junta. Esta&rea no se calenta io suficiente como para eliminar lasuciedad durante la autoimpieza No deje que e! agua,producto de limpieza, etc., penetre en las ranuras det marcode la puerta Use un patio hL_medo para iimpiar esta _rea.
J t /iJJl UlJ t ilJJtilJlUlUlljljlll
Peligro de Quemadura
No toque et horno durante el ciclo de autolimpieza.
Mantenga a los nitros lejos det homo durante el ciclo
de autolimpieza,
No seguir estas instrucciones puede ocasionarquemaduras.
=1 Umpie cualquier suciedad suelta para reducir el humo yevitar datios. A alas temperaturas, los alimentos reaccionancon la porcelana, pudiendo ocasionar manchas, picaduras,corrosiones o manchas blancas tenues.. Esto no afectar& elrendimiento de la coccitn.
Prepare la superficie de cocci6n:
Quite los articulos de pl_stico de la stlperficie de cocci6n, yaque pueden derretirse.
IMPORTANTE:
IMPORTANTE: La salud de algunas ayes es sumamente sensiblea los gases emanados durante el ciclo de autolimpieza+. Laexposici6n a los gases puede ocasionar la muerte de ciertasayes. Mude siempre fas aves a otro cuarto cerrado y bienventlado,
Haga ia autolimpieza del homo antes de que est6 muy sucio. Lasuciedad profunda da lugar a una lmpieza m&s profongada ym_s humo,
Mantenga la cocina bien ventilada durante el ciclo deautofmpieza para facilitar la eliminaci6n del calor, otores y humo
No bloquee ]a(s) rejilfa(s) de escape dei homo durante e! ciclo deautolimpieza. El aire debe poder circular tbremente.Dependiendo def modelo, yea la seccitn "Rejila de escape delhomo" o "Rejillas de escape del homo".
No limpie, frote, datie o mueva la junta de la puerta del homo Lajunta de ]a puerta es esencial para un buen cierre
Prepare el homo:Retire la charola para asar, Ia rejila, los utenstios de cocina yde hornear y, en atgunos modelos, ta sonda de temperaturadet homo,
Retire las parrilas del homo para mantenerlas lustrosas yf&cies de deslizaE Para mayor informaci6n, yea "Limpiezageneral"..
Retire todo forro de atuminio del homo ya que poddaquemarse o derretirse, datiando el homo.
La temperatura del homo deber& estar por debajo de400_F (205°C) para programar un ciclo de lmpieza,,
$61o t homo se puede fimpiar a la vez,,
Ambas puertas del homo se aseguran cuando cualquiera de loshornos se est_ limpiando,
C6rno funciona et ciclo
IMPORTANTE: Si la porcelana se calienta o se enfrfa sobre elacero en et homo, esto puede resultar en decoloracitn, p_rdidade brillo, pequetas grietas y sonidos de estalldo..
El cicfo de Self-Cleaning (Autolimpieza) usa temperaturas muyalas que queman la suciedad, convirti_ndola en ceniza,.
El homo est,1 prefijado en un ciclo de limpieza de 3 horas, peroeste tiempo se puede cambiar_ Los tiempos de fimpiezarecomendados son 2 horas para suciedad ligera y de 3 a 4 horaspara suciedad normal a profunda
Una vez que se haya enfriado el homo por completo, quite lascenizas con un patio hL_medo,. No [impie ninguna de lassuperficies del interior hasta que el homo se haya enfriado porcomplete,. Si aplica un trapo hQmedo y frio al viddo interior delhomo antes de que se haya enfdado por compieto, el vidriopuede romperse..
La luz del homo no funcionar_ durante el ciclo de
autolimpiezao
Cuando aparezca "LOCK" (Btoqueo) en la pantalla, la puerta nose podr& abrir Para evitar datios a la puerta, no fa fuerce paraabrirla cuando se muestre "LOCK" (Bloqueo) en la pantala.
Si una puerta del homo se deja abierta, "door" (puerta) aparecer_en ta pantalla y una setial har& un pitido hasta que se cierre lapuerta y se haya presionado Clean (Limpieza) nuevamente,.
38i

Para hacer ta aLrtolimpieza:
1o Cierre la puerta del homo..
2. Presione CLEAN.. "CLEAN" (Umpieza), "SET' (Fijar) y"UPPER" (Superior) o "LOWER" (inferior) destellarCn en lapantall&
3. Presione AUTOSET (Fijar autom6ticamente).
MEd (Media - suciedad media, 3 horas) aparecer#, en lapantalla
Si no se cierra la puerta, e! homo har_. un pitido y "door"(puerta) aparecer_ en ta pantalla hasta que se cierre la puertay haya presionado Clean (Limpieza) nuevamente.. Si la puertano se cierra en 30 segundos, el funcionamiento deautolimpieza se canceIar& y la pantatla regresar_ a la hera deldi&
44
5.
Para elegir un ajuste de limpieza que no sea el de medic,presione AUTOSET para ver los ajustes de autolimpieza.
HVy (suciedad profunda, 4 horas)MEd (suciedad mediana, 3 horas)LITE (suciedad ligera, 2 horas)
El elegir et nivel de suciedad del homo automditicamenteprograma el tiempo de autolimpieza.
DespuCs de 4 segundos, el homo comenzarA a limpiar.
Aparecer_. "CLEAN" (Limpieza) en la pantalla.. Destellar_"LOCK" {Bloqueo) en la pantatla.. Una vez que se bloqueenambas puertas, "LOCK" (Bloqueo) permanecer& en lapantalfa. En la pantalta aparecer_ fa cuenta regresiva deftiempo de limpieza.
Cuando termine el cicio de autolimpieza:
Se apagar,_ "LOCK" aproximadamente I hera despuCs de haberterminado e] cicio de limpieza,. La puerta se puede abrir en esememento..
Para retrasar el inicio de la autolimpieza:
Antes de retrasar ta autolimpieza, asegurese de que la puertaest6 completamente cerrada; de Io contrario no quedar&bloqueada y el ciclo no comenzar&
1. Presione DELAY (Retraso) una vez para el homo superior, ydos veces para el homo inferior,
Destellar&n en la pantatla "DELAY" (Retrase), "00:00" y"UPPER" (Superior) o "LOWER" (Inferior)..
2. Usando los botones num_ricos, ingrese el tiempo que Ud.quiere retrasar el ciclo_ El tiempo de retraso se puede fijar de10 minutes (00:t0) a 11 horas y 59 minutes (11:59)..
3. Presione CLEAN (Limpieza)..
Desteilar_ "SET" (Fijar) en la panta]fa
4,. Presione AUTOSET (Fijar autom&ticamente)
"MEd" (niveI de suciedad mediano) aparece en la pantalla.
5. Para elegir un ajuste de limpieza que no sea el de medic,presione AUTOSET para ver los ajustes de autolimpieza.
HVy (suciedad profunda, 4 betas)MEd (suciedad mediana, 3 horas)LtTE (suciedad ligera, 2 horas)
Et elegir el nivel de suciedad del homo autom_ticamenteprograma el tiempo de autolimpieza..
Despu6s de 4 segundos, "CLEAN" (Limpieza), "DELAY"(Retraso) y "UPPER" (Superior) o "LOWER" (Inferior) seencender_n y "LOCK" (Bioqueo) destel]ar,_ en ]a pantalia.Cuando ambas puertas se aseguren, "LOCK" dejar#, dedestellar y permanecer& encendido para mostrar que elhomo se ha fijado para ilevar a cabo una timpieza conretraso. El tiempo de retraso aparece en la pantalta.
Para cambiar el tiempo de autolimpieza con retraso:
1. Oprima DELAY (Retraso)
"DELAY" (Retraso) destellar;_ y "00:00" aparecer_ en lapantalla.
2. Presione los botones numericos para ingresar el tiempo queUd quiere retrasar el ciclo.
Despu_s de 4 segundos, "CLEAN" (Limpieza), "DELAY"(Retraso) y "LOCK" (Bloqueo) aparecer&n en la pantafla paramestrar que el homo se ha fijado para un funcionamiento defimpieza retrasado El tiempo de retraso aparece en lapantalla
Cuando comience el cielo de autolimpieza:
"DELAY" (Retraso) se apagar& y el tiempo de limpieza aparecer_en ta panta]la.
Cuando termine el ciclo de auto|impieza:
"LOCK" (Bloqueo) se apagar_ aproximadamente 1 hera despu_sde haber terminado el ciclo de timpieza.. La puerta se puede abrirentonces..
Para detener la autolimpieza en cualquier memento:
Presione CANCEL (Anutar) o STOP (Parada)Todas las palabrasdesaparecen de la pantalla. Todas las funciones de anufan..Vuelve a aparecer la hera del dia en la pantat]a.
Dependiendo de la temperatura actual del homo cuando secancela la autolimpieza, la puerta del homo puede permanecerasegurada hasta que el homo se enfffe
IMPORTANTE: Antes de la fimpieza, asegurese de que todos loscontroles esten apagados, y que el home y ]a superficie decocciCn est_n frios Siempre siga fas instr'dcciones que vienen entas etiquetas de los productos de limpieza
En primer lugar se sugiere e! empleo de jabCn, agua y unaesponja o paso suave, a menos que se indique Io contrario..
SUPERFICIES EXTERIORES DE ESMALTE DEPORCELANA
Los derrames que contienen &cides, tales come vinagre ytomate, deben ser limpiados tan pronto come se enfr[e la estufacompleta Es posible que estos derrames da#en el acabado..
MCtodo de limpieza:
m Producto para limpiar vidrios, producto de [impieza li'quidosuave o estropajo no abrasive: Limpie cuidadosamentealrededor de la placa con e] n_mero de modelo y de serieporque el refregar puede borrar los nQmeros..
m Limpiador multiuso para electrodom_sticos, piezanL_mero 31682 (no inciuido):
Vea la contraportada para encargarlo
39

ACERO INOXIDABLE (en algunos modelos)
M_todo de limpieza:
Frote en la direcci6n del hito para evitar que se daSe..
u Limpiador de acero inoxidable, pieza numero 31462 (noincluido): Vea la contraportada para encargarlo
u Detergente lfquido o producto de limpieza general: Enjuaguecon agua limpia y seque con un pado suave que no dejepelusa,.
Para evitar daSos at acero inoxidabte, no use estropajos quevienen con jab6n, productes de limpieza abrasivos, cremapara pulir la superficie de cocci6n, estropajos de metal,pa_os &speros o toalias de papet abrasivas.
CONTROLES DE LA SUPERFlClE DE COCClON
Para evitar da5os en los contmles de la supenlcie de cocci6n, nouse estopa de acero, productos de limpieza abrasivos nilimpiador de horno.
Para evitar dafos, no remoje las perillas.
Cuando quite o vuelva a cotocar las pedllas, asegL_rese de quelas mismas est_n en ta posici6n de apagado..
Si estAn presentes, no quite los setlos que se encuentran bajo lasperillas.
M6todo de limpieza:
m Agua tibia jabonosa o lavavajiitas: Jale las perillas en sentidorecto para quitarlas del panel de control..
PANEL DE CONTROL
Para evitar daSos en el panel de control, no use productos delimpieza abrasivos, estropajos de metal, paSos _speros o toallasde papel abrasivas..
Para evitar encender los controles mientras limpia, puede activarla caracter[stica de Control Lock (Bloqueo de control) (en algunosmodelos). Consulte la secci6n "Panel de control y seguro de tapuerta del homo"..
M6todo de limpieza:
u Producto para limpiar vidrios y un paso suave o esponja:Aplique el producto para limpiar vidrios en una esponja opaso suave, no lo haga directamente sobre e! panel.
= Limpiador multiuso para electrodom6sticos, pieza n0mero31682 (no inciuido):
Vea la contraportada para encargado.,
TAPAS Y PARRILLAS CON RE_41_STIMIENTO DEPORCELANA
Los derrames que contienen &cidos, tales como vinagre ytomate, deben ser timpiados tan pronto como se enfrfen lasuperficie de cocci6n, las parriHas y las tapas. Es posibte queestos derrames daSen el acabado.
Para evitar tas desportiHaduras, no golpee tas parrillas y las tapasuna contra la otra o contra superficies tales como utensilios decocina de hierro fundido..
No vuelva a armar las tapas o los quemadores mientras estenhOmedos.
M_todo de limpieza:
u Estropajo de pl&stico no abrasivo y limpiador abrasivo suave:
Limpietos tan pronto como la superficie de cocciSn, laspardIlas y las tapas se hayan enfriado,
En la lavavajilfas (s6Io las parrillas, no ias tapas):
Use ef cicfo que sea mAs poderoso.. Los restos de alimentoscocidos deben ponerse en remojo o fregarse antes deponerlos en una lavavajilias,
Umpiador para rejifta a gas y bandeia de goteo, piezan0mero 31617:
Vea la contraportada para encargarlo
QUEMADORES DE SUPERFIClE
Vea la secciSn "Quemadores seltados de superficie".
EXTERIOR DE LA PUERTA DEL HORNO
M_todo de limpieza:
_, Producto para limpiar vidrios y toaHas de papel o unestropajo de pl&stico no abrasivo: Apiique et producto paralimpiar viddos en una esponja o paso suave, no Io hagadirectamente sobre el panel
Umpiador multiuso para electr0dom6sticos, piezant)mero 31682 (no incfuido):
Vea ta contraportada para encargarlo.
CAVIDAD DEL HORNO
No use productos de limpieza para hornos.
Los derrames de alimentos deber&n limpiarse cuando el homo seenffie.. A altas temperaturas, la reacci6n quimica de los a[imentoscon la porcelana puede dar lugar a manchas, corrosi6n,picaduras o tenues puntos blancos..
Mdtodo de timpieza:
[] Cicto de autolimpieza: Vea pdmero la secci6n "Ciclo deautolimpieza".
PARRtLLAS DEL HORNO
M6todo de ]impieza:
m Ciclo de autolimpieza: Vea primero la secci6n "Cicto deautolimpieza". Quite las parritlas o se decolorar&n y ser& m&sdiffcil deslizarlas.. Si esto sucede, una ligera capa de aceitevegetal aplicado alas gufas de las parrillas las ayudar& adeslizarse..
_l Esponja de fibra met&Iica
Los hornos usan un foco de haf6geno de 120 voftios o uno de20 vatios m&ximo, y/o un foco para electrodom_sticos est_ndarde 40 ratios,,
Para reemplazar el foco est_ndar del homo:
Antes de reemplazarlo, cerci6rese de que el homo est6 apagadoy fifo
1. Desenchufe la estufa o desconecte el suministro de energia
2. Gire hacia ta izquierda la cubierta de vidrio dei foco en laparte posterior det homo para quitar[o.
4O

3., Gire el foco a fa izquierda para sacarlo del casquillo.,
4_ Reemplace el foco y vuelva a cofocar fa cubierta del focogirando hacia la derecha
5. Enchufe la estufa o reconecte el suministro de energ[a
Para reemplazar et foco de hal6geno:
Antes de reemplazado, cerci6rese de que el homo est6 apagadoy ffio,
i. Desenchufe la estufa o desconecte el suministro de energfa.,
2. Use las puntas de los dedos para sujetar la orilfa de lacubierta del foco J_lela hacia afuera y qufteta,
Para el uso normal de la estufa, no se aconseja quitar la puertadel homo. Sin embargo, si es necesario quitarla, aseg_rese deque el homo est6 apagado y frfo Despu6s> siga estasinstrucciones., La puerta del homo es pesada,,
Para quitan
t. Abra la puerta hasta el primer tope (abierta aproximadamentea 4" (10.0 cm).
2. Sujete la puerta por los lados No use fa manija de ta puertapara tevantarfa,,
3. Lev&ntela de forma pareja hasta que la puerta libre los brazosde las bisagras,
3_
4°
5,,
6o
Retire el foco det casquiilo jal&ndo!o directamente haciaafuera de la base de cer_mica,,
Reemplace el foco usando un pafiuelo de papel o guantes dealgod6n para manipularlo. Para evitar dafiar o disminuir lavida Qtil del nuevo foco, no toque el foco con los dedosdescubiertos,
Vuelva a cofocar la cubierta del foce encaj&ndola a presi6n ensu lugar..
Enchufe la estufa o reconecte el suministro de energfa.
Para vo|ver a colocar:
!_ Sujete ta puerta por los lados.
2. Alinee las ranuras en la puerta con los brazos de las bisagrasen ta estufa,,
3., Deslice la puerta hacia abajo en los brazos de las bisagras,hasta que la puerta est6 asentada por completo en lasbisagras,. Presione hacia abajo en las esquinas supefiores dela puerta para que 6sta se asiente por completo en lasbisagas, La puerta no debe lucir torcida,.
SOLUCK)N DE PROBLEMASPrimero pruebe las sotuciones sugeridas aqui para evitar el costo innecesario del servicio.
..........................................................."...............................................................................<..................................................... = i.Est& desconectado el cable el6ctrico?Nada funciona Conecte a un contacto de pared de conexi6n a tierra de
3 terminales
Peligro de Choque El_ctrico
Conecte a un contacto de pared de conexi6n a tierra de3 terminales.
No quite la terminal de conexi6n a tierra.,
No use un adaptador.
No use un cable el_ctrico de extensl6n.,
No seguir estas instrucciones puede ocasionarla muerte, incendio o choque ei6ctrico,,
/.Hay un fusible de la casa fundido o se dispar6 etcortacircuitos?Reemplace el fusible o reposicione el cortacircuitoso Si elproblema continL_a,Uame a un electricista,.
i,Est& ia v_lvula de cierre de gas principal o reguladora enla posici6n apagada?Consulte las lnstrucciones de instalaci6n,,
&Se ha conectado debidamente la estufa al suministro degas?P6ngase en contacto con un especialista en reparaciSncompetente o vea las instrucciones de instafaci6n.,
Los quemadores de supe_cie no funcionan
B
&Es 6sta la primera vez se han usado los quemadores desuperficie? Encienda cualquiera de fas perillas de losquemadores de superficie para despejar el aire de tas lineasde gas.,
&Se ha fijado correctamente la perilla de control?Empuje hacia adentro la perilla antes de girar hacia un ajuste.,
&Est&n bloqueados los orificios de! quemador?Vea la secci6n "Quemadores sellados de superficie",,
i;!7!iii_i
41
Las llamas del quemador de superficie son desparejas,amarillas y/o hacen ruido
a &Est_n bloqueados los orificios del quemador?Vea la secciSn "Quemadores sellados de superficie"
&Est_n bien colocadas las tapas de los quemadores?Vea la secci0n "Quemadores seltados de superficie"
&Se est_ usando gas propano?Es probable que la estufa se haya convertidoincorrectamente. Contacte a un t6cnico de servicio o vea la
contraportada
El quemador de superficie hace ruidos como estallidos
m &Est_ mojado el quemador?D6jelo secar..
Hay demasiado calor alrededor de los utensilios decocina sobre la superficie de cocciSn
/.Son los utensilios de cocina del tama_o correcto?Use utensilios de cocina que sean m_s o menos def mismotamaSo que e! _rea, el elemento o el quemador de lasuperficie de cocci0n. Los utensilios de cocina no deber&nextenderse m&s de V_" (t,3 cm) fuera del &rea de cocciSn.
Los resultados de cocciSn de la superficie de cocci_nno son los que se esperaba
&Se est_ usando el utensilio de cocina adecuado?Vea la secciOn "Utensilios de cocina".
&Se ha fijado la perilla de control en el nivel de caloradecuado?Consulte Ia secciSn "Controles de la superficie de cocci0n"
&Est& nivelada la estufa?Nivele la estufa Vea las Instrucciones de instataci0n
El homo no funciona
&Es _sta la primera vez que se usa el homo?Encienda cuatquiera de tas perillas de los quemadores de tasuperficie para despejar el aire de las l[neas de gas
&Se ha fijado correctamente et control electrSnico delhomo?Consulte la secci6n "Controles etectrSnicos deI homo".
En atgunos modelos, &se ha fijado el bloqueo de control?Consulte la secci0n "Panel de control y seguro de [a puertadel homo",
Las llamas del quemador del homo son amadllas oruidosas
&Se est_ usando gas propano?Es probable que la estufa se haya convertidoincorrectamente. Contacte a un t_cnico de ser_icio o vea la
contraportad&
E! ventilador de enfriamiento funciona durante e!homeado, el asado o la limpieza.
Es normal que el ventilador funcione autom_ticamentemientras que e! homo se est_ utilizando, y por un tiempodespu_s, para enfriar el control electr6nico.
La temperat_Jra del homo est_ muy aria o muy baja
&Necesita ajustarse el calibre de la temperatura delhomo?Consufte la secciSn "Control de la temperatura del homo",.
La pantalla muest_a mensajes
&Est_ destellando la hora en la pantalla?Ha ocurrido un corte de corriente. Despeje la pantatla. Vea lasecci6n "Pantalla(s)", En algunos mode]os, vuelva a fijar elretoj, si es necesario. Vea la secci0n "Reloj".
&Muestra la pantalla una letra seguida de un n_mero?Dependiendo del modelo que tenga, presione CANCEL(Anular), para despejar la pantalta,, Vea la secci0n"Pantalla(s)", Si vuelve a aparecer, solicite servicio, Vea lacontraportada,
No funciona el ciclo de autotimpieza
&Est& abierta la puerta del homo?La pantalla mostrar_, "door" (puerta), Cierre bien la puerta delhomo
&Se ha ingresado ta funci6n?Vea la secci6n "Ciclo de autolimpieza"..
En algunos modelos, t,.se ha fijado un inicio diferido parael ciclo de autolimpieza?Vea la secci6n "Ciclo de autolimpieza",
&Se ha fijado un inicio diferido?Vea la secci0n "Cocinar y mantener caliente'L
&Se encuentra la temperatura del homo a m&s de4000F (205_C)?D_je que se enfrie el homo antes de usar el ciclo deautolimpieza.,
42

Los resultados de cocci6n del homo no son los que se esperaba
t_
r_
r_
w
i.Est_ nivelada la estufa?Nivele la estufa. Vea las Instrucciones de instaiaci6n
&Se ha fijado la temperatura adecuada?Vuelva a verfficar ta receta en un [ibro de cocina confiable..
_,Se ha fijado el calibre debido de la temperatura delhomo?
Consulte la secci6n "Control de la temperatura de! homo"..
&Se ha precalentado e! horno?Consuite la secci6n "Come Homear".
&Se est;_n usando los utensilios de horneado adecuados?Vea la secci6n "Utensilios para hornear".
_,Se han colocado las parriltas en forma adecuada?Vea la secci6n "Posici6n de fas parriHas y los utensitios parahornear'L
&Circula et aire de manera adecuada alrededor delutensilio para hornear?Vea ta secci6n "Posici6n de las parriltasy los utensilios parahornear",,
m
&Est& la masa distribuida de manera uniforme en lacharola?
AsegQrese de que la masa est6 nivelada en fa charola.
&Se ha usado la cantidad de tiempo adecuada?Aumente e! tiempo de cocci6n..
&Se ha abierto la puerta det horno durante la cocci6n?Abrir el homo para mirar los alimentos libera el calor delhomo hacia fuera y puede prolongar los tiempos de cocci6n.
&Est_n los artz'cu|os horneados demasiado dorados en elrondo?
Mueva la parriila hacia una posici6n m&s alta en el horno
&Se est&n dorando |os bordes de las cortezas de los paysdemasiado pronto?Use papet de afuminio para cubrir el borde de la corteza y/oreduzca ia temperatura de horneado,.
CONTRATOS DE PROTECCKSN
Contratos maes_os de protecci6n
iFelicitaciones per su inteligente adquisici6n! Su nuevo productoKenmore _ est_ dise_ado y fabricado para proporcionarle a_os de V"funcionamiento confiable. Pero al igual que todos los productos,puede necesitar mantenimiento preventive o reparaci6n de vezen cuando. Es atl[ donde e! Contrato maestro de protecci6npuede ahorrarle dinero e inconvenientes_
v"E! Contrato maestro de protecci6n tambi_n ayuda a prolongar tavida de su nuevo producto. He aqu[ io qua se incluye en elContrato*: v"
v' Piezas y mane de obra necesarias para ayudar a mantenerlos productos funcionando correctamente bajo use normal,no s61o en case de defectos, Nuestra cobertura va touche
m_s all& de la garant_'a del producto No existen deduciblesni fallas de funcionamiento que est_n excluidas de lacober_ura -- protecci6n verdadera..
i/Servicio experto a cargo de un personal de m&s de 10..000t6cnicos de servicio autorizados per Sears, Io que significaque su producto ser__ reparado per atguien en quien ustedpuede confiar
_' Llamadas de servicio ilimitado y servicio en todo el pais,con la frecuencia que usted desee, cuando usted desee.
v' Garantia "sin disgustos" - reemplazo de su productoprotegido si ocurren cuatro fallas o m_s del producto en eltranscurso de doce meses.
v' Reemplazo del producto si su producto protegido no puedeser reparado.
v' Revisi6n anuat de mantenimiento preventive a solicitudsuya - sin costo adicionaL
v' Ayuda r_pida per tel_fono - lo que nosotros llamamosSoluci6n r_pida - apoyo per tel6fono a cargo de unrepresentante de Sears para todos los productos.. Piense ennosotros come si fu_ramos un "manual padante para e_propietario'L
v" Protecci6n de sobrevoltaje contra daSos el_.ctricos debido afluctuaciones de electdcidad.
Protecci6n per pbrdida de comida, per un valor anual de$250, per cualquier p6rdida de comida que sea comeresultado de fallas mec&nicas de cualquier refdgerador ocongelador cubierto bajo la garantfa.
Reembolso de la renta si la reparaci6n de su productoprotegido tarda m&s de Io prometido..
10% de descuento sobre el precio com0n per el servicio dereparaci6n que no est_ bajo protecci6n, as_ come tambi_n laspiezas relacionadas con el mismo que se hayan instalado
Una vez adquirido el Contrato, tan s6to tiene que llamar para fijarla visita de servicio t_'cnico. Usted puede [lamar a cualquier hera,de d_a o de noche, o fijar una visita t6cnica en InterneL
El Contrato maestro de protecci6n es una compra sin riesgo.. Siper algL_n motive usted Io cancela durante el periodo de lagarant_a del producto, le proveeremos un reembolso total. O unreembotso proporcional en cualquier memento posterior a laexpiraci6n det perlodo de la garant_a., iAdquiera hey su Contratomaestro de protecci6n!
Se aplican algunas limitaciones y exclusioneso Para obtenerprecios e informaci6n adiciona| en EE.UU.., Ilame al1-800-827-6655,,
Servicio de instalaci6n de Sears
Para la instalaci6n profesional de Sears de aparatoselectrodom_sticos, abridores de puertas de garaje, calentadoresde agua y otros art[culos principates dei hogar, en los EE UU.Ilame al 1-800-4-MY-HOME _.
43

Get itfixed, at your home or ours!Your Home
For expert troubleshooting and home solutions advice:
manage homewww.manage myhome co m
For repair - in your home - of all major brand appliances,lawn and garden equipment, or heating and cooling systems,
no matter who made it, no matter who sold it!
For the replacement parts, accessories and
owner's manuals that you need to do-it-yourself.
For Sears professional installation of home appliancesand items like garage door openers and water heaters.
1-8(}(}=4-MY-HOME ® (1-800-469-4663)
Call anytime day or night (USA and Canada)
www°sears.com v,rwwosears.ca
Our Home
For repair of carry-in items like vacuums, lawn equipment,and electronics, call anytime for the location of your nearest
Sears Parts & Repair Service Center
1-800-488-1222 (USA) 1-800-469-4663 (Canada)www.sea rs°com www.sears.ca
To purchase a protection agreement on a product serviced by Sears:
1-800-827-6655 (US.A) 1-800-361-6665 (Canada)
Para pedir servicio de reparaci6n Au Canada pour service en ffan_ais:
a domicilio, y para ordenar piezas: 1-800-LE-FOYER Mc
1-888-SU-HOGAR ® (1-800-533-6937)
(I-888-784-6427) __l_/F_ www.sears ca
W10206015A© 2008 Sears Brands. LLC
TM SM .® Registered Trademark / "Trademark / Service Ma_k of Sea_s Brands. LLC
TM SM ,® Marca regtstrada ! Marca de c_mercio / Marca de serv_cio de S_rars Brands. LLC
6/0BPrinted in U,S.A
Impreso en EE UU