Embed Size (px)
Citation preview
GenePattern Desktop Client Guide

Software Copyright
The Broad Institute SOFTWARE COPYRIGHT NOTICE AGREEMENT
This software and its documentation are copyright 2006 by the Broad Institute/Massachusetts Institute of Technology. All rights are reserved.
This software is supplied without any warranty or guaranteed support whatsoever. Neither the Broad Institute nor MIT can be responsible for its use, misuse, or functionality.
2
GenePattern provides access to a broad array of computational methods used to analyze genomic data. Its extendable architecture makes it easy for computational biologists to add analysis and visualization modules, which ensures that GenePattern users have access to new computational methods on a regular basis.
If you are new to GenePattern, begin with the basics:
● The Concepts Guide provides a brief introduction to GenePattern: its primary objects (modules, pipelines, suites) and its client-server architecture. All other GenePattern documentation assumes that you are familiar with these concepts.
● The Tutorial provides a hands-on introduction to the GenePattern Desktop Client. Many users find that this is all they need to begin using GenePattern.
If you are familiar with GenePattern and are looking for more information about the Desktop Client, this is the right guide:
Getting Started Describes how to start and exit from the GenePattern Desktop Client.
Working with Projects Describes how to work with project directories – the directories that contain your data.
Running Analysis and Visualization Modules
Describes how to run GenePattern analyses and how to check job status. (To create and delete modules, use the Web Client.)
Working with Analysis Results Describes how to display, save, and delete analysis results.
Working with Pipelines Describes how to create, edit, and install pipelines. (To delete pipelines, use the Web Client.)
Working with Suites Describes how to create, edit, and install suites. (To delete suites, use the Web Client.)
Menu Bar Describes each command in the menu bar.
3
Getting Started This section describes how to get started with the GenePattern Desktop Client. It contains the following topics:
● Installing GenePattern
● Starting the GenePattern Server
● Starting the GenePattern Desktop Client
● Exiting from GenePattern
● Getting Help
Installing GenePattern When you install GenePattern, you typically install all three components: the server, Desktop Client, and Web Client. GenePattern can be run standalone, or separated into its client and server components to take advantage of a more powerful compute server. A single installer works for either local or distributed configurations.
If you have not yet installed GenePattern, you can do so by following the installation instructions. If you are new to GenePattern, you may find it helpful to work through the GenePattern Tutorial before reading the more detailed information in this guide.
Starting the GenePattern Server You must start the GenePattern server before you can start either the Desktop Client or the Web Client. The server takes several seconds to start; clients cannot connect to it while it is starting.
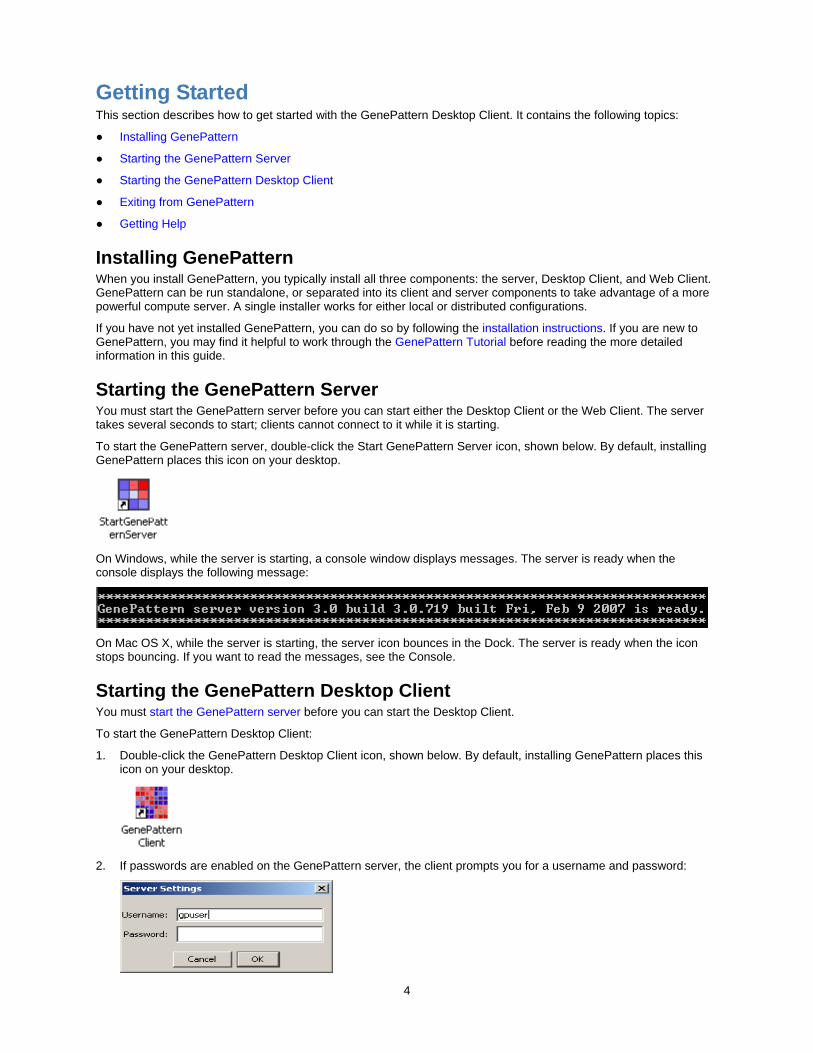
To start the GenePattern server, double-click the Start GenePattern Server icon, shown below. By default, installing GenePattern places this icon on your desktop.
On Windows, while the server is starting, a console window displays messages. The server is ready when the console displays the following message:
On Mac OS X, while the server is starting, the server icon bounces in the Dock. The server is ready when the icon stops bouncing. If you want to read the messages, see the Console.
Starting the GenePattern Desktop Client You must start the GenePattern server before you can start the Desktop Client.
To start the GenePattern Desktop Client:
1. Double-click the GenePattern Desktop Client icon, shown below. By default, installing GenePattern places this icon on your desktop.
2. If passwords are enabled on the GenePattern server, the client prompts you for a username and password:
4
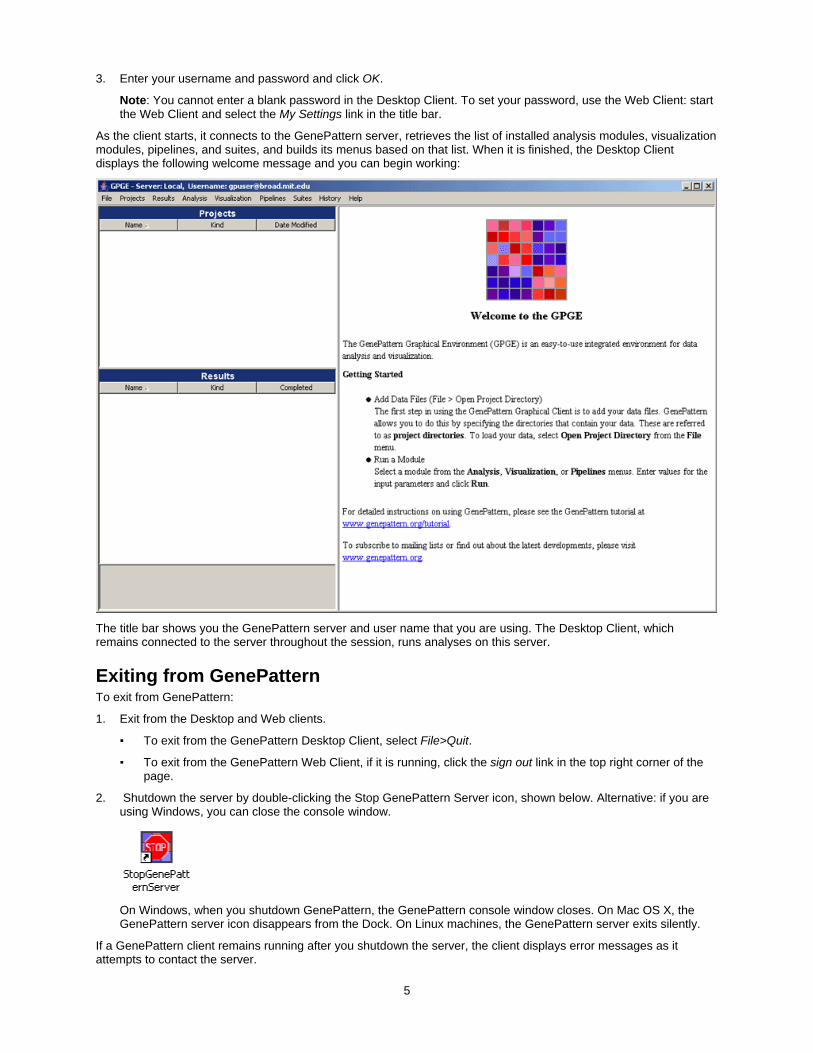
3. Enter your username and password and click OK.
Note: You cannot enter a blank password in the Desktop Client. To set your password, use the Web Client: start the Web Client and select the My Settings link in the title bar.
As the client starts, it connects to the GenePattern server, retrieves the list of installed analysis modules, visualization modules, pipelines, and suites, and builds its menus based on that list. When it is finished, the Desktop Client displays the following welcome message and you can begin working:
The title bar shows you the GenePattern server and user name that you are using. The Desktop Client, which remains connected to the server throughout the session, runs analyses on this server.
Exiting from GenePattern To exit from GenePattern:
1. Exit from the Desktop and Web clients.
▪ To exit from the GenePattern Desktop Client, select File>Quit.
▪ To exit from the GenePattern Web Client, if it is running, click the sign out link in the top right corner of the page.
2. Shutdown the server by double-clicking the Stop GenePattern Server icon, shown below. Alternative: if you are using Windows, you can close the console window.
On Windows, when you shutdown GenePattern, the GenePattern console window closes. On Mac OS X, the GenePattern server icon disappears from the Dock. On Linux machines, the GenePattern server exits silently.
If a GenePattern client remains running after you shutdown the server, the client displays error messages as it attempts to contact the server.
5

Getting Help The GenePattern web site provides an overview of GenePattern and its analysis modules, as well as links to the GenePattern software and documentation. The documentation is your primary source for help with GenePattern:
● The Concepts Guide provides a brief introduction to GenePattern: its primary objects (modules, pipelines, suites) and its client-server architecture. All other GenePattern documentation assumes that you are familiar with these concepts.
● The Tutorial provides a hands-on tour of the Web Client and Desktop Client.
● The Desktop Client Guide, this guide, describes the Desktop Client and how to use it.
● The Web Client Guide describes the Web Client and how to use it.
● The Programmers Guide provides guidelines for writing modules and instructions for accessing GenePattern from the Java, MATLAB, and R programming environments.
● The Modules page lists the modules and pipelines in the Broad repository, with links to their documentation.
● The File Formats Guide describes all file formats and provides instructions for creating input files.
● The Release Notes describe new features and known issues in this release.
● Frequently Asked Questions answers common questions about GenePattern.
Working with Projects In GenePattern, the directories that contain your data are called project directories. Although you do not have to open your project directories in GenePattern, doing so makes it easier to find and analyze the data in those directories.
This section describes how to work with project directories in GenePattern:
● Projects Pane
● Opening a Project Directory
● Refreshing a Project Directory
● Closing a Project Directory
● Working with Project Files
Projects Pane The Projects pane lists the project directories that you have opened in GenePattern:
The three columns in the Projects pane describe the project directories and files:
● Name: shows the name of the directory or file. Each directory name is followed by the directory path in parentheses.
● Kind: describes the content of the directory or file. For directories, Kind is Project. For files, Kind is usually the file extension. If the file extension is ODF, Kind is one of the following:
▪ Gene List: the file contains lists of genes or markers
6
▪ PredictionResults: the file contains the results of a prediction analysis
▪ SOMCluster: the file contains the results of a SOMClustering analysis
▪ ComparativeMarkerSelection: the file contains the results of a ComparativeMarkerSelection analysis
● Date Modified: shows the date and time the directory or file was last modified.
In the Projects pane, you can:
● Click a column label to sort the directories and files based on the information in that column.
● Click-and-drag the column boundary to change the width of the column.
● Double-click a directory name to hide and show the files in that directory.
● Click a file name to display its size and statistics relevant to the file type; file statistics are displayed below the Results pane.
● Double-click a file name to open the file in the default application (if any) for this file type. For information about associating an application with a file type, see your operating system documentation.
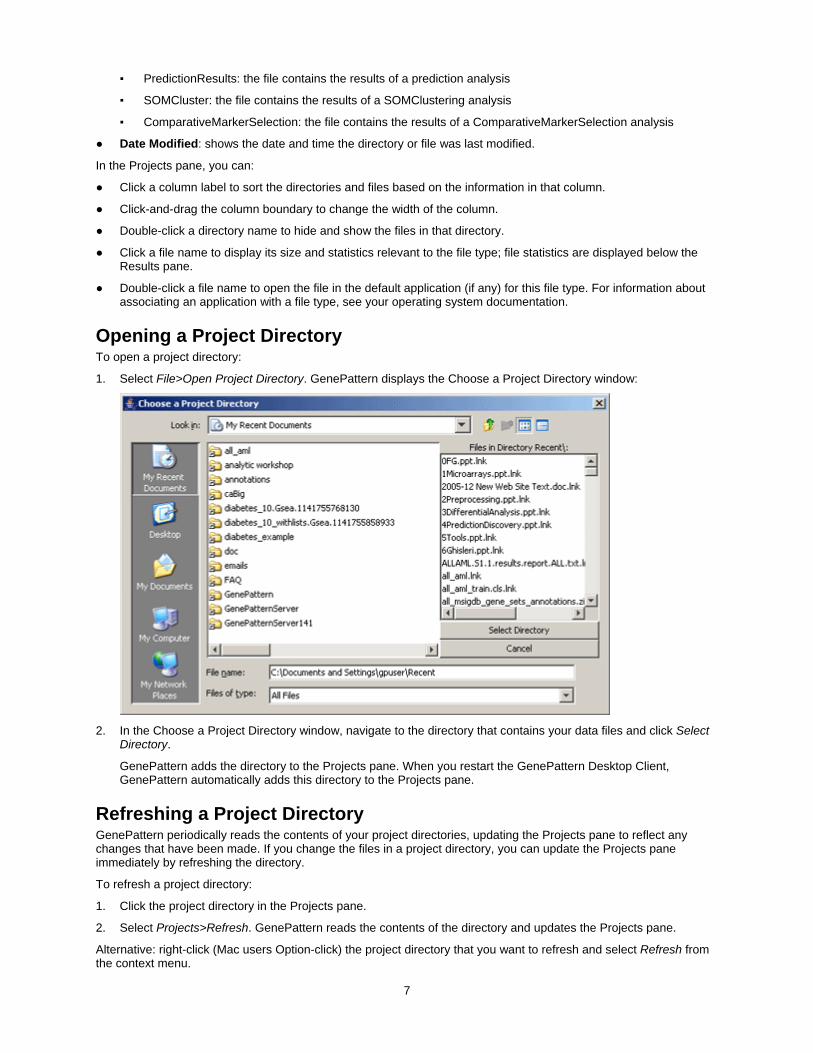
Opening a Project Directory To open a project directory:
1. Select File>Open Project Directory. GenePattern displays the Choose a Project Directory window:
2. In the Choose a Project Directory window, navigate to the directory that contains your data files and click Select
Directory.
GenePattern adds the directory to the Projects pane. When you restart the GenePattern Desktop Client, GenePattern automatically adds this directory to the Projects pane.
Refreshing a Project Directory GenePattern periodically reads the contents of your project directories, updating the Projects pane to reflect any changes that have been made. If you change the files in a project directory, you can update the Projects pane immediately by refreshing the directory.
To refresh a project directory:
1. Click the project directory in the Projects pane.
2. Select Projects>Refresh. GenePattern reads the contents of the directory and updates the Projects pane.
Alternative: right-click (Mac users Option-click) the project directory that you want to refresh and select Refresh from the context menu.
7
Closing a Project Directory To close a project directory, removing it from the Projects pane:
1. Click the project directory.
2. Select Projects>Close Project. GenePattern removes the directory from the Projects pane; it is not added when you next restart the GenePattern Desktop Client.
Alternative: right-click (Mac users Option-click) the project directory that you want to remove and select Close Project from the context menu.
Working with Project Files By adding a project directory to GenePattern, you make it easier to work with the files in that directory. To work with a file in the Projects pane:
1. Select the file.
2. Select one of the following actions from the Projects menu:
▪ Send To>parameter_name: When you run an analysis (see Running Analysis and Visualization Modules), you must enter values for each parameter. Send To makes this file the input value for the selected parameter.
▪ Open With>Text Viewer: Display the content of this file in the Text Viewer. You can use the Text Viewer to copy text to the clipboard, but not to modify the file.
▪ Open With>Default Application: Display this file in the default application (if any) associated with this file type. For information about associating an application with a file type, see your operating system documentation.
▪ Show File Location: Display this file and its parent directory in a file browser.
▪ Modules>module_name: When you run an analysis, you must enter values for each parameter. When you select a module from Modules, the Desktop Client displays the parameters for the selected analysis and makes this file the input value for the first parameter that accepts this file type.
Modules provides a quick way to determine which modules accept this file as input. However, if a module is not listed, it may be because it has not yet been annotated, not because it cannot be used with this file. You can access all modules from the Analysis and Visualization menus.
Alternative: right-click (Mac users Option-click) a file and select the desired action from the context menu.
Running Analysis and Visualization Modules This section describes how to run the analysis modules that implement the computational methods and the visualization modules that display the analysis results graphically. If you are unfamiliar with GenePattern modules, see the Concepts Guide.
● Running an Analysis or Visualization Module
● Checking Job Status
● Viewing Analysis Results
● Rerunning Analyses
Note: To create and delete modules, use the Web Client.
Running an Analysis or Visualization Module To run an analysis or visualization module:
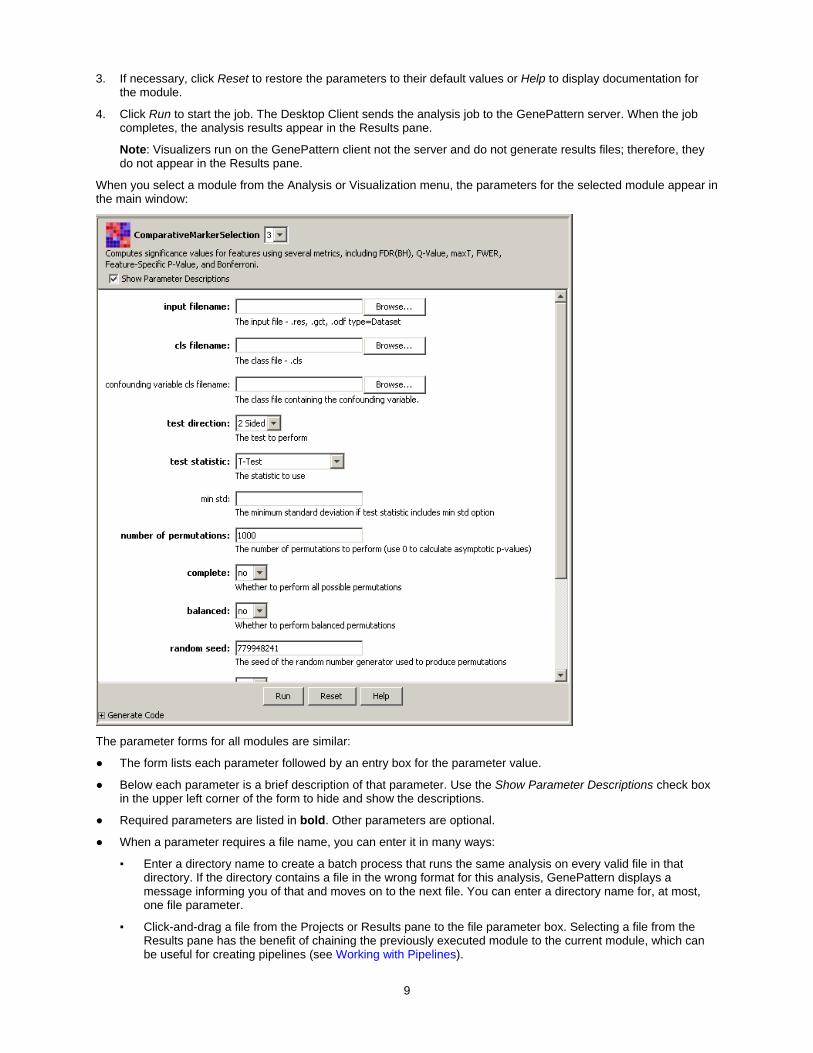
1. Select a module from the Analysis or Visualization menu. The parameters for the selected module appear in the main window, as shown below.
The Analysis and Visualization menus list all of the modules on your GenePattern server. If you think your server has been updated since you started the Desktop Client, click File>Refresh>Modules to update the menus.
2. Enter values for each parameter, as described below.
Note: If a module has multiple filename parameters, you must supply a unique filename for each parameter. Passing the same filename to multiple parameters causes the module to fail.
8
3. If necessary, click Reset to restore the parameters to their default values or Help to display documentation for the module.
4. Click Run to start the job. The Desktop Client sends the analysis job to the GenePattern server. When the job completes, the analysis results appear in the Results pane.
Note: Visualizers run on the GenePattern client not the server and do not generate results files; therefore, they do not appear in the Results pane.
When you select a module from the Analysis or Visualization menu, the parameters for the selected module appear in the main window:
The parameter forms for all modules are similar:
● The form lists each parameter followed by an entry box for the parameter value.
● Below each parameter is a brief description of that parameter. Use the Show Parameter Descriptions check box in the upper left corner of the form to hide and show the descriptions.
● Required parameters are listed in bold. Other parameters are optional.
● When a parameter requires a file name, you can enter it in many ways:
▪ Enter a directory name to create a batch process that runs the same analysis on every valid file in that directory. If the directory contains a file in the wrong format for this analysis, GenePattern displays a message informing you of that and moves on to the next file. You can enter a directory name for, at most, one file parameter.
▪ Click-and-drag a file from the Projects or Results pane to the file parameter box. Selecting a file from the Results pane has the benefit of chaining the previously executed module to the current module, which can be useful for creating pipelines (see Working with Pipelines).
9
▪ Right-click a file in the Projects or Results pane and select Send To>parameter-name.
Alternative: select the file and select either Projects>Send To>parameter-name or Results>Send To>parameter-name.
▪ Click-and-drag a file from a file browser or a web browser to the file parameter box.
▪ Click Browse (next to the file parameter box) to display the file selection window. Navigate to the desired file, select it, and click Open.
▪ Enter the full path name of a file in the file parameter box. This method is not recommended because file names can too easily be mistyped.
The Generate Code field at the bottom of the form displays the code (Java, MATLAB, or R) used to run the module with the parameters that you have entered. This can be useful for programmers writing batch procedures or new modules.
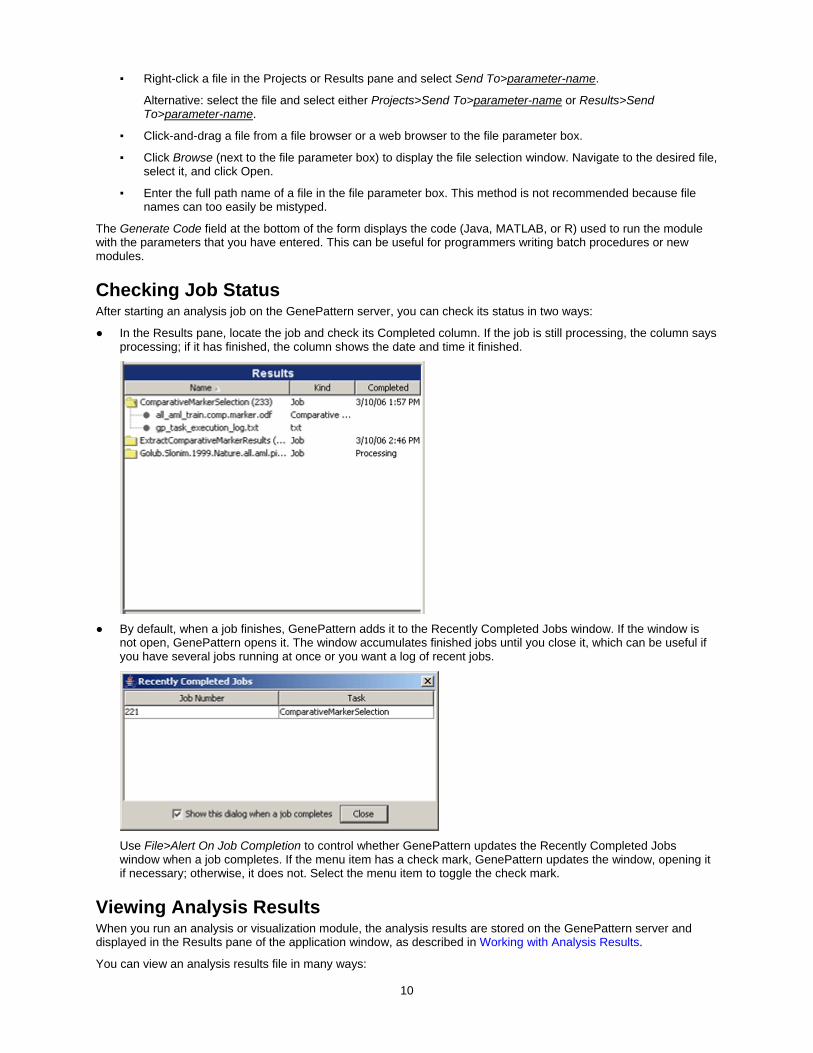
Checking Job Status After starting an analysis job on the GenePattern server, you can check its status in two ways:
● In the Results pane, locate the job and check its Completed column. If the job is still processing, the column says processing; if it has finished, the column shows the date and time it finished.
● By default, when a job finishes, GenePattern adds it to the Recently Completed Jobs window. If the window is
not open, GenePattern opens it. The window accumulates finished jobs until you close it, which can be useful if you have several jobs running at once or you want a log of recent jobs.
Use File>Alert On Job Completion to control whether GenePattern updates the Recently Completed Jobs window when a job completes. If the menu item has a check mark, GenePattern updates the window, opening it if necessary; otherwise, it does not. Select the menu item to toggle the check mark.
Viewing Analysis Results When you run an analysis or visualization module, the analysis results are stored on the GenePattern server and displayed in the Results pane of the application window, as described in Working with Analysis Results.
You can view an analysis results file in many ways:
10
● Visualizer: select the visualizer from the Visualization menu and run it as described in Running an Analysis or Visualization Module. Visualizers, which allow you to view your data graphically and to manipulate that view interactively, are generally the best way to view analysis results. By convention, visualizer names end in "Viewer;" for example, HeatMapViewer.
● Image creator: select the image creator from the Visualization menu and run it as described in Running an Analysis or Visualization Module. Image creators, which create static graphics for view in other applications, are often useful for documenting or sharing analysis results. By convention, image creator names end in "Image;" for example, HeatMapImage.
● Text Viewer: right-click the file and select Open With>Text Viewer to display the file in a text viewer. This is generally the best way to view log files.
● Default Application: right-click the file and select Open With>Default Application to display the file in the default application (if any) associated with this file type. This can be useful when you have assigned default applications to particular file types. For information about associating an application with a file type, see your operating system documentation.
Rerunning Analyses To rerun an analysis:
1. Reload the previously run analysis in one of two ways:
▪ In the Results pane, click the analysis job and select Results>Reload.
Alternative: right-click (Mac users Option-click) the analysis and select Reload.
▪ Select History>View All. When GenePattern displays the History window, select an analysis and click Reload.
The Desktop Client displays the analysis module in the main window, populating the parameter fields with the values used to run the previous analysis.
2. Optionally, modify the parameters.
3. Click Run to run the analysis.
Another way to rerun an analysis or series of analyses is to build an analysis pipeline. For more information, see Working with Pipelines.
Working with Analysis Results When you run an analysis, the analysis results are stored on the GenePattern server and displayed in the Results pane of the application window. Analysis results are stored on the GenePattern server for a period of time (by default, one week) and then deleted.
This section describes how to view and manage analysis results:
● Analysis Results
● Results Pane
● Saving Analysis Results
● Deleting Analysis Results
● Working with Analysis Results Files
Analysis Results The module author determines the content and format of the analysis results; however, by convention, each module generates the following files:
● Analysis results files are typically formatted text files that contain the results of the analysis. Most analysis results files are intended to be used as input to subsequent analyses. Although these files can be viewed in a text viewer, the amount of information in the files may make them difficult to read.
If an analysis module generates an analysis results file that requires examination and interpretation, there is generally a corresponding visualization module that you can use to display the results. Visualization modules have “Viewer” in the title. For example:
▪ Results from ComparativeMarkerSelection are viewed using the ComparativeMarkerSelectionViewer
11
▪ Results from modules in the Prediction category are viewed using the PredictionResultsViewer
▪ Results from SOMClustering are viewed using the SOMClusteringViewer
▪ Gene expression datasets are often viewed using the HeatMapViewer
● Execution log files are text files that describe how the analysis was run. A module might generate one or more of the following log files:
▪ gp_task_execution_log.txt: contains the parameter values used to run the analysis, which is useful for reproducing analysis results.
▪ stdout.txt: contains "standard output" messages; that is, comments generated as the analysis module runs.
▪ stderr.txt: contains "standard error" messages; that is, information about errors (if any) that occurred during the analysis.
Log files can be viewed using a text viewer.
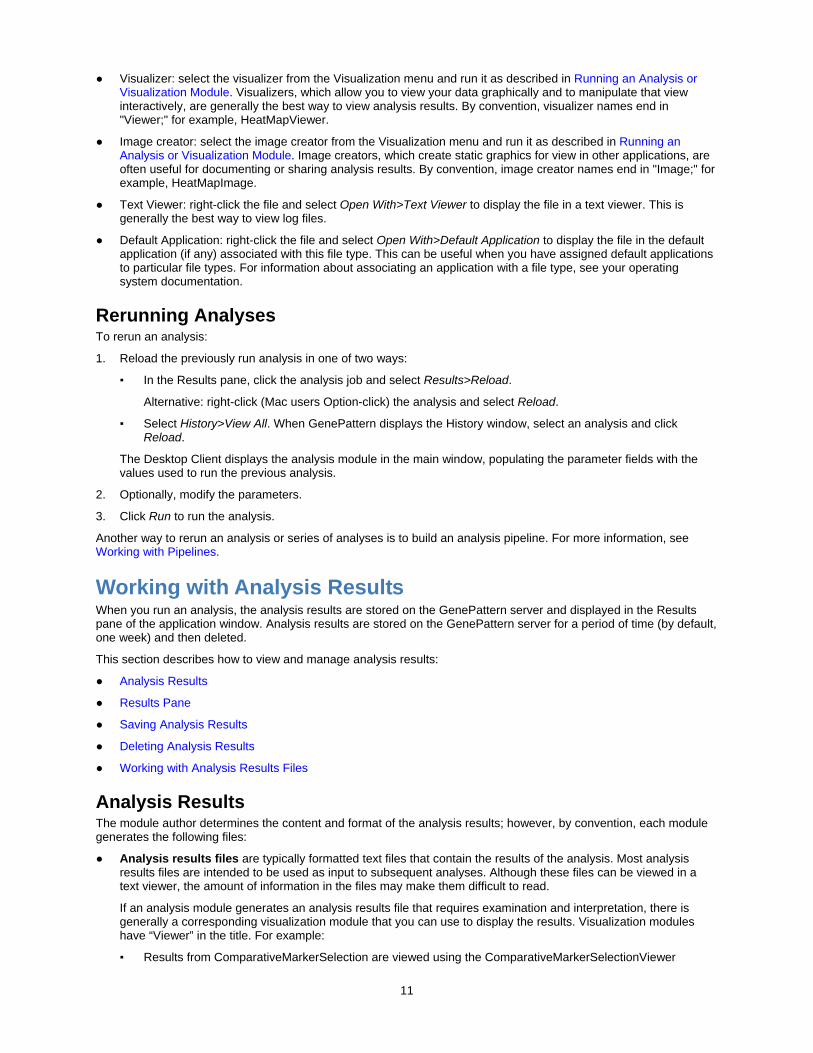
Results Pane The Results pane displays the analyses that you have run. More precisely, it displays the analysis results files stored for you on the GenePattern server:
The three columns in the Results pane describe your analysis results:
● Name: shows each analysis you have run and its generated files. Each analysis is identified by its name followed by its job number in parentheses.
● Kind: describes the analysis or file content. For analyses, Kind is Job. For files, Kind is the file extension, unless the file extension is ODF (as described in Projects Pane).
● Completed: shows the date and time the analysis finished, or Processing if the job is still running.
You can manipulate the columns and files in the Results pane, just as you can the Projects pane (see Projects Pane).
Saving Analysis Results When you run an analysis, the analysis results are stored on the GenePattern server and displayed in the Results pane. Server storage is temporary and results files are deleted after they have been on the server for a certain length of time (by default, one week). To save results persistently (beyond the period of time they are stored on the server), you must download the files to a more permanent location.
To save an analysis results file:
1. In the Results pane, click the file that you want to save.
2. Select Results>Save To. GenePattern displays the Save To submenu, which lists your project directories.
12
3. Select a project directory, or select Other to choose a directory that you have not added to GenePattern. GenePattern copies the file to the selected directory. If you copy the file to a project directory, GenePattern refreshes the Projects pane to display the new file.
Alternative: right-click (Mac users Option-click) the file to save and select Save To from the context menu.
Deleting Analysis Results As you run more analyses, the Results pane contains an increasing number of jobs. If you no longer need the results of an analysis, you can delete that job. Deleting a job removes it from the Results pane and deletes its results files from the GenePattern server.
You can delete analysis jobs in many ways:
● To delete all analyses and their results files, select Results>Delete All Jobs.
● To delete a single results file, click the analysis results file and select Results>Delete File.
Alternative: right-click (Mac users Option-click) the file and select Delete File.
● To delete an analysis and all its results files, click the analysis and select Results>Delete Job.
Alternative: right-click (Mac users Option-click) the analysis and select Delete Job.
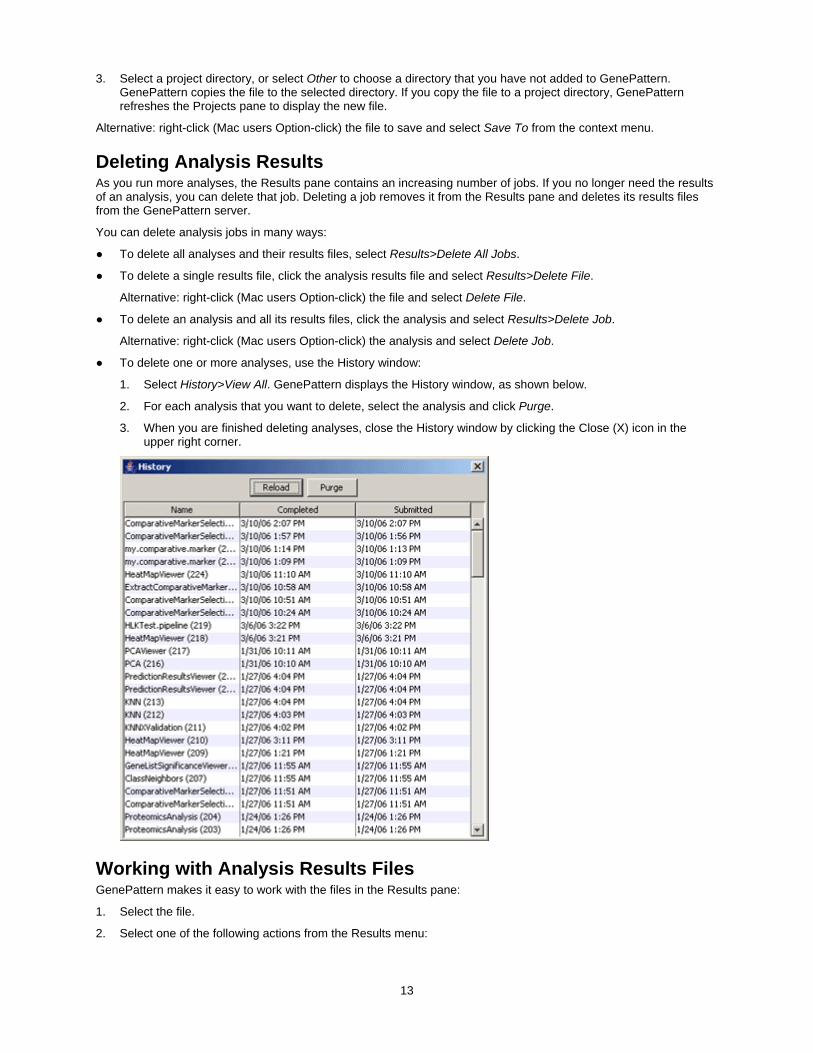
● To delete one or more analyses, use the History window:
1. Select History>View All. GenePattern displays the History window, as shown below.
2. For each analysis that you want to delete, select the analysis and click Purge.
3. When you are finished deleting analyses, close the History window by clicking the Close (X) icon in the upper right corner.
Working with Analysis Results Files GenePattern makes it easy to work with the files in the Results pane:
1. Select the file.
2. Select one of the following actions from the Results menu:
13
▪ Send To>parameter_name: When you run an analysis (see Running Analysis and Visualization Modules), you must enter values for each parameter. Send To makes this file the input value for the selected parameter.
▪ Save To>directory: Copies this file from the GenePattern server (temporary storage) to the selected directory. See Saving Analysis Results.
▪ Delete File: Deletes this file from the GenePattern server. See Deleting Analysis Results.
▪ Open With>Text Viewer: Displays the content of this file in the Text Viewer. You can use the Text Viewer to copy text to the clipboard, but not to modify the file.
▪ Open With>Default Application: Displays this file in the default application (if any) associated with this file type. For information about associating an application with a file type, see your operating system documentation.
▪ Modules>module_name: When you run an analysis, you must enter values for each parameter. When you select a module from Modules, the Desktop Client displays the parameters for the selected analysis and makes this file the input value for the first parameter that accepts this file type.
Modules provides a quick way to determine which modules accept this file as input. However, if a module is not listed, it may be because it has not yet been annotated, not because it cannot be used with this file. You can access all modules from the Analysis and Visualization menus.
▪ Create Pipeline: Create a pipeline that contains the modules used to create this file. See Working with Pipelines.
Alternative: right-click (Mac users Option-click) a file and select the desired action from the context menu.
Working with Pipelines Pipelines allow you to combine analysis and visualization modules into a single workflow. This section describes pipelines and how to use them. If you are unfamiliar with GenePattern modules and pipelines, see the Concepts Guide.
● Running a Pipeline
● Viewing a Pipeline
● Creating a Pipeline
● Editing a Pipeline
● Exporting and Installing Pipelines
Note: To delete pipelines, use the Web Client.
Running a Pipeline To run a pipeline:
1. Select the pipeline from the Pipelines menu. The pipeline and its parameters (if any) appear in the main window, as shown below.
The Pipelines menu lists all of the pipelines on your GenePattern server. If you think your server has been updated since you started the Desktop Client, click File>Refresh>Modules to update the menu.
14
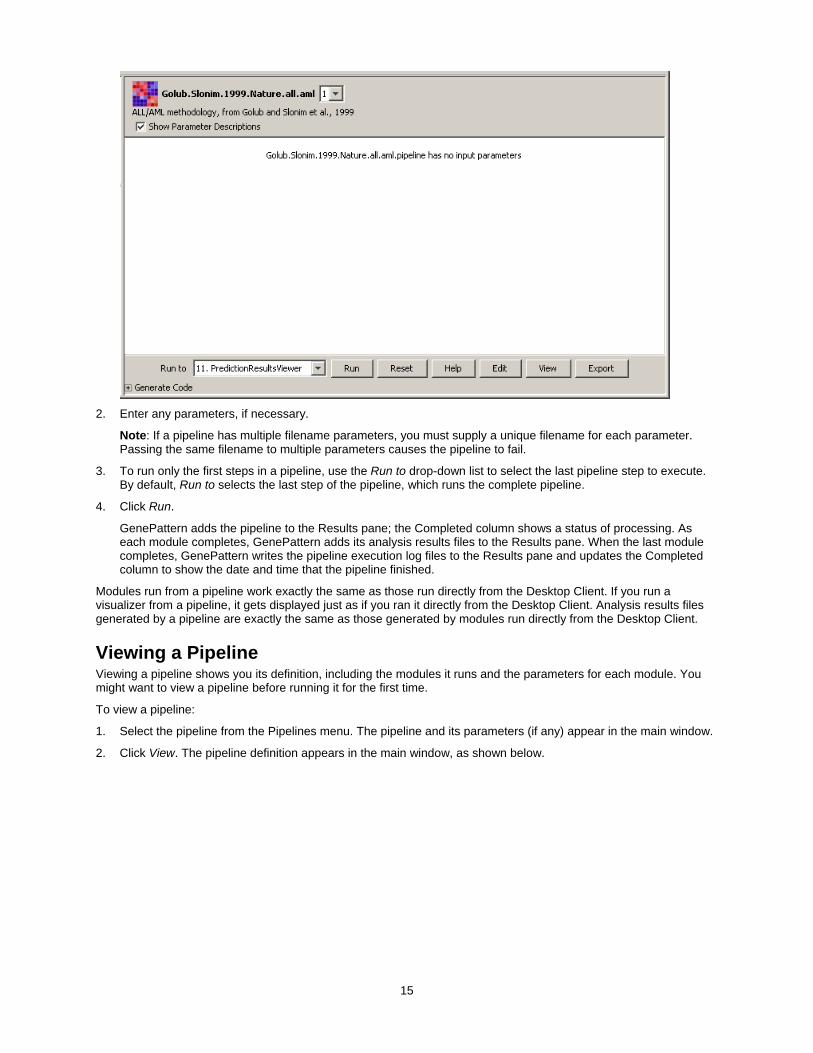
2. Enter any parameters, if necessary.
Note: If a pipeline has multiple filename parameters, you must supply a unique filename for each parameter. Passing the same filename to multiple parameters causes the pipeline to fail.
3. To run only the first steps in a pipeline, use the Run to drop-down list to select the last pipeline step to execute. By default, Run to selects the last step of the pipeline, which runs the complete pipeline.
4. Click Run.
GenePattern adds the pipeline to the Results pane; the Completed column shows a status of processing. As each module completes, GenePattern adds its analysis results files to the Results pane. When the last module completes, GenePattern writes the pipeline execution log files to the Results pane and updates the Completed column to show the date and time that the pipeline finished.
Modules run from a pipeline work exactly the same as those run directly from the Desktop Client. If you run a visualizer from a pipeline, it gets displayed just as if you ran it directly from the Desktop Client. Analysis results files generated by a pipeline are exactly the same as those generated by modules run directly from the Desktop Client.
Viewing a Pipeline Viewing a pipeline shows you its definition, including the modules it runs and the parameters for each module. You might want to view a pipeline before running it for the first time.
To view a pipeline:
1. Select the pipeline from the Pipelines menu. The pipeline and its parameters (if any) appear in the main window.
2. Click View. The pipeline definition appears in the main window, as shown below.
15
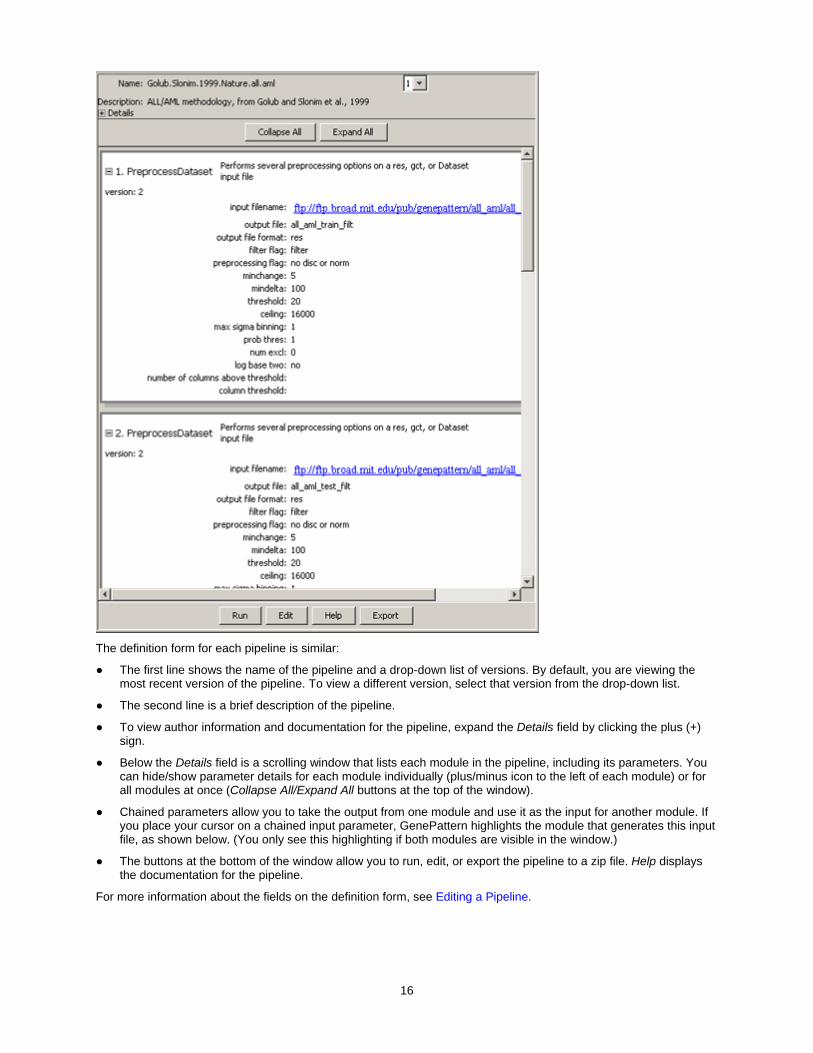
The definition form for each pipeline is similar:
● The first line shows the name of the pipeline and a drop-down list of versions. By default, you are viewing the most recent version of the pipeline. To view a different version, select that version from the drop-down list.
● The second line is a brief description of the pipeline.
● To view author information and documentation for the pipeline, expand the Details field by clicking the plus (+) sign.
● Below the Details field is a scrolling window that lists each module in the pipeline, including its parameters. You can hide/show parameter details for each module individually (plus/minus icon to the left of each module) or for all modules at once (Collapse All/Expand All buttons at the top of the window).
● Chained parameters allow you to take the output from one module and use it as the input for another module. If you place your cursor on a chained input parameter, GenePattern highlights the module that generates this input file, as shown below. (You only see this highlighting if both modules are visible in the window.)
● The buttons at the bottom of the window allow you to run, edit, or export the pipeline to a zip file. Help displays the documentation for the pipeline.
For more information about the fields on the definition form, see Editing a Pipeline.
16

Creating a Pipeline You can create a pipeline in two ways:
● Use Pipelines>New to create an empty pipeline.
● Use Results>Create Pipeline to create a pipeline that contains the modules used to generate the selected analysis results file.
To create an empty pipeline:
1. Select Pipelines>New. GenePattern displays an empty pipeline definition form in the main window.
2. Enter a name for the pipeline in the Name field.
3. Edit the fields at the top of the form and add modules to pipeline, as described in Editing a Pipeline.
To create a pipeline based on an analysis results file:
1. Select an analysis results file from the Results pane and then select Results>Create Pipeline. GenePattern displays the following window prompting you for a pipeline name.
Alternative: right-click (Mac users Option-click) an analysis results file and select Create Pipeline.
17
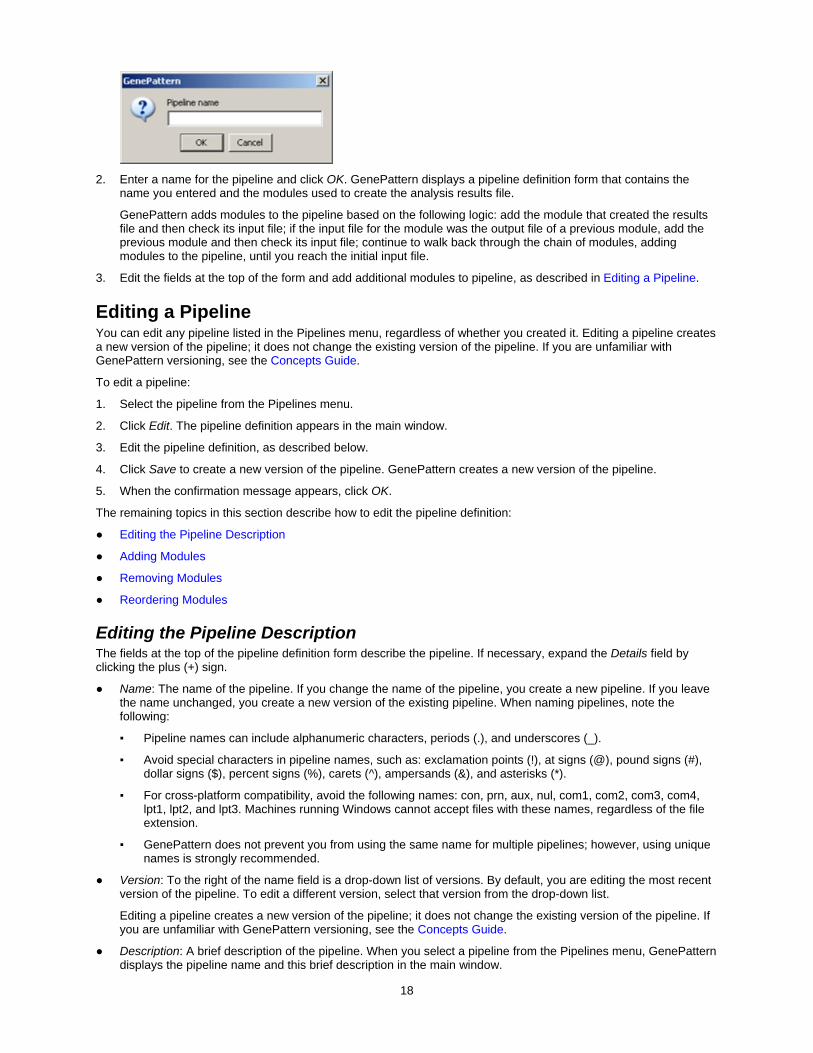
2. Enter a name for the pipeline and click OK. GenePattern displays a pipeline definition form that contains the
name you entered and the modules used to create the analysis results file.
GenePattern adds modules to the pipeline based on the following logic: add the module that created the results file and then check its input file; if the input file for the module was the output file of a previous module, add the previous module and then check its input file; continue to walk back through the chain of modules, adding modules to the pipeline, until you reach the initial input file.
3. Edit the fields at the top of the form and add additional modules to pipeline, as described in Editing a Pipeline.
Editing a Pipeline You can edit any pipeline listed in the Pipelines menu, regardless of whether you created it. Editing a pipeline creates a new version of the pipeline; it does not change the existing version of the pipeline. If you are unfamiliar with GenePattern versioning, see the Concepts Guide.
To edit a pipeline:
1. Select the pipeline from the Pipelines menu.
2. Click Edit. The pipeline definition appears in the main window.
3. Edit the pipeline definition, as described below.
4. Click Save to create a new version of the pipeline. GenePattern creates a new version of the pipeline.
5. When the confirmation message appears, click OK.
The remaining topics in this section describe how to edit the pipeline definition:
● Editing the Pipeline Description
● Adding Modules
● Removing Modules
● Reordering Modules
Editing the Pipeline Description The fields at the top of the pipeline definition form describe the pipeline. If necessary, expand the Details field by clicking the plus (+) sign.
● Name: The name of the pipeline. If you change the name of the pipeline, you create a new pipeline. If you leave the name unchanged, you create a new version of the existing pipeline. When naming pipelines, note the following:
▪ Pipeline names can include alphanumeric characters, periods (.), and underscores (_).
▪ Avoid special characters in pipeline names, such as: exclamation points (!), at signs (@), pound signs (#), dollar signs ($), percent signs (%), carets (^), ampersands (&), and asterisks (*).
▪ For cross-platform compatibility, avoid the following names: con, prn, aux, nul, com1, com2, com3, com4, lpt1, lpt2, and lpt3. Machines running Windows cannot accept files with these names, regardless of the file extension.
▪ GenePattern does not prevent you from using the same name for multiple pipelines; however, using unique names is strongly recommended.
● Version: To the right of the name field is a drop-down list of versions. By default, you are editing the most recent version of the pipeline. To edit a different version, select that version from the drop-down list.
Editing a pipeline creates a new version of the pipeline; it does not change the existing version of the pipeline. If you are unfamiliar with GenePattern versioning, see the Concepts Guide.
● Description: A brief description of the pipeline. When you select a pipeline from the Pipelines menu, GenePattern displays the pipeline name and this brief description in the main window.
18
● Author: The author's name and affiliation (company or academic institution). This is a comment-only field. If you share this pipeline, the author field allows other users to credit the author and to contact the author with questions, suggestions, or enhancement ideas.
● Owner: The user name of the person who created or installed this version of the pipeline. By default, this is your user name.
● Privacy: Select Private (default) or Public. A private pipeline can be accessed only by the person who created or installed the pipeline (or by an administrator); a public pipeline can be seen and run by all users.
● Version comment: A brief description of this version. This comment is visible on pages used to keep versions up to date, so keep your comments complete and concise.
● Documentation: The full path name of the file that contains the pipeline documentation. Documentation is strongly encouraged for public pipelines. Click Add to select the (previously created) pipeline documentation file. Click Delete to clear this field.
● LSID: The Life Science Identifiers (LSIDs) for this pipeline. GenePattern maintains this field; you cannot edit it. If you are unfamiliar with GenePattern versioning and LSIDs, see the Concepts Guide.
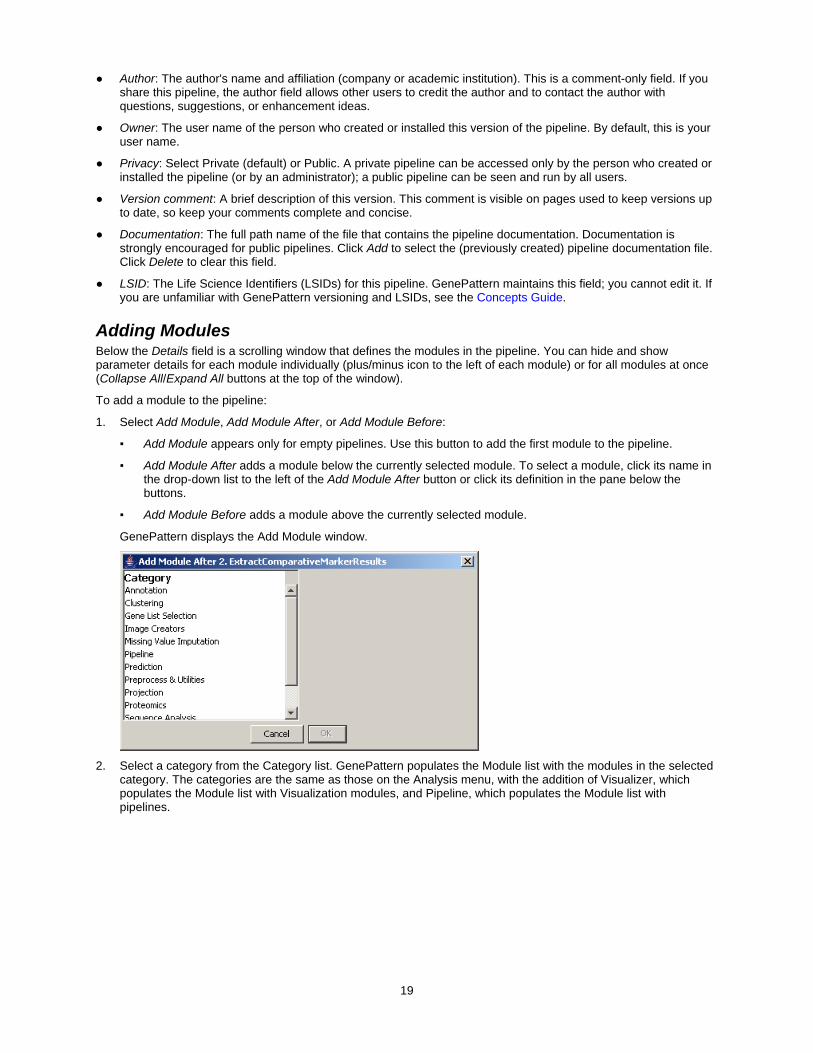
Adding Modules Below the Details field is a scrolling window that defines the modules in the pipeline. You can hide and show parameter details for each module individually (plus/minus icon to the left of each module) or for all modules at once (Collapse All/Expand All buttons at the top of the window).
To add a module to the pipeline:
1. Select Add Module, Add Module After, or Add Module Before:
▪ Add Module appears only for empty pipelines. Use this button to add the first module to the pipeline.
▪ Add Module After adds a module below the currently selected module. To select a module, click its name in the drop-down list to the left of the Add Module After button or click its definition in the pane below the buttons.
▪ Add Module Before adds a module above the currently selected module.
GenePattern displays the Add Module window.
2. Select a category from the Category list. GenePattern populates the Module list with the modules in the selected
category. The categories are the same as those on the Analysis menu, with the addition of Visualizer, which populates the Module list with Visualization modules, and Pipeline, which populates the Module list with pipelines.
19
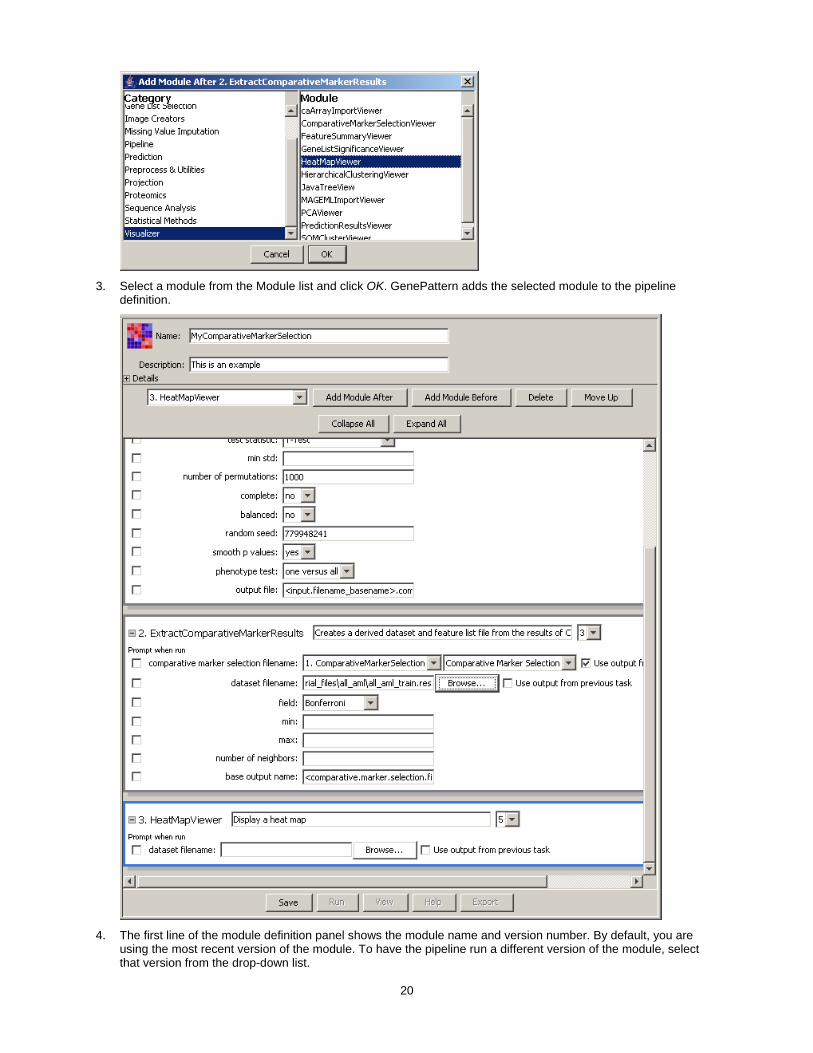
3. Select a module from the Module list and click OK. GenePattern adds the selected module to the pipeline
definition.
4. The first line of the module definition panel shows the module name and version number. By default, you are
using the most recent version of the module. To have the pipeline run a different version of the module, select that version from the drop-down list.
20
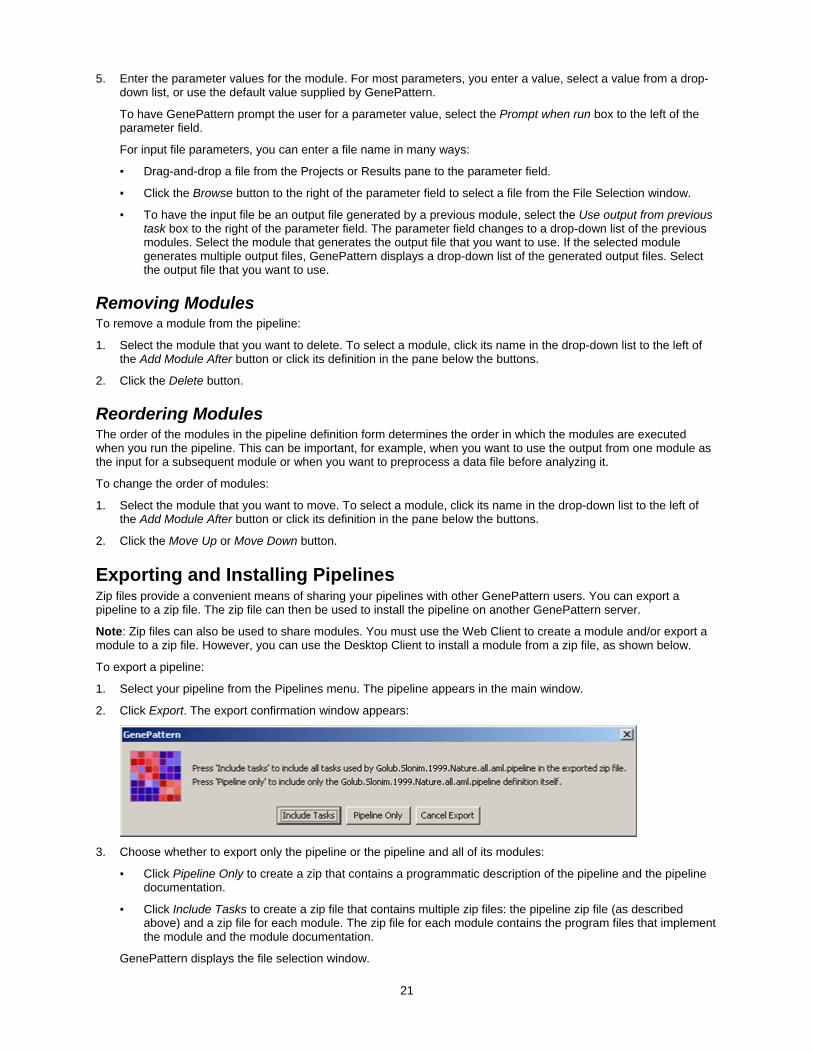
5. Enter the parameter values for the module. For most parameters, you enter a value, select a value from a drop-down list, or use the default value supplied by GenePattern.
To have GenePattern prompt the user for a parameter value, select the Prompt when run box to the left of the parameter field.
For input file parameters, you can enter a file name in many ways:
▪ Drag-and-drop a file from the Projects or Results pane to the parameter field.
▪ Click the Browse button to the right of the parameter field to select a file from the File Selection window.
▪ To have the input file be an output file generated by a previous module, select the Use output from previous task box to the right of the parameter field. The parameter field changes to a drop-down list of the previous modules. Select the module that generates the output file that you want to use. If the selected module generates multiple output files, GenePattern displays a drop-down list of the generated output files. Select the output file that you want to use.
Removing Modules To remove a module from the pipeline:
1. Select the module that you want to delete. To select a module, click its name in the drop-down list to the left of the Add Module After button or click its definition in the pane below the buttons.
2. Click the Delete button.
Reordering Modules The order of the modules in the pipeline definition form determines the order in which the modules are executed when you run the pipeline. This can be important, for example, when you want to use the output from one module as the input for a subsequent module or when you want to preprocess a data file before analyzing it.
To change the order of modules:
1. Select the module that you want to move. To select a module, click its name in the drop-down list to the left of the Add Module After button or click its definition in the pane below the buttons.
2. Click the Move Up or Move Down button.
Exporting and Installing Pipelines Zip files provide a convenient means of sharing your pipelines with other GenePattern users. You can export a pipeline to a zip file. The zip file can then be used to install the pipeline on another GenePattern server.
Note: Zip files can also be used to share modules. You must use the Web Client to create a module and/or export a module to a zip file. However, you can use the Desktop Client to install a module from a zip file, as shown below.
To export a pipeline:
1. Select your pipeline from the Pipelines menu. The pipeline appears in the main window.
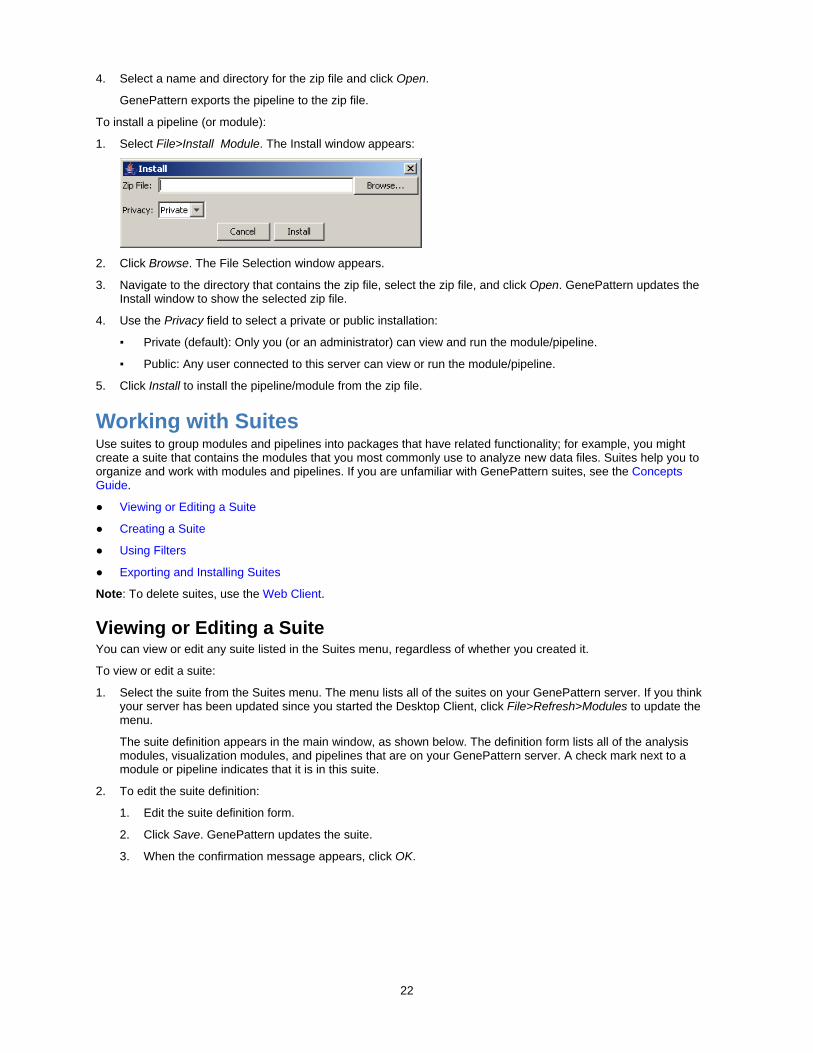
2. Click Export. The export confirmation window appears:
3. Choose whether to export only the pipeline or the pipeline and all of its modules:
▪ Click Pipeline Only to create a zip that contains a programmatic description of the pipeline and the pipeline documentation.
▪ Click Include Tasks to create a zip file that contains multiple zip files: the pipeline zip file (as described above) and a zip file for each module. The zip file for each module contains the program files that implement the module and the module documentation.
GenePattern displays the file selection window.
21
4. Select a name and directory for the zip file and click Open.
GenePattern exports the pipeline to the zip file.
To install a pipeline (or module):
1. Select File>Install Module. The Install window appears:
2. Click Browse. The File Selection window appears.
3. Navigate to the directory that contains the zip file, select the zip file, and click Open. GenePattern updates the Install window to show the selected zip file.
4. Use the Privacy field to select a private or public installation:
▪ Private (default): Only you (or an administrator) can view and run the module/pipeline.
▪ Public: Any user connected to this server can view or run the module/pipeline.
5. Click Install to install the pipeline/module from the zip file.
Working with Suites Use suites to group modules and pipelines into packages that have related functionality; for example, you might create a suite that contains the modules that you most commonly use to analyze new data files. Suites help you to organize and work with modules and pipelines. If you are unfamiliar with GenePattern suites, see the Concepts Guide.
● Viewing or Editing a Suite
● Creating a Suite
● Using Filters
● Exporting and Installing Suites
Note: To delete suites, use the Web Client.
Viewing or Editing a Suite You can view or edit any suite listed in the Suites menu, regardless of whether you created it.
To view or edit a suite:
1. Select the suite from the Suites menu. The menu lists all of the suites on your GenePattern server. If you think your server has been updated since you started the Desktop Client, click File>Refresh>Modules to update the menu.
The suite definition appears in the main window, as shown below. The definition form lists all of the analysis modules, visualization modules, and pipelines that are on your GenePattern server. A check mark next to a module or pipeline indicates that it is in this suite.
2. To edit the suite definition:
1. Edit the suite definition form.
2. Click Save. GenePattern updates the suite.
3. When the confirmation message appears, click OK.
22
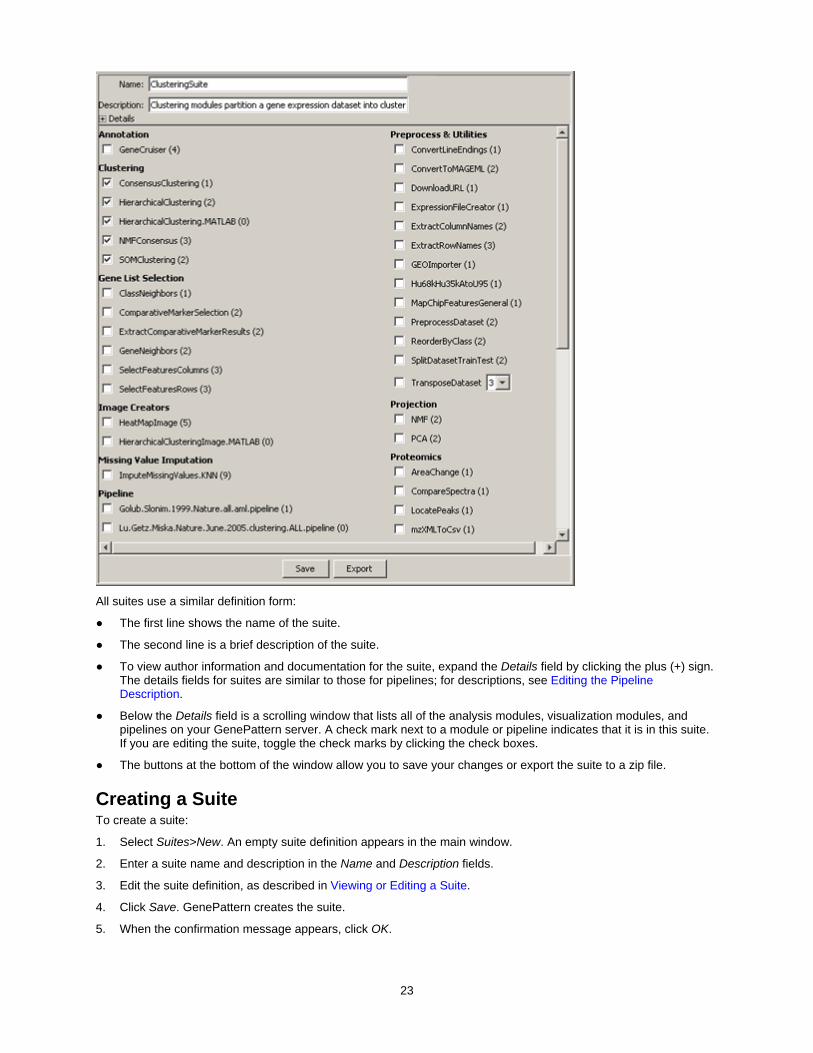
All suites use a similar definition form:
● The first line shows the name of the suite.
● The second line is a brief description of the suite.
● To view author information and documentation for the suite, expand the Details field by clicking the plus (+) sign. The details fields for suites are similar to those for pipelines; for descriptions, see Editing the Pipeline Description.
● Below the Details field is a scrolling window that lists all of the analysis modules, visualization modules, and pipelines on your GenePattern server. A check mark next to a module or pipeline indicates that it is in this suite. If you are editing the suite, toggle the check marks by clicking the check boxes.
● The buttons at the bottom of the window allow you to save your changes or export the suite to a zip file.
Creating a Suite To create a suite:
1. Select Suites>New. An empty suite definition appears in the main window.
2. Enter a suite name and description in the Name and Description fields.
3. Edit the suite definition, as described in Viewing or Editing a Suite.
4. Click Save. GenePattern creates the suite.
5. When the confirmation message appears, click OK.
23
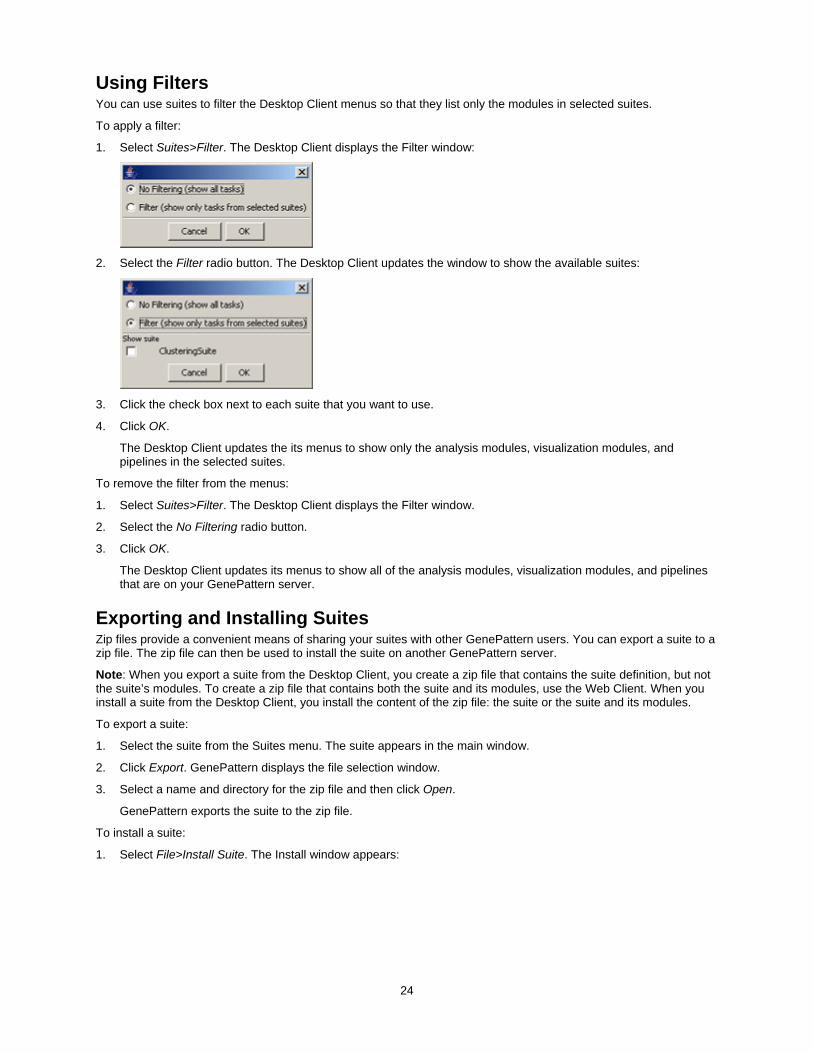
Using Filters You can use suites to filter the Desktop Client menus so that they list only the modules in selected suites.
To apply a filter:
1. Select Suites>Filter. The Desktop Client displays the Filter window:
2. Select the Filter radio button. The Desktop Client updates the window to show the available suites:
3. Click the check box next to each suite that you want to use.
4. Click OK.
The Desktop Client updates the its menus to show only the analysis modules, visualization modules, and pipelines in the selected suites.
To remove the filter from the menus:
1. Select Suites>Filter. The Desktop Client displays the Filter window.
2. Select the No Filtering radio button.
3. Click OK.
The Desktop Client updates its menus to show all of the analysis modules, visualization modules, and pipelines that are on your GenePattern server.
Exporting and Installing Suites Zip files provide a convenient means of sharing your suites with other GenePattern users. You can export a suite to a zip file. The zip file can then be used to install the suite on another GenePattern server.
Note: When you export a suite from the Desktop Client, you create a zip file that contains the suite definition, but not the suite’s modules. To create a zip file that contains both the suite and its modules, use the Web Client. When you install a suite from the Desktop Client, you install the content of the zip file: the suite or the suite and its modules.
To export a suite:
1. Select the suite from the Suites menu. The suite appears in the main window.
2. Click Export. GenePattern displays the file selection window.
3. Select a name and directory for the zip file and then click Open.
GenePattern exports the suite to the zip file.
To install a suite:
1. Select File>Install Suite. The Install window appears:
24
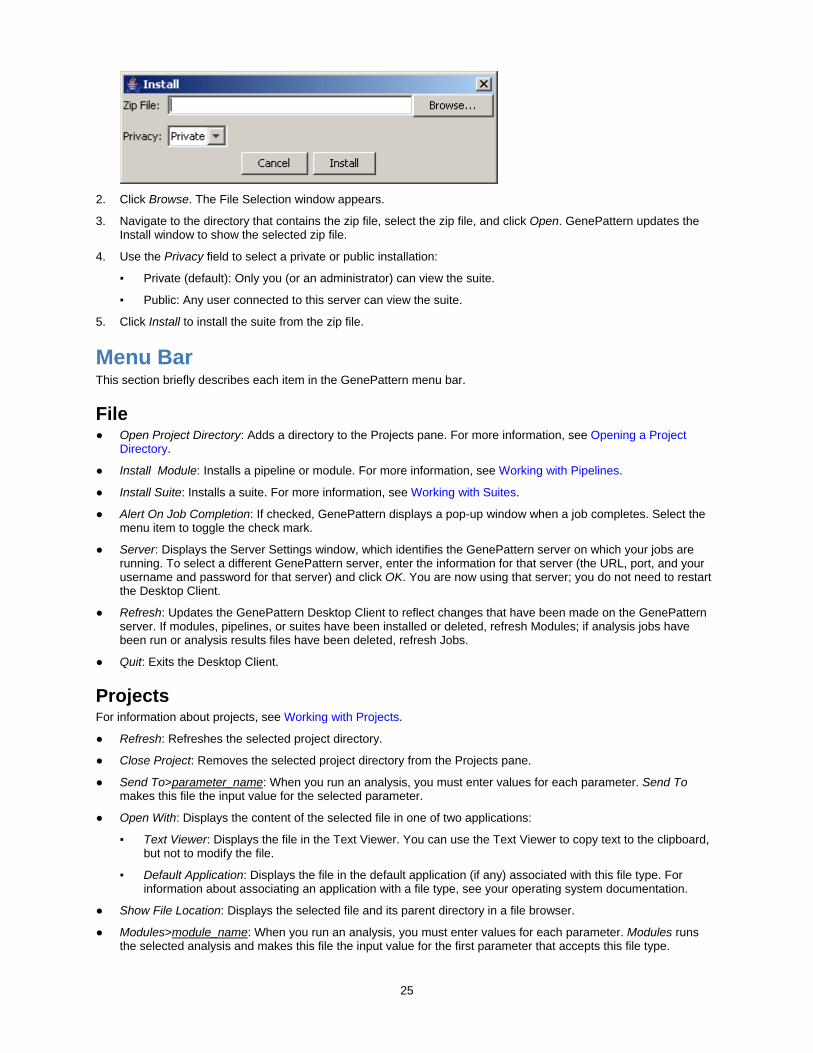
2. Click Browse. The File Selection window appears.
3. Navigate to the directory that contains the zip file, select the zip file, and click Open. GenePattern updates the Install window to show the selected zip file.
4. Use the Privacy field to select a private or public installation:
▪ Private (default): Only you (or an administrator) can view the suite.
▪ Public: Any user connected to this server can view the suite.
5. Click Install to install the suite from the zip file.
Menu Bar This section briefly describes each item in the GenePattern menu bar.
File ● Open Project Directory: Adds a directory to the Projects pane. For more information, see Opening a Project
Directory.
● Install Module: Installs a pipeline or module. For more information, see Working with Pipelines.
● Install Suite: Installs a suite. For more information, see Working with Suites.
● Alert On Job Completion: If checked, GenePattern displays a pop-up window when a job completes. Select the menu item to toggle the check mark.
● Server: Displays the Server Settings window, which identifies the GenePattern server on which your jobs are running. To select a different GenePattern server, enter the information for that server (the URL, port, and your username and password for that server) and click OK. You are now using that server; you do not need to restart the Desktop Client.
● Refresh: Updates the GenePattern Desktop Client to reflect changes that have been made on the GenePattern server. If modules, pipelines, or suites have been installed or deleted, refresh Modules; if analysis jobs have been run or analysis results files have been deleted, refresh Jobs.
● Quit: Exits the Desktop Client.
Projects For information about projects, see Working with Projects.
● Refresh: Refreshes the selected project directory.
● Close Project: Removes the selected project directory from the Projects pane.
● Send To>parameter_name: When you run an analysis, you must enter values for each parameter. Send To makes this file the input value for the selected parameter.
● Open With: Displays the content of the selected file in one of two applications:
▪ Text Viewer: Displays the file in the Text Viewer. You can use the Text Viewer to copy text to the clipboard, but not to modify the file.
▪ Default Application: Displays the file in the default application (if any) associated with this file type. For information about associating an application with a file type, see your operating system documentation.
● Show File Location: Displays the selected file and its parent directory in a file browser.
● Modules>module_name: When you run an analysis, you must enter values for each parameter. Modules runs the selected analysis and makes this file the input value for the first parameter that accepts this file type.
25
Results For information about running analyses and working with analysis results, see Running Analysis and Visualization Modules and Working with Analysis Results.
● Reload: Displays the analysis module and parameter values used to run the selected analysis. You can rerun the same analysis or modify the parameters and run the modified analysis.
● Delete Job: Removes the analysis from the Results pane and deletes all of its generated files from the GenePattern server.
● Delete All Jobs: Removes all analyses from the Results pane and all of the associated analysis results files from the GenePattern server.
● Terminate Job: Cancels a currently executing analysis job.
● View Code: Displays the code (Java, MATLAB, or R) used to run the selected analysis.
● Send To>parameter_name: When you run an analysis, you must enter values for each parameter. Send To makes this file the input value for the selected parameter.
● Save To: Copies the selected results file from temporary storage on the GenePattern server to the selected directory.
● Delete File: Deletes the selected results file from the GenePattern server.
● Open With: Displays the content of the selected file in one of two applications:
▪ Text Viewer: Displays the file in the Text Viewer. You can use the Text Viewer to copy text to the clipboard, but not to modify the file.
▪ Default Application: Displays the file in the default application (if any) associated with this file type. For information about associating an application with a file type, see your operating system documentation.
● Modules>module_name: When you run an analysis, you must enter values for each parameter. Modules runs the selected analysis and makes this file the input value for the first parameter that accepts this file type.
● Create Pipeline: Creates a pipeline that contains the analysis modules used to create the selected results file. For more information, see Working with Pipelines.
Analysis The Analysis menu lists the analysis modules available on your GenePattern server. For more information, see Running Analysis and Visualization Modules.
Visualization The Visualization menu lists the visualization modules available on your GenePattern server. For more information, see Running Analysis and Visualization Modules.
Pipelines For information about pipelines, see Working with Pipelines.
● New: Creates a pipeline.
● The remainder of the Pipeline menu lists the pipeline modules available on your GenePattern server. Select a pipeline to run, view, edit, or export the pipeline.
Suites For information about suites, see Working with Suites.
● New: Creates a suite.
● Filter: Applies or removes a filter. When you apply a filter and select one or more suites, the Desktop Client updates its menus to show only the modules listed in the selected suites.
● The remainder of the Suites menu lists the suites available on your GenePattern server. Select a suite to view, edit, or export the suite.
26
History ● The first items in the History menu are the most recently run analysis jobs. Select an item to display the analysis
module and parameter values used to run that analysis job.
● View All: Displays the History window, which lists all analysis jobs that you have run. From the History window, you can select a job and then select Reload or Purge:
▪ Reload: Displays the analysis module and parameter values used to run the selected analysis.
▪ Purge: Removes the selected analysis from the Results pane and deletes all of its generated files from the GenePattern server.
To close the History window, click the Close (X) icon in the upper right corner.
Help ● About: Displays the GenePattern release number, build number and date, and authors.
● GenePattern Web Site: Opens a web browser and displays the GenePattern web site. You must be connected to the internet to use this feature.
● GenePattern Tutorial: Opens a web browser and displays the GenePattern Tutorial. Use the links in the title bar of the Tutorial window to display any other GenePattern manual.
● GenePattern Server: Opens a web browser and displays the GenePattern Web Client.
● Getting Started: Displays the welcome message in the main window.
● Module Color Key: Displays a legend for the colors used to color-code pipeline names; the colors indicate who authored the module.
● Errors: Displays a window that allows you to send a bug report to the GenePattern Help Desk. You must be connected to the Internet to use this feature.
When you create a bug report, please enter as much information as possible including the text of any error messages and the release and build numbers listed in the Help>About box.
27