Embed Size (px)
Citation preview

Genesis 250/300 rear seatwill fit e-z-go® txt®and freedom txt®
installation instructions
included: tools needed:
Madjax recommends professional installation. If you choose to not have this product installed by a professional, we highly recommend that you exercise caution, care, and patience when installing this product as it involves drilling holes into your cart’s body.
12
Revised February 2015
Remove strut and basket assembly. Remove hardware from struts and detach canopy. Use a brace to support the canopy. Retain hardware.
Attach main seat bracket using hardware from pack 1. Side plate of bracket should be facing the outside of cart. Tighten hardware.
Grab Bar
Footrest
Main FrameArmrests
Lean Back Brackets
Main Seat BracketsHardware Packs 1-7
Grab BarLean Back BracketsFootrestBagwell BracketsMain BracketsMain FrameArm Rests
Drill17mm Wrench17mm Socket#3 Phillips Bit14 mm Socket10mm Socket3/8” Drill Bit13mm wrench
Bagwell Brackets
34
Attach factory roof struts using remaining hardware from pack 1. Re-attach factory roof using retained hardware.
Attach factory lean back cushions using hardware retained from step 1.
56
Attach main polyboard frame to main bracket using hardware from pack 2 and tighten.
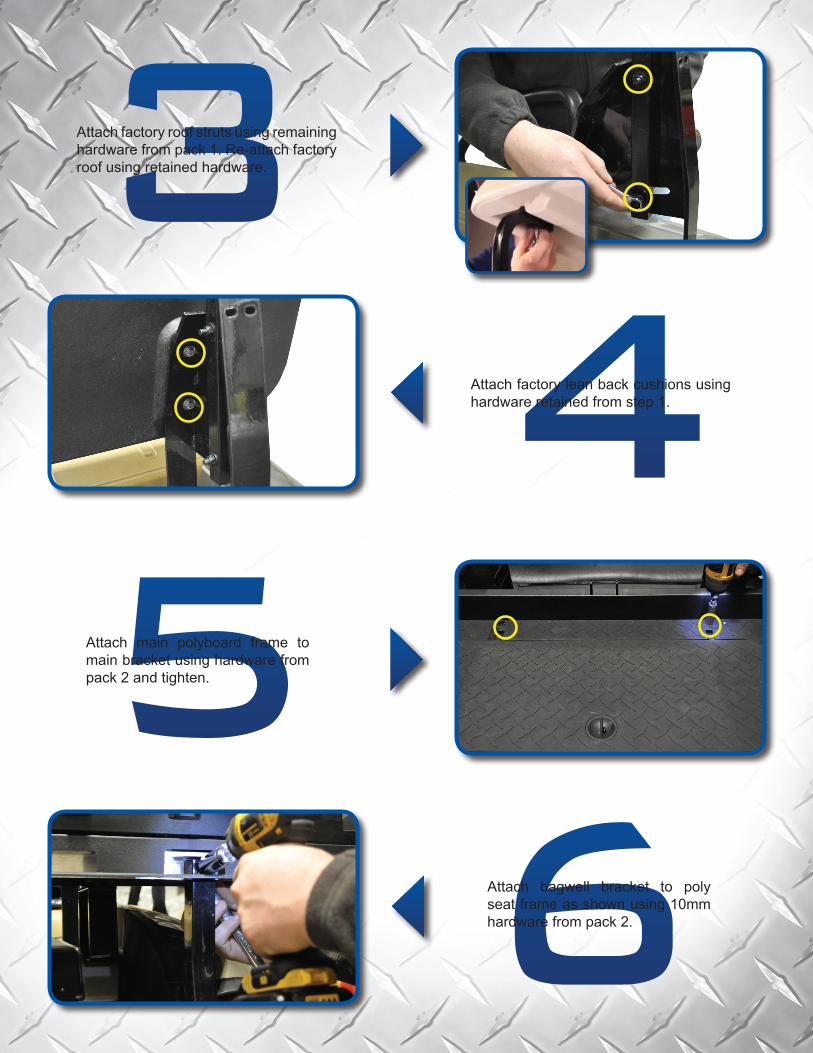
Attach bagwell bracket to poly seat frame as shown using 10mm hardware from pack 2.

910
78
Using a 3/8”mm drill bit, drill out previously marked holes through outer bumper into bagwell.
Attach bagwell bracket to rear of cart as shown using hardware from pack 2.
Attach armrest to main polyboard frame using hardware from pack 3. Repeat process on the other side. TIghten hardware.
Using the appropriate labeled hole for your cart attach lean back bracket to main seat bracket using hardware from pack 4.
1112
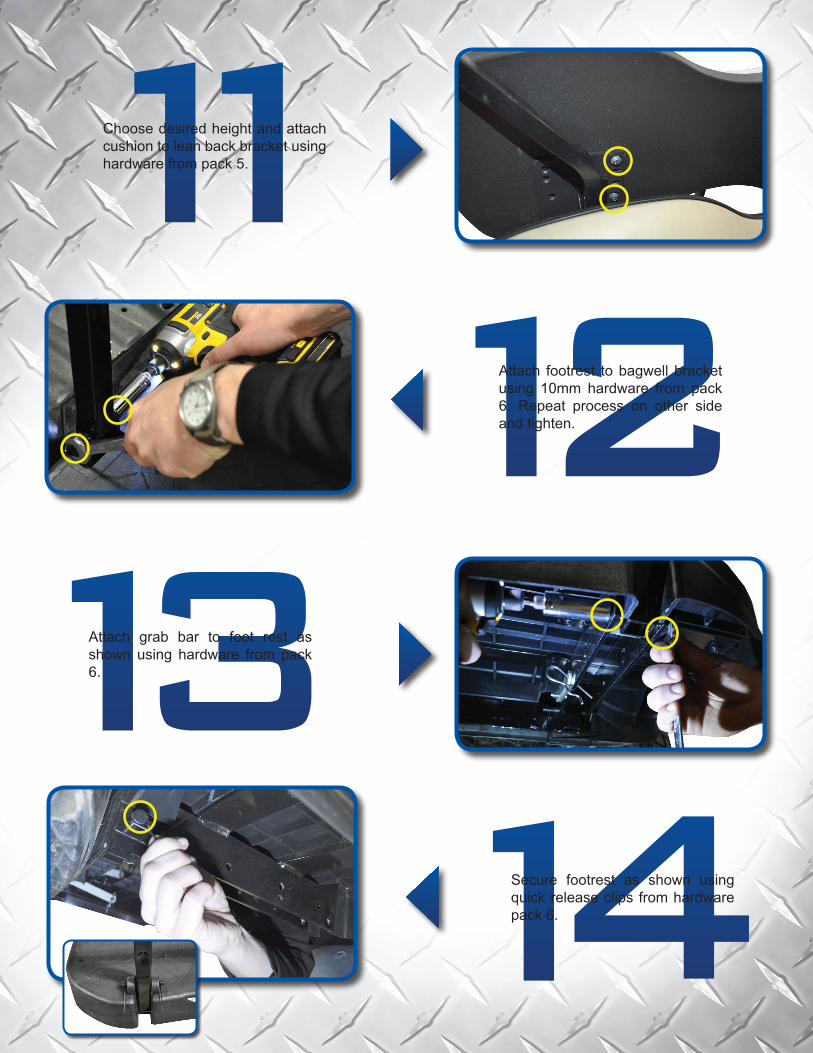
Choose desired height and attach cushion to lean back bracket using hardware from pack 5.
1413
Attach footrest to bagwell bracket using 10mm hardware from pack 6. Repeat process on other side and tighten.
Attach grab bar to foot rest as shown using hardware from pack 6.
Secure footrest as shown using quick release clips from hardware pack 6.

1516
visit www.mymadjax.com for more installation videosINSTALLATION COMPLETE
E-Z-GO®, E-Z-Go® TXT®, and E-Z-Go® RXV® are registered trademarks of Textron Innovations, Inc. Club Car®, Club Car® Precedent®, and Club Car® DS® are registered trademarks of Ingersoll Rand, Inc. Yamaha®, Yamaha® Drive®, G-14®, G-16®, G-19®, and G-22® are registered trademarks of Yamaha Golf-Car Company. Any reference to Club Car®, E-Z-Go®, or Yamaha® or their associated trademarks, word marks, and products are only for purposes of identifying golf carts with which this Madjax product is compatible. Madjax products are aftermarket parts and are not original equipment parts. Madjax is not connected to, affiliated with, sponsored by, or endorsed by either Textron Innovations, Inc., Ingersoll Rand, Inc., Yamaha Golf Cart Company, or any of their parent or subsidiary companies.
Attach seat bottom cushion as shown using hardware from pack 7.
Footplate can be folded up by removing the four quick release clips and folding forward. To lock footplate in up right poistion use brackets as shown.
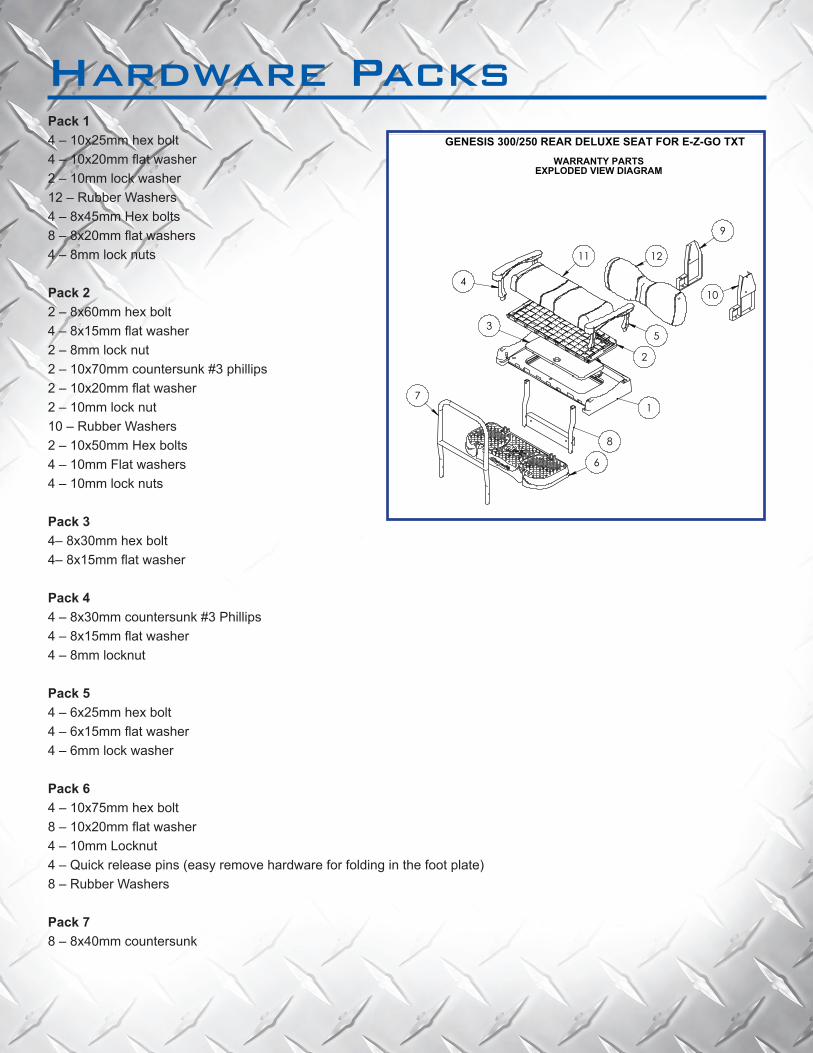
Pack 14 – 10x25mm hex bolt4 – 10x20mm flat washer2 – 10mm lock washer12 – Rubber Washers4 – 8x45mm Hex bolts8 – 8x20mm flat washers4 – 8mm lock nuts
Pack 22 – 8x60mm hex bolt4 – 8x15mm flat washer2 – 8mm lock nut2 – 10x70mm countersunk #3 phillips2 – 10x20mm flat washer2 – 10mm lock nut10 – Rubber Washers2 – 10x50mm Hex bolts4 – 10mm Flat washers4 – 10mm lock nuts
Pack 34– 8x30mm hex bolt 4– 8x15mm flat washer
Pack 44 – 8x30mm countersunk #3 Phillips4 – 8x15mm flat washer4 – 8mm locknut
Pack 54 – 6x25mm hex bolt4 – 6x15mm flat washer4 – 6mm lock washer
Pack 64 – 10x75mm hex bolt8 – 10x20mm flat washer4 – 10mm Locknut4 – Quick release pins (easy remove hardware for folding in the foot plate)8 – Rubber Washers
Pack 78 – 8x40mm countersunk
Hardware Packs
WARRANTY PARTSEXPLODED VIEW DIAGRAM
GENESIS 300/250 REAR DELUXE SEAT FOR E-Z-GO TXT
12
9
104
11
5
2
1
3
8
6
7