Embed Size (px)
Citation preview
CashPro® Online Getting Started Guide
Notifications
CashPro® Online Getting Started Guide 2
Table of Contents
Introduction..................................................................................................4
Accessing the Notifications Setup Wizard......................................................4
Setting Up ACH Batch Alerts.........................................................................5
Setting Up ACH End of Day Alerts.................................................................6
Setting Up ACH Positive Pay Exception Alerts..............................................7
Setting Up ACH Positive Pay Pending Approval Alerts..................................8
Setting Up Check Positive Pay Exceptions Alerts..........................................9
Setting Up Check Positive Pay Issue File Alerts..........................................10
Setting Up Check Positive Pay Outstanding Issue Alerts.............................11
Setting Up Investments Alerts.....................................................................12
Setting Up Payments Confirms/Rejects Alerts.............................................13
Setting Up Payments Pending Approval Alerts............................................14
Setting Up Payments Templates Alerts .......................................................15
Setting Up Global Clearing Confirmations Alerts..........................................16
Setting Up Reporting - Previous Day Alerts.................................................17
Setting Up Reporting - Current Day Alerts...................................................19
Setting Up Wires Pending Approval Alerts...................................................21
CashPro® Online Getting Started Guide 3
Table of Contents
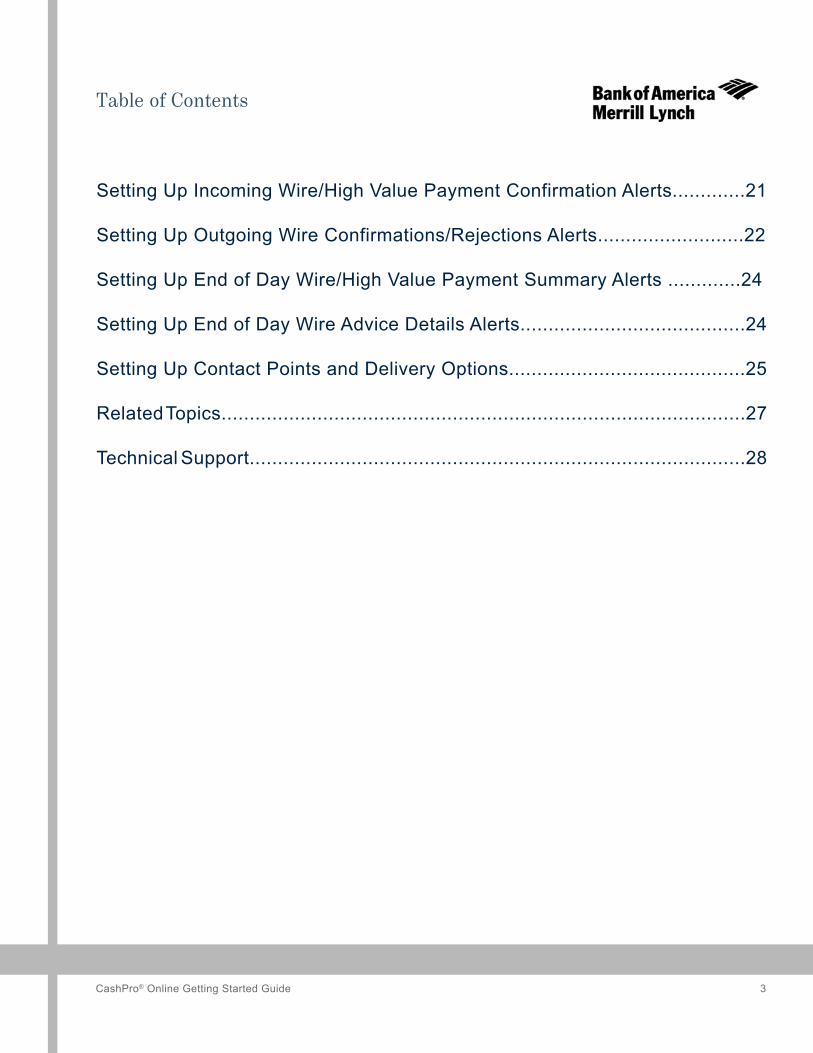
Setting Up Incoming Wire/High Value Payment Confirmation Alerts.............21
Setting Up Outgoing Wire Confirmations/Rejections Alerts..........................22
Setting Up End of Day Wire/High Value Payment Summary Alerts .............24
Setting Up End of Day Wire Advice Details Alerts........................................24
Setting Up Contact Points and Delivery Options..........................................25
Related Topics.............................................................................................27
Technical Support........................................................................................28
CashPro® Online Getting Started Guide 4
Technical Support
Go to CashPro Online > Support >
Help > Contact Us.
Return to Table of Contents
Notifications
Setup Wizard Guide
Introduction
CashPro Notifications enables you to receive treasury management information conveniently through email, voice mail, fax, or text message. This service allows you to receive the alerts of important updates on treasury management accounts when you are away from the office.
This guide provides the information needed to use the Notification Setup Wizard to set up alerts, define contact points, and select delivery options for each alert within the Notifications service.
The CashPro® Online services display in the following order:
▪ Automated Clearing House (ACH)
▪ Automated Clearing House (ACH) Positive Pay
▪ Check Positive Pay
▪ Investments
▪ Payments
▪ Reporting
▪ Wires
Note: You will see alert setup screens only for entitled services.
Accessing the Notifications Setup Wizard
1. Go to CashPro Online.
2. Click Notifications > Settings. The Notifications Setup Wizard displays.
3. Go to the appropriate section in this guide for the service for which you would like to set up notifications.
This completes the procedure.

CashPro® Online Getting Started Guide 5
Return to Table of Contents
Setting Up ACH Batch Alerts
To set up ACH Batch alerts, complete the following:
1. Enter the alert Name.
Notes:
▪ The name should be unique to the report content.
▪ The Existing Alerts box lists active ACH alerts.
2. Select the desired company in the Inactive ACH Companies list box, and move the company to the Active ACH Companies column.
3. Select the desired payment type in the Inactive Payment Types list box, and move the payment type to the Active Payment Types column.
Notes:
▪ To move one selection, click the single right arrow button.
▪ To move more than one selection, press the Ctrl key while making the desired selections, and click the single right arrow button.
▪ To move all selections, click the double right arrow button.
4. Select the check box of each alert you wish to receive. The following alerts display:
▪ ACH Batch Entered
▪ ACH Batch Released
▪ ACH Batch Submitted
▪ ACH Batch Confirmed
5. Set up the desired selections within Limit the Number of Alerts Sent.
6. Click Save. The alerts display in the list of existing alerts.
7. Complete one of the following:To... Then...Set up additional ACH Batch Alerts
Repeat steps 1 – 6.
Set up ACH End of Day Alerts
a. Click Next. The ACH End of Day Alerts screen displays.
b. Go to step 1 of Setting Up ACH End of Day Alerts.
This completes the procedure.

CashPro® Online Getting Started Guide 6
Return to Table of Contents
Setting Up ACH End of Day Alerts
To set up ACH End of Day alerts, complete the following:
1. Enter the alert Name.
Notes:
▪ The name should be unique to the report content.
▪ The Existing Alerts box lists active ACH alerts.
2. Select the desired company in the Inactive ACH Companies list box, and move the company to the Active ACH Companies column.
3. Select the desired payment type in the Inactive Payment Types list box, and move the payment type to the Active Payment Types column.
Notes:
▪ To move one selection, click the single right arrow button.
▪ To move more than one selection, press the Ctrl key while making the desired selections, and click the single right arrow button.
▪ To move all selections, click the double right arrow button.
4. Select the check box of each alert you wish to receive. The following alerts display:
▪ End of Day Transaction Summary
▪ Expired ACH Transactions
▪ Pending ACH Transactions
5. Set up the desired selections within Limit the Number of Alerts Sent.
6. Click Save. The alerts display in the list of existing alerts.
7. Complete one of the following:To... Then...Set up additional ACH End of Day Alerts
Repeat steps 1 – 6.
Proceed to the next alert setup screen
a. Click Next.
b. Go to the appropriate section in this guide for the service for which you would like to set up notifications.
Note: If ACH Notifications is your only entitled service, the next screen displays how to set up contact points. Go to Setting Up Contact Points and Delivery Options.
This completes the procedure.
CashPro® Online Getting Started Guide 7
Return to Table of Contents
Setting Up ACH Positive Pay Exception Alerts
To set up ACH Positive Pay Exceptions alerts, complete the following:
1. Enter the alert Name.
Notes:
▪ The name should be unique to the report content.
▪ The Existing Alerts box lists active Positive Pay Exception alerts.
2. Select the desired account(s) in the Inactive Accounts list box, and move to the Active Accounts column.
Notes:
▪ To move one account, click the single right arrow.
▪ To move more than one account, press the Ctrl key while selecting the desired accounts and click the single right arrow button.
▪ To move all accounts, click the double right arrow button.
3. Click Save. The alerts display in the list of existing alerts.
4. Complete one of the following:To... Then...Set up the same alert type for ACH Positive Pay Exceptions
Repeat steps 1 – 3.
Proceed to the next alert setup screen
a. Click Next.
b. Go to the appropriate section in this guide for the service for which you would like to set up notifications.
Note: If ACH Positive Pay is your only entitled service, the next screen displays how to set up contact points. Go to Setting Up Contact Points and Delivery Options.
This completes the procedure.
CashPro® Online Getting Started Guide 8
Return to Table of Contents
Setting Up ACH Positive Pay Pending Approval Alerts
To set up ACH Positive Pay Pending Approval alerts, complete the following:
Note: The accounts are derived from your ACH Positive Pay service.
1. Enter the alert Name.
Notes:
▪ The name should be unique to the report content.
▪ The Existing Alerts box lists active ACH Positive Pay alerts.
2. Select the desired account(s) in the Inactive Accounts list box, and move to the Active Accounts column.
Notes:
▪ To move one account, click the single right arrow.
▪ To move more than one account, press the Ctrl key while selecting the desired accounts and click the single right arrow button.
▪ To move all accounts, click the double right arrow button.
3. Select the desired alert type:For... Then...Transactions Pending Approval
a. Select the Alert on Transactions Pending Approval check box.
b. Go to step 4.Authorizations Pending Approval
a. Select the Alert on Authorizations Pending Approval check box.
b. Go to step 4.
4. Click Save. The alert displays in the list of Existing Alerts.
5. Complete one of the following:To... Then...Set up the same alert type for ACH Positive Pay Pending Approval
Repeat steps 1 – 4.
Proceed to the next alert setup screen
a. Click Next.
b. Go to the appropriate section within this guide for the service for which you would like to set up notifications.
Note: If ACH Positive Pay is your only entitled service, the next screen displays how to set up contact points. Go to Setting Up Contact Points and Delivery Options.
This completes the procedure.
CashPro® Online Getting Started Guide 9
Return to Table of Contents
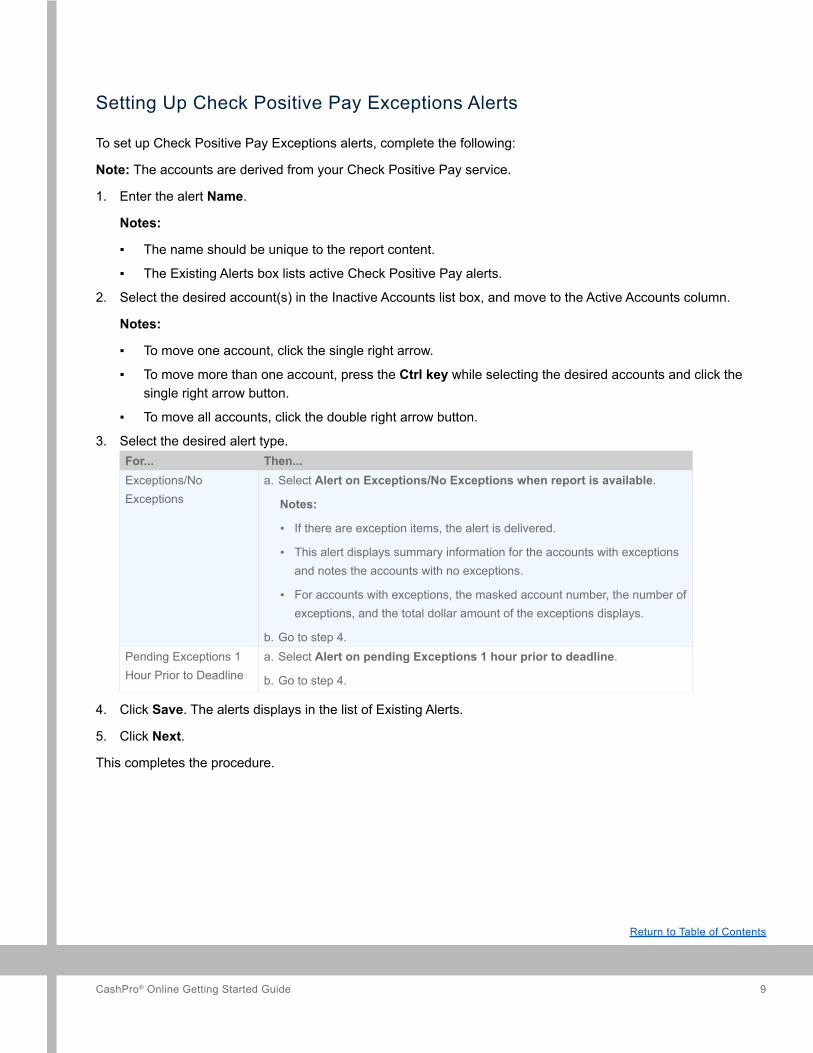
Setting Up Check Positive Pay Exceptions Alerts
To set up Check Positive Pay Exceptions alerts, complete the following:
Note: The accounts are derived from your Check Positive Pay service.
1. Enter the alert Name.
Notes:
▪ The name should be unique to the report content.
▪ The Existing Alerts box lists active Check Positive Pay alerts.
2. Select the desired account(s) in the Inactive Accounts list box, and move to the Active Accounts column.
Notes:
▪ To move one account, click the single right arrow.
▪ To move more than one account, press the Ctrl key while selecting the desired accounts and click the single right arrow button.
▪ To move all accounts, click the double right arrow button.
3. Select the desired alert type.For... Then...Exceptions/No Exceptions
a. Select Alert on Exceptions/No Exceptions when report is available.
Notes:
▪ If there are exception items, the alert is delivered.
▪ This alert displays summary information for the accounts with exceptions and notes the accounts with no exceptions.
▪ For accounts with exceptions, the masked account number, the number of exceptions, and the total dollar amount of the exceptions displays.
b. Go to step 4.Pending Exceptions 1 Hour Prior to Deadline
a. Select Alert on pending Exceptions 1 hour prior to deadline.
b. Go to step 4.
4. Click Save. The alerts displays in the list of Existing Alerts.
5. Click Next.
This completes the procedure.

CashPro® Online Getting Started Guide 10
Return to Table of Contents
Setting Up Check Positive Pay Issue File Alerts
To set up Check Positive Pay Issue File alerts, complete the following:
Note: The accounts are derived from your Check Positive Pay service.
1. Enter the alert Name.
Notes:
▪ The name should be unique to the report content.
▪ The Existing Alerts box lists active Check Positive Pay alerts.
2. Select the desired account(s) in the Inactive Accounts list box, and move to the Active Accounts column.
Notes:
▪ To move one account, click the single right arrow.
▪ To move more than one account, press the Ctrl key while selecting the desired accounts and click the single right arrow button.
▪ To move all accounts, click the double right arrow button.
3. Select the desired alert type:For... Then...Issue Files Posted a. Select Alert on files posted.
b. Go to step 4.
Issue Files Received via Data Transmission
a. Select Alert on files received.
b. Go to step 4.
Issue Files Not Received a. Select Alert on files not received within.
b. Select the time for the alert from the drop-down menu.
c. Select the weekday for the alert from the drop-down menu.
d. Go to step 4.
4. Click Save. The alert displays in the list of Existing Alerts.
5. Click Next.
This completes the procedure.
CashPro® Online Getting Started Guide 11
Return to Table of Contents
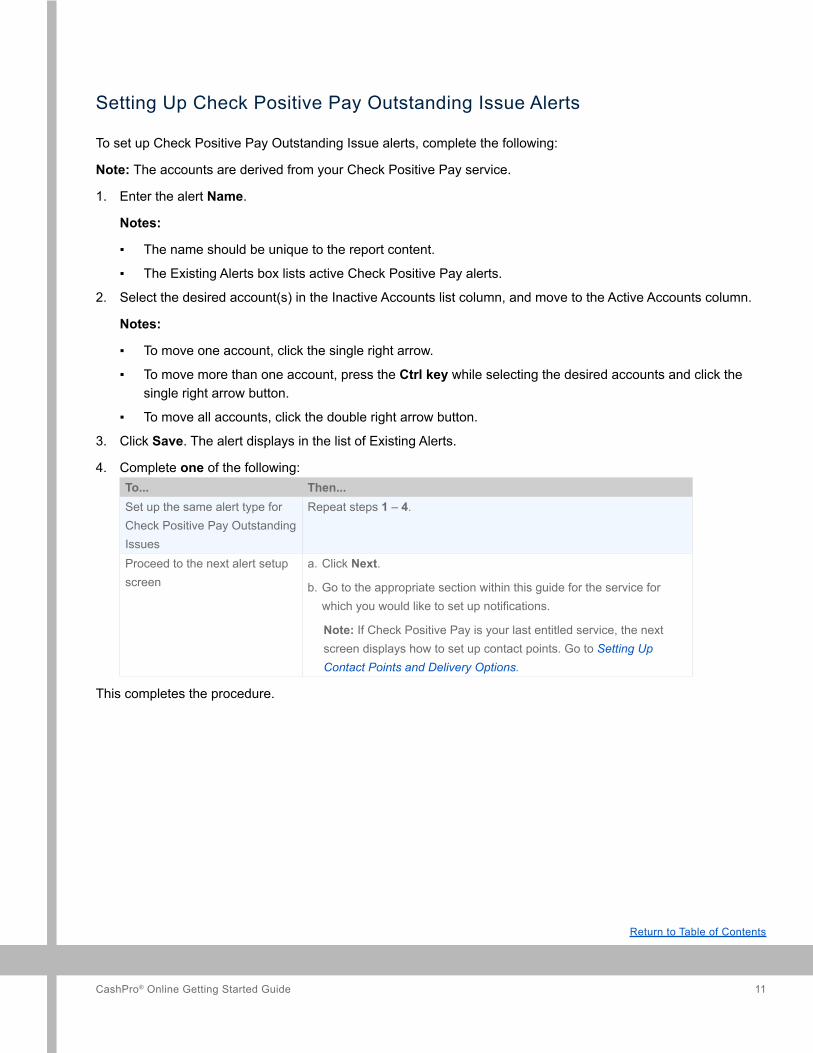
Setting Up Check Positive Pay Outstanding Issue Alerts
To set up Check Positive Pay Outstanding Issue alerts, complete the following:
Note: The accounts are derived from your Check Positive Pay service.
1. Enter the alert Name.
Notes:
▪ The name should be unique to the report content.
▪ The Existing Alerts box lists active Check Positive Pay alerts.
2. Select the desired account(s) in the Inactive Accounts list column, and move to the Active Accounts column.
Notes:
▪ To move one account, click the single right arrow.
▪ To move more than one account, press the Ctrl key while selecting the desired accounts and click the single right arrow button.
▪ To move all accounts, click the double right arrow button.
3. Click Save. The alert displays in the list of Existing Alerts.
4. Complete one of the following:To... Then...Set up the same alert type for Check Positive Pay Outstanding Issues
Repeat steps 1 – 4.
Proceed to the next alert setup screen
a. Click Next.
b. Go to the appropriate section within this guide for the service for which you would like to set up notifications.
Note: If Check Positive Pay is your last entitled service, the next screen displays how to set up contact points. Go to Setting Up Contact Points and Delivery Options.
This completes the procedure.
CashPro® Online Getting Started Guide 12
Return to Table of Contents
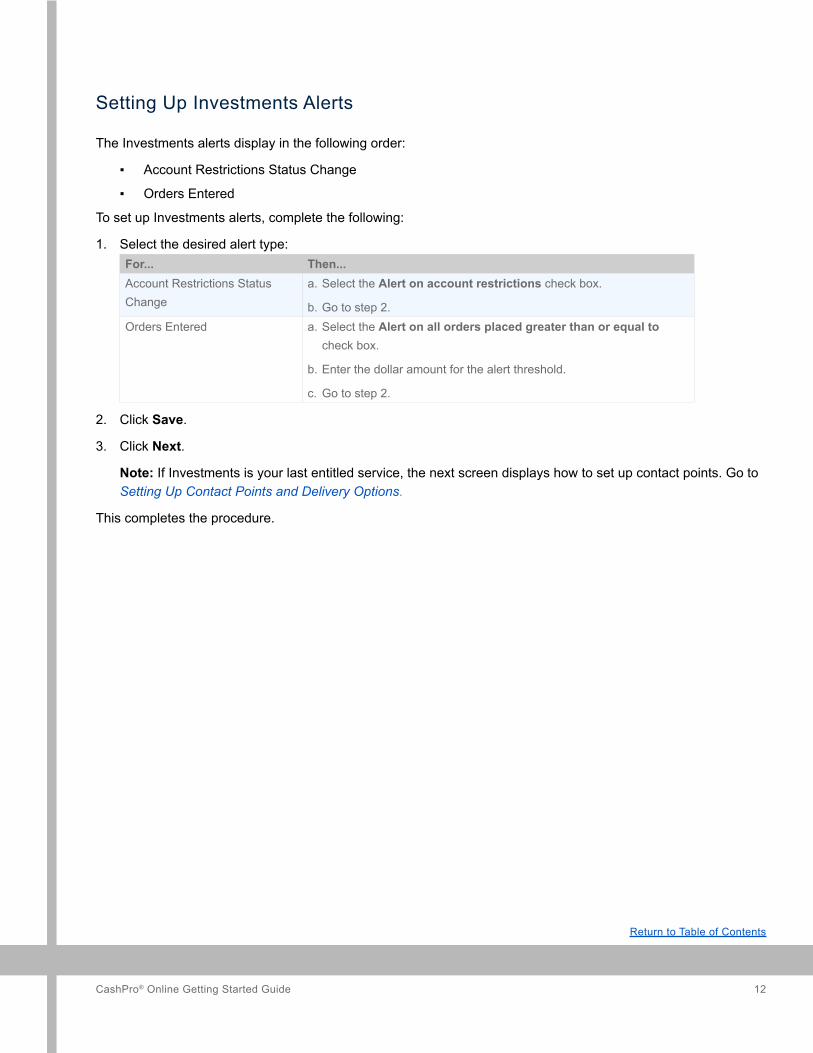
Setting Up Investments Alerts
The Investments alerts display in the following order:
▪ Account Restrictions Status Change
▪ Orders Entered
To set up Investments alerts, complete the following:
1. Select the desired alert type: For... Then...Account Restrictions Status Change
a. Select the Alert on account restrictions check box.
b. Go to step 2.Orders Entered a. Select the Alert on all orders placed greater than or equal to
check box.
b. Enter the dollar amount for the alert threshold.
c. Go to step 2.
2. Click Save.
3. Click Next.
Note: If Investments is your last entitled service, the next screen displays how to set up contact points. Go to Setting Up Contact Points and Delivery Options.
This completes the procedure.
CashPro® Online Getting Started Guide 13
Return to Table of Contents
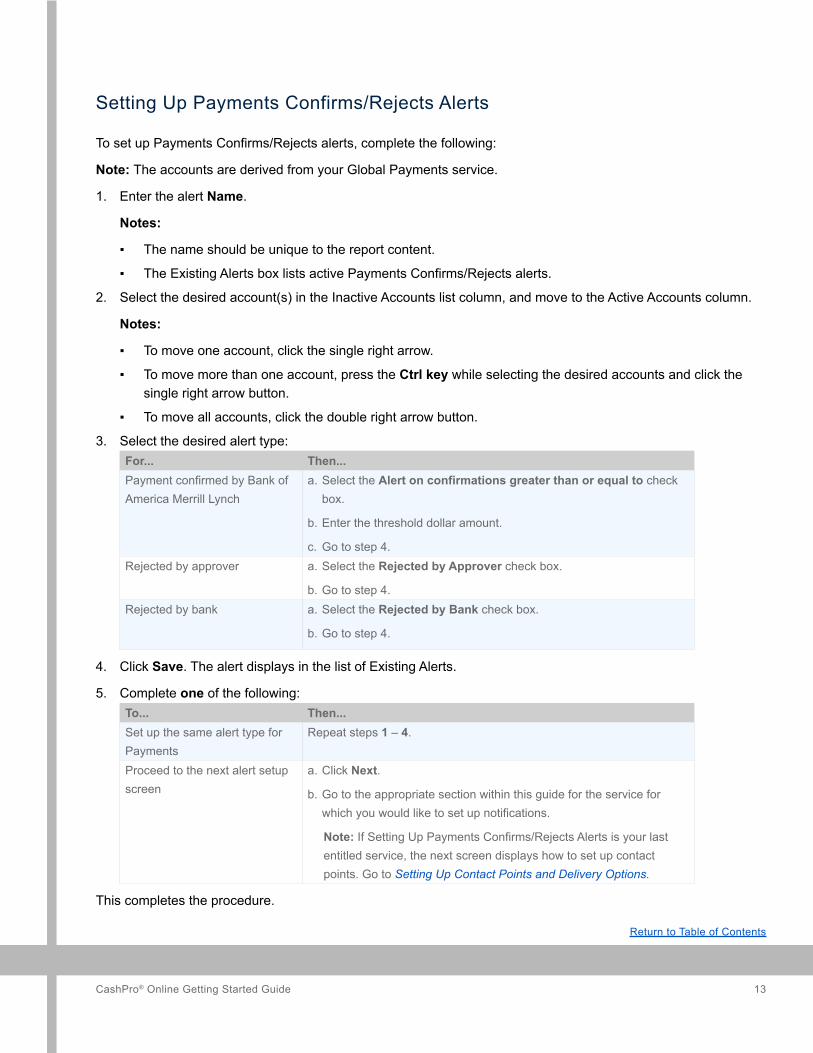
Setting Up Payments Confirms/Rejects Alerts
To set up Payments Confirms/Rejects alerts, complete the following:
Note: The accounts are derived from your Global Payments service.
1. Enter the alert Name.
Notes:
▪ The name should be unique to the report content.
▪ The Existing Alerts box lists active Payments Confirms/Rejects alerts.
2. Select the desired account(s) in the Inactive Accounts list column, and move to the Active Accounts column.
Notes:
▪ To move one account, click the single right arrow.
▪ To move more than one account, press the Ctrl key while selecting the desired accounts and click the single right arrow button.
▪ To move all accounts, click the double right arrow button.
3. Select the desired alert type:For... Then...Payment confirmed by Bank of America Merrill Lynch
a. Select the Alert on confirmations greater than or equal to check box.
b. Enter the threshold dollar amount.
c. Go to step 4.Rejected by approver a. Select the Rejected by Approver check box.
b. Go to step 4.Rejected by bank a. Select the Rejected by Bank check box.
b. Go to step 4.
4. Click Save. The alert displays in the list of Existing Alerts.
5. Complete one of the following:To... Then...Set up the same alert type for Payments
Repeat steps 1 – 4.
Proceed to the next alert setup screen
a. Click Next.
b. Go to the appropriate section within this guide for the service for which you would like to set up notifications.
Note: If Setting Up Payments Confirms/Rejects Alerts is your last entitled service, the next screen displays how to set up contact points. Go to Setting Up Contact Points and Delivery Options.
This completes the procedure.
CashPro® Online Getting Started Guide 14
Return to Table of Contents
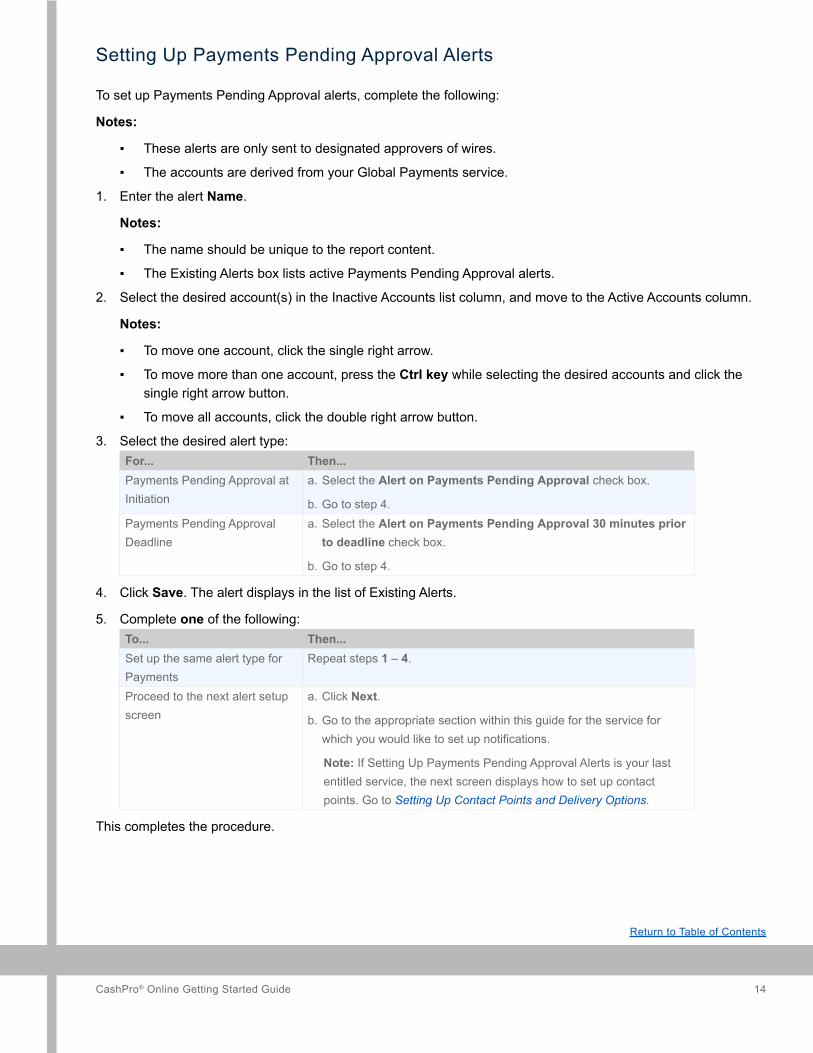
Setting Up Payments Pending Approval Alerts
To set up Payments Pending Approval alerts, complete the following:
Notes:
▪ These alerts are only sent to designated approvers of wires.
▪ The accounts are derived from your Global Payments service.
1. Enter the alert Name.
Notes:
▪ The name should be unique to the report content.
▪ The Existing Alerts box lists active Payments Pending Approval alerts.
2. Select the desired account(s) in the Inactive Accounts list column, and move to the Active Accounts column.
Notes:
▪ To move one account, click the single right arrow.
▪ To move more than one account, press the Ctrl key while selecting the desired accounts and click the single right arrow button.
▪ To move all accounts, click the double right arrow button.
3. Select the desired alert type:For... Then...Payments Pending Approval at Initiation
a. Select the Alert on Payments Pending Approval check box.
b. Go to step 4.Payments Pending Approval Deadline
a. Select the Alert on Payments Pending Approval 30 minutes prior to deadline check box.
b. Go to step 4.
4. Click Save. The alert displays in the list of Existing Alerts.
5. Complete one of the following:To... Then...Set up the same alert type for Payments
Repeat steps 1 – 4.
Proceed to the next alert setup screen
a. Click Next.
b. Go to the appropriate section within this guide for the service for which you would like to set up notifications.
Note: If Setting Up Payments Pending Approval Alerts is your last entitled service, the next screen displays how to set up contact points. Go to Setting Up Contact Points and Delivery Options.
This completes the procedure.
CashPro® Online Getting Started Guide 15
Return to Table of Contents
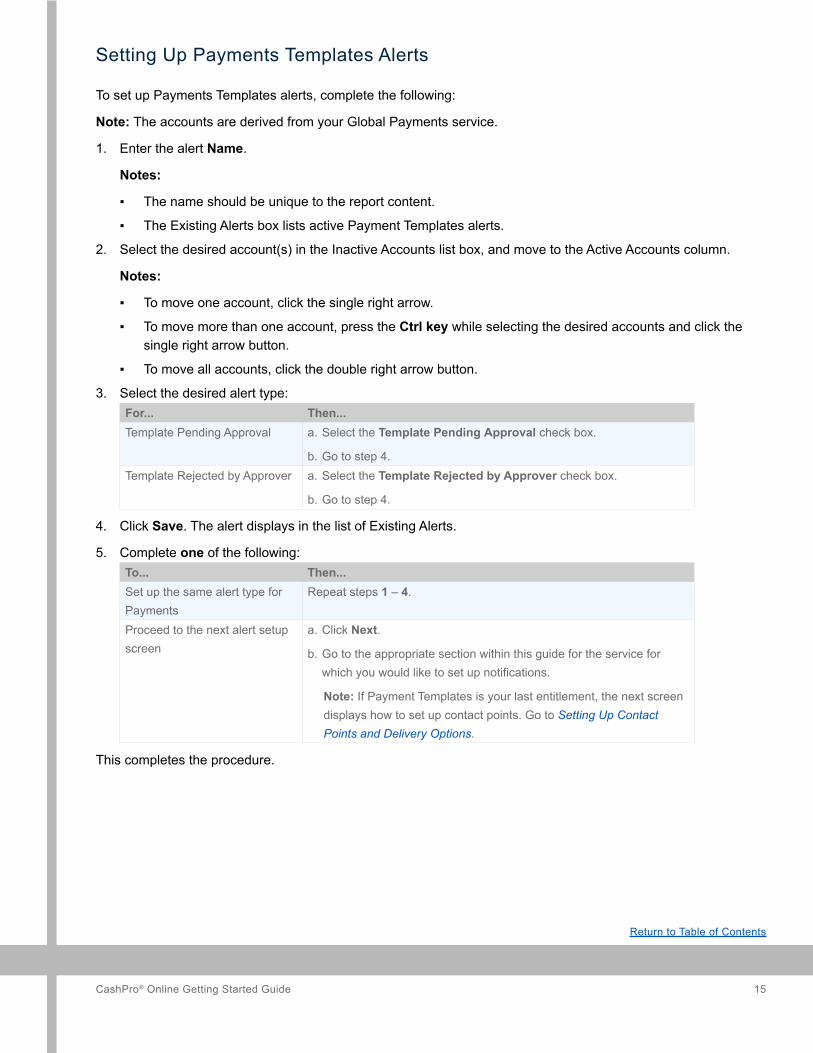
Setting Up Payments Templates Alerts
To set up Payments Templates alerts, complete the following:
Note: The accounts are derived from your Global Payments service.
1. Enter the alert Name.
Notes:
▪ The name should be unique to the report content.
▪ The Existing Alerts box lists active Payment Templates alerts.
2. Select the desired account(s) in the Inactive Accounts list box, and move to the Active Accounts column.
Notes:
▪ To move one account, click the single right arrow.
▪ To move more than one account, press the Ctrl key while selecting the desired accounts and click the single right arrow button.
▪ To move all accounts, click the double right arrow button.
3. Select the desired alert type:For... Then...Template Pending Approval a. Select the Template Pending Approval check box.
b. Go to step 4.Template Rejected by Approver a. Select the Template Rejected by Approver check box.
b. Go to step 4.
4. Click Save. The alert displays in the list of Existing Alerts.
5. Complete one of the following:To... Then...Set up the same alert type for Payments
Repeat steps 1 – 4.
Proceed to the next alert setup screen
a. Click Next.
b. Go to the appropriate section within this guide for the service for which you would like to set up notifications.
Note: If Payment Templates is your last entitlement, the next screen displays how to set up contact points. Go to Setting Up Contact Points and Delivery Options.
This completes the procedure.
CashPro® Online Getting Started Guide 16
Return to Table of Contents
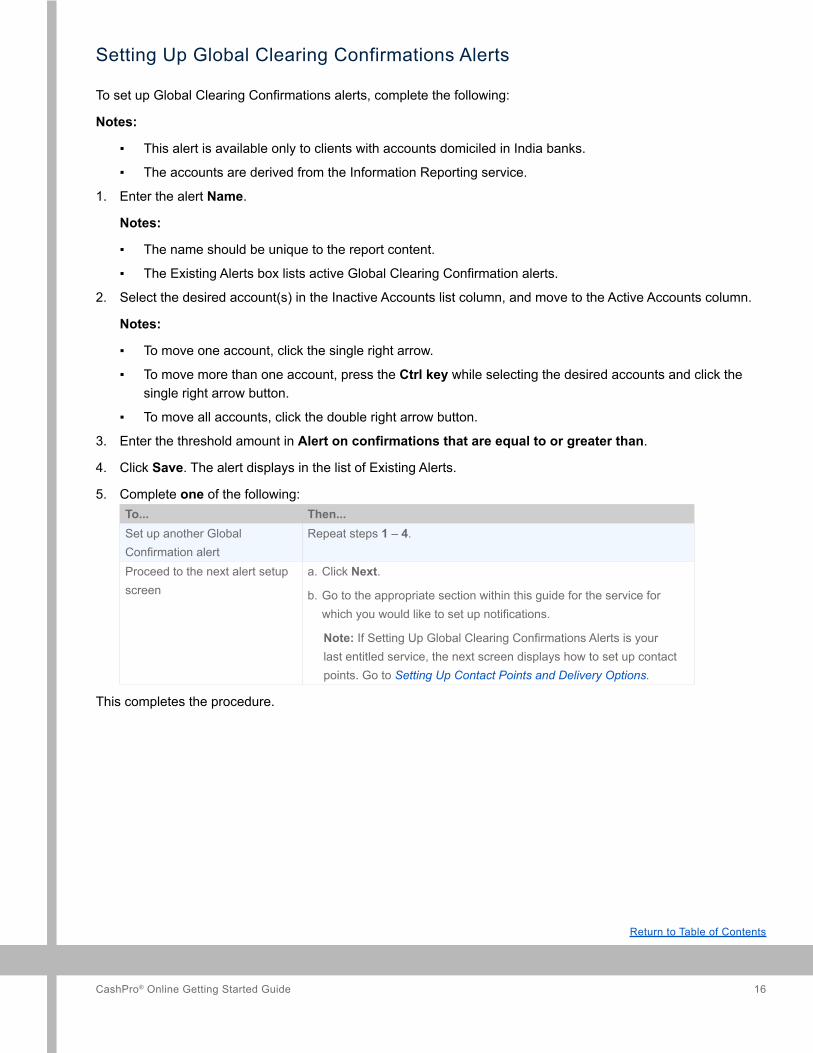
Setting Up Global Clearing Confirmations Alerts
To set up Global Clearing Confirmations alerts, complete the following:
Notes:
▪ This alert is available only to clients with accounts domiciled in India banks.
▪ The accounts are derived from the Information Reporting service.
1. Enter the alert Name.
Notes:
▪ The name should be unique to the report content.
▪ The Existing Alerts box lists active Global Clearing Confirmation alerts.
2. Select the desired account(s) in the Inactive Accounts list column, and move to the Active Accounts column.
Notes:
▪ To move one account, click the single right arrow.
▪ To move more than one account, press the Ctrl key while selecting the desired accounts and click the single right arrow button.
▪ To move all accounts, click the double right arrow button.
3. Enter the threshold amount in Alert on confirmations that are equal to or greater than.
4. Click Save. The alert displays in the list of Existing Alerts.
5. Complete one of the following:To... Then...Set up another Global Confirmation alert
Repeat steps 1 – 4.
Proceed to the next alert setup screen
a. Click Next.
b. Go to the appropriate section within this guide for the service for which you would like to set up notifications.
Note: If Setting Up Global Clearing Confirmations Alerts is your last entitled service, the next screen displays how to set up contact points. Go to Setting Up Contact Points and Delivery Options.
This completes the procedure.

CashPro® Online Getting Started Guide 17
Return to Table of Contents
Setting Up Reporting - Previous Day Alerts
To set up Reporting - Previous Day alerts, complete the following:
Note: The accounts are derived from your Information Reporting - Previous Day and Information Reporting - Current Day services.
1. Enter the alert Name.
Notes:
▪ The name should be unique to the report content.
▪ The Existing Alerts box lists active Reporting alerts.
2. Select the desired account(s) in the Inactive Accounts list column, and move to the Active Accounts column.
Notes:
▪ To move one account, click the single right arrow.
▪ To move more than one account, press the Ctrl key while selecting the desired accounts and click the single right arrow button.
▪ To move all accounts, click the double right arrow button.
3. Complete one of the following:For... Then...Transaction Type a. Select Transaction Type.
b. Select a transaction type from the drop-down menu.
c. Select the desired options within the Additional Criteria section.
d. Go to step 5.BAI Code or Name a. Select BAI Code or Name.
Note: The alert will be generated only if the user is currently subscribed to receive that BAI code in the Information Reporting service.
b. Enter the BAI Code or Name.
Note: As you enter a code or name, a prompt displays code/name combinations that match the entered pattern. Select a combination, if desired.
c. Go to step 4.

CashPro® Online Getting Started Guide 18
Return to Table of Contents
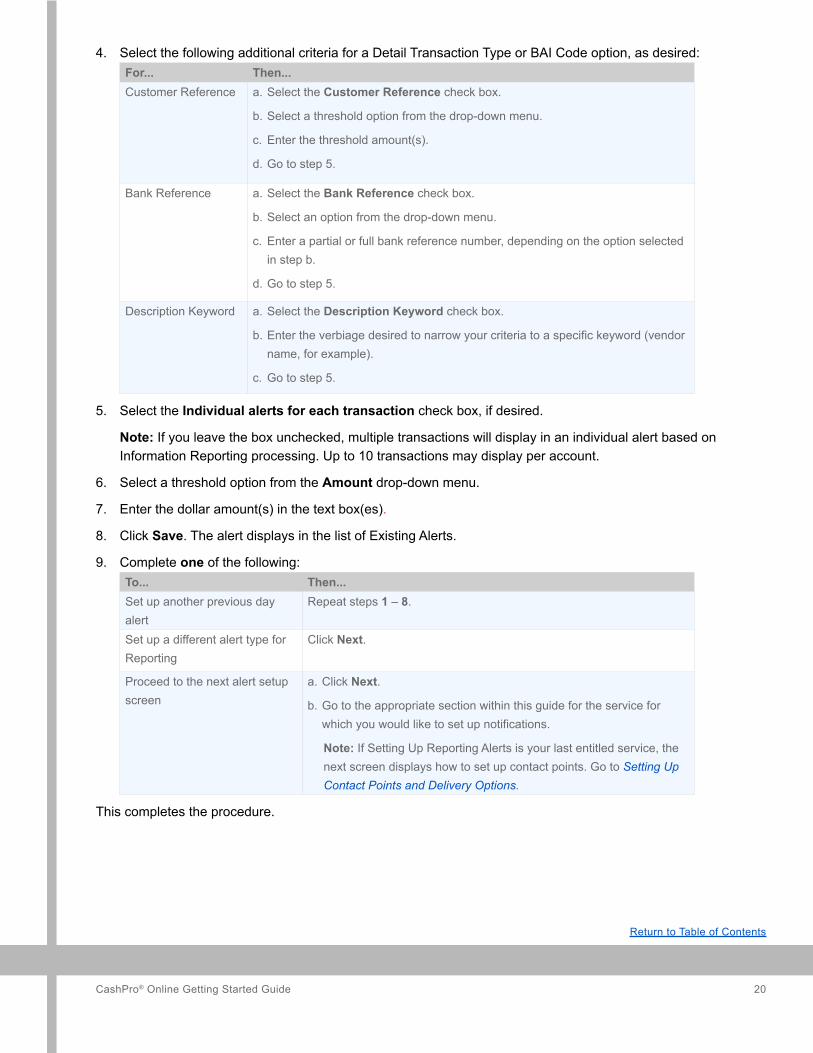
4. Select the following additional criteria for a Detail Transaction Type or BAI Code option, as desired:For... Then...Customer Reference a. Select the Customer Reference check box.
b. Select a threshold option from the drop-down menu.
c. Enter the threshold amount(s).
d. Go to step 5.
Bank Reference a. Select the Bank Reference check box.
b. Select an option from the drop-down menu.
c. Enter a partial or full bank reference number, depending on the option selected in step b.
d. Go to step 5.
Description Keyword a. Select the Description Keyword check box.
b. Enter the verbiage desired to narrow your criteria to a specific keyword (vendor name, for example).
c. Go to step 5.
5. Select the Individual alerts for each transaction check box, if desired.
Note: If you leave the box unchecked, multiple transactions will display in an individual alert based on Information Reporting processing. Up to 10 transactions may display per account.
6. Select a threshold option from the Amount drop-down menu.
7. Enter the dollar amount(s) in the text box(es).
8. Click Save. The alert displays in the list of Existing Alerts.
9. Complete one of the following:To... Then...Set up another previous day alert
Repeat steps 1 – 8.
Set up a different alert type for Reporting
a. Click Next.
Proceed to the next alert setup screen
a. Click Next.
b. Go to the appropriate section within this guide for the service for which you would like to set up notifications.
Note: If Setting Up Reporting Alerts is your last entitled service, the next screen displays how to set up contact points. Go to Setting Up Contact Points and Delivery Options.
This completes the procedure.
CashPro® Online Getting Started Guide 19
Return to Table of Contents
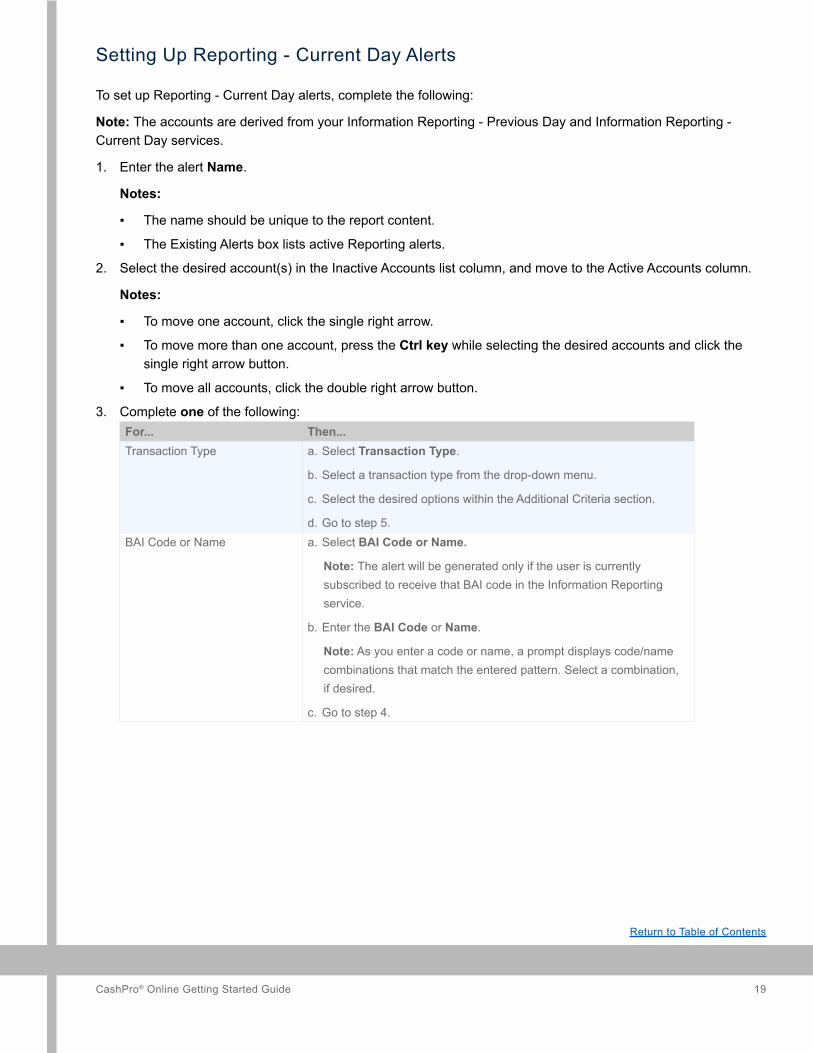
Setting Up Reporting - Current Day Alerts
To set up Reporting - Current Day alerts, complete the following:
Note: The accounts are derived from your Information Reporting - Previous Day and Information Reporting - Current Day services.
1. Enter the alert Name.
Notes:
▪ The name should be unique to the report content.
▪ The Existing Alerts box lists active Reporting alerts.
2. Select the desired account(s) in the Inactive Accounts list column, and move to the Active Accounts column.
Notes:
▪ To move one account, click the single right arrow.
▪ To move more than one account, press the Ctrl key while selecting the desired accounts and click the single right arrow button.
▪ To move all accounts, click the double right arrow button.
3. Complete one of the following:For... Then...Transaction Type a. Select Transaction Type.
b. Select a transaction type from the drop-down menu.
c. Select the desired options within the Additional Criteria section.
d. Go to step 5.BAI Code or Name a. Select BAI Code or Name.
Note: The alert will be generated only if the user is currently subscribed to receive that BAI code in the Information Reporting service.
b. Enter the BAI Code or Name.
Note: As you enter a code or name, a prompt displays code/name combinations that match the entered pattern. Select a combination, if desired.
c. Go to step 4.
CashPro® Online Getting Started Guide 20
Return to Table of Contents
4. Select the following additional criteria for a Detail Transaction Type or BAI Code option, as desired:For... Then...Customer Reference a. Select the Customer Reference check box.
b. Select a threshold option from the drop-down menu.
c. Enter the threshold amount(s).
d. Go to step 5.
Bank Reference a. Select the Bank Reference check box.
b. Select an option from the drop-down menu.
c. Enter a partial or full bank reference number, depending on the option selected in step b.
d. Go to step 5.
Description Keyword a. Select the Description Keyword check box.
b. Enter the verbiage desired to narrow your criteria to a specific keyword (vendor name, for example).
c. Go to step 5.
5. Select the Individual alerts for each transaction check box, if desired.
Note: If you leave the box unchecked, multiple transactions will display in an individual alert based on Information Reporting processing. Up to 10 transactions may display per account.
6. Select a threshold option from the Amount drop-down menu.
7. Enter the dollar amount(s) in the text box(es).
8. Click Save. The alert displays in the list of Existing Alerts.
9. Complete one of the following:To... Then...Set up another previous day alert
Repeat steps 1 – 8.
Set up a different alert type for Reporting
Click Next.
Proceed to the next alert setup screen
a. Click Next.
b. Go to the appropriate section within this guide for the service for which you would like to set up notifications.
Note: If Setting Up Reporting Alerts is your last entitled service, the next screen displays how to set up contact points. Go to Setting Up Contact Points and Delivery Options.
This completes the procedure.
CashPro® Online Getting Started Guide 21
Return to Table of Contents
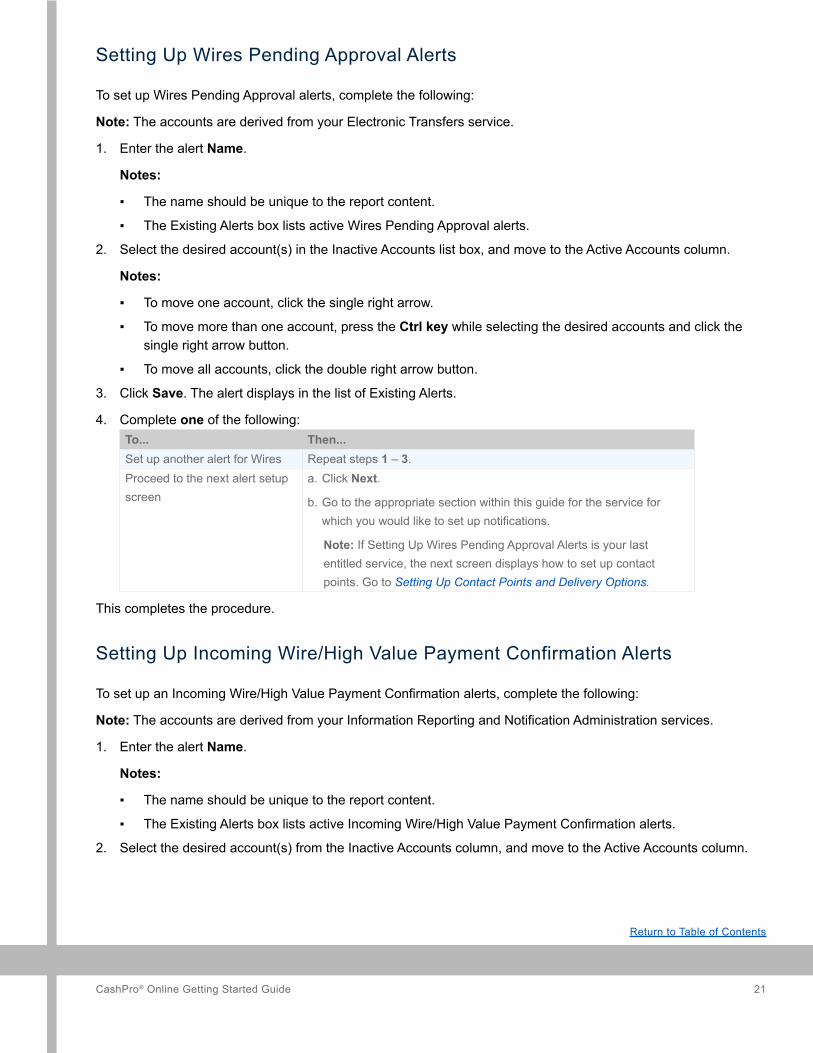
Setting Up Wires Pending Approval Alerts
To set up Wires Pending Approval alerts, complete the following:
Note: The accounts are derived from your Electronic Transfers service.
1. Enter the alert Name.
Notes:
▪ The name should be unique to the report content.
▪ The Existing Alerts box lists active Wires Pending Approval alerts.
2. Select the desired account(s) in the Inactive Accounts list box, and move to the Active Accounts column.
Notes:
▪ To move one account, click the single right arrow.
▪ To move more than one account, press the Ctrl key while selecting the desired accounts and click the single right arrow button.
▪ To move all accounts, click the double right arrow button.
3. Click Save. The alert displays in the list of Existing Alerts.
4. Complete one of the following:To... Then...Set up another alert for Wires Repeat steps 1 – 3.Proceed to the next alert setup screen
a. Click Next.
b. Go to the appropriate section within this guide for the service for which you would like to set up notifications.
Note: If Setting Up Wires Pending Approval Alerts is your last entitled service, the next screen displays how to set up contact points. Go to Setting Up Contact Points and Delivery Options.
This completes the procedure.
Setting Up Incoming Wire/High Value Payment Confirmation Alerts
To set up an Incoming Wire/High Value Payment Confirmation alerts, complete the following:
Note: The accounts are derived from your Information Reporting and Notification Administration services.
1. Enter the alert Name.
Notes:
▪ The name should be unique to the report content.
▪ The Existing Alerts box lists active Incoming Wire/High Value Payment Confirmation alerts.
2. Select the desired account(s) from the Inactive Accounts column, and move to the Active Accounts column.
CashPro® Online Getting Started Guide 22
Return to Table of Contents
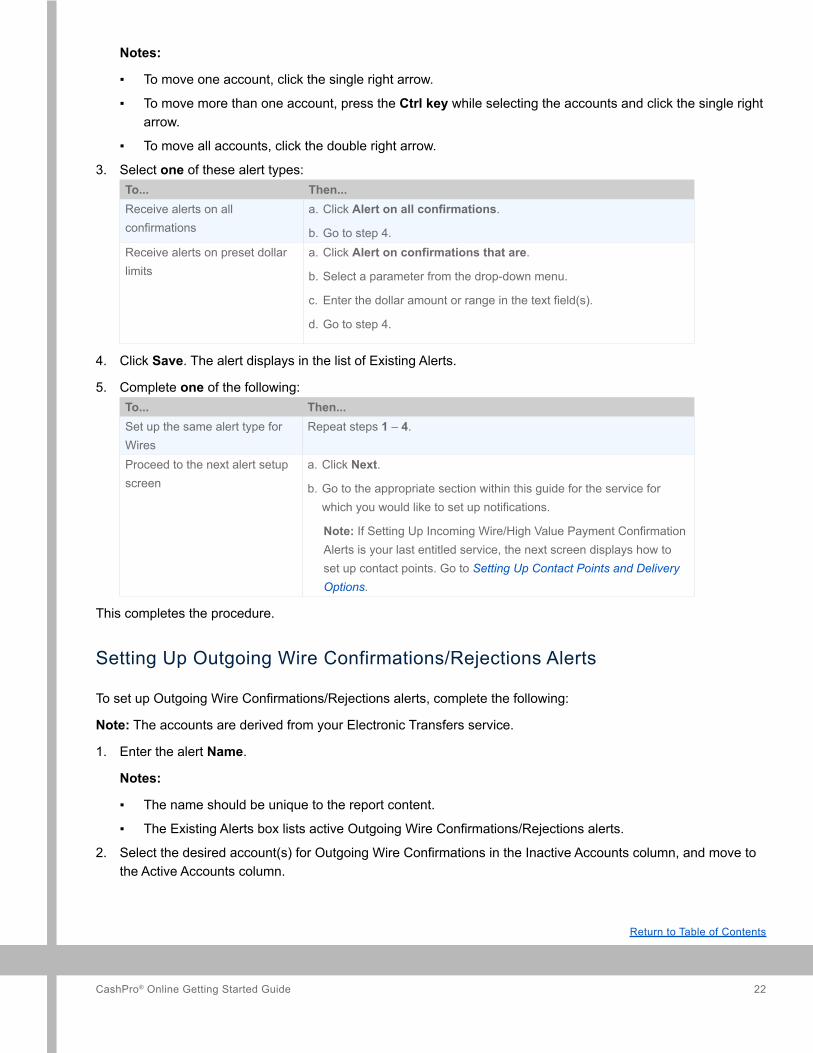
Notes:
▪ To move one account, click the single right arrow.
▪ To move more than one account, press the Ctrl key while selecting the accounts and click the single right arrow.
▪ To move all accounts, click the double right arrow.
3. Select one of these alert types:To... Then...Receive alerts on all confirmations
a. Click Alert on all confirmations.
b. Go to step 4.Receive alerts on preset dollar limits
a. Click Alert on confirmations that are.
b. Select a parameter from the drop-down menu.
c. Enter the dollar amount or range in the text field(s).
d. Go to step 4.
4. Click Save. The alert displays in the list of Existing Alerts.
5. Complete one of the following:To... Then...Set up the same alert type for Wires
Repeat steps 1 – 4.
Proceed to the next alert setup screen
a. Click Next.
b. Go to the appropriate section within this guide for the service for which you would like to set up notifications.
Note: If Setting Up Incoming Wire/High Value Payment Confirmation Alerts is your last entitled service, the next screen displays how to set up contact points. Go to Setting Up Contact Points and Delivery Options.
This completes the procedure.
Setting Up Outgoing Wire Confirmations/Rejections Alerts
To set up Outgoing Wire Confirmations/Rejections alerts, complete the following:
Note: The accounts are derived from your Electronic Transfers service.
1. Enter the alert Name.
Notes:
▪ The name should be unique to the report content.
▪ The Existing Alerts box lists active Outgoing Wire Confirmations/Rejections alerts.
2. Select the desired account(s) for Outgoing Wire Confirmations in the Inactive Accounts column, and move to the Active Accounts column.
CashPro® Online Getting Started Guide 23
Return to Table of Contents
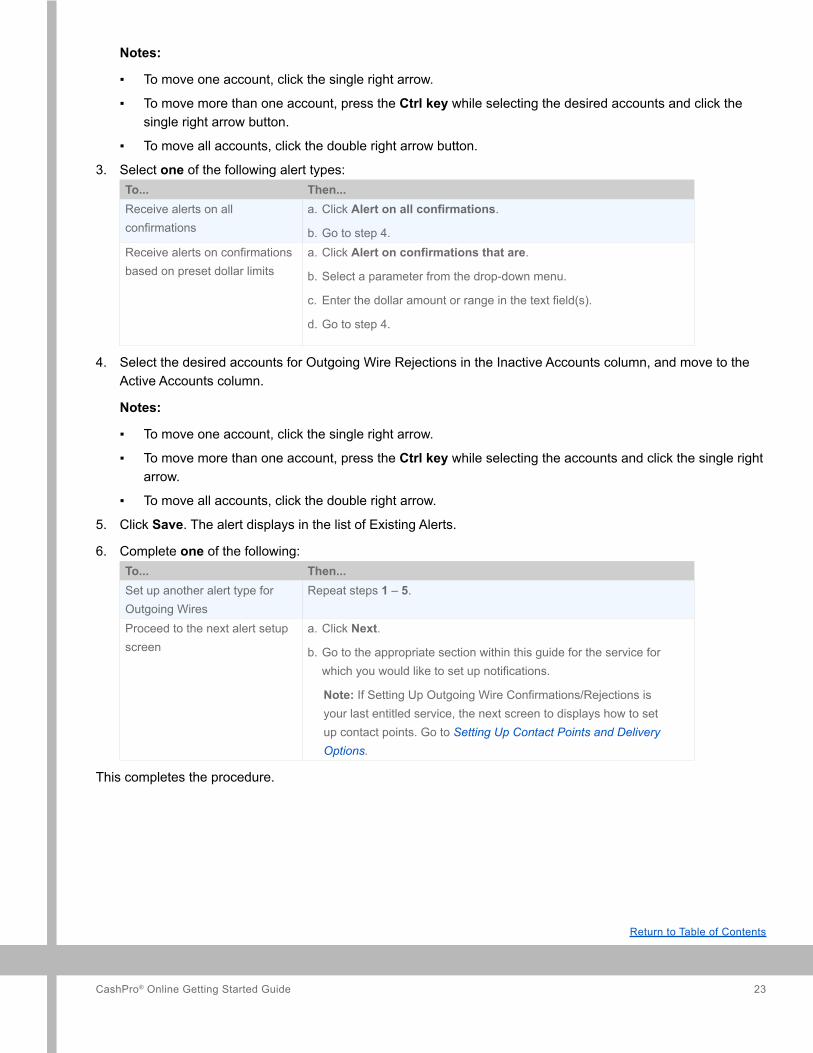
Notes:
▪ To move one account, click the single right arrow.
▪ To move more than one account, press the Ctrl key while selecting the desired accounts and click the single right arrow button.
▪ To move all accounts, click the double right arrow button.
3. Select one of the following alert types:To... Then...Receive alerts on all confirmations
a. Click Alert on all confirmations.
b. Go to step 4.Receive alerts on confirmations based on preset dollar limits
a. Click Alert on confirmations that are.
b. Select a parameter from the drop-down menu.
c. Enter the dollar amount or range in the text field(s).
d. Go to step 4.
4. Select the desired accounts for Outgoing Wire Rejections in the Inactive Accounts column, and move to the Active Accounts column.
Notes:
▪ To move one account, click the single right arrow.
▪ To move more than one account, press the Ctrl key while selecting the accounts and click the single right arrow.
▪ To move all accounts, click the double right arrow.
5. Click Save. The alert displays in the list of Existing Alerts.
6. Complete one of the following:To... Then...Set up another alert type for Outgoing Wires
Repeat steps 1 – 5.
Proceed to the next alert setup screen
a. Click Next.
b. Go to the appropriate section within this guide for the service for which you would like to set up notifications.
Note: If Setting Up Outgoing Wire Confirmations/Rejections is your last entitled service, the next screen to displays how to set up contact points. Go to Setting Up Contact Points and Delivery Options.
This completes the procedure.
CashPro® Online Getting Started Guide 24
Return to Table of Contents
Setting Up End of Day Wire/High Value Payment Summary Alerts
To set up End of Day Wire/High Value Payment Summary alerts, complete the following:
Note: The accounts are derived from your Information Reporting and Notification Administration services.
1. Enter the alert Name.
Notes:
▪ The name should be unique to the report content.
▪ The Existing Alerts box lists active End of Day Wire Advice Summary alerts.
2. Select the desired account(s) in the Inactive Accounts list column, and move to the Active Accounts column.
Notes:
▪ To move one account, click the single right arrow.
▪ To move more than one account, press the Ctrl key while selecting the desired accounts and click the single right arrow button.
▪ To move all accounts, click the double right arrow button.
3. Click the desired Summary alert.
4. Click Save. The alert displays in the list of Existing Alerts.
5. Complete one of the following:To... Then...Set up the same alert type for Wires
Repeat steps 1 – 4.
Proceed to the next alert setup screen
a. Click Next.
b. Go to the appropriate section within this guide for the service for which you would like to set up notifications.
Note: If Setting Up End of Day Wire/High Value Payment Summary Alerts is your last entitled service, the next screen to display is how to set up contact points. Go to Setting Up Contact Points and Delivery Options.
This completes the procedure.
Setting Up End of Day Wire Advice Details Alerts
To set up End of Day Wire Advice Details alerts, complete the following:
Note: The accounts are derived from the Information Reporting and Notification Administration services.
1. Enter the alert Name.
Notes:
▪ The name should be unique to the report content.
▪ The Existing Alerts box lists active End of Day Wire Advice Details alerts.
CashPro® Online Getting Started Guide 25
Return to Table of Contents
2. Select the desired account(s) in the Inactive Accounts list box, and move to the Active Accounts column.
Notes:
▪ To move one account, click the single right arrow.
▪ To move more than one account, press the Ctrl key while selecting the desired accounts and click the single right arrow button.
▪ To move all accounts, click the double right arrow button.
3. Click the desired Detail alert.
4. Click Save. The alert displays in the list of Existing Alerts.
5. Complete one of the following:To... Then...Set up the same alert type for Wires
Repeat steps 1 – 4.
Proceed to set up Contact Points
a. Click Next.
b. Go to Setting Up Contact Points and Delivery Options.
This completes the procedure.
Setting Up Contact Points and Delivery Options
To set up Contact Points and Delivery Options, complete the following:
1. Select the desired time zone from the Time Zone drop-down menu.
2. Complete the following, as desired:To... Then...Set up a Work Phone, Mobile Phone, or Fax contact point
a. Select the country code from the drop-down menu.
b. Enter the phone number in the text fields.
Note: For numbers outside of the U.S., enter numbers without special characters.
c. Go to step 3.Set up a Work Email contact point
a. Enter the email address.
b. Select HTML, if desired.
c. Go to step 3.

CashPro® Online Getting Started Guide 26
Return to Table of Contents
2. Complete the following, as desired:To...
(Continued)
Then...
Set up a Text Message a. Select the desired country code from the drop-down menu.
b. Complete one of the following:
▪ If you selected U.S./Caribbean – 1 in step a, proceed to step c.
▪ If you selected a different country code in step a, enter the mobile number.
c. Click Click Here to Setup.
d. Select Text Device Email Address.
e. Enter the Email Address.
f. Click Save.
g. Go to step 3.Set up a Text Device contact point where the email address is unknown
a. Click Click Here to Setup.
b. Select Text Device Address Finder.
c. Select a carrier from the Carrier drop-down menu.
d. Select a plan from the Plan drop-down menu.
e. Click Next.
f. Complete one of the following:
▪ Select Phone Number, and enter the Phone Number.
▪ Select Pin Number, and enter the Pin Number.
g. Click Save.
h. Go step 3.
3. Do you wish to block alerts during specified time frames for phone or fax contact points?If... Then...Yes a. Select the No calls from check box for each desired contact point to block alerts during
the specified time frames.
b. Select the desired quiet time frames for each desired contact point from the drop-down menus.
c. Go to step 4.No Go to step 4.
CashPro® Online Getting Started Guide 27
Return to Table of Contents
4. Do you wish to test your contact points?If... Then...Yes, test some
a. Click the Test link next to the contact points to be tested.
b. Go to step 5.Yes, test all a. Select the Send a test message to all contact points check box.
b. Go to step 5.No Go to step 5.
5. Click Next. The Alert Delivery Options screen displays.
6. Complete one of the following:To... Then...Deliver all alerts to the same contact point
a. Click the desired contact point within All Alerts.
b. Click Save.
Deliver alerts to different contact points
a. Select the desired contact point for each alert.
b. Click Save.
This completes the procedure.
Related Topics
The following are additional Notifications topics that can be accessed within CashPro University:
▪ Adding and Editing Contact Points
▪ Adding New Alerts
▪ Deleting or Deactivating an Alert
▪ Editing Alert Rules
▪ Editing Delivery Options
CashPro® Online Getting Started Guide 28
Return to Table of Contents
“Bank of America Merrill Lynch” is the marketing name for the global banking and global markets businesses of Bank of America Corporation. Lending, derivatives, and other commercial banking activities are
performed globally by banking affiliates of Bank of America Corporation, including Bank of America, N.A., member FDIC. Securities, strategic advisory, and other investment banking activities are performed
globally by investment banking affiliates of Bank of America Corporation (“Investment Banking Affiliates”), including, in the United States, Merrill Lynch, Pierce, Fenner & Smith Incorporated and Merrill Lynch
Professional Clearing Corp., all of which are registered broker dealers and members of FINRA and SIPC, and, in other jurisdictions, by locally registered entities. Investment products offered by Investment
Banking Affiliates: Are Not FDIC Insured * May Lose Value * Are Not Bank Guaranteed. ©2013 Bank of America Corporation.
Ouvidoria Bank of America Merrill Lynch1| DDG: 0800 886 2000 | e-mail: [email protected]
1Bank of America Merrill Lynch Banco Múltiplo S.A. e Merrill Lynch S.A. Corretora de Títulos e Valores Mobiliários
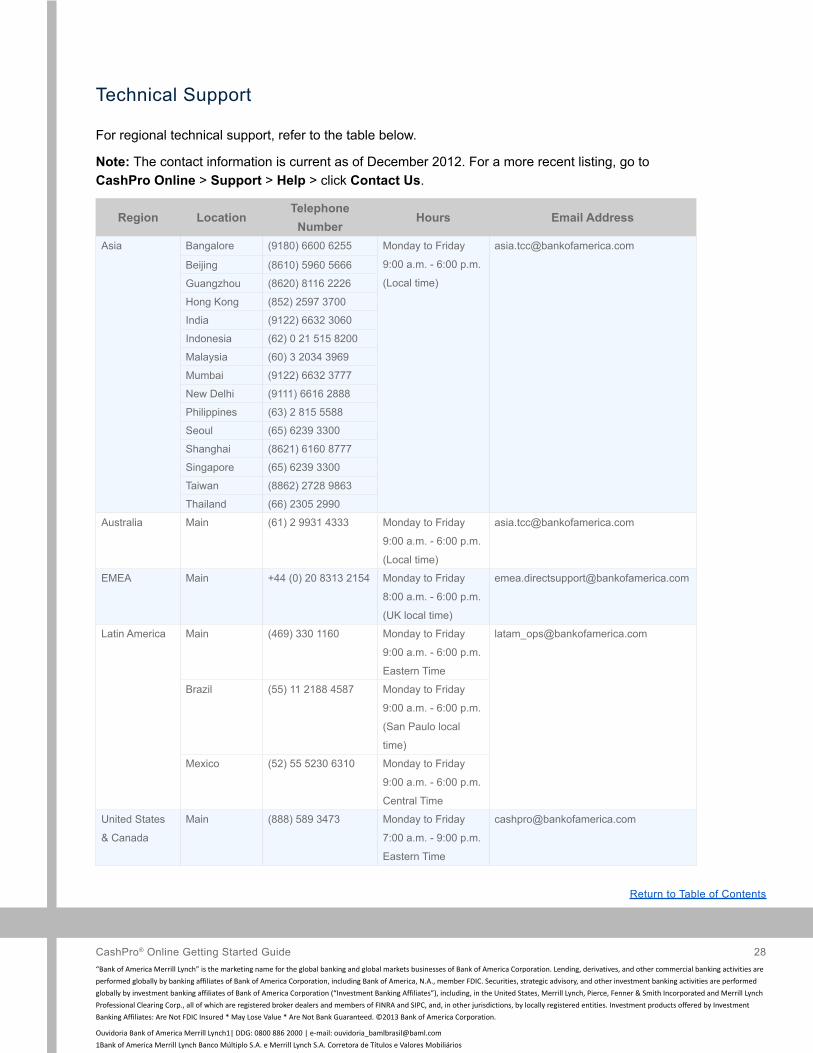
Technical Support
For regional technical support, refer to the table below.
Note: The contact information is current as of December 2012. For a more recent listing, go to CashPro Online > Support > Help > click Contact Us.
Region LocationTelephone
NumberHours Email Address
Asia Bangalore (9180) 6600 6255 Monday to Friday
9:00 a.m. - 6:00 p.m.
(Local time)
Beijing (8610) 5960 5666
Guangzhou (8620) 8116 2226
Hong Kong (852) 2597 3700
India (9122) 6632 3060
Indonesia (62) 0 21 515 8200
Malaysia (60) 3 2034 3969
Mumbai (9122) 6632 3777
New Delhi (9111) 6616 2888
Philippines (63) 2 815 5588
Seoul (65) 6239 3300
Shanghai (8621) 6160 8777
Singapore (65) 6239 3300
Taiwan (8862) 2728 9863
Thailand (66) 2305 2990
Australia Main (61) 2 9931 4333 Monday to Friday
9:00 a.m. - 6:00 p.m.
(Local time)
EMEA Main +44 (0) 20 8313 2154 Monday to Friday
8:00 a.m. - 6:00 p.m.
(UK local time)
Latin America Main (469) 330 1160 Monday to Friday
9:00 a.m. - 6:00 p.m.
Eastern Time
Brazil (55) 11 2188 4587 Monday to Friday
9:00 a.m. - 6:00 p.m.
(San Paulo local
time)
Mexico (52) 55 5230 6310 Monday to Friday
9:00 a.m. - 6:00 p.m.
Central Time
United States
& Canada
Main (888) 589 3473 Monday to Friday
7:00 a.m. - 9:00 p.m.
Eastern Time