Embed Size (px)
Citation preview
Getting Started with FECFile User Manual
Hands-on Help with FECFile and Electronic
Filing for Candidate Committees
The “Getting Started with FECFile User Manual” was developed as a quick reference tool for Candidate Committees to be used as a training aid in FEC sponsored Reporting Workshops. Candidate committees must consult the FECFile User Manual for Candidate Committees for more detailed reporting assistance.
Reports Analysis Division (800) 424- 9530 Ext. 1130
Electronic Filing Office (800) 424- 9530 Ext. 1307
Table of Contents
Getting Started ................................................................................. 2 Beginning Electronic Filing ............................................................................................ 2 Using FECFile ................................................................................................................. 5
Creating a New Committee File ..................................................................................................... 5 Creating the First Report (Form 3) in a New Committee File ........................................................ 7 Creating a New Report in an Existing Committee File .................................................................. 8 Creating a Statement of Organization (Form 1) ............................................................................. 8
FECFile Basics .............................................................................................................. 12
Receipts ........................................................................................... 16 Receipt Basics ............................................................................................................... 16 Special Categories of Receipts ...................................................................................... 17
In-Kind Contributions ................................................................................................................... 17 Reattribution/Redesignation of a Contribution ............................................................................. 17 48-Hour Notices (Form 6) ............................................................................................................ 18
Bundled Contributions .................................................................................................. 20 Tips for Reporting Receipts .......................................................................................... 21
Disbursements ................................................................................. 22 Disbursement Basics ..................................................................................................... 22 Special Categories of Disbursements ........................................................................... 22
Debts and Loans ............................................................................. 24 Schedule D: Debts ......................................................................................................... 24 Schedule C & Schedule C-1: Loans.............................................................................. 26
Closing/Uploading/Amending ........................................................ 28 Closing a Report ............................................................................................................ 28 Validating and Uploading a Report .............................................................................. 28 Amending a Report ....................................................................................................... 29
Secrets to FECFile .......................................................................... 31 Common E-Filing Mistakes! ......................................................................................... 31 Common Validation Errors and How to Fix Them ...................................................... 32
Common Error Messages .............................................................................................................. 33
FECFile Training Manual Page 2
Getting Started Beginning Electronic Filing Electronic filing is:
1. Required when a political committee or other person receives contributions or makes expenditures in excess of $50,000 in the current calendar year or has reason to expect to do so.
2. Voluntary for any political committee or other person that receives contributions or makes expenditures less than $50,000 in the current calendar year. However, once a committee decides to e-file on a voluntary basis, it must continue to do so for the remainder of the calendar year, unless the Commission determines that extraordinary and unforeseeable circumstances have made it impractical for the political committee or other person to continue filing electronically.
Creating electronic filing passwords for new committees:
Committees registering with the FEC may create an electronic password when using the online webform to complete the Form 2 (Statement of Candidacy) and Form 1 (Statement of Organization). Committees who filed the Form 2 and Form 1 by mail or electronic filing software can follow the instructions below to create a password.
Creating electronic filing passwords for registered committees:
1. If you have registered your committee and no electronic filing password has been previously assigned to the committee, you can use the FEC’s Electronic Filing Password Request webpage. https://transition.fec.gov/elecfil/passwords.shtml
2. The request must come from the official committee treasurer or assistant treasurer.
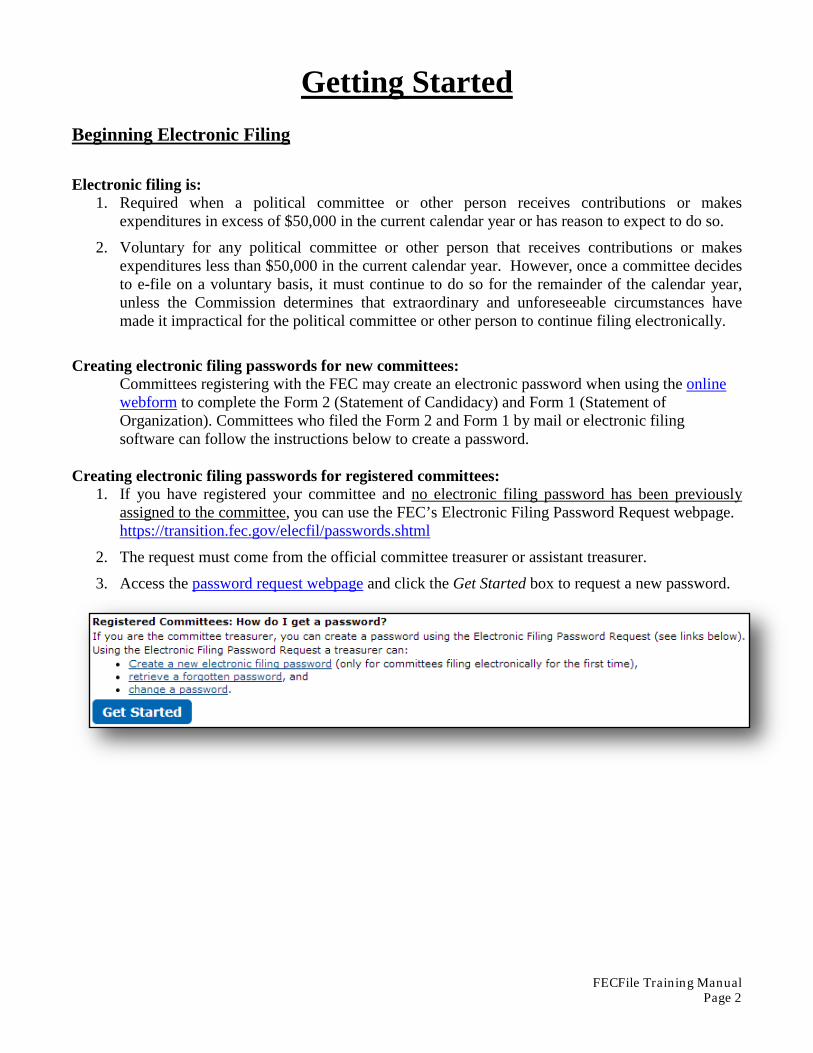
3. Access the password request webpage and click the Get Started box to request a new password.
FECFile Training Manual Page 3
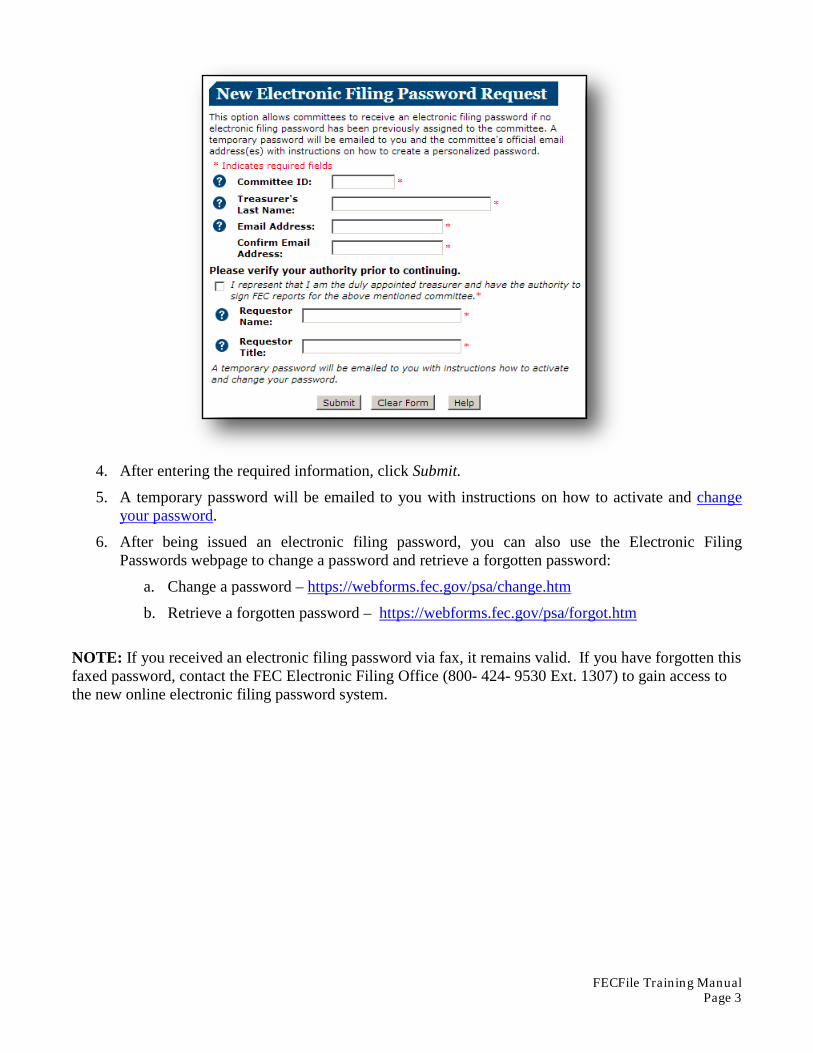
4. After entering the required information, click Submit. 5. A temporary password will be emailed to you with instructions on how to activate and change
your password.
6. After being issued an electronic filing password, you can also use the Electronic Filing Passwords webpage to change a password and retrieve a forgotten password:
a. Change a password – https://webforms.fec.gov/psa/change.htm
b. Retrieve a forgotten password – https://webforms.fec.gov/psa/forgot.htm
NOTE: If you received an electronic filing password via fax, it remains valid. If you have forgotten this faxed password, contact the FEC Electronic Filing Office (800- 424- 9530 Ext. 1307) to gain access to the new online electronic filing password system.

FECFile Training Manual Page 4
Downloading Software: 1. From www.FEC.gov, click Help for Candidates and Committees at the top of the page and then
click Candidates and committees home
2. Under “Candidates and their authorized committees,” click on Filing candidate reports.
3. Under “How to file,” click on FECFile: The FEC’s free software. 4. Confirm Minimum System Requirements are met (https://www.fec.gov/help-candidates-and-
committees/filing-reports/fecfile-software/)
5. Click Download FECFile Now. 7. Enter the committee ID and choose Submit. 8. Enter the required committee and contact information then click Submit. 9. Click the FECFile X.X.X.X Download button. 10. Follow your computer’s download instructions. 11. Double-click the FECFile install icon and follow the installation prompts.
Note: FECFile will automatically check for the latest program updates every time you start the software. If you are having trouble downloading FECFile, please contact the FEC Electronic Filing Office (800- 424- 9530 Ext. 1307).
FECFile Training Manual Page 5
Using FECFile FECFile Video Tutorial: "FECFile Introduction" FECFile Video Tutorial: "Setting Up a FECFile Database for a Candidate" Creating a New Committee File
1. Start FECFile using either the desktop icon or the computer’s Start Menu.
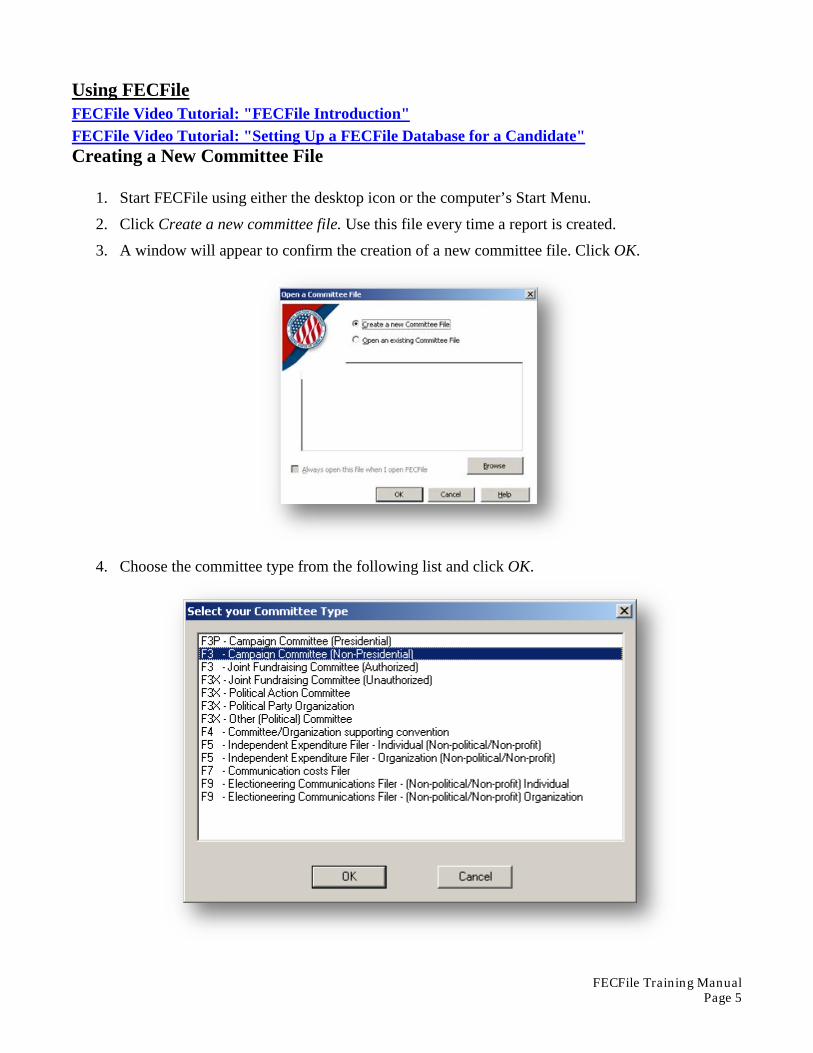
2. Click Create a new committee file. Use this file every time a report is created.
3. A window will appear to confirm the creation of a new committee file. Click OK.
4. Choose the committee type from the following list and click OK.
FECFile Training Manual Page 6
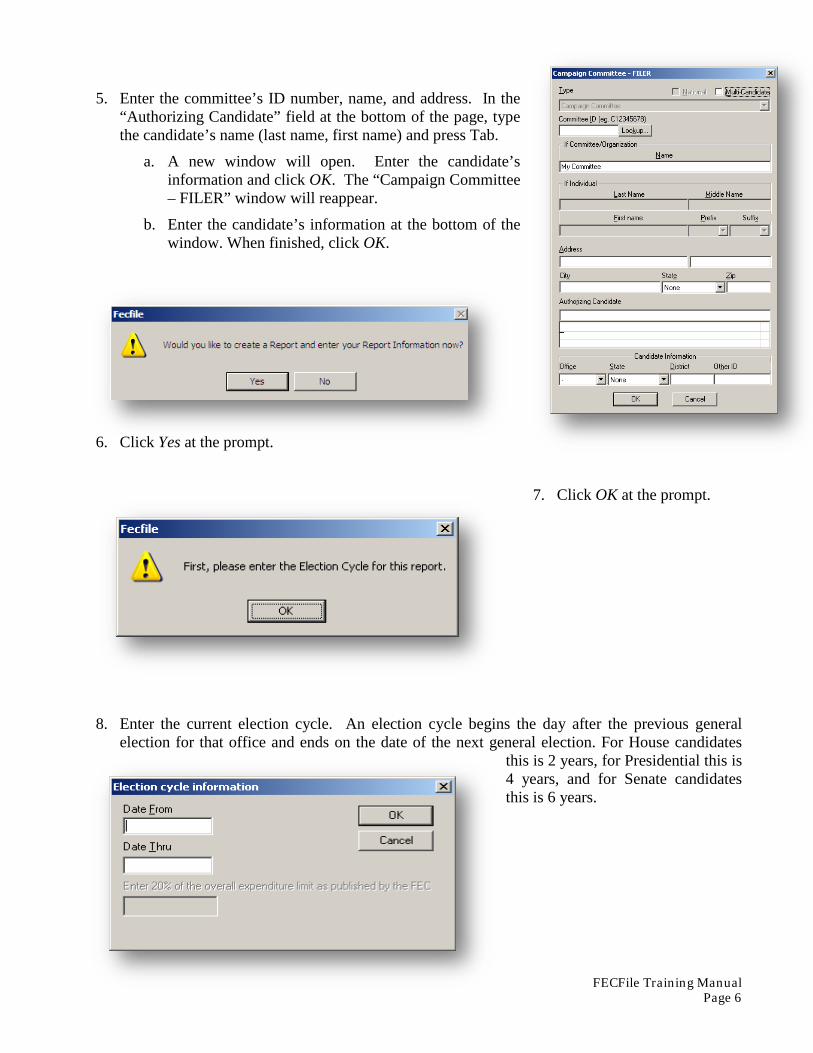
5. Enter the committee’s ID number, name, and address. In the “Authorizing Candidate” field at the bottom of the page, type the candidate’s name (last name, first name) and press Tab.
a. A new window will open. Enter the candidate’s information and click OK. The “Campaign Committee – FILER” window will reappear.
b. Enter the candidate’s information at the bottom of the window. When finished, click OK.
6. Click Yes at the prompt.
7. Click OK at the prompt.
8. Enter the current election cycle. An election cycle begins the day after the previous general election for that office and ends on the date of the next general election. For House candidates
this is 2 years, for Presidential this is 4 years, and for Senate candidates this is 6 years.
FECFile Training Manual Page 7
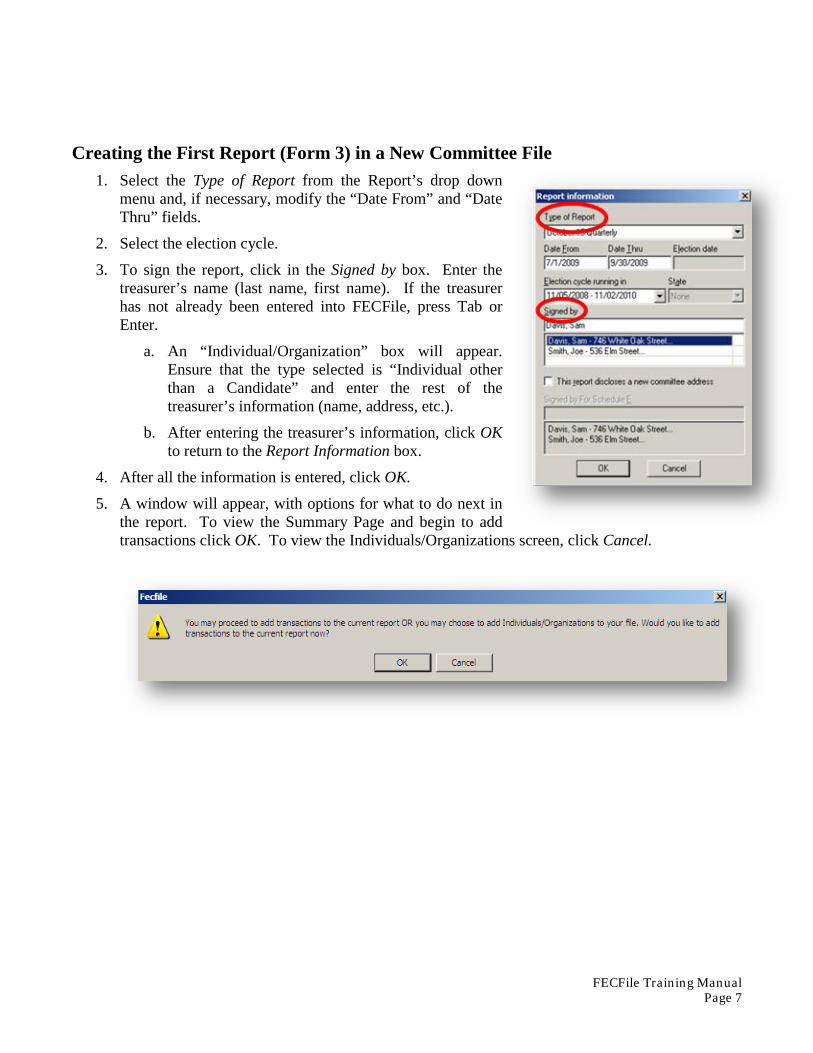
Creating the First Report (Form 3) in a New Committee File 1. Select the Type of Report from the Report’s drop down
menu and, if necessary, modify the “Date From” and “Date Thru” fields.
2. Select the election cycle.
3. To sign the report, click in the Signed by box. Enter the treasurer’s name (last name, first name). If the treasurer has not already been entered into FECFile, press Tab or Enter.
a. An “Individual/Organization” box will appear. Ensure that the type selected is “Individual other than a Candidate” and enter the rest of the treasurer’s information (name, address, etc.).
b. After entering the treasurer’s information, click OK to return to the Report Information box.
4. After all the information is entered, click OK. 5. A window will appear, with options for what to do next in
the report. To view the Summary Page and begin to add transactions click OK. To view the Individuals/Organizations screen, click Cancel.
FECFile Training Manual Page 8
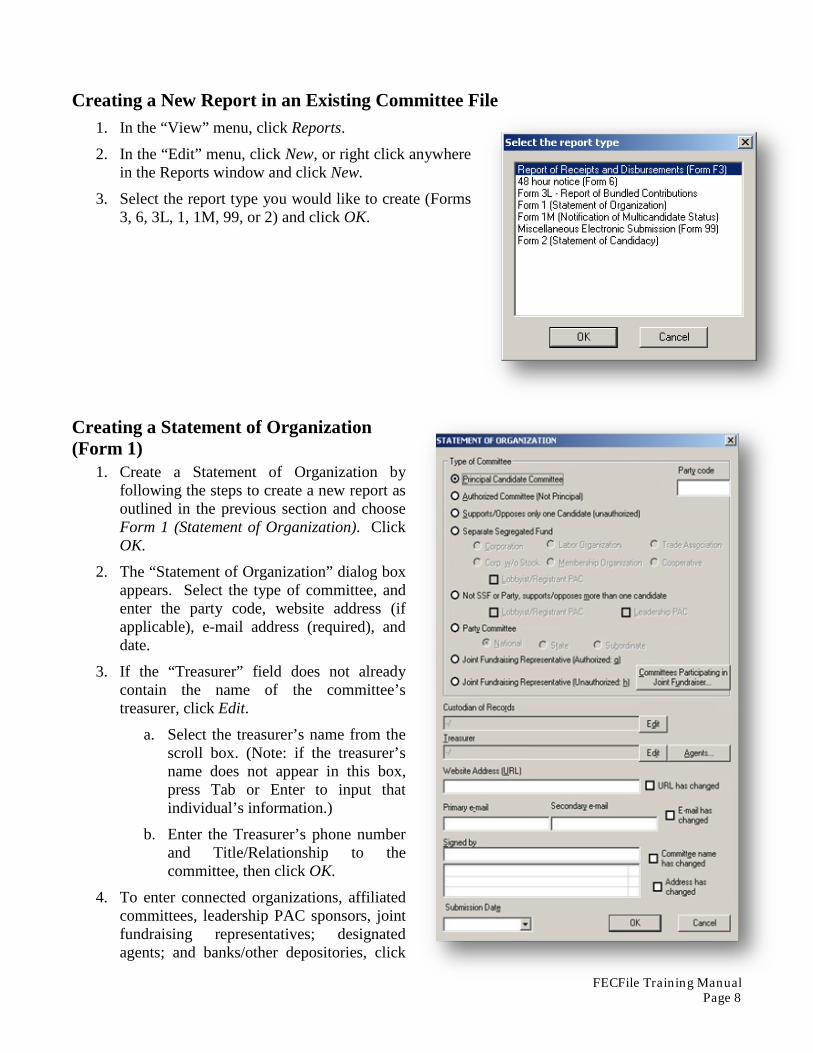
Creating a New Report in an Existing Committee File 1. In the “View” menu, click Reports.
2. In the “Edit” menu, click New, or right click anywhere in the Reports window and click New.
3. Select the report type you would like to create (Forms 3, 6, 3L, 1, 1M, 99, or 2) and click OK.
Creating a Statement of Organization (Form 1)
1. Create a Statement of Organization by following the steps to create a new report as outlined in the previous section and choose Form 1 (Statement of Organization). Click OK.
2. The “Statement of Organization” dialog box appears. Select the type of committee, and enter the party code, website address (if applicable), e-mail address (required), and date.
3. If the “Treasurer” field does not already contain the name of the committee’s treasurer, click Edit.
a. Select the treasurer’s name from the scroll box. (Note: if the treasurer’s name does not appear in this box, press Tab or Enter to input that individual’s information.)
b. Enter the Treasurer’s phone number and Title/Relationship to the committee, then click OK.
4. To enter connected organizations, affiliated committees, leadership PAC sponsors, joint fundraising representatives; designated agents; and banks/other depositories, click
FECFile Training Manual Page 9
on Agents…
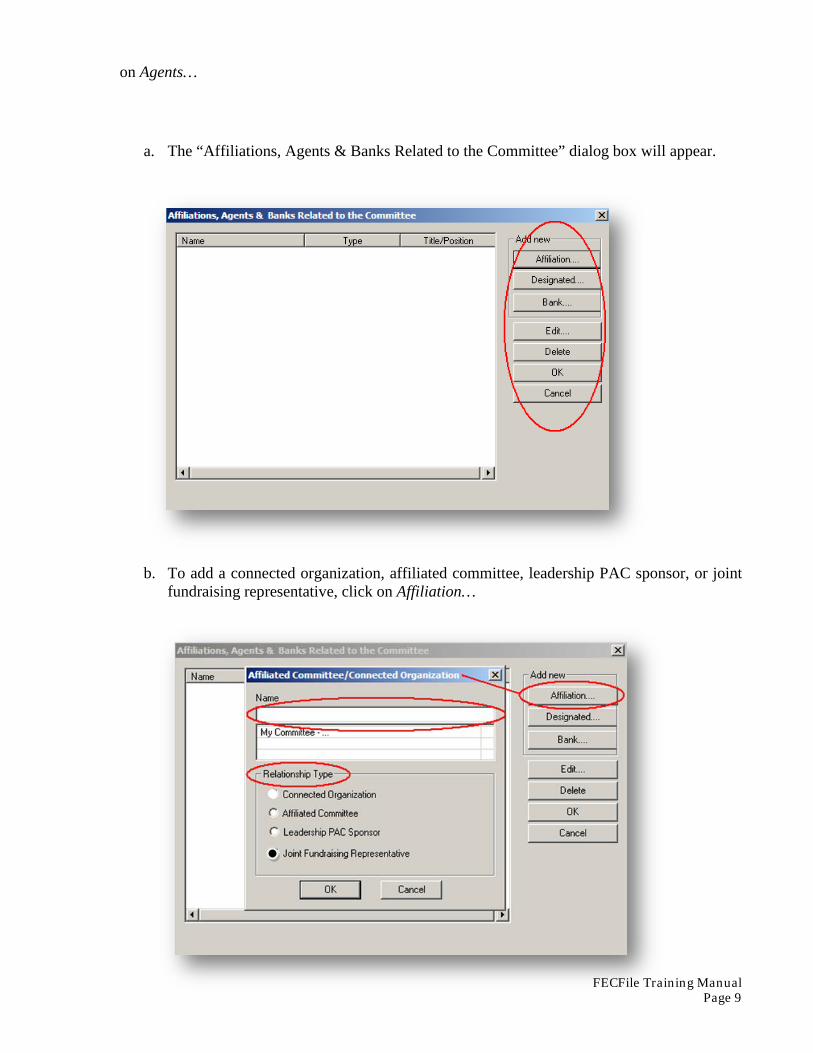
a. The “Affiliations, Agents & Banks Related to the Committee” dialog box will appear.
b. To add a connected organization, affiliated committee, leadership PAC sponsor, or joint fundraising representative, click on Affiliation…
FECFile Training Manual Page 10
c. Select the name of the connected organization, affiliated committee, leadership PAC sponsor, or joint fundraising representative from the list. (Note: if the name of the entity does not appear, and press Tab or Enter to input its information.)
d. Under “Relationship Type”, select the corresponding type of relationship then click OK. 5. To add a designated agent (for example, an assistant treasurer), click on Designated...
a. Select the name of the designated agent from the list. (Note: if the individual does not appear, type the name (last, first), and press Tab or Enter to input that individual’s information.)
b. Enter the designated agent’s phone number and title/position with the committee, then click OK.
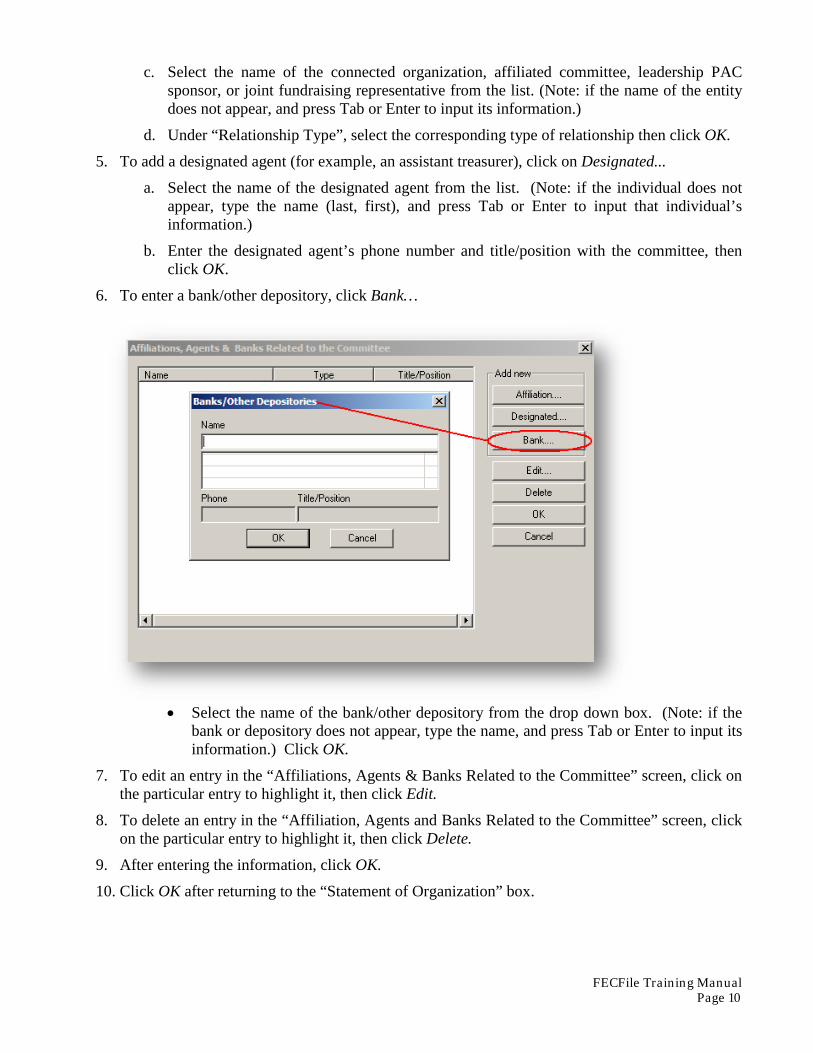
6. To enter a bank/other depository, click Bank…
• Select the name of the bank/other depository from the drop down box. (Note: if the bank or depository does not appear, type the name, and press Tab or Enter to input its information.) Click OK.
7. To edit an entry in the “Affiliations, Agents & Banks Related to the Committee” screen, click on the particular entry to highlight it, then click Edit.
8. To delete an entry in the “Affiliation, Agents and Banks Related to the Committee” screen, click on the particular entry to highlight it, then click Delete.
9. After entering the information, click OK. 10. Click OK after returning to the “Statement of Organization” box.

FECFile Training Manual Page 11
11. The Form 1 is now created. To view the Form 1 to ensure that it is complete, click the printer icon in the top menu bar in order to see the committee’s information as it looks filled in on the FEC forms.
FECFile Training Manual Page 12
FECFile Basics Saving in FECFile: FECFile creates a committee database (with file extension .DCf), which holds the entirety of the committee’s reporting history. This includes all reports, amendments, and contributors or vendors with whom the committee works.
1. Save the file as often as possible. This will decrease the chance of massive data loss. Be sure to save the file in a location easily accessible and easily remembered. Additionally, it is also recommended that you back up the file to an external source, such as a flash drive, external hard drive, or CD.
2. For each new report, open the same committee file. Do not create a new committee file each time the committee files a report. This will lead to problems with election cycle-to-date amounts, cash on-hand amounts, and aggregate amounts.
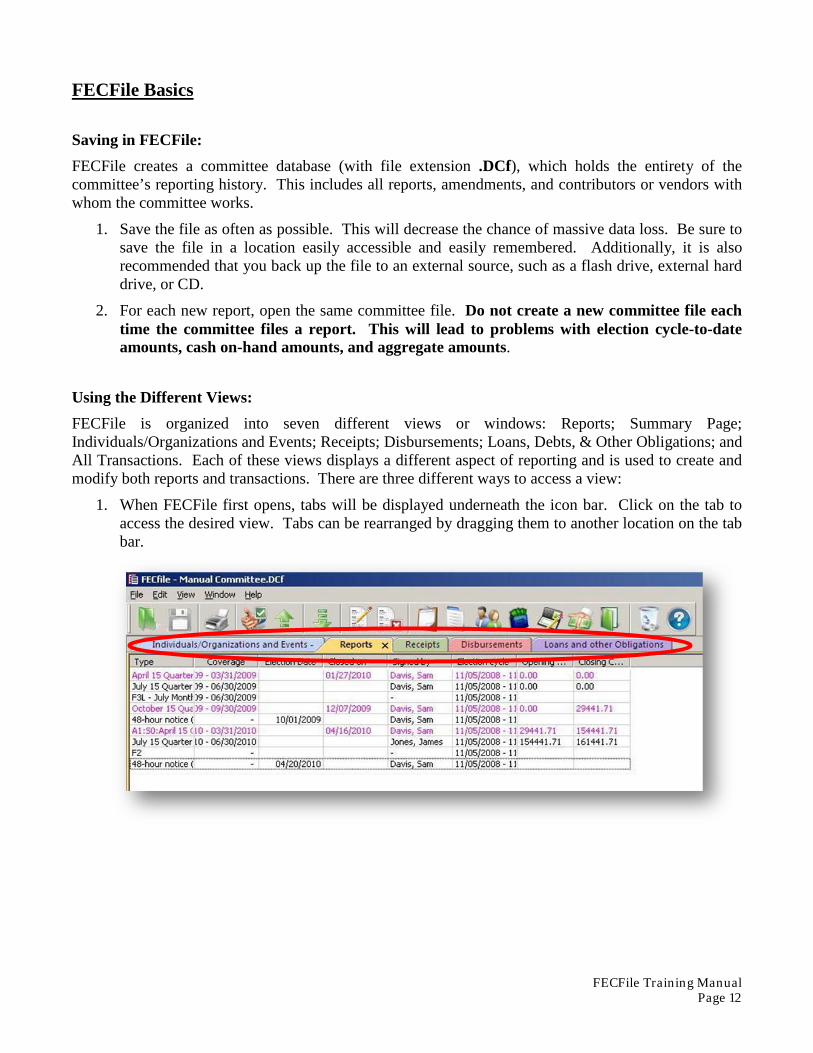
Using the Different Views: FECFile is organized into seven different views or windows: Reports; Summary Page; Individuals/Organizations and Events; Receipts; Disbursements; Loans, Debts, & Other Obligations; and All Transactions. Each of these views displays a different aspect of reporting and is used to create and modify both reports and transactions. There are three different ways to access a view:
1. When FECFile first opens, tabs will be displayed underneath the icon bar. Click on the tab to access the desired view. Tabs can be rearranged by dragging them to another location on the tab bar.
FECFile Training Manual Page 13
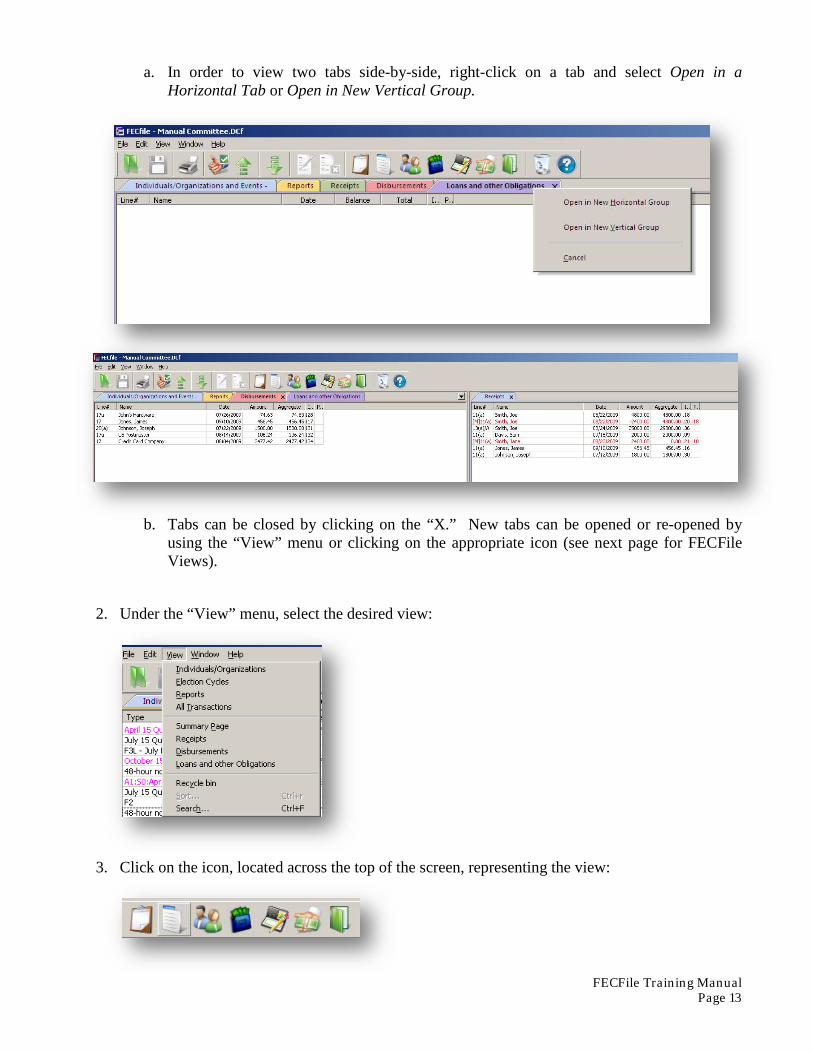
a. In order to view two tabs side-by-side, right-click on a tab and select Open in a Horizontal Tab or Open in New Vertical Group.
b. Tabs can be closed by clicking on the “X.” New tabs can be opened or re-opened by using the “View” menu or clicking on the appropriate icon (see next page for FECFile Views).
2. Under the “View” menu, select the desired view:
3. Click on the icon, located across the top of the screen, representing the view:
FECFile Training Manual Page 14
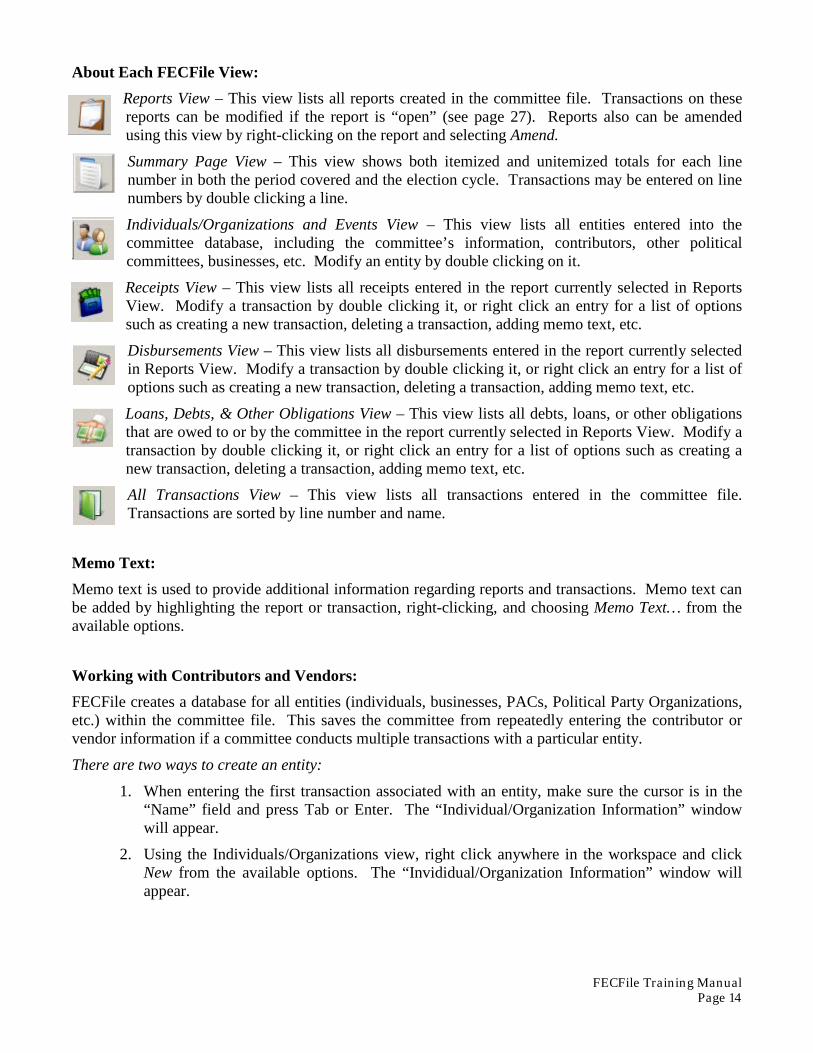
About Each FECFile View: Reports View – This view lists all reports created in the committee file. Transactions on these reports can be modified if the report is “open” (see page 27). Reports also can be amended using this view by right-clicking on the report and selecting Amend. Summary Page View – This view shows both itemized and unitemized totals for each line number in both the period covered and the election cycle. Transactions may be entered on line numbers by double clicking a line.
Individuals/Organizations and Events View – This view lists all entities entered into the committee database, including the committee’s information, contributors, other political committees, businesses, etc. Modify an entity by double clicking on it.
Receipts View – This view lists all receipts entered in the report currently selected in Reports View. Modify a transaction by double clicking it, or right click an entry for a list of options such as creating a new transaction, deleting a transaction, adding memo text, etc.
Disbursements View – This view lists all disbursements entered in the report currently selected in Reports View. Modify a transaction by double clicking it, or right click an entry for a list of options such as creating a new transaction, deleting a transaction, adding memo text, etc.
Loans, Debts, & Other Obligations View – This view lists all debts, loans, or other obligations that are owed to or by the committee in the report currently selected in Reports View. Modify a transaction by double clicking it, or right click an entry for a list of options such as creating a new transaction, deleting a transaction, adding memo text, etc. All Transactions View – This view lists all transactions entered in the committee file. Transactions are sorted by line number and name.
Memo Text: Memo text is used to provide additional information regarding reports and transactions. Memo text can be added by highlighting the report or transaction, right-clicking, and choosing Memo Text… from the available options.
Working with Contributors and Vendors: FECFile creates a database for all entities (individuals, businesses, PACs, Political Party Organizations, etc.) within the committee file. This saves the committee from repeatedly entering the contributor or vendor information if a committee conducts multiple transactions with a particular entity.
There are two ways to create an entity: 1. When entering the first transaction associated with an entity, make sure the cursor is in the
“Name” field and press Tab or Enter. The “Individual/Organization Information” window will appear.
2. Using the Individuals/Organizations view, right click anywhere in the workspace and click New from the available options. The “Invididual/Organization Information” window will appear.
FECFile Training Manual Page 15
Filling Out the Individual/Organization Information Box 1. Select the correct entity type from the drop down menu at the top of the window.
• Note: FECFile disables any field that is not required for a type of entity. 2. After entering the information, click OK.
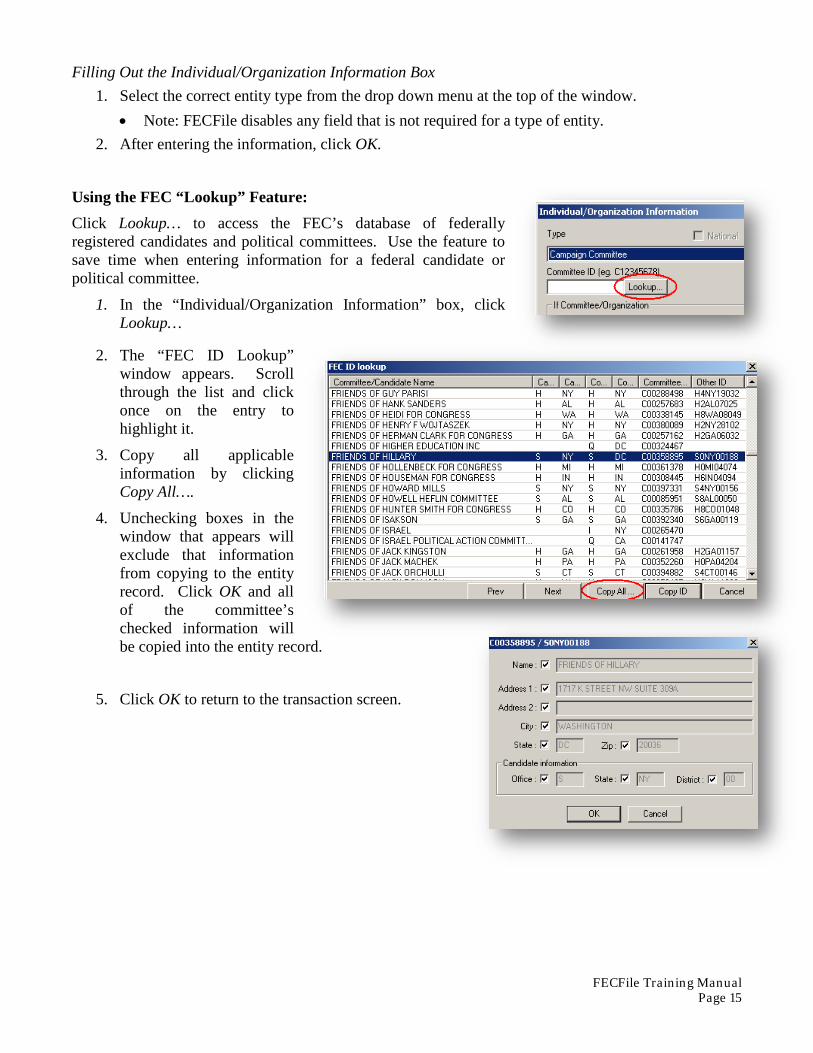
Using the FEC “Lookup” Feature: Click Lookup… to access the FEC’s database of federally registered candidates and political committees. Use the feature to save time when entering information for a federal candidate or political committee.
1. In the “Individual/Organization Information” box, click Lookup…
2. The “FEC ID Lookup” window appears. Scroll through the list and click once on the entry to highlight it.
3. Copy all applicable information by clicking Copy All….
4. Unchecking boxes in the window that appears will exclude that information from copying to the entity record. Click OK and all of the committee’s checked information will be copied into the entity record.
5. Click OK to return to the transaction screen.
FECFile Training Manual Page 16
Receipts FECFile Video Tutorial: "Entering Contributions from Individuals and PACs"
Receipt Basics
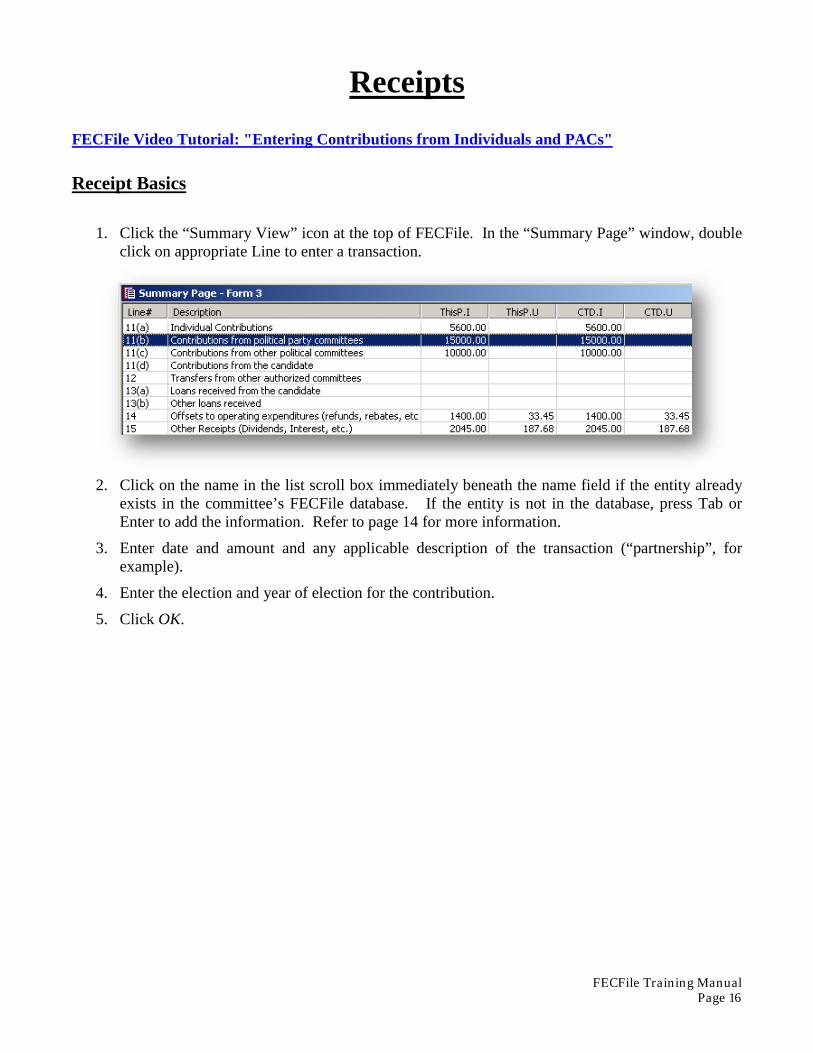
1. Click the “Summary View” icon at the top of FECFile. In the “Summary Page” window, double click on appropriate Line to enter a transaction.
2. Click on the name in the list scroll box immediately beneath the name field if the entity already
exists in the committee’s FECFile database. If the entity is not in the database, press Tab or Enter to add the information. Refer to page 14 for more information.
3. Enter date and amount and any applicable description of the transaction (“partnership”, for example).
4. Enter the election and year of election for the contribution.
5. Click OK.
FECFile Training Manual Page 17
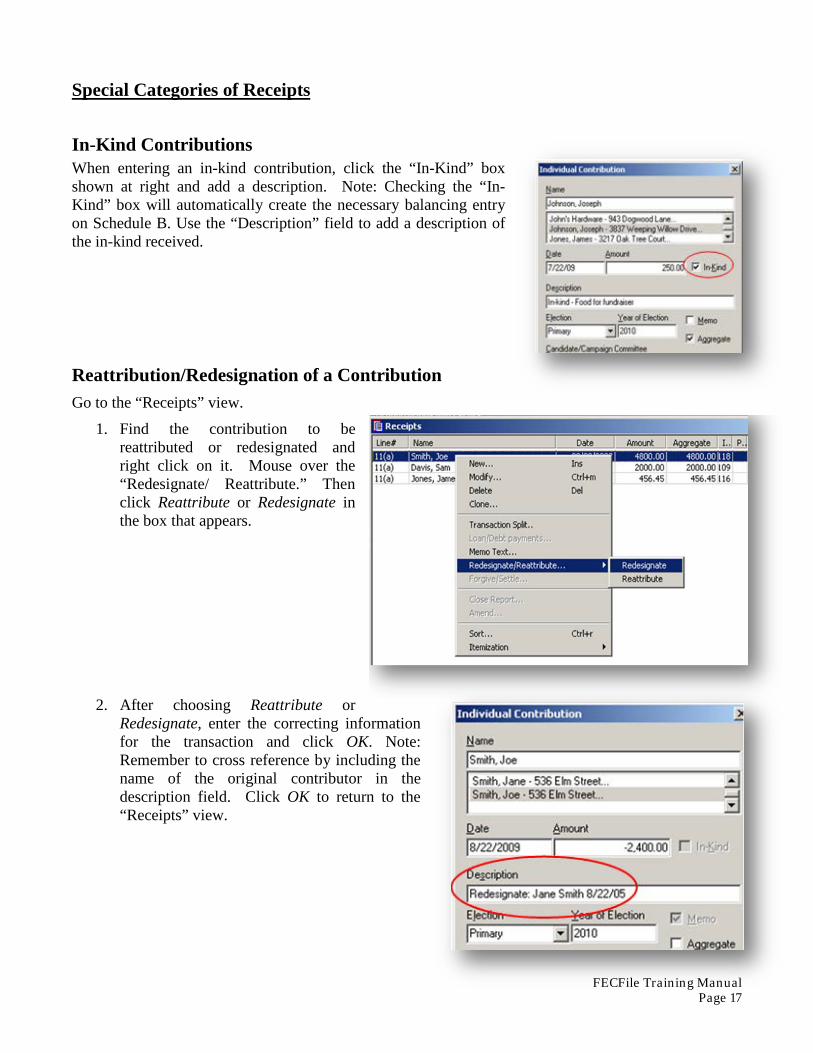
Special Categories of Receipts In-Kind Contributions When entering an in-kind contribution, click the “In-Kind” box shown at right and add a description. Note: Checking the “In-Kind” box will automatically create the necessary balancing entry on Schedule B. Use the “Description” field to add a description of the in-kind received.
Reattribution/Redesignation of a Contribution Go to the “Receipts” view.
1. Find the contribution to be reattributed or redesignated and right click on it. Mouse over the “Redesignate/ Reattribute.” Then click Reattribute or Redesignate in the box that appears.
2. After choosing Reattribute or Redesignate, enter the correcting information for the transaction and click OK. Note: Remember to cross reference by including the name of the original contributor in the description field. Click OK to return to the “Receipts” view.

FECFile Training Manual Page 18
a. For reattribution, highlight the newly created negative entry that FECFile generated for the original contributor, then right click and click Modify...
b. Update the description field to include the name of the person to whom the contribution is
being reattributed.
3. Click “OK” and then click “Yes” at the prompt.
48-Hour Notices (Form 6) 1. A 48-hour notice is a separate filing from a Form 3. 2. To prepare to create 48-hour notices, first create the Form 3 that includes the 48-hour notice
period. 3. To create a 48-hour notice, go to the “Reports”
view, right click, and click New. Click “48-hour notice (Form 6)” and click OK.
4. The “48-hour notice (Form 6)” box will appear; fill in the election date, the state, and enter the treasurer’s information in the “Signed by” box. All fields are required.
5. Click OK. Note that at this point the notice is not complete.
6. Select the “Reports” view and select the 48-hour notice by clicking on it.
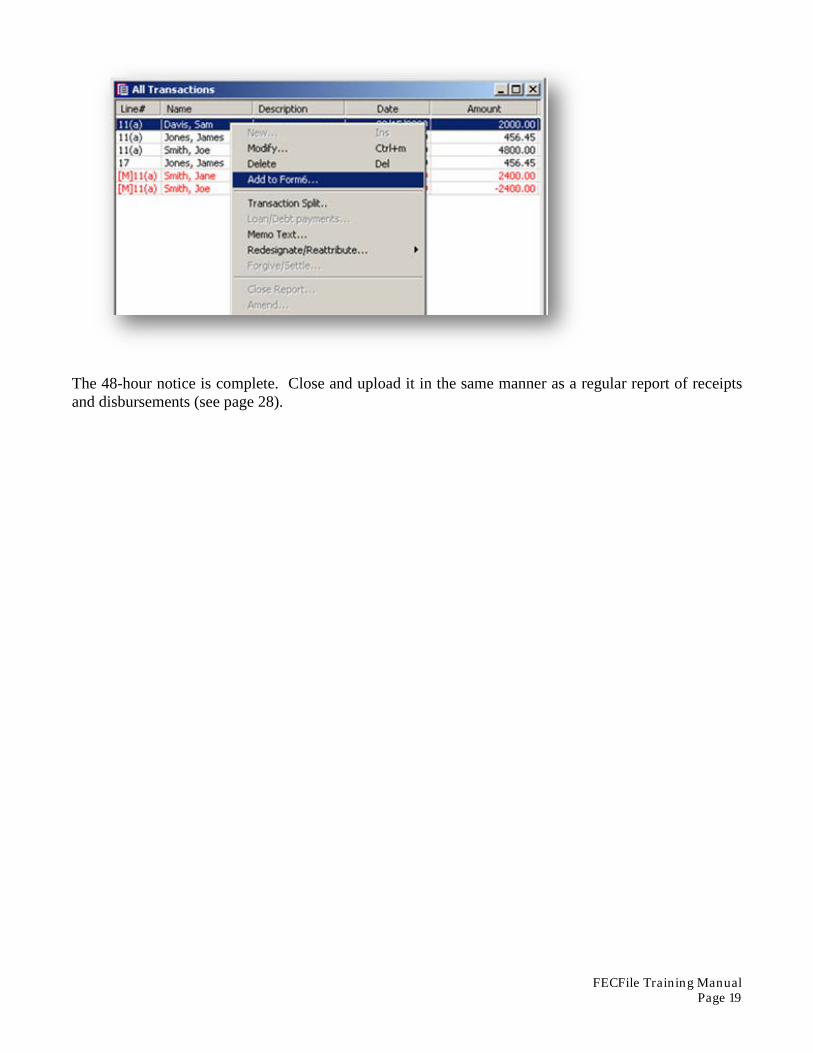
7. Select the “All Transactions” view and locate the receipt(s) that needs to appear on the 48-hour notice. Receipts will be sorted by line number and then alphabetical order.
8. After finding a transaction, select the entry, right click, and click Add to Form 6. (See next page for example.) Repeat this step until all the required contributions have been added to the 48-hour notice.
FECFile Training Manual Page 19
The 48-hour notice is complete. Close and upload it in the same manner as a regular report of receipts and disbursements (see page 28).
FECFile Training Manual Page 20
Bundled Contributions
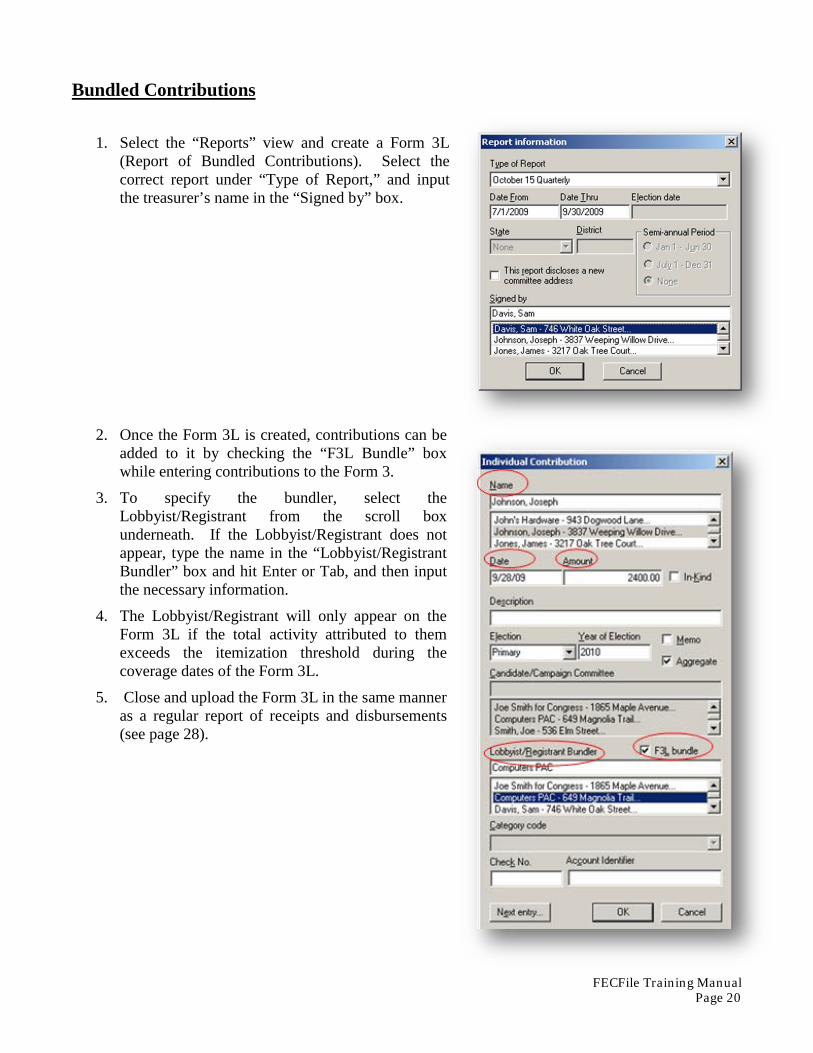
1. Select the “Reports” view and create a Form 3L (Report of Bundled Contributions). Select the correct report under “Type of Report,” and input the treasurer’s name in the “Signed by” box.
2. Once the Form 3L is created, contributions can be added to it by checking the “F3L Bundle” box while entering contributions to the Form 3.
3. To specify the bundler, select the Lobbyist/Registrant from the scroll box underneath. If the Lobbyist/Registrant does not appear, type the name in the “Lobbyist/Registrant Bundler” box and hit Enter or Tab, and then input the necessary information.
4. The Lobbyist/Registrant will only appear on the Form 3L if the total activity attributed to them exceeds the itemization threshold during the coverage dates of the Form 3L.
5. Close and upload the Form 3L in the same manner as a regular report of receipts and disbursements (see page 28).

FECFile Training Manual Page 21
Tips for Reporting Receipts
1. FECFile automatically itemizes contributions according to the thresholds outlined in the law. By entering a record for each individual who contributes to the committee, regardless of the contribution amount, FECFile can track aggregate election cycle-to-date totals more effectively, and, if a contributor crosses the $200 threshold, itemize that individual.
2. To report an offset to operating expenditures, please include additional text in the “Description” field indicating “Refund,” “Rebate,” etc., as well as the original date of the corresponding disbursement.
3. The check number and account identifier are NOT required fields and do not show up on a report. However, providing this information will allow the committee to keep better internal financial records.
4. The “Aggregate” box should remain checked so that transactions aggregate on an election cycle-to-date basis.
5. Memo entries can be used for any transaction requiring supporting information, and when the amounts should not be included in cash on hand totals.
FECFile Training Manual Page 22
Disbursements FECFile Video Tutorial: "Entering Operating Expenditures and Staff Reimbursements"
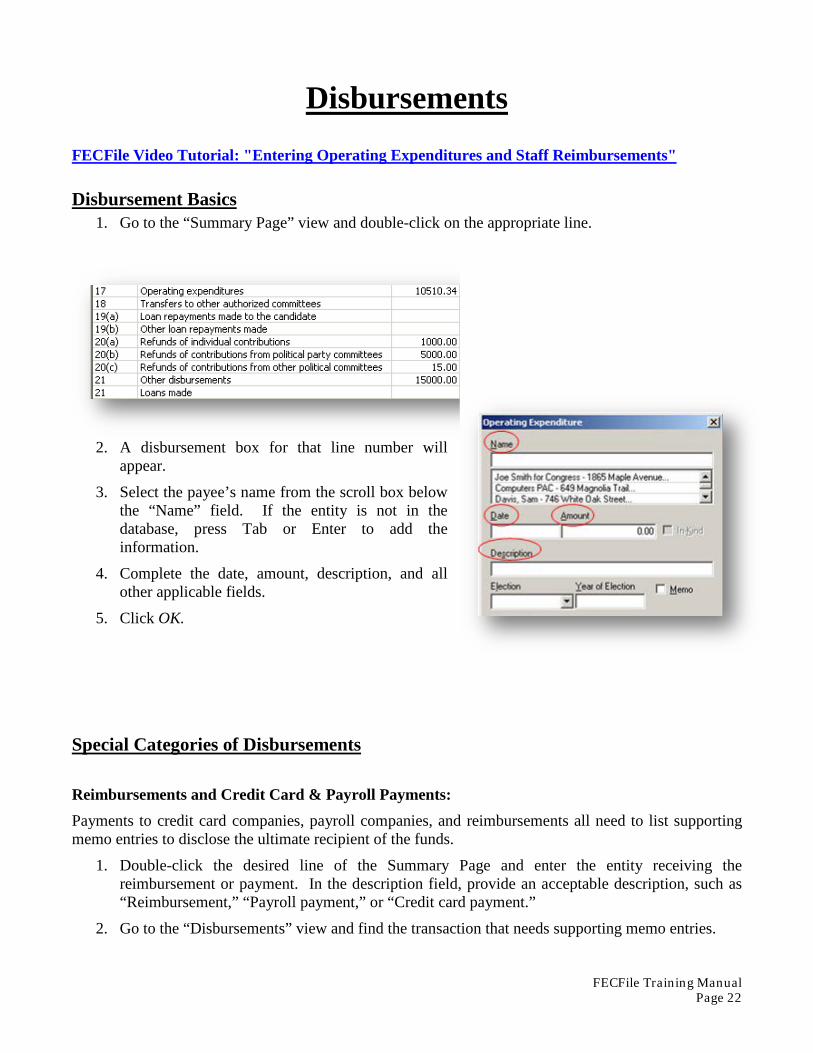
Disbursement Basics 1. Go to the “Summary Page” view and double-click on the appropriate line.
2. A disbursement box for that line number will
appear.
3. Select the payee’s name from the scroll box below the “Name” field. If the entity is not in the database, press Tab or Enter to add the information.
4. Complete the date, amount, description, and all other applicable fields.
5. Click OK.
Special Categories of Disbursements Reimbursements and Credit Card & Payroll Payments: Payments to credit card companies, payroll companies, and reimbursements all need to list supporting memo entries to disclose the ultimate recipient of the funds.
1. Double-click the desired line of the Summary Page and enter the entity receiving the reimbursement or payment. In the description field, provide an acceptable description, such as “Reimbursement,” “Payroll payment,” or “Credit card payment.”
2. Go to the “Disbursements” view and find the transaction that needs supporting memo entries.
FECFile Training Manual Page 23
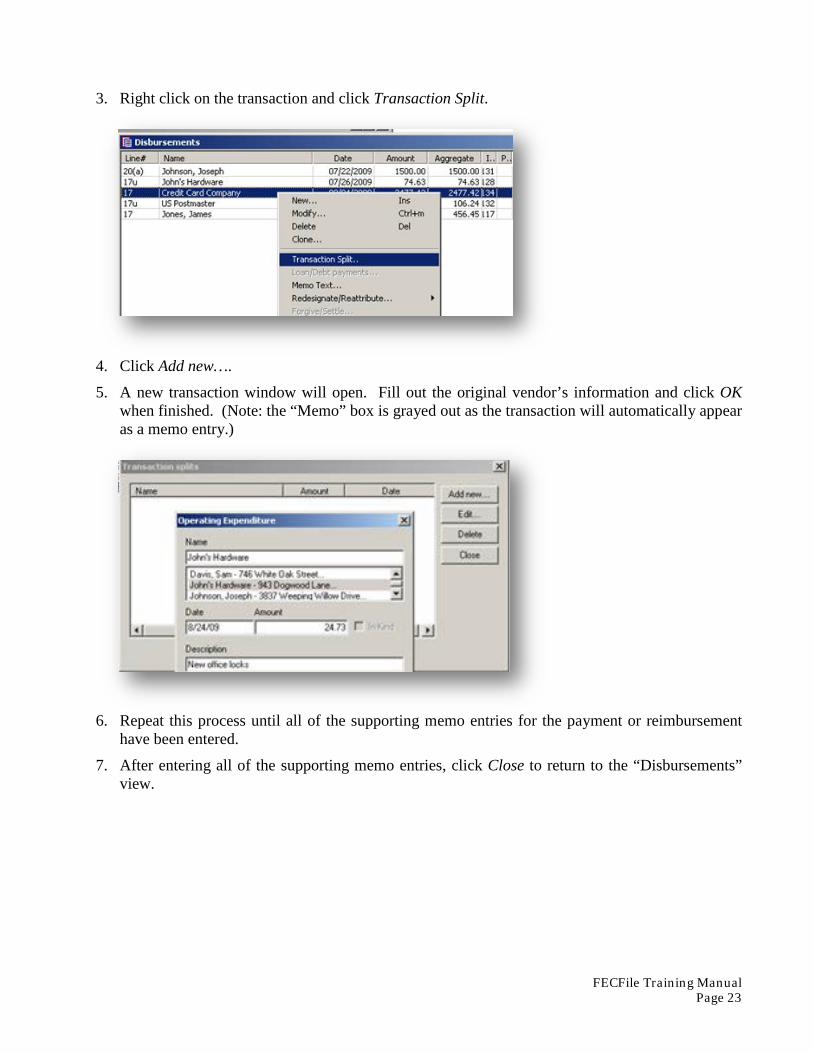
3. Right click on the transaction and click Transaction Split.
4. Click Add new….
5. A new transaction window will open. Fill out the original vendor’s information and click OK when finished. (Note: the “Memo” box is grayed out as the transaction will automatically appear as a memo entry.)
6. Repeat this process until all of the supporting memo entries for the payment or reimbursement have been entered.
7. After entering all of the supporting memo entries, click Close to return to the “Disbursements” view.
FECFile Training Manual Page 24
Debts and Loans
Schedule D: Debts
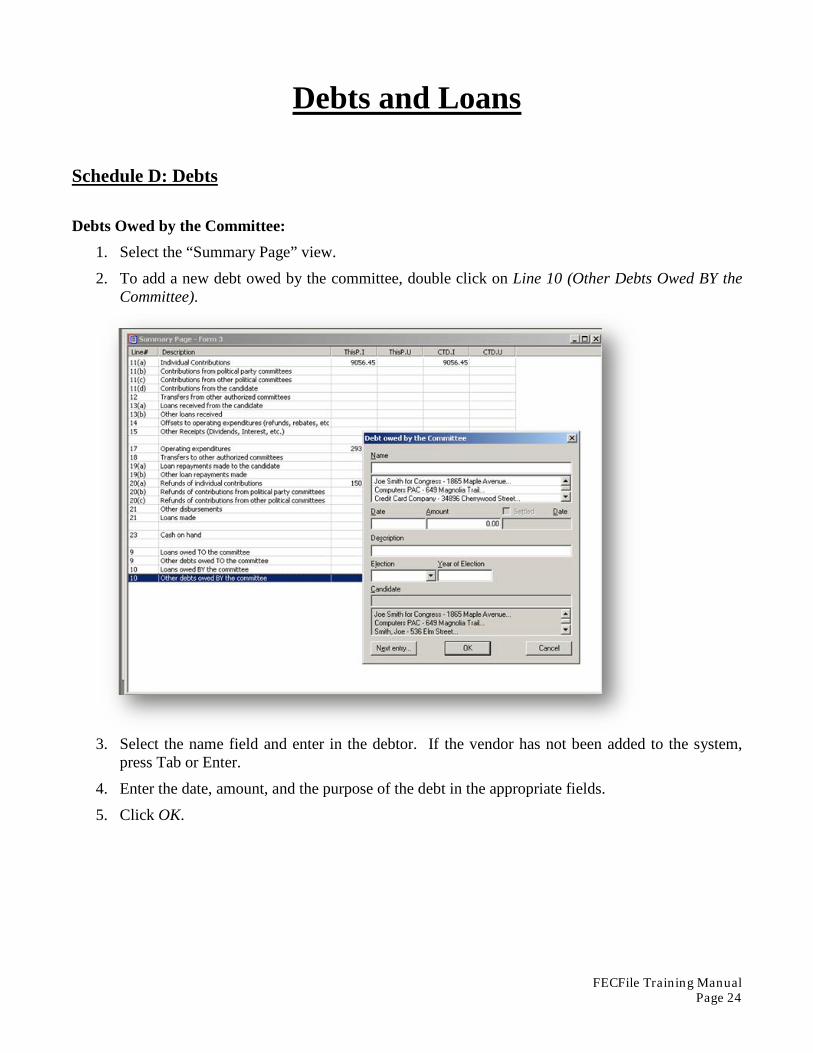
Debts Owed by the Committee: 1. Select the “Summary Page” view.
2. To add a new debt owed by the committee, double click on Line 10 (Other Debts Owed BY the Committee).
3. Select the name field and enter in the debtor. If the vendor has not been added to the system, press Tab or Enter.
4. Enter the date, amount, and the purpose of the debt in the appropriate fields.
5. Click OK.
FECFile Training Manual Page 25
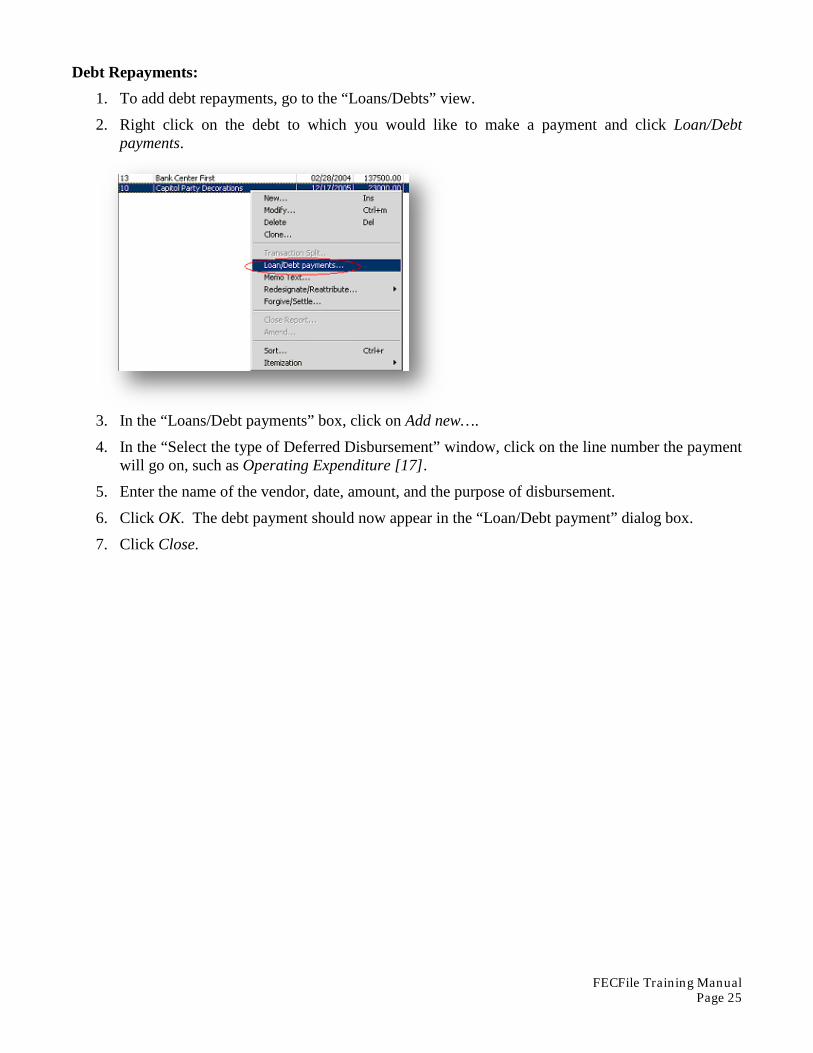
Debt Repayments: 1. To add debt repayments, go to the “Loans/Debts” view.
2. Right click on the debt to which you would like to make a payment and click Loan/Debt payments.
3. In the “Loans/Debt payments” box, click on Add new….
4. In the “Select the type of Deferred Disbursement” window, click on the line number the payment will go on, such as Operating Expenditure [17].
5. Enter the name of the vendor, date, amount, and the purpose of disbursement.
6. Click OK. The debt payment should now appear in the “Loan/Debt payment” dialog box.
7. Click Close.
FECFile Training Manual Page 26
Schedule C & Schedule C-1: Loans
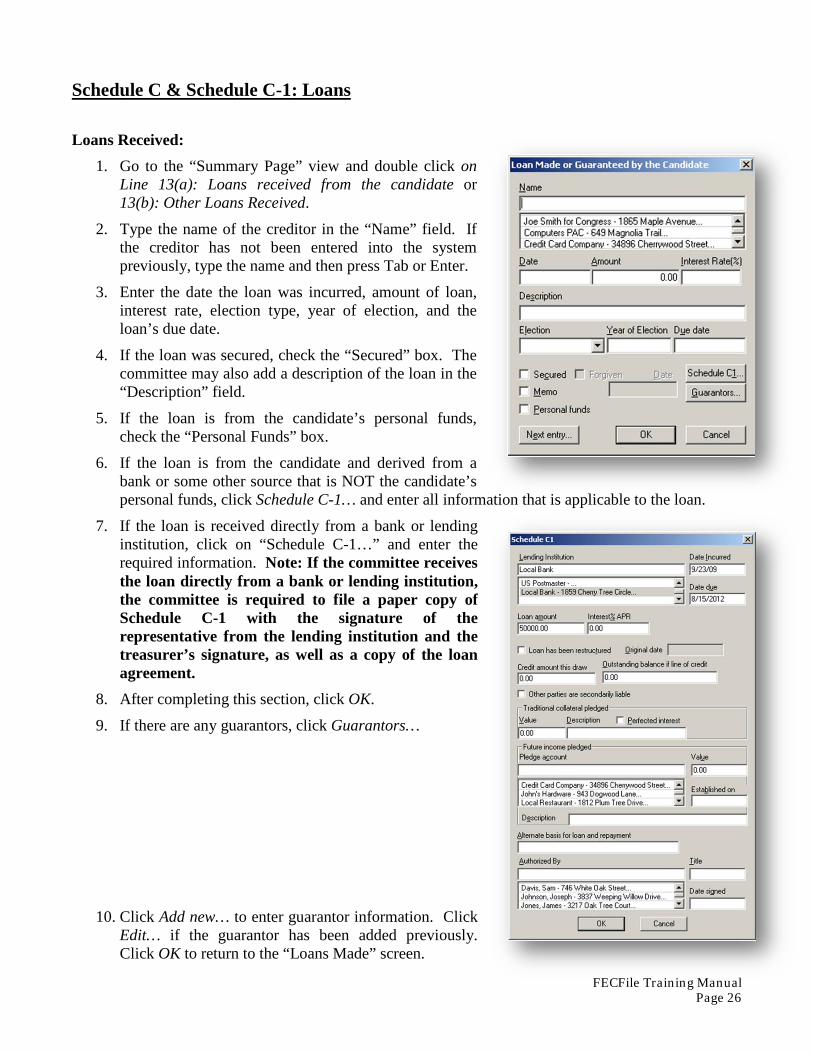
Loans Received: 1. Go to the “Summary Page” view and double click on
Line 13(a): Loans received from the candidate or 13(b): Other Loans Received.
2. Type the name of the creditor in the “Name” field. If the creditor has not been entered into the system previously, type the name and then press Tab or Enter.
3. Enter the date the loan was incurred, amount of loan, interest rate, election type, year of election, and the loan’s due date.
4. If the loan was secured, check the “Secured” box. The committee may also add a description of the loan in the “Description” field.
5. If the loan is from the candidate’s personal funds, check the “Personal Funds” box.
6. If the loan is from the candidate and derived from a bank or some other source that is NOT the candidate’s personal funds, click Schedule C-1… and enter all information that is applicable to the loan.
7. If the loan is received directly from a bank or lending institution, click on “Schedule C-1…” and enter the required information. Note: If the committee receives the loan directly from a bank or lending institution, the committee is required to file a paper copy of Schedule C-1 with the signature of the representative from the lending institution and the treasurer’s signature, as well as a copy of the loan agreement.
8. After completing this section, click OK.
9. If there are any guarantors, click Guarantors…
10. Click Add new… to enter guarantor information. Click Edit… if the guarantor has been added previously. Click OK to return to the “Loans Made” screen.
FECFile Training Manual Page 27
11. After the loan information is entered, click OK to return to the “Summary Page” view. Schedule
A supporting Line 13 and Schedule C supporting Line 10 will now have amounts reflected on the Summary Page and the corresponding schedules will be created on the report.
Loan Repayments Made: 1. Go to the “Loans/Debts” view.
2. Click the loan for which repayment is being made, right click, and click Loan/Debt payments…
3. Click Add New…
4. Enter the creditor’s name; if the creditor has already been entered, select that name. Type the date, amount, and enter “Loan repayment” into the “Description” field.
5. Click OK to return to the “Loan/Debt Payments” screen, then click OK to close that window. Schedule B supporting Line 19(a) or 19(b) and Schedule C supporting Line 10 will now have amounts reflected on the Summary Page and the corresponding schedules will be created on the report.
FECFile Training Manual Page 28
Closing/Uploading/Amending
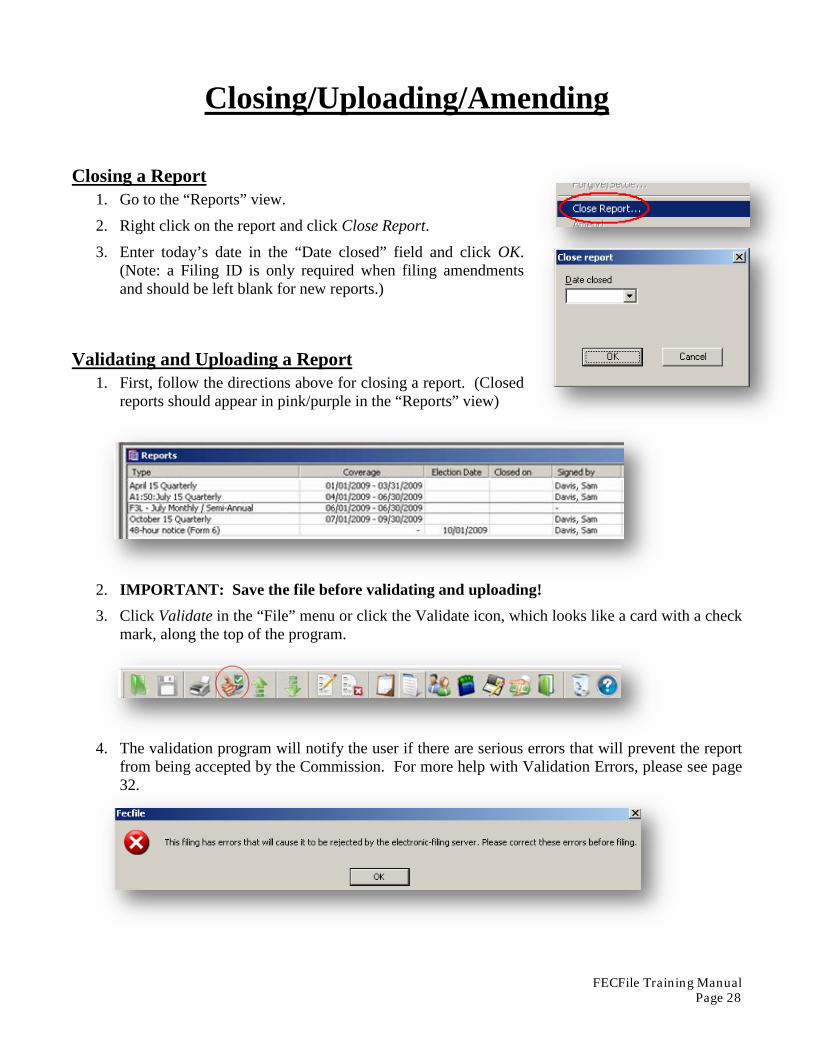
Closing a Report 1. Go to the “Reports” view.
2. Right click on the report and click Close Report. 3. Enter today’s date in the “Date closed” field and click OK.
(Note: a Filing ID is only required when filing amendments and should be left blank for new reports.)
Validating and Uploading a Report 1. First, follow the directions above for closing a report. (Closed
reports should appear in pink/purple in the “Reports” view)
2. IMPORTANT: Save the file before validating and uploading! 3. Click Validate in the “File” menu or click the Validate icon, which looks like a card with a check
mark, along the top of the program.
4. The validation program will notify the user if there are serious errors that will prevent the report
from being accepted by the Commission. For more help with Validation Errors, please see page 32.
FECFile Training Manual Page 29
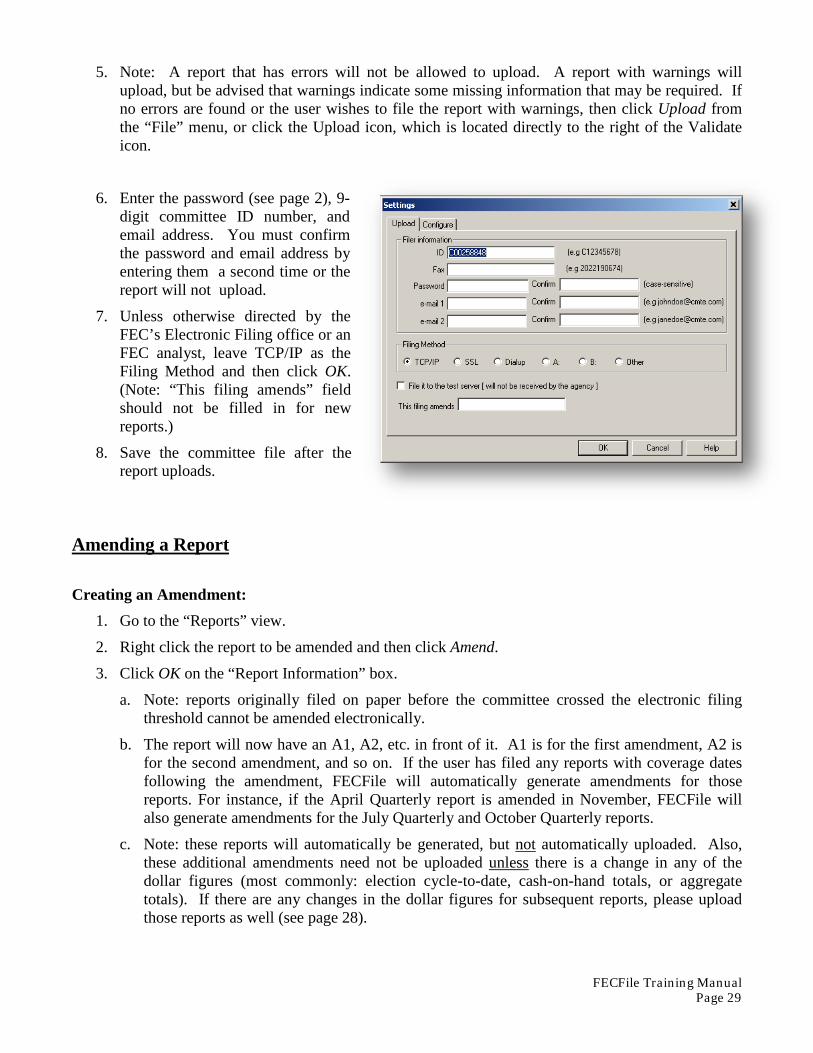
5. Note: A report that has errors will not be allowed to upload. A report with warnings will upload, but be advised that warnings indicate some missing information that may be required. If no errors are found or the user wishes to file the report with warnings, then click Upload from the “File” menu, or click the Upload icon, which is located directly to the right of the Validate icon.
6. Enter the password (see page 2), 9-digit committee ID number, and email address. You must confirm the password and email address by entering them a second time or the report will not upload.
7. Unless otherwise directed by the FEC’s Electronic Filing office or an FEC analyst, leave TCP/IP as the Filing Method and then click OK. (Note: “This filing amends” field should not be filled in for new reports.)
8. Save the committee file after the report uploads.
Amending a Report Creating an Amendment:
1. Go to the “Reports” view.
2. Right click the report to be amended and then click Amend.
3. Click OK on the “Report Information” box.
a. Note: reports originally filed on paper before the committee crossed the electronic filing threshold cannot be amended electronically.
b. The report will now have an A1, A2, etc. in front of it. A1 is for the first amendment, A2 is for the second amendment, and so on. If the user has filed any reports with coverage dates following the amendment, FECFile will automatically generate amendments for those reports. For instance, if the April Quarterly report is amended in November, FECFile will also generate amendments for the July Quarterly and October Quarterly reports.
c. Note: these reports will automatically be generated, but not automatically uploaded. Also, these additional amendments need not be uploaded unless there is a change in any of the dollar figures (most commonly: election cycle-to-date, cash-on-hand totals, or aggregate totals). If there are any changes in the dollar figures for subsequent reports, please upload those reports as well (see page 28).
FECFile Training Manual Page 30
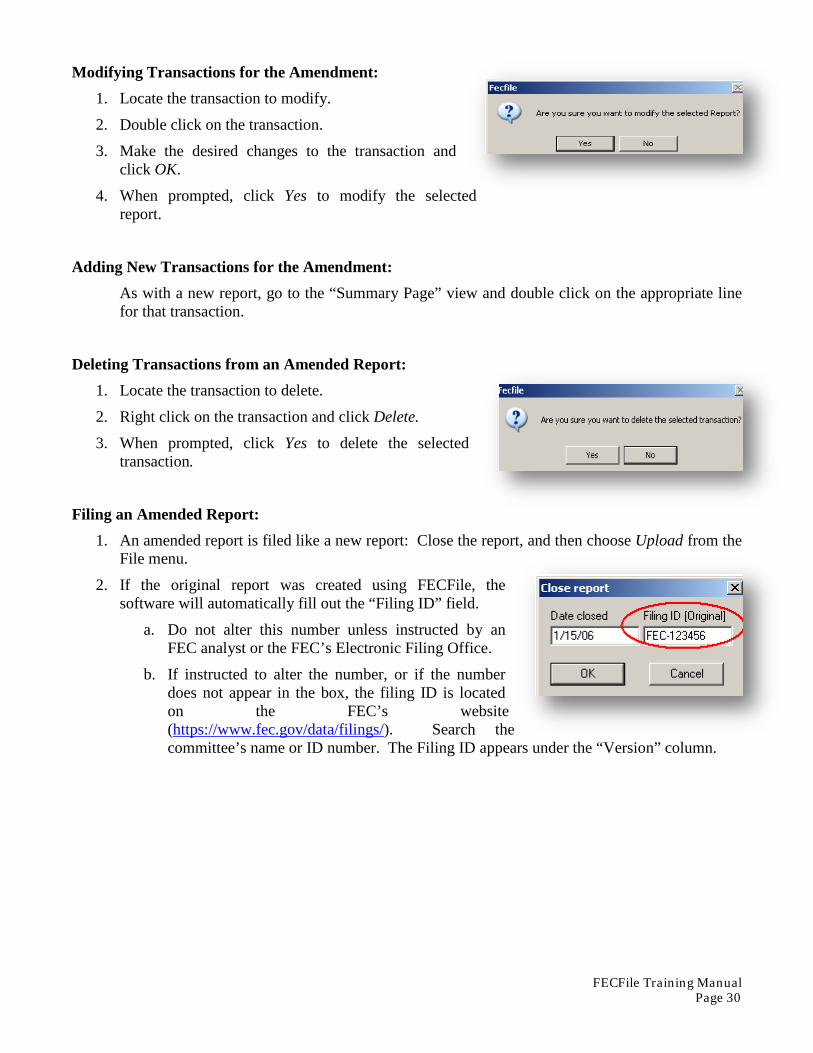
Modifying Transactions for the Amendment: 1. Locate the transaction to modify.
2. Double click on the transaction.
3. Make the desired changes to the transaction and click OK.
4. When prompted, click Yes to modify the selected report.
Adding New Transactions for the Amendment: As with a new report, go to the “Summary Page” view and double click on the appropriate line for that transaction.
Deleting Transactions from an Amended Report: 1. Locate the transaction to delete.
2. Right click on the transaction and click Delete. 3. When prompted, click Yes to delete the selected
transaction.
Filing an Amended Report: 1. An amended report is filed like a new report: Close the report, and then choose Upload from the
File menu.
2. If the original report was created using FECFile, the software will automatically fill out the “Filing ID” field.
a. Do not alter this number unless instructed by an FEC analyst or the FEC’s Electronic Filing Office.
b. If instructed to alter the number, or if the number does not appear in the box, the filing ID is located on the FEC’s website (https://www.fec.gov/data/filings/). Search the committee’s name or ID number. The Filing ID appears under the “Version” column.
FECFile Training Manual Page 31
Secrets to FECFile
Common E-Filing Mistakes! Passwords • Remember to obtain a password as soon as possible.
• Don’t wait until the last minute to apply for a password or to apply for a new one if necessary.
• Remember the committee’s password and keep it secure: the FEC cannot look up misplaced or forgotten passwords; the Treasurer must request a new one.
Filing at the last minute • Any problem, whether it’s technical or non-familiarity with the software, can be difficult to deal
with during the rush of a deadline week. It is advisable to always file as early as possible, especially the first time the committee files electronically.
Email receipts confirm filing has been received. • After uploading the report electronically, a receipt will be sent to the email address or fax entered
when uploading the report. Assume that the report was not successfully filed if no receipt is received. Call the Electronic Filing Office (202-694-1642, Option #3) if more than a few minutes pass without receiving a receipt.
• The receipt is proof of filing. Print it out and keep it.
Save and validate data set early and often • Doing this through the process of report creation will ensure proper and consistent data entry as well
as preventing the loss of work due to unforeseen computer problems, i.e. freezes, crashes etc.
Back up the data file! • The file that contains all of the committee’s reports, the “Data File” (*.dcf), should be backed up to
an external source.
• It is very difficult and time consuming to recreate the committee file if it is lost.

FECFile Training Manual Page 32
Common Validation Errors and How to Fix Them
Warning vs. Error Messages There are two different types of validation errors: warning messages and error messages.
Warning messages: These messages are a result of possible incorrect/missing information in the report so the user can correct the issues (if necessary) before uploading the report. However, they do not prevent the committee from uploading a report.
Error messages: These messages result from more serious problems with the report and prevent the user from uploading the report until the errors are corrected.
Reading and Understanding a Validation Message Each warning or error message contains basic information that allows the user to pinpoint which transaction is causing the issue. It also gives a brief description of the error. For example:
Form{Item}: SA11AI {Johnson, Jane}
Field Name: #012 Employer
Warning Conditionally Required Field is Empty
The Form {Item} field identifies where the transaction causing the error is on the report. In the example above, the transaction is on Schedule A, Line 11(a)(i) and is specifically identified as “Johnson, Jane.” Field Name identifies the aspect of the transaction – in this case the employer field – that is causing the problem. The last line identifies what type of message this is (Warning) and describes what caused the problem (Required field is Empty).
In order to correct this problem, the user should find the specific transaction and edit it to disclose Jane Johnson’s employer.
The FEC’s website includes a more extensive list of commonly found warning and error messages along with brief descriptions and solutions.
https://www.fec.gov/help-candidates-and-committees/filing-reports/validation-errors-explained/
FECFile Training Manual Page 33
Common Error Messages Below are a list of common error messages that committees encounter and the steps that need to be taken in order to correct the errors. Please remember that all error messages must be corrected before you can upload your report.
Filing must be in the current FEC format
• This indicates that you are using an outdated version of FECFile.
• FECFile users will need to download the latest version of the software from the FEC's website (https://www.fec.gov/help-candidates-and-committees/filing-reports/fecfile-software/).
Amended filing must have an ID of the "Original"
• This indicates that the user is trying to submit an amendment absent the original report ID number. The original report ID number must be used. If you are properly amending existing reports in the committee file, the original filing ID should appear automatically.
• If the user cannot locate his receipt for the original report, the ID number can be located on the FEC's Electronic Filing Report Retrieval website under the “Version” column ((https://www.fec.gov/data/filings/).
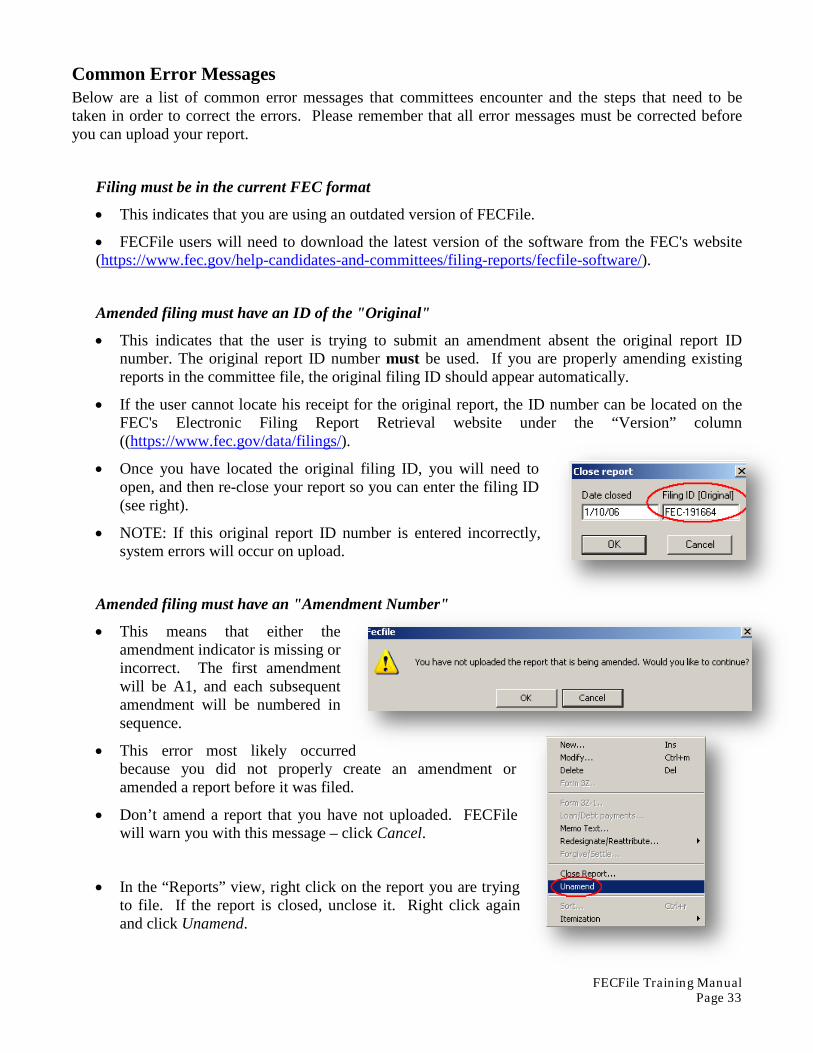
• Once you have located the original filing ID, you will need to open, and then re-close your report so you can enter the filing ID (see right).
• NOTE: If this original report ID number is entered incorrectly, system errors will occur on upload.
Amended filing must have an "Amendment Number"
• This means that either the amendment indicator is missing or incorrect. The first amendment will be A1, and each subsequent amendment will be numbered in sequence.
• This error most likely occurred because you did not properly create an amendment or amended a report before it was filed.
• Don’t amend a report that you have not uploaded. FECFile will warn you with this message – click Cancel.
• In the “Reports” view, right click on the report you are trying to file. If the report is closed, unclose it. Right click again and click Unamend.
FECFile Training Manual Page 34
• Repeat this process until your report is at the correct numbered amendment
Validation terminated! – Over 32,000 problems found!
• This indicates that 32,000+ errors have been found. The threshold for total errors for the system is 32,000; therefore, the first 32,000 errors will be listed in accordance with their severity.
• If you receive this message please contact your reports analyst or the FEC electronic filing office.
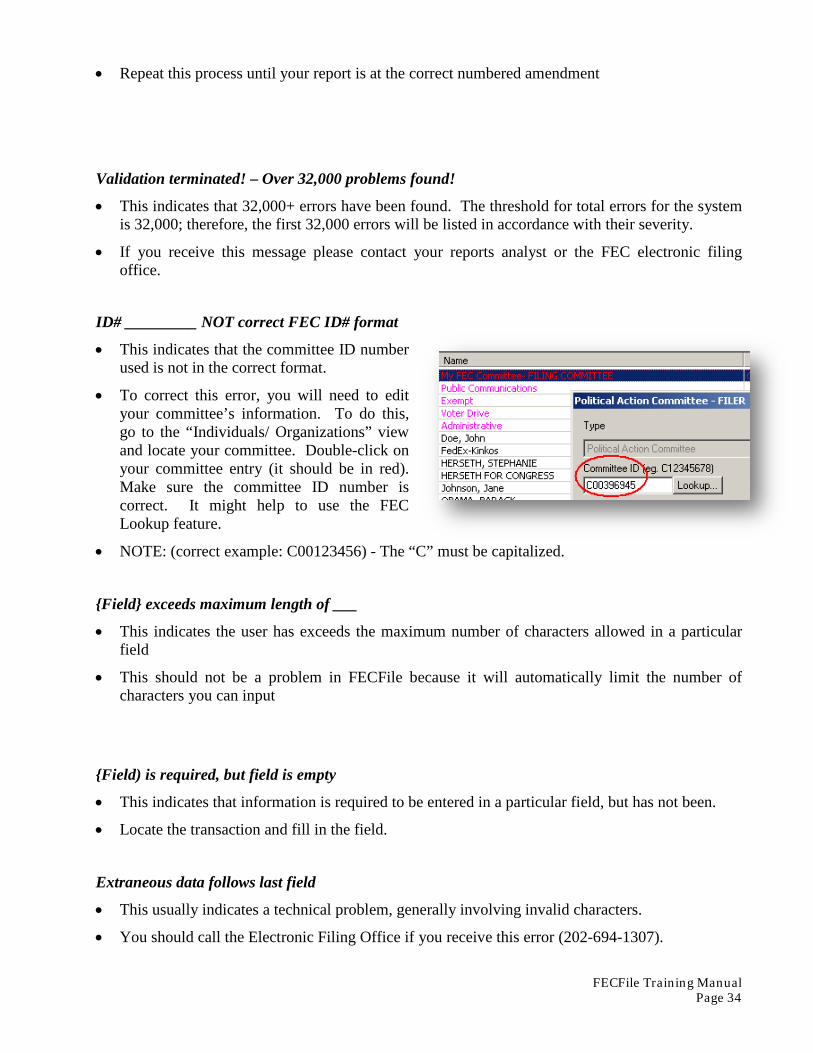
ID# _________ NOT correct FEC ID# format
• This indicates that the committee ID number used is not in the correct format.
• To correct this error, you will need to edit your committee’s information. To do this, go to the “Individuals/ Organizations” view and locate your committee. Double-click on your committee entry (it should be in red). Make sure the committee ID number is correct. It might help to use the FEC Lookup feature.
• NOTE: (correct example: C00123456) - The “C” must be capitalized.
{Field} exceeds maximum length of ___
• This indicates the user has exceeds the maximum number of characters allowed in a particular field
• This should not be a problem in FECFile because it will automatically limit the number of characters you can input
{Field) is required, but field is empty
• This indicates that information is required to be entered in a particular field, but has not been.
• Locate the transaction and fill in the field.
Extraneous data follows last field
• This usually indicates a technical problem, generally involving invalid characters.
• You should call the Electronic Filing Office if you receive this error (202-694-1307).

FECFile Training Manual Page 35
• NOTE: Only characters between ASCII 22 and ASCII 126 are acceptable. The ASCII 32 - 126 used to be the only characters allowed; however, the foreign language alphabet and punctuation characters are also allowed. Specifically ASCII characters: 32 - 168 are allowed (excluding 127 and the series 157 through 159). Also, 173 is allowed.
Invalid double-quote surround text field – OR - Embedded double-quotes (") not allowed
• This indicates that there are a set quotes around a text field where there should not be.
• Locate the transaction/field and take out the quotes.
• NOTE: Quotes are used as part of the data delimiter. Since the introduction of a level-8 message that says "Embedded double-quotes (") not allowed", this message only applies to the very last field of a CSV string and only in the instance where a begin-quoted text is not terminated with an end-quote. (Example: falling within the maximum length of that last field.)
• ADDITIONAL NOTE: Any field can have begin/end quotes (they are necessary for text that has embedded commas). However, any field that has surrounding quotes may not also contain double quotes anywhere within the text. Validator is only trapping "embedded quotes" within "text fields" which have surrounding begin-quotes and end-quotes. For example [,""",] is a case of an embedded double-quote, but [,",] is not.
Body of text exceeds maximum of 20,000 characters (F99 filings)
• F99 (Miscellaneous text document) filings are limited to 20,000 characters in length.
• To correct this, either shorten your Form 99 filing or file more than one.
Leading blanks {e.g. " TEXT"} not allowed
• This indicates that there are blanks prior to data; this is not allowed.
• Locate the transaction/field and delete the spaces that precede the first word in the file.
Bad date – ________ not YYYYMMDD format
• This indicates the user has entered a date in the incorrect format.
• Locate the transaction and re-enter the date trying this format: MM/DD/YYYY.
________ is not a real date
• This indicates that the user has entered an invalid date.
• Locate the transaction and enter a valid date.
Invalid amount format: ____________ – OR – Non-numeric data in numeric field
FECFile Training Manual Page 36
• This indicates that the user has entered values other than numbers and decimals.
• Locate the transaction and enter only numbers and one decimal point. FECFile will issue a warning before this error is made. (See right)
• NOTE: Dollar signs and commas are not permitted.
____ is an invalid year (CCYY) format
• This indicates the user has entered the year in the incorrect format.
• Locate the transaction and make sure the year referenced in the date field is in a four-digit format.
District "__" is not 2-digit numeric format
• This indicates the user failed to enter the congressional district as two digits.
• Locate the transaction, and make sure the congressional district field has two digits (ex: 04, 11). Using the FEC Lookup feature might make things easier.


![Skaffold - storage.googleapis.com · [getting-started getting-started] Hello world! [getting-started getting-started] Hello world! [getting-started getting-started] Hello world! 5](https://img.pdfslide.net/doc/110x75/5ec939f2a76a033f091c5ac7/skaffold-getting-started-getting-started-hello-world-getting-started-getting-started.jpg)


