Embed Size (px)
Citation preview
Getting Started with SAP BusinessObjects 4.2
Fiorified Launch Pad and Interactive Viewer
Workbook
Edition 1 December 2018 Document Reference: 3901-2018

Getting Started with SAP BusinessObjects 4.2
Contents
1. Getting Started 1.1 Launch Pad ....................................................................................................................... 1 1.2 Web Intelligence Interactive Viewer ................................................................................ 8 1.3 Share Data ...................................................................................................................... 12 1.4 Schedule a Document .................................................................................................... 17 1.5 Additional Exercises ....................................................................................................... 19
2. Formatting in Design Mode 2.1 Sections, Breaks, Sorts and Filters.................................................................................. 20 2.2 Add Reports, Tables, Objects and Cells .......................................................................... 25 2.3 Change Text and Backgrounds ....................................................................................... 28 2.4 Additional Exercises ....................................................................................................... 29
3. Introduction to BI Explorer 3.1 Launch Explorer and Open an Information Space ......................................................... 30 3.2 Use Facets to Filter the Data .......................................................................................... 31 3.3 Change the Data Visualisation ....................................................................................... 34 3.4 Export Options ............................................................................................................... 38 3.5 Additional Exercises ....................................................................................................... 40
4. Help Resources
If you require this document in an alternative format, such as large print, please contact Catherine Koppe in the Digital Skills and Training team by email [email protected] or phone 0131 6513233
Copyright © Information Services 2018
Permission is granted to any individual or institution to use, copy or redistribute this document whole or in
part, so long as it is not sold for profit and provided that the above copyright notice and this permission
notice appear in all copies.
Where any part of this document is included in another document, due acknowledgement is required.

Getting Started with SAP BusinessObjects 4.2
Getting Started with SAP BusinessObjects 4.2 1
1 Getting Started
1. Getting Started
1.1 Launch Pad
Learning objectives:
Log in to the BI Launch Pad.
Switch between the Launch Pad tabs.
Find a public document on the Folders tab.
Sort and filter the documents in a folder.
Mark a public document as a favourite, and view the favourites list on the My Home tab.
Copy a public document to your personal folder.
Log in
1. Start a web browser and go to MyEd www.myed.ed.ac.uk
2. Log on using your EASE username and password.
3. Locate the Reporting + Analytics channel and click on the Start BI Launchpad button. If the
Reporting + Analytics channel is not visible, add it using the Customise link (top left).
4. The Launch Pad will open in a new browser tab.
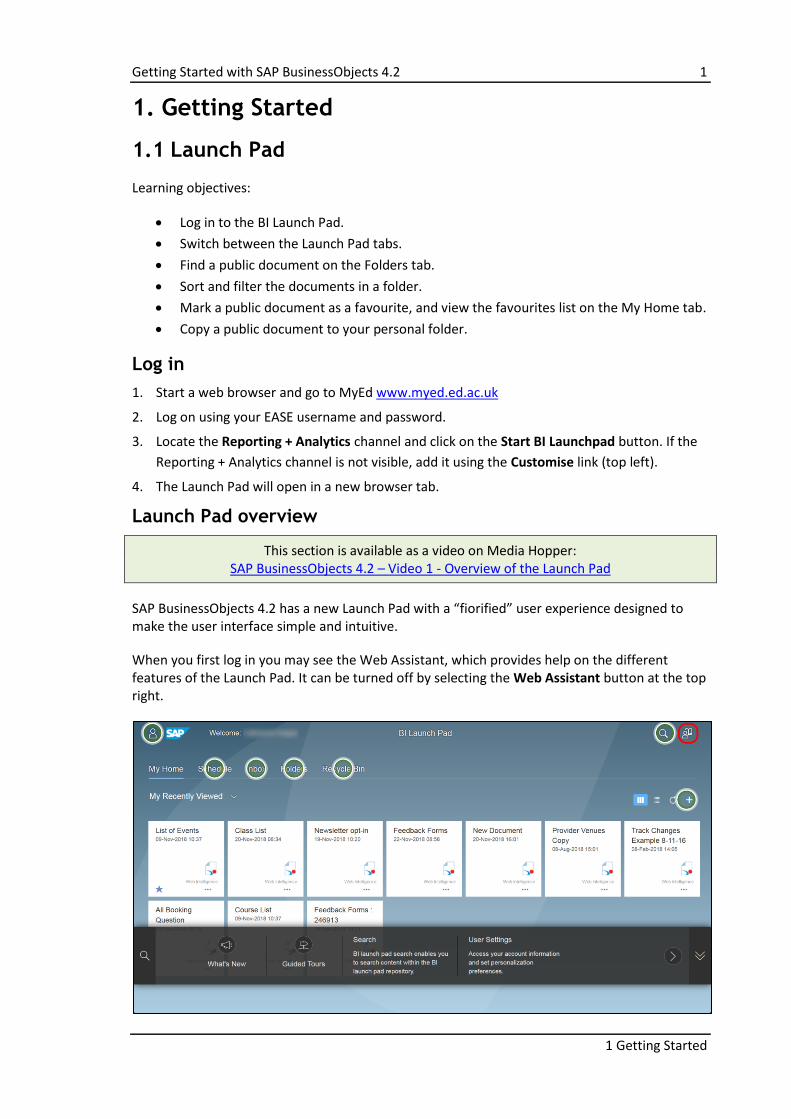
Launch Pad overview
This section is available as a video on Media Hopper: SAP BusinessObjects 4.2 – Video 1 - Overview of the Launch Pad
SAP BusinessObjects 4.2 has a new Launch Pad with a “fiorified” user experience designed to make the user interface simple and intuitive.
When you first log in you may see the Web Assistant, which provides help on the different features of the Launch Pad. It can be turned off by selecting the Web Assistant button at the top right.
2 Getting Started with SAP BusinessObjects 4.2
1 Getting Started
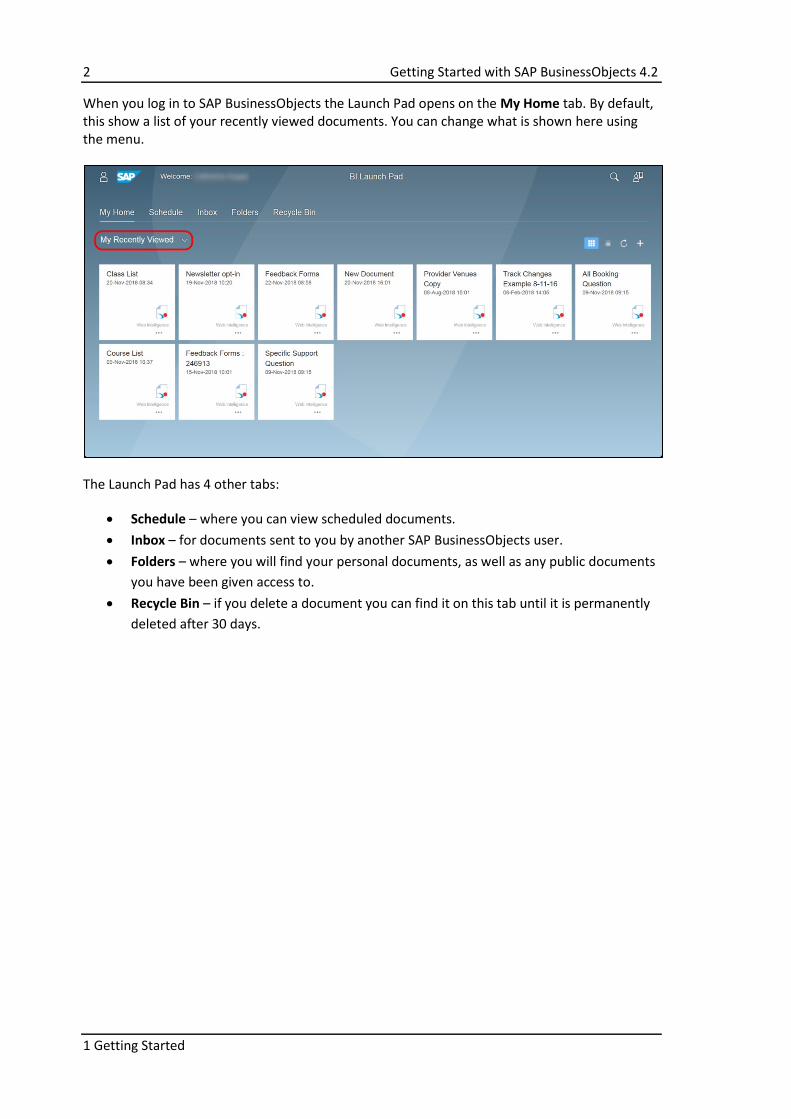
When you log in to SAP BusinessObjects the Launch Pad opens on the My Home tab. By default, this show a list of your recently viewed documents. You can change what is shown here using the menu.
The Launch Pad has 4 other tabs:
Schedule – where you can view scheduled documents.
Inbox – for documents sent to you by another SAP BusinessObjects user.
Folders – where you will find your personal documents, as well as any public documents
you have been given access to.
Recycle Bin – if you delete a document you can find it on this tab until it is permanently
deleted after 30 days.
Getting Started with SAP BusinessObjects 4.2 3
1 Getting Started
Folders tab
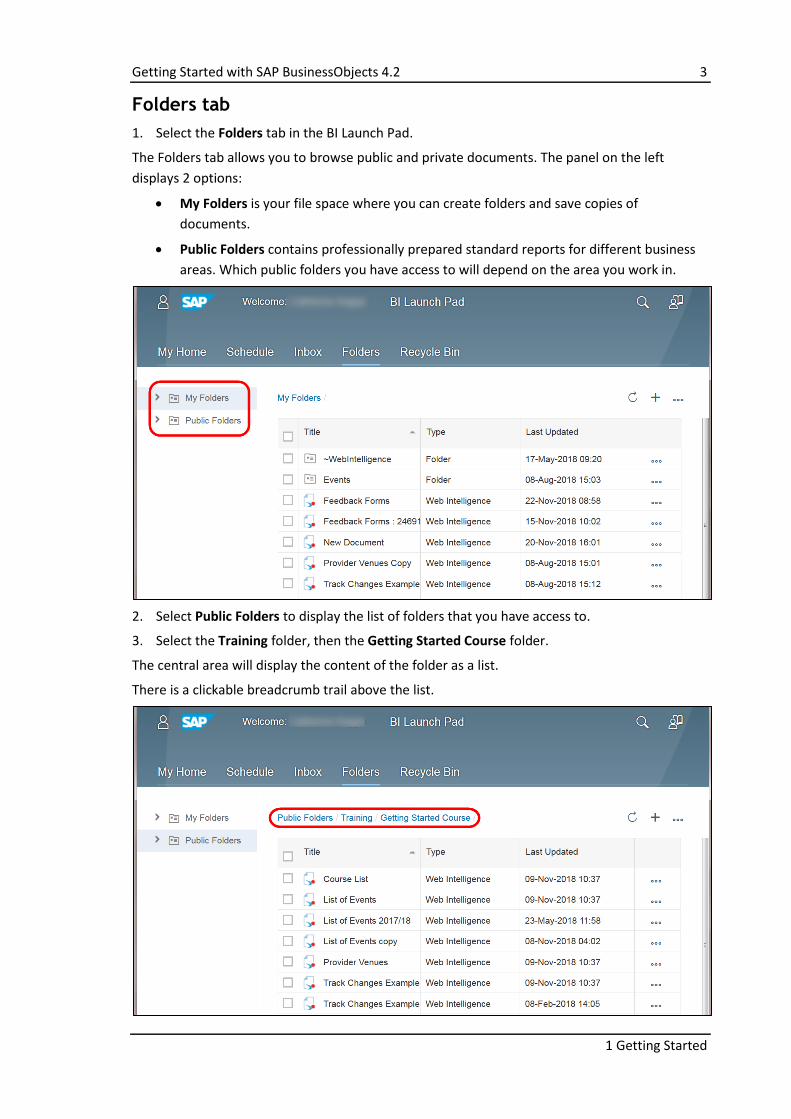
1. Select the Folders tab in the BI Launch Pad.
The Folders tab allows you to browse public and private documents. The panel on the left
displays 2 options:
My Folders is your file space where you can create folders and save copies of
documents.
Public Folders contains professionally prepared standard reports for different business
areas. Which public folders you have access to will depend on the area you work in.
2. Select Public Folders to display the list of folders that you have access to.
3. Select the Training folder, then the Getting Started Course folder.
The central area will display the content of the folder as a list.
There is a clickable breadcrumb trail above the list.
4 Getting Started with SAP BusinessObjects 4.2
1 Getting Started
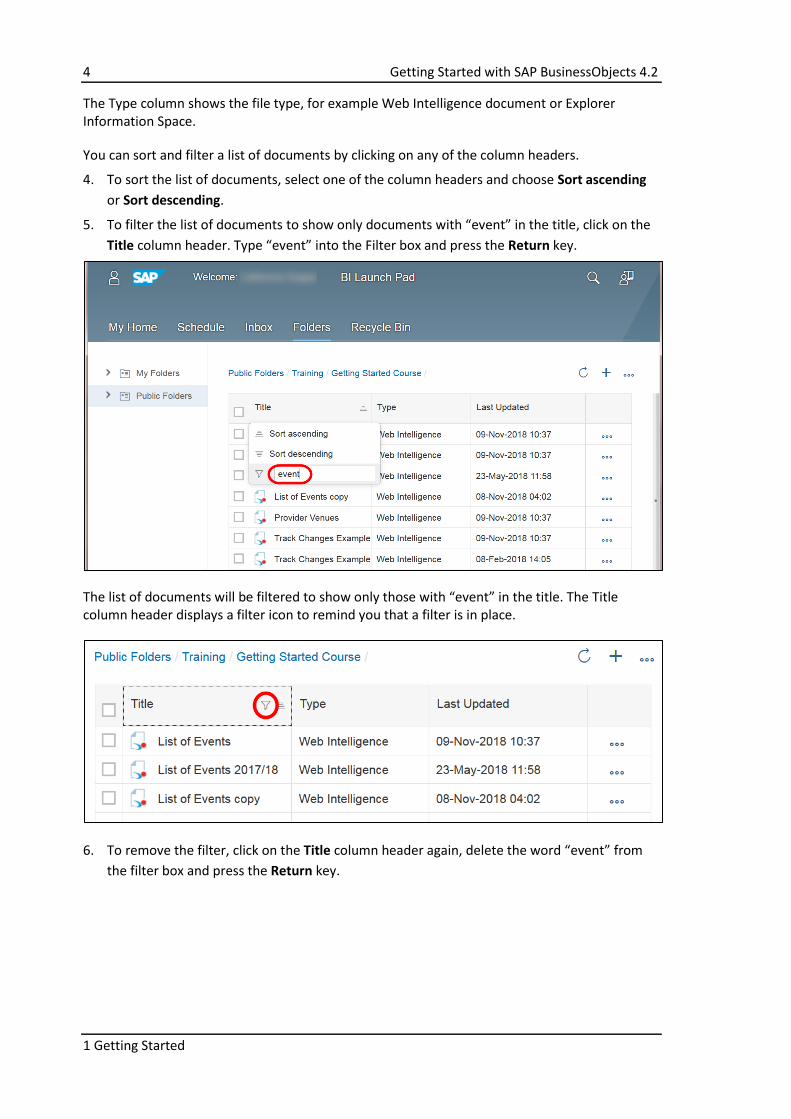
The Type column shows the file type, for example Web Intelligence document or Explorer Information Space.
You can sort and filter a list of documents by clicking on any of the column headers.
4. To sort the list of documents, select one of the column headers and choose Sort ascending
or Sort descending.
5. To filter the list of documents to show only documents with “event” in the title, click on the
Title column header. Type “event” into the Filter box and press the Return key.
The list of documents will be filtered to show only those with “event” in the title. The Title column header displays a filter icon to remind you that a filter is in place.
6. To remove the filter, click on the Title column header again, delete the word “event” from
the filter box and press the Return key.
Getting Started with SAP BusinessObjects 4.2 5
1 Getting Started
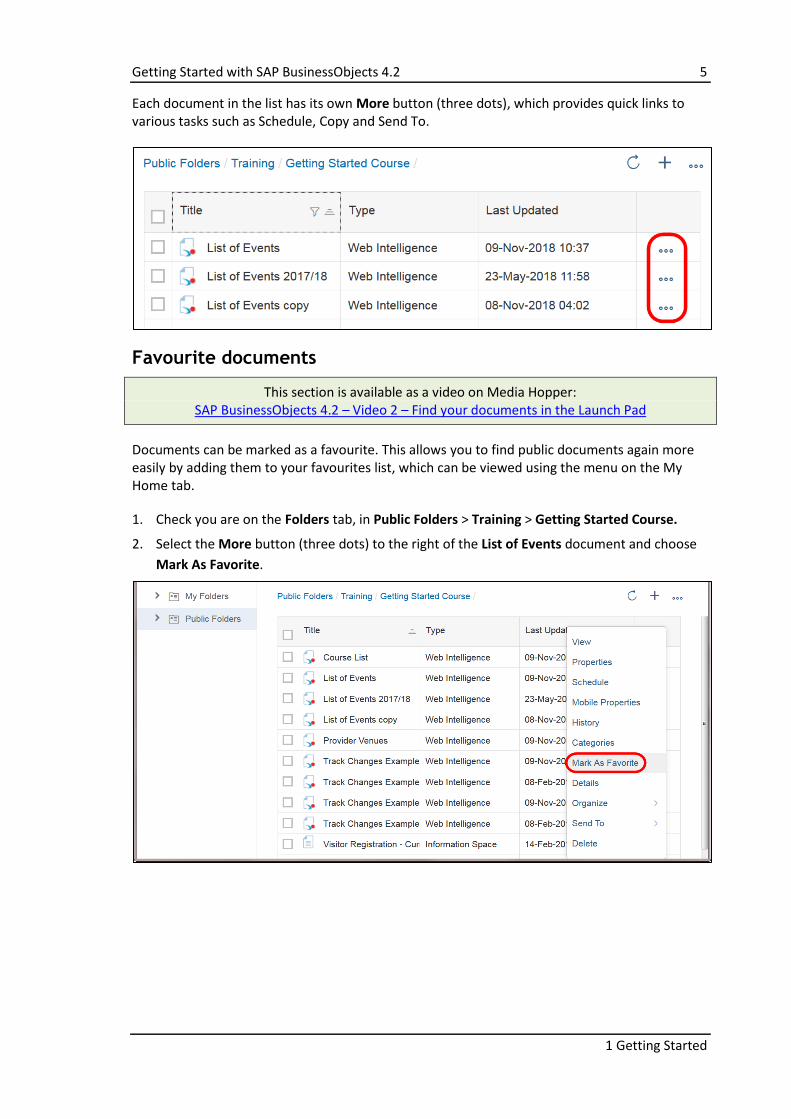
Each document in the list has its own More button (three dots), which provides quick links to various tasks such as Schedule, Copy and Send To.
Favourite documents
This section is available as a video on Media Hopper: SAP BusinessObjects 4.2 – Video 2 – Find your documents in the Launch Pad
Documents can be marked as a favourite. This allows you to find public documents again more easily by adding them to your favourites list, which can be viewed using the menu on the My Home tab.
1. Check you are on the Folders tab, in Public Folders > Training > Getting Started Course.
2. Select the More button (three dots) to the right of the List of Events document and choose
Mark As Favorite.
6 Getting Started with SAP BusinessObjects 4.2
1 Getting Started
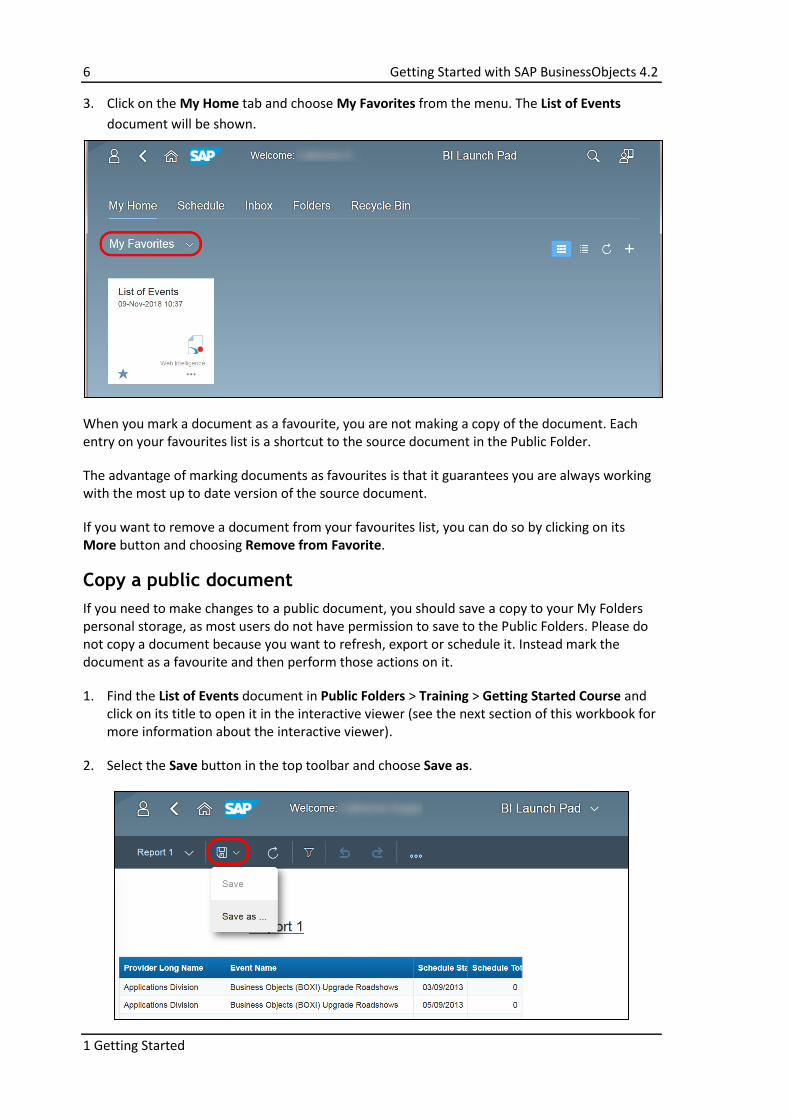
3. Click on the My Home tab and choose My Favorites from the menu. The List of Events
document will be shown.
When you mark a document as a favourite, you are not making a copy of the document. Each entry on your favourites list is a shortcut to the source document in the Public Folder.
The advantage of marking documents as favourites is that it guarantees you are always working with the most up to date version of the source document.
If you want to remove a document from your favourites list, you can do so by clicking on its More button and choosing Remove from Favorite.
Copy a public document
If you need to make changes to a public document, you should save a copy to your My Folders personal storage, as most users do not have permission to save to the Public Folders. Please do not copy a document because you want to refresh, export or schedule it. Instead mark the document as a favourite and then perform those actions on it.
1. Find the List of Events document in Public Folders > Training > Getting Started Course and click on its title to open it in the interactive viewer (see the next section of this workbook for more information about the interactive viewer).
2. Select the Save button in the top toolbar and choose Save as.
Getting Started with SAP BusinessObjects 4.2 7
1 Getting Started
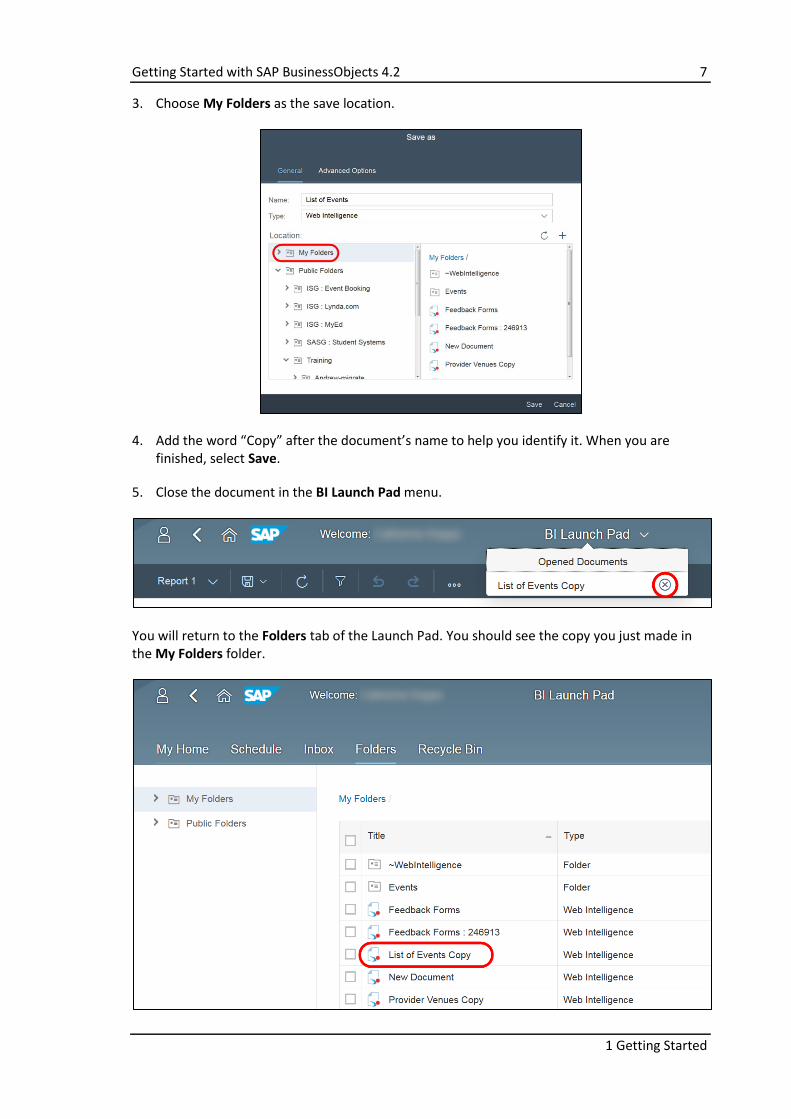
3. Choose My Folders as the save location.
4. Add the word “Copy” after the document’s name to help you identify it. When you are finished, select Save.
5. Close the document in the BI Launch Pad menu.
You will return to the Folders tab of the Launch Pad. You should see the copy you just made in the My Folders folder.
8 Getting Started with SAP BusinessObjects 4.2
1 Getting Started
If you can’t find the document that you need in the Public Folders, don’t worry! Please email the relevant business unit who will provide advice. Contact details are on the Reporting + Analytics website – see the Help Resources chapter at the end of this workbook.
1.2 Web Intelligence Interactive Viewer
This section is available as video on Media Hopper: SAP BusinessObjects 4.2 – Video 3 – Web Intelligence Interactive Viewer
Learning objectives:
Open a Web Intelligence (Webi) document.
Move between pages in the report and zoom in and out.
Display the side panel and switch between its tabs.
Switch between reports.
Refresh the data in the document, including filling in prompts.
Return to the BI Launch Pad.
Close a Webi document.
Open a Web Intelligence document
There are two ways of opening a Web Intelligence document in SAP BusinessObjects 4.2. If you just want to view and refresh data you should use the interactive viewer, which we will look at in this section. If you want to make changes to a document you will instead need to open it in Design mode (see chapter 2 of this workbook).
We will open the List of Events document from the Public Folders > Training > Getting Started Course folder, which we marked as a favourite in the previous section of the workbook.
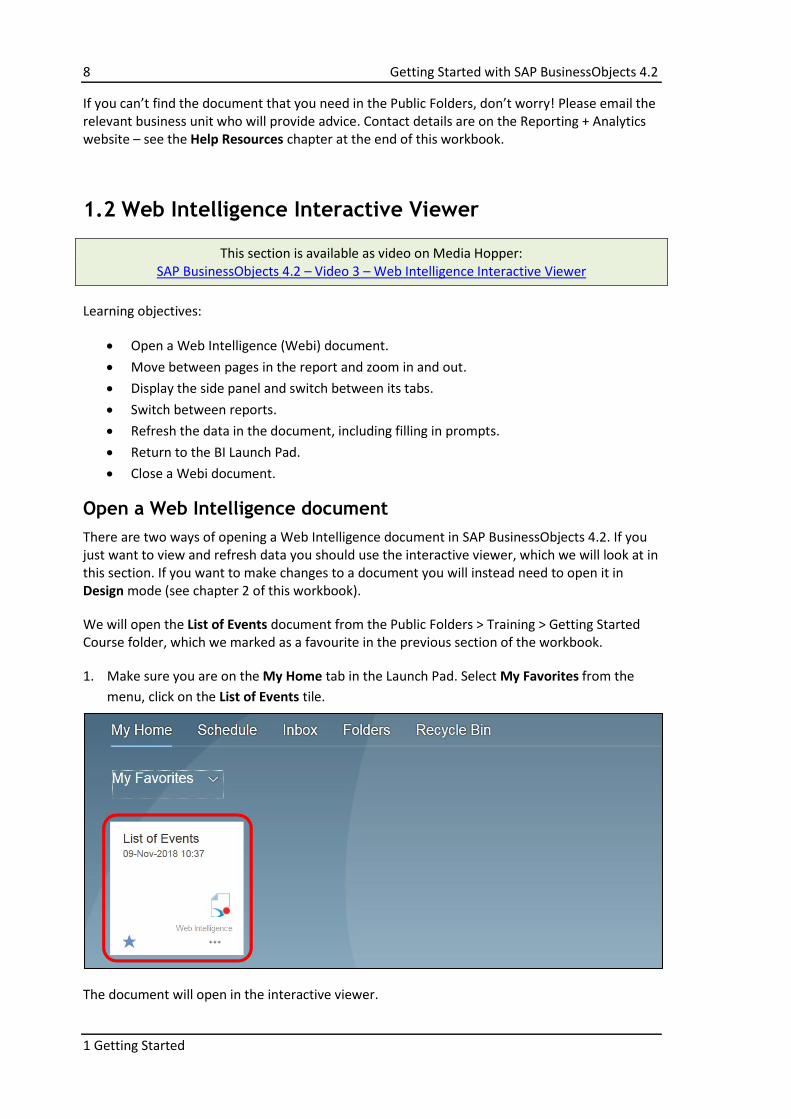
1. Make sure you are on the My Home tab in the Launch Pad. Select My Favorites from the
menu, click on the List of Events tile.
The document will open in the interactive viewer.
Getting Started with SAP BusinessObjects 4.2 9
1 Getting Started
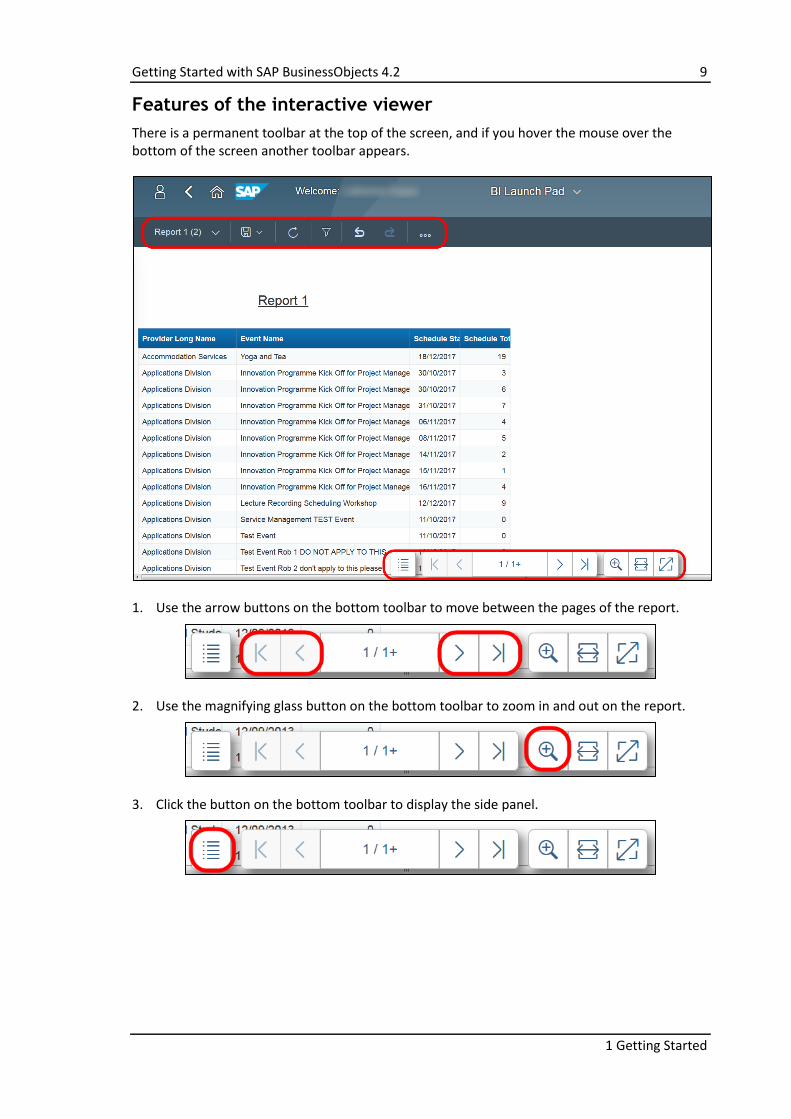
Features of the interactive viewer
There is a permanent toolbar at the top of the screen, and if you hover the mouse over the bottom of the screen another toolbar appears.
1. Use the arrow buttons on the bottom toolbar to move between the pages of the report.
2. Use the magnifying glass button on the bottom toolbar to zoom in and out on the report.
3. Click the button on the bottom toolbar to display the side panel.
10 Getting Started with SAP BusinessObjects 4.2
1 Getting Started
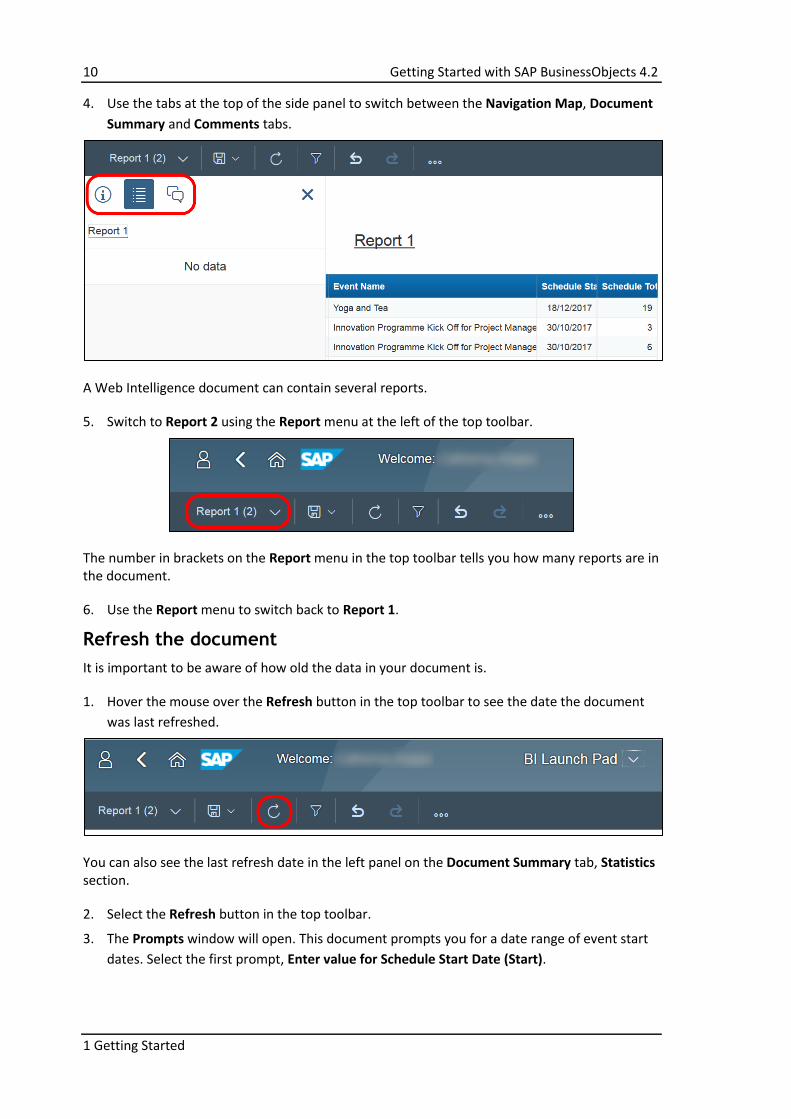
4. Use the tabs at the top of the side panel to switch between the Navigation Map, Document
Summary and Comments tabs.
A Web Intelligence document can contain several reports.
5. Switch to Report 2 using the Report menu at the left of the top toolbar.
The number in brackets on the Report menu in the top toolbar tells you how many reports are in the document.
6. Use the Report menu to switch back to Report 1.
Refresh the document
It is important to be aware of how old the data in your document is.
1. Hover the mouse over the Refresh button in the top toolbar to see the date the document
was last refreshed.
You can also see the last refresh date in the left panel on the Document Summary tab, Statistics section.
2. Select the Refresh button in the top toolbar.
3. The Prompts window will open. This document prompts you for a date range of event start
dates. Select the first prompt, Enter value for Schedule Start Date (Start).
Getting Started with SAP BusinessObjects 4.2 11
1 Getting Started
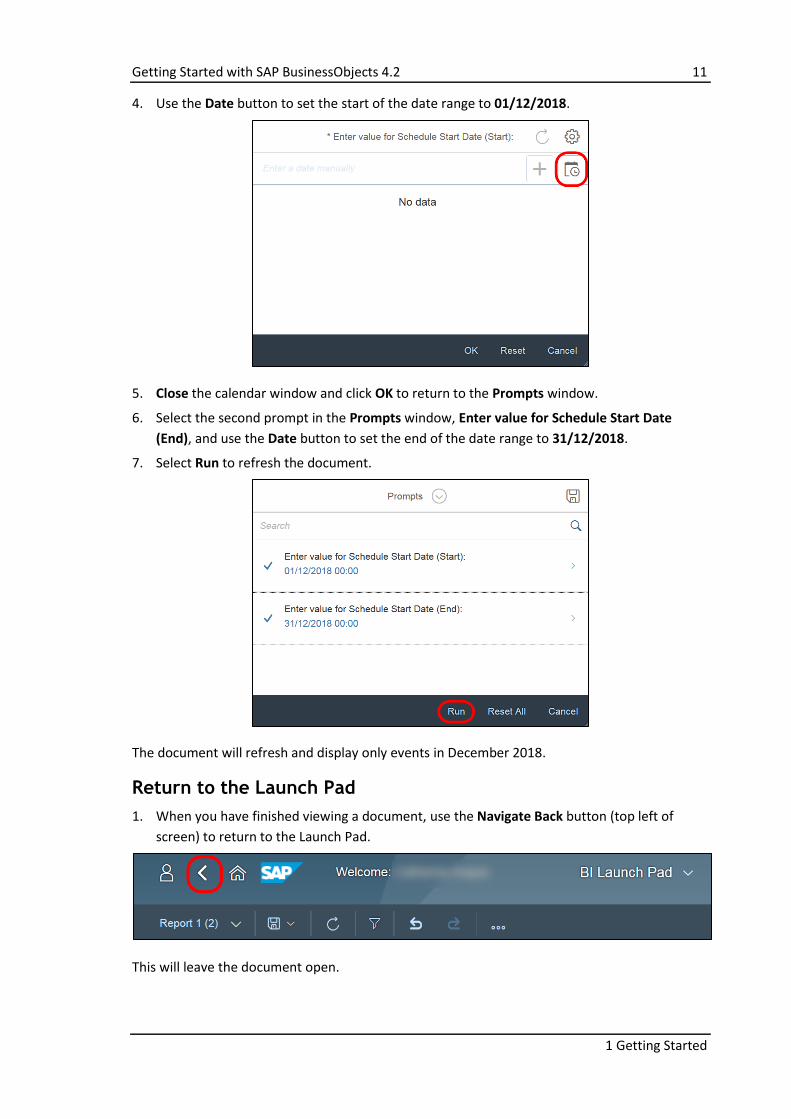
4. Use the Date button to set the start of the date range to 01/12/2018.
5. Close the calendar window and click OK to return to the Prompts window.
6. Select the second prompt in the Prompts window, Enter value for Schedule Start Date
(End), and use the Date button to set the end of the date range to 31/12/2018.
7. Select Run to refresh the document.
The document will refresh and display only events in December 2018.
Return to the Launch Pad
1. When you have finished viewing a document, use the Navigate Back button (top left of
screen) to return to the Launch Pad.
This will leave the document open.
12 Getting Started with SAP BusinessObjects 4.2
1 Getting Started
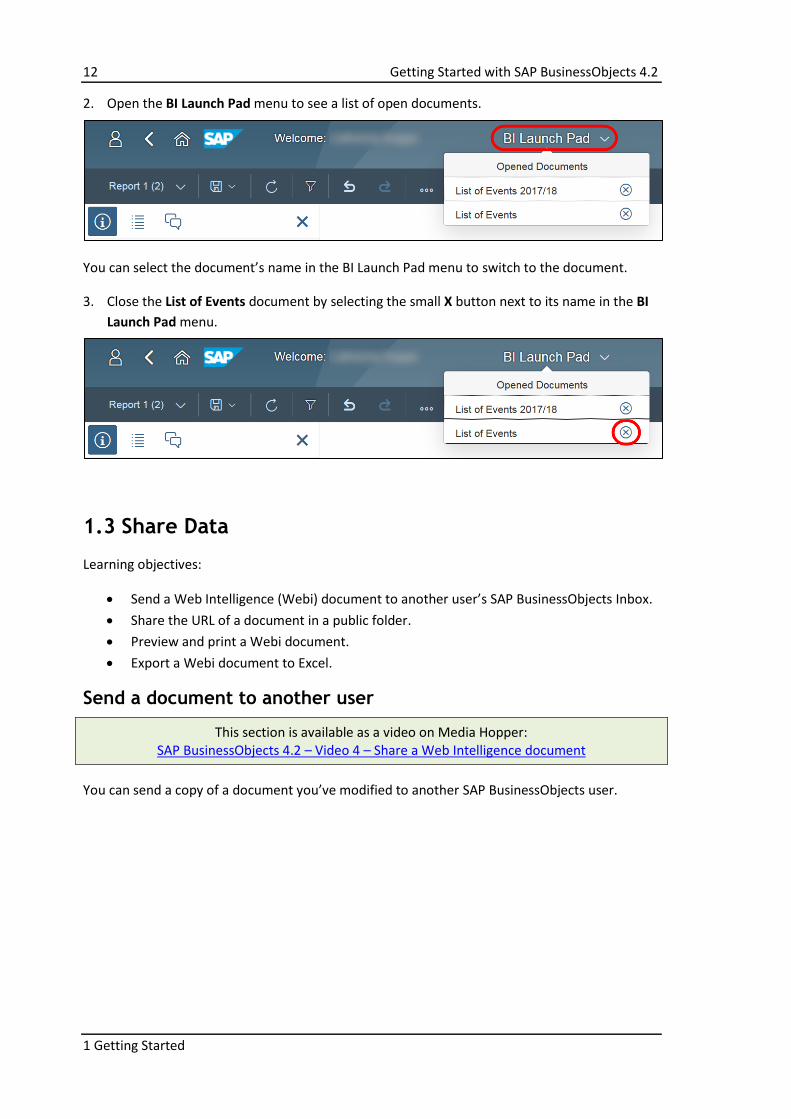
2. Open the BI Launch Pad menu to see a list of open documents.
You can select the document’s name in the BI Launch Pad menu to switch to the document.
3. Close the List of Events document by selecting the small X button next to its name in the BI
Launch Pad menu.
1.3 Share Data
Learning objectives:
Send a Web Intelligence (Webi) document to another user’s SAP BusinessObjects Inbox.
Share the URL of a document in a public folder.
Preview and print a Webi document.
Export a Webi document to Excel.
Send a document to another user
This section is available as a video on Media Hopper: SAP BusinessObjects 4.2 – Video 4 – Share a Web Intelligence document
You can send a copy of a document you’ve modified to another SAP BusinessObjects user.
Getting Started with SAP BusinessObjects 4.2 13
1 Getting Started
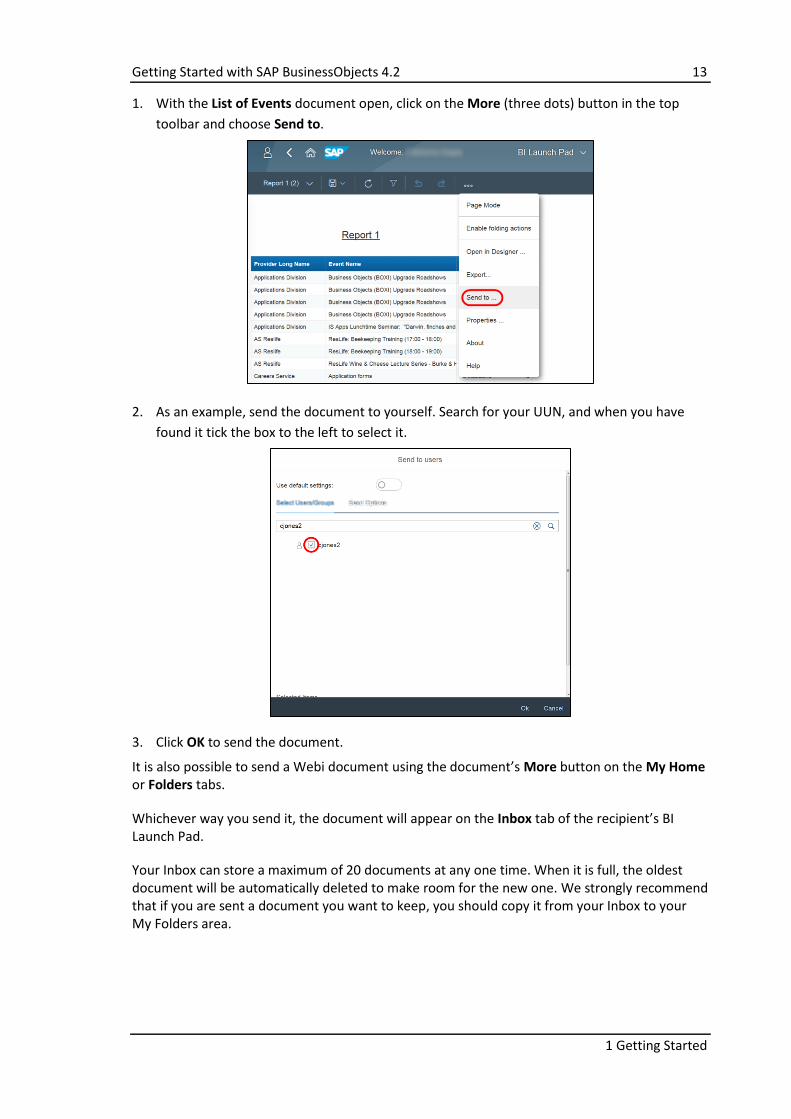
1. With the List of Events document open, click on the More (three dots) button in the top
toolbar and choose Send to.
2. As an example, send the document to yourself. Search for your UUN, and when you have
found it tick the box to the left to select it.
3. Click OK to send the document.
It is also possible to send a Webi document using the document’s More button on the My Home or Folders tabs.
Whichever way you send it, the document will appear on the Inbox tab of the recipient’s BI Launch Pad.
Your Inbox can store a maximum of 20 documents at any one time. When it is full, the oldest document will be automatically deleted to make room for the new one. We strongly recommend that if you are sent a document you want to keep, you should copy it from your Inbox to your My Folders area.
14 Getting Started with SAP BusinessObjects 4.2
1 Getting Started
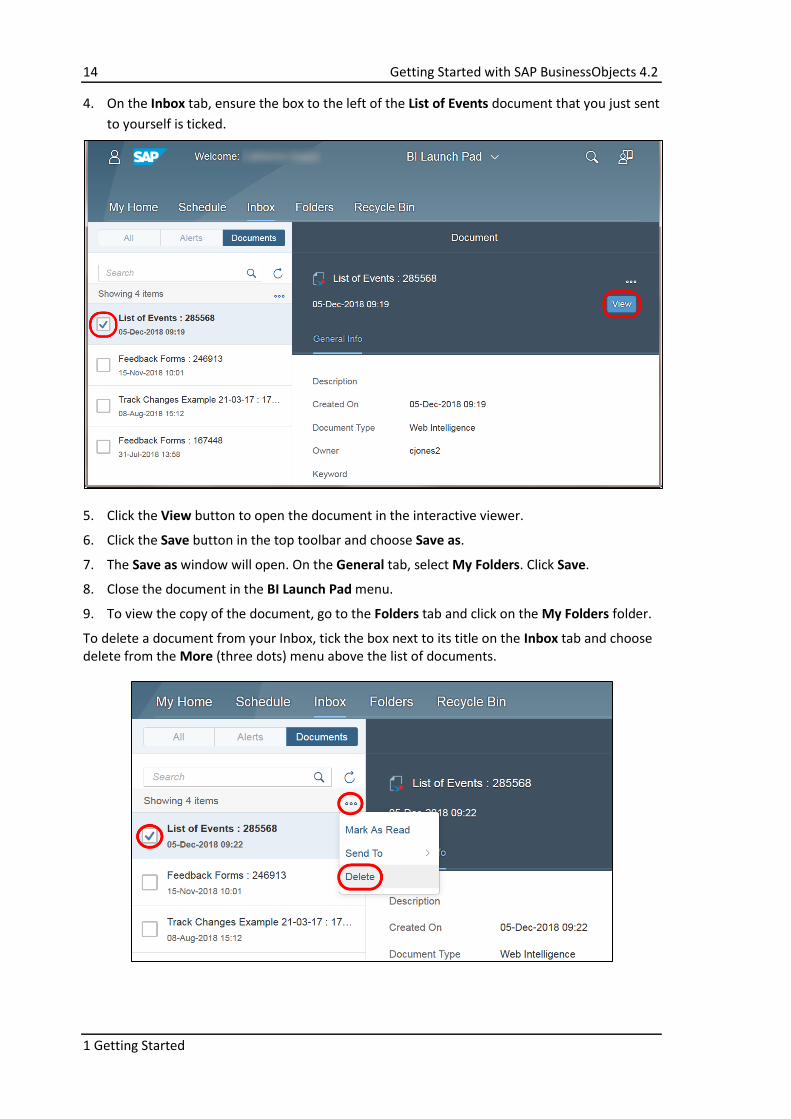
4. On the Inbox tab, ensure the box to the left of the List of Events document that you just sent
to yourself is ticked.
5. Click the View button to open the document in the interactive viewer.
6. Click the Save button in the top toolbar and choose Save as.
7. The Save as window will open. On the General tab, select My Folders. Click Save.
8. Close the document in the BI Launch Pad menu.
9. To view the copy of the document, go to the Folders tab and click on the My Folders folder.
To delete a document from your Inbox, tick the box next to its title on the Inbox tab and choose delete from the More (three dots) menu above the list of documents.
Getting Started with SAP BusinessObjects 4.2 15
1 Getting Started
Share a public document’s URL
If you want to share a document saved in the Public Folders, you should share a direct link to it instead of sending a copy to their SAP BusinessObjects Inbox.
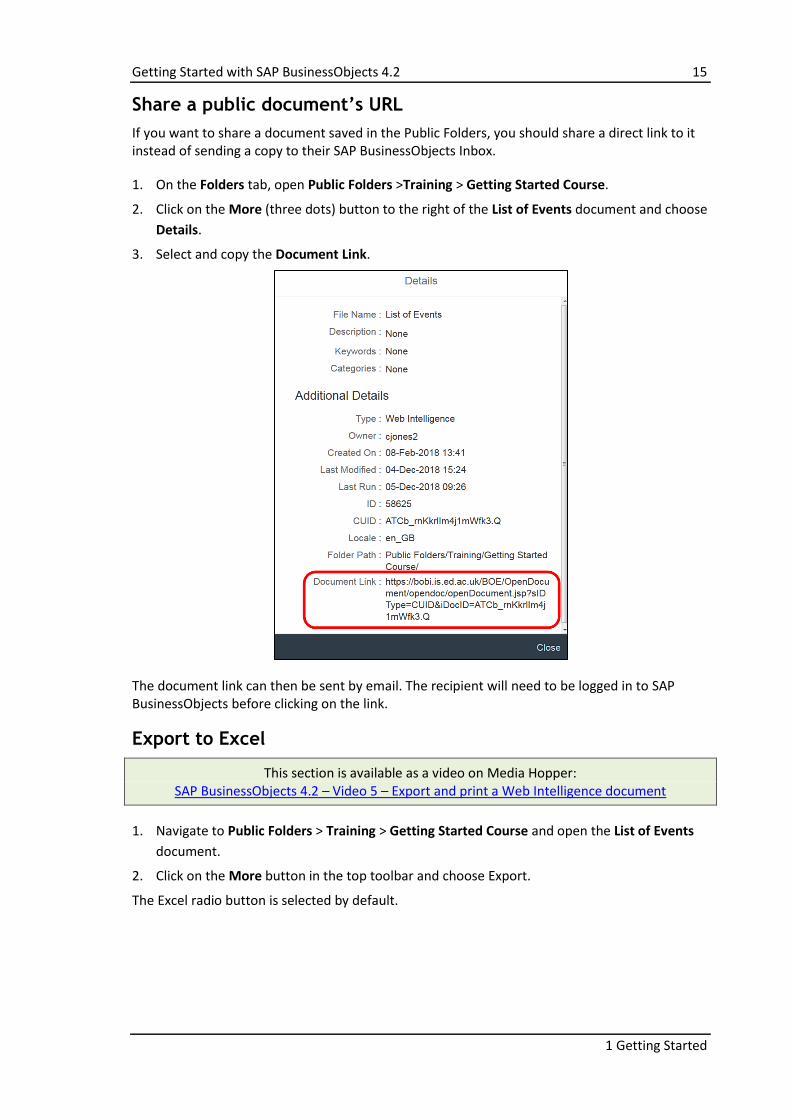
1. On the Folders tab, open Public Folders >Training > Getting Started Course.
2. Click on the More (three dots) button to the right of the List of Events document and choose
Details.
3. Select and copy the Document Link.
The document link can then be sent by email. The recipient will need to be logged in to SAP BusinessObjects before clicking on the link.
Export to Excel
This section is available as a video on Media Hopper: SAP BusinessObjects 4.2 – Video 5 – Export and print a Web Intelligence document
1. Navigate to Public Folders > Training > Getting Started Course and open the List of Events
document.
2. Click on the More button in the top toolbar and choose Export.
The Excel radio button is selected by default.
16 Getting Started with SAP BusinessObjects 4.2
1 Getting Started
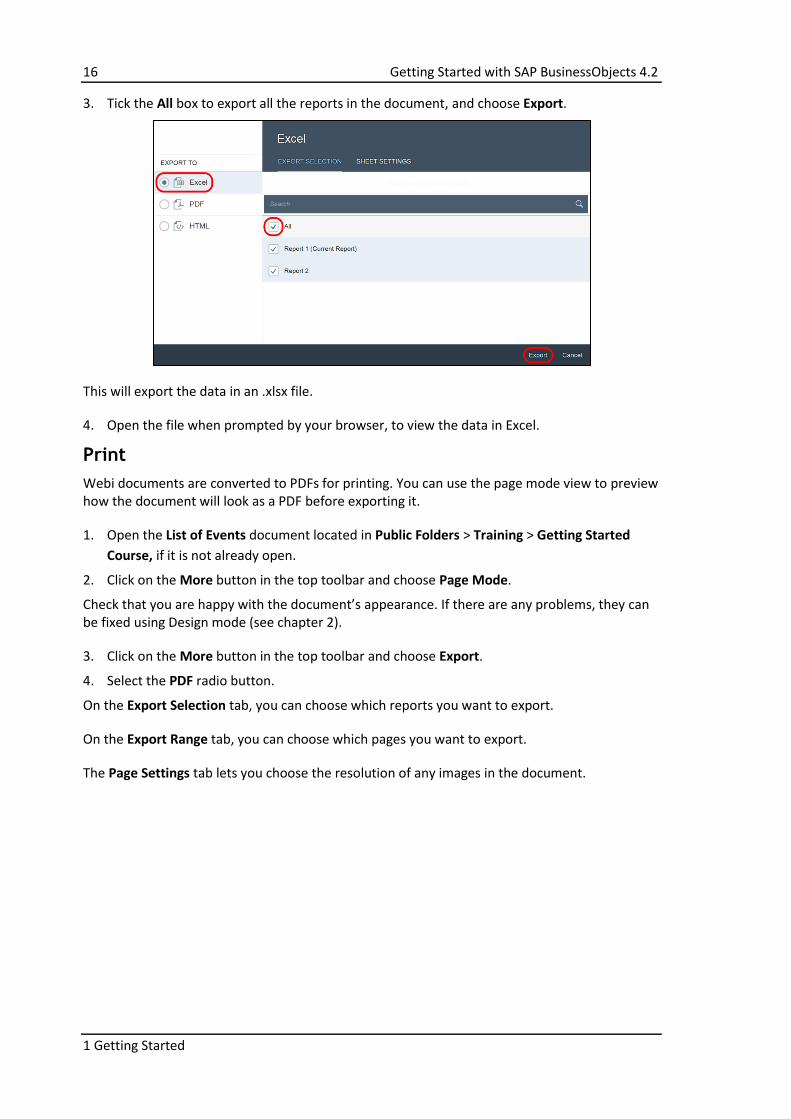
3. Tick the All box to export all the reports in the document, and choose Export.
This will export the data in an .xlsx file.
4. Open the file when prompted by your browser, to view the data in Excel.
Webi documents are converted to PDFs for printing. You can use the page mode view to preview how the document will look as a PDF before exporting it.
1. Open the List of Events document located in Public Folders > Training > Getting Started
Course, if it is not already open.
2. Click on the More button in the top toolbar and choose Page Mode.
Check that you are happy with the document’s appearance. If there are any problems, they can be fixed using Design mode (see chapter 2).
3. Click on the More button in the top toolbar and choose Export.
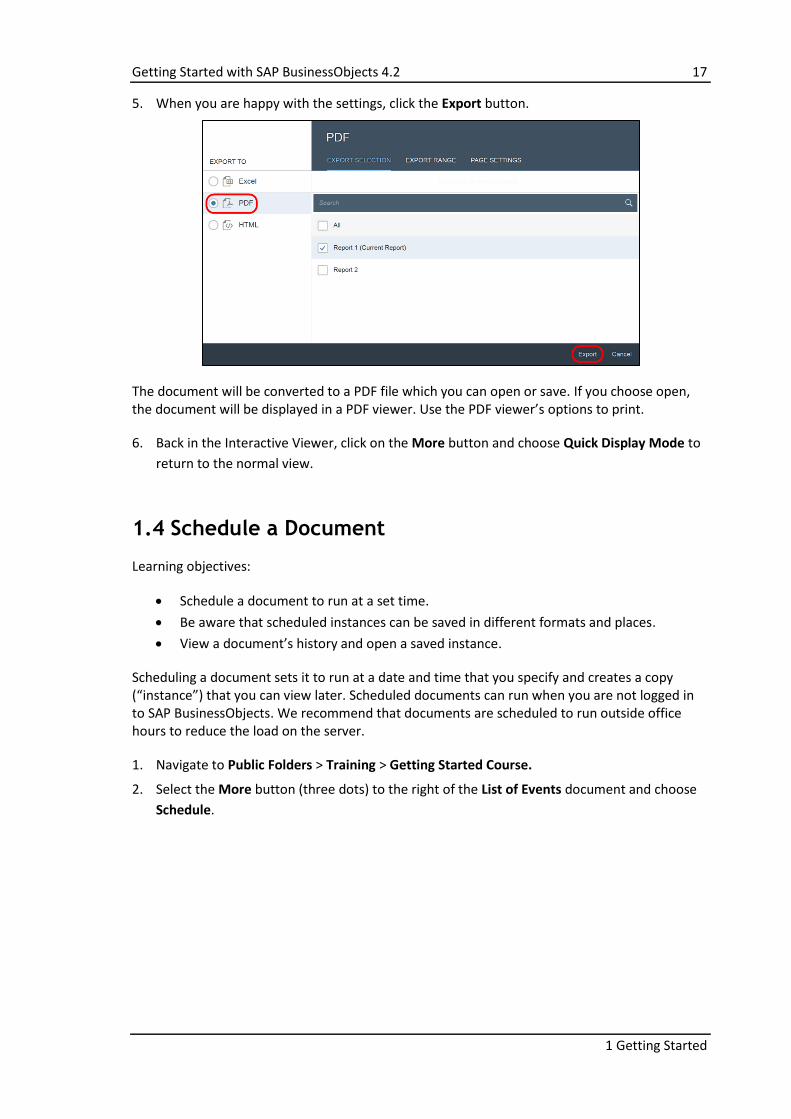
4. Select the PDF radio button.
On the Export Selection tab, you can choose which reports you want to export.
On the Export Range tab, you can choose which pages you want to export.
The Page Settings tab lets you choose the resolution of any images in the document.
Getting Started with SAP BusinessObjects 4.2 17
1 Getting Started
5. When you are happy with the settings, click the Export button.
The document will be converted to a PDF file which you can open or save. If you choose open, the document will be displayed in a PDF viewer. Use the PDF viewer’s options to print.
6. Back in the Interactive Viewer, click on the More button and choose Quick Display Mode to
return to the normal view.
1.4 Schedule a Document
Learning objectives:
Schedule a document to run at a set time.
Be aware that scheduled instances can be saved in different formats and places.
View a document’s history and open a saved instance.
Scheduling a document sets it to run at a date and time that you specify and creates a copy (“instance”) that you can view later. Scheduled documents can run when you are not logged in to SAP BusinessObjects. We recommend that documents are scheduled to run outside office hours to reduce the load on the server.
1. Navigate to Public Folders > Training > Getting Started Course.
2. Select the More button (three dots) to the right of the List of Events document and choose
Schedule.
18 Getting Started with SAP BusinessObjects 4.2
1 Getting Started
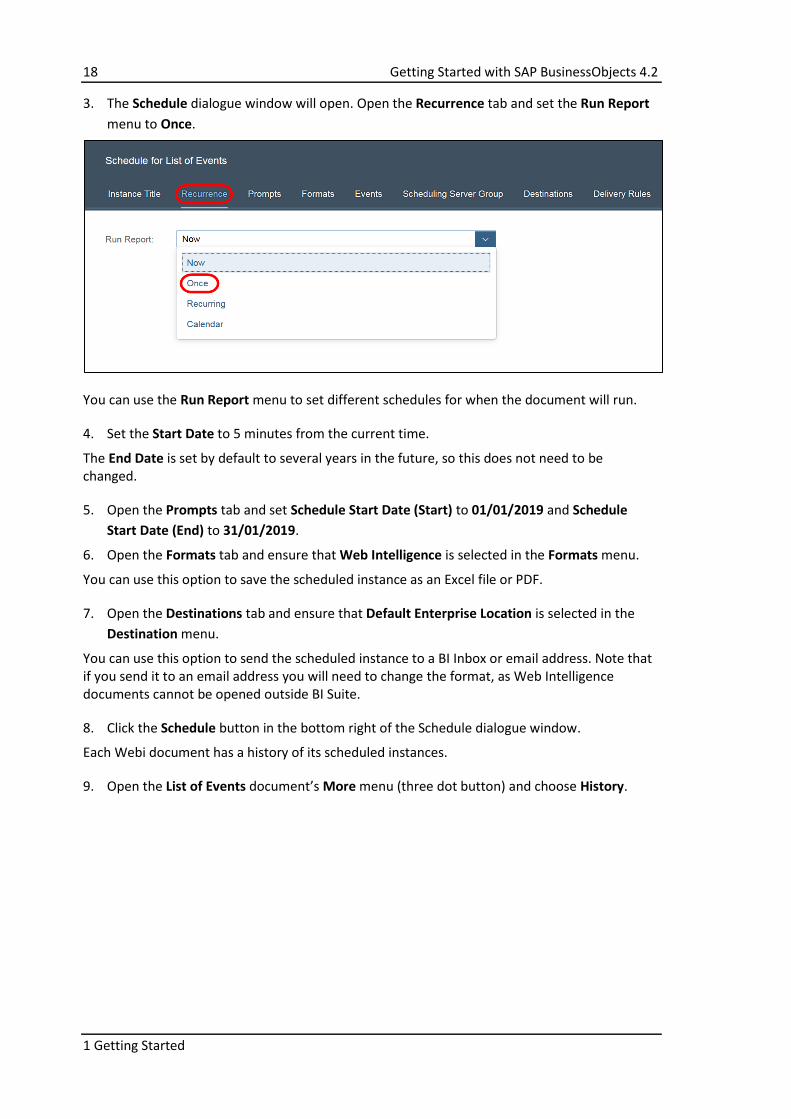
3. The Schedule dialogue window will open. Open the Recurrence tab and set the Run Report
menu to Once.
You can use the Run Report menu to set different schedules for when the document will run.
4. Set the Start Date to 5 minutes from the current time.
The End Date is set by default to several years in the future, so this does not need to be changed.
5. Open the Prompts tab and set Schedule Start Date (Start) to 01/01/2019 and Schedule
Start Date (End) to 31/01/2019.
6. Open the Formats tab and ensure that Web Intelligence is selected in the Formats menu.
You can use this option to save the scheduled instance as an Excel file or PDF.
7. Open the Destinations tab and ensure that Default Enterprise Location is selected in the
Destination menu.
You can use this option to send the scheduled instance to a BI Inbox or email address. Note that if you send it to an email address you will need to change the format, as Web Intelligence documents cannot be opened outside BI Suite.
8. Click the Schedule button in the bottom right of the Schedule dialogue window.
Each Webi document has a history of its scheduled instances.
9. Open the List of Events document’s More menu (three dot button) and choose History.
Getting Started with SAP BusinessObjects 4.2 19
1 Getting Started
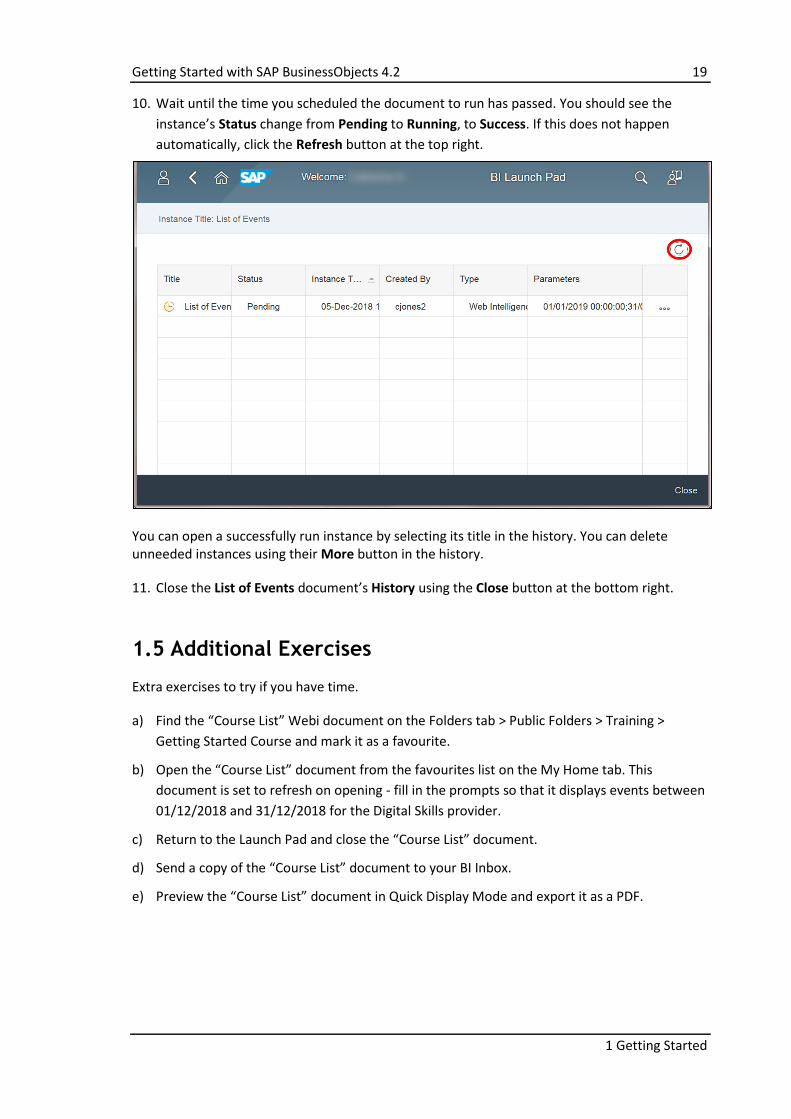
10. Wait until the time you scheduled the document to run has passed. You should see the
instance’s Status change from Pending to Running, to Success. If this does not happen
automatically, click the Refresh button at the top right.
You can open a successfully run instance by selecting its title in the history. You can delete unneeded instances using their More button in the history.
11. Close the List of Events document’s History using the Close button at the bottom right.
1.5 Additional Exercises
Extra exercises to try if you have time.
a) Find the “Course List” Webi document on the Folders tab > Public Folders > Training >
Getting Started Course and mark it as a favourite.
b) Open the “Course List” document from the favourites list on the My Home tab. This
document is set to refresh on opening - fill in the prompts so that it displays events between
01/12/2018 and 31/12/2018 for the Digital Skills provider.
c) Return to the Launch Pad and close the “Course List” document.
d) Send a copy of the “Course List” document to your BI Inbox.
e) Preview the “Course List” document in Quick Display Mode and export it as a PDF.
20 Getting Started with SAP BusinessObjects 4.2
2 Formatting in Design Mode
2. Formatting in Design Mode
2.1 Sections, Breaks, Sorts and Filters
Learning objectives:
Add and remove a section.
Add and remove a break.
Sort the data in a table.
Add a report filter.
Add and remove a section
Sections can be used to split up a long table. Each section has its own title that appears in the Navigation Map.
1. Open the List of Events Copy Web Intelligence document that you saved to your My Folders
folder in the previous chapter.
2. Switch to Design mode by clicking on the More (three dots) button in the top toolbar and
choosing Open in Designer. The document will open in a new tab.
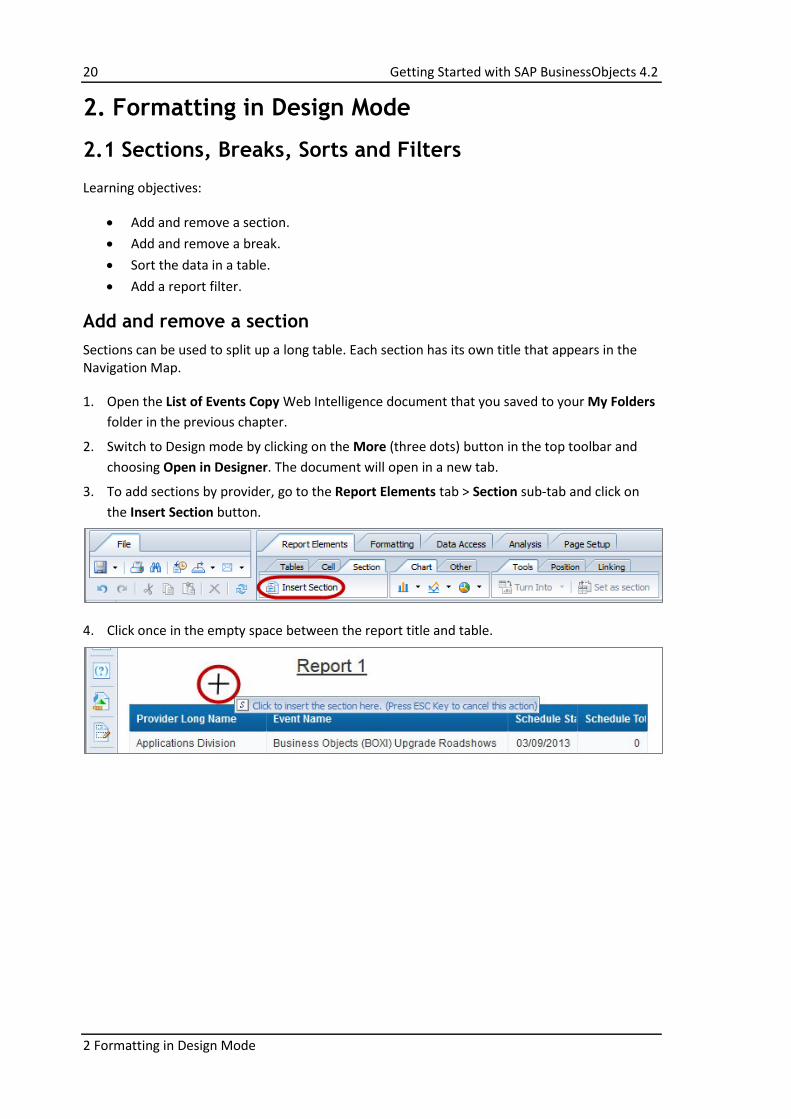
3. To add sections by provider, go to the Report Elements tab > Section sub-tab and click on
the Insert Section button.
4. Click once in the empty space between the report title and table.
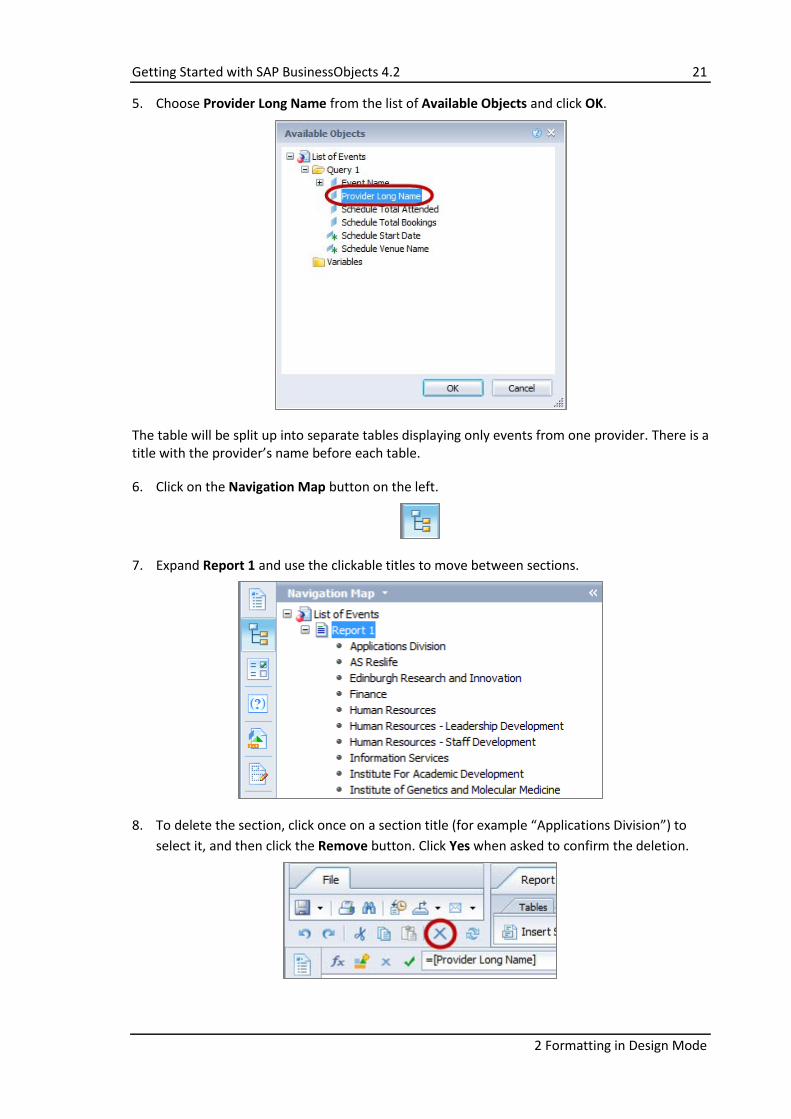
Getting Started with SAP BusinessObjects 4.2 21
2 Formatting in Design Mode
5. Choose Provider Long Name from the list of Available Objects and click OK.
The table will be split up into separate tables displaying only events from one provider. There is a title with the provider’s name before each table.
6. Click on the Navigation Map button on the left.
7. Expand Report 1 and use the clickable titles to move between sections.
8. To delete the section, click once on a section title (for example “Applications Division”) to
select it, and then click the Remove button. Click Yes when asked to confirm the deletion.
22 Getting Started with SAP BusinessObjects 4.2
2 Formatting in Design Mode
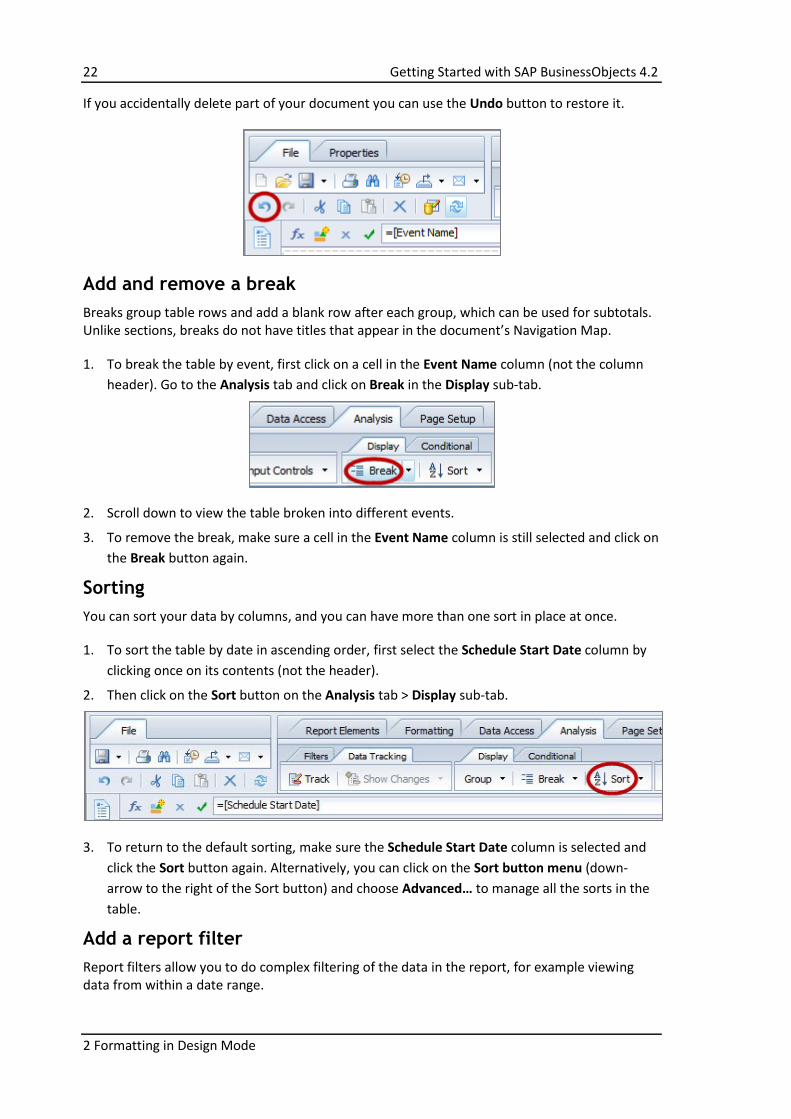
If you accidentally delete part of your document you can use the Undo button to restore it.
Add and remove a break
Breaks group table rows and add a blank row after each group, which can be used for subtotals. Unlike sections, breaks do not have titles that appear in the document’s Navigation Map.
1. To break the table by event, first click on a cell in the Event Name column (not the column
header). Go to the Analysis tab and click on Break in the Display sub-tab.
2. Scroll down to view the table broken into different events.
3. To remove the break, make sure a cell in the Event Name column is still selected and click on
the Break button again.
Sorting
You can sort your data by columns, and you can have more than one sort in place at once.
1. To sort the table by date in ascending order, first select the Schedule Start Date column by
clicking once on its contents (not the header).
2. Then click on the Sort button on the Analysis tab > Display sub-tab.
3. To return to the default sorting, make sure the Schedule Start Date column is selected and
click the Sort button again. Alternatively, you can click on the Sort button menu (down-
arrow to the right of the Sort button) and choose Advanced… to manage all the sorts in the
table.
Add a report filter
Report filters allow you to do complex filtering of the data in the report, for example viewing data from within a date range.
Getting Started with SAP BusinessObjects 4.2 23
2 Formatting in Design Mode
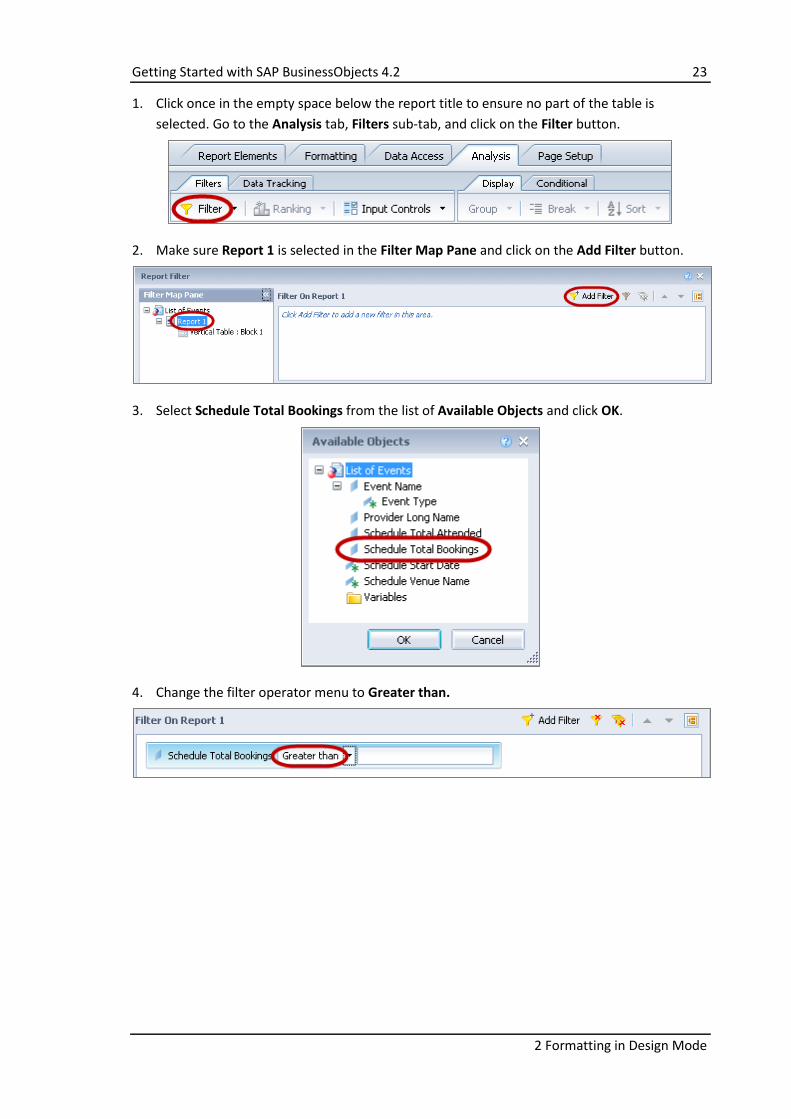
1. Click once in the empty space below the report title to ensure no part of the table is
selected. Go to the Analysis tab, Filters sub-tab, and click on the Filter button.
2. Make sure Report 1 is selected in the Filter Map Pane and click on the Add Filter button.
3. Select Schedule Total Bookings from the list of Available Objects and click OK.
4. Change the filter operator menu to Greater than.
24 Getting Started with SAP BusinessObjects 4.2
2 Formatting in Design Mode
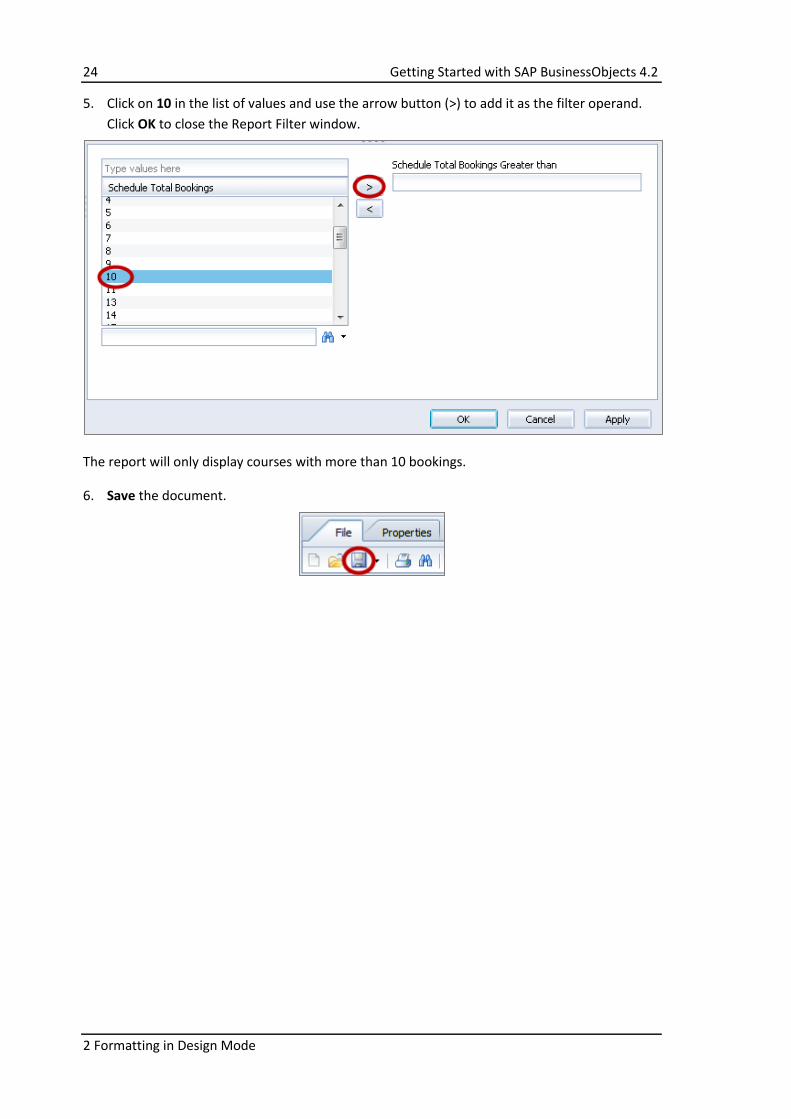
5. Click on 10 in the list of values and use the arrow button (>) to add it as the filter operand.
Click OK to close the Report Filter window.
The report will only display courses with more than 10 bookings.
6. Save the document.
Getting Started with SAP BusinessObjects 4.2 25
2 Formatting in Design Mode
2.2 Add Reports, Tables, Objects and Cells
Learning objectives:
Add a report to a Web Intelligence document.
Add a table to a report.
Add objects to and remove them from the table.
Delete the table.
Add a cell containing page numbers to the report header.
Add a report
1. Open the List of Events Copy document located in My Folders, if it is not already open.
Make sure you are in Design mode.
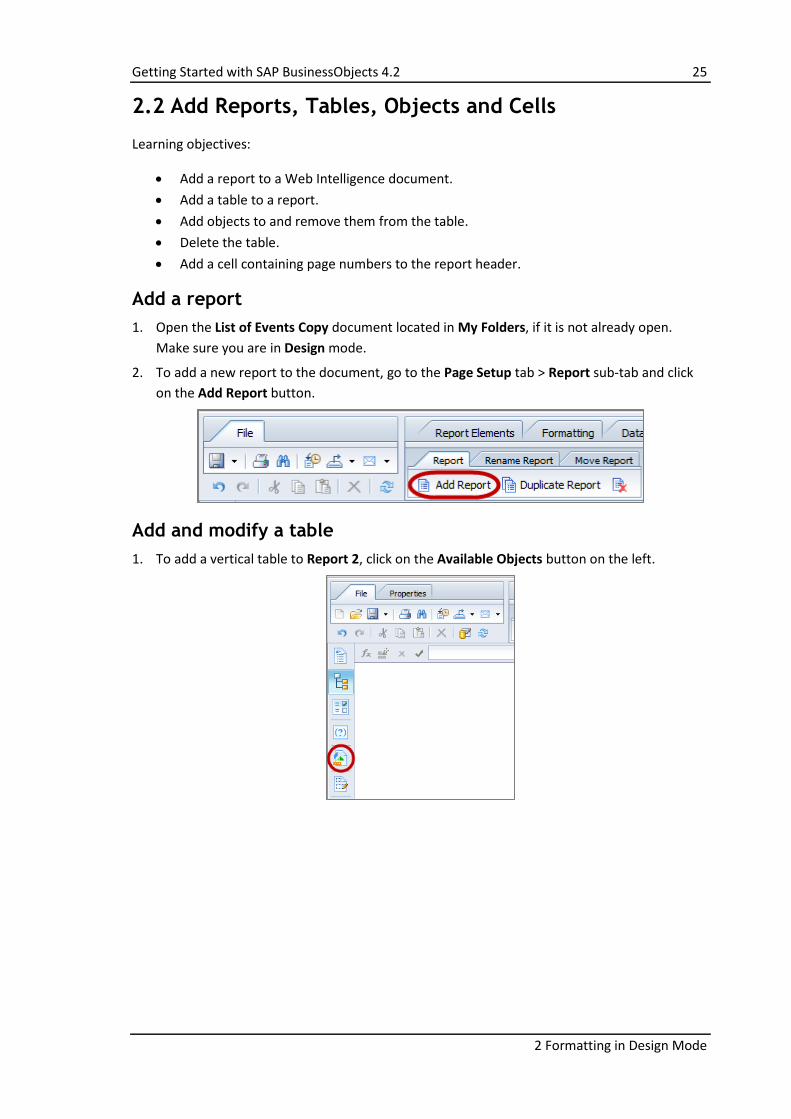
2. To add a new report to the document, go to the Page Setup tab > Report sub-tab and click
on the Add Report button.
Add and modify a table
1. To add a vertical table to Report 2, click on the Available Objects button on the left.
26 Getting Started with SAP BusinessObjects 4.2
2 Formatting in Design Mode
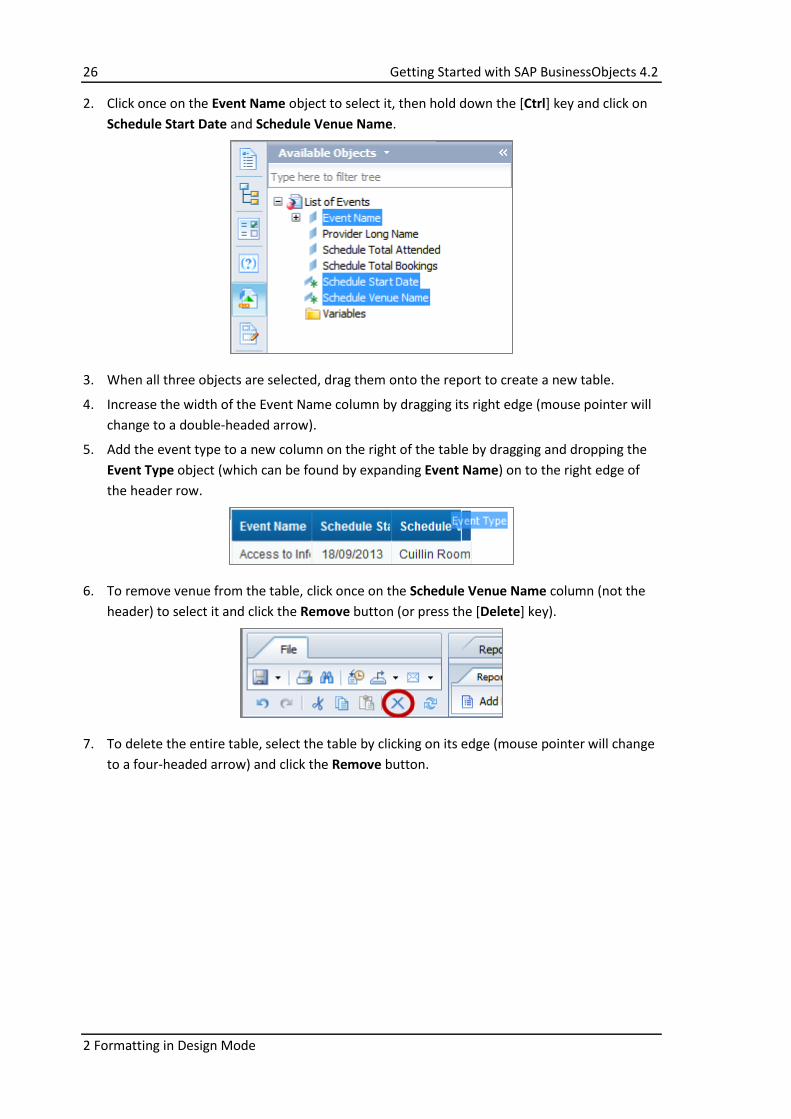
2. Click once on the Event Name object to select it, then hold down the [Ctrl] key and click on
Schedule Start Date and Schedule Venue Name.
3. When all three objects are selected, drag them onto the report to create a new table.
4. Increase the width of the Event Name column by dragging its right edge (mouse pointer will
change to a double-headed arrow).
5. Add the event type to a new column on the right of the table by dragging and dropping the
Event Type object (which can be found by expanding Event Name) on to the right edge of
the header row.
6. To remove venue from the table, click once on the Schedule Venue Name column (not the
header) to select it and click the Remove button (or press the [Delete] key).
7. To delete the entire table, select the table by clicking on its edge (mouse pointer will change
to a four-headed arrow) and click the Remove button.
Getting Started with SAP BusinessObjects 4.2 27
2 Formatting in Design Mode
Add page numbers to the report header
Web Intelligence reports contain headers and footers at the top and bottom. Objects in the header and footer will be displayed on every page.
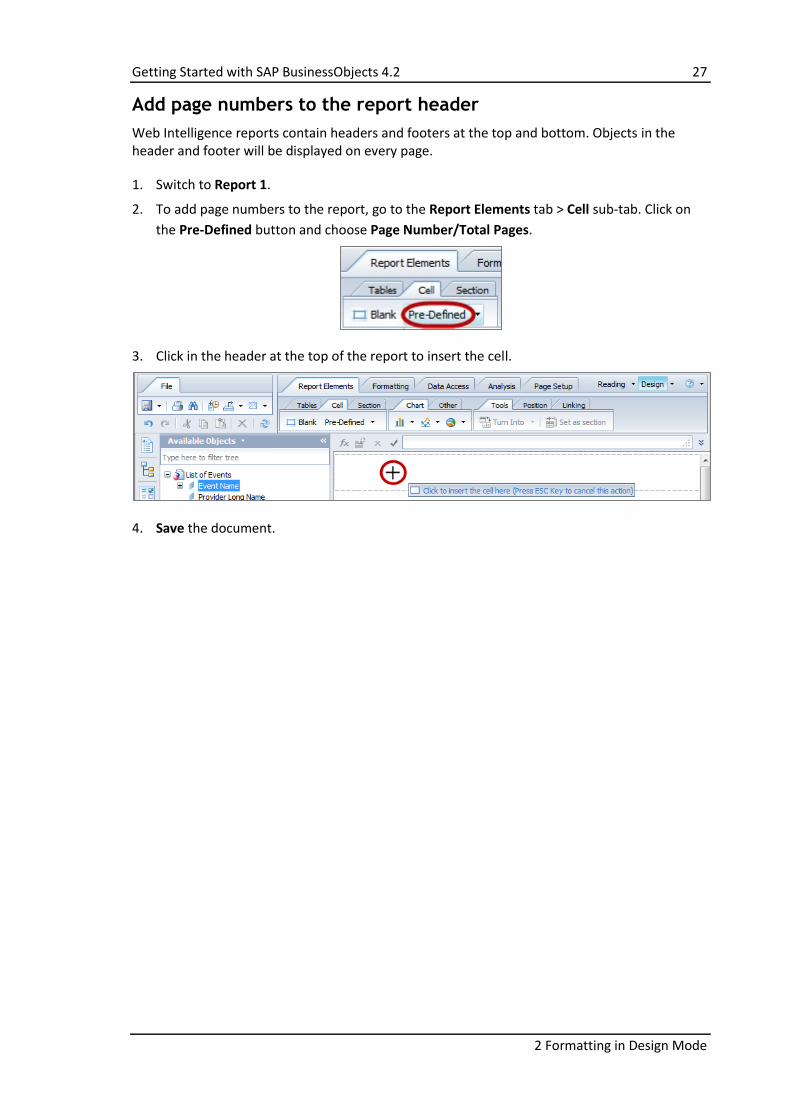
1. Switch to Report 1.
2. To add page numbers to the report, go to the Report Elements tab > Cell sub-tab. Click on
the Pre-Defined button and choose Page Number/Total Pages.
3. Click in the header at the top of the report to insert the cell.
4. Save the document.
28 Getting Started with SAP BusinessObjects 4.2
2 Formatting in Design Mode
2.3 Change Text and Backgrounds
Learning objectives:
Change background colour.
Change text font, size and colour.
Edit text in a cell using the formula bar.
Format backgrounds and fonts
Each object in a Web Intelligence document has formatting options – access these by selecting the object and clicking on the Formatting tab.
1. Open the List of Events Copy document located in My Folders, if it is not already open.
Make sure you are in Design mode and viewing Report 1.
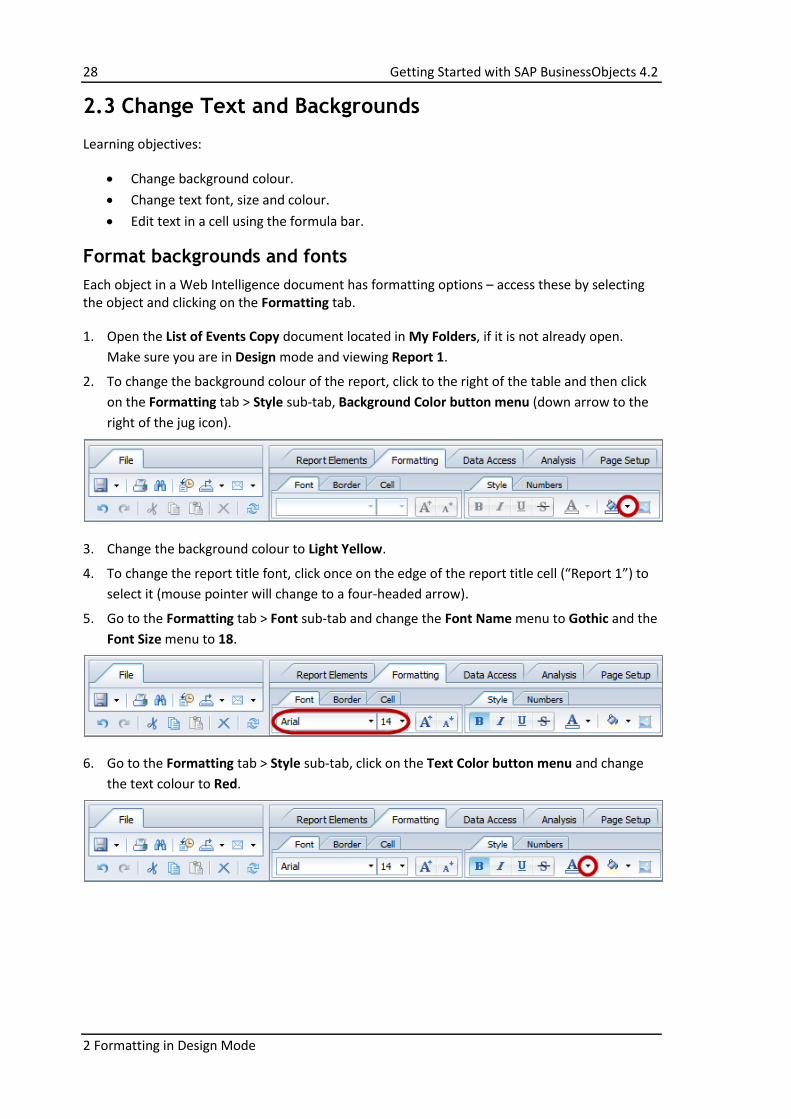
2. To change the background colour of the report, click to the right of the table and then click
on the Formatting tab > Style sub-tab, Background Color button menu (down arrow to the
right of the jug icon).
3. Change the background colour to Light Yellow.
4. To change the report title font, click once on the edge of the report title cell (“Report 1”) to
select it (mouse pointer will change to a four-headed arrow).
5. Go to the Formatting tab > Font sub-tab and change the Font Name menu to Gothic and the
Font Size menu to 18.
6. Go to the Formatting tab > Style sub-tab, click on the Text Color button menu and change
the text colour to Red.
Getting Started with SAP BusinessObjects 4.2 29
2 Formatting in Design Mode
Edit text in a cell
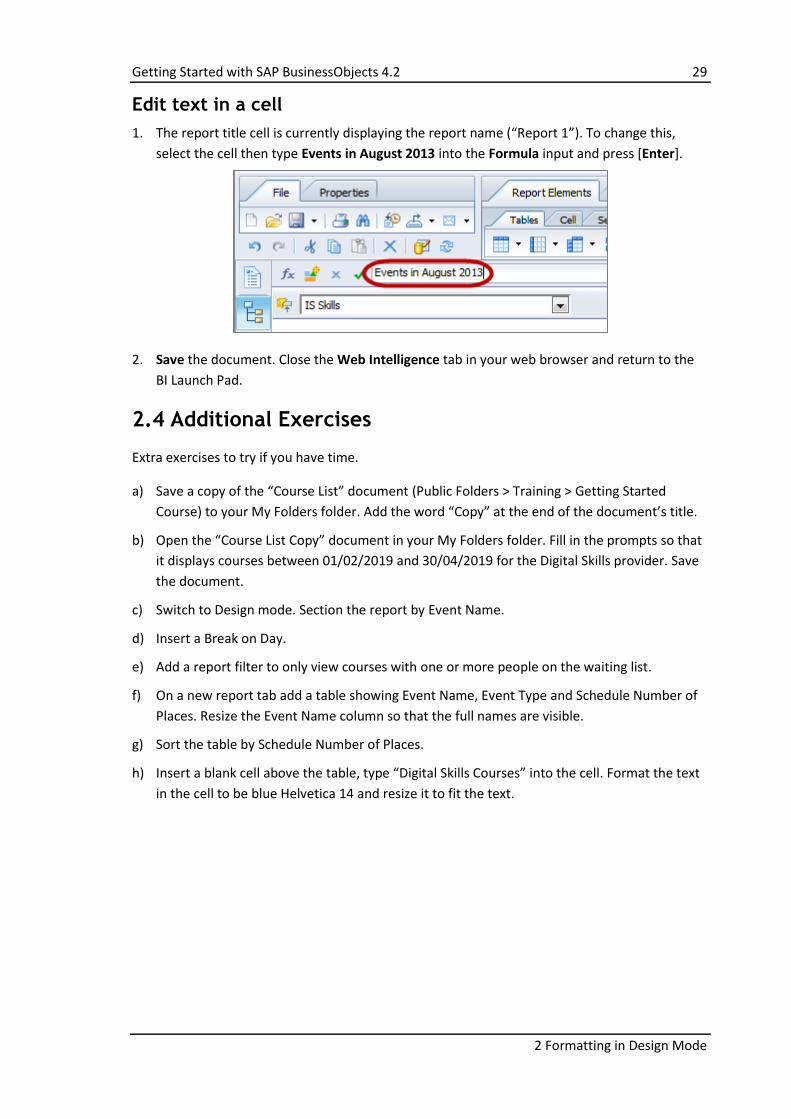
1. The report title cell is currently displaying the report name (“Report 1”). To change this,
select the cell then type Events in August 2013 into the Formula input and press [Enter].
2. Save the document. Close the Web Intelligence tab in your web browser and return to the
BI Launch Pad.
2.4 Additional Exercises
Extra exercises to try if you have time.
a) Save a copy of the “Course List” document (Public Folders > Training > Getting Started
Course) to your My Folders folder. Add the word “Copy” at the end of the document’s title.
b) Open the “Course List Copy” document in your My Folders folder. Fill in the prompts so that
it displays courses between 01/02/2019 and 30/04/2019 for the Digital Skills provider. Save
the document.
c) Switch to Design mode. Section the report by Event Name.
d) Insert a Break on Day.
e) Add a report filter to only view courses with one or more people on the waiting list.
f) On a new report tab add a table showing Event Name, Event Type and Schedule Number of
Places. Resize the Event Name column so that the full names are visible.
g) Sort the table by Schedule Number of Places.
h) Insert a blank cell above the table, type “Digital Skills Courses” into the cell. Format the text
in the cell to be blue Helvetica 14 and resize it to fit the text.
30 Getting Started with SAP BusinessObjects 4.2
3 Introduction to BI Explorer
3. Introduction to BI Explorer
Business Intelligence (BI) Explorer is a data discovery and visualisation tool. It allows you to search and filter data to quickly answer your business questions. When you have the data you want you can export it to other applications.
3.1 Launch Explorer and Open an Information Space
Learning objectives:
Launch BI Explorer and open an information space.
Be aware of the different parts of the Explorer interface.
Switch between views.
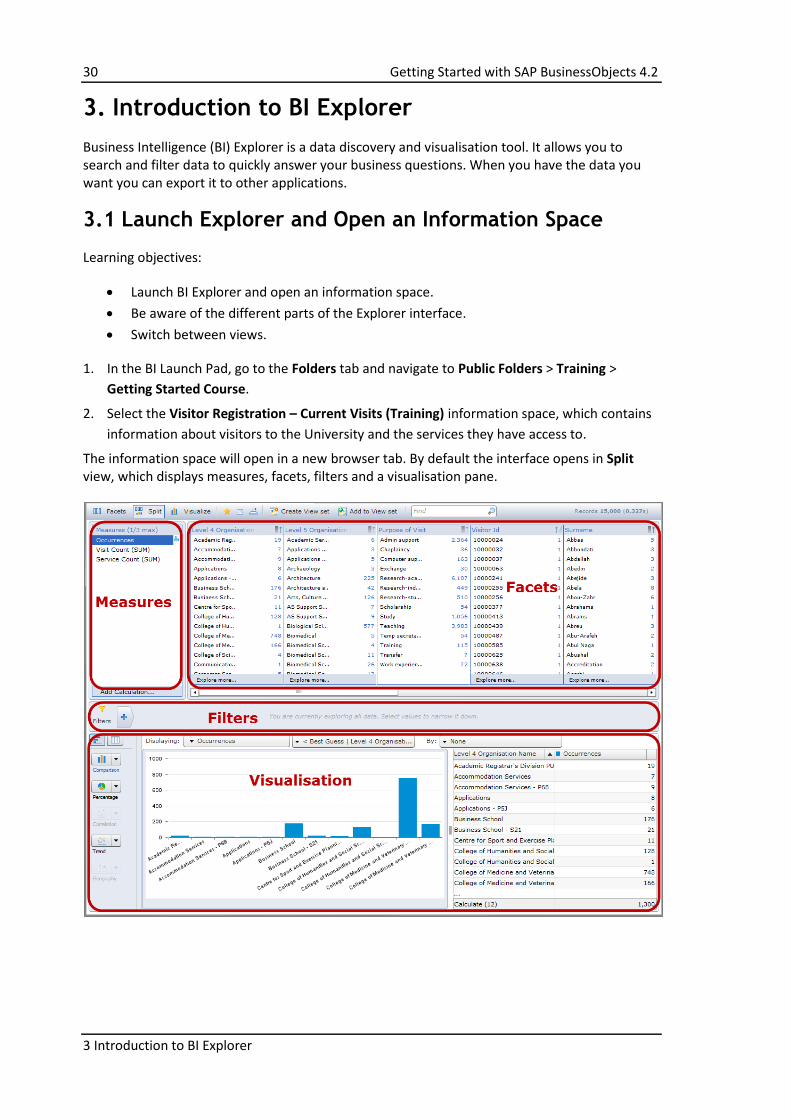
1. In the BI Launch Pad, go to the Folders tab and navigate to Public Folders > Training >
Getting Started Course.
2. Select the Visitor Registration – Current Visits (Training) information space, which contains
information about visitors to the University and the services they have access to.
The information space will open in a new browser tab. By default the interface opens in Split view, which displays measures, facets, filters and a visualisation pane.
Getting Started with SAP BusinessObjects 4.2 31
3 Introduction to BI Explorer
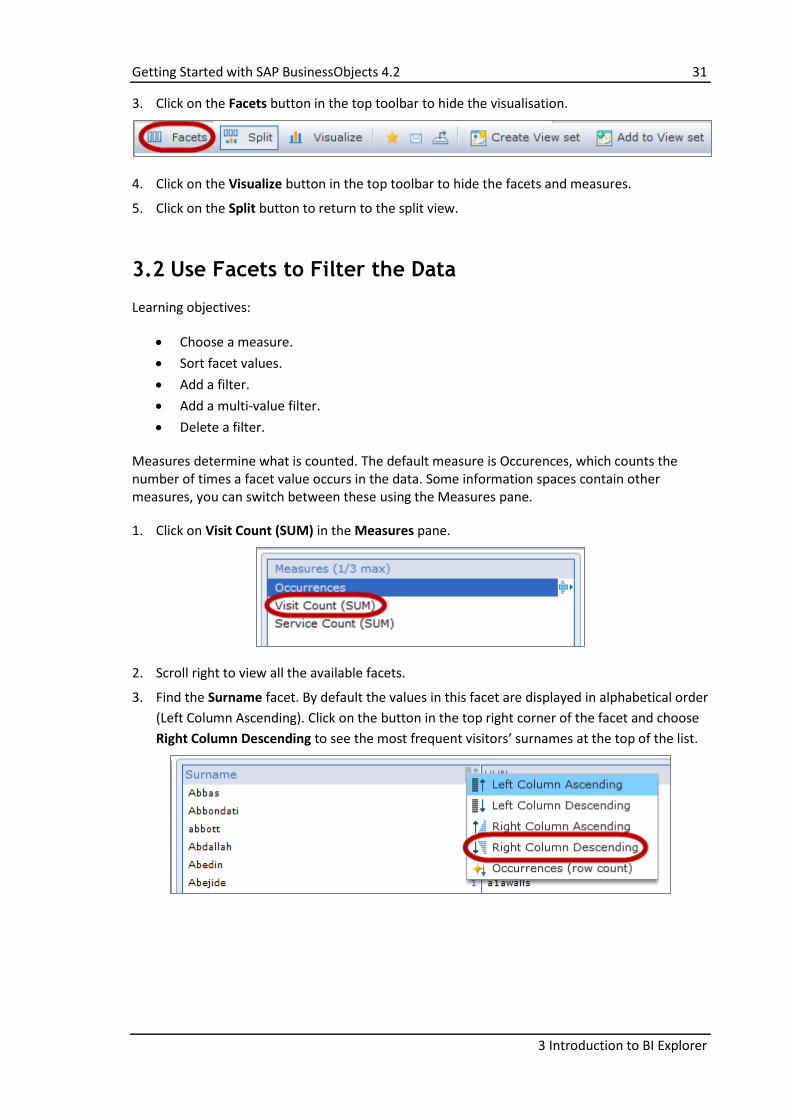
3. Click on the Facets button in the top toolbar to hide the visualisation.
4. Click on the Visualize button in the top toolbar to hide the facets and measures.
5. Click on the Split button to return to the split view.
3.2 Use Facets to Filter the Data
Learning objectives:
Choose a measure.
Sort facet values.
Add a filter.
Add a multi-value filter.
Delete a filter.
Measures determine what is counted. The default measure is Occurences, which counts the number of times a facet value occurs in the data. Some information spaces contain other measures, you can switch between these using the Measures pane.
1. Click on Visit Count (SUM) in the Measures pane.
2. Scroll right to view all the available facets.
3. Find the Surname facet. By default the values in this facet are displayed in alphabetical order
(Left Column Ascending). Click on the button in the top right corner of the facet and choose
Right Column Descending to see the most frequent visitors’ surnames at the top of the list.
32 Getting Started with SAP BusinessObjects 4.2
3 Introduction to BI Explorer
4. Click on Teaching in the Purpose of Visit facet to add a filter.
A filter is added to the Filters bar in the centre of the screen and the visualisation changes to include only visits for teaching purposes.
5. To add a multi-value filter, click on Explore more… at the bottom of the Level 4 Organisation
Name facet.
Getting Started with SAP BusinessObjects 4.2 33
3 Introduction to BI Explorer
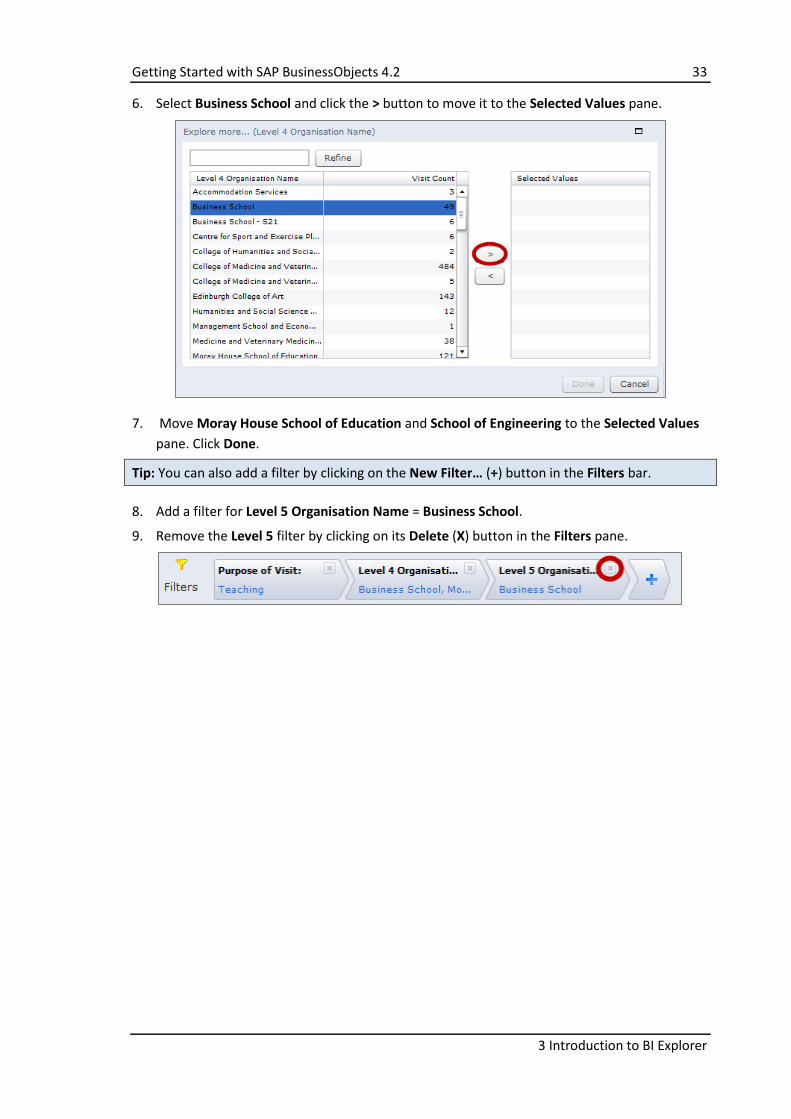
6. Select Business School and click the > button to move it to the Selected Values pane.
7. Move Moray House School of Education and School of Engineering to the Selected Values
pane. Click Done.
Tip: You can also add a filter by clicking on the New Filter… (+) button in the Filters bar.
8. Add a filter for Level 5 Organisation Name = Business School.
9. Remove the Level 5 filter by clicking on its Delete (X) button in the Filters pane.
34 Getting Started with SAP BusinessObjects 4.2
3 Introduction to BI Explorer
3.3 Change the Data Visualisation
Learning objectives:
Be aware of the different parts of the visualisation pane.
Change the chart’s dimensions.
View chart tooltips.
Switch between chart types.
Add a filter by clicking on the chart.
View the data as a table.
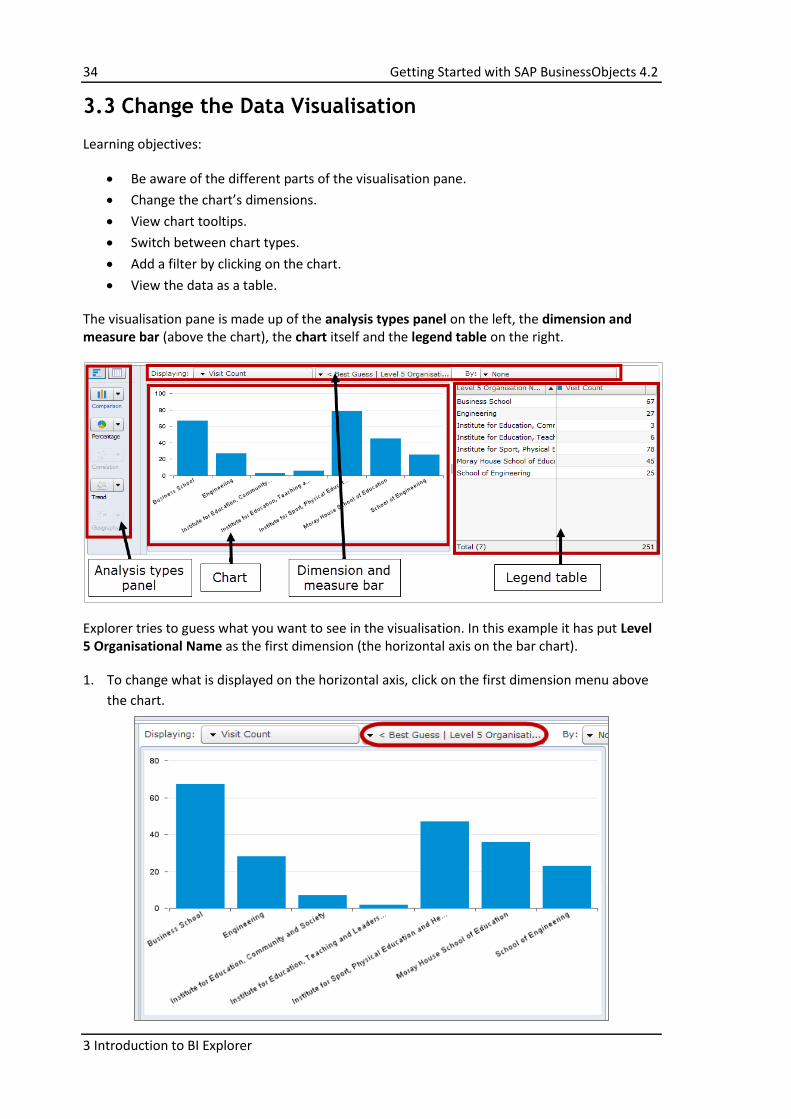
The visualisation pane is made up of the analysis types panel on the left, the dimension and measure bar (above the chart), the chart itself and the legend table on the right.
Explorer tries to guess what you want to see in the visualisation. In this example it has put Level 5 Organisational Name as the first dimension (the horizontal axis on the bar chart).
1. To change what is displayed on the horizontal axis, click on the first dimension menu above
the chart.
Getting Started with SAP BusinessObjects 4.2 35
3 Introduction to BI Explorer
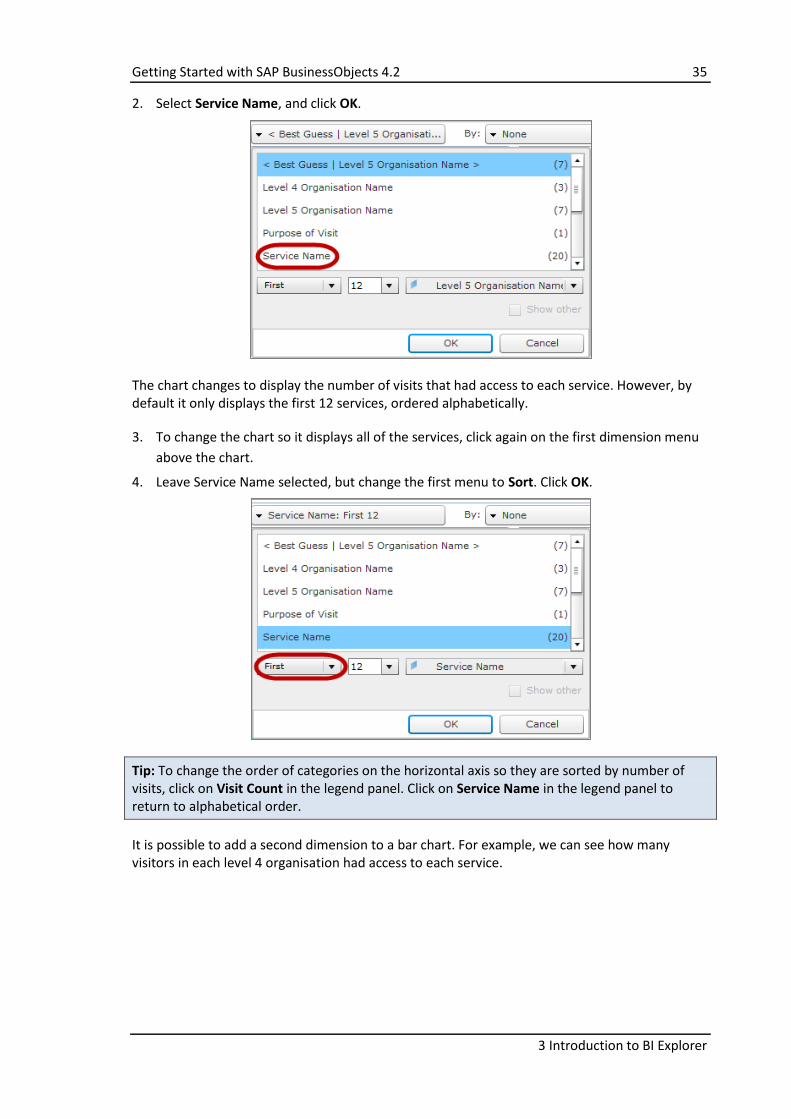
2. Select Service Name, and click OK.
The chart changes to display the number of visits that had access to each service. However, by default it only displays the first 12 services, ordered alphabetically.
3. To change the chart so it displays all of the services, click again on the first dimension menu
above the chart.
4. Leave Service Name selected, but change the first menu to Sort. Click OK.
Tip: To change the order of categories on the horizontal axis so they are sorted by number of visits, click on Visit Count in the legend panel. Click on Service Name in the legend panel to return to alphabetical order.
It is possible to add a second dimension to a bar chart. For example, we can see how many visitors in each level 4 organisation had access to each service.
36 Getting Started with SAP BusinessObjects 4.2
3 Introduction to BI Explorer
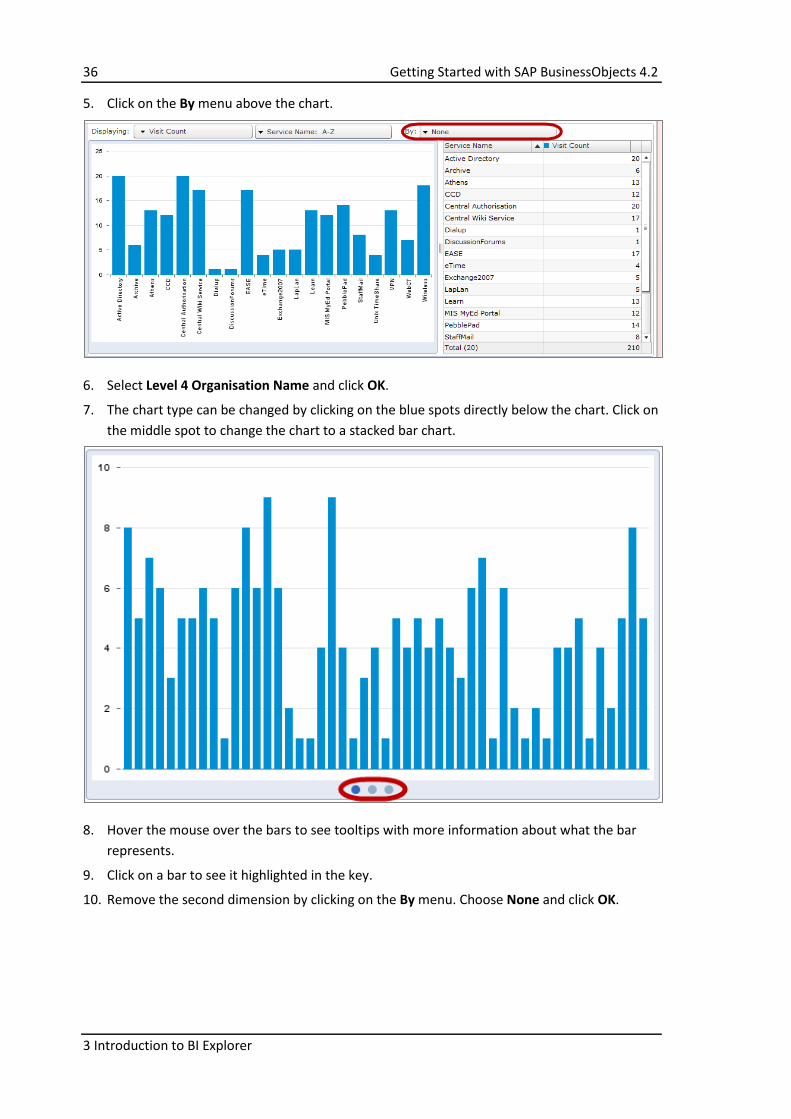
5. Click on the By menu above the chart.
6. Select Level 4 Organisation Name and click OK.
7. The chart type can be changed by clicking on the blue spots directly below the chart. Click on
the middle spot to change the chart to a stacked bar chart.
8. Hover the mouse over the bars to see tooltips with more information about what the bar
represents.
9. Click on a bar to see it highlighted in the key.
10. Remove the second dimension by clicking on the By menu. Choose None and click OK.
Getting Started with SAP BusinessObjects 4.2 37
3 Introduction to BI Explorer
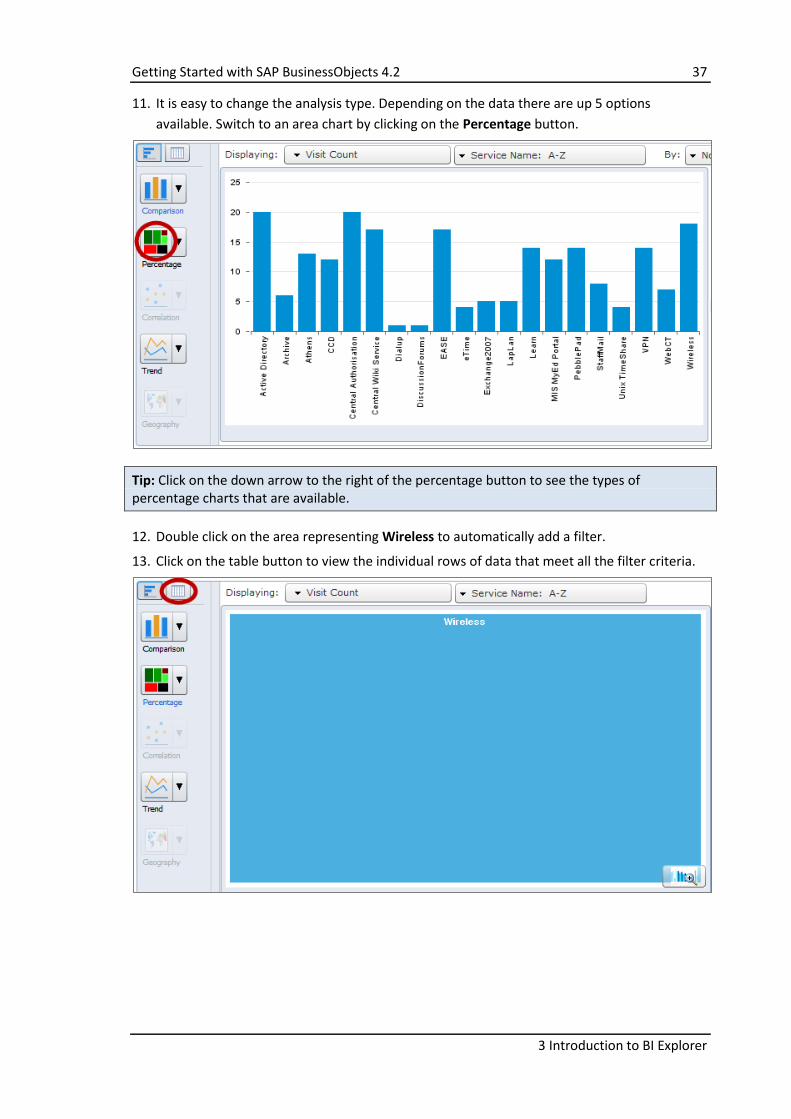
11. It is easy to change the analysis type. Depending on the data there are up 5 options
available. Switch to an area chart by clicking on the Percentage button.
Tip: Click on the down arrow to the right of the percentage button to see the types of percentage charts that are available.
12. Double click on the area representing Wireless to automatically add a filter.
13. Click on the table button to view the individual rows of data that meet all the filter criteria.
38 Getting Started with SAP BusinessObjects 4.2
3 Introduction to BI Explorer
3.4 Export Options
Learning objectives:
Export the data table as an Excel file.
Send the data table to your BusinessObjects Inbox as a Web Intelligence document.
Export the chart as an image (PNG).
Once you have found the data you are interested in you may wish to use it in another application.
Excel file
1. If the Visitor Registration – Current Visits (Training) information space is already open from
the previous exercises skip to step 2. If it is not already open, open it and add a couple of
filters.
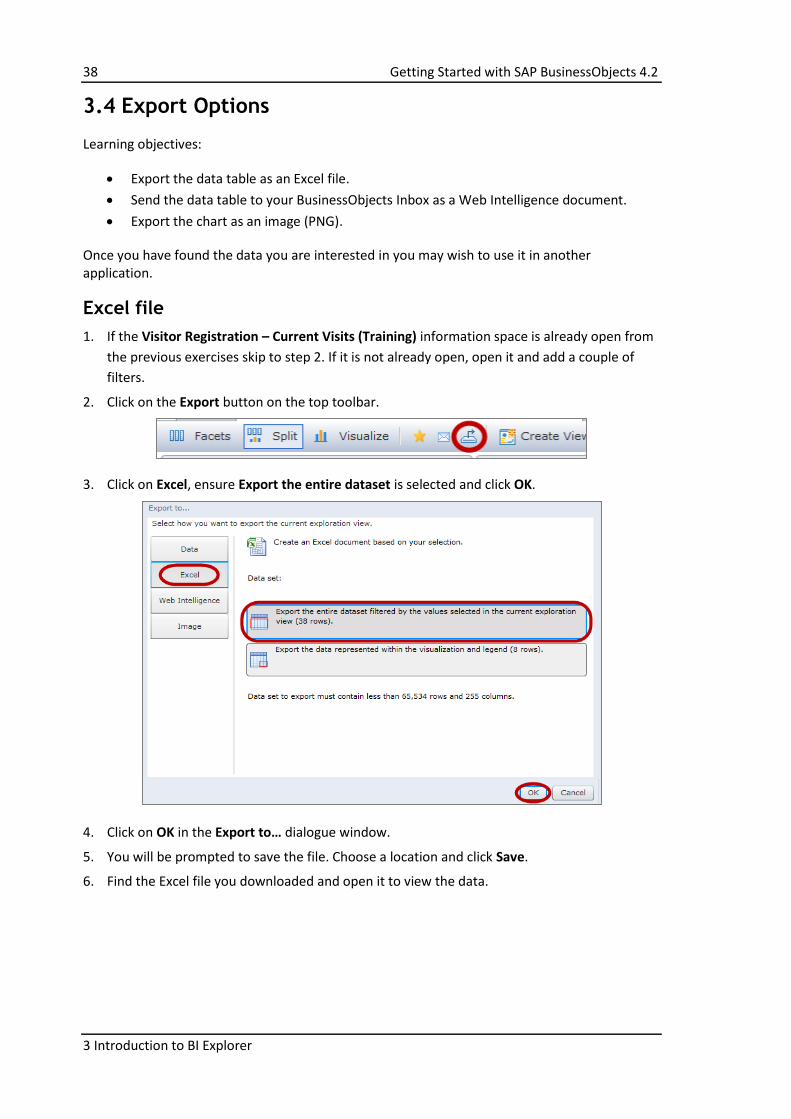
2. Click on the Export button on the top toolbar.
3. Click on Excel, ensure Export the entire dataset is selected and click OK.
4. Click on OK in the Export to… dialogue window.
5. You will be prompted to save the file. Choose a location and click Save.
6. Find the Excel file you downloaded and open it to view the data.
Getting Started with SAP BusinessObjects 4.2 39
3 Introduction to BI Explorer
Web Intelligence document
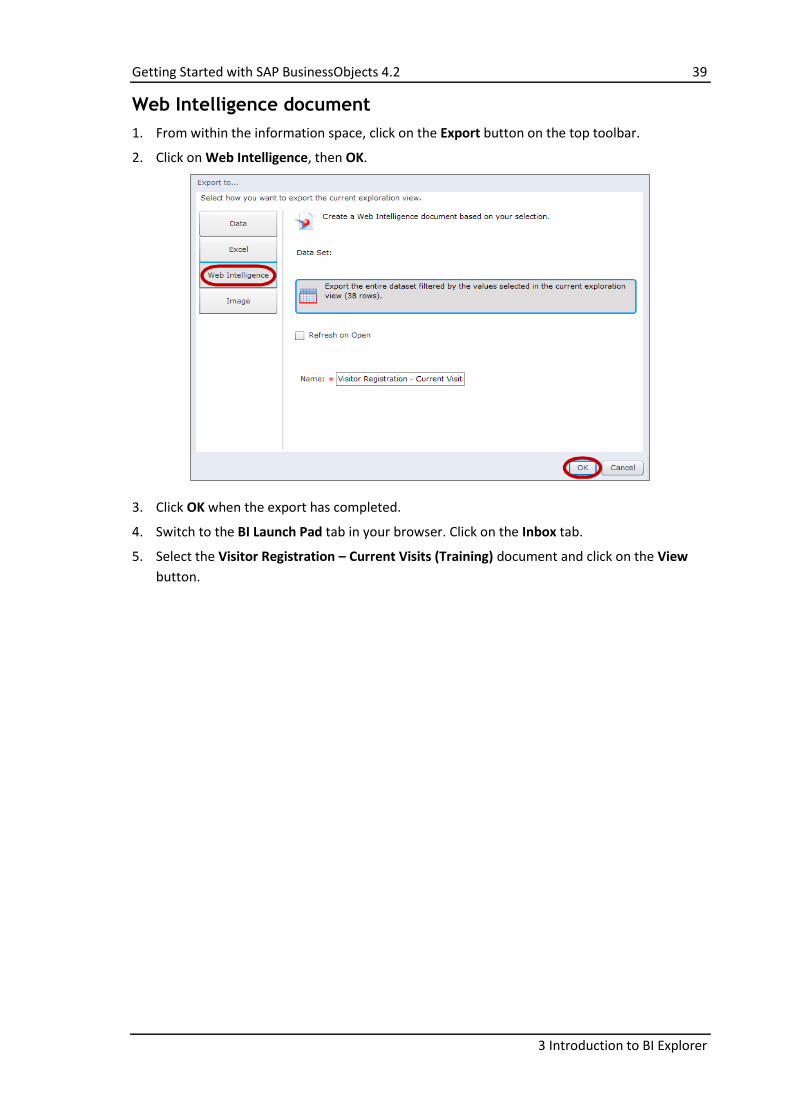
1. From within the information space, click on the Export button on the top toolbar.
2. Click on Web Intelligence, then OK.
3. Click OK when the export has completed.
4. Switch to the BI Launch Pad tab in your browser. Click on the Inbox tab.
5. Select the Visitor Registration – Current Visits (Training) document and click on the View
button.
40 Getting Started with SAP BusinessObjects 4.2
3 Introduction to BI Explorer
Image
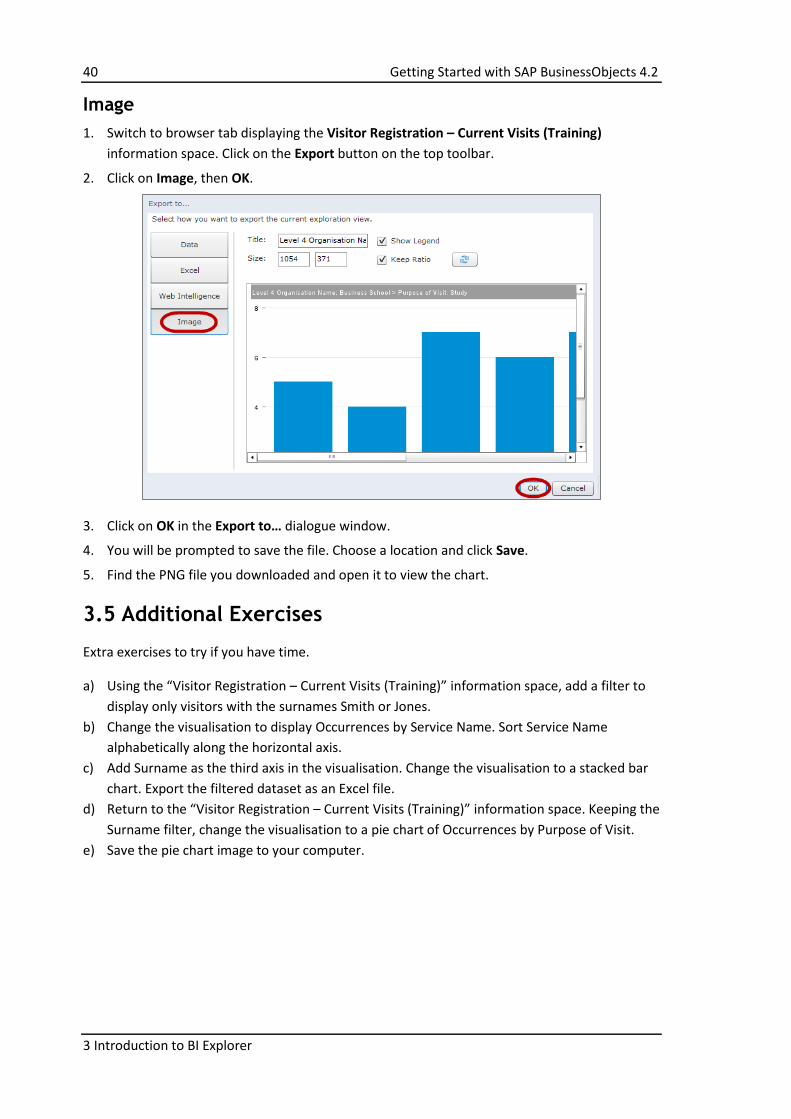
1. Switch to browser tab displaying the Visitor Registration – Current Visits (Training)
information space. Click on the Export button on the top toolbar.
2. Click on Image, then OK.
3. Click on OK in the Export to… dialogue window.
4. You will be prompted to save the file. Choose a location and click Save.
5. Find the PNG file you downloaded and open it to view the chart.
3.5 Additional Exercises
Extra exercises to try if you have time.
a) Using the “Visitor Registration – Current Visits (Training)” information space, add a filter to
display only visitors with the surnames Smith or Jones.
b) Change the visualisation to display Occurrences by Service Name. Sort Service Name
alphabetically along the horizontal axis.
c) Add Surname as the third axis in the visualisation. Change the visualisation to a stacked bar
chart. Export the filtered dataset as an Excel file.
d) Return to the “Visitor Registration – Current Visits (Training)” information space. Keeping the
Surname filter, change the visualisation to a pie chart of Occurrences by Purpose of Visit.
e) Save the pie chart image to your computer.
Getting Started with SAP BusinessObjects 4.2 41
4 Help Resources
4. Help Resources
Reporting + Analytics website
www.ed.ac.uk/is/reporting-analytics
This website is the first place to look for answers to any SAP BusinessObjects question.
See the Accessing Data page for details of who to contact if you have problems using SAP BusinessObjects.
Online videos
Videos showing how to use various features in SAP BusinessObjects are available on Media Hopper (search for “BusinessObjects”):
http://media.ed.ac.uk