Embed Size (px)
Citation preview

GETTING STARTED WITH THE
TFS WORK ITEM MANAGER

Contents What is the TFS Work Item Manager ....................................................................................... 4
What You Need To Run the TFS Work Item Manager .............................................................. 5
Launching the TFS Work Item Manager for the First Time ...................................................... 6
Connecting to a Team Project ................................................................................................. 7
Running a Query ..................................................................................................................... 9
Launching a Query .............................................................................................................. 9
Working with Filtering and Sorting ..................................................................................... 9
Filtering by Area/Iteration ................................................................................................ 10
Search for Work Items ....................................................................................................... 11
Work Item Links ................................................................................................................ 11
The Aggregate Graph ....................................................................................................... 12
Editing a Query ..................................................................................................................... 14
Creating an Aggregate for a Group .................................................................................. 14
Creating a New Query by Example ...................................................................................... 16
Creating a New Query .......................................................................................................... 17
Copying a Query .................................................................................................................. 18
Editing Work Items ............................................................................................................... 19
Adding a New Work Item .................................................................................................. 19
Adding Related Work Items .............................................................................................. 19
Editing Multiple Work Items .............................................................................................. 20
Pasting Content from the Clipboard to Work Items ........................................................... 21
Pasting Content from the Work Items into other applications ........................................... 22
Printing Work Item Cards ..................................................................................................... 24
Managing Areas and Iterations .......................................................................................... 25
Assigning Dates to Iterations ............................................................................................. 26
Using the Task Board ............................................................................................................ 28
Adding New Work Items Using the Task Board ................................................................. 28
Editing Work Items Using the Task Board ......................................................................... 30
Viewing Related Work Items ............................................................................................. 30
Configuring the Task Board ............................................................................................... 31
Using the Iteration Planner .................................................................................................... 33

Starting a New Iteration Planning Session ......................................................................... 33
Adding Work Items to an Iteration .................................................................................... 34
Committing an Iteration Plan to TFS .................................................................................. 35
Continuing a Previous Iteration Planning Session ............................................................. 36
Reloading Work Items for an Iteration ............................................................................... 36
Getting to the Project SharePoint Site ................................................................................... 38
Work Item Manager Options ................................................................................................ 39
Managing Panes .................................................................................................................... 40
Managing Tabs ..................................................................................................................... 42
Saving Changes ................................................................................................................. 42
Open Tab in a Window ...................................................................................................... 42
Understanding the TFS Project Dashboard ........................................................................... 43
Launching the Project Dashboard ..................................................................................... 43
Launching the Project Dashboard as a standalone application .......................................... 43
Launching the Project Dashboard from the Work Item manager ...................................... 44
Configuring the Project Dashboard ................................................................................... 44
Configuring the TFS warehouse connection string ............................................................ 46
Troubleshooting WIM ........................................................................................................... 48
Problem: An error occurs that says “Could not load type…” ............................................ 48
Problem: Cannot connect to TFS warehouse using default settings ................................... 48
Problem: Cannot connect to TFS warehouse over HTTP .................................................... 48
Problem: The Dashboard is not displaying some widgets ................................................ 49
Problem: When connecting to a new project with the Work Item Manager you are not able to upload project settings to the Team Project’s source control repository ....................... 49
Problem: Work Item Manager and Dashboard cannot store settings in Source Control ... 50
Problem: The Dashboard displays an error when connecting to Team Foundation Server 2005 ................................................................................................................................... 50
Problem: Task Board only displays work items from my current iteration ........................ 50
Appendix – File Locations ..................................................................................................... 51
Appendix – Configuring the TFS Analysis Services Database .............................................. 52
What is the TFS Work Item Manager The TFS Work Item Manager (WIM) was built as an alternative for users who may not be familiar with using Microsoft Visual Studio to access Microsoft Team Foundation Server (TFS). This tool was created in collaboration with Telerik and demonstrates how the Telerik platform can be used to create real world solutions.
At a high level, the Work Item Manager helps users find and edit TFS work items as well as provide many features that make it easier for teams to add new work items, visualize work items in different ways, and display information contained within work items in a way that users can act upon. The goals of the Work Item Manager are to:
1. Provide a tool to those who may not be comfortable using Microsoft Visual Studio to access Microsoft Team Foundation Server.
2. Provide a way for teams to better visualize information stored in TFS in order to facilitate better team communication and collaboration.
3. Provide teams with a user interface that can be displayed on fixed displays in and around a team room to provide up to date and meaningful project information.
What You Need To Run the TFS Work Item Manager The following are what you need installed to run the Work Item Manager:
1. Microsoft Visual Studio Team Explorer 2008 (with Service Pack 1)
2. .NET 3.5 Service Pack 1 Runtime
If you do not have these components already installed, you will be prompted to download and install these during the Work Item Manager setup process.
IMPORTANT: Visual Studio 2008 SP1 must be installed after installing Team Explorer 2008. You may experience issues running WIM if SP1 is installed before installing Team Explorer 2008.
IMPORTANT: In order for the Dashboard to display all of the reports you must grant a user or group read access to the Team System Analysis Services database. See “Appendix – Configuring the TFS Analysis Services Database” for more information.

Launching the TFS Work Item Manager for the First Time The Work Item Manager was built to support virtually any Team Foundation Server Team Process Template and works seamlessly out of the box with the following templates:
1. MSF for Agile Software Development (v4.22)
2. MSF for CMMI Process Improvement (v4.22)
3. EMC/Conchango Agile Software Development with Scrum (v2.11)
If you use a different Process Template definition or you created or modified your own Process Template, WIM will still work, however you may have to change some of the settings to ensure your data is being displayed properly.
After installing the Work Item Manager, it can be launched by choosing TFS Work Item Manager in the Telerik folder of your Start Menu or from your Desktop.
Connecting to a Team Project Before you can use the Work Item Manager to manage Team System work items, you must connect to your Team Foundation Server. To connect to your Team Foundation Server perform the following steps:
1. Click the Connect Button on the Home Ribbon
2. You are then presented with a dialog that will allow you to connect to your Team Foundation Server and select a project.
3. After selecting a Team Project you will be asked if you want to store project settings on the server.
Choose Yes to store the data that the Work Item Manager creates on the server, allowing you to share these settings with the rest of your team. If you choose Yes, the Work Item Manager will use the Team Project’s source control repository in a folder called WIM.

Note: You must have the ability to create folders and files in your Team Project’s source control repository. All other team members must have read access to the WIM folder in order to use these settings

Running a Query
Launching a Query To display the results of a Work Item Query, double click on a query from the Work Item Queries pane. Alternatively, you can right click on a query and choose Open Query.
Working with Filtering and Sorting To sort the results by a column, click on the column heading. You can also rearrange columns by dragging columns to a new location.
The Work Item Manager also provides the ability to filter the work item grid by one or more column values. To set a filter on the work item results grid, click the filter icon in the column heading.
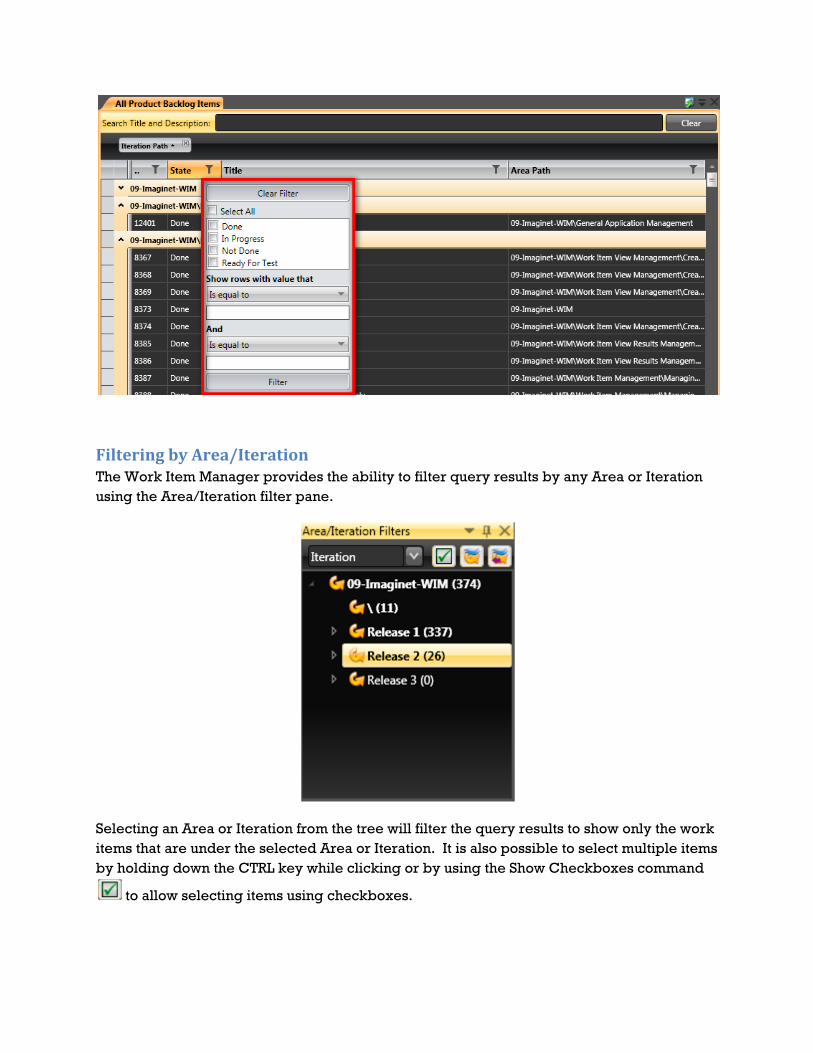
Filtering by Area/Iteration The Work Item Manager provides the ability to filter query results by any Area or Iteration using the Area/Iteration filter pane.
Selecting an Area or Iteration from the tree will filter the query results to show only the work items that are under the selected Area or Iteration. It is also possible to select multiple items by holding down the CTRL key while clicking or by using the Show Checkboxes command
to allow selecting items using checkboxes.
By using the Current Iteration command or the Current and Past Iterations command you can quickly filter your query to show only the items that are in the current iteration or in any iteration up to and including the current iteration.
The Area/Iteration filter pane also works with the task board.
Search for Work Items The Work Item Manager also provides the ability to search for text contained within the title and description of the work items displayed in the grid.
To start searching for work items, simply start typing in the Search Title and Description field located at the top of the query results. The Work Item Manager will perform the search as you type.
Work Item Links Work Items can contain references to other work items, URL’s, test results, source code change sets or a particular version of a file in Team Foundation Server’s source control. To display all of the links associated with a work item, simply click on a work item and view the links in the Work Item Links pane.

The Aggregate Graph The Work Item Manager aggregate graph has the ability to display a graph that represents the results of a mathematical equation applied to work items that are grouped using the group features of the Work Item Results Grid. To set up aggregations on Work Item groups, please see the Edit a Query section. Note that the aggregate values are also displayed on the group heading on the grid.


Editing a Query To edit a query, you can either right click on a query and choose Edit Query or launch a query and choose the Edit Query command from the Home ribbon.
Editing a query will allow you to change the name of the query, the query definition, the fields you wish to view, the Work Item Results Grid grouping and aggregations, as well as column sorting.
Note: The Work Item Manager Query Builder is not as powerful as the Work Item Query editor available using the Microsoft Team Explorer. Use the New Query by Example feature to create more complex queries with the Work Item Manager.
Creating an Aggregate for a Group In order to have the Work Item Manager display aggregate values on work item groupings edit the Work Item Query in the Work Item Manager, and select a group by definition in the Grouping tab (if a group by definition does not already exist you must first specify one).

Click on the Add button above the Group Aggregates grid and then specify the function you want the Work Item Manager to perform on the values of the selected field, the field, and the caption that will be displayed in the Aggregate Graph and Work Item Results Grid.

Creating a New Query by Example Creating a new query by example is a powerful way to create a new query by using an existing query as a starting point and then modifying the results until you get the desired query.
To create a new query by example, open a query and modify it using the available filters, sorting, grouping, and columns. When the query displays the desired results, click the New by Example button in the ribbon to create a new query. All the changes that were made will be applied to a new query which can be saved to TFS.

Creating a New Query To create a new query, you can either right click in the Work Item Queries pane and choose New Query or use the New Query command from the Home ribbon.
Creating a new query is very similar to editing an existing query, except that there are two more options available when creating a new query that are not available when editing a query.
When creating a new query you can choose the query type and project as well as use the query builder to specify the types of results to return.
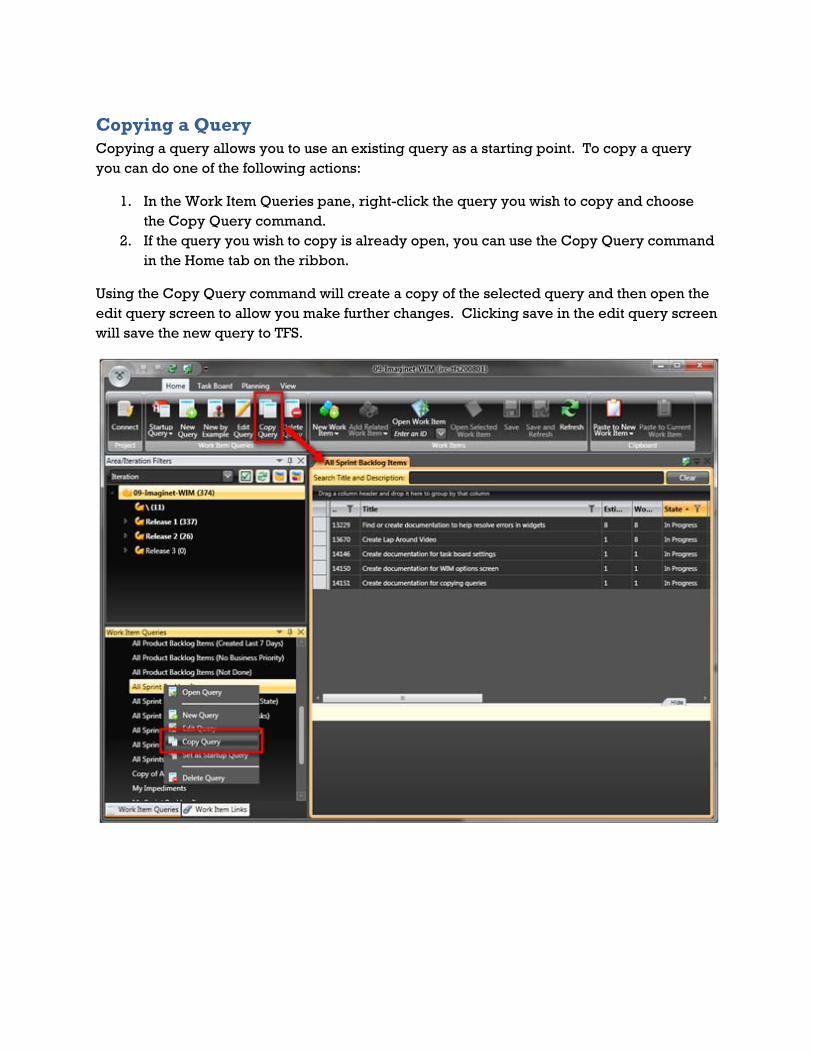
Copying a Query Copying a query allows you to use an existing query as a starting point. To copy a query you can do one of the following actions:
1. In the Work Item Queries pane, right-click the query you wish to copy and choose the Copy Query command.
2. If the query you wish to copy is already open, you can use the Copy Query command in the Home tab on the ribbon.
Using the Copy Query command will create a copy of the selected query and then open the edit query screen to allow you make further changes. Clicking save in the edit query screen will save the new query to TFS.

Editing Work Items There are many ways to add and edit work items in the Work Item Manager. The following sections describe the different options.
Adding a New Work Item To add a new work item click on the New Work Item command on the Home ribbon. Use the drop arrow on the New Work Item button to choose a work item to create. By default, the New Work Item button will use the top most listed work item as a default.
Adding Related Work Items To add a work item that is related to an existing work item, choose a work item from the Work Item Results Grid and choose the Add Related Work Item command on the Home ribbon. Similar to the New Work Item command, you can also specify the type of the related work item to create.

Editing Multiple Work Items In the query results grid, you can use Shift-click or Ctrl-click to select multiple work items and edit some common fields. When multiple work items are selected, the bulk editor will appear in the lower pane.

To edit the selected work items, use one of the combo boxes to select a new value for a field and then click Apply.
To clear the selected values in the combo boxes, click Cancel.
Pasting Content from the Clipboard to Work Items The Work Item Manager makes it easy to create new work items and associate virtually any type of content from the Windows Clipboard with the new work item.

To paste the contents of the clipboard into a new work item, choose the Paste to New Work Item command. You can also use the drop down arrow on this command to choose the type of work item to create.
To paste the contents of the clipboard into an existing work item, select a work item and choose the Paste to Current Work Item command in the Home or Task Board ribbon. Work items can be selected from the query results grid, the task board, or from a work item opened in a tab.
How the clipboard content is added to the work item depends on the type of data that is on the clipboard. The following table summarizes the behavior of the paste to work item commands.
Clipboard Content Action Files (including email messages) Added as an attachment Images (such as screen captures) Added as an attachment URL’s Added as a link (hyperlink) Text Appends text to the description field
Pasting Content from the Work Items into other applications To copy and paste the query results from WIM into another application, select the work items you wish to copy, right click in the selection, and choose the Copy command.
The selected work items will be added to the clipboard in a tabular format which can be consumed by other applications including Excel, Word, and Outlook.


Printing Work Item Cards If your team maintains a physical task board, you can print work items as cards to visually represent each work item.
Each card is color coded based on the work item type and contains the work item type name, ID, and title.
To print out work items in a card format, select any number of work items, then select the Task Board tab in the ribbon and choose the Print Work Item Cards command.
Work items can be selected from the query results grid, the task board, or from a work item opened in a tab.

Managing Areas and Iterations To modify Areas and Iterations go to the View tab in the ribbon and choose the Areas and Iterations command. A dialog window will open that is identical in functionality to the Areas and Iterations dialog in Team Explorer.

Assigning Dates to Iterations To assign dates to Iterations, select the View tab in the ribbon, then choose the Iteration Schedule command. A new document tab will open allowing you to set the dates for Iterations.

Dates can be set by either linking two iterations together (i.e. making one iteration the predecessor of another) or by setting the start date, end date, or duration directly.
If Iterations are added or modified after the iteration schedule has been initially created, you may need to use the Sync from TFS command to apply those changes to the iteration schedule.
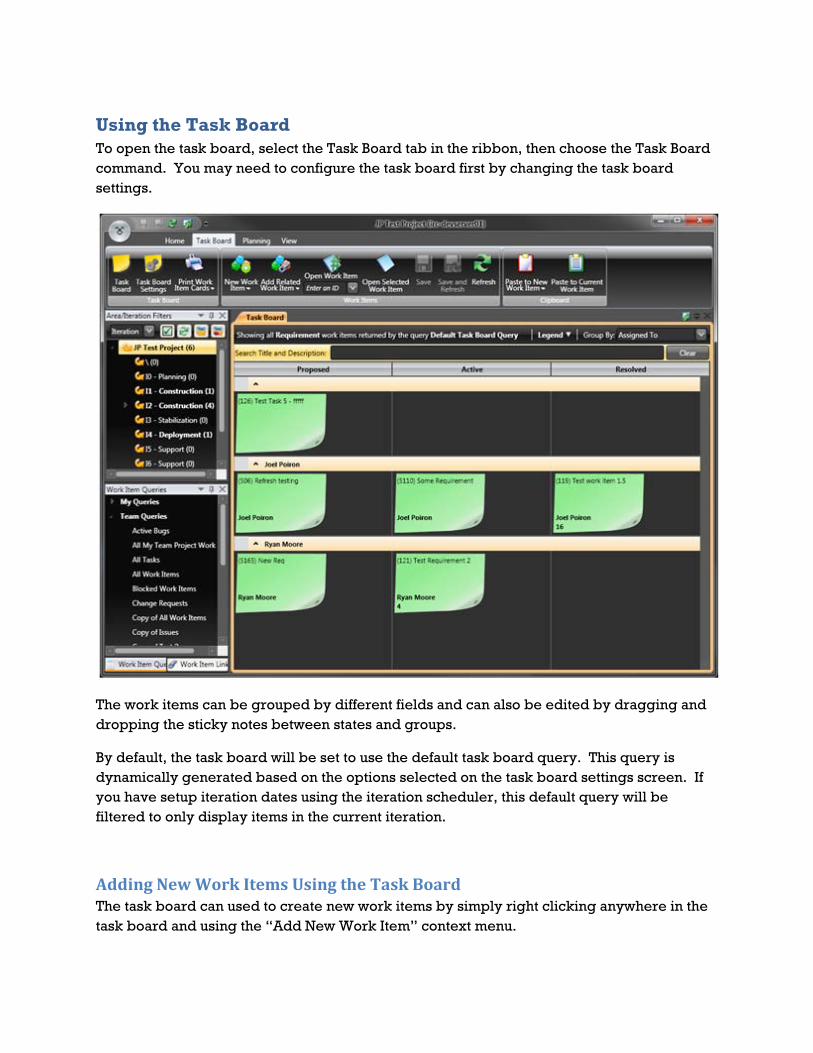
Using the Task Board To open the task board, select the Task Board tab in the ribbon, then choose the Task Board command. You may need to configure the task board first by changing the task board settings.
The work items can be grouped by different fields and can also be edited by dragging and dropping the sticky notes between states and groups.
By default, the task board will be set to use the default task board query. This query is dynamically generated based on the options selected on the task board settings screen. If you have setup iteration dates using the iteration scheduler, this default query will be filtered to only display items in the current iteration.
Adding New Work Items Using the Task Board The task board can used to create new work items by simply right clicking anywhere in the task board and using the “Add New Work Item” context menu.
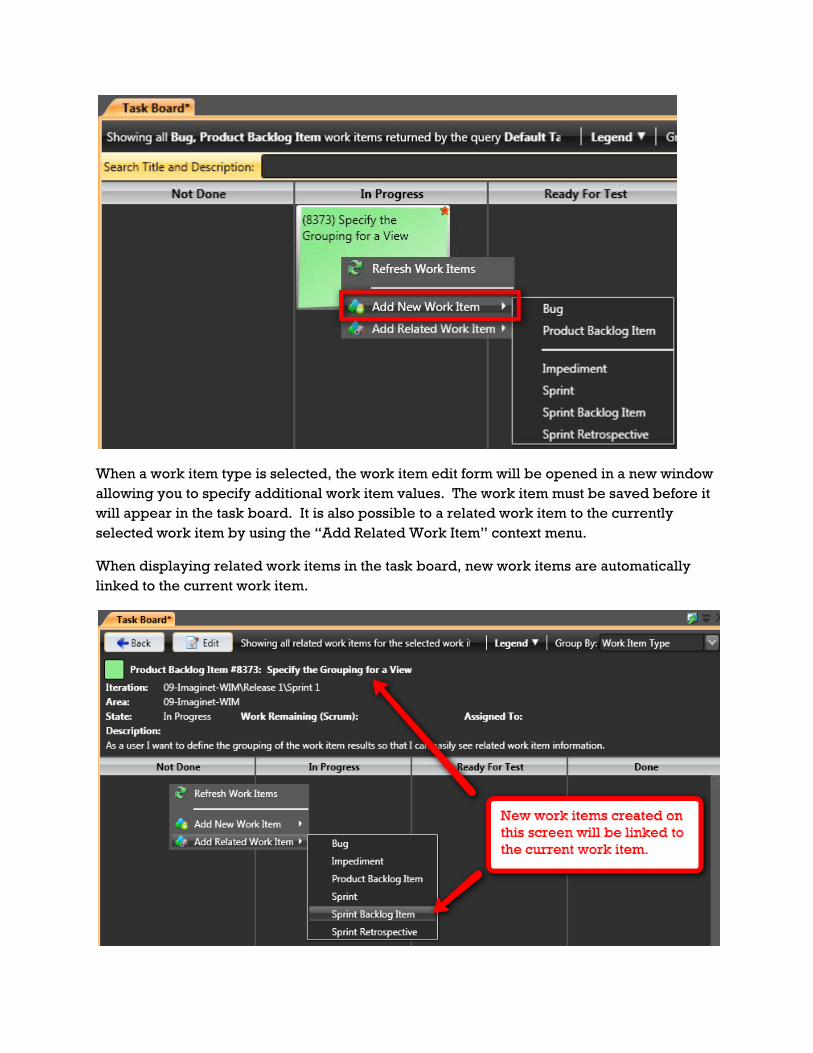
When a work item type is selected, the work item edit form will be opened in a new window allowing you to specify additional work item values. The work item must be saved before it will appear in the task board. It is also possible to a related work item to the currently selected work item by using the “Add Related Work Item” context menu.
When displaying related work items in the task board, new work items are automatically linked to the current work item.

Editing Work Items Using the Task Board The task board is useful not only for viewing work items in a more easily consumable fashion, but also for editing work items.
Work items can be dragged from one state column to another in order to set the state of that work item. The columns for states that are not valid will be disabled and the work item will not be allowed to be dropped in that column.
Additional work item fields can be edited by choosing the edit command on a sticky note. To make the edit command appear, move the mouse over the work item you wish to edit.
Viewing Related Work Items To view related work items, move the mouse over a work item and choose the Show Related Work Items command.

Information about the selected work item will be displayed above the task board and all its related work items will be shown in the task board. The selected work item can also be edited on this screen. To go back to the main task board, choose the Back command.
Configuring the Task Board There are a number of different options that can be set to change the information the task board displays and the way that it is displayed.
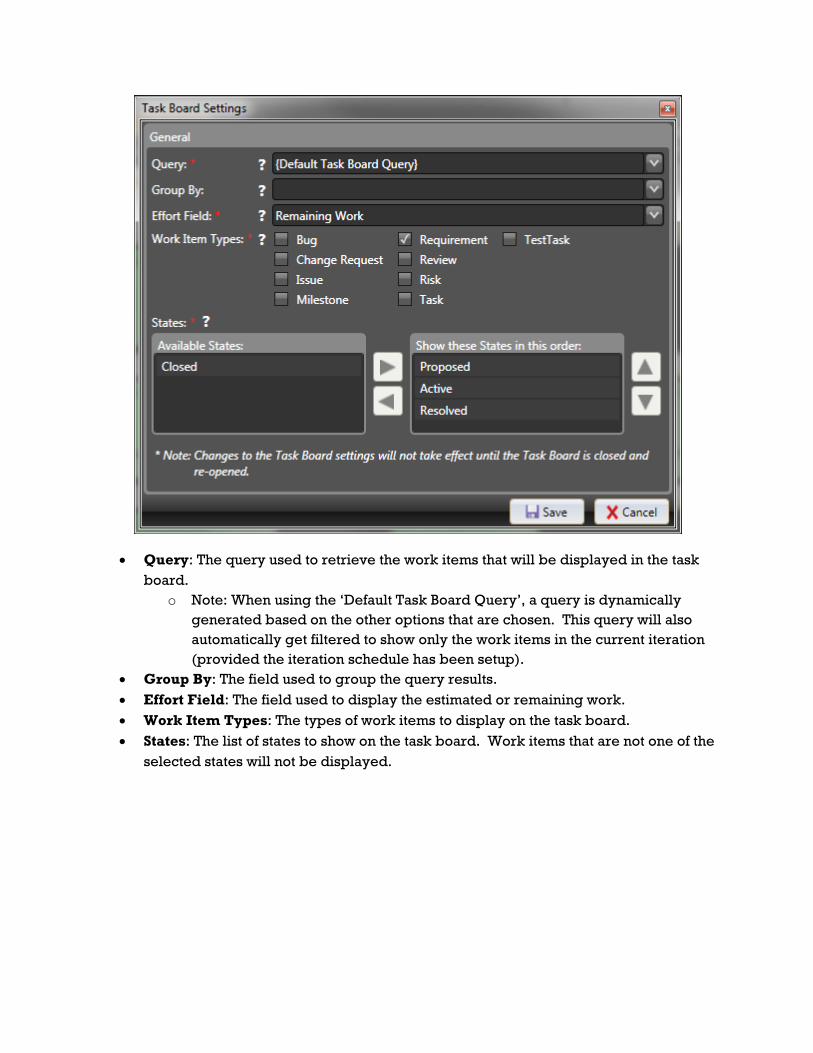
• Query: The query used to retrieve the work items that will be displayed in the task board.
o Note: When using the ‘Default Task Board Query’, a query is dynamically generated based on the other options that are chosen. This query will also automatically get filtered to show only the work items in the current iteration (provided the iteration schedule has been setup).
• Group By: The field used to group the query results. • Effort Field: The field used to display the estimated or remaining work. • Work Item Types: The types of work items to display on the task board. • States: The list of states to show on the task board. Work items that are not one of the
selected states will not be displayed.

Using the Iteration Planner The iteration planning tool is a quick and easy way to add work items to iterations while tracking the capacity remaining in each iteration.
Iteration planning is performed in sessions which can span multiple days. The session will be saved whenever the iteration planner pane is closed or the application is shut down.
Starting a New Iteration Planning Session A new planning session can be started by clicking the Planning tab in the ribbon and choosing the Start New Session command.
Some configuration must be done prior to starting a new session. In particular, the work item types being planned, the size field, the iteration capacity, and the iterations to plan must be chosen.

• Work Item Types: The work item types that will be planned in this session. o Only work items of the selected types will be allowed to be added to the
iterations. o Using the Additional options, you can also exclude work items that are in
certain states. • Work Item Size Field: The field used to determine the size of a work item.
o This field will be used to help calculate the capacity remaining in an iteration. • Iteration Capacity: A numeric value that specifies how much work can be done in an
iteration. Depending on the process template used for the project, this value may be in days, hours, or story points.
o This value can be set per iteration during the planning session. • Iterations: The iterations that will be planned in this session.
Adding Work Items to an Iteration Adding work items to an iteration is as simple as dragging work items from any query results grid and dropping them into the iteration buckets.
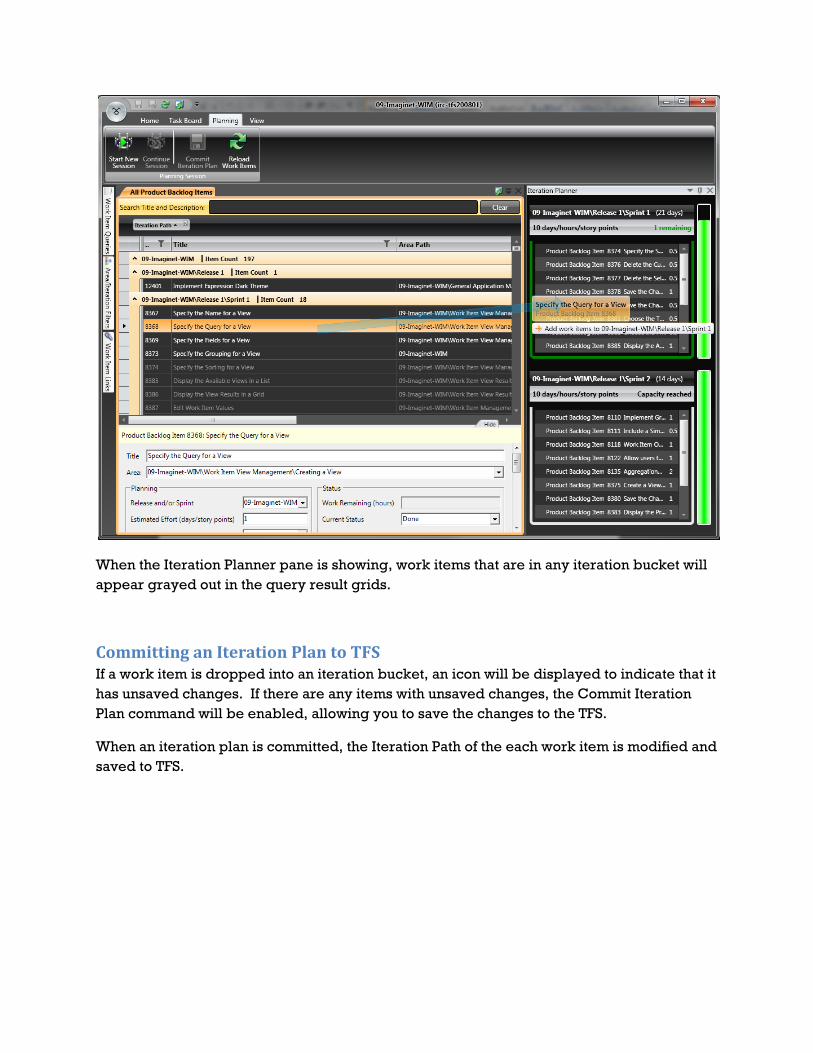
When the Iteration Planner pane is showing, work items that are in any iteration bucket will appear grayed out in the query result grids.
Committing an Iteration Plan to TFS If a work item is dropped into an iteration bucket, an icon will be displayed to indicate that it has unsaved changes. If there are any items with unsaved changes, the Commit Iteration Plan command will be enabled, allowing you to save the changes to the TFS.
When an iteration plan is committed, the Iteration Path of the each work item is modified and saved to TFS.

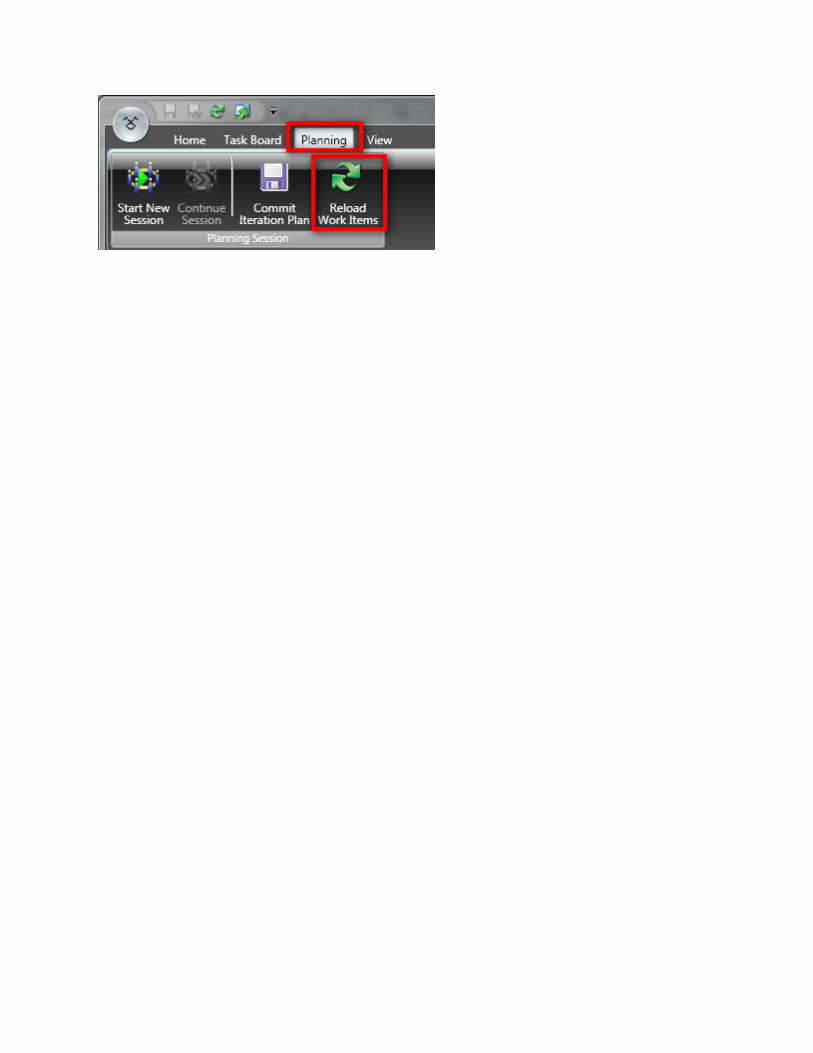
Continuing a Previous Iteration Planning Session Whenever the Iteration Planner pane is closed or application is shut down, the current planning session is saved. To resume a previous planning session, click the Planning tab in the ribbon and choose the Continue Session command.
Reloading Work Items for an Iteration As a planning session may span several days, the work items that are in the session may be modified outside of the session. As a result, you may need to reload the work items for each iteration in the session to ensure that they are up to date. Any work item with pending changes in an iteration bucket will not be reloaded or removed when reloading the work items.
To reload the work items for an iteration in a planning session, click the Planning tab in the ribbon and choose the Reload Work Items command.
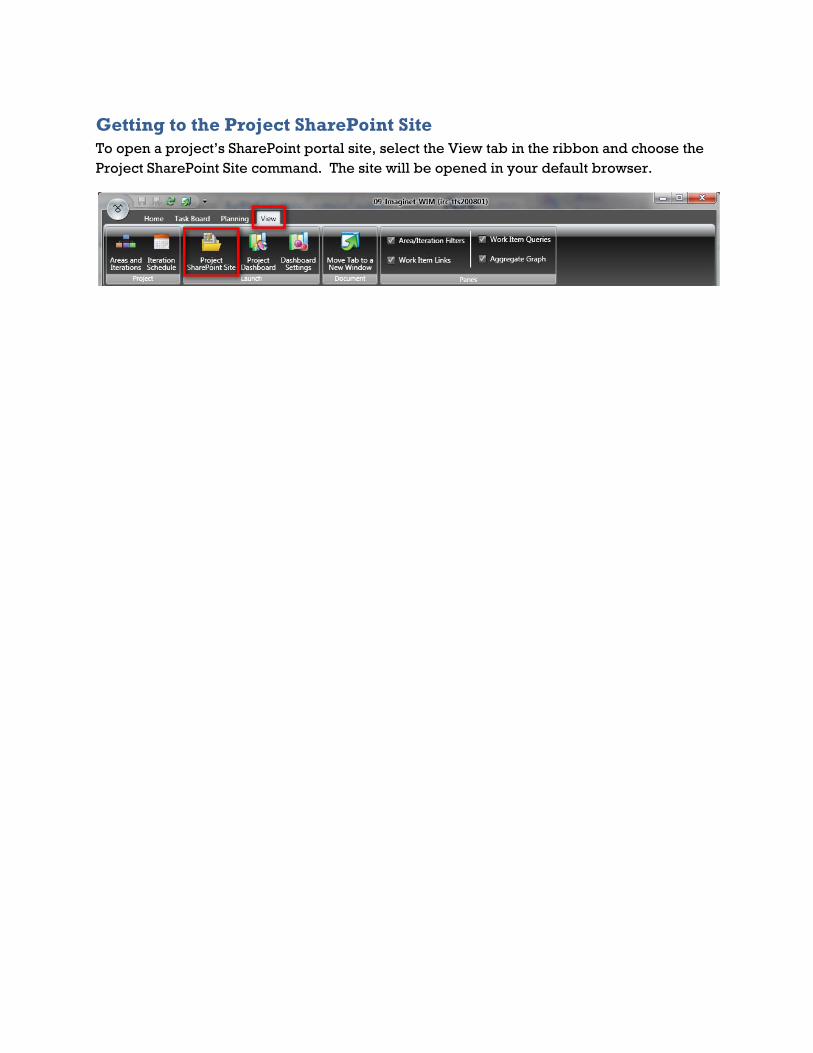
Getting to the Project SharePoint Site To open a project’s SharePoint portal site, select the View tab in the ribbon and choose the Project SharePoint Site command. The site will be opened in your default browser.
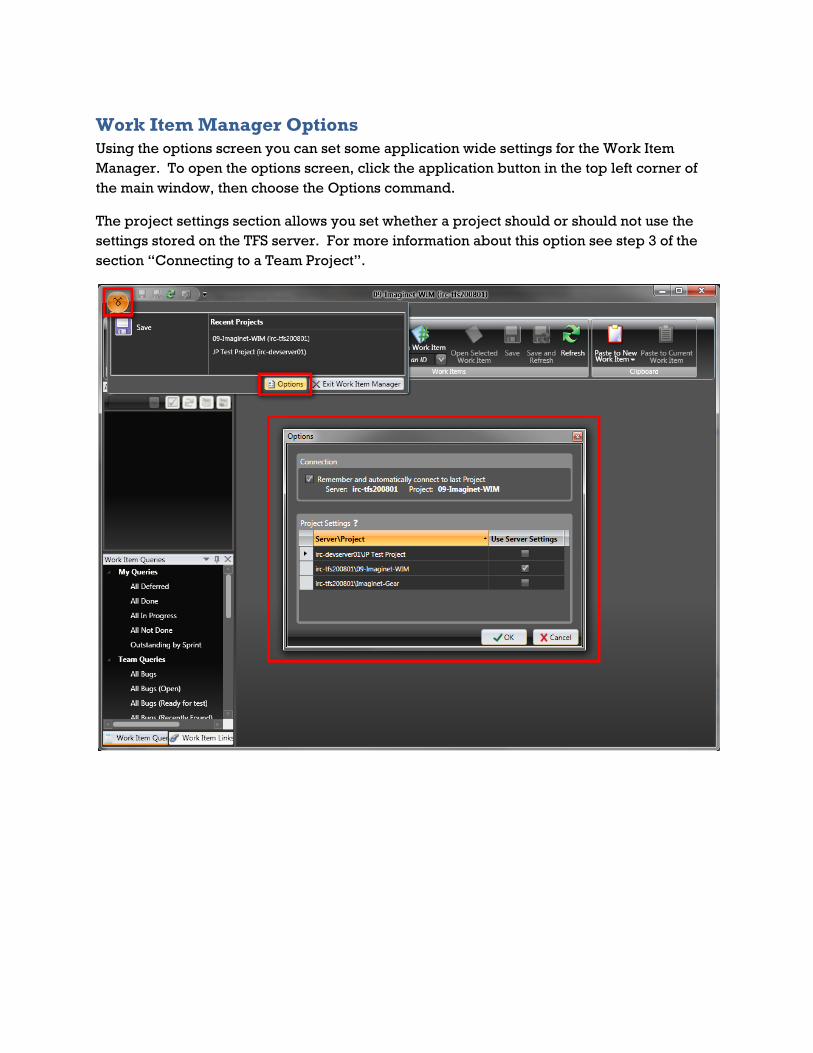
Work Item Manager Options Using the options screen you can set some application wide settings for the Work Item Manager. To open the options screen, click the application button in the top left corner of the main window, then choose the Options command.
The project settings section allows you set whether a project should or should not use the settings stored on the TFS server. For more information about this option see step 3 of the section “Connecting to a Team Project”.

Managing Panes The location, size, and behavior of the panes that make up part of the Work Item Manager user interface can be customized to your liking.
To dock a pane to a new location, pick up the pane by clicking and holding the left mouse button while over the pane’s header. Use the docking indicators to help you reposition the pane.
Panes can also be closed by clicking the X in pane’s header. Closed panes can be re-opened by clicking the checkbox beside the name of the pane on the View tab in the ribbon.

Auto hide mode can be used if you want the pane to minimize when it is not in use. To put a pane in auto hide mode, click the pin icon in pane’s header or click the drop down arrow and choose the Auto Hide command. In this mode, the pane will be hidden until the mouse is placed over the pane’s tab. To get the tab out of auto hide mode, click the pin icon.

Managing Tabs
Saving Changes Many of the items that are opened as document tabs allow you to edit their contents. If a document tab contains unsaved changes as asterisk (*) will be displayed in the title of the tab.
Changes can be saved by clicking one of the Save commands or by pressing CTRL-S.
Open Tab in a Window To open a document tab in a separate window, choose the Move Tab to a New Window command located in the document tab row, the quick access toolbar, and on the View tab in the ribbon.

Understanding the TFS Project Dashboard
Launching the Project Dashboard There are two different ways to launch the Project Dashboard
1. As a standalone application 2. From inside of the Work Item Manager
Launching the Project Dashboard as a standalone application When you install the Work Item Manager, the TFS Project Dashboard is also installed. To launch the Project Dashboard, click on the Telerik TFS Project Dashboard icon that is either located on your desktop or located in the start menu under Program Files->Telerik->Work Item Manager

Launching the Project Dashboard from the Work Item manager To launch the Dashboard from the Work Item Manager, ensure you are connected to a project, then select the View tab in the ribbon and choose the Project Dashboard command. When the Dashboard starts, the project will be added to the rotation and the project will be displayed first.
Note: If the Dashboard is already running and you choose the Project Dashboard command, you will be prompted to shut down the Dashboard prior to launching it from WIM.
Configuring the Project Dashboard To open the dashboard configuration screen, press F2 while the dashboard is running, or from the Work Item Manager, select the View tab in the ribbon and choose the Dashboard Settings command.
Using the dashboard configuration settings window you can change the general settings for the dashboard application as well as change the settings for each project that will be shown in the dashboard.
The general tab is used to change the user settings associated with the dashboard application. This includes choosing a layout for the dashboard. If you do not have direct access to the TFS warehouse, you should choose a layout that only displays widgets that do not require warehouse access.

The projects tab is used to define which projects will be shown in the dashboard and in which order they should appear. You can change the settings for each project by choosing the Configure command for a project.

Configuring the TFS warehouse connection string Some Dashboard widgets require direct access to the TFS warehouse to retrieve data. If you do not have direct access or are using a non-standard TFS installation, you may need to manually configure the TFS warehouse connection string.
To modify the TFS warehouse connection string for a project, open the Dashboard configuration screen, select the Projects tab, and choose the Configure command for the project you wish to configure. This will open the project configuration screen.
On the project configuration screen select the General tab and choose the Edit Connection String command. This will open the TFS warehouse connection string screen.

Use the Server name, Database name, Connect timeout, and Log on credentials fields to build your connection string. Changing the values in these fields will automatically update the Connection String field. Alternatively, you can type in the Connection String field.
To test your connection string, choose the Test Connection command. The result of your test will be displayed beside the Test Connection button.
For more information on accessing the TFS warehouse see the appendix “Configuring the TFS Analysis Services Database” in this document or read the following online resources:
Accessing the TFS Data Warehouse Configuring a SQL Analysis Services Connection String

Troubleshooting WIM
Problem: An error occurs that says “Could not load type…” When using the Work Item Manager or the Project Dashboard you may receive an error similar to the following:
Could not load type ‘Microsoft.TeamFoundation.WorkItemTracking.Client.WorkItemTypeDeniedOrNotExistException’ from assembly ‘Microsoft.WorkItemTracking.Client, Version=9.0.0.0, Culture=neutral, PublicKeyToken=b03f5f7f11d50a3a
There are 2 known reasons for receiving this error:
1. You have the Visual Studio 2010 Beta installed a. Solution: uninstall the Visual Studio 2010 Beta.
2. You installed SP1 (service pack) for Visual Studio 2008 before installing Team
Explorer 2008. a. Solution: re-install SP1 for Visual Studio 2008.
Problem: Cannot connect to TFS warehouse using default settings The Dashboard will attempt to determine the name of your data warehouse automatically. If you have a distributed TFS installation, the Dashboard may not be able to determine the location of the TFS data warehouse automatically. In this case, you may see a dashboard layout that does not contain any widgets that rely upon data in your TFS Warehouse. You can use the Dashboard settings to manually configure the connection string to your TFS warehouse. See the section “Configuring the TFS warehouse connection string” for more information.
Problem: Cannot connect to TFS warehouse over HTTP If you get prompted for credentials when you connect to a TFS server, you may not be able to connect to the TFS warehouse. Some dashboard widgets require direct access to the TFS warehouse and the credentials that are used to connect to the warehouse are by default, the Windows credentials.

Problem: The Dashboard is not displaying some widgets The Dashboard relies upon access to your Team Foundation Server’s data warehouse. If you do not have access to the warehouse or if the Dashboard does not have access to the server then the Dashboard will only display widgets that do not rely upon the Dashboard for data.
Problem: When connecting to a new project with the Work Item Manager you are not able to upload project settings to the Team Project’s source control repository The Work Item Manager stores its project settings in the source control repository for the team project you are attempting to connect to. There are a couple of reasons why you may not be able to upload and store the project settings.
There is no source control repository for the team project. If you wish to centrally store project settings, then follow these steps to add a source control repository to the team project.
1. Open the Team Explorer 2. Connect to the team project 3. Click on the Source Control node in the project tree 4. Select Yes when prompted to create a source control repository
Note: Your user account will have to have the appropriate permissions to perform this action.
Your user account does not have write permissions to the project’s source control repository. If you wish to centrally store project settings, then follow these steps to give your account the appropriate permission to the source control repository for the team project.
1. Open the Team Explorer 2. Connect to the team project 3. Double click on the Source Control node in the project tree 4. Locate the WIM folder at the root of the team projects source control repository 5. Right-click on the WIM folder and select Properties… 6. Click the Security tab 7. If you are adding an Active Directory user, then click the Windows User or Group
radio button. If you are adding a Team System user, then click the Team Foundation Server Group radio button.
8. Click Add… button and add the appropriate user or group. Close the dialog once completed.
9. Check the Allow box next to Read, Check Out, Check In and Lock. 10. Click OK to close the properties dialog.
Note: These steps assume that a user with Read/Write access to source control has already run the Work Item Explorer and saved their settings on the server.
Note: These actions will have to be performed by an account that has the appropriate permissions for this team project.
Problem: Work Item Manager and Dashboard cannot store settings in Source Control The Work Item Manager and the Dashboard rely upon your project’s source control folder to store its settings if you choose. If the project you are working with was set up without a source control folder then the Work Item Manager and Dashboard will not be able to store settings for that project centrally.
Problem: The Dashboard displays an error when connecting to Team Foundation Server 2005 The dashboard currently does not work with Team Foundation Server 2005. If you add a TFS 2005 project to the dashboard you may experience errors or the dashboard may fail to load.
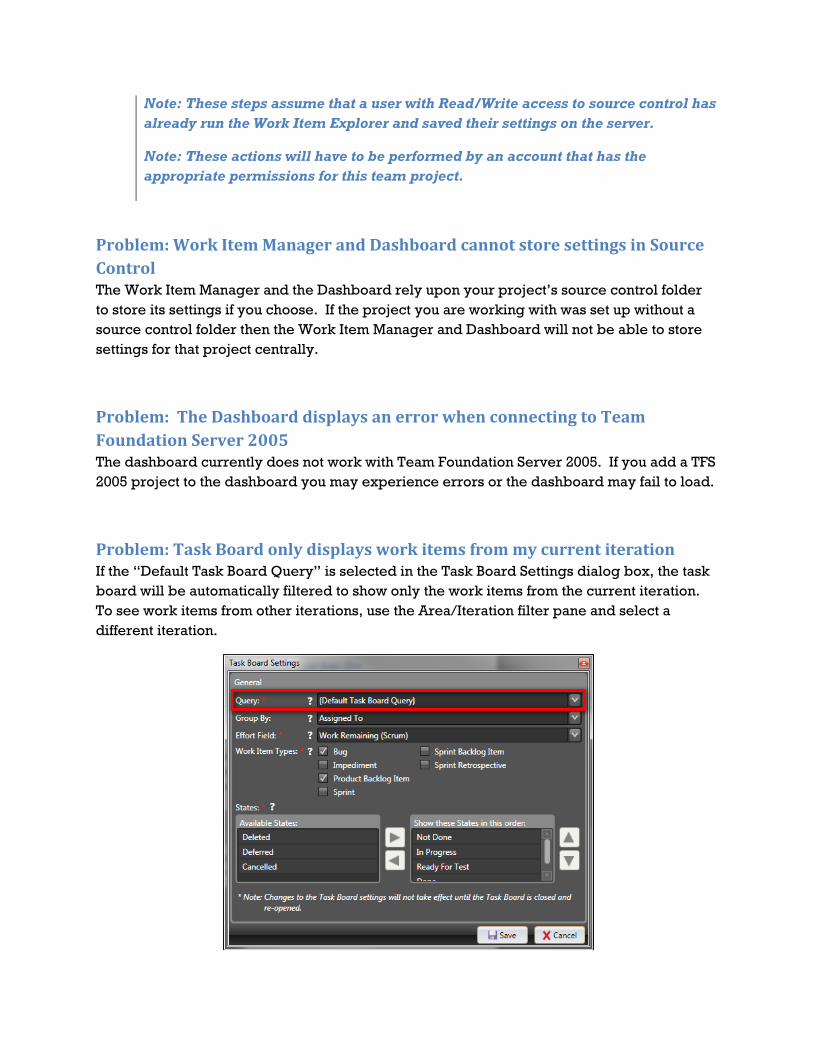
Problem: Task Board only displays work items from my current iteration If the “Default Task Board Query” is selected in the Task Board Settings dialog box, the task board will be automatically filtered to show only the work items from the current iteration. To see work items from other iterations, use the Area/Iteration filter pane and select a different iteration.

Appendix – File Locations
Default Installation Path:
• 64Bit: C:\Program Files (x86)\Telerik\Work Item Manager • 32Bit: C:\Program Files\Telerik\Work Item Manager
Settings Paths:
• My Documents\Work Item Manager o Storage of Team Project and Query metadata
• C:\Users\<user>\AppData\Local\Telerik o Storage of window and pane settings and positions

Appendix – Configuring the TFS Analysis Services Database Perform the following to grant a user or group read access to the analysis services database
1. On the Start menu, point to All Programs, point to Microsoft SQL Server 2005, and then click SQL Server Management Studio.
2. SQL Server Management Studio starts and the Connect to Server dialog box appears.
3. In the Server type list, click Analysis Services.
4. In the Server name box, type the name of the analysis services server for Team Foundation Server, and then click Connect.
NOTE: The analysis services server for Team Foundation Server is typically the same as the data-tier server.
5. The Connect to Server dialog box closes.
6. In Object Explorer, expand the server's Databases folder, then expand the TfsWarehouse database, and then expand the Roles folder.
7. Right-click the TfsWarehouseDataReader role and then click Properties.
8. The Edit Role dialog box appears.
9. Under Select a page, click Membership, and then click Add.
10. The Select Users or Groups dialog box appears.
11. Add the user or group, click OK, and then click OK.