Embed Size (px)
Citation preview

Autodesphotos. ‘image b Autodesin applicdownstrReCap™ AutodesAutoCADAutodesMac or Wmodest
Shoot Phrecap.auto start RPhoto
Being sOne of tGOOD pfor tips o
sk® ReCap™ In the technbased model
sk® ReCap™ Pcations such ream in modPhoto also
sk® ReCap™ D®, Revit®, Insk® ReCap™ PWindows ancomputer.
hotos, go to utodesk.comReCap
successfuhe most funhotos and Eon good shoo
Au
Photo is an nology worlding’ or ‘phot
Photo generas Project Mdeling applicgenerates a Pro (Autod
nventor®, NaPhoto is a fund as it lever
1
Stit,ththge
l: damental faNOUGH phooting strateg
todesGettin
online servd this procesogrammetry
rates mesh mMemento (scations suchpoint cloud desk’s laser avisworks®, Iull cloud solurages the clo
Photo
art a new pr select the mhe export filehe photos anet a 3D mode
ctors for getotos that havgies.
sk ReCng Starte
vice that cress of generaty’.
models (.OBJoftware for h as Autodesformat (.RCscans regisnfraworks® ution that reqoud for powe
o‐to3D p
roject, name mesh quality,e type, upload submit to el
tting a good 3ve GOOD ov
Cap Phed Guide
ates high reting 3D mod
J, .RCM, .FBXcleanup/fix sk 3ds Max®CS) that can fstration, visuetc.. quires no doerful compu
process
, d 2
3D model reerlap. Please
hoto
esolution texdels from ph
X, .IPM) thatand editing ®, Maya® orfurther be uualization an
ownload, it ctations, it ca
View the moand downlomodels to ufurther in vaworkflows
constructione refer to th
xtured 3D mhotographs is
t can be posthuge mesher Mudbox®. sed in a wornd clean up
an be run froan be used f
odel online ad the 3D se them arious
n from photoe end of the
1
models from s known as
t processed es) or used Autodesk® rkflow with p solution),
om any OS, from a very
3
os is to take e document
2
Table of Contents 1. GETTING STARTED ........................................................................................................................... 3
2. BASIC WORKFLOW: From photos to a 3D model .......................................................................... 5
STEP 1 ‐ Create a new project ............................................................................................................. 5
STEP 2‐ Project settings ....................................................................................................................... 5
STEP 3 ‐ Upload photos ....................................................................................................................... 6
STEP 4 – Viewing the results online .................................................................................................... 8
3. FOLLOW UP WORKFLOW: Resubmit .......................................................................................... 12
B1. Resubmit to get different mesh quality or different export format .......................................... 12
B2. Resubmit to add more images ................................................................................................... 13
B2. Resubmit to manually stitch unstitched images ........................................................................ 13
4. ADVANCED FEATURES AND WORKFLOWS .................................................................................... 15
ADDING SURVEY POINTS ................................................................................................................... 16
INPUT KNOWN DISTANCES................................................................................................................ 18
5. WHAT NEXT? ................................................................................................................................. 21
6. 3D PRINTING .................................................................................................................................. 21
7. MANAGING MY PROJECTS and STORAGE ..................................................................................... 22
8. NOTES for existing users of ReCap Photo on A360 ....................................................................... 23
9. KNOWN ISSUES, LIMITATIONS and BUGS ..................................................................................... 24
10. ADDENDUM ‐ How to take photos that are good for photogrammetry ................................... 25
1. GTo start,
To start A360 is Aviewing Sign in b Know ththis web VERY IMTo run Abrowsercurrently
GETTING go to http://
using ReCapAutodesk’s cas well as c
button. If don
at all your pb site, using t
MPORTANT: A360 or ReCr. (we use Wy do not sup
STARTED /recap.autod
p Photo, you cloud platforcollaborativen’t yet have a
rojects (phothe Autodesk
Cap Photo, yWebGL techport WebGL
desk.com/pho
will first neerm that give exchange aan A360 acco
tos and recok 360 link in
you must ush for previewL. Chrome is
oto
ed an accouns you accessand sharing. ount, sign up
onstructions the ribbon a
se Google Cwing the 3Dour recomm
nt on Autodes to many cloIf you alreap for a free a
will be hosteat the bottom
Chrome or aD model in
mendation.)
esk 360 httpsoud based sdy have anaccount using
ed on A360 bm of the page
ny other Wa browser
s://360.autodervices, storA360 accoug the link nex
but can be ae)
WebGL enableand Interne
3
desk.com rage, online nt, use the xt to it.
ccessed via
ed internet et Explorer

Once sig
The Land
If you arphotos aobviouslmodels/ So, let’s
gned in, you w
ding page co
Learning
Gallery o
Possibilit
Informat
Links to
Link to y
re new to theand how thisly you are – s/scenes gene
start making
will arrive on
ontains:
g and inform
of projects yo
ty to start a
tion about th
forums
your A360 ac
e ReCap Phos photo‐to‐3since this is erated from p
g 3D models
n the landing
ational mate
ou have alre
New project
he usage of y
ccount where
to service, wD service woit !). Also, photos look
from photos
g page of ReC
erial (getting
ady done, an
t
your storage
e you can ma
we recommeorks. You shoopen some like.
s!
Cap Photo.
g Started guid
nd the last 3
e (top right)
anage and sh
nd you to loould also reaof the exam
de, videos an
projects exp
hare your pro
ok at the Vidad the Gettinple files to s
nd example p
posed
oject files
deos to see hng started guee and expe
4
projects)
how to take uide (which erience how
2.
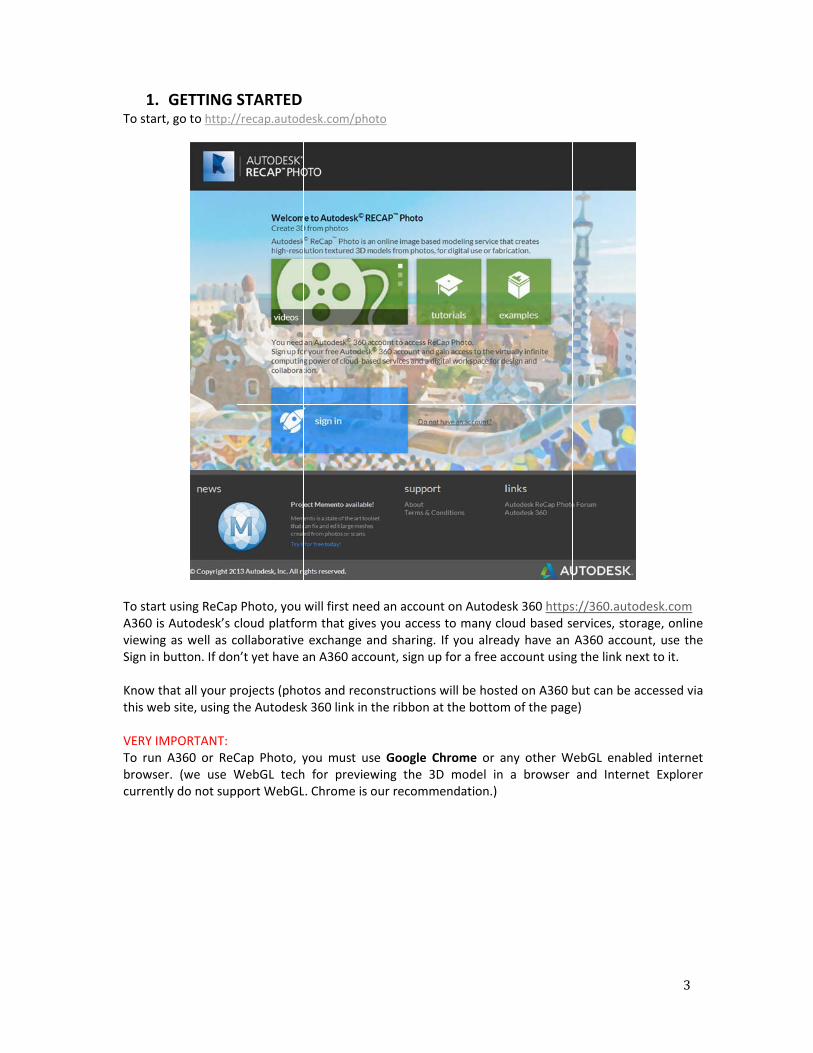
STEP 1 ‐
To start
Change This will
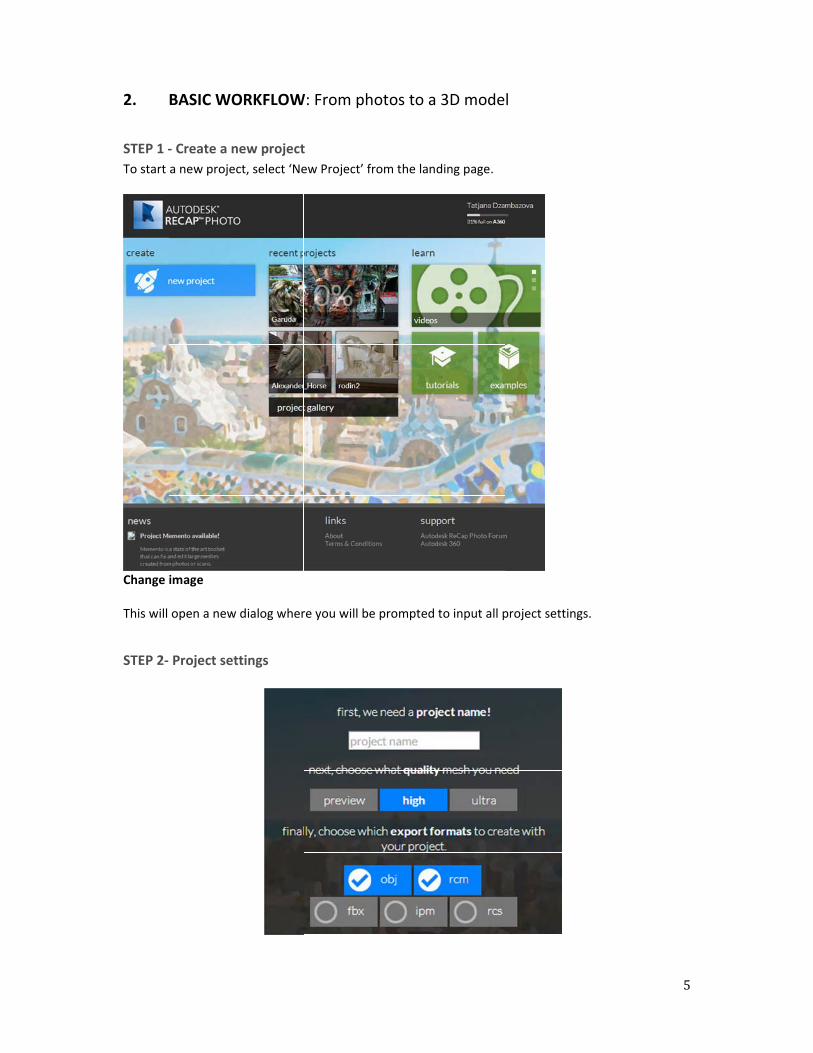
STEP 2‐
BASIC WO
‐ Create a n
a new projec
image
open a new
Project set
ORKFLOW
new project
ct, select ‘Ne
dialog wher
ttings
W: From ph
t
ew Project’ f
re you will be
hotos to a
from the land
e prompted
3D mode
ding page.
to input all p
l
project settin
ngs.
5

6
You will start by giving a Project Name (this btw, will become the name of the project folder on your Autodesk 360 account where the projects are stored and can be managed)
Next you select the quality for the 3D model you wish to create
Finally, you set which export formats you wish the 3D model generated from the photos to be published in
Few details here:
QUALITY OF MESH There are 3 choices for mesh densities/qualities for the generated 3D models:
Preview – you can use this mode to get a quick result and see if your stitching (3D model creation) will be successful. In Preview mode, you can only view the 3D model, but you cannot export the mesh. (The export options are not available in this mode). This selection will give you the results in shortest amount of time, but it will also by no means give you the high quality results you are aiming. It is more a mode in which you can see if you took the photos well and if they stitch well at all, without having to wait too much.
High and Ultra – These mesh densities give you a high quality mesh model that can be exported in various formats. Given that they deliver high quality results, they will take some time to get processed, sometimes up to few hours, depending on the size of the scene.
Selecting which will depend on the time you are willing to wait for the 3D model to be calculated and the final quality of the 3D reconstruction you will need.
EXPORT FILE FORMATS ReCap Photo can export the 3D models that it generates from photos, in .OBJ, .FBX, .IPM .RCM and .RCS format. The first four are MESH file formats, while .RCS is a point cloud file format, appropriate to be opened in ReCap Pro, Autodesk’s solution for visualizing, cleaning and registering point clouds (scans). The native file format in which ReCap Photo saves the 3D scene is .RCP. This is the Reality Capture Project file and it is that file that you need to select when wanting to open/view your model online. Do not confuse it with RCS which is the point cloud format that can be opened and used in ReCap Pro. After making all the choices about the project you are about to create, click on Next to open the new page where you can upload the photos.
STEP 3 ‐ Upload photos
The service now guides you to the next step – prompting you to upload photos. You can upload photos from your Desktop (by browsing or drag&drop) or from your A360 account, if you have stored images there). To upload from the Desktop, click anywhere in the main window – this will open Finder/Explorer and you browser to the folder with your photos

Be awarthe phot After all In the ne
t
OR
Ye
AND
yft
Doing anwill be sWhen thcreated registere You will project t
e – if you artos to ‘the cl
your photos
ext page you
Immediatelythe uploaded
You can deleentered the D / OR
you can insefor the recothe screen), More about
ny of the aboubmitted. he scene has3D scene. Ned on A360.
also notice tthumbnail in
re uploadingoud’
s have a blue
u can choose
y click ‘next’ d photos
ete first unwset)
ert Survey ponstruction. Tthat when this later on
ove and end
s been fully cNote that th
that on the percentage
lots of phot
e sign indicat
to:
again, whic
wanted photo
oints or set aThese settingactivated, dn in the docu
ding by clicki
calculated, ye email will
landing page:
tos it might t
ting that the
h means tha
os (if you no
a known Distgs are availaisplays a nement
ng Next, wil
ou will receibe sent to
e, the progre
take a few m
upload has b
at you are s
tice now tha
tance you mble under thw button in
l send your
ve an email the email a
ess of the ca
minutes, as t
been done, c
submitting t
at they are b
ight have ashe ‘advanced the ribbon,
scene for co
notification ddress with
lculation wil
the system is
click ‘next’.
the scene as
blurry or a w
s additional id tools’ (bott, called REG
omputation:
with a link twhich you
ll be displaye
7
s uploading
is, with all
rong photo
nformation tom left on ISTRATION.
Your scene
to open the logged in /
ed over the
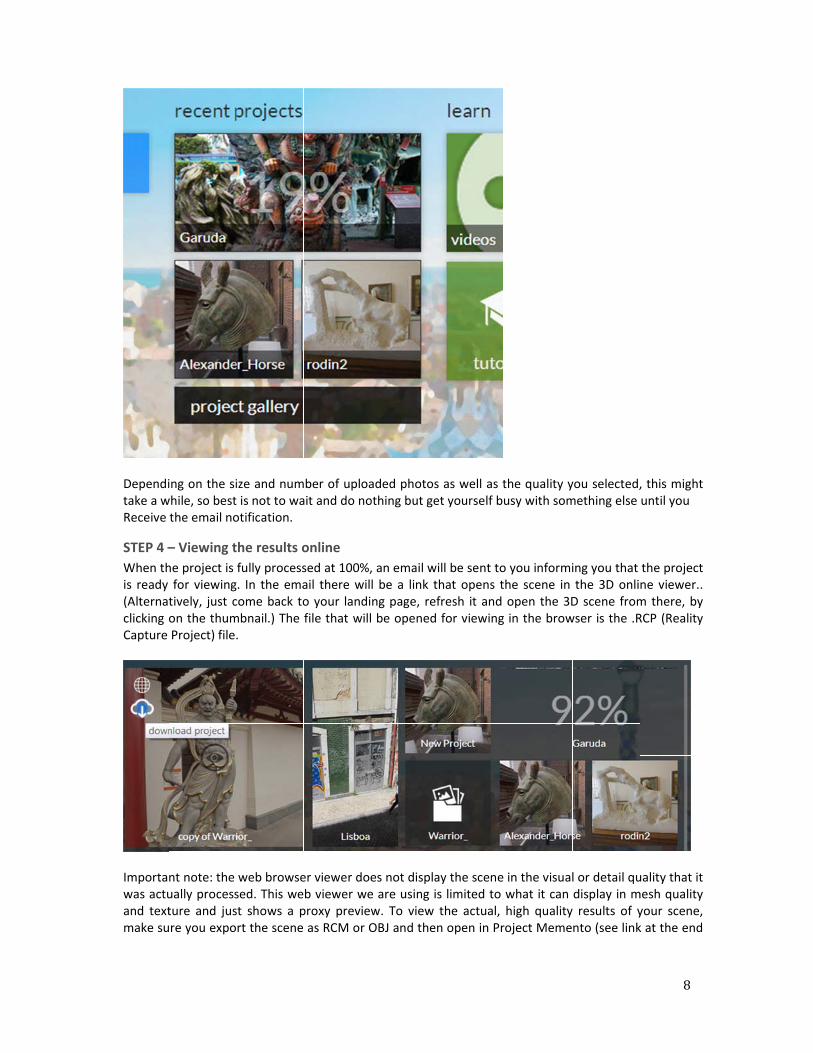
Dependitake a wReceive
STEP 4 –
When this ready (Alternatclicking oCapture
Importawas actuand textmake su
ing on the siwhile, so bestthe email no
– Viewing t
he project is for viewingtively, just con the thumProject) file.
nt note: the ually processture and jusre you expo
ize and numt is not to waotification.
the results o
fully processg. In the emacome back tombnail.) The .
web browsesed. This west shows a prt the scene
mber of uploaait and do no
online
sed at 100%,ail there wilo your landifile that will
er viewer doeb viewer weproxy preview as RCM or O
aded photosothing but ge
, an email wil be a link tng page, refl be opened
es not displae are using isw. To view OBJ and then
s as well as tet yourself bu
ill be sent tohat opens thfresh it and for viewing
ay the scene s limited to the actual, n open in Pro
the quality yusy with som
o you informihe scene in open the 3Din the brow
in the visualwhat it can high qualityoject Meme
you selected,mething else
ing you that the 3D onliD scene fromwser is the .R
l or detail qudisplay in m results of ynto (see link
8
, this might until you
the project ne viewer.. m there, by RCP (Reality
uality that it mesh quality your scene, k at the end
of doc), when op
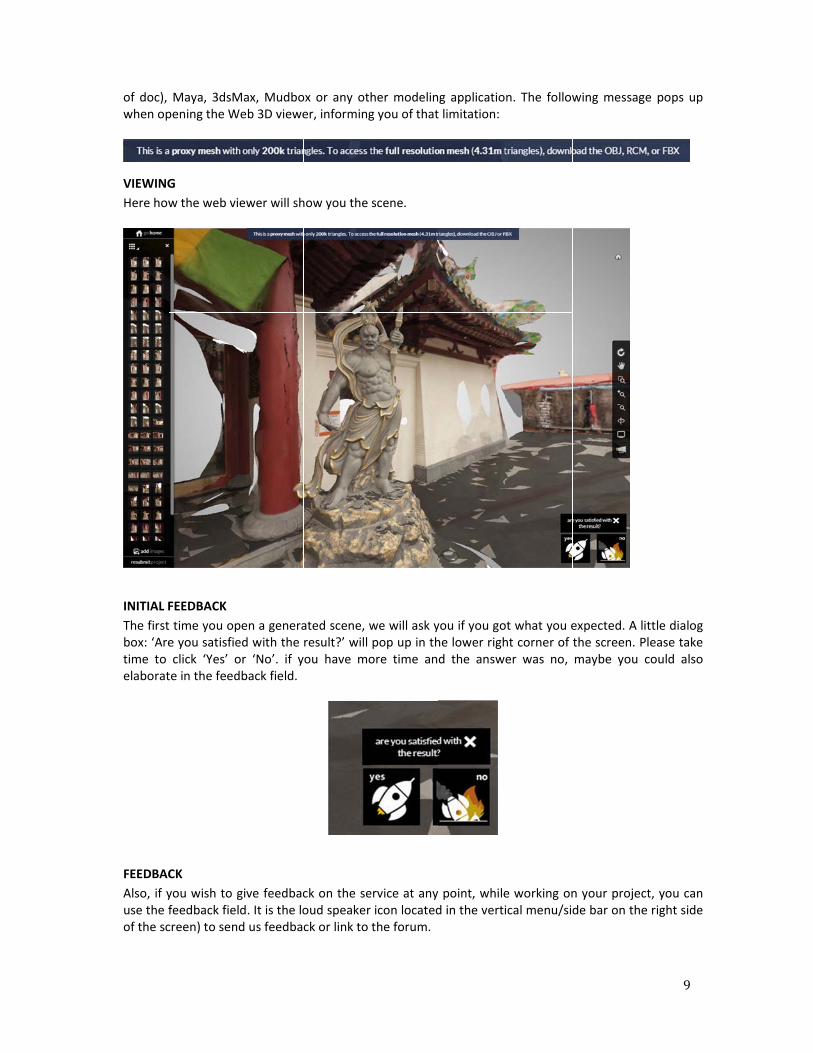
VIEWING
Here how
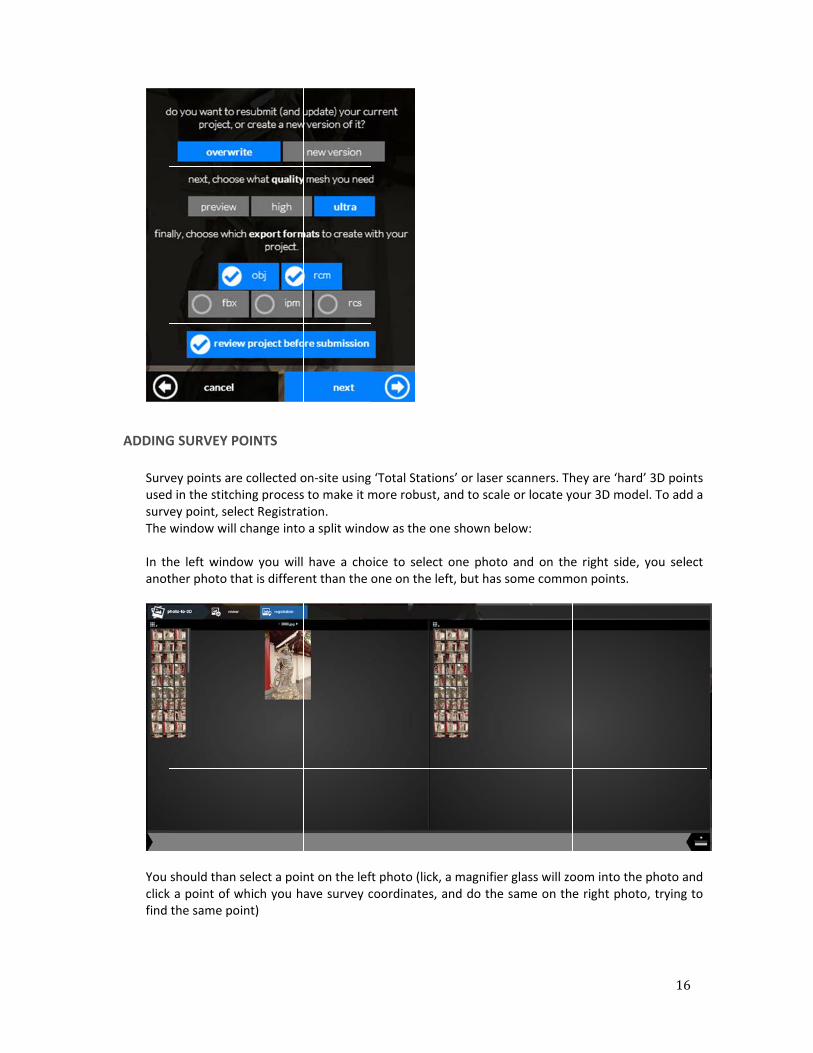
INITIAL F
The firstbox: ‘Aretime to elaborat
FEEDBAC
Also, if yuse the fof the sc
Maya, 3dsMpening the W
G
w the web v
FEEDBACK
t time you ope you satisfieclick ‘Yes’ ote in the feed
CK
you wish to feedback fiecreen) to sen
Max, MudboWeb 3D viewe
iewer will sh
pen a generaed with the or ‘No’. if ydback field.
give feedbacld. It is the lond us feedba
ox or any other, informing
how you the
ated scene, wresult?’ will ou have mo
ck on the seoud speaker ck or link to
her modeling you of that
scene.
we will ask ypop up in thore time an
ervice at anyicon locatedthe forum.
g applicatiot limitation:
you if you gohe lower righd the answ
point, whiled in the verti
n. The follow
ot what you eht corner of er was no,
e working onical menu/sid
wing messag
expected. A the screen. maybe you
n your projede bar on th
9
ge pops up
little dialog Please take could also
ect, you can e right side

Note thaNote tha
NAVIGA
To navigor the m
O
Z
The sidegenerateclick on To comepreviousquality o
at there is aat we will loo
ATION
gate the 3D smouse:
ORBIT : left b
ZOOM : mou
PAN : middle
e bar in the ed 3D modelthe monitore back to tesly in the doof texture, it
a check box ok at your sc
scene, you ca
button
use wheel fo
e mouse + ho
viewer also l as a texture icon in the exture displocument, thais just a prox
with which ene ONLY if
an use eithe
r zoom
old
gives you thed model (Demenu on theay, click agaat the viewexy viewer.
you will alloyou do chec
r the navigat
he option toefault settinge right side aain on the ger does NOT
ow us, Autodck that box.
tion tools dis
o change theg) or as mesand select thglobe icon. T display the
desk, to take
splayed in th
e display of th only. To swhe globe iconDon’t forgee actual reso
e a look at y
he side bar o
the mesh anwitch between for mesh oet what we olution of th
10
your scene.
on the right,
nd view the en the two, nly display. mentioned he mesh or

You can that sam
With th
1.
2.
Y
Let us ta
also display me sub‐menu
he steps abo
DONE
and t
you
Or c
RESUBMIT
You would re
o You
high
o You
need
o You
reco
o The
man
o You
you
ake a look at
the camerau. To stop vie
ove you cou
that’s it, if yo
need for dow
ontinue to:
esubmit in th
did Preview
est possible
are OK with
d later
want to add
onstruction
reconstructi
nually add th
have survey
want to add
those scena
positions wewing the ca
uld be:
ou are happy
wnstream us
he following
or Standard
quality and
everything,
d more image
ion failed to
em.
y points or a
that info to
rios
where the phmeras, click
y with the sc
se.
use cases:
d mode to ch
exported file
but forgot to
es that you h
take in acco
known dista
the scene
otos were taon the came
cene and hav
eck if all is g
es
o check som
have taken a
unt some of
nce that you
aken, by clickera icon agai
ve exported i
ood and you
e of the exp
dditionally, t
your photos
u got later as
king the camn.
it in the file f
u want now t
ort formats t
to improve t
s and you wa
s information
11
mera icon in
formats
the
that you
he
ant to
n and

3.
B1. Res
If you suhow welscene in quality) To do thclicking othe lowe
Once yoproject,
FOLLOW
submit to g
ubmitted youll you took th a higher res
hat, you can on it from ther left corner
ou do that, abut this one
UP WORK
et different
ur project inihe photos ansolution, Hig
either openhe project Gr there is a R
settings dia has few mo
KFLOW: R
t mesh qua
itially in Prevnd if your sceh or Ultra. (S
n the link froGallery. The mESUBMIT PR
alog appearsore options:
Resubmit
lity or diffe
view mesh qene will stitcSame goes fo
om the emamoment youROJECT butto
s, similar to t
erent expor
quality in ordch, you will por, if you sub
il that was su do that, thon.
the one you
rt format
der to save tiprobably wanbmitted in H
sent to you e web View
saw when y
ime and havnt to then reigh but now
or open theer opens, an
you initially
12
ve a look at esubmit the want Ultra
e project by nd there, in
started the

13
This time, you are given the option to decide whether, when you reprocess the scene, you wish to overwrite the existing scene or create a new scene. You can also review project before submitting (which will be discussed later) If you decide that the new reconstruction should be a new file and you don’t want to override the existing reconstruction you made, select ‘new version’, select the mesh quality you wish to make now and the export file formats, and click next. This will restart the computation on the cloud and you will again receive an email about the newly made reconstruction, once it is ready. Note that, Ultra setting and more export types can mean few hours or calculation, so plan on doing some other work while that is being processed.
B2. Resubmit to add more images
This is a second situation for which you might want to resubmit a project. If you notice that you have lots of gaps in your reconstruction, or see that you didn’t get the level of detail you expected in certain areas, it may be that you have not taken enough photos. If you do take additional photos (these are often detailed close ups of a part of the object where lot of detail is required, or reshooting from an angle where the reconstruction didn’t do so well) you have two strategies to follow:
you can start a whole new project and rerun Base scenario with all images
you can use the ADD IMAGES button on the left lower side of the viewer and add more images. Note: please note that the current system does care about the order of the images (their naming). So, before you upload more images, try to name them such that they will fit on the right position in the sequence of the existing photos.
B2. Resubmit to manually stitch unstitched images
When there are issues with your photos, after the scene is reconstructed for the first time, you might see that you have a few ‘unstitched’ photos, displayed in the side bar (usually you need to scroll down to see them – they will be listed under: ‘Not stitched images’). Unstitched photos are photos that the service couldn’t take into account for the model generation, because they have little similarity with the rest of the photos (for example, the contrast between two photos is too high, or the overlap is too small etc.). Adding those photos might increase the quality of the generated 3D model, but it requires a manual stitching process. You will be allowed to manually stitch those images, by defining manually matching points between an unstitched photo and stitched photo so that the system takes the unstitched photo in account. Note that you must add 4 manual points in 4 different images to have a successful manual stitch. To start a manual stitch, from the left side bar, scroll down to see unstitched images, pick one and select STITCH on the top right of the screen

Iopo
E
YopWt
s
In the new won the screephotos to picone. And you
Expand the l
You should norder to hepoints in totaWhen you cturns into a magnificatiomarked as Pbe marked something li
window, the en. On the ck from. Youu have to do
ittle icon on
now start idelp the systeal is usually gclick on a pomagnifying
on factor witoint 1. Thenas Point 1. ke this when
photo that yright side, yu should pick it on 4 diffe
the left corn
entifying mam understagood practicoint you wisglass that hth your mou try to find tContinue un you are do
you selected you will be k an image thrent images,
ner of the rig
tching pointnd where the. h to set as helps more puse wheel. She same pointil you do ne.
to be stitchoffered a chhat has many, defining 4 d
ght screen to
ts between the unstitche
common beprecisely deftart finding int on the phthis with 4
ed will be dihoice of muy similar poidifferent poi
o see the pho
he two photed photo fits
etween the tfine the poina point on hoto on the r matching p
splayed on tultiple, alreadnts with thents.
otos to choos
tos that are s. Defining 4
two photos, nt. You can the left clickright side. Thpoints. You
14
the left side dy stitched unstitched
se from.
common in 4 matching
the cursor change the k. It will be hat will also should see

Ocy
W
4ReCaprocbottproc
T
T
Regiphotrecothe reco
On the bottcorrespondinyou can click
When done,
4. ADap Photo hacess. You cantom left of tcessed.
This will invo
The registrat
SURVEY
DISTANC
stration cantos for a 3onstructed sc‘Review pr
onstruction.
om left of tng selection.k on any of th
click on the
DVANCEDas advanced n see the adhe sidebar i
oke the Regis
tion tab will
POINTS ‐ to
CE ‐ known d
be done wh3D reconstrucene from throject settin
he screen y. To view alhe other poi
‘next’ and y
D FEATUREfeatures andditional advin the initial
stration tab t
offer ways to
define the co
istance so to
hen you staruction, OR, he email or ngs option’
ou will also l points you nts to see th
ou will be ag
ES AND Wd those arevanced tools settings scr
that will app
o add either
orrect coord
o set the cor
rt the projecif you gotfrom the prthat will g
have a disphave identif
he correspon
gain resubmi
WORKFLOW ‘optional’ ts by clickingreen or in th
pear in the rib
:
dinates of the
rect scale of
ct for the first that inforroject gallerygive you acc
play of all mfied, hover oding matchin
itting the sce
WS o the straig on ‘advanche viewer, w
bbon on the
e object
an object
st time and rmation latey and Resubcess to the
atching poinover the firstng points.
ene for recal
htforward ped tool’ butwhen a scen
top of the sc
prior to suber, you canmit, this time advanced
15
nts and the t icon. Then
culation.
photo‐to‐3D tton on the e has been
creen.
mitting the reopen a
me checking tool after
ADDING
SurvusedsurvThe In thanot
You clickfind
G SURVEY P
vey points ard in the stitchvey point, selwindow will
he left windther photo th
should than k a point of wthe same po
POINTS
e collected ohing processect Registrat change into
ow you will hat is differe
select a poiwhich you hoint)
on‐site usings to make it mtion. o a split wind
have a choent than the
nt on the lefave survey c
‘Total Statiomore robust,
dow as the on
oice to selecone on the l
ft photo (lickcoordinates,
ons’ or laser , and to scale
ne shown be
t one photoeft, but has s
, a magnifierand do the
scanners. The or locate y
elow:
o and on thesome comm
r glass will zosame on th
hey are ‘hardour 3D mode
e right side, on points.
oom into thee right phot
16
d’ 3D points el. To add a
you select
e photo and o, trying to

Withbott
Afte NOTWheturnThe You last s
h this, you htom left of th
r this, click N
TE: en you start into a magnmagnifying gcan change set zoom fac
have helped he screen, se
Next and resu
the process nifier glass. Yglass will helthe zoom byctor will be u
the systemee the define
ubmit the sc
of defining tYou will get ap locate in dy scrolling thused.
to identify ed point and
cene.
the points, aa message abdetail a pointhe mouse wh
a point in scan fill in the
and click on bout the mout on the photheel. Each tim
space and ne X, Y ad Z co
the photo, yuse control, to for which me you use t
ow you canoordinates
your mouse please accepyou have cothe magnifie
17
go on the
pointer will pt. oordinates. er glass, the

Notecoordista
INPUT K
Photactuyour Like or af To stafterblue The the pane
WharefeStart
e: ReCap Phrdinates. Inpances.
KNOWN DIS
togrammetryal size of ther original obj
the survey pfterwards, by
tart the procr selecting Re ribbon, click
same split Uobject for we where you
at you will nrence distant by clicking
hoto currentputting coor
STANCES
y does not he reconstrucect you can
points, this cy selecting th
cess for settiReview projek on Registra
UI window apwhich you kncan also see
need to do ce between in the left pa
tly has a limrdinates wit
have a senscted 3D objecset a distanc
can also be dhe advanced
ing a referenect settings) ation.
ppears. Hereow the refee the same re
is identify athem. ane to create
mitation of 6h more tha
e of scale. Wct is unknowce to your m
done prior tod options and
nce distance,select the a
e you pick onrence distaneference poi
a pair of the
e Point 1. In
6 decimal pn 6 decima
When we crwn. If you knoodel and thu
o submittingd the Registr
, after uploadvanced too
ne image in tnce, and theints between
e same poin
the same pa
places when al places mi
reate a 3D mow the distaus scale the m
g your photoration tab
ading the phools in the sid
the left panen select anon which you
nts in both i
ane, click aga
it comes toght result in
model from ance betweemodel to its
s for 3D reco
otos (or it’s ade bar and t
e that shows other image have a dista
images and
ain to create
18
o inputting n incorrect
photos the n points on actual size.
onstruction
a resubmit, then, in the
the part of in the right nce value.
then set a
Point 2.

Nowleft pVERYundePoin
Do tpane You
Onceon tdone
w move to thphoto and clY IMPORTANerstands thant 2 in the lef
the same fore on the sam
should end u
e you have she bottom re)
he right side lick to createNT: before clt you are creft photo, and
r Point 2. Clicme point.
up with poin
successfully cight of the s
and in the re a Point 1. icking in theeating a matd the click on
ck first in the
nt 1 and 2 in
created Poincreen. (make
right pane cl
e right photoching point tn the same p
e left pane o
both the left
nt 1 and Poine sure you d
ick the spot
, you must ato Point 1. Roint on the r
n Point2 to a
t and the rig
nt 2 in both ididn’t click th
that matche
activate poinepeat for poright photo,
activate it an
ht pane.
images, you hat icon prio
es the Point
nt 1 , so that oint 2: Selectto create Po
nd then click
go to the dir before the
19
1 from the
the system to activate oint 2 there.
k in he right
stance icon above was

Onlyscreques
Now
If yoPoin
Wha
(Not
The
y now shoulden. When opstion mark, a
w select the s
ou made thatnt 2. After thi
at you should
te that in the
above cover
d you click opened, click and then in a
second icon w
t correctly, yis, simply typ
d end up wit
e current rele
rs just about
on the refereon the tape any of the tw
with the que
your two iconpe the know
h is a blue lin
ease we do n
everything y
ence distancmeasure ico
wo photos on
estion mark a
ns on the rign length betw
ne that conn
not let you d *
you can do in
e tool, locaton and then n Point 1. Thi
and once sel
ht of the tapween those
nects point 1
efine the un
n the current
ted in the lowclick once onis will set Po
ected, click o
pe measure stwo points.
and point 2
its for the di
t release of R
wer right con the icon wint 1 .
on Point 2.
should read
in both of th
istance.)
ReCap Photo
20
orner of the with the first
Point 1 and
he panes.
o.

5
If yomesqualTo fapplHowmighdeal To ahandand is poThe dowMemhttp
6 While wMementMementHere an Recap Phprinter.
R
5. WHAT
ou made gooh models. Eity, you mighfix those, yoication that
wever, note tht be very d with meshe
address this dle such hugprepare theowerful, fast first tech pr
wnload and mento’s labs p://labs.auto
6. 3D PRI
e still cannotto, we have bto. example of ahoto, the me
RIP ReCap Photo
NEXT?
od photos anEven thoughht find that tou will needyou might bthat when yifficult to opes of such de
problem, wge meshes ae models for and real funreview of thaall relevantsite: odesk.com/u
INTING
t claim to bebeen having
a statue of wesh was fixed
o
nd a successf they are hthe models hd to use a me already usyou ask for Upen them in nsity and siz
we started and help youpublishing on to use! at software t informatio
utilities/me
e able to fix asome great
which photosd and prepar
Proje
ful 3D reconigh quality mhave errors, mesh editinging. Ultra high qmany modeze.
a technologyu identify poor digital fab
is called Pron on Autod
emento
all issues in aresults 3D p
s were takenred in Meme
MOD ect Mement
struction, yomeshes andholes or spikg software w
uality, you weling applicat
y preview oftential probrication (3D
ject Memendesk Labs. f
mesh with trinting the m
n, a mesh moento and dire
to
ou probably the texturekes. which can b
will get suchtions as they
f software slems, fix theprinting as e
nto and you follow this
the early labmodels that w
odel was creaectly printed
OB
ended up wes are of be
be any mesh
h dense mesy were not d
specifically dem, clean upexample). Th
can find thelink to acce
s preview ofwe fixed in
ated using Awith OBJET
FAB BJET 3D print
21
with nice 3D est possible
h modeling
shes that it designed to
designed to p the scene he software
e link to the ess Project
f
utodesk 3D
t

7 As mon Aacco You sign OnceReCa
Might lothe projethe DocuIt is hereclick on aother typ
7. MANA
mentioned atAutodesk’s count will com
can go direcup.
e signed up,ap Photo pag
ook confusingects you creauments foldee that you caany of the fope of data.
AGING MY
t the beginncloud platforme with free
ctly there usi
, when you ge), you will
g, but don’t wate in ReCaper will be emn manage yoolders and sa
Y PROJECT
ing of this dorm: Autodes5GB space.
ng the link fr
click on thesee a page t
worry: go top will be thermpty). our ReCap Phay share). Ob
TS and STO
ocument, tosk 360. Sign
rom the ReC
e link Accessthat looks so
p left to the e. (if you hav
hoto projectbviously, you
ORAGE
o access ReCaing up for t
Cap landing p
s Autodesk 3mething like
Documents ven’t done a
ts, delete or can use this
ap Photo, yohe account
page or go to
360 (locatede this.
Tab and oncny scene on
share them ws space for st
ou will need is free and
o 360.autode
on the bot
ce you click o ReCap Phot
with others (toring or sha
22
an account your A360
esk.com to
tom of the
on it, all to as yet,
(right aring

Know thlimit ( thdownloabin that Please reyou thataddress.
8
Those ofaccessinmore pleto be do
at currently his will alwayad your projeis located in
emember wht a scene is re.
8. NOTES
f you, who wg the serviceeasurable exone on A360.
there is no wys be displayeects and dele the left pan
hich email adeady with th
S for existi
were the firste will still woxperience. M
way to increaed on the Laete them froe of your Do
ddress you ue calculation
ing users
t testers of Rork. We belieanaging you
ase the storanding page om your A360ocuments tab
used to sign un and can be
of ReCap
eCap Photo eve however,ur folders, de
age space soof your ReCa0 account. Db on A360.
up on Autode seen online
Photo on
trial on A360, that this froeleting or sha
when you aap Photo siteo not forget
esk 360, as te, will be sent
A360
0, know thatont end will aaring project
re close to re), you will neto empty yo
the email infot to that ema
t the old wayallow for cles etc. will sti
23
each the eed to our trash
orming ail
y of ar and ill need

24
9. KNOWN ISSUES, LIMITATIONS and BUGS Limitations BROWSER: You will need to use Google Chrome as the browser. We are using a Web GL based
3D model viewer to preview 3D models in A360 and thus Internet Explorer are not supported. Try not to exceed 200 photos per reconstruction. Fisheye lenses are not supported (GoPro lenses, 8mm SLR, or any other fisheye lens). We only
currently support rectilinear lenses 5 GB storage limit of the A360 storage 3D Web Viewer As previously mentioned, note that the viewer we currently use to preview the
generated 3D scene has limitations in the size of the mesh and the quality of the texture that it can display, and thus what you will be viewing on screen is only a proxy and will not do justice to the actual quality of the mesh and texture, when processed in High or Ultra resolution. You can see the high quality results once you import the exported meshes in Memento, Maya, 3DsMax, Mudbox etc.
ReCap Photo currently has a limitation of 6 decimal digits when it comes to inputting coordinates. Inputting coordinates with more than 6 decimal places might result in incorrect distances.
25
10. ADDENDUM ‐ How to take photos that are good for photogrammetry
What makes photos good for photogrammetry? The photogrammetry process looks at series of photos and reconstructs the camera location, orientation, lens type and lens distortion. It does that by comparing and matching pixels/points across photos in the Entire Scene and match/ triangulate on visual features. This means that you should follow the following guidelines: ENVIRONMENT (Lighting conditions) You should avoid any environment in which the light creates strong contrast shadows over the object you shoot. Shadows are enemy to the reconstruction process.
If you shoot in interior o The object must be placed in a room with diffuse light that does not produce contrast light
or shadow. o Do not use the flash.
If you shoot outside o Avoid shooting at midday under strong sun. Best times are early in the morning or later in
the afternoon EQUIPEMENT
You can get good results with any camera. However, plastic lenses only go so far in terms of sharpness. If you are serious about this process a good lens makes a difference.
Try to shoot the photos with a fixed lens. Fixed lens have no focal change which is good for the photogrammetry process. A 50mm lens is good.
Whenever possible, shoot with a tripod and if possible a clicker. You need this because in order to make the entire photo sharp, you will have to set a wide depth of field. This means that a very small amount of light will be coming in the camera so you will need to set your shutter speed long. This makes even a tiniest of shake of the camera result blurry photos. The tripod and a clicker will assure sharp photos.
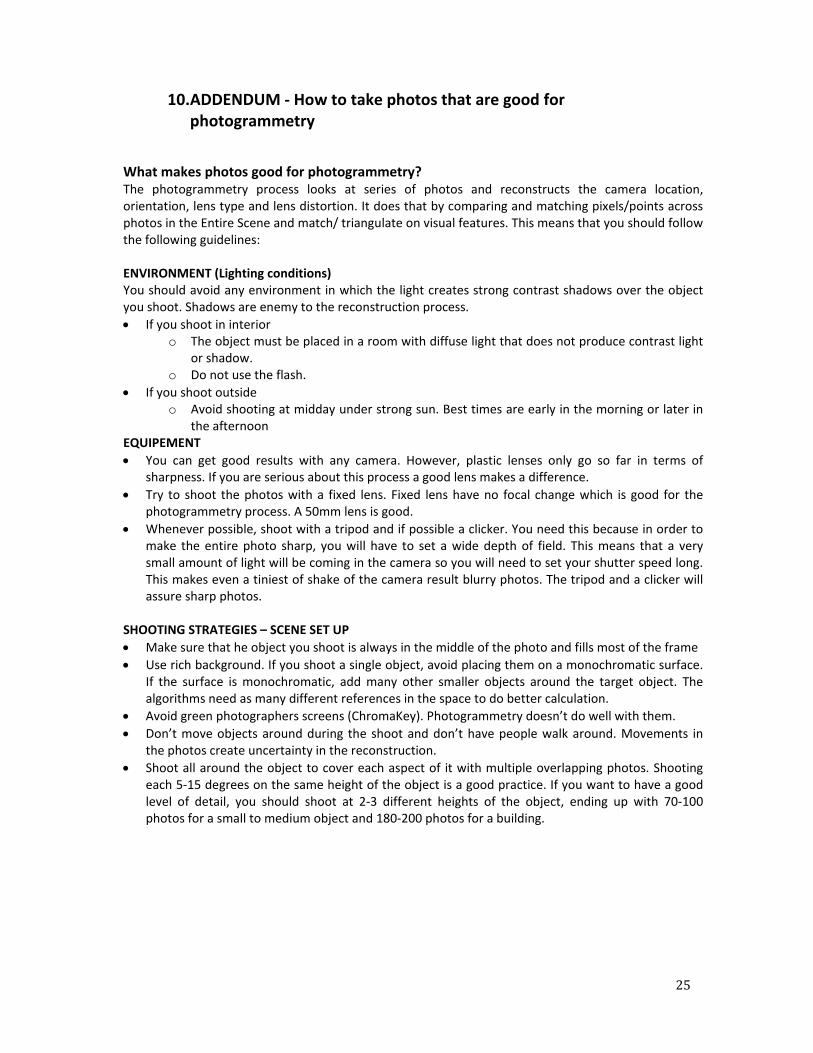
SHOOTING STRATEGIES – SCENE SET UP
Make sure that he object you shoot is always in the middle of the photo and fills most of the frame
Use rich background. If you shoot a single object, avoid placing them on a monochromatic surface. If the surface is monochromatic, add many other smaller objects around the target object. The algorithms need as many different references in the space to do better calculation.
Avoid green photographers screens (ChromaKey). Photogrammetry doesn’t do well with them.
Don’t move objects around during the shoot and don’t have people walk around. Movements in the photos create uncertainty in the reconstruction.
Shoot all around the object to cover each aspect of it with multiple overlapping photos. Shooting each 5‐15 degrees on the same height of the object is a good practice. If you want to have a good level of detail, you should shoot at 2‐3 different heights of the object, ending up with 70‐100 photos for a small to medium object and 180‐200 photos for a building.
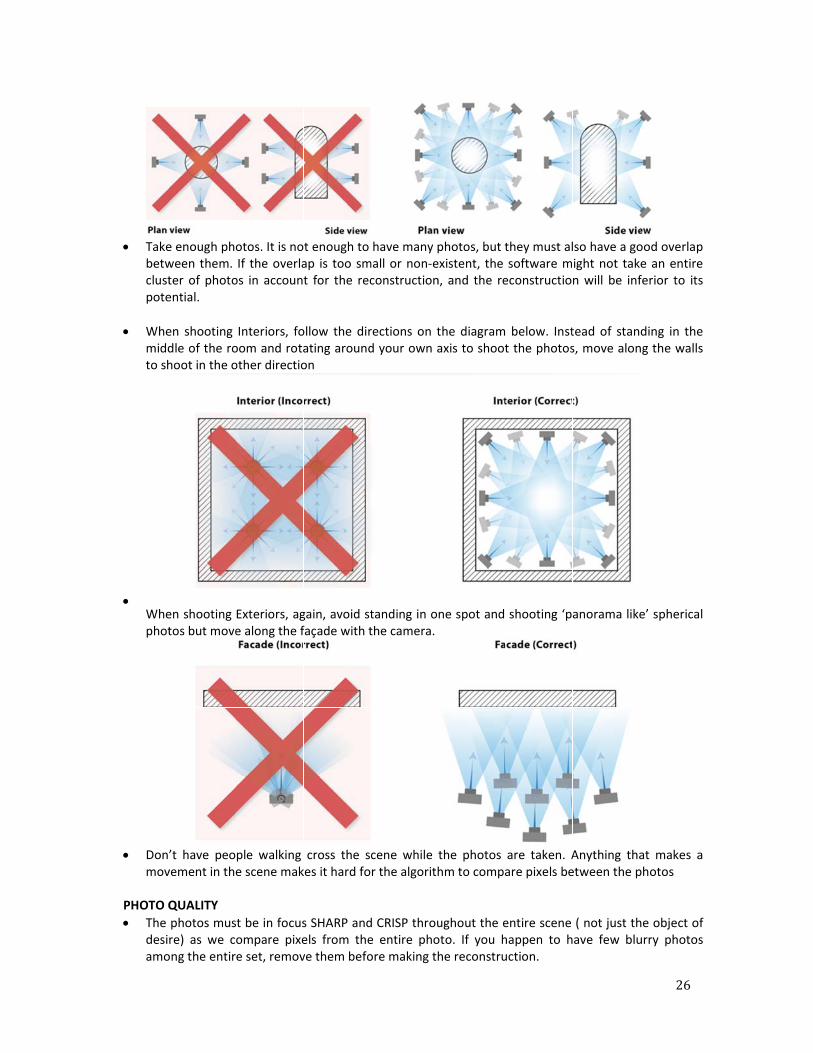
Takebetwclustpote
Whemiddto sh
Whephot
Don’mov
PHOTO Q
The desiamo
e enough phoween them. ter of photoential.
en shooting dle of the rohoot in the o
en shooting tos but move
’t have peovement in the
QUALITY
photos musre) as we coong the entir
otos. It is noIf the overlaos in accoun
Interiors, fooom and rotaother directio
Exteriors, age along the f
ple walking e scene mak
t be in focusompare pixee set, remov
t enough to ap is too smt for the rec
ollow the dirating aroundon
gain, avoid stfaçade with t
cross the skes it hard fo
s SHARP andels from theve them befo
have many p
mall or non‐econstruction
rections on td your own a
tanding in othe camera.
cene while r the algorith
d CRISP throue entire phoore making th
photos, but texistent, the n, and the re
the diagramaxis to shoot
ne spot and
the photos hm to compa
ughout the eoto. If you hhe reconstru
they must alsoftware meconstructio
below. Instt the photos
shooting ‘p
are taken. Aare pixels be
entire scene happen to huction.
lso have a goight not takn will be inf
tead of stans, move alon
anorama like
Anything thaetween the p
( not just thave few blu
26
ood overlap e an entire ferior to its
ding in the ng the walls
e’ spherical
at makes a photos
he object of urry photos

27
Avoid blurriness in any part of the photos (ah, that beloved Depth of field effect). That will not work very well for photogrammetry. Do not assume that all is well if the object you try to shoot is sharp. We calculate the entire scene, not just the target object and any blurriness will confuse the algorithm.
Do not change the zoom if you don’t have a fixed lens. Rather move towards and away from the object.
Do not change exposure during the same acquisition.
Set ISO to 100, it works on pretty much any reconstruction. Or simply keep the ISO low. High iso brings noise which should be avoided.
The ReCap Photo service currently accepts JPEG format only. However, if you shoot in RAW, you will have the ability to do some changes in the RAW images that WILL affect the quality of the 3D model. You can always re‐export JPEG’s from the Raw images using photo editing sowftare such as Adobe Photoshop or Bridge.
KNOWN TECHNOLOGICAL LIMITATIONS OF PHOTOGRAMMETRY The photogrammetry process does not work on shiny, transparent or highly glossy objects. This is due to the fact that these reflect the surrounding which makes the same point on one photo to be in a different color on another photo, making it impossible for the algorithms to calculate the scene. Enjoy using ReCap Photo and please send any questions, suggestions and wishes on the ReCap Photo forum http://feedback.autodesk.com/cloudservices/products/cloudservices_recap Want to know more about Project Memento, Autodesk’s fun, fast, powerful solution for fixing huge meshes ? Go here: http://labs.autodesk.com/utilities/memento
For any questions or suggestions for improvement of the tutorial, please contact
[email protected] or [email protected]


![Autodesk Fusion 360 Security Whitepaper Final[2]help.autodesk.com.s3.amazonaws.com/sfdcarticles/kA23A000000mg9S... · Fusion 360 provides end users with the option to use multi-factor](https://img.pdfslide.net/doc/110x75/5e1d6c3152f8d255a65df47f/autodesk-fusion-360-security-whitepaper-final2help-fusion-360-provides-end-users.jpg)