Embed Size (px)
Citation preview

fig. 1 Your kit contains:
• Two brass Saw-Bolts
• Two brass Saw-Nuts
• Two phosphor bronze Lock-Washers
• A 14" Blade, drilled and pitched at 12tpi (13ppi)
• A brass Saw-Back folded, chamfered, attached to the blade
• A paper template for the handle (page seven)
• These instructions: please read all the way through before you start making your saw. All the instructions for building this kit apply to the handle design that is on the included template.
Wood Selection
You’ll need a piece of wood for the handle approximately 6-5/8" by 4-3/4". The piece should be a little thicker than 7/8" so there is extra material for sanding and finishing. Orient the wood so the grain runs through the thinner parts of the handle. (fig. 2) The handle template has a line indicating which direction the grain of the wood should be oriented. Proper grain orientation is important, and gives the handle the strength it needs.
A wide variety of wood species will yield a functional and beautiful saw handle. Almost any stable wood can work well. Traditional materials are quarter-sawn Beech and Apple wood.
Depending on your experience or how precious your chosen handle material might be, you may want to practice cutting a handle or two out of scrap. The "letting in" operations that cut the slot for the Saw-Back and Blade can be tricky if it’s your first time.
A full scale template of the saw handle we use on our saws can be found on the last page of this document. You can download and print additional templates from the copy of this document that is available on our website. Make sure to turn off any page scaling in your printer’s driver settings before printing. There are dimensioned photoscales on the template that you can check to see if the printout is the correct size.
Attach the template to the wood. Paper patterns can shrink and buckle with water-soluble glue, so instead use rubber cement or strong spray adhesive.
Instructions
1
4-3/4"
6-5/8" fig. 2
SAWBOLT(2)
SAW-NUT (2)
LOCK-WASHER (2)
SAW BACK
BLADE
HANDLE
14" Sash saw KIT
Thank you for purchasing our sash saw kit. We hope you will find working from this kit to be a rewarding experience.
When complete, we feel you will have a fine tool that will find a favored place in your toolbox, and provide a lifetime of service.
If you have any questions about the instructions, please email or call us.
We hope you enjoy your saw. Please contact us if you have any questions.
ALWAYS WEAR EYE PROTECTION WHEN
USING TOOLS
Gramercy Tools are designed & manufactured
by the good people at:
112 26th St. Brooklyn, NY 11232800.426.4613 & 718.499.5877
toolsforworkingwood.com
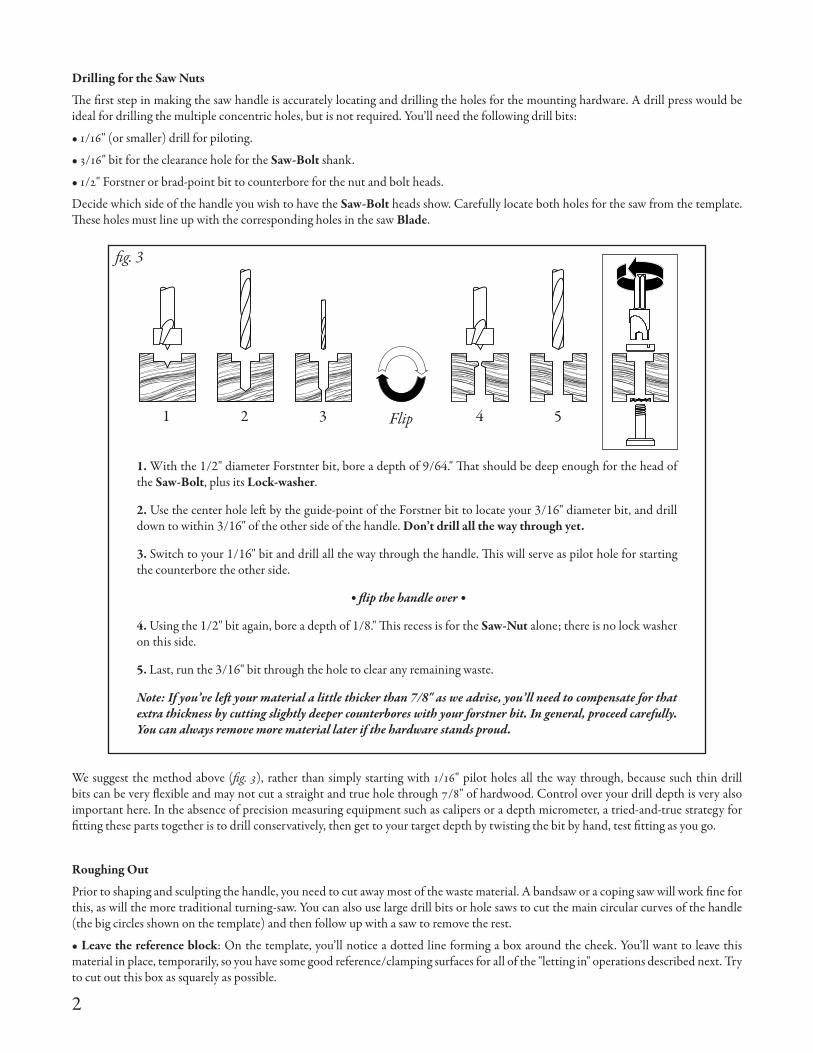
Drilling for the Saw Nuts
The first step in making the saw handle is accurately locating and drilling the holes for the mounting hardware. A drill press would be ideal for drilling the multiple concentric holes, but is not required. You’ll need the following drill bits:
• 1/16" (or smaller) drill for piloting.
• 3/16" bit for the clearance hole for the Saw-Bolt shank.
• 1/2" Forstner or brad-point bit to counterbore for the nut and bolt heads.
Decide which side of the handle you wish to have the Saw-Bolt heads show. Carefully locate both holes for the saw from the template. These holes must line up with the corresponding holes in the saw Blade.
fig. 3
1. With the 1/2" diameter Forstnter bit, bore a depth of 9/64." That should be deep enough for the head of the Saw-Bolt, plus its Lock-washer.
2. Use the center hole left by the guide-point of the Forstner bit to locate your 3/16" diameter bit, and drill down to within 3/16" of the other side of the handle. Don’t drill all the way through yet.
3. Switch to your 1/16" bit and drill all the way through the handle. This will serve as pilot hole for starting the counterbore the other side.
flip the handle over
4. Using the 1/2" bit again, bore a depth of 1/8." This recess is for the Saw-Nut alone; there is no lock washer on this side.
5. Last, run the 3/16" bit through the hole to clear any remaining waste.
Note: If you’ve left your material a little thicker than 7/8" as we advise, you’ll need to compensate for that extra thickness by cutting slightly deeper counterbores with your forstner bit. In general, proceed carefully. You can always remove more material later if the hardware stands proud.
1 2 3 4 5Flip
2
We suggest the method above (fig. 3), rather than simply starting with 1/16" pilot holes all the way through, because such thin drill bits can be very flexible and may not cut a straight and true hole through 7/8" of hardwood. Control over your drill depth is very also important here. In the absence of precision measuring equipment such as calipers or a depth micrometer, a tried-and-true strategy for fitting these parts together is to drill conservatively, then get to your target depth by twisting the bit by hand, test fitting as you go.
Roughing Out
Prior to shaping and sculpting the handle, you need to cut away most of the waste material. A bandsaw or a coping saw will work fine for this, as will the more traditional turning-saw. You can also use large drill bits or hole saws to cut the main circular curves of the handle (the big circles shown on the template) and then follow up with a saw to remove the rest.
• Leave the reference block: On the template, you’ll notice a dotted line forming a box around the cheek. You’ll want to leave this material in place, temporarily, so you have some good reference/clamping surfaces for all of the "letting in" operations described next. Try to cut out this box as squarely as possible.

Letting in
"Let in" or "inletting" are terms often used when describing how well a blade and saw-back fit into their handle. The steps required to make a tight, good-looking fit are delicate but straightforward. If you take your time and test your fit often, you should be in good shape.
BACK SLOT: The slot that receives the Saw-Back is approximately 13/64" wide, 21/32" deep, and about 2" long, but with 45˚ interior chamfers. There might be countless ways to achieve this complex interior shape, but the simplest way we can think of is to drill out as much waste as possible, then pare down to the final dimensions with sharp chisels.
• Scribe the slot width on your reference block.
• Using a 3/16" bit, drill one hole in the long direction, near the intended bottom of the slot.
• Now drill a series of holes in the short direction, clearing out most of the waste. Final fitting will be done after the slot for the saw Blade is cut.
BLADE SLOT: Depending on what other saws you have at your disposal, the blade slot may be cut by a variety of means. Since the Blade is only 0.020" thick, it rules out many hand saws, and all but the thinnest band saws. We’ve had good results with some extra thin Japanese rip saws, but there you can run the risk of an undersized slot, which makes assembly quite difficult. In a pinch, you can actually use the Blade in your kit (which is probably the best course of action anyway). Here’s how:
• Plane down some scrap to half the thickness of your handle, minus half the thickness of your Blade. With an exactly 7/8" thick handle that should be:
(0.875" ÷ 2)-(0.020" ÷ 2) = 0.4275"
Once again, don’t forget if you’re working with oversized stock. Adjust accordingly.
• Scribe a center-line around your reference block
• Place your scrap-block and your handle on a smooth, flat surface and rest the saw plate on the block.
• Bear in mind that the teeth should hang over the block because the teeth are set wider than the saw plate itself
• If your saw Blade teeth sit evenly over the center-line, proceed to cut. If not, you may need to plane down your scrap block a little more, or shim it up with tape.
Once you’ve cut your blade slot you can finish off the slot for the Saw-Back. Making some practice slots on scrap wood, or a practice handle, is highly advisable. In any case, you need to pare down the sides with a chisel to get to your final slot width, and you’ll need a very thin chisel or V-gouge to cut in the chamfers.
fig. 5
fig. 4
3

We hope you enjoy building your saw. Please take a look at the other saw kits we have available.As always, we can be contacted via our website or over the phone if you should have any questions or comments.
Shaping Up
When you are satisfied with how your Blade and Saw-Back fit into the handle, it’s time to start in on the shaping and rounding of the various handle features and decorations (aka: the fun part). Cut off the reference block and then contour as desired.
• Good rasps are excellent for shaping and sculpting. A traditional tool for rounding the graceful interior curves of saw handles is the Saw Handlemaker’s Rasp, which is available from Gramercy Tools. It’s similar to a cabinetmaker’s half round rasp, but it has no teeth on the flat side, and the point curls inward, enabling the user to rasp the inside of a closed handle without digging the point into the opposite side.
• "Shop roll," or cloth-backed abrasive strips, held taut, are an excellent way to round and sand handles. Often they can be split or torn lengthwise to finish tight curves and narrow spaces.
• Triangular, or "three-square" needle files are used on our production handles for the decorative notches. Notches such as these are traditional saw handle ornamentation, and serve to personalize as well as refine the look of a handle. In some cases, the size, shape, and placement of these can help to date an antique or identify the maker.
Final Assembly
Insert the blade/back assembly into the handle, and with a Lock-Washer on each Saw-Bolt, insert the screws into the saw handle. Thread on the Saw-Nuts from the other side and tighten them up a test fit. If the bolts do not slide into place with ease, it could be for any combination of the following of reasons:
• There’s interference in the rest of your assembly. This is the likeliest reason. Try to align the Blade holes with the handle holes by inserting an awl or a piece of steel rod, or the taper of a machinist’s scribe. If that doesn’t work, you may need to cut the blade slot a little deeper. You shouldn’t have to cut anything out of the back-slot at this time. If the back-slot is too shallow in either direction, the Saw-Back will simply ride high. You can correct this at any time.
• The holes are a little undersized. Depending on the make of your bit and any wear it may have sustained, your drill could cut a hole smaller than its nominal diameter. If you have a set of straight reamers, or even a bit of sandpaper rolled up tightly, you can enlarge the hole diameters until the Saw-Bolts fit.
• There’s interference between the hole patterns. If the distance between the holes on the Blade does not match the distance between the holes on the handle, you could have a tough time forcing the Saw-Bolts in. If the interference is minor, you may be able to twist the Saw-Bolts in until the threads are past the blade stock, then force them the rest of the way home. Don’t try to force the bolts in if you can’t get the threads past the Blade. At the very least, you’ll bungle the threads. You may even crack the cheek. Because the holes in the handle have to remain concentric with their counterbores, the easiest way to correct for interference here is by adjusting the holes in the Blade with a round needle file. Proceed slowly. If you remove too much material there is a chance your blade will wobble in its mount.
Tighten the Saw-Nuts: If you do not have a purpose made split nut driver you can make one from a bit of steel or a screwdriver with a gap ground in the middle. Gramercy Tools offers a split nut screwdriver tip made specially for our saw nuts. It’s got a standard hexagonal shank so it will fit in a wide variety of bit holders. (Around the shop, we use them in our spiral ratchet screwdrivers.) A moderate amount of torque will be required to bed the Lock-Washer in.
Finishing Up
A conventional way of finishing off a fine hand saw is to sand down the faces of the handle, while the saw is fully assembled. This has the effect of making the hardware perfectly flush with the with surface of the handle, leaving uniform, parallel scratches in the brass. You may also prefer to polish the brass components prior to assembly with a little buffing compound and a wheel. As always, wear eye protection.
When you are totally satisfied with the shape and fit of your assembly, It’s time to apply the finish. Our production saws are finished with oil and wax. Of course, you can use whatever you want.
4

PHOT
OSCA
LE1/2
"1/4
"
1 "
4 "
PHOTOSCALE
1/2 "
1/4 "
1 "
4 "
© C
opyr
ight t
oolsf
orwo
rking
wood
.com
, 201
0-20
17. A
ll righ
ts re
serv
ed.
Aut
horiz
ed fo
r per
sona
l use
only
. Any
oth
er re
prod
uctio
n is
strict
ly pr
ohibi
ted.
A
lway
s wea
r eye
pro
tect
ion w
hen
using
tools
.
14" S
ASH
SAW
HAN
DLE
TEMP
LATE
1:1PA
RTTOO
LS F
OR
WO
RK
ING
WO
OD
112 2
6th S
TREE
T, BR
OOKL
YN, N
Y 11
232
T: 71
8.499
.5877
• 1-
800-
426-
4613
SCAL
E
DATE
D
WOR
K SA
FELY
: AL
WAY
S W
EAR
EYE
PROT
ECTI
ON.
WW
W.T
OOLS
FORW
ORKI
NGW
OOD.
COM
supp
ort@
toolsf
orwo
rking
wood
.com
TITL
E
9/01/2
009
W
OOD GRAIN DIRECTION
REFE
RENC
E BO
XSAW SLOT LINE
1 "21
/32 "
0.934
" 1.684
"
1.152
"
Ø
Ø
Ø
Ø
Ø
Ø
Ø
10-3
2 UNF
1/8 "
3/64 "
No
mina
l Sl
ot W
idth
7/32
"
Ø 1/2
"Ø
1/2 "
3/4
"
SAW
NU
T &
SA
W B
OLT
REF
EREN
CE
- D
O N
OT
SCA
LE

Rip Cutting: For a smooth cut, saw "uphill" with the grain of the wood shaving the tops of the fibers. Ripping "downhill" into the ends of the grain will feel jerky and make a messy cut. To start a dovetail cut, rest the saw teeth flat on the wood, tilt the toe up slightly, and just push. The usual way of cutting tenons is to clamp the wood at a diagonal in the vise. This way you can see both top and side as you saw "uphill." To start, rest the saw on the top corner of the tenon and just push. Reverse the wood in the vise as needed, sawing diagonally until it’s time to finish the cut square. In both instances of ripping:
• USE NO DOWNWARD PRESSURE. Relax and push the saw straight forward, starting the cut. If you tense up or press the saw down into the work, the saw may jam.
• After the first stroke, ease up and return the saw to the start position, keeping the saw in the kerf. Do another stroke the same way, easily, relaxed, with no pressure. The blade is thin. If you start cutting askew, the blade will bend and bind in the cut. Be attuned to that feedback and you’ll quickly learn to saw straight. Relax your hand and your body, and just pay attention to the saw.
Holding the Saw: The handle is designed to ensure your hand is correctly positioned for comfortable sawing, even for extended periods. Hold it like a pistol, with the index finger outstretched. Only three fingers curl around the handle. If you try to put all four fingers through it, it’s easy to clench a fist, which leads to cramping and loss of control. For these reasons, the handle is designed for the three-fingered grip shown below. The handle should sit snugly in the upper part of your hand so you can easily control the saw with your thumb and forefinger. This is the key to accurate sawing.
Cutting Square: The ability to make straight, square cuts comes from two things: sensing the orientation of the saw, and being able to follow a line. If you hold the saw in your outstretched hand and rotate your wrist clockwise and counterclockwise a bit, you might notice that the saw doesn’t seem rotate evenly. What you are sensing is referred to as the hang. Hang is the general relationship between the angle of
the handle and the angle of the blade. It’s influenced by the weight and angle of the brass back. If you rest the teeth on a surface and rotate your wrist again (pivoting on the teeth) the blade will feel ever-so-slightly top-heavy. Understanding this will allow you to develop a feeling for that ‘sweet spot’ where the blade is hanging vertical, which will aid you considerably when orienting the saw for cuts. Following a line is a little more tricky with a backsaw than with a (backless) handsaw due to the curtailed ability to english the blade, and the comparatively short cuts one is prone to make. If you can hold the saw straight and get the cut started the saw should continue to track along the same direction. If you find you’re having consistent tracking issues, shift your stance slightly, rather than your arm, to finely compensate for any sideways influence you might be introducing to the cut.
14" Sash saw
Thank you for Purchasing a Gramercy Tools Saw. We’ve put a lot of care and effort into it’s production, so in the interest of your enjoyment, we’ve prepared some tips on its usage.. This saw has been hand filed and hammer set, with a canted blade. We feel that these features and other features of late eighteenth century saws that this saw is based on will help you cut more accurately, faster, smoother, and with less effort.
We hope you enjoy your saw. Please contact us if you have any questions.
ALWAYS WEAR EYE PROTECTION WHEN
USING TOOLS
Gramercy Tools are designed & manufactured
by the good people at:
112 26th St. Brooklyn, NY 11232800.426.4613 & 718.499.5877
toolsforworkingwood.com
Your Sash Saw has been hand filed by our saw sharpeners to cut equally well across (crosscutting) and with (rip cutting) the grain of the wood. Our goal was to provide you with an incredibly versatile saw that can answer to many tasks. The shape of the teeth represent a balance between a knife and a chisel, and the effect is like having two saws in one:Crosscutting: The sash is excellent at is trimming all sorts of parts to length and for sawing shoulders on joints. For crosscutting stock to length and rough cutting for mitres, etc. A Bench Hook is a useful accessory. It can be constructed quickly and simply out of any scrap wood you might have. It’s a suitable and more expedient solution than clamping for most cuts, and it functions as a sacrificial work surface; the saw will exit the work cleanly without cutting into your bench. Hold the work down with your free hand, leaning into the stop, using your thumb as a fence for the saw to run against.
With the saw tilted nose down, advance toward the far corner, starting the cut. With each stroke lower the angle of the saw until it is level and cutting the entire length of the cut. Work slowly and easily, letting the saw do the work, and paying attention to both vertical and horizontal orientation of the blade. With practice, cutting square will become second nature. A common technique when marking out precise cuts for joinery is to incise a sharp line with a knife or chisel, and then cut a trench on the waste side, making a channel for the saw to ride in. This ensures sharp shoulder lines for clean-looking joints.
A Note on Sharpening: Eventually, with enough use, a saw will dull and need sharpening. We recommend a long, slender, triangular (sometimes called three-square) saw file for sharpening your Gramercy Tools Sash Saw. After repeated sharpening, the teeth will possibly require setting and possibly jointing. None of these activities are hard to do, but practice makes perfect, and we recommend reading up on the subject prior to sharpening your own saws. We offer a saw sharpening service at a nominal charge. See our website for more details.