Embed Size (px)
Citation preview
EVO 80 SENIOR - EVO 80 JUNIOR
Grazie per la fiducia accordata e buon divertimento.Con questo manuale abbiamo voluto darle le informazioni necessarie per un corretto uso e una buona manutenzione della sua moto.
I dati, le caratteristiche e le immagini riportati sul presente manuale non impegnano la BETAMOTOR S.p.A che si riserva il diritto di apportare modifiche e miglioramenti ai propri modelli in qualsiasimomento e senza preavviso.
EVO 80 SENIOR - EVO 80 JUNIOR
We would like to thank you for your trust in us. Within this manual we are pleased to give you the necessaries informations to use and maintain your bike properly.
The data, specifications and images shown in this manual does not constitute an engagement on the part of BETAMOTOR S.p.A.BETAMOTOR reserves the right to make any changes and improvements to its models at any moment and without notice.
Cod. 012440050 000
IND
EXIN
DIC
E
2
AVVERTENZA Si raccomanda, dopo la prima ora di utilizzo, di controllare tutti i serraggi con particolare attenzione a:
• Supporti pedane• Raggi ruote• Bulloneria ammortizzatore• Bulloneria motore• Corona• Carter sottomotore
ATTENTION After the first i use hour, check all the tightenings and in particular manner:
• footboard supports• wheel rims• bolts and nuts rear shock absorber• engine bolts and nuts• crown• under-engine crankcase
INFO
RMA
TIO
NS
INFO
RMA
ZIO
NI
IND
EXIN
DIC
E
3
ECOLOGIC DRIVEThe noise and the pollution of every vehicle depends on how it is driven.
We strongly recommend you to drive steadily, without strong acceleration and deceleration.
During off road use do not damage the environment, avoid noise and everything that can disturb persons and animals.
Use a sport drive only on race circuits
SAFE DRIVE•thisvehiclemustonlyberunonracetracksandaway
frompublicroads.Parentsareresponsibleforthesafetyofchildren,thereforetheymustpaytheutmostattentiontothem;
•always wear approved personal protective equipment;•drive with your hands and feet in the correct drive posi-
tion;•use both brakes;•take care when the road is wet, dirty, slippery;•do not start the engine in enclosed spaces.
Drivecarefully,topreserveyourownandtheotherlives.Respectthenature.Alwayswearthehelmet.
GUIDA ECOLOGICA Il rumore e l’inquinamento prodotto da ogni veicolo dipende in larga misura da come è condotto.
Le raccomandiamo di guidare in maniera regolare, senza forti accellerazioni e decelerazioni.
Durante la guida in fuoristrada non arrecare danni alla natura, fare il minor rumore possibile, evitare qualsiasi comportamento che possa disturbare persone ed animali.
Praticare una guida sportiva solo su appositi circuiti chiusi.
GUIDA SICURA•l'utilizzo di questo veicolo è permesso solo in pista o
fuoristradaenonsullapubblicavia.Igenitori,comere-sponsabilidellasicurezzadelfiglio,sonotenutipertantoaverificarecheciòavvenga;
• indossare sempre dispositivi di sicurezza personale omo-logati;
•guidare sempre con entrambe le mani sul manubrio ed i piedi sulle pedane;
•non trainare o farsi trainare da altri veicoli;•utilizzare entrambi i freni, facendo particolare attenzione in
caso di fondi scivolosi (pioggia, fango, guida in fuoristrada ecc.);
•non avviare il motore in ambienti chiusi.
Guidare con prudenza, nel rispetto della natura che cicirconda, indossaresempre ilcasco,sonodimostrazionidiprofondaciviltà.
IND
EXIN
DIC
E
4
SECTION 1 GENERAL INFORMATION Main parts ........................................................... 8 Hand drive controls ............................................ 9 Vehicle identification data .............................. 10 Technical data .................................................. 11 Electrical diagram ............................................. 15
SECTION2OPERATIONANDUSE Checks and maintenance before and after use ........................................ 18 Fueling operations ........................................ 19 Recommended lubricants and liquids ........... 20 Breaking in .......................................................... 21 Startup ................................................................ 22
SECTION 3 MAINTENANCE AND CHECKS Gearbox oil ........................................................ 24 Brake pump oil....................................25, 26, 27, 28 Fork oil ................................................................. 29 Air filter ................................................................ 30 Spark plug .......................................................... 32 Front brake ......................................................... 33 Rear brake .......................................................... 34 Liquid coolant .................................................... 35 Valve petals ....................................................... 36
Cleaning the vehicle ........................................ 37 Maintenance schedule .................................... 38
CAP.1CONOSCENZADELVEICOLO Elementi principali ................................................8 Comandi ...............................................................9 Dati identificazione veicolo ..............................10 Dati tecnici ..........................................................11 Schema elettrico ................................................15
CAP.2 FUNZIONAMENTOEUTILIZZO Controlli e manutenzione prima e dopo l'utilizzo ..................................................18 Operazioni di rifornimento .................................19 Lubrificanti e liquidi consigliati ..........................20 Rodaggio ............................................................21 Avviamento .........................................................22
CAP.3MANUTENZIONEECONTROLLI Olio carter ...........................................................24 Olio pompa freni ...............................25, 26, 27, 28 Olio forcella .........................................................29 Filtro aria ............................................................. 30 Candela ..............................................................32 Freno anteriore ...................................................33 Freno posteriore..................................................34 Liquido di raffreddamento ................................35 Lamelle ................................................................36 Pulizia del veicolo ...............................................37 Manutenzione programmata ...........................39
IND
EXIN
DIC
E
5
CAP.4REGOLAZIONI Regolazione freni................................................42 Regolazione frizione ...........................................43 Regolazione minimo ..........................................44 Regolazione gioco gas ......................................44 Controllo e regolazione gioco sterzo ...............45 Regolazione forcella (solo per EVO 80 Senior) ..46 Regolazione ammortizzatore posteriore .........47 Tensionamento catena .....................................48
CAP.5COSAFAREINCASODIEMERGENZA Ricerca del guasto .............................................50
INDICE ALFABETICO Indice ...................................................................53
SECTION 4 ADJUSTMENTS Adjustment of brake ......................................... 42 Adjustment of clutch ........................................ 43 Adjustment of idling speed .............................. 44 Adjustment of gas clearance .......................... 44 Check and adjustment of steering gear ........ 45 Adjustment fork (for only EVO 80 Senior) ........ 46 Adjustment of rear shock absorber ................. 47 Tightening the chain ......................................... 48
SECTION 5 WHAT TO DO IN AN EMERGENCY Trouble shooting ................................................ 50
ALPHABETICALINDEX Index ................................................................... 53

7
1
GEN
ERA
L IN
FORM
ATI
ON
CO
NO
SCEN
ZA D
EL V
EIC
OLO
INDICE ARGOMENTI
Elementiprincipali
Datiidentificazioneveicolo Comandi
Datitecnici
Schemielettrici
INDEX
Mainparts
Vehicleidentificationdata
Handdrivecontrols
Technicaldata
Electricaldiagrams
CAPI
TOLO
1
SECT
ION
1
8
1G
ENER
AL
INFO
RMA
TIO
NC
ON
OSC
ENZA
DEL
VEI
CO
LO
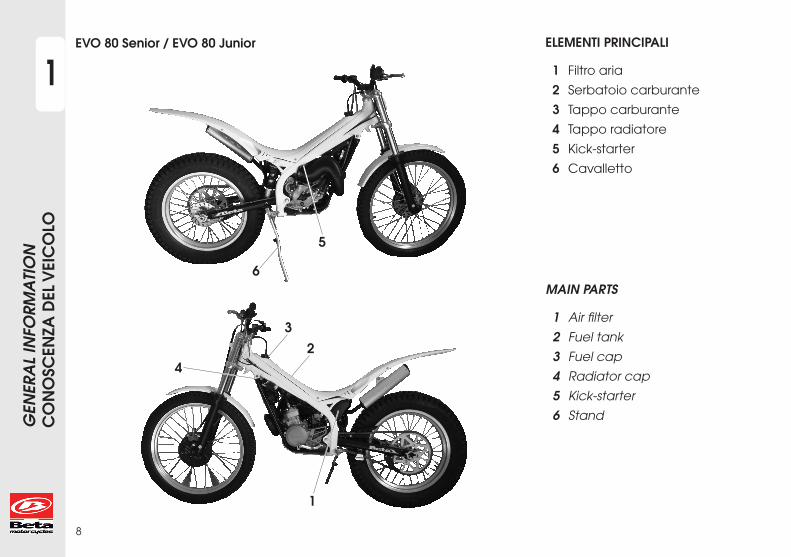
MAINPARTS
1 Air filter
2 Fuel tank
3 Fuel cap
4 Radiator cap
5 Kick-starter
6 Stand
ELEMENTI PRINCIPALI
1 Filtro aria
2 Serbatoio carburante
3 Tappo carburante
4 Tappo radiatore
5 Kick-starter
6 Cavalletto
EVO80Senior/EVO80Junior
5
6
24
1
3
9
1
GEN
ERA
L IN
FORM
ATI
ON
CO
NO
SCEN
ZA D
EL V
EIC
OLO
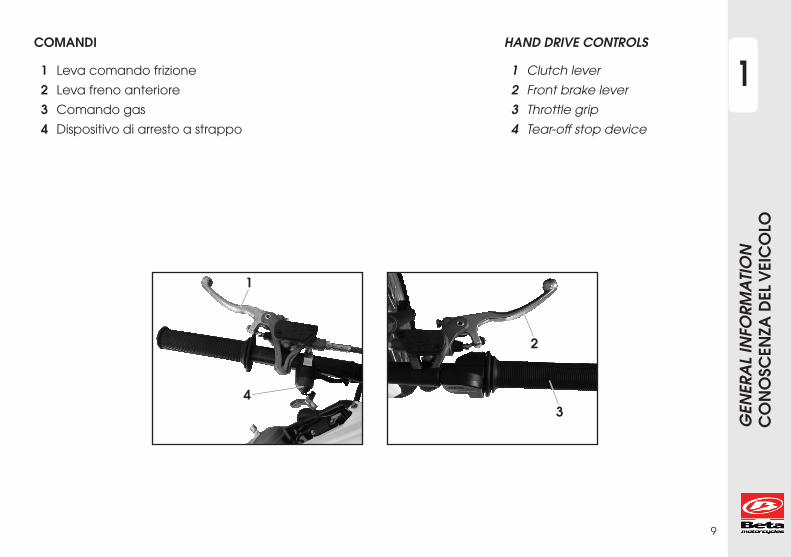
HAND DRIVE CONTROLS
1 Clutch lever
2 Front brake lever
3 Throttle grip
4 Tear-off stop device
COMANDI
1 Leva comando frizione
2 Leva freno anteriore
3 Comando gas
4 Dispositivo di arresto a strappo
1
2
34
10
1G
ENER
AL
INFO
RMA
TIO
NC
ON
OSC
ENZA
DEL
VEI
CO
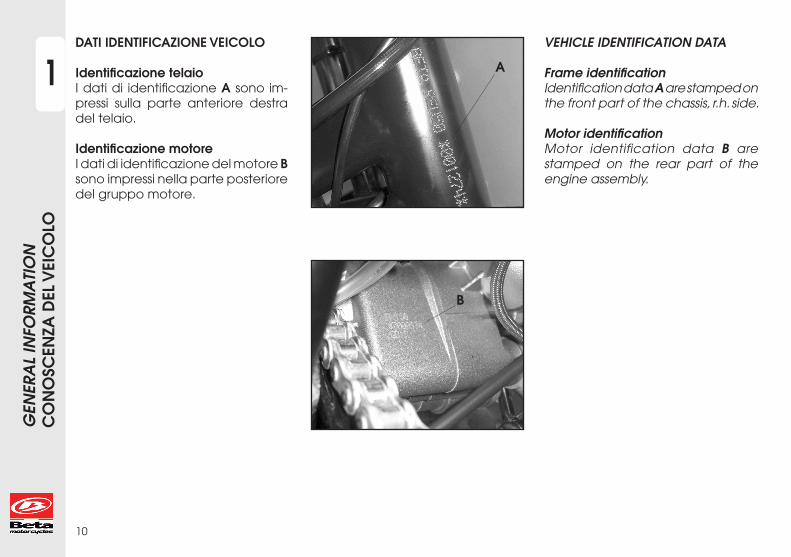
LODATI IDENTIFICAZIONE VEICOLO
IdentificazionetelaioI dati di identificazione A sono im-pressi sulla parte anteriore destra del telaio.
IdentificazionemotoreI dati di identificazione del motore B sono impressi nella parte posteriore del gruppo motore.
VEHICLE IDENTIFICATION DATA
FrameidentificationIdentification data A are stamped on the front part of the chassis, r.h. side.
MotoridentificationMotor identification data B are stamped on the rear part of the engine assembly.
A
B
11
1
GEN
ERA
L IN
FORM
ATI
ON
CO
NO
SCEN
ZA D
EL V
EIC
OLO
DATI TECNICI EVO 80 SENIOR
Pesoveicolo• in ordine di marcia (a vuoto) ......................... 66 (kg)
Dimensioni• lunghezza totale ........................................... 1925 mm
• larghezza totale .............................................. 815 mm
• altezza totale ................................................. 1127 mm
• passo .............................................................. 1230 mm
• altezza sella ..................................................... 678 mm
• luce a terra ...................................................... 325 mm
Capacitàdiriempimento• serbatoio carburante .........................................2,5 (lt)
• liquido circuito di raffreddamento ...............600 (cc)
• olio trasmissione nel carter .............................430(cc)
Sospensioneanteriore• forcella idraulica con steli di Ø 38 mm
Contenuto olio nelle gambe:
- destra ...............................................................65mm*
- sinistra .............................................................125mm*
* misurazione livello olio tubo completamente inserito,
senza molla, distanziale e complessivo tappo.
TECHNICAL DATA EVO 80 SENIOR
Vehicleweight•readytooperate(unfueled) ...........................66 (kg)
Dimensions•totallength .....................................................1925 mm
•totalwidth .........................................................815 mm
•totalheight .....................................................1127 mm
•pitch ................................................................1230 mm
•saddleheight ...................................................678 mm
•clearancefromground...................................325 mm
Fillingcapacity•fueltank ............................................................... 2,5 (lt)
•coolingcircuitliquid ....................................... 600 (cc)
•crankcasetransmissionoil ............................. 430 (cc)
Frontsuspension•hydraulicforkwith38mmØrods
Oil content in shafts:
- right .................................................................... 65mm*
- left .................................................................... 125mm*
* oil level measurement with fully inserted tube, wi-
thout spring, spacer and cap assembly.
12
1G
ENER
AL
INFO
RMA
TIO
NC
ON
OSC
ENZA
DEL
VEI
CO
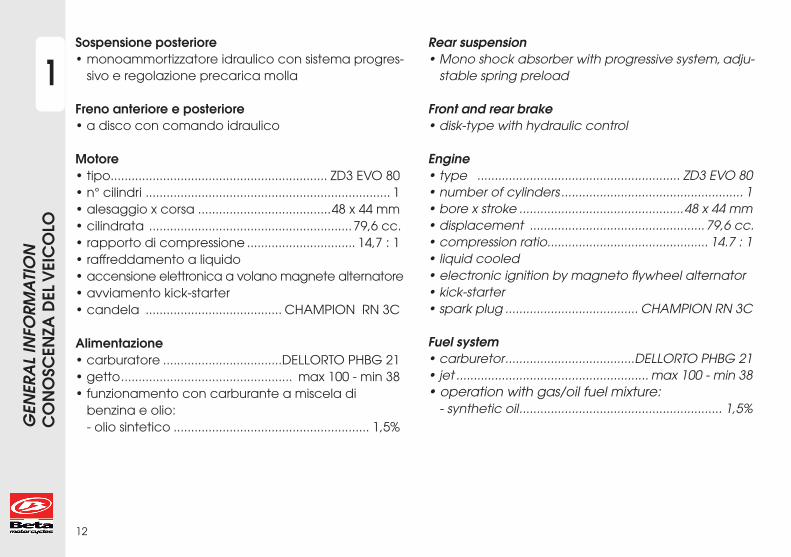
LOSospensioneposteriore• monoammortizzatore idraulico con sistema progres-
sivo e regolazione precarica molla
Frenoanterioreeposteriore• a disco con comando idraulico
Motore• tipo.............................................................. ZD3 EVO 80• n° cilindri ...................................................................... 1• alesaggio x corsa ......................................48 x 44 mm• cilindrata ..........................................................79,6 cc.• rapporto di compressione ............................... 14,7 : 1• raffreddamento a liquido• accensione elettronica a volano magnete alternatore• avviamento kick-starter• candela ....................................... CHAMPION RN 3C
Alimentazione• carburatore ..................................DELLORTO PHBG 21• getto ................................................. max 100 - min 38 • funzionamento con carburante a miscela di benzina e olio: - olio sintetico ........................................................ 1,5%
Rearsuspension•Monoshockabsorberwithprogressivesystem,adju-
stable spring preload Frontandrearbrake•disk-typewithhydrauliccontrol
Engine•type .......................................................... ZD3 EVO 80•numberofcylinders .................................................... 1•borexstroke ...............................................48 x 44 mm•displacement ..................................................79,6 cc.•compressionratio.............................................. 14.7 : 1•liquidcooled•electronicignitionbymagnetoflywheelalternator•kick-starter•sparkplug ...................................... CHAMPION RN 3C
Fuelsystem•carburetor .....................................DELLORTO PHBG 21•jet ....................................................... max 100 - min 38 •operationwithgas/oilfuelmixture: - synthetic oil .......................................................... 1,5%
13
1
GEN
ERA
L IN
FORM
ATI
ON
CO
NO
SCEN
ZA D
EL V
EIC
OLO
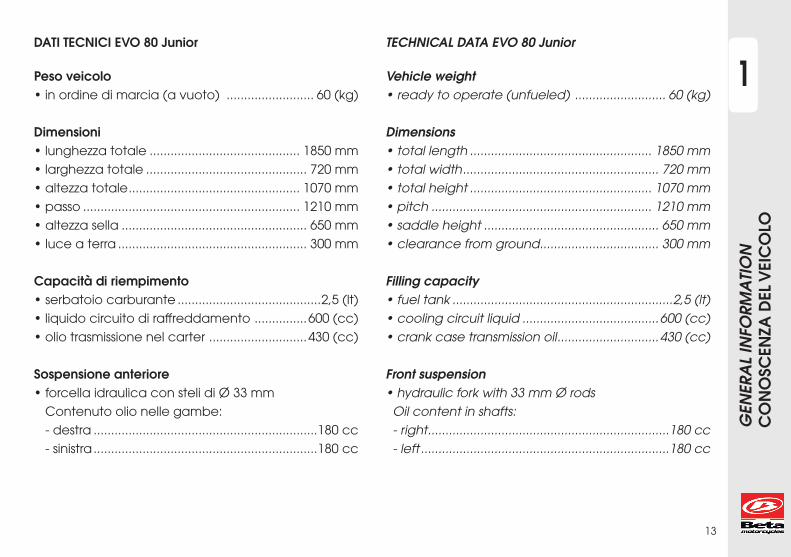
DATITECNICIEVO80Junior
Pesoveicolo• in ordine di marcia (a vuoto) ......................... 60 (kg)
Dimensioni• lunghezza totale ........................................... 1850 mm
• larghezza totale .............................................. 720 mm
• altezza totale ................................................. 1070 mm
• passo .............................................................. 1210 mm
• altezza sella ..................................................... 650 mm
• luce a terra ...................................................... 300 mm
Capacitàdiriempimento• serbatoio carburante .........................................2,5 (lt)
• liquido circuito di raffreddamento ...............600 (cc)
• olio trasmissione nel carter ............................430 (cc)
Sospensioneanteriore• forcella idraulica con steli di Ø 33 mm
Contenuto olio nelle gambe:
- destra ................................................................180 cc
- sinistra ................................................................180 cc
TECHNICALDATAEVO80Junior
Vehicleweight•readytooperate(unfueled) .......................... 60 (kg)
Dimensions•totallength .................................................... 1850 mm
•totalwidth ........................................................ 720 mm
•totalheight .................................................... 1070 mm
•pitch ............................................................... 1210 mm
•saddleheight .................................................. 650 mm
•clearancefromground.................................. 300 mm
Fillingcapacity•fueltank ...............................................................2,5 (lt)
•coolingcircuitliquid .......................................600 (cc)
•crankcasetransmissionoil .............................430 (cc)
Frontsuspension•hydraulicforkwith33mmØrods
Oil content in shafts:
- right .....................................................................180 cc
- left .......................................................................180 cc

14
1G
ENER
AL
INFO
RMA
TIO
NC
ON
OSC
ENZA
DEL
VEI
CO
LOSospensioneposteriore• monoammortizzatore idraulico con sistema progres-
sivo e regolazione precarica molla
Frenoanterioreeposteriore• a disco con comando idraulico
Motore• tipo...............................................................ZD3 EVO 80• n° cilindri .......................................................................1• alesaggio x corsa ...................................... 48 x 44 mm• cilindrata .......................................................... 79,6 cc.• rapporto di compressione ................................14,7 : 1• raffreddamento a liquido• accensione elettronica a volano magnete alternatore• avviamento kick-starter• candela ........................................CHAMPION RN 3C
Alimentazione• carburatore ..................................DELLORTO PHBG 21• getto .................................................. max 100 - min 38 • funzionamento con carburante a miscela di benzina e olio: - olio sintetico .........................................................1,5%
Rearsuspension•Monoshockabsorberwithprogressivesystem,adju-
stable spring preload Frontandrearbrake•disk-typewithhydrauliccontrol
Engine•type ...........................................................ZD3 EVO 80•numberofcylinders .....................................................1•borexstroke ............................................... 48 x 44 mm•displacement .................................................. 79,6 cc.•compressionratio...............................................14.7 : 1•liquidcooled•electronicignitionbymagnetoflywheelalternator•kick-starter•sparkplug .......................................CHAMPION RN 3C
Fuelsystem•carburetor .....................................DELLORTO PHBG 21•jet ....................................................... max 100 - min 38 •operationwithgas/oilfuelmixture: - synthetic oil ...........................................................1,5%
15
1
GEN
ERA
L IN
FORM
ATI
ON
CO
NO
SCEN
ZA D
EL V
EIC
OLO
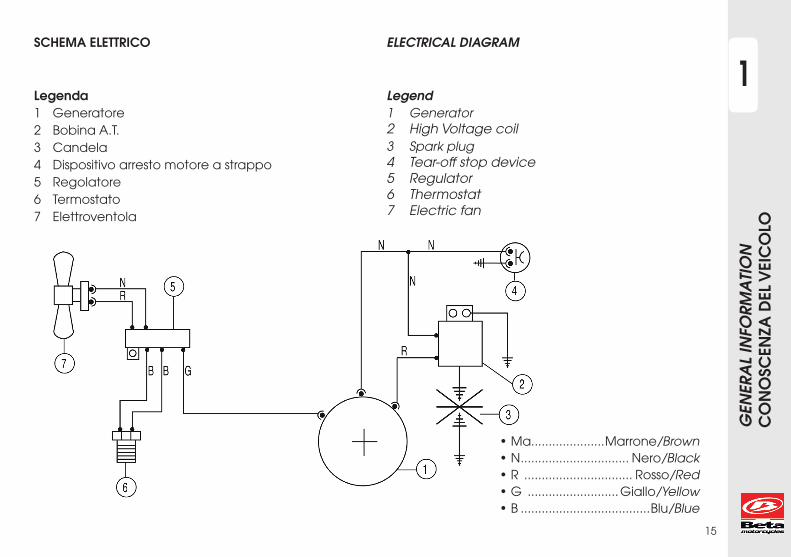
SCHEMA ELETTRICO
Legenda1 Generatore2 Bobina A.T.3 Candela4 Dispositivo arresto motore a strappo5 Regolatore6 Termostato7 Elettroventola
ELECTRICAL DIAGRAM
Legend1 Generator2 High Voltage coil 3 Spark plug4 Tear-off stop device5 Regulator6 Thermostat7 Electric fan
• Ma.....................Marrone/Brown• N ............................... Nero/Black• R ............................... Rosso/Red• G ..........................Giallo/Yellow• B .....................................Blu/Blue
17
2
OPE
RATI
ON
AN
DU
SEFU
NZI
ON
AM
ENTO
E U
TILI
ZZO
INDICE ARGOMENTI
Controlli e manutenzioneprimaedopol'utilizzo
Operazionedirifornimento
Lubrificantieliquidiconsigliati
Rodaggio
Avviamento
INDEX
Checks and maintenancebeforeandafteruse
Fuelingoperations
Recommended lubricantsandliquids
Breakingin
Startup
CAPI
TOLO
2
SECT
ION
2
18
OPE
RATI
ON
AN
DU
SEFU
NZI
ON
AM
ENTO
E U
TILI
ZZO
2CONTROLLIEMANUTENZIONEPRIMAEDOPOL'UTILIZZO
Onde evitare spiacevoli inconvenienti durante il fun-zionamento del veicolo è consigliabile effettuare, sia prima che dopo l'utilizzo, alcune operazioni di controllo e manutenzione . Infatti pochi minuti dedicati a queste operazioni, oltre a rendere la guida più sicura, possono farvi risparmiare tempo e denaro.Quindi procedere come segue:
• Verificare la pressione, lo stato generale e lo spessore del battistrada.
• Nei giorni freddi è consigliabile prima della partenza, fare scaldare il motore facendolo funzionare al minimo per alcuni istanti.
• Ogni volta che il veicolo viene utilizzato in fuoristrada occorre lavarlo accuratamente.
CHECKSANDMAINTENANCEBEFOREANDAFTERUSE
In order to avoid problems connected to the opera-tion of the vehicle, it is advisable to perform a number of checks and maintenance operations before and after use. Just a few minutes given to these proce-dures will save you time and money, and will make riding much safer.Proceed as follows:
•Checkpressure,generalconditionandthicknessoftread.
•Oncolddays,warmuptheenginebyrunningitatminimum for a few minutes before starting off.
•Washthevehiclecarefullyaftereveryoff-roaduse.
19
2
OPE
RATI
ON
AN
DU
SEFU
NZI
ON
AM
ENTO
E U
TILI
ZZO
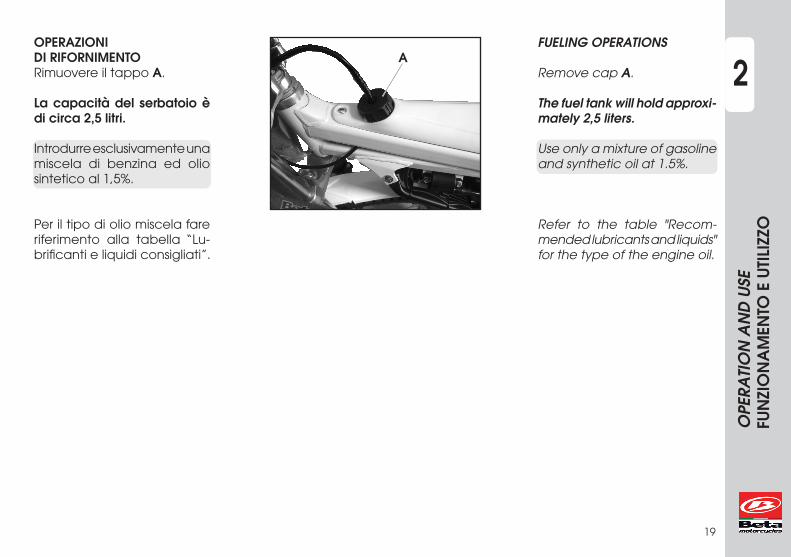
OPERAZIONI DI RIFORNIMENTORimuovere il tappo A.
Lacapacitàdel serbatoioèdicirca2,5litri.
Introdurre esclusivamente una miscela di benzina ed olio sintetico al 1,5%.
Per il tipo di olio miscela fare riferimento alla tabella “Lu-brificanti e liquidi consigliati”.
FUELINGOPERATIONS
Remove cap A.
Thefueltankwillholdapproxi-mately2,5liters.
Use only a mixture of gasoline and synthetic oil at 1.5%.
Refer to the table "Recom-mended lubricants and liquids" for the type of the engine oil.
A
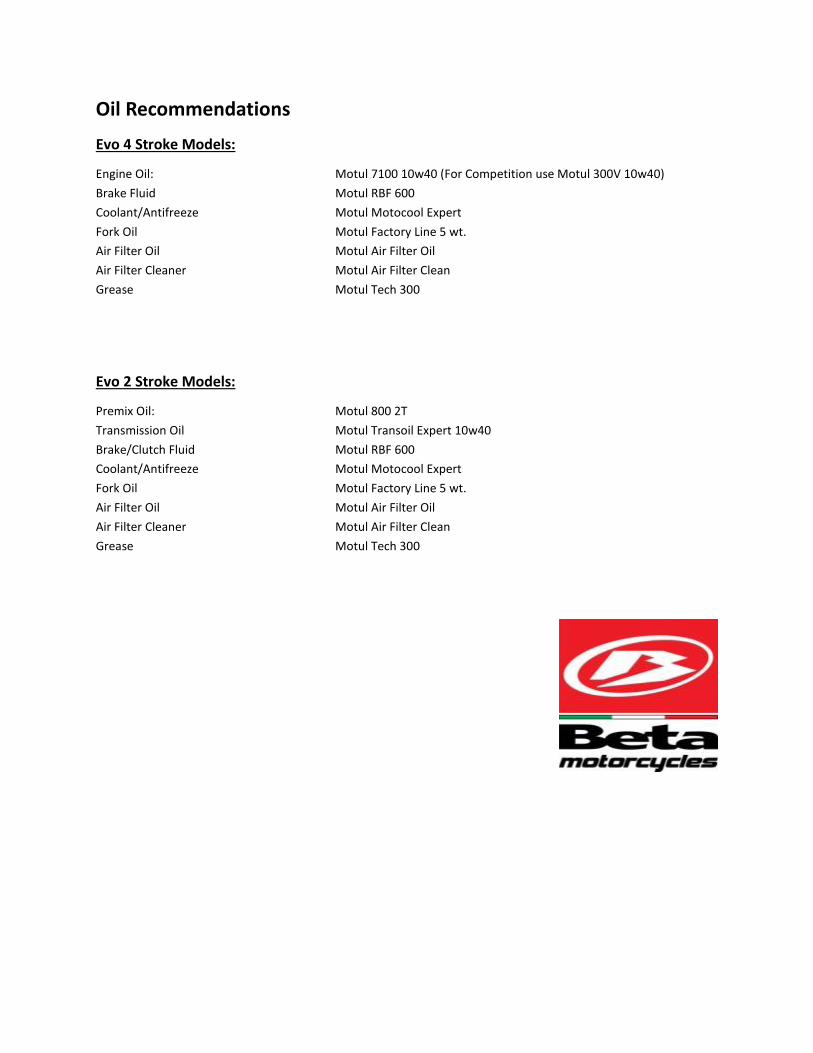
Oil Recommendations
Evo 4 Stroke Models:
Engine Oil: Motul 7100 10w40 (For Competition use Motul 300V 10w40)
Brake Fluid Motul RBF 600
Coolant/Antifreeze Motul Motocool Expert
Fork Oil Motul Factory Line 5 wt.
Air Filter Oil Motul Air Filter Oil
Air Filter Cleaner Motul Air Filter Clean
Grease Motul Tech 300
Evo 2 Stroke Models:
Premix Oil: Motul 800 2T
Transmission Oil Motul Transoil Expert 10w40
Brake/Clutch Fluid Motul RBF 600
Coolant/Antifreeze Motul Motocool Expert
Fork Oil Motul Factory Line 5 wt.
Air Filter Oil Motul Air Filter Oil
Air Filter Cleaner Motul Air Filter Clean
Grease Motul Tech 300
21
2
OPE
RATI
ON
AN
DU
SEFU
NZI
ON
AM
ENTO
E U
TILI
ZZO
RODAGGIO
Il rodaggio ha una durata di circa 500 Km o N. 10 pieni di carburante; durante questo periodo si consiglia di:
- Evitare di viaggiare a velocità costante - Variando la velocità i vari componenti si asseste-ranno uniformemente ed in minor tempo
- Evitare di ruotare la manopola del gas per più di 3/4.
Attenzione:
• Dopo 500 km di percorrenza sostituire l'olio trasmis-sione nel carter.
• Utilizzare sempre miscela di benzina senza piombo e olio (olio sintetico 1,5%).
• Dopo la prima uscita fuoristrada provvedere a risentire tutta la bulloneria.
BREAKINGIN
Run in the vehicle over about 500 km or No. 10 refu-elin; during this time:
- Avoid travel at high speeds
- Change speed often so that the parts will break in uniformly and in a shorter time
-Avoidturningthethrottlemorethan3/4oftheway.
Warning:
•Change the gearbox oil after 500km.
•Alwaysuseamixtureofsupergradegasand oil (synthetic oil 1,5%).
•Afterthefirstoff-roaduse,checkallofthenutsandbolts.
22
OPE
RATI
ON
AN
DU
SEFU
NZI
ON
AM
ENTO
E U
TILI
ZZO
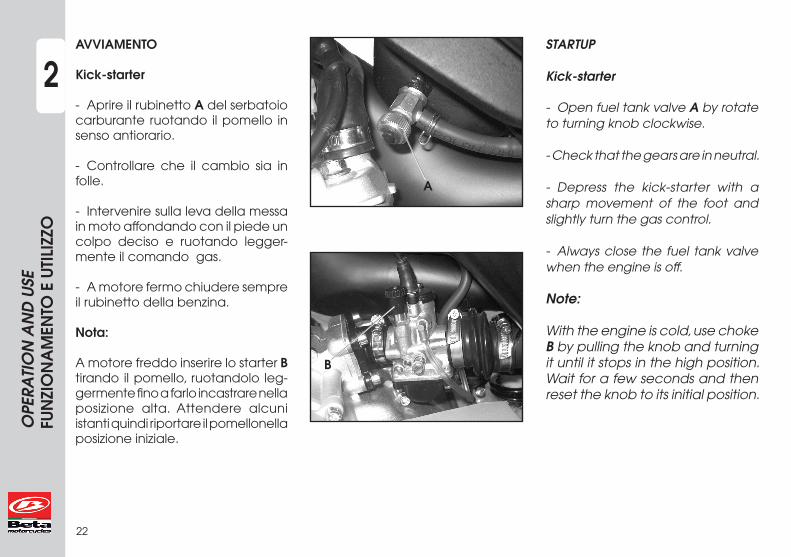
2AVVIAMENTO
Kick-starter
- Aprire il rubinetto A del serbatoio carburante ruotando il pomello in senso antiorario. - Controllare che il cambio sia in folle.
- Intervenire sulla leva della messa in moto affondando con il piede un colpo deciso e ruotando legger-mente il comando gas.
- A motore fermo chiudere sempre il rubinetto della benzina.
Nota:
A motore freddo inserire lo starter B tirando il pomello, ruotandolo leg-germente fino a farlo incastrare nella posizione alta. Attendere alcuni istanti quindi riportare il pomellonella posizione iniziale.
STARTUP
Kick-starter
- Open fuel tank valve A by rotate to turning knob clockwise.
- Check that the gears are in neutral.
- Depress the kick-starter with a sharp movement of the foot and slightly turn the gas control.
- Always close the fuel tank valve when the engine is off.
Note:
With the engine is cold, use choke Bby pulling the knob and turning it until it stops in the high position. Wait for a few seconds and then reset the knob to its initial position.
A
B
23
3
MA
INTE
NA
NC
E A
ND
CH
ECKS
MA
NU
TEN
ZIO
NE
E C
ON
TRO
LLI
INDICE ARGOMENTI
Oliocarter
Oliopompafreni
Olioforcella
Filtroaria
Candela
Freni
Liquidodiraffreddamento
Lamelle
Puliziadelveicolo
Manutenzioneprogrammata
INDEX
Gearboxoil
Brakepumpoil
Forkoil
Airfilter
Sparkplug
Brakes
Coolingliquid
Valvepetals
Cleaningthevehicle
Maintenanceschedule
CAPI
TOLO
3
SECT
ION
3
MA
INTE
NA
NC
E A
ND
CH
ECKS
MA
NU
TEN
ZIO
NE
E C
ON
TRO
LLI
24
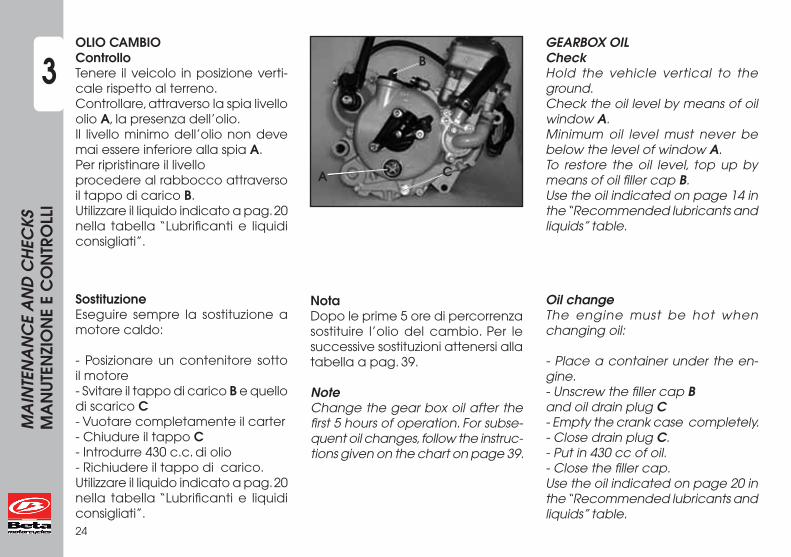
3OLIO CAMBIOControlloTenere il veicolo in posizione verti-cale rispetto al terreno.Controllare, attraverso la spia livello olio A, la presenza dell’olio.Il livello minimo dell’olio non deve mai essere inferiore alla spia A.Per ripristinare il livelloprocedere al rabbocco attraverso il tappo di carico B.Utilizzare il liquido indicato a pag. 20nella tabella “Lubrificanti e liquidi consigliati”.
SostituzioneEseguire sempre la sostituzione a motore caldo:
- Posizionare un contenitore sotto il motore- Svitare il tappo di carico B e quello di scarico C- Vuotare completamente il carter- Chiudure il tappo C - Introdurre 430 c.c. di olio- Richiudere il tappo di carico.Utilizzare il liquido indicato a pag. 20nella tabella “Lubrificanti e liquidi consigliati”.
GEARBOXOILCheckHold the vehicle vertical to the ground.Check the oil level by means of oil window A.Minimum oil level must never be below the level of window A.To restore the oil level, top up by means of oil filler cap B.Use the oil indicated on page 14 inthe “Recommended lubricants and liquids” table.
OilchangeThe engine must be hot when changing oil:
- Place a container under the en-gine.- Unscrew the filler cap B and oil drain plug C- Empty the crank case completely.- Close drain plug C.- Put in 430 cc of oil.- Close the filler cap.Use the oil indicated on page 20 inthe “Recommended lubricants and liquids” table.
NotaDopo le prime 5 ore di percorrenza sostituire l’olio del cambio. Per le successive sostituzioni attenersi alla tabella a pag. 39.
NoteChange the gear box oil after the first 5 hours of operation. For subse-quent oil changes, follow the instruc-tions given on the chart on page 39.
B
CA
25
3
MA
INTE
NA
NC
E A
ND
CH
ECKS
MA
NU
TEN
ZIO
NE
E C
ON
TRO
LLI
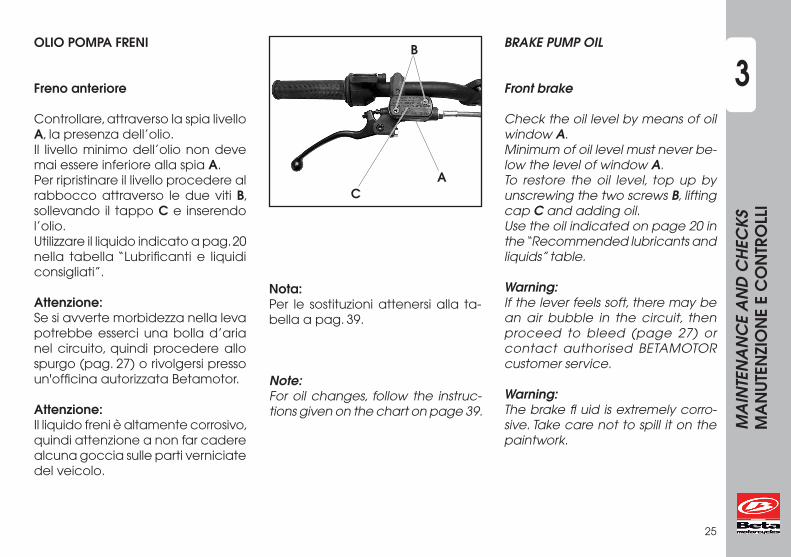
OLIO POMPA FRENI
Frenoanteriore
Controllare, attraverso la spia livello A, la presenza dell’olio.Il livello minimo dell’olio non deve mai essere inferiore alla spia A.Per ripristinare il livello procedere al rabbocco attraverso le due viti B, sollevando il tappo C e inserendo l’olio.Utilizzare il liquido indicato a pag. 20nella tabella “Lubrificanti e liquidi consigliati”.
Attenzione:Se si avverte morbidezza nella leva potrebbe esserci una bolla d’aria nel circuito, quindi procedere allo spurgo (pag. 27) o rivolgersi presso un'officina autorizzata Betamotor.
Attenzione:Il liquido freni è altamente corrosivo, quindi attenzione a non far cadere alcuna goccia sulle parti verniciate del veicolo.
BRAKEPUMPOIL
Frontbrake
Check the oil level by means of oil window A.Minimum of oil level must never be-low the level of window A.To restore the oil level, top up by unscrewing the two screws B, lifting cap C and adding oil.Use the oil indicated on page 20 inthe “Recommended lubricants and liquids” table.
Warning:If the lever feels soft, there may be an air bubble in the circuit, then proceed to bleed (page 27) or contact authorised BETAMOTOR customer service.
Warning:Thebrakefluidisextremelycorro-sive. Take care not to spill it on the paintwork.
Nota:Per le sostituzioni attenersi alla ta-bella a pag. 39.
Note:For oil changes, follow the instruc-tions given on the chart on page 39.
CA
B
MA
INTE
NA
NC
E A
ND
CH
ECKS
MA
NU
TEN
ZIO
NE
E C
ON
TRO
LLI
26
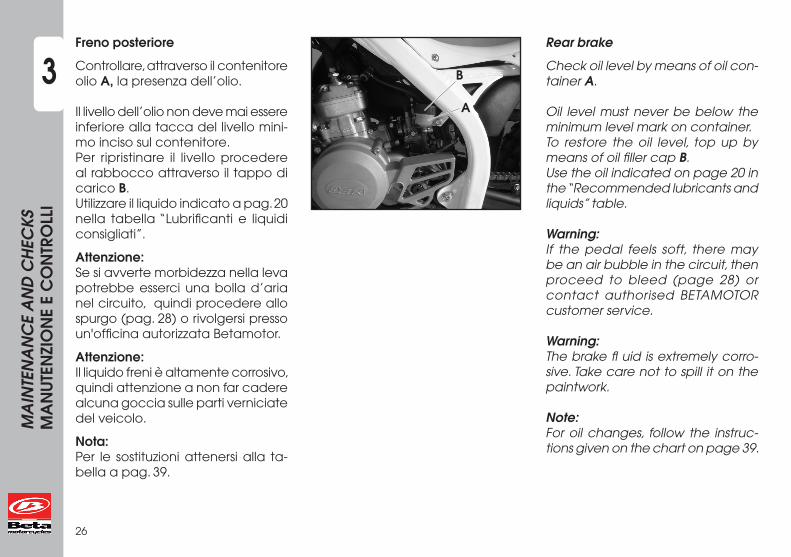
3Frenoposteriore
Controllare, attraverso il contenitore olio A, la presenza dell’olio.
Il livello dell’olio non deve mai essere inferiore alla tacca del livello mini-mo inciso sul contenitore.Per ripristinare il livello procedere al rabbocco attraverso il tappo di carico B.Utilizzare il liquido indicato a pag. 20nella tabella “Lubrificanti e liquidi consigliati”.
Attenzione:Se si avverte morbidezza nella leva potrebbe esserci una bolla d’aria nel circuito, quindi procedere allo spurgo (pag. 28) o rivolgersi presso un'officina autorizzata Betamotor.
Attenzione:Il liquido freni è altamente corrosivo, quindi attenzione a non far cadere alcuna goccia sulle parti verniciate del veicolo.
Nota:Per le sostituzioni attenersi alla ta-bella a pag. 39.
Rearbrake
Check oil level by means of oil con-tainer A.
Oil level must never be below the minimum level mark on container.To restore the oil level, top up by means of oil filler cap B. Use the oil indicated on page 20 inthe “Recommended lubricants and liquids” table.
Warning:If the pedal feels soft, there may be an air bubble in the circuit, then proceed to bleed (page 28) or contact authorised BETAMOTOR customer service.
Warning:Thebrakefluidisextremelycorro-sive. Take care not to spill it on the paintwork.
Note:For oil changes, follow the instruc-tions given on the chart on page 39.
B
A
27
3
MA
INTE
NA
NC
E A
ND
CH
ECKS
MA
NU
TEN
ZIO
NE
E C
ON
TRO
LLI
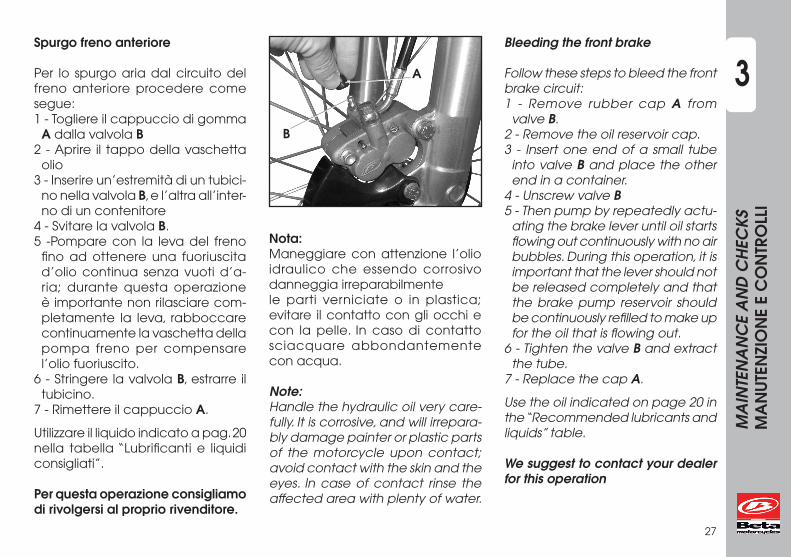
Spurgofrenoanteriore
Per lo spurgo aria dal circuito del freno anteriore procedere come segue:1 - Togliere il cappuccio di gomma
A dalla valvola B2 - Aprire il tappo della vaschetta
olio3 - Inserire un’estremità di un tubici-
no nella valvola B, e l’altra all’inter-no di un contenitore
4 - Svitare la valvola B.5 -Pompare con la leva del freno
fino ad ottenere una fuoriuscita d’olio continua senza vuoti d’a-ria; durante questa operazione è importante non rilasciare com-pletamente la leva, rabboccare continuamente la vaschetta della pompa freno per compensare l’olio fuoriuscito.
6 - Stringere la valvola B, estrarre il tubicino.
7 - Rimettere il cappuccio A.
Utilizzare il liquido indicato a pag. 20nella tabella “Lubrificanti e liquidi consigliati”.
Perquestaoperazioneconsigliamodirivolgersialpropriorivenditore.
Bleedingthefrontbrake
Follow these steps to bleed the front brake circuit:1 - Remove rubber cap A from
valve B.2 - Remove the oil reservoir cap.3 - Insert one end of a small tube
into valve B and place the other end in a container.
4 - Unscrew valve B 5 - Then pump by repeatedly actu-
ating the brake lever until oil starts flowingoutcontinuouslywithnoairbubbles. During this operation, it is important that the lever should not be released completely and that the brake pump reservoir should be continuously refilled to make up fortheoilthatisflowingout.
6 - Tighten the valve B and extract the tube.
7 - Replace the cap A.
Use the oil indicated on page 20 inthe “Recommended lubricants and liquids” table.
Wesuggesttocontactyourdealerforthisoperation
Nota:Maneggiare con attenzione l’olio idraulico che essendo corrosivo danneggia irreparabilmentele parti verniciate o in plastica; evitare il contatto con gli occhi e con la pelle. In caso di contatto sciacquare abbondantemente con acqua.
Note:Handle the hydraulic oil very care-fully. It is corrosive, and will irrepara-bly damage painter or plastic parts of the motorcycle upon contact; avoid contact with the skin and the eyes. In case of contact rinse the affected area with plenty of water.
A
B
MA
INTE
NA
NC
E A
ND
CH
ECKS
MA
NU
TEN
ZIO
NE
E C
ON
TRO
LLI
28
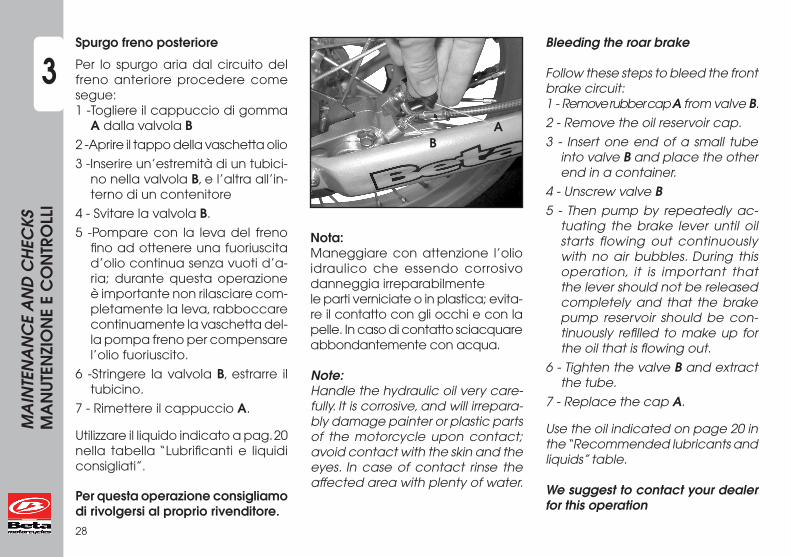
3Spurgofrenoposteriore
Per lo spurgo aria dal circuito del freno anteriore procedere come segue:1 -Togliere il cappuccio di gomma
A dalla valvola B2 -Aprire il tappo della vaschetta olio
3 -Inserire un’estremità di un tubici-no nella valvola B, e l’altra all’in-terno di un contenitore
4 - Svitare la valvola B.
5 -Pompare con la leva del freno fino ad ottenere una fuoriuscita d’olio continua senza vuoti d’a-ria; durante questa operazione è importante non rilasciare com-pletamente la leva, rabboccare continuamente la vaschetta del-la pompa freno per compensare l’olio fuoriuscito.
6 -Stringere la valvola B, estrarre il tubicino.
7 - Rimettere il cappuccio A.
Utilizzare il liquido indicato a pag. 20nella tabella “Lubrificanti e liquidi consigliati”.
Perquestaoperazioneconsigliamodirivolgersialpropriorivenditore.
Nota:Maneggiare con attenzione l’olio idraulico che essendo corrosivo danneggia irreparabilmentele parti verniciate o in plastica; evita-re il contatto con gli occhi e con la pelle. In caso di contatto sciacquare abbondantemente con acqua.
Note:Handle the hydraulic oil very care-fully. It is corrosive, and will irrepara-bly damage painter or plastic parts of the motorcycle upon contact; avoid contact with the skin and the eyes. In case of contact rinse the affected area with plenty of water.
Bleedingtheroarbrake
Follow these steps to bleed the front brake circuit:1 - Remove rubber cap A from valve B.
2 - Remove the oil reservoir cap.
3 - Insert one end of a small tube into valve B and place the other end in a container.
4 - Unscrew valve B
5 - Then pump by repeatedly ac-tuating the brake lever until oil starts flowing out continuously with no air bubbles. During this operation, it is important that the lever should not be released completely and that the brake pump reservoir should be con-tinuously refilled to make up for theoilthatisflowingout.
6 - Tighten the valve B and extract the tube.
7 - Replace the cap A.
Use the oil indicated on page 20 inthe “Recommended lubricants and liquids” table.
Wesuggesttocontactyourdealerforthisoperation
AB
29
3
MA
INTE
NA
NC
E A
ND
CH
ECKS
MA
NU
TEN
ZIO
NE
E C
ON
TRO
LLI
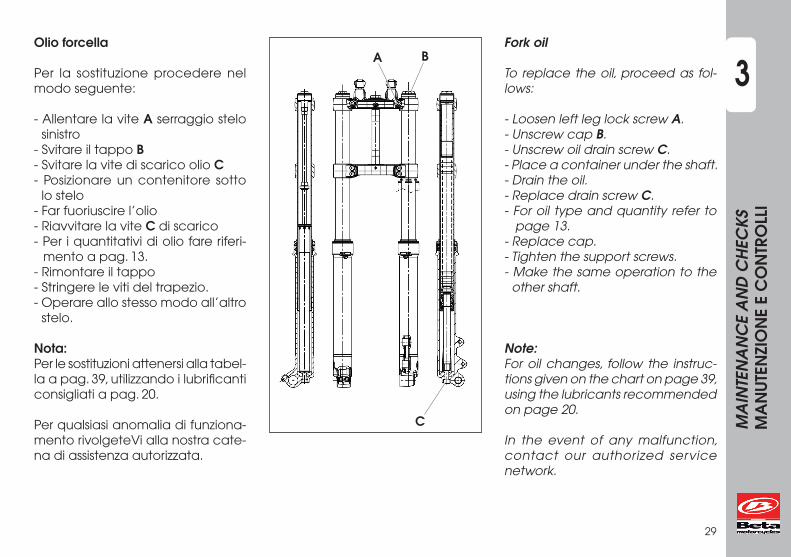
Olioforcella
Per la sostituzione procedere nel modo seguente:
- Allentare la vite A serraggio stelo sinistro
- Svitare il tappo B- Svitare la vite di scarico olio C- Posizionare un contenitore sotto
lo stelo- Far fuoriuscire l’olio- Riavvitare la vite C di scarico- Per i quantitativi di olio fare riferi-
mento a pag. 13.- Rimontare il tappo- Stringere le viti del trapezio.- Operare allo stesso modo all’altro
stelo.
Nota:Per le sostituzioni attenersi alla tabel-la a pag. 39, utilizzando i lubrificanti consigliati a pag. 20.
Per qualsiasi anomalia di funziona-mento rivolgeteVi alla nostra cate-na di assistenza autorizzata.
Forkoil
To replace the oil, proceed as fol-lows:
- Loosen left leg lock screw A.- Unscrew cap B.- Unscrew oil drain screw C.- Place a container under the shaft.- Drain the oil.- Replace drain screw C.- For oil type and quantity refer to
page 13.- Replace cap.- Tighten the support screws.- Make the same operation to the
other shaft.
Note:For oil changes, follow the instruc-tions given on the chart on page 39, using the lubricants recommended on page 20.
In the event of any malfunction, contact our authorized service network.
BA
C
MA
INTE
NA
NC
E A
ND
CH
ECKS
MA
NU
TEN
ZIO
NE
E C
ON
TRO
LLI
30
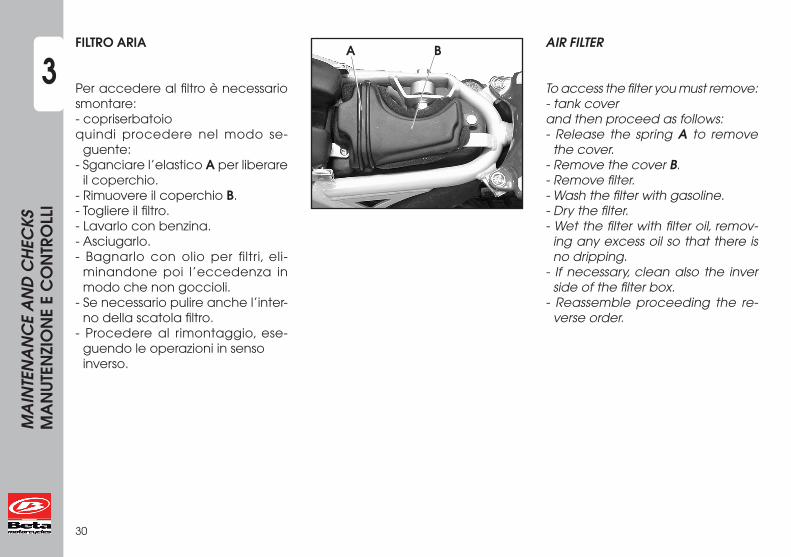
3FILTRO ARIA
Per accedere al filtro è necessario smontare:- copriserbatoioquindi procedere nel modo se-
guente:- Sganciare l’elastico A per liberare
il coperchio.- Rimuovere il coperchio B.- Togliere il filtro.- Lavarlo con benzina.- Asciugarlo.- Bagnarlo con olio per filtri, eli-
minandone poi l’eccedenza in modo che non goccioli.
- Se necessario pulire anche l’inter-no della scatola filtro.
- Procedere al rimontaggio, ese-guendo le operazioni in senso inverso.
AIR FILTER
To access the filter you must remove:- tank coverand then proceed as follows:- Release the spring A to remove
the cover.- Remove the cover B.- Remove filter.- Wash the filter with gasoline.- Dry the filter.- Wet the filter with filter oil, remov-
ing any excess oil so that there is no dripping.
- If necessary, clean also the inver side of the filter box.
- Reassemble proceeding the re-verse order.
A B
31
3
MA
INTE
NA
NC
E A
ND
CH
ECKS
MA
NU
TEN
ZIO
NE
E C
ON
TRO
LLI
Nota:• Nel caso che il filtro risulti danneggiato procedere
immediatamente alla sua sostituzione.
Attenzione:Dopo ogni intervento controllare che all'interno della scatola del filtro non ci sia rimasto nessun oggetto.
Eseguirelapuliziadelfiltroognivoltacheilmezzovieneutilizzatoinfuoristrada.
Note:• Ifthefilterisdamaged,replaceitimmediately.
Warning:After every intervention, check that nothing has been left inside the filter box.
Clean thefilterevery time thevehicle isusedcross-country.
MA
INTE
NA
NC
E A
ND
CH
ECKS
MA
NU
TEN
ZIO
NE
E C
ON
TRO
LLI
32
3CANDELA
Mantenere la candela in buono stato contribuisce alla diminuzione dei consumi e all'ottimale funzionamento del motore.
Per effettuare il controllo è sufficiente sfilare la pipetta della corrente e svitare la candela.Esaminare con uno spessimetro la distanza fra gli elettrodi che dovrà essere di 0,5-0,6 mm, nel caso non corrispon-da a questo valore è possibile correggerla piegando delicatamente l'elettrodo di massa.
Verificare inoltre che non presenti screpolature sull'iso-lante o elettrodi corrosi, in questi casi procedere all'im-mediata sostituzione.
Effettuareilcontrolloattenendosiallatabellaapag.39.
Per il montaggio della candela è consigliabile avvitarla a mano fino a battuta, quindi bloccarla con la chiave.
Nota:• L'utilizzo di olii di bassa qualità determina l'aumento
dei depositi carboniosi, è quindi consigliabile utilizzare un olio di buona qualità, consigliato a pag. 20.
• Si raccomanda di utilizzare sempre candele RN 3C
SPARKPLUG
Keeping the spark plug in good condition will reduce fuel consumption and increase engine performance.
To perform the check, simply slide off the electrical con-nection tube and unscrew the spark plug.Examine the distance between the electrodes with a feeler. This distance should be from 0.5 to 0.6 mm. If it is not, it may be corrected by bending the earth electrode.
Check as well that there are no cracks in the insulation or corroded electrodes. If so, replace immediately.
Observethechartonpage39whenperformingthecheck.
When replacing the spark plug, screw it in by hand until it stops, then tighten with a wrench.
Note:• Theuseoflow-qualityoilwillcauseanincreaseincar-
bon deposits. We therefore advise the use of a qualitatively good oil, recommended on page 20.•AlwaysuseSparksplugsRN3C
33
3
MA
INTE
NA
NC
E A
ND
CH
ECKS
MA
NU
TEN
ZIO
NE
E C
ON
TRO
LLI
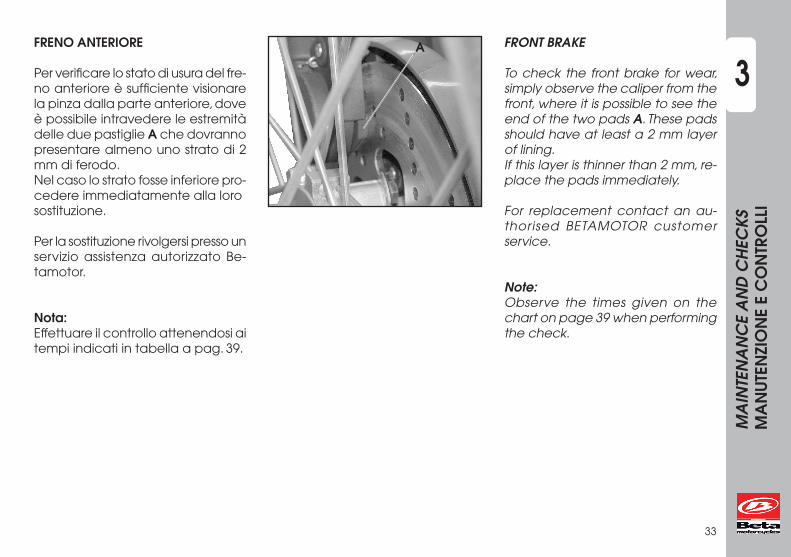
FRENO ANTERIORE
Per verificare lo stato di usura del fre-no anteriore è sufficiente visionare la pinza dalla parte anteriore, dove è possibile intravedere le estremità delle due pastiglie A che dovranno presentare almeno uno strato di 2 mm di ferodo.Nel caso lo strato fosse inferiore pro-cedere immediatamente alla lorosostituzione.
Per la sostituzione rivolgersi presso unservizio assistenza autorizzato Be-tamotor.
Nota:Effettuare il controllo attenendosi ai tempi indicati in tabella a pag. 39.
FRONTBRAKE
To check the front brake for wear, simply observe the caliper from the front, where it is possible to see the end of the two pads A. These pads should have at least a 2 mm layer of lining. If this layer is thinner than 2 mm, re-place the pads immediately.
For replacement contact an au-thorised BETAMOTOR customer service.
Note:Observe the times given on the chart on page 39 when performing the check.
A
MA
INTE
NA
NC
E A
ND
CH
ECKS
MA
NU
TEN
ZIO
NE
E C
ON
TRO
LLI
34
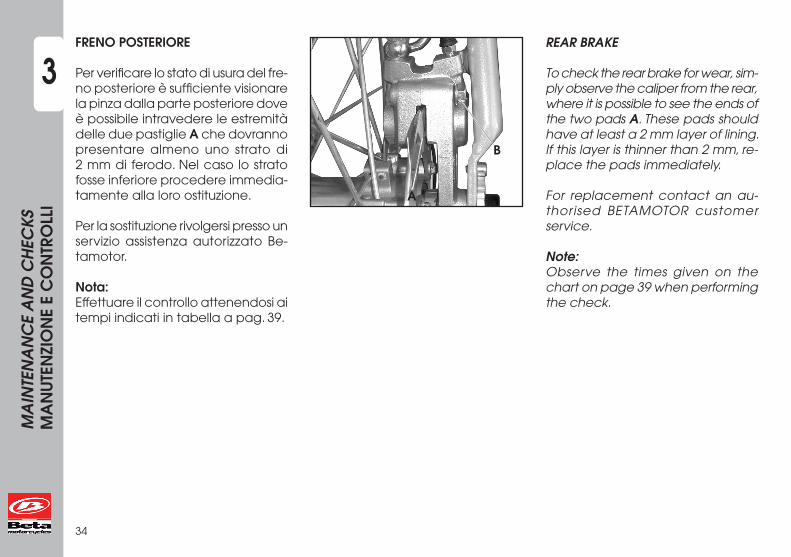
3FRENO POSTERIORE
Per verificare lo stato di usura del fre-no posteriore è sufficiente visionare la pinza dalla parte posteriore dove è possibile intravedere le estremità delle due pastiglie A che dovranno presentare almeno uno strato di 2 mm di ferodo. Nel caso lo strato fosse inferiore procedere immedia-tamente alla loro ostituzione.
Per la sostituzione rivolgersi presso unservizio assistenza autorizzato Be-tamotor.
Nota:Effettuare il controllo attenendosi ai tempi indicati in tabella a pag. 39.
REARBRAKE
To check the rear brake for wear, sim-ply observe the caliper from the rear, where it is possible to see the ends of the two pads A. These pads should have at least a 2 mm layer of lining. If this layer is thinner than 2 mm, re-place the pads immediately.
For replacement contact an au-thorised BETAMOTOR customer service.
Note:Observe the times given on the chart on page 39 when performing the check.
B
A

35
3
MA
INTE
NA
NC
E A
ND
CH
ECKS
MA
NU
TEN
ZIO
NE
E C
ON
TRO
LLI
LIQUIDO DI RAFFREDDAMENTO
Il controllo del livello deve essere ef-fettuato a motore freddo nel modo seguente:- Tenere il motociclo in posizione
verticale rispetto al terreno.- Controllare che il liquido sia al
livello minimo visibile nella zona A all’interno del radiatore dopo aver svitato e rimosso il tappo di carico B.
- In caso di bisogno aggiungere il li-quido svitando il tappo di carico B.
ATTENZIONE:Mai svitare il tappo di carico del radiatore a motore caldo onde evitare scottature.
Nota:La capacità del circuito è di 600 cc, utilizzare i liquidi consigliati in tabella a pag. 20.
LIQUIDCOOLANT
The level check must be performed with the engine cold, as follows:- Hold the motorcycle vertical to
the ground.- Check that the liquid is at the mini-
mum visible level in zone A, inside the radiator, after unscrewing and removing the filler cap B.
- If necessary, add liquid by unscrewing filler cap B.
WARNING:To avoid burns, never unscrew the radiator filler cap when the engine is hot.
Note:Circuit capacity is 600 cc. Use the liquids racommended on the table on page 20.
B
A
MA
INTE
NA
NC
E A
ND
CH
ECKS
MA
NU
TEN
ZIO
NE
E C
ON
TRO
LLI
36
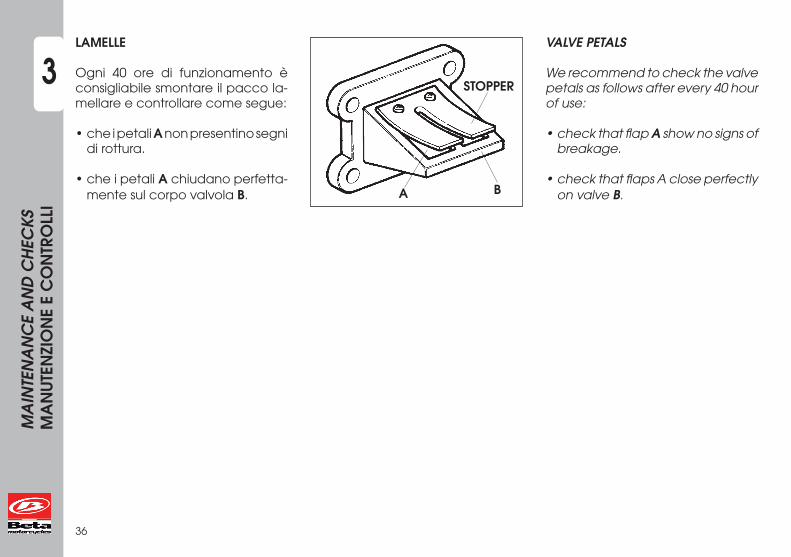
3LAMELLE
Ogni 40 ore di funzionamento è consigliabile smontare il pacco la-mellare e controllare come segue:
• che i petali A non presentino segni di rottura.
• che i petali A chiudano perfetta-mente sul corpo valvola B.
VALVEPETALS
We recommend to check the valve petals as follows after every 40 hour of use:
•checkthatflapA show no signs of breakage.
•checkthatflapsAcloseperfectlyon valve B.
STOPPER
A B
37
3
MA
INTE
NA
NC
E A
ND
CH
ECKS
MA
NU
TEN
ZIO
NE
E C
ON
TRO
LLI
PULIZIA DEL VEICOLO
ATTENZIONE: non pulire mai il veicolo con un apparecchio ad alta pressione con un forte getto d’acqua. L’ecces-siva pressione può raggiungere componenti elettrici, connettori, cavi flessibili, cuscinetti ecc. e danneggiarli o distruggerli.
ATTENZIONE: lavare frequentemente i veicoli che ope-rano in prossimità del mare (salmastro) e su strade sog-gette a spargimento sale nei periodi invernali. Coprire con un velo d’olio o silicone spray le parti non verniciate e quelle maggiormente esposte come cerchi, forcella e forcellone. Non trattare le parti in gomma ed i freni.
Durante la pulizia evitare l’esposizione diretta ai raggi solari.
Chiudere l’impianto di scarico, in modo da evitare che vi penetri acqua.
Evitare di indirizzare il getto d’acqua sul coperchio cassa filtro.
Per ammorbidire lo sporco e il fango depositato sulle superfici verniciate usare un getto di acqua. Una volta ammorbiditi, fango e sporcizia sono asportabili con una spugna soffice per carrozzeria imbevuta di molta acqua e “shampoo”. Successivamente sciacquare abbondan-temente con acqua, ed asciugare con soffio di aria e panno o pelle scamosciata.Procedere allo scarico della scatola filtro mediante l’apposito sfiato ed alla asciugatura.
CLEANING THE VEHICLE
WARNING: Do not clean your vehicle with a high-pressure device with a strong jet of water. Excessive pressure canreachelectricalcomponents,connectors,flexiblecables, bearings, etc and can damage or destroy them.
WARNING: Wash motorbikes frequently that are used near the sea (salty air) and on roads subject to salt spreading in winter. Cover with a film of oil or silicone spray unpainted parts and the most exposed parts such as wheels, forks and swingarm. Do not treat rubber parts and brakes.
When cleaning, avoid direct exposure to sunlight.
Close off the exhaust system to prevent water from entering.
Avoid directing the jet of water onto the air filter box cover.
Use water jet to soften the dirt and mud accumulated on the paintwork, then remove them with a soft bodywork sponge soaked in water and shampoo. Subsequently rinse well with water, and dry with air and cloth or suede leather.
Proceed to the emptying of the filter box using the ap-propriate ventilation and drying.
Detergents pollute water. Always wash the vehicle in areas equipped for collection and purification of the washing liquids.
MA
INTE
NA
NC
E A
ND
CH
ECKS
MA
NU
TEN
ZIO
NE
E C
ON
TRO
LLI
38
3I detersivi inquinano le acque. Pertanto il lavaggio del veicolo va effettuato in zone attrezzate per la raccolta e la depurazione dei liquidi impiegati per il lavaggio stesso.
Terminata la pulizia guidare per un breve tratto finché il motore non raggiunge la temperatura di esercizio.
ATTENZIONE: con freni bagnati si ha ridotto effetto fre-nante. Azionare prudentemente i freni in modo da farli asciugare.
Spingere indietro le protezioni dei comandi manubrio, affinché l’acqua penetrata possa evaporare.
Quando la moto sarà completamente asciutta e raf-freddata, lubrificare tutti i punti di scorrimento e lavoro.
Trattare tutti i componenti in plastica e verniciati con detergenti o prodotto non aggressivi e specifici per la cura del veicolo.
Per prevenire anomalie alla parte elettrica, trattare i contatti elettrici ed interruttori con spray per contatti elettrici.
Smontare il coperchio volano per eliminare l'eventuale acqua entrata e soffiare con aria compressa.
After cleaning, ride a short distance until the engine reaches operating temperature.
WARNING: braking effect is reduced with wet brakes. Operate the brakes cautiously to allow them to dry.
Push back the handlebar control covers, so that water can evaporate.
When the bike is completely dry and cooled down, lubricate all moving parts.
Treat all plastic and painted components with non-aggressive detergents or products that are specific for the care of the motorcycle.
To prevent malfunction of the electrical system, treat electric contacts and switches with electrical contact spray.
Removetheflywheelcovertoeliminateanywaterthatmay have entered and blow with compressed air.
39
3
MA
INTE
NA
NC
E A
ND
CH
ECKS
MA
NU
TEN
ZIO
NE
E C
ON
TRO
LLI
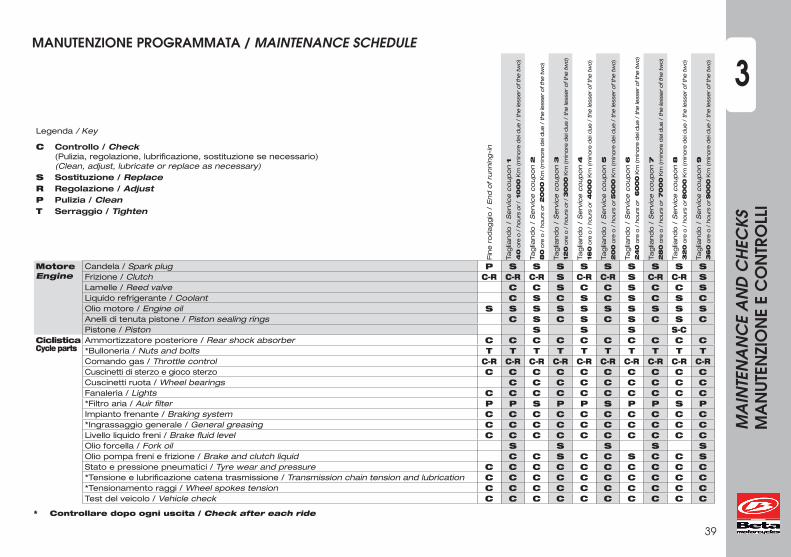
MANUTENZIONEPROGRAMMATA/MAINTENANCE SCHEDULE
Fin
e r
od
ag
gio
/ E
nd
of ru
nnin
g-i
n
Tag
liand
o /
Serv
ice c
oup
on 1
40
ore
o / h
ours
or / 1
00
0 K
m (m
inore
dei d
ue / the le
sser of t
he tw
o)
Tag
liand
o /
Serv
ice c
oup
on 2
80
ore
o / h
ours
or 2
00
0 K
m (m
inore
dei d
ue / the le
sser of t
he tw
o)
Tag
liand
o /
Serv
ice c
oup
on 3
120
ore
o / h
ours
or / 3
00
0 K
m (m
inore
dei d
ue / the le
sser of t
he tw
o)
Tag
liand
o /
Serv
ice c
oup
on 4
160
ore
o / h
ours
or 4
00
0 K
m (m
inore
dei d
ue / the le
sser of t
he tw
o)
Tag
liand
o /
Serv
ice c
oup
on 5
20
0 o
re o
/ h
ours
or 5
00
0 K
m (m
inore
dei d
ue / the le
sser of t
he tw
o)
Tag
liand
o /
Serv
ice c
oup
on 6
24
0 o
re o
/ h
ours
or 6
00
0 K
m (m
inore
dei d
ue / the le
sser of t
he tw
o)
Tag
liand
o /
Serv
ice c
oup
on 7
28
0 o
re o
/ h
ours
or 7
00
0 K
m (m
inore
dei d
ue / the le
sser of t
he tw
o)
Tag
liand
o /
Serv
ice c
oup
on 8
32
0 o
re o
/ h
ours
or 8
00
0 K
m (m
inore
dei d
ue / the le
sser of t
he tw
o)
Tag
liand
o /
Serv
ice c
oup
on 9
36
0 o
re o
/ h
ours
or 9
00
0 K
m (m
inore
dei d
ue / the le
sser of t
he tw
o)
MotoreEngine
Candela / Spark plug P S S S S S S S S SFrizione / Clutch C-R C-R C-R S C-R C-R S C-R C-R SLamelle / Reed valve C C S C C S C C SLiquido refrigerante / Coolant C S C S C S C S COlio motore / Engine oil S S S S S S S S S SAnelli di tenuta pistone / Piston sealing rings C S C S C S C S CPistone / Piston S S S S-C
CiclisticaCycle parts
Ammortizzatore posteriore / Rear shock absorber C C C C C C C C C C*Bulloneria / Nuts and bolts T T T T T T T T T TComando gas / Throttle control C-R C-R C-R C-R C-R C-R C-R C-R C-R C-RCuscinetti di sterzo e gioco sterzo C C C C C C C C C CCuscinetti ruota / Wheel bearings C C C C C C C C CFanaleria / Lights C C C C C C C C C C*Filtro aria / Auir filter P P S P P S P P S PImpianto frenante / Braking system C C C C C C C C C C*Ingrassaggio generale / General greasing C C C C C C C C C CLivello liquido freni / Brake fluid level C C C C C C C C C COlio forcella / Fork oil S S S S SOlio pompa freni e frizione / Brake and clutch liquid C C S C C S C C SStato e pressione pneumatici / Tyre wear and pressure C C C C C C C C C C*Tensione e lubrificazione catena trasmissione / Transmission chain tension and lubrication C C C C C C C C C C*Tensionamento raggi / Wheel spokes tension C C C C C C C C C CTest del veicolo / Vehicle check C C C C C C C C C C
Legenda / Key
C Controllo / Check (Pulizia, regolazione, lubrificazione, sostituzione se necessario) (Clean, adjust, lubricate or replace as necessary)S Sostituzione / ReplaceR Regolazione / AdjustP Pulizia / CleanT Serraggio / Tighten
* Controllare dopo ogni uscita / Check after each ride

4
41
AD
JUST
MEN
TSRE
GO
LAZI
ON
I
INDICE ARGOMENTI
Regolazionefreni
Regolazionefrizione Regolazioneminimo Regolazionegiocogas
Controlloeregolazionegiocosterzo
Regolazioneforcella(solo per EVO 80 Senior)
Regolazione ammortizzatoreposteriore
Tensionamentocatena
INDEX
Adjustmentofbrake
Adjustmentofclutch
Adjustmentofidlingspeed
Adjustmentofgasclearance
Check and adjustment ofsteeringgear
Adjustmentfork(for only EVO 80 Senior)
Adjustment of rear shockabsorber
Tighteningthechain
CAPI
TOLO
4
SECT
ION
4
4
42
AD
JUST
MEN
TSRE
GO
LAZI
ON
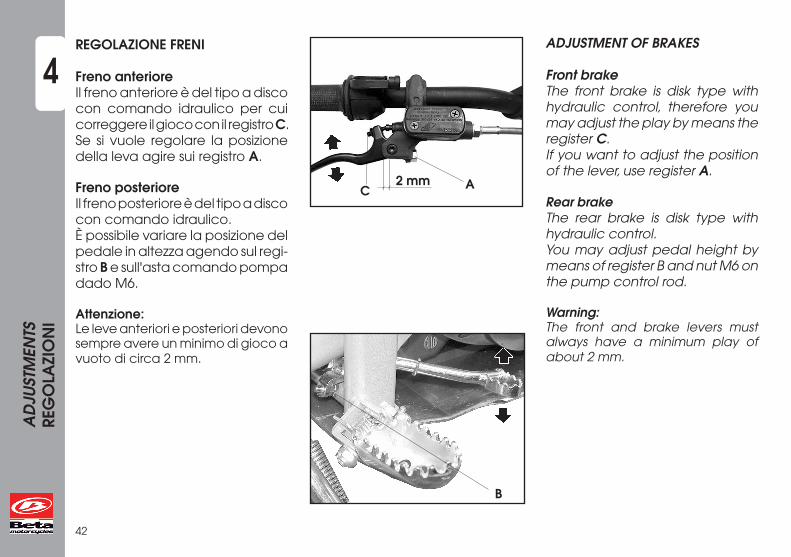
IREGOLAZIONE FRENI
FrenoanterioreIl freno anteriore è del tipo a disco con comando idraulico per cui correggere il gioco con il registro C.Se si vuole regolare la posizione della leva agire sui registro A.
FrenoposterioreIl freno posteriore è del tipo a disco con comando idraulico. È possibile variare la posizione del pedale in altezza agendo sul regi-stro B e sull'asta comando pompa dado M6.
Attenzione: Le leve anteriori e posteriori devono sempre avere un minimo di gioco a vuoto di circa 2 mm.
ADJUSTMENTOFBRAKES
FrontbrakeThe front brake is disk type with hydraulic control, therefore you may adjust the play by means the register C.If you want to adjust the position of the lever, use register A.
RearbrakeThe rear brake is disk type with hydraulic control.Youmayadjustpedalheightbymeans of register B and nut M6 on the pump control rod.
Warning: The front and brake levers must always have a minimum play of about 2 mm.
A2mmC
B
4
43
AD
JUST
MEN
TSRE
GO
LAZI
ON
I
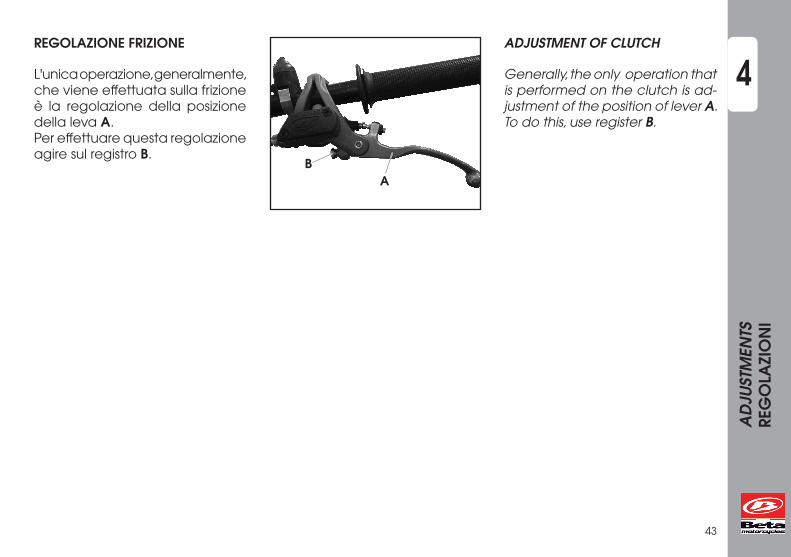
REGOLAZIONE FRIZIONE
L'unica operazione, generalmente, che viene effettuata sulla frizione è la regolazione della posizione della leva A.Per effettuare questa regolazione agire sul registro B.
ADJUSTMENT OF CLUTCH
Generally, the only operation that is performed on the clutch is ad-justment of the position of lever A.To do this, use register B.
AB
4
44
AD
JUST
MEN
TSRE
GO
LAZI
ON
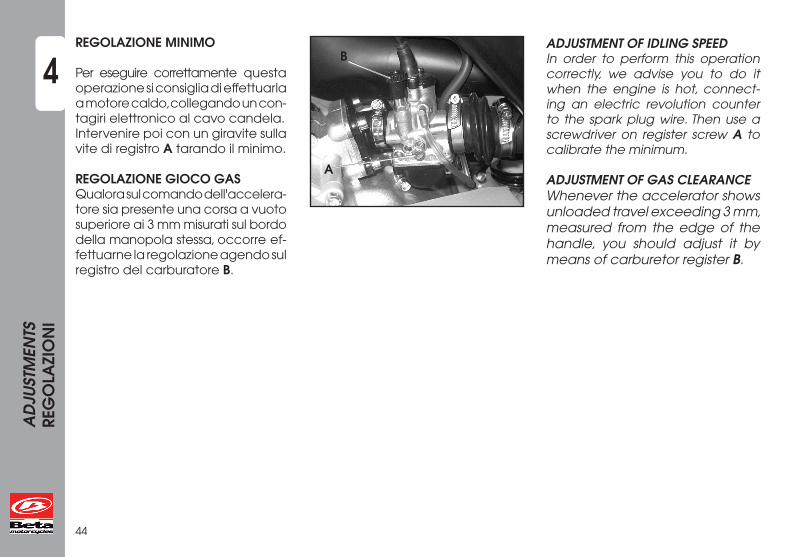
IREGOLAZIONE MINIMO
Per eseguire correttamente questa operazione si consiglia di effettuarla a motore caldo, collegando un con-tagiri elettronico al cavo candela. Intervenire poi con un giravite sulla vite di registro A tarando il minimo.
REGOLAZIONE GIOCO GASQualora sul comando dell'accelera-tore sia presente una corsa a vuoto superiore ai 3 mm misurati sul bordo della manopola stessa, occorre ef-fettuarne la regolazione agendo sul registro del carburatore B.
ADJUSTMENTOFIDLINGSPEEDIn order to perform this operation correctly, we advise you to do it when the engine is hot, connect-ing an electric revolution counter to the spark plug wire. Then use a screwdriver on register screw A to calibrate the minimum.
ADJUSTMENT OF GAS CLEARANCEWhenever the accelerator shows unloaded travel exceeding 3 mm, measured from the edge of the handle, you should adjust it by means of carburetor register B.
A
B
4
45
AD
JUST
MEN
TSRE
GO
LAZI
ON
I
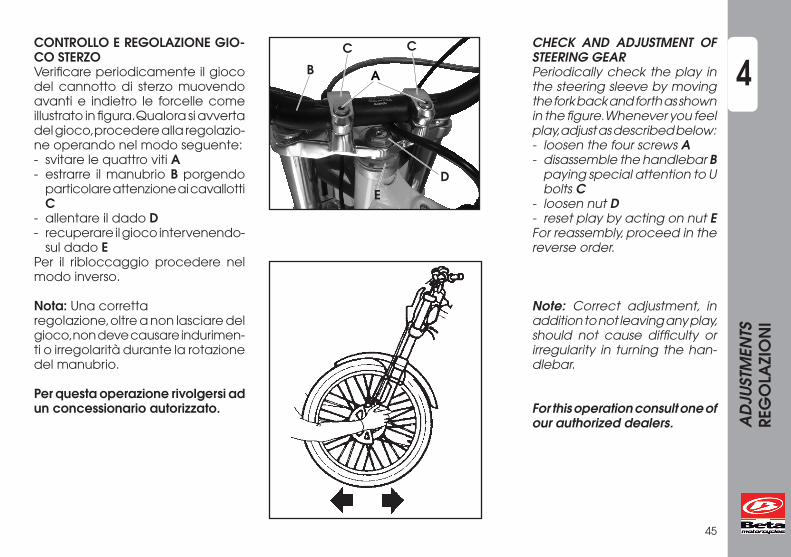
CONTROLLO E REGOLAZIONE GIO-CO STERZOVerificare periodicamente il gioco del cannotto di sterzo muovendo avanti e indietro le forcelle come illustrato in figura. Qualora si avverta del gioco, procedere alla regolazio-ne operando nel modo seguente:- svitare le quattro viti A- estrarre il manubrio B porgendo
particolare attenzione ai cavallotti C
- allentare il dado D- recuperare il gioco intervenendo-
sul dado EPer il ribloccaggio procedere nel modo inverso.
Nota: Una corretta regolazione, oltre a non lasciare del gioco, non deve causare indurimen-ti o irregolarità durante la rotazione del manubrio.
Perquestaoperazionerivolgersiadunconcessionarioautorizzato.
CHECK AND ADJUSTMENT OF STEERING GEARPeriodically check the play in the steering sleeve by moving the fork back and forth as shown in the figure. Whenever you feel play, adjust as described below:- loosen the four screws A- disassemble the handlebar B
paying special attention to U bolts C
- loosen nut D- reset play by acting on nut EFor reassembly, proceed in the reverse order.
Note: Correct adjustment, in addition to not leaving any play, should not cause difficulty or irregularity in turning the han-dlebar.
Forthisoperationconsultoneofourauthorizeddealers.
A
C
E
B
D
C
4
46
AD
JUST
MEN
TSRE
GO
LAZI
ON
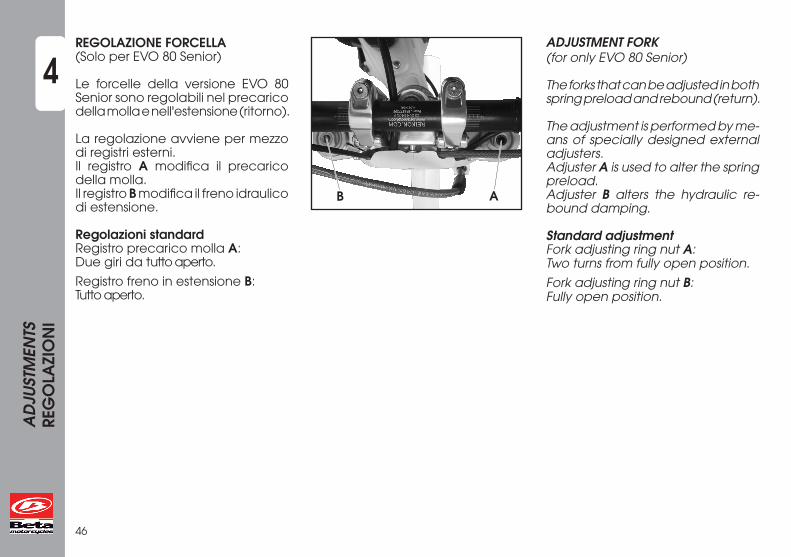
IREGOLAZIONE FORCELLA (Solo per EVO 80 Senior)
Le forcelle della versione EVO 80 Senior sono regolabili nel precarico della molla e nell'estensione (ritorno).
La regolazione avviene per mezzo di registri esterni.Il registro A modifica il precarico della molla.Il registro B modifica il freno idraulico di estensione.
RegolazionistandardRegistro precarico molla A: Due giri da tutto aperto.
Registro freno in estensione B: Tutto aperto.
ADJUSTMENT FORK(for only EVO 80 Senior)
The forks that can be adjusted in both spring preload and rebound (return).
The adjustment is performed by me-ans of specially designed external adjusters.Adjuster A is used to alter the spring preload.Adjuster B alters the hydraulic re-bound damping.
Standardadjustment Fork adjusting ring nut A: Two turns from fully open position.
Fork adjusting ring nut B: Fully open position.
B A
4
47
AD
JUST
MEN
TSRE
GO
LAZI
ON
I
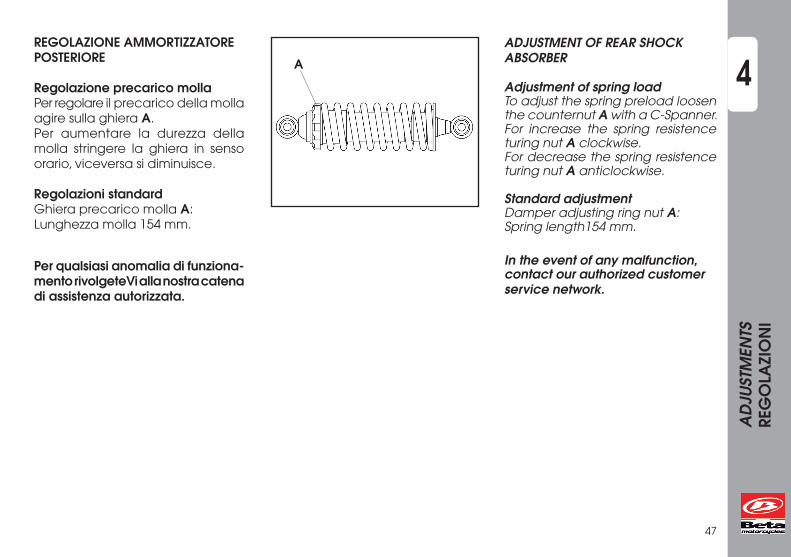
ADJUSTMENT OF REAR SHOCK ABSORBER
AdjustmentofspringloadTo adjust the spring preload loosen the counternut A with a C-Spanner.For increase the spring resistence turing nut A clockwise.For decrease the spring resistence turing nut A anticlockwise.
StandardadjustmentDamper adjusting ring nut A:Spring length154 mm.
Intheeventofanymalfunction,contactourauthorizedcustomerservicenetwork.
REGOLAZIONE AMMORTIZZATORE POSTERIORE
RegolazioneprecaricomollaPer regolare il precarico della molla agire sulla ghiera A.Per aumentare la durezza della molla stringere la ghiera in senso orario, viceversa si diminuisce.
RegolazionistandardGhiera precarico molla A:Lunghezza molla 154 mm.
Perqualsiasianomaliadifunziona-mentorivolgeteViallanostracatenadiassistenzaautorizzata.
A
4
48
AD
JUST
MEN
TSRE
GO
LAZI
ON
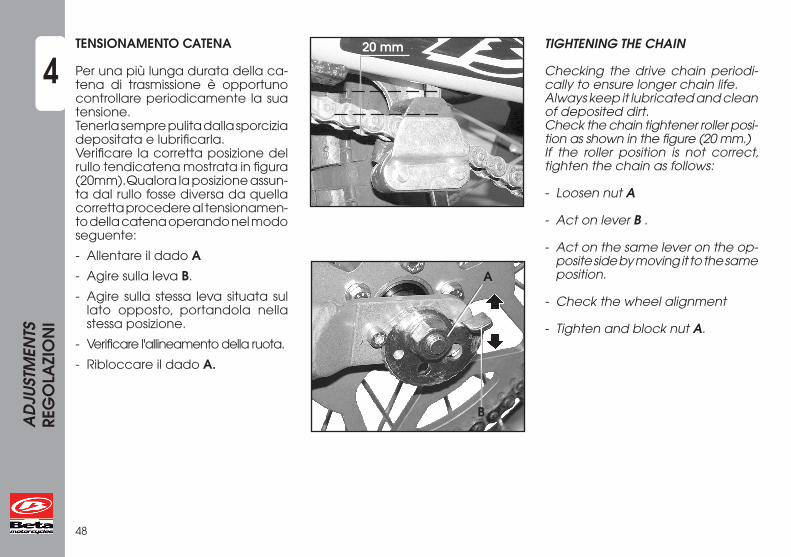
ITENSIONAMENTO CATENA
Per una più lunga durata della ca-tena di trasmissione è opportuno controllare periodicamente la sua tensione.Tenerla sempre pulita dalla sporcizia depositata e lubrificarla.Verificare la corretta posizione del rullo tendicatena mostrata in figura (20mm). Qualora la posizione assun-ta dal rullo fosse diversa da quella corretta procedere al tensionamen-to della catena operando nel modo seguente:
- Allentare il dado A
- Agire sulla leva B.
- Agire sulla stessa leva situata sul lato opposto, portandola nella stessa posizione.
- Verificare l'allineamento della ruota.
- Ribloccare il dado A.
TIGHTENING THE CHAIN
Checking the drive chain periodi-cally to ensure longer chain life.Always keep it lubricated and clean of deposited dirt.Check the chain tightener roller posi-tion as shown in the figure (20 mm.)If the roller position is not correct, tighten the chain as follows:
- Loosen nut A
- Act on lever B .
- Act on the same lever on the op-posite side by moving it to the same position.
- Check the wheel alignment
- Tighten and block nut A.
20mm
A
B
49
5
WH
AT
TO D
O IN
AN
EM
ERG
ENC
YC
OSA
FA
RE IN
CA
SO D
I EM
ERG
ENZA
INDICE ARGOMENTI
Ricercadelguasto
INDEX
Troubleshooting
CAPI
TOLO
5
SECT
ION
5
5W
HA
T TO
DO
IN A
N E
MER
GEN
CY
CO
SA F
ARE
IN C
ASO
DI E
MER
GEN
ZA
50
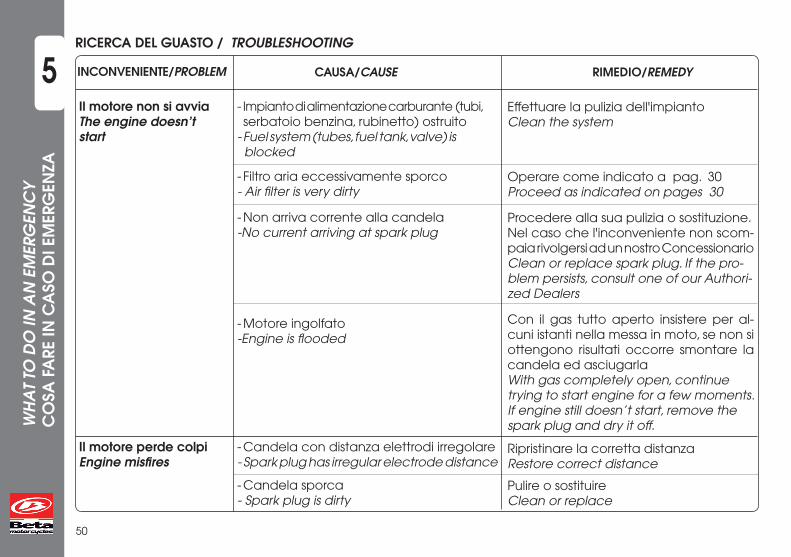
RICERCADELGUASTO/ TROUBLESHOOTING
Effettuare la pulizia dell'impiantoClean the system
Operare come indicato a pag. 30Proceed as indicated on pages 30
Procedere alla sua pulizia o sostituzione.Nel caso che l'inconveniente non scom-paia rivolgersi ad un nostro ConcessionarioClean or replace spark plug. If the pro-blem persists, consult one of our Authori-zed Dealers
Con il gas tutto aperto insistere per al-cuni istanti nella messa in moto, se non si ottengono risultati occorre smontare la candela ed asciugarlaWith gas completely open, continue trying to start engine for a few moments. If engine still doesn’t start, remove the spark plug and dry it off.
Ripristinare la corretta distanzaRestore correct distance
Pulire o sostituireClean or replace
INCONVENIENTE/PROBLEM CAUSA/CAUSE RIMEDIO/REMEDY
Ilmotorenonsiavvia - Impianto di alimentazione carburante (tubi, Theenginedoesn’t serbatoio benzina, rubinetto) ostruito start - Fuel system (tubes, fuel tank, valve) is blocked - Filtro aria eccessivamente sporco - Air filter is very dirty - Non arriva corrente alla candela -No current arriving at spark plug
- Motore ingolfato -Engineisflooded
Ilmotoreperdecolpi - Candela con distanza elettrodi irregolareEnginemisfires - Spark plug has irregular electrode distance
- Candela sporca - Spark plug is dirty
51
5
WH
AT
TO D
O IN
AN
EM
ERG
ENC
YC
OSA
FA
RE IN
CA
SO D
I EM
ERG
ENZA
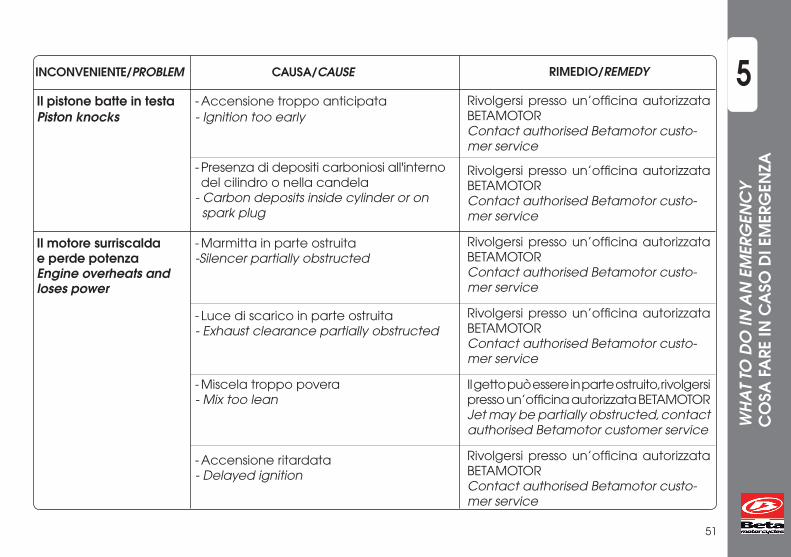
Ilpistonebatteintesta - Accensione troppo anticipata Pistonknocks - Ignition too early
- Presenza di depositi carboniosi all'interno del cilindro o nella candela - Carbon deposits inside cylinder or on spark plug
Ilmotoresurriscalda - Marmitta in parte ostruitaeperdepotenza -Silencer partially obstructedEngineoverheatsandlosespower - Luce di scarico in parte ostruita - Exhaust clearance partially obstructed
- Miscela troppo povera - Mix too lean
- Accensione ritardata - Delayed ignition
INCONVENIENTE/PROBLEM CAUSA/CAUSE RIMEDIO/REMEDY
Rivolgersi presso un’officina autorizzata BETAMOTORContact authorised Betamotor custo-mer service
Rivolgersi presso un’officina autorizzata BETAMOTORContact authorised Betamotor custo-mer service
Rivolgersi presso un’officina autorizzata BETAMOTORContact authorised Betamotor custo-mer service
Rivolgersi presso un’officina autorizzata BETAMOTORContact authorised Betamotor custo-mer service
Il getto può essere in parte ostruito, rivolgersi presso un’officina autorizzata BETAMOTORJet may be partially obstructed, contact authorised Betamotor customer service
Rivolgersi presso un’officina autorizzata BETAMOTORContact authorised Betamotor custo-mer service
5W
HA
T TO
DO
IN A
N E
MER
GEN
CY
CO
SA F
ARE
IN C
ASO
DI E
MER
GEN
ZA
52
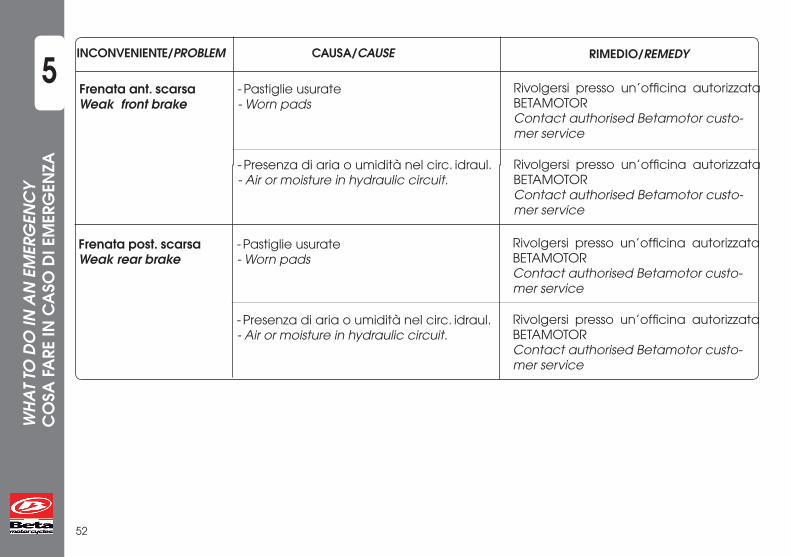
INCONVENIENTE/PROBLEM CAUSA/CAUSE RIMEDIO/REMEDY
Frenataant.scarsa - Pastiglie usurateWeakfrontbrake - Worn pads
- Presenza di aria o umidità nel circ. idraul. - Air or moisture in hydraulic circuit.
Rivolgersi presso un’officina autorizzata BETAMOTORContact authorised Betamotor custo-mer service
Rivolgersi presso un’officina autorizzata BETAMOTORContact authorised Betamotor custo-mer service
Frenatapost.scarsa - Pastiglie usurate Weakrearbrake - Worn pads
- Presenza di aria o umidità nel circ. idraul. - Air or moisture in hydraulic circuit.
Rivolgersi presso un’officina autorizzata BETAMOTORContact authorised Betamotor custo-mer service
Rivolgersi presso un’officina autorizzata BETAMOTORContact authorised Betamotor custo-mer service
Avviamento ...............................22
Candela ....................................32Comandi .....................................9Controlli e manutenzioneprima e dopo l'utilizzo ..............18
Dati identificazione veicolo - identificazione motore ........10 - identificazione telaio ...........10Dati tecnici ................................11
Elementi principali .....................8
Filtro aria .....................................30Freni - controllo ................................33Lamelle .......................................36Liquido di raffreddamento .......35Lubrificanti e liquidi consigliati ..20
Manutenzione programmata .39
Olio carter - controllo ................................24 - sostituzione ............................24Olio pompa freni ......................25Operazioni di rifornimento ......19
Pulizia del veicolo .....................37
Regolazione amm. poster .......4 7 Regolazione forcella(solo per EVO 80 Senior) ...........46Regolazione frizione ................43Regolazione freni - freno anteriore .....................42 - freno posteriore ....................42Regolazione gioco gas ............44Regolazione minimo .................44Ricerca del guasto ...................50
53
ALP
HA
BETI
CA
LIN
DEX
IND
ICE
ALF
ABE
TIC
O
Rodaggio ...................................21
Schema elettrico ......................15Sterzo - controllo ................................45 - regolazione ...........................45
Tensionamento catena ...........46
Adjustment of clutch .................43Adjustment fork (for only EVO 80 Senior) ................46Adjustment of brakes - front brake ............................42 - rear brake .............................42Adjustment of gas clearance ...44Adjustment of idling speed .......44Adjustment of rear schok abs ...47Air filter .........................................30
Brakes - check ....................................33Breaking in ..................................21
Checks and maintenancebefore and after use ..................18Cleaning the vehicle .................37
Electrical diagram .....................15
Fueling operations .....................19
Hand drive controls ....................9Liquid coolant .............................35
Lubricants and liquids .................20
Main parts ....................................8Maintenance schedule .............39
Oil crankcase - check .....................................24 - change ..................................24 - brake pump ...........................25 - fork ..........................................29
54
Spark plug ...................................32Startup .........................................22Steering gear- check ........................................45- adjustment ................................45
Technical data ...........................11Tightening the chain ..................48Troubleshooting ..........................50
Valve petals ................................36
Vehicle identification data- motor identification .................10- frame identification ..................10
ALP
HA
BETI
CA
LIN
DEX
IND
ICE
ALF
ABE
TIC
O
55
EVO 80 SENIOR - EVO 80 JUNIOR
Nous vous remercions pour votre confiance et nous vous souhaitons beaucoup de joies avec votre nouvelle moto.Pour une utilisation optimale et une longévité maximale nous vous conseillons de lire attentivement ce manuel d’utilisation.
Les données, les spécifications et les illustrations de ce manuel n’engagent pas BETAMOTOR S.p.A. qui se réserve le droit d’apporter des modifications et des améliorations à ses modèles à tout moment et sans préavis.
EVO 80 SENIOR - EVO 80 JUNIOR
Wir danken Ihnen für Ihr Vertrauen und wünschen Ihnen viel Spaß und Freude!Mit diesen Anleitungen möchten wir Ihnen die notwendigen Informationen für eine korrekte Anwendung und eine gute Wartung Ihres Motorrades übermitteln.
Alle Angaben zu Technik, Ausstattung und die Abbildungen sind unverbindlich. Die Betamotor S.p.A. behält sich das Recht vor an ihren Fahrzeugmodellen jederzeit und ohne Vorankündigung Änderun-gen und Verbesserungen vorzunehmen.
EVO 80 SENIOR - EVO 80 JUNIOR
Gracias por la confianza otorgada y felicitaciones por su óptima elección. Con este manual, pretendemos darle la información necesaria para un correc-to uso y un adecuado mantenimiento de su moto.
Los datos, las características y imagenes indicadas en éste manual no comprometen BETAMOTOR S.p.A que se reserva los derechos a realizar modificaciones y mejoras a sus propios modelos en cualquier momento sin previo aviso.
Cod. 012440050 000
56
INFO
RMA
TIO
NS
INFO
RMA
CIÓ
NES
IN
FORM
ATI
ON
EN
IATTENTION Après la première heure j'emploie, nous recommandons de controler tous les serrage, avec une attention parti-culière pour les suivants:• Supports des repose-pieds• Rayons des roues• Visserie amortisseure arrière• Visserie moteur• Couronne
• Carter sous-moteur
AVISO Se recomienda, después de la primera hora de use, controlar todas las sujeciones, y en concreto:• Soportes plataformas• Radios ruedas• Tornilleria ammortiguador posterior• Tornilleria motor• Corona
• Cárter debajo del motor
HINWEIS Nach der ersten ich verwende empfehlen wir eine Überprüfung, um zu kontrollieren, dass alle Bauteile und Schrauben richtig festgezogen sind. Dabei muss besonders auf folgendes geachtet werden:• Fußrasten-Halterungen• Radspeichen• Alle Schrauben und Bolzen am Motor• Alle Schrauben und Bolzen des hinteren stoßdämpfers• Zahnkranz
• Motor-Untergehäuse
57
CONDUIRE EN RESPECTANT LA NATURE Bruit et pollution de chaque véhicule varient selon le type de conduite de l’utilisateur.
Il est recommandé de conduire de manière régu-lière et souple, sans donner de fortes accélérations ou décélérations.
Pendant la conduite tout terrain veillez à ne pas causer de dégâts à la nature, faire un bruit minimum, et éviter tout comportement pouvant déranger des personnes ou des animaux.
Pratiquez une conduite sportive seulement sur les circuits fermés.
CONDUIRE EN TOUTE SECURITE•L’utilisation de ce véhicule n’est autorisée que
sur un circuit ou comme tout-terrain, et non sur la voie publique. Les parents sont responsables de la sécurité de leurs enfants, et sont tenus de vérifier le bon usage du véhicule;
•Toujoursporterdeséquipementsdeprotectionpersonnelle homologués;
•Conduiseztoujoursassisavecles2mainssurle guidon et les pieds sur les repose pieds;•Interdit remorquer autres motos ou se faire remorquer;•Utiliseztoujoursles2freins,enfaisantparticulière-
ment attention en cas de chaussée glissante (pluie, boue, conduite hors route, etc...);
•N'allumerpaslemoteurdansunendroitfermèclos.Conduire avec prudence, en respectant le code de la route et la nature environnante, mettre son ca-sque, sont des démonstrations de savoir vivre.
GUÍA ECOLOGÍCA El ruido y la polución que produce cada vehículo, de-penden en gran medida en la forma de conducirlo.
Le recomendamos conducir de una forma regular, sin aceleraciones y desaceleraciones bruscas.
Durante la conducción fuera de carretera (caminos rurales) no efectuar daño a la naturaleza, efectuar el menor ruido posible, evitando así un comportamiento que pueda molestar a personas y animales.
Practicar una conducción deportiva, sólo en circuitos cerrados.
GUIA DE SEGURIDAD•estápermitidoelusodelvehículoúnicamenteenpista
oentodoterreno,noestápermitidoenlavíapública.Lospadres,comoresponsablesdelaseguridaddesushijos,debenporlotantoverificarqueestosuceda;
•Llevarpuestossiemprelosdispositivosdeseguridadpersonal homologados;
•Conducirsiempresentadoyconambasmanos sobre el manillar así como los pies en los estribos;•noremolcarnohacerseremolcarporotrosvehículos;•Utilizarambosfrenos,prestandoparticularatención en caso de suelo resbaladizo (lluvia, barro, caminos, etc.);•Noarrancarelmotorenlugarcerrado.Conducirconprudencia,respetarelcódigodecir-culaciónylanaturalezaquenosrodea,llevarsiemprepuestoelcasco,esunademostracióndepersonacivilizada.
INFO
RMA
TIO
NS
INFO
RMA
CIÓ
NES
IN
FORM
ATI
ON
EN
58
ÖKOLOGISCHFAHREN
Der von jedem Fahrzeug erzeugte Lärm und die Umweltverschmut-zung hängen größtenteils von der Fahrzeugführung ab.
Wir empfehlen Ihnen deshalb, eine regelmäßige Fahrweise, ohne schnelle Beschleunigungen und momentane Abbrem-sungen, anzuwenden.
Während der Geländefahrt berücksichtigen Sie die Natur und verursachen Sie sowenig Lärm wie möglich und vermeiden Sie Verhalten, die Personen und Tiere stören könnte.
Üben Sie eine sportliche Fahrweise nur in geschlossenen Ra-cingbahnen aus.
SICHERES FAHREN
• Das Fahrzeug darf nur auf Rennstrecken oder im Gelände aber nicht auf auf öffentlichen Straßen gefahren werden. Die Eltern, die für die Sicherheit ihrer Kinder verantwortlich sind, müssen darauf achten, dass dies eingehalten wird;
•StetsdiezugelassenepersönlicheSchutzausrüstungtragen;•lenkeSiemitbeidenHändenamLenker, sitzend und mit den Füßen am Trittbrett;•schleppenSiekeineanderenFahrzeugeund lassen Sie sich nicht schleppen;•benützenSiebeideBremsenundfahrenSie bei rutschigem Boden (Regen, Schlamm, Geländefahrt usw.) besonders vorsichtig;•startenSiedenMotornichtingeschlossenenRäumen.Das vorsichtige Fahren, Respekt der Verkehrsvor-schriften, der Natur und Umwelt, die Anwendung eines Helmes sind Merkmale wahrer Zivilisation.
INFO
RMA
TIO
NS
INFO
RMA
CIÓ
NES
IN
FORM
ATI
ON
EN
59
CHAPITRE - 1 CONNAITRE SON VEHICULE Eléments principaux ...........................................64 Commandes .......................................................65 Identification du véhicule .................................66 Données techniques ....................................66, 70 Schéma électrique ............................................73
CHAPITRE 2 - FONCTIONNEMENT ET UTILISATION Contrôles et entretien avant et après usage .................................................................. 76 Ravitaillement en carburant ........................ 78 Lubrifiants et ingrédients conseillés ................. 79
Rodage .............................................................. 80 Démarrage ......................................................... 82
CHAPITRE 3 - ENTRETIEN ET CONTROLES Huile carter ..........................................................84 Huile hydraulique de freins ................................86 Huile de fourche ................................................94 Filtre à air .............................................................96 Bougie ................................................................. 98 Frein avant ........................................................100 Frein arrière .......................................................101 Liquide de refroidissement ..............................102 Boíte a clapets .................................................103 Nettoyage du véhicule ...................................104 Tableau d’entretien ......................................... 107
INFO
RMA
TIO
NS
INFO
RMA
CIÓ
NES
IN
FORM
ATI
ON
EN
CHAPITRE 4 - REGLAGES Réglages des freins. ..........................................110 Réglages de l'embrayage. ..............................112 Réglage du ralenti... .........................................113 Réglage jeu gaz................................................113 Contrôle et réglage jeu de direction.............114 Réglage fourches (seulement pour Evo 80 Senior) ......................116 Réglage amortisseur arrière ............................117 Réglage tension chaîne ..................................118
CHAPITRE 5 - QUE FAIRE EN CAS DE PANNE Recherche de la panne. .................................120
INDEX ALPHABETIQUE Index ..................................................................123
60
CAPITULO 4 - REGULACIONES Regulación frenos ............................................110 Regulación embrague ....................................112 Regulación mínimo ..........................................113 Regulación juego gas .....................................113 Control y regulación juego manillar ..............114 Regulación horquilla (solamente para EVO 80 Senior) ....................116 Regulación amortiguador trasero ..................117 Tensado de la cadena ...................................118
CAPITULO 5 - QUE HACER EN CASO DE EMERGENCIA Búsqueda de la avería ....................................120
ÍNDICE ALFABETICO Índice .................................................................124
INFO
RMA
TIO
NS
INFO
RMA
CIÓ
NES
IN
FORM
ATI
ON
ENCAPITULO 1 - CONOCIMIENTO DEL VEHICULO Elementos principales ........................................64 Mandos ...............................................................65 Datos identificación vehículo ...........................66 Datos técnicos ............................................67, 70 Esquema eléctrico .............................................73
CAPITULO 2 - FUNCIONAMIENTO Y UTILIZACION Control y mantenimiento antes y después de su utilización ..................................76 Reposición carburante .....................................78 Lubricantes y líquidos aconsejados .................79 Rodaje .................................................................80 Arranque .............................................................82
CAPITULO 3 - MANTENIMIENTO Y CONTROL Aceite carter ......................................................84 Aceite bomba freno ..........................................86 Aceite horquilla ..................................................94 Filtro aire ..............................................................96 Bujía......................................................................98 Freno delantero ................................................100 Freno trasero .....................................................101 Liquido de refrigeración ..................................102 Caja laminas .....................................................103 Limpieza del vehículo ......................................104 Mantenimiento programado ..........................107
61
ABSCHNITT 1 - FAHRZEUGKENNTNIS Hauptbestandteile .............................................64 Steuerung ............................................................65 Fahrzeugidentifizierungsdaten ..........................66 Technische Daten ........................................69, 72 Elektroschema ....................................................73
ABSCHNITT 2 - FUNKTION UND BENÜTZUNG Kontrollen und Wartung vor und nach Benützung .................................................77 Auftankoperationen ..........................................78 Empfohlene Schmiermittel und Flüssigkeiten ........................................................79 Einfahrung ...........................................................81 Zündung ..............................................................82
ABSCHNITT 3 - WARTUNG UND KONTROLLEN Getriebeöl ...........................................................85 Bremsflüssigkeit ...................................................87 Gabelöl ...............................................................95 Luftfilter ............................................................... 97 Zündkerze ............................................................99 Vorderradbremse .............................................100 Hinterradbremse ...............................................101 Kühlflüssigkeit ....................................................102 Lamellen ............................................................103 Fahrzeugpflege ................................................104 Programmierte Wartung ..................................107
ABSCHNITT 4 - REGELUNGEN Bremsenregelung .............................................111 Einstellung der Kupplung .................................112 Minimumregelung ............................................113 Gasspielraumregelung ....................................113 Kontrolle und Regelung des Lenkungsspielraums ..1 1 5
Einstellung der vorderen gabeln (nur für EVO 80 Senior) .....................................116 Regelung des hinteren Stossdämpfers ..........117 Kettenspannung ...............................................118
ABSCHNITT 5 - ABHILFE IN NOTFALL-SITUATIONEN Defektermittlung ...............................................120
ALPHABETISCHES VERZEICHNIS Inhaltsverzeichnis ..............................................125
INFO
RMA
TIO
NS
INFO
RMA
CIÓ
NES
IN
FORM
ATI
ON
EN