Embed Size (px)
Citation preview

1
Guidance on Using Slide Show Software Version of 12/22/2013
This document describes how to use slide show software to develop historical slide shows
consistent with the suggestions in Chapter 8 of the website and book Preserving History: How to
Archive and Share Historical Photographs, Documents, and Audio Recordings. The assumption here
is that the ideas in Chapter 8 will be used to develop general plans and specific parameters for an
historical slide show. This guidance document describes the specific steps for developing a slide
show using certain currently available software.
Unfortunately, the available software that has the features needed for developing historical
slide shows tends to be complicated to use and has generally focused more on special effects
than efficient, intuitive workflow. Less complicated software does not currently provide all the
features needed for historical slide shows. Suitable software that is much easier to use will likely
become available in the next few years. In fact, I hope and expect that innovations that greatly
increase ease of use and power will substantially alter the slide show software market in the
relatively near future.
1. Specific Software
The two programs described in this guidance are ProShow Gold and ProShow Producer.
ProShow Gold (about $60 - $70) is one of the most popular and powerful slide show programs
for consumers. ProShow Producer ($200 - $250) is one of the most advanced slide show
programs. The primary difference between ProShow Gold and ProShow Producer is that
ProShow Producer has more sophisticated methods for handling zooming, panning, and text, and
for working with menus for slide shows. As this is being written, version 5 of ProShow Producer
has just been released and includes significant improvements in workflow and efficiency.
However, in my opinion significant further improvement in workflow is still needed. The
descriptions in this document are for version 5 of both ProShow Gold and ProShow Producer.
[Update in December, 2013, my investigation of version 6 of ProShow Producer found no
significant changes for the features discussed here for historical slide shows.]
The free IrfanView image viewer can quickly make simple slide shows that play on a
computer and have features that are useful in certain situations. The use of IrfanView for slide
shows is also described at the end of this document.
My investigations of slide show software have found that ProShow Producer is currently the
best option for developing historical slide shows. PicturesToExe and the slide show package in

2
Adobe Photoshop Elements are two other applications that could easily catch up with and
surpass ProShow Producer for developing historical slide shows. PicturesToExe is a less mature
program that is in the process of developing features. It has a very good design foundation that
could easily be enhanced to efficiently handle historical slide shows. However, the past focus has
been more on special effects such as rotating three-dimensional objects. It remains to be seen
whether the developers will continue the narrower focus or expand into wider markets. The slide
show package in Adobe Photoshop Elements Organizer is intended to provide basic slide show
capabilities and is very easy to use. It does not focus on special effects, but also does not
currently have all the features needed for historical slide shows. It could easily be enhanced to
include them and the simplicity of workflow would likely make it the optimal software for
historical slide shows.
One very useful feature that none of the current slide show software offers is an easy method
to display text on an image with a background for the text. As discussed in Chapter 8, text can
provide very useful historical information for an image. The best display for text on an image is
with a background that can be consistently used with different images. All current slide show
software requires that the text and the background for the text be created and aligned with
separate processes. This more than doubles the amount of effort and complexity that is needed
compared to a simple single option for text with background. Slide show software that provides a
healthy balance between ease of use and special effects would provide this type of option.
The descriptions here generally do not repeat the suggestions made in Chapter 8. This
guidance describes how to apply certain features and settings, but assumes the reader will refer
to Chapter 8 for suggestions on what specific values should be used.
2. Basic Operation
ProShow Gold and ProShow Producer, like most slide show software, allow images, audio
files, and video clips to be incorporated into a slide show. Video clips are treated as a type of
slide and are played in sequence similar to the display of images. Some limited adjustments to
the media files can be made within the slide show software. More sophisticated adjustments and
enhancements can be made with the usual image, audio, and video editing software.
Workspace Layout
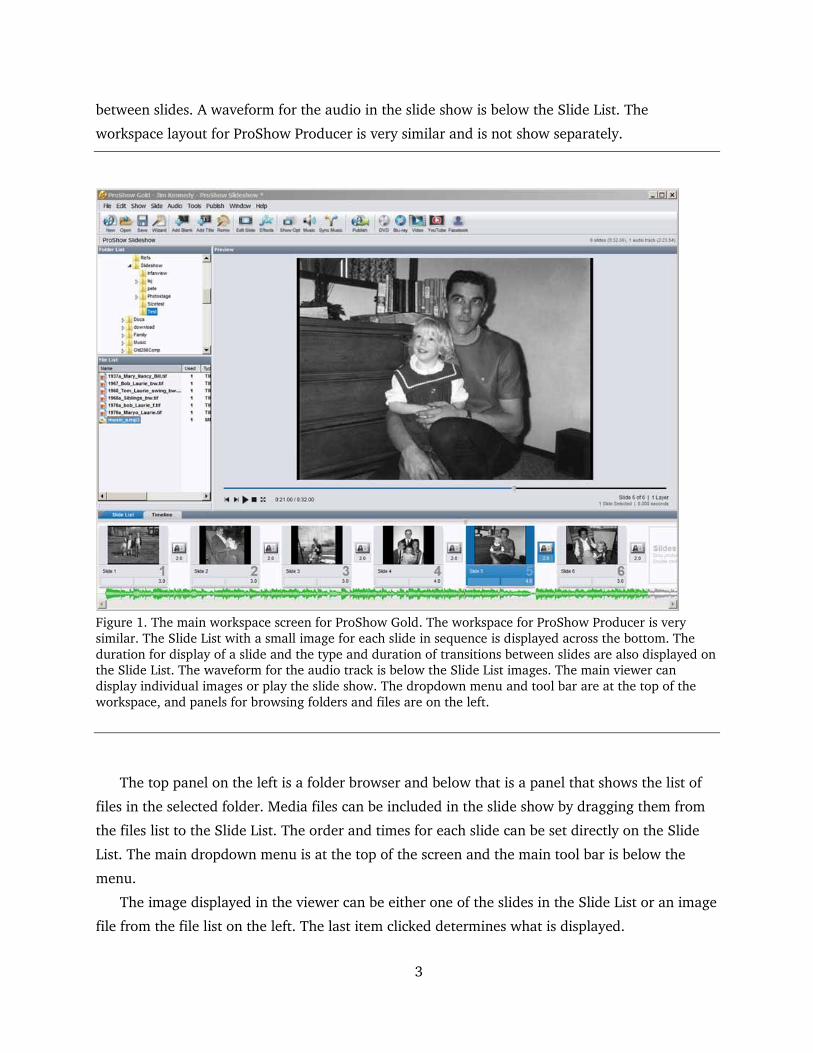
The Slide List on the bottom of the main workspace screen is the backbone for developing a
slide show. As shown in Figure 1 for ProShow Gold, each slide is shown as a small image in
sequence, along with the duration of display for the slide and the type and duration of transitions
3
between slides. A waveform for the audio in the slide show is below the Slide List. The
workspace layout for ProShow Producer is very similar and is not show separately.
Figure 1. The main workspace screen for ProShow Gold. The workspace for ProShow Producer is very similar. The Slide List with a small image for each slide in sequence is displayed across the bottom. The duration for display of a slide and the type and duration of transitions between slides are also displayed on the Slide List. The waveform for the audio track is below the Slide List images. The main viewer can display individual images or play the slide show. The dropdown menu and tool bar are at the top of the workspace, and panels for browsing folders and files are on the left.
The top panel on the left is a folder browser and below that is a panel that shows the list of
files in the selected folder. Media files can be included in the slide show by dragging them from
the files list to the Slide List. The order and times for each slide can be set directly on the Slide
List. The main dropdown menu is at the top of the screen and the main tool bar is below the
menu.
The image displayed in the viewer can be either one of the slides in the Slide List or an image
file from the file list on the left. The last item clicked determines what is displayed.

4
Controls to start and stop playing the slide show are below the image. A preview of the slide
show can be played by clicking the play icon or by tapping the space bar. The preview is stopped
by clicking the stop icon or tapping the space bar again. A timeline marker on the horizontal bar
below the image can be clicked and dragged to manually move or scrub through the slide show.
The operation of transitions, zooming, panning, and text can be observed by moving the
scrubbing marker. A similar scrubbing marker is on a bar at the top of the Slide List.
Double-clicking on a slide in the Slide List brings up the Slide Options screen that has options
for zooming, panning, adding text, and other adjustments to the slide. The specific options that
are presented are determined by tabs combined with several option panels on the left. As shown
in Figure 2 for ProShow Gold and Figure 3 for ProShow Producer, the Layers and Captions
panels on the left determine what is displayed in the main viewer. The panels have lists with a
row for each layer and for each block of captions or text. The image for the slide is on one layer
and any text background is a separate layer. The properties of the slide that are displayed in the
viewer depend on which row in the panels is clicked. More details about the slide options screen
are described below as different options are described.
Figure 2. The screen for setting motion effects in ProShow Gold. The image on the left is the position of the slide at the beginning of display and the image on the right is the position at the end of display. The slide show software creates images to provide continuous motion from the start to the end displays. In this case the slide opens with a close-up of the men and then zooms out to display the context of their work.

5
The panels on the left list each caption and layer for the slide. Controls at the bottom of the screen allow the slide to be played in the left image display. The tabs for Layer Settings and Adjustments control different features of a slide.
Figure 3. The screen for setting motion effects in ProShow Producer. The image display shows the position of the image at one keyframe. The keyframe timeline with keyframe markers and the audio waveform is below the image. After the positions have been set at the different keyframe points, the slide show software creates images to provide continuous motion between keyframes. This slide includes a caption and background for the caption. The panels on the left list each caption and layer for the slide and determine what is displayed. Controls at the bottom of the screen allow the slide to be played. The tabs for Layer Settings and Adjustments control different features of a slide.
ProShow Producer has buttons in the upper right of the main screen that modify the screen
for different purposes. After the files have been included for the slide show, the button for Design
on the upper right can be clicked to eliminate the folder browser and provide more information
about each slide. The Publish button can be clicked when the slide show is ready to have a menu
and output file created.

6
Slide Show Files
A slide show is created in a two-step process with different types of output files for each step.
First a file is created that holds the specifications for the content of the slide show. Second, the
specification file is used to make the output video file that actually plays the slide show. Different
types of output video files can be made from the specification file.
In ProShow Gold and ProShow Producer, the file that holds the specifications has a file name
extension of .psh. This file specifies the media files that are included in the slide show and the
timing, transitions, motion, text, etc. that are applied for each media file. If the psh file is deleted
or damaged, the slide show is lost. The psh file points to the various media files, but does not
include them. The media files need to remain in the same locations if the slide show is modified.
An error message occurs if a file cannot be found. The lost file must be found or it will be
excluded from the slide show. A larger computer file with a file name extension .pxc is made for
each psh file. The pxc file is made from the psh file and holds data that is reused and takes time
to derive. The pxc file can be deleted and will be regenerated as needed.
Setting Colors
Colors for fonts and backgrounds are set with a color picker dialog box. The color can be
selected using the graphical display or by entering numbers for the amount of red, green, and
blue in the three RGB fields at the bottom of the dialog box. The numeric fields are the most
precise way to set colors. Click the Set Color tab in the upper right to apply the new color.
3. Global Slide Show Settings
A few key settings apply to the entire slide show. In ProShow Gold and ProShow Producer
these are set with the main dropdown menu Show> Show Settings, or by clicking the icon for
Show Opt on the main tool bar. The background for the slide show and aspect ratio are selected
here.
By default ProShow Gold and ProShow Producer display a “safe zone” on the screens for
developing a slide show. This safe zone will rarely be cut off by when a slide show is played on a
TV and is based on significant research by the makers of ProShow. Display of the safe zone can
be modified or turned off in the show settings. However, placing important content within the
default safe zone is recommended for slide shows that may be displayed on a variety of TVs.

7
4. Images for Slide Shows
The image files used for a slide show with ProShow Gold or ProShow Producer do not need
any pre-processing to set a standard size, resolution, or format. The slide show software can use
virtually any image and encodes the images appropriately for the output file. High-resolution
images are needed for clear display of the enlargement that occurs with zooming and panning.
5. Timing of Slide Display
The times for display of slides and transitions between slides are shown on the Slide List for
ProShow Gold and ProShow Producer. These times can be changed by clicking directly on the
numbers shown. The type of transition is selected by clicking on the icon between slides on the
Slide List. In ProShow Gold and ProShow Producer the simple fading transitions that are useful
include “Crossfade (Blend) – Linear” and “Crossfade (Blend)”. If multiple slides are clicked while
the Control key is held down, the changes to timing and transitions apply to all the selected
slides.
6. Slide Motion—Zooming and Panning
As discussed in Chapter 8, zooming in for close-ups and panning across close-ups are key
practices for historical slide shows. These steps bring out historical information and make the
slide show more dynamic.
In ProShow Gold and ProShow Producer two types of movement speed are usually used for
zooming and panning. The “Smooth” setting has faster movement in the middle of the motion
and slower movement near the ends. This is appropriate when the primary interest is the start
and end positions. The “Linear” setting is uniform throughout the motion and is appropriate
when the intermediate points are of interest such as slowly panning across a group of people.
The type of movement can be set separately for zooming and panning. Zooming is typically
smooth and panning may be smooth or linear.
Slide Motion with ProShow Gold
ProShow Gold can perform one simple motion step on a slide and requires multiple duplicate
slides for a more complex motion sequence. This is typical of many slide show programs. For
example a typical sequence of hold, zoom, hold for an image would be done as three steps with
each step using a separate copy of the image placed as a slide on the Slide List.

8
The transition time between the slides in the motion sequence is set to zero. If the transition
time between slides in a motion sequence is not set to zero, a jump or fuzziness will usually
occur during the motion. The type of transition does not matter if the time is set to zero.
A slide can be duplicated by clicking on the slide on the Slide List and using the usual copy
and paste functions with Ctrl-C and Ctrl-V. Copy and paste can also be done with the dropdown
menu under Edit and with the right mouse button. The display time and any motion effects are
copied with the image. The duplicate slide will have the default transition time for the slide show
and the transition time will usually need to be changed to zero.
Motion effects are applied by double-clicking on a slide on the Slide List, which opens the
Slide Options screen. Select the row or layer for motion effects from the Layer panel on the left.
Then click the Effects tab to open the screen for slide motion. As shown in Figure 2 two versions
of the image are displayed. The left version is the start position and the right is the end position
for the motion during the slide.
A motion effect is specified by selecting either the start or end image and zooming and
shifting the image to display the position of the slide that is wanted at that point. The mouse
scroll wheel can be used for zooming and the image can be clicked and dragged. Sliders in the
lower part of the dialog box can also be used for zooming and panning. Once the start and end
images have been set, ProShow Gold fills in the continuous movement between the start and end
points when the output video is created. The maximum enlargement with the mouse wheel or
slider is 500%; however, a larger value that is typed in the zoom field will be used. The example
in Figure 2 starts with a close-up of the men and then zooms back to display the context of their
work.
When duplicate slides are used in a motion sequence the start position for a slide needs to
match the end position for the previous slide. This can also be handled by clicking the Match
button on the motion effects screen. Once the two slides are matched, changes to one will
automatically be transferred to the other.
The icon for “Copy” on the bottom of the screen is a key tool in working with slide motion
with ProShow Gold. This allows the start position for the slide to be copied to the end position,
or the end position to be copied to the start position. These are very useful when a position of the
image is being held fixed for display. The Copy icon also has an option to copy the end position
of a slide to the start position of the next slide, but the Match button described above is the more
efficient method to align slides.
One counter-intuitive property of ProShow is that motion actually begins during the
transition in for a slide. If the first slide has movement, the image will be moving as it initially
appears. That tends to be disorienting for an historical slide show unless the motion is very slow.
At least a brief period with a stable image is usually desirable.

9
When several slides are used in a complex motion sequence, it can be helpful to change the
slide name to indicate the function of the slide. If the motion needs to be revised later,
identifying the relevant slide or slides that need to be changed can be difficult. It is helpful to
add codes like move or hold to the names of the slides on the Slide List. In some cases adding an
identifier for the target of the motion may be useful. Right-clicking a slide on the Slide List gives
the option to change the slide name.
Slide Motion with ProShow Producer
ProShow Producer implements motion effects with keyframes, which define a point that is the
end point for one motion step and the start point for another motion step. Double-clicking on a
slide on the Slide List brings up the Slide Options Screen. Then click on the Effects tab. As shown
in Figure 3 the resulting screen displays the image at one keyframe. Beneath the image is a time
line for the slide. The top row of the time line has the markers for keyframes. When a slide is
initially opened, a keyframe marker is at each end and the keyframes are set with identical
values, which results in no motion during the slide. The second row of the slide time line has a
green waveform for the audio during the slide. The third row of the slide time line shows the
times for the slide transitions in and out in dark gray.
A blue line connects the bottom center of the displayed image to the keyframe marker that is
currently active and displayed. Clicking on a keyframe marker on the timeline makes the marker
active. A small image for the previous and next keyframe is displayed on each side of the main
image. Clicking on one of the side images makes that keyframe active.
A new keyframe point is made by double-clicking anywhere on the keyframe row of the slide
timeline. Alternatively, right-clicking and selecting “Insert” or “Insert Multiple” will add one or
more keyframes to the timeline. The keyframes are numbered starting with 1 on the far left.
Numbers are shifted as keyframes are added.
Previous versions of ProShow Producer often had a problem when new keyframes were
added between existing keyframes, but my limited experience with version 5 indicates that this
problem has been greatly reduced or eliminated. The previous problem caused changes at one
keyframe to make unwanted changes to an adjacent keyframe. The easiest work-around for the
problem was to develop motion effects from left to right. The keyframe on the extreme right was
dragged to the left and used for the end of the motion step being developed. A new keyframe
would be added on the right. After the motion effects were done, a keyframe needed to be on the
right edge of the keyframe timeline, or else there will be a period with nothing displayed.
Hopefully this type of awkward processing will not be needed with version 5.

10
Setting Motion Effects
A motion effect is specified by selecting a keyframe and zooming and shifting the image to
display the position that is wanted at that point in time. The mouse scroll bar is used for zooming
and the image can be clicked and dragged. Sliders in the lower part of the dialog box can also be
used for zooming and panning. Once sequential keyframes have been set, ProShow Producer fills
in the continuous movement between the keyframes. The Copy button at the bottom of the
dialog box can be used to copy the settings from one keyframe to another, which is useful when
the display is held fixed for a period of time. The maximum enlargement with the mouse wheel
or slider is 500%; however, a larger value typed in the zoom field will be used.
The rate of motion is determined by the time between keyframes on the timeline. The time
point for a keyframe can be set by dragging the keyframe marker with the mouse or the exact
time can be entered into a field by right-clicking on a keyframe marker and selecting “Set Time
for this Keyframe.” The type of motion speed (smooth or linear) is set by clicking the label on the
left of the relevant slider (e.g., “Pan – Smooth” as shown in Figure 3).
The play icon at the bottom of the dialog box can be clicked to play a preview of the motion
for the slide. Also if the mouse pointer is clicked and dragged on the third or transition row of
the keyframe timeline, a red pointer appears and can be used to scrub or display the slide as the
pointer is dragged over time.
Changing Time for Motion Effects
A certain method is required to increase the time between a pair of keyframes without
changing the time between other keyframes. Right-clicking on a keyframe marker and then
selecting “Add/Remove Time from Keyframe” allows time to be inserted or deleted to the right at
that keyframe point. The number of seconds to be added is entered into a field. If a negative
number is entered, the time will be removed from the keyframe. The time for all other keyframes
will be shifted right for add or left for remove, but the time between keyframes will only be
changed for the keyframe that was clicked. The overall time for the slide will be increased or
decreased by the specified amount of time. The results with this method of changing time are
very different than other methods for changing the overall slide time.
For slides with motion effects, I avoid changing the slide or transition times by (a) modifying
the times on the Slide List, (b) clicking the button for “Slide Time” at the bottom of the Slide
Options screen, or (c) using the right mouse option “Set Slide Time.” For all of these methods,
ProShow Producer shifts the time between keyframes for all pairs of keyframes on the slide.
Although useful in certain situations, in many situations these can alter the results of much effort
to set precise motion effects. Undoing an inadvertent change with Ctrl-Z is valuable here.

11
The overall slide time can be locked by clicking the Slide Settings row in the Slide Options
panel on the left. Then click the checkbox for “Lock slide time to prevent changes.” This prevents
changes to the overall slide time, but allows keyframes to be moved within the fixed slide time.
Locking the time of a slide is a good practice when much effort has been spent setting precise
motions. However, contrary to what is stated in the ProShow Producer manual, transition times
can be changed even if the slide time is locked. Changes to transition time can cause the
keyframe times to shift.
Other Precarious Operations
I also avoid adding keyframes in the slide transition periods. Another counter-intuitive effect
in ProShow Producer is that if “Add/Remove Time from Keyframe” is used to add or remove time
to a keyframe that occurs during the transition in or out for the slide, the length of the transition
is changed by the specified amount of time. This occurs when adding time at the end of the slide
to expand the overall slide time without changing keyframe times. Trying to restore the
transition time without shifting keyframe times can be precarious. Also, using the “Add/Remove
Time from Keyframe” when the slide time is locked will cause keyframes to shift within the fixed
slide time.
Working with slide motion effects with ProShow Producer is much easier when the
precarious operations are known and avoided. One useful strategy is to have the overall slide
time be longer than is needed while setting motion effects. When the motion effects are complete
except for the extra time for the last keyframe, eliminate the extra time by right-clicking on the
keyframe second from the right and selecting “Add/Remove Time from Keyframe.” Enter a
negative number for a longer time than the extra time. This will remove the time between that
keyframe and the beginning of the slide transition out. The keyframe that was clicked will be
moved to the starting edge of the transition out and the length of the transition will not be
changed.
7. Slides with Only Text
In ProShow Gold or ProShow Producer a text slide can be created by tapping Alt-Ctrl-B or
with the Add Title button on the main tool bar. The new slide will be inserted just to the left of
the slide that was selected on the Slide List. The slide will have the default background color for
the slide show and the font for the text will be the color used on a previous slide.
The new slide opens with the Slide Options screen set on the Captions Setting tab ready to
have the text entered into the Selected Caption Text box on the upper right. The entered text will
be displayed in the preview area and can be moved and sized by dragging the outline

12
surrounding the block of text. Multiple rows can be entered for one block of text. Another block
of text can be entered by clicking the + icon on the Captions panel on the left. Each block is
listed in the Captions panel and the block that is selected is displayed in the preview area. Each
block can be moved and sized independently. Various properties of the text can be set with
options in the panels in the lower half of the screen. The field for Alignment determines whether
the text lines in a block are aligned on the left, right, or centered.
The type, size, and color of the font can be changed with fields in the Caption Format box on
the right. There are also icons of B and I that can be clicked to make the font bold or italic. As
noted in Chapter 8, the text in slide shows is usually most clear and readable if the font is
optimized for display on electronic screens, such as Arial, Lucinda Sans, and Verdana.
The background color for a text slide is changed by clicking the Default Background option in
the panel on the lower left. Click the button for Solid Color in the Background Source panel
below the image and select the color for the background. I often use a white font with a black
outline and a medium gray background such as red, green, and blue all set to 100. The font size
is usually about 16 points for a slide show on DVD. However, many other options for font and
background properties can be used. A photograph image can also be used as the background for
text slides.
I prefer to have the text fade in and out rather than appear and disappear suddenly. Click the
Effects tab to set the transitions for the text. The Fly In field is set to Fade In and the Fly Out field
is set to Fade Out. Note that by default the Fly In and Fly Out periods for text occur for only half
or less of the slide transition periods. This means that two sequential text slides will never
display overlapping text. As will be discussed in a later section, this default behavior can be
changed for a slide.
The color and other settings for the text and background can be easily copied to one or more
slides using the Copy button at the bottom of the Slide Options screen or the dropdown menu
Edit> Copy Settings. Select “Between Slides,” which brings up a dialog box that allows selection
of the source slide and one or more destination slides. The specific settings to be copied are
selected from a list. For example, there is a section for Background and a checkbox for Color. The
Copy button at the bottom of the dialog box applies the changes.

13
8. Captions on Images
Captions on an Image with ProShow Gold
With ProShow Gold a caption displays for the full time of the slide. A duplicate copy of the
slide without captions is needed to display the image without captions. Given the effort needed
to put captions on separate slides with ProShow Gold, it may be reasonable to put more text on a
slide and have longer display times.
Assuming the Slide Options screen is already open create a new caption by clicking on the
plus icon on the header of the Captions panel on the left. This opens a dialog box to enter the
caption. The caption is displayed on the image with a frame that can be used to move and resize
the text. If the text in a caption needs to be modified, right-click on the caption row in the
Captions panel and select “Edit Text.”
Caption Background
With ProShow Gold the background for a caption must use an image file made with other
software. The image file will have only the background color that is used for captions. The
background image can easily be made a variety of software. An image width of 300 pixels and
height of 90 pixels is a useful starting point for a one-line caption and 300 by 120 pixels for a
two-line caption. In Photoshop Elements click the “Set background color” icon (small rectangle
behind the foreground rectangle) on the left vertical tool bar and select the color for the text
background. Create a new image with the dropdown menu File> New> Blank File. Set the size
and resolution, and Background Contents to “Background color.” An easy way to change the
color is to add a new fill layer with Layer> New Fill Layer> Solid Color. After selecting the color,
flatten the layers. The free IrfanView image viewing program can also be used to make the
background image. After opening IrfanView use the dropdown menu Image> Create New
(empty) image. The text background image is written as a file with the usual Save As command.
The background image is used as a layer in ProShow Gold to provide the background for a
caption. After the caption size and location have been set, click the Layer Settings tab, then click
the plus sign on the header for the Layers panel on the left and select “Add Image or Video.” This
opens a browser to select the image file with the background color. The background file is
displayed in the preview area. Set the Scaling field to be “Fit to safe zone.” Change the size of the
background layer with the mouse scroll wheel or by clicking and dragging the outline anchor
points. Click and drag the background rectangle to place it behind the caption. All captions are
displayed on the Layer Settings tab, which is convenient for aligning the background layer. Also,
14
moving and resizing the background layer while on the Layer Settings tab initially applies the
changes uniformly throughout the slide. Changes made under the Effects tab will apply to only
the start or end position for the slide and cause the background layer to have motion.
If the shape of the rectangle for the caption background needs to be modified, set the Aspect
field in the Layer Setup panel to Custom. Then enter a different number in one of fields to the
right to change the ratio of length to height for the background layer. In my experience, the
background layer sometimes gets unexpectedly enlarged when the slide is played. The
background layer can be made smaller in these cases and will expand when played.
A border can be added to the caption background by clicking the Adjustments tab and then
clicking the Outline checkbox and setting the color for the outline.
The transitions for a caption background layer track the transitions for the slide and are
different than the default transitions for the captions. As noted earlier, the transitions for
captions are quicker than the transitions for the slide, which means that captions in sequential
slides do not overlap. However, the caption background can appear noticeably before the actual
letters and remain after the caption has faded out. If the slide is part of a sequence of slides for
one image and has slide transitions times of zero, the difference between the background and
captions will probably not be noticed. However, if the captions are on a slide with non-zero
transition times, the differences between the caption and background transitions can be noticed.
The caption transition can be set to track the slide transition in these cases. This is done by
opening the Slide Options screen and clicking on the relevant row in the Captions panel. In the
Captions Setup panel click the checkbox for “Included in slide transition effect.” This will need to
be done for each row on the captions list.
Captions on an Image with ProShow Producer
Set Caption Text
In ProShow Producer keyframes are used for captions and background layers. This gives
precise control over timing and transitions, but some planning can be very useful for a slide with
multiple motion steps and multiple captions.
Assuming the Slide Options screen is already open create a new caption by clicking on the
plus icon on the header of the Captions panel on the left. This opens a dialog box to enter the
caption. The caption is displayed on the image with a frame that can be used to move and resize
the text. It is most efficient if all the captions that will display for the same time are included in
one caption block. Make another caption block for other captions that have different display

15
times. If the text in a caption needs to be modified, right-click on the caption row in the Captions
panel and select “Edit Text.”
Set Caption Timing
The timing for a caption is set by clicking the Effects tab after the caption has been selected
on the Captions panel on the left. The keyframe timeline can be used to set the timing of the
caption as well as other effects. In most cases timing is the only effect that will be used for a
caption. Drag the keyframes at the ends of the timeline to set when the caption appears and
when it fades out. The caption will not display before the first keyframe in the timeline or after
the last keyframe. Icons with a T are displayed on the timeline for the caption transitions in and
out. The type of transition can be modified by clicking the icon. The time of transition can be
modified by moving the mouse pointer over the transition at a keyframe marker. A red rectangle
appears for the transition time. Adjust the transition time by dragging the edge of the rectangle
or by right-clicking the mouse and selecting “Set Effect Time.”
The caption can be played or scrubbed using the same methods as when setting motion. The
timing for each caption will need to be set individually. Select a different caption by clicking a
different row in the Captions panel on the left.
Set Caption Background
After the caption timings have been set, click the plus sign on the header for the Layers panel
on the left. Select “Add Solid Color” and then choose a color for the caption background. Click
the Layer Settings tab if it is not already active. Set the size of the background layer by zooming
with the mouse scroll wheel or by clicking and dragging the outline anchor points for the layer.
Click inside the outline and drag the rectangle to place it behind the caption.
The easiest way to set the shape of the rectangle for the caption background layer is to click
the Effects tab and then click the little lock icon that links the X and Y zoom sliders. This allows
the shape of the rectangle for the caption background to be changed by dragging the outline
anchor points. It is usually easiest to go back to the Layers tab to finish setting the size and
position of the caption background. The captions are all displayed on the Layers tab, which is
convenient for aligning the background layer.
A border and various other options can be added to the caption background by clicking the
Adjustments tab. Click the Outline checkbox on the Editing Tools panel on the lower right and
then set the color and size or thickness for the outline.
Add a background layer for each caption on the slide. When more than one caption is used
on a slide, it is helpful to name each layer in a way that indicates which caption is associated.

16
This can be very helpful in working with the slide later. Right-click the row in the Layers panel
on the left and select Rename Layer.
Align Timing for Caption and Background Layers
The easiest way to align the timing of the captions and background layers is to use the multi-
layer keyframe editor. Tap Ctrl-K or click the button for “Keyframe Editor” at the bottom of the
Slide Options screen. This displays a timeline with all layers and captions. Click the keyframe
marker for one of the background layers and drag the marker until it aligns with the
corresponding marker for the caption. Another way to get alignment is to hold down the control
key and click the keyframe marker for the caption and corresponding marker for the background
layer. Then right-click on the keyframe marker for the caption and select “Align Selected
Keyframes Here.” The alignment needs to be done for the start and end keyframes for each
caption. The transitions for the layers can also be set to match the captions by using the same
methods described above for setting transitions for the captions. These methods can be applied
in the multi-layer keyframe editor. The slide can be played from the multi-layer editor by clicking
the Play button below the display on the left.
Holding down the Alt key while clicking and dragging a keyframe marker will cause all the
keyframes on the timeline to move while keeping the times between keyframes fixed. This
method can be used on a timeline row of the multi-layer keyframe editor as well as on the
screens for each caption, layer, or motion. This shifting of keyframes only works when the last
keyframe is not at the end of the timeline.
9. Creating and Using Styles
Styles allow the motion, captions, and layers of a slide to be stored for use on another slide.
This can save significant time when applying effects and is particularly useful for captions on
images with ProShow Producer. When a style is applied, the specific text, timing, and location of
text and background will typically need to be adjusted for the slide. Note that applying a style
removes any styles or effects that have been previously applied to the slide. Styles are not
cumulative. Only one can be applied to a slide.
Many styles are provided with ProShow Gold and ProShow Producer. These can be useful for
learning about methods as well as for directly using the styles. In particular, the styles for
handling text may stimulate ideas. Additional styles can be purchased.
Creating and saving effects as a style is easy. Once the effects have been implemented on a
slide, click the Slide Style row in the Slide Options panel on the Slide Options screen. Then click
the “+ create” button on the Slide Styles panel below the image display. Fill in the information

17
fields about the new style and it will be created when the Ok button is clicked. For example, a
style could be created for adding one caption to a slide, and another for adding two captions.
Other styles may be needed for handling motion and captions. The information fields about the
style can be modified by clicking the “manage” button, selecting the style to modify, and then
clicking the “edit” button at the bottom of the screen.
A style is applied by opening the Slide Options screen and clicking the Slide Style row in the
Slide Options panel on the upper left. Select the style category and specific style from the Slide
Styles panel in the lower part of the screen. Once the style has been selected, click the Apply
Style button in the lower right.
10. Transitions between Black and White and Color
As noted in Chapter 8, when a slide show has one transition from black and white slides to
color slides, a distinct type of slide transition will usually be appropriate at that point. One option
is to make a slide that is a solid black background. The last grayscale image fades into the black
slide, which then fades into the color image.
Another option is to use the colorize adjustment to make the first color slide initially display
as grayscale and then the color emerges in the slide. In ProShow Gold this can be done by
placing two copies of the slide on the time line. For the first slide, click the checkbox for Colorize
on the slide Adjustments tab. Then set the transition to the next slide to Crossfade (Blend) –
Linear with the transition time about 3 or 4 seconds. Color will emerge during the transition
between slides.
In ProShow Producer colorizing can be done directly as an effect. On the Slide Options screen
select the layer for the image in the Layers panel and click the Effects tab. Then click the check
box for Colorize on the lower right. The time for the adjustment can be set with the usual use of
keyframes.
11. Audio in Slide Shows
The handling of audio is similar for ProShow Gold and ProShow Producer. Unless otherwise
noted, the methods described in this section apply for both applications.
Soundtracks for the Slide Show
Clips or tracks of sound are placed on the slide show soundtrack. The easiest way to add
audio is by dragging an audio file from the browser area in the upper left of the main ProShow

18
screen to the audio waveform row below the Slide List. Different audio files can be added in any
order. Audio clips shift down if a file is added at the beginning of the slide show.
Once an audio clip has been added, the easiest way to work with it is to tap the Tab key or
click the Timeline button on the Slide List. This toggles the display to the audio timeline display,
which focuses on the audio rather than on the slides. If the mouse pointer is placed over the
audio waveform for an audio clip and the Control key is held down, an outline with control
points appears around the audio clip. The location of the audio clip on the timeline can be
shifted by clicking anywhere within the outline and dragging the audio clip waveform. The
volume of the audio clip can be modified by dragging the top or bottom of the outline up or
down. Clicking and dragging the middle control point on either end of the audio clip will exclude
sound from the play back. However, the underlying audio clip is not altered and the excluded
sound will be returned if the control point is dragged back. The upper and lower control points
on the ends of the audio clip can be dragged to make the sound fade in or fade out, according to
how far the control points are dragged. When the Control key is not held down, clicking on the
waveform sets a blue marker that is the starting point for play back if the space bar is tapped.
The slide show can be manually displayed or scrubbed by dragging the blue marker along the
timeline.
A more precise method to set the start and stop points and the fade-in and fade-out for an
audio clip is to right-click on the waveform and select “Edit Fades and Timing.” This brings up a
waveform display that can be expanded using the Zoom slider to set cutoffs and fades precisely.
Another alternative for working with sound is to double-click on the waveform on the main
display, which brings up the Show Options screen set to the Sound Track panel, which has a row
for each soundtrack in the slide show. Various adjustments to a soundtrack can be made by
selecting the row in the Sound Track panel and then adjusting the various sliders for different
modifications. A sound track can be added from this screen by clicking the plus icon on the
Sound Track panel.
If two audio clips overlap on the timeline, both will play. This feature allows fading from one
audio clip to another.
Soundtrack for an Individual Slide
In addition to the slide show soundtrack discussed above, each slide can have its own
soundtrack. The slide soundtrack is useful for sound effects and voice that are applicable to and
should stay aligned with a specific slide. However, the soundtrack for a slide can extend beyond
the time of the slide and play during other slides. This feature allows multiple audio clips to play
at once.

19
An audio file can be placed in a slide soundtrack by opening the Slide Options screen and
then clicking the Slide Sound row in the Background and Sound panel on the lower left. Then
click the “browse” button in the Current Slide Sound panel on the upper right to select an audio
file for the slide soundtrack. Various adjustments and effects can be applied with the sliders in
the lower part of the screen. Clicking the “Edit Fades and Timing” button in the Sound Timing
panel brings up the waveform to precisely set the audio that is included and excluded from
playback and the fade in and fade out. When the audio timeline is on, a waveform for the slide
soundtrack is displayed above the larger waveform for the slide show soundtrack.
When a slide audio clip is playing, ProShow Gold and ProShow Producer reduce the sound
volume of the main slide show soundtrack by 50% by default. This effect emphasizes the slide
soundtrack but keeps the slide show soundtrack in the background. The amount that the slide
show soundtrack is reduced for the slide soundtrack can be adjusted by clicking the checkbox for
“Override Soundtrack During this Sound” on the Slide Sound screen. For example, the volume of
the main slide show soundtrack can be turned off when the soundtrack for a slide is playing. The
default settings for the slide show can also be changed under the Show Options, which can be
opened by double-clicking on the slide show waveform.
Aligning Slides and Audio
ProShow Gold and ProShow Producer have built-in functions for aligning slides and audio;
however, my limited experience has been that these generally did more harm than good when
carefully prepared slides with motion and text were involved. These functions tended to change
slide and transition times in ways that were not optimal. They may be useful for a simple slide
show without complex motion and text effects.
The most reliable method for adjusting timing is to make specific changes to individual
slides. That is the best way to make a certain audio passage precisely coincide with a motion
effect on a particular slide. There may be two or three points in a slide show when this precise
coordination is wanted. To achieve this type of coordination, several slides may need to be
adjusted. When several slides will get the same adjustment, the slides can be selected by holding
down the Control key and clicking on each slide. A setting made to one of the selected slides on
the Slide List will be transferred to all the other selected slides. The times for the display and
transitions between slides can also be adjusted by dragging the edges of the slide on the audio
timeline display. This is intended for aligning the slides with certain points in the audio.

20
12. Video Output for a Slide Show
As noted in Chapter 8, the output of a slide show is a video file that can be played on a TV,
computer, or other video device. The output video file options are the same for ProShow Gold
and ProShow Producer. However, ProShow Gold has more limited options for menus.
Menus for Slide Shows
ProShow Gold and ProShow Producer can both include menus in the output files, but each
menu item must be created as a separate slide show. Working with a few smaller slides shows as
sections or chapters rather than one longer slide show is generally easier in addition to being
useful for menus. The slide show name and thumbnail image set in the initial options for each
slide show are used as the default label and thumbnail image in a menu.
In ProShow Gold the menu options appear as a tab and are the first step in creating an
output file for a slide show. Click the Shows tab to add additional slide shows to the menu and
output. After the slide shows have been selected, click the Menu tab to set the properties of the
menu. This includes the menu background image, title of the overall show, layout of the menu
items, aspect ratio of the menu display, and a button for other custom features.
Unfortunately, ProShow Gold cannot save the specific menu that was created for a slide show
output. The menu format can be saved as a template but the individual menu items must be
reassigned every time a new output is made. For historical slide shows with several sections or
chapters I find it easier to use video authoring software to make the menu rather than work with
the limited capabilities of ProShow Gold. Video files in the format needed for a DVD can be
created with ProShow Gold and these files are input into the video authoring software.
ProShow Producer has much more useful menu capabilities. A project can be defined that
includes several slide shows and a menu. The project can be saved and opened again when
modifications or additional output are needed. The menu is saved as part of the project. The
dropdown menu Project brings up the options to create, open, and save a project, and to add
shows and edit the menu for the project. A useful Project panel can be displayed by tapping Ctrl-
Shift-F12 or with the dropdown menu Window> Show> Project. The options for editing the
menu are the same as described above for ProShow Gold and also appear as a tab in making an
output file with ProShow Producer.

21
13. Slide Show Output for DVDs
Burning DVDs with ProShow
A DVD can be burned directly from ProShow Gold and ProShow Producer, or files can be
created and used by other software to burn DVDs. To burn a DVD with ProShow Gold or
ProShow Producer click the DVD icon on the toolbar or select the dropdown menu Publish>
DVD. Select slide shows to include and set the menu as described above. The Options tab can
usually be left with the default settings, which are DVD type set to “DVD HQ (High Quality -
Safe),” TV system set to NTSC for North America, audio type set to MP2, and anti-flicker and
desaturation both checked with desaturation set to 80%. The alternative TV system is PAL, which
is used in some countries. Anti-flicker causes a slight softening of an image, but eliminates the
flicker or shimmer that can occur on a TV when the image has high contrast. The ProShow
manuals recommend that desaturation and anti-flicker be used for slide shows that may be
played on a variety of TVs. DVD burning is started by clicking the Burning tab. As a general rule,
a burning speed of 4x or 8x will produce more reliable output than a faster speed.
The Burning tab on the Create DVD dialog box includes options to add additional files to the
DVD. A slide show will typically use only a small part of the capacity of the DVD and other files
can be added. This is a useful way to distribute copies of digital archive files. One option is a
checkbox to include the files for the images that were used in the slide show and a second option
is to include all the files in a specified folder. The image files used in the slide shows are put in
separate folders with names like SHOW1, SHOW2, etc. The files for the second option are placed
on the root folder of the DVD. These files can be accessed by putting the DVD in a computer,
turning off the automatic play of the DVD when it comes up, and accessing the DVD with
Windows Explorer. The folders named VIDEO_TS and AUDIO_TS hold the video files that are
played on the DVD. Any other files and folders are additional and do not affect the normal
playing of the DVD.
When making DVDs, ProShow Gold and ProShow Producer make folders with the rendered
video files on the hard drive of the computer. A separate folder is made for each slide show
included on the DVD. Once these folders and files are made, DVDs can be created very quickly
without rendering the slide shows again. These folders are put in the same folder as the slide
show psh file and they are given the name of the slide show with “_psdata” added to the name.
These folders have large files and can be deleted; however, creating a DVD will take much longer
because the slide shows will need to be rendered again.

22
Burning DVDs with other Software
When video authoring software is being used to create the menu and burn DVDs each slide
show is output as a DVD compatible video file. This is done by clicking the Video icon on the tool
bar or using the dropdown menu Publish> Video for Web, Devices and Computers. Click the row
for Video File, then the row for MPEG-2, and then select the desired aspect ratio. Set the location
for the output file and click the Create button. After the video files have been created, the video
authoring software uses the files in creating the menu and DVDs. Note that by default ProShow
Gold and ProShow Producer use the MP2 format for audio in DVDs. This does not strictly meet
the current specifications for DVDs and video authoring software may give a warning message. It
is safe to ignore the warning message and use the MP2 format.
As noted in Chapter 8, my usual practice is to create DVD compatible video files from
ProShow Gold or ProShow Producer, use video authoring software to create the menu and files
for a DVD, and actually burn the DVD with other software such as Nero Burning ROM. Among
the advantages with this process is that Nero provides more control over the additional files that
are added to a DVD and allows better organization. In addition, Nero can save the full
specifications for burning a DVD, including the additional files. This is very useful when more
copies are made later after the details of the burning specifications have been forgotten. Nero
Burning ROM can be difficult to find from the Nero front end. An icon that runs Nero Burning
ROM version 9 directly can be set up in Windows 7 with the path "C:\Program Files
(x86)\Nero\Nero 9\Nero Burning ROM\Nero.exe."
The additional files put on a DVD can include a video file that plays much better on a
computer than the basic DVD video plays. These files are described in the next section.
14. Slide Show Output for Computers
Executable Program Files
ProShow Gold and ProShow Producer can create executable program files that can be played
on a computer. An executable slide show file can be created by clicking the icon for Executable
on the toolbar or with the dropdown menu Publish> Executable. The Executable dialog box
includes a tab to set the menu as described in the section on menus above. Clicking the tab for
Options brings up the dialog box for setting the size and quality of the slide show display. The
first option is Window Size, which sets the overall size of the window or frame for playing the
slide show. The default value of 1200 x 900 pixels is a useful size when the aspect ratio is 4:3,

23
but other size can also be used. For best results, the dimensions should match the aspect ratio of
the slide show. For an aspect ratio of 4:3, dimensions of 1024 x 768 or 1280 x 960 pixels are
frequently suggested and provide good results for a variety of computers. Other alternatives
include 1000 x 750 or 1400 x 1050. For an aspect ratio of 16:9, 1024 x 576 and 1280 x 720
pixels are common, but 1408 x 792 and 1600 x 900 could also be used. The other settings for
Full Size, Image Size, and Loop Show will usually be left to the default values of blank.
In the section for Quality the slider for image quality can be left at the default value of 85%.
Increasing this value causes the output file size to increase dramatically with minimal
improvement in quality. The setting for Video Quality also can be left at the default setting of
Max. The checkbox for On Screen Controls will normally be checked to provide controls for
playing the slide show.
High Quality Video File
ProShow Gold and ProShow Producer have preset options for video output files, but also
allow custom settings and the capability to save and reuse custom settings. The preset output
video files are opened by clicking the Video icon on the tool bar or by using the dropdown menu
Publish> Video for Web, Devices and Computers. When the row for Video File is clicked, the
options for MPEG-4 may be useful when the slide show aspect ratio is 16:9. The option for 1080
has output resolution 1920 x 1080 pixels and 720 has output resolution 1280 x 720 pixels. New
preset options can be created by clicking the plus icon on the “Devices, Presets & Services” panel
header. Select the desired settings, choose a name for the preset settings, and click the Save
button.
Custom video output settings can also be specified with the dropdown menu Publish> For
Computers> Custom Video File, or by tapping Ctrl-P and selecting Custom Video File. Set the
field for Type to “Custom.” For the Format field, the most reliable format for high quality video
that may be played on a variety of computers is currently “MPEG 2.” The field for Compression
will be fixed as “MPEG Video.” Click the Options button to the right of the Compression field to
bring up some key settings. The Video Settings Bitrate field determines the overall quality of the
video and size of the video file. For display sizes of 1000 to 1280 pixels on the longest side, a bit
rate of 8000 kbps (Kbit on the dialog box) is a useful starting point. If there are problems
displaying the slide show, the bit rate can be increased. My limited experience has been that bit
rates in the range of 8000 to 15000 kbps are adequate for display sizes in the range of 1000 to
1200 pixels. The checkboxes for Interlacing and GOPs should be left blank for slide shows played
on a computer. The default Audio Settings of Bitrate 224 kbps and Frequency of 48 KHz can be
used. The Multiplex field should be MPEG2. Click Ok to return to the main dialog box.

24
MPEG4 AVC can also be used for the video output. The default options for the Compression
field are for internet use; however, the Custom setting can be used to set a higher bitrate such as
8000 Kbit.
The Resolution field is the display size for the slide show and should match the aspect ratio
of the slide show. The values described above for executable files can also be used here. The field
for Framerate can be set to 30. If the motion in the slide show is choppy, the Framerate can be
increased to 60 and the video bit rate increased. However, needing a frame rate of more than 30
may be an indication that the motion is overly fast in the slide show. For the Display settings, the
aspect ratio will match the aspect ratio in the slide show. The Encoding field can be left with the
default “High Quality.” The checkboxes for Desaturation and Anti-Flicker primarily apply for TVs
and are better set as unchecked for slide shows played on a computer. Click the Create button to
generate the output video file.
15. Slide Show Output for the Internet
ProShow Gold and ProShow Producer have output options specifically for Facebook,
YouTube, Vimeo, and SmugMug that are intended to allow the user to login to the site, set
appropriate settings, and upload the video file for a slide show. However, ProShow Gold and
Producer will need to be frequently updated to respond to changes at these sites. Another option
is to create video files with ProShow Gold or ProShow Producer that are consistent with the
recommendations from the website and upload the files using the usual process for the website.
For those who want to put a slide show on their own website, Flash video is one of the
options for output video with ProShow Gold and ProShow Producer. The settings for the Flash
option include the size of the display window and the video bit rate, which ranges from very
slow to moderately fast broadband internet access. Information is provided on the Flash dialog
box that is helpful in selecting settings. ProShow Gold and ProShow Producer also have an
option to make a file with the HTML code for playing the Flash slide show. Typically the relevant
part of the HTML code would be incorporated into the larger HTML for the webpage. Flash video
with low bit rates usually produces very poor results for historical slide shows. Providing two
options for a slide show on a website can be useful with Flash video. One option would be for
slower internet connections and the other would have higher quality video for those with faster
internet connections.
Other types of video files for use on the internet can be specified by clicking the Video icon
on the toolbar, then selecting Video File and “Video for Uploading to the Web.” These provide
alternatives to Flash, but have the same basic trade-off between quality and accessibility.

25
ProShow Presenter
Higher quality video for slide shows on the internet can be obtained using the ProShow
Presenter plug-in. This plug-in is added to the web browser on a computer and plays special files
made by ProShow Gold and ProShow Producer. These files use the same strategy as described
above for executable program files played on a computer. The special file has the filename
extension .px and has the specifications and media files for a slide show, but does not have the
thousands of rendered images for video. The Presenter plug-in generates the video from the .px
file as the video is played. This allows higher quality video with much smaller file sizes.
The .px file is made with the dropdown menu Publish> For the Web> ProShow Presenter, or
by tapping Ctrl-P and selecting ProShow Presenter. Menus can be created as usual with the Menu
and Shows tabs. The Options tab specifies the same settings as described above for making
executable files. For internet use lower values of window size etc. would be explored. An HTML
file that plays the slide show can also be created along with the .px file. The relevant section
from this file would typically be put into the larger HTML file for the web page.
The main disadvantage with the Presenter plug-in is that it requires special software to be
installed on each computer. If Presenter has not been installed on the computer, a message will
come up asking to install it. Presenter is automatically installed as part of ProShow Gold and
ProShow Producer and probably will not be a problem for those who frequently view slide shows
with it. However, those who are not familiar with ProShow products may and should be very
hesitant to install the Presenter plug-in. Special software like this can easily contain viruses or
other malware. It is very unwise to casually install software in situations like this without first
verifying that the software is from a legitimate company and does not contain malware. A
considerate website will acknowledge and support this concern. The optimal strategy for a
website may be to offer other video formats as well as a Presenter version of the slide show.
16. Slide Shows with IrfanView
The free IrfanView image viewer can make simple slide shows that play on a computer and
allow the person watching the slide show to control the duration of display for each slide. With
this option, each slide or image is displayed until the user taps a key to advance to the next slide.
This user control is particularly useful for slide shows with significant text or other information
that may require longer display times for some people. The optimal presentation for such slide
shows is for one or two people to view the show at their own rate.
The slide show dialog box is opened in IrfanView by taping the W key or with the dropdown
menu File> Slideshow. The upper right part of the slide show dialog box has a file browser that

26
can be used to find files. Below that are some control buttons and a box for the list of files that
are included in the slide show. Files can be dragged from the browser to the list box or can be
selected in the upper box and the Add button clicked. Images are played in the order of the list
and are re-ordered by clicking on an image in the list box and then clicking the button for “Move
up” or “Move down”. An audio file can be put in the list and begins playing when the display
reaches that point in sequence. An audio file plays in a loop until another audio file is
encountered in the list or until the slideshow ends.
The slide show settings on the left side of the dialog box that are useful are slide
advancement “Automatic after mouse/keyboard input”, “Suppress errors while playing”, “Loop
MP3 files (for background music)”, and “Close IrfanView after last slideshow file”. The play
mode for the slide show can be set to full screen or to a specified size. Full screen works well for
most computers. The list of files included in the slideshow can be saved with the button for “Save
filenames as TXT file” and can be recalled with the button for “Load filenames from TXT file”.
The slide show is output for playback on a computer by clicking the button for “Save slideshow
as EXE/CSR”. This makes an executable file (filename extension .exe) that is played on a
computer by double-clicking on the file. This self-contained program file can be copied or
emailed to someone with another computer. The button “Burn slideshow to CD” has not worked
for me.
Title slides and text information can be displayed from images created with IrfanView or
from text files. A text file placed in the list is displayed in sequence. The font color and
background color for a text file are set with the dropdown menu Options> Properties/Settings>
Browsing/Editing. The text file font and background colors are set at the bottom of the dialog
box. Alternatively, an image with text writing can be created in IrfanView by creating a new
blank image with the dropdown menu Image> Create new (empty) image. This brings up a
dialog box for setting the size and background color for the blank image. Text can be added to
the blank image by dragging the mouse to make a rectangular selection on the blank image and
then using the dropdown menu Edit> Insert text into selection. Text typed into the dialog box is
placed in the selection rectangle on the blank image. The button for “Chose Font” is used to set
the size, color, and type of font for the text. The same method is used to place text or captions on
a picture. Once text has been placed on an image, it cannot be revised, but it can be undone with
the usual Ctrl-Z. Image editing software such as Photoshop can also be used to create images
with text.
IrfanView does not have functions for zooming and panning in slideshows. Enlargement can
be made by copying an image and cropping it.
An IrfanView slide show advances to the next slide when the space bar, PageDown, right
arrow, or right mouse button are tapped. The display returns to the previous slide when the

27
Backspace, PageUp, left arrow, or left mouse button are tapped. The Esc key exits from the
slideshow. It can be helpful if the first slide in a slide show provides instructions for the slide
show.
ProShow and XnView have somewhat similar options for manually advancing through a slide
show, but the handling of sound tracks is not as flexible as with IrfanView.
Resources
Photodex Corporation, 2012a. ProShow Gold. Accessed February 7, 2012
from http://files.photodex.com/docs/manuals/ProShowGold5.pdf.
Photodex Corporation, 2012b. ProShowProducer. Accessed February 7, 2012
from
Schmidt, Paul, 2011. Secrets of ProShow Experts: The Official Guide to Creating your Best Slide
Shows with ProShow Gold and Producer. Published by Course Technology in Boston, MA.
http://files.photodex.com/docs/manuals/ProShowProducer5.pdf.
From: http://archivehistory.jeksite.com/ © 2012, 2013 James E. Kennedy