Embed Size (px)
Citation preview
TNV
-GD
B-D
TA-4
63
60
-14
11
GUIDE DE BRANCHEMENT—Convertisseur numérique analogique
CoNNECTIoN GUIDE—Digital-to-analogue Converter
32
Bienvenue ......................................................................................................................................................................................3
Convertisseur...............................................................................................................................................................................4
Branchement ................................................................................................................................................................................5
Télécommande..............................................................................................................................................................................9
Foire aux questions ...................................................................................................................................................................11
Service à la clientèle et Soutien technique..........................................................................................................................13
Sécurité .......................................................................................................................................................................................14
BieNVeNueCe convertisseur vous permettra de capter certaines chaînes numériques en format standard et de les convertir afin que leur format soit compatible avec votre téléviseur analogique ou numérique. ainsi vous pourrez avoir accès à une qualité d’image supérieure et à un son plus clair, ce qui enrichira votre expérience de divertissement télé.
Prenez note que ce convertisseur ne vous donnera pas accès à l’ensemble de votre forfait numérique, mais que vous pourrez accéder aux chaînes du forfait de Base et du forfait de Base Plus.
suivez les instructions contenues dans ce manuel pour installer le module Convertisseur numérique analogique.
Si VouS AVez reçu le coNVerTiSSeur PAr PoSTeS cANADA, NouS VouS iNViToNS À SuiVre leS iNSTrucTioNS ci-DeSSouS : 1. Branchez le convertisseur en suivant les instructions à partir de la page 5.
2. une fois le convertisseur branché, composez le numéro de téléphone suivant pour le faire activer :
Composez sans frais le 1 877 486-6695 Du lundi au vendredi : de 7 h 30 à 22 h | samedi et dimanche : de 8 h à 20 h
TaBle deS maTiÈreS Bienvenue
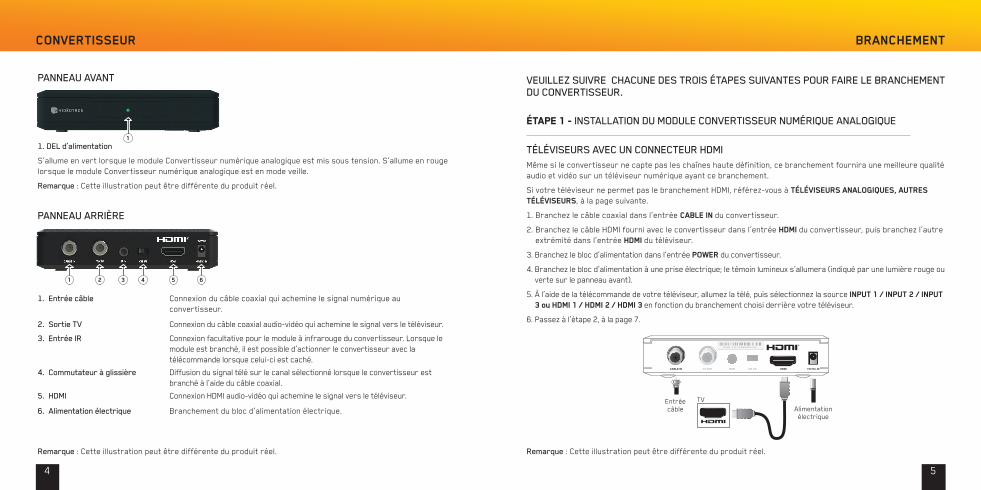
1. Del d’alimentation
s’allume en vert lorsque le module Convertisseur numérique analogique est mis sous tension. s’allume en rouge lorsque le module Convertisseur numérique analogique est en mode veille.
remarque : Cette illustration peut être différente du produit réel.
remarque : Cette illustration peut être différente du produit réel.
1. entrée câble Connexion du câble coaxial qui achemine le signal numérique au convertisseur.
2. Sortie TV Connexion du câble coaxial audio-vidéo qui achemine le signal vers le téléviseur.
3. entrée ir Connexion facultative pour le module à infrarouge du convertisseur. lorsque le module est branché, il est possible d’actionner le convertisseur avec la télécommande lorsque celui-ci est caché.
4. commutateur à glissière Diffusion du signal télé sur le canal sélectionné lorsque le convertisseur est branché à l’aide du câble coaxial.
5. HDMi Connexion HDmi audio-vidéo qui achemine le signal vers le téléviseur.
6. Alimentation électrique Branchement du bloc d’alimentation électrique.
remarque : Cette illustration peut être différente du produit réel.
S / N : 1 0 11 2 4 0 0 0 1 2
HDMITV OUT IR IN CH 3/4 +5V DC INCABLE IN
®
tventréecâble alimentation
électrique
54
PANNeAu AVANT
PANNeAu Arrière
COnverTiSSeur
ÉTAPE 1 - iNSTAllATioN Du MoDule coNVerTiSSeur NuMérique ANAloGique
TéléViSeurS AVec uN coNNecTeur HDMimême si le convertisseur ne capte pas les chaînes haute définition, ce branchement fournira une meilleure qualité audio et vidéo sur un téléviseur numérique ayant ce branchement.
si votre téléviseur ne permet pas le branchement HDmi, référez-vous à TÉlÉviSeurS analOGiQueS, auTreS TÉlÉviSeurS, à la page suivante.
1. Branchez le câble coaxial dans l’entrée CaBle in du convertisseur.
2. Branchez le câble HDmi fourni avec le convertisseur dans l’entrée Hdmi du convertisseur, puis branchez l’autre extrémité dans l’entrée Hdmi du téléviseur.
3. Branchez le bloc d’alimentation dans l’entrée POWer du convertisseur.
4. Branchez le bloc d’alimentation à une prise électrique; le témoin lumineux s’allumera (indiqué par une lumière rouge ou verte sur le panneau avant).
5. À l’aide de la télécommande de votre téléviseur, allumez la télé, puis sélectionnez la source inPuT 1 / inPuT 2 / inPuT 3 ou Hdmi 1 / Hdmi 2 / Hdmi 3 en fonction du branchement choisi derrière votre téléviseur.
6. Passez à l’étape 2, à la page 7.
Veuillez SuiVre cHAcuNe DeS TroiS éTAPeS SuiVANTeS Pour FAire le BrANcHeMeNT Du coNVerTiSSeur.
BranCHemenT
1
1 2 3 4 5 6
ruban à crochets
ruban à bouclettes
retirer la pellicule de la bande adhésive
Fixer les carrés de montage ici
Dessous du convertisseur
S / N : 1 0 11 2 4 0 0 0 1 2
TV OUT IR IN CH 3/4 HDMI
®
+5V DC INCABLE IN
entrée câble
tv
entréecâble alimentation
électrique
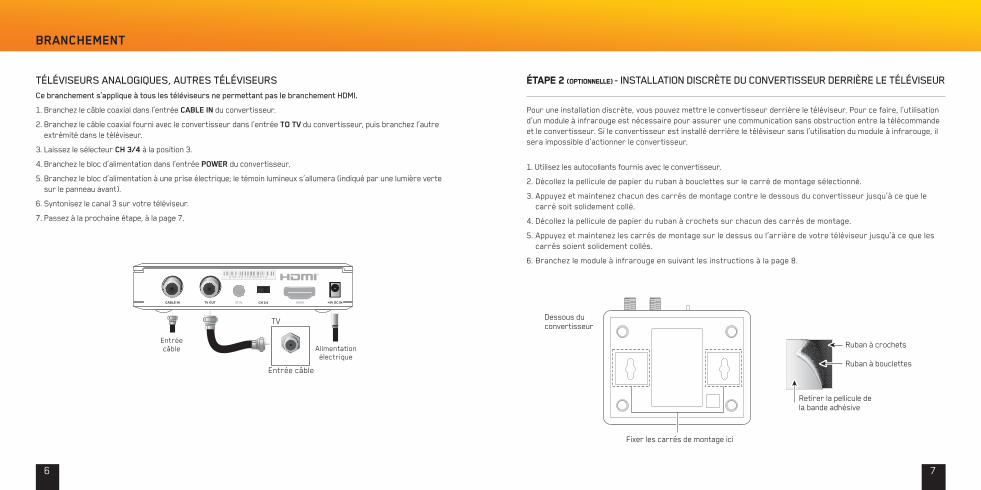
ÉTAPE 2 (oPTionnEllE) - iNSTAllATioN DiScrèTe Du coNVerTiSSeur Derrière le TéléViSeur
Pour une installation discrète, vous pouvez mettre le convertisseur derrière le téléviseur. Pour ce faire, l’utilisation d’un module à infrarouge est nécessaire pour assurer une communication sans obstruction entre la télécommande et le convertisseur. si le convertisseur est installé derrière le téléviseur sans l’utilisation du module à infrarouge, il sera impossible d’actionner le convertisseur.
76
BranCHemenT
TéléViSeurS ANAloGiqueS, AuTreS TéléViSeurSce branchement s’applique à tous les téléviseurs ne permettant pas le branchement HDMi.
1. Branchez le câble coaxial dans l’entrée CaBle in du convertisseur.
2. Branchez le câble coaxial fourni avec le convertisseur dans l’entrée TO Tv du convertisseur, puis branchez l’autre extrémité dans le téléviseur.
3. laissez le sélecteur CH 3/4 à la position 3.
4. Branchez le bloc d’alimentation dans l’entrée POWer du convertisseur.
5. Branchez le bloc d’alimentation à une prise électrique; le témoin lumineux s’allumera (indiqué par une lumière verte sur le panneau avant).
6. syntonisez le canal 3 sur votre téléviseur.
7. Passez à la prochaine étape, à la page 7.
1. utilisez les autocollants fournis avec le convertisseur.
2. Décollez la pellicule de papier du ruban à bouclettes sur le carré de montage sélectionné.
3. appuyez et maintenez chacun des carrés de montage contre le dessous du convertisseur jusqu’à ce que le carré soit solidement collé.
4. Décollez la pellicule de papier du ruban à crochets sur chacun des carrés de montage.
5. appuyez et maintenez les carrés de montage sur le dessus ou l’arrière de votre téléviseur jusqu’à ce que les carrés soient solidement collés.
6. Branchez le module à infrarouge en suivant les instructions à la page 8.
entrée pour le module à infrarouge
S / N : 1 0 11 2 4 0 0 0 1 2
TV OUT CH 3/4 +5V DC INIR INCABLE IN HDMI
®
Changer de page
98
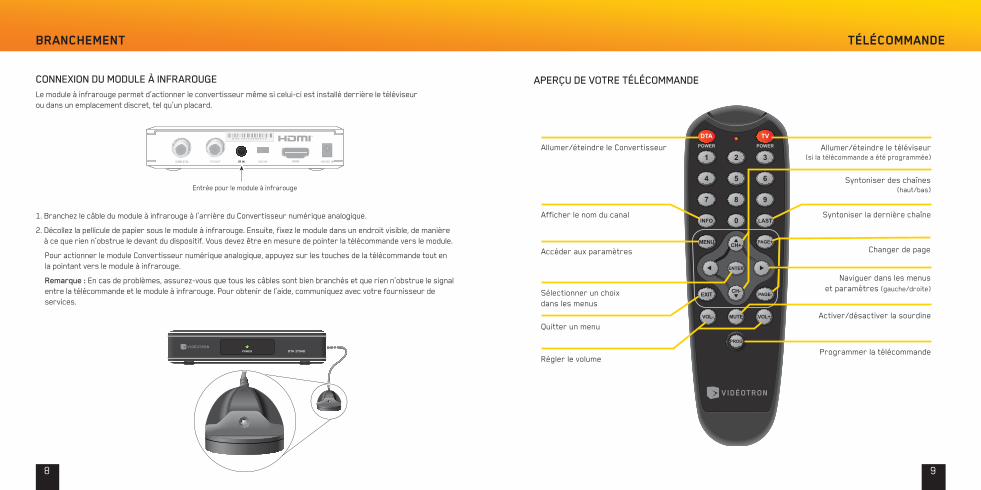
coNNexioN Du MoDule À iNFrArouGele module à infrarouge permet d’actionner le convertisseur même si celui-ci est installé derrière le téléviseur ou dans un emplacement discret, tel qu’un placard.
POWER DTA 270HD
1. Branchez le câble du module à infrarouge à l’arrière du Convertisseur numérique analogique.
2. Décollez la pellicule de papier sous le module à infrarouge. ensuite, fixez le module dans un endroit visible, de manière à ce que rien n’obstrue le devant du dispositif. vous devez être en mesure de pointer la télécommande vers le module.
Pour actionner le module Convertisseur numérique analogique, appuyez sur les touches de la télécommande tout en la pointant vers le module à infrarouge.
remarque : en cas de problèmes, assurez-vous que tous les câbles sont bien branchés et que rien n’obstrue le signal entre la télécommande et le module à infrarouge. Pour obtenir de l’aide, communiquez avec votre fournisseur de services.
POWER
DTAPOWER
TV
1 2 3
4 5 6
7 8 9
INFO LAST0 LAST
MENU PAGE+
EXIT PAGE-
ENTER
CH+
CH-
VOL+MUTEVOL-
PROG
allumer/éteindre le Convertisseur
afficher le nom du canal
accéder aux paramètres
naviguer dans les menus et paramètres (gauche/droite)sélectionner un choix
dans les menus
quitter un menu
allumer/éteindre le téléviseur (si la télécommande a été programmée)
syntoniser la dernière chaîne
Programmer la télécommande
activer/désactiver la sourdine
régler le volume
syntoniser des chaînes (haut/bas)
TÉlÉCOmmande
APerçu De VoTre TélécoMMANDe
BranCHemenT

1110
ÉTAPE 3 - iNSTrucTioNS De ProGrAMMATioN De lA TélécoMMANDe Du coNVerTiSSeur
la télécommande est originalement programmée pour actionner le convertisseur uniquement. la télécommande peut aussi être programmée pour commander la majorité des téléviseurs. Pour ce faire, veuillez suivre les instructions ci-dessous pour la programmer automatiquement :
1. allumez d’abord votre téléviseur.
2. appuyez sur les touches PrOG et Tv en simultané puis relâchez-les lorsque la lumière rouge s’allume.
3. Pointez la télécommande vers le téléviseur, appuyez sur tv, puis relâchez.
4. la télécommande cherchera automatiquement le code du téléviseur et clignotera à chaque 1,5 seconde.
5. lorsque le téléviseur s’éteindra, appuyez immédiatement sur PrOG pour confirmer que la télécommande a reconnu le téléviseur.
6. Pour vérifier si la télécommande a bien été programmée, appuyez sur Tv pour allumer le téléviseur. si la télé ne s’allume pas, répétez les étapes 1 à 5.
Note : si votre téléviseur ne s’éteint pas et que la lumière rouge clignote rapidement, la programmation automatique n’a pas réussi à reconnaître votre téléviseur. veuillez essayer de nouveau ou consultez la programmation manuelle de la télécommande au www.videotron.com/programmationconvertisseur.
FOire auX QueSTiOnS
iNSTAllATioN eT AcTiVATioN
Je n’arrive pas à avoir une image. Pourquoi?
si vous avez branché le convertisseur avec le câble coaxial, vous devez syntoniser les chaînes 3 ou 4 sur votre téléviseur en fonction de la sélection faite à l’arrière du convertisseur. Pour ce faire, utilisez la télécommande de votre téléviseur.
si vous avez branché le convertisseur avec le câble HDmi, vous devez sélectionner la source appropriée (par exemple : inPuT 1 ou Hmdi 1) selon le branchement à l’arrière du téléviseur. Pour ce faire, utilisez la télécommande de votre téléviseur.
est-ce que je peux modifier la résolution affichée par le convertisseur?
lorsque vous utilisez le branchement HDmi, le convertisseur adapte automatiquement la résolution et le format d’image en fonction de votre téléviseur. Pour modifier ce paramètre, appuyez sur menu et sélectionnez Hdmi. lorsque vous utilisez le branchement coaxial, la résolution d’image est fixe.
l’image ne couvre pas tout l’écran de mon téléviseur. Que faire?
lorsque vous utilisez le branchement HDmi, vous pouvez modifier le format de l’image pour remplir la surface de l’écran. Pour ce faire, appuyez sur menu, sélectionnez FOrmaT d’imaGe, puis choisissez le format que vous préférez (normal/élargi/Zoomé); comme ce paramètre modifie le format d’affichage, il peut aussi déformer l’image. lorsque vous utilisez le branchement coaxial, le format d’image est fixe et ne peut être changé.
uTiliSATioN
Je ne retrouve plus mes chaînes. Que faire?
le convertisseur offre les mêmes chaînes que le service analogique, mais comme le convertisseur capte les chaînes numériques, la position de la chaîne peut avoir changé. Pour consulter la liste des chaînes disponibles sur le convertisseur et la position de chacune d’elles, appuyez sur la touche menu puis sélectionnez CHaÎneS.
Comment activer le contrôle parental?
appuyez sur la touche menu de la télécommande, sélectionnez COnTrÔleS ParenTauX puis ajoutez le niP par défaut (le niP par défaut est 0000). Dans ce menu, vous pourrez activer les contrôles parentaux, sélectionner le mode de blocage (par classement ou par chaînes) et modifier le niP.
TÉlÉCOmmande

1312
J’ai un téléviseur Hd, mais je n’obtiens pas la haute définition. Pourquoi?
même si vous avez une télé HD et que vous utilisez le branchement HDmi, le convertisseur ne captera pas les chaînes en haute définition, mais en définition standard. le convertisseur est conçu pour les télés analogiques.
AcceSSiBiliTé
Comment changer la langue du convertisseur?
appuyez sur la touche menu de la télécommande, sélectionnez lanGue, menu, puis faites votre choix.
Comment activer le sous-titrage pour malentendants?
appuyez sur la touche menu de la télécommande, puis sélectionnez SOuS-TiTreS. Dans ce menu, vous pourrez activer les sous-titres et modifier l’apparence des sous-titres en sélectionnant OPTiOnS.
afin d’assurer le bon fonctionnement des sous-titres, sélectionnez la source SÉleCTiOn auTOmaTiQue. si vous souhaitez obtenir différentes sources pour le sous-titrage, choisissez plutôt SÉleCTiOn manuelle, puis faites votre choix.
Comment activer l’audiodescription pour malvoyants?
l’audiodescription est une option offerte par le diffuseur et n’est pas disponible sur toutes les chaînes. Pour activer cette option sur le convertisseur, appuyez sur menu, sélectionnez lanGue, puis ensuite audiO d.
Comment modifier la langue de l’audiodescription pour malvoyants?
appuyez sur menu, sélectionnez lanGue, SaP (seconde piste audio), puis faites votre choix. notez que l’option audiodescription doit être activée et que le diffuseur n’offre pas toujours une seconde piste audio.
Je demeure dans un immeuble muni d’une caméra de surveillance à l’entrée. Quelle chaîne dois-je syntoniser pour afficher la vidéo sur la télé?
si la caméra de votre immeuble est compatible avec ce convertisseur, vous pouvez afficher le flux vidéo de cette dernière au canal 940 ou 941.
ServiCe à la ClienTÈle eT SOuTien TeCHniQue
SerVice À lA clieNTèlePour plus de détails, nous vous invitons à consulter le guide complet d’utilisation à videotron.com/soutien-terminaux ou à communiquer avec notre service à la clientèle. vous pouvez joindre un conseiller de 7 h 30 à 22 h du lundi au vendredi, et de 8 h à 20 h le samedi et le dimanche.
montréal : 514 281-1711
québec : 418 847-4410
saguenay : 418 545-1114
outaouais : 819 771-7715
ailleurs au québec : 1 888 433-6876
SouTieN TecHNiquePour tout problème d’ordre technique, nous vous invitons à communiquer avec le soutien technique. vous pouvez joindre un conseiller 24 heures sur 24, 7 jours sur 7.
montréal : 514 841-2611
québec : 418 842-2611
saguenay : 418 543-4611
outaouais : 819 771-2611
ailleurs au québec : 1 877 380-2611
liSez ATTeNTiVeMeNT ceS rèGleS De FoNcTioNNeMeNT SécuriTAire AVANT De BrANcHer le TerMiNAl.
averTiSSemenT : évitez les risques d’électrocution et d’incendie! évitez les surcharges en ce qui concerne l’alimentation électrique. vérifiez les prises de courant, rallonges, blocs multiprises. Pour les produits qui tirent leur alimentation d’une pile ou d’une autre source d’alimentation, consultez les instructions d’utilisation fournies avec ces produits.
FOire auX QueSTiOnS
SÉCuriTÉSeCuriTy
1414
averTiSSemenT : il existe un risque d’explosion si les piles ne sont pas manipulées ou remplacées de façon adéquate. ne remplacez les piles que par des piles de même type. ne démontez pas et ne tentez pas de recharger les piles hors du système. n’écrasez pas les piles, ne les percez pas, ne les jetez pas au feu, ne court-circuitez pas les contacts externes et ne les exposez pas à l’eau ou à d’autres matières liquides. Jetez les piles usagées conformément aux réglementations locales et aux instructions de votre fournisseur.
averTiSSemenT : évitez les risques d’électrocution et d’incendie! n’exposez pas ce produit aux infiltrations et aux projections de matières liquides, à la pluie ou à l’humidité. ne placez pas d’objet contenant des matières liquides tel qu’un vase sur cet appareil.
averTiSSemenT : évitez les risques d’électrocution et d’incendie! Débranchez le produit avant de le nettoyer. n’utilisez pas de nettoyant liquide sous forme d’aérosol. n’utilisez pas de dispositif de nettoyage magnétique ou statique (dépoussiéreur) pour nettoyer ce produit.
averTiSSemenT : évitez les risques d’électrocution et d’incendie! n’insérez jamais d’objets dans les ouver-tures de l’appareil. les objets peuvent provoquer des courts-circuits et entraîner une décharge électrique ou un incendie.
averTiSSemenT : évitez les décharges électriques! ne retirez pas le couvercle de ce produit. l’ouverture ou le retrait du couvercle peut vous exposer à des tensions dangereuses. le retrait du couvercle entraîne l’annulation de la garantie. aucune pièce de ce produit ne peut être réparée par l’utilisateur.
COnSeil relaTiF à la SÉCuriTÉ eT à la PerFOrmanCene posez aucun objet ni appareil électronique, notamment un téléviseur, sur le dessus du module Convertisseur numérique analogique.
averTiSSemenT relaTiF à l’alimenTaTiOnseule l’alimentation livrée avec votre système peut être utilisée en toute sécurité pour alimenter le module Convertisseur numérique analogique.
averTiSSemenTrisque de décharge électrique. Débranchez tous les appareils électroniques avant de connecter ou déconnecter des câbles de périphérique au module Convertisseur numérique analogique.
WarninG: there is a risk of explosion if the batteries are not properly handled or replaced. only replace the batteries with the same type of battery. Do not take apart and try to recharge the batteries outside the system. Do not squash, pierce or throw the batteries into a fire, do not short-circuit the external contacts and do not expose them to water or other liquids. Dispose of the used batteries in accordance with local regulations and your service provider’s instructions.
WarninG: avoid risks of electrocution and fire! Do not expose this product to leaks and liquids, rain or humidity. Do not place any objects containing liquid, such as a vase, on this device.
WarninG: avoid risks of electrocution and fire! unplug the product before cleaning it. Do not use liquid or aerosol cleaners. Do not use magnetic or static cleaning devices (dusters) to clean this product.
WarninG: avoid risks of electrocution and fire! never insert objects into the device’s openings. the objects could cause short-circuiting and bring about electric shock or fire.
WarninG: avoid electric shocks! Do not remove the cover of this product. opening or removing the cover could expose you to dangerous voltage. removing the cover voids the warranty. no pieces of this product can be fixed by the user.
TiPS relaTinG TO SaFeTy and PerFOrmanCeDo not place any objects or electronic devices, notably a television, on top of the converter.
WarninG aBOuT THe POWer SuPPlyonly supply delivered by our system can be used safely to supply the converter.
WarninG:risk of electric shock. unplug all electronic devices before connecting or disconnecting the perimeter cable from the converter.
13 12
CuSTOmer ServiCe and TeCHniCal SuPPOrT
iMPorTANT SAFeTy iNSTrucTioNS WarninG: avoid risks of electrocution and fire! avoid overloading the power source, power outlets,
extension cords or multi-socket plugs. For products that get their power from a battery or other power source, consult the usage instructions provided with these products.
i have an Hd television, but i’m not getting Hd quality. Why?
even if you have an HD tv and use the HDmi connection, the converter does not detect HD channel formats, but rather their sD format. the converter is designed for analogue tvs.
AcceSSiBiliTy
How can i change the converter’s language?
Press the menu button on the remote control, select lanGuaGe, menu and then make your choice.
How can i activate the subtitles for the hearing impaired?
Press the remote control’s menu button, select SuBTiTleS. in this menu, you can activate the subtitles and modify their appearance by selecting OPTiOnS.
in order to ensure that the subtitles are functioning properly, select the auTOmaTiC SeleCTiOn source. if you wish to obtain different sources for the subtitling, opt for manual SeleCTiOn and make your choice.
How can i activate the auto description for the visually impaired?
audio description is an option offered by the broadcaster and it is not available on all channels. to activate this option on the converter, press the menu button and select lanGuaGe and then audiO d.
How can i modify the language of the audio description for the visually impaired?
Press the menu button, select lanGuaGe and then SaP (second audio program) and make your choice. note that the audio description option must be activated and a second audio program is not always provided by the broadcaster.
i live in a building with a surveillance camera at the entrance. Which channel do i need to tune to display the video on my Tv?
if the camera in your building is compatible with this converter, you can display its video stream on channel 940 or 941.
FaQ
cuSToMer SerVice For further information, we invite you to visit the illico tv Help Portal, to check out instructional videos at videotron.com/terminal-support or to contact Customer service. You can reach a representative monday–Friday from 7:30 a.m. to 10 p.m., saturdays from 8 a.m. to 8 p.m. and sundays from 9 a.m. to 8 p.m.
montréal 514-281-1711
québec City 418-847-4410
saguenay 418-545-1114
outaouais 819-771-7715
elsewhere in québec 1-888-433-6876
TecHNicAl SuPPorTFor problems of a technical nature, we invite you to contact technical support. You can reach a representative 24 hours a day, 7 days a week.
montréal 514-841-2611
québec City 418-842-2611
saguenay 418-543-4611
outaouais 819-771-2611
elsewhere in québec 1-877-380-2611
11 10
STEP 3 - iNSTrucTioNS For ProGrAMMiNG A coNVerTer reMoTe coNTrol
the remote is originally programmed for converter only. it can also be programmed to control the majority of tvs. to program it automatically, please follow the instructions below:
1. turn on your tv.
2. Press and hold the PrOG and Tv buttons simultaneously until the red light turns on.
3. Point the remote at the tv and press and release the Tv button.
4. the remote will automatically search for your tv’s code and will blink every 1.5 seconds.
5. When the tv turns off, immediately press the PrOG button to confirm that the remote has successfully identified the tv.
6. to make sure the remote has been programmed successfully, press the Tv button to turn on the tv. if the tv does not turn on, repeat steps 1 to 5.
Note: if your tv does not turn off and the red lights continues to blink rapidly, it means that the automatic programming did not successfully identify your tv. Please try again or try manually programming the remote using the following instructions: www.videotron.com/programmingconverter
yOur remOTe COnTrOl
iNSTAllATioN AND AcTiVATioN
i can’t see an image. Why?
if you plugged in the converter with the coaxial cable, you need to tune in to channel 3 or 4 on your tv in relation to the selection made on the back of the converter. to do so, use your television’s remote control.
if you plugged in the converter with the HDmi cable, you need to select the appropriate source (For example: inPuT 1 or Hdmi 1) depending on the connection at the back of the television. to do so, use your television’s remote control.
Can i modify the resolution displayed by the converter?
When using the HDmi connection, the converter will adapt the resolution and image format automatically depending on your television. to modify this setting, press the menu button and select Hdmi. When you use the coaxial connection, the image resolution is fixed.
The image does not cover the entire screen. What can i do?
When using the HDmi connection, you can modify the size of the image to fill the entire screen. to do so, press the menu button, select imaGe FOrmaT and choose your preferred format (normal/ Widened / Zoomed). Because this setting modifies the display format, it can also distort the image. When using the coaxial connection, the image format is fixed and cannot be changed.
uSAGe
i can no longer find my channels. What can i do?
the converter offers the same channels as the analogue service, but since the converter gets digital channels, the channel number might have changed. to see the list of channels available on the converter and their numbers, press the menu button and select CHannelS.
How can i activate the parental controls?
Press the remote control’s menu button, select ParenTal COnTrOl and add the default Pin (the default Pin is 0000). in this menu, you can activate the parental control, select the lock mode (by classification and/or by channel) and modify your Pin.
FaQ
S/N:10112400012
TV OUTCH 3/4+5V DC IN IR IN CABLE INHDMI
®
ir Port for infrared extender
Change pages
9 8
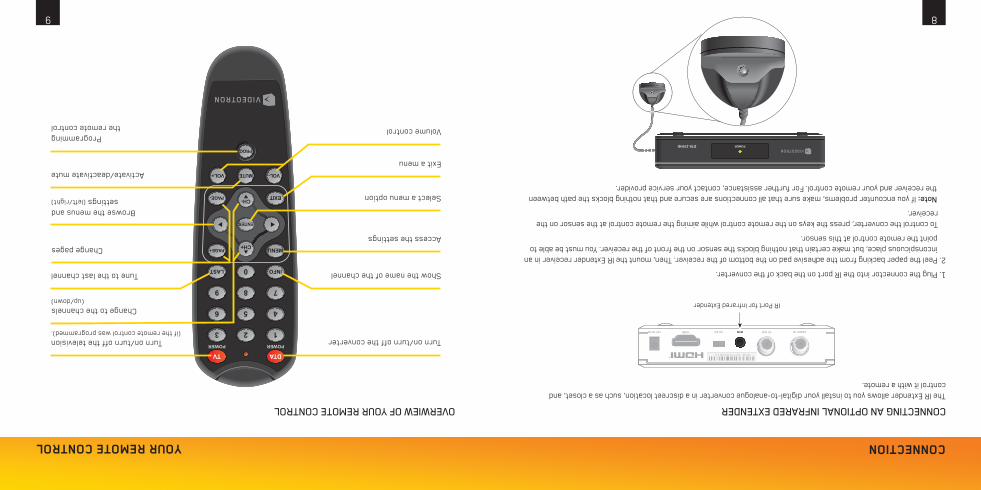
coNNecTiNG AN oPTioNAl iNFrAreD exTeNDerthe ir extender allows you to install your digital-to-analogue converter in a discreet location, such as a closet, and control it with a remote.
1. Plug the connector into the ir port on the back of the converter.
2. Peel the paper backing from the adhesive pad on the bottom of the receiver. then, mount the ir extender receiver in an inconspicuous place, but make certain that nothing blocks the sensor on the front of the receiver. You must be able to point the remote control at this sensor.
to control the converter, press the keys on the remote control while aiming the remote control at the sensor on the receiver.
Note: if you encounter problems, make sure that all connections are secure and that nothing blocks the path between the receiver and your remote control. For further assistance, contact your service provider.
oVerWieW oF your reMoTe coNTrol
yOur remOTe COnTrOl
POWERDTA 270HD
COnneCTiOn
POWER
DTAPOWER
TV
123
456
789
INFOLAST 0LAST
MENUPAGE+
EXITPAGE-
ENTER
CH+
CH-
VOL+ MUTE VOL-
PROG
turn on/turn off the converter
show the name of the channel
access the settings
Browse the menus and settings (left/right)
select a menu option
exit a menu
turn on/turn off the television (if the remote control was programmed).
tune to the last channel
Programming the remote control
activate/deactivate mute
volume control
Change to the channels (up/down)

S/N:10112400012
TV OUTIR INCH 3/4HDMI
®
+5V DC IN CABLE IN
Cable in
tv
Cable inPower supply
attach mounting squares Here
Bottom of converter
Hook Fastener
loop tape
remove adhesive strip Covering
7 6
STEP 2 (oPTionAl) - DiScreeTly iNSTAlliNG THe coNVerTer BeHiND THe TV For a more discreet installation, you can install the converter behind the television. to do so, you will need the infrared extension to ensure that you have an obstruction-free field of vision between the remote control and the converter. if the converter is installed behind the tv without using the infrared sensor, it will be impossible to control the converter.
COnneCTiOn
oTHer TVsThis connection applies to all TVs that do not have an HDMi connector.
1. Connect the coaxial cable to the converter’s CaBle in.
2. Connect the provided coaxial cable to the converter’s Tv OuT port, then connect the other end to your tv.
3. leave the selector CH3/4 as channel 3.
4. Plug the external power supply behind the converter into the POWer outlet.
5. Plug the external power supply into a power outlet; the indicator light will turn on (indicated by a green light on the front panel).
6. go to channel 3 on your television.
7. Proceed to the following step on page 7.
1. use the stickers provided with the converter.
2. Peel the paper backing from the loop tape on the selected mounting squares.
3. Press and keep each mounting square in place on the bottom of the converter until it is firmly bonded.
4. remove the paper backing from the hook fastener on each mounting square.
5. Press and keep the mounting squares in place on the bottom or back of your television until they are firmly bonded.
6. Plug in the infrared sensor following the instructions on page 8.
1 Power leD
illuminates green when the converter is powered up. illuminates red when the converter is in standby mode.
Note: this illustration may vary from the actual product.
Note: this illustration may vary from the actual product.
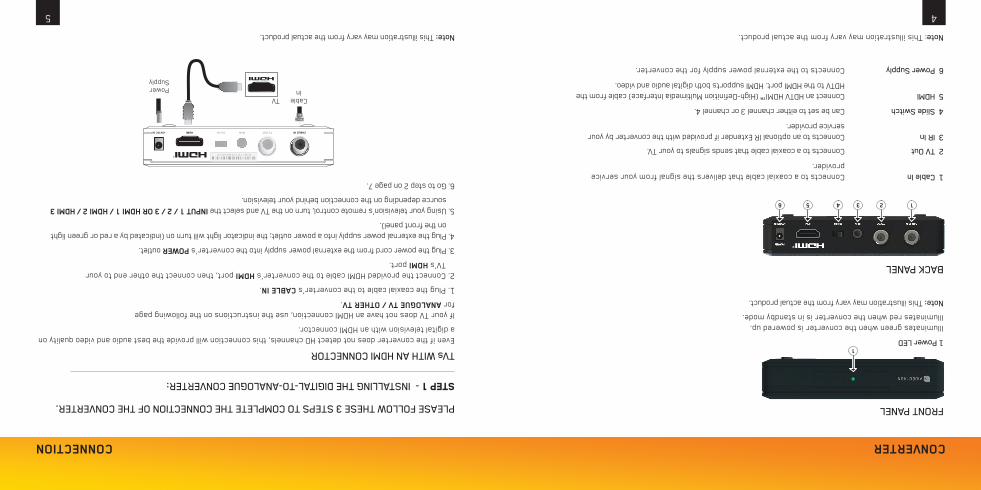
1 cable inConnects to a coaxial cable that delivers the signal from your service provider.
2 TV outConnects to a coaxial cable that sends signals to your tv.
3 ir inConnects to an optional ir extender if provided with the converter by your service provider.
4 Slide SwitchCan be set to either channel 3 or channel 4.
5 HDMiConnect an HDtv HDmi™ (High-Definition multimedia interface) cable from the HDtv to the HDmi port. HDmi supports both digital audio and video.
6 Power SupplyConnects to the external power supply for the converter.
Note: this illustration may vary from the actual product.
S/N:10112400012
HDMI TV OUTIR INCH 3/4+5V DC IN CABLE IN
®
Cable in
tv
Power supply
5 4
FroNT PANel
BAcK PANel
COnverTer
STEP 1 - iNSTAlliNG THe DiGiTAl-To-ANAloGue coNVerTer:
TVs WiTH AN HDMi coNNecTor even if the converter does not detect HD channels, this connection will provide the best audio and video quality on a digital television with an HDmi connector.
if your tv does not have an HDmi connection, use the instructions on the following page for analOGue Tv / OTHer Tv.
1. Plug the coaxial cable to the converter’s CaBle in.
2. Connect the provided HDmi cable to the converter’s Hdmi port, then connect the other end to your tv’s Hdmi port.
3. Plug the power cord from the external power supply into the converter’s POWer outlet.
4. Plug the external power supply into a power outlet; the indicator light will turn on (indicated by a red or green light on the front panel).
5. using your television’s remote control, turn on the tv and select the inPuT 1 / 2 / 3 Or Hdmi 1 / Hdmi 2 / Hdmi 3 source depending on the connection behind your television.
6. go to step 2 on page 7.
PleASe FolloW THeSe 3 STePS To coMPleTe THe coNNecTioN oF THe coNVerTer.
COnneCTiOn
1
123456
3 2
Welcome ........................................................................................................................................................................................3
Converter ......................................................................................................................................................................................4
Connection ....................................................................................................................................................................................5
your remote control....................................................................................................................................................................9
Frequently asked questions ....................................................................................................................................................11
Customer Service and Technical Support ............................................................................................................................13
Safety...........................................................................................................................................................................................14
WelcoMethis converter will allow you to get certain standard format digital channels and convert them so that they are compatible with your analogue or digital television. You can then have access to a higher-quality image and clearer sound, which enriches your tv entertainment experience. note that your converter will not provide access to the entirety of your digital package, but will grant you access to channels included in the Basic package and Basic Plus package.
use the instructions within this manual to install the digital-to-analogue converter.
iF you receiVeD your coNVerTer ViA cANADA PoST, PleASe FolloW THe iNSTrucTioNS BeloW: 1. Plug in your converter following the instructions starting on page 5.
2. once your converter is plugged in, dial the following number to activate it:
1-877-486-6695 (toll free) monday to Friday: from 7:30 a.m. to 10 p.m. | saturday and sunday: from 8 a.m. to 8 p.m.
TaBle OF COnTenTSWelCOme