Embed Size (px)
Citation preview
PROF. PAUL C. KING RA
New York City College of Technology
Fall 2011
LC.1200-1290 Tutorials.03 Bldg.Gym- Prof.King V.1.0.docx
Copyright © 2011 Paul C. King
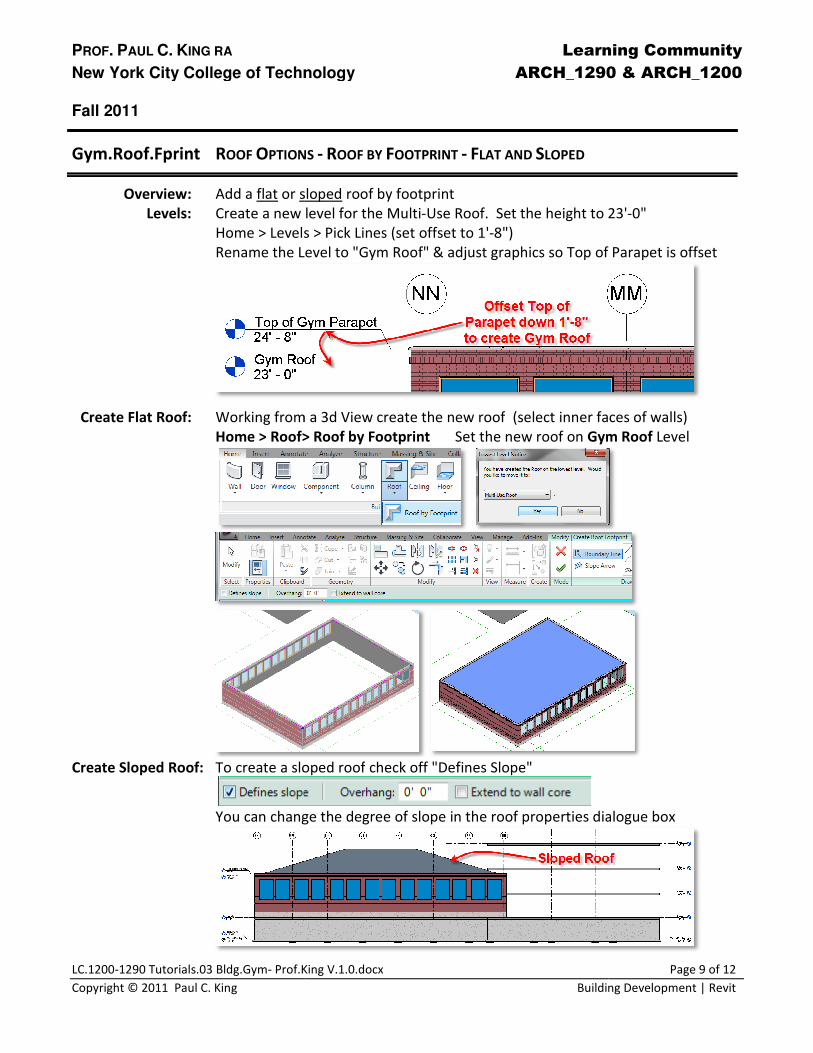
Gym.Roof.Fprint ROOF OPTIONS
Overview: Add a flat or sloped
Levels: Create a new level for the Multi
Home > Levels > Pick Lines (set offset to 1'
Rename the Level to "Gym Roof" & adjust
Create Flat Roof: Working from a 3d View create the new roof
Home > Roof>
Create Sloped Roof: To create a sloped roof
You can change the degree of slope in the roof properties dialogue box
Learning Community
New York City College of Technology ARCH_1290 & ARCH_1200
Prof.King V.1.0.docx
Building Development
PTIONS - ROOF BY FOOTPRINT - FLAT AND SLOPED
sloped roof by footprint
Create a new level for the Multi-Use Roof. Set the height to 23'
Home > Levels > Pick Lines (set offset to 1'-8")
Rename the Level to "Gym Roof" & adjust graphics so Top of Parapet is offset
Working from a 3d View create the new roof (select inner faces of walls)
> Roof by Footprint Set the new roof on Gym
To create a sloped roof check off "Defines Slope"
You can change the degree of slope in the roof properties dialogue box
Learning Community
ARCH_1290 & ARCH_1200
Page 9 of 12
Building Development | Revit
Use Roof. Set the height to 23'-0"
graphics so Top of Parapet is offset
(select inner faces of walls)
Gym Roof Level
You can change the degree of slope in the roof properties dialogue box
PROF. PAUL C. KING RA
New York City College of Technology
Fall 2011
LC.1200-1290 Tutorials.03 Bldg.Gym- Prof.King V.1.0.docx
Copyright © 2011 Paul C. King
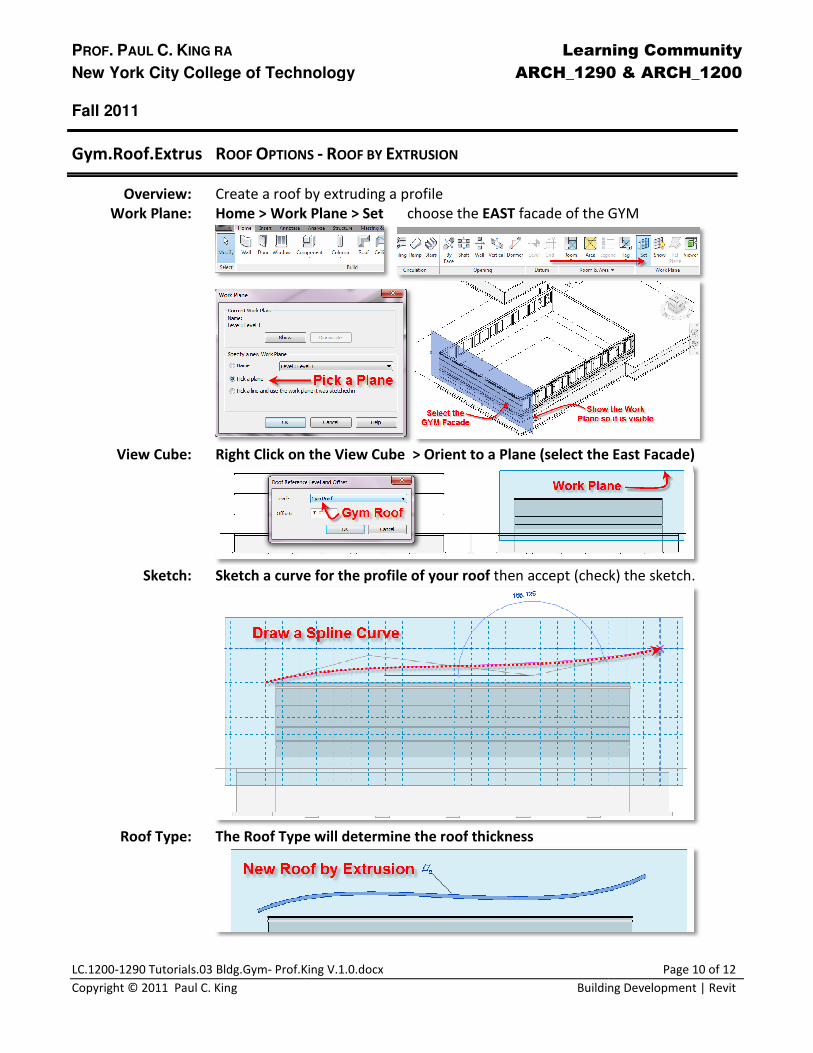
Gym.Roof.Extrus ROOF OPTIONS
Overview: Create a roof by extruding a profile
Work Plane: Home > Work
View Cube: Right Click on the View Cube > Orient to a Plane (select the East Facade)
Sketch: Sketch a curve for the profile of your roof
Roof Type: The Roof Type will determine the roof
Learning Community
New York City College of Technology ARCH_1290 & ARCH_1200
Prof.King V.1.0.docx
Building Development
PTIONS - ROOF BY EXTRUSION
Create a roof by extruding a profile
Home > Work Plane > Set choose the EAST facade of the GYM
Right Click on the View Cube > Orient to a Plane (select the East Facade)
Sketch a curve for the profile of your roof then accept (check)
The Roof Type will determine the roof thickness
Learning Community
ARCH_1290 & ARCH_1200
Page 10 of 12
Building Development | Revit
facade of the GYM
Right Click on the View Cube > Orient to a Plane (select the East Facade)
(check) the sketch.
PROF. PAUL C. KING RA
New York City College of Technology
Fall 2011
LC.1200-1290 Tutorials.03 Bldg.Gym- Prof.King V.1.0.docx
Copyright © 2011 Paul C. King
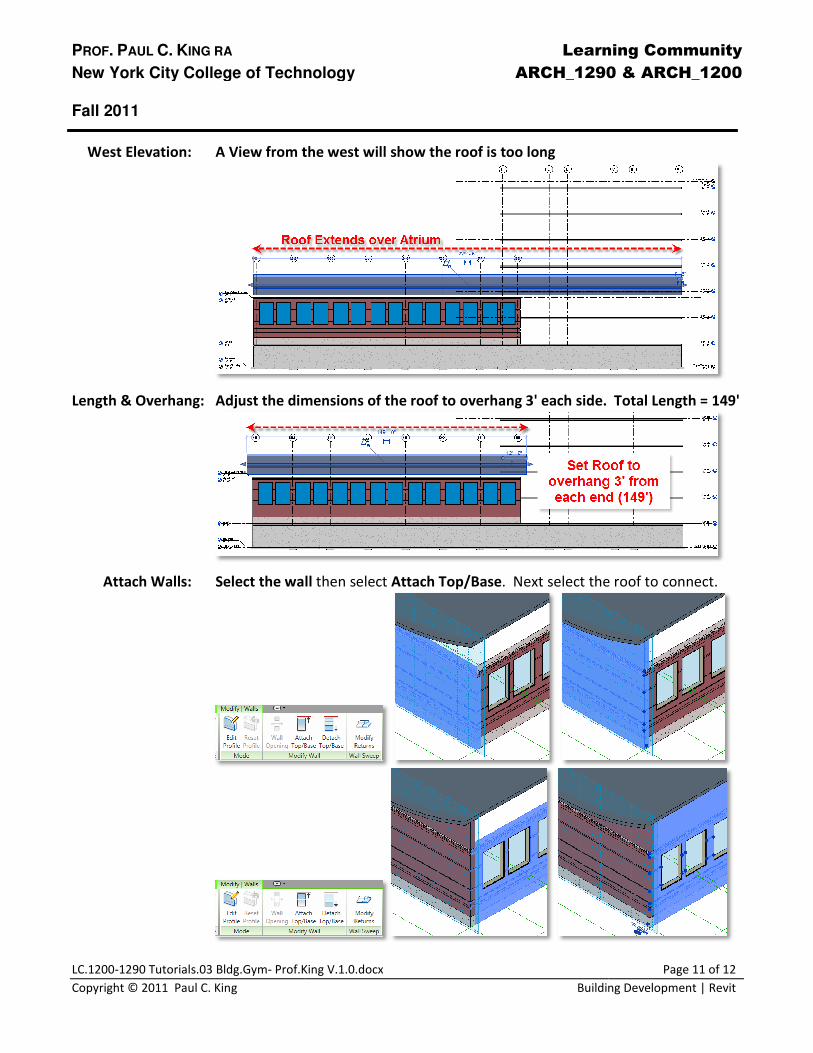
West Elevation: A View from the west will show the roof is too long
Length & Overhang: Adjust the dimensions of the roof to overhang 3' each side. Total Length = 149'
Attach Walls: Select the wall
Learning Community
New York City College of Technology ARCH_1290 & ARCH_1200
Prof.King V.1.0.docx
Building Development
A View from the west will show the roof is too long
Adjust the dimensions of the roof to overhang 3' each side. Total Length = 149'
Select the wall then select Attach Top/Base. Next select the roof to connect.
Learning Community
ARCH_1290 & ARCH_1200
Page 11 of 12
Building Development | Revit
Adjust the dimensions of the roof to overhang 3' each side. Total Length = 149'
select the roof to connect.
PROF. PAUL C. KING RA
New York City College of Technology
Fall 2011
LC.1200-1290 Tutorials.03 Bldg.Gym- Prof.King V.1.0.docx
Copyright © 2011 Paul C. King
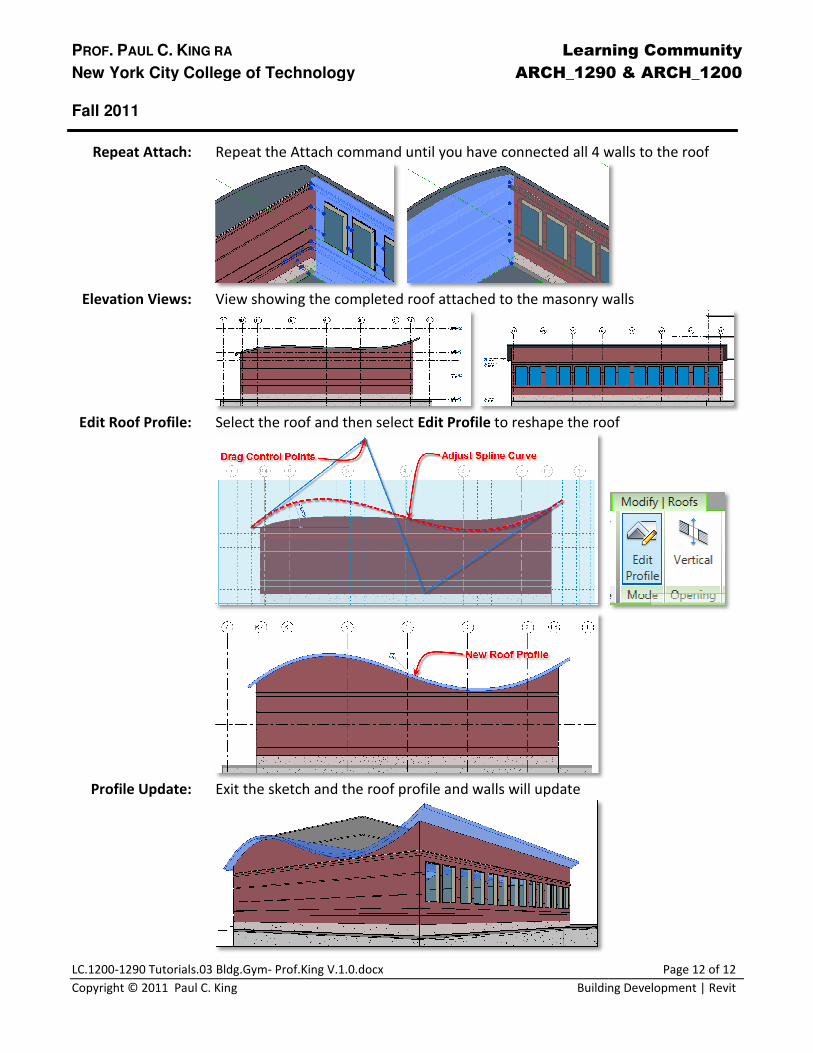
Repeat Attach: Repeat the Attach command until you have connected all 4 walls to the roof
Elevation Views: View showing the completed roof attached to the masonry walls
Edit Roof Profile: Select the roof and then select
Profile Update: Exit the sketch and the roof profile and walls will update
Learning Community
New York City College of Technology ARCH_1290 & ARCH_1200
Prof.King V.1.0.docx
Building Development
Repeat the Attach command until you have connected all 4 walls to the roof
showing the completed roof attached to the masonry walls
Select the roof and then select Edit Profile to reshape the roof
Exit the sketch and the roof profile and walls will update
Learning Community
ARCH_1290 & ARCH_1200
Page 12 of 12
Building Development | Revit
Repeat the Attach command until you have connected all 4 walls to the roof
showing the completed roof attached to the masonry walls
to reshape the roof