Embed Size (px)
Citation preview

OperatOr Manual Manufactured by
Handheld X-ray Systemfor Medical Radiographic Imaging

DO NOT OPERATE THIS DEVICE UNTIL YOU HAVE READ THIS MANUAL and reviewed the accompanying materials. Disclaimer: The NOMAD MD is sold with the understanding that the user assumes sole responsibility for radiation safety (as well as any state, provincial, or local regulatory compliance) and that Aribex and its agents or representatives do not accept responsibility for the following: a) injury or danger to personnel from X-ray exposure, b) image over/under exposure due to poor operating techniques or procedures, c) equipment not properly serviced or maintained in accordance with instructions contained in this publication, and d) equipment which has been damaged, modified, or tampered with in any way.
Aribex and NOMAD are registered trademarks within the United States and other countries. NOMAD MD, NOMAD 75kV, NOMAD Dental, NOMAD Pro, NOMAD Pro 2, PORTA-X, and the ARIBEX and NOMAD logos are trademarks of Aribex worldwide. Product protected in other countries by one or more issued patents. U.S. patents issued: 7,224,769 and 7,496,178. Other United States and international patents pending. All other brand and product names are trademarks or registered trademarks of their respective companies.
Further information about Aribex intellectual property available: aribex.com

The symbols used in this publication or used to mark the equipment have the following meanings:
Ionizing Radiation
Attention, consult instructions for use
Laser Radiation: Class 2 laser product, do not stare into beam
Recycling/instructions for handling product at end of life
Dangerous Voltage, Electrical Shock Hazard
Manufacturer of the device
Date of device manufacture
Model number or corresponding name
Unique serial number for the device
Reference to a radiation filter or a value of filtration
Type B Equipment (providing a degree of protection against electric shock, pertaining particularly to allowable leakage currents)Conformity marking indicating that product meets requirements to be sold in the European Union (EU)
Marking indicating that product is compliant with certain North American safety standards
Power button, used to power on/off device
Audible signal, indicating audible cues emitted by device during operation
Indicates manufacturer’s authorized representative in the EU
Cd
REF
SN
EC REP

Table of Contents1.0 Getting Started 6
1.1 Intended Use/Indications for Use 61.2 Unpack, Check, and Register NOMAD MD System 61.3 Charging the Batteries 7
2.0 Safety Precautions 92.1 Radiation Safety 92.2 Studies and Data on Leakage and Scatter 112.3 Usage and Duty Cycle 142.4 Cleaning 142.5 Security, Storage, and Transportation 14
3.0 Setup and Check 163.1 Attaching a Charged Battery 163.2 Checking for Power and Adequate Charge 163.3 Optional Checks 17
4.0 Operation 184.1 Powering Up 184.2 Ensuring the Right Exposure Time Is Set 184.3 Preparing to Enable the Device 194.4 Situating the Patient and Enabling the Device 204.5 Initiating and Completing an X-ray Exposure 224.6 Powering Down 224.7 Exposure Techniques 224.8 Adult Technique Chart 244.9 Adult Dose Value Chart 254.10 Adult Dose Area Product Chart 254.11 Pediatric Technique Chart 264.12 Pediatric Dose Value Chart 284.13 Pediatric Dose Area Product Chart 28
5.0 Battery Replacement and Care 295.1 Battery Replacement 295.2 Battery Care 29
6.0 NOMAD MD Care and Upkeep 316.1 Alarms and Alerts 316.2 Troubleshooting 32
7.0 Maintenance and Repair 357.1 Maintenance Schedule 357.2 Optional Calibration Checks 377.3 Maintenance Log Sheets 387.4 Repair 39
8.0 Technical Description 408.1 Basic Technical Specifications 408.2 Functional Diagram 418.3 X-ray Tube Specifications and Characteristics 428.4 EMC Data 448.5 Limited Warranty 45
Thank you for choosing the NOMAD MD TM as your X-ray solution!
At Aribex we value your business and we would like to hear from you because your feedback and suggestions are important to us. If you have comments, please contact us by emailing [email protected] or calling 1-866-340-5522.
NOMAD MDTM Features:
• Performance – Battery power source delivers dependable high voltage (75kV, true DC) and direct current (2.0mA).
• Consistent Emission Radiation – High-frequency, constant-potential X-ray generator provides high quality images, with a lower radiation dose to the patient than standard AC X-ray systems. (See Compendium Report, May 1993, Vol. XIV, No. 5, “X-Radiation: Potential Risks and Dose Reduction Mechanisms.”)
• Radiation Protection – Operator shielded from source radiation.
• Simple Operation – Operator custom-selects exposure time, shutter width, and shooting distance, all to ensure precise X-rays; exposure time digitally displayed on the user-friendly control panel along with indicators for machine and battery status.
• Exposure Thickness Range – Validated to capture diagnostic quality images of body part extremities such as fingers (from 1.5cm) and thighs (up to 21cm).
• Lightweight and Ergonomic – Design provides complete flexibility and convenience, allowing operator to perform exposures without moving patients.
• Exposure Safety Feature – Cannot emit X-rays with insufficient voltage (low battery).
• Engineered for Compatibility – Works with film, phosphor plate (CR), and digital (DR) radiography systems.
• Security Lock-out Feature – Enables the safe training, demonstration, and storage of the device without undue concern related to unintended or unauthorized radiation emission.
• Inclinometer – Inclinometer attached to side of device provides method for measuring angles during exposure process.
• Authorized Service – Complete support and maintenance from Aribex and through our authorized distributors.

76
1.0 Getting Started
1.1 Intended Use/Indications for UseThe NOMAD MD is a handheld and portable general purpose X-ray system. The device uses a fixed tube current and voltage (kVp) and, therefore, is limited to taking diagnostic X-rays of extremities.
It is intended to be used by a qualified and trained clinician on both adult and pediatric patients. It is not intended to replace a radiographic system with variable tube current and voltage (kVp) which may be required for full optimization of image quality and radiation exposure for different exam types.
Caution: U.S. Federal law restricts this device to sale by or on the order of a physician or other licensed practitioner.
1.2 Unpack, Check, and Register NOMAD MD System
Unwrap individual components from the protective plastic and check for any noticeable signs of damage. The standard package system includes the following items:
• NOMAD MD Device with SSD (Source to Skin Distance) cage and integrated inclinometer attached
• Two Rechargeable Batteries
• Battery Charger (the charger should be appropriate for local AC line voltage; actual color/style/model may differ)
• Certificate of Conformance, Getting Started Guide, Battery Charger Manual, Warranty/Registration Card, and NOMAD MD Operator Training DVD
Battery Charger
Certificate of Conformance
Warranty/Registration Card
Battery Charger Manual
Batteries: Charge Before Use
InclinometerGetting Started Guide
SSD Cage
Operator Training DVD

76
Preliminary Checks:
Item CheckDevice Labels Verify that the device labels (the serial number label located on the
backside of the shutter ring housing and the warning label across the foot of the device) are legible and in place.
Other Labels Verify that the serial number on the warranty/registration card (see number 3 below) matches the device serial number and the device carrying case serial number.
Collimator Cone Inspect for shipping damage.
Control Panel Check that panel face is smooth and free of nicks, scratches, or other damage.
Trigger Switch Check that trigger moves freely in and out when depressed and released.
Device Housing Check that housing is free of cracks or fractures.SSD Cage Check that cage is firmly attached to the collimator cone and that it is not
cracked or broken.Shutter Rings Verify the following: the ring with the larger tabs furthest from the operator
moves the outer shutters to adjust the horizontal size; the ring with the smaller tabs closest to the operator moves the inner shutters to adjust the vertical size. Rotating tabs clockwise closes the shutters; rotating tabs counterclockwise opens the shutters.
Inclinometer Check that face and casing are smooth and free of nicks, scratches, or other damage. Needle inside of inclinometer should respond to tilting of the device.
Complete the product warranty/registration card and mail it with proper postage to Aribex today. This can also be completed on the NOMAD MD website: NOMADMDXray.com/warranty-registration/. Completing the card fulfills a condition of warranty coverage (see Section 8.5 Limited Warranty) and enables you to receive valuable product news and updates.
1.3 Charging the BatteriesNOTE: Batteries are charged at the factory and should be fully recharged before the initial use of the NOMAD MD. If the system has been in long-term storage prior to initial use, batteries will definitely require a proper charge first. Actual color/style/model of batteries may differ from batteries shown in manual pictures.
Fully charge the battery before placing it into long-term storage (over 30 days). After placing the battery into long-term storage, it is recommended that the battery be fully recharged every 3 months.
Unwrap the power cord of the battery charger and connect it to an AC electrical outlet (110/120V or 220/240V, dictated by the country/region).
98
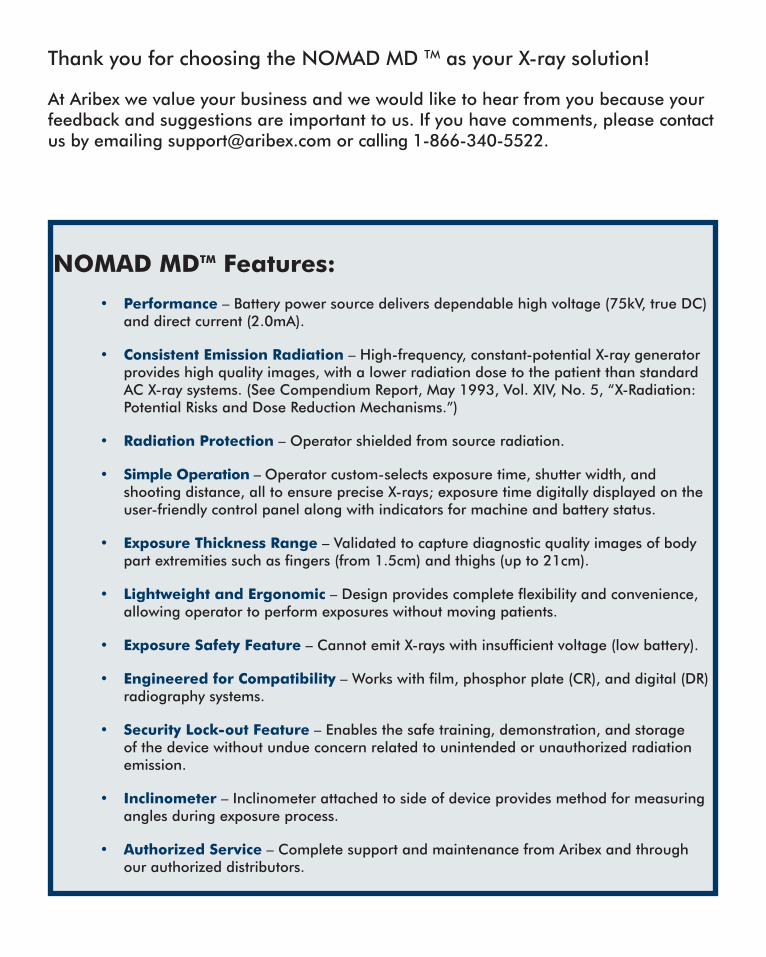
Position the battery charger away from the normal patient environment. A plug adapter may be used as needed; use only the supplied battery charger (for manufacturer and model info, see Section 7.0 Maintenance and Repair.
Invert one of the batteries and carefully plug it into the charger (do not force the battery into the charger or the battery may be damaged as a result). The red indicator light on the top of the charger will flash at a steady rate while the battery is charging. The required charge time varies (normally between 30 to 45 minutes). Battery and charger may become warm to the touch while charging, which is a normal condition.
When the battery is fully charged and ready to use, the indicator light will stop flashing and remain on continuously. Remove the charged battery and charge the second battery for future use.
After the initial 30 to 45 minute recharge, the charger will switch to Tune-Up Mode, which continues for 8 hours while cells in the battery are equalized. The battery is ready for use and can be removed at any time during Tune-Up Mode. Always unplug the charger from the power supply when it is not in service. For additional info specifically about the charger, see the accompanying instruction manual for the battery charger. Also see Section 5.0 Battery Replacement and Care.

98
2.0 Safety Precautions
2.1 Radiation SafetyThe NOMAD MD was designed to be used in both clinical settings (e.g., a radiology department) and controlled settings where transportation or use of other X-ray devices might be prohibitive due to the device’s size and/or mobility.
This X-ray unit may be dangerous to patient and operator unless safe exposure factors and operating instructions are observed. Safety equipment used with this device should be fully tested and certified, and CE marked for compliance with the EU PPE (personal protective equipment) Directive.
This X-ray unit must only be operated by trained personnel in a controlled setting. Within such a setting, ensure that only the patient is in the direct beam of the x-ray, and that any ancillary personnel are a minimum of 3 meters (approximately 9 feet) away from the patient. If it is necessary for any ancillary personnel to be closer than 3 meters, these personnel should stay out of the direct beam and wear personal protective equipment (PPE), such as an apron (with 0.5mm lead equivalent) and thyroid collar. However, any structural enclosures (e.g., barriers or walls) in the controlled setting will reduce the zone requiring PPE use (see figure below). Safety equipment used with this device should be fully tested and certified, and CE marked for compliance with the EU PPE Directive.
• The NOMAD MD provides a high degree of protection from unnecessary radiation. However, no practical design can provide complete protection nor prevent operators from exposing themselves or others to unnecessary radiation. It is important to restrict use and follow all applicable government radiation protection regulations. Pregnant women should not be exposed to X-rays unless necessary. Proper safety precautions should be taken to minimize dose to the fetus.
• Operators must be fully acquainted with industry safety recommendations, established maximum permissible doses, and local jurisdiction requirements for use. Beyond these requirements and the
Encroachment Zone with PPE Use
Patient
Operator Zone
Measureable Scatter Radiation
1.4 meters
3 meters

1110
instructions provided by Aribex, no additional skills, training, or knowledge are required.
• Do not enable the NOMAD MD until the patient and operator are positioned and ready for the exposure, preventing interruption and inadvertent exposure of anyone to X-rays.
• An exposure can be terminated for any reason by prematurely releasing the depressed trigger (for more information, see Section 4.0 Operation).
Operators should always wear PPE while using the NOMAD MD in order to be shielded from backscatter radiation. Both an apron (with 0.5mm lead equivalent) and thyroid collar are recommended. For those operators who take over 5000 exposures a year, radiation protective eyewear is also recommended. Safety equipment used with this device should be fully tested and certified, and CE marked for compliance with the EU PPE Directive.
The SSD cage is designed to maintain a minimum source to skin distance per FDA requirements. Do NOT remove the SSD cage from the NOMAD MD in order to bring the X-ray source closer to the patient. Do NOT make any other modifications to the device. Doing so highly increases radiation exposure risks for the patient and will void the NOMAD MD warranty. In addition, do NOT stick extremities (hands, feet, fingers, toes) inside of the SSD cage in order to bring the X-ray source closer to the patient, since this also increases radiation exposure risks for the patient.
In implementing a radiation protection program, consult all applicable regulations governing radiation protection and the use of X-ray equipment, and ensure full compliance with any such regulations.

1110
2.2 Studies and Data on Leakage and ScatterBesides direct beam, potential exposure from X-ray devices has only two other possibilities:
1) leakage radiation and2) scatter radiation from the patient/subject in the direct beam.
Leakage
The primary protective shielding of the NOMAD MD blocks leakage radiation, allowing safe handheld use of the NOMAD MD. Aribex has set and continually meets an internal standard for leakage well below regulations.1
Scatter
In order to fully assess backscatter to the operator, Aribex has conducted an internal study to measure these levels.2 After positioning the NOMAD MD 28 inches (the recommended operating distance) from a secured phantom, a total of 672 X-ray exposures were fired remotely. A radiation-detecting ion-chamber was rotated to various positions in the room for each exposure. The resulting data were graphed to delineate the Significant Zone of Occupancy (or Operator Zone) for both the vertical (Chart 1) and horizontal (Chart 2) axes:
1 IEC 60601-1-3, Part 29.203.4 gives a leakage radiation limit of 250 µGy/hr (0.250 mGy/hr), at 1 m from the device enclosure, while Aribex follows a standard of 20 µGy/hr (0.020 mGy/hr), at 5 cm from the device enclosure.2 TP-0223, Test Case, Scatter Radiation, NOMAD MD (75kV)
Source to Skin Distance (min. 30 cm)Rechargeable
Battery
Primary Protective Shielding
X-ray Source Focal Spot
SSD Cage
Recommended patient buffer plane

1312
Chart 1: Vertical Axis, 60 cm X 200 cm
Foot Phantom and DR Plate
0
10
20
30
40
50
60
70
80
90
100
110
120
130
140
0
10
20
30
40
50
60
70
80
90
100
110
120
130
140
0.0 - 10 μGy/hr
11 - 20 μGy/hr
21 - 40 μGy/hr
41 - 80 μGy/hr
> 81 μGy/hr
Horizontal Significant Zone of
Occupancy: 60 cm x 60 cm

1312
Chart 2: Horizontal Axis, 60 cm X 60 cm
IEC 60601-1-3, Part 29.208-4 gives a backscatter radiation limit of 20 µGy/hr with a Significant Zone of Occupancy measuring 200 cm high, 60 cm wide, and 60 cm deep: otherwise, PPE is required. As is demonstrated by Charts 1 and 2, the Significant Zone of Occupancy for the NOMAD MD contains radiation measurements from the 0 to 40 µGy/hr range:
Operators should always wear PPE while using the NOMAD MD in order to be shielded from backscatter radiation. Both an apron (with 0.5mm lead equivalent) and thyroid collar are recommended. For those operators who take over 5000 exposures a year, radiation protective eyewear is also recommended. Safety equipment used with this device should be fully tested and certified, and CE marked for compliance with the EU PPE Directive.
0
10
20
30
40
50
60
70
80
90
100
110
120
130
140
0
10
20
30
40
50
60
70
80
90
100
110
120
130
140
0.0 - 10 μGy/hr
11 - 20 μGy/hr
21 - 40 μGy/hr
41 - 80 μGy/hr
> 81 μGy/hr
Horizontal Significant Zone of
Occupancy: 60 cm x 60 cm

1514
2.3 Usage and Duty CycleAn exposure can be terminated for any reason by abruptly releasing the depressed trigger (for more information, see Section 4.0 Operation).
As a safety feature, the NOMAD MD will not emit X-rays with insufficient voltage (low battery).
The NOMAD MD is also designed to avoid damage from overheating. The minimum duty cycle rating for maximum exposure (the relationship between duration and frequency of exposures taken during a rolling 60 second period) is 1:60. The following table shows examples of optimal use:
Duration 0.25 sec 0.46 sec 0.50 sec 0.99 sec
Cycle Every 15 sec Every 28 sec Every 30 sec Every 60 sec
Do not operate the NOMAD MD or the battery charger if either was immersed in liquid or subjected to an undue amount of moisture. Return to Aribex for an evaluation.
• Do not open the housings. Doing so will void the warranty. There are no user serviceable parts inside the NOMAD MD.
• The NOMAD MD should not be used in environments where flammable cleaning agents are present.
• Locate the battery charger away from the normal patient environment.
2.4 Cleaning
Turn off the power and detach the battery before cleaning. Ensure the battery charger is unplugged before attempting to clean it.
Use a non-acetone based disinfectant wipe (with less than 17% alcohol content) or a cloth to wipe the exterior surfaces of the NOMAD MD and charger. Do not use cleaners intended for hard metal surfaces, since certain chemical combinations may deteriorate the NOMAD MD plastic prematurely.
NOTE: The NOMAD MD and the accompanying battery charger are not designed to be subjected to any kind of heat sterilization procedure.
Do not spray disinfectant or cleaners directly on the NOMAD MD or battery charger. The connecting areas are open to ingress and damage to your device may result.
2.5 Security, Storage, and Transportation• Do not store the NOMAD MD, battery charger, or batteries in extreme conditions:
below –20°C (–4°F) or above +60°C (+140°F) for the device or above +40°C (+104°F) for the batteries, or beyond 95% relative humidity (non-condensing). The optimal storage location is cool, dry, and away from direct sunlight. For more info about storage and operational temperature limits, see Section 8.1 Basic Technical Specifications.

1514
• Aribex recommends that the NOMAD MD (like all electronic equipment) be allowed to acclimate before use when switching between temperature extremes (i.e., cold storage area to a hot use area or hot storage area to a cold use area).
• The NOMAD MD must be kept in a secure location (such as a locked cabinet) when not in use in order to prevent unauthorized access.
• The battery serves as one of the device security keys. When finished with the NOMAD MD for the day, detach the battery and lock it away in a separate location to prevent unauthorized use.
• Another one of the security keys of the device is the lock-out feature. If the NOMAD MD has automatically shut off after a 2.5 minute period of inactivity or if it has been turned off manually, simply pressing the Power button alone will NOT allow the operator to begin the enable sequence. The operator must first press the Power button and then press the upper left and lower right exposure time buttons simultaneously, holding them down for approximately 2 seconds.
• Take steps to ensure the NOMAD MD is in a secure location when not in use. Lay it on its side if necessary. Power will automatically shut off after a period of inactivity (approximately 2.5 minutes).
• Do not store or carry batteries so that metal objects can contact exposed battery terminals.
• Some battery charge may be lost during extended inactivity (leading to fewer exposures between charging periods). The batteries may also completely lose charge if they are left in the device for over a week. If the NOMAD MD is not likely to be used for an extended period, the battery should be removed from the device.
Disengaging the lock-out feature
LC
75kV - 2.0mA
THIS X-RAY UNIT MAY BE DANGEROUS TO PATIENT AND OPERATOR UNLESS SAFE EXPOSURE FACTORS, OPERATING INSTRUCTIONS AND MAINTENANCE SCHEDULES ARE OBSERVED.
Enable button
Low battery indicator

1716
• The NOMAD MD should not be operated if it has been dropped, if performance degrades, if the SSD cage has been broken or compromised in any way, or if the light field fails to function; it should be returned to Aribex for an evaluation.
• Fully charge the battery before placing it into long-term storage (over 30 days). After placing the battery into long-term storage, it is recommended that the battery be fully recharged every 3 months.
3.0 Setup and Check
3.1 Attaching a Charged Battery
Properly orient and carefully insert the newly charged battery into the base of the NOMAD MD handle. (A properly oriented battery should click into place without force. Forcing the battery into position may damage the battery and/or the device.) The clicking sound ensures the snaps on both sides of the handle bottom are fastened.
Make sure the battery is secure by giving it a tug. The NOMAD MD can be placed into service after the operator has checked for power (see Section 3.2 Checking for Power and Adequate Charge).
Read the battery charger instruction manual for complete information on how to achieve the longest life and best performance from your batteries.
3.2 Checking for Power and Adequate Charge
After inserting a fully charged battery, press, hold briefly, and then release the Power button on the user interface panel. The numeric (LED) display should illuminate, showing an “LC” (an indication that the security lock is engaged), accompanied by a single, elongated audible signal . Then, simultaneously press the upper left and lower right exposure time buttons and hold them for 2 seconds. If the security lock has been successfully disengaged, the most recently entered exposure time will show on the numeric display. If the “LC” remains on the display, try pushing the exposure time buttons again, this time being sure to hold down for a full 2 seconds.
In order to check whether or not the NOMAD MD has sufficient battery charge to complete an exposure, enable the device by either pressing and releasing the Enable button or pressing and releasing the trigger.
If the battery is too low, the red Low Battery indicator at the lower right of the control panel will flash, accompanied by an intermittent audible signal .
Once a battery is depleted, indicated by the Low Battery alert, it must be recharged before use.
Disengaging the lock-out feature
LC

1716
For continued use, insert the secondary, replacement battery (which should be charged in advance).
3.3 Optional ChecksThe NOMAD MD is factory calibrated and tested prior to release (see your Certificate of Conformance); the only adjustment options are length of exposure and X-ray field size. However, the optional checks listed below may be performed by a qualified technician as desired.
This X-ray unit may be dangerous to testing technician and any bystanders unless safe test exposure factors, such as placing the test detector in a lead lined box or the use of an apron (with 0.5mm lead equivalent) and thyroid collar, are observed. Safety equipment used with this device should be fully tested and certified, and CE marked for compliance with the EU PPE Directive.
• On/Off Switch: To verify the On and Off conditions, install a fully charged battery to the NOMAD MD device. Press the Power button. The device should turn on. To turn off the device, press the Power button.
• Exposure Time Buttons (Up and Down Arrows): With the device turned On and the security lock disengaged, press each of the increase buttons then each of the decrease buttons and verify that the exposure times shown on the LED display change appropriately. Pressing the hundredths up button will cause the display to go from “00” to “02.” Pressing the hundredths down button will cause the display to go from “02” to “00.” This is because the value “01” is not a viable exposure time. The exposure time buttons have a scrolling feature—press down and hold on either the up or down arrow in order to scroll through the different time settings.
• Enable Switch: With the device turned On and the LED exposure display set at 50 (500ms), press the Enable button and verify functional conditions. Wait approximately 20 seconds, at which point the enabled condition should expire.
• Automatic Shutdown: Press the Power button to turn the device On and wait for it to automatically shut off after approximately 2.5 minutes of inactivity.
The NOMAD MD should not be operated if it has been dropped, if performance degrades, if the SSD cage has been broken or compromised in any way, or if the light field fails to function; it should be returned to Aribex for an evaluation.
See Section 6.1 Alarms and Alerts, for more information.

1918
4.0 Operation
4.1 Powering UpNOTE: Manufacturer’s recommendation is for the operator to wear nitrile or other gloves during basic operation of the NOMAD MD. The NOMAD MD is designed and tested to be capable of operating inside a transparent and protective bag.
Press, hold briefly, and then release the Power button to turn on the NOMAD MD. The numeric (LED) display should illuminate, showing an “LC” (an indication that the security lock is engaged), accompanied by a single, elongated audible signal . The illuminated display and audible signal indicate the unit has power. Press the upper left and lower right exposure time buttons simultaneously and hold for 2 seconds in order to disengage the security lock. (After approximately 2.5 minutes of inactivity, the NOMAD MD shuts off automatically and can only be activated by pressing the Power button and disengaging the security lock.)
4.2 Ensuring the Right Exposure Time Is SetWhen the power is turned off, the most recent setting for exposure time is stored in the memory and redisplays when the power is turned back on and the security lock is disengaged.
To change exposure settings, press the increase or decrease buttons. (Exposure time increases and decreases by tenths and hundredths of a second. Following is an example of how to read the display: 08 LED setting = 0.08 seconds; 35 LED setting = 0.35 seconds.) A single, short audible signal confirms input when a button is pressed and released. To scroll through exposure time settings, press and hold on the appropriate increase or decrease button.
Powering On and Unlocking the NOMAD MD
75kV - 2.0mA
THIS X-RAY UNIT MAY BE DANGEROUS TO PATIENT AND OPERATOR UNLESS SAFE EXPOSURE FACTORS, OPERATING INSTRUCTIONS AND MAINTENANCE SCHEDULES ARE OBSERVED.
First press here
Second press here
75kV - 2.0mA
THIS X-RAY UNIT MAY BE DANGEROUS TO PATIENT AND OPERATOR UNLESS SAFE EXPOSURE FACTORS, OPERATING INSTRUCTIONS AND MAINTENANCE SCHEDULES ARE OBSERVED.
Increase buttons
Decrease buttons

1918
4.3 Preparing to Enable the Device The NOMAD MD has several unique features that you should familiarize yourself with before attempting to enable the device and perform exposures.
The shutters located at the end of the collimator determine the size of the X-ray field. The shutters are controlled by the two tabbed rings located on the outside rim of the collimator cone. The ring with the larger tabs furthest from the operator moves the outer shutters to adjust the horizontal size; the ring with the smaller tabs closest to the operator moves the inner shutters to adjust the vertical size. Rotating tabs clockwise closes the shutters; rotating tabs counterclockwise opens the shutters.
The inclinometer attached to the left side of the NOMAD MD is used to measure the angle of the device relative to the earth. Even before enabling the NOMAD MD, you can determine which angle will be best suited for the exposure being taken.
As much as possible, determine device angle, shutter dimensions, and appropriate distance from the patient prior to enabling the device. More precise adjustments can be made after enabling the device, but
preliminary inputs are suggested.
Closes Shutters
Opens Shutters
Adjusts Vertical Size
Adjusts Horizontal Size
Inclinometer

2120
4.4 Situating the Patient and Enabling the DeviceTo prevent accidental exposure, properly position the patient and yourself before enabling the NOMAD MD.
There are two ways to ready the device for exposures: either press and release the Enable button, or press and release the trigger. Be sure to re-enable the NOMAD MD if any subsequent changes are made to the timer setting prior to exposure.
The flashing, green Enabled indicator and audible signal (an intermittent, double beep) confirm that the NOMAD MD is enabled. This continues for 20 seconds or until an exposure is initiated.
If the red Low Battery indicator flashes, accompanied by an intermittent audible signal , see Section 3.2 Checking for Power and Adequate Charge and Section 5.0 Battery Replacement and Care.
For other error conditions, see Section 6.1 Alarms and Alerts or Section 6.2 Troubleshooting.
NOTE: An exposure can be prematurely terminated for any reason by abruptly releasing the depressed trigger. The X-rays On and Start buttons will repeatedly flash simultaneously, accompanied by an audible signal . This condition will continue for 10 seconds, after which the device may be re-enabled.
Upon enabling the device, expect to see two colored projections on the patient: a white rectangular light field with a black reticle and a red laser dot. The light field indicates the area of the patient that will be exposed to X-rays; to reduce patient dose, the field size should be collimated to the minimum possible area required to produce the desired diagnostic image. The red laser dot can be moved either up or down on the reticle: moving the device away from the patient causes the laser to travel vertically up the reticle, while moving the device towards the patient causes the laser to travel vertically down the reticle.
Indicates device is enabled
Indicates device has low battery
75kV - 2.0mA
THIS X-RAY UNIT MAY BE DANGEROUS TO PATIENT AND OPERATOR UNLESS SAFE EXPOSURE FACTORS, OPERATING INSTRUCTIONS AND MAINTENANCE SCHEDULES ARE OBSERVED.
Press to enable
2120
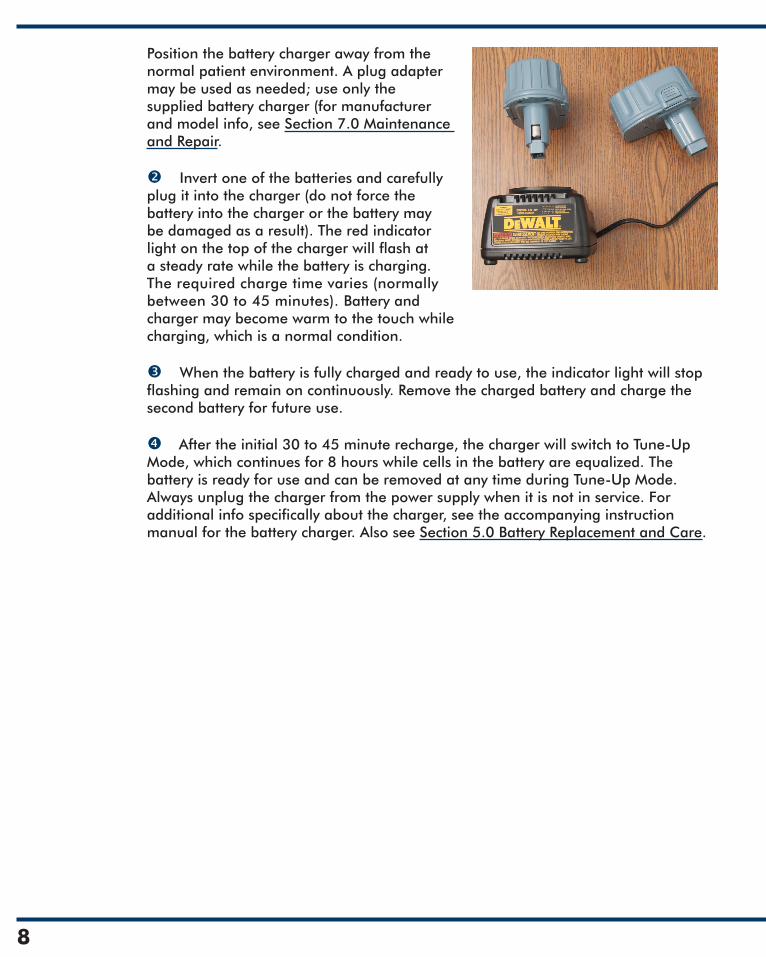
When the laser is aligned with the center of the reticle, the NOMAD MD X-ray source is 28 inches (71.12 cm) from the patient. (The center of the reticle also marks the center of the light field.) For each tick mark above the middle of the reticle that the laser travels up, the X-ray source becomes 4 inches (10.16 cm) further from the patient. For each tick mark below the reticle that the laser travels down, the X-ray source becomes 4 inches (10.16 cm) closer to the patient.
When the X-ray source is 28 inches (71.12 cm) from the patient and the shutters are fully open, the X-ray field size is 10 inches x 12 inches (25.40 cm x 30.48 cm).
The laser used in the NOMAD MD is a Class 2 laser. Operators should take extra precautions to not shine the laser in their own eyes, the eyes of the patient, or anyone else’s eyes.
The SSD cage is designed to maintain a minimum source to skin distance per FDA requirements. Do NOT remove the SSD cage from the NOMAD MD in order to bring the X-ray source closer to the patient. Do NOT make any other modifications to the device. Doing so highly increases radiation exposure risks for the patient and will void the NOMAD MD warranty. In addition, do NOT stick extremities (hands, feet, fingers, toes) inside of the SSD cage in order to bring the X-ray source closer to the patient, since this also increases radiation exposure risks for the patient.
Location of laser aperture (top: full view, left: close-up view)
24”28”
40”
20”
36”32”
Reticle image and measurements
71 cm
101 cm91 cm81 cm
61 cm
51 cm

2322
4.5 Initiating and Completing an X-ray ExposureAfter enabling the NOMAD MD, make final adjustments for shutter dimensions and distance from the patient. Line up the red laser dot with the middle point of the reticle, or at another point on the reticle, depending on the desired exposure.
To generate the exposure, press and hold the handle trigger (or press and hold Start). The Enabled indicator stops flashing, and the green Start and yellow X-rays On indicators illuminate.
To ensure complete exposure, keep the trigger or Start button depressed until the audible, continuous-tone signal ends and both the X-rays On and Start indicators are off.
4.6 Powering DownPress and release Power button to turn the NOMAD MD off, or wait for it to automatically shut off after approximately 2.5 minutes of inactivity.
4.7 Exposure TechniquesThe NOMAD MD provides a high degree of flexibility, making it possible for exposures to be produced while patients are reclined, lying on their backs, or sitting upright. The operator can also take a variety of positions in relation to the patient as well as orient the NOMAD MD using a variety of angles.
When taking images, hold the NOMAD MD using two hands, placing one hand on the handle and the other hand under the device housing for increased stability and patient safety.
To minimize cone-cutting, the NOMAD MD must be properly
positioned relative to the imaging system. The light field and laser should be used to assist in properly aligning the NOMAD MD and detector.
Avoid touching the patient with the cone or SSD cage and/or use disposable plastic coverings. The NOMAD MD is designed and tested to be capable of operating inside a transparent and protective bag.
75kV - 2.0mA
THIS X-RAY UNIT MAY BE DANGEROUS TO PATIENT AND OPERATOR UNLESS SAFE EXPOSURE FACTORS, OPERATING INSTRUCTIONS AND MAINTENANCE SCHEDULES ARE OBSERVED.
Press and hold to initiate X-ray
Indicates exposure is in process

2322
Determine which time settings, angles, shutter widths, and distances deliver optimal results for the type of digital or film-based imaging that is done on a regular basis. Note that digital imaging sensors and film speeds can vary somewhat in their characteristics and could require different exposure settings than the suggested nominal exposure times shown in Section 4.8 Adult Technique Chart and Section 4.11 Pediatric Technique Chart. Adjust as needed to meet density preference. The body part being imaged should be unobstructed during the exposure.
For an explanation of the relationship between shot duration and rest cycle between exposures (also known as the duty cycle), see Section 2.3 Usage and Duty Cycle.
Operators should always wear PPE while using the NOMAD MD in order to be shielded from backscatter radiation. Both an apron (with 0.5mm lead equivalent) and thyroid collar are recommended. For those operators who take over 5000 exposures a year, radiation protective eyewear is also recommended. Safety equipment used with this device should be fully tested and certified, and CE marked for compliance with the EU PPE Directive.
Do NOT remove the SSD cage from the NOMAD MD in order to bring the X-ray source closer to the patient. Do NOT make any other modifications to the device. Doing so highly increases radiation exposure risks for the patient and will void the NOMAD MD warranty. In addition, do NOT stick extremities (hands, feet, fingers, toes) inside of the SSD cage in order to bring the X-ray source closer to the patient, since this also increases radiation exposure risks for the patient.
2524
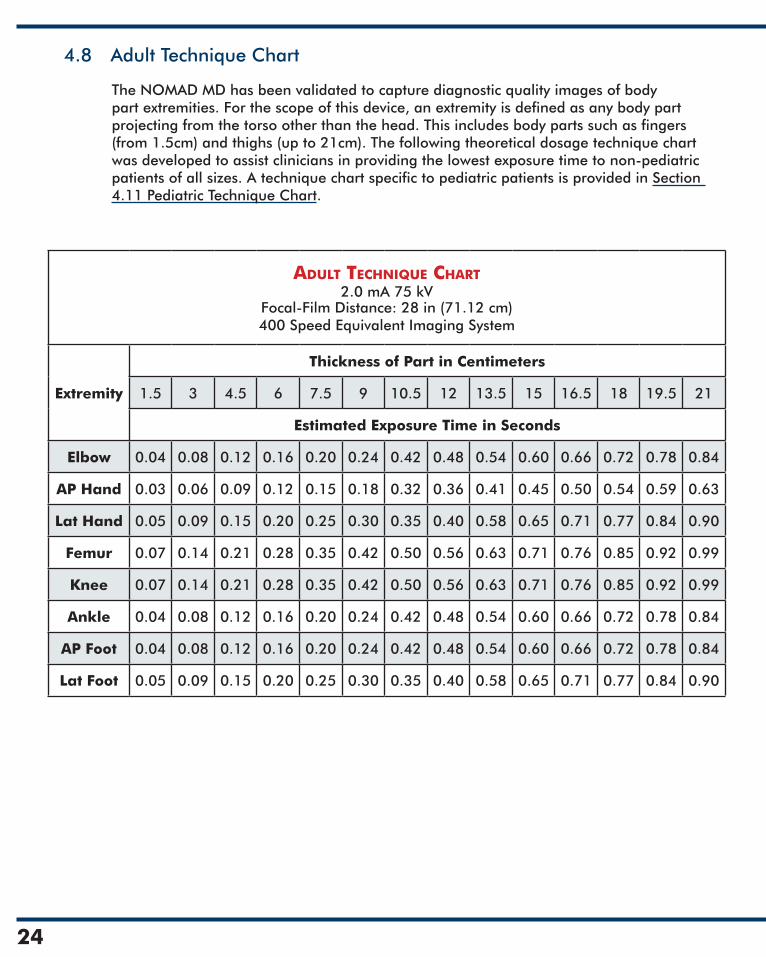
4.8 Adult Technique Chart
The NOMAD MD has been validated to capture diagnostic quality images of body part extremities. For the scope of this device, an extremity is defined as any body part projecting from the torso other than the head. This includes body parts such as fingers (from 1.5cm) and thighs (up to 21cm). The following theoretical dosage technique chart was developed to assist clinicians in providing the lowest exposure time to non-pediatric patients of all sizes. A technique chart specific to pediatric patients is provided in Section 4.11 Pediatric Technique Chart.
adult technique chart2.0 mA 75 kV
Focal-Film Distance: 28 in (71.12 cm)400 Speed Equivalent Imaging System
Extremity
Thickness of Part in Centimeters
1.5 3 4.5 6 7.5 9 10.5 12 13.5 15 16.5 18 19.5 21
Estimated Exposure Time in Seconds
Elbow 0.04 0.08 0.12 0.16 0.20 0.24 0.42 0.48 0.54 0.60 0.66 0.72 0.78 0.84
AP Hand 0.03 0.06 0.09 0.12 0.15 0.18 0.32 0.36 0.41 0.45 0.50 0.54 0.59 0.63
Lat Hand 0.05 0.09 0.15 0.20 0.25 0.30 0.35 0.40 0.58 0.65 0.71 0.77 0.84 0.90
Femur 0.07 0.14 0.21 0.28 0.35 0.42 0.50 0.56 0.63 0.71 0.76 0.85 0.92 0.99
Knee 0.07 0.14 0.21 0.28 0.35 0.42 0.50 0.56 0.63 0.71 0.76 0.85 0.92 0.99
Ankle 0.04 0.08 0.12 0.16 0.20 0.24 0.42 0.48 0.54 0.60 0.66 0.72 0.78 0.84
AP Foot 0.04 0.08 0.12 0.16 0.20 0.24 0.42 0.48 0.54 0.60 0.66 0.72 0.78 0.84
Lat Foot 0.05 0.09 0.15 0.20 0.25 0.30 0.35 0.40 0.58 0.65 0.71 0.77 0.84 0.90

2524
4.9 Adult Dose Value ChartTypically, dose value is proportional to the quality of the images obtained. Appropriate considerations should be made for adult patients to assure appropriate dose is maintained based on mAs settings.
adult dOse Values fOr nOMad Md
Exposure Time in Seconds
Dose Value in Micrograys
Exposure Time in Seconds
Dose Value in Micrograys
0.02 5.8 0.05 12.30.10 23.4 0.15 34.20.20 45.4 0.25 56.30.30 67.1 0.35 78.30.40 89.2 0.45 100.20.50 111.2 0.55 122.30.60 133.1 0.65 144.10.70 154.9 0.75 166.10.80 177.0 0.85 188.00.90 199.0 0.95 210.10.99 218.9
4.10 Adult Dose Area Product ChartDose value is measured using a Fluke TNT 12000D performance meter with a Dosemate diagnostic ion chamber (100 cm²), with a collimated beam of 5cm x 5cm.
adult dOse area prOduct (area Of 5 cM x 5 cM) fOr nOMad MdExposure Time in Seconds
Entrance Dose Value
in Micrograys
Dose Value per cm2
(5cm x 5cm square/25
cm)
Exposure Time in Seconds
Entrance Dose Value
in Micrograys
Dose Value per cm2
(5cm x 5cm square/25
cm)0.02 1.51 37.80 µGy 0.05 3.31 82.82 µGy0.10 4.61 115.22 µGy 0.15 8.88 221.95 µGy0.20 9.96 248.92 µGy 0.25 15.81 395.25 µGy0.30 18.90 472.50 µGy 0.35 19.01 475.25 µGy0.40 22.03 550.75 µGy 0.45 27.68 692.00 µGy0.50 30.53 763.25 µGy 0.55 33.53 838.25 µGy0.60 35.74 893.50 µGy 0.65 39.25 981.25 µGy0.70 42.04 1.05 mGy 0.75 44.86 1.12 mGy0.80 47.31 1.18 mGy 0.85 49.43 1.23 mGy0.90 52.97 1.32 mGy 0.95 55.83 1.39 mGy0.99 58.16 1.45 mGy

2726
4.11 Pediatric Technique ChartUse of equipment and exposure settings designed for an average-sized adult can result in excessive radiation exposure for a smaller patient, especially a pediatric patient. Studies3 have shown that pediatric patients may be more radio-sensitive than adults (i.e., the cancer risk per unit dose of ionizing radiation is higher), and so unnecessary radiation exposure is of particular concern for pediatric patients. The NOMAD MD will work with current pediatric positioning devices. Normal immobilization is recommended for quality imaging of pediatric patients. Please use caution when configuring the NOMAD MD by considering the patient’s age, size, body habitus, and clinical indication when verifying exposure time settings.
For pediatric patients, which include neonates, infants, children, and adolescents, special effort should be made to reduce radiation dose, when diagnostically feasible. Please consider the following when preparing to image a pediatric patient:
• Measure the body part to be imaged using calipers.
• Position the patient properly. Due to the flexible nature of the NOMAD MD, retakes can be reduced by moving the device instead of the patient to achieve the required image. This is especially important when the patient may be physically compromised due to injury.
• Collimate prior to exposure. The NOMAD MD has the ability to collimate down to 1.3 cm by 1.3 cm. X-ray only the indicated area with proper collimation. This will reduce the overall radiation dose as well as prevent excess scatter from degrading image contrast and resolution.
• Shield gonads/breasts/thyroid and other body parts not being imaged when possible.
• Review exposure indicators and image quality.
• Make your decisions so that retakes of X-rays are kept to a minimum or are not necessary.
Because pediatric patients are generally anxious during any medical procedure, the following guidelines should be followed to ensure the patient is calm and still during an X-ray procedure. Following these important guidelines will also help to avoid retakes.
• Stay with the patient at all times in order to ensure that the patient remains still during the X-ray procedure. The NOMAD MD is sufficiently shielded internally and has a very low dose output, which allows for the X-ray technologist to remain with the patient during exposures. The technologist should be properly trained and should use protective equipment as recommended. Do not attempt to acquire the image until the patient is sufficiently calm and immobile.
• Ask a parent or other responsible adult to remain in the examination room during the exposure. Because of the low dose output of the NOMAD MD, adults can safely remain in the same room with the patient during the examination. Show the parent where to
3 NAS National Research Council Committee to Assess Health Risks from Exposure to Low Levels of Ionizing Radiation. 2006. Health risks from exposure to low levels of ionizing radiation: BEIR VII phase 2. Washington, D.C.: National Academy of Sciences, National Academies Press.
2726
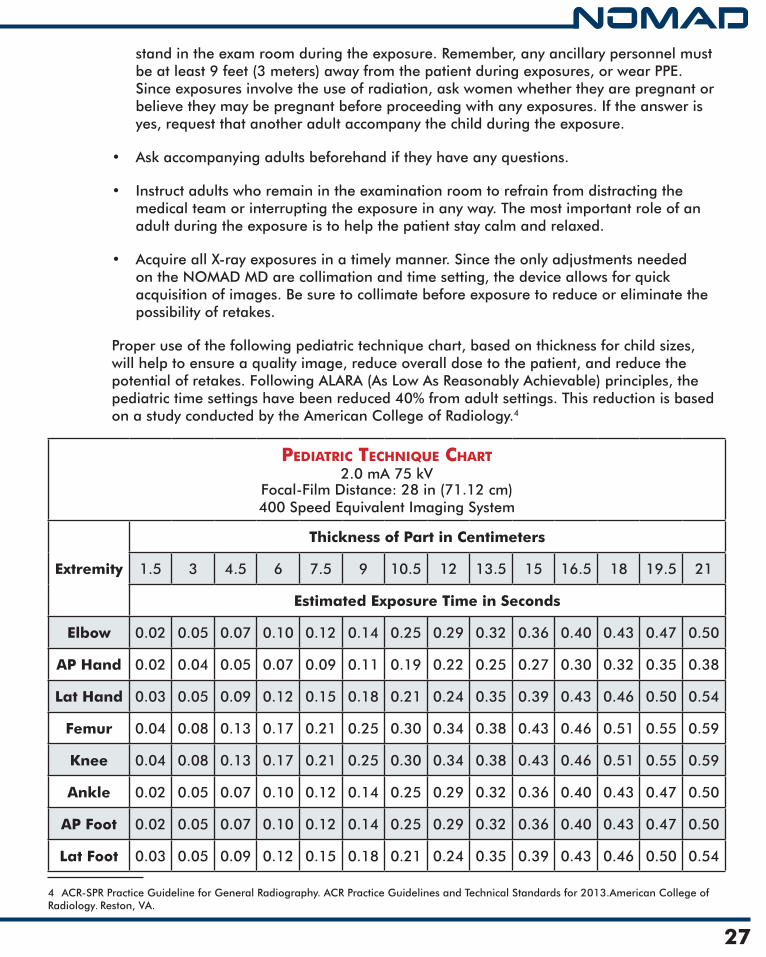
stand in the exam room during the exposure. Remember, any ancillary personnel must be at least 9 feet (3 meters) away from the patient during exposures, or wear PPE. Since exposures involve the use of radiation, ask women whether they are pregnant or believe they may be pregnant before proceeding with any exposures. If the answer is yes, request that another adult accompany the child during the exposure.
• Ask accompanying adults beforehand if they have any questions.
• Instruct adults who remain in the examination room to refrain from distracting the medical team or interrupting the exposure in any way. The most important role of an adult during the exposure is to help the patient stay calm and relaxed.
• Acquire all X-ray exposures in a timely manner. Since the only adjustments needed on the NOMAD MD are collimation and time setting, the device allows for quick acquisition of images. Be sure to collimate before exposure to reduce or eliminate the possibility of retakes.
Proper use of the following pediatric technique chart, based on thickness for child sizes, will help to ensure a quality image, reduce overall dose to the patient, and reduce the potential of retakes. Following ALARA (As Low As Reasonably Achievable) principles, the pediatric time settings have been reduced 40% from adult settings. This reduction is based on a study conducted by the American College of Radiology.4
pediatric technique chart2.0 mA 75 kV
Focal-Film Distance: 28 in (71.12 cm)400 Speed Equivalent Imaging System
Extremity
Thickness of Part in Centimeters
1.5 3 4.5 6 7.5 9 10.5 12 13.5 15 16.5 18 19.5 21
Estimated Exposure Time in Seconds
Elbow 0.02 0.05 0.07 0.10 0.12 0.14 0.25 0.29 0.32 0.36 0.40 0.43 0.47 0.50
AP Hand 0.02 0.04 0.05 0.07 0.09 0.11 0.19 0.22 0.25 0.27 0.30 0.32 0.35 0.38
Lat Hand 0.03 0.05 0.09 0.12 0.15 0.18 0.21 0.24 0.35 0.39 0.43 0.46 0.50 0.54
Femur 0.04 0.08 0.13 0.17 0.21 0.25 0.30 0.34 0.38 0.43 0.46 0.51 0.55 0.59
Knee 0.04 0.08 0.13 0.17 0.21 0.25 0.30 0.34 0.38 0.43 0.46 0.51 0.55 0.59
Ankle 0.02 0.05 0.07 0.10 0.12 0.14 0.25 0.29 0.32 0.36 0.40 0.43 0.47 0.50
AP Foot 0.02 0.05 0.07 0.10 0.12 0.14 0.25 0.29 0.32 0.36 0.40 0.43 0.47 0.50
Lat Foot 0.03 0.05 0.09 0.12 0.15 0.18 0.21 0.24 0.35 0.39 0.43 0.46 0.50 0.54
4 ACR-SPR Practice Guideline for General Radiography. ACR Practice Guidelines and Technical Standards for 2013.American College of Radiology. Reston, VA.

2928
4.12 Pediatric Dose Value ChartTypically, dose value is proportional to the quality of the images obtained. Appropriate considerations should be made for pediatric patients to assure appropriate dose is maintained based on mAs settings.
pediatric dOse Values fOr nOMad MdExposure Time in
SecondsDose Value in
MicrograysExposure Time in
SecondsDose Value in
Micrograys
0.02 5.8 0.05 12.3
0.10 23.4 0.15 34.2
0.20 45.4 0.25 56.3
0.30 67.1 0.35 78.3
0.40 89.2 0.45 100.2
0.50 111.2 0.55 122.3
0.60 133.1 0.65 144.1
0.70 154.9 0.75 166.1
0.80 177.0 0.85 188.0
0.90 199.0 0.95 210.1
0.99 218.9
4.13 Pediatric Dose Area Product ChartDose value is measured using a Fluke TNT 12000D performance meter with a Dosemate diagnostic ion chamber (100 cm²), with a collimated beam of 5cm x 5cm.
pediatric dOse area prOduct (area Of 5 cM x 5 cM) fOr nOMad MdExposure Time in Seconds
Entrance Dose Value in
Micrograys
Dose Value per cm2
(5cm x 5cm square/25
cm)
Exposure Time in Seconds
Entrance Dose Value in
Micrograys
Dose Value per cm2
(5cm x 5cm square/25
cm)
0.02 1.51 37.80 µGy 0.05 3.31 82.82 µGy
0.10 4.61 115.22 µGy 0.15 8.88 221.95 µGy
0.20 9.96 248.92 µGy 0.25 15.81 395.25 µGy
0.30 18.90 472.50 µGy 0.35 19.01 475.25 µGy
0.40 22.03 550.75 µGy 0.45 27.68 692.00 µGy
0.50 30.53 763.25 µGy 0.55 33.53 838.25 µGy
0.60 35.74 893.50 µGy 0.65 39.25 981.25 µGy
0.70 42.04 1.05 mGy 0.75 44.86 1.12 mGy
0.80 47.31 1.18 mGy 0.85 49.43 1.23 mGy
0.90 52.97 1.32 mGy 0.95 55.83 1.39 mGy
0.99 58.16 1.45 mGy

2928
5.0 Battery Replacement and Care
5.1 Battery ReplacementA flashing, red Low Battery indicator located on the control panel and intermittent audible signal indicate the need for a freshly charged battery. The NOMAD MD cannot emit X-rays with a low, depleted battery with insufficient voltage. Follow these steps to clear the Low Battery alert:
Press and release the Power button on the control panel in order to turn the device off.
Grasp and depress the buttons on both sides of the battery to release it from the handle. You may have to put pressure at the very top of the buttons (nearest the handle). Then pull the battery away from the handle.
Carefully insert a newly charged battery into the base of the NOMAD MD handle. (A properly oriented battery should click into place without force; forcing the battery into position may damage the battery and/or the device.) A clicking sound ensures that the snaps on both sides of the handle bottom are fastened. Make sure the battery is secure by giving it a tug. When a battery is detached and then reattached or when a new battery is attached, the most recently entered exposure time is shown on the numeric display, after first disengaging the security lock.
After the initial 30 to 45 minute recharge, the charger will switch to Tune-Up Mode, which continues for 8 hours while cells in the battery are equalized. The battery is ready for use and can be removed at any time during Tune-Up Mode. Always unplug the charger from the power supply when it is not in service. For additional info specifically about the charger, see the accompanying instruction manual for the battery charger.
Battery charge will diminish during extended inactivity. Fully recharge batteries every 3 months during inactivity. Never place a low battery into long-term storage.
5.2 Battery Care• Battery life is expected to be between 1-2 years or 200-300 charge/discharge cycles,
whichever occurs first. When the battery charger senses a bad battery, the battery is spent and must be taken out of service. Batteries should also be taken out of service once only 10 to 20 exposures can be taken per charging cycle.
• Do not attempt to charge damaged or spent batteries. An authorized distributor, Aribex, or your local recycling center will accept spent or damaged batteries. Please fully discharge and properly package batteries before returning to Aribex for disposal (see the accompanying instruction manual about the batteries for proper packaging guidelines). Order new 14.4V batteries from Aribex or your authorized distributor. Do not use batteries from other sources; doing so will invalidate the warranty. Check the battery periodically (at least weekly) and ensure proper functionality.

3130
• Replace the battery immediately if it does not retain a charge during normal operation or if there are any signs of deterioration.
• Do not drop the batteries since mechanical shock can damage the batteries and can initiate battery failure.
• The batteries contain no user serviceable parts. Opening the battery enclosure will void the warranty.
• Do not pierce the plastic enclosure (no nails, screws, or other sharp metal objects).
Risk of Shock: There is high electrical current present at the battery charger terminals. Do not probe with fingers or conductive objects.
The following are instructions for handling a product at end of life. Please, protect the environment and do not improperly dispose of any part of the NOMAD MD system, battery, or charger; contact an authorized distributor or Aribex, regarding assistance in returning the product for proper disposal. Please fully discharge and properly package batteries before returning to Aribex for disposal (see the accompanying instruction manual about the batteries for proper packaging guidelines).
Cd

3130
6.0 NOMAD MD Care and Upkeep
6.1 Alarms and AlertsThe visual and audible alarms signal a programmed action designed to prevent harm to the operator, patients, and/or the NOMAD MD.
The visual/audible alerts confirm normal conditions or draw the operator’s attention to a required action.
Condition Visual Indicator
Audible
Signal Function/ Resolution
Overheating
Alarm
LED display begins alternately flashing “OH” and a countdown sequence
None
Operation suspends if the device overheats; after waiting for the countdown sequence to complete, power on and continue with exposures (see Section 2.3 Usage and Duty Cycle).
Low Battery
Alert
Red Low Battery indicator flashes Slow series of short
beeps
Replace the battery and reset exposure time (for information see Section 5.0 Battery Replacement and Care).
X-ray Exposure
Alert
Green Start and yellow X-rays On indicators illuminate
Continuous tone (for the duration of the timed exposure)
At the end of the successful exposure, audible signal and indicators stop.
Incomplete Exposure
Alert
Green Start and yellow X-rays On indicators flash Series of long beeps
Activates if trigger is released before the timed X-ray exposure finishes and ends automatically after 12 seconds or if power is manually turned off and then on.
System Readiness
Alert
Green Enabled indicator flashes
Slow series of short, double beeps
Activates when Enable is pressed/released; ends automatically after 20 seconds or when an exposure starts (trigger or Start is pressed).
O H

3332
Condition Visual Indicator
Audible
Signal Function/ Resolution
Invalid Input Error
Alert
N/A Two short beepsInvalid input (for example, triggering prior to enabling) activates alert, which then ends automatically.
Valid Input
Alert
For numeric LED display, time setting increments or decrements
Single short beepValid when panel button is pressed or released.
System Alert
Alert
LED display turns off Two short beeps X-ray emissions are not detected during timed exposure because there has been a failure in the internal circuitry. The battery may be OK.Followed by a system shutdown
Power OFF
Alert
LED display turns off Two short beepsPower button is pressed and released (while power is on).
Followed by a system shutdown
Power ON
AlertLED display lights up Single long beep
Power button is pressed and released (while power is off).
6.2 TroubleshootingIf you encounter results and/or errors in the operation of the NOMAD MD that are not explained in the previous sections, check the following table on user troubleshooting to determine the need for authorized service. If you have additional questions or require help, contact Aribex customer support by emailing [email protected] or calling 1-866-340-5522.
Device Symptom Potential Problem Corrective Action
6.2.1 Image from X-ray exposure does not have sufficient contrast.
Underexposure (too light).Increase the exposure time setting; or see “Incomplete Exposure” below (6.2.4).
Overexposure (too dark).
Decrease the exposure time setting. Also check film expiration date (old film can produce dark, grainy/foggy images).
Chemical developer (for film-based imaging).
Ensure chemical freshness and proper temperature.

3332
Device Symptom Potential Problem Corrective Action
6.2.2 Image from X-ray exposure is blurred.
Combined movements of operator and patient during exposure produced too much distortion.
Check the exposure time setting and re-enable when operator and patient are again properly situated.
6.2.3 Green Enabled indicator stops flashing (and corresponding, short double beeps end) before an exposure is started.
The NOMAD MD is no longer enabled. If an X-ray exposure is not initiated within 20 seconds of enabling, the system ready condition will terminate.
Check the exposure time setting and re-enable when operator and patient are again properly situated.
6.2.4 Green Start and yellow X-rays On indicators flash (with corresponding series of long beeps).
Incomplete exposure – the depressed trigger was released before the timed exposure was able to complete.
This condition is cleared automatically within 10 seconds or by manually turning the NOMAD MD off and back on.
6.2.5 Yellow X-rays On indicator does not illuminate.
No exposure – a subsequent low battery alert will signal whether a low battery is the source of the problem.
Follow proper procedures for replacing the battery; see Section 5.0 Battery Replacement and Care.
If within a few seconds, two short beeps are emitted and the system automatically shuts down, a different problem exists.
The NOMAD MD will require authorized service; see Section 7.0 Maintenance and Repair.
6.2.6 The NOMAD MD automatically shuts down.
After about 2.5 minutes of inactivity, the NOMAD MD emits two short beeps and shuts off automatically – the system has timed out.
Manually turn on the NOMAD MD when you are ready to use the device.
However, if while attempting an X-ray exposure two short beeps were emitted and shutdown occurred, a different problem exists.
The NOMAD MD will require authorized service; see Section 7.0 Maintenance and Repair.

3534
Device Symptom Potential Problem Corrective Action
6.2.7 There is no power to the NOMAD MD control panel.
If pressing Power several times does not cause the numeric (LED) display to illuminate, the attached battery is likely the problem.
Ensure battery is securely attached.Replace with a newly charged battery before continuing. Use the battery charger to determine if the first battery is spent and must be taken out of service or if it can be recharged.
If while attempting an X-ray exposure two short beeps were emitted and shutdown occurred, a different problem exists (see Section 6.1 Alarms and Alerts).
The NOMAD MD will require authorized service; see Section 7.0 Maintenance and Repair.
6.2.8 X-ray image is not centered on target area.
Either red laser dot was not properly aligned with the reticle, or the area being X-rayed was not aligned on the center of the receptor.
Be sure to align the red laser dot with the middle of the reticle before taking the X-ray exposure; also be sure to align the area being X-rayed on the center of the receptor.
6.2.9 Even though the NOMAD MD is powered on, control panel buttons are unresponsive.
The NOMAD MD control panel is locked.
To unlock control panel after having powered up the NOMAD MD, press the upper left and lower right exposure time buttons simultaneously and hold for 2 seconds.
6.2.10 The LED display begins to alternately flash “OH” and a countdown sequence.
The NOMAD MD has overheated.
Wait for the countdown sequence to complete; then power on and continue exposures.
If you have additional questions or require help, contact customer support by emailing [email protected] or calling 1-866-340-5522.

3534
7.0 Maintenance and Repair
7.1 Maintenance ScheduleThe following quality checks and maintenance items can be performed by any trained personnel. Use Section 7.3 Maintenance Log Sheets to track results.
On-going Maintenance:
1. Schedule the NOMAD MD for a maintenance inspection at Aribex every five years.
2. Periodically review Section 1.1 Intended Use/Indications for Use and product labeling in order to verify understanding of indications for use for the NOMAD MD.
3. Clean the NOMAD MD routinely; it is recommended that the NOMAD MD device be cleaned after any patient contact. Make sure the power is off while cleaning and detach the battery. It is unnecessary to detach anything else in order to clean the unit. Use a non-acetone based disinfectant wipe (with less than 17% alcohol content) or a cloth to wipe the exterior surfaces of the NOMAD MD and charger. Do not use cleaners intended for hard surfaces, since certain chemical combinations may deteriorate the NOMAD MD plastic prematurely.
4. Batteries should be replaced every 1–2 years or as needed. If during the normal course of use battery charge depletes after 10–20 exposures (i.e., 25% of expected exposures for a fully charged battery), replace the battery.
5. Periodically assess operator familiarity with the NOMAD MD to determine whether refresher training/certification (per local, national, and jurisdictional requirements) is needed.
6. Periodically review the technique, dose value, and dose area product charts on page 24 through page 28 for comprehension and to assess whether or not chart information is being incorporated into daily use.
7. Periodically review Section 2.1 Radiation Safety and Section 2.2 Studies and Data on Leakage and Scatter in order to become reacquainted with safety precautions, which include designating a Significant Zone of Occupancy and understanding exposure information near the unit.
Annual Maintenance:
1. Power Button Verification: Verify that the Power button is working properly and that the exposure time selection LED is illuminated and that an indicator alarm sounds when the device is powered on.
2. Lock-out Mode Verification: Verify that the device is in lock-out mode when the device is initially powered on. Press the upper left and lower right exposure time buttons simultaneously, holding them down for approximately 2 seconds to unlock the device. Verify that the device is unlocked.
3. Automatic Shut-off Verification: Verify that, when left on for a period of approximately

3736
2.5 minutes without pressing any buttons, the device automatically shuts off.
4. Time Exposure Buttons Verification: With the device powered on and unlocked, verify that a time selection value indicates on the user interface panel. Also check the function of the time exposure buttons. Pressing the time exposure buttons should cause the LED display to adjust accordingly.
5. Enable and Start Buttons Verification: Verify that the Enable and Start buttons on the user interface panel are functioning properly. Also verify that the Enabled and Start LEDs illuminate when their corresponding buttons are pressed.
6. Trigger Verification: Verify that the trigger moves freely when depressed and released.
7. SSD Cage Verification: Verify that the cage is firmly attached to the collimator cone and that it is not cracked or broken.
8. Shutter Rings Verification: Verify the function of the shutter rings. The ring with the larger tabs furthest from the operator moves the outer shutters to adjust the horizontal size; the ring with the smaller tabs closest to the operator moves the inner shutters to adjust the vertical size. Rotating tabs clockwise closes the shutters; rotating tabs counterclockwise opens the shutters.
9. Inclinometer Verification: Verify that the needle inside of inclinometer responds to tilting of the device.
10. Exposure Termination Verification: Select an exposure of 0.99 seconds using the time exposure buttons. Initiate an exposure, but release the exposure switch before 0.99 seconds have elapsed. Verify that the exposure terminates immediately upon release of the trigger.
11. Laser Range Indicator Verification: Verify that the laser range indicator is properly calibrated by placing the device 28 inches from a flat wall or surface and enabling the device. Verify that a white rectangular light field with a black reticle and a red laser dot appear on the wall. If the device is 28 inches from the wall, the red dot should be positioned approximately in the center of the reticle.
12. Light Field Size Verification: With the device positioned 28 inches from the wall, adjust the shutters until they are fully open. Enable the device and measure the light field that is displayed on the wall. It should measure approximately 10 inches x 12 inches (25.4 cm x 30.48 cm).
13. Image Size Verification: With the device positioned 28 inches from a panoramic film or digital plate, adjust the shutters until they are fully open. Take an exposure. Verify that the resulting image is approximately 10 inches x 12 inches (25.4 cm x 30.48 cm).
14. X-Rays On LED and Audible Signal Verification: While taking the exposure to verify the x-ray beam size, verify that the X-Rays On LED illuminates and the audible signal is heard.
15. Operator Manual Verification: Ensure that the operator of the system has received a copy of the operator manual.

3736
• The NOMAD MD should not be operated if it has been dropped, if performance degrades, if the SSD cage has been broken or compromised in any way, or if the light field fails to function; it should be returned to Aribex for an evaluation.
• Fully charge the battery before placing it into long-term storage (over 30 days). After placing the battery into long-term storage, it is recommended that the battery be fully recharged every 3 months.
• The NOMAD MD and the battery charger are NOT designed to be user serviceable. Do not open the device housing. Doing so will void the warranty.
7.2 Optional Calibration ChecksThe NOMAD MD is factory calibrated and tested prior to release (see your Certificate of Conformance) and there are no adjustment options. However, the optional checks listed below may be performed by a qualified technician as desired.
Set up a calibrated Performance Meter (such as the Fluke TNT 12000) according to manufacturer’s specifications to detect and report the following: X-ray Tube Voltage (kVp average and kV PPV), Radiation Time (ms Effective Mode), and Dose (mR Average Mode).
Measurement Method: Final performance measurements are made using a Fluke TNT 12000. Exposure time is measured from the moment X-rays are detected until they are no longer detected (which means 90% crossing setting is selected with no timer delay). Accelerating voltage (kV) is calculated using kVp average and kV practical peak value (kV PPV). Linearity is calculated per IEC60601-2-7, 50.102.2a.
This X-ray unit may be dangerous to testing technician and any bystanders unless safe test exposure factors, such as placing the test detector in a lead lined box or the use of an apron (with 0.5mm lead equivalent) and thyroid collar, are observed. Safety equipment used with this device should be fully tested and certified, and CE marked for compliance with the EU PPE Directive.
Enable the NOMAD MD and with the collimator perpendicular to the test detector, make exposures into the test detector and capture the resulting data.
Compare the result with the factory release parameters (indicated in the chart below). For results outside these parameters, discontinue use and contact Aribex.
Test Description
Acceptance Limits
Timer Settings and Corresponding Acceptable Ranges
20ms 40ms 400ms 600ms 990ms
kVp (eff) Accuracy
75kV ±10%67.5 to 82.5
67.5 to 82.5
67.5 to 82.5
67.5 to 82.5
67.5 to 82.5
Timer Accuracy
Setpoint ±(10%, +1ms)
17 to 23 35 to 45 359 to 441 539 to 661890 to 1090
A duty cycle of 1:60 is required after each x ray discharge to prevent over-heating damage to the x ray tube.

3938
7.3 Maintenance Log Sheets
Maintenance Test Year 1 Year 2 Year 3 Year 4 Year 5 Year 6Date/Initial
Date/Initial
Date/Initial
Date/Initial
Date/Initial
1. Power Button
Sche
dule
Fiv
e-Ye
ar M
aint
enan
ce
Insp
ectio
n at
Ari
bex
2. Lock-out Mode3. Automatic Shut-Off 4. Time Selection Buttons5. Enable and Start Buttons6. Trigger7. SSD Cage8. Shutter Rings9. Inclinometer10. Exposure Termination11. Laser Range Indicator12. Light Field Size13. Exposure Size14. X-Rays On LED and Audible Signal 15. Operator Manual16. Calibration Checks (Optional)
Maintenance Test Year 7 Year 8 Year 9 Year 10 Year 11 Year 12Date/Initial
Date/Initial
Date/Initial
Date/Initial
Date/Initial
1. Power Button
Sche
dule
Fiv
e-Ye
ar M
aint
enan
ce
Insp
ectio
n at
Ari
bex
2. Lock-out Mode3. Automatic Shut-Off 4. Time Selection Buttons5. Enable and Start Buttons6. Trigger7. SSD Cage8. Shutter Rings9. Inclinometer10. Exposure Termination11. Laser Range Indicator12. Light Field Size13. Exposure Size14. X-Rays On LED and Audible Signal 15. Operator Manual16. Calibration Checks (Optional)

3938
7.4 RepairRepairs can only be undertaken by trained service personnel. Direct all questions to Aribex toll free: 1-866-340-5522; fax 800-659-4299.
The following are factory serviceable parts and components:
•NOMADMD,mainapparatusassembly–item0.850.0112
•SSDcage–item0.850.0392
•Batteries–item0.850.0068
•110/120VACbatterychargerw/manual(DeWalt,modelDW9116orDC9310)–item 0.850.0120
•220/240VACbatterychargerw/manual(DeWalt,modelDE9116orDE9135)–item 0.850.0151
•Hard-shellcarryingcase–item0.850.0222
•Inclinometer–item0.850.0117
•LaserAssembly–item0.850.0409
•LEDAssembly–item0.850.0411
The following are instructions for handling a product at end of life. Please, protect the environment and do not improperly dispose of any part of the NOMAD MD system, battery, or charger; contact an authorized distributor or Aribex, regarding assistance in returning the product for proper disposal. Please fully discharge and properly package batteries before returning to Aribex for disposal (see the accompanying instruction manual about the batteries for proper packaging guidelines).
If product return is required, contact Aribex for a Return Authorization (RA) number and shipping instructions to return the product to the proper facility. You will be required to provide the serial number from the label affixed to the backside of the shutter ring housing of the NOMAD MD device.
Be sure to include the RA number on the package you are returning. Products without an RA number cannot be serviced or given credit consideration.
Aribex will not assume responsibility for shipping damages; however, Aribex will help you file a claim with the freight carrier. Please see warranty information at the end of this manual.
Cd
Serial number location

4140
8.0 Technical Description
8.1 Basic Technical SpecificationsMaximum deviation from fixed factors: ±10% (unless otherwise noted)Total weight: 5kg (11 lbs)
EnvironmentalOperation
Temperature –5°C to +40°C (+23°F to +104°F) +4°C to +40°C (+39°F to +104°F) charging
Relative humidity 10% to 80%, non-condensingStorage and transportation
Temperature –20°C to +60°C (–4°F to +140°F) NOMAD–20°C to +40°C (–4°F to +104°F) battery
Relative humidity 95%, non-condensing
Do not use the NOMAD MD device outside of the temperature and relative humidity ranges specified.
Classification / Specification ComplianceIEC 60601-1 (Ed. 3), 60601-1-3, 60601-2-7; 21 CFR 1020.30 & 1020.31 Class II, Type B MDD (93/42/EEC): Annex IX Class IIbIPX specification IP0; do not operate under wet conditionsMode of operation Intermittent operation
For use in environments where no flammable anesthetics and/or flammable cleaning agents are present. Use a non-acetone based disinfectant wipe (with less than 17% alcohol content) or a cloth to wipe the exterior surfaces of the NOMAD MD and charger. Do not use cleaners intended for hard surfaces, since certain chemical combinations may deteriorate the NOMAD MD plastic prematurely.
ElectricalRechargeable NiCad battery 14.4V, 2A/hrLow battery alert set point 14.4VBattery current at 2.0mA, 75kVp output approx. 26A
X-ray Controls and GeneratorExposure time range 0.02–0.99 sec. Maximum duty cycle 1:60 (one 0.25 sec. exposure / 15 sec.)Minimum inherent filtration 2.5mm Al

4140
X-ray Controls and GeneratorMaximum output power 150W nominal at 75kV, 2.0mAGenerator rating 2.0mA at 75kVp ±10%Leakage technique factors 75kV, 2.0mA, 0.99 sec.
Measurement Base of Technique FactorsThe kV is measured during pre-potting testing using a calibrated high voltage divider with a guaranteed accuracy of ±2%. Final performance measurements are made using a Fluke TNT 12000. Exposure time is measured from the moment X-rays are detected until they are no longer detected (which means 90% crossing setting is selected with no timer delay).
Collimator ConeMinimum source to skin distance 30cm (from focal spot to SSD tip)Nominal dose output at SSD tip (30cm) 3.28mGy/sec.X-ray field size and configuration
Max: 106.6 x 133.3 mmMin: 13.12 x 13.12 mm
Shielding Primarily non-lead heavy metals in molded plastic. Some lead is added as needed to reduce radiation leakage.
LaserSafety classification Class 2Wavelength 655 nmMaximum power <1 mWBeam divergence 2 mrad
8.2 Functional Diagram

4342
8.3 X-ray Tube Specifications and Characteristics
The KL 11-0.4-70 is available for nominal tube voltage with self-rectified or constant potential circuit – manufactured by Kailong.Nominal tube voltage 50 – 70kVNominal focal spot (IEC 60336:1993) 0.4mmMaximum anode heat content 4500JMaximum current continuous service 1.5mA x 70kVMaximum anode cooling rate 100WNominal anode input power 430WTarget material TungstenMinimum target angle 12˚Filament characteristics 2.2 – 3.0A, 2.0 – 3.5VMinimum permanent filtration (IEC 60522:1999) 0.8mm Al/50kV
F
y 37 100MIN 12°
Ø
30M
AX
x
10MAX
70 2MIN
FCC
Ø12
CENTRAL X-RAY
F: FILAMENTC: CATHODE
OUTLINE DRAWINGx axis: horizontal y axis: vertical
M4Deep10

4342
NOTE: The X-ray source assembly heating and cooling curves are equivalent to the anode heating curves shown here.
Maximum continuous heat dissipation will be made available upon request from Aribex.
Cathode Emission/Filament Characteristics Chart
Rating Chart
Thermal Characteristics Chart
anode cooling curve
anode heating curves

4544
8.4 EMC DataIndependent laboratory testing for electromagnetic compatibility for conformity to the Sub-clause 5.10 requirements of ISO/IEC 17025 “General Criteria for the Competence of Testing and Calibration Laboratories” was conducted by:
Nemko CCL, Inc. 1940 West Alexander St.Salt Lake City, Utah 84119-2039USA
The NOMAD MD needs special precautions regarding EMC and needs to be put into service according to the EMC information provided in this manual.
The NOMAD MD X-ray system is intended for use in the electromagnetic environment as specified. The NOMAD MD uses RF energy only for its internal function. In addition, the housing includes conductive shielding; therefore, while portable and mobile RF communications equipment can affect other medical electrical equipment, the RF emissions of the NOMAD MD are very low and are not likely to cause any interference in nearby electronic equipment.
The NOMAD MD is intended for use by healthcare professionals only. This system may cause radio interference or may disrupt the operation of nearby equipment. It may be necessary to take mitigation measures, such as re-orienting or relocating the NOMAD MD or shielding the location.
The test results show that the NOMAD MD is suitable for use in all establishments, including domestic establishments and those directly connected to public low-voltage power supply networks that supply buildings used for domestic purposes. Test Report Serial No. 226889-3.2 verifies that the NOMAD MD passed all necessary testing, and is compliant with the following standards, as they are applicable for the device type: EN 60601-1-2:2007, EN 55011 (2007), IEC 61000-4-2 (2008), IEC 61000-4-3 (2006), IEC 61000-4-4 (2004), IEC 61000-4-6 (2008), and IEC 61000-4-8 (1993). A complete copy of the test report will be made available to the appropriate parties upon request.

4544
8.5 Limited Warranty
LIMITED WARRANTYCOVERAGE. Aribex warrants its medical and dental x-ray equipment to be free from any defects in material or workmanship for a period of one (1) year from the date of purchase. Aribex also warrants any accessories purchased from Aribex to be free from any defects in material or workmanship for the period of one (1) year from the date of purchase.
The liability of Aribex is limited to repair or replacement of any parts that Aribex or its authorized resellers determine to be defective. Contact Aribex for a Return Authorization (RA) number and shipping instructions. Parts proving defective shall be repaired or replaced free of charge (labor and shipping included), if defective equipment is returned (shipment return service) to Aribex (USA) or the location of the authorized service center. Equipment repaired or replaced under warranty shall continue to be warranted for the balance of the original warranty term. All warranty claims must be made not later than ten (10) business days following the expiration of the applicable warranty period.
LIMITATIONS OF COVERAGE. This warranty does not apply to equipment that is or has been abused, misused, or altered (including opening enclosure or tampering), improperly maintained, subjected to use beyond rated conditions, or damaged as a result of any carelessness or accidents. This warranty does not cover ordinary wear and tear or maintenance.
LIMITATIONS OF LIABILITY. Aribex makes no other warranty, either expressed or implied, with respect to any equipment purchased from Aribex, including without limitation any implied warranties of merchantability or fitness for a particular purpose, whether or not Aribex may have been informed of the actual uses to which any of such equipment may be put. Aribex shall not under any circumstance be liable for incidental, indirect, consequential, punitive or exemplary damages, including without limitation damages for delay or lost profits, and in no event shall liability of Aribex arising from the purchase, sale or use of the equipment, or breach of any warranty made above, exceed in the aggregate the purchase price paid therefore.
4746
NOTES
4746
NOTES

0473
ISO 13485 / ISO 9001Certified Company
© Aribex 2015All Rights Reserved
English is the original draft language for this manual.
Aribex11727 Fruehauf Dr
Charlotte, NC 28273U.S.A.
Phone: 866-340-5522Fax: 800-659-4299
Email: [email protected]://www.aribex.com
EC REPMT Promedt Consulting GmbH, Altenhofstr. 80, 66386 St. Ingbert, GermanyTel: +49 6894 58102 0; Fax: +49 6894 58102 1; Email: [email protected]
0.850.0516 Rev00 09/29/15