Embed Size (px)
Citation preview

Harmonic CLEARcutStorage Encoding Solution
Installation and Startup GuideVERSION 3.8
Rev E
Manual Part No. MAN-CCS-GUIDE-3.8
© 2011 Harmonic Inc. All rights reserved.
Disclaimer
Harmonic reserves the right to alter the equipment specifications and descriptions in this publication without prior notice. No part ofthis publication shall be deemed to be part of any contract or warranty unless specifically incorporated by reference into suchcontract or warranty. The information contained herein is merely descriptive in nature, and does not constitute a binding offer forsale of the product described herein. Harmonic assumes no responsibility or liability arising from the use of the products describedherein, except as expressly agreed to in writing by Harmonic. The use and purchase of this product do not convey a license underany patent rights, copyrights, trademark rights, or any intellectual property rights of Harmonic. Nothing hereunder constitutes arepresentation or warranty that using any products in the manner described herein will not infringe any patents of third parties.
Trademark Acknowledgments
Harmonic and all Harmonic product names are trademarks of Harmonic Inc. All other trademarks are the property of their respectiveowners.
Compliance and Approval
This equipment has been tested and found to comply with the limits for a Class A digital device, pursuant to Part 15, Subpart B of theFederal Communications Commission (FCC) rules.
These limits are designed to provide reasonable protection against harmful interference when the equipment is operated in acommercial environment.
This equipment generates, uses, and can radiate radio frequency energy. It may cause harmful interference to radio communicationsif it is not installed and used in accordance with the instructions in this manual. Operation of this equipment in a residential area islikely to cause harmful interference. If this occurs, the user will be required to correct the interference at his or her own expense.
This device complies with Part 15 of the FCC rules. Operation is subject to the following two conditions: (1) this device may notcause harmful interference, and (2) this device must accept any interference received, including interference that may causeundesired operation.
Connections between the Harmonic equipment and other equipment must be made in a manner that is consistent with maintainingcompliance with FCC radio frequency emission limits. Modifications to this equipment not expressly approved by Harmonic mayvoid the authority granted to the user by the FCC to operate this equipment.
WEEE/RoHS Compliance Policy
Harmonic Inc. intends to comply fully with the European Union’s Directive 2002/96/EC as amended by Directive 2003/108/EC, onWaste Electrical and Electronic Equipment, also known as “WEEE,” and Directive 2002/95/EC, as amended, on the Restriction ofuse of Hazardous Substances, also known as “RoHS.”
Harmonic will ensure that product which cannot be reused will be recycled in compliance with the WEEE Directive. To that end,users are advised that (1) Harmonic equipment is not to be discarded in household or office garbage, (2) Harmonic Inc. will pay thefreight for shipment of equipment to be disposed of if it is returned to Harmonic, (3) customers should call the normal RMAtelephone numbers to arrange for such shipment, and (4) for additional and updated information on this process customers mayconsult the Harmonic website: http://harmonicinc.com/ah_weee_recycle.cfm.
Harmonic will ensure that its products will be either reused or recycled in compliance with the WEEE Directive. For the latestinformation concerning Harmonic’s WEEE/RoHS Compliance Policy and its Recycling and Take-Back process, please visit our website.

© 2011 Harmonic Inc. All rights reserved.
Names and Contents of the Toxic and Hazardous Substances or Elements in theProducts if the Part is Present
This table shows those components where hazardous substances may be found in Harmonic products based on, among otherthings, material content information provided by third party suppliers. These components may or may not be part of the product.
The Environmental Protective Use Period for Harmonic products is 20 years unless displayed otherwise on the product. The EPUPperiod is valid only when the products are operated or stored as per the conditions specified in the product manual.
(Part name) (Hazardous Substance)
(PB) (Hg) (Cd) (CrVI) (PBB) (PBDE)
(Printed Circuit Assemblies)
X O O O O O
(Mechanical Subassemblies)
X O O O O O
(Optical Subassemblies)
X O O O O O
(Power Supplies)X O O O O O
(Cables, harnesses)
X O O O O O
(Screens, Monitors)
X O O O O O
(Metal Parts)
O O O O O O
(Plastics, foams)O O O O O O
(Batteries)
X O O O O O
O:O: Indicates the content of the toxic and hazardous substances at the homogeneous material level of the parts is below the limitdefined in SJ/T11363 2006 standard.
X:X: Indicates that the content of the toxic and hazardous substances in at least one of the homogeneous materials of the parts isabove the limit defined in SJ/T11363 2006 standard.

© 2011 Harmonic Inc. All rights reserved.
Standards and Agency Approval
The following tables list regulatory standards and agency approvals:
North America
Standards Agency Approval
EMI: FCC Part 15, Subpart B, ICES-003, Issue 2, Class A FCC
Safety: UL 60950, CSA 60950 cTUV-us Mark
Europe
Standards Agency Approval
EMI/EMC: EN55022, Class A, EN55024 CE
Safety: EN 60950 TUV-GS-Mark, CE
Japan
Standards Agency Approval
EMI: VCCI V-3 / 2000.04 VCCI
Australia and New Zealand
Standards Agency Approval
EMI: AS/NZS-3548: 1995 +A1: 1997 +A2: 1997 N/A

© 2011 Harmonic Inc. All rights reserved.
Documentation ConventionsThis manual uses some special symbols and fonts to call your attention to important information. Thefollowing symbols appear throughout this manual:
DANGER: The Danger symbol calls your attention to information that, if ignored, can cause physicalharm to you.
CAUTION: The Caution symbol calls your attention to information that, if ignored, can adversely affectthe performance of your Harmonic product, or that can make a procedure needlessly difficult.
LASER DANGER: The Laser symbol and the Danger alert call your attention to information about thelasers in this product that, if ignored, can cause physical harm to you.
NOTE: The Note symbol calls your attention to additional information that you will benefit fromheeding. It may be used to call attention to an especially important piece of information you need, or itmay provide additional information that applies in only some carefully delineated circumstances.
TIP: The Tip symbol calls your attention to parenthetical information that is not necessary for performinga given procedure, but which, if followed, might make the procedure or its subsequent steps easier,smoother, or more efficient.
In addition to these symbols, this manual uses the following text conventions:
■ Data Entry: indicates text you enter at the keyboard.
■ User Interface: indicates a button to click, a menu item to select, or a key or key sequenceto press.
■ Screen Output: shows console output or other text that is displayed to you on acomputer screen.
■ Bold: indicates the definition of a new term.
■ Italics: used for emphasis, cross-references, and hyperlinked cross-references in onlinedocuments.

Table of Contents
© 2011 Harmonic Inc. 6 CLEARcut, Version 3.8, Rev E
Table of Contents
Chapter 1 Welcome to CLEARcut Studio1.1 About This Manual . . . . . . . . . . . . . . . . . . . . . . . . . . . . . . . . . . . . . . . . . 81.2 About CLEARcut Storage Encoding Solution . . . . . . . . . . . . . . . . . . . . 81.3 Operating Environment . . . . . . . . . . . . . . . . . . . . . . . . . . . . . . . . . . . . 101.4 System Requirements . . . . . . . . . . . . . . . . . . . . . . . . . . . . . . . . . . . . . . 11
Chapter 2 Installation and Setup2.1 Connecting Equipment . . . . . . . . . . . . . . . . . . . . . . . . . . . . . . . . . . . . . 12
2.1.1 Connecting Source Devices . . . . . . . . . . . . . . . . . . . . . . . . . . . . . . . . 122.1.2 Connecting the Encoders . . . . . . . . . . . . . . . . . . . . . . . . . . . . . . . . . . 132.1.3 Connecting the CLEARcut Workstation . . . . . . . . . . . . . . . . . . . . . . . 142.1.4 Connecting Equipment for Transcoding . . . . . . . . . . . . . . . . . . . . . . 14
2.2 Configuring Network Information . . . . . . . . . . . . . . . . . . . . . . . . . . . . 142.3 NMX Configuration . . . . . . . . . . . . . . . . . . . . . . . . . . . . . . . . . . . . . . . . 15
2.3.1 Starting the NMX Server . . . . . . . . . . . . . . . . . . . . . . . . . . . . . . . . . . . 162.3.2 Configuring the Encoder in NMX . . . . . . . . . . . . . . . . . . . . . . . . . . . . 17
2.4 Upgrading CLEARcut Studio from a Previous Version . . . . . . . . . . . 192.4.1 Migrating to Another CLEARcut Workstation . . . . . . . . . . . . . . . . . . 202.4.2 Updating Embedded Encoder Software . . . . . . . . . . . . . . . . . . . . . . 20
Chapter 3 Getting Started in CLEARcut Studio3.1 Opening CLEARcut Studio . . . . . . . . . . . . . . . . . . . . . . . . . . . . . . . . . . 223.2 Setting the Active Catalog . . . . . . . . . . . . . . . . . . . . . . . . . . . . . . . . . . 233.3 Starting the CLEARcut Studio Server. . . . . . . . . . . . . . . . . . . . . . . . . . 243.4 Where to Go Next . . . . . . . . . . . . . . . . . . . . . . . . . . . . . . . . . . . . . . . . . 24
Chapter 4 Troubleshooting4.1 Contacting Harmonic Support . . . . . . . . . . . . . . . . . . . . . . . . . . . . . . . 25
Appendix A Keystroke Commands
Appendix B Using a Contour ShuttlePRO Device
Appendix C Restoring CLEARcut StudioC.1 Restoring Windows Server 2003 and SQL 2008 for IBM x3650 M2 server29
C.1.1 Recovery Steps for IBM x3650 M2 . . . . . . . . . . . . . . . . . . . . . . . . . . 29C.2 Restoring Windows Server 2003 and SQL 2008 for Dell PowerEdge 2950server 30
C.2.1 Recovery Steps for Dell 2950 . . . . . . . . . . . . . . . . . . . . . . . . . . . . . . 31C.2.2 Data Execution Prevention (before NMX installs) . . . . . . . . . . . . . . . 32
C.3 Installing NMX Server Application . . . . . . . . . . . . . . . . . . . . . . . . . . . 32C.4 Post-installation NMX Configurations . . . . . . . . . . . . . . . . . . . . . . . . . 34
C.4.1 Data Execution Prevention after NMX is installed (for Dell PowerEdge

Table of Contents
© 2011 Harmonic Inc. 7 CLEARcut, Version 3.8, Rev E
2950 server only) 34C.4.2 Creating an NMX Catalog . . . . . . . . . . . . . . . . . . . . . . . . . . . . . . . . . . 34C.4.3 Setting the Active Catalog in NMX . . . . . . . . . . . . . . . . . . . . . . . . . . . 35
C.5 Installing the Vela Decoder Card Software . . . . . . . . . . . . . . . . . . . . 36C.6 Installing CLEARcut Studio . . . . . . . . . . . . . . . . . . . . . . . . . . . . . . . . . 37C.7 Data Execution Prevention (for Dell PowerEdge 2950 server only) 38

© 2011 Harmonic Inc. 8 CLEARcut, Version 3.8, Rev E
Chapter 1Welcome to CLEARcut Studio
1.1 About This ManualThis manual covers the following topics:
■ Setting up the CLEARcut workstation
■ Installing the software
■ Performing configuration tasks
■ Starting the CLEARcut server
■ Contacting Harmonic Support
■ Using keyboard shortcuts
■ Using a ShuttlePRO device
For information and instructions regarding tasks performed within the CLEARcut application,refer to the CLEARcut Studio online help.
1.2 About CLEARcut Storage Encoding SolutionHarmonic CLEARcut™ Storage Encoding Solution provides an end-to-end solution forcompression, storage, and management of stream captures. CLEARcut Studio 3.8 providesthe following features:
■ PCR resetting and null packet stripping for capture and concatenation jobs
■ Stream capture from VTR, DVD, and live feed sources
■ Support using VDCP server as input source
■ Streamlined, easy-to-use interface
■ Asset database and management tools
■ Capture of encoder-multicast UDP/IP output streams
■ Video encode parameter controls for optimal video quality settings
■ NTSC and PAL video stream capture, playback, and looping
■ Video and audio stream capture and playback for MPEG-2 and MPEG-4 AVC (H.264)formats. The capture bit rate can be up to 20 Mbps.
■ As of v3.2.1, CLEARcut can capture and playback MPEG2 SD and HD content, as well as H.264 SD and HD content
■ Easy switching between multiple encoders
■ Clip concatenation for MPEG-2 and MPEG-4 AVC (H.264) formats
■ Frame-accurate stream capture with I frame at the beginning of each stream capture
■ Full VTR and DVD player control, and VDR control via VDCP
■ Multiple interface options for easily controlling VTRs, VDRs, and DVD players andproducing captures: USB ShuttlePro2 controller, graphical user interface control, andkeyboard “hot key” controls
■ SCTE-104 compliant support of messaging between the workstation and any Harmonicbroadcast encoder for accurate closed GOP control
Chapter 1 Welcome to CLEARcut Studio About CLEARcut Storage Encoding Solution
© 2011 Harmonic Inc. 9 CLEARcut, Version 3.8, Rev E
■ Video and audio decoding for captured asset quality verification with external TV or anonscreen display
■ File transfer GUI to allow ease of uploading files to remote servers (manual or automatic)
■ Batch processing to allow a list of predefined captures to be automatically captured frommultiple tapes or DVDs
■ Parallel capture of multiple IP output streams originating from multiple encoders or amultichannel encoder
■ LRV/PIP stream support
■ Simultaneous creation of multiple captures from a single source
■ Creation of external viewing clips for quality assurance and verification
■ Metadata creation based on CableLabs ADI 1.0 and ADI 1.1 or Microsoft TV
■ Support for importing external XML-formatted job listings for capture on CLEARcut
■ Content re-encoding (high bit rate MPEG-2 to lower bit rate MPEG-2), SD to HD up-conversion, and HD to SD down-conversion
■ Content transcoding between formats; for example, from MPEG-2 to iPod® format, ormobile phone format to MPEG-2. This feature requires a separate license.
■ Ability to view the clip while it is being recorded
■ Asset encryption using a DRM server
■ Support for VBI and data PIDs passthrough and capture
■ Automated Xcode integration with Entone IDP
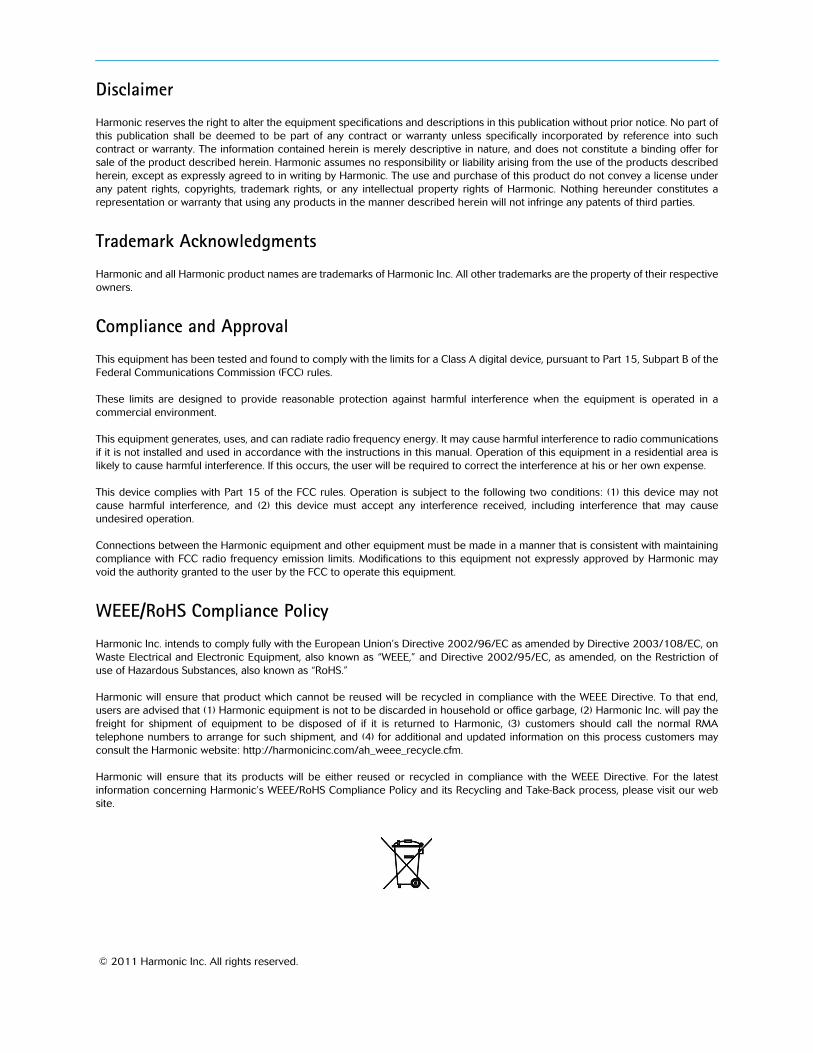
The following table shows the encoders that support several features of CLEARcut 3.8.
Encoder Support forSeveral CLEARcut 3.8 Features
Encoder RFD CappedVBR
Frame-accurate DPI * VBVManagementat splice point
PAL 1080PsF NTSC
RFD off RFD on CBR CappedVBR
MV100 —
ELC-5000 — —
ELC-5400 —
MV500 — — —
ELC-7000 —
*For ELC-5000 and MV100, frame-accurate DPI is not supported in H.264 mode.
❑ When using the default profiles settings on these encoders, CLEARcut 3.8 cancapture MPEG-2 assets that comply with the CableLabs Video-on-Demand ContentEncoding Profiles, Specification v1.1 and v2.0 if you are using the default profilessettings.
Chapter 1 Welcome to CLEARcut Studio Operating Environment
© 2011 Harmonic Inc. 10 CLEARcut, Version 3.8, Rev E
❑ For MPEG2-SD: Encoders ELC-5000 and MV100
❑ For MPEG2-HD: MV500
■ Contact Harmonic support for information about CableLabs stream and Manzanitaanalyzer compliance.
NOTE: For information about how to upgrade to CLEARcut Studio 3.8 from an earlier version, see2.4 Upgrading CLEARcut Studio from a Previous Version on page 19.
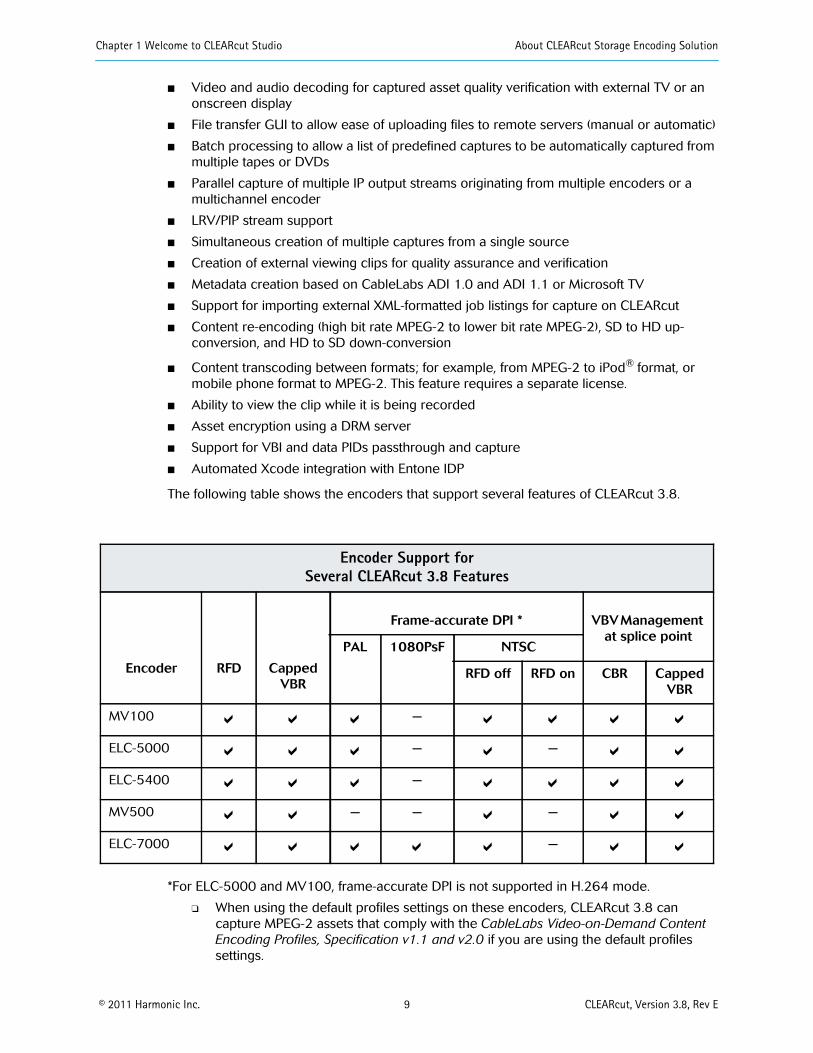
1.3 Operating EnvironmentCLEARcut Studio software runs on the same computer as the NMX™ Digital Service ManagerServer. NMX manages the encoders. You can hook up multiple encoders to the CLEARcutworkstation via a network switch. If resources are available, CLEARcut records multiple clipsin parallel.
CLEARcut Studio communicates with the encoder using the SCTE104 and SCTE-35protocols, which are used by digital program insertion (DPI) messages. The MPEG outputfrom the encoder is sent to the CLEARcut workstation over a multicast IP address.
CLEARcut Storage Encoding Solution supports one VTR, VDR, or DVD player at a time.
CLEARcut allows the creation of a metadata package through the CLEARcut MetaData Editor.A graphical user interface guides you through the process of creating the related assetpackages as defined in either CableLabs Video-on-Demand (VOD) Metadata ContentSpecification 1.0 and 1.1 or Microsoft IPTV VOD Metadata Specification 1.1.
The following figure shows the components of a typical CLEARcut Storage Encoding Solutionnetwork.
Figure 1-1: A typical CLEARcut Storage Encoding Solution network
Your CLEARcut workstation comes with the following software installed:
■ CLEARcut Studio
■ NMX Digital Service Manager
■ Microsoft® SQL Server
Chapter 1 Welcome to CLEARcut Studio System Requirements
© 2011 Harmonic Inc. 11 CLEARcut, Version 3.8, Rev E
■ Adobe® Reader 7.0.7
■ MG-Soft MIB browser
■ NetTime
1.4 System RequirementsSetting up a CLEARcut network requires the following equipment:
■ CLEARcut workstation computer
■ VTR with Sony 9-pin RS-422 protocol, or VDR with VDCP support, or a Pioneer DVDplayer (PRV-LX1/DVD-V5000/DVD-V8000)
■ At least one of the following encoders: Harmonic Electra 5000, Electra 5400, orElectra 7000; or Harmonic MV100 or Harmonic MV500 with an IPA module
NOTE: If you plan to hook up multiple encoders, make sure you have all the necessary cables. If you planto use SD and HD encoders, you need SD and HD source devices, too.
■ A network switch capable of multicasting with IGMP snooping for setups with multipleencoders
■ 1 RS-232-to-RS-422 serial cable (Harmonic provides)
■ 1 multi I/O audio/video breakout cable
■ 1 coaxial cable to connect the VTR, VDR, or DVD player to the monitor
■ 1 serial digital video cable or analog video and audio cables to connect the VTR or DVDplayer to the encoder
■ 1 audio cable to connect an external TV monitor
■ 1 ASI jumper cable (Harmonic provides with IPA)
■ 1 crossover Ethernet cable (single encoder setups only)
■ 1 or more regular Ethernet cables
© 2011 Harmonic Inc. 12 CLEARcut, Version 3.8, Rev E
Chapter 2Installation and Setup
This chapter guides you through the steps for setting up the CLEARcut Studio system. Whichtasks you perform depend on whether you’re migrating data from one system to another,upgrading the software on an existing system, or receiving CLEARcut for the first time. Referto the following table for information about the steps you need to take.
Table 2-1: Installation, Migration, and Upgrade Scenarios
Situation Background Information Relevant Sections in This Chapter
Setting upCLEARcut for thefirst time
NMX and CLEARcut Studio software isalready installed on the workstationyou received from Harmonic. You mustconnect and configure the equipment.
■ 2.1 Connecting Equipment on page 12■ 2.2 Configuring Network Information on
page 14■ 2.3 NMX Configuration on page 15
Migrating data to anew CLEARcutworkstation
NMX and CLEARcut Studio software isalready installed on the workstationyou received from Harmonic. You mustconnect and configure the equipmentand transfer the assets from your oldworkstation to the new one.
■ 2.4.1 Migrating to Another CLEARcutWorkstation on page 20
■ 2.2 Configuring Network Information onpage 14
Upgrading softwareon an existingCLEARcutworkstation
Back up the CLEARcut and NMXcatalogs and assets to anothermachine, then perform cleaninstallation of the entire system, thenrestore the catalogs.
■ 2.4 Upgrading CLEARcut Studio from aPrevious Version on page 19
Adding orswitching encodersto your CLEARcutsetup
Whenever you change the encoders inyour CLEARcut setup, you mustconnect and configure the equipment.
■ 2.2 Configuring Network Information onpage 14
■ 2.3.2 Configuring the Encoder in NMXon page 17
2.1 Connecting EquipmentTo begin using CLEARcut Storage Encoding Solution, first connect the equipment in thenetwork.
2.1.1 Connecting Source DevicesYou can capture streams from video tape players, DVD players, live broadcast sources, orfiles on disk (transcoding). Depending on your CLEARcut system, you may have multiplesource devices set up.
This section explains how to connect VTRs, VDRs, DVD players, and live source devices. Forinstructions for connecting equipment for transcoding (available only on Dell 2RU or IBMCLEARcut platforms), see 2.1.4 Connecting Equipment for Transcoding on page 14.
To connect a VTR, VDR, or DVD player, or live source device:
1. Connect the female end of the provided RS-232-to-RS-422 cable to the COM 1 port onthe CLEARcut workstation and the male end to the serial input port on the source device.

Chapter 2 Installation and Setup Connecting Equipment
© 2011 Harmonic Inc. 13 CLEARcut, Version 3.8, Rev E
NOTE: If you are using SD and HD source devices, remember to connect the appropriate source device tothe CLEARcut workstation depending on the type of capturing you’re doing.
2. If you are using serial digital input, connect an SDI cable from the source device to theserial digital input port on the encoder.
If you are using both SD and HD source devices and encoders, connect the SD sourcedevice to the MV100, Electra 5000, or Electra 5400 encoder, and connect the HDsource device to the MV500 or the Electra 7000 encoder.
If you are using analog video (the VTR), connect a cable from the VTR to the composite-video-in port on the encoder, and connect the analog audio cables to the audio ports onthe encoder.
For more information about the encoder audio and video ports, see the followingencoder manuals:
❑ DiviCom Electra 5000 Multichannel Encoder guide
❑ DiviCom Electra 5400 MPEG-4 AVC Standard Definition Multi-Service Encoder guide
❑ DiviCom Electra 7000 MPEG-4 AVC High Definition Multi-Service Encoder guide
❑ Standard Definition DiviCom MPEG-2 Encoder guide
❑ High Definition DiviCom MPEG-2 Encoder guide
3. Use a coaxial cable to connect the source device to a monitor.
2.1.2 Connecting the EncodersThis section includes instructions for connecting Electra and MV encoders.
NOTE: If you have multiple encoders, connect them to the CLEARcut workstation by a common networkswitch.
2.1.2.1 Connecting Electra Encoders
To connect an Electra encoder:
1. Connect the primary IP output port, labeled “Pri,” as appropriate for your network.
❑ For single encoder networks, connect a crossover Ethernet cable from the primary IPoutput port to the second Ethernet port (NIC 2) on the CLEARcut workstation.
❑ For multiple encoder networks, connect a regular Ethernet cable from the primary IPoutput port to a port on a network switch.
NOTE: You must use different networks for IP output and encoder management. Do not connect the IPoutput port to the same switch you connect the Ethernet management port.
2. Connect the Ethernet management port, labeled “Eth,” to a network switch.
3. Configure the Ethernet switch to support autonegotiation by setting each port to “setspeed auto” or “set duplex auto.”
2.1.2.2 Connecting the MV100 and MV500 Encoders
To connect the encoders:
1. Connect the IPA output port as appropriate for your network.
❑ For single encoder networks, connect a crossover Ethernet cable from the IPAEthernet output port to the second Ethernet port (NIC 2) on the CLEARcutworkstation.

Chapter 2 Installation and Setup Configuring Network Information
© 2011 Harmonic Inc. 14 CLEARcut, Version 3.8, Rev E
❑ For multiple encoder networks, connect a regular Ethernet cable from the IPAEthernet output port to a port on a network switch.
NOTE: You must use different networks for IP output and encoder management. Do not connect the IPAEthernet output port to the same switch you connect the Ethernet management port.
2. Connect the ASI jumper cable from the first main board ASI output port to the ASI inputport on the IPA module.
See the Standard Definition DiviCom MPEG-2 Encoder guide or the High DefinitionDiviCom MPEG-2 Encoder guide for more information.
3. Connect a regular Ethernet cable from the encoder management Ethernet port to anetwork switch.
2.1.3 Connecting the CLEARcut WorkstationTo connect the CLEARcut workstation:
1. Connect the first Ethernet port (NIC 1) on the CLEARcut workstation to the networkswitch to which you connected the encoder management ports.
2. For Dell PowerEdge 2950 server, connect the VGA monitor to the VGA output of the on-board display card. For IBM x3650 M2 server, connect to VGA output of ASUS graphicscard.
3. Connect the video/audio output of the Vela decoder card to an external TV monitor usingthe multi I/O audio/video breakout cable.
2.1.4 Connecting Equipment for TranscodingIf you are using a Dell 2RU or IBM CLEARcut platform, you can use transcoding on MPEG-2files to reduce the transport bit rate of asset files. With the Electra encoder, you can alsochange the video codec to H.264 if you want. For transcoding, CLEARcut plays the MPEG-2file through the decoder, and the encoder receives the decoder output as input. Audiostreams are embedded. CLEARcut captures streams from the encoder output.
To connect the encoder and CLEARcut workstation for transcoding:
■ Connect an SDI cable from the SDI HD or SD output port of the Vela decoder card on theCLEARcut workstation to the serial digital input port on the encoder.
NOTE: For transcoding, the source input type in the encoding profile should be set to digital video. Forinformation, see the CLEARcut Studio online help.
2.2 Configuring Network InformationThe CLEARcut workstation communicates with the encoder over an Ethernet network.Additionally, the CLEARcut workstation may need Ethernet connectivity to VOD servers oradvertisement servers.
You need to set several IP addresses: one for each encoder and two for the CLEARcutworkstation. You do not need to set the IP address on the encoder right now, but set the IPaddresses on the CLEARcut workstation.
NOTE: When you configure IP addresses for the CLEARcut workstation, you can change the default hostname. If you need to change the host name after CLEARcut Studio is running, some additionalconfiguration is required. See the CLEARcut Studio online help for additional information.
Choose IP addresses as follows:
Chapter 2 Installation and Setup NMX Configuration
© 2011 Harmonic Inc. 15 CLEARcut, Version 3.8, Rev E
■ Encoder Ethernet management port. Choose a unique IP address on the corporatenetwork. You set the IP address on the encoder when you set up the NMX map. You donot need to set the IP address from the encoder front panel.
■ CLEARcut workstation NIC 1. The computer uses NIC 1 for encoder management andcontrol, and for file transfers to advertisement servers or VOD servers. Use a unique IPaddress on the corporate network for this IP address.
■ CLEARcut workstation NIC 2. The computer uses NIC 2 for video streaming and capture.This NIC is connected directly to the IP output port on the encoder in single encodernetworks, or to a network switch in multiple encoder networks. In single encodernetworks, NIC 2 does not need access to the corporate network. Harmonic recommendssetting this IP address to 10.10.10.10 and the subnet mask to 255.255.255.0. If youhave multiple encoders, you connect NIC 2 to a network switch. Use a unique IP addresson a separate network for this IP address when you have multiple encoders. Do not usethe same network for encoder management and video streaming.
NOTE: Do not set the default gateway for NIC 2 when you have a single encoder. The default gateway isnot required.
You need to know the MAC address when you configure encoders in NMX.
To find the encoder MAC address on an Electra encoder:
1. On the encoder front panel, press the STAT button.
The Status menu appears on the front panel LCD screen.
Press the up arrow button to navigate to STAT: Serial Number.
The MAC address appears beneath the parameter name.
2. Note the last four digits of the MAC address.
To find the encoder MAC address on an MV100 or MV500 encoder:
1. On the encoder front panel, press the STAT button.
The Status menu appears on the front panel LCD screen.
2. Press the right arrow button on the front panel to scroll through the menu items.
MAC Address is the sixth parameter in the list.
3. Note the last four digits of the MAC address.
2.3 NMX ConfigurationIf this is the first time you are using CLEARcut Studio, or if you are adding a new encoder toyour setup, you must perform some NMX configuration tasks. NMX Digital Service Managerprovides encoder management, PSI generation, and DPI messaging for CLEARcut StorageEncoding Solution. CLEARcut Studio comes with most NMX settings preconfigured for theCLEARcut network. You need to configure only a few network settings that are specific toyour environment.
NMX includes two main software components:
■ Domain Manager. Use Domain Manager to start the NMX server and system processes. Ifyou shut the system down for any reason, be sure to use Domain Manager to restart theNMX server before starting CLEARcut Studio.
■ Digital Service Manager. Use Digital Service Manager to set the encoder networkproperties.
Chapter 2 Installation and Setup NMX Configuration
© 2011 Harmonic Inc. 16 CLEARcut, Version 3.8, Rev E
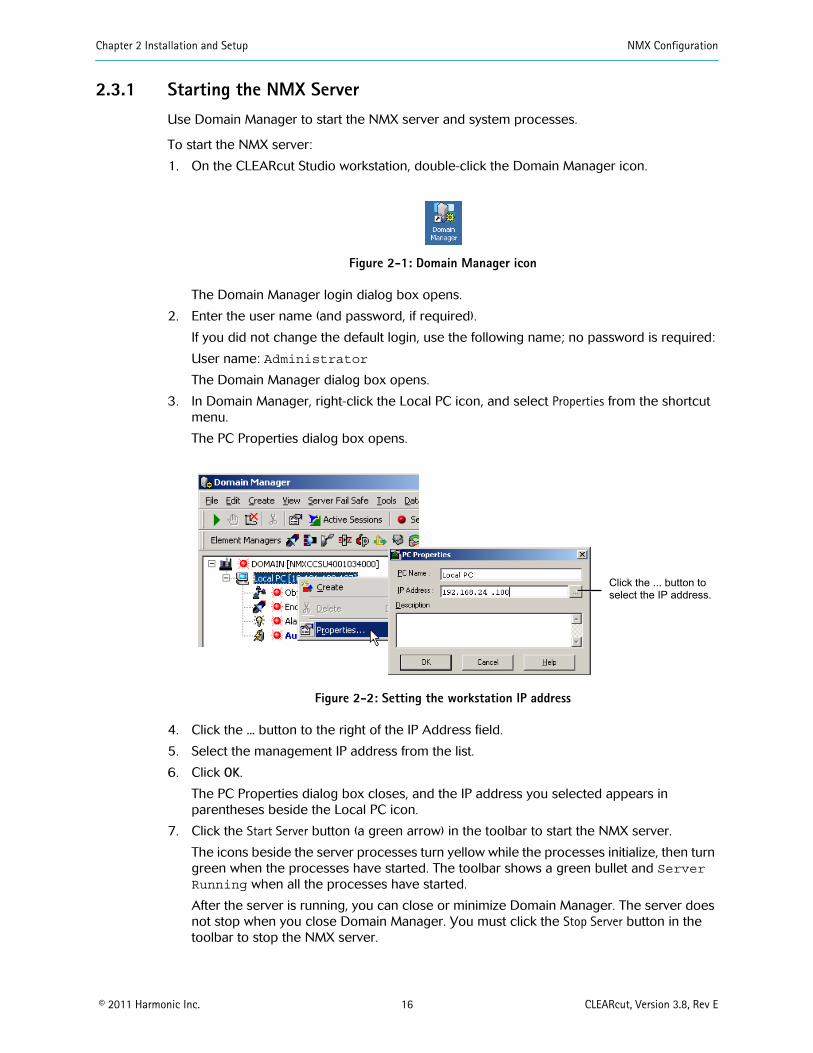
2.3.1 Starting the NMX ServerUse Domain Manager to start the NMX server and system processes.
To start the NMX server:
1. On the CLEARcut Studio workstation, double-click the Domain Manager icon.
Figure 2-1: Domain Manager icon
The Domain Manager login dialog box opens.
2. Enter the user name (and password, if required).
If you did not change the default login, use the following name; no password is required:
User name: Administrator
The Domain Manager dialog box opens.
3. In Domain Manager, right-click the Local PC icon, and select Properties from the shortcutmenu.
The PC Properties dialog box opens.
Click the ... button to select the IP address.
Figure 2-2: Setting the workstation IP address
4. Click the ... button to the right of the IP Address field.
5. Select the management IP address from the list.
6. Click OK.
The PC Properties dialog box closes, and the IP address you selected appears inparentheses beside the Local PC icon.
7. Click the Start Server button (a green arrow) in the toolbar to start the NMX server.
The icons beside the server processes turn yellow while the processes initialize, then turngreen when the processes have started. The toolbar shows a green bullet and ServerRunning when all the processes have started.
After the server is running, you can close or minimize Domain Manager. The server doesnot stop when you close Domain Manager. You must click the Stop Server button in thetoolbar to stop the NMX server.
Chapter 2 Installation and Setup NMX Configuration
© 2011 Harmonic Inc. 17 CLEARcut, Version 3.8, Rev E
CAUTION: The NMX server must be running for you to perform normal monitoring and management ofyour network devices. Leave the server running even after you have finished hardware and serviceconfiguration.
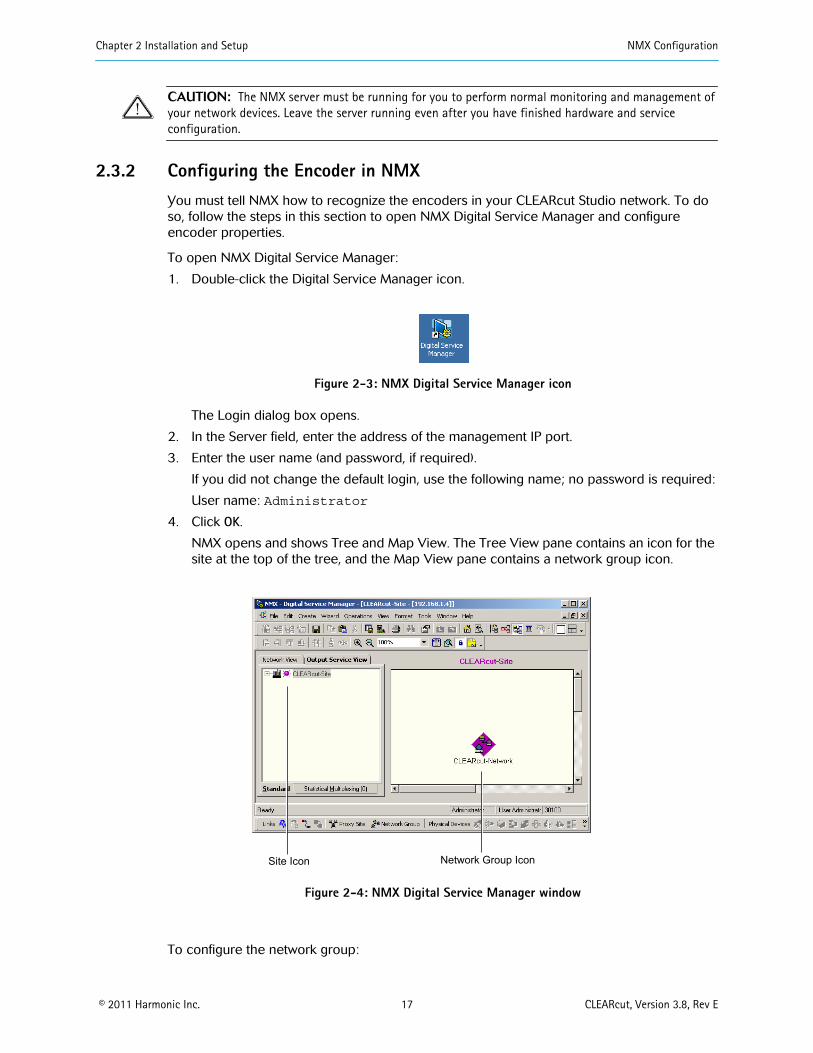
2.3.2 Configuring the Encoder in NMXYou must tell NMX how to recognize the encoders in your CLEARcut Studio network. To doso, follow the steps in this section to open NMX Digital Service Manager and configureencoder properties.
To open NMX Digital Service Manager:
1. Double-click the Digital Service Manager icon.
Figure 2-3: NMX Digital Service Manager icon
The Login dialog box opens.
2. In the Server field, enter the address of the management IP port.
3. Enter the user name (and password, if required).
If you did not change the default login, use the following name; no password is required:
User name: Administrator
4. Click OK.
NMX opens and shows Tree and Map View. The Tree View pane contains an icon for thesite at the top of the tree, and the Map View pane contains a network group icon.
Network Group IconSite Icon
Figure 2-4: NMX Digital Service Manager window
To configure the network group:

Chapter 2 Installation and Setup NMX Configuration
© 2011 Harmonic Inc. 18 CLEARcut, Version 3.8, Rev E
1. Double-click the network group icon in the map.
The map now shows the items in the network group:
❑ An input icon for each of the encoders in the network group. Each input device iconrepresents the source of the audio and video streams flowing to the encoder. In theCLEARcut Studio network, the input source is the VTR, VDR, or DVD player, and youdo not manage it through NMX. However, NMX requires an input icon for properprovisioning.
❑ An encoder icon representing each encoder in the network group. NMX managesand monitors the encoders. The red background on the encoder icons means thereis a major alarm asserted against it, but the alarm should clear and the backgroundturn green when you set network properties for the encoder, enabling NMX torecognize it.
❑ An output icon for each of the encoders in the network group. Each output deviceicon represents the output flowing from the encoder IP or IPA output port. This icontells NMX the output transport type. The yellow background on this icon means thereis a warning alarm asserted against this object. It should clear and turn green whenservices begin flowing.
❑ A PSI input device icon. NMX creates PSI for the video clip. When NMX generatesPSI/SI, there is no external PSI/SI input source. However, NMX requires a PSI/SI inputdevice in the network group to represent the flow of PSI/SI.
Encoder IconsInput Icons Output Icons
PSI Input Icon
Figure 2-5: The CLEARcut network group map in NMX Digital Service Manager
2. Right-click an encoder icon in the map, and select Properties from the shortcut menu.
The Properties dialog box opens.

Chapter 2 Installation and Setup Upgrading CLEARcut Studio from a Previous Version
© 2011 Harmonic Inc. 19 CLEARcut, Version 3.8, Rev E
3. Enter the encoder IP address, MAC address, subnet mask, and default gateway in theappropriate fields.
Set the encoderIP address,MAC address, subnet mask, default gateway.
Make sure In Service is set to True.
Figure 2-6: An encoder properties dialog box in NMX Digital Service Manager
4. Make sure the In Service field is set to True.
5. Click OK.
6. Power-cycle the encoder.
The encoder begins using these network settings when it restarts. The encoder iconbackground should turn green, and the output icon should turn green.
7. Repeat steps 2–6 for each encoder in the network group.
You can now close NMX Digital Service Manager. You are ready to begin using CLEARcutStudio. Proceed to Chapter 3, Getting Started in CLEARcut Studio.
2.4 Upgrading CLEARcut Studio from a Previous VersionUnlike previous versions, CLEARcut Studio 3.8 runs only on the Windows 2003 platform withSQL 2008. If you are upgrading from another platform, you must back up all assets andconfigurations, and do a full system update.
1. You must back up NMX and you CCS catalogs. Refer to the NMX Guide for instructionsabout backing up your catalogs. Copy the backup files from c:\databasebkup to a remotelocation.
2. Back up all your asset files from c:\assets to a remote location.
3. Follow the system recovery process in Appendix C, Restoring CLEARcut Studio onpage 29.
4. After the recovery, copy all the assets and backup catalogs files back to the system.Restore the catalogs.
5. Download the latest embedded software to the encoders in your CLEARcut setup. See2.4.2 Updating Embedded Encoder Software on page 20.
NOTE: If you have a Dell 1RU CLEARcut workstation and want to upgrade to CLEARcut 3.8, you mustorder a Dell 2RU or IBM server from Harmonic, then migrate your data to the new workstation asdescribed in 2.4.1 Migrating to Another CLEARcut Workstation on page 20.

Chapter 2 Installation and Setup Upgrading CLEARcut Studio from a Previous Version
© 2011 Harmonic Inc. 20 CLEARcut, Version 3.8, Rev E
2.4.1 Migrating to Another CLEARcut WorkstationIf you are migrating from one CLEARcut workstation to another, you need to perform thefollowing tasks:
■ Transfer your assets from the old CLEARcut workstation to the new one.
■ Connect your equipment. See Table 2-1: Installation, Migration, and Upgrade Scenarioson page 12.
■ Assign IP addresses. See 2.2 Configuring Network Information on page 14.
■ Enter encoder information in NMX Digital Service Manager.
■ Download the latest embedded software to the encoders in your CLEARcut setup. See2.4.2 Updating Embedded Encoder Software on page 20.
NOTE: Rather than using your existing NMX and CLEARcut catalogs, Harmonic recommends that you usethe default catalogs installed on the new CLEARcut workstation. The new NMX catalog includes a networkgroup and stream map that allow you to switch easily between encoders.
To transfer CLEARcut assets to the new workstation:
■ Copy the files from the c:\Assets directory on the old workstation to the c:\Assetsdirectory on the new workstation.
2.4.2 Updating Embedded Encoder SoftwareIf you are upgrading from a previous release of CLEARcut Studio, you must update theembedded software on your encoders. You do this using NMX Digital Service Manager.
NOTE: Upgrading encoder software affects service. Do not attempt to run CLEARcut Studio whileupgrading the embedded encoder software.
To upgrade an encoder’s embedded software:
1. If the NMX server is stopped, start it by opening Domain Manger and clicking theStart Server button (a green arrow) on the toolbar.
2. When the server has started, double-click the Digital Service Manager icon on thedesktop.
Figure 2-7: Digital Service Manager icon
The Login dialog box opens.
3. In the Server field, enter the address of the management IP port.
4. Enter the user name (and password, if required).
If you did not change the default login, use the following name; no password is required:
User name: Administrator
5. Click OK.
6. Double-click the network group icon in Map View to open the network group map.

Chapter 2 Installation and Setup Upgrading CLEARcut Studio from a Previous Version
© 2011 Harmonic Inc. 21 CLEARcut, Version 3.8, Rev E
7. Right-click the encoder, and select Properties from the shortcut menu.
The Properties dialog box opens.
Figure 2-8: Encoder properties dialog box
8. In the Desired Software Version drop-down list, select the version of embedded softwaresupported by CLEARcut Studio.
Check your CLEARcut Studio release notes to find the software version supported by thisrelease of CLEARcut Studio.
9. Click OK.
The encoder downloads the new software and resets itself. This process may take sometime.
10. Repeat steps 7–9 for each encoder in the network group.
This completes the upgrade process. You are now ready to begin using CLEARcut Studio.

© 2011 Harmonic Inc. 22 CLEARcut, Version 3.8, Rev E
Chapter 3Getting Started in CLEARcut Studio
To begin using CLEARcut Studio, open the application, set the active catalog, and start theserver. These tasks are described in this chapter.
You must set the active catalog the first time you use CLEARcut Studio, but you do not needto do this every time. After the initial setup, you only need to open the application and startthe server.
3.1 Opening CLEARcut StudioThe NMX server must be running before you start CLEARcut Studio. If you restart thisworkstation or any applications, always open Domain Manager and click the green arrow tostart the NMX server before opening CLEARcut Studio.
To open CLEARcut Studio:
1. Double-click the CLEARcut Studio icon on the desktop.
Figure 3-1: CLEARcut Studio icon
The CLEARcut Studio Login dialog box opens.
Figure 3-2: CLEARcut Studio login dialog box
2. If you have not set an administrator password, click OK.
There is no password the first time you log in, because the default Administrator logindoes not have a password. Harmonic recommends setting a password and creatingindividual user logins. See the CLEARcut Studio online help for instructions.
3. You may see the message, A valid active database catalog has not beenset. Please use database administration to create and specify anactive catalog. Click OK.
Figure 3-3 on page 23 shows CLEARcut Studio.

A red status bullet indicates that the CLEARcut Studioserver is stopped. A green status bullet indicates thatthe server is running.
Chapter 3 Getting Started in CLEARcut Studio Setting the Active Catalog
© 2011 Harmonic Inc. 23 CLEARcut, Version 3.8, Rev E
Figure 3-3: CLEARcut Studio main window
Next, you set the active catalog and start the CLEARcut Studio server.
3.2 Setting the Active CatalogCLEARcut Studio comes with one database catalog. You may need to create other catalogs inthe future, but you can use this catalog to start.
To set the active catalog:
1. Select Database > Active Catalog.
The Active Catalog dialog box opens.
4. Click the ... button toselect the IP address.
Figure 3-4: Activating the CLEARcut Studio catalog
2. Enter the host name of the CLEARcut workstation in the SQL Server field.
3. If you are upgrading to the 3.8 release, and your catalogs were created in an older version, you will be prompted to upgrade the preconfigured NMX catalogs when you first start CLEARcut.
4. In the Catalog drop-down list, select the catalog CCSDB.

Chapter 3 Getting Started in CLEARcut Studio Starting the CLEARcut Studio Server
© 2011 Harmonic Inc. 24 CLEARcut, Version 3.8, Rev E
5. Click the ... button beside the Server field, and select the management IP address of theCLEARcut workstation, or enter the IP address.
6. Click OK.
3.3 Starting the CLEARcut Studio ServerTo start the CLEARcut Studio server:
■ Select File > Start Server.
When the server starts, the status bullet in the bottom right corner turns green.
3.4 Where to Go NextTo begin using CLEARcut Studio, complete some initial configuration that you will use laterwhen creating capture jobs. See the CLEARcut Studio online help for information about thefollowing CLEARcut configuration tasks:
■ Configure the source device, the servers to which you upload captures, the CLEARcuthost, and your encoding profiles.
■ Set preferences—default properties for the CLEARcut server, video captures, sourcedevice operation, and decoder output.
■ Create a list of the providers that supply the video tapes or DVDs from which you recordclips.
■ Create a list of the sources—the video tapes and DVDs from which you record clips.
After you finish the initial configuration, you can begin to capture, certify, upload, and managevideo clips and create metadata packages.

© 2011 Harmonic Inc. 25 CLEARcut, Version 3.8, Rev E
Chapter 4Troubleshooting
4.1 Contacting Harmonic SupportThe Harmonic Customer and Technical Support groups are available to help you with anyquestions or problems you may have regarding Harmonic products.
For assistance from within the U.S. and Canada, call toll free:
1.888.MPEGTWO (673.4896)
For assistance from outside the U.S. and Canada, call:
1.408.490.6477
The fax number is 408.490.6770
The email address is [email protected]
The corporate address for Harmonic Inc. is:
Harmonic Inc.4300 North First St.San Jose, CA 95134, U.S.A.Attn: Customer Support
The corporate telephone numbers for Harmonic Inc. are:
Tel. 1.800.788.1330 (from the U.S. and Canada)Tel. +1.408.542.2500 (outside the U.S. and Canada)Fax.+1.408.490.6708
The web address for Harmonic Inc. is www.harmonicinc.com.

© 2011 Harmonic Inc. 26 CLEARcut, Version 3.8, Rev E
Appendix AKeystroke Commands
CLEARcut Studio supports the following keystroke commands:
Table A-1: CLEARcut Studio Keystroke Commands
Key Strokes Description
Ctrl+Spacebar Activates and deactivates keyboardmode
Spacebar Stop
Down Arrow Stop
Up Arrow Play
Alt+Up Arrow Eject
Left Arrow Decrease speed if shuttling forwardIncrease speed if shuttling backward
Right Arrow Increase speed if shuttling forwardDecrease speed if shuttling backward
Alt+Left Arrow Seek to in-point
Alt+Right Arrow Seek to out-point
Ctrl+Left Arrow Skip n frames backward
Ctrl+Right Arrow Skip n frames forward
Ctrl+Enter Record
Shift+Left Arrow Set in-point
Shift+Right Arrow Set out-point
Shift+Enter Review
TIP: The keystroke commands do not work until you activate keyboard mode. Press Ctrl+Spacebar toactivate keyboard mode.

© 2011 Harmonic Inc. 27 CLEARcut, Version 3.8, Rev E
Appendix BUsing a Contour ShuttlePRO Device
CLEARcut Studio supports using the Contour ShuttlePRO device instead of the CLEARcutStudio graphical user interface to send most commands. Harmonic provides a configurationfile that maps CLEARcut Studio commands to specific ShuttlePRO buttons.
NOTE: The VTR, VDR, or DVD player might not respond to a quick succession of commands from theShuttlePro device. For example, if you turn the wheel to its maximum right or left position and release thewheel so it quickly returns to the center position, the VTR or DVD player might continue playing in thedirection you were going. For best results, maintain contact with the wheel.
To use the ShuttlePRO device with CLEARcut Studio:
1. Connect the ShuttlePRO device to the CLEARcut workstation.
2. Open the ShuttlePRO Shuttle Configuration application.
3. Click the Options button, and select Import settings from the menu.
4. Navigate to the CLEARcut Studio software installation directory:
c:\Program Files\Harmonic\CLEARcut Studio\Resources\Configuration
5. Select the file CLEARcutStudio.pref, and click OK.
CLEARcutStudio.pref now appears in the Target Application menu.
6. Click Apply.
The following figure shows the buttons on the ShuttlePRO device and their functions.
RecordReview
Play
PauseEject
Seek to In-point Seek to Out-point
Play Stop
Set In-point Set Out-point
Jog wheel
Shuttle Ring
Figure B-1: ShuttlePRO buttons

Appendix B Using a Contour ShuttlePRO Device
© 2011 Harmonic Inc. 28 CLEARcut, Version 3.8, Rev E
The following table describes the jog wheel functions.
Table B-1: ShuttlePRO Jog Wheel Functions
Jog Wheel Direction Description
Left Skip n frames backward
Right Skip n frames forward
The following table describes the shuttle ring positions.
Table B-2: ShuttlePRO Shuttle Ring Positions
Shuttle Position Description
Left 7 –50 seconds
Left 6 –24 seconds
Left 5 –10 seconds
Left 4 –1 second
Left 3 –0.6 second
Left 2 –0.24 second
Left 1 –0.1 second
0 Still
Right 1 +0.1 second
Right 2 +0.25 second
Right 3 +0.6 second
Right 4 +1 second
Right 5 +10 seconds
Right 6 +24 seconds
Right 7 +60 seconds

© 2011 Harmonic Inc. 29 CLEARcut, Version 3.8, Rev E
Appendix CRestoring CLEARcut Studio
The CLEARcut workstation comes with CLEARcut Studio software installed. In most situations,you need to restore CLEARcut Studio software only in the event of a failure on theworkstation.
Harmonic provides recovery CDs so you can restore the computer in the event of a diskcrash or other failure on an NMX server or client computer. If you do need to rebuild thecomputer, you’ll need to perform the following tasks as described in this appendix:
■ Restoring Windows Server 2003 and SQL 2008 for IBM x3650 M2 server
■ Restoring Windows Server 2003 and SQL 2008 for Dell PowerEdge 2950 server
■ Creating an NMX Catalog
■ Setting the Active Catalog in NMX
■ Installing the Vela Decoder Card Software
■ Installing CLEARcut Studio
C.1 Restoring Windows Server 2003 and SQL 2008 for IBM x3650M2 server
The PC server is a IBM x3650 M2 with three slots which include Audigy Audio, Vela hardwaredecoder card and ASUS graphics card respectively.
You need the following DVD for recovery:
■ Australia Platform DVD
■ CLEARcut Studio application DVD
C.1.1 Recovery Steps for IBM x3650 M2The following installation procedures apply to the IBM x3650 M2 Server.
C.1.1.1 Hardware configuration
The IBM x3650 M2 server is required to setup a hardware RAID volume for OS installation.
To initiate the LSI Configuration Utility program, complete the following steps:
1. Turn on the server.
NOTE: Approximately 3 minutes after the server is connected to ac power, the power-control buttonbecomes active.
2. When the prompt <F1> Setup is displayed, press F1 to enter BIOS setup utility.
3. Select System Settings > Adapters and UEFI drivers.
4. Select Please press ENTER to compile the list of drivers.
5. Select the LSI Logic Fusion MPT SAS Driver.
To create a RAID array of hard disk drives, complete the following steps:
1. From the list of adapters, select the SAS controller “SAS1068E”.
2. Select RAID Properties.

Appendix C Restoring CLEARcut Studio Restoring Windows Server 2003 and SQL 2008 for Dell PowerEdge 2950 server
© 2011 Harmonic Inc. 30 CLEARcut, Version 3.8, Rev E
3. Select Create IM Volume.
4. In the RAID Disk column, use the Spacebar or Minus (-) key to select [Yes] (select) toselect a drive from a RAID disk.
5. Continue to select drives, using the Spacebar or Minus (-) key, until you have selected allthe drives for your array.
6. Press C to create the disk array.
7. Select Save changes then exit this menu to create the array.
8. Exit the Setup utility.
9. Select Exit the Configuration Utility and Restart.
10. When prompt for ‘Stop Controller’, press Enter to continue.
11. Exit the BIOS Setup utility.
C.1.1.2 Using the Platform Recovery Disk
1. Power on the server, insert the Australia Platform DVD to the DVD rom drive.
2. You will see the following message during server bootup “Press any key to boot from CD…”.When you see this, press a key on the keyboard. (You only have a few seconds to dothis).
3. The first Windows setup screen appears for 30 minutes approximately and then thesystem reboots.
4. The second Windows setup screen appears (displaying a count-down timer that startsaround 39 minutes). The system will reboot automatically at the end of setup.
5. Remove Australia Platform disc when reboot is started.
6. The next Windows setup screen will start installing Windows 2003 R2, .NET framework,security hotfixes and settings for Windows 2003. The system will reboot automatically atthe end of setup.
7. MS SQL Server installation will be started. It takes 45 minutes approximately to completethe installation.
8. Windows will login automatically to the Windows desktop and launch “Windows ServerPost-Setup Security Updates” page. Click Finish and then Yes to close the page.
9. In the text field type “c:\windows\system32\oobe\msoobe /a” and then click OK.
10. Click OK after a message appears stating that the Windows is already activated (if theBIOS loaded correctly). If it did not load correctly you may need to update your BIOS witha valid SLP key.
11. Insert the CLEARcut Studio application DVD. A message pops up requiring user'sconfirmation to continue. Input “YES" in capital letters to continue, then the device driverand hotfix will be installed. Afterwards, a menu interface will pop up for the selection ofNMX or CLEARcut installation.
C.2 Restoring Windows Server 2003 and SQL 2008 for DellPowerEdge 2950 server
The PC server is a Dell PowerEdge 2950 with two slots. One slot is for Audigy Audio and oneis for the Vela hardware decoder card.
A packet of recovery media was included with your system. For server recovery, you need thefollowing items:
■ Windows 2003 OS disk
Appendix C Restoring CLEARcut Studio Restoring Windows Server 2003 and SQL 2008 for Dell PowerEdge 2950 server
© 2011 Harmonic Inc. 31 CLEARcut, Version 3.8, Rev E
■ SQL 2008 disk
■ NMX Application Software
■ Backups of your NMX server database catalog files and configuration settings, if available.
NOTE: Always read any README documents in the recovery media before beginning any restorationprocedures.
C.2.1 Recovery Steps for Dell 2950The following recovery procedures apply to the 2950 PowerEdge workstation.
C.2.1.1 Using the Windows OS Disks
Table 4-1: CDs and DVDs Needed for Software Installation
Disk Title # ofDisks Part #
Windows 2003 OS Setup 3 CD SW-BU-SRV2K3-RCVRY-CD1-xxSW-BU-SRV2K3-RCVRY-CD2-xxSW-BU-SRV2K3-RCVRY-CD3-xx
SQL 2008 1 DVD SW-BU-SQL2K8-RCVRY-03
Table 4-1 lists the disks necessary to re-install your applications.
Install CD, disk 1 of the OS recovery disks, and follow these steps.1. Just before jumping to Windows a text line will read “Press any key to boot from CD …”.
When you see this, press a key on the keyboard. (You only have a few seconds to do this.)
2. The first Windows setup screen appears for 8-10 minutes and the system reboots.
3. The second Windows setup screen appears (displaying a count-down timer that startsaround 39 minutes). Your PC will reboot automatically.
4. When the Ctrl-Alt-Del screen appears logon to the PC (there is no password)
5. The system will be prompting for the second OS disk. Remove the first disk, insert thesecond disk, and click OK.
When the CD, disk 2 of the OS recovery disks is inserted, follow these steps.1. Click Next when the Windows Server 2003 R2 Setup Wizard appears.
2. Click Next when the Setup Summary dialog box appears.
3. Click Next when the Completing Windows Server 2003 R2 Setup dialog box appears.
4. Click Finish when the Windows Server Post-Setup Security Updates dialog box appears.
5. Click Yes when you are asked “if you want to close this page?”
6. Click the Do not display this page at logon check box at the bottom of the Manage YourServers dialog box.
7. Reboot the server and log back into the PC.
8. Click Start and select Run.
9. In the text field type oobe/msoobe/a and click OK.
10. Click OK after a message appears stating that the Windows is already activated (if theBIOS loaded correctly). If it did not load correctly you may need to update your BIOS.
11. Click OK to exit the installation process.

Appendix C Restoring CLEARcut Studio Installing NMX Server Application
© 2011 Harmonic Inc. 32 CLEARcut, Version 3.8, Rev E
Insert the CD, disk 3 of the OS recovery disks, and follow these steps.1. When prompted, enter 1 to start the installation process.
2. Click Finish and wait a moment while the PC reboots. You can also remove the CD.
C.2.1.2 Setting the IP Addresses
If you are restoring CLEARcut workstation, you must set the IP addresses for the NIC 1 andNIC 2 cards before you install the software. Setting the IP address of the management NICcard (NIC 1) makes sure that the workstation operates in your network.
Before changing the IP and subnet mask addresses, be sure that your network is connectedto a hub.
C.2.1.3 Using the SQL 2008 Recovery Media for Windows 2003
This sections describes how to install the SQL 2008 Recovery Media.
1. Insert DVD, and enter the SQL option. When prompted to enter the SQL option that youwant to start loading, choose: 3 CLEARcut Server.
2. SQL installer loads various drivers. If the installer asks Do you want to reboot? click theOK to reboot.
3. The Server will reboot once again. At the next opportunity, log in to the PC. When thesystem asks for OS disk number 1, install that disk and click OK.
4. The system will reboot twice more, you need to logon both times. Next, the screen willask you to press any key, do this and the unit will reboot one more time.
5. The next step is to log on to the PC. You are now ready to load the NMX applicationsoftware.
C.2.2 Data Execution Prevention (before NMX installs)1. Navigate to: my computer -> Properties -> Advanced -> Performance -> Setting ->
Data Execution Prevention.
2. There is a radio button that says: Turn on DEP for all programs and servicesexcept those I select. Click that button and add the following:
❑ C:\Windows\System32\msiexec.exe
❑ C: Windows\System32\regsvr32.exe
3. Click Apply.
4. Click OK.
5. Click OK to close the System Properties dialog box.
6. When you finish setting up the driver, install the NMX server software. You do not need torestart the computer to install NMX.
C.3 Installing NMX Server Application1. Have your NMX License Token and License Key handy. If you’re not sure where this
information is located, keep in mind the following:
❑ For new NMX installations, the License Token and Key are provided to thedepartment that places the order (for example, the purchasing department).
❑ For upgrades to an existing NMX installation, the License Token and Key are providedto the person that places the upgrade request.
❑ The information could be in a .pdf file that was e-mailed to your customer e-mailaddress.

Appendix C Restoring CLEARcut Studio Installing NMX Server Application
© 2011 Harmonic Inc. 33 CLEARcut, Version 3.8, Rev E
❑ The information could be on papers sent to your customer shipping address.
2. For IBM x3650 M2 server: select NMX option on the menu interface of CLEARcutStudio application DVD.
For Dell PowerEdge 2950 server: use Windows Explorer, navigate to the NMXApplication Media root directory and double-click the file Setup.exe.
3. If you do not have the correct OS service pack, click Yes when the NMX installationprogram asks if you want to install the appropriate service pack.
When the OS service pack installation completes:
❑ Reboot the computer and start the NMX installation program again (see Step 2).
4. Click Next in the Setup window.
5. Read the License Agreement. If you accept the terms, click Next.
6. In the NMX Registration dialog box, enter your user name and company name, and clickNext.
7. In the NMX License Registration dialog box, enter the License Token and License Keythat you received with your software package, and click Next.
8. In the Information dialog box, click Next.
9. In the Setup Type dialog box, select Typical Client and Server, and click Next.
NOTE: Server installation must be on the C: drive. Client can be installed on any drive.
10. In the Site Information dialog box, enter a unique identifier for the site, and click Next.
If you are installing for the first time: You can enter any number from 11–2000.
11. In the SQL Server Information dialog box Server field, confirm or edit the host name ofthe computer where the SQL Server database is installed, and click Next.
CAUTION: Do not change the default values for User ID and Password. The default values are thecorrect values to access the NMX database.
12. In the SQL Server Catalog Information dialog box, enter the name of the SQL Servercatalog used by NMX. The name must start with an alphabetic character.
If you are installing for the first time: In this step, you’re just naming thecatalog. You must create the catalog after you finish installing NMX. The default catalogname is NMXDB.
13. In the Backup Directory Path dialog box, enter the full path to a directory on the SQLServer computer where you want to save NMX database backups.
NOTE: The default backup directory in the Full Path field is C:\databasebkup. NMX automatically createsthis directory and populates this field. Harmonic strongly recommends that you use the default backupdirectory.
14. In the Start Copying Files dialog box, click Next.
The software installation begins. When the NMX software installation finishes, the MG-SoftMIB Browser installation begins.
15. Follow the MG-SOFT MIB Browser installation through the onscreen instructions.
When the MG-SOFT MIB Browser installation finishes, the browser opens. Close thewindow. (If the readme file opens, close it, too.)
16. NMX documentation requires Acrobat Reader. Follow the onscreen steps to installAcrobat Reader. If asked to reboot, select No.

Appendix C Restoring CLEARcut Studio Post-installation NMX Configurations
© 2011 Harmonic Inc. 34 CLEARcut, Version 3.8, Rev E
17. If you are installing a Typical Client and Server, the Wizard will prompt you to installNetTime. If you require an NTP Server, follow the installation instructions in the NetTimeSetup Wizard.
If you are installing for the first time: You must configure at least oneserver name in the NetTime Options dialog box before you can proceed.
NOTE: Harmonic recommends using the default settings for all other NetTime options. When theNetTime Options dialog box appears, enter the server addresses, accept the defaults, and click OK. If youchange the NetTime settings, the service can lock up, requiring you to restart the computer.
18. When the installation finishes, you are prompted to restart the computer. Select Yes, Iwant to restart my computer now, and click Finish.
NOTE: Restarting the computer is essential to the proper performance of the following steps.
C.4 Post-installation NMX Configurations
C.4.1 Data Execution Prevention after NMX is installed (for Dell PowerEdge2950 server only)
After the NMX installation, navigate to: My Computer -> Properties -> Advanced ->Performance-> Setting -> Data Execution Prevention.
There is a radio button that says: Turn on DEP for all programs and servicesexcept those I select. Click that button, and add the following:
c:\Program Files\harmonic\NMX\GUI\NMXGUI.exe
C.4.2 Creating an NMX CatalogIf you are not using an NMX catalog from a previous version, you must create one.
Before installing CLEARcut Studio, create a database catalog for NMX, and start the server.The CLEARcut Studio installation requires an existing catalog in NMX. The CLEARcut Studioinstallation will overwrite the catalog you create here.
To create a new NMX database catalog:
1. On the CLEARcut workstation, double-click the Domain Manager icon.
The Domain Manager login dialog box opens.
2. Enter the user name (and password, if required).
If you did not change the default login, use the following name; no password is required:
User name: Administrator
NOTE: NMX provides user administration tools to create user logins with specific permissions. Harmonicrecommends changing the Administrator password and setting up individual user accounts.
The first time you install NMX, Domain Manager opens but tells you that it could notconnect to the database. This is because the database catalog does not exist yet.
Appendix C Restoring CLEARcut Studio Post-installation NMX Configurations
© 2011 Harmonic Inc. 35 CLEARcut, Version 3.8, Rev E
3. In Domain Manager, select Database > Catalog Administrator.
The Database User Login dialog box opens.
4. In the login dialog box, enter the SQL system administrator user name and password, andclick OK.
User Name: sa
Password: harmonic
5. The Catalog dialog box opens, showing Automation, NMX, and Other catalogs. You mustfirst add the NMX database:
❑ Click the New button.
❑ Select NMX from the Catalog Type drop-down list.
❑ Enter NMXCCS in the Catalog Name field, and click OK.
A DOS window opens, and text scrolls as the catalog is created. The catalog creationhas finished when you can see a command prompt in the DOS window. Then theDOS window closes automatically.
6. Close the Catalog Administration dialog box.
Now configure Domain Manager to use the catalog you just created, and start and stop theserver. These tasks are described in the following section.
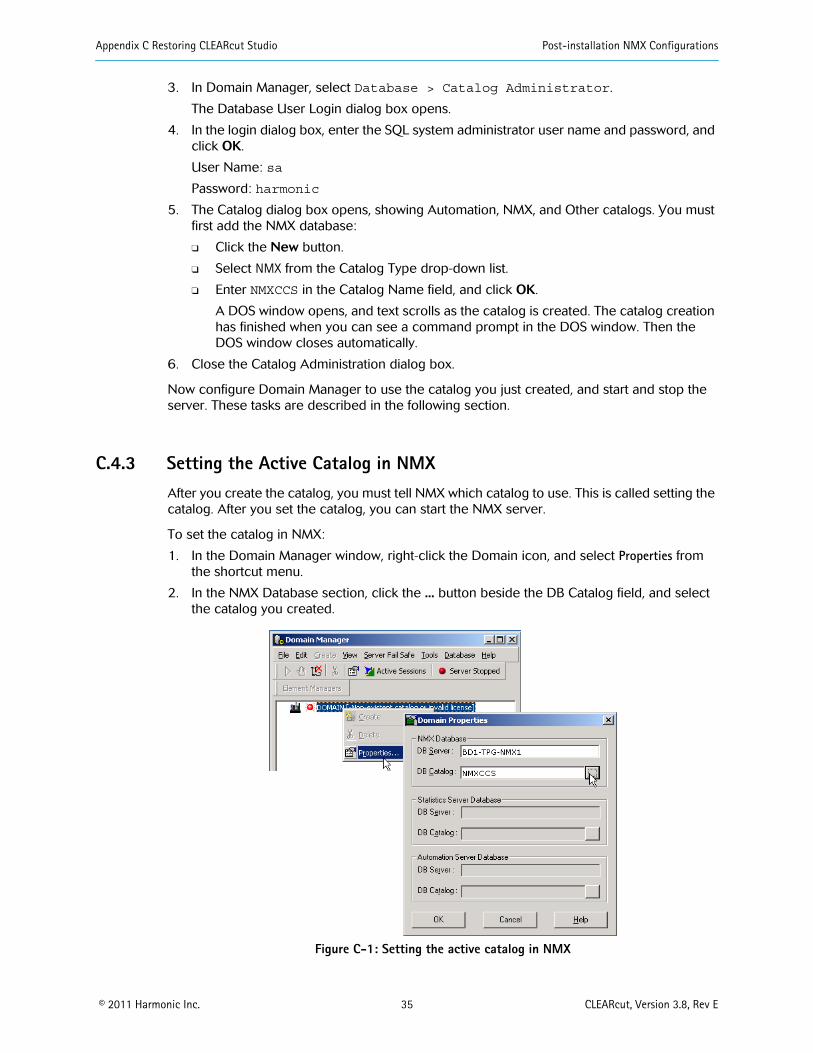
C.4.3 Setting the Active Catalog in NMXAfter you create the catalog, you must tell NMX which catalog to use. This is called setting thecatalog. After you set the catalog, you can start the NMX server.
To set the catalog in NMX:
1. In the Domain Manager window, right-click the Domain icon, and select Properties fromthe shortcut menu.
2. In the NMX Database section, click the ... button beside the DB Catalog field, and selectthe catalog you created.
Figure C-1: Setting the active catalog in NMX

Appendix C Restoring CLEARcut Studio Installing the Vela Decoder Card Software
© 2011 Harmonic Inc. 36 CLEARcut, Version 3.8, Rev E
3. Click OK.
4. Right-click the Local PC icon, and select Properties from the shortcut menu.
5. Click the .... button beside the IP Address field, and select the management IP address.
.
Figure C-2: Selecting the local PC IP address in NMX
6. Click OK.
7. Click the green arrow button to start the server.
The status bullets beside each element manager turn yellow, then green when the serverstarts.
8. After the server starts, click the red hand to shut it down.
The server should not be running when you install CLEARcut Studio.
9. Close Domain Manager.
C.5 Installing the Vela Decoder Card SoftwareTo install the Vela software:
1. For IBM x3650 M2 server: Insert the CLEARcut Studio application DVD.
For Dell PowerEdge 2950 server: Insert the CLEARcut Studio installation CD.
2. For IBM x3650 M2 server: Navigate to the directory Software\<CCSpath>\Support_Software\VelaSystemSoftware on the DVD.
For Dell PowerEdge 2950 server: Navigate to the directorySupport_Software\VelaSystemSoftware on the CD.
3. Locate and run Setup.exe. Select Install Vela System Software.
4. Follow the onscreen instructions to install the Vela software.
5. During installation, the installer may prompt for installing the CineView HD Pro Decoderor CineView HD Pro Decoder G10 driver. Simply press Continue Anyway to proceedwith installation.
6. When installation is complete, restart the computer.
NOTE: During the restart, some warnings may show during the Windows startup. Click OK to close thosewarnings.
The CLEARcut Studio application DVD or CLEARcut installation CD includes Veladocumentation.

Appendix C Restoring CLEARcut Studio Installing CLEARcut Studio
© 2011 Harmonic Inc. 37 CLEARcut, Version 3.8, Rev E
For more detailed instructions regarding uninstalling and installing Vela software, refer to thesection, Changing or Uninstalling Vela Software in the online CineView HD Pro Installation andUser Guide (CineView-HD-Pro-User.pdf). Remember, however, that you are working with aCLEARcut Studio application DVD or CLEARcut installation CD, not a Vela CD.
C.6 Installing CLEARcut StudioAfter starting and stopping the NMX server and updating the decoder card, install CLEARcutStudio. DirectX is installed automatically with CLEARcut Studio.
To install CLEARcut Studio:
1. For IBM x3650 M2 server: Select CLEARcut option on the menu interface of CLEARcutStudio application DVD.
For Dell PowerEdge 2950 server: Insert the CLEARcut Studio installation CD in the CDdrive of the CLEARcut workstation. Navigate to the CD drive, and double-click the fileSetup.exe.
2. An WinPcap Setup dialog box is prompted for the installation of WinPcap. Click Next toproceed the installation procedures.
3. At the Welcome screen, click Next.
4. A window is prompted to ask whether to reinstall .NET framework. Click No.
5. Accept the terms of the license agreement, and click Next.
6. In the Select Encoder Models screen, select the check boxes next to the encoder modelsthat correspond to the encoders in your CLEARcut setup.
7. Specify whether you want to create preconfigured NMX catalogs, and click Next.
NOTE: Harmonic recommends that you let the installation program create preconfigured NMX catalogsif you are upgrading from a CLEARcut Studio release earlier than 3.2. This allows you to switch easilybetween encoders. You do not need to create preconfigured catalogs if you are upgrading from CLEARcut3.2 or later, or if you are reinstalling this release of CLEARcut Studio due to disk recovery and have backupcopies of your catalogs.
If you don’t already have the catalogs created by this release of CLEARcut Studio, selectYes to create them. This catalog creation updates the NMX catalog you created earlier(see C.4.2 Creating an NMX Catalog on page 34) and creates the Automation catalog.
If you select Yes, click Next, and proceed to step 7.
If you select No, skip to step 10. The catalogs that you already have will be used.
8. Accept the default names for the NMX and Automation catalogs, and click Next.
9. If the installation asks if you want to overwrite the existing catalog NMXCCS, select Yes,and click Next.
The installation asks you to make sure that NMX is not currently running.
10. Select Yes to continue, and click Next.
If you chose to create preconfigured catalogs, they are created now.
11. To continue with installation, click Install.
12. When installation is complete, you can choose to restart the computer now or later.Select the option to restart the computer now, remove the CLEARcut installation CD fromthe CD drive, and click Finish.
NOTE: While updating Microsoft DirectX Runtimes, the installer may prompt, saying that one or moreDirectX components are disabled. Simply press OK to continue.

Appendix C Restoring CLEARcut Studio Data Execution Prevention (for Dell PowerEdge 2950 server only)
© 2011 Harmonic Inc. 38 CLEARcut, Version 3.8, Rev E
C.7 Data Execution Prevention (for Dell PowerEdge 2950 server only)After the CLEARcut Studio installation, navigate to:
My Computer -> Properties -> Advanced -> Performance-> Setting -> Data Execution Prevention.
There is a radio button that says: Turn on DEP for all programs and services except those I select. Clickthat button, then add the following:
c:\Program Files\Harmonic\CLEARcut Studio\CLEARcutStudio.exe