Embed Size (px)
Citation preview
HELI-X
User’s Guide
Version 4.1 (2012-09-07)

Licence
HELI-X R/C Helicopter Flight Simulator. Copyrightc© 2008-2012 by Michael Schreiner ([email protected]). All rights reserved.
This version of HELI-X is not freeware. You can download the demo version of HELI-X fromwww.heli-x.net and the sites which are linked from this sitefor testing purposes. The full versionof HELI-X can be obtained via www.heli-x.net. For both versions, you only obtain the right to useHELI-X privately on your computers.
It is NOT allowed to make HELI-X available for download or to distribute or sell it. You may notrent, lease, modify, translate, reverse engineer, decompile, disassemble, or create derivative worksbased on HELI-X.
The usage of HELI-X without registration at www.heli-x.netis not legal. If you are not sure whetheryou are allowed to use your copy of HELI-X, ask at [email protected].
If you are interested in a commercial use of HELI-X, please contact [email protected].
This program was built using Java, Xith3d, Jogl, Joal, LWJGL, Jdom, the java networking library,Jama, Jagatoo, Gluegen and JInput. Many thanks to all developers involved in these great projects.All licenses for these projects are stored in the particularfolder.
Warranty Disclaimers and Liability Limitations
HELI-X, and any and all accompanying software, files, data and materials, are distributed and provi-ded ”AS IS” and with no warranties of any kind, whether express or implied. You acknowledge thatgood data processing procedure dictates that any program, including HELI-X, must be thoroughlytested with non-critical data before you rely on it, and you hereby assume the entire risk of using theprogram. The same ist true for flying R/C-helicopters. This is dangerous you do it on your own risk.This disclaimer of warranty constitutes an essential part of this license. Any liability of the devel-opers of HELI-X will be limited to zero. In addition, in no event shall the developers of HELI-X, orits principals, be liable for any indirect, incidental, consequential, or punitive damages whatsoeverrelating to the use of HELI-X.
Note: Flying with R/C helicopters may be dangerous. R/C helicopters are no toy.
Have fun with HELI-X.
http://www.heli-x.net 1
Release Notes
Version 4.1 New in Version 4.1 compared to 4.0:
• Multicopter (Tricopter, Quadrocopter, Hexacopter)
• Acro- and ACC-Mode for Multicopter
• Improved ground effect
• Improved collision handling
• Flight path for a better training
• Favorites and ignore function
• Japanese and Russian language
• Some minor changes and bug fixes
Version 4.0 New in Version 4.0 compared to 3.0:
• Download manager for the installation of models, airports,scenes, videos
• improved physics
• physics for coaxial helicopters
• controller curves with dead zone in the middle for weaker controllers
• reaction training
• no collective training
• promenade training
• funnel training
• wind display
• better rotor reflections, dependent on the pitch value
http://www.heli-x.net 2
• elastic blades visualization of the rotating rotor
• new models
• new 3D scene Heli Flying field
• better performance in multiplayer simulation
• rework of the keyboard and button functions
• Polish and Italian Language support
• some bug fixes
Version 3.0 New in Version 3.0 compared to 2.0:
• Crash-Objekte in foto scenes
• 3D scenes
• Pilot position vaiable (in 3d scenes)
• FPV-View (in 3D scenes)
• Smoke
• Tail rotor sound
• ambient sound
• multiplayer using color and texture information
• Basket training
• Rope training
• Failure training
• variable vertical helicopter position on screen
• Object zoom
http://www.heli-x.net 3

• Performance updates
• History for helicopter and airport selection
• Filter for the helicopter selection
• Plugins
• Statistics information
• Online news
• New helicopter models
• Czech and Norwegian language supported
http://www.heli-x.net 4
Version 2.0 New in Version 2.0 in contrast to 1.1:
• Update of the helicopter physics
• Simulation of three axes gyro systems
• Import of V-Stabi Settings
• New dynamic objects (boxes, balls, etc.)
• Balloon training
• Cargo training
• Cage training
• Display of a position marker
• Throttle and pitch curves can be stored
• Slow motion
• French version
• Possibility of a game server (already in the demo version)
• Better adjustment to the performance of the hardware
• New helicopters, textures with alpha channel
• Helicopter colors can be changed interactively
http://www.heli-x.net 5
Version 1.1 New in Version 1.1 in contrast to 1.0:
• Pitch- and throttle-curves, Possibility for fixed pitch helis
• Gyro settings dependent on flight state
• Improvements of the gyro algorithms. Simulation of the tailservo
• Auto rotation training
• Tail training
• Stall-meter
• Slip-meter
• Rotor head instability
• Improvement of the hover training
• New keyboard functions
• Automatic screen saver deactivation
• Improvements of the graphics of rotating parts
• Change of the view during multi player not only via the menu but also by click in the pilotwindow
• New helis: T-Rex 600, Honey Bee King V2, Dragonus
http://www.heli-x.net 6

Inhaltsverzeichnis Inhaltsverzeichnis
Inhaltsverzeichnis
1 Getting Started 9
2 Installation 102.1 Directory Structure. . . . . . . . . . . . . . . . . . . . . . . . . . . . . . . . . . 102.2 Windows . . . . . . . . . . . . . . . . . . . . . . . . . . . . . . . . . . . . . . . 112.3 Linux . . . . . . . . . . . . . . . . . . . . . . . . . . . . . . . . . . . . . . . . . 112.4 Mac OS-X. . . . . . . . . . . . . . . . . . . . . . . . . . . . . . . . . . . . . . . 12
3 The Menu 133.1 Simulation. . . . . . . . . . . . . . . . . . . . . . . . . . . . . . . . . . . . . . . 13
3.1.1 Airports. . . . . . . . . . . . . . . . . . . . . . . . . . . . . . . . . . . . 153.1.2 Utilities . . . . . . . . . . . . . . . . . . . . . . . . . . . . . . . . . . . . 153.1.3 Scenes . . . . . . . . . . . . . . . . . . . . . . . . . . . . . . . . . . . . 153.1.4 Import VStabi 4 configuration. . . . . . . . . . . . . . . . . . . . . . . . 153.1.5 Helicopter Colors. . . . . . . . . . . . . . . . . . . . . . . . . . . . . . . 163.1.6 Helicopter Textures. . . . . . . . . . . . . . . . . . . . . . . . . . . . . . 163.1.7 Recent Helicopters. . . . . . . . . . . . . . . . . . . . . . . . . . . . . . 163.1.8 Recent Airports. . . . . . . . . . . . . . . . . . . . . . . . . . . . . . . . 16
3.2 Plugins . . . . . . . . . . . . . . . . . . . . . . . . . . . . . . . . . . . . . . . . 163.2.1 Quit HELI–X . . . . . . . . . . . . . . . . . . . . . . . . . . . . . . . . . 16
3.3 Configuration . . . . . . . . . . . . . . . . . . . . . . . . . . . . . . . . . . . . . 173.3.1 Controller. . . . . . . . . . . . . . . . . . . . . . . . . . . . . . . . . . . 173.3.2 Stick Display. . . . . . . . . . . . . . . . . . . . . . . . . . . . . . . . . 213.3.3 Camera. . . . . . . . . . . . . . . . . . . . . . . . . . . . . . . . . . . . 213.3.4 Flight mode. . . . . . . . . . . . . . . . . . . . . . . . . . . . . . . . . . 243.3.5 Wind/Brightness. . . . . . . . . . . . . . . . . . . . . . . . . . . . . . . 253.3.6 Slow Motion . . . . . . . . . . . . . . . . . . . . . . . . . . . . . . . . . 263.3.7 Performance. . . . . . . . . . . . . . . . . . . . . . . . . . . . . . . . . 263.3.8 Sound. . . . . . . . . . . . . . . . . . . . . . . . . . . . . . . . . . . . . 283.3.9 Shadow configuration. . . . . . . . . . . . . . . . . . . . . . . . . . . . 283.3.10 Window size . . . . . . . . . . . . . . . . . . . . . . . . . . . . . . . . . 283.3.11 Video size. . . . . . . . . . . . . . . . . . . . . . . . . . . . . . . . . . . 28
3.4 Flight Recorder. . . . . . . . . . . . . . . . . . . . . . . . . . . . . . . . . . . . 283.5 Multi Player . . . . . . . . . . . . . . . . . . . . . . . . . . . . . . . . . . . . . . 30
3.5.1 Create session as server. . . . . . . . . . . . . . . . . . . . . . . . . . . 303.5.2 Connecting with a running session. . . . . . . . . . . . . . . . . . . . . . 323.5.3 Other windows. . . . . . . . . . . . . . . . . . . . . . . . . . . . . . . . 333.5.4 Other functions. . . . . . . . . . . . . . . . . . . . . . . . . . . . . . . . 343.5.5 Requirements for the communication. . . . . . . . . . . . . . . . . . . . 35
3.6 Training . . . . . . . . . . . . . . . . . . . . . . . . . . . . . . . . . . . . . . . . 35
http://www.heli-x.net 7
Inhaltsverzeichnis Inhaltsverzeichnis
3.7 View . . . . . . . . . . . . . . . . . . . . . . . . . . . . . . . . . . . . . . . . . . 423.8 Shortcuts . . . . . . . . . . . . . . . . . . . . . . . . . . . . . . . . . . . . . . . 443.9 Settings . . . . . . . . . . . . . . . . . . . . . . . . . . . . . . . . . . . . . . . . 453.10 Help . . . . . . . . . . . . . . . . . . . . . . . . . . . . . . . . . . . . . . . . . . 45
4 Functions 47
5 Developer 515.1 Helicopter Models . . . . . . . . . . . . . . . . . . . . . . . . . . . . . . . . . . 51
5.1.1 General remarks. . . . . . . . . . . . . . . . . . . . . . . . . . . . . . . 515.1.2 Visual parameters. . . . . . . . . . . . . . . . . . . . . . . . . . . . . . . 525.1.3 Physics parameters for Helicopters. . . . . . . . . . . . . . . . . . . . . . 545.1.4 Physics Parameters for Multicopters. . . . . . . . . . . . . . . . . . . . . 69
5.2 Airports . . . . . . . . . . . . . . . . . . . . . . . . . . . . . . . . . . . . . . . . 805.2.1 Photo realistic airports. . . . . . . . . . . . . . . . . . . . . . . . . . . . 815.2.2 Scene3D–Airports. . . . . . . . . . . . . . . . . . . . . . . . . . . . . . 83
5.3 Utilities . . . . . . . . . . . . . . . . . . . . . . . . . . . . . . . . . . . . . . . . 84
http://www.heli-x.net 8
1 Getting Started 1 Getting Started
1 Getting Started
The usage of HELI-X is not that complicated so that it is possible to use HELI-X without readingthe user’s guide completely. But you should consider the following points:
• The controller should be plugged inbeforethe start of HELI-X.
• At the beginning, you should configure the controller, see Section 3.3.1.
• You also have to assign the functions Idle Up 1 and 2 to a switchof your controller or a keyof the keyboard. Only then, the engine of the helicopters canbe started.
• Then you can select an airport. There are different kinds of airports available: SkyBox1024has only a limited resolution (for not so strong graphics adapters) while SkyBox offers thefull resolution, a HD resolution is available with SkyBoxHD.
• 3D-Scenes offer the possibilitiy for a variable pilot position and to fly ”with” the helicopter.
• Then, you can select a helicopter and your training can start.
• Many functions in HELI-X can be used by assigning functions to a switch on the controlleror a key on the keyboard. Thus, you might want to have a look at Section4.
Have fun with HELI-X!
http://www.heli-x.net 9
2 Installation 2 Installation
2 Installation
HELI-X is based on Java and can be run on different operation systems. In order to make this compa-tibility possible, HELI-X does not make use of features which are dependent on the operating system(e.g. the registry in Windows). The important data is thus stored in files. Hence it is mandatory thatthe structure of the directories in HELI-X is not changed.
2.1 Directory Structure
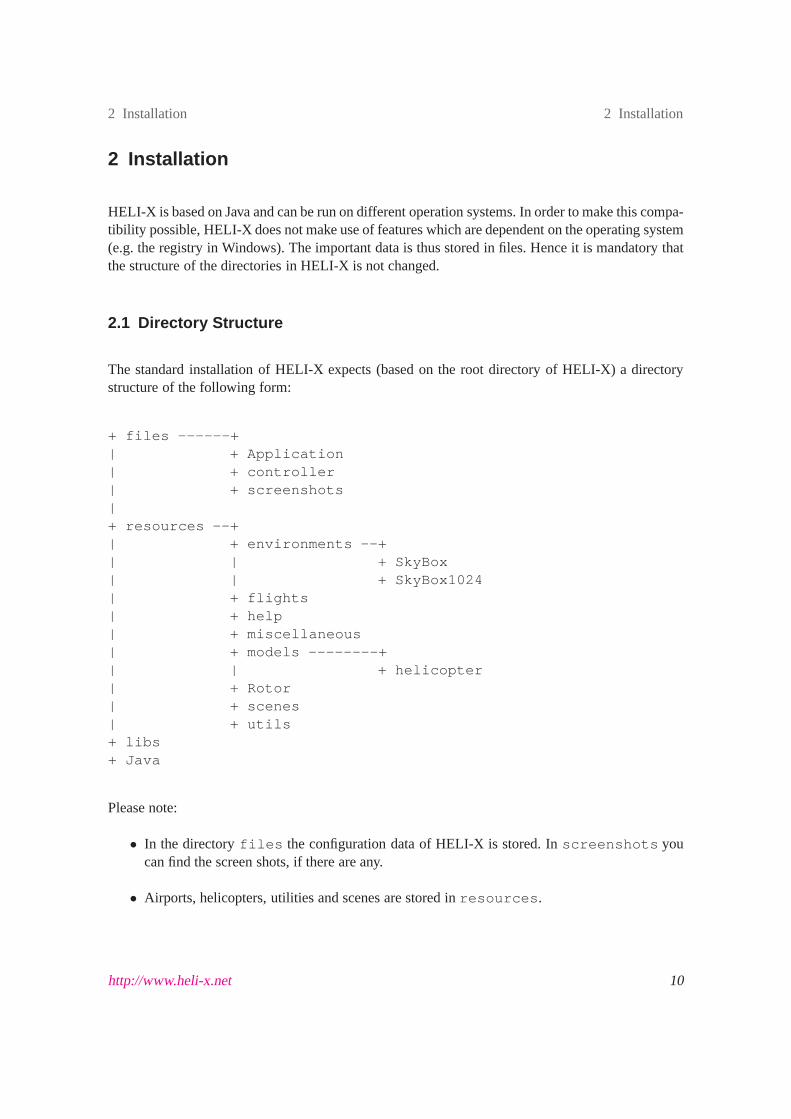
The standard installation of HELI-X expects (based on the root directory of HELI-X) a directorystructure of the following form:
+ files ------+| + Application| + controller| + screenshots|+ resources --+| + environments --+| | + SkyBox| | + SkyBox1024| + flights| + help| + miscellaneous| + models --------+| | + helicopter| + Rotor| + scenes| + utils+ libs+ Java
Please note:
• In the directoryfiles the configuration data of HELI-X is stored. Inscreenshots youcan find the screen shots, if there are any.
• Airports, helicopters, utilities and scenes are stored inresources.
http://www.heli-x.net 10
2 Installation 2.2 Windows
• Since the models can be edited, it is necessary that the user has the permissions to write in thedirectoryfiles as well as inresources.
• All libraries are stored inlibs.
• In the Windows version of HELI-X, a Java distribution is included. It is stored inJava. TheLinux and Mac OS-X versions require that Java is already installed on your machine.
• When you install the Mac OS-X version from admg then the directoriesfiles andresourcesare automatically in the private directory of the user.
Experienced users have the possibility to change the paths for files andresources. To do this,you can use the following parameters in the Java call:
• -DheliX.path.home=absolute pathWith this statement, the home directory is set, so thatfiles andresources are expectedbelow this directory.
• -DheliX.path.resources=absolute pathWith this parameter, the path forfiles can be set.
• -DheliX.path.files=absolute pathWith this parameter, the path forresources can be set.
• If both files and resources are set, then the parameter-DheliX.path.home is ignored.
2.2 Windows
To install HELI-X on Windows, you only have to execute the setup programme. The standard in-stallation directory isC:\HELI-X\. Remember that you need write access to the directory. Do notforget to calibrate the controller in the windows settings.
2.3 Linux
The installation of the Linux version is done by unzipping the file into a directory. Dependent onyour system (32 bit or 64 bit) you have to execute the correct start script. HELI-X expects that Java 5(or later) is installed on your system. Do not forget to calibrate the controller in the system settings.
http://www.heli-x.net 11

2 Installation 2.4 Mac OS-X
2.4 Mac OS-X
HELI-X on Mac OS-X requires the version Mac OS-X 10.4 or better. For the installation just movethe installation dmg package to the programs directory and start HELI-X as any other application.You do not have to calibrate the controller within the operating system as it should be done withWindows.When you start HELI-X for the first time, thefiles andresources directories arecreated automatically in the user’s library directory (e.g. /Users/name/library/Heli-X). The file per-missions are automatically set and you can add your models and airports there. Thus, the first startmay take some minutes.
http://www.heli-x.net 12
3 The Menu 3 The Menu
3 The Menu
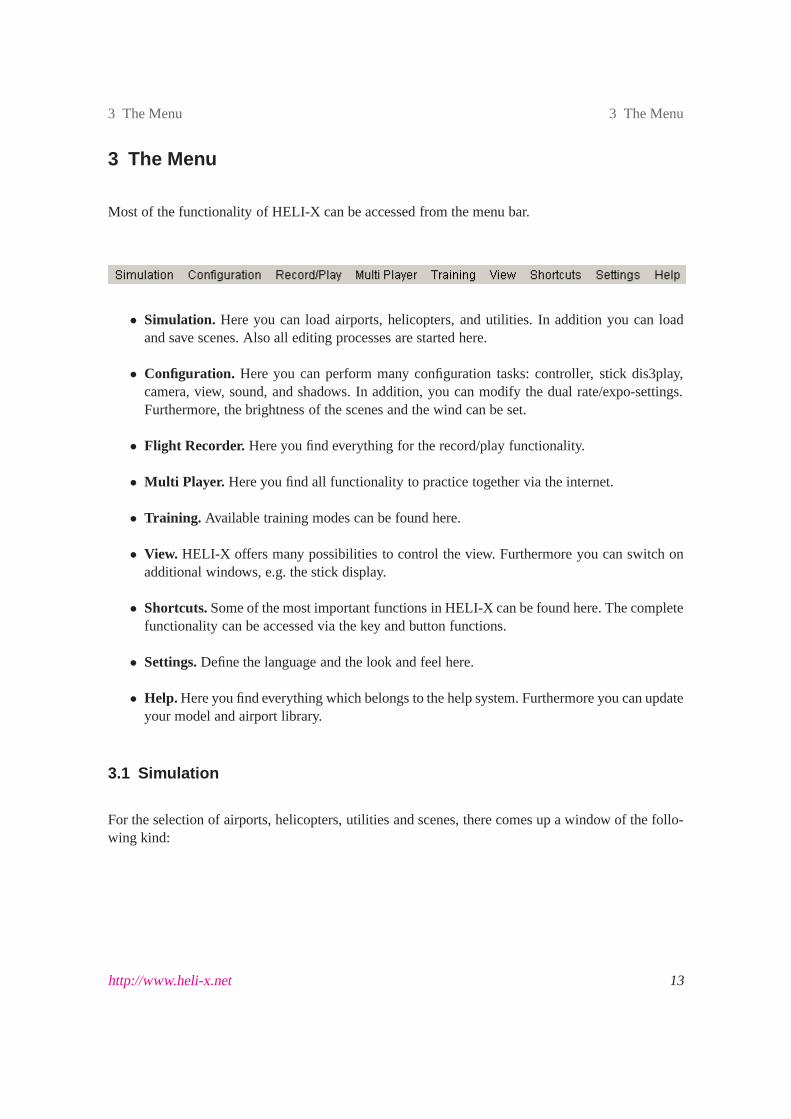
Most of the functionality of HELI-X can be accessed from the menu bar.
• Simulation. Here you can load airports, helicopters, and utilities. In addition you can loadand save scenes. Also all editing processes are started here.
• Configuration. Here you can perform many configuration tasks: controller, stick dis3play,camera, view, sound, and shadows. In addition, you can modify the dual rate/expo-settings.Furthermore, the brightness of the scenes and the wind can beset.
• Flight Recorder. Here you find everything for the record/play functionality.
• Multi Player. Here you find all functionality to practice together via the internet.
• Training. Available training modes can be found here.
• View. HELI-X offers many possibilities to control the view. Furthermore you can switch onadditional windows, e.g. the stick display.
• Shortcuts.Some of the most important functions in HELI-X can be found here. The completefunctionality can be accessed via the key and button functions.
• Settings.Define the language and the look and feel here.
• Help. Here you find everything which belongs to the help system. Furthermore you can updateyour model and airport library.
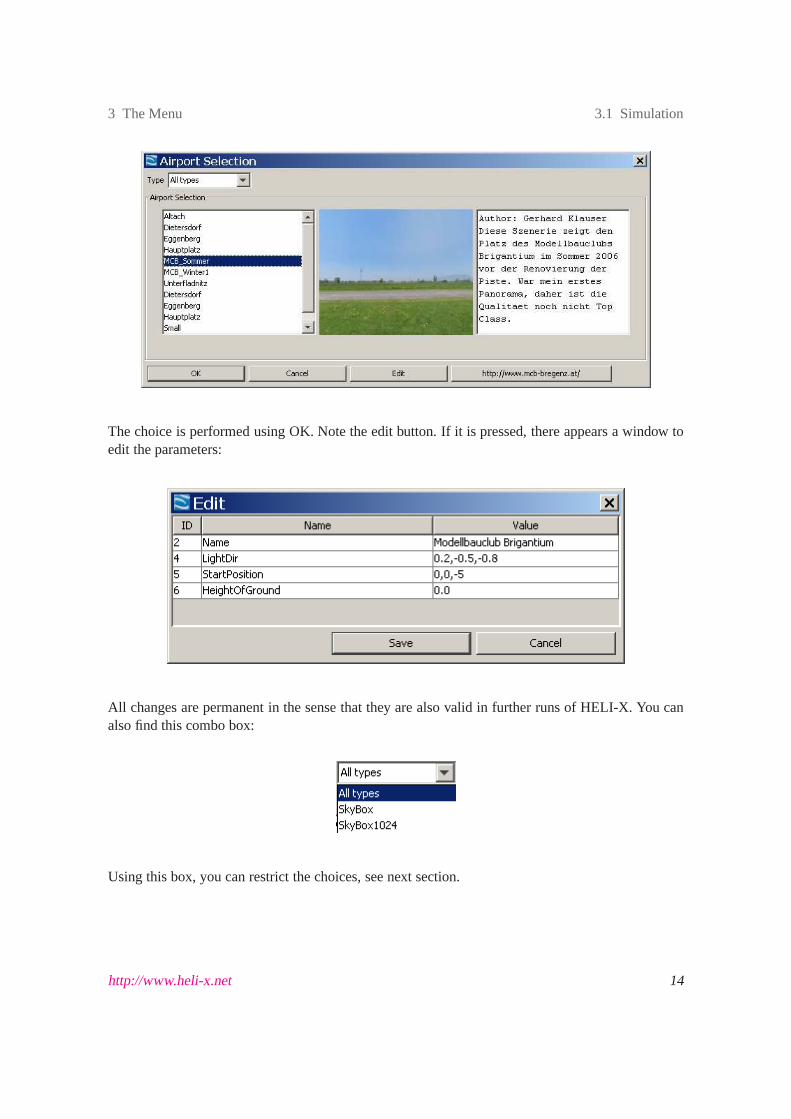
3.1 Simulation
For the selection of airports, helicopters, utilities and scenes, there comes up a window of the follo-wing kind:
http://www.heli-x.net 13
3 The Menu 3.1 Simulation
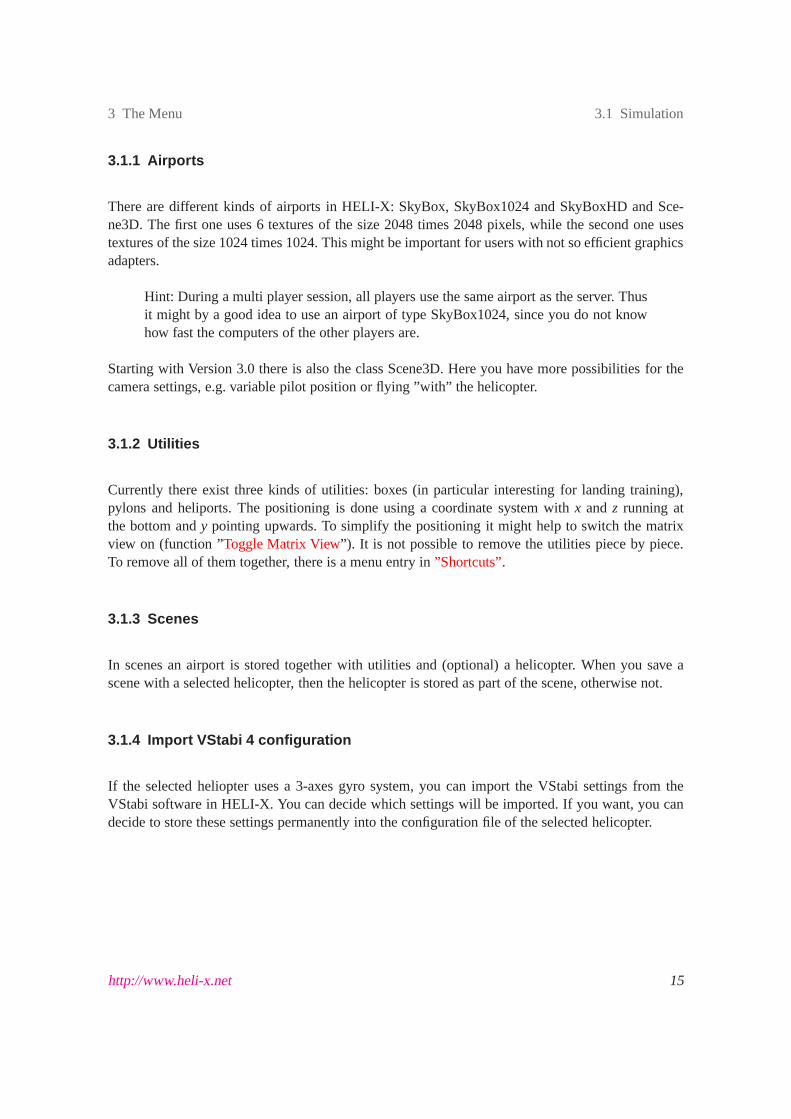
The choice is performed using OK. Note the edit button. If it is pressed, there appears a window toedit the parameters:
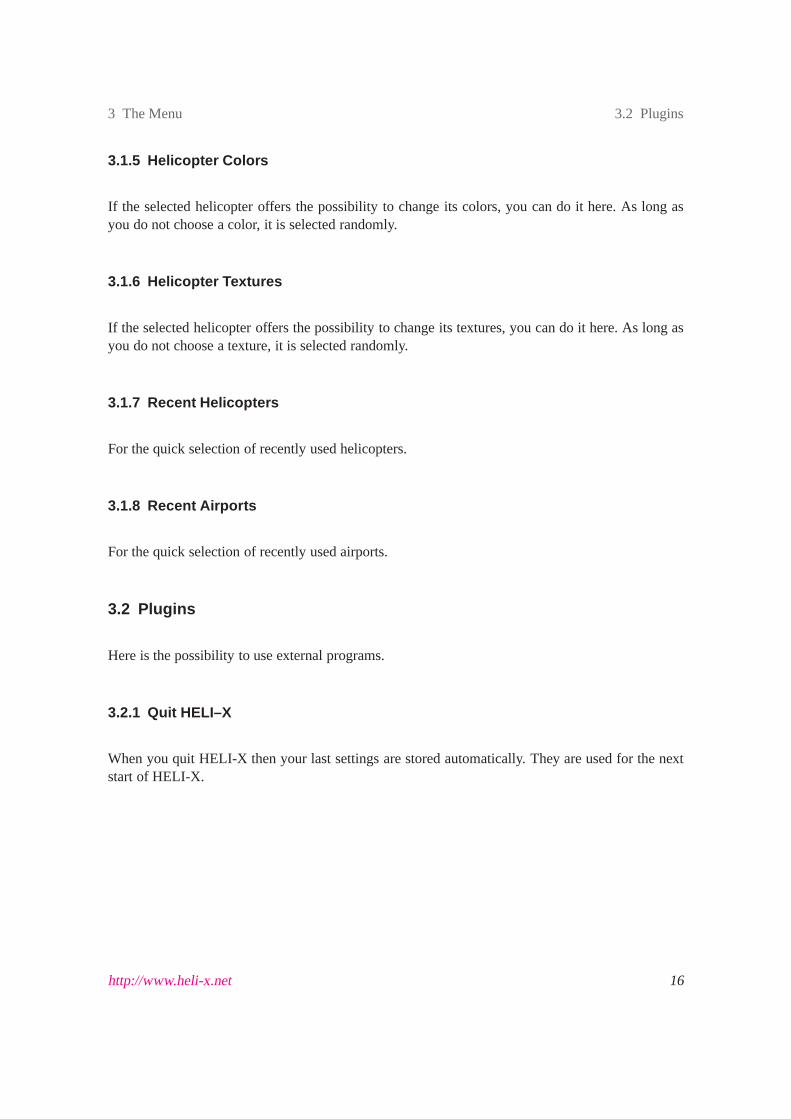
All changes are permanent in the sense that they are also valid in further runs of HELI-X. You canalso find this combo box:
Using this box, you can restrict the choices, see next section.
http://www.heli-x.net 14
3 The Menu 3.1 Simulation
3.1.1 Airports
There are different kinds of airports in HELI-X: SkyBox, SkyBox1024 and SkyBoxHD and Sce-ne3D. The first one uses 6 textures of the size 2048 times 2048 pixels, while the second one usestextures of the size 1024 times 1024. This might be importantfor users with not so efficient graphicsadapters.
Hint: During a multi player session, all players use the sameairport as the server. Thusit might by a good idea to use an airport of type SkyBox1024, since you do not knowhow fast the computers of the other players are.
Starting with Version 3.0 there is also the class Scene3D. Here you have more possibilities for thecamera settings, e.g. variable pilot position or flying ”with” the helicopter.
3.1.2 Utilities
Currently there exist three kinds of utilities: boxes (in particular interesting for landing training),pylons and heliports. The positioning is done using a coordinate system withx andz running atthe bottom andy pointing upwards. To simplify the positioning it might helpto switch the matrixview on (function ”Toggle Matrix View”). It is not possible to remove the utilities piece by piece.To remove all of them together, there is a menu entry in”Shortcuts”.
3.1.3 Scenes
In scenes an airport is stored together with utilities and (optional) a helicopter. When you save ascene with a selected helicopter, then the helicopter is stored as part of the scene, otherwise not.
3.1.4 Import VStabi 4 configuration
If the selected heliopter uses a 3-axes gyro system, you can import the VStabi settings from theVStabi software in HELI-X. You can decide which settings will be imported. If you want, you candecide to store these settings permanently into the configuration file of the selected helicopter.
http://www.heli-x.net 15
3 The Menu 3.2 Plugins
3.1.5 Helicopter Colors
If the selected helicopter offers the possibility to changeits colors, you can do it here. As long asyou do not choose a color, it is selected randomly.
3.1.6 Helicopter Textures
If the selected helicopter offers the possibility to changeits textures, you can do it here. As long asyou do not choose a texture, it is selected randomly.
3.1.7 Recent Helicopters
For the quick selection of recently used helicopters.
3.1.8 Recent Airports
For the quick selection of recently used airports.
3.2 Plugins
Here is the possibility to use external programs.
3.2.1 Quit HELI–X
When you quit HELI-X then your last settings are stored automatically. They are used for the nextstart of HELI-X.
http://www.heli-x.net 16
3 The Menu 3.3 Configuration
3.3 Configuration
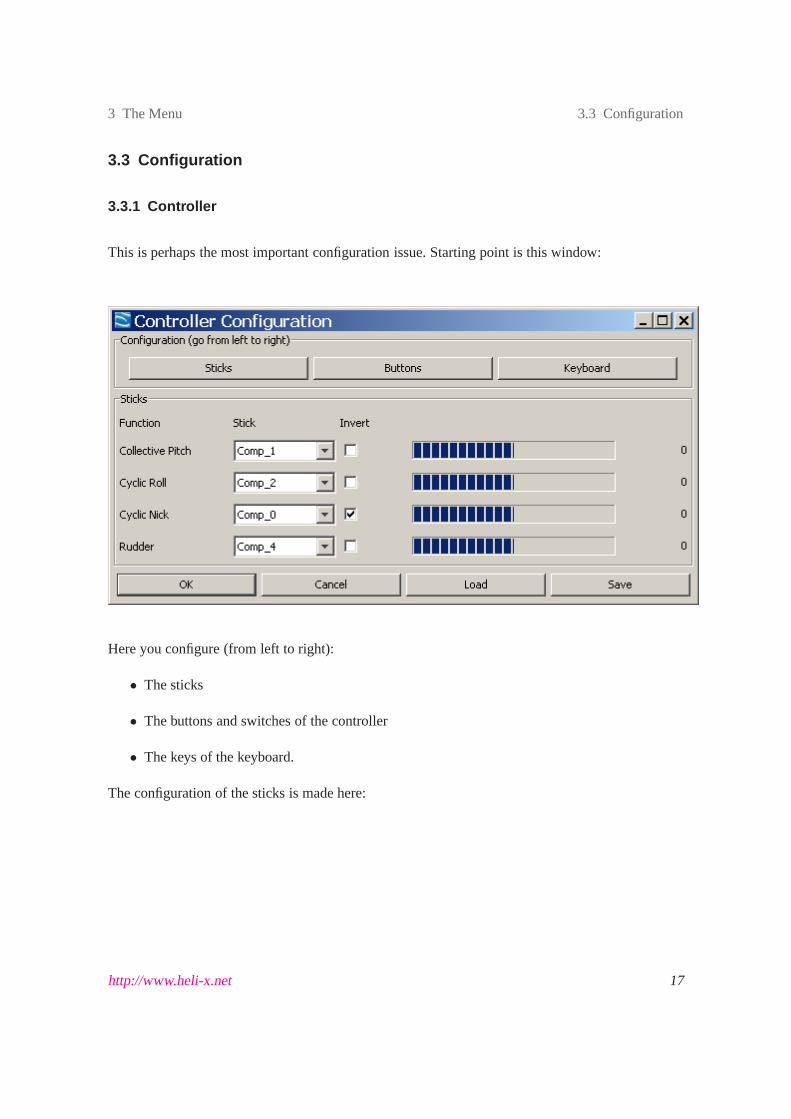
3.3.1 Controller
This is perhaps the most important configuration issue. Starting point is this window:
Here you configure (from left to right):
• The sticks
• The buttons and switches of the controller
• The keys of the keyboard.
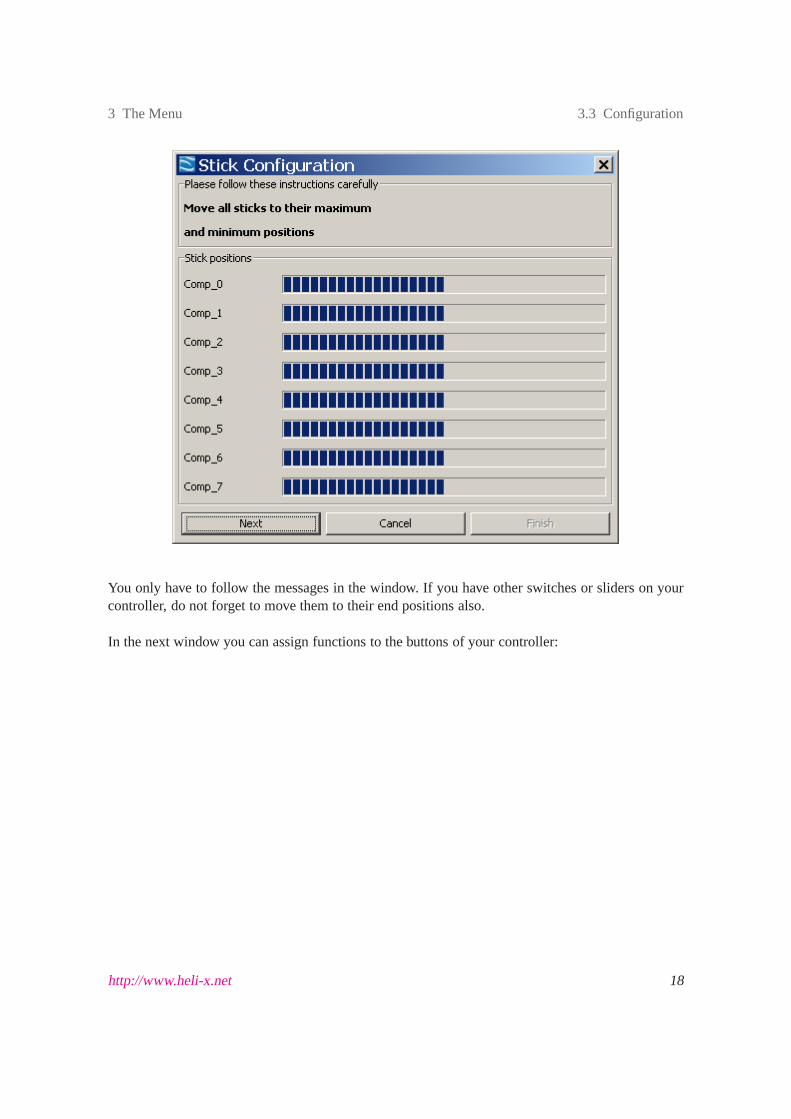
The configuration of the sticks is made here:
http://www.heli-x.net 17
3 The Menu 3.3 Configuration
You only have to follow the messages in the window. If you haveother switches or sliders on yourcontroller, do not forget to move them to their end positionsalso.
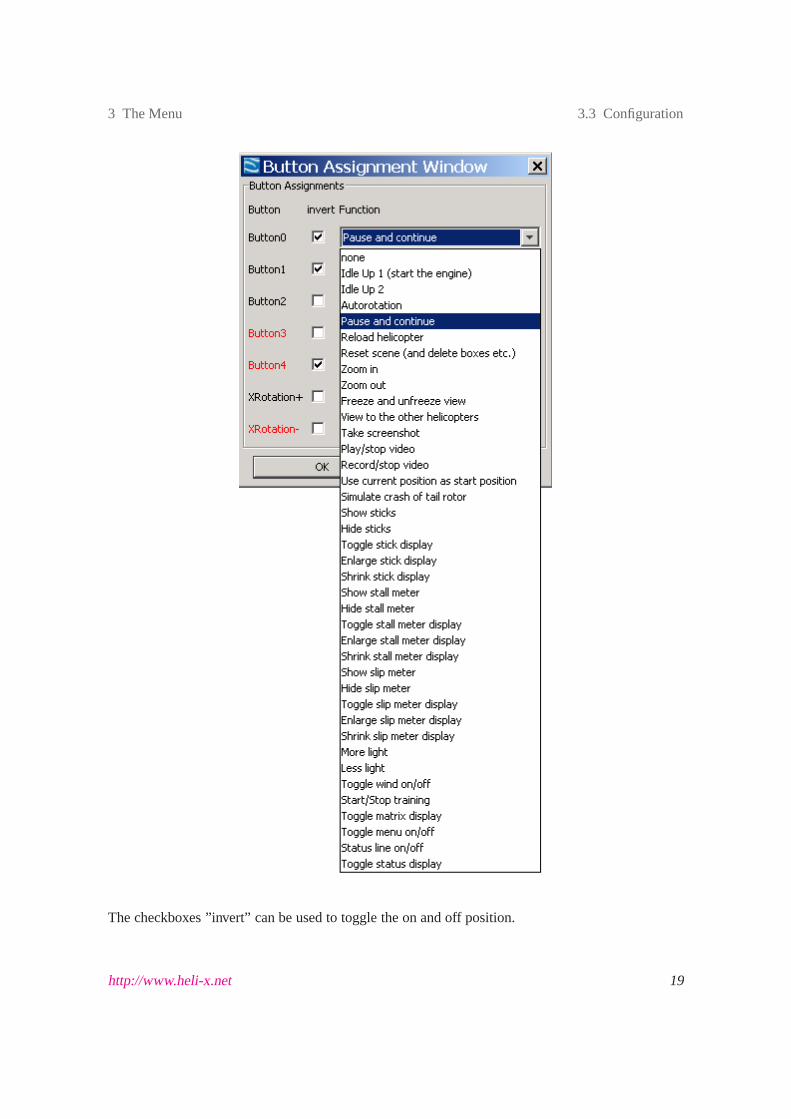
In the next window you can assign functions to the buttons of your controller:
http://www.heli-x.net 18
3 The Menu 3.3 Configuration
The checkboxes ”invert” can be used to toggle the on and off position.
http://www.heli-x.net 19
3 The Menu 3.3 Configuration
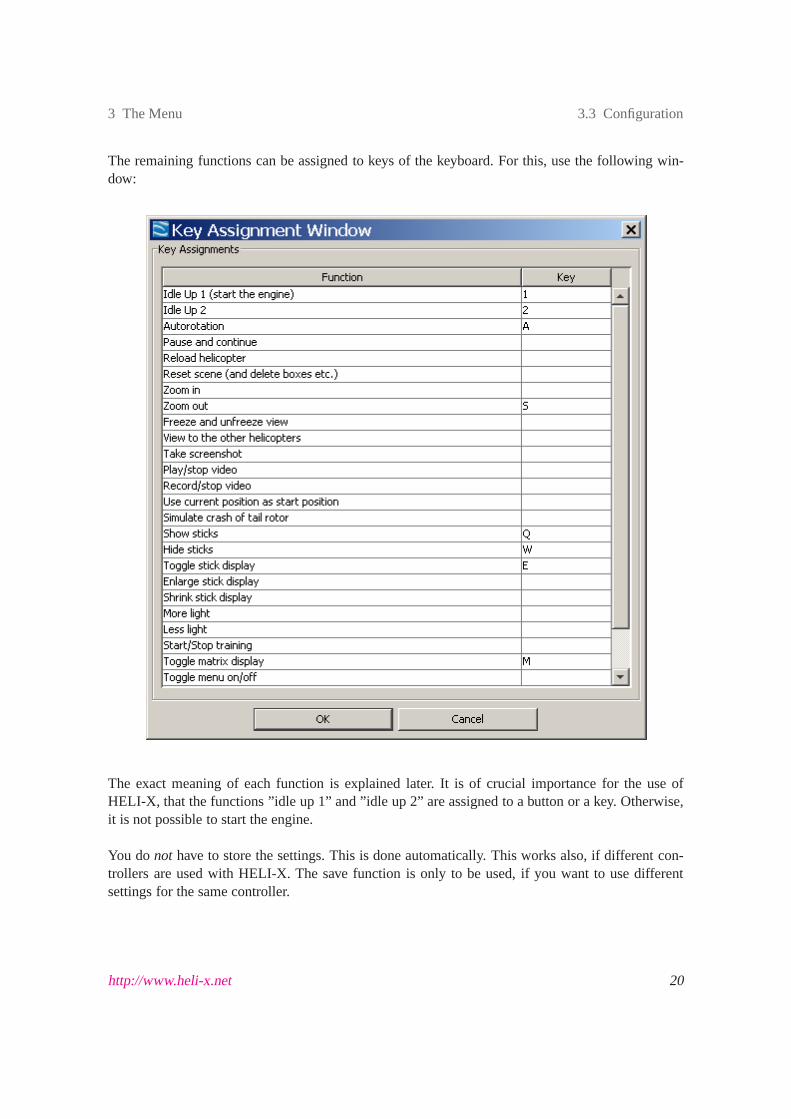
The remaining functions can be assigned to keys of the keyboard. For this, use the following win-dow:
The exact meaning of each function is explained later. It is of crucial importance for the use ofHELI-X, that the functions ”idle up 1” and ”idle up 2” are assigned to a button or a key. Otherwise,it is not possible to start the engine.
You donot have to store the settings. This is done automatically. Thisworks also, if different con-trollers are used with HELI-X. The save function is only to beused, if you want to use differentsettings for the same controller.
http://www.heli-x.net 20
3 The Menu 3.3 Configuration
3.3.2 Stick Display
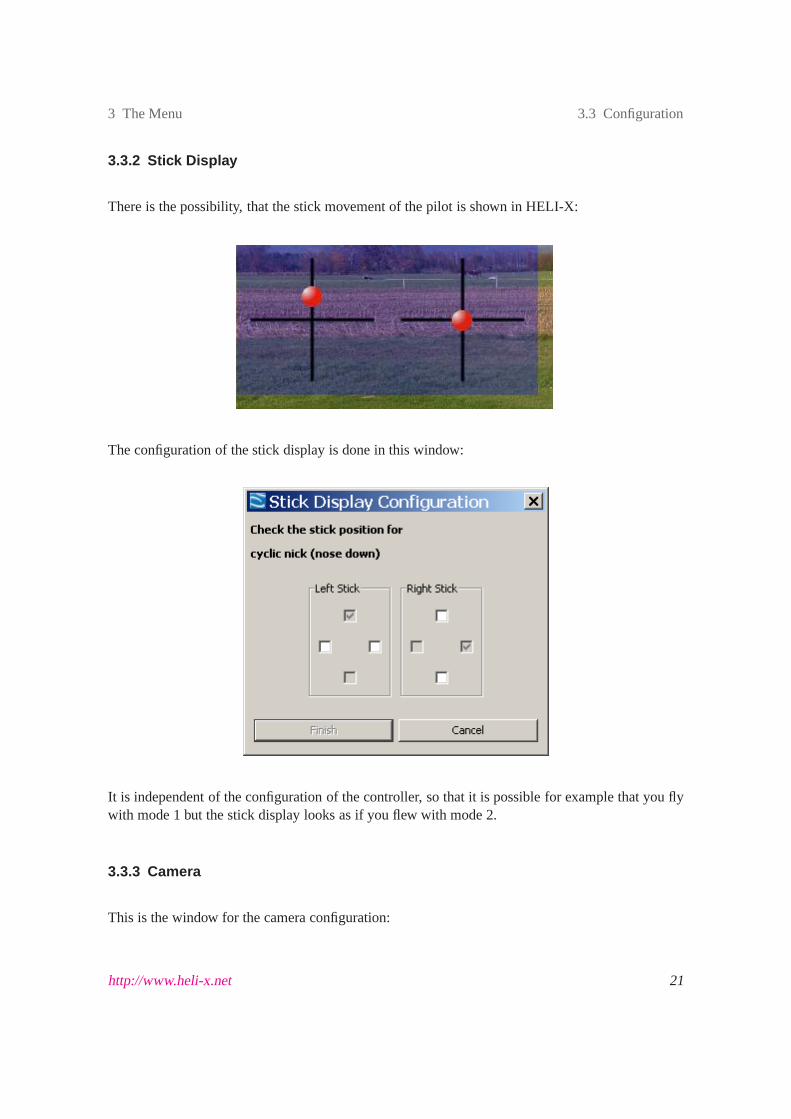
There is the possibility, that the stick movement of the pilot is shown in HELI-X:
The configuration of the stick display is done in this window:
It is independent of the configuration of the controller, so that it is possible for example that you flywith mode 1 but the stick display looks as if you flew with mode 2.
3.3.3 Camera
This is the window for the camera configuration:
http://www.heli-x.net 21
3 The Menu 3.3 Configuration
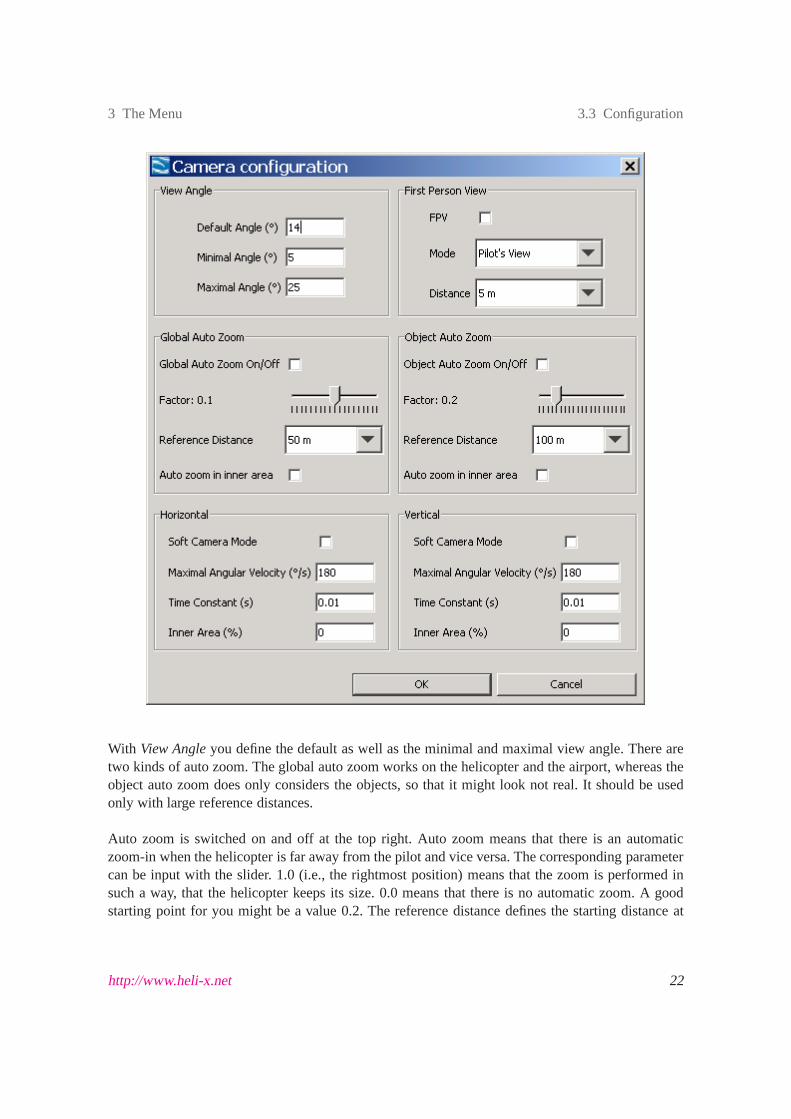
With View Angleyou define the default as well as the minimal and maximal view angle. There aretwo kinds of auto zoom. The global auto zoom works on the helicopter and the airport, whereas theobject auto zoom does only considers the objects, so that it might look not real. It should be usedonly with large reference distances.
Auto zoom is switched on and off at the top right. Auto zoom means that there is an automaticzoom-in when the helicopter is far away from the pilot and vice versa. The corresponding parametercan be input with the slider. 1.0 (i.e., the rightmost position) means that the zoom is performed insuch a way, that the helicopter keeps its size. 0.0 means thatthere is no automatic zoom. A goodstarting point for you might be a value 0.2. The reference distance defines the starting distance at
http://www.heli-x.net 22
3 The Menu 3.3 Configuration
which the auto zoom works. If you select ”auto zoom in inner area” it works also within a distancewhich is less than the reference distance.
Hint: In reality there is no auto zoom. So you might want to tryto switch off this featureafter some time and try to fly in such distances that you can still see and control yourhelicopter.
Below, you can adjust the soft camera mode for vertical and horizontal camera movement separately.Soft camera means that the helicopter is not fixed in the midpoint of the window but can move freelyaround the center and the camera does not follow immediately. There are the following settings:
• The maximum angular speed of the camera.
• The time constant determines how fast the camera reacts to the movements of the helicopter.The larger this number is, the slower reacts the camera.
• The inner area determines the area in which the helicopter can be without a movement of thecamera.
A variable camera location can be activated with First Persons’s View (FPV), which works only inairports of type Scene3D. There are several settings for thecamera movement:
• Pilot’s viewmeans that the camera moves with the helicopter as if you werea pilot inside thehelicopter..
• rigid means that the camera is moving with a fixed distance behind the helicopter.
• flexiblemeans that the camera movement is around the helicopter witha preferred distance.
• On groundis similar to the flexible mode, but in this mode, the height ofthe camera is theusual height of the eyes above the ground.
Note that the same settings are also valid when you look to another helicopter in mul-tiplayer mode or to the video helicopter. And remember that you can switch the viewin multiplayer mode by clicking on the pilot’s name in the pilot window or by using afunction.
Further settings for the camera can be found in the menu”View”.
http://www.heli-x.net 23
3 The Menu 3.3 Configuration
3.3.4 Flight mode
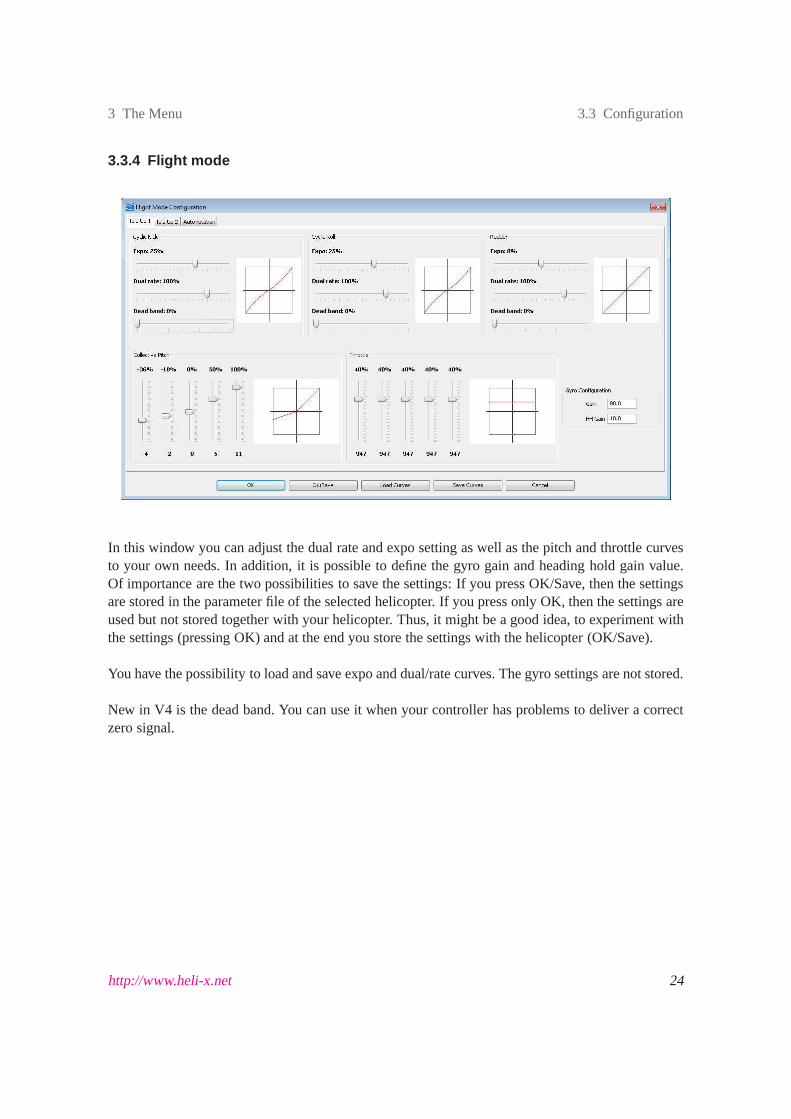
In this window you can adjust the dual rate and expo setting aswell as the pitch and throttle curvesto your own needs. In addition, it is possible to define the gyro gain and heading hold gain value.Of importance are the two possibilities to save the settings: If you press OK/Save, then the settingsare stored in the parameter file of the selected helicopter. If you press only OK, then the settings areused but not stored together with your helicopter. Thus, it might be a good idea, to experiment withthe settings (pressing OK) and at the end you store the settings with the helicopter (OK/Save).
You have the possibility to load and save expo and dual/rate curves. The gyro settings are not stored.
New in V4 is the dead band. You can use it when your controller has problems to deliver a correctzero signal.
http://www.heli-x.net 24
3 The Menu 3.3 Configuration
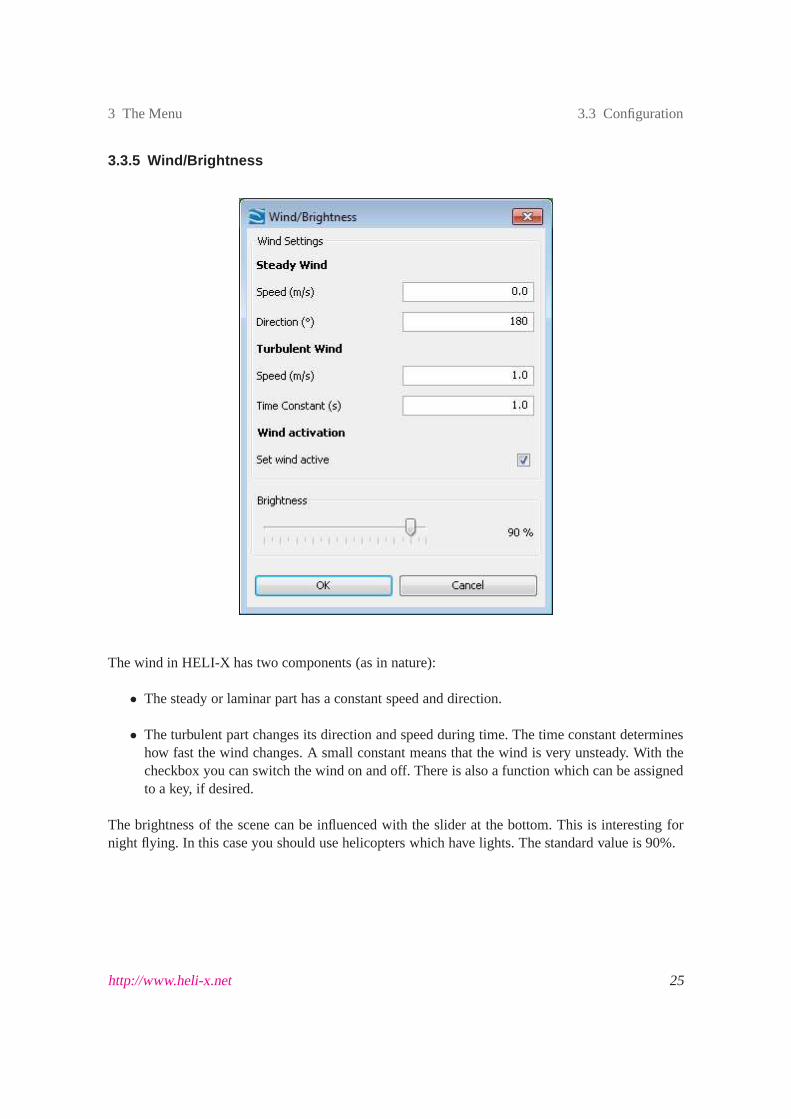
3.3.5 Wind/Brightness
The wind in HELI-X has two components (as in nature):
• The steady or laminar part has a constant speed and direction.
• The turbulent part changes its direction and speed during time. The time constant determineshow fast the wind changes. A small constant means that the wind is very unsteady. With thecheckbox you can switch the wind on and off. There is also a function which can be assignedto a key, if desired.
The brightness of the scene can be influenced with the slider at the bottom. This is interesting fornight flying. In this case you should use helicopters which have lights. The standard value is 90%.
http://www.heli-x.net 25
3 The Menu 3.3 Configuration
3.3.6 Slow Motion
Here you can choose the simulation speed (with the same physics) of your own helicopter.
3.3.7 Performance
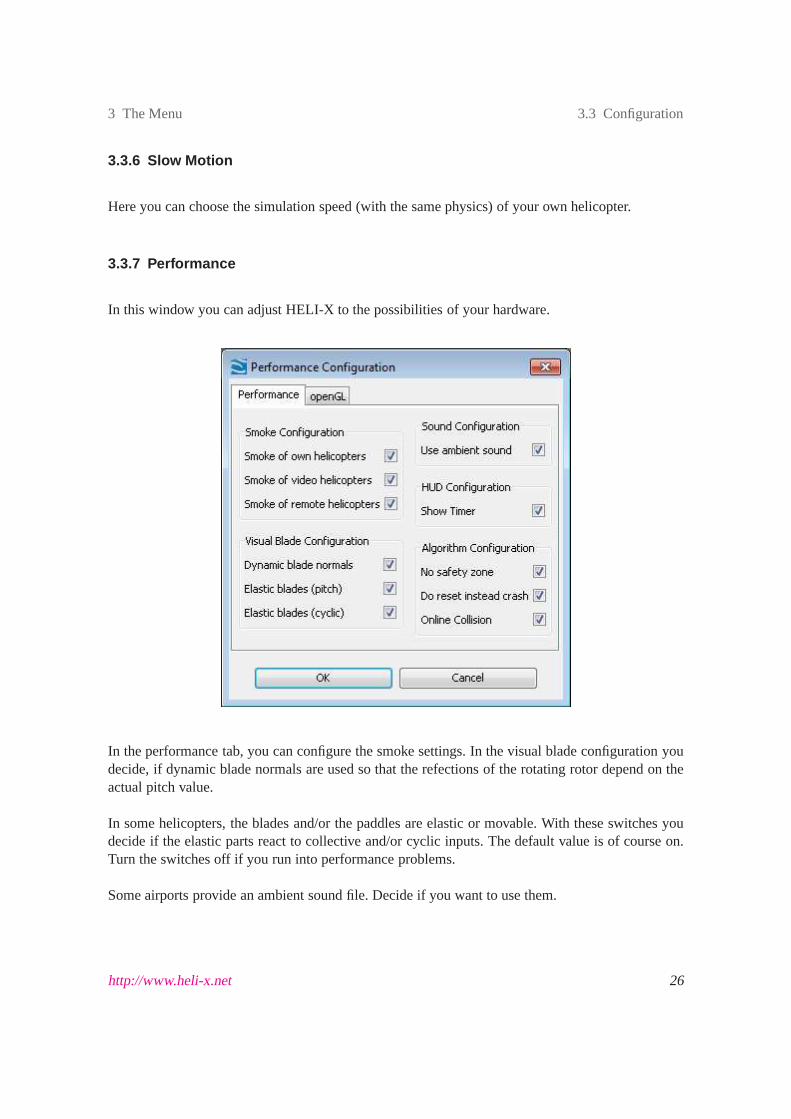
In this window you can adjust HELI-X to the possibilities of your hardware.
In the performance tab, you can configure the smoke settings.In the visual blade configuration youdecide, if dynamic blade normals are used so that the refections of the rotating rotor depend on theactual pitch value.
In some helicopters, the blades and/or the paddles are elastic or movable. With these switches youdecide if the elastic parts react to collective and/or cyclic inputs. The default value is of course on.Turn the switches off if you run into performance problems.
Some airports provide an ambient sound file. Decide if you want to use them.
http://www.heli-x.net 26

3 The Menu 3.3 Configuration
On some systems, the timer in the Cage Training needs too manyresources. In this case, disable thetimer.
Furthermore, you can deactivate the safety zone and you can disable the crash simulation so that thesimulation starts faster after a crash. Decide also, if yourhelicopter will be crashed when it collidesin a multi player simulation with an other helicopter.
The second tab provides possibilities to adjust the openGL settings.
The anti aliasing settings are responsible for the smoothing of edges. Theses settings might drasti-cally influence the performance of HELI-X, depending on yourgraphics adapter. VSync means thatthe frame rate is synchronized with the monitor refresh frequency, which causes a limitation of theframe rate. If you do not limit the frame rate, HELI-X tries toget as much performance as possibleto maximize the frame rate of the simulation.
If you are a really experienced user, you can set in the fileApplicationSettings.xml thevalue ofShowAllOptions to true. Then you can adjust more settings.
http://www.heli-x.net 27
3 The Menu 3.4 Flight Recorder
3.3.8 Sound
Here you can turn on and off the sound and adjust the volume. The Doppler factor influences howthe pitch of the sound changes dependent on the velocity of the helicopter.
You can also define the volume of the ambient sound which is available for some airports.
3.3.9 Shadow configuration
The calculation of the shadows (in particular when there aremany utilities in the scene), can influ-ence the performance if you have a graphics adapter which hasnot so much performance. Thus youcan define here which shadows are displayed.
3.3.10 Window size
You can set the window size to a standard value with one click.
3.3.11 Video size
Here you can determine the size of the canvas. This is of interest, if you want to create screen shotsor videos.
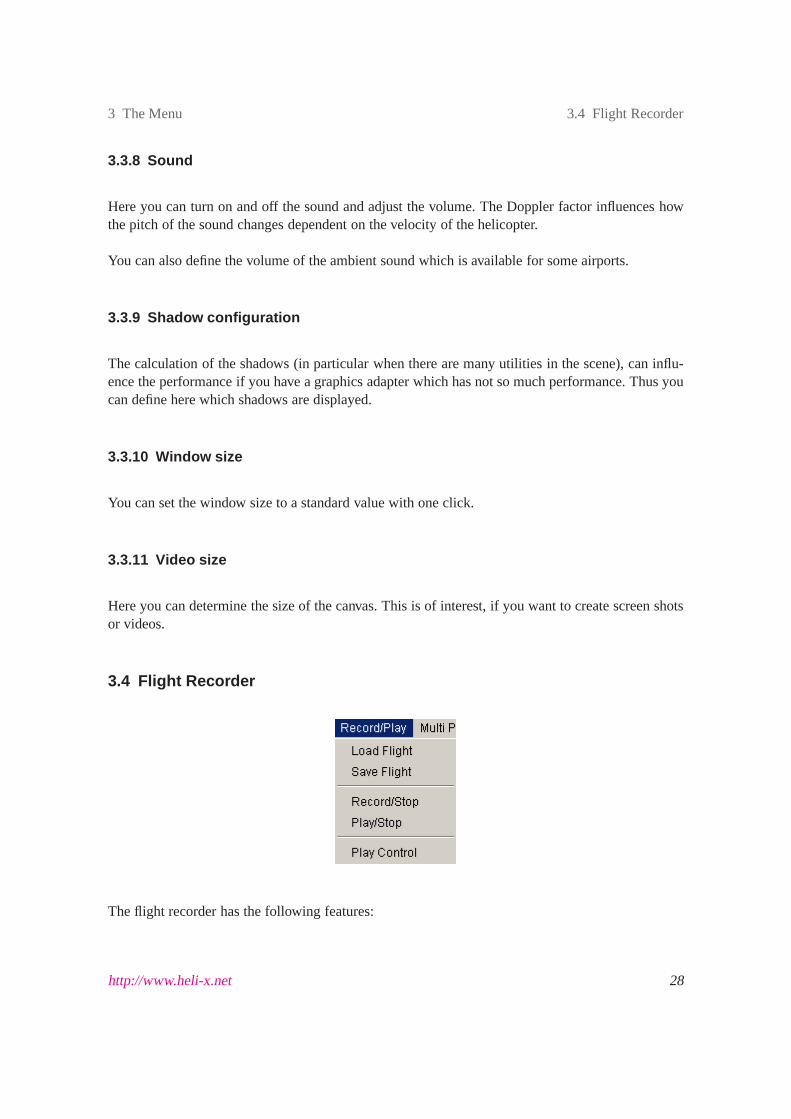
3.4 Flight Recorder
The flight recorder has the following features:
http://www.heli-x.net 28
3 The Menu 3.4 Flight Recorder
• A recording can be started and stopped with the menu entry ”record/stop”. The recording timeis then displayed in the status bar. In case of a crash, the recording is stopped automatically.After recording, the video is in the internal memory of HELI-X and can be played.
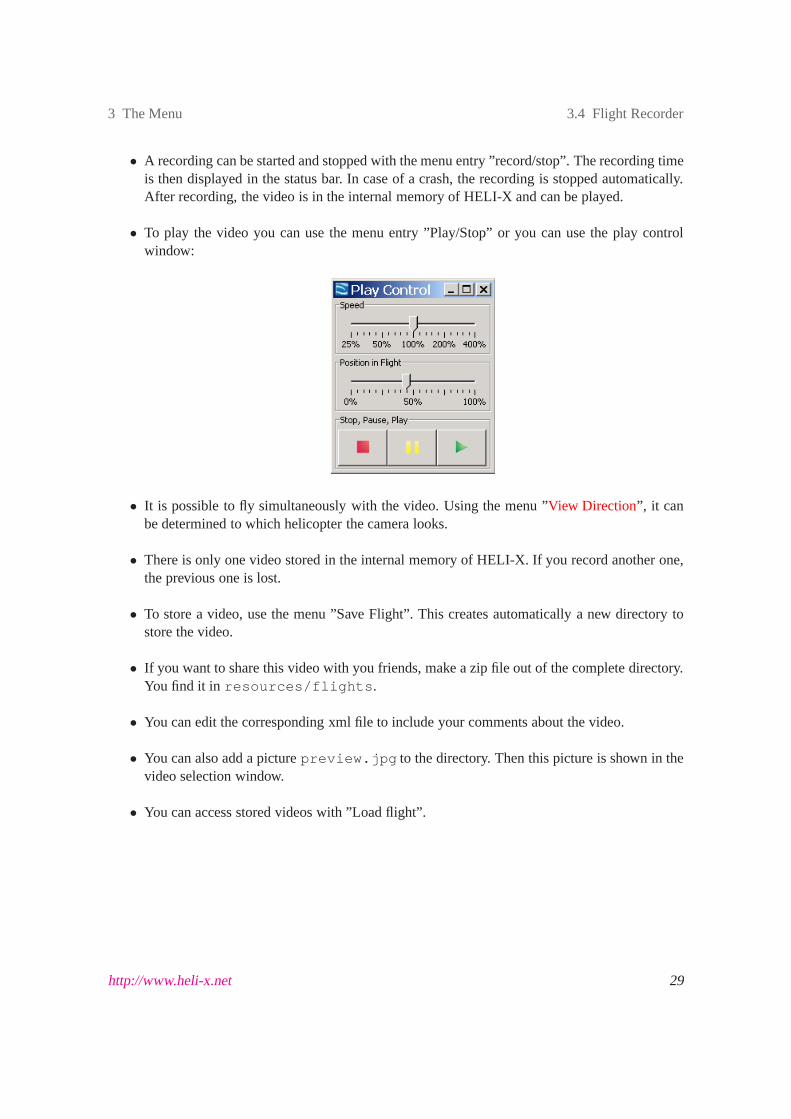
• To play the video you can use the menu entry ”Play/Stop” or youcan use the play controlwindow:
• It is possible to fly simultaneously with the video. Using themenu ”View Direction”, it canbe determined to which helicopter the camera looks.
• There is only one video stored in the internal memory of HELI-X. If you record another one,the previous one is lost.
• To store a video, use the menu ”Save Flight”. This creates automatically a new directory tostore the video.
• If you want to share this video with you friends, make a zip fileout of the complete directory.You find it in resources/flights.
• You can edit the corresponding xml file to include your comments about the video.
• You can also add a picturepreview.jpg to the directory. Then this picture is shown in thevideo selection window.
• You can access stored videos with ”Load flight”.
http://www.heli-x.net 29
3 The Menu 3.5 Multi Player
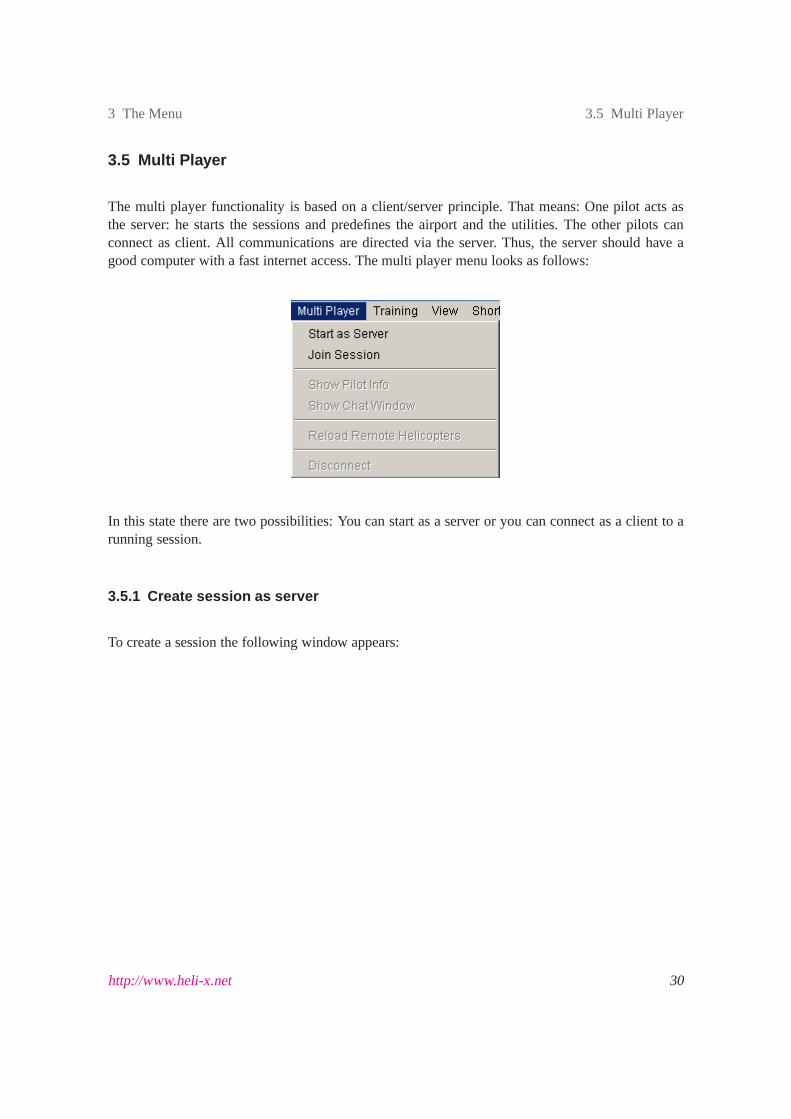
3.5 Multi Player
The multi player functionality is based on a client/server principle. That means: One pilot acts asthe server: he starts the sessions and predefines the airportand the utilities. The other pilots canconnect as client. All communications are directed via the server. Thus, the server should have agood computer with a fast internet access. The multi player menu looks as follows:
In this state there are two possibilities: You can start as a server or you can connect as a client to arunning session.
3.5.1 Create session as server
To create a session the following window appears:
http://www.heli-x.net 30
3 The Menu 3.5 Multi Player
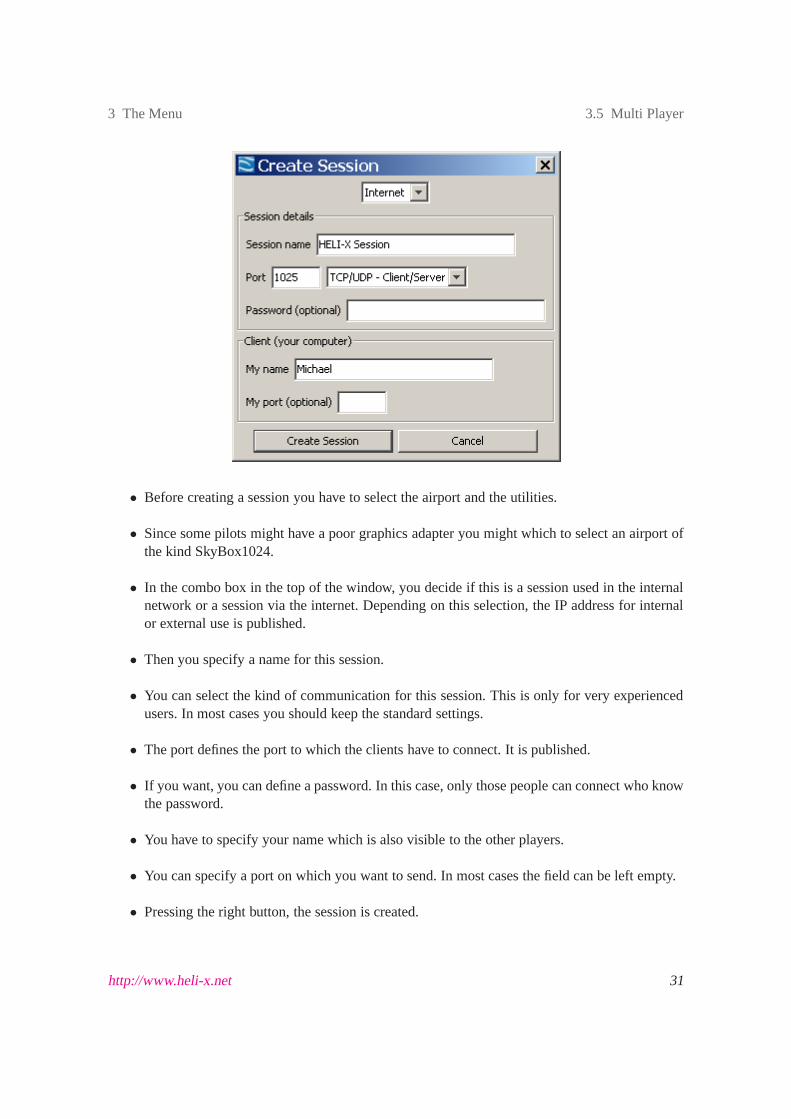
• Before creating a session you have to select the airport and the utilities.
• Since some pilots might have a poor graphics adapter you might which to select an airport ofthe kind SkyBox1024.
• In the combo box in the top of the window, you decide if this is asession used in the internalnetwork or a session via the internet. Depending on this selection, the IP address for internalor external use is published.
• Then you specify a name for this session.
• You can select the kind of communication for this session. This is only for very experiencedusers. In most cases you should keep the standard settings.
• The port defines the port to which the clients have to connect.It is published.
• If you want, you can define a password. In this case, only thosepeople can connect who knowthe password.
• You have to specify your name which is also visible to the other players.
• You can specify a port on which you want to send. In most cases the field can be left empty.
• Pressing the right button, the session is created.
http://www.heli-x.net 31
3 The Menu 3.5 Multi Player
• And then, other pilots can connect to your session.
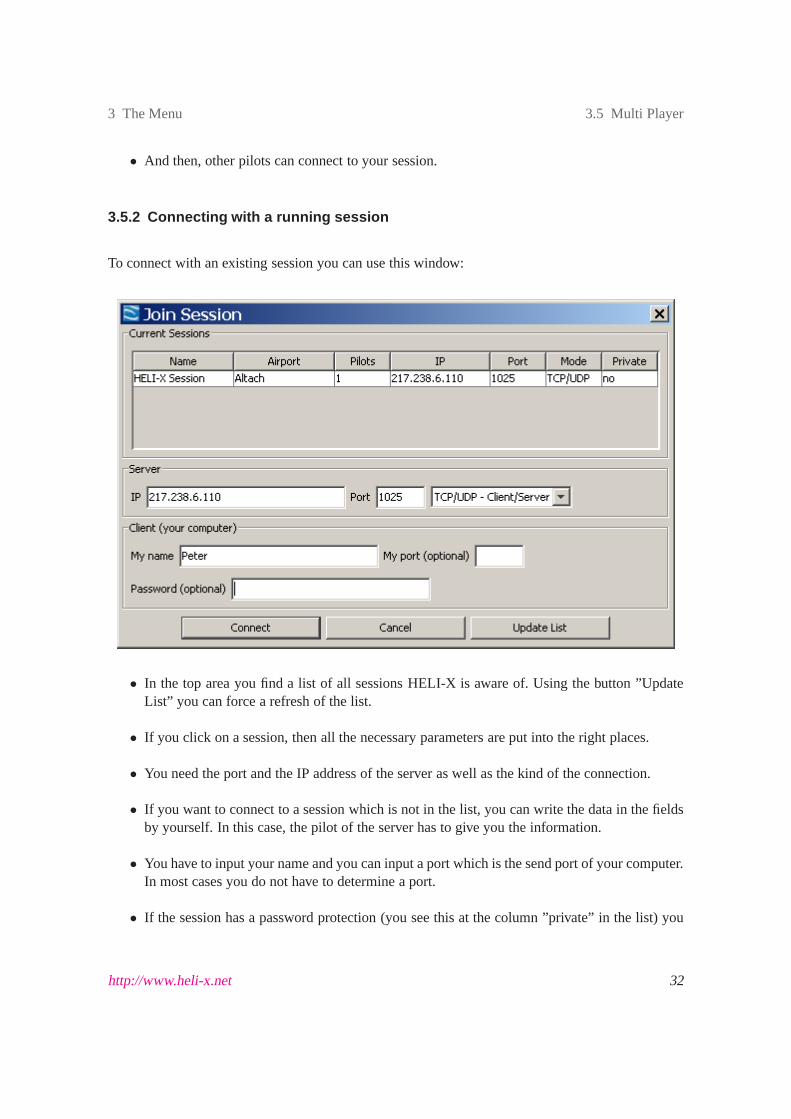
3.5.2 Connecting with a running session
To connect with an existing session you can use this window:
• In the top area you find a list of all sessions HELI-X is aware of. Using the button ”UpdateList” you can force a refresh of the list.
• If you click on a session, then all the necessary parameters are put into the right places.
• You need the port and the IP address of the server as well as thekind of the connection.
• If you want to connect to a session which is not in the list, youcan write the data in the fieldsby yourself. In this case, the pilot of the server has to give you the information.
• You have to input your name and you can input a port which is thesend port of your computer.In most cases you do not have to determine a port.
• If the session has a password protection (you see this at the column ”private” in the list) you
http://www.heli-x.net 32
3 The Menu 3.5 Multi Player
have to input the correct password to join the session.
• If you press ”connect”, the connection to the server will be established.
3.5.3 Other windows
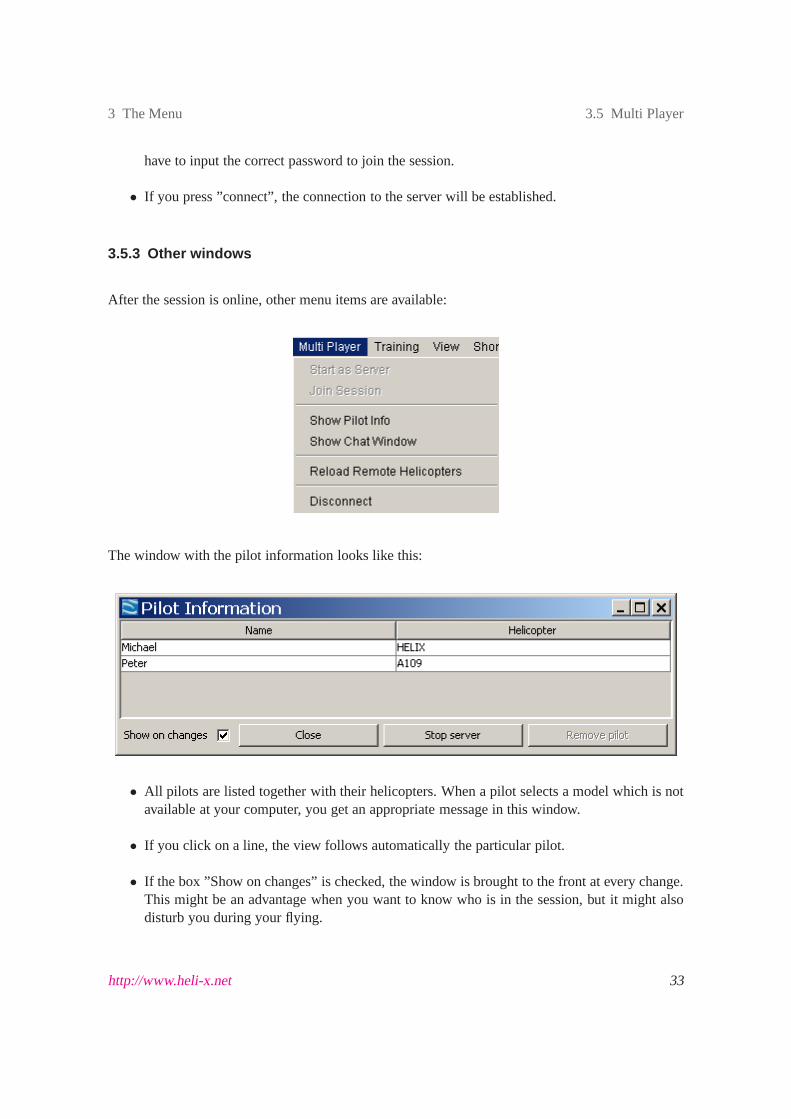
After the session is online, other menu items are available:
The window with the pilot information looks like this:
• All pilots are listed together with their helicopters. Whena pilot selects a model which is notavailable at your computer, you get an appropriate message in this window.
• If you click on a line, the view follows automatically the particular pilot.
• If the box ”Show on changes” is checked, the window is broughtto the front at every change.This might be an advantage when you want to know who is in the session, but it might alsodisturb you during your flying.
http://www.heli-x.net 33
3 The Menu 3.5 Multi Player
• The server has an additional button to disconnect another player. You have to select the ap-propriate player in the list beforehand.
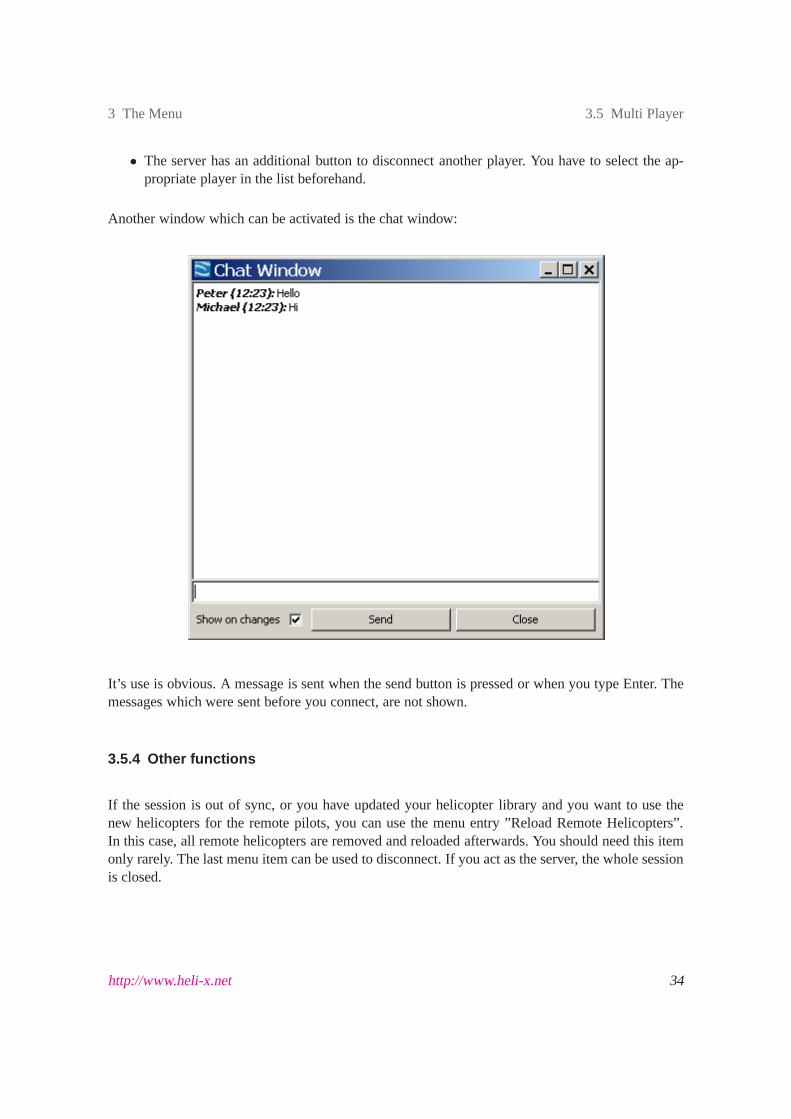
Another window which can be activated is the chat window:
It’s use is obvious. A message is sent when the send button is pressed or when you type Enter. Themessages which were sent before you connect, are not shown.
3.5.4 Other functions
If the session is out of sync, or you have updated your helicopter library and you want to use thenew helicopters for the remote pilots, you can use the menu entry ”Reload Remote Helicopters”.In this case, all remote helicopters are removed and reloaded afterwards. You should need this itemonly rarely. The last menu item can be used to disconnect. If you act as the server, the whole sessionis closed.
http://www.heli-x.net 34
3 The Menu 3.6 Training
3.5.5 Requirements for the communication
The communication of the HELI-X multi player mode is based onTCP and UDP. Please note thefollowing hints:
• The client has to allow outgoing connections. For this, a configuration in the router might benecessary. Used is the given port and the two following port numbers, for example 1025-1027.
• The port should be able to communicate with TCPandUDP.
• The server has to allow incoming connections.
• If you have a fire wall, you should be aware of the parameters there. In Windows, it mighthelp to deactivate the fire wall.
• If your router does perform a port mapping, it has to bo configured accordingly.
• All these settings depend strongly on your particular hardware. Thus, if there are any questi-ons, you should ask for help at the HELI-X forumhttp://forum.heli-x.info.
3.6 Training
Here you can start and configure all the available training methods. The first entry in the menuallows to start and stop any training.
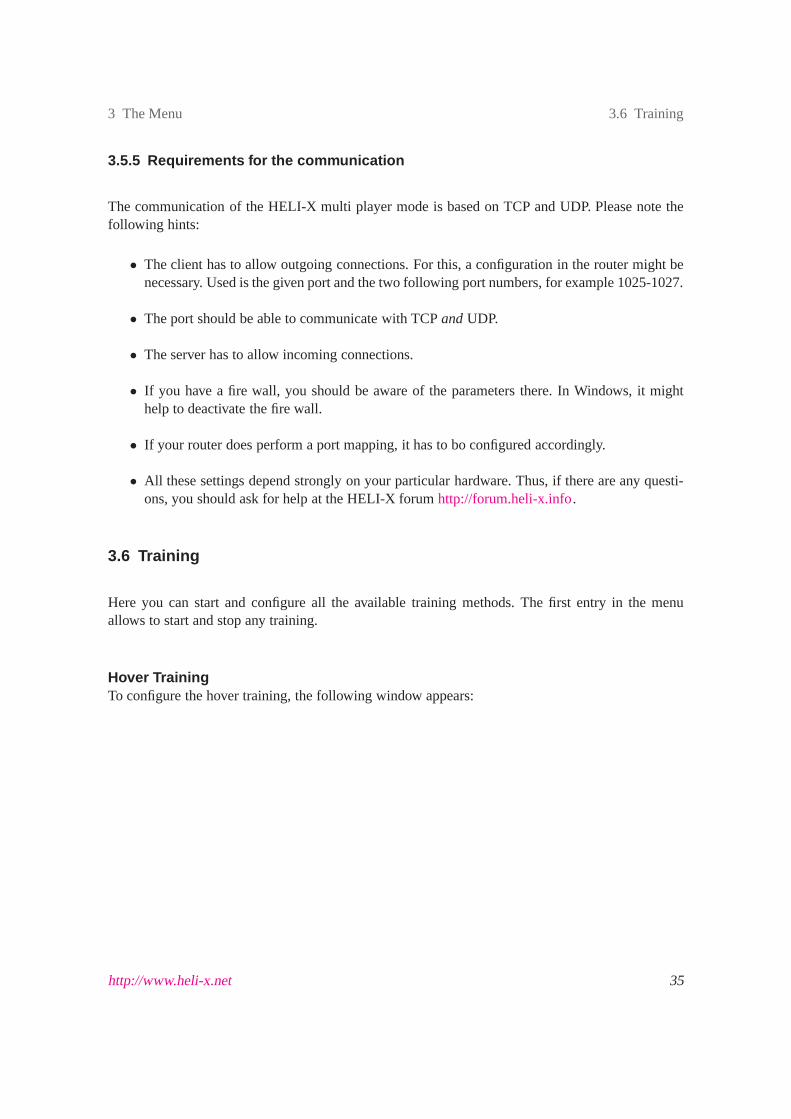
Hover TrainingTo configure the hover training, the following window appears:
http://www.heli-x.net 35
3 The Menu 3.6 Training
• On the left hand side, you can decide which functions are controlled by HELI-X and whichyou want to control by yourself.
• Several details are specified on the right hand side.
– Do you want to practice inverted or not?
– In which height is the hover training performed?
– Which side of the helicopter should be visible?
– With the box ”Rotation Speed” you can define if the helicoptershould rotate around thevertical axis or not. You can also specify the rotation speed.
– With the checkbox below you can change the rotation direction.
• Those functions which are controlled by HELI-X, are performed in such a way, as a teacherwould do. The position of the helicopter is therefore not held artificially. The control algorithmcan be set to fast or robust according to the value of the slider. If the helicopter starts to swingyou should choose a lower value. And if the heli does not hold its position, chose a higher
http://www.heli-x.net 36
3 The Menu 3.6 Training
value.
• Using the buttons, you can start or stop the training.
• It is possible during the training to change the airport or the helicopter.
Promenade Training
The promenade training is similar to the hover training. However, this time the pilot walks around thehelicopter. The nose of the helicopter should typically point into the same direction. The promenadetraining does only work when an airport of type Scene3D is selected.
Reaction Training
The idea of this training is that the helicopter starts in a random situation and it is your task to bringthe helicopter safely to the ground.
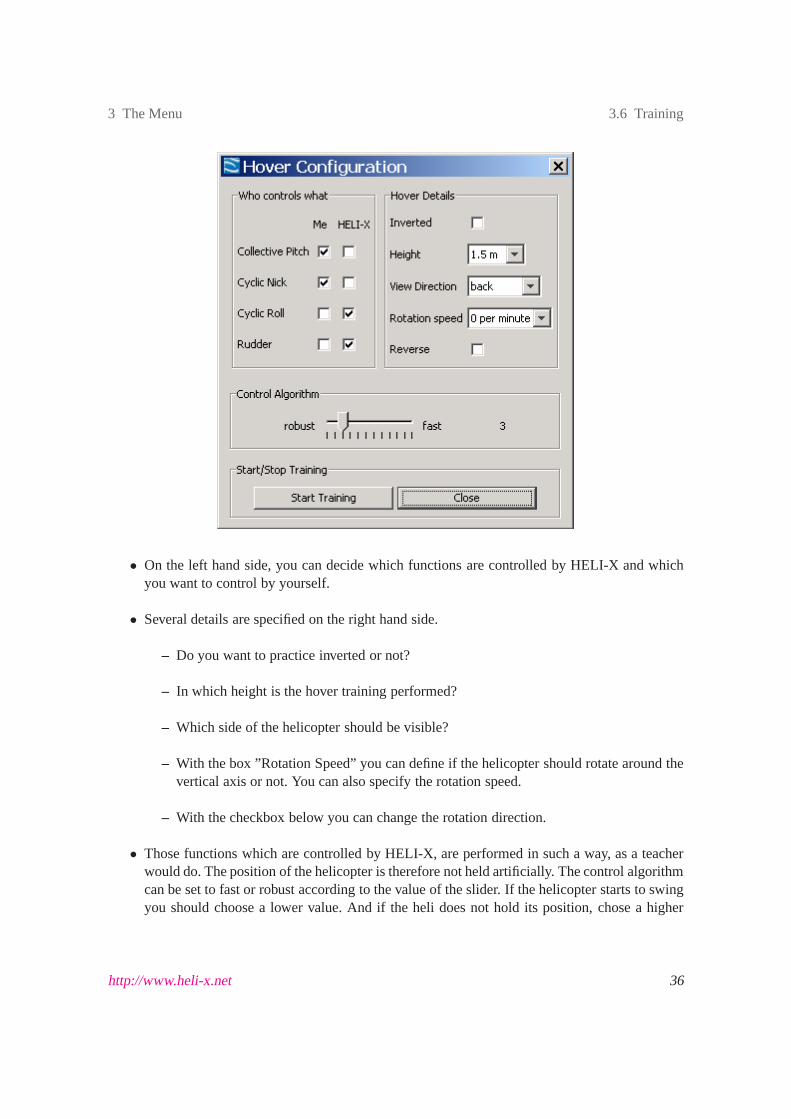
Tail Training
The tail training is to practice the tail in such a way, that the helicopter is always oriented along itsflight path. For this, the slip meter shows the angle difference between the helicopter orientation andits flight direction.
When you start the tail training you get an explanation and the slip meter is activated. Thereforethere is nothing to stop.
http://www.heli-x.net 37
3 The Menu 3.6 Training
Funnel TrainingThe funnel training is similar to the tail training. This time, however, the flight direction is perfectlyorthogonal to the helicopter orientation. The display is then called a side slip meter.
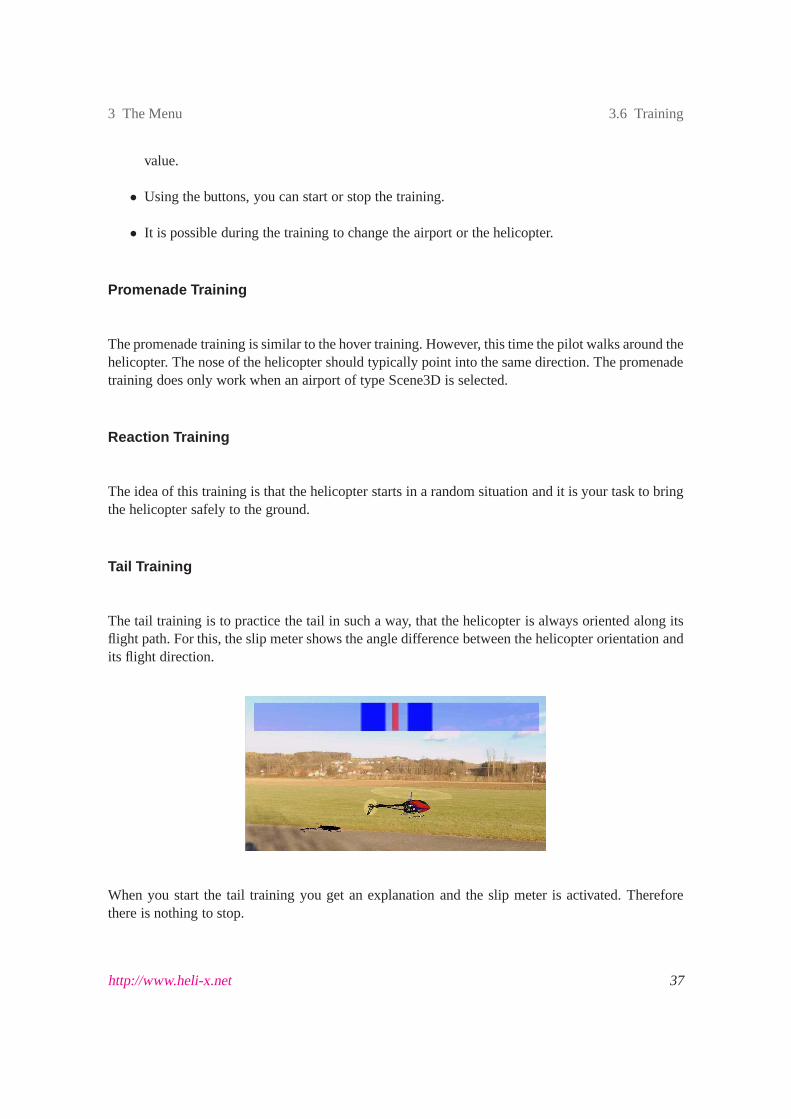
Autorotation TrainingFor the configuration of the auto rotation training, the following window appears:
Here you can define the height for the start, the horizontal velocity during start, the time until theengine stops and the view direction to the heli. The checkboxdefines if you want to start inverted.The goal is of course, to land with a small vertical velocity.
The stall meter might help you with the training. It is explained later.
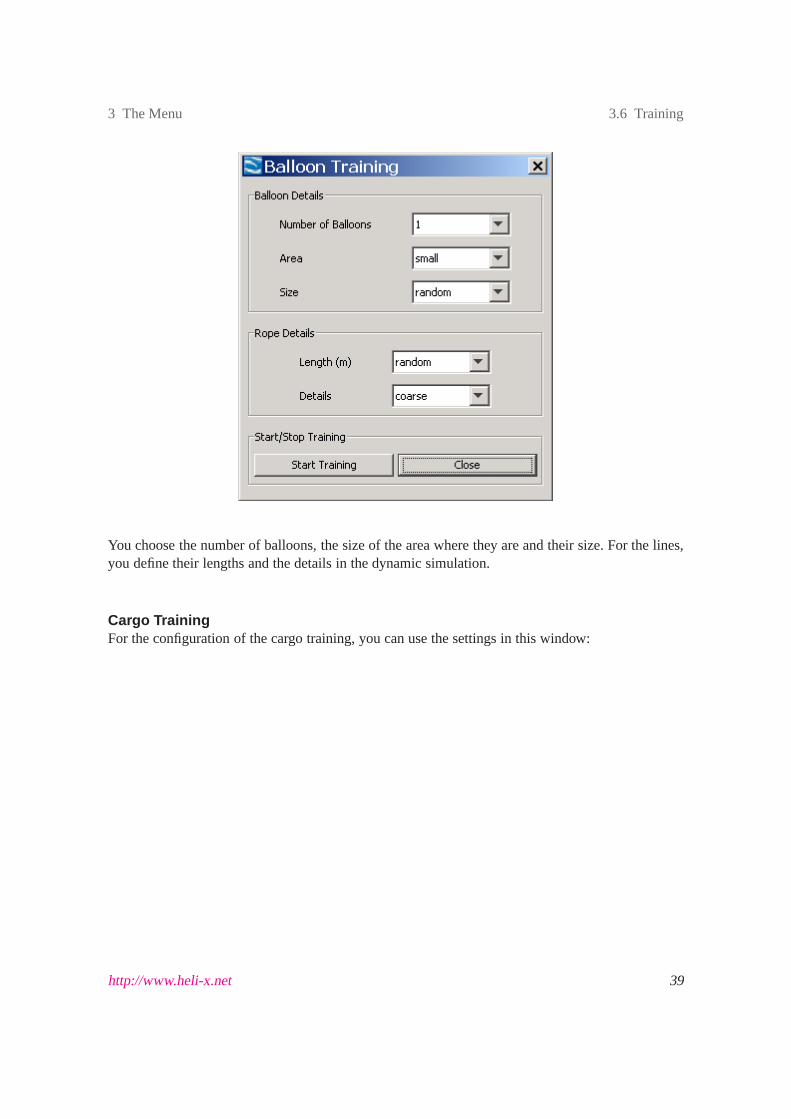
Balloon TrainingIn order to configure the balloon training, the following window is used:
http://www.heli-x.net 38
3 The Menu 3.6 Training
You choose the number of balloons, the size of the area where they are and their size. For the lines,you define their lengths and the details in the dynamic simulation.
Cargo TrainingFor the configuration of the cargo training, you can use the settings in this window:
http://www.heli-x.net 39

3 The Menu 3.6 Training
The settings are similar to the balloon training. Note that you have to put the cargo from where itis placed to the active heliports. There it is unloaded automatically as soon as it touches the activeheliport.
Basket TrainingThe basket training is similar to the cargo training. But theballs are stored in baskets.
http://www.heli-x.net 40
3 The Menu 3.6 Training
Lasso TrainingThe goal of the lasso training is to fly with the rope. The rope can be cut by the rotors. So typicallythe helicopter has to fly backwards.
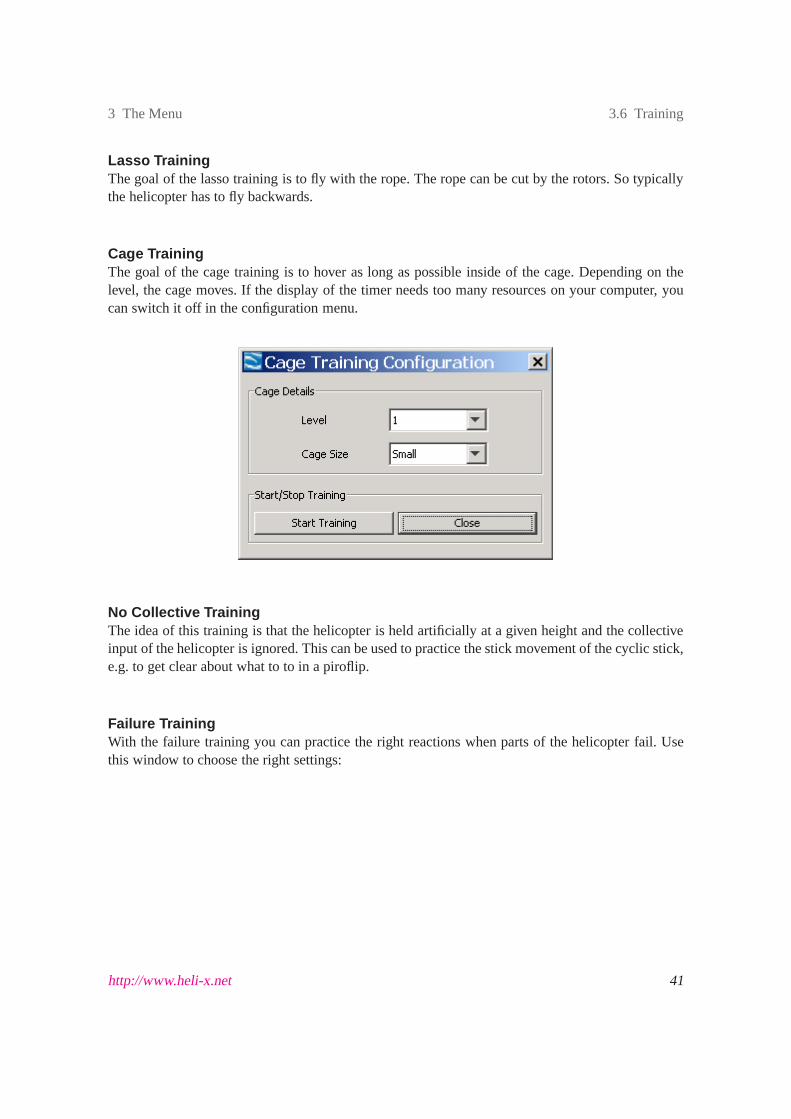
Cage TrainingThe goal of the cage training is to hover as long as possible inside of the cage. Depending on thelevel, the cage moves. If the display of the timer needs too many resources on your computer, youcan switch it off in the configuration menu.
No Collective TrainingThe idea of this training is that the helicopter is held artificially at a given height and the collectiveinput of the helicopter is ignored. This can be used to practice the stick movement of the cyclic stick,e.g. to get clear about what to to in a piroflip.
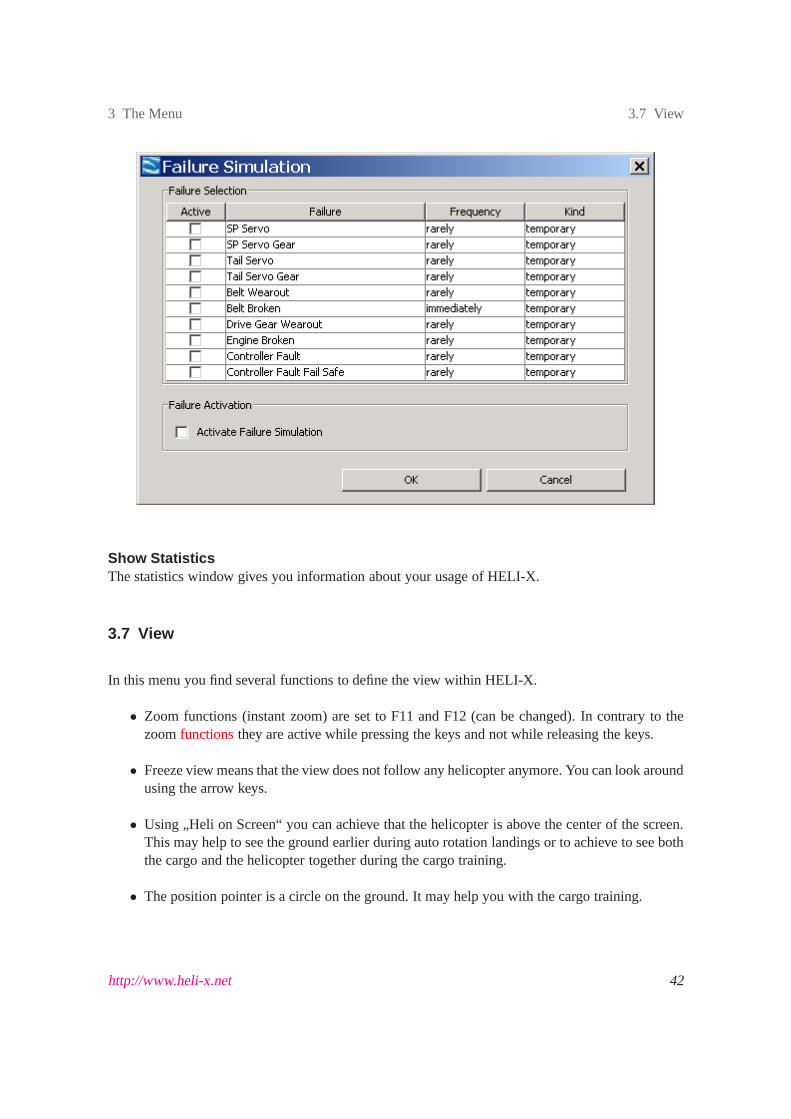
Failure TrainingWith the failure training you can practice the right reactions when parts of the helicopter fail. Usethis window to choose the right settings:
http://www.heli-x.net 41
3 The Menu 3.7 View
Show StatisticsThe statistics window gives you information about your usage of HELI-X.
3.7 View
In this menu you find several functions to define the view within HELI-X.
• Zoom functions (instant zoom) are set to F11 and F12 (can be changed). In contrary to thezoomfunctionsthey are active while pressing the keys and not while releasing the keys.
• Freeze view means that the view does not follow any helicopter anymore. You can look aroundusing the arrow keys.
• Using „Heli on Screen“ you can achieve that the helicopter isabove the center of the screen.This may help to see the ground earlier during auto rotation landings or to achieve to see boththe cargo and the helicopter together during the cargo training.
• The position pointer is a circle on the ground. It may help youwith the cargo training.
http://www.heli-x.net 42
3 The Menu 3.7 View
With the next five menue entries you can switch on and off the display of the sticks, the stall meter,the slip meter, the side slip meter and the wind display.
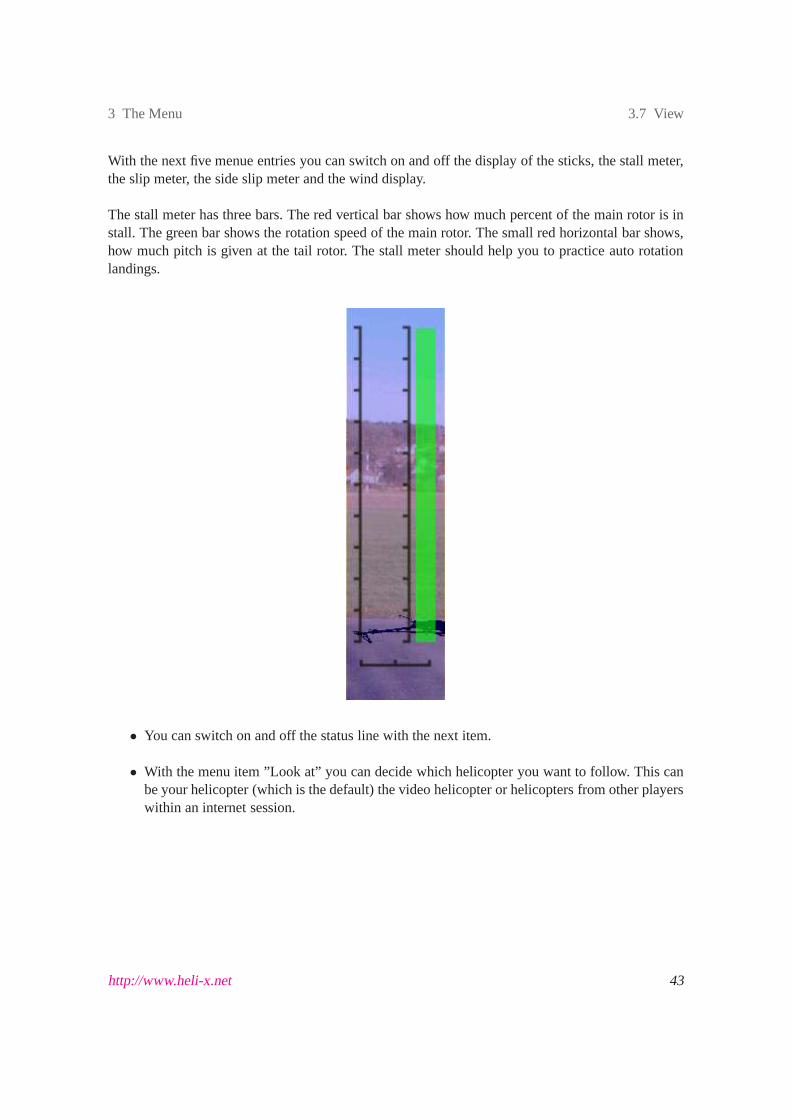
The stall meter has three bars. The red vertical bar shows howmuch percent of the main rotor is install. The green bar shows the rotation speed of the main rotor. The small red horizontal bar shows,how much pitch is given at the tail rotor. The stall meter should help you to practice auto rotationlandings.
• You can switch on and off the status line with the next item.
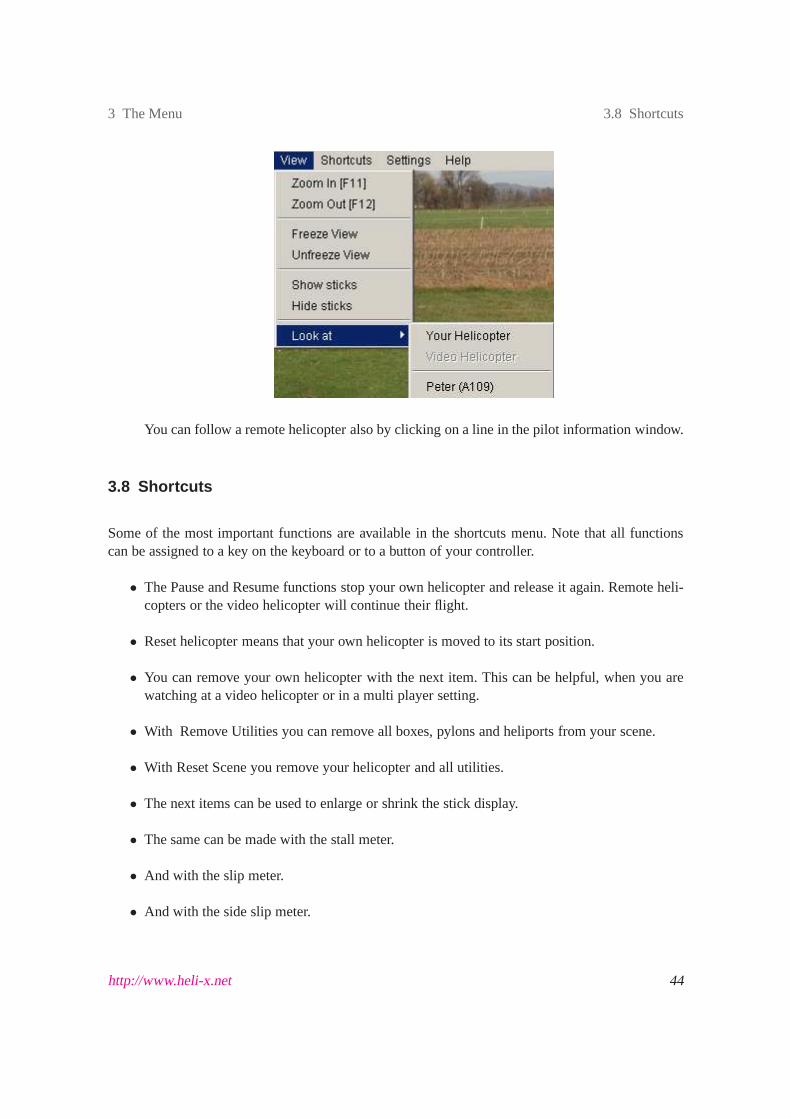
• With the menu item ”Look at” you can decide which helicopter you want to follow. This canbe your helicopter (which is the default) the video helicopter or helicopters from other playerswithin an internet session.
http://www.heli-x.net 43
3 The Menu 3.8 Shortcuts
You can follow a remote helicopter also by clicking on a line in the pilot information window.
3.8 Shortcuts
Some of the most important functions are available in the shortcuts menu. Note that all functionscan be assigned to a key on the keyboard or to a button of your controller.
• The Pause and Resume functions stop your own helicopter and release it again. Remote heli-copters or the video helicopter will continue their flight.
• Reset helicopter means that your own helicopter is moved to its start position.
• You can remove your own helicopter with the next item. This can be helpful, when you arewatching at a video helicopter or in a multi player setting.
• With Remove Utilities you can remove all boxes, pylons and heliports from your scene.
• With Reset Scene you remove your helicopter and all utilities.
• The next items can be used to enlarge or shrink the stick display.
• The same can be made with the stall meter.
• And with the slip meter.
• And with the side slip meter.
http://www.heli-x.net 44
3 The Menu 3.9 Settings
• And with the wind display.
3.9 Settings
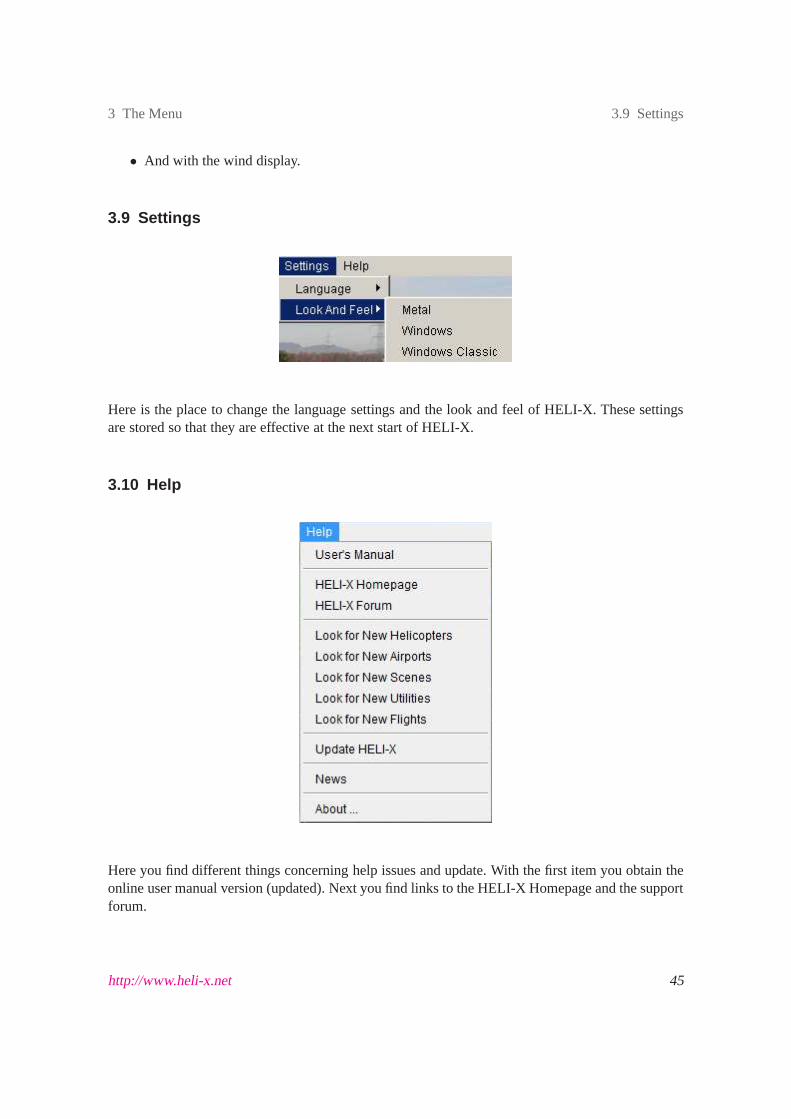
Here is the place to change the language settings and the lookand feel of HELI-X. These settingsare stored so that they are effective at the next start of HELI-X.
3.10 Help
Here you find different things concerning help issues and update. With the first item you obtain theonline user manual version (updated). Next you find links to the HELI-X Homepage and the supportforum.
http://www.heli-x.net 45

3 The Menu 3.10 Help
The following items start a process where HELI-X looks for updated versions of airports, helicoptersand so on. Of course you need to have online access for this feature. You get a list where you cansee for which local data there is an update available. Decidewhat data you want to download andpress the update button.
Updates of HELI-X are available online. When you select thisitem you see whether your version isup-to-date. When there is an update available, you can obtain it with your personal registration data.
The news screen gives you the most recent information about HELI-X.
For further assistance have a look at the HELI–X–Forum (http://forum.heli-x.info).
http://www.heli-x.net 46
4 Functions 4 Functions
4 Functions
This important section describes the many functions of HELI-X which can be assigned to a buttonor switch of the controller or to a key of the keyboard. Since many features of HELI-X can be usedwith these functions, this is a section which you should read.
• Idle Up 1 (start the engine).You start or stop the idle up 1 state, that means the engine isstarted and runs with a low speed.
• Idle Up 2. The state with a higher rotor speed.
• Autorotation. You start the auto rotation with this function.
• Airport Selection. Same function as the corresponding menu entry.
• Helicopter Selection.Same function as the corresponding menu entry.
• Utility Selection. Same function as the corresponding menu entry.
• Scene Selection.Same function as the corresponding menu entry.
• Pause.Turning on the pause.
• Resume.Turning off the pause.
• Toggle pause and resume.Turning on and off the pause.
• Reload Helicopter. The actual helicopter is reloaded. This function is in particular usefulwhen you are editing model parameters with an external editor. Using this function you canimmediately try the changes made in the xml file.
• Reset scene (and delete boxes etc.)The reset functionality of HELI-X.
• Zoom in/Zoom out. These zoom functions can be assigned on any key.
• Freeze and unfreeze view.Toggle on and off of the dynamic view.
• Switch view from heli to heli. Changes the view focus from helicopter to helicopter. Theother helicopters can be a video helicopter and the remote helicopters.
• Toggle Heli position on screen.Moves the heli position vertically. This may be of advantagewhile in an auto rotation or cargo training.
http://www.heli-x.net 47
4 Functions 4 Functions
• Take Screenshot.Take a screenshot and store it in the screenshots directory.
• Play/Pause Video.Start and stop the playback of a video.
• Record/Stop Video.Start and stop the recording of a video.
• Use current position as start position.After the next crash or a reset the helicopter is at thisposition with the current engine state. This might help the impatient pilots who do not wantto wait until the engine starts.
• Simulate crash of tail rotor. The only way to ”repair” the tail rotor is a reset (or crash) ofthehelicopter.
• Show/Hide/Toggle Sticks.These functions can be used to control the stick display. Youmightprefer the toggle function on the keyboard.
• Enlarge/shrink Stick Display. Change the size of the stick display. The settings are storedwhen HELI-X is finished.
• Show/Hide/Toggle Stall Meter.These functions can be used to control the stall meter. Youmight prefer the toggle function on the keyboard.
• Enlarge/shrink Stall Meter. Change the size of the stall meter. The settings are stored whenHELI-X is finished.
• Show/Hide/Toggle Slip Meter.These functions can be used to control the slip meter. Youmight prefer the toggle function on the keyboard.
• Enlarge/shrink Slip Meter. Change the size of the slip meter. The settings are stored whenHELI-X is finished.
• Show/Hide/Toggle Side Slip Meter.These functions can be used to control the side slipmeter. You might prefer the toggle function on the keyboard.
• Enlarge/shrink Side Slip Meter. Change the size of the side slip meter. The settings arestored when HELI-X is finished.
• Show/Hide/Toggle Wind Display.These functions can be used to control the wind display.You might prefer the toggle function on the keyboard.
• Enlarge/shrink Wind Display. Change the size of the wind display. The settings are storedwhen HELI-X is finished.
http://www.heli-x.net 48
4 Functions 4 Functions
• Toggle Position Pointer.This function can be used to control the position pointer.
• More light/Less Light. Use this to make the scene darker for night flights.
• Toggle wind on/off. Use this function to turn the wind on and off. The velocity settings forthe wind are stored.
• Start/Stop Training. To start and stop the currently selected training.
• Unload Cargo.To unload the cargo manually during the cargo training.
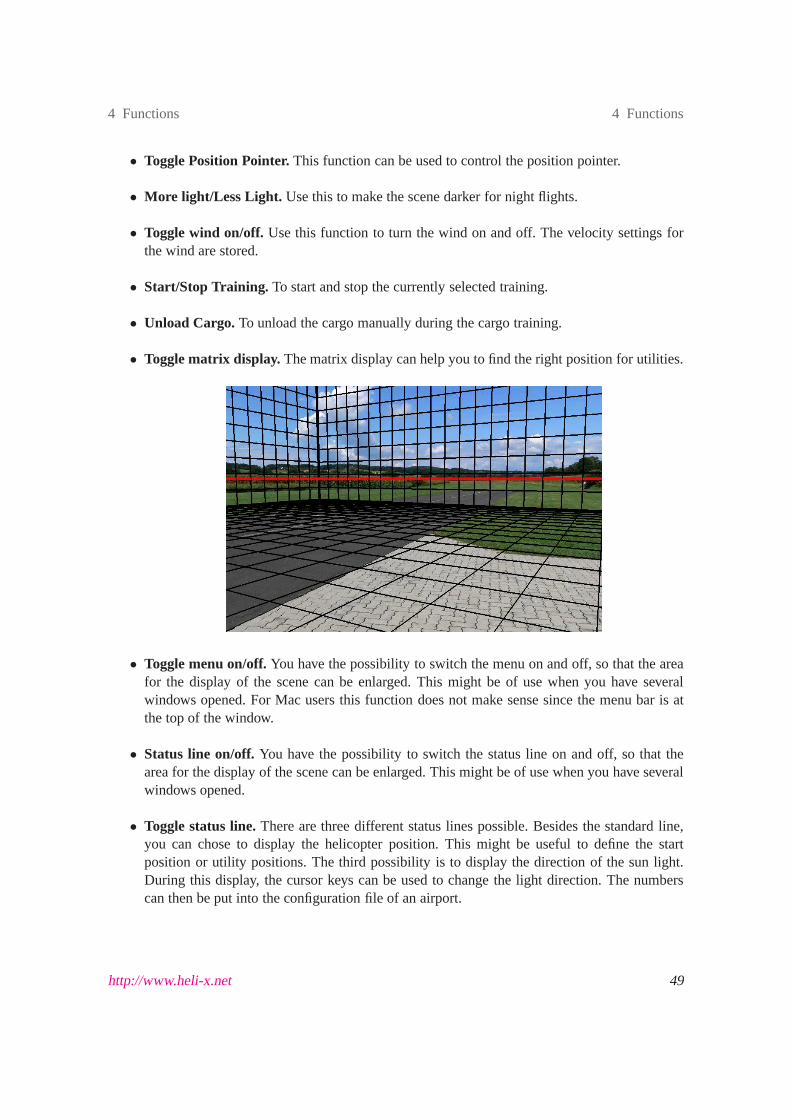
• Toggle matrix display. The matrix display can help you to find the right position for utilities.
• Toggle menu on/off.You have the possibility to switch the menu on and off, so thatthe areafor the display of the scene can be enlarged. This might be of use when you have severalwindows opened. For Mac users this function does not make sense since the menu bar is atthe top of the window.
• Status line on/off.You have the possibility to switch the status line on and off,so that thearea for the display of the scene can be enlarged. This might be of use when you have severalwindows opened.
• Toggle status line.There are three different status lines possible. Besides the standard line,you can chose to display the helicopter position. This mightbe useful to define the startposition or utility positions. The third possibility is to display the direction of the sun light.During this display, the cursor keys can be used to change thelight direction. The numberscan then be put into the configuration file of an airport.
http://www.heli-x.net 49
4 Functions 4 Functions
• Toggle Sound on/off.You can switch the sound on and off.
• Switch to next texture. If the helicopter has several textures, they can be changed with thisfunction
• Switch to next color. If the helicopter supports the change of a color, this can be done withthis function
• Toggle topography shape.If you construct crash objects, you can make them visible withthis function.
• Reload topography.Using this function, you can update the crash objects from the topogra-phy files without loading the sky box pictures.
• Instant Zoom In/Out These functions are only available for the keyboard. In contrast to thenormal zoom functions, they act instantly when a key is pressed and not when it is released.In a standard installation they are assigned to F11 and F12.
http://www.heli-x.net 50
5 Developer 5 Developer
5 Developer
5.1 Helicopter Models
Currently, all helicopters are seen as helicopters which have paddles. If you want to model a helico-pter without paddles, just set the coupling between paddlesand blades to zero.
5.1.1 General remarks
• Models for helicopters consist out of a couple of files which are collected in one directory.
• The name of the helicopter is the name of the directory.
• In order to ensure compatibility with the different operating systems, you have to take care ofthe cases in the filenames.
• As said before, all files are collected in one directory.
• Three files have the same name as the directory: *.wav with thesound of the helicopter, *.xmlwith the parameters and *.obj which is a wavefront graphics file.
• There might be other files in the directory, e.g. for the materials or the textures.
• If there is a picture ”preview.jpg” in the directory, this picture is used as preview in the modelselection window.
• The .obj-File is a wavefront file. Please take care about the following:
– The center of gravity of the model is the origin of a right handed coordinate system. Thex axis points to the front, they axis is vertical. Thezaxis points to the right.
– The rotating axis of the main rotor lies on they axis.
– The groups which build the main rotor have names beginning with ”Mainrotor”.
– The groups which build the tail rotor have names beginning with ”Tailrotor”.
– Groups with transparent material must have a name that ends with _transparent,e.g.canopy_transparent.
http://www.heli-x.net 51
5 Developer 5.1 Helicopter Models
• HELI-X uses different graphical objects for the rotor with low speed and the rotor with highspeed. The low speed rotors are the ones from the object file. For rotors with a high speed, adifferent object is used. If you want specific objects for your helicopter, these objects have tobe in the directory with the names ”Mainrotor.obj” and ”Tailrotor.obj”. If these files are notpresent, HELI-X uses standard rotors.
• Within the xml file there are some parameters for the graphics. They are used for the positionof the rotors and for the size of the helicopter.
5.1.2 Visual parameters
In the xml file of the model the following parameters are used for the visual representation of themodel.
<MainrotorPosition> [f,f,f]The position of the main rotor in local model coordinates. Itis used when the rotor is substi-tuted by the transparent disk.
<MainrotorTurnAxis> [f,f,f]The turn axis of the main rotor.
<MainrotorAngle> [f,f,f]Tipping angles of the axis of the main rotor.
<TailrotorPosition> [f,f,f]The position of the tail rotor in local model coordinates. Itis used when the rotor is substitutedby the transparent disk.
<TailrotorTurnAxis> [f,f,f]The turn axis of the tail rotor.
<TailrotorAngle> [f,f,f]Tipping angles of the axis of the tail rotor.
<TailrotorCrashSizePercentage> [f]using this value (0-100) you can reduce the sensitivity of the tail rotor with respect to crashes.
<Scale> [f]This parameter can be used to define the scale between model coordinates and real coordina-tes. Usually, it is not used. Then the actual size of the helicopter is determined by the next twoparameters.
http://www.heli-x.net 52
5 Developer 5.1 Helicopter Models
<ScaleDeterminantPartName> [s]Here you write e.g. Mainrotor
<SizeOfScaleDeterminantPart> [f]and then you specify the diameter of the main rotor here in meter.
<HelicopterType> [s]Type of the helicopter: Trainer or Scale or Multicopter or Coaxial
<HookPosition> [s,f,f,f]Defines a hook for the cargo training. A comma seperated list.Name and x,y z coordinates.
<FactorVisualElasticBladePitch> [f]If you want that a part of the main rotor object deforms due to the pitch or cyclic values, givethose parts a group name that contains the stringelastic. Similarly if you want that theface normals change their angle due to the pitch value, give the corresponding group a namethat containsdynamic_normal. This factor now determines the amount of elastic bendingdue to pitch.
<FactorVisualElasticBladeCyclic> [f]This factor determines the amount of elastic bending of the main rotor due to cyclic controls.
<ColorShape> [s]It is possible to change the colors of Shapes within HELI-X. You define the shapes for whichthis is possible as ColorShape. To identify which color is possible for which shape, there areused groups. An example:<ColorShape group="0" color="1">Body</ColorShape>There is a shape with the name Body. It is associated with the group 0. The optional value forcolor means, that color 1 is used for this shape.
<Color> ,[s,f,f,f,f,f,ff,f,f]With this tag you define the colors. It is a comma separated list. After the name of the colorthere are nine numbers between 0 and 1. They define the RGB values of the ambient, diffusiveand specular intensities.
<TextureShape> [s]It is possible to change the texture of the so called texture shapes which are defined with thistag. To identify which texture is possible for which shape, there are used groups. An example:<TextureShape group="0" texture="1">Body</TextureShape>There is a shape with the name Body. It is associated with the group 0. The optional value fortexturemeans, that texture 1 is used for this shape.
<Texture> [s,s]
http://www.heli-x.net 53
5 Developer 5.1 Helicopter Models
This tag defines a texture. in a comma separated list there is the name and then the file nameof the texture. You should also use the attribute group.
5.1.3 Physics parameters for Helicopters
General parameters
<Name> [s]The name of the model. It is displayed in the title bar of the window.
<TimeFactor> [f]This factors determines the simulation speed. Default is 1.
<PhysicalModelName> [s]The internal name of the physical model. Here you have to write one of these:Helicopter_V1_1,CoaxHelicopter_V1_1,QuadroCopter_V1_1,HexaCopter_V1_1,TriCopter_V1_1.
<Author> [s]The name of the author of the model.
<WWW> [s]URL of the author’s web site.
<Comment> [s]Comments about the model.
<Version> [s]The release date of the model in the form YYYY-MM-DD.
<HelixRevision> [i]The revision number of HELI-X for the model to work.
Mass, geometry, etc.
<RhoAir> [f]The density of the air in kg/m3. Default value is 1.209.
<Mass> [f]The mass of the helicopter in kg.
http://www.heli-x.net 54
5 Developer 5.1 Helicopter Models
<Ixx> [f]Moment of inertia for rotation around thex axis. In kg m2.
<Iyy> [f]Moment of inertia for rotation around they axis. In kg m2.
<Izz> [f]Moment of inertia for rotation around thezaxis. In kg m2.
<Ixy> [f]Combined moment of inertia for rotation around thex-y axis. In kg m2.
Main rotor
<RotorHeadPosition> [f,f,f]The position of the main rotor in the true coordinate system.x,y,z in m.
<NumberOfBlades> [i]The number of blades.
<MaxRadiusBlade> [f]Outer radius of the blades in m.
<MinRadiusBlade> [f]Inner radius of the blades in m.
<ChordLengthBlade> [f]Chord length in m.
<MassBlade> [f]Mass of a blade in kg.
<SenseOfOrientation> [i]Direction of rotation. To the right: -1, to the left: 1.
<MultiplicatorMainRotorInertia> [f]With this factor you increase the moment of inertia of the main rotor around they axis, e.g. totake into account the paddles.
Main rotor — settings
http://www.heli-x.net 55
5 Developer 5.1 Helicopter Models
<PitchAngleMinMax> [f,f]Minimum and maximum pitch angle in degree.
<BladeRollAngleMinMax> [f,f]Minimum and maximum roll angle in degree.
<BladeNickAngleMinMax> [f,f]Minimum and maximum nick angle in degree.
<RotorRevPerMin100> [f]Number of revolutions per minute of the main rotor. The valuegives the speed when thethrottle curve has the value+100%.
<PitchCurve> [i,i,i,i,i]5 values, which define the pitch curve. Values from -100 to 100.
<PitchCurve2> [i,i,i,i,i]Like <PitchCurve>, but for Idle Up 2.
<PitchCurveA> [i,i,i,i,i]Like <PitchCurve>, but for auto rotation.
<ThrottleCurve> [i,i,i,i,i]5 values, which define the throttle curve. Values from -100 to100.
<ThrottleCurve2> [i,i,i,i,i]Like <ThrottleCurve>, but for Idle Up 2.
<ThrottleCurveA> [i,i,i,i,i]Like <ThrottleCurve>, but for auto rotation.
<NickExpo> [i]Expo settings for cyclic nick, -100 up to 100. Default is 0.
<NickExpo2> [i]Like <NickExpo>, but for Idle Up 2.
<NickExpoA> [i]Like <NickExpo>, but for auto rotation.
<NickDualRate> [i]Dual rate settings for cyclic nick, 25 up to 125. Default is 100.
http://www.heli-x.net 56
5 Developer 5.1 Helicopter Models
<NickDualRate2> [i]Like <NickDualRate>, but for Idle Up 2.
<NickDualRateA> [i]Like <NickDualRate>, but for auto rotation.
<RollExpo> [i]Expo settings for cyclic nick, -100 up to 100. Default is 0.
<RollExpo2> [i]Like <RollExpo>, but for Idle Up 2.
<RollExpoA> [i]Like <RollExpo>, but for auto rotation.
<RollDualRate> [i]Dual rate settings for cyclic roll, 25 up to 125. Default is 100.
<RollDualRate2> [i]Like <RollDualRate>, but for Idle Up 2.
<RollDualRateA> [i]Like <RollDualRate>, but for auto rotation.
Main rotor — thrust
<MultiplicatorRotorLift> [f]This factor is used to fit the thrust of the rotor.
<MultiplicatorRotorLiftAutorotation> [f]Same asMultiplicatorRotorLift, but valid during auto rotation.
<MultiplicatorAirResistanceM> [f]This factor determines the air resistance of the rotor whichis independent of the angle ofattack.
<MultiplicatorAirResistanceN> [f]This factor determines the air resistance of the rotor whichis dependent on the angle of attack.
<MultiplicatorStallLift> [f]This factor controls the lift during stall.
http://www.heli-x.net 57
5 Developer 5.1 Helicopter Models
<FactorAirResistanceDuringStall> [f]During stall you can influence the air resistance (dependenton pitch) with this factor.
<StallAngle> [f]This is the angle (in degree), for which a stall might occur.
<StallAngleAutorotation> [f]Like StallAngle, but valid during the autorotation phase.
<StallRevPerMin> [f]The stall can only happen when the number of revolutions is below this number.
<MultiplicatorNickRollPower> [f]This factor increases the power consumption caused by cyclic controls. It is due to the airresistance of the paddles.
<AdditionalLinearAirResistance> [f]With this parameter you can adjust the air resistance duringforward flight (independent of theangle of attack).
<AdditionalLinearPitchAirResistance> [f]With this parameter you can adjust the air resistance duringforward flight (dependent on theangle of attack).
<GroundEffectExponent> [f]Tuning of the ground effect. Default is 1. Higher values willincrease the ground effect.
<GroundEffectIntensity>[f]Tuning of the ground effect. Default is 1. Higher values willincrease the horizontal instability.
<TipLossFactor> [f]The thrust at the tips of the blades is not optimal. If you decrease the value (default is 1) youcan decrease the thrust in order to simulate the tip losses.
<VerticalClimbFactor> [f]This factor is very experimental. Values greater than the default value 1 will restrict the ma-ximal climb speed of the helicopter. Maybe this parameter will be erased at some time.
<MultiplicatorRotorTorque> [f]Factor to increase the torque caused by the main rotor.
<EulerFlowMagicNumber1> [f]This parameters controls the inertia of the air flowing through the main rotor. This influences
http://www.heli-x.net 58
5 Developer 5.1 Helicopter Models
the reaction speed in pitch changes.
<EulerFlowMagicNumber2> [f]This factor controls the flow situation in forward flight. It is responsible for the gain of liftduring forward flight.
<EulerFlowMagicNumber3> [f]This parameter controls the shape of the air flow above and below the main rotor. This controlse.g. the maximum climb velocity.
<FactorRollNickCouplingForewardFlight> [f]During forward flight torque is also produced in roll direction. This can be influenced by thisvalue.
<PitchDynamic> [f]Shortens the reaction time to pitch which is due to the dynamics of the blade angles. It makesthe heli more aggressive, so use it with care. Default: 0:
<NickDynamic> [f]Shortens the reaction time to nick which is due to the dynamics of the blade angles. It makesthe heli more aggressive, so use it with care. Default: 0:
<RollDynamic> [f]Shortens the reaction time to roll which is due to the dynamics of the blade angles. It makesthe heli more aggressive, so use it with care. Default: 0:
Main rotor — rotor head
<RotorHeadStiffnessTimeConstant> [f]The bearing of the feathering shaft can cause vibrations. This is the time constant of thesesvibrations (in seconds).
<RotorHeadStiffnessDamping> [f]The damping of the system is determined by this parameter. Higher values mean a greaterdamping. Small values cause intensive vibrations. Tha value 1 is the limit between oscillatingsystems and strongly damped systems.
<RotorHeadStiffnessMinimalDamping> [f]For small rotation speeds the vibrations are typically moreintensive. Thus, this damping valueis used for small rotation speeds.
http://www.heli-x.net 59
5 Developer 5.1 Helicopter Models
<RotorHeadStiffnessMinimalOmega> [f]And this damping value is used for revolutions per minute which are smaller than this value.
<RotorHeadStiffnessNickRollCoupling> [f]The coupling of the vibrations in nick and roll direction is determined by this value. Zeromeans no coupling, larger values mean a greater coupling.
<RotorHeadInstabilityTimeConstant> [f]Time constant (in seconds) for the rotor head instability. Agood starting point is 2.
<RotorHeadStiffnessDifferential> [f]This value (when greater than the default value 0) causes an amplification of the vibrationsbased on the vibration velocity.
<RotorHeadInstabilityAmplitude> [f]Amplitude of the rotor head instability.
<RotorPhaseShiftDegrees> [f]The pase shift (in◦) between controlled and true cyclic controls.
Bell–Hiller paddles
<MassPaddle> [f]The mass of a paddle in kg.
<MassFlybar> [f]The mass of the flybar in kg.
<LengthFlybar> [f]The length of the flybar in m.
<AreaPaddle> [f]Area of one paddle in m2.
Bell–Hiller paddles — settings
<PaddlePitchFactor> [f]Factor between angles of the flybar and the angle of attack of the blades. Example: 1 meansthe angles of the flybar is equal to the angle of the blades. 0 isequivalent to a rotor withoutpaddles.
http://www.heli-x.net 60
5 Developer 5.1 Helicopter Models
<HillerNickAngleMinMax> [f]Minimum and maximum nick angle of the paddles in degree. If there are two values, the firstis for idle up 1, the second for idle up 2.
<HillerRollAngleMinMax> [f]Minimum and maximum roll angle of the paddles in degree. If there are two values, the firstis for idle up 1, the second for idle up 2.
Tail rotor
<TailNumberOfBlades> [i]Number of blades of the tail rotor.
<TailMaxRadiusBlade> [f]Outer radius of the tail rotor in m.
<TailMinRadiusBlade> [f]Inner radius of the tail blades in m.
<TailChordLengthBlade> [f]Chord length of the tail blades in m.
<TailXyzPosition> [f,f,f]Position of the tail rotor, x,y,z, in m.
<TailXyzDirection> [f,f,f]Direction of the rotation axis of the tail rotor.
<TailFrequencyRatio> [f]Frequency ratio between the revolutions of the tail rotor and the main rotor.
Tail rotor — thrust
<MultiplicatorTailRotorLift> [f]This factor is used to fit the thrust of the tail rotor.
<MultiplicatorTailAirResistanceM> [f]This factor determines the air resistance of the tail rotor which is independent of the angle ofattack.
http://www.heli-x.net 61
5 Developer 5.1 Helicopter Models
<MultiplicatorTailAirResistanceN> [f]This factor determines the air resistance of the tail rotor which is dependent on the angle ofattack.
<MultiplicatorSideShiftByTailRotor> [f]This factor increases the sideward thrust of the tail rotor.Default is 1.
<TailRotorFlightAirResistanceM> [f]This factor determines the air resistance of the tail rotor in forward flight which is independentof the angle of attack.
<TailRotorFlightAirResistanceN> [f]This factor determines the air resistance of the tail rotor in forward flight which is dependenton the angle of attack.
Tail rotor, gyro — settings
<TailPitchAngleMinMax> [f,f]Smallest and greatest angle of attack of the tail blades.
<TailServoSpeed> [f]Maximum speed of the tail servo in pitch degrees per second.
<TailThrustReduction> [f]This exponent is responsible for a non proportional reduction of the thrust. Default: 1. Valuesgreater than 1 will make a stall at small numbers of revolution more likely.
<YawRateMax> [f]Maximum rotation speed around the vertical axis in revolutions per second.
<GyroGain> [f]Gyro gain.
<GyroGain2> [f]Gyro gain for Idle Up 2.
<GyroGainA> [f]Gyro gain during auto rotation.
<GyroHeadingHoldGain> [f]Gain value for heading hold. 0 means no heading hold.
http://www.heli-x.net 62
5 Developer 5.1 Helicopter Models
<GyroHeadingHoldGain2> [f]Like <GyroHeadingHoldGain>, but for Idle Up 2.
<GyroHeadingHoldGainA> [f]Like <GyroHeadingHoldGain>, but for Autorotation.
<GyroSensorQuality> [f]For the simulation of the gyro drift. Value 0: no drift. Valuegreater than 0: Yes there is a drift.
<YawExpo> [i]Expo setting for yaw, -100 up to 100. Default is 0.
<YawExpo2> [i]Like <YawExpo>, but for Idle Up 2.
<YawExpoA> [i]Like <YawExpo>, but for Autorotation.
<YawDualRate> [i]Dual rate setting for yaw, 25 up to 125. Default is 100.
<YawDualRate2> [i]Like <YawDualRate>, but for Idle Up 2.
<YawDualRateA> [i]Like <YawDualRate>, but for Autorotation.
3-Axes-Stabilisation system
<StabiNickGain> [f]P-Factor for the control of cyclic nick.
<StabiNickHeadingHoldGain> [f]I-factor for the control of cyclic nick.
<StabiNickSensorQuality> [f]Quality of the sensor. 0 means best quality.
<StabiNickRateMax> [f]The maximum rate in revolutions per second.
http://www.heli-x.net 63
5 Developer 5.1 Helicopter Models
<StabiRollGain> [f]P-Factor for the control of cyclic roll.
<StabiRollHeadingHoldGain> [f]I-factor for the control of cyclic roll.
<StabiRollSensorQuality> [f]Quality of the sensor. 0 means best quality.
<StabiRollRateMax> [f]The maximum rate in revolutions per second.
<VStabiPitchFactor> [f]The corresponding value of the V-Stabi system.
<VStabiExpoModeYaw> [i]The corresponding value of the V-Stabi system.
<VStabiExpoModeSwashplate> [i]The corresponding value of the V-Stabi system.
Engine
<EngineFrequencyRatio> [f]Frequency ratio of the engine to the main rotor.
<OmegaTorqueData> [f,f,...]Table with the engine characteristics. Each pair represents a number of revolution per minuteand the torque in Nm.
<GearFrictionCoefficientNormal> [f]Friction coefficient for the friction which is proportionalto the speed.
<GearFrictionCoefficientAutorotation> [f]Same as above for auto rotation. Usually smaller than the normal value.
Servos
<ServoMaxSpeed> [f]Maximum angular speed of a servo in degree per second.
http://www.heli-x.net 64
5 Developer 5.1 Helicopter Models
<ServoClearance> [f]Clearance of the servos in degree.
Fuselage
<Face> [node]The fuselage is approximated using faces. Each face is represented by a list of the followingtags:
<Position> [f,f,f]The coordinates of the midpoint of the surface.
<Normal> [f,f,f]The direction of the normal vector (pointing outwards) of the face.
<CW> [f]TheCW-value if the face.
<Area> [f]the area of the face inm2.
<MultiplicatorAirResistanceTailRotorBroken> [f]In case of a tail rotor crash, this parameter can be used to increase the air resistance againstthe rotation of the fuselage.
Horizontal and vertical tails
<VerticalTailArea> [f]Area of the vertical tail plane.
<VerticalTailNormal> [f,f,f]A vector which is normal to the vertical tail plane. Often, 0,0,1 is correct.
<VerticalTailPosition> [f,f,f]The position of the midpoint of the vertical tail plane.
<HorizontalTailArea> [f]Area of the horizontal tail plane.
<HorizontalTailNormal> [f,f,f]
http://www.heli-x.net 65
5 Developer 5.1 Helicopter Models
A vector which is normal to the horizontal tail plane. Often,0,1,0 is correct.
<HorizontalTailPosition> [f,f,f]The position of the midpoint of the horizontal tail plane.
Landing gear
<ContactStiffness> [f]Stiffness of the landing gear.
<ContactViscosity> [f]Damping of the landing gear in normal direction.
<ContactViscosityTangential> [f]Damping of the landing gear in tangential direction.
<FrictionCoefficientX> [f]Friction coefficient in x-direction, i.e. forwards.
<FrictionCoefficientZ> [f]Friction coefficient in z-direction, i.e. sidewards.
<MaximalContactVelocity> [f]The maximal velocity during contact so that there is no crash(in m/s). Default: 5.
Sound
<SoundVolumeFactor> [f]Loudness factor of the engine sound, between 0 and 1.
<BladeVolumeFactor> [f]Loudness factor of the blade sound, between 0 and 1.
<TailVolumeFactor> [f]Loudness factor of the tail sound, between 0 and 1.
<CrashVolumeFactor> [f]Loudness factor of the crash sound, between 0 and 1.
<BladeSound> [f]
http://www.heli-x.net 66
5 Developer 5.1 Helicopter Models
This factor determines at which stall value the stall sound is created.
<BladeSoundExpo> [f]This factor makes the blade sound behavior non linear.
<TailSound> [f]This factor determines at which stall value at the tail rotorthe tail sound is created.
<TailSoundExpo> [f]This factor makes the tail sound behavior non linear.
Smoke
<SmokeIntensityFactor> [f]The intensity of the smoke. Usually values in the range 0.5 upto 5.
<SmokeDurationSeconds> [f]The life time of a smoke particle in seconds.
<SmokeDiffusionConstant> [f]The value defines how fast the smoke spreads out in the air.
<SmokeTimeConstant> [f]The time constant determined how fast the smoke follows the speed of the surrounding air.Values which are too small (less than 0.01) might cause instabilities in the smoke simulation.
<SmokeColorRGB> [f,f,f]The smoke color as RGB value.
<SmokeSourcePosition> [f,f,f]The position of the smoke source in model coordinates.
<SmokeDirection> [f,f,f]The initial direction of the smoke velocity.
<SmokeEmissionVelocity> [f]The speed of the smoke in m/s.
<SmokeEmissionSpread> [f]This value determined the diameter of the cone of the smoke generation. Typical values are inthe range 0.1 to 1.
http://www.heli-x.net 67
5 Developer 5.1 Helicopter Models
<SmokeBlendingPreset1to8> [i]Here you define one out of 8 presets how the blending is realized in terms of openGL.
<SmokeTextureNumber> [i]You choose the texture of the smoke with an integer value between 0 and 5. Default value: 0.
<Smoke2IntensityFactor> [f]The intensity of the smoke. Usually values in the range 0.5 upto 5. For the second smokesource.
<Smoke2DurationSeconds> [f]The life time of a smoke particle in seconds. For the second smoke source.
<Smoke2DiffusionConstant> [f]The value defines how fast the smoke spreads out in the air. Forthe second smoke source.
<Smoke2TimeConstant> [f]The time constant determined how fast the smoke follows the speed of the surrounding air.Values which are too small (less than 0.01) might cause instabilities in the smoke simulation.For the second smoke source.
<Smoke2ColorRGB> [f,f,f]The smoke color as RGB value. For the second smoke source.
<Smoke2SourcePosition> [f,f,f]The position of the smoke source in model coordinates. For the second smoke source.
<Smoke2Direction> [f,f,f]The initial direction of the smoke velocity. For the second smoke source.
<Smoke2EmissionVelocity> [f]The speed of the smoke in m/s. For the second smoke source.
<Smoke2EmissionSpread> [f]This value determined the diameter of the cone of the smoke generation. Typical values are inthe range 0.1 to 1. For the second smoke source.
<Smoke2BlendingPreset1to8> [i]Here you define one out of 8 presets how the blending is realized in terms of openGL. For thesecond smoke source.
<Smoke2TextureNumber> [i]You choose the texture of the smoke with an integer value between 0 and 5. Default value: 0.
http://www.heli-x.net 68
5 Developer 5.1 Helicopter Models
For the second smoke source.
5.1.4 Physics Parameters for Multicopters
General parameters
<Name> [s]The name of the model. It is displayed in the title bar of the window.
<TimeFactor> [f]This factors determines the simulation speed. Default is 1.
<PhysicalModelName> [s]The internal name of the physical model. Here you have to write one of these:Helicopter_V1_1,CoaxHelicopter_V1_1,QuadroCopter_V1_1,HexaCopter_V1_1,TriCopter_V1_1.
<Author> [s]The name of the author of the model.
<WWW> [s]URL of the author’s web site.
<Comment> [s]Comments about the model.
<Version> [s]The release date of the model in the form YYYY-MM-DD.
<HelixRevision> [i]The revision number of HELI-X for the model to work.
Mass, geometry, etc.
<RhoAir> [f]The density of the air in kg/m3. Default value is 1.209.
<Mass> [f]The mass of the helicopter in kg.
<Ixx> [f]
http://www.heli-x.net 69
5 Developer 5.1 Helicopter Models
Moment of inertia for rotation around thex axis. In kg m2.
<Iyy> [f]Moment of inertia for rotation around they axis. In kg m2.
<Izz> [f]Moment of inertia for rotation around thezaxis. In kg m2.
<Ixy> [f]Combined moment of inertia for rotation around thex-y axis. In kg m2.
<ConfigurationX> [b]true or false, depending on configuration type.
Main rotor
<RotorHeadPosition> [f,f,f]The position of the main rotor in the true coordinate system.x,y,z in m.
<RotorHeadPosition2> [f,f,f]The position of the main rotor 2 in the true coordinate system. x,y,z in m.
<RotorHeadPosition3> [f,f,f]The position of the main rotor 3 in the true coordinate system. x,y,z in m.
<RotorHeadPosition4> [f,f,f]The position of the main rotor 4 in the true coordinate system. x,y,z in m.
<RotorHeadPosition5> [f,f,f]The position of the main rotor 5 in the true coordinate system. x,y,z in m (only for hexaco-pters).
<RotorHeadPosition6> [f,f,f]The position of the main rotor 6 in the true coordinate system. x,y,z in m (only for hexaco-pters).
<NumberOfBlades> [i]The number of blades.
<MaxRadiusBlade> [f]Outer radius of the blades in m.
http://www.heli-x.net 70
5 Developer 5.1 Helicopter Models
<MinRadiusBlade> [f]Inner radius of the blades in m.
<ChordLengthBlade> [f]Chord length in m.
<MassBlade> [f]Mass of a blade in kg.
<SenseOfOrientation> [i]Direction of rotation. To the right: -1, to the left: 1.
<MultiplicatorMainRotorInertia> [f]With this factor you increase the moment of inertia of the main rotor around they axis, e.g. totake into account the paddles.
Main rotor — settings
<PitchAngleMinMax> [f,f]Minimum and maximum pitch angle in degree.
<RotorRevPerMin100> [f]Number of revolutions per minute of the main rotor. The valuegives the speed when thethrottle curve has the value+100%.
<MaxDiffRotorPercentage> [f]The maximum difference of the rotors in percent. Using this parameter you can avoid that arotor is completely turned off. Default: 15.
<PitchCurve> [i,i,i,i,i]5 values, which define the pitch curve. Values from -100 to 100.
<PitchCurve2> [i,i,i,i,i]Like <PitchCurve>, but for Idle Up 2.
<PitchCurveA> [i,i,i,i,i]Like <PitchCurve>, but for auto rotation.
<ThrottleCurve> [i,i,i,i,i]5 values, which define the throttle curve. Values from -100 to100.
http://www.heli-x.net 71
5 Developer 5.1 Helicopter Models
<ThrottleCurve2> [i,i,i,i,i]Like <ThrottleCurve>, but for Idle Up 2.
<ThrottleCurveA> [i,i,i,i,i]Like <ThrottleCurve>, but for auto rotation.
<NickExpo> [i]Expo settings for cyclic nick, -100 up to 100. Default is 0.
<NickExpo2> [i]Like <NickExpo>, but for Idle Up 2.
<NickExpoA> [i]Like <NickExpo>, but for auto rotation.
<NickDualRate> [i]Dual rate settings for cyclic nick, 25 up to 125. Default is 100.
<NickDualRate2> [i]Like <NickDualRate>, but for Idle Up 2.
<NickDualRateA> [i]Like <NickDualRate>, but for auto rotation.
<RollExpo> [i]Expo settings for cyclic nick, -100 up to 100. Default is 0.
<RollExpo2> [i]Like <RollExpo>, but for Idle Up 2.
<RollExpoA> [i]Like <RollExpo>, but for auto rotation.
<RollDualRate> [i]Dual rate settings for cyclic roll, 25 up to 125. Default is 100.
<RollDualRate2> [i]Like <RollDualRate>, but for Idle Up 2.
<RollDualRateA> [i]Like <RollDualRate>, but for auto rotation.
http://www.heli-x.net 72
5 Developer 5.1 Helicopter Models
Main rotor — thrust
<MultiplicatorRotorLift> [f]This factor is used to fit the thrust of the rotor.
<MultiplicatorRotorLiftAutorotation> [f]Same asMultiplicatorRotorLift, but valid during auto rotation.
<MultiplicatorAirResistanceM> [f]This factor determines the air resistance of the rotor whichis independent of the angle ofattack.
<MultiplicatorAirResistanceN> [f]This factor determines the air resistance of the rotor whichis dependent on the angle of attack.
<MultiplicatorStallLift> [f]This factor controls the lift during stall.
<FactorAirResistanceDuringStall> [f]During stall you can influence the air resistance (dependenton pitch) with this factor.
<StallAngle> [f]This is the angle (in degree), for which a stall might occur.
<StallAngleAutorotation> [f]Like StallAngle, but valid during the autorotation phase.
<StallRevPerMin> [f]The stall can only happen when the number of revolutions is below this number.
<MultiplicatorNickRollPower> [f]This factor increases the power consumption caused by cyclic controls. It is due to the airresistance of the paddles.
<AdditionalLinearAirResistance> [f]With this parameter you can adjust the air resistance duringforward flight (independent of theangle of attack).
<AdditionalLinearPitchAirResistance> [f]With this parameter you can adjust the air resistance duringforward flight (dependent on theangle of attack).
<GroundEffectExponent> [f]
http://www.heli-x.net 73
5 Developer 5.1 Helicopter Models
Tuning of the ground effect. Default is 1. Higher values willincrease the ground effect.
<GroundEffectIntensity>[f]Tuning of the ground effect. Default is 1. Higher values willincrease the horizontal instability.
<TipLossFactor> [f]The thrust at the tips of the blades is not optimal. If you decrease the value (default is 1) youcan decrease the thrust in order to simulate the tip losses.
<VerticalClimbFactor> [f]This factor is very experimental. Values greater than the default value 1 will restrict the ma-ximal climb speed of the helicopter. Maybe this parameter will be erased at some time.
<MultiplicatorRotorTorque> [f]Factor to increase the torque caused by the main rotor.
<EulerFlowMagicNumber1> [f]This parameters controls the inertia of the air flowing through the main rotor. This influencesthe reaction speed in pitch changes.
<EulerFlowMagicNumber2> [f]This factor controls the flow situation in forward flight. It is responsible for the gain of liftduring forward flight.
<EulerFlowMagicNumber3> [f]This parameter controls the shape of the air flow above and below the main rotor. This controlse.g. the maximum climb velocity.
Gyro — settings
<YawRateMax> [f]Maximum rotation speed around the vertical axis in revolutions per second.
<GyroGain> [f]Gyro gain.
<GyroGain2> [f]Gyro gain for Idle Up 2.
<GyroGainA> [f]Gyro gain during auto rotation.
http://www.heli-x.net 74
5 Developer 5.1 Helicopter Models
<GyroHeadingHoldGain> [f]Gain value for heading hold. 0 means no heading hold.
<GyroHeadingHoldGain2> [f]Like <GyroHeadingHoldGain>, but for Idle Up 2.
<GyroHeadingHoldGainA> [f]Like <GyroHeadingHoldGain>, but for Autorotation.
<GyroSensorQuality> [f]For the simulation of the gyro drift. Value 0: no drift. Valuegreater than 0: Yes there is a drift.
<YawExpo> [i]Expo setting for yaw, -100 up to 100. Default is 0.
<YawExpo2> [i]Like <YawExpo>, but for Idle Up 2.
<YawExpoA> [i]Like <YawExpo>, but for Autorotation.
<YawDualRate> [i]Dual rate setting for yaw, 25 up to 125. Default is 100.
<YawDualRate2> [i]Like <YawDualRate>, but for Idle Up 2.
<YawDualRateA> [i]Like <YawDualRate>, but for Autorotation.
3-Axes-Stabilisation system
<StabiNickGain> [f]P-Factor for the control of cyclic nick.
<StabiNickHeadingHoldGain> [f]I-factor for the control of cyclic nick.
<StabiNickSensorQuality> [f]Quality of the sensor. 0 means best quality.
http://www.heli-x.net 75
5 Developer 5.1 Helicopter Models
<StabiNickRateMax> [f]The maximum rate in revolutions per second.
<StabiRollGain> [f]P-Factor for the control of cyclic roll.
<StabiRollHeadingHoldGain> [f]I-factor for the control of cyclic roll.
<StabiRollSensorQuality> [f]Quality of the sensor. 0 means best quality.
<StabiRollRateMax> [f]The maximum rate in revolutions per second.
<AccMaxAngle> [f]The maximum bank angle in ACC-Mode.
<AccGainAngle> [f]Control factor (angle) in ACC-Mode.
<AccGainOmega> [f]Control factor (angular velocity) in ACC-Mode.
Engine
<EngineFrequencyRatio> [f]Frequency ratio of the engine to the main rotor.
<OmegaTorqueData> [f,f,...]Table with the engine characteristics. Each pair represents a number of revolution per minuteand the torque in Nm.
<GearFrictionCoefficientNormal> [f]Friction coefficient for the friction which is proportionalto the speed.
Fuselage
<Face> [node]The fuselage is approximated using faces. Each face is represented by a list of the following
http://www.heli-x.net 76
5 Developer 5.1 Helicopter Models
tags:
<Position> [f,f,f]The coordinates of the midpoint of the surface.
<Normal> [f,f,f]The direction of the normal vector (pointing outwards) of the face.
<CW> [f]TheCW-value if the face.
<Area> [f]the area of the face inm2.
Horizontal and vertical tails
<VerticalTailArea> [f]Area of the vertical tail plane.
<VerticalTailNormal> [f,f,f]A vector which is normal to the vertical tail plane. Often, 0,0,1 is correct.
<VerticalTailPosition> [f,f,f]The position of the midpoint of the vertical tail plane.
<HorizontalTailArea> [f]Area of the horizontal tail plane.
<HorizontalTailNormal> [f,f,f]A vector which is normal to the horizontal tail plane. Often,0,1,0 is correct.
<HorizontalTailPosition> [f,f,f]The position of the midpoint of the horizontal tail plane.
Landing gear
<ContactStiffness> [f]Stiffness of the landing gear.
<ContactViscosity> [f]
http://www.heli-x.net 77
5 Developer 5.1 Helicopter Models
Damping of the landing gear in normal direction.
<ContactViscosityTangential> [f]Damping of the landing gear in tangential direction.
<FrictionCoefficientX> [f]Friction coefficient in x-direction, i.e. forwards.
<FrictionCoefficientZ> [f]Friction coefficient in z-direction, i.e. sidewards.
<MaximalContactVelocity> [f]The maximal velocity during contact so that there is no crash(in m/s). Default: 5.
Sound
<SoundVolumeFactor> [f]Loudness factor of the engine sound, between 0 and 1.
<BladeVolumeFactor> [f]Loudness factor of the blade sound, between 0 and 1.
<TailVolumeFactor> [f]Loudness factor of the tail sound, between 0 and 1.
<CrashVolumeFactor> [f]Loudness factor of the crash sound, between 0 and 1.
<BladeSound> [f]This factor determines at which stall value the stall sound is created.
<BladeSoundExpo> [f]This factor makes the blade sound behavior non linear.
<TailSound> [f]This factor determines at which stall value at the tail rotorthe tail sound is created.
<TailSoundExpo> [f]This factor makes the tail sound behavior non linear.
http://www.heli-x.net 78
5 Developer 5.1 Helicopter Models
Smoke
<SmokeIntensityFactor> [f]The intensity of the smoke. Usually values in the range 0.5 upto 5.
<SmokeDurationSeconds> [f]The life time of a smoke particle in seconds.
<SmokeDiffusionConstant> [f]The value defines how fast the smoke spreads out in the air.
<SmokeTimeConstant> [f]The time constant determined how fast the smoke follows the speed of the surrounding air.Values which are too small (less than 0.01) might cause instabilities in the smoke simulation.
<SmokeColorRGB> [f,f,f]The smoke color as RGB value.
<SmokeSourcePosition> [f,f,f]The position of the smoke source in model coordinates.
<SmokeDirection> [f,f,f]The initial direction of the smoke velocity.
<SmokeEmissionVelocity> [f]The speed of the smoke in m/s.
<SmokeEmissionSpread> [f]This value determined the diameter of the cone of the smoke generation. Typical values are inthe range 0.1 to 1.
<SmokeBlendingPreset1to8> [i]Here you define one out of 8 presets how the blending is realized in terms of openGL.
<SmokeTextureNumber> [i]You choose the texture of the smoke with an integer value between 0 and 5. Default value: 0.
<Smoke2IntensityFactor> [f]The intensity of the smoke. Usually values in the range 0.5 upto 5. For the second smokesource.
<Smoke2DurationSeconds> [f]The life time of a smoke particle in seconds. For the second smoke source.
http://www.heli-x.net 79
5 Developer 5.2 Airports
<Smoke2DiffusionConstant> [f]The value defines how fast the smoke spreads out in the air. Forthe second smoke source.
<Smoke2TimeConstant> [f]The time constant determined how fast the smoke follows the speed of the surrounding air.Values which are too small (less than 0.01) might cause instabilities in the smoke simulation.For the second smoke source.
<Smoke2ColorRGB> [f,f,f]The smoke color as RGB value. For the second smoke source.
<Smoke2SourcePosition> [f,f,f]The position of the smoke source in model coordinates. For the second smoke source.
<Smoke2Direction> [f,f,f]The initial direction of the smoke velocity. For the second smoke source.
<Smoke2EmissionVelocity> [f]The speed of the smoke in m/s. For the second smoke source.
<Smoke2EmissionSpread> [f]This value determined the diameter of the cone of the smoke generation. Typical values are inthe range 0.1 to 1. For the second smoke source.
<Smoke2BlendingPreset1to8> [i]Here you define one out of 8 presets how the blending is realized in terms of openGL. For thesecond smoke source.
<Smoke2TextureNumber> [i]You choose the texture of the smoke with an integer value between 0 and 5. Default value: 0.For the second smoke source.
5.2 Airports
We distinguish two kinds of airports: photo realistic ones with a fixed position of the pilot and a 3Dtype where the pilot position is not fix.
http://www.heli-x.net 80
5 Developer 5.2 Airports
5.2.1 Photo realistic airports
Airports are made from photo realistic panorama pictures. Here are the details:
• HELI-X uses the cubic format. Details can be found e.g. here:http://www.panoguide.com/howto/panoramas/types.jsp.
• Each airports consists out of 6 pictures. They have the format 2048×2048 (SkyBox), 1024×1024 (SkyBox1024) pixels or more (SkyBoxHD).
• The smaller format is in particular for poor graphics adapters.
• The six pictures should be in the same directory. The name of the directory is the name of theairport. An example: The airport Alvier is in the directory Alvier and there are six files with thefollowing names:Alvier_back.jpg,Alvier_front.jpg,Alvier_left.jpg,Alvier_right.jpAlvier_bottom.jpg,Alvier_top.jpg.
• Furthermore, the fileAlvier.xml is needed. In this file there are informations regardingthe direction to the sun, the start position of the helicopters and the height of the horizon.
In the xml file which belongs to the airport, the following tags can be found:
<Name> [s]The name of the airport.
<Author> [s]The name of the author.
<WWW> [s]A link to the web site of the author.
<Comment> [s]Comments about the airport.
<HeightOfGround> [f]The height of the ground in m. Typically 0.
<HeightOfEyes> [f]The height of the eyes above the ground (in meter). A usual value is 1.7. This height shouldbe the height of the camera when the photos are taken.
<StartPosition> [f,f,f]
http://www.heli-x.net 81
5 Developer 5.2 Airports
The start position of the helicopter. The coordinate systemis a right handed one withx andzon the bottom, andy pointing upwards. In order to find a suitable start position,you can usethe option-DheliX.statusformat=1 in the start script. In this case, the current positionof the helicopter is shown in the status bar. Or you can use thematrix view.
<LightDir> [f,f,f]The direction of the sun rays is important for the creation ofthe shadows. You have to inputthex-, y- andz-component of the vector which describes the direction of the sun rays. Sincethe sun shines from above, they value should be negative.
<StartPosition0>, <StartPosition1>, ... [f,f,f]With these tags you can define the start positions for all the helicopters in the multi playersimulation.
<AmbientSoundFile> [s]The name of a sound file for the ambient sounds. It has to be in the ogg-Format.
<UseStandardHeightOfGroundPlane> True or false. You define, if the ground plane isseen as a crash object in this setting.
<FrictionFactorGroundPlane> [f]With this factor, you multiply the friction of the ground plane, default: 1.
<TopographyFile> [s]The file name of a topography file, where the crash objects are defined.
A topography file is a file which defines crash objects. There are three kinds of crash objects:
<Triangle> A triangle, defined by three points.
<Parallelogram> A parallelogram. It is defined like a triangle with three points.
<Plane> A flat plane of infinite size.
For each of these crash objects you can define
<CrashSensitivityFactor> This factor defines how dangerous it is to crash this object,default: 1.
<FrictionFactor> A factor, to increase (> 1) or decrease (< 1) the friction.
For triangles and parallelograms, there are in addition:
http://www.heli-x.net 82
5 Developer 5.2 Airports
<Alpha> The Alpha value defines the opaqueness of the part. If Alpha is1, the helicopter is notvisible when behind the object. If Alpha is 0, the crash object is not visible. You can also useskybox pictures with alpha channel (then you have to use png files).
5.2.2 Scene3D–Airports
Airports of typeScene3D allow a free pilot position (for this, FPV has to be activatedin the camerasettings). In addition, the following tags are allowed.
VariablePilotPosition Set to true, if the pilot is allowed to move.
MaxPilotRadiusGround The maximum radius the pilot can move as long as he is on theground.
MaxPilotRadiusAir The maximum radius the pilot can move when he is in the air.
Object An object is a graphical model in the wavefront format. Defining an object, you candefine the following attributes:
MakeCrashObject This defines, if the object is included in the collision and contactdetection.
CeilingType If a model is of ceiling type it is not considered when definingthe heightof the start position and in the ground effect.
GroundType When a model is of ground type then internallysetDepthBufferWriteEnabledis set to false.
FrictionFactor The friction factor gives the friction a factor of the usual frictioncoefficient.
Within an object description, the following tags have to be defined:
Path The path to the wavefront file.
Translation A translation inx, y, andzdirection
ShadowOnGround This determines whether a shadow is calculated for this object.
Rotation The rotation angle (in degrees) around they axis. In the rotation tag, you mightset the attributeBillboard.
http://www.heli-x.net 83
5 Developer 5.3 Utilities
AutoTextureShapeName This defines the name of a group where the texture is varia-ble.
AutoTexturePath With several of these tags the different paths of the textures aredefined.
AutoTextureSeconds The time in seconds in which the textures are changed.
ShadowBox A shadow box can be used, if you need a shadow on a horizontal rectangular face.It’s attributes arexMin, xMax, zMin, zMax, andyMax. Inside the object you define thetranslation with the tagTranslation, as before.
ObjectFile With this tag, you define another xml file where you can put object tags.
5.3 Utilities
It is possible, to load utilities in an airport. Airport and utilities are then called a scene. Currently,there are three types of utilities: Boxes, pylons and heliports. They differ in their creation of shadowsand in their collision behavior. You can put the utilities atany position in the scene. As always: Thecoordinates of the ground arex andz.
The xml file for the utilities consists out of the following tags:
<PhysicalModelName> [s]The name of the internal simulation model. You have the choice:Pylon,Heliport orBox.
<Author> [s]The name of the author.
<WWW> [s]The URL of the author’s web site.
<Comment> [s]Comments about the model
<Scale> [f]This factor scales from the model coordinates to the world coordinates. The default value is1.
http://www.heli-x.net 84