Embed Size (px)
Citation preview
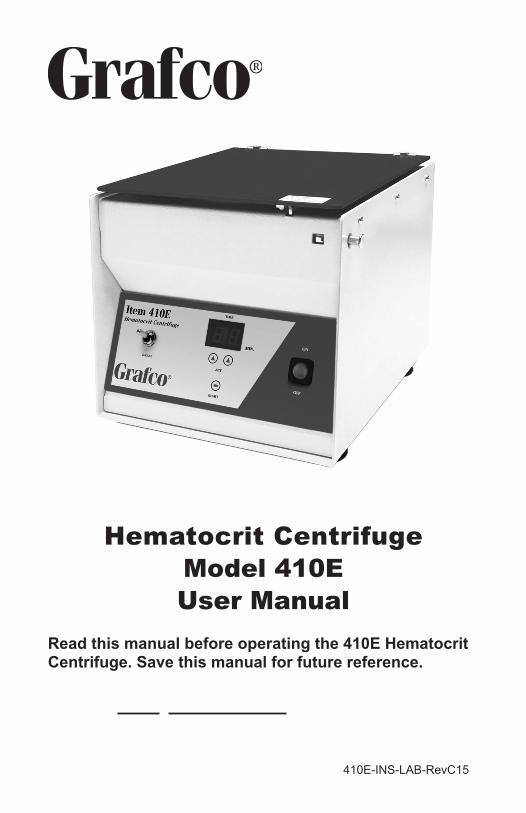
Hematocrit CentrifugeModel 410EUser Manual
Read this manual before operating the 410E Hematocrit Centrifuge. Save this manual for future reference.
410E-INS-LAB-RevC15
410E-INS-LAB-RevC15 2
CONTENTSINTRODUCTION ................................................................................................... 2
PRODUCT OVERVIEW ................................................................................... 3GLOSSARY ..................................................................................................... 3INTENDED USE .............................................................................................. 4
IMPORTANT SAFETY GUIDELINES—PLEASE READ BEFORE USE .............. 4SETUP ................................................................................................................... 5
UNPACKING ................................................................................................... 5CONTENTS ..................................................................................................... 6REPLACEMENT PARTS ................................................................................ 6INSTALLATION ............................................................................................... 6
SPECIMEN COLLECTION ................................................................................... 7MATERIALS NEEDED: ................................................................................... 7CAPILLARY TUBE SPECIFICATIONS ........................................................... 7TUBE PREPARATION .................................................................................... 7
OPERATION ......................................................................................................... 7BALANCED LOADS ....................................................................................... 7LOADING THE ROTOR .................................................................................. 8SETTING THE DIGITAL TIMER ...................................................................... 8OPERATING THE CENTRIFUGE ................................................................... 9
INTERPRETING RESULTS: USING THE READING SCALE .............................. 9EXPECTED VALUE ...................................................................................... 10LIMITATIONS AND FACTORS AFFECTING RESULTS............................... 10
DISASSEMBLY ................................................................................................... 11TROUBLESHOOTING ........................................................................................ 11MAINTENANCE .................................................................................................. 12
CLEANING .................................................................................................... 12TRANSPORTATION ...................................................................................... 13STORAGE ..................................................................................................... 13
SPECIFICATIONS ............................................................................................... 14LIMITED WARRANTY ........................................................................................ 15
GF Health Products, Inc. is not responsible for typographical errors. For the most updated and current information on packaging, warranties, products and specifications, including the most current version of these instructions, please visit our website at www.grahamfield.com. Graham-Field and Grafco are registered trademarks of GF Health Products, Inc.
INTRODUCTIONYour Grafco Hematocrit Centrifuge has been designed to be reliable, safe, and easy to use. This manual contains important operation and safety information. Carefully read and understand the contents of this manual before installing or using the Grafco Hematocrit Centrifuge. Always install this centrifuge in accordance with local electrical parameters.
410E-INS-LAB-RevC15 3
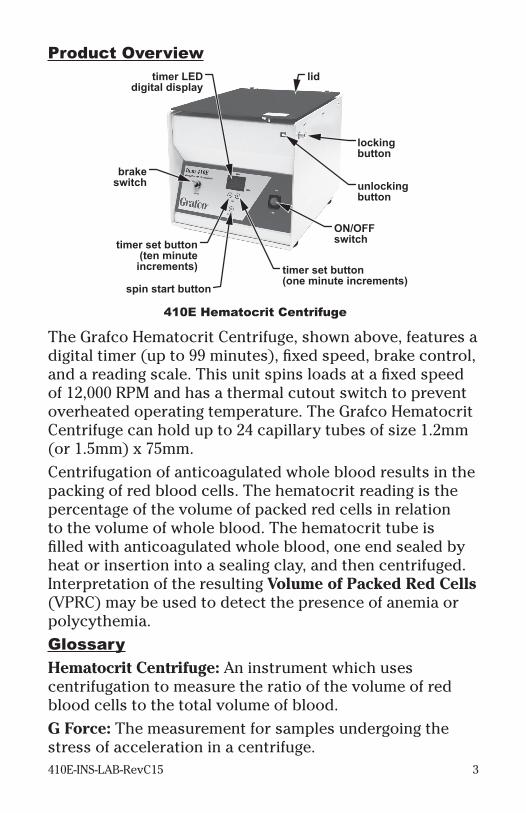
Product Overview
410E Hematocrit Centrifuge
ON/OFFswitch
lockingbutton
unlockingbutton
lidtimer LEDdigital display
timer set button(ten minute
increments)
spin start button
timer set button(one minute increments)
brakeswitch
The Grafco Hematocrit Centrifuge, shown above, features a digital timer (up to 99 minutes), fixed speed, brake control, and a reading scale. This unit spins loads at a fixed speed of 12,000 RPM and has a thermal cutout switch to prevent overheated operating temperature. The Grafco Hematocrit Centrifuge can hold up to 24 capillary tubes of size 1.2mm (or 1.5mm) x 75mm.Centrifugation of anticoagulated whole blood results in the packing of red blood cells. The hematocrit reading is the percentage of the volume of packed red cells in relation to the volume of whole blood. The hematocrit tube is filled with anticoagulated whole blood, one end sealed by heat or insertion into a sealing clay, and then centrifuged. Interpretation of the resulting Volume of Packed Red Cells (VPRC) may be used to detect the presence of anemia or polycythemia.GlossaryHematocrit Centrifuge: An instrument which uses centrifugation to measure the ratio of the volume of red blood cells to the total volume of blood.G Force: The measurement for samples undergoing the stress of acceleration in a centrifuge.
410E-INS-LAB-RevC15 4
RCF (Relative Centrifugal Force): The centrifugal force that the samples undergo, which relies on the speed of rotation (N) in RPM and the rotating radius (R). The rotating radius is measured from the center axis of the rotor to the extreme ends of the centrifuge tubes. RCF Formula: RCF = 11.18 x R x (N/1000)²
Intended useThe Grafco Hematocrit Centrifuge is intended to provide laboratory tests for hematocrit values (HCT) in the fields of biochemistry, microbic immunity genetics, and blood separation, as well as general clinic tests.
IMPORTANT SAFETY GUIDELINES—PLEASE READ BEFORE USEThe safety statements presented in this chapter refer to the basic safety information that the operator of the centrifuge shall pay attention to and abide by. There are additional safety statements in other chapters or sections, which may be the same as or similar to the following, or specific to the operations.
WARNING: Indicates a potential hazard situation or unsafe practice that, if not avoided, could result in death or serious personal injury. CAUTION: Indicates a potential hazard or unsafe practice that, if not avoided, could result in moderate or minor personal injury.
s NOTICE: Indicates a potential hazard or unsafe practice that, if not avoided, could result in product or property damage.
Info: Provides application recommendations or other useful information to ensure that you get the most from your product.
WARNING: Important! Read and understand these instructions before installing or using the Grafco 410E Hematocrit Centrifuge. If you do not understand any part of these instructions, contact your medical professional or GF authorized distributor for direction in the use of this product.
410E-INS-LAB-RevC15 5
WARNING: For the safety of both the operator and service personnel, take care when handling substances that are known to be toxic, radioactive or contaminated with pathogenic microorganisms when using this centrifuge. WARNING: If components are damaged or missing, contact your GF authorized distributor immediately. DO NOT use substitute parts. WARNING: Notice for California Customers- California Proposition 65 WARNING: This product contains a chemical known to the State of California to cause cancer and reproductive or developmental harm. WARNING: GF Health Products, Inc. assumes no responsibility for any damage or injury caused by improper installation or use of this product.
SETUP
Unpacking1. Check for obvious damage to the carton or its contents.
If damage is evident, please notify the carrier and GF Health Products, Inc.
2. Open the product box carefully. This may include cutting external packaging strips which surround the product shipping box. Also, for added safety when shipping, the centrifuge may sometimes be packaged inside the outer shipping box, meaning two boxes must be opened.
3. Carefully remove the Hematocrit Centrifuge from the packaging, including removing the plastic bag in which the centrifuge is placed for shipping purposes. Do not drop the centrifuge. Ensure that all of the equipment listed in Contents, following, is present.
4. Keep the packing materials for transportation and/or storage.
410E-INS-LAB-RevC15 6
ContentsYour Grafco Hematocrit Centrifuge contains:Equipment supplied with 410E
Quantity Description1 Rotor with lid1 Detachable power cord1 Reader scale
Replacement partsReplacement parts available for the Grafco 410E Hematocrit Centrifuge (from your GF authorized distributor): Grafco Item 410E-1, Replacement Carbon Brushes, package of two.
Installations NOTICE: The operation of AC motor is affected by
the surrounding power consumption, which will result in a fluctuation of speed. To assure an accurate RPM and its corresponding RCF, do not place this equipment in draft, sunlight or near a piece of equipment that emits heat and/or electromagnetic conduction emission.
1. Place the centrifuge in a large, open space with unencumbered air flow on a sturdy, flat, level countertop with sufficient clearance to open the lid completely.
2. Attach the product's electrical cord to the cord port located on the back of the centrifuge.
3. Plug the centrifuge's power cord into a properly grounded (110V / 60Hz) electrical wall outlet.
s NOTICE: Locate the unit so that the centrifuge will not be accidentally pulled or dislodged from the countertop; and so the cord will not be stepped on, tripped over, or otherwise subjected to damage or stress.
410E-INS-LAB-RevC15 7
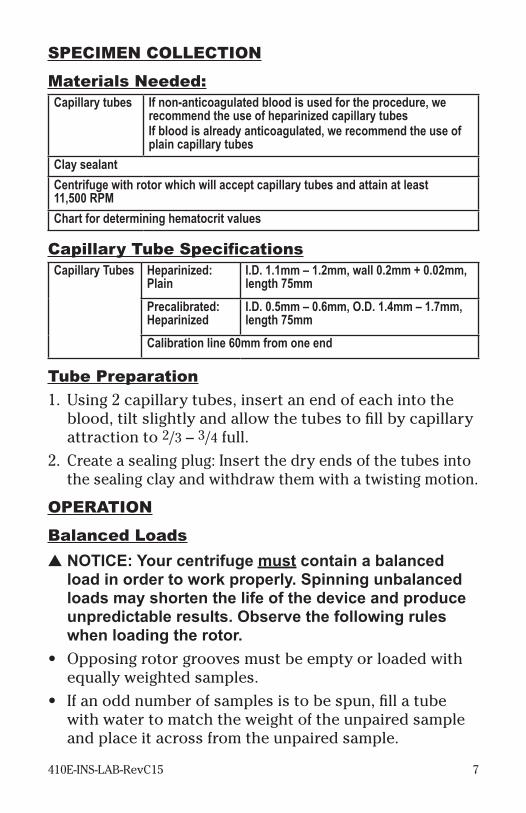
SPECIMEN COLLECTION
Materials Needed:Capillary tubes If non-anticoagulated blood is used for the procedure, we
recommend the use of heparinized capillary tubesIf blood is already anticoagulated, we recommend the use of plain capillary tubes
Clay sealantCentrifuge with rotor which will accept capillary tubes and attain at least 11,500 RPMChart for determining hematocrit values
Capillary Tube SpecificationsCapillary Tubes Heparinized:
PlainI.D. 1.1mm – 1.2mm, wall 0.2mm + 0.02mm, length 75mm
Precalibrated: Heparinized
I.D. 0.5mm – 0.6mm, O.D. 1.4mm – 1.7mm, length 75mm
Calibration line 60mm from one end
Tube Preparation1. Using 2 capillary tubes, insert an end of each into the
blood, tilt slightly and allow the tubes to fill by capillary attraction to 2/3 – 3/4 full.
2. Create a sealing plug: Insert the dry ends of the tubes into the sealing clay and withdraw them with a twisting motion.
OPERATION
Balanced Loadss NOTICE: Your centrifuge must contain a balanced
load in order to work properly. Spinning unbalanced loads may shorten the life of the device and produce unpredictable results. Observe the following rules when loading the rotor.
• Opposingrotorgroovesmustbeemptyorloadedwithequally weighted samples.
• Ifanoddnumberofsamplesistobespun,fillatubewith water to match the weight of the unpaired sample and place it across from the unpaired sample.
410E-INS-LAB-RevC15 8
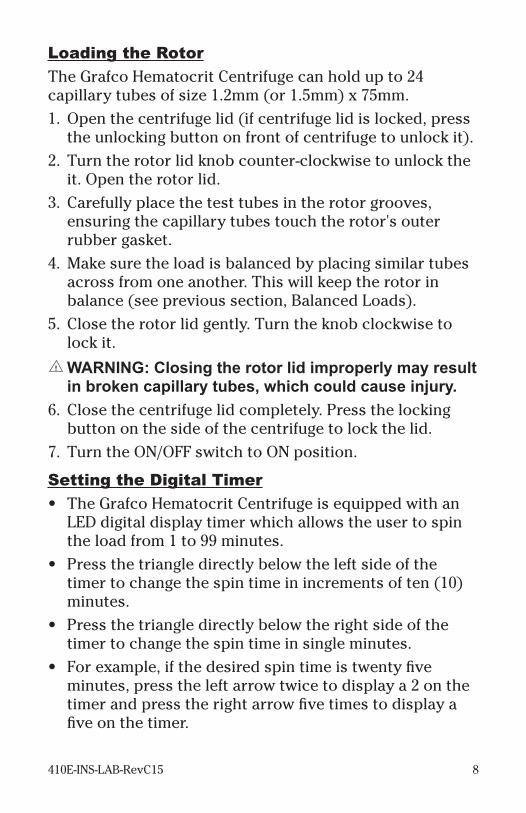
Loading the RotorThe Grafco Hematocrit Centrifuge can hold up to 24 capillary tubes of size 1.2mm (or 1.5mm) x 75mm.1. Open the centrifuge lid (if centrifuge lid is locked, press
the unlocking button on front of centrifuge to unlock it).2. Turn the rotor lid knob counter-clockwise to unlock the
it. Open the rotor lid.3. Carefully place the test tubes in the rotor grooves,
ensuring the capillary tubes touch the rotor's outer rubber gasket.
4. Make sure the load is balanced by placing similar tubes across from one another. This will keep the rotor in balance (see previous section, Balanced Loads).
5. Close the rotor lid gently. Turn the knob clockwise to lock it.
WARNING: Closing the rotor lid improperly may result in broken capillary tubes, which could cause injury.
6. Close the centrifuge lid completely. Press the locking button on the side of the centrifuge to lock the lid.
7. Turn the ON/OFF switch to ON position.
Setting the Digital Timer• TheGrafcoHematocritCentrifugeisequippedwithan
LED digital display timer which allows the user to spin the load from 1 to 99 minutes.
• Pressthetriangledirectlybelowtheleftsideofthetimer to change the spin time in increments of ten (10) minutes.
• Pressthetriangledirectlybelowtherightsideofthetimer to change the spin time in single minutes.
• Forexample,ifthedesiredspintimeistwentyfiveminutes, press the left arrow twice to display a 2 on the timer and press the right arrow five times to display a five on the timer.
410E-INS-LAB-RevC15 9
Operating the Centrifuge WARNING: As a safety feature, the centrifuge has a power shut-off device to turn the power off automatically when the lid is opened during spinning. This is a safety feature of the centrifuge. DO NOT open the lid when the rotor is spinning.
1. After the desired spin time is displayed on the timer, press the START button to initiate rotor spinning.
2. The timer will display the spin time remaining during operation. When the spin cycle is complete, the unit will slowly stop spinning.
3. To accelerate the deceleration, press the BRAKE SWITCH.4. Once the rotor has completely stopped spinning, turn
the ON/OFF switch to OFF position.5. Press the unlocking button located on the front of the
centrifuge to unlock the lid. Open the centrifuge lid.6. Carefully open the rotor lid and remove the specimens.
WARNING: DO NOT open the centrifuge lid until the rotor has completely stopped spinning. Opening the lid before the rotor has stopped spinning could result in personal injury.
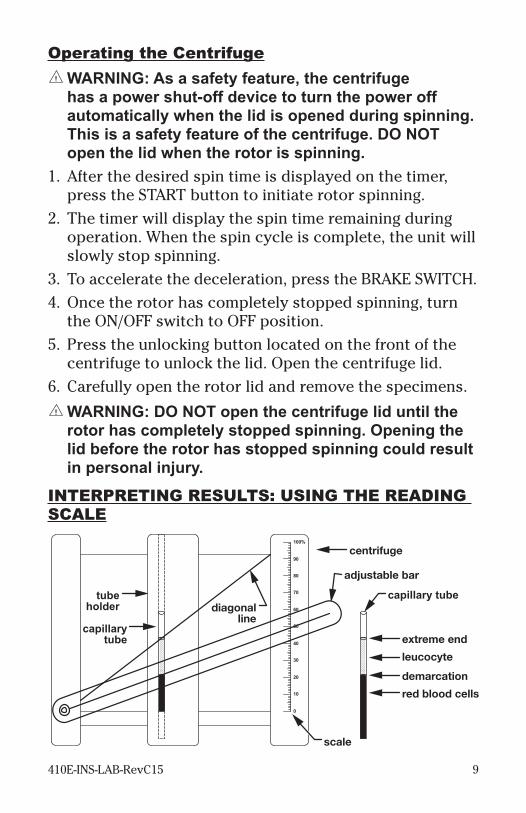
INTERPRETING RESULTS: USING THE READING SCALE
0
10
20
30
40
50
60
70
80
90
100%
adjustable bar
capillary tubediagonal
line
scale
demarcation
extreme end
centrifuge
red blood cells
leucocyte
capillarytube
tubeholder
410E-INS-LAB-RevC15 10
1. Remove the capillary tubes from the rotor. Take care not to let the blood drain from the tubes.
2. Place the capillary tubes on the grooves of the tube holder carefully. Line up the bottom red blood cell portion of the tube with the straight line at the bottom of the reading scale so that the start of the red blood cell portion lines up with this horizontal fixed line.
3. Move the tube holder from left to right on the reader until the top of the leucocyte line matches up with the fixed diagonal line on the reader platform.
4. Move the adjustable bar to meet the demarcation (place where the leucocyte and red blood cells separate). The diagonal line on the adjustable bar should be directly on top of the demarcation.
5. The percentage of HCT can then be read directly from the scale by reading the number the adjustable diagonal bar crosses at the right side of the reader.
Expected ValueNormal hematocrit values will vary somewhat depending upon such factors as age, sex, size of red cells, and altitude. Generally accepted normal values with range of variation are: • Women:36%–46%
• Men:42%–52%
Limitations and Factors Affecting Results1. Inadequate centrifugation, either time or RPM, will
result in erroneously high reading.2. Ensure that the capillary tube is sealed properly, to
prevent red cell loss during centrifugation. The rubber gasket encircling the interior of the rotor must be smooth and pliable. This will aid in clay sealing plug retention and reduce breakage during centrifugation.
3. Take the reading from the top of the clay sealing plug to the top of the column of VPRC.
410E-INS-LAB-RevC15 11
4. Hemolized blood, due to over-anticoagulation or improper finger stick, can produce erroneous results.
5. Hematocrit determinations are not accurate immediately following blood transfusions or blood loss.
DISASSEMBLY WARNING: Disassembly or dismantling of this centrifuge is limited to authorized service personnel only. Dismantling or disassembly by non-qualified personnel will result in the voiding of the unit’s warranty. Please contact your GF authorized distributor or customer service representative to identify a qualified technician.
TROUBLESHOOTING WARNING: Unplug the centrifuge before performing troubleshooting corrective actions.
WARNING: Do not disassemble or dismantle the centrifuge.
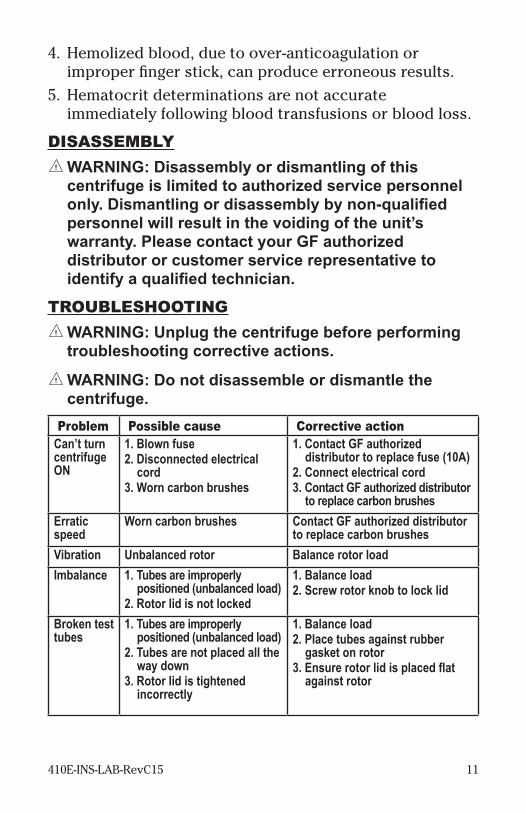
Problem Possible cause Corrective actionCan’t turn centrifuge ON
1. Blown fuse2. Disconnected electrical
cord3. Worn carbon brushes
1. Contact GF authorized distributor to replace fuse (10A)
2. Connect electrical cord3. Contact GF authorized distributor
to replace carbon brushesErratic speed
Worn carbon brushes Contact GF authorized distributor to replace carbon brushes
Vibration Unbalanced rotor Balance rotor loadImbalance 1. Tubes are improperly
positioned (unbalanced load)2. Rotor lid is not locked
1. Balance load2. Screw rotor knob to lock lid
Broken test tubes
1. Tubes are improperly positioned (unbalanced load)
2. Tubes are not placed all the way down
3. Rotor lid is tightened incorrectly
1. Balance load2. Place tubes against rubber
gasket on rotor3. Ensure rotor lid is placed flat
against rotor
410E-INS-LAB-RevC15 12
MAINTENANCE WARNING: Centrifuge disassembly or dismantling is limited to authorized service personnel only. WARNING: Always use a properly grounded electrical outlet of correct voltage and current handling capacity.
WARNING: Do not immerse the centrifuge in or saturate it with water.
s NOTICE: Do not lubricate the drive motor or linkage assembly.
s NOTICE: Do not drop the centrifuge, turn it upside down, or subject it to vibration.
s NOTICE: Clean the chamber and rotor as described below after each use.
s NOTICE: In order to spin balanced loads, the centrifuge must be level. To this end, confirm the rubber supports are in good condition before each use.
s NOTICE: Contact your GF authorized distributor to replace the carbon brushes yearly or as needed.
CleaningClean the equipment as described below after each use.1. Unplug the unit and disconnect the power cord from the
unit.2. Clean the outer case, rotor lid, and rotor tube holder
grooves with a moist, clean cloth.3. Ensure the equipment is thoroughly dry. Attach the
product's electrical cord to the cord port located on the back of the centrifuge.
4. Plug the centrifuge's power cord into a properly grounded (110V / 60Hz) electrical wall outlet.
s NOTICE: DO NOT use benzine or paint thinner for cleaning.
410E-INS-LAB-RevC15 13
Transportations NOTICE: When transporting the unit, place in secure
packaging (preferably the original packaging material) which will prevent the unit from tipping over.
s NOTICE: Do not drop the centrifuge, turn it upside down, or subject it to vibration.
s NOTICE: Transport within temperature limitations listed in following SPECIFICATIONS section.
Storages NOTICE: Do not place this equipment in a draft,
sunlight or near a piece of equipment which emits heat or electromagnetic conduction emission.
s NOTICE: Disconnect power supply when the centrifuge is not in use.
s NOTICE: DO NOT place other equipment or objects on top of the centrifuge.
s NOTICE: Store within temperature limitations listed in following SPECIFICATIONS section.
410E-INS-LAB-RevC15 14
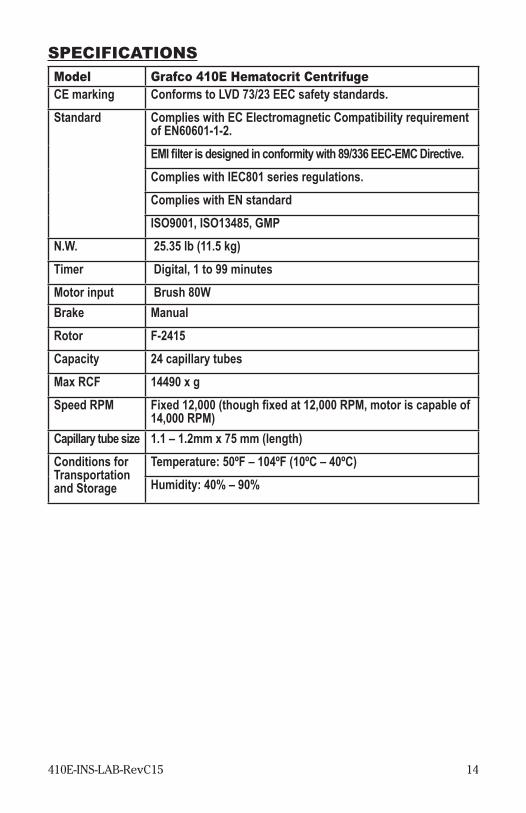
SPECIFICATIONSModel Grafco 410E Hematocrit CentrifugeCE marking Conforms to LVD 73/23 EEC safety standards.Standard Complies with EC Electromagnetic Compatibility requirement
of EN60601-1-2.EMI filter is designed in conformity with 89/336 EEC-EMC Directive.Complies with IEC801 series regulations.Complies with EN standardISO9001, ISO13485, GMP
N.W. 25.35 lb (11.5 kg)Timer Digital, 1 to 99 minutes Motor input Brush 80WBrake Manual Rotor F-2415Capacity 24 capillary tubesMax RCF 14490 x gSpeed RPM Fixed 12,000 (though fixed at 12,000 RPM, motor is capable of
14,000 RPM)Capillary tube size 1.1 – 1.2mm x 75 mm (length)Conditions for Transportation and Storage
Temperature: 50ºF – 104ºF (10ºC – 40ºC)Humidity: 40% – 90%

410E-INS-LAB-RevC15 15
LIMITED WARRANTYSCOPE OF WARRANTYGF Health Products, Inc. (“GF”) warrants to the original purchaser only that it will replace or repair components, at GF’s sole discretion, that are defective in material or workmanship under normal use and service. All warranties are conditioned upon the proper use of the products strictly in accordance with good commercial practice and applicable GF instructions and manuals, including proper use and maintenance. To the extent that a component is warranted by a third party, GF conveys all of its rights under that warranty to the original purchaser, to the extent permitted. This limited warranty shall only apply to defects that are reported to GF’s customer service team within the applicable warranty period and which, upon examination by GF or its authorized representative, prove to be a warranty item. This limited warranty is not transferable. Within the guidelines set forth in this document, this product is warranted for one (1) year. The applicable warranty period shall commence from date of shipment to the original customer, unless there is an expiration date on the component in which case the warranty shall expire on the earlier of warranty period or the expiration date.OBTAINING WARRANTY SERVICEThis limited warranty shall only apply to defects that are reported to the Distributor from whom the Customer purchased the product within the applicable warranty period. If there is not a Distributor, you must contact GF directly by calling 770-368-4700, sending a fax request to 770-368-2386, or by e-mailing a request to [email protected]. Specific directions will be provided by the Customer Service Representative. Failure to abide by the specific directions will result in denial of the warranty claim.EXCLUSIONSThe warranty does not cover and GF shall not be liable for the following: 1) Defects, damage, or other conditions caused, in whole or in part, by misuse, abuse,
negligence, alteration, accident, freight damage, tampering or failure to seek and obtain repair or replacement in a timely manner;
2) Products which are not installed, used, or properly cleaned and maintained as required in the official manual for the applicable product;
3) Products considered to be of a non-durable nature including, but not limited to: casters, filters, fuses, gaskets, lubricants, and charts;
4) Accessories or parts not provided by GF;5) Charges by anyone for adjustments, repairs, replacement parts, installation or other work
performed upon or in connection with such products which are not expressly authorized in writing, in advance, by GF;
6) Any labor or shipping charges incurred in the replacement part installation or repair;7) Costs and expenses of regular maintenance and cleaning; and8) Representations and warranties made by any person or entity other than GF.ENTIRE WARRANTY, EXCLUSIVE REMEDY AND CONSEQUENTIAL DAMAGES DISCLAIMERTHIS WARRANTY IS GF’S ONLY WARRANTY AND IS IN LIEU OF ALL OTHER WARRANTIES, EXPRESS OR IMPLIED. GF MAKES NO IMPLIED WARRANTIES OF ANY KIND INCLUDING ANY IMPLIED WARRANTIES OF MERCHANTABILITY OR FITNESS FOR A PARTICULAR PURPOSE. IF ANY MODEL OR SAMPLE WAS SHOWN TO THE CUSTOMER, SUCH MODEL OR SAMPLE WAS USED MERELY TO ILLUSTRATE THE GENERAL TYPE AND QUALITY OF THE PRODUCT AND NOT TO REPRESENT THAT THE PRODUCT WOULD NECESSARILY CONFORM TO THE MODEL OR SAMPLE IN ALL RESPECTS. THIS WARRANTY IS LIMITED TO THE REPAIR OR REPLACEMENT OF THE DEFECTIVE PARTS. GF SHALL NOT BE LIABLE FOR AND HEREBY DISCLAIMS ANY DIRECT, SPECIAL, INDIRECT, INCIDENTAL, EXEMPLARY OR CONSEQUENTIAL DAMAGES, INCLUDING, BUT NOT LIMITED TO: DAMAGES FOR LOSS OF PROFITS OR INCOME, LOSS OF USE, DOWNTIME, COVER, OR EMPLOYEE OR INDEPENDENT CONTRACTOR WAGES, PAYMENTS AND BENEFITS.The warranties contained herein contain all the representations and warranties with respect to the subject matter of this document, and supersede all prior negotiations, agreements and understandings with respect thereto. The recipient of this document hereby acknowledges and represents that it has not relied on any representation, assertion, guarantee, warranty, collateral contract or other assurance, except those set out in this document.For additional information on this product or this warranty, please contact a GF Customer Service Representative.NOTES:1) Additional terms and conditions may apply.2) Freight claims must be notated on the appropriate shipping documents and must be made
with immediacy. International, federal and state regulations govern specific requirements for freight claims. Failure to abide by those regulations may result in a denial of the freight claim. GF will assist you in filing the freight claim.
3) Claims for any short shipment must be made within three (3) days of the invoice date.

Made in Taiwan © 2008 GF Health Products, Inc.


![Crit-Line IV User’s Guides-manuals---hemo...[Na+] affect the micro centrifuge-derived hematocrit values as follows: 1 unit decrease in “spun” hematocrit per 12 mEq/L increases](https://img.pdfslide.net/doc/110x75/5e5b7c0db7d6f71b2568789a/crit-line-iv-useras-guide-s-manuals-hemo-na-affect-the-micro-centrifuge-derived.jpg)