Embed Size (px)
Citation preview
1
HOBIE CAT 16
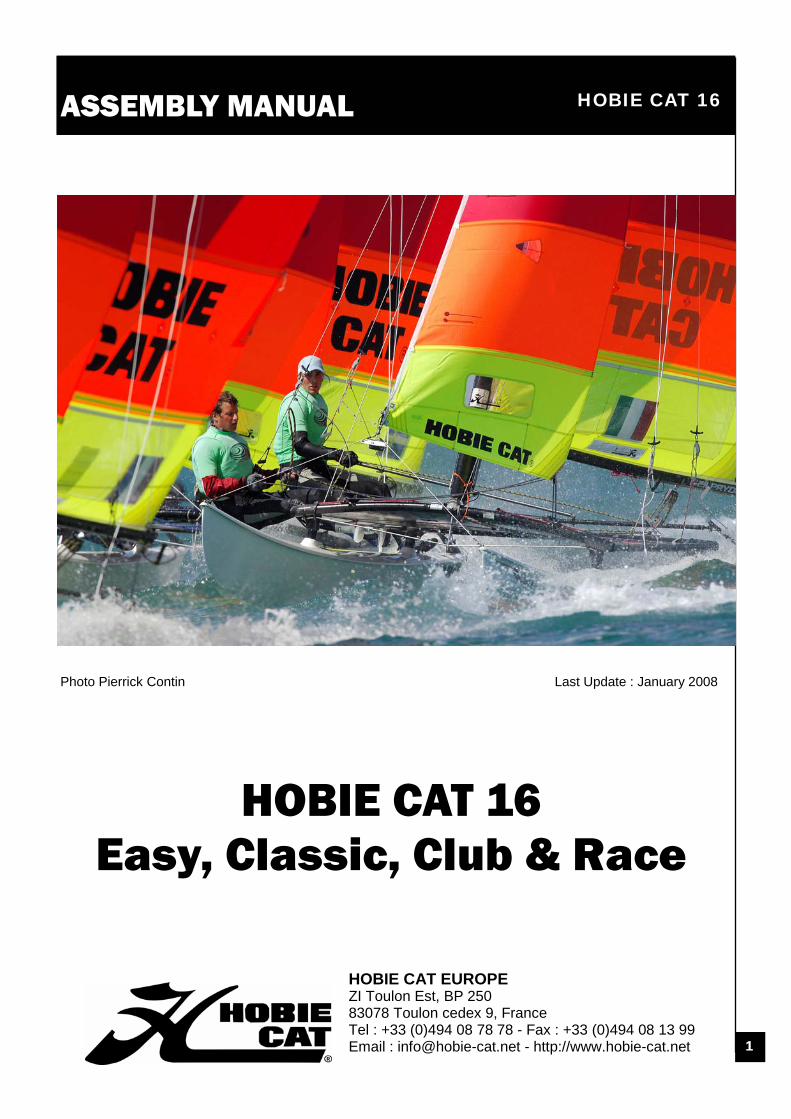
HOBIE CAT EUROPE ZI Toulon Est, BP 250 83078 Toulon cedex 9, France Tel : +33 (0)494 08 78 78 - Fax : +33 (0)494 08 13 99 Email : [email protected] - http://www.hobie-cat.net
Photo Pierrick Contin Last Update : January 2008
ASSEMBLY MANUAL
HOBIE CAT 16 Easy, Classic, Club & Race
2
HOBIE CAT 16
TABLE OF CONTENT Part description....................................2-3
Hull assembly ......................................... 4
Trampoline.............................................. 5
Rudder assembly.................................... 6
Tiller crossbar & extension ..................... 6
Gudgeon bushings.................................. 7
Mast preparation..................................... 8
Stepping the mast................................... 9
Shrouds & trapeze ................................ 10
Mainsail traveller................................... 11
Mainsail................................................. 12
Gooseneck & boom (except Race)....... 13
Boom & cunningham (Race only) ......... 14
Mainsheet system................................. 15
Jib ....................................................16-17
Race jib halyard / Righting.................... 18
Jib furling assembly (option) ................. 19
Spinnaker kit classic ............................. 20
Spinnaker kit trumpet soft ..................... 21
Before sailing ........................................ 22
Safety advices ...................................... 23
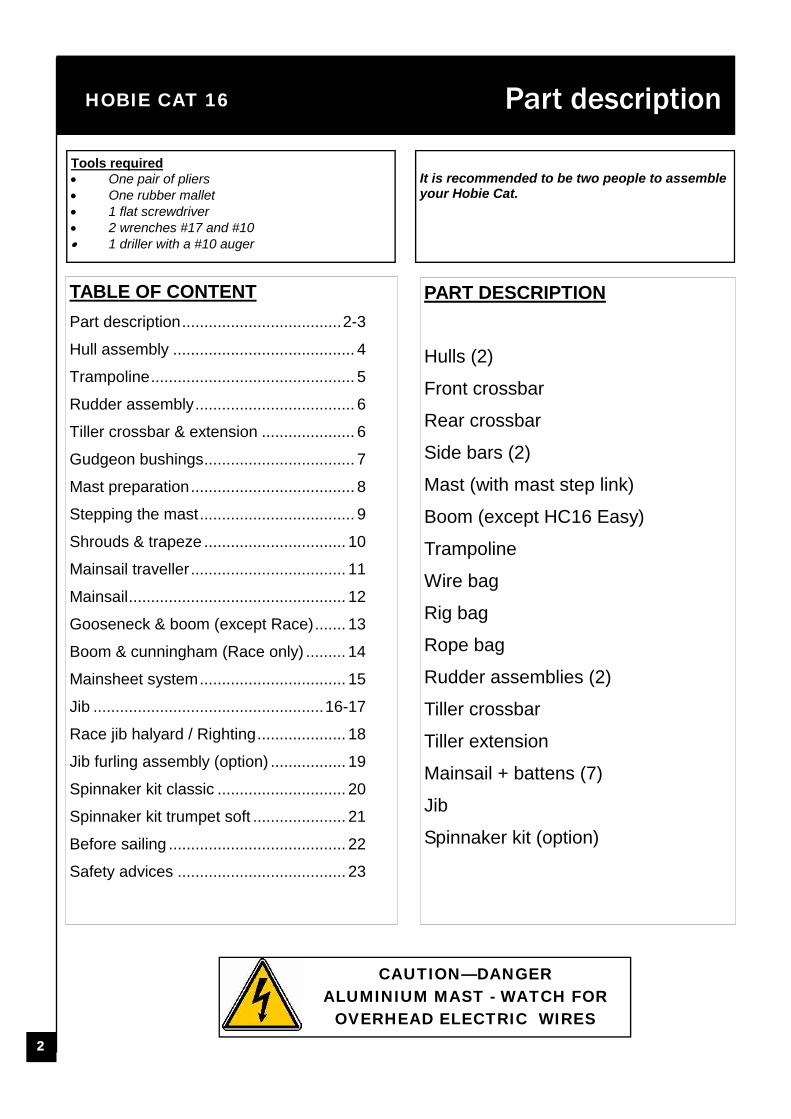
Tools required • One pair of pliers • One rubber mallet • 1 flat screwdriver • 2 wrenches #17 and #10 • 1 driller with a #10 auger
It is recommended to be two people to assemble your Hobie Cat.
Liste des Pièces
PART DESCRIPTION
Hulls (2)
Front crossbar
Rear crossbar
Side bars (2)
Mast (with mast step link)
Boom (except HC16 Easy)
Trampoline
Wire bag
Rig bag
Rope bag
Rudder assemblies (2)
Tiller crossbar
Tiller extension
Mainsail + battens (7)
Jib
Spinnaker kit (option)
CAUTION—DANGER ALUMINIUM MAST - WATCH FOR
OVERHEAD ELECTRIC WIRES
Part description
3
HOBIE CAT 16 Part description
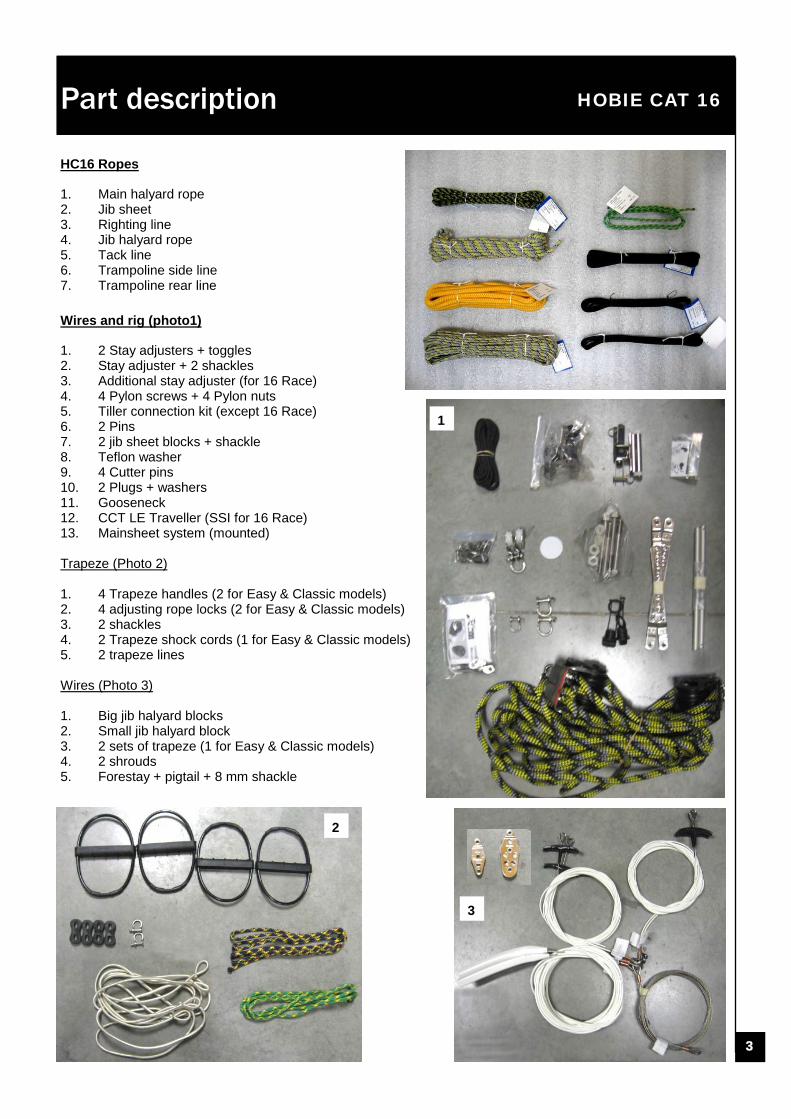
HC16 Ropes 1. Main halyard rope 2. Jib sheet 3. Righting line 4. Jib halyard rope 5. Tack line 6. Trampoline side line 7. Trampoline rear line
Wires and rig (photo1) 1. 2 Stay adjusters + toggles 2. Stay adjuster + 2 shackles 3. Additional stay adjuster (for 16 Race) 4. 4 Pylon screws + 4 Pylon nuts 5. Tiller connection kit (except 16 Race) 6. 2 Pins 7. 2 jib sheet blocks + shackle 8. Teflon washer 9. 4 Cutter pins 10. 2 Plugs + washers 11. Gooseneck 12. CCT LE Traveller (SSI for 16 Race) 13. Mainsheet system (mounted) Trapeze (Photo 2) 1. 4 Trapeze handles (2 for Easy & Classic models) 2. 4 adjusting rope locks (2 for Easy & Classic models) 3. 2 shackles 4. 2 Trapeze shock cords (1 for Easy & Classic models) 5. 2 trapeze lines Wires (Photo 3) 1. Big jib halyard blocks 2. Small jib halyard block 3. 2 sets of trapeze (1 for Easy & Classic models) 4. 2 shrouds 5. Forestay + pigtail + 8 mm shackle
1
3
2
4
HOBIE CAT 16
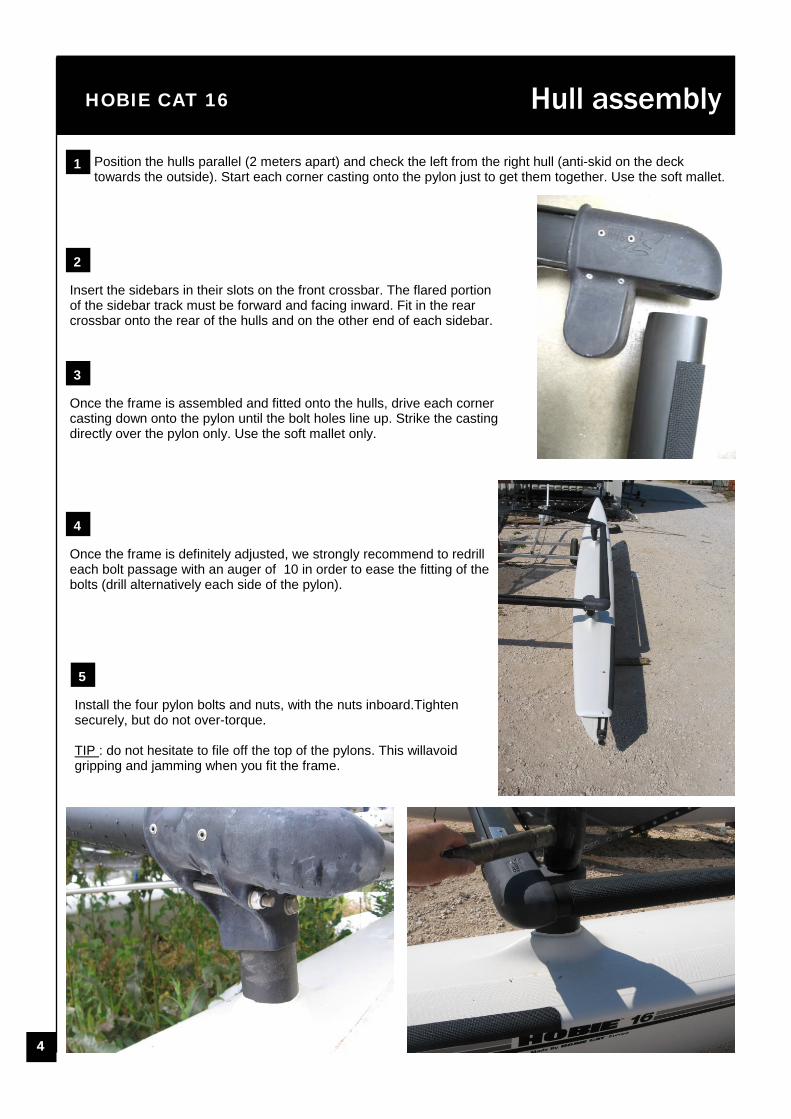
Insert the sidebars in their slots on the front crossbar. The flared portion of the sidebar track must be forward and facing inward. Fit in the rear crossbar onto the rear of the hulls and on the other end of each sidebar.
Hull assembly
Position the hulls parallel (2 meters apart) and check the left from the right hull (anti-skid on the deck towards the outside). Start each corner casting onto the pylon just to get them together. Use the soft mallet.
1
2
Once the frame is assembled and fitted onto the hulls, drive each corner casting down onto the pylon until the bolt holes line up. Strike the casting directly over the pylon only. Use the soft mallet only.
3
Once the frame is definitely adjusted, we strongly recommend to redrill each bolt passage with an auger of 10 in order to ease the fitting of the bolts (drill alternatively each side of the pylon).
4
Install the four pylon bolts and nuts, with the nuts inboard.Tighten securely, but do not over-torque. TIP : do not hesitate to file off the top of the pylons. This willavoid gripping and jamming when you fit the frame.
5
5
HOBIE CAT 16 Trampoline
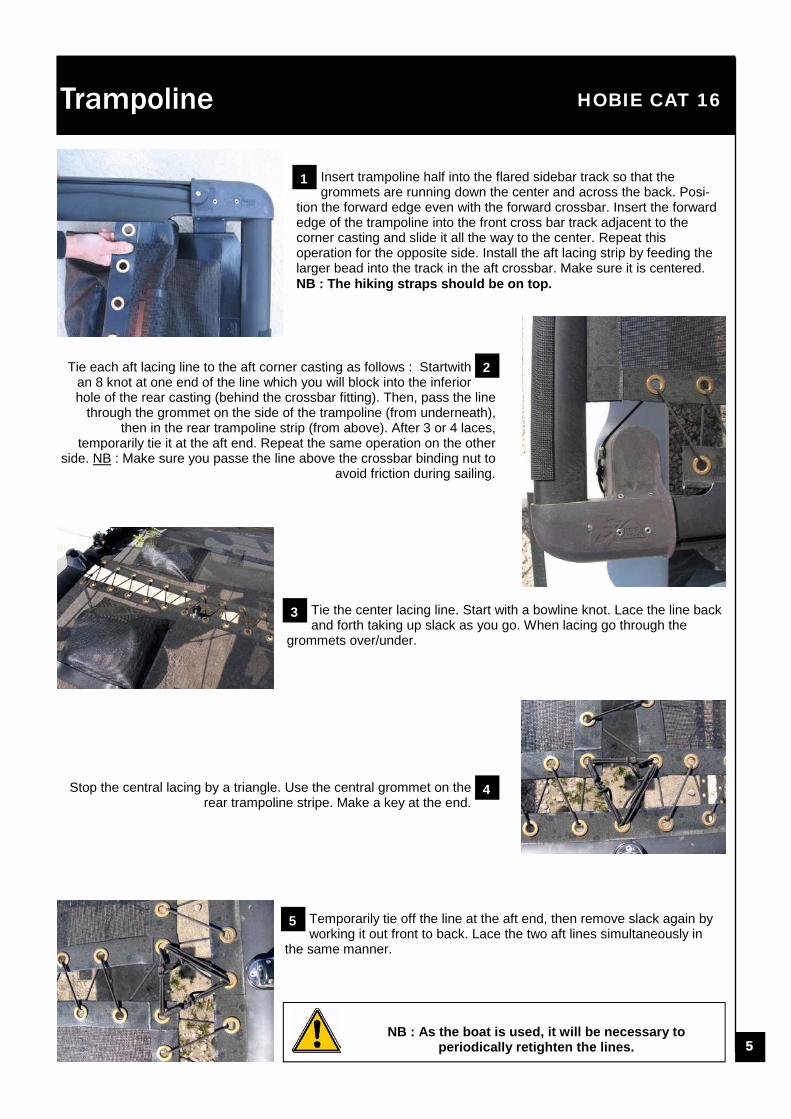
Tie each aft lacing line to the aft corner casting as follows : Startwith an 8 knot at one end of the line which you will block into the inferior hole of the rear casting (behind the crossbar fitting). Then, pass the line
through the grommet on the side of the trampoline (from underneath), then in the rear trampoline strip (from above). After 3 or 4 laces,
temporarily tie it at the aft end. Repeat the same operation on the other side. NB : Make sure you passe the line above the crossbar binding nut to
avoid friction during sailing.
Insert trampoline half into the flared sidebar track so that the grommets are running down the center and across the back. Posi-
tion the forward edge even with the forward crossbar. Insert the forward edge of the trampoline into the front cross bar track adjacent to the corner casting and slide it all the way to the center. Repeat this operation for the opposite side. Install the aft lacing strip by feeding the larger bead into the track in the aft crossbar. Make sure it is centered. NB : The hiking straps should be on top.
1
2
Tie the center lacing line. Start with a bowline knot. Lace the line back and forth taking up slack as you go. When lacing go through the
grommets over/under.
3
Stop the central lacing by a triangle. Use the central grommet on the rear trampoline stripe. Make a key at the end.
4
Temporarily tie off the line at the aft end, then remove slack again by working it out front to back. Lace the two aft lines simultaneously in
the same manner.
5
NB : As the boat is used, it will be necessary to
periodically retighten the lines.
6
HOBIE CAT 16 Rudder Assembly
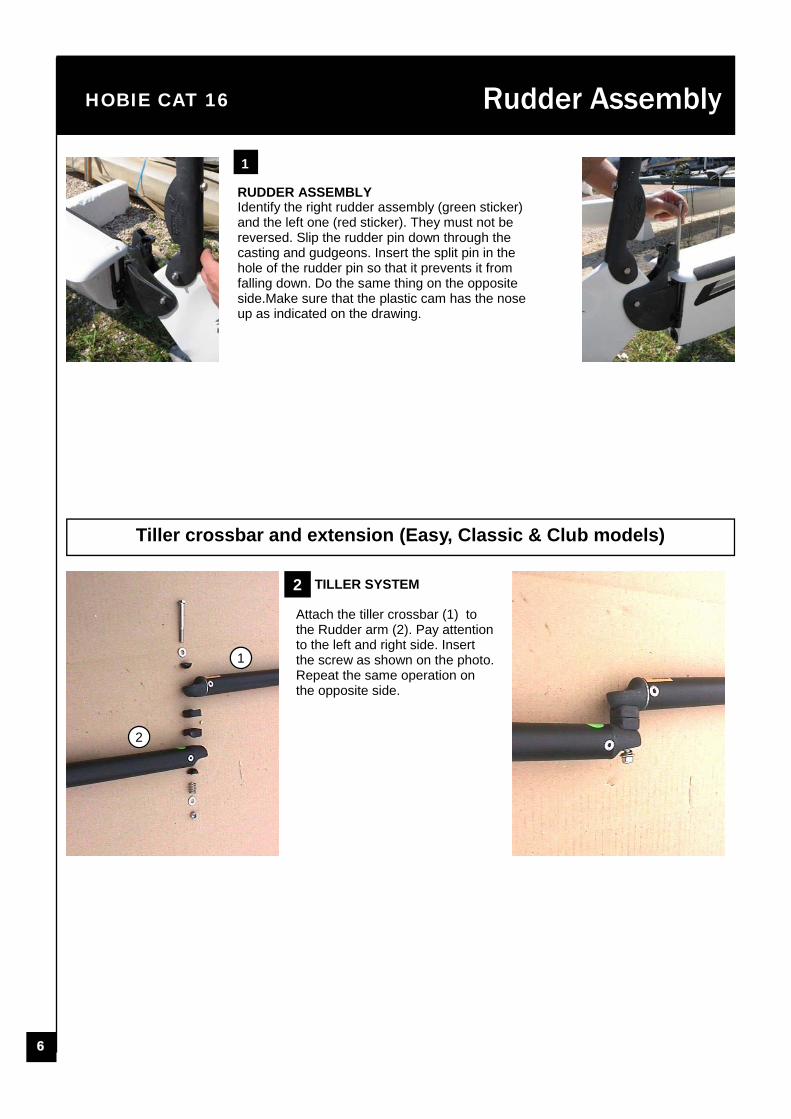
RUDDER ASSEMBLY Identify the right rudder assembly (green sticker) and the left one (red sticker). They must not be reversed. Slip the rudder pin down through the casting and gudgeons. Insert the split pin in the hole of the rudder pin so that it prevents it from falling down. Do the same thing on the opposite side.Make sure that the plastic cam has the nose up as indicated on the drawing.
TILLER SYSTEM
Attach the tiller crossbar (1) to the Rudder arm (2). Pay attention to the left and right side. Insert the screw as shown on the photo. Repeat the same operation on the opposite side.
1
Tiller crossbar and extension (Easy, Classic & Club models)
2
1
2
7
HOBIE CAT 16 Rudder Assembly
Attach the stick by slipping the pinthrough the violin screw in themiddle of the tiller crossbar.
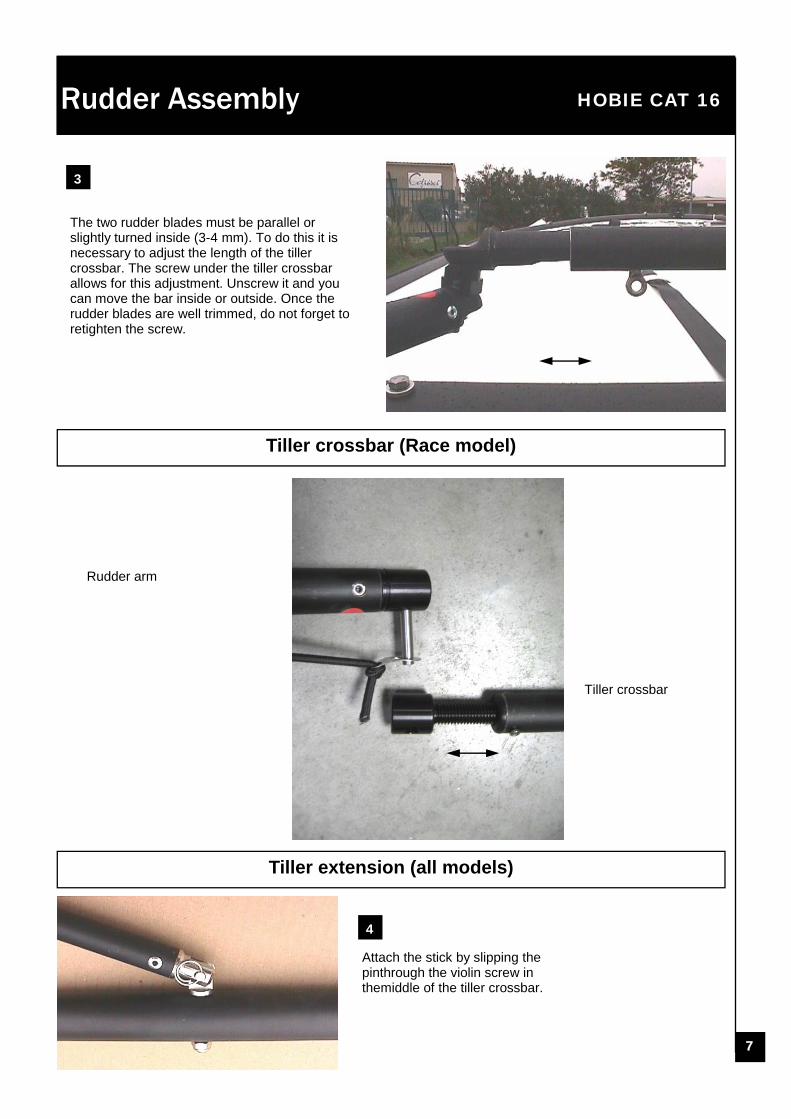
The two rudder blades must be parallel or slightly turned inside (3-4 mm). To do this it is necessary to adjust the length of the tiller crossbar. The screw under the tiller crossbar allows for this adjustment. Unscrew it and you can move the bar inside or outside. Once the rudder blades are well trimmed, do not forget to retighten the screw.
3
4
Tiller crossbar (Race model)
Tiller crossbar
Rudder arm
Tiller extension (all models)
8
HOBIE CAT 16
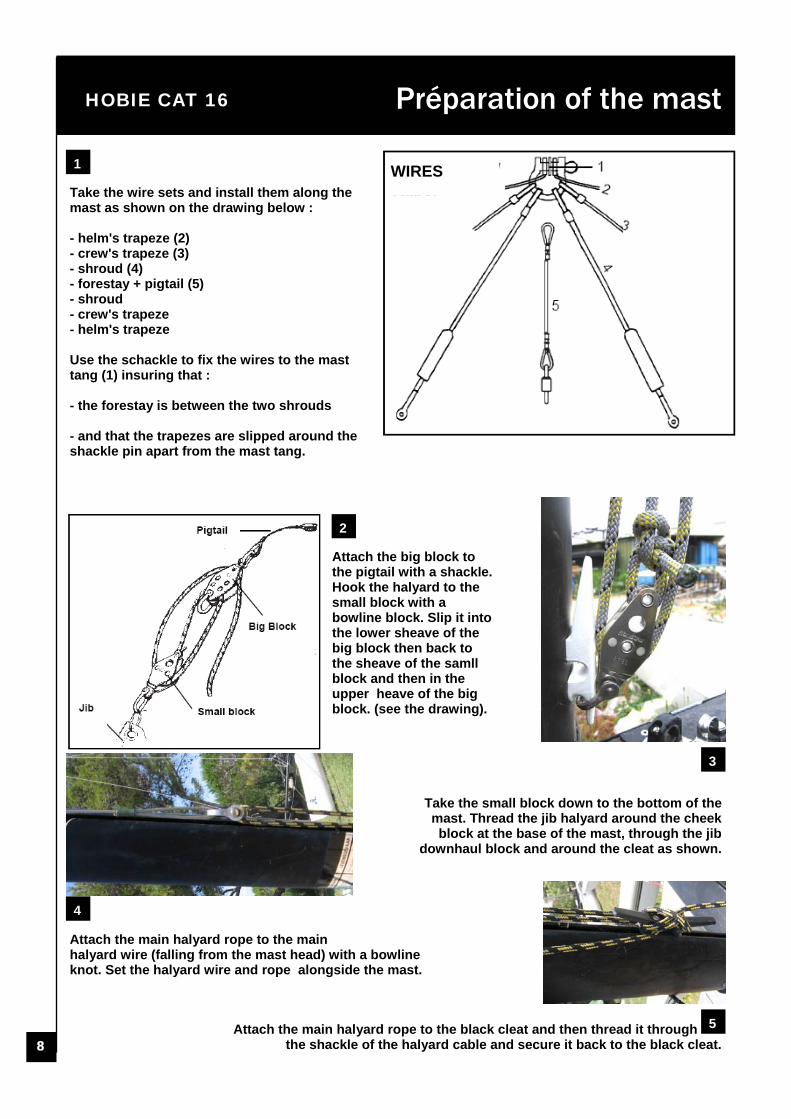
Attach the main halyard rope to the black cleat and then thread it through
the shackle of the halyard cable and secure it back to the black cleat.
Take the wire sets and install them along the mast as shown on the drawing below : - helm's trapeze (2) - crew's trapeze (3) - shroud (4) - forestay + pigtail (5) - shroud - crew's trapeze - helm's trapeze Use the schackle to fix the wires to the mast tang (1) insuring that : - the forestay is between the two shrouds - and that the trapezes are slipped around the shackle pin apart from the mast tang.
Attach the main halyard rope to the main halyard wire (falling from the mast head) with a bowline knot. Set the halyard wire and rope alongside the mast.
Préparation of the mast
Attach the big block to the pigtail with a shackle. Hook the halyard to the small block with a bowline block. Slip it into the lower sheave of the big block then back to the sheave of the samll block and then in the upper heave of the big block. (see the drawing).
WIRES
1
2
Take the small block down to the bottom of the mast. Thread the jib halyard around the cheek block at the base of the mast, through the jib
downhaul block and around the cleat as shown.
3
4
5

9
HOBIE CAT 16
Place the mast pivot bearing in the mast step cup. Install the mast step link following the instructions supplied with the kit.
Stepping the mast
ATTENTION - DANGER ALUMINIUM MAST - When stepping the mast or launching the boat watch for overhead electric wires.
Shock or even death could result if the mast comes in contact with overhead electric wires.
Take the briddle wires and attach the opposite ends to the shackle on the bottom of the forestay adjuster.
1 2
3
4
Check that the bolts of the shroud anchor bars are well tightened. Attach the shroud stay adjuster to the anchor bolts on each hull with the clevis pins and lock rings provided.
lay the mast on top of the frame with the mast head aft. Position the mast foot in front of the step link body in order to insert the pin through.
Attach the shrouds to the top holes of the adjusters. Make sure that the shrouds are not crossed at the mast tang. Put the shroud covers over the adjusters. The mast is ready for stepping.
5
10
HOBIE CAT 16 Stepping the mast
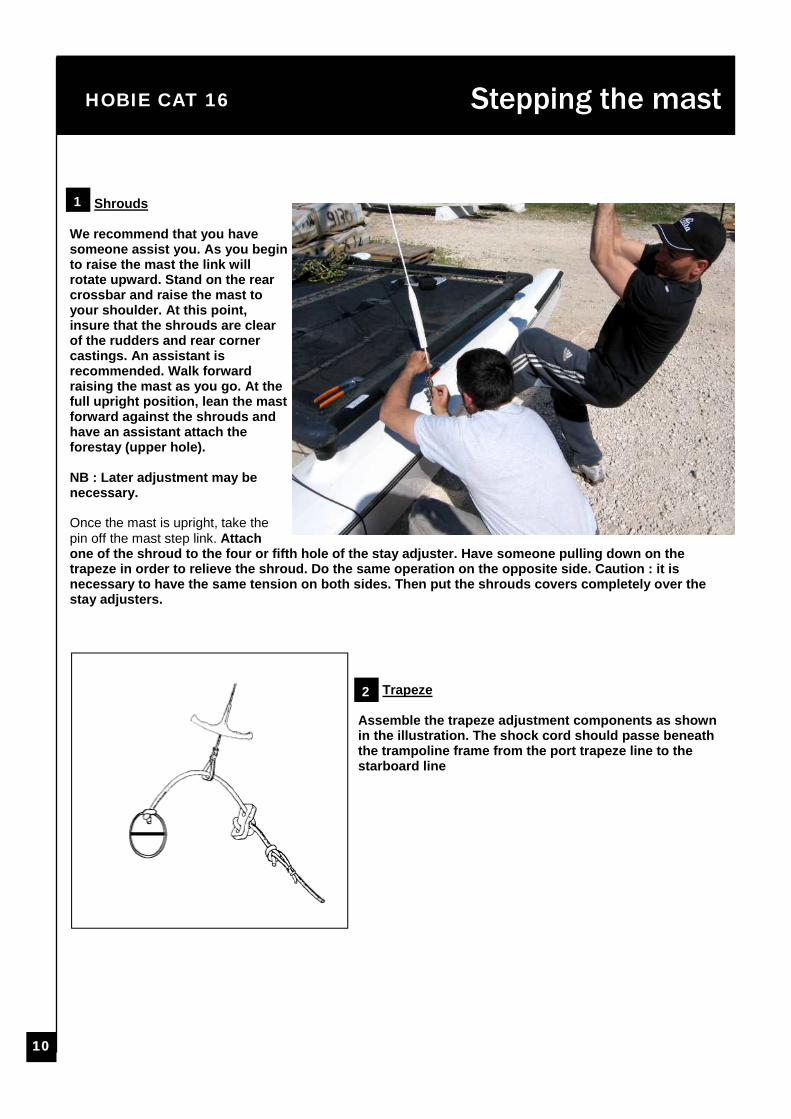
Shrouds
We recommend that you have someone assist you. As you begin to raise the mast the link will rotate upward. Stand on the rear crossbar and raise the mast to your shoulder. At this point, insure that the shrouds are clear of the rudders and rear corner castings. An assistant is recommended. Walk forward raising the mast as you go. At the full upright position, lean the mast forward against the shrouds and have an assistant attach the forestay (upper hole). NB : Later adjustment may be necessary. Once the mast is upright, take the pin off the mast step link. Attach one of the shroud to the four or fifth hole of the stay adjuster. Have someone pulling down on the trapeze in order to relieve the shroud. Do the same operation on the opposite side. Caution : it is necessary to have the same tension on both sides. Then put the shrouds covers completely over the stay adjusters.
Trapeze
Assemble the trapeze adjustment components as shown in the illustration. The shock cord should passe beneath the trampoline frame from the port trapeze line to the starboard line
1
2
11
HOBIE CAT 16 Main traveller car
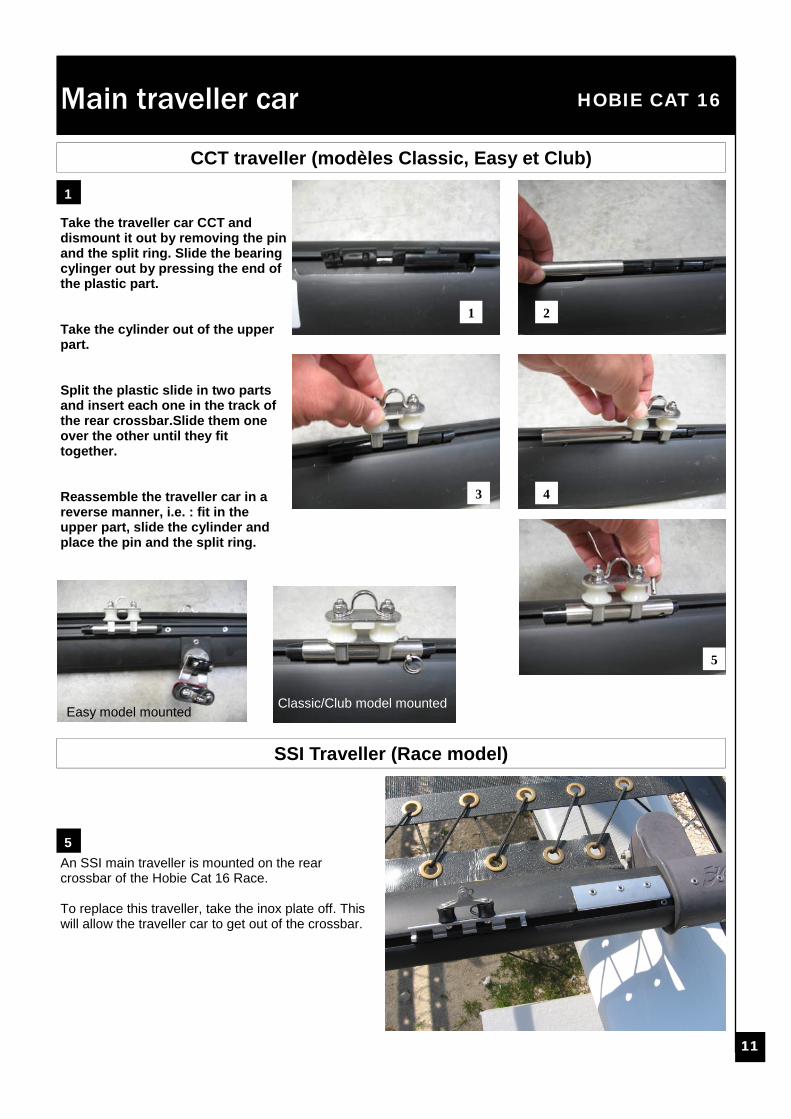
Take the traveller car CCT and dismount it out by removing the pin and the split ring. Slide the bearing cylinger out by pressing the end of the plastic part. Take the cylinder out of the upper part. Split the plastic slide in two parts and insert each one in the track of the rear crossbar.Slide them one over the other until they fit together. Reassemble the traveller car in a reverse manner, i.e. : fit in the upper part, slide the cylinder and place the pin and the split ring.
1
CCT traveller (modèles Classic, Easy et Club)
SSI Traveller (Race model)
An SSI main traveller is mounted on the rear crossbar of the Hobie Cat 16 Race. To replace this traveller, take the inox plate off. This will allow the traveller car to get out of the crossbar.
5
1 2
3 4
5
Easy model mounted Classic/Club model mounted
12
HOBIE CAT 16 Main Sail
Unfold the mainsail on the trampoline and insert the battens starting from the top of the sail. 1
How to fix the « Race » batten end caps
Insert the batten tie in one of the hole of the batten end cap, feed it into the opposite grommet of the batten pocket, then into the second hole of the batten end cap, then back in the first grommet and secure it with a knot into the V groove. Batten tension can be varied to suit personal preference or sailing conditions.
2
How to fix the standard batten end caps (Classic, Club & Easy models) 3
The battens should be stiff. It may be necessary to make adjustements an re-tighten them periodically after sailing
Before hoisting the sail, place your Hobie Cat directly into the wind Take the halyard rope and the halyard wire which are attached together on the mast and pull them apart. Pull on the halyard rope to hoist a bit the halyard wire
4
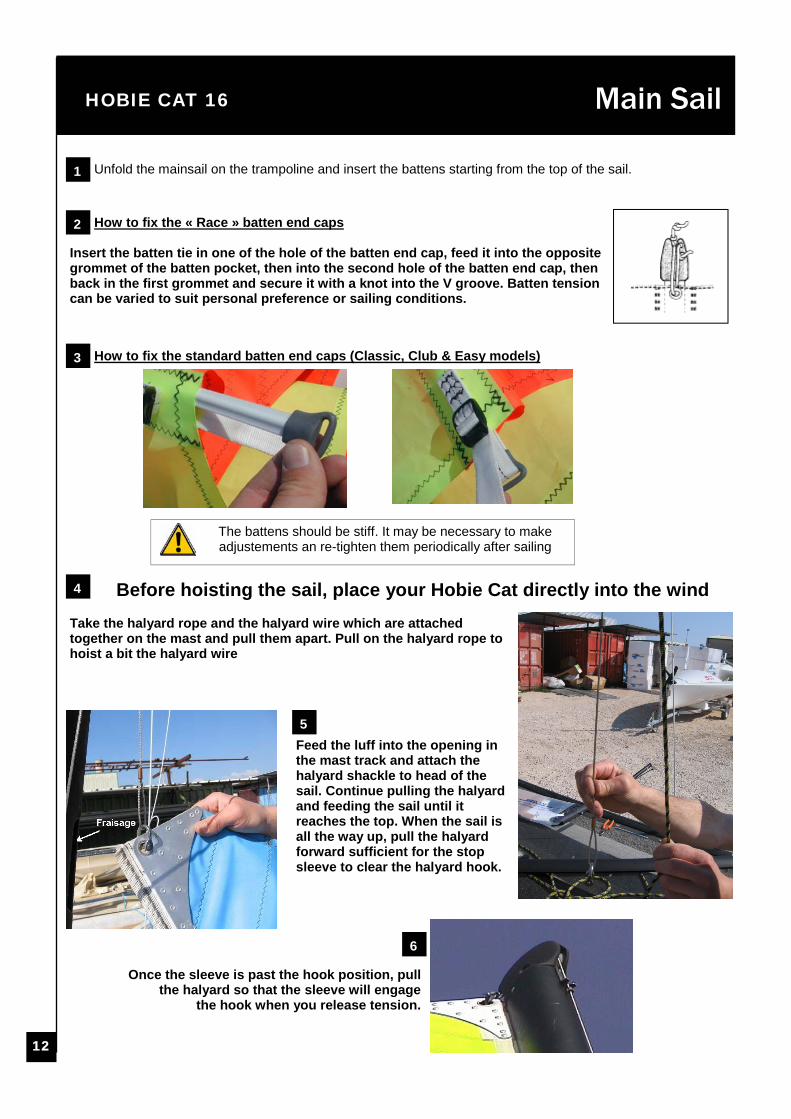
Feed the luff into the opening in the mast track and attach the halyard shackle to head of the sail. Continue pulling the halyard and feeding the sail until it reaches the top. When the sail is all the way up, pull the halyard forward sufficient for the stop sleeve to clear the halyard hook.
5
Once the sleeve is past the hook position, pull the halyard so that the sleeve will engage
the hook when you release tension.
6
13
HOBIE CAT 16
Hobie Cat Classic & Club—Installation of the boom
Take the boom Feed the foot of the sail into the track opening in the forward end of the boom. Fix the boom to the gooseneck. Lead the outhaul (already tied to the mainsail clew) around the boome cap, through the block hanger and through the outhaul jam cleat. Tie a figure eight knot in the end of the line.
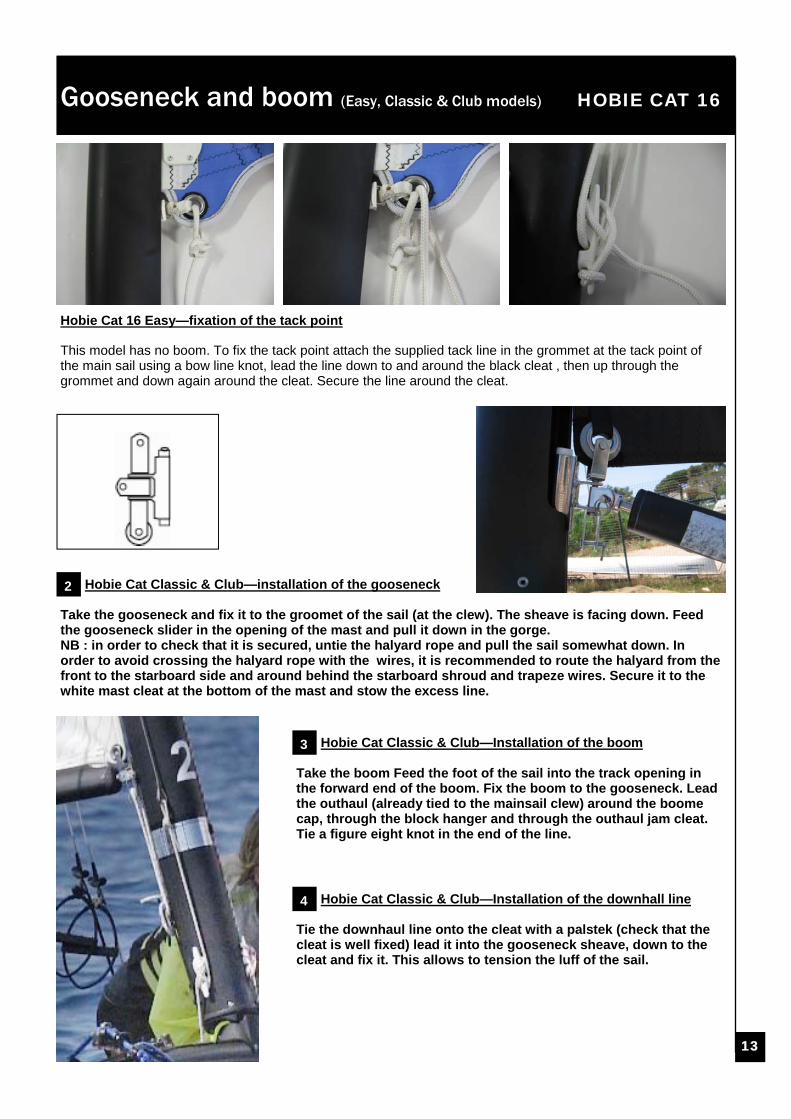
Gooseneck and boom (Easy, Classic & Club models)
Hobie Cat 16 Easy—fixation of the tack point This model has no boom. To fix the tack point attach the supplied tack line in the grommet at the tack point of the main sail using a bow line knot, lead the line down to and around the black cleat , then up through the grommet and down again around the cleat. Secure the line around the cleat.
1
Hobie Cat Classic & Club—installation of the gooseneck
Take the gooseneck and fix it to the groomet of the sail (at the clew). The sheave is facing down. Feed the gooseneck slider in the opening of the mast and pull it down in the gorge. NB : in order to check that it is secured, untie the halyard rope and pull the sail somewhat down. In order to avoid crossing the halyard rope with the wires, it is recommended to route the halyard from the front to the starboard side and around behind the starboard shroud and trapeze wires. Secure it to the white mast cleat at the bottom of the mast and stow the excess line.
2
3
Hobie Cat Classic & Club—Installation of the downhall line
Tie the downhaul line onto the cleat with a palstek (check that the cleat is well fixed) lead it into the gooseneck sheave, down to the cleat and fix it. This allows to tension the luff of the sail.
4
14
HOBIE CAT 16 Boom & Cunningham (Race)
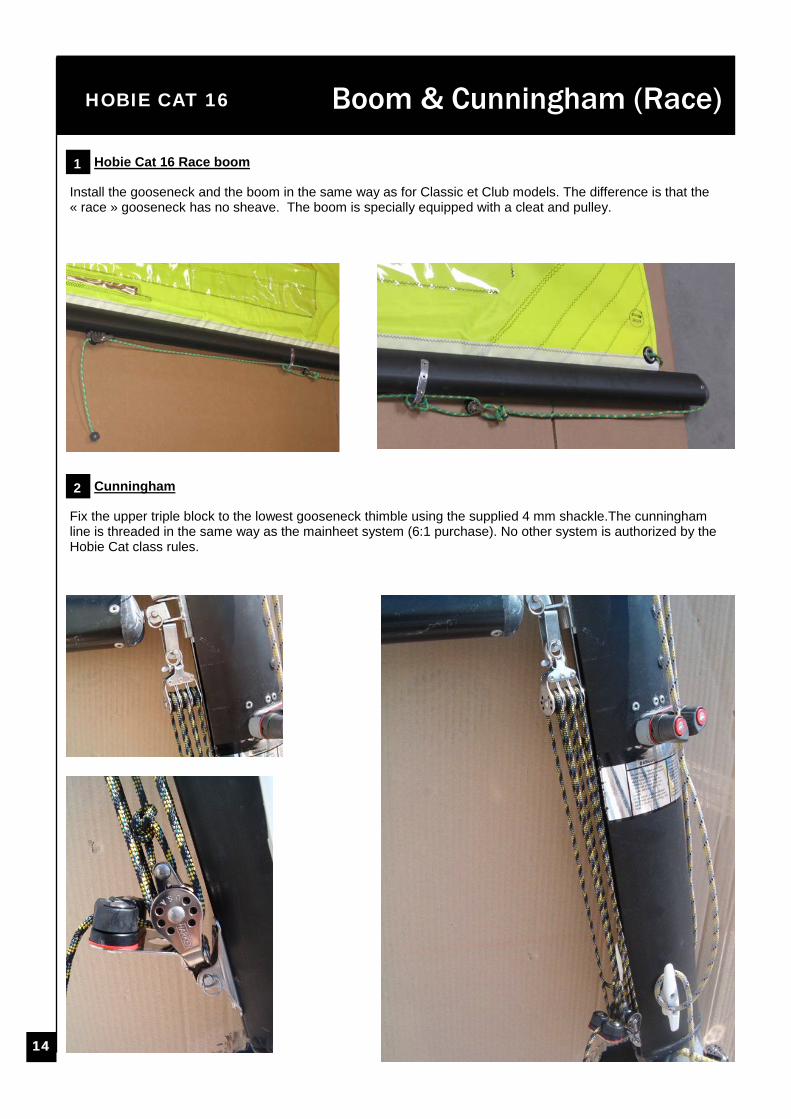
Hobie Cat 16 Race boom
Install the gooseneck and the boom in the same way as for Classic et Club models. The difference is that the « race » gooseneck has no sheave. The boom is specially equipped with a cleat and pulley.
Cunningham
Fix the upper triple block to the lowest gooseneck thimble using the supplied 4 mm shackle.The cunningham line is threaded in the same way as the mainheet system (6:1 purchase). No other system is authorized by the Hobie Cat class rules.
1
2
15
HOBIE CAT 16 Mainsheet system
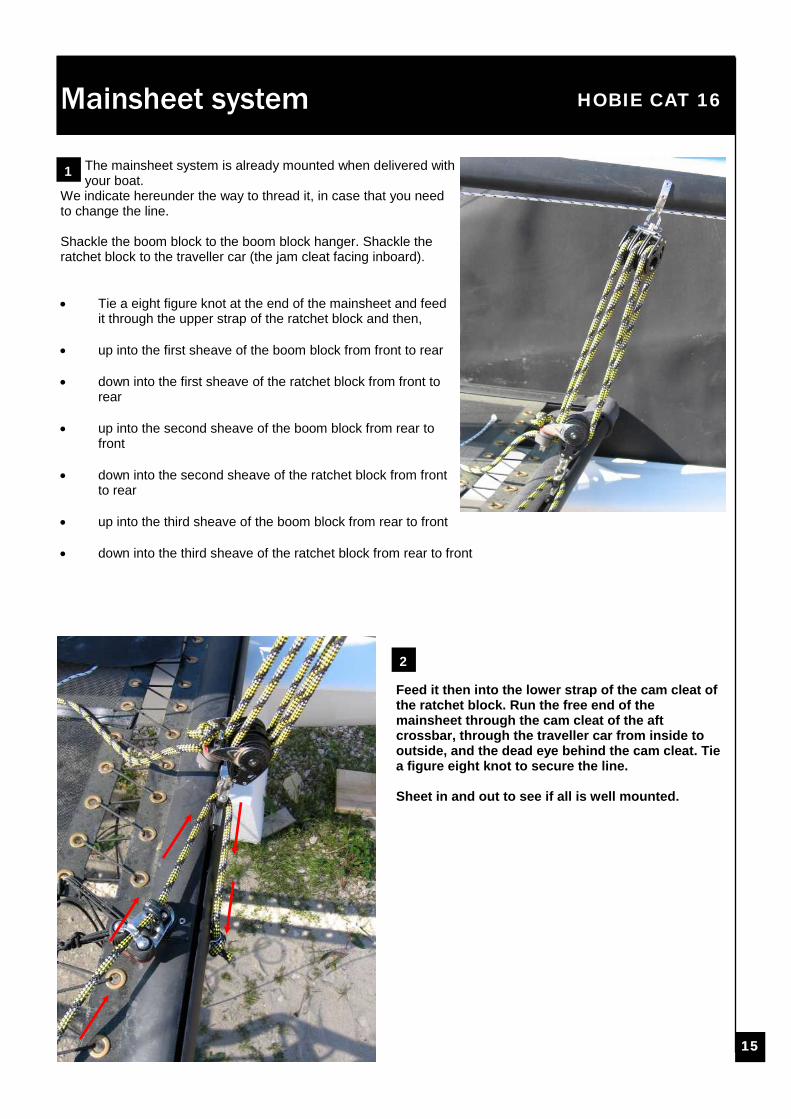
The mainsheet system is already mounted when delivered with your boat.
We indicate hereunder the way to thread it, in case that you need to change the line. Shackle the boom block to the boom block hanger. Shackle the ratchet block to the traveller car (the jam cleat facing inboard). • Tie a eight figure knot at the end of the mainsheet and feed
it through the upper strap of the ratchet block and then, • up into the first sheave of the boom block from front to rear • down into the first sheave of the ratchet block from front to
rear
• up into the second sheave of the boom block from rear to front
• down into the second sheave of the ratchet block from front to rear
• up into the third sheave of the boom block from rear to front
• down into the third sheave of the ratchet block from rear to front
Feed it then into the lower strap of the cam cleat of the ratchet block. Run the free end of the mainsheet through the cam cleat of the aft crossbar, through the traveller car from inside to outside, and the dead eye behind the cam cleat. Tie a figure eight knot to secure the line. Sheet in and out to see if all is well mounted.
1
2
16
HOBIE CAT 16
Lead the jib sheet to one of the clew blocks and back through the second hole of the Trentec traveller car, then back to the jib block on the front crossbar, leading it first through the sheaves and then under the strap of the cam cleat. Repeat the operation on the opposite side in a reverse manner : feed the jib sheet under the strap of the opposite jib block on the front crossbar, then between the sheaves, then through the 2nd hole of the Trentec traveller car (the one towards the inside) from outside to inside, and then back to the first hole of the traveller from inside to outside. Secure the end of the line with a knot. NB : to lead the jib sheet from one jib block to the other, be careful to stay inside of the boat. Never lead the rope behind the mast.
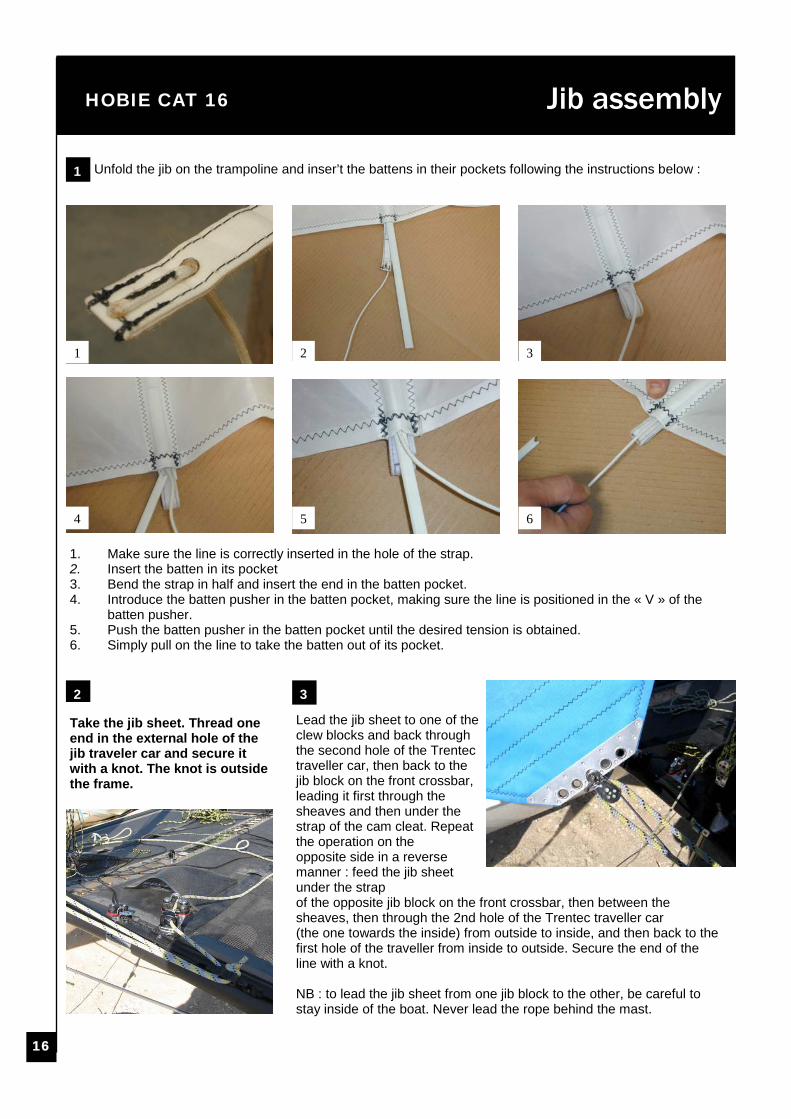
Jib assembly
Unfold the jib on the trampoline and inser’t the battens in their pockets following the instructions below :
1
1 2 3
4 5 6
1. Make sure the line is correctly inserted in the hole of the strap. 2. Insert the batten in its pocket 3. Bend the strap in half and insert the end in the batten pocket. 4. Introduce the batten pusher in the batten pocket, making sure the line is positioned in the « V » of the
batten pusher. 5. Push the batten pusher in the batten pocket until the desired tension is obtained. 6. Simply pull on the line to take the batten out of its pocket.
Take the jib sheet. Thread one end in the external hole of the jib traveler car and secure it with a knot. The knot is outside the frame.
2 3
17
HOBIE CAT 16 Jib Assembly
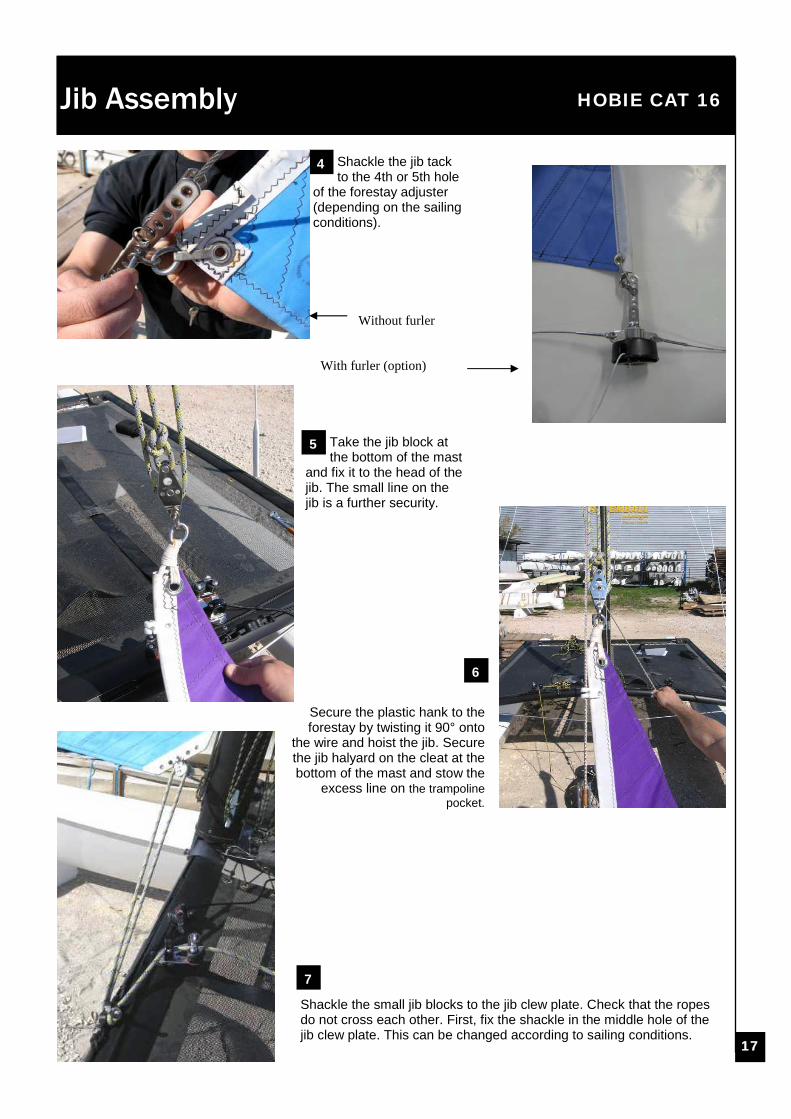
Shackle the jib tack to the 4th or 5th hole
of the forestay adjuster (depending on the sailing conditions).
4
Take the jib block at the bottom of the mast
and fix it to the head of the jib. The small line on the jib is a further security.
Secure the plastic hank to the forestay by twisting it 90° onto
the wire and hoist the jib. Secure the jib halyard on the cleat at the bottom of the mast and stow the
excess line on the trampoline pocket.
5
6
Shackle the small jib blocks to the jib clew plate. Check that the ropes do not cross each other. First, fix the shackle in the middle hole of the jib clew plate. This can be changed according to sailing conditions.
7
Without furler
With furler (option)

18
HOBIE CAT 16
The Jib halyard adjustment system is installed as serial equipment on the Hobie Cat 16 Race. Just thread the jib halyard rope as indicated on the picture and stop it into the white cleat.
Race jib halyard / Righting line
RIGHTING LINE
Attach the righting line to one of the front pylon with a figure eight knot. Tie the other end to the opposite pylon. The line should be lead under the trampoline through the center lacing.
2
1
19
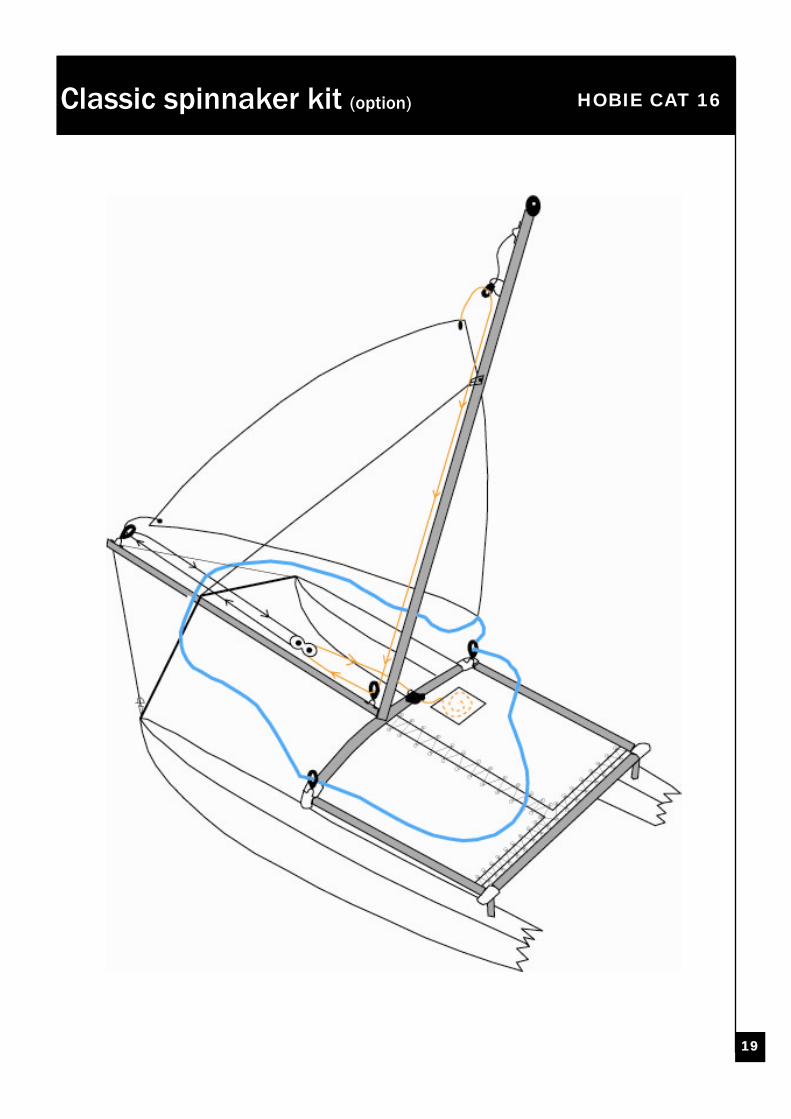
HOBIE CAT 16 Classic spinnaker kit (option)
20
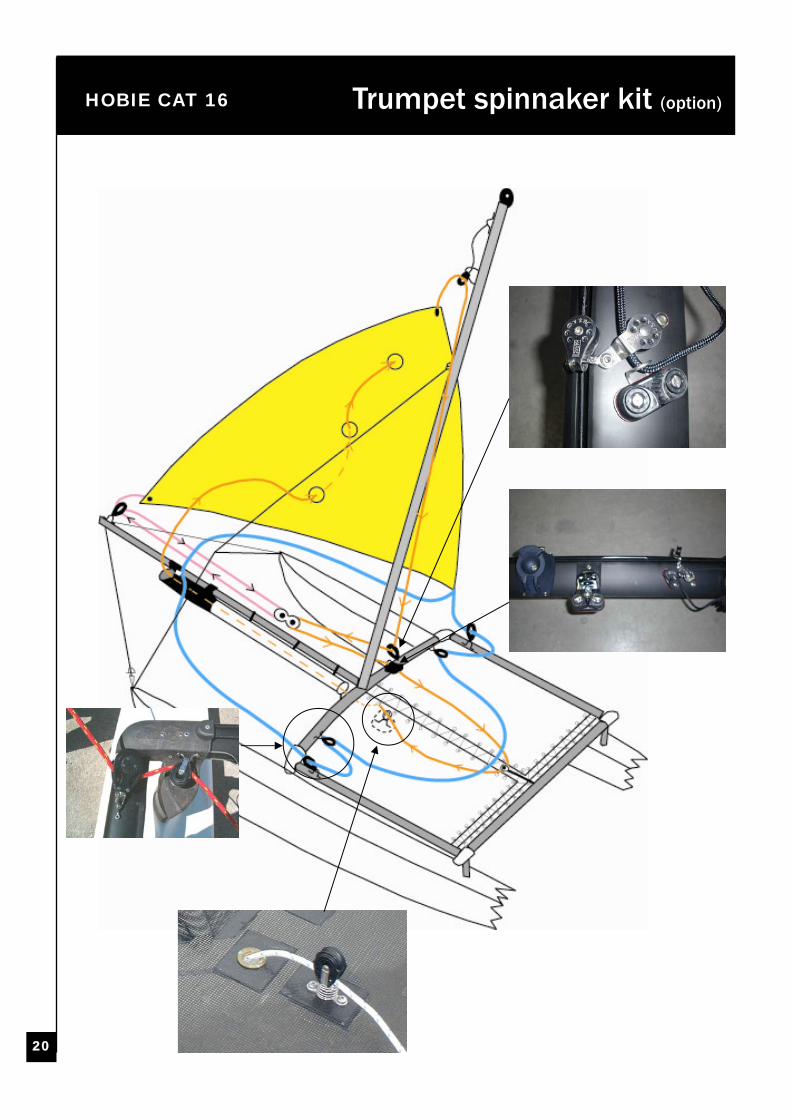
HOBIE CAT 16 Trumpet spinnaker kit (option)
21
HOBIE CAT 16 Maintenance & advices
Maintenance & repairs
- Always wash the hulls and the sails with fresh water after sailing in salt water. - Take off the plugs to drain the water from the hulls. - In order to avoid expensive repairs, it is recommended to check wear of hull bottoms as follows : as soon as the first woven glass cloth appears, you should apply gelcoat or resin to protect the glassfiber. If the wear is already so advanced that several layers of glass fiber have been worn through or the colored wear indicator is showing, stop using them and rebuild the bottom with glassfiber and resin.
CAREFULLY READ AND OBSERVE THE SAFETY ADVICES MENTIONED
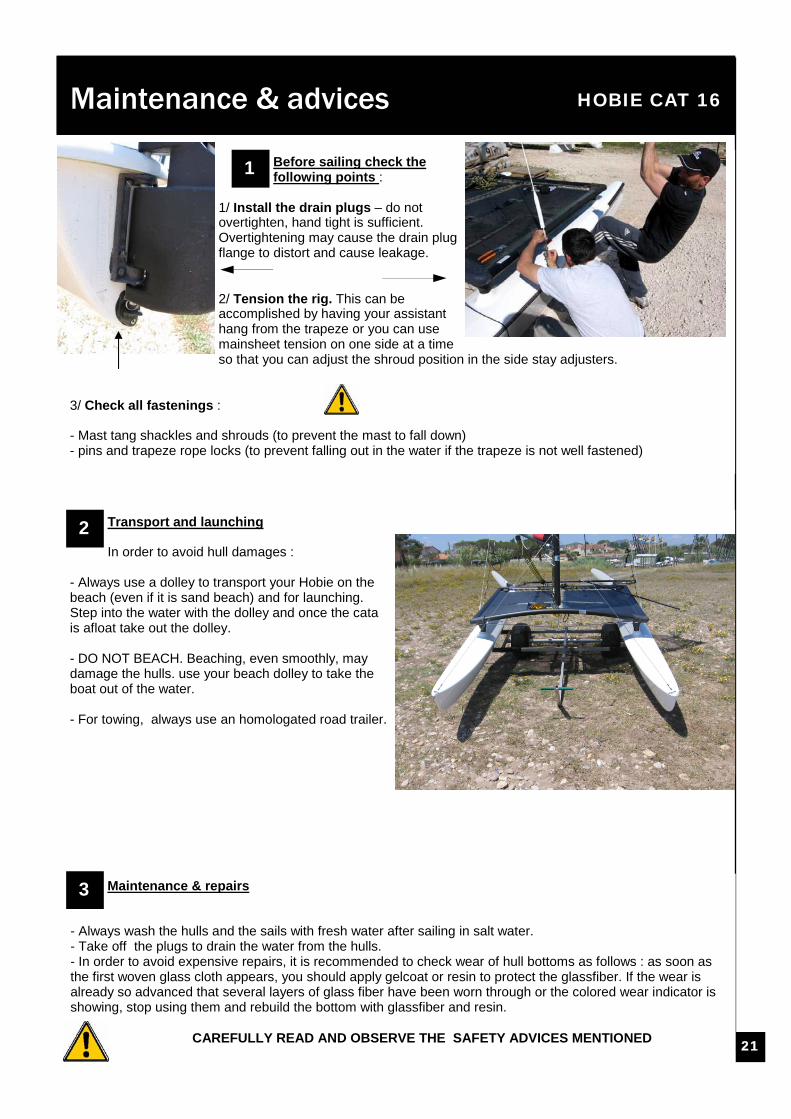
Transport and launching In order to avoid hull damages :
- Always use a dolley to transport your Hobie on the beach (even if it is sand beach) and for launching. Step into the water with the dolley and once the cata is afloat take out the dolley. - DO NOT BEACH. Beaching, even smoothly, may damage the hulls. use your beach dolley to take the boat out of the water. - For towing, always use an homologated road trailer.
3
2
Before sailing check the following points :
1/ Install the drain plugs – do not overtighten, hand tight is sufficient. Overtightening may cause the drain plug flange to distort and cause leakage. 2/ Tension the rig. This can be accomplished by having your assistant hang from the trapeze or you can use mainsheet tension on one side at a time so that you can adjust the shroud position in the side stay adjusters.
3/ Check all fastenings : - Mast tang shackles and shrouds (to prevent the mast to fall down) - pins and trapeze rope locks (to prevent falling out in the water if the trapeze is not well fastened)
1
22
HOBIE CAT 16
TO READ CAREFULLY BEFORE SAILING
♦ Whether on land or on the water, watch for overhead power lines. Contact with power lines can cause serious injury or death.
♦ DO NOT sail while under the influence of alcohol and/or drugs
♦ Only sail in conditions in which you feel comfortable and where you feel confident that you can safely sail the boat. Never go out in conditions beyond your ability.
♦ Everyone on board should wear a life jacket at all times.
♦ If you are in the water, remain in contact with the boat, even if it is capsized. A sailboat can drift away faster than a person can swim.
♦ Never sail without a righting line.
♦ Wear appropriate clothes. Wear a wet suit or dry suit in cold weather or cold water conditions.
♦ Learn the right of way rules and when in doubt, give way to others.
♦ When not sailing, always keep the boat pointed into the wind whether in the water or on the beach.
♦ Read the instruction manual carefully.
♦ Make sure everyone on the boat reads and understnads these safety instructions.
♦ ALWAYS check that the drain plugs are screwed in before launching your catamaran. Remove the plugs after sailing to drain any water that may have leaked into the hulls. Store the boat with the plugs removed to allow for pressure changes due to heating, cooling and altitude changes. This will prevent warping of the hull surface.
Safety
Have fun with your Hobie and fair winds !