Embed Size (px)
DESCRIPTION
Homemade Leg Press Machine
Citation preview

http://www.instructables.com/id/Homemade-Leg-Press-Machine/
Food Living Outside Play Technology Workshop
Homemade Leg Press Machineby Isshinryu on August 22, 2012
Table of Contents
Homemade Leg Press Machine . . . . . . . . . . . . . . . . . . . . . . . . . . . . . . . . . . . . . . . . . . . . . . . . . . . . . . . . . . . . . . . . . . . . . . . . . . . . . . . . . . . . . . . . . . . . . . . . . . . 1
Intro: Homemade Leg Press Machine . . . . . . . . . . . . . . . . . . . . . . . . . . . . . . . . . . . . . . . . . . . . . . . . . . . . . . . . . . . . . . . . . . . . . . . . . . . . . . . . . . . . . . . . . . . 2
File Downloads . . . . . . . . . . . . . . . . . . . . . . . . . . . . . . . . . . . . . . . . . . . . . . . . . . . . . . . . . . . . . . . . . . . . . . . . . . . . . . . . . . . . . . . . . . . . . . . . . . . . . . . . . . . 2
Step 1: Parts / tools List . . . . . . . . . . . . . . . . . . . . . . . . . . . . . . . . . . . . . . . . . . . . . . . . . . . . . . . . . . . . . . . . . . . . . . . . . . . . . . . . . . . . . . . . . . . . . . . . . . . . . . 2
Step 2: Painting . . . . . . . . . . . . . . . . . . . . . . . . . . . . . . . . . . . . . . . . . . . . . . . . . . . . . . . . . . . . . . . . . . . . . . . . . . . . . . . . . . . . . . . . . . . . . . . . . . . . . . . . . . . . 3
Step 3: Lower weight support . . . . . . . . . . . . . . . . . . . . . . . . . . . . . . . . . . . . . . . . . . . . . . . . . . . . . . . . . . . . . . . . . . . . . . . . . . . . . . . . . . . . . . . . . . . . . . . . . 4
Step 4: Upper weight support . . . . . . . . . . . . . . . . . . . . . . . . . . . . . . . . . . . . . . . . . . . . . . . . . . . . . . . . . . . . . . . . . . . . . . . . . . . . . . . . . . . . . . . . . . . . . . . . . 5
Step 5: Installing 2nd yellow board . . . . . . . . . . . . . . . . . . . . . . . . . . . . . . . . . . . . . . . . . . . . . . . . . . . . . . . . . . . . . . . . . . . . . . . . . . . . . . . . . . . . . . . . . . . . . . 5
Step 6: Drill peg holes . . . . . . . . . . . . . . . . . . . . . . . . . . . . . . . . . . . . . . . . . . . . . . . . . . . . . . . . . . . . . . . . . . . . . . . . . . . . . . . . . . . . . . . . . . . . . . . . . . . . . . . 6
Step 7: Add shoulder supports . . . . . . . . . . . . . . . . . . . . . . . . . . . . . . . . . . . . . . . . . . . . . . . . . . . . . . . . . . . . . . . . . . . . . . . . . . . . . . . . . . . . . . . . . . . . . . . . . 7
Step 8: Add wheels . . . . . . . . . . . . . . . . . . . . . . . . . . . . . . . . . . . . . . . . . . . . . . . . . . . . . . . . . . . . . . . . . . . . . . . . . . . . . . . . . . . . . . . . . . . . . . . . . . . . . . . . . 8
Step 9: Finishing touches . . . . . . . . . . . . . . . . . . . . . . . . . . . . . . . . . . . . . . . . . . . . . . . . . . . . . . . . . . . . . . . . . . . . . . . . . . . . . . . . . . . . . . . . . . . . . . . . . . . . 9
Step 10: How to use . . . . . . . . . . . . . . . . . . . . . . . . . . . . . . . . . . . . . . . . . . . . . . . . . . . . . . . . . . . . . . . . . . . . . . . . . . . . . . . . . . . . . . . . . . . . . . . . . . . . . . . . 10
Related Instructables . . . . . . . . . . . . . . . . . . . . . . . . . . . . . . . . . . . . . . . . . . . . . . . . . . . . . . . . . . . . . . . . . . . . . . . . . . . . . . . . . . . . . . . . . . . . . . . . . . . . . . . . 11
Advertisements . . . . . . . . . . . . . . . . . . . . . . . . . . . . . . . . . . . . . . . . . . . . . . . . . . . . . . . . . . . . . . . . . . . . . . . . . . . . . . . . . . . . . . . . . . . . . . . . . . . . . . . . . . . . . . . 11
Comments . . . . . . . . . . . . . . . . . . . . . . . . . . . . . . . . . . . . . . . . . . . . . . . . . . . . . . . . . . . . . . . . . . . . . . . . . . . . . . . . . . . . . . . . . . . . . . . . . . . . . . . . . . . . . . . . 11
http://www.instructables.com/id/Homemade-Leg-Press-Machine/
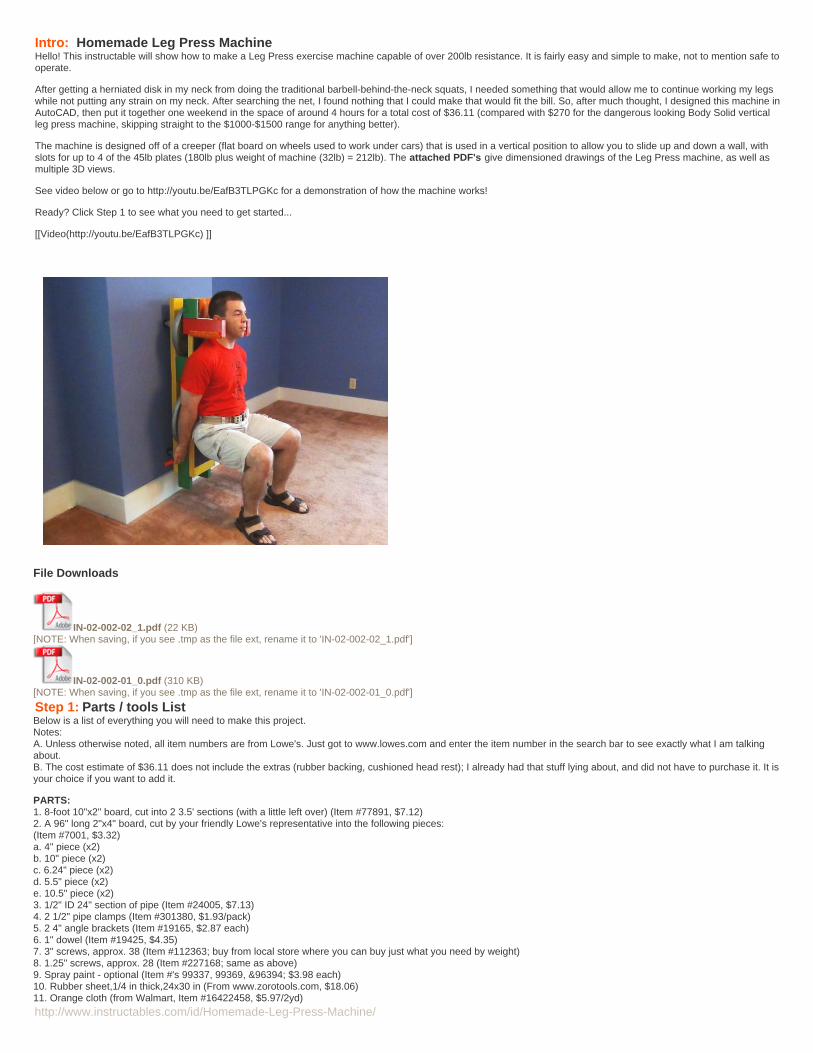
Intro: Homemade Leg Press MachineHello! This instructable will show how to make a Leg Press exercise machine capable of over 200lb resistance. It is fairly easy and simple to make, not to mention safe tooperate.
After getting a herniated disk in my neck from doing the traditional barbell-behind-the-neck squats, I needed something that would allow me to continue working my legswhile not putting any strain on my neck. After searching the net, I found nothing that I could make that would fit the bill. So, after much thought, I designed this machine inAutoCAD, then put it together one weekend in the space of around 4 hours for a total cost of $36.11 (compared with $270 for the dangerous looking Body Solid verticalleg press machine, skipping straight to the $1000-$1500 range for anything better).
The machine is designed off of a creeper (flat board on wheels used to work under cars) that is used in a vertical position to allow you to slide up and down a wall, withslots for up to 4 of the 45lb plates (180lb plus weight of machine (32lb) = 212lb). The attached PDF's give dimensioned drawings of the Leg Press machine, as well asmultiple 3D views.
See video below or go to http://youtu.be/EafB3TLPGKc for a demonstration of how the machine works!
Ready? Click Step 1 to see what you need to get started...
[[Video(http://youtu.be/EafB3TLPGKc) ]]
File Downloads
IN-02-002-02_1.pdf (22 KB)[NOTE: When saving, if you see .tmp as the file ext, rename it to 'IN-02-002-02_1.pdf']
IN-02-002-01_0.pdf (310 KB)[NOTE: When saving, if you see .tmp as the file ext, rename it to 'IN-02-002-01_0.pdf']
Step 1: Parts / tools ListBelow is a list of everything you will need to make this project.Notes:A. Unless otherwise noted, all item numbers are from Lowe's. Just got to www.lowes.com and enter the item number in the search bar to see exactly what I am talkingabout.B. The cost estimate of $36.11 does not include the extras (rubber backing, cushioned head rest); I already had that stuff lying about, and did not have to purchase it. It isyour choice if you want to add it.
PARTS:1. 8-foot 10"x2" board, cut into 2 3.5' sections (with a little left over) (Item #77891, $7.12)2. A 96" long 2"x4" board, cut by your friendly Lowe's representative into the following pieces:(Item #7001, $3.32)a. 4" piece (x2)b. 10" piece (x2)c. 6.24" piece (x2)d. 5.5" piece (x2)e. 10.5" piece (x2)3. 1/2" ID 24" section of pipe (Item #24005, $7.13)4. 2 1/2" pipe clamps (Item #301380, $1.93/pack)5. 2 4" angle brackets (Item #19165, $2.87 each)6. 1" dowel (Item #19425, $4.35)7. 3" screws, approx. 38 (Item #112363; buy from local store where you can buy just what you need by weight)8. 1.25" screws, approx. 28 (Item #227168; same as above)9. Spray paint - optional (Item #'s 99337, 99369, &96394; $3.98 each)10. Rubber sheet,1/4 in thick,24x30 in (From www.zorotools.com, $18.06)11. Orange cloth (from Walmart, Item #16422458, $5.97/2yd)

http://www.instructables.com/id/Homemade-Leg-Press-Machine/
12. Foam padding (from Walmart, Item #19397511, $6.97)Note: I used a different padding because I already had it, but this will work fine.
TOOLS:1. Drill2. Staple gun3. Measuring tape4. Scissors5. 12" drill bit extension6. Various drill bits, including a 1-1/8" spade bit7. Gorilla Glue8. Utility knife
SAFETY:While building this Leg Press machine, you will be using several things that could be potentially dangerous. For chemicals (spray paint, Gorilla glue), make sure to onlyuse them where there is plenty of ventilation and no open flames around. For the tools (drill, staple gun, utility knife), make sure you have read the owners manual foryour specific tool and know how to use it, and wear the appropriate protective clothing (safety glasses, gloves). For safety in using the finished machine, see the last step.
Image Notes1. The rubberized padding and cushioned rests are extras that add a bit to the trouble and expense, but make the machine more comfy to use - decide now if youwant to mess with them.
Step 2: PaintingThis step is optional. When I designed this project in CAD (see photos in following steps) I made the different parts different colors for clarity. When I got finished, I likedthe way it looked, and decided to just spray-paint the real thing to match. Find a good place outside and spray the 2 large boards yellow, then everything else green(except for the two 10" boards, which are red).For an added touch, I stuck a bunch of the screws lightly into the ground and sprayed the heads red, to give the finished product a professional touch.
Image Notes1. Post spray painting
Image Notes1. Pre- spray painting

http://www.instructables.com/id/Homemade-Leg-Press-Machine/
Image Notes1. The next batch of screws ready to be painted red
Step 3: Lower weight supportThis step will attach the legs/support for the lower weights to the "front" yellow board.
NOTE: For this entire project, I always drill pilot holes for every screw I use. It helps keep the wood from splitting, and helps the screws go in straight. I know this adds alot of time to the project, but do not skip doing it! It makes a big difference.
1. Take the 2 10.5" wooden pieces and line them up 7" from the bottom of one of the yellow boards. Go ahead and stick one of the 6.25" boards between them, so you donot make them too close together.
2. Drill your pilot holes, then screw the 2 10.5" pieces into place (see photos) using the 3" screws. It helps to have one of the green pieces of wood propping up the otherend of the yellow board so it is level.
3. Now make sure your 6.25" piece is 3" in from the bottom, and screw it in in the same way with 3" screws. This is your base.
4. Now drill a 3/4" in hole in each side (see photos). Measure it so that bottom of the hole is level with the 6.25" piece, and make it as far towards the yellow board as yourpipe clamps will allow.
5. Slide your 24" piece of pipe through the holes, and clamp it down to the 6.25" piece of wood (see photos) using the 1.25" screws.
Image Notes1. This is the part that will be added this step
http://www.instructables.com/id/Homemade-Leg-Press-Machine/
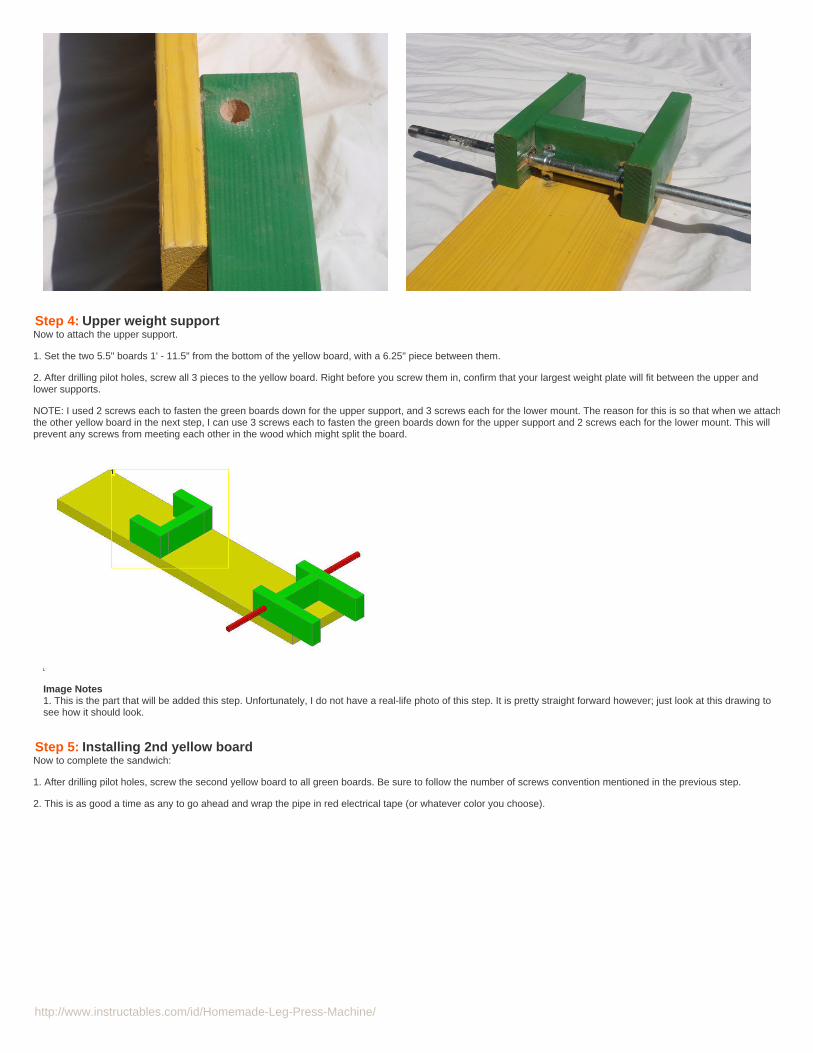
Step 4: Upper weight supportNow to attach the upper support.
1. Set the two 5.5" boards 1' - 11.5" from the bottom of the yellow board, with a 6.25" piece between them.
2. After drilling pilot holes, screw all 3 pieces to the yellow board. Right before you screw them in, confirm that your largest weight plate will fit between the upper andlower supports.
NOTE: I used 2 screws each to fasten the green boards down for the upper support, and 3 screws each for the lower mount. The reason for this is so that when we attachthe other yellow board in the next step, I can use 3 screws each to fasten the green boards down for the upper support and 2 screws each for the lower mount. This willprevent any screws from meeting each other in the wood which might split the board.
Image Notes1. This is the part that will be added this step. Unfortunately, I do not have a real-life photo of this step. It is pretty straight forward however; just look at this drawing tosee how it should look.
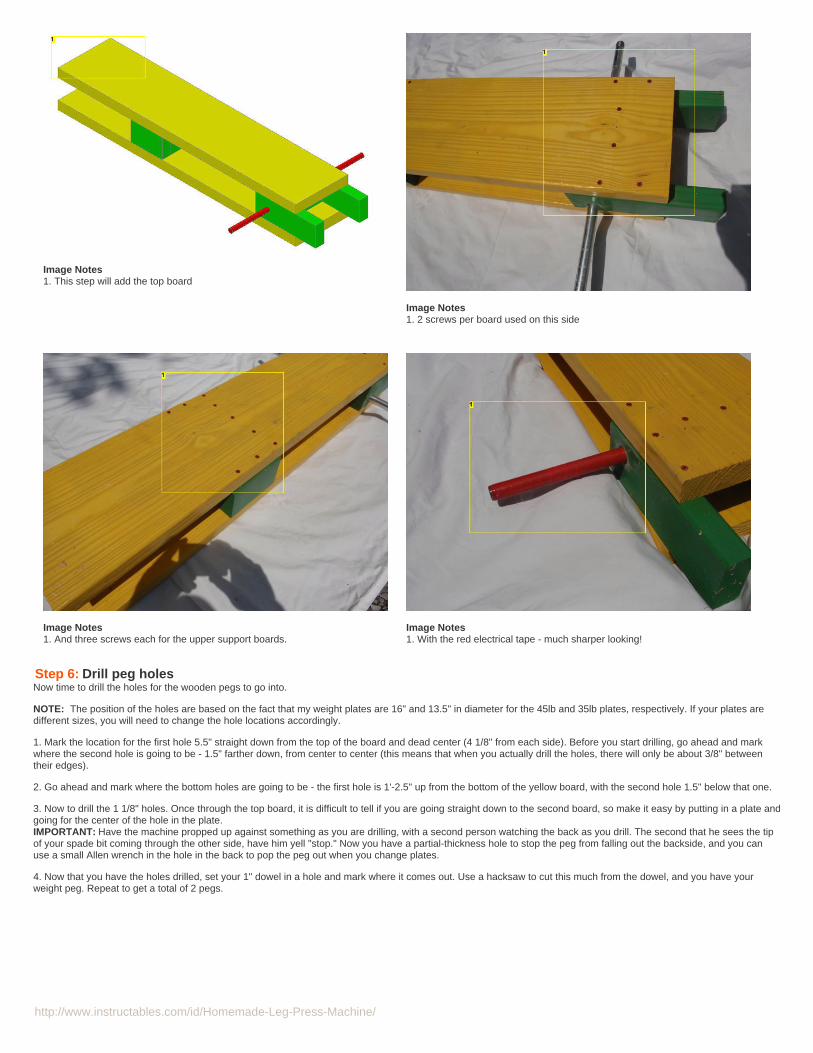
Step 5: Installing 2nd yellow boardNow to complete the sandwich:
1. After drilling pilot holes, screw the second yellow board to all green boards. Be sure to follow the number of screws convention mentioned in the previous step.
2. This is as good a time as any to go ahead and wrap the pipe in red electrical tape (or whatever color you choose).
http://www.instructables.com/id/Homemade-Leg-Press-Machine/
Image Notes1. This step will add the top board
Image Notes1. 2 screws per board used on this side
Image Notes1. And three screws each for the upper support boards.
Image Notes1. With the red electrical tape - much sharper looking!
Step 6: Drill peg holesNow time to drill the holes for the wooden pegs to go into.
NOTE: The position of the holes are based on the fact that my weight plates are 16" and 13.5" in diameter for the 45lb and 35lb plates, respectively. If your plates aredifferent sizes, you will need to change the hole locations accordingly.
1. Mark the location for the first hole 5.5" straight down from the top of the board and dead center (4 1/8" from each side). Before you start drilling, go ahead and markwhere the second hole is going to be - 1.5" farther down, from center to center (this means that when you actually drill the holes, there will only be about 3/8" betweentheir edges).
2. Go ahead and mark where the bottom holes are going to be - the first hole is 1'-2.5" up from the bottom of the yellow board, with the second hole 1.5" below that one.
3. Now to drill the 1 1/8" holes. Once through the top board, it is difficult to tell if you are going straight down to the second board, so make it easy by putting in a plate andgoing for the center of the hole in the plate.IMPORTANT: Have the machine propped up against something as you are drilling, with a second person watching the back as you drill. The second that he sees the tipof your spade bit coming through the other side, have him yell "stop." Now you have a partial-thickness hole to stop the peg from falling out the backside, and you canuse a small Allen wrench in the hole in the back to pop the peg out when you change plates.
4. Now that you have the holes drilled, set your 1" dowel in a hole and mark where it comes out. Use a hacksaw to cut this much from the dowel, and you have yourweight peg. Repeat to get a total of 2 pegs.

http://www.instructables.com/id/Homemade-Leg-Press-Machine/
Image Notes1. These holes are added in this step2. These holes are added in this step
Image Notes1. Marking the dowel to cut the pegs.
Step 7: Add shoulder supportsNow to add the shoulder supports. Reminder - this was dimensioned for me (I am 5'8"), so you may need them slightly lower or higher depending.
1. Get the 2 4" green boards and the 2 10" red boards. Fasten them together with the angle brackets using the short screws as shown in the photo above (remember yourpilot holes!)
2. Fasten them to the sides of the machine with 2 of the 3" screws per board.
Image Notes1. This is what is added in this step

http://www.instructables.com/id/Homemade-Leg-Press-Machine/
Step 8: Add wheelsThis step is very straight forward - screw on the wheels as shown using the short screws, making sure to drill pilot holes first. (are you tired of hearing me say that yet?)
You are now technically finished!!! The leg press machine will now work to give you a massive workout. However, why stop now? Just a few more touches in the nextstep will give it a much more professional look, and make it more comfortable to use.
Image Notes1. The wheels are added in this step2. The wheels are added in this step
Image Notes1. The 2 pinholes from drilling the peg holes.2. I ended up not putting the wheels right up against the edge as shown in thedrawing. No specific reason, just instinctively seemed like they would do betterthere.

http://www.instructables.com/id/Homemade-Leg-Press-Machine/
Step 9: Finishing touchesIn this step we will add some rubber padding and cushions to make it much more comfortable to use.
Rubberized Matting:1. Cut a piece of matting to fit your machine, from the bottom of the yellow board up to justunder the top holes, and just a quarter inch from the sides.2. Using a staple gun set on high, staple all around the matting. What I did was first staplethe corners, then stapled in the middle of each side, and then stapled in the middlebetween the corner and middle staple. By cutting the distance in half each time insteadof just going from one corner all the way to the other, I kept all the staples evenly spaced andnice looking. See photo above for what I mean.3. Using a razor, cut out the mat at the two bottom holes, then slip some Gorilla Glue underthe edges to keep it secure.
Head & Shoulder Pads:1. Cut 2 matching pieces of foam each to fit the area that you are padding.2. Cut a piece of cloth 1.5" larger on all sides than the pieces of foam.3. Fold the cloth around the foam nice and snug.4. Hold the entire package against the board, and just staple through the entire thing all theway around. That's it! No sewing whatsoever!
Image Notes1. 1st staple2. 2nd staple3. 3rd staple4. 4th staple5. 5th staple6. 6th staple, and so on.

http://www.instructables.com/id/Homemade-Leg-Press-Machine/
Image Notes1. Foam cut to size
Image Notes1. Head pad2. Shoulder pads
Image Notes1. The two lower holes trimmed out and ready to be glued.
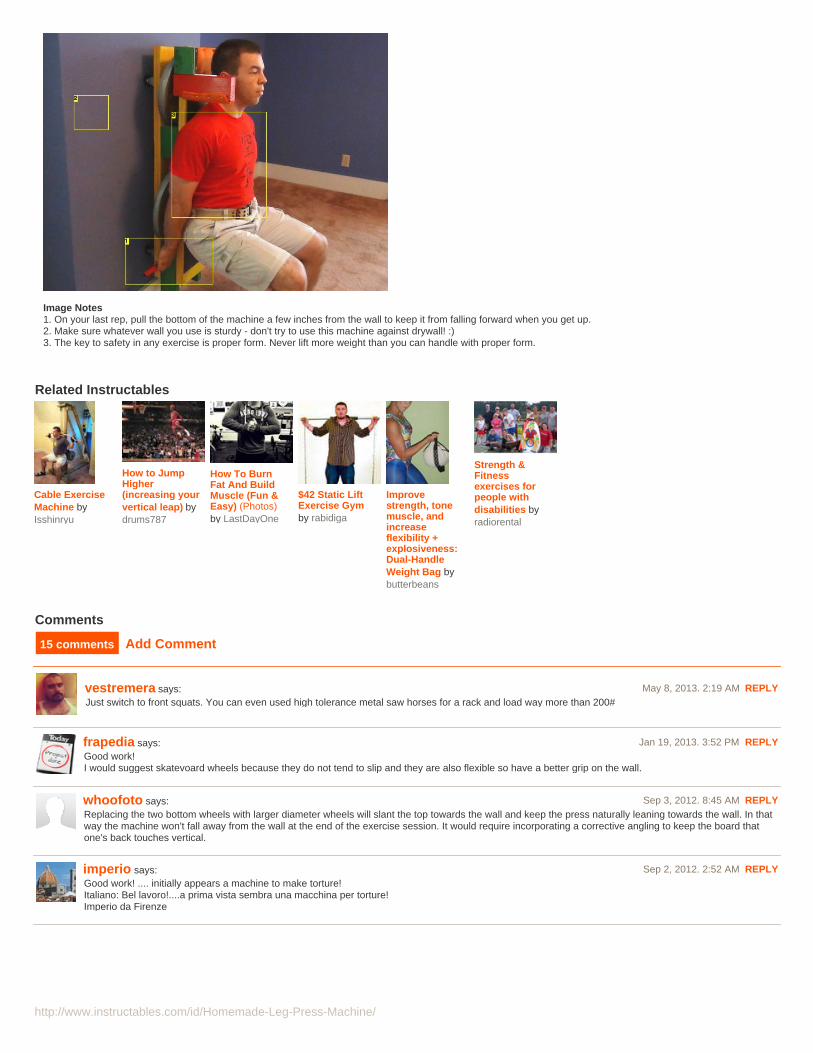
Step 10: How to useIt is easiest to watch the video in the first step on how to use the machine. But if you prefer, below are the steps written out.
Slide the weight plates of your choice either into the top or into the side of the leg press machine. Insert the wooden peg into the appropriate holes to secure the plates.
You have the option of either using the handles or the shoulder rests. With the machine leaning up against a sturdy wall, squat down and place your back against it.Grabbing the handles, and with your feet a fair ways from the wall, push up and gently bring the lower wheels in contact with the wall. Now you can bring your feet incloser for a more intense workout.
Once you have completed your reps, take hold of the bottom of the machine and pull it out from the wall as you go down on the last rep. This will keep the machine fromfalling forward after you get up. Use a small allen wrench in the holes in the back to knock out the wooden pegs to change weights for the next set.
SAFETY:There are two keys to safety in using this machine:1. Keep perfect form. Never put on so much weight that you cannot keep perfect posture. This will keep you from losing control of the machine, and also protect yourbody and joints over time.2. Keep the machine in good repair. If something is broken or worn out, replace it. You want to replace something way before it ever gives out while you are using it, andpotentially cause you to lose control of the machine.
I hope you have enjoyed this Instructable - even more, I hope you get a chance to build the Leg Press machine and see for yourself how easy it is!Regards -
http://www.instructables.com/id/Homemade-Leg-Press-Machine/
Image Notes1. On your last rep, pull the bottom of the machine a few inches from the wall to keep it from falling forward when you get up.2. Make sure whatever wall you use is sturdy - don't try to use this machine against drywall! :)3. The key to safety in any exercise is proper form. Never lift more weight than you can handle with proper form.
Related Instructables
Cable ExerciseMachine byIsshinryu
How to JumpHigher(increasing yourvertical leap) bydrums787
How To BurnFat And BuildMuscle (Fun &Easy) (Photos)by LastDayOne
$42 Static LiftExercise Gymby rabidiga
Improvestrength, tonemuscle, andincreaseflexibility +explosiveness:Dual-HandleWeight Bag bybutterbeans
Strength &Fitnessexercises forpeople withdisabilities byradiorental
Advertisements
Comments
15 comments Add Comment
vestremera says: May 8, 2013. 2:19 AM REPLYJust switch to front squats. You can even used high tolerance metal saw horses for a rack and load way more than 200#
frapedia says: Jan 19, 2013. 3:52 PM REPLYGood work!I would suggest skatevoard wheels because they do not tend to slip and they are also flexible so have a better grip on the wall.
whoofoto says: Sep 3, 2012. 8:45 AM REPLYReplacing the two bottom wheels with larger diameter wheels will slant the top towards the wall and keep the press naturally leaning towards the wall. In thatway the machine won't fall away from the wall at the end of the exercise session. It would require incorporating a corrective angling to keep the board thatone's back touches vertical.
imperio says: Sep 2, 2012. 2:52 AM REPLYGood work! .... initially appears a machine to make torture!Italiano: Bel lavoro!....a prima vista sembra una macchina per torture!Imperio da Firenze

http://www.instructables.com/id/Homemade-Leg-Press-Machine/
Norsefalconer says: Aug 31, 2012. 10:01 AM REPLYYeah, I'm sure there many ways to make this a little better, but the idea must come first to even have something to improve (take cars, for example). This isa great idea and an awesome Instructable. Did anyone notice how the real build components are color coded to match the CAD drawings? That's the type ofthinking and detail that everyone should use when posting to this site. Great Work! Ok, here are my suggestions for the improvements list: 1. Yes, putsomething on the wall, maybe with some tracks for the casters to follow or maybe the wall part has the casters? Or possibly use extended length, heavy dutydrawer slides and build the whole thing as a one unit? 2. Extend (or make adjustable) the bottom "legs" to position the device at the correct height to start theexercise. In any case, this a wonderful solution. Hats off to you for not just giving up on lifting after your injury, but instead finding and developing a solution,then sharing it with the rest of us. Thanks.
zacker says: Aug 31, 2012. 5:58 AM REPLYNice job. might i suggest that if you arent against making a hile in your ceiling, or if you are doing this in a basement or garage, if you install a good heavyduty pulley above this machine, in the ceiling joist, you can run a cable from the top of this machine up and around the pulley then back down to the bottomback of the machine so it can stay upright against the wall when not in use.
Rob O says: Aug 26, 2012. 6:39 PM REPLYInteresting. Do the wheels gouge up the walls??
underground carpenter says: Aug 31, 2012. 3:15 AM REPLYThey will. But that's not the biggest concern for me. When drywall fails from being pushed against, it develops cracks running through the gypsum core(which is only covered with 2 thick sheets of paper). Once it has been sufficiently compromised, the wheels will just punch straight through the wall. Nowthe drywall has to be replaced or at least majorly patched up.
Simple solution - attach a piece of 1/2" plywood or MDF to the wall wide enough to span at least 2 of the studs - 3 is better and would give you a surfaceabout 34" wide so you don't have to worry about running off the surface. It can be painted to blend into the wall better. It could be held in place with aslittle as 6-8 drywall screws (2" - 2-1/2" long). And if you are renting, when you move out you'll just have 6-8 screw holes to patch rather than the fixing thewhole wall.
Big J says: Aug 30, 2012. 2:14 PM REPLYI'm glad he isn't renting from me. That wall will need repairs in no time at all.
viperguy says: Aug 30, 2012. 9:24 AM REPLYI would also be concerned about the walls. Maybe hot wheels plastic track for the little cars could be placed on the walls with two sided tape. This wouldkeep the unit rolling straight and protect the wall from the wheels.
Nice idea....
Makedo says: Aug 30, 2012. 11:34 AM REPLYThe idea is ok. you will need a plywood sheet to push against. the wall will fail. I recommend using wide white rubber rollers to keep from marking up the walland floor. they don't make any wall coverings that would not fail with the pressures your pushing with. If you add legs to the bottom to prevent it from tippingwhen your on the floor. It would prevent it from laying on top of you if you slip or hurt yourself. The idea is sound. I like it.
STCVKR says: Aug 29, 2012. 6:22 AM REPLYAmazing creation, no doubt. It resembles a hacksquat machine in most gyms. You said you got a hernia from regular squats though, it sounds like you needto adjust your form, and maybe invest in a weightlifting belt.
wsecomp says: Aug 30, 2012. 11:05 AM REPLYHe said he got a herniated disk in his neck. Yes, changing his form would help, but I'm not sure the belt would help much (except with his form). Also, itwould depend on what, if any, cushioning was used on the bar.
fotune says: Aug 30, 2012. 9:16 AM REPLYsgooby pls
roubadg says: Aug 30, 2012. 6:46 AM REPLYthis is awesome, love it...