Embed Size (px)
Citation preview

Homopolar Motors!!!
Introduction:
Every day we use motors and batteries to power machines all around us, but what makes them go? In this activity we are going to look at simple motors and try to explain how they work. We are also going to explore the forces that make them move. The purpose of our investigation is to explore magnetic fields, currents, and forces; and how these three events affect one another.
You are going to need:
One HPM bag from the activity supply box and a clear space to work!
Exploration:
1. What items do you have at home that use batteries? Which ones have a motor?2. Have you ever wondered how they work? How do you think this happens?3. What do you think makes a motor go? What materials would you need to build a
motor?4. Can you build a motor with the items in your bag? Take out the items and try to
put them together so that the screw (or metal) will spin. Sketch your ideas on your paper and remember you can only use the materials in the bag!
Class Investigation
We will now look at ways to build a motor with these items, listen for the instructions from your teacher and follow along to build your motor. If your motor will not work, raise your hand for help.
5. Observe the motor as it runs, how does it move? Which direction is it moving?6. If you change part of the motor will it still move? Can you change the direction
that it moves? Form a hypothesis to explain your ideas.7. Test your hypotheses by experimenting with your motor. What were your
results? 8. Think about what you have seen. Could you make the motor move faster or
slower? Can you make it more powerful? Sketch some ideas showing how you would improve the motor.
9. How does our motor work? Write or sketch your conclusion about what makes it “go”.
Closure:
Did this experiment change your idea of what a motor is or how it works? How did your ideas change?
Now that we have our own ideas, we are going to look at how this motor works and what makes it move.
For the Teacher:
STANDARDS:
National Science Education Standards for Physical Sciences Grades 5-8Motions and forces (8BPS2) Transfer of energy (8BPS3)
ESSENTIAL QUESTIONS & BACKGROUND:What are magnetic fields and where are they found?What is the relationship between batteries, current, and electricity?What happens when these things come in contact with one another?
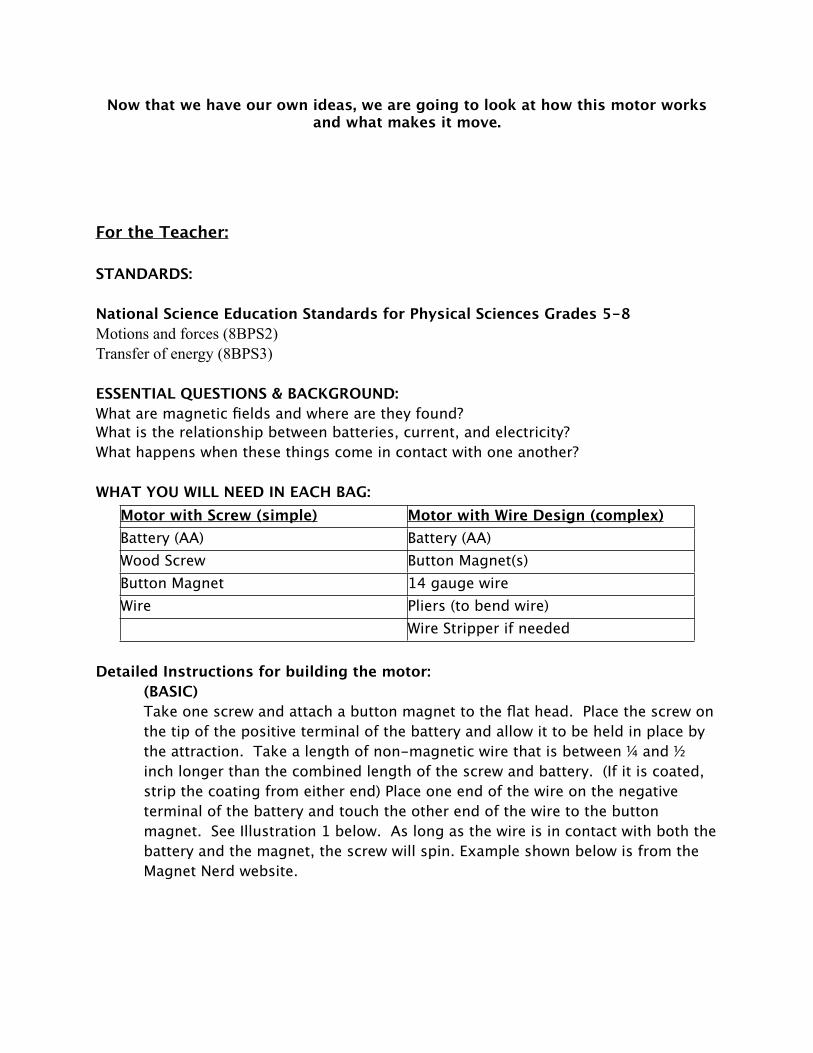
WHAT YOU WILL NEED IN EACH BAG: Motor with Screw (simple) Motor with Wire Design (complex)Battery (AA) Battery (AA)Wood Screw Button Magnet(s)Button Magnet 14 gauge wire Wire Pliers (to bend wire)
Wire Stripper if needed
Detailed Instructions for building the motor:(BASIC)Take one screw and attach a button magnet to the flat head. Place the screw on the tip of the positive terminal of the battery and allow it to be held in place by the attraction. Take a length of non-magnetic wire that is between ¼ and ½ inch longer than the combined length of the screw and battery. (If it is coated, strip the coating from either end) Place one end of the wire on the negative terminal of the battery and touch the other end of the wire to the button magnet. See Illustration 1 below. As long as the wire is in contact with both the battery and the magnet, the screw will spin. Example shown below is from the Magnet Nerd website.

(UPGRADED) *This allows more advanced students to build wire designs to turn with their motor*Take one or more button magnets and place on the negative terminal of the battery. Take the desired length of stripped wire and place a tight V bend in the center. (This is done by folding the wire in half tightly, then bending either side perpendicular to the original fold) This works best if the two sides are symmetrical. The “V” will sit atop the post of the positive battery terminal. The lengths on either side can then be bent to form spirals, hearts, or other shapes. The ends of the wire should be turned toward each other in an arch so that both are in constant contact with opposite sides of the magnet(s). Having a straight segment of wire that is flat for a length before it curves around the magnet produces a greater force for the turns. See Illustration 2 below. The entire wire will spin in these demonstrations and students have more freedom to create their own designs with the wire. Examples shown below were found on the Wohba and Dangerously Fun websites available online.

Class Investigation (Possible Responses)
We will now look at ways to build a motor with these items, listen for the instructions from your teacher and follow along to build your motor. If your motor will not work, raise your hand for help.
10.Observe the motor as it runs, how does it move? Which direction is it moving? The screw should spin in a single direction at a fixed speed when the wire is in contact with the magnet and battery. The direction will be based on how the student has constructed the battery but options will be clockwise or counterclockwise.
11.If you change part of the motor will it still move? Can you change the direction that it moves? Form a hypothesis to explain your ideas. The direction can be changed by reversing the battery, but will not change by reversing the wire or magnets. Student hypotheses will vary.
12.Test your hypotheses by experimenting with your motor. What were your results? Students should either accept their hypothesis as correct or reject it.
13.Think about what you have seen. Could you make the motor move faster or slower? Can you make it more powerful? Sketch some ideas showing how you would improve the motor. Students might come up with ideas about changing the wire length, number of magnets, the size of the battery, the length or type of screw just for a few examples. If time and resources allow, having some extra materials for additional experimentation can lead to new discoveries.
14.How does our motor work? Write or sketch your conclusion about what makes it “go”. Students will give their explanation through discussion or a drawing. This will be compared to the explanation chosen by the teacher that best fits the background level of the class.
Explaining How It Works: This material is broken down and may be adjusted based on audience experience prior to conducting the experiment.
We generally understand that magnets attract metal objects, that they have poles (North & South) and that these poles interact so that opposites attract and like poles

repel one another. It is also important to know that between these poles there is a magnetic field that runs from the North to the South pole in the form of curved lines, as shown on a bar magnet in figure A.
Figure A
The magnets we are using are button magnets. They still have North and South poles which are assigned to the flat surfaces of the magnet with the field still running from North to South. This is shown in figure B.
Figure B
Electrical current is produced by the movement of electrons through an object that is conductive. The flow of electrons in a battery is out of the negative end, into the positive terminal, and back through the battery to the negative in a loop (figure c). When there is no outside connection, the battery does not produce a current because it is an open circuit. When the circuit is closed by plugging the battery into an object such as a flashlight, the electrons are able to flow from the negative terminal, through the object being powered, and back into the positve terminal and through the conductive solution inside the battery over and over in a loop until the electrons are no longer able produce the needed energy.
N
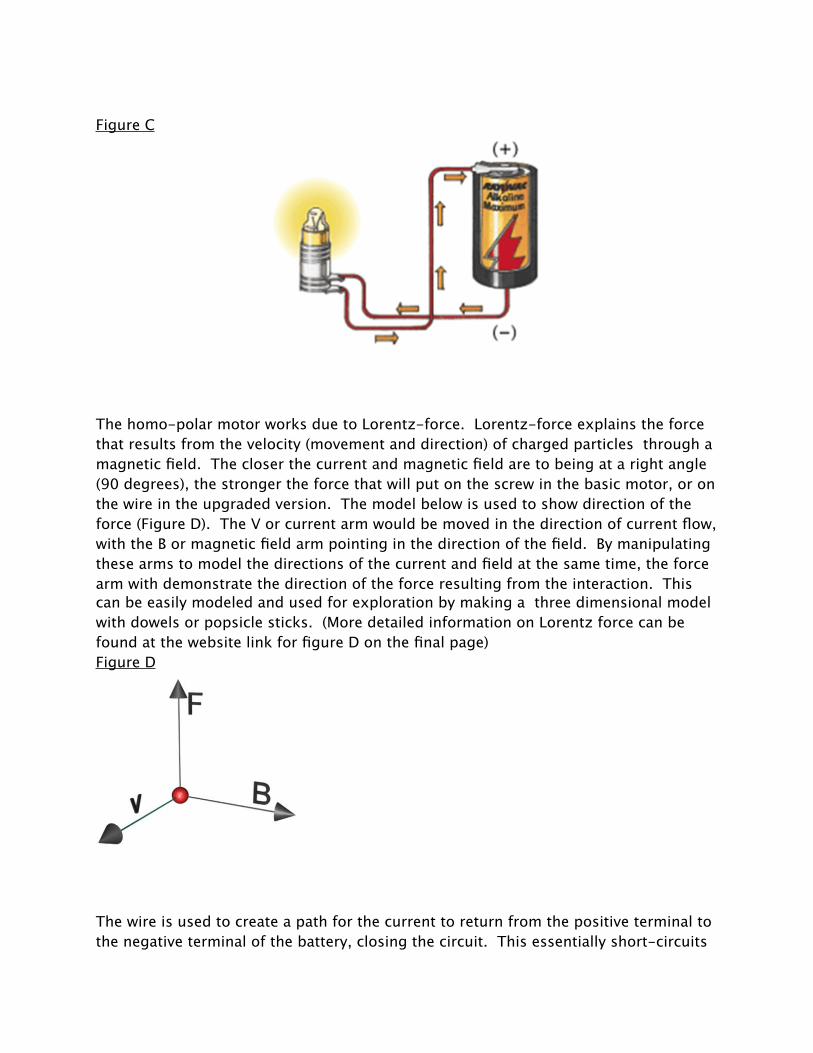
Figure C
The homo-polar motor works due to Lorentz-force. Lorentz-force explains the force that results from the velocity (movement and direction) of charged particles through a magnetic field. The closer the current and magnetic field are to being at a right angle (90 degrees), the stronger the force that will put on the screw in the basic motor, or on the wire in the upgraded version. The model below is used to show direction of the force (Figure D). The V or current arm would be moved in the direction of current flow, with the B or magnetic field arm pointing in the direction of the field. By manipulating these arms to model the directions of the current and field at the same time, the force arm with demonstrate the direction of the force resulting from the interaction. This can be easily modeled and used for exploration by making a three dimensional model with dowels or popsicle sticks. (More detailed information on Lorentz force can be found at the website link for figure D on the final page)Figure D
The wire is used to create a path for the current to return from the positive terminal to the negative terminal of the battery, closing the circuit. This essentially short-circuits

the battery and causes it lose its charge rather quickly (approximately 2 minutes with a mid-quality battery if allowed to run without stopping). The interaction between the magnet’s field and the current from the battery will result in a torque (twisting) force on the magnet that will run either clockwise or counterclockwise depending on the flow of the current. (If you switch the magnets to the positive terminal with the wire bend (or screw) on the negative terminal, it will spin in the opposite direction. This image shows how the force comes off the magnet when the motor is in motion (D) and the locations and direction of the current, field, and forces when the motor is working (E):
Figure D
Figure E
This shows the Lorentz-force relationships.The Blue arrows pointing up through the magnet represent the field direction (B). The purple lines moving down the screw, across the magnet to the wire and then up the wire show the direction of the current (V). The green arrow pointing from the magnet to the rear demonstrates the direction of force (F)that results from the interaction of the current
and field.
A Few Common Misconceptions: The term homo-polar sometimes causes students to think it means “same poles”. What it actually means is that there is no change in polarity in the motor.

Students might look for an interaction between the poles of the magnet and the field. Have them turn the magnets over and test this idea. The motor will work in the same way with no regard to which pole of the magnet is contacting the terminal.
Students might think the direction of the electrical current is going to be changed by the battery. Explain to them that the flow of electrons does not change direction and that the role of the magnet here is not to attract or repel the electrons in the battery but to cause a force to be created around the magnet due to the current crossing through it’s magnetic field lines.
Students might get nervous and think they are going to get shocked. Touching the wire when it is touching the battery and magnet will not shock them, however, over time the battery or wire will get hot from the current.
Further Investigation:There are a multitude of videos and web-pages devoted to the homo-polar motor, different ways to build them, and the concepts behind why they work. Videos are readily available from sources such as Teacher Tube.
CREDITS
Special Acknowledgement is given Dr. Patrick Leclair, Professor of Physics at the University of Alabama, Tuscaloosa.
Special Assistance and mentoring by Dr. Patrick Leclair and Dr. Nouredine Zettili, Professor of Physics at Jacksonville State University, Jacksonville, Alabama.
Homopolar Motor Image Credits:1. Wohba Online- http://wohba.com/blogimages/motor0307.jpg

2. Dangerously Fun Online- http://dangerouslyfun.com/images/photos/homopolarmotor2.jpg.
Image Credits:Figure A- Magnetic Shield Corporation- http://www.magnetic-shield.com/faq/interference.htmlFigure B- Modified version of figure AFigure C- Rayovac Corporation- http://www.rayovac.com/wizard/battery_howwork.htmFigure D- Newton Satellite School Page- http://www.sr.bham.ac.uk/xmm/fmc1.htmlFigure E- Evil Mad Scientist Online- http://www.evilmadscientist.com/article.php/SimpleMHD