Embed Size (px)
Citation preview
Instruction Manual www.JYU.com
Hornet SMB1
Safety FirstWe hope you enjoy flying the Hornet S, but for the safest and most enjoyable experience, please read this manual carefully. You may also watch the video manual on the JYU website by going to visit www.jyu.com or by scanning the QR code below.
※ Instruction※ Quick Start User Manual
Warnings
1. The Hornet S is not a toy and must not be used by anyone 14 years old or younger.2. The propellers operate at high speed and may cause injury.
Attention
Never fly the Hornet S closer than 600 feet (200 meters) to high voltage power lines or cell phone towers as they may interfere with the radio signal and cause the Hornet S to crash.You must not fly the Hornet S in FAA posted No Fly Zones or you will be subject to fines or arrest.Do not fly the Hornet S near crowds of people or high traffic areas. The Hornet S should never be flown near groups of children.The Hornet S should not be flown in very hot or very cold temperatures, snow, rain, high winds or other extreme weather conditions.It is normal for the battery to feel warm when the Hornet S lands. If the battery capacity is less than 30% you should charge the battery before flying again. Do not fly when the battery capacity is less than 30%.
Notices
User ModificationsUnauthorized modifications to the Hornet S are done at your own risk and will void the warranty.Read the ManualRead the user operation manual carefully before attempting to fly the Hornet S. Failure to do so may result in a crash, damage to the vehicle, damage to other property or injury.Battery StorageWhen not in use the Hornet S battery should be kept in a dry, smoke free environment with a temperature of 15-30 degree C.
Warranty and Software Update1. Your Hornet S is warrantied against defects for a period of one year from your initial purchase(details are on the warranty card found in the package). You may also visit the JYU website or contact the distributor for more information. 2、 For more information about software updates or customer service, please visit our website: www.jyu.com.
Always fly the Hornet S in a way that allows it to remain in sight at all times.Always fly the Hornet S in an open field. Tall buildings and areas with many houses or trees will obstruct the GPS signal and make flying difficult.

Part Descriptions
propeller
Battery latchpower on/off
battery pack lock
gimbal(only for aerial
version)
flight LED
camera mount lock
FPV camera(only for FPV version)
motor
charging port
1. Short press to check battery capacity.2. Short press+long press to start operation.
Battery capacity indicator
battery power on/off
25%50%75%
100%
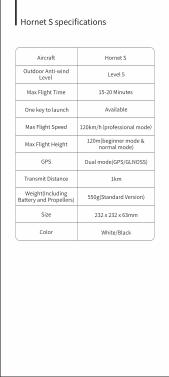
Hornet S specifications
Aircraft
Outdoor Anti-windLevel
Max Flight Time
One key to launch
Max Flight Speed
Max Flight Height
GPS
Transmit Distance
Weight(IncludingBattery and Propellers)
Size
Color
120m(beginner mode & normal mode)
Hornet S
Level 5
15-20 Minutes
Available
Dual mode(GPS/GLNOSS)
120km/h(professional mode)
1km
550g(Standard Version)
232 x 232 x 63mm
White/Black
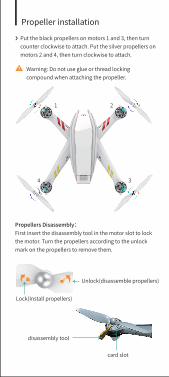
Propeller installation
Put the black propellers on motors 1 and 3, then turn counter clockwise to attach. Put the silver propellers on motors 2 and 4, then turn clockwise to attach.
Warning: Do not use glue or thread locking compound when attaching the propeller.
1 2
34
Propellers Disassembly:First insert the disassembly tool in the motor slot to lock the motor. Turn the propellers according to the unlock mark on the propellers to remove them.
disassembly tool
Lock(Install propellers)
Unlock(disassemble propellers)
card slot
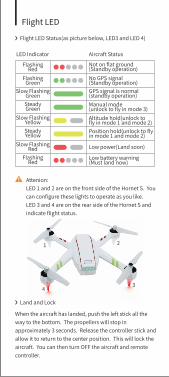
Flight LED Status(as picture below, LED3 and LED 4)
1 2
34
Flight LED
Attenion:LED 1 and 2 are on the front side of the Hornet S. You can configure these lights to operate as you like.LED 3 and 4 are on the rear side of the Hornet S and indicate flight status.
When the aircraft has landed, push the left stick all the way to the bottom. The propellers will stop in approximately 3 seconds. Release the controller stick and allow it to return to the center position. This will lock the aircraft. You can then turn OFF the aircraft and remote controller.
Land and Lock
Altitude hold(unlock to fly in mode 1 and mode 2)Position hold(unlock to fly in mode 1 and mode 2)
Low power(Land soon)
Low battery warning(Must land now)
FlashingRed
LED Indicator Aircraft Status
FlashingGreen
Slow FlashingGreen
Slow FlashingYellowSteadyYellow
Slow FlashingRed
FlashingRed
No GPS signal(Standby operation)GPS signal is normal(standby operation)
SteadyGreen
Manual mode(unlock to fly in mode 3)
Not on flat ground(Standby operation)
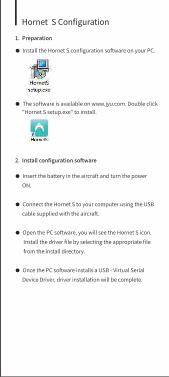
Hornet S Configuration
● The software is available on www.jyu.com. Double click "Hornet S setup.exe" to install.
● Insert the battery in the aircraft and turn the power ON.
● Connect the Hornet S to your computer using the USB cable supplied with the aircraft.
● Open the PC software, you will see the Hornet S icon. Install the driver file by selecting the appropriate file from the install directory.
● Once the PC software installs a USB - Virtual Serial Device Driver, driver installation will be complete.
1. Preparation
2. Install configuration software
● Install the Hornet S configuration software on your PC.
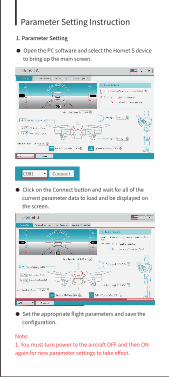
Parameter Setting Instruction
● Open the PC software and select the Hornet S device to bring up the main screen.
● Click on the Connect button and wait for all of the current parameter data to load and be displayed on the screen.
● Set the appropriate flight parameters and save the configuration.
1. Parameter Setting
Note:1. You must turn power to the aircraft OFF and then ON again for new parameter settings to take effect.
COM1 Connect
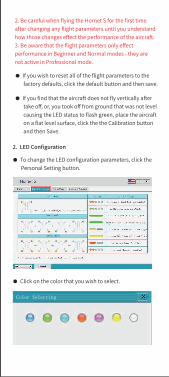
● To change the LED configuration parameters, click the Personal Setting button.
● Click on the color that you wish to select.
● If you wish to reset all of the flight parameters to the factory defaults, click the default button and then save.
● If you find that the aircraft does not fly vertically after take off, or, you took off from ground that was not level causing the LED status to flash green, place the aircraft on a flat level surface, click the the Calibration button and then Save.
2. LED Configuration
2. Be careful when flying the Hornet S for the first time after changing any flight parameters until you understand how those changes effect the performance of the aircraft.3. Be aware that the flight parameters only effect performance in Beginner and Normal modes - they are not active in Professional mode.
Color Selecting
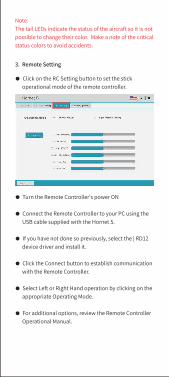
● Click on the RC Setting button to set the stick operational mode of the remote controller.
● Turn the Remote Controller's power ON
● Connect the Remote Controller to your PC using the USB cable supplied with the Hornet S.
● If you have not done so previously, select the | RD12 device driver and install it.
● Click the Connect button to establish communication with the Remote Controller.
● Select Left or Right Hand operation by clicking on the appropriate Operating Mode.
● For additional options, review the Remote Controller Operational Manual.
3. Remote Setting
Note:The tail LEDs indicate the status of the aircraft so it is not possible to change their color. Make a note of the critical status colors to avoid accidents.

You can use your computer and the Hornet S PC software to check for Remote Controller software updates that may be available from JYU. If a new software version is available, you may load it on to your Remote Controller in this way:
● Connect the Remote Controller to your PC using the supplied Micro USB cable.
● Turn the Hornet S power ON.
● Open the Hornet S software on your PC.
● Click on the Firmware Updating button, then click on the upgrade button. The LED indicator will flash yellow to indicate the software is being downloaded and the screen will show the progress of the download in % complete.
● When the update process is complete, turn the Hornet S power OFF and then ON again. The new firmware will then be active.
4. Upgrade Firmware
![Migration d'un projet Hornet 2.0 vers Hornet 3 · Communauté Adullact - [ HORNET ] Migration d'un projet Hornet 2.0 vers Hornet 3.1 Développement Hornet HORNET_GUI_Migration d'un](https://img.pdfslide.net/doc/110x75/5f2456cb7890f4440e0171ec/migration-dun-projet-hornet-20-vers-hornet-3-communaut-adullact-hornet-.jpg)