Embed Size (px)
Citation preview

A GUIDE TO WORKSHOP LAYOUTS
1. What makes an ideal workshop layout?
A landscape designer friend of mine tells a story about the college he went to. During his years there, the university embarked upon an ambitious building plan, adding several large structures around the main quad: a dorm, a chemistry lab, and a couple of others. The look of the place, which had remained unchanged for a century, was suddenly transformed, as glass-and-steel modernist structures were interspersed with the earlier ivy-covered stone Victorian-Gothic.
The streetscape wasn’t the only thing that changed. The patterns of use of the quad itself were also affected, as more people were moving in more directions. The long-established roadways and paths no longer served the traffic.
The planners did an interesting thing, my friend recalls. Instead of commissioning a hugely expensive study to try to predict the new patterns that would result from the opening of the new buildings, rather than devising an anticipated program and laying out a new scheme, the university’s brain trust decided to let the students and faculty, the lifeblood of the university, shape their own arterial flow.
Sure enough, the approach worked. A semester alter the buildings were completed, a definite crisscross of paths emerged. Only then were the landscapers hired to come in and memorialize. They paved the paths, then planted grass and shrubs, off the beaten paths. A pretty clever move, I thought.
Now, maybe you can do the same thing in your workshop. You can move your benches, tables and tools, and storage units around as you devise better work flows. But as is so often the case, what works in academe might not be the best approach in the workaday world, namely in your workshop.
For one thing, the rearrange-it-later approach may simply mean that once you’re set up, the haphazard plan becomes the permanent plan, thanks to sheer inertia (it is a pain to move furniture, after all, especially when some of it is as heavy and awkward as workbenches and stationary tools). For another, too little advance planning may mean you buy a power tool that’s too big for your space.
So I, for one, would recommend a certain amount of advance planning. Even if the layout you devise evolves over time (and it almost certainly will), you’ll probably find the workshop a more efficient place to work right from the start if you think it through as thoroughly as you can beforehand.
I’m guessing you’ll find it to your advantage to consider the issues that follow in your planning process.

Stationary Tool Space.
Tools take up two kinds of space. First, there’s the square footage required by the tool and its stand, whether it’s in use or waiting patiently for its next opportunity to show its stuff. With a big table saw, that can represent a dozen or more square feet; a drill press requires roughly from three to five square feet.
Second is the operating space around the machine. When the table saw is used to cut a piece of four-by-eight-foot plywood, the tool space increases geometrically, as the thirty-two-square-foot sheet of stock is pushed and pulled through the blade. Even if you’re not planning on using your table saw to cut plywood, you need to allow ripping and crosscutting space. This means that in front of and beyond the blade, you need distances at least as great as the length of the longest board you’ll need to rip; and that you’ll require space for cutoff work on either side of the saw.
The bottom line, then, is that in most cases the logical place for the table saw is at the hub of the workshop.
If you have a fixed-in-place cutoff saw (a radial-arm, miter saw, or sawbuck, for example), it can, unlike the table saw, be conveniently positioned against a wall. Don’t set it in a corner, however, as you’ll need space on either side of the blade. Figure into your plan a two-foot-deep, three-foot-wide space for the saw itself and tables or other supports flanking the tool. Allow enough space directly in front of the saw for the operator to be able to comfortably line up and operate the saw.
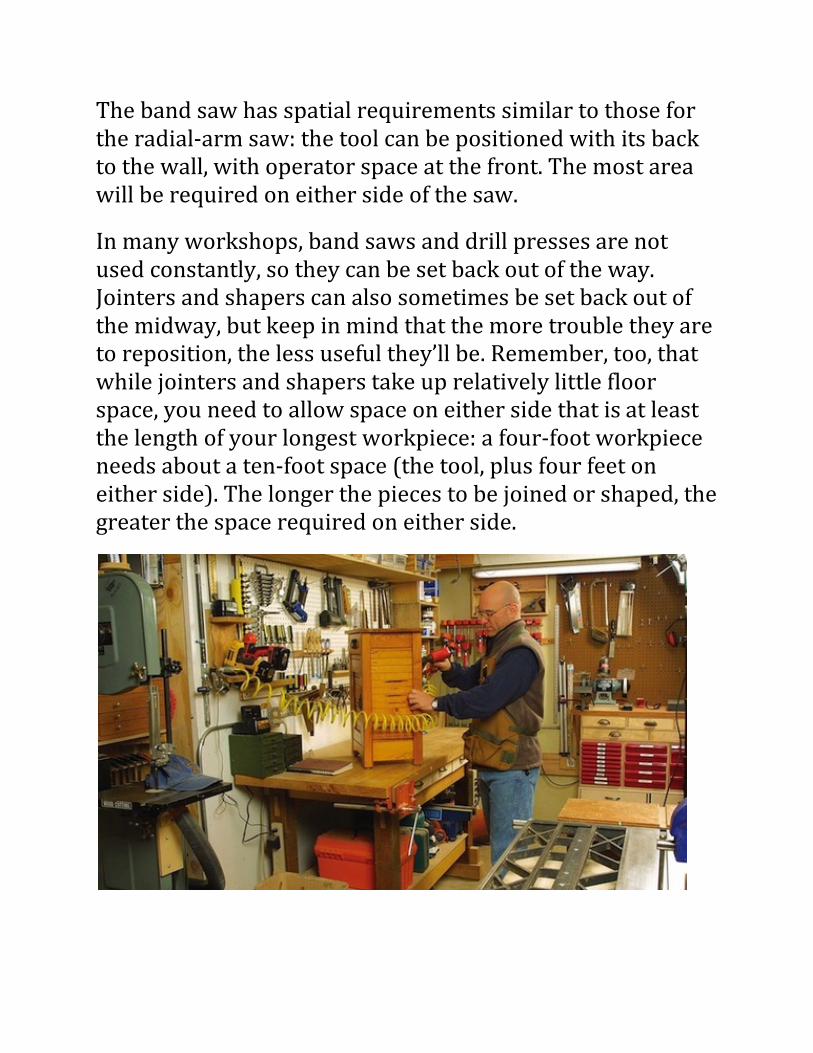
The band saw has spatial requirements similar to those for the radial-arm saw: the tool can be positioned with its back to the wall, with operator space at the front. The most area will be required on either side of the saw.
In many workshops, band saws and drill presses are not used constantly, so they can be set back out of the way. Jointers and shapers can also sometimes be set back out of the midway, but keep in mind that the more trouble they are to reposition, the less useful they’ll be. Remember, too, that while jointers and shapers take up relatively little floor space, you need to allow space on either side that is at least the length of your longest workpiece: a four-foot workpiece needs about a ten-foot space (the tool, plus four feet on either side). The longer the pieces to be joined or shaped, the greater the space required on either side.

Tabletop versus Freestanding Tools.
When purchasing some power tools (the list includes the jointer, shaper, sander, and even some models of table and band saw), you may decide to opt for benchtop models. A single bench can then serve, alternately, a range of purposes. Make- ready time is increased significantly, of course, as not only the blades, fences, miter gauges, and the rest must be set but the machine itself has to be positioned and powered. But for the small shop, the infrequently used tool may be quite easily stowed on a shelf out of the way, opening up more space for other tasks.
Partitions.
If you are planning to introduce your workshop into an existing space in your house, you may find it necessary to construct a partition to separate the dust and dirt of the workshop from, say, the laundry room with which it is to share the cellar. Or, for safety reasons, from the children’s play area.
Within the workshop itself, you may deem it necessary to subdivide the space for a painting and finishing area.
Natural Light.
Natural light is best, so any windows that offer illumination to the space should be put to good use. If you have little

sunlight in your shop, locate your workbench so that its work surface gets whatever there is. Even the best eyesight is made better by good light, so the close work to be done on a benchtop benefits from the natural light.
Another thing about windows: As we have learned in our workshop, they can make a small shop seem bigger than it is when long workpieces being ripped or planed begin with one end out one window (or door), are run through the machine, and extend out another window.
Artificial Illumination.
The same rules apply: Good light is essential, and if it isn’t natural light, it will have to be artificial. Don’t put your safety at risk by working in poorly lit or shadowed areas: If you can’t see what you’re cutting or shaping, you just might cut or gash yourself.
Plumbing.
You don’t need plumbing, you say? Then what about washing up not only paintbrushes but yourself after a particularly dirty job? A utility sink is a very handy convenience to have near at hand.
Temperature and Moisture Control.
If your workshop is to be located in a portion of your house that is already comfortably warm, this will not be an issue. But if you’re converting a barn or shed or an unheated space, especially if you live in a climate where winter temperatures make for cold hands, you’ll need to devise a heating strategy. In some climates, air conditioning is a virtual necessity in hot weather.
Is your cellar damp? If so, you may have to correct that problem before installing your tools and lumber supplies. Insulate pipes to prevent condensation. Make sure your gutters outside keep rainwater running away from the house. Cracks in the cement floor or walls should be filled with hydraulic cement; a high water table may necessitate a sump pump to collect water at a low point and pump it out. Any or all of these circumstances may also require a dehumidifier. In any case, dampness is unacceptable where power tools are to be used because of the risk of electric shock.
Egress.
A door that leads directly outside is best (avoiding corners and hallways); a double-wide door is better still. The closer the door is to the outside world, the less stuff to be tracked in from without.
Electricity.
It’s a rare workshop today that doesn’t need electricity; most need multiple receptacles of high amperage (20 amperes or more). Are there plugs available or will you need to add new lines and circuits? If you need to add wiring, when laying it out keep in mind that there’s no such thing as too many outlets in a workshop. The fewer (as in, ideally, zero) extension cords the better; they’re safety hazards. A good minimum is to have receptacles set at no more than six-foot intervals around the perimeter of the room, and, if possible, flush-mounted floor plugs in the central area.
If a poured cement floor prohibits the installation of plug receptacles flush to the floor and you elect to surface-mount a plug, protect the exposed feed wire. A piece of one-by-four stock with a groove cut in its underside and its top edges chamfered, will pose little more tripping risk than a threshold. However, paint its protective covering a bright color to remind you and any other visitors to your shop of its presence.
A receptacle or circuit that is overloaded is a hazard, in particular one fused beyond its limits. Power tools, especially heavy-duty saws, require lots of amperage, and you may need to add a circuit or two to serve the increased demand in your workshop space. Some tools require 220-volt service, so you may want to install a special plug and line to power that high-powered table saw.
2. The Workshop Triangle Method For Layout Planning
Once the workshop location is determined, it's time to begin planning how to lay it out. First, acknowledge the need to formulate a plan that's realistic in terms of the space allotted. The size of the structure or workspace will place some constraints on how much can be done. Taking into account size limitations, begin fashioning a plan that keeps efficiency in mind.
The layout of a workshop will be based, in part, on how it will be used — whether for carpentry, fine woodworking, metalwork or other activities. Regardless of category, however, it's important to keep in mind the principles of efficiency and organization. A layout that's clearly thought out in terms of functionality will make all the difference in creating a workspace that offers a pleasant surrounding as well as a space that's conducive to work.
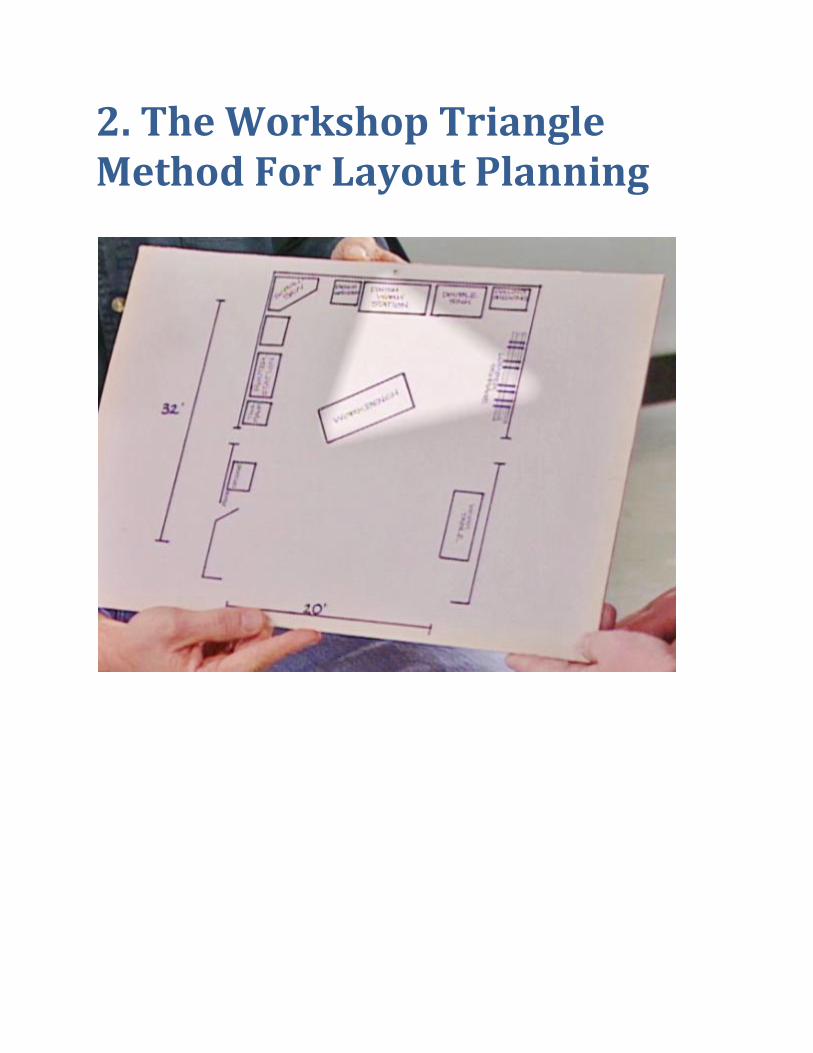
Rather than purchasing equipment first and then trying to decide where to put it all, start with a diagram instead. For the workshop in our project, the diagram included major stationary tools and storage placed along the walls, and a sizeable workbench placed in the center of the room.
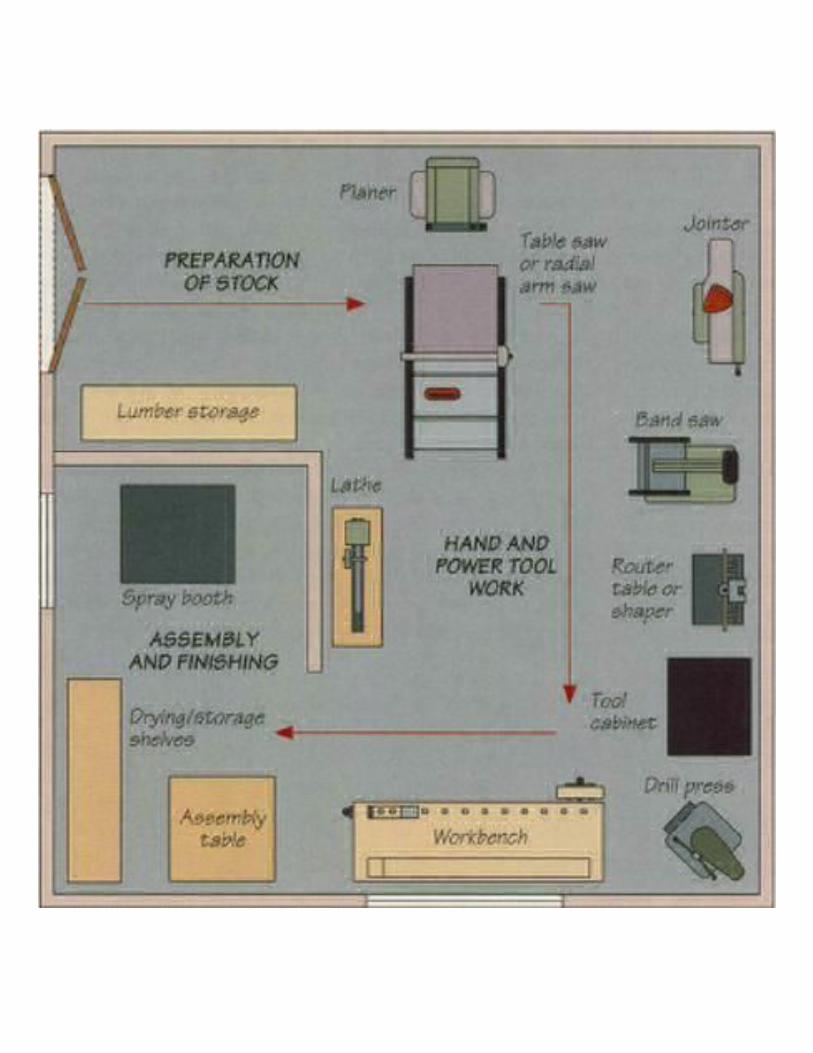
For most workshop applications, efficient workspace design follows a triangle, with the most important workstations at the three corners of the triangle.
A shop geared toward woodworking would have lumber storage located at one corner of the triangle. Storage space for wood — both long pieces and flat plywood pieces —
should be adequate. Raised storage, such as racks or shelves mounted on the wall, must be sturdy. Wood storage should also be in close proximity to the stationary tools or machines (table saw, jointer, power planer, etc.) to avoid frequently carrying heavy wood across the span of the workspace. Wood storage should be handy and near the area where the heavy woodworking tasks will take place. Keep in mind that a considerable amount of space will be needed around stationary tools such as a table saws and jointers for manipulating large pieces of raw lumber.
The second corner of the triangle is in the center of the room and, in our case, is where the workbench is located. Following work progress in sequence, the workbench is typically the second workstation where medium-duty work is done after heavier preparatory or wood-milling steps are finished. The workbench is where work is typically done using hand tools or smaller power tools such as hand drills, routers and joinery tools.
The third corner of the triangle is the finishing station, where fine and detailed work takes place. At this station, tasks such as sanding, wood finishing and painting may take place. Since the detailed work is likely to be done here, it may be critical to keep this station more organized, clean and free of dust than the others.
Segregating the functional workstations in this way helps to keep the right tools and materials where they are needed for specific tasks. Meanwhile, keeping the three workstations in the close proximity of the triangle configuration makes it
easy to proceed from one phase of a project to the next in a logical fashion.
Adequate storage for tools is essential, but easy access is also highly important for an efficiently designed workshop.
General tool storage can be in an area adjacent to the triangle so that individual tools are in easy reach for any project. Efficient design helps eliminate wasted time searching for necessary tools, and wasted steps carrying items back and forth — both of which can add up quickly.
3. Workshop Organization Tips
The key to working efficiently in a workshop is having a good system of organization for tools and materials. Here are some suggestions for organization and efficiency in a workshop.
Clamps are easy to store, since they can simply be clamped onto a shelf or an existing feature such as ceiling joists. For more clamp organization, consider building a clamp rack. A rack like this is simple to build. Just drill half-inch holes in a piece of lumber at regular intervals. Then glue some pieces of half-inch doweling that have been cut to length into the holes.
Organize the clamps on the rack by size to make it easy to access the right size clamp.
Tool Boxes
Tool boxes come in a variety of types and sizes, some of which are specialized for a particular type of usage.
A classic wooden grip is a simple, open design that can store and carry both large and small items.

A small-tool box is designed to house small tools separate from larger items so that they are in one centralized place and easy to find.
Some tool users like to keep dedicated tool boxes for particular types of jobs, such as an electrical tool box that contains only the types of tools and supplies used for electrical work.
A plastic tote is a handy carrier and works well as a dedicated tool-box for certain jobs. One example is a plumbing tool box that contains only wrenches and other tools that are commonly used in plumbing work. An advantage of plastic totes is that they are washable.
Saw Horse
A portable saw-horse/workstation is a space-saver and uses an efficient design to serve multiple purposes in the workshop. It serves as a sawhorse for supporting large work, or it can be opened up to serve as a sturdy tabletop. The work surface locks into position with locking handles on the side. The entire unit folds flat when not in use for easy storage.
Ladders
Wall brackets are ideal for storing ladders, saw-horses and other large items so that they are off the floor and out of the

way. It's important to secure wall brackets to wall studs for stability as they will be supporting heavy items.
Ladders come in many sizes and designs, but perhaps the most versatile ladder of all is an adjustable ladder that can be configured to serve as a regular trestle ladder, a straight extension ladder, a scaffold or even a saw-horse for supporting a work surface.
Tools Belts
Tool belts are essential for jobs that require a great deal of mobility while working. Keep in mind that many tools are heavy, so loading a tool-belt with a large amount of tools can be uncomfortable and cause fatigue. Tool belts come in an assortment of styles including cloth, nylon and canvas ones that are relatively lightweight, and more serious heavy-duty belts made from leather. Some are designed as a simple belt with removable attachments so the selection of tools can be customized depending on the job at hand.
Heavy-duty tool belts are generally made of treated leather, and are sewn and bradded for durability.
Tip: Avoid storing fine leather tool-belts fully loaded with tools. The heavy weight will cause the leather to get stretched out and worn over time. Remove the tools from the belt after use, and hang the belt on a hook or peg for storage.

If a particular job only includes drilling or driving screws using a cordless drill, consider using a drill clip that attaches to a belt. This convenient accessory acts as a lightweight "holster" for the drill.

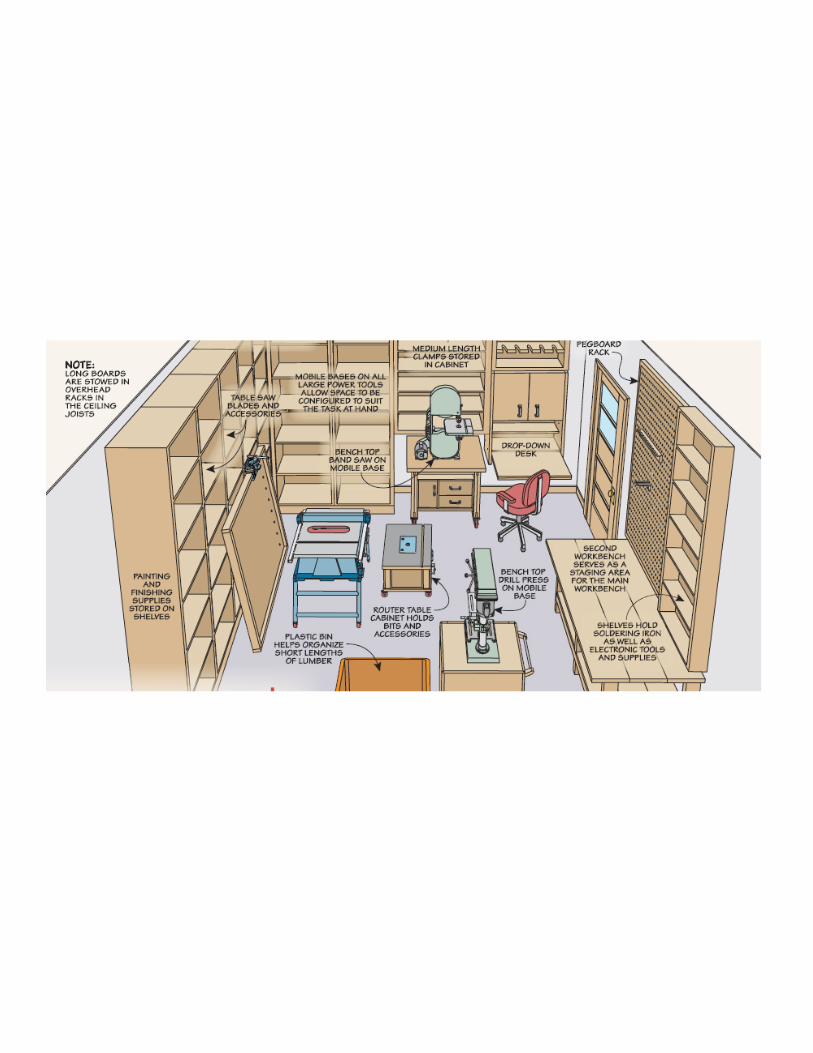
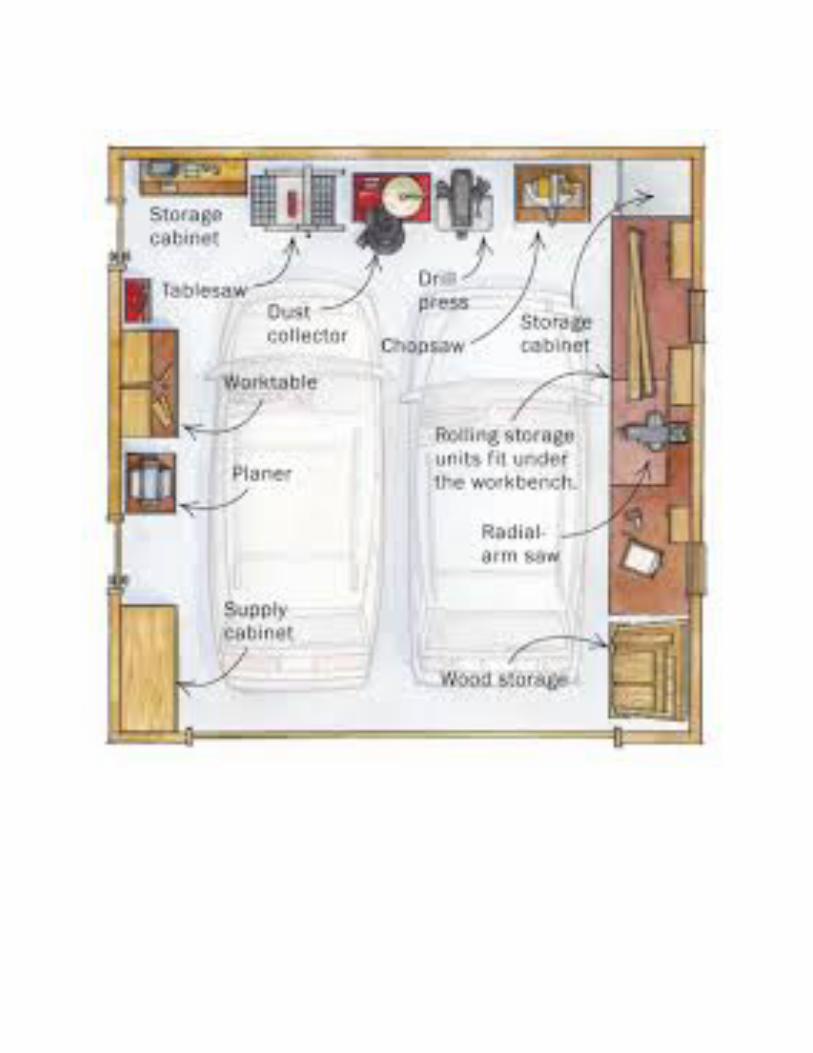
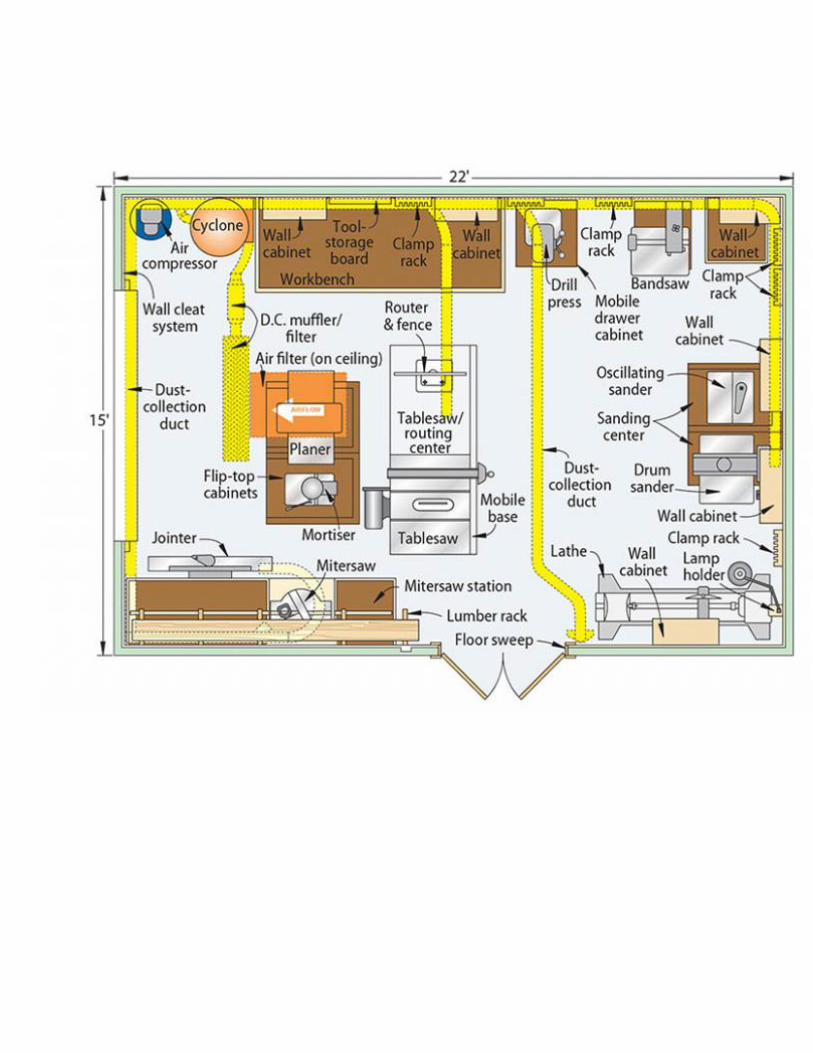
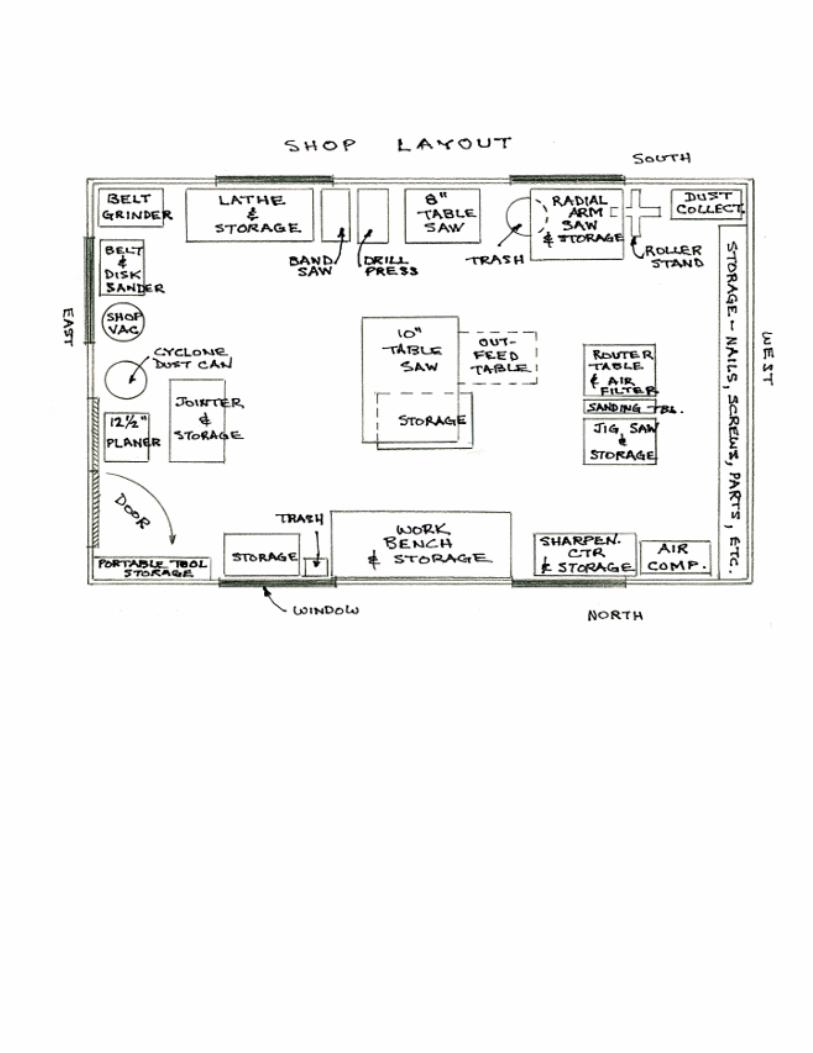
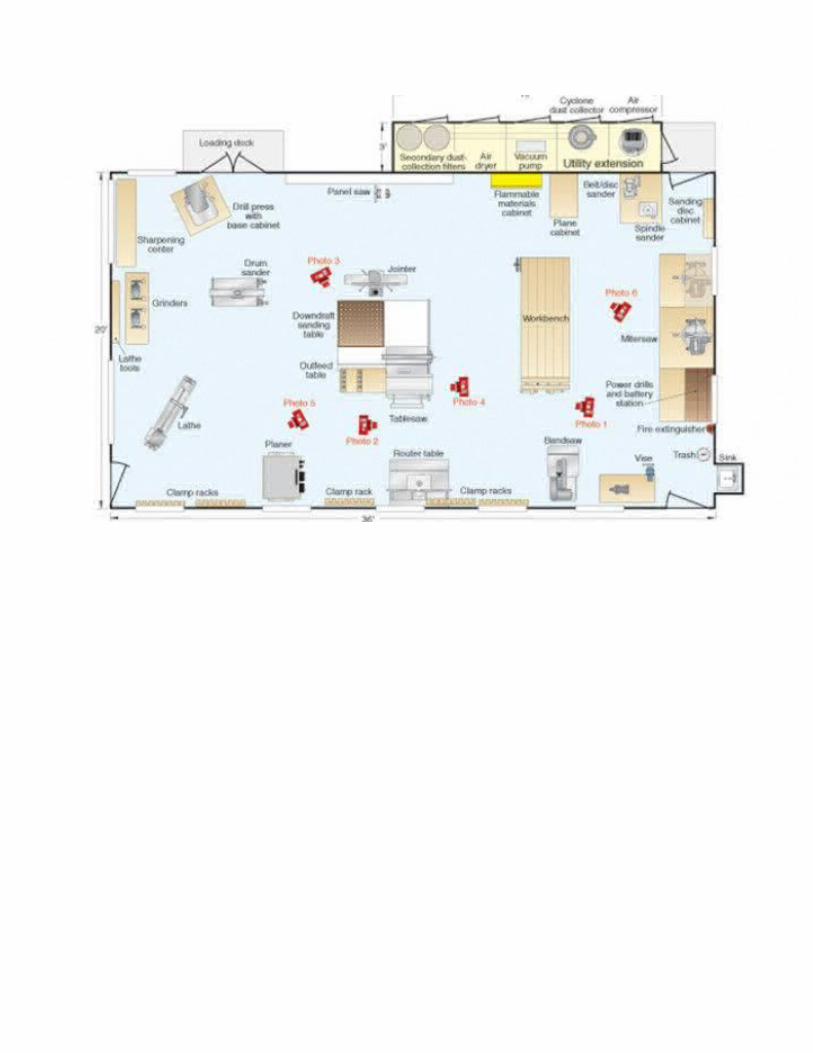
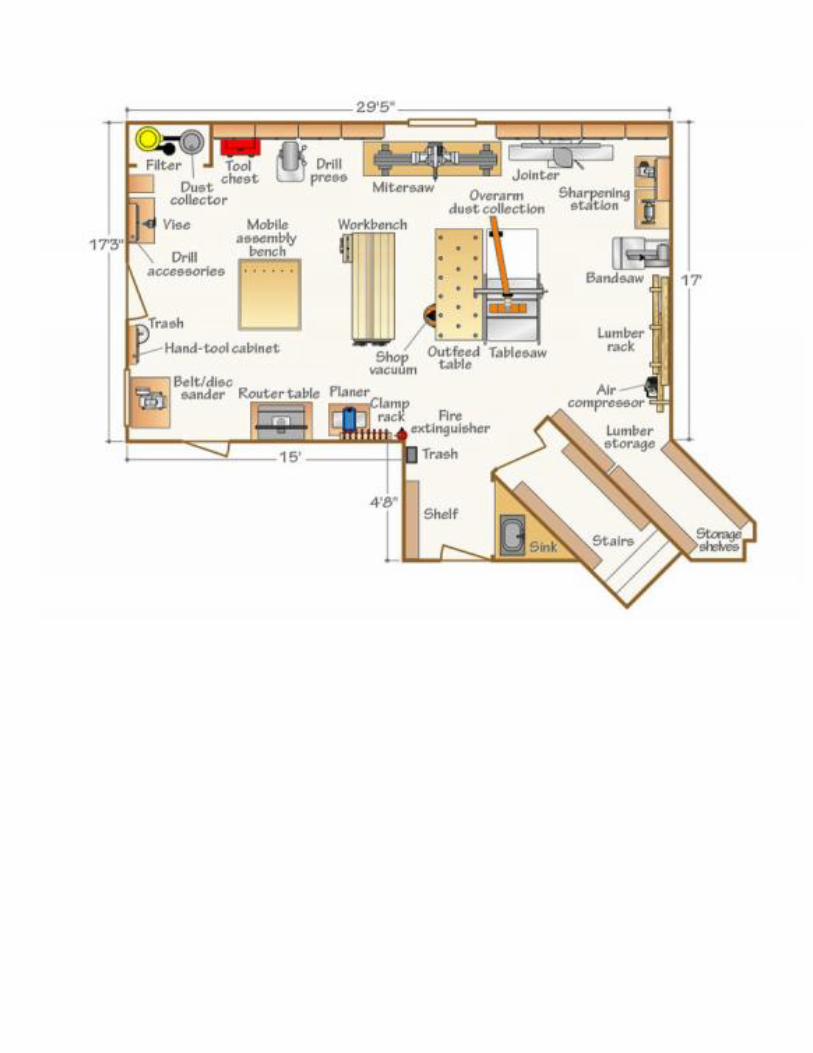
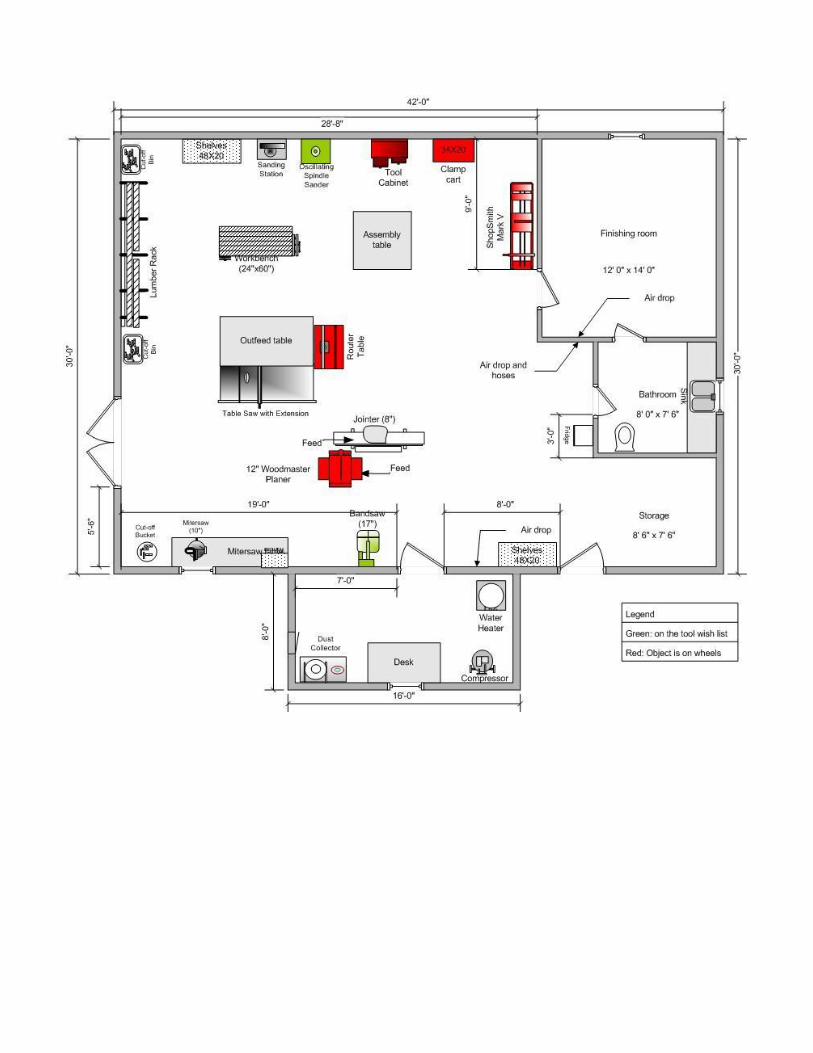
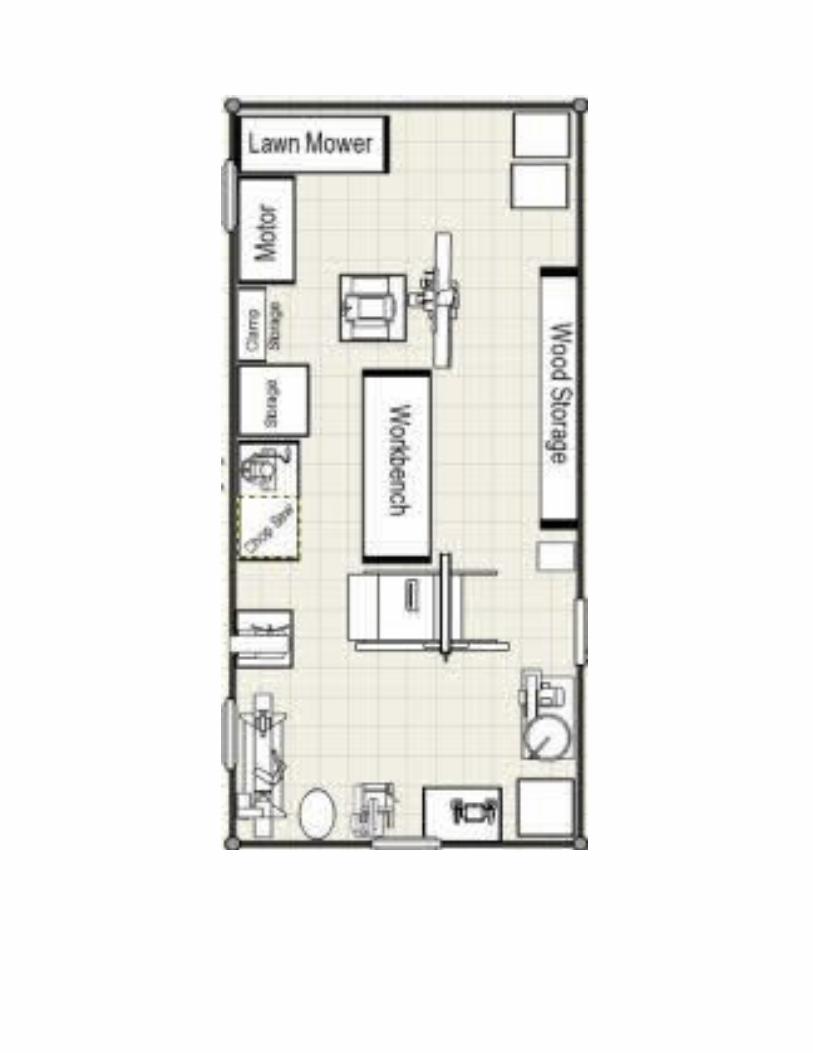
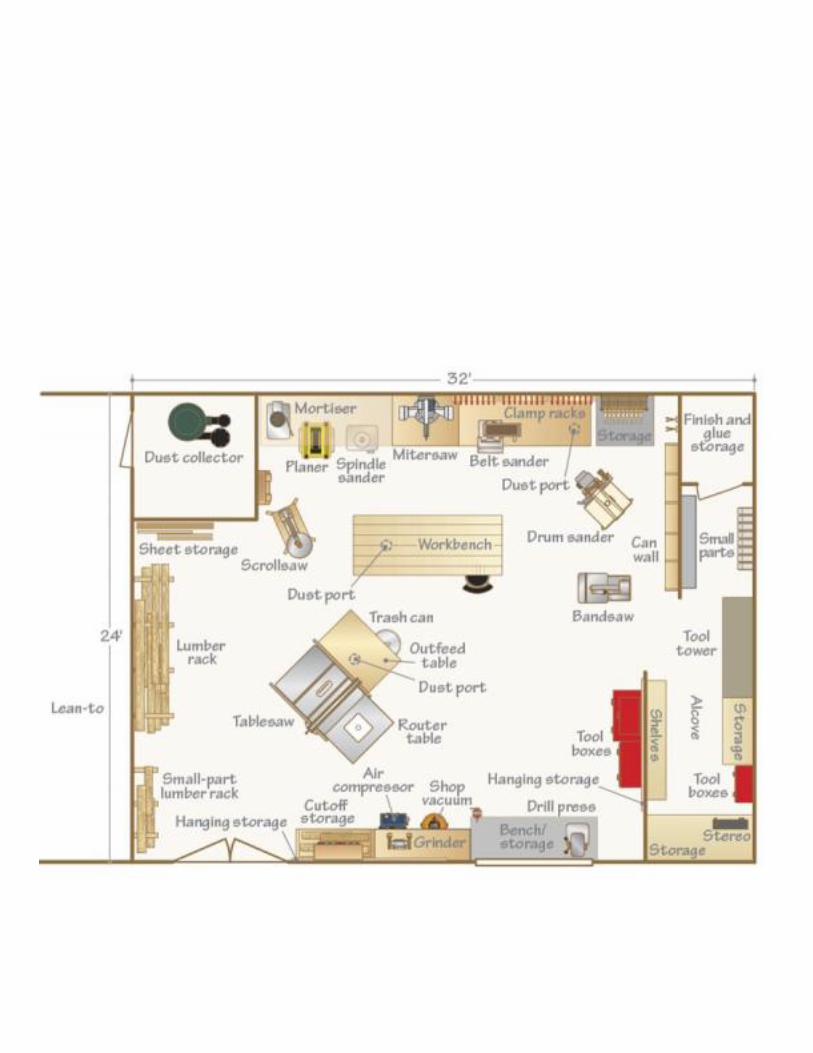
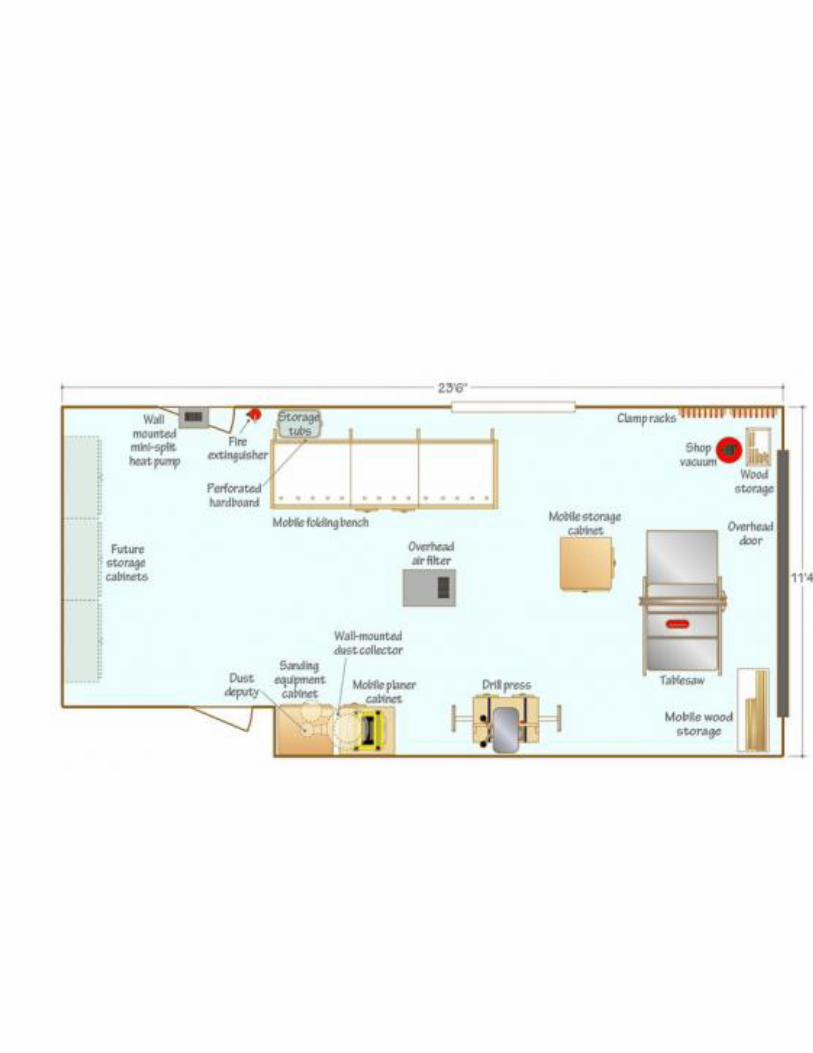
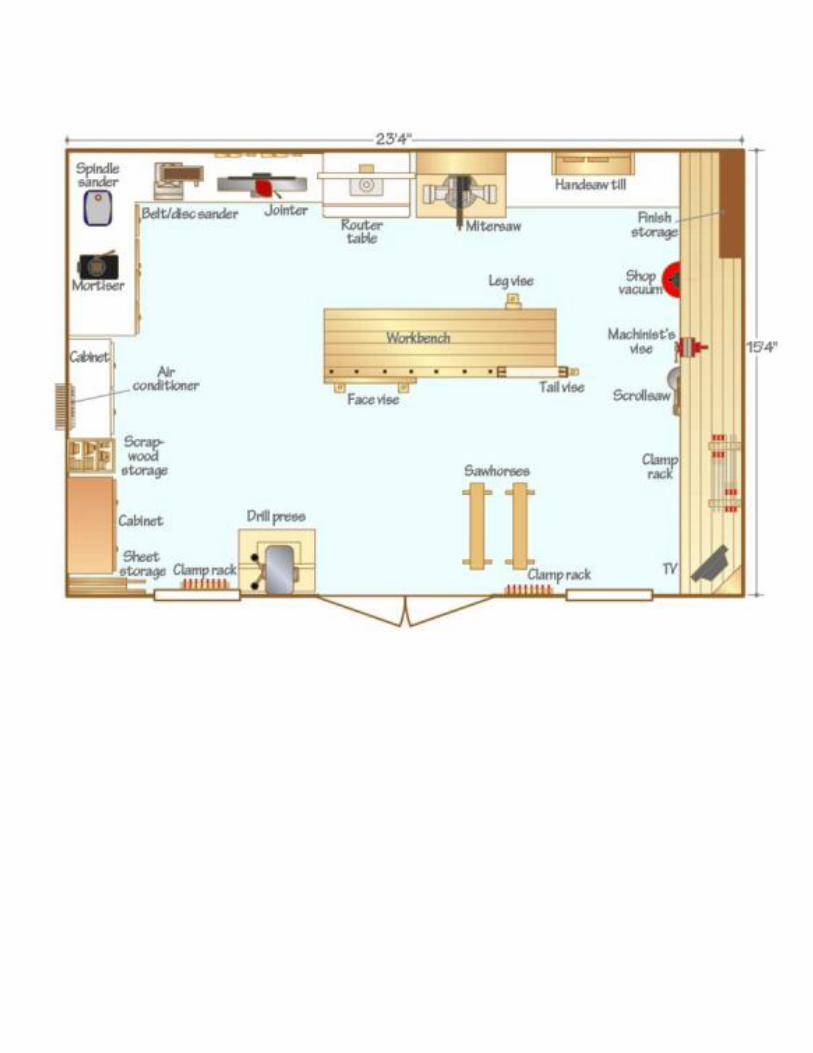
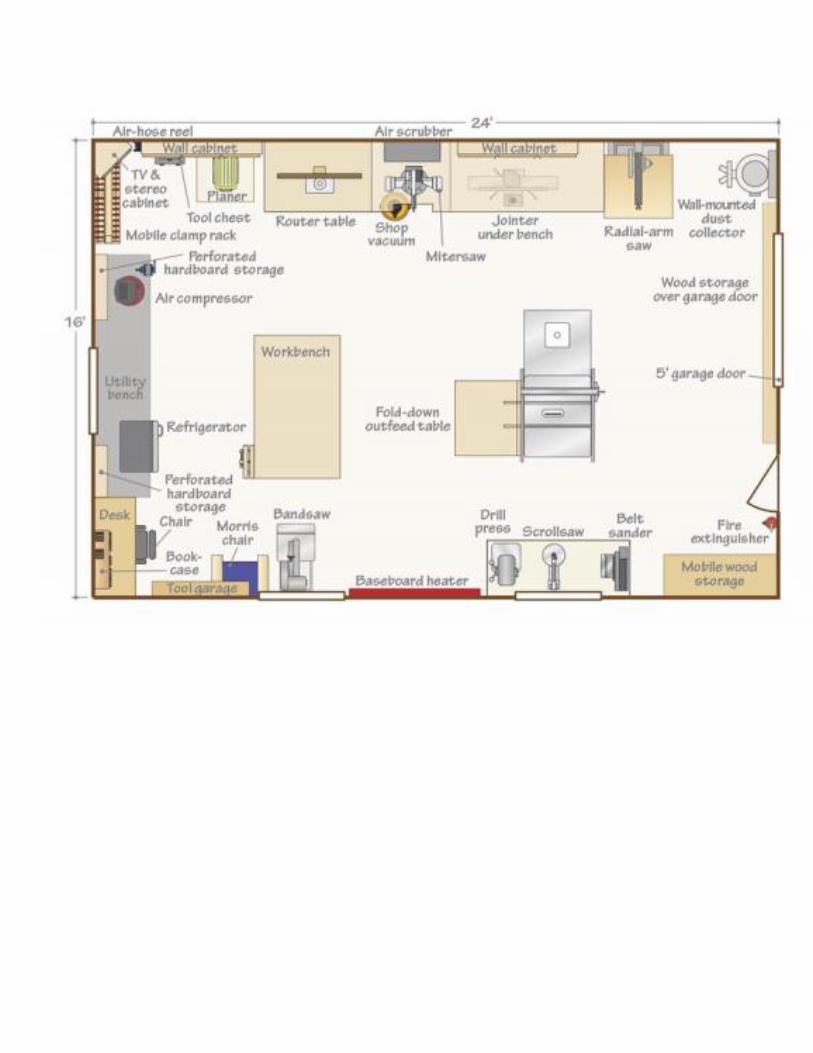
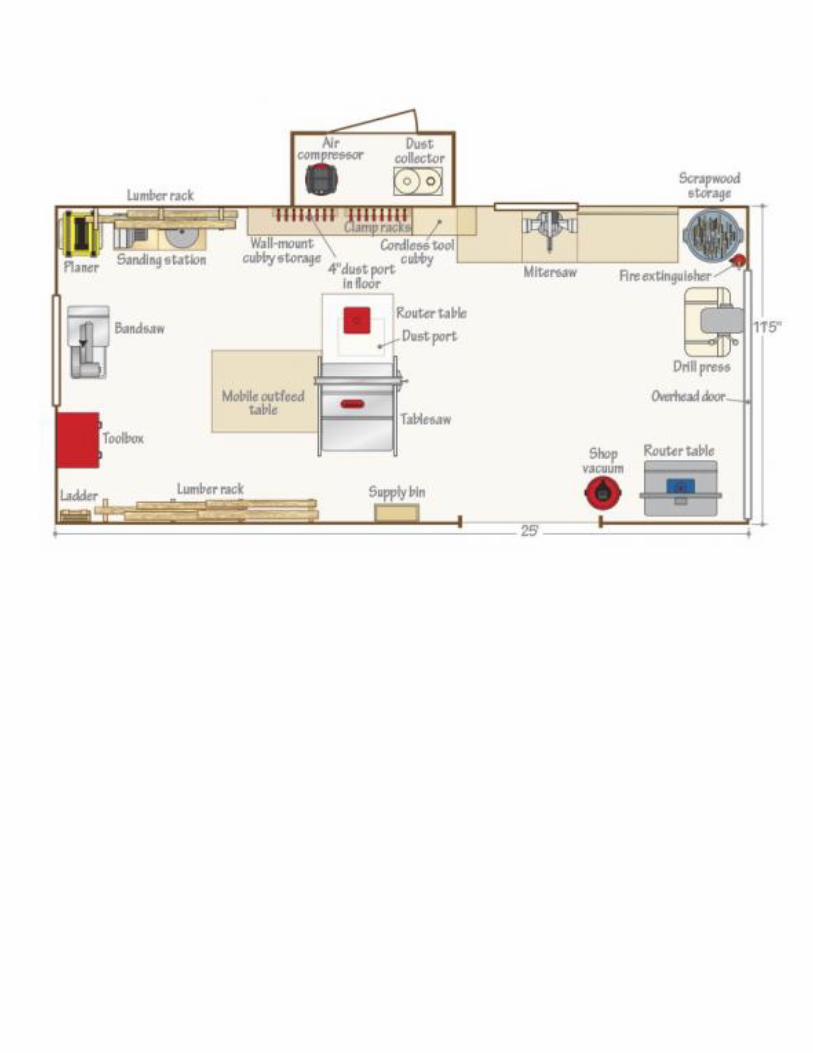
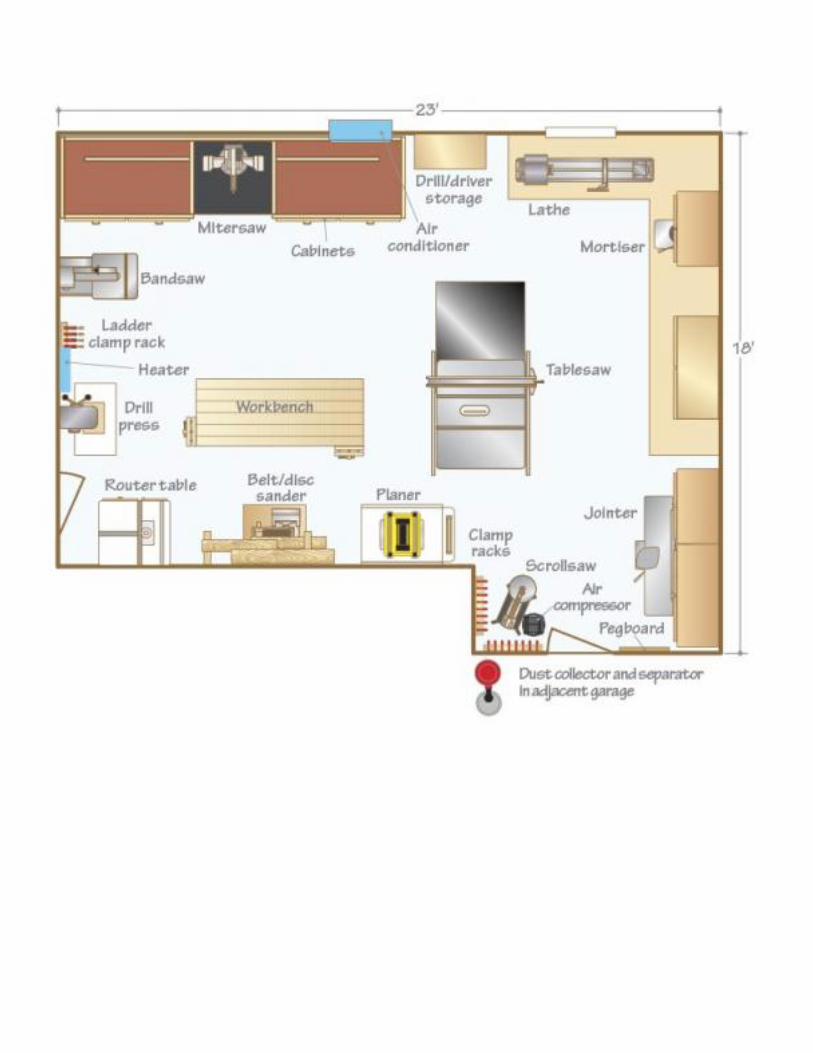
4. Workshop Layout Images