Embed Size (px)
Citation preview
How to use Kaltura Live Room Author: E.R. Deul Dd: 18-03-2020
Introduction Kaltura Live Room is the tool to use for interactive teaching. It provides a visual of you, the teacher, and allows you to share a Whiteboard or your desktop scree/application windows. It has a chat facility so students can ask questions that you answer verbally. You can also record the Live Room to allow students to view the stream at a later stage.
You have to access Kaltura Live Room through Blackboard (https://blackboard.leidenuniv.nl). From the Blackboard portal you can start a Live Room and invite your students through Blackboard email. Note that the url of your Live Room is the same each time you start a new session. So once the students have your url, they can return to next week’s Live Room without further notice.
In the tutorial below I will take you along the individual steps of starting a Live Room and show you how to share the whiteboard and your desktop, in particular your powerpoint presentation. I will also show what the students will see.
Note that for the best functionality seems to be if you use the Google Chrome browser. Many of the below images are taken using the Firefox browser. Note that Safari NOT the preferred browser for Kaltura…
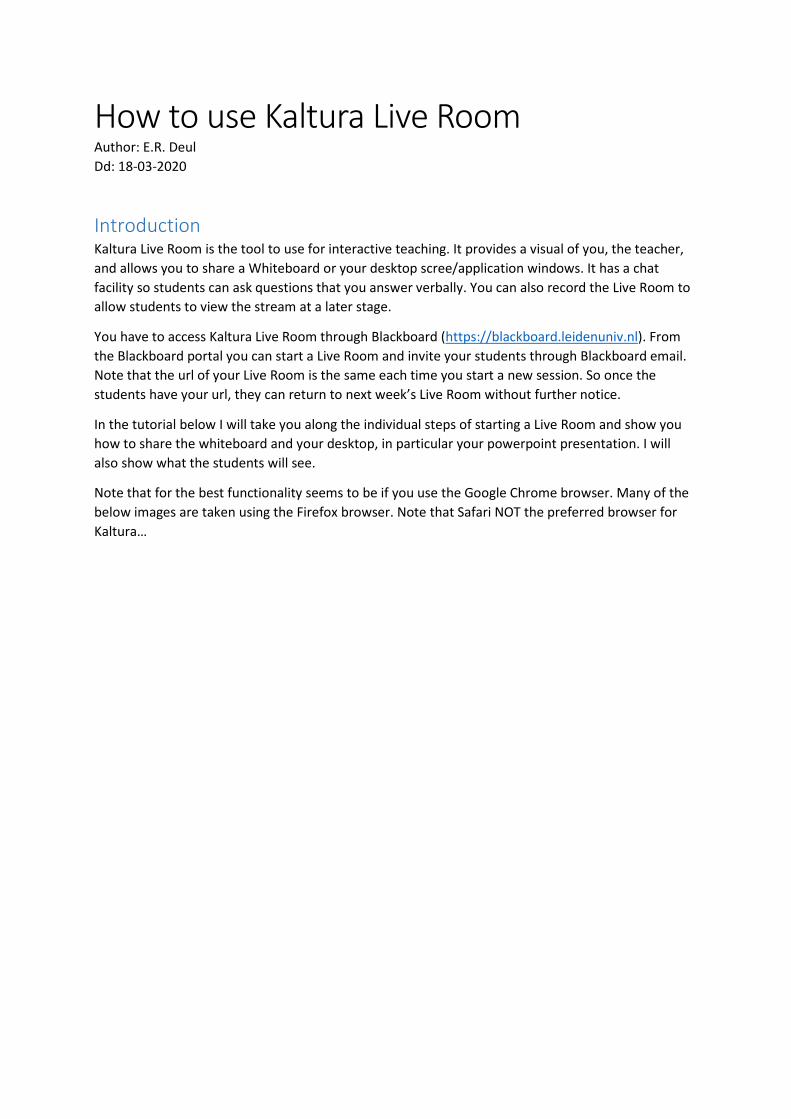
Tutorial Open the Blackboard link and login using your ULCN credentials:
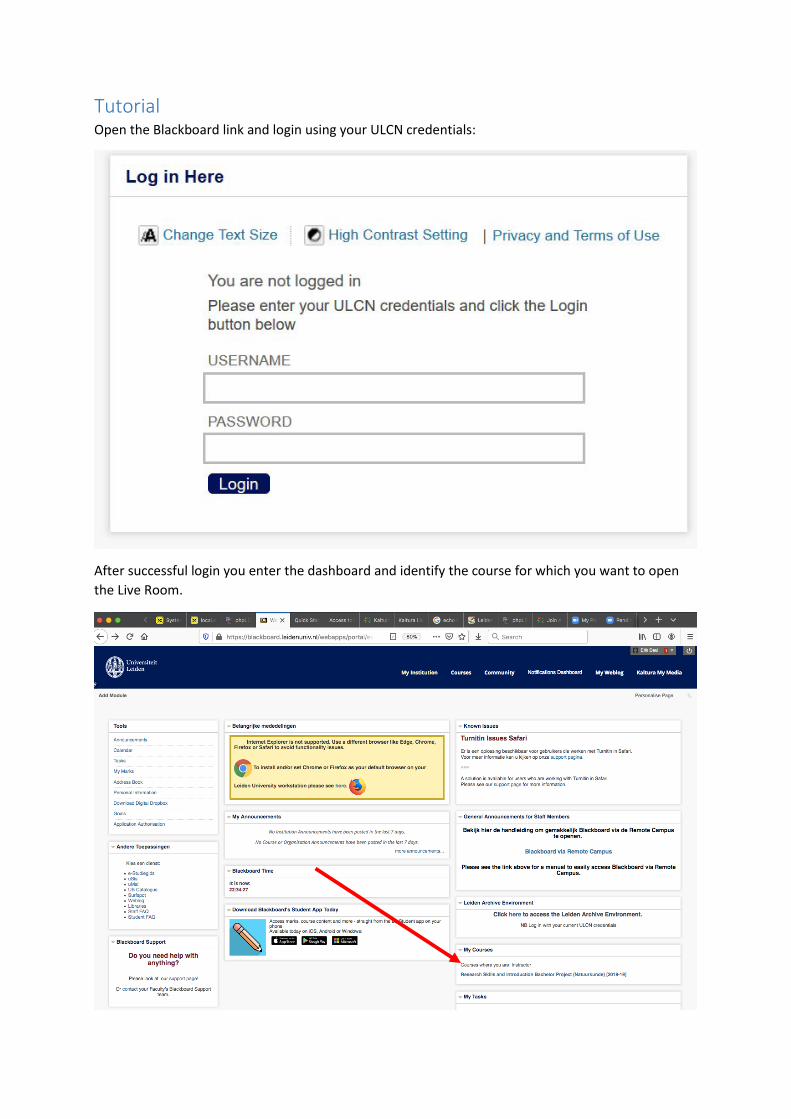
After successful login you enter the dashboard and identify the course for which you want to open the Live Room.
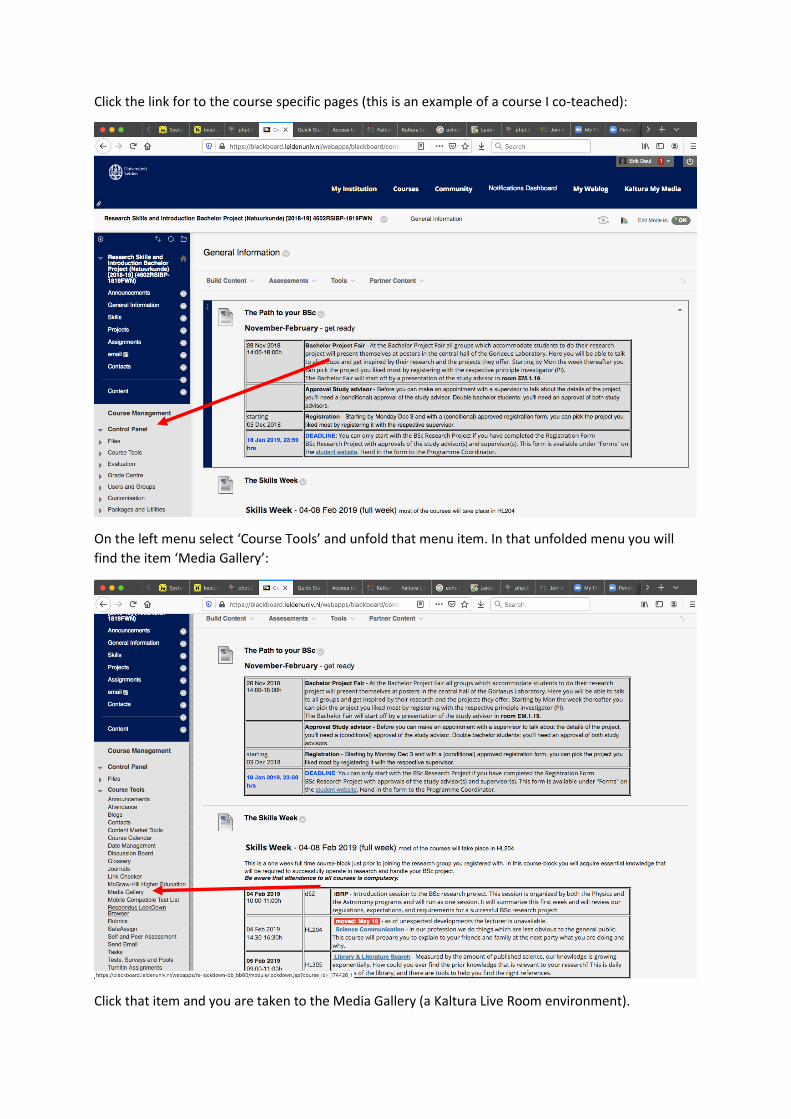
Click the link for to the course specific pages (this is an example of a course I co-teached):
On the left menu select ‘Course Tools’ and unfold that menu item. In that unfolded menu you will find the item ‘Media Gallery’:
Click that item and you are taken to the Media Gallery (a Kaltura Live Room environment).
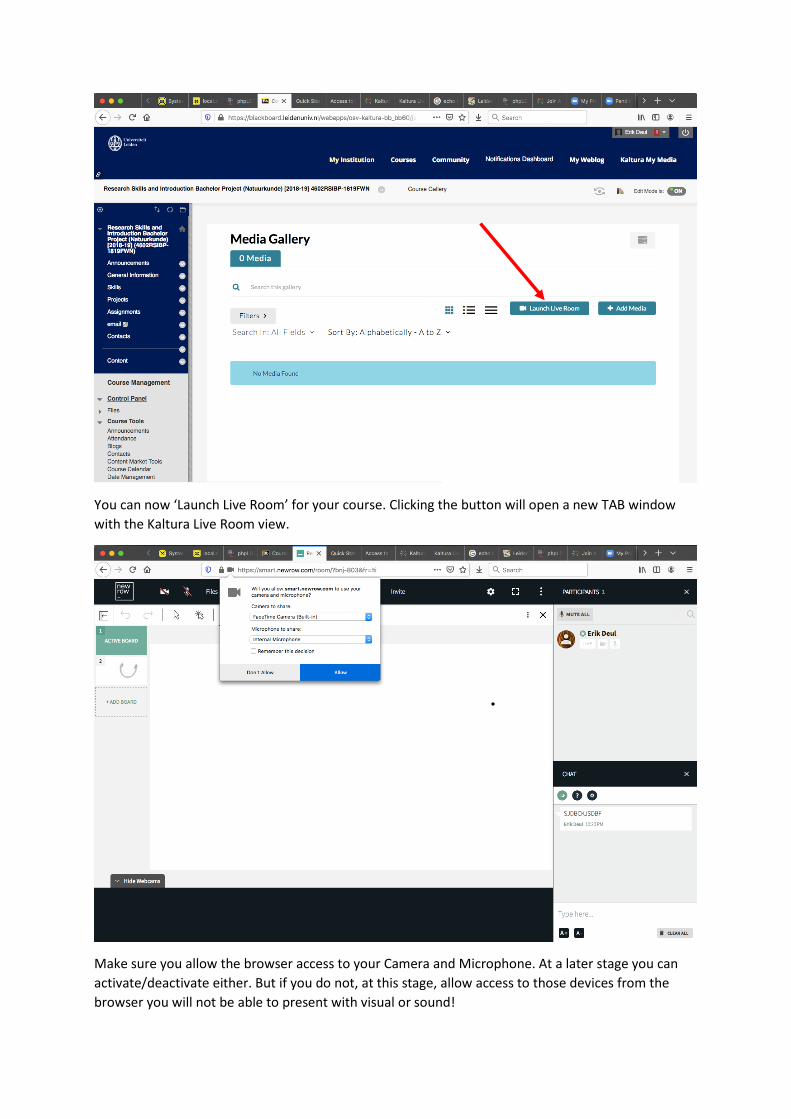
You can now ‘Launch Live Room’ for your course. Clicking the button will open a new TAB window with the Kaltura Live Room view.
Make sure you allow the browser access to your Camera and Microphone. At a later stage you can activate/deactivate either. But if you do not, at this stage, allow access to those devices from the browser you will not be able to present with visual or sound!
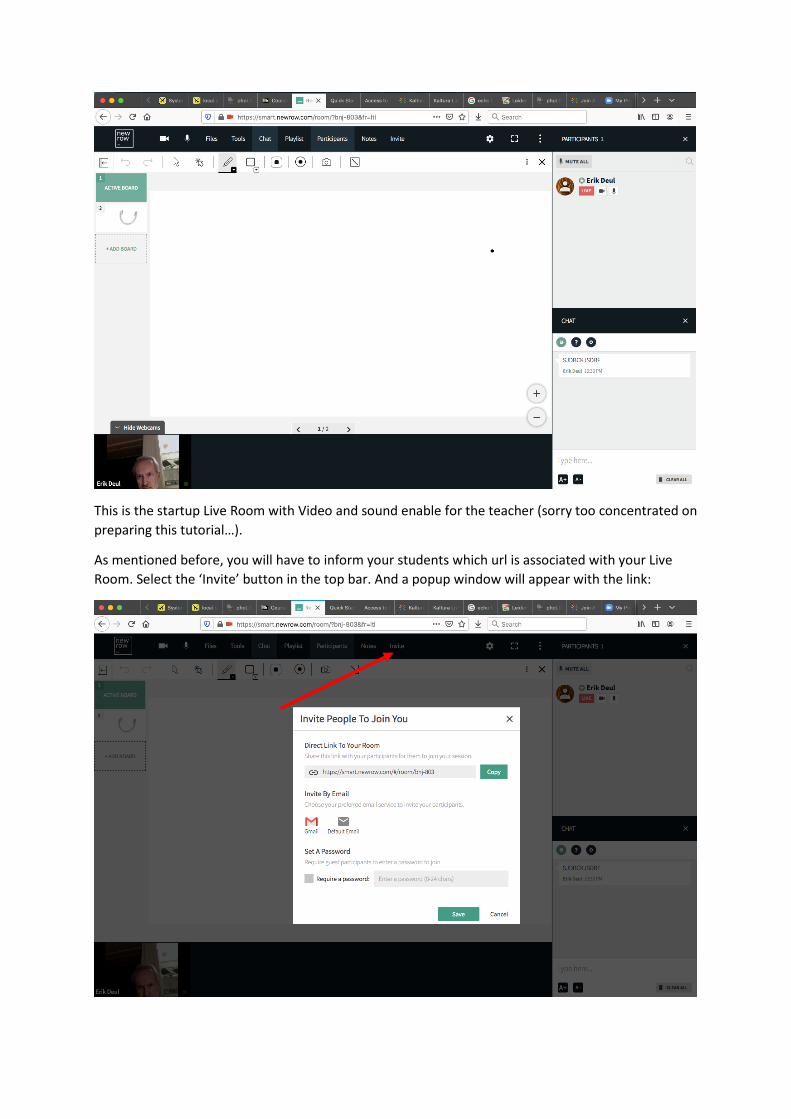
This is the startup Live Room with Video and sound enable for the teacher (sorry too concentrated on preparing this tutorial…).
As mentioned before, you will have to inform your students which url is associated with your Live Room. Select the ‘Invite’ button in the top bar. And a popup window will appear with the link:
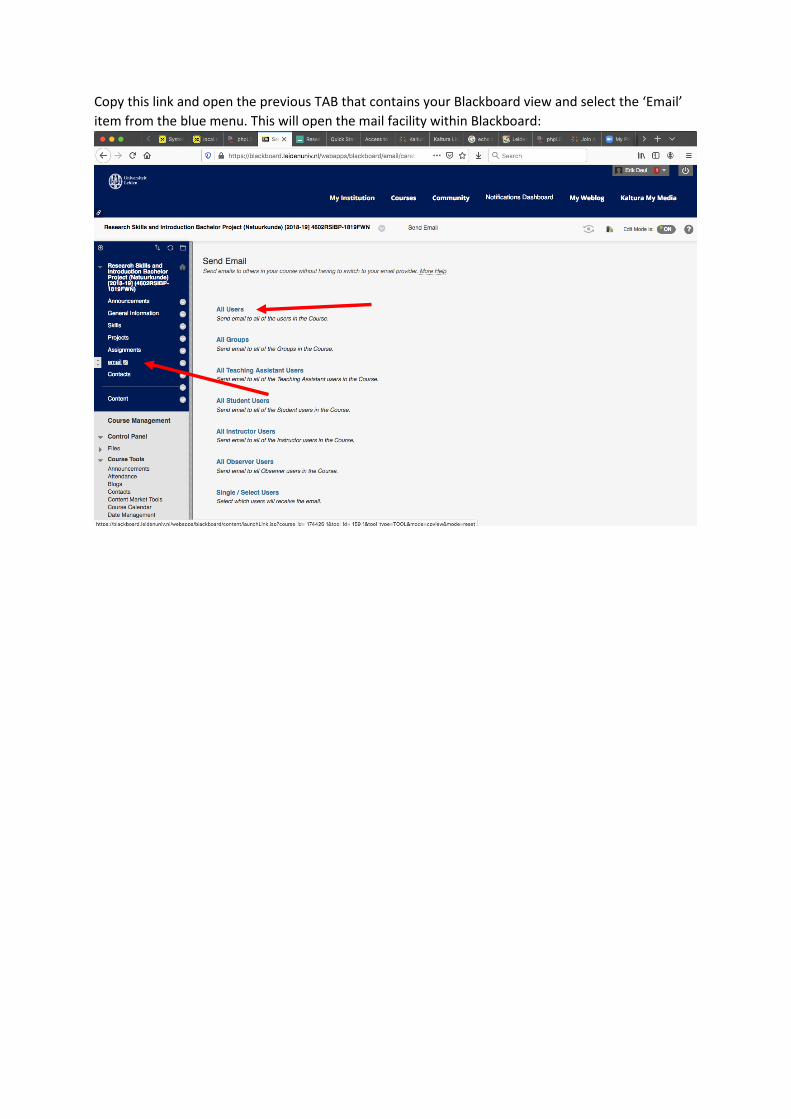
Copy this link and open the previous TAB that contains your Blackboard view and select the ‘Email’ item from the blue menu. This will open the mail facility within Blackboard:
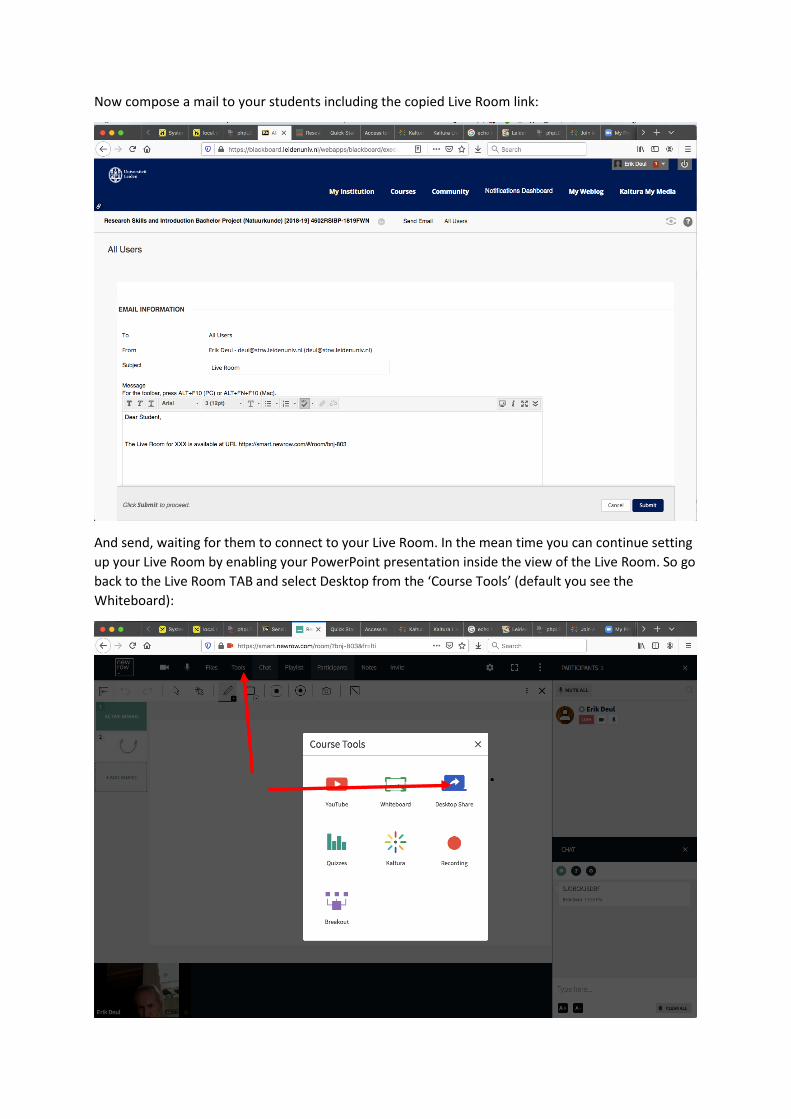
Now compose a mail to your students including the copied Live Room link:
And send, waiting for them to connect to your Live Room. In the mean time you can continue setting up your Live Room by enabling your PowerPoint presentation inside the view of the Live Room. So go back to the Live Room TAB and select Desktop from the ‘Course Tools’ (default you see the Whiteboard):
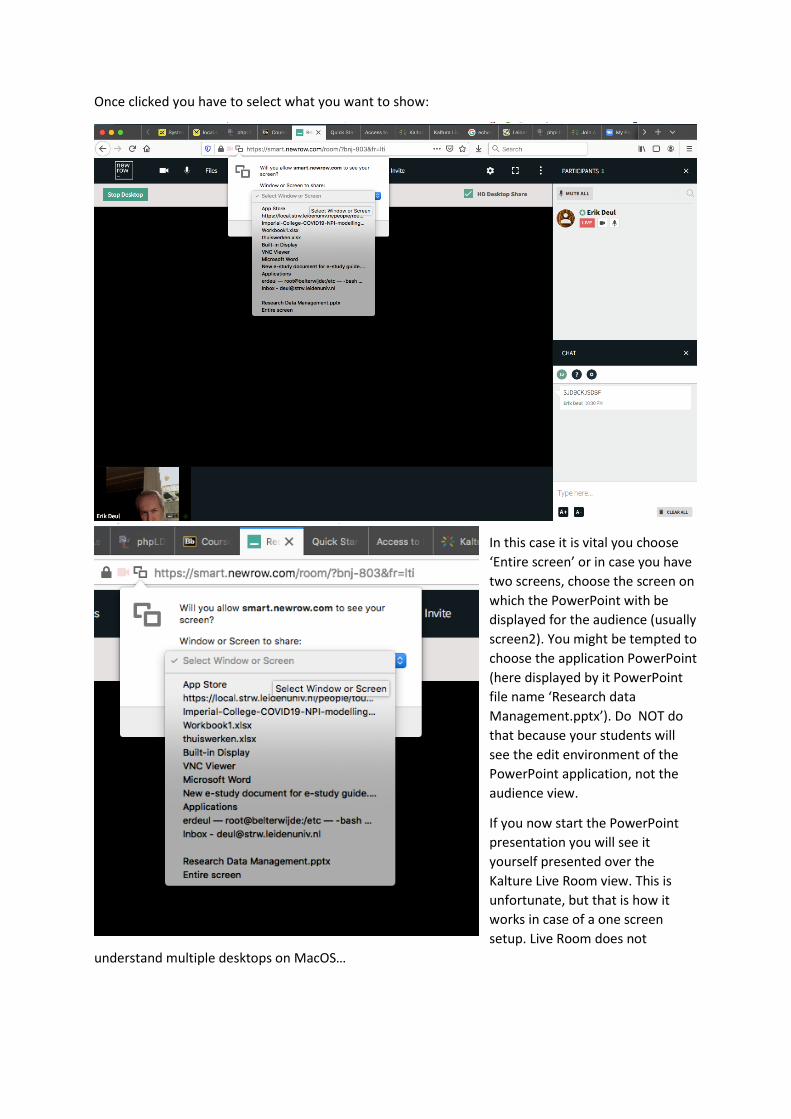
Once clicked you have to select what you want to show:
In this case it is vital you choose ‘Entire screen’ or in case you have two screens, choose the screen on which the PowerPoint with be displayed for the audience (usually screen2). You might be tempted to choose the application PowerPoint (here displayed by it PowerPoint file name ‘Research data Management.pptx’). Do NOT do that because your students will see the edit environment of the PowerPoint application, not the audience view.
If you now start the PowerPoint presentation you will see it yourself presented over the Kalture Live Room view. This is unfortunate, but that is how it works in case of a one screen setup. Live Room does not
understand multiple desktops on MacOS…
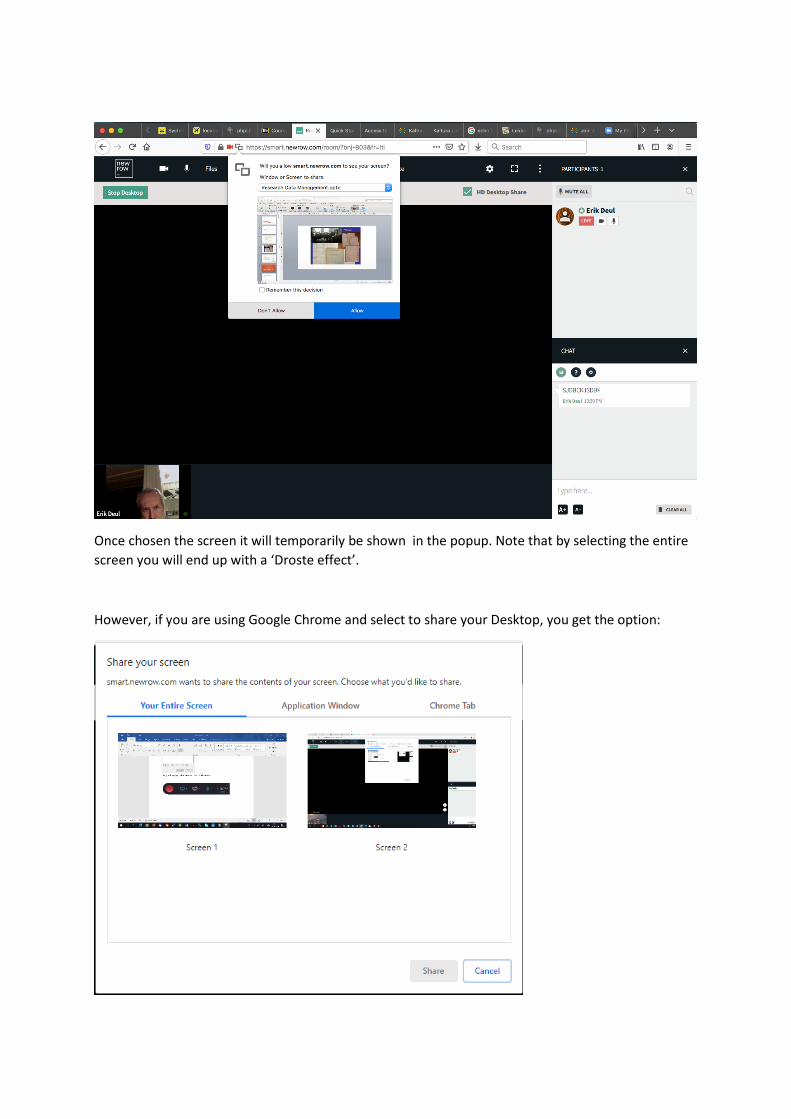
Once chosen the screen it will temporarily be shown in the popup. Note that by selecting the entire screen you will end up with a ‘Droste effect’.
However, if you are using Google Chrome and select to share your Desktop, you get the option:
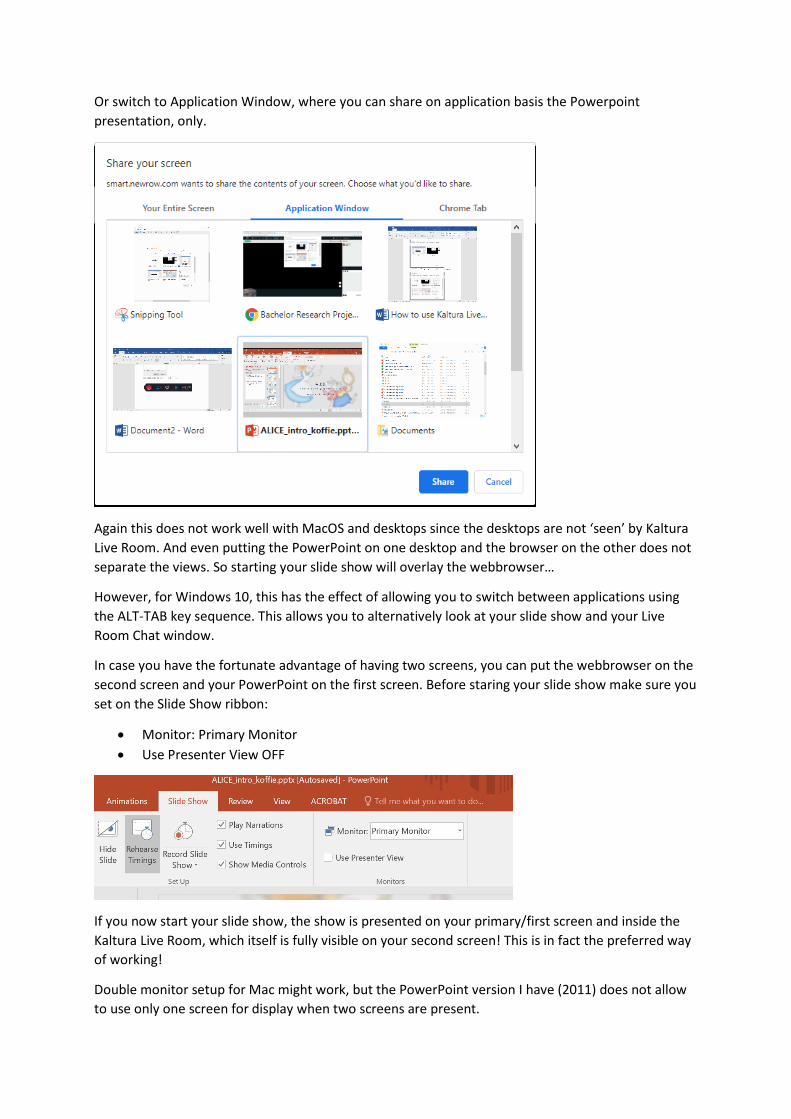
Or switch to Application Window, where you can share on application basis the Powerpoint presentation, only.
Again this does not work well with MacOS and desktops since the desktops are not ‘seen’ by Kaltura Live Room. And even putting the PowerPoint on one desktop and the browser on the other does not separate the views. So starting your slide show will overlay the webbrowser…
However, for Windows 10, this has the effect of allowing you to switch between applications using the ALT-TAB key sequence. This allows you to alternatively look at your slide show and your Live Room Chat window.
In case you have the fortunate advantage of having two screens, you can put the webbrowser on the second screen and your PowerPoint on the first screen. Before staring your slide show make sure you set on the Slide Show ribbon:
• Monitor: Primary Monitor • Use Presenter View OFF
If you now start your slide show, the show is presented on your primary/first screen and inside the Kaltura Live Room, which itself is fully visible on your second screen! This is in fact the preferred way of working!
Double monitor setup for Mac might work, but the PowerPoint version I have (2011) does not allow to use only one screen for display when two screens are present.
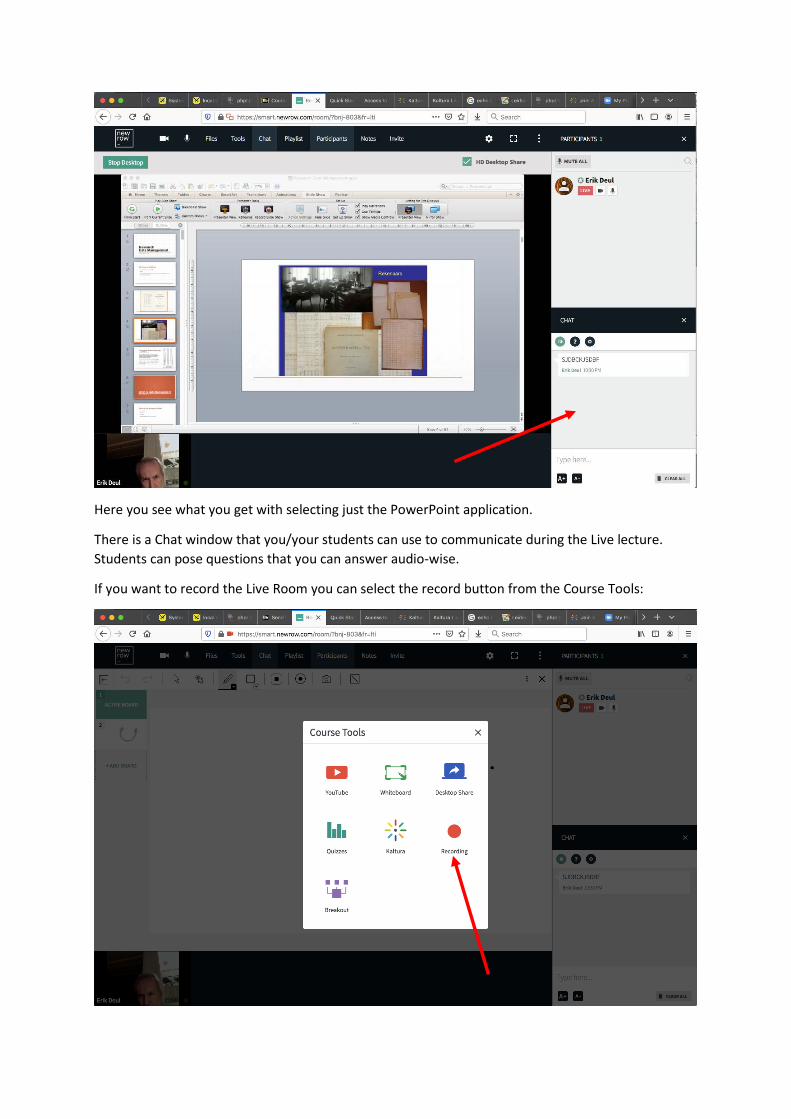
Here you see what you get with selecting just the PowerPoint application.
There is a Chat window that you/your students can use to communicate during the Live lecture. Students can pose questions that you can answer audio-wise.
If you want to record the Live Room you can select the record button from the Course Tools:
This will pop-up a window asking you how long the recording should last. Select the appropriate length: 2 hr. Note that the recording will not start immediately.
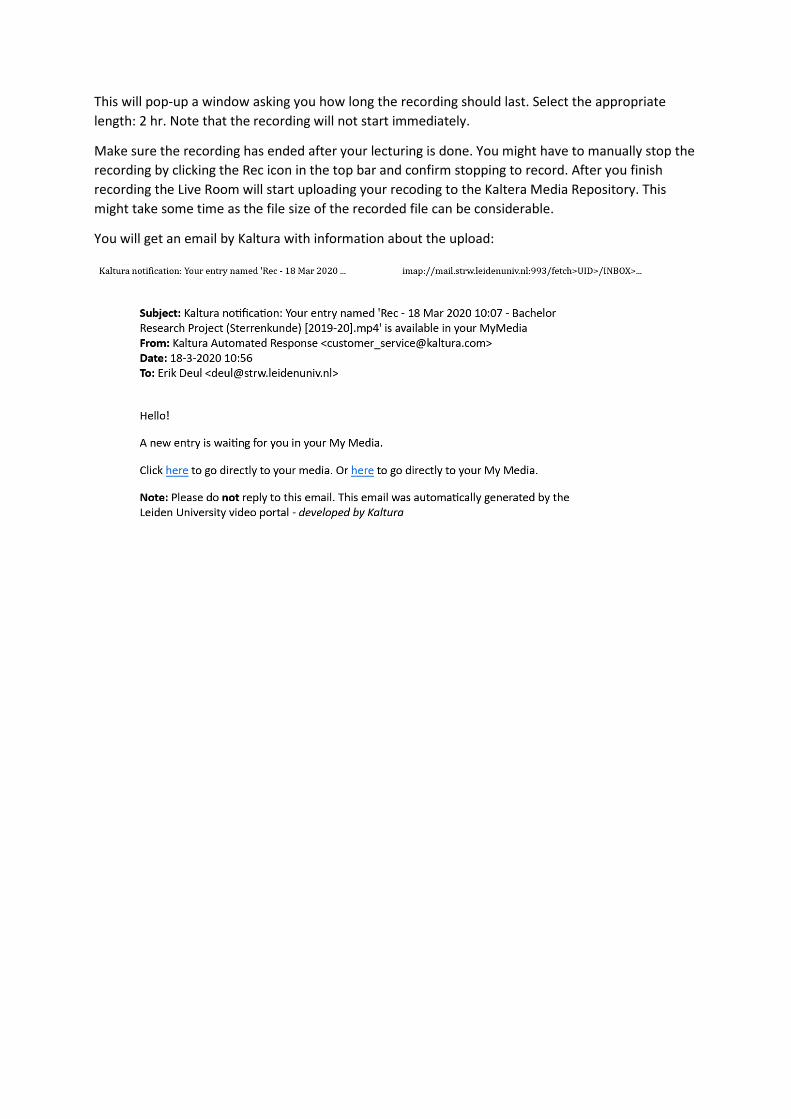
Make sure the recording has ended after your lecturing is done. You might have to manually stop the recording by clicking the Rec icon in the top bar and confirm stopping to record. After you finish recording the Live Room will start uploading your recoding to the Kaltera Media Repository. This might take some time as the file size of the recorded file can be considerable.
You will get an email by Kaltura with information about the upload:
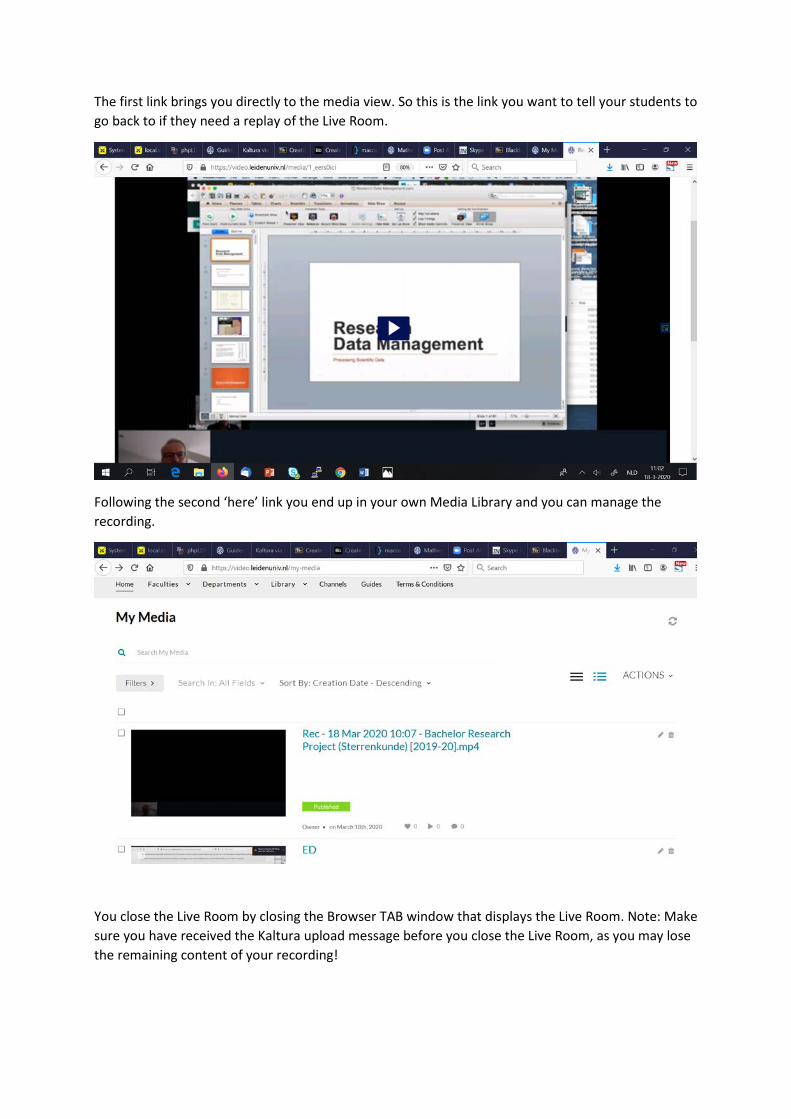
The first link brings you directly to the media view. So this is the link you want to tell your students to go back to if they need a replay of the Live Room.
Following the second ‘here’ link you end up in your own Media Library and you can manage the recording.
You close the Live Room by closing the Browser TAB window that displays the Live Room. Note: Make sure you have received the Kaltura upload message before you close the Live Room, as you may lose the remaining content of your recording!
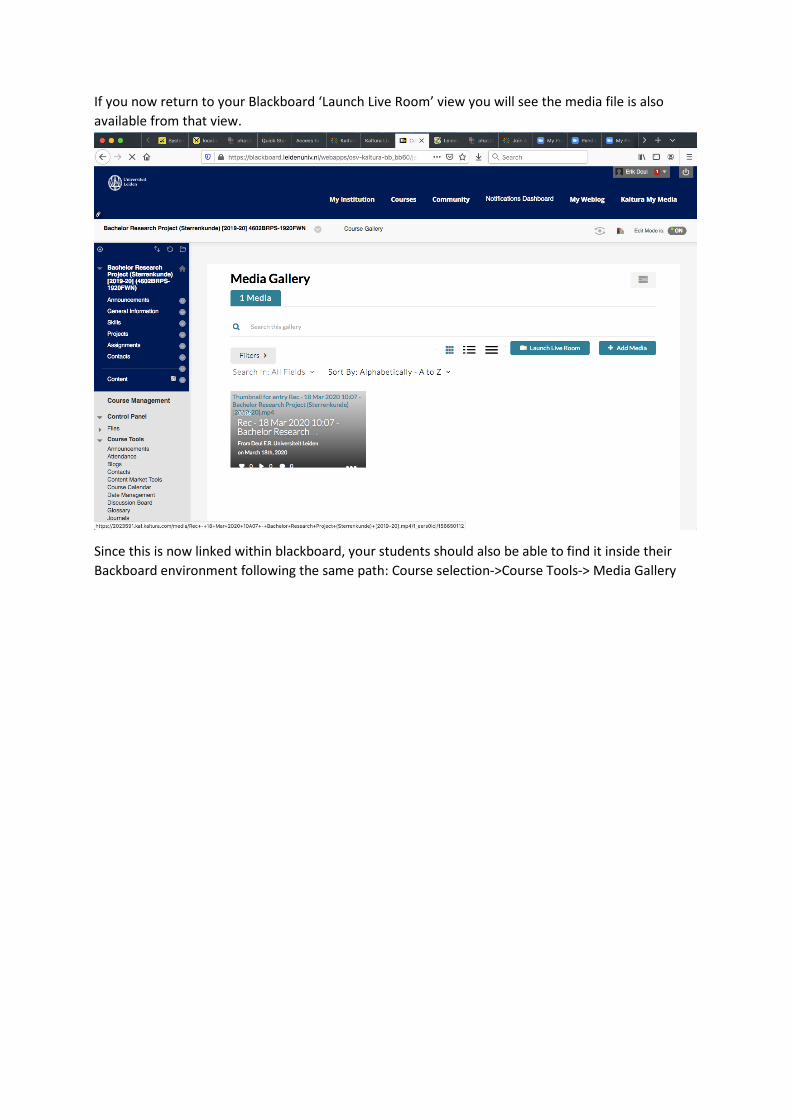
If you now return to your Blackboard ‘Launch Live Room’ view you will see the media file is also available from that view.
Since this is now linked within blackboard, your students should also be able to find it inside their Backboard environment following the same path: Course selection->Course Tools-> Media Gallery
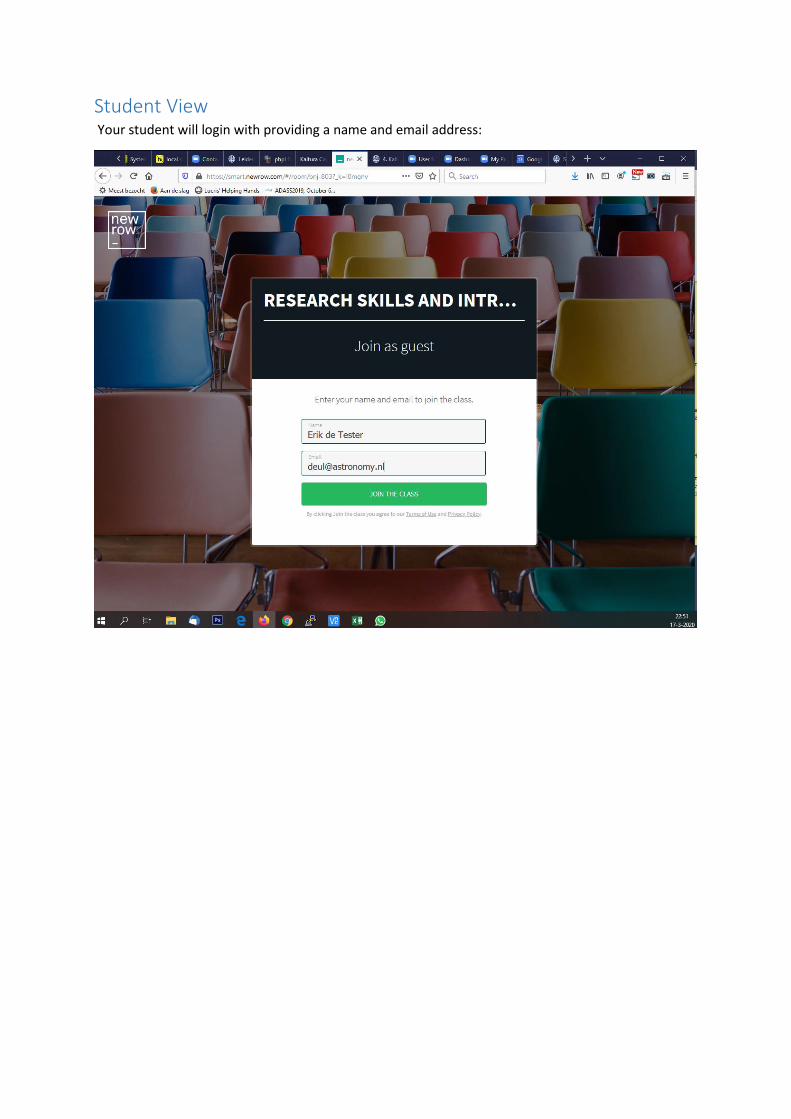
Student View Your student will login with providing a name and email address:
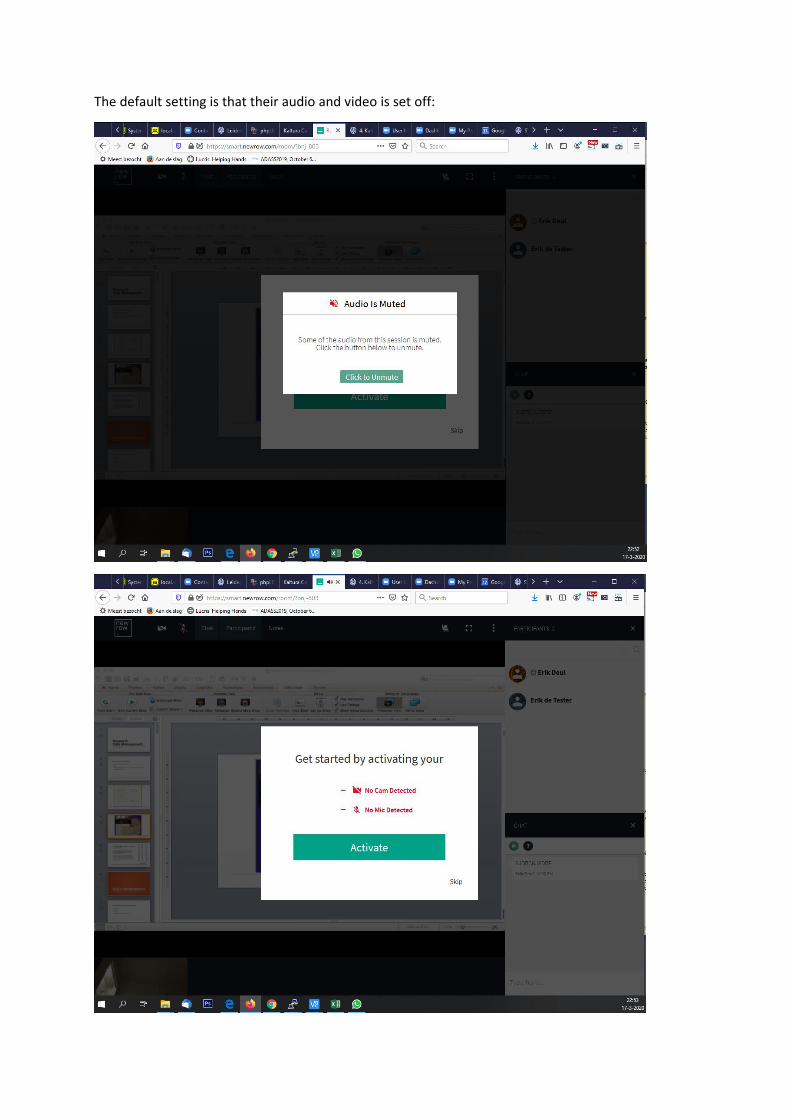
The default setting is that their audio and video is set off:
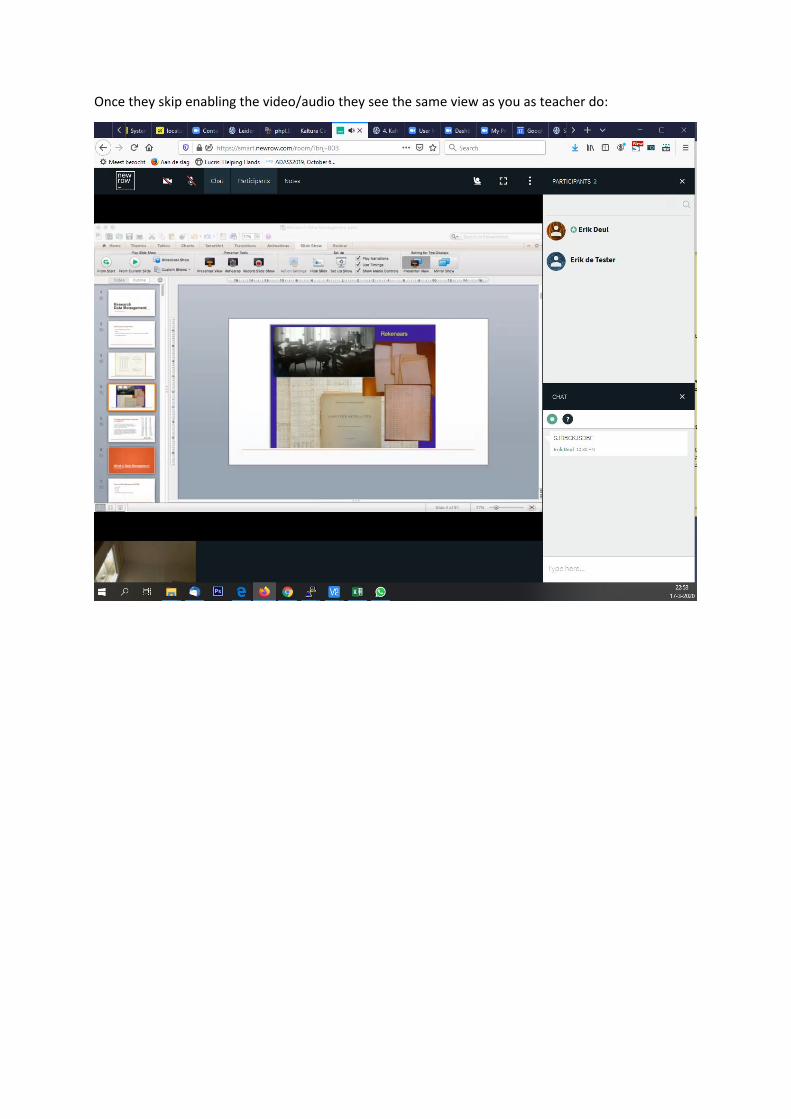
Once they skip enabling the video/audio they see the same view as you as teacher do:
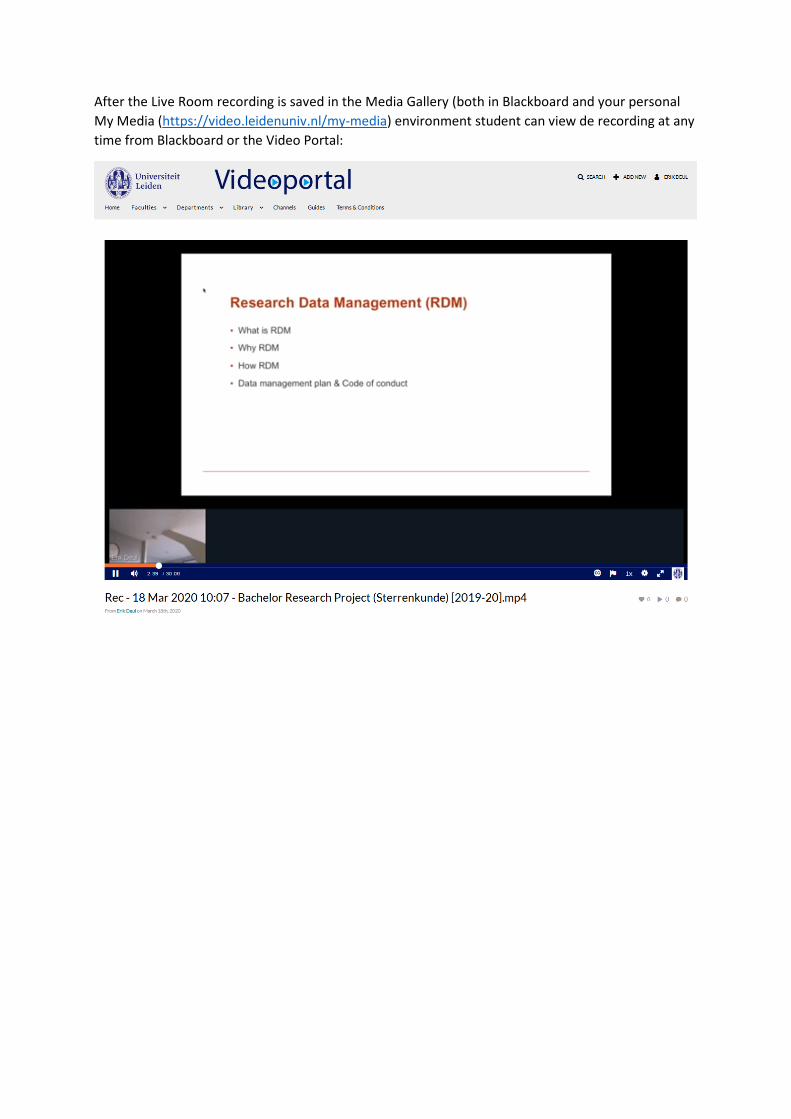
After the Live Room recording is saved in the Media Gallery (both in Blackboard and your personal My Media (https://video.leidenuniv.nl/my-media) environment student can view de recording at any time from Blackboard or the Video Portal: